USER MANUAL ANRATTA 00411718 IKEA
Please refer to the last page of this manual for the full list of IKEA appointed Authorized Service Centre and relative national phone numbers.
ENGLISH 5
DEUTSCH 23
FRANÇAIS 44
ITALIANO 69

| Safety Information | 5 |
| Product description | 8 |
| Control panel | 9 |
| First use | 9 |
| Daily use | 10 |
| Cooking tables | 13 |
| Cleaning and maintenance | 15 |
| What to do if ... | 17 |
| Technical data | 18 |
| Installation | 19 |
| Electrical connection | 20 |
| Environmental concerns | 20 |
| IKEA GUARANTEE | 21 |
Before using the appliance, read these safety instructions. Keep them nearby for future reference. These instructions and the appliance itself provide important safety warnings, to be observed at all times. The manufacturer declines any liability for failure to observe these safety instructions, for inappropriate use of the appliance or incorrect setting of controls.
SAFETY WARNINGS
⚠️ Very young children (0-3 years) should be kept away from the appliance. Young children (3-8 years) should be kept away from the appliance unless continuously supervised. Children from 8 years old and above and persons with reduced physical, sensory or mental capabilities or lack of experience and knowledge can use this appliance only if they are supervised or have been given instructions on safe use and understand the hazards involved. Children must not play with the appliance. Cleaning and user maintenance must not be carried out by children without supervision.
⚠ WARNING! The appliance and its accessible parts become hot during use. Care should be taken to avoid touching heating elements. Children less than 8 years old must be kept away unless continuously supervised.
⚠ WARNING! Never leave the appliance unattended during food drying. If the appliance is suitable for probe usage, only use a temperature probe recommended for this oven - risk of fire.
⚠️ Keep clothes or other flammable materials away from the appliance, until all the components have cooled down completely - risk of fire. Always be vigilant when cooking foods rich in fat, oil or when adding alcoholic beverages - risk of fire. Use oven gloves to remove pans and accessories. At the end of cooking, open the door with caution: allowing hot air or
steam to exit gradually before accessing the cavity - risk of burns. Do not obstruct hot air vents at the front of the oven - risk of fire.
⚠ Exercise caution when the oven door is in the open or down position, to avoid hitting the door.
PERMITTED USE
⚠️ CAUTION: the appliance is not intended to be operated by means of an external switching device, such as a timer, or separate remote controlled system.
⚠ This appliance is intended to be used in household and similar applications such as: staff kitchen areas in shops, offices and other working environments; farm houses; by clients in hotels, motels, bed & breakfast and other residential environments.
⚠ This appliance is not for professional use. Do not use the appliance outdoors.
No other use is permitted (e.g. heating rooms).
⚠ Do not store explosive or flammable substances (e.g. gasoline or aerosol cans) inside or near the appliance - risk of fire.
INSTALLATION
⚠ The appliance must be handled and installed by two or more persons - risk of injury. Use protective gloves to unpack and install - risk of cuts.
⚠ Installation, including water supply (if any) and electrical connections, and repairs must be carried out by a qualified technician. Do not repair or replace any part of the appliance unless specifically stated in the user manual. Keep children away from the installation site. After unpacking the appliance, make sure that it has not been damaged during transport. In the event of problems, contact the dealer or your nearest After-sales Service. Once installed, packaging waste (plastic, styrofoam parts etc.) must be stored out of reach of children - risk of suffocation. The appliance must be disconnected from the power supply before any installation operation - risk of electrical shock. During installation, make sure the appliance does not damage the power cable - risk of fire or electrical shock. Only activate the appliance when the installation has been completed.
⚠️ Carry out all cabinet cutting works before fitting the appliance in the furniture and remove all wood chips and sawdust.
Do not obstruct the minimum gap between the worktop and the
upper edge of the oven - risk of burn.
Do not remove the oven from its polystyrene foam base until the time of installation.
⚠️ After installation, the bottom of the appliance must no longer be accessible - risk of burn.
⚠ Do not install the appliance behind a decorative door - risk of fire.
ELECTRICAL WARNINGS
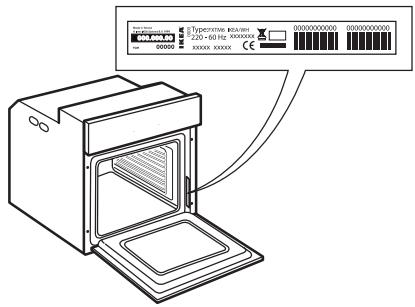
⚠ The rating plate is on the front edge of the oven (visible when the door is open).
⚠ It must be possible to disconnect the appliance from the power supply by unplugging it if plug is accessible, or by a multi-pole switch installed upstream of the socket and the appliance must be earthed, in conformity with national electrical safety standards.
⚠ Do not use extension leads, multiple sockets or adapters. The electrical components must not be accessible to the user after installation.
Do not use the appliance when you are wet or barefoot.
Do not operate this appliance if it has a damaged power cable or plug, if it is not working properly, or if it has been damaged or dropped.
⚠️ If the supply cord is damaged, it must be replaced with an identical one by the manufacturer, its service agent or similarly qualified persons in order to avoid a hazard - risk of electrical shock.
⚠ In case of replacement of power cable, contact an authorized service center.
Product description
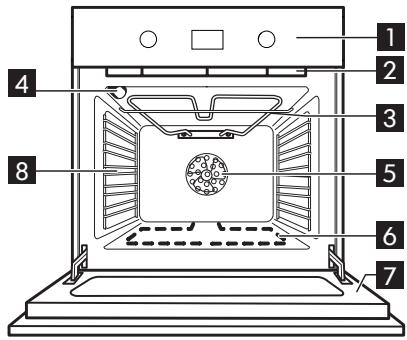
1 Control panel
2 Cooling fan (not visible)
3 Grill element
4 Oven lamp
5 Oven fan
6 Lower heating element (hidden)
7 Oven door
8 Lateral grids
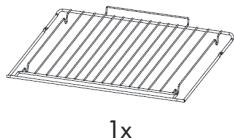
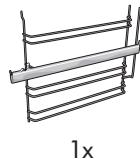
Accessories
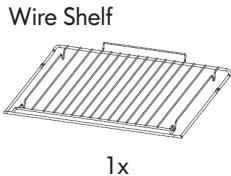
Inserting the wire shelf and other accessories
Insert the wire shelf onto the level you require by holding it tilted slightly upwards and resting the raised rear side (pointing upwards) down first. Next, slide it horizontally along the shelf guide as far as possible.
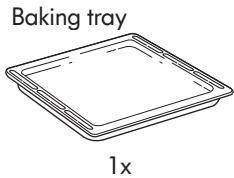
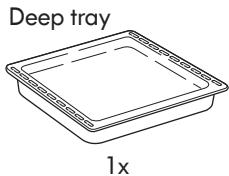
The other accessories, such as the baking tray, are inserted horizontally by sliding them along the shelf guides.
If you want to buy an accessory, call the Authorized Service Centre.

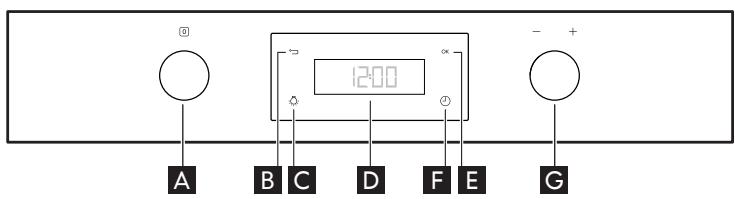
Control panel

1

2

A Selection push-push knob
B Back button
C Light
D Display
E Confirmation button
F Minute minder
G Adjust push-push knob
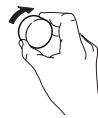
Retractable knobs
To use this type of knob, press it in the middle.
The knob comes out.
Turn it to the required position.
Once cooking is over, turn the knob to 0 and press it again to restore it to its original position.
First use
Remove the accessories from the oven and heat it at 200^ for about an hour to eliminate the smell and fumes from the insulating materials and protective grease.
Settings
Turn the "Functions" knob A indicator to display setting and urn the G knob to access a submenu containing four display settings which can be changed once cooking is over, turn the knob to its original position.
- Clock
Turn the G knob to display CLOCK. The two left digits will then start to blink, turn the G knob to set hours. Press E button to confirm the value and the right two digit will start to blink. Turn the G knob to set minutes and press the E button to confirm the selection.
- Sound
To activate or deactivate the acoustic signal, proceed as follows:
- Turn the G knob to display "SOUND"
- press E button to confirm
- Use the G knob to select the desired
setting
- Press E button to confirm
- Brightness
To change the display brightness, proceed as follows:
- Turn the G knob to display "BRIGHTNESS and press E to confirm.
- The current brightness value is visible
- Turn the G knob to increase or decrease brightness and confirm by pressing E.
- Eco
- Turn the G knob to display "ECO".
- Press E to access the setting (ON/OFF).
- Turn the G knob to select the desired setting and confirm by pressing button E.
- During a cooking function, if the Eco Mode is activated, the display reduces the brightness to the lowest level after 1 minute, the cavity lamp will be switched off after 1 minute of cooking and reactivated by pressing button C.
Daily use
To activate a Function
- select the desidered function with A knob and press E button to confirm.
- the Temperature is Blinking and you can adjust with G knob and press E button to confirm.
- the cooking time is visible on the display, you can adjust it with G knob or leave to for an immediate start and press E button to confirm.
- if you selected before a desired cooking time, the display will show the expected time of end, you can postpone it with G knob and press E button to confirm the delay.
Preheat
The preheat will start atomically when available (Check the table) and is included in the cooking time if you select it before starting the function.
If you select the temperature and a cooking time the preheat starts automatically. If you do not select the cooking time the timer will start only after reached the desired temperature.
Always an audible sound will advice when the temperature is reached.
Delay to Start
Will be postpone the end of cooking time, when available (Check the table).
| FunctionA Knob | FunctionG Knob | PREHEAT | Temperature | Time | Delay to Start |
| OFF | - | - | - | - | - |
| FORCED AIR | - | X | X | X | X |
| CONVENTIONAL(Top and Bottom Heat) | - | X | X | X | X |
| CONVECTION BAKE | - | X | X | X | X |
| MAXI COOKING | - | X | X | X | X |
| GRILL | GRILL | - | level 1-2-3 | X | - |
| GRILL | TURBO GRILL | - | level 1-2-3 | X | - |
| BREAD | BREAD | X | X | X | - |
| PIZZA | PIZZA | X | X | X | - |
| SPECIAL | ECO FORCED AIR* | - | X | X | X |
| SPECIAL | DEFROST | - | - | X | X |
| SPECIAL | WARM KEEPING | - | 65° | X | X |
| SPECIAL | RISING | - | 30° 35° 40° | X | X |
| FAST PREHEAT | - | X | X | X | - |
Browning
At the end of cooking, with certain functions, the display indicates the possibility of extra browning. This function can only be used when cooking time has been set.
At the end of cooking time, the display shows: "PRESS E TO BROWN". Press E, and the oven starts a 5 minute browning cycle. This function can be selected consecutively a maximum of twice.
Minute Minder
This option activate the minute minder only when there are no other functions active. Keep pressing ⏻ until the ⏻ and «00:00» start flashing on the display, select and press ok to confirm. An down the selected audible signal will sound once the timer has finished counting.
Oven functions table
The oven has 5 cooking levels. Count up from the lower level.
*Function used as reference for the energy efficiency declaration in accordance with Regulation (EU) No. 65 / 2014
| Function | Description of function |
 | OFF | For switching off the oven. |
 | FORCED AIR | For cooking different foods that require the same cooking temperature on several shelves (maximum three) at the same time. This function can be used to cook different foods without odours being transferred from one food to another. |
 | CONVENTIONAL (Top and Bottom Heat) | For cooking any kind of dish on one shelf only.It is best to use the 2nd or the 3rd shelf. Preheat the oven before insert the food. |
— | CONVECTION BAKE | To cook meat and pies with liquid filling (savoury or sweet) on a single shelf. Use the 2nd shelf. Preheat the oven before cooking. |
 | MAXI COOKING | To cook large joints of meat (above 2.5 kg). Use the 1st or 2nd shelf, depending on the size of the joint. It is advisable to turn the meat over during cooking for more even browning. It is best to baste the meat every now and again to avoid it drying out. |
 | GRILL | For grilling steaks, kebabs and sausages, cooking vegetables au gratin or toasting bread. It is best to use the 4th or 5th Shelf. When grilling meat, we recommend using a drip tray to collect the cooking juices: position the pan on the 3rd/4th level and add 500 ml of water. the oven door should be closed during cooking. |
| [CGHX] | TURBOGRILL | To roast large joints of meat (legs, roast beef, chickens). Position the food on the middle shelves.Use the drip tray to collect the cooking juices. Position it on the 1st/2nd shelf, adding approx. half a litre of water. The oven does not have to be preheated.During cooking the oven door must remain closed. |
— | BREAD | To bake different types and sizes of bread.Simply indicate the values required (temperature and time) and the oven will manage the cooking cycle automatically. Place the dough on the 2nd shelf. |
[CT86] | PIZZAECO FORCED AIR* | To bake different types and sizes of pizza.Simply indicate the values required (temperature and time) and the oven will manage the cooking cycle automatically. Place the dough on the 2nd shelf.To cook stuffed roasts and meat in pieces on one shelf. This function uses discontinuous, delicate fan assistance, which prevents excessive drying of foods. In this ECO function the light remains off during cooking and can be temporarily switched on again by pressing the confirm button. In order to maximize energy efficiency, it is advisable not to open the door during cooking. It is advisable to use 3rd level. The oven does not have to be preheated. |
 | DEFROST | To speed up defrosting of food. Place food on the middle shelf.Leave food in its packaging in order to prevent it from drying out on the outside. |
 | WARM KEEPING | For keeping just-cooked food hot and crisp (e.g: meat, fried food or flans). Place food on the middle shelf. |
 | RISING | For optimal rising of sweet or savoury dough. To safeguard the quality of proving, the function will not activate if the temperature in the oven is above 40°C. Place the dough on the 2nd shelf. The oven does not have to be preheated. |
 | FAST PREHEAT | To preheat the oven rapidly. At the end of the prehear the oven will select automatically the CONVENTIONAL function. Wait the end of the preheat before inserting te food inside the oven. |
| - + | SETTINGS | To set the display (Time, Light, Volumes of sounds, energy saving) |
Cooking tables
| Type of food | Function | Preheating | Level (from the bottom) | Temperature (°C) | Cooking time (min) |
| SWEETS, PASTRY, ETC |
| Leavened cakes | [S778] | X | 2/3 | 150-170 | 30-90 |
| [702Y] | X | 1-4 | 160-180 | 30-90 |
| Filled pies (cheesecake, strudel, fruit pie) | [ZC03] | X | 2 | 160-200 | 35-90 |
 | X | 2-4 | 160-200 | 40-90 |
| Biscuits/tartlets | [BY63] | X | 3 | 150-170 | 20-45 |
 | X | 2-4/5-3-1 | 150-170 | 20-45 |
| Choux buns |  | X | 3 | 180-200 | 30-40 |
 | X | 2-4 | 170-190 | 35-45 |
| Meringues |  | X | 2 | 90 | 150-200 |
 | X | 2-4/5-3-1 | 90 | 140-200 |
| Bread |  | X | 2 | 180-220 | 30-50 |
| Pizza |  | X | 2 | 220-250 | 15-30 |
| Bread/pizza/focaccia |  | X | 2-4/5-3-1 | 190-250 | 20-40 |
| Frozen pizza | [6ASK] | X | 2 | 250 | 10-30 |
 | X | 2-4 | 230-250 | 10-30 |
| Savoury pies (vegetable pie, quiche) |  | X | 2 | 180-200 | 30-50 |
 | X | 2-4/5-3-1 | 180-190 | 30-60 |
| Vols-au-vent /Puff pastry crackers |  | X | 2 | 190-200 | 20-30 |
 | X | 2-4/5-3-1 | 180-190 | 20-40 |
| Lasagne, baked pasta, cannelloni, flans | [TW1C] | X | 2 | 190-200 | 45-65 |
| Lasagna & Meat |  | X | 2-4 | 200 | 50-100*** |
| Meat & Potatoes |  | X | 1-4 | 190-200 | 45-100*** |
| Fish & Vegetables | [DH20] | X | 1-4 | 180 | 30-50*** |
| Complete meal Fruit tart (Level 5) / Lasagna (Level 3) / Meat (Level 1) | [6BAc] | X | 1-3-5 | 180-190 | 40-120*** |
 |
| Roast meat/stuffed roasting joints | [OW67] | - | 2 | 180-200 | 100-150*** |
| MEAT |
| Meat pieces (rabbit, chicken, lamb) | [OKTA] | - | 2 | 180-200 | 60-100*** |
| Roast pork with crackling 2 kg | [H6YZ] | X | 2 | 170-190 | 110-150 |
| Lamb/Veal/Beef/Pork 1Kg | [W6O3] | X | 2 | 190-200 | 80-120 |
| Chicken/Rabbit/Duck 1Kg | [STDH] | X | 2 | 200-230 | 50-100 |
| Turkey/Goose 3Kg | [C3KD] | X | 2 | 200-230 | 150-200 |
| FISH |
| Baked fish/en papillote 0.5Kg (fillet, whole) |  | X | 2 | 170-190 | 30-50 |
| VEGETABLES |
| Stuffed vegetables (tomatoes, courgettes, aubergines) |  [IMAGE] [IMAGE] | X | 2 | 180-200 | 50-70 |
Cooking table with GRILL function
| Type of food | Function | Preheating | Level (from the bottom) | Temperature (°C) | Cooking time (min) |
| Toast | [2X0X] | 5' | 5 | 3 (High) | 1-3 |
| Fish fillets/slices | [BK6Z] | 5' | 3/4 | 2 (Medium) | 15-30* |
| Sausages/kebabs/ spare ribs/ hamburgers | [C03Y] — | 5' | 4/5 | 2-3 (Medium-High) | 15-30* |
| Leg of lamb/ knuckle |  | - | 3 | 2 (Medium) | 60-90** |
| Vegetable gratin |  | - | 3 | 3 (High) | 10-25 |
| Roast potatoes |  | - | 3 | 2 (Medium) | 35-60** |
| Roast chicken 1-1.3 Kg | [BK43] — | - | 2 | 2-3 (Medium-High) | 55-80** |
| Roast beef rare 1Kg |  | - | 3 | 2 (Medium) | 35-50** |
Note: cooking temperatures and times are for guidance only.
* Turn food halfway through cooking
** Turn food two-thirds of the way through cooking (if necessary).
*** Estimated length of time: dishes can be removed from the oven at different times depending on personal preference.
Cleaning and maintenance
CLEANING

WARNING!
- Never use steam cleaning equipment.
- Only clean the oven when it is cool to the touch.
- Disconnect the appliance from the power supply.
Oven exterior
i IMPORTANT: do not use corrosive or abrasive detergents. If any of these products accidentally comes into contact with the appliance, clean immediately with a damp cloth.
- Clean the surfaces with a damp cloth. If it is very dirty, add a few drops of washing up detergent to the water. Finish off with a dry cloth.
Oven interior
i IMPORTANT: do not use abrasive sponges or metallic scrapers or scourers.
Over time, these can ruin enamelled surfaces and the oven door glass.
- After every use, allow the oven to cool then clean it preferably while it is still warm in order to remove built-up dirt and stains caused by food residues (e.g. food with a high sugar content).
- Use proper oven detergents and follow the manufacturer's instructions to the letter.
- Clean the door glass with a suitable liquid detergent. The oven door can be removed to facilitate cleaning (see MAINTENANCE). Inner glass is smooth to facilitate cleaning.
NOTE: during prolonged cooking of foods with a high water content (e.g. pizza, vegetables, etc.) condensation may form on the inside of the door and around the seal. When the oven is cold, dry the inside of the door with a cloth or sponge.
Accessories
- Soak the accessories in water with washing up detergent immediately after use, handling them with oven gloves if still hot.
- Food residues can be easily removed using a brush or sponge.
MAINTENANCE

WARNING!
- Use safety gloves.
- Ensure the oven is cold before carrying out the following operations.
- Disconnect the oven from the power supply.
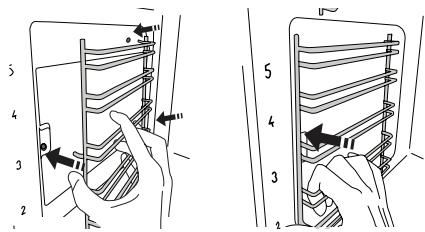
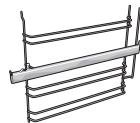
To remove the shelf guides
firmly grip the external part of the guide, and pull it towards you to extract the support and the two internal pins from the lodging.
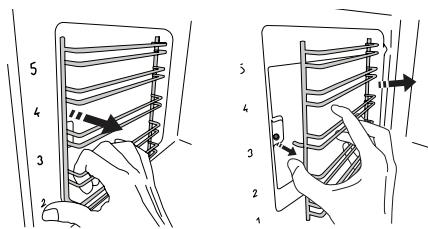
To reposition the shelf guides
position them near the cavity and initially insert the two pins into their lodgings. Next, position the external part near its lodging, insert the support, and firmly press towards the wall of the cavity to make sure the shelf guide is properly secured.
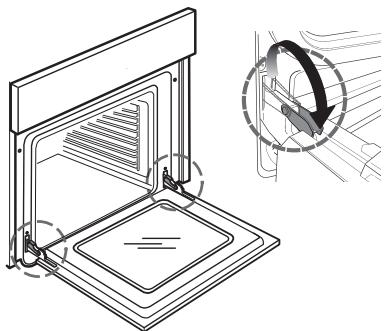
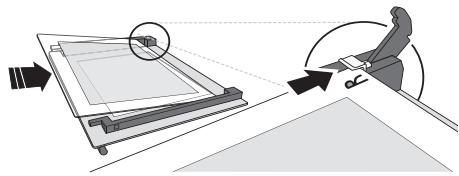
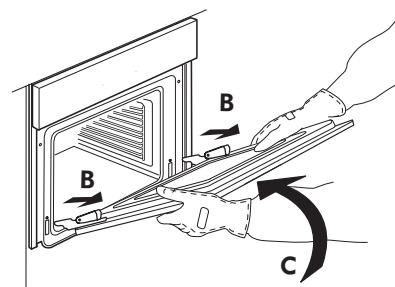
To remove the door
- Open the door fully.
- Lift the catches and push them forwards as far as they will go (Fig. 1).
natural_image
Technical line drawing of a mechanical component with a magnified inset showing internal structure (no text or symbols)
Fig. 1
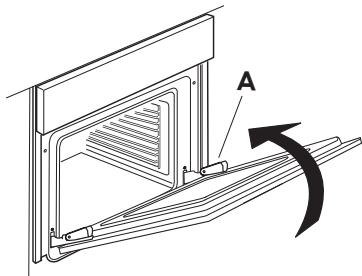
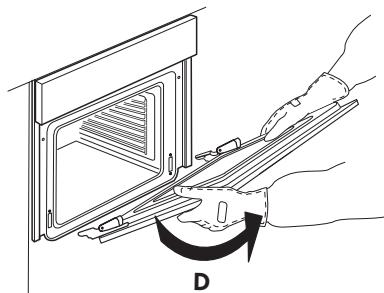
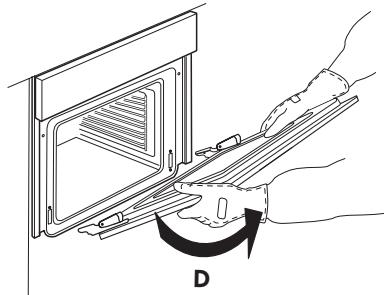
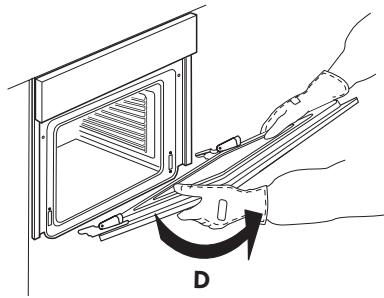
- Close the door as far as it will go (A), lift it up (B) and turn it (C) until it is released (D) (Fig. 2, 3, 4).
natural_image
Diagram of a door frame with labeled component A and curved arrow indicating rotation (no text or symbols)
Fig. 2
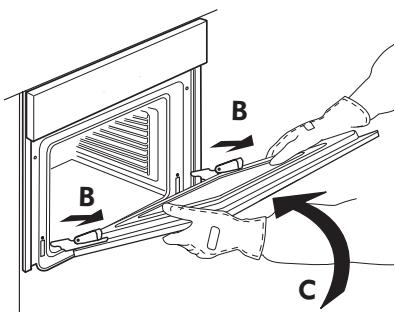
Fig. 3
natural_image
Illustration of a hand using a tool to adjust or install a mounted oven (no text or symbols visible)
Fig. 4
To refit the door
- Insert the hinges in their seats.
- Open the door fully.
- Lower the two catches.
- Close the door
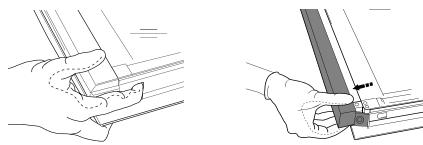
Cleaning the glass
- After removing the door and resting it on a soft surface with the handle downwards, simultaneously press the two retaining clips and remove the upper edge of the door by pulling it towards you.
natural_image
Two technical line drawings showing hands fastening a cable or connector (no text or symbols present)
-
Lift and firmly hold the inner glass with both hands, remove it and place it on a soft surface before cleaning it. Do the same operation for the intermediate glass.
-
To reposition both the intermediate and the internal glass properly, be sure that the "R" can be seen in the left corner. First insert the long side of the glass indicated by "R" into the support seats, then lower it into position.
natural_image
Diagram showing a person sitting on a chair facing a screen, with an arrow indicating motion direction (no text or symbols present)
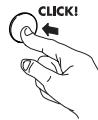
- Refit the upper edge: A click will indicate correct positioning. Make sure the seal is secure before refitting the door.
To replace the lamp
- Disconnect the oven from the power supply.
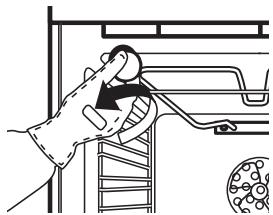
natural_image
Line drawing of a hand using a tool to adjust or install a mechanical component (no text or symbols present)
Fig. 5
- Unscrew the lamp cover (Fig. 5), replace the lamp (see note for lamp type) and screw the lamp cover back on.
- Reconnect the oven to the power supply.
NOTE:
- Only use 25W/230 V type G9, T300°C halogen lamps.
- The lamp used in the appliance is specifically designed for electrical appliances and it is not suitable for household room illumination (Commission Regulation (EC) No 244/2009).
- Lamps are available from IKEA Authorized Service Centre.
What to do if ...
| Problem | Possible cause | Solution |
| The oven does not work. | No presence of mains electrical power. | Verify the presence of mains electrical power. |
| The oven is not connected to the electrical supply. | Connect the oven to the power supply. |
| The display shows the letter “F” followed by a number | Software problem | Contact you nearest After-sales Service Centre and state the letter or number that follows the letter “F” |
Before calling the Authorized Service Centre:
- See if you can solve the problem yourself with the help of the suggestions given in the "What to do if ..." table.
- Switch the appliance off and back on again it to see if the fault persists. If after the above checks the fault still occurs, contact IKEA Authorized Service Centre.
Always specify:
• a brief description of the fault;
• the type and exact model of the oven;
- the service number (number after the word Service on the rating plate), located on the right hand edge of the oven cavity (visible when the oven door is open);
SERVICE 0000 000 00000
- your full address;
- your telephone number.
If any repairs are required, please contact IKEA Authorized Service Centre (to guarantee that original spare parts will be used and repairs carried out correctly).
Technical data
| Type of product: Built-in Electrical Oven |
| Model identification:ANRÄTTA 604.117.20 |
| Number of cavities | 1 |
| Heat source | Electrical |
| Number of functions | 9 |
| Usable volume. Measured with any side grids and catalytic panels removed I | 71 |
| Area of the largest baking sheet cm2 | 1191 |
| Energy Efficiency Class (Lowest Consumption) | A+ |
| Energy Efficiency Index | 81,2 |
| Energy consumptionConventional function (with a standard load and top + bottom heating) kWh/cycle | 0,89 |
| Energy consumptionFan Forced function (with a standard load and forced air heating) kWh/cycle | 0,69 |
| Top heating element W | 1800 |
| Bottom heating element W | 1000 |
| Grill heating element W | 1800 |
| Fan heating element W | 1800 |
| Cooling fan W | 15 |
| Oven lamp W | 25 |
| Oven Fan Wattage W | 22 |
| Total rating W | 2900 |
| Dimensions |
| Width mm | 595 |
| Height mm | 595 |
| Depth mm | 550 |
| Mass of the applianceANRÄTTA Kg | 30,5 |
Technical data
The technical informations are situated in the rating plate inside the appliance.
Installation
Door lock device
To open the door with the door lock device see Fig 1.
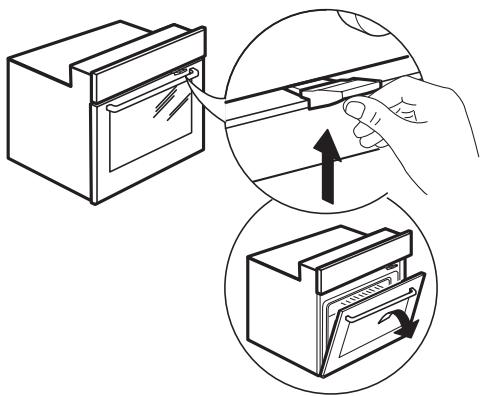
Fig. 1
The door safety device can be removed by following the sequence of images (see Fig. 2).
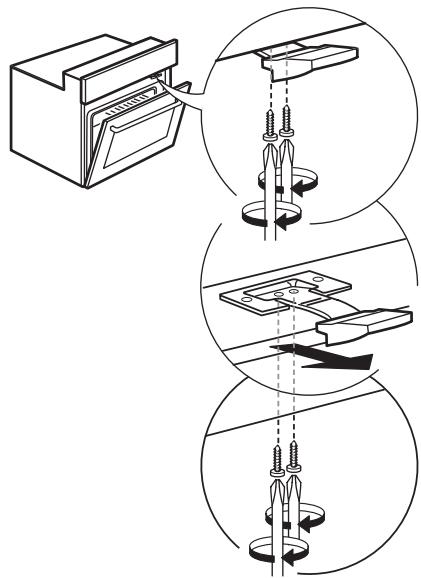
Fig. 2
Electrical connection
Make sure the power voltage specified on the appliance rating plate is the same as the mains voltage. The rating plate is on the front edge of the oven (visible when the door is open).
Power cable replacement (type H05 V2V2 x 1,5 mm ^4 ) must be carried out by a qualified electrician. Contact IKEA Authorized Service Centre.
Environmental concerns
⚠ WARNING! Ensure that the appliance is switched off and disconnected from the power supply before performing any maintenance operation - risk of electrical shock. Never use steam cleaning equipment.
⚠ Do not use harsh abrasive cleaners or metal scrapers to clean the door glass since they can scratch the surface, which may result in shattering of the glass.
⚠ Ensure the appliance is cooled down before any cleaning or maintenance. - risk of burn.
⚠ WARNING! Switch off the appliance before replacing the lamp - risk of electrical shock.
DISPOSAL OF PACKAGING MATERIALS
The packaging material is 100% recyclable and is marked with the recycle symbol. The various parts of the packaging must therefore be disposed of responsibility and in full compliance with local authority regulations governing waste disposal.
SCRAPPING OF HOUSEHOLD
APPLIANCES
This appliance is manufactured with recyclable or reusable materials. Dispose of it in accordance with local waste disposal regulations. For further information on the treatment, recovery and recycling of household electrical appliances, contact your local authority, the collection service for household waste or the store where you purchased the appliance. This appliance is marked in compliance with European Directive 2012/19/EU, Waste Electrical and Electronic Equipment (WEEE). By ensuring this product is disposed of correctly, you will help prevent negative consequences for the environment and human health.

The symbol ☐ on the product or on the accompanying documentation indicates that it should not be treated as domestic waste but must be taken to an appropriate collection center for the recycling of electrical and electronic equipment.
ENERGY SAVING TIPSs
Only preheat the oven if specified in the cooking table or your recipe. Use dark lacquered or enamelled baking trays as they absorb heat better. Food requiring prolonged cooking will continue to cook even once the oven is switched off.
This appliance meets the Eco Design requirements of European Regulations n.65/2014 and 66/2014 in conformity to the European standard EN 60350-1.
CE
IKEA GUARANTEE
How long is the IKEA guarantee valid?
This guarantee is valid for five years from the original date of purchase of your appliance at IKEA. The original sales receipt, is required as proof of purchase. If service work is carried out under guarantee, this will not extend the guarantee period for the appliance.
Who will execute the service?
IKEA service provider will provide the service through its own service operations or authorized service partner network.
What does this guarantee cover?
The guarantee covers faults of the appliance, which have been caused by faulty construction or material faults from the date of purchase from IKEA. This guarantee applies to domestic use only. The exceptions are specified under the headline “What is not covered under this guarantee?” Within the guarantee period, the costs to remedy the fault e.g. repairs, parts, labour and travel will be covered, provided that the appliance is accessible for repair without special expenditure. On these conditions the EU guidelines (Nr. 99/44/EG) and the respective local regulations are applicable. Replaced parts become the property of IKEA.
What will IKEA do to correct the problem?
IKEA appointed Service Provider will examine the product and decide, at its sole discretion, if it is covered under this guarantee. If considered covered, IKEA Service Provider or its authorized service partner through its own service operations, will then, at its sole discretion, either repair the defective product or replace it with the same or a comparable product.
What is not covered under this guarantee?
• Normal wear and tear.
- Deliberate or negligent damage, damage caused by failure to observe operating instructions, incorrect installation or by connection to the wrong voltage, damage caused by chemical or electrochemical reaction, rust, corrosion or water damage including but not
limited to damage caused by excessive lime in the water supply, damage caused by abnormal environmental conditions.
- Consumable parts including batteries and lamps.
- Non-functional and decorative parts which do not affect normal use of the appliance, including any scratches and possible color differences.
- Accidental damage caused by foreign objects or substances and cleaning or unblocking of filters, drainage systems or soap drawers.
- Damage to the following parts: ceramic glass, accessories, crockery and cutlery baskets, feed and drainage pipes, seals, lamps and lamp covers, screens, knobs, casings and parts of casings. Unless such damages can be proved to have been caused by production faults.
- Cases where no fault could be found during a technician's visit.
- Repairs not carried out by our appointed service providers and/or an authorized service contractual partner or where non-original parts have been used.
• Repairs caused by installation which is faulty or not according to specification.
- The use of the appliance in a non-domestic environment i.e. professional use.
- Transportation damages. If a customer transports the product to his home or another address, IKEA is not liable for any damage that may occur during transport. However, if IKEA delivers the product to the customer's delivery address, then damage to the product that occurs during this delivery will be covered by IKEA.
- Cost for carrying out the initial installation of the IKEA appliance.
- However, if an IKEA appointed Service Provider or its authorized service partner repairs or replaces the appliance under the terms of this guarantee, the appointed Service Provider or its authorized service partner will reinstall the repaired appliance or install the replacement, if necessary.
- This does not apply within Ireland, customer should contact the local IKEA dedicated after sales line or the appointed Service Provider for further information.
(just for GB)
These restrictions do not apply to fault-free work carried out by a qualified specialist using our original parts in order to adapt the appliance to the technical safety specifications of another EU country.
How country law applies
The IKEA guarantee gives you specific legal rights, which cover or exceed all the local legal demands. However these conditions do not limit in any way consumer rights described in the local legislation.
Area of validity
For appliances which are purchased in one EU country and taken to another EU country, the services will be provided in the framework of the guarantee conditions normal in the new country.
An obligation to carry out services in the framework of the guarantee exists only if the appliance complies and is installed in accordance with:
- the technical specifications of the country in which the guarantee claim is made;
- the Assembly Instructions and User Manual Safety Information.
The dedicated AFTER SALES for IKEA appliances
Please don't hesitate to contact IKEA appointed Authorized Service Centre to:
• make a service request under this guarantee;
- ask for clarifications on installation of the IKEA appliance in the dedicated IKEA kitchen furniture;
- ask for clarification on functions of IKEA appliances.
To ensure that we provide you with the best assistance, please read carefully the Assembly Instructions and/or the User Manual before contacting us.
How to reach us if you need our service

Please refer to the last page of this manual for the full list of IKEA appointed Authorized Service Centre and relative national phone numbers.
In order to provide you a quicker service, we recommend to use the specific phone numbers listed on this manual. Always refer to the numbers listed in the booklet of the specific appliance you need an assistance for. Please also always refer to the IKEA article number (8 digit code) and 12 digit service number placed on the rating plate of your appliance.
i SAVE THE SALES RECEIPT!
It is your proof of purchase and required for the guarantee to apply. The sales receipt also reports the IKEA name and article number (8 digit code) for each of the appliances you have purchased.
For any additional questions not related to After Sales of your appliances please contact your nearest IKEA store call centre. We recommend you read the appliance documentation carefully before contacting us.
Inhaltsverzeichnis
natural_image
Simple line drawing of a rectangular tray or container with no text or symbols
1x
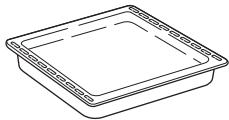
Tiefes Backblech
natural_image
Line drawing of a rectangular container with side grout (no text or symbols)
1x
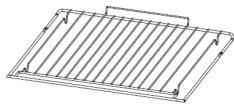
Rost
natural_image
Technical line drawing of a rectangular grid structure with no text or symbols
1x
1

2
Ausbau der Tür
natural_image
Technical line drawing of a mechanical assembly with a magnified inset showing internal components (no text or symbols)
Abb. 1
Abb. 3
natural_image
Illustration of hands installing or maintaining an oven with a curved arrow indicating rotation (no text or symbols)
Abb. 4
Einsetzen der Tür
natural_image
Two technical line drawings showing hands holding a bracket and a close-up of the handle (no text or symbols present)
natural_image
Diagram showing a mechanical assembly with an arrow indicating motion, no text or symbols present
natural_image
Line drawing of a hand using a tool to adjust or install a mechanical component (no text or symbols present)
Abb. 5
Abb. 1
Abb. 2
natural_image
Simple line drawing of a rectangular tray or container with no text or symbols
1x
Plateau profond

natural_image
Line drawing of a rectangular container with side grout (no text or symbols)
1x
Grille

natural_image
Technical line drawing of a rectangular grid structure with no text or symbols
1x
Glissières
coulissantes
1x
1
2

natural_image
Technical line drawing of a mechanical assembly with a magnified inset showing internal components (no text or symbols)
Fig. 1
natural_image
Illustration of a hand using a tool to adjust or install a mounted appliance, showing a curved arrow labeled 'D' (no text or symbols present)
Fig. 4
natural_image
Two technical illustrations showing hands adjusting a mechanical component (no text or symbols present)
natural_image
Diagram showing a person using a device to interact with a laptop, illustrating the concept of virtual reality (no text or symbols present)
natural_image
Illustration of a hand cleaning a wall-mounted device with a ladder (no text or symbols)
Fig. 5
Fig. 1
Fig. 2
GARANTIE IKEA (FRANCE)
CONTRAT DE GARANTIE ET DE SERVICE APRES-VENTE IKEA
natural_image
Simple line drawing of a rectangular container with side grooves, labeled '1x' below (no text or symbols on the diagram itself)
Griglia
natural_image
Line drawing of a metal grate with slats and a handle, labeled '1x' below (no text or symbols on the grate itself)
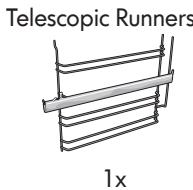
Guide telescopiche
natural_image
Simple line drawing of a ladder structure with 1x load, no text or symbols present
flowchart
graph TD
    A["Car Washing Machine"] --> B["Toile Stove with Waste Bag"]
    B --> C["Toile Stove with Hand Gesture"]
    C --> D["Toile Stove with Hand Capture"]
    D --> E["Toile Stove with Hand Pulling"]
    E --> F["Toile Stove with Hand Retouch"]
    F --> G["Toile Stove with Hand Cover"]
    G --> H["Toile Stove with Hand Flush"]
    H --> I["Toile Stove with Hand Flush Pulling"]
Pannello comandi
1

2

natural_image
Technical line drawing of a mechanical assembly with a magnified inset showing a circular component detail (no text or symbols)
Fig. 1
natural_image
Technical diagram of a mechanical assembly with labeled component A and curved arrow indicating rotation (no text or symbols present)
Fig. 2
v 3
natural_image
Illustration of hands installing or maintaining a door frame with a curved arrow indicating rotation (no text or symbols)
Fig. 4
natural_image
Two technical illustrations showing hands holding a mechanical component, one with dashed lines indicating alignment or wear (no text or symbols present)
natural_image
Diagram showing a person using a device to interact with a screen, with no visible text or symbols
natural_image
Illustration of a hand using a tool to clean or install a ladder, with no visible text or symbols
Fig. 5
Fig. 1
Fig. 2
| Phone number: | 02076601517 | |
| Rate: | Local rate | |
| Opening hours: | Monday - Friday | 8.00am - 6.00pm |
| Saturday | 8.30am - 4.30pm |
| Sunday | 9.30am - 3.30pm |

