
HT1334S TEPPAN YAKI - Cooking appliance ASKO - Free user manual and instructions
Find the device manual for free HT1334S TEPPAN YAKI ASKO in PDF.


| Product type | Gas cooktop |
| Number of burners | 4 burners (1 semi-rapid, 1 simmer, 1 rapid, 1 double-ring wok) |
| Wok burner | Double-ring with independently adjustable outer and inner ring |
| Ignition | Integrated spark ignition, push-and-turn knob |
| Safety | Safety thermocouple on each burner (gas cut-off if flame goes out) |
| Burner adjustment range | Continuous from minimum to maximum for all burners |
| Cooktop surface material | Stainless steel with anti-fingerprint "easy clean" coating |
| Pan supports | 2 enamel grates, removable for cleaning |
| Included accessories | Wok ring and small pan support |
| Minimum pan diameter | 12 cm (stability) |
| Care and cleaning | Mild detergent, non-abrasive sponge; do not wash burners in dishwasher |
| Wok burner features | Brass parts may discolor normally during cooking |
| Power supply | Gas (natural or butane/propane depending on model) |
| Declaration of conformity | CE certified, compliant with European directives |
| Repairability | Spare parts available via after-sales service (see www.asko.com) |
Frequently Asked Questions - HT1334S TEPPAN YAKI ASKO
User questions about HT1334S TEPPAN YAKI ASKO
0 question about this device. Answer the ones you know or ask your own.
Ask a new question about this device
Download the instructions for your Cooking appliance in PDF format for free! Find your manual HT1334S TEPPAN YAKI - ASKO and take your electronic device back in hand. On this page are published all the documents necessary for the use of your device. HT1334S TEPPAN YAKI by ASKO.
USER MANUAL HT1334S TEPPAN YAKI ASKO
Instructions for use
Mode d'emploi
Gas hob
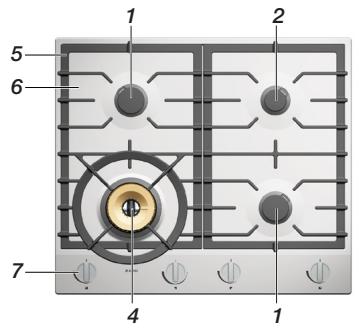
- standard burner
- simmer burner
- rapid burner
- wok burner
- pan support
- drip tray
- control knob
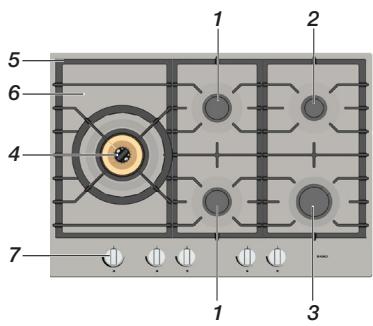
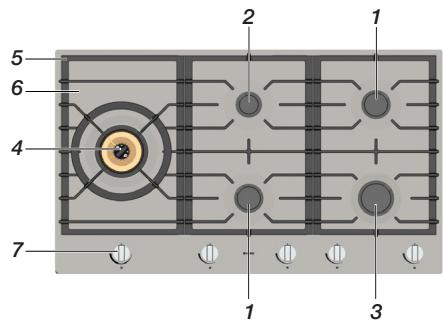
Ignition and adjustment
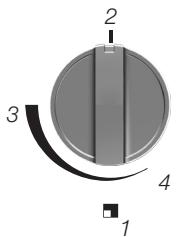
control knob
Standard burner
- zone indication
- 0 position
- high setting
- low setting
Each burner is fully adjustable between high and low settings.
- Press the control knob and turn it anticlockwise. The burner will ignite.
- Press the control knob fully for at least 3 seconds between high (3) and low (4) settings. The thermocouple safety pilot has been activated.
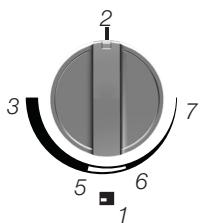
control knob
wok with double regulator
Wok burner with double regulator
- zone indicator
- 0 position
- high setting
- outer ring low setting / Inner ring high setting
- outer ring off / inner ring high setting
- inner ring low setting
The wok burner with double regulator is easy to control.
- The outer ring can be adjusted between high setting and low setting between positions 3 and 5. The inner ring will then continue to burn on high setting.
Use
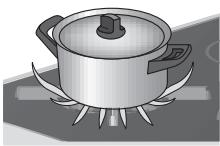
error
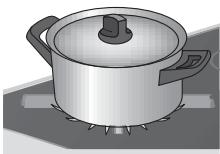
good
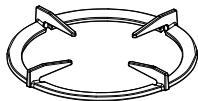
wok ring
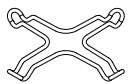
Small pan grid
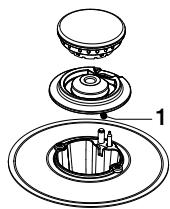
burner
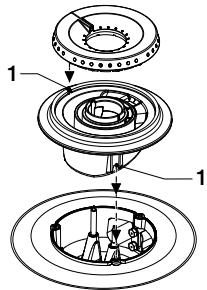
wok burner
Pans
Always ensure that the flames remain under the pan.
A lot of energy is lost if flames burn around the pan. The handles may also become too hot.
- Do not use pans with a base diameter smaller than 12cm . Smaller pans are not as stable.
Wok ring
The wok ring for use with the wok burner supplied or obtainable as an accessory provides extra stability for woks with a round base.
Small pan grid
The small pan grid supplied or obtainable as an accessory makes it possible to use very small pans.
Pan support
Place the pan supports vertically, without sliding over the drip tray.
Position the pan supports on the drip tray in the correct way.
Burner
Use the position pins (1) to put the burner parts together.
Wok burner
Place the wok burner in the correct way. Placing the wok burner parts incorrectly can result in a non-functioning or poorly functioning burner.
Maintenance

Regular maintenance after use prevents food residue from encrusting and creating persistent stains. Use a mild cleaning detergent to remove stains.
Clean the control knobs, burners and pan supports first and then the drip tray or glass cover. This will prevent the drip tray or glass cover from becoming dirty again during cleaning.

Attention! Burner parts should not be cleaned in the dishwasher.
Dishwasher detergents can corrode burner parts!
Stainless steel drip tray with coating
Drip trays with an 'easy clean' coating are easily cleaned with a mild cleaning detergent. Do not use aggressive cleaning products! They may damage the coating.
Persistent stains on enamel (pan supports, burner caps, drip trays)
Persistent stains can best be removed with a fluid detergent or a plastic scouring sponge. Never use scouring powder, scouring pads, sharp objects or aggressive cleaning products.
Brass wok burner parts
Some wok burner parts are made of brass. It is not unusual to see a change in the colour of the brass as a result of the high temperatures involved in wok use.

Consult the www.asko.com website for additional maintenance and cleaning instructions!
Fault table
If your gas hob does not work properly it does not always mean that it is defect. Try to solve the problem yourself first by checking the points in the table below or check the 'www.asko.com' website for more information.
| SYMPTOM | POSSIBLE CAUSE | SOLUTION |
| There is a smell of gas near the appliance. | The appliance connection is leaking. | Turn off the main gas supply valve. Contact your installer. |
| A burner does not ignite.12122 | Plug not in socket.Fuse defective/fuse switched off in fuse box.Spark plug (1) dirty/damp.Burner parts not placed correctly.Burner parts dirty/damp.Main gas supply valve closed.Fault in gas mains.Gas bottle or tank is empty.Wrong type of gas used. | Put the plug into the socket.Replace the fuse or switch on the fuse in the fuse box.Clean/dry the spark plug.Use the position pins to put the burner parts together Clean/dry the burner parts. Make sure that the outflow holes are open.Open the main gas valve.Consult you gas supplier Connect a new gas bottle or have the tank refilledHECK whether the gas used is suitable for the appliance. Contact your installer if it is not correct. |
| The burner does not burn evenly. | Burner parts not placed correctly.Burner parts dirty/damp.Wrong type of gas used. | Use the centring leads to put the burner parts together CLEAN/dry the burner parts. Make sure that the outflow holes are openCHECK whether the gas used is suitable for the appliance. Contact your installer if it is not correct. |
| Burner extinguishes after igniting. | The control knob has not been pressed long and/or deep enough (at least 3 seconds).Thermocouple (2) is dirty. | Keep the control knob fully pressed for at least 3 seconds between high and low settings. This can take longer the first time because of the gas supply.Clean/dry thermocouple. |
Disposal of the appliance and packaging
Sustainable materials have been used during manufacture of this appliance.
The appliance packaging is recyclable. The following materials may have been used:
cardboard;
- paper;
polyethylene film (PE);
CFC-free polystyrene (PS-rigid foam);
polypropylene tape (PP).
Dispos of these materials in a responsible way and in accordance with government regulations.
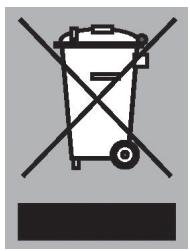
The product has been marked with a crossed-out dustbin symbol to remind you of the obligation to dispose of electrical household appliances separately.
This means that at the end of its working life, the product must not be disposed of as urban waste. It must be taken to a special local authority differentiated waste collection centre or to a dealer providing this service. Disposing of a household appliance such as this hob separately avoids possible negative consequences for the environment and health and enables the constituent materials to be recovered, resulting in significant savings in energy and resources.

Declaration of conformity
We hereby declare that our products satisfy the applicable European directives, orders and regulations, as well as the requirements stated in the referenced standards.
Description
- Instructions for use
- Mode d'emploi
- Ignition and adjustment
- Standard burner
- Wok burner with double regulator
- Use
- Pans
- Wok ring
- Small pan grid
- Pan support
- Burner
- Wok burner
- Maintenance
- Stainless steel drip tray with coating
- Persistent stains on enamel (pan supports, burner caps, drip trays)
- Brass wok burner parts
- Fault table
- Disposal of the appliance and packaging
- Declaration of conformity
- Description
Brand : ASKO
Model : HT1334S TEPPAN YAKI
Category : Cooking appliance