
PG6030 - Versatile mower REMINGTON - Free user manual and instructions
Find the device manual for free PG6030 REMINGTON in PDF.
| Product Type | Multifunctional Trimmer |
| Brand | REMINGTON |
| Model | PG6030 |
| Power Supply | Rechargeable via mains adapter |
| Battery Type | Nickel-Metal Hydride (Ni-MH) |
| Charging Time | 14 to 16 hours for first charge |
| Charge Indicator | Yes, LED indicator |
| Included Trimming Heads | 3 heads: 30mm, 17mm, nose/ears |
| Cutting Guides | 2 cutting guides |
| Main Uses | Beard, mustache, sideburns, neck, nose, ears, eyebrows |
| Blade Material | Stainless Steel |
| Cleaning | Soft bristle brush; rinse accessories with warm water |
| Lubrication | Supplied light oil or sewing machine oil |
| Safety | Turn off before changing accessory; do not use if damaged |
| Operating and Storage Temperature | Between 15°C and 35°C |
| Storage | Dry place, out of reach of children |
| Warranty | 2 years against material and manufacturing defects |
| Included Accessories | Mains adapter, cleaning brush, oil |
| Country of Manufacture | Not specified, manufactured for REMINGTON |
Frequently Asked Questions - PG6030 REMINGTON
User questions about PG6030 REMINGTON
0 question about this device. Answer the ones you know or ask your own.
Ask a new question about this device
Download the instructions for your Versatile mower in PDF format for free! Find your manual PG6030 - REMINGTON and take your electronic device back in hand. On this page are published all the documents necessary for the use of your device. PG6030 by REMINGTON.
USER MANUAL PG6030 REMINGTON
All technical modifications reserved. 11/08. TSC 08.0880
ALL IN ONE GROOMING KIT FOR PRECISE STYLING AND FINISH

Model No. PG340
YbKaHaBmI NokyntaB! IpnH6peTaembl BAMn npOaYkT Remington® npoWeAeHO6xoADMyIO cePTNACAUIO BO COTBETCTBm IN Tpe6BOAHmIMPOCCHKO4ZakoHOaTaBCTBa. IOpO6bHy IOHΦOPMaUIO O HOMepe cTeHfNKATA n Cpoke EOE AChTBNA Bc CMxOte HaNTi HA caTne www.remont-products.ru.

BZ02
11/INT/PG340 Version 05/11 Part No. T22-31721
REMINGTON® is a registered Trade Mark of Spectrum Brands, Inc., or one of its subsidiaries VARTA Consumer Batteries GmbH & Co. KGaA
Alfred-Krupp-Str.9
73479 Ellwangen
Germany
www.remington-europe.com
© 2011 SBI


44-0340-105000

PG340

REMINGTON


INTERNATIONAL SERVICE CENTRE
GERMANY
BENELUX
FRANCE
DENMARK
ITALY
SCANDINAVIA
AUSTRIA
SWITZERLAND
Central Europe
00800/821700821
Mo.-Fr. 9 a.m. - 5 p.m. Central European Time (free call)
E-Mail: service@remington-europe.com
www.remington-europe.com
SPAIN
PORTUGAL
+34 902 10 45 17; 08.00 - 13.00; lunes - viernes (Posventa)
Spectrum Brands (UK) Limited, Fir Street, Failsworth, Manchester, M35 OHS, UNITED KINGDOM, www.remington.co.uk
6 Tel. +420 487 754 605
VARTA Baterie spo. l.r. Jindficha z Lipé 108, 470 01 Ceska Lipa, CESKA REPUBLIKA, www.cz. remington-europe.com
6 Tel. +353 (0) 1460 4711
Remington Consumer Products, Unit 7C, Riverview Business Park, New Nangor Road, Dublin 22, IRELAND, www/remington.co.uk
6 Tel.+3613300404
BEST EXPERT SERVICE JAK SRL, 4th, Drumul Taberei St., sector 6, Bucharest, Romania, www.remington-europe.com
6 Tel.+386(0)15616630
Jezek Trgovina Servis d.o.o., Cesta 24 Junija 21, 1231 LJUBLJANA - Cnruče Republika Slovenia, www.remington-europe.com
Tel. +30 210 94 10 699
D. J. DAMKALIDIS S.A., Import Agencies, 44 Zefyrou str., www.remington-europe.com
Tel. +356 21 664488
Miller Distributors Ltd, Miller House - Airport Way, tarxien Road, Llua LQA 1814, www.millermalta.com
ENGLISH
REMINGTON
Thank you for choosing Remington. Our products are designed to meet the highest standard of quality, functionality and design. We hope you enjoy using your new Remington® appliance. Please read the instructions for use carefully and keep in a safe place for future reference.

CAUTION
Use this appliance only for its intended use as described in this manual. Do not use attachments not recommended by Remington.
Do not use this product if it is not working correctly, if it has been dropped or damaged, or dropped into water.

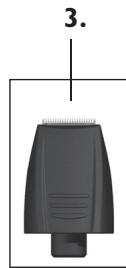
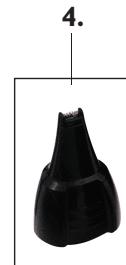
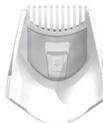
DESCRIPTION
- On/Off Switch
- 30mm trimmer attachment
- 17mm trimmer attachment
- Nose & Ear trimmer attachment
- Charging adaptor
- 2 guide combs
- Charging indicator light
ENGLISH

GETTING STARTED
CHARGING YOUR PERSONAL GROOMER
Before using your personal groomer for the first time, charge for 14-16 hours.
Ensure the product is switched off.
Place your personal groomer into the charging stand, connect the charging adaptor to the product and then to the mains. The charging indicator will light up.
Your personal groomer cannot be overcharged. However, if the product is not going to be used for an extended period time (2-3 months), unplug it from the mains and store. Fully recharge your personal groomer when you would like to use it again.
To preserve the life of your batteries, let them run out every six months then recharge for 14-16 hours.

HOW TO USE
BEFORE YOU BEGIN
Always comb your beard or moustache with a fine comb before you start trimming.
ATTACHING AND REMOVING THE GUIDE COMBS
- With the trimmer blade facing away from you, slide the guide comb on top of the clipper blade and click into position.
- With the trimmer blade facing away from you, carefully push the guide comb away from the trimmer blade.
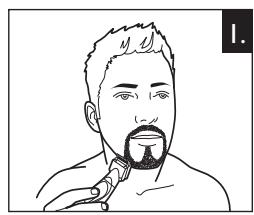
TO THIN AND TAPER THE BEARD/MOUSTACHE (Diagram I)
Attach a guide comb to the 30mm Trimmer Blade. If you are trimming for the first time start with the maximum trimming length setting.
Turn the unit on.
Place the flat top of the trimmer comb against the skin.
Slowly slide the personal groomer through the hair. Repeat from different directions as necessary.
If hair builds up in the trimmer comb during the trimming process, switch the unit off, pull off the comb and brush/rinse off.
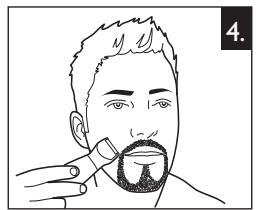
TO DEFINE THE BEARD/MOUSTACHE LINE (Diagram 2)
Hold the personal groomer with 17mm Trimmer Blade facing you.
Start with edge of beard/moustache line and gently lower the trimmer blade onto your skin. Use motions towards edge of beard/moustache line to trim to desired locations in facial area and away from beard in neck area.
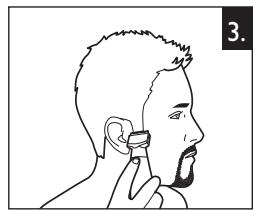
TRIMMING EDGE OF SIDEBURNS (Diagram 3)
Hold the personal groomer with 17mm Trimmer Blade facing you.
Start with edge of sideburn, and with the trimmer blades resting lightly against your skin, use motions towards edge of sideburn line to trim to desired locations in facial area.
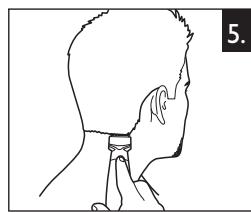
TRIMMING THE NAPE OF YOUR NECK (Diagram 5)
Note: You will need a hand mirror for this operation if performing it alone.
Before you begin, attach the 30mm Trimmer Blade.
- Use your fingers to lift the hair at the base of your head up off the neck. Your index finger should be covering the roots of the hairs you are lifting to prevent accidental removal by the personal groomer.
Using your other hand, hold the personal groomer to the base of your neck with the cutting unit facing up, and move the personal groomer up the length of the neck until it touches your finger covering the hair roots at the base of your head.
Be sure to move the unit slowly when performing this operation and to keep the hair roots at the base of your head out of the way of the trimmer.
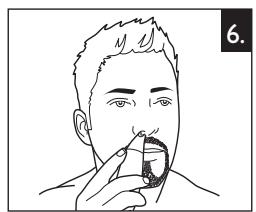
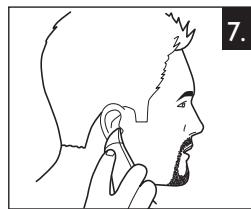
TO REMOVE HAIR FROM NOSE AND EAR (Diagram 6 & 7)
Attach Nose & Ear trimmer attachment.
Insert the personal groomer gently into nostril or ear.
Gently move the groomer in and out of the nostril or ear and at the same time rotate.
Avoid inserting the cutting unit more than 6mm into your nostril or ear.
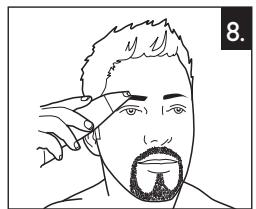
TO REMOVE HAIR FROM EYEBROWS (Diagram 8)
Attach 17mm trimmer attachment.
Gently guide cutting unit to stray, unwanted hairs along the eyebrow line or protruding from the eyebrow itself.
To remove the hairs completely lower onto the skin and move over desired area.
Use slow and well-controlled movements.
ATTACHING AND REMOVING THE TRIMMER COMB ATTACHMENT
Note: Always ensure the personal groomer is switched off before changing any attachments.
To remove, hold the personal groomer with one hand and turn the trimmer head anti-clockwise with the other.
To attach, hold the personal groomer with one hand and turn the trimmer head clockwise with the other.
ENGLISH

Tips for best results
Beard, moustache and sideburn hairs should be dry.
Avoid using lotions before using your personal groomer. Comb your hair in the direction that it grows.
Remove trimmer comb attachment if you are: defining hairline edges such as sideburns, trimming the nape of your neck, trimming your beard line on front of neck.

- Turn the personal groomer off.
[2]. Gently brush the remaining hairs away/rinse under warm water from the guide comb and trimmer blade.
CLEANING CAUTIONS
Only the guide comb attachment and trimmer blade may be removed from the product for cleaning.
- Cleaning should only be done with a soft brush, such as the brush supplied with the product. If rinsing under water, rinse only the attachments under warm running water. Do not use hot water as this might cause damage.
Only use the light-grade oil supplied or sewing machine oil on the blades.
Do not use harsh or corrosive cleaners on the units or their blades.
Do not submerge in water as damage will occur.
STORAGE
Always store this appliance and cord in a moisture-free area. Do not store it in temperatures exceeding 140^ (60^) .
Do not wrap the cord of the charging adaptor around the appliance.
STOP
IMPORTANT SAFETY INSTRUCTIONS
WARNING - TO REDUCE THE RISK OF BURNS, ELECTROCUTION, FIRE, OR INJURY TO PERSONS:
An appliance should never be left unattended when plugged into a power outlet.
Keep the power plug and cord away from heated surfaces.
Make sure the power plug and cord do not get wet.
Do not plug or unplug the shaver with wet hands.
Do not use the product with a damaged cord. A replacement can be obtained via the Remington Service Center.
ENGLISH
REMINGTON
Charge, use and store the product at a temperature between 15^ and 35^
Always unplug from the mains when cleaning.
Only use the parts supplied with the appliance.
- Keep this product out of reach of children. The use of this appliance by persons with reduced physical, sensory or mental capabilities or lack of experience and knowledge can give cause to hazards. Persons responsible for their safety should give explicit instructions or supervise the use of the appliance.

PROTECT THE ENVIRONMENT
The product contains a Nickel Metal Hydride cell unit. Do not dispose the trimmer in household waste at the end of its useful life. Disposal can take place at the Remington® Service Centre or appropriate collection sites.
CAUTION:
Do not put in fire or mutilate your battery packs as they may burst or release toxic materials.

For further information on recycling see www.remington-europe.com

BATTERY REMOVAL
The battery must be removed from the appliance before it is scrapped. The battery is to be disposed of safely.
- Unplug groomer from outlet avoid risk of electrical shock.
- Remove rear groomer cover by first prying the rubber panel from the product with a flat head screwdriver. Pry the on/off switch from the product with a flat head screwdriver. Unscrew the front cover from the product by Philips head screwdriver. Unscrew the upper housing by Philips head screwdriver and pry the upper housing from the product with a flat head screwdriver. This will expose the batteries.
- With wire cutters, clip the wires leading to the batteries.
- Remove the batteries from the product. Contact your local authorities for proper disposal.
ENGLISH
2 years
SERVICE AND WARRANTY
This product has been checked and is free of defects. We warrant this product against any defects that are due to the faulty material or workmanship for a 2 year period from the original date of consumer purchase. If the product should become defective within the warranty period, we will repair any such defect or elect to replace the product or any part of it without charge provided there is proof of purchase. This does not mean an extension of the warranty period.
In the case of a warranty simply call the Remington® Service Centre in your region.
This warranty is offered over and above your normal statutory rights.
The warranty shall apply in all countries in which our product was sold via an authorised dealer.
This warranty does not include shaving heads / foils and the cutters which are consumable parts. Also, not covered is damage to the product by accident or misuse, abuse, alteration to the product or use inconsistent with the technical and/or safety instructions required.
This warranty shall not apply if the product has been dismantled or repaired by a person not authorised by us.
DEUTSCH
REMINGTON
SCHUTZEN SIE UNSERE UMWELT
UDTYNDING AF SK/EG/OVERSK/EG (diagram I)
MEPbI IPEAOCTOPOXHOCTH INPNY NCTKE INPNBOPA
Aa YnCTKn yCtpoiCTBa C erO KOpnyCa MoKHO CHaTb ToAko HAcAky N Ae3Bne TpMMepa.
OuHuaTb npH6Op cAeDyET MRAKOJ UeTOUKO, BXOJAeB B KOMnAEKT NocTaBN.
PmOpMbIaBHe HAcAaHToAaBKO IOA TEaONIOPOTOHOI BOaO. Iopraa BOaMOKET CTaTb npnHNOPBKeAeHN
AARMA3KH AEBTHNAB3yIte HCKAOJYTEABHO BXOABJEEB KOMPAEKT AERKEO MCAO HA MAACAO DAABSEHBX MAAHIOK.
HeNcOAbayIeAaYCHCTKN KOpnyca HAn Ae3Bn arpeccNBhe HAn Abpa3NBhe YChCTaJIme CpeACTBa.
Bo n36eXaHne noBpeXaEHn He nOpryXaIte np6op B BOy.
XPAHEHNE
Xpahnte pnpohnAeKtpoHypB cyxom nOmeuHInn. XpaHnTe np60 npn Tmemepatype He bHte 60°C.
He 6mbaIte shyp aanTepa A3apAkn BOKpy np6opa.
STOP
INHCTPyKUINIIOBE3OJACHOCTN
BHIMAHNE! -ДАМ CHINSEH涅 PMCKA OXKOTOB, YDAPA 3АLEKTPNUECKM TOKOM, BO3TOGOPAH涅 IAPMbI
Hikorda He octabayte yctpoicTBo 6e3 npcMOTpa, ean OH noKaioueh K 3AeKTPocetm.
He KlaaHTe WTeNCEbHyIO Bnky n Hhyp Ha rOpRyHe NOBepxHOCTH.
He no3BOAraTe wTeCceAbHOB BnAKE HhHpy HAOMKHyTb.
He bCTaBAIe H He BbIHMaIe TTeNCEaBHyIO BnAky N3 PO3eTKM MOKpbIM pyKaAM.
He IIObA3yIte YCTOPBTOC B NOPEKJENHMI UHYPOMIITAHNIA. 3aMEHNb IOEPEKJENHHI SHYP IINTAHNA MOHXO, O6bPTAHINCHB C EBPCHIJI CHENTRg EMPRTONG
3apkaIte,ncno3yIte n xpaHITpe npH6op npn TemepaType 15^ - 35^
PnHCTKe BceTgA OTCoeAHNHTe Pn6Op OT AekTPOCetH.
Hcnoa3yIte NCKAOHTeABHO BXO4JUne B KOMnAeKTe DeTaAM.
XpaHnTBbHEOCTYNHOMAaTeMeTc.VEIOIb3OBAHHe 3TOrnp6Opa.MUcAMN C YMHbUeHNBbIMMfHINHECkIMH,YCBCTNEbMbHMIMANyMCTBEHBmHmCNOCO6HOCTMRN HAI HEXBAKTHoONbITaN3HAHNMOKeTb6bTbOAnCHbIM.AuLg,OTBeTcBEHNbIe 3AHX6E20NaCHOCTb, OAOJHbAaTbYcHTKHeHnCTpyKlIMnKOHHTPOAmPObATbNIOLOB3OBAHnAnpata.
PYCCKN

3AUHTA OKPYXKAIOUCEI CPEAbi
B npH6ope hncOa3yeTcra HnkeAe-MetaaIorHaPnAdbn aakkymyAaTOp. He bIb6paCbBAaTe TPhMMep NocteeHHc cpoKa CyaXkb BiMeCTe C bItOBbIMN OTOxOAam. YTHAnHpOBaTB 6pHTby MoKHO B 6AnxAwem cepBnCHOM ueHTpe Remington MHN B COOTBeCTByUoxnx npHMephynkTx.
BHUMAHNE: He KaAHTe B OOrHb I He AeOΦpMByTe AKKYMAyTOpbI, TAK KAK 3TO MOKET pRNECTu H 3BpBHy AH YNTeK TOKCHNHyBx MATEPNa3OB.

3a DoAnoHHTBHeNbHnOFOAeMOn OIOBTOPHMOIcHOBAHN MATEPNaAOB 06paauTaeBc, NOKAYeTt, HA caiWy REMington-europe.com

ydaAeHHe AKKymyAToPA
IpeaTmKaK Bb6pOcHTb np6Op,BbHbTe H3 Hero aKKMyAToP.
- BbHbTe MEXAHNcEkyoETKy I3 PO3eTKI AIA IpeOaTbpaUeHHN NopAkeHHN AEKTpYHeCKN TOMOK.
- CHMNTE 3aAHOIO KpbIbIKy MEXaHueCKO IeTKn, ChaAaYdaAIB pe3HOByIO naHeAb c NOMOJIbIO NAOCKO OTEBTKN. C ee Jc NOMOJIbIO CHMNTE nepeKIAUOTAEb. 3aTeM c NOMOJIbIO OTEBTKN Philips OTBNHTNe IepaAHOIO KpbIbIKy. C ee Jc NOMOJIbIO OTEBTKN eBEXHN BnHT H c HCMNTE ETO C NOMOJIbIO NAOCKO OTEBTKN. OTKPOEtC r OTdAeHEMe C 6bTaPaeMM.
3.ПepepejxbTe npObOda,BeAyuHcK 6aTaapeM. - BbHtHe 6tatapen H3 yucpTcB8A. CaYAEyMeCThBm npabAAm yTHnA3aunu.

CEPBHCHOE OBCAYKINBAHNE I TAPAHTNA
Пгббпр пошел поворку и не ямаeeТдфсктов. Мь ratapантчур emOTCYTCTBNEВ bnpbope DeфсктВ, ВЗн��ыхиИЗ-зЗанkaeСЧЕТьньхМATEРУAN ИИн КрачесТБНСИ CBбркИ, в ТЕЧЕНО ratapантнIHORO cPOKA с.dунnotokун pnpbopa. ECSIn b TЕЧЕНО ratapanTHHOROT cPOKa BaWt npббрь bIyIET n3 cTPOR, мь -пгн haJIINu YeKa -бecPnATNo OTPMOnTHPyER oIIIz ZAMEHIM HA HOBY.CPOK ratapanTHm TEM cambm npodJЯТСВ. B clyuae polONOMK npboppa CBJXNTcE NO TEFOhoC cepBCHSbM ΜeHTpOM RemingtonВ BaWem Pernohe. AApcec N TeLEFOHObCEPUBHbOY CEHTPOB MOxH Oy3HabNo 6eCnPANTHom TYeFOHy ORpaeN IINHN 8-800-100-8011* (3BOHKn 6eCnPAnThIbe No TeppitOpTN PΦ)
AaHnHa rapaHTHa npoOCTabAeTcB ADOAnOAHHe K BaUHM 3aKOHbM npAbam notpe6HTeAa.
IpaHTHa AeCTbHTeBa Hb CxE CTpaHax, B KOTOpbIX Bbl pIno6peH npi6Op y haWero
aBOPtOBaHOrHO dHaepa.
IpaanpOCTpaHREcaHa 6peoUHne IIOAOBKN/ctKn HOKN, NOKOaBky OHn ppeCTaBAHOT co60n 3NaHsauBaIOuNEcAaTN. Kpome TOrO, paOpTHe nIpaocPOnTaeTbA HA deEeKtBu, BO3HNkuHNe 3-3a HEPaNbAHOH KOcNAYATAuIN npi6opaa, hCNOAb3OBaHnra erho He no Ha3auHEnu, u3MeHeneHHo KnoCHTpPyKuHm HnHecObAoHnna HnCTpyKuHn no TeXnueckO kcnApTaauu Hn/Hn Mepam npoeOCTOPOXHOctn. IpaanTHn hCTekaET, eCa npi6Op 6bl paO6pan Hn OtpemOHtnPOBaHn He ABTOPHaBBHM HAMn AHOM.
KomnneKT dny yxoda 3a BONocamn PG340
Pino3BODHTeB: Spectrum Brands Shenzhen Ltd./CnEkrpym Bp3nDc IeHbKHeB JITd, Ktaiy Dara Varta Consumer Batteries GmbH & Co. KGaA, AInbppei-Kpynn UTrpacce 9, 3IbnBaHren, 73479, FepmaHnia
Nidemie nncnlo3oBAt no H3NaHueHIno B COOTBTCTBm C INHCTpykUne no 3Knplnyatau
Cpok cayx6bni3dAeAa 2 rOda c daTb npoDaXn.
TAPAHNTINHbI TAAOH
MoAeAb REMINGTONPG340
Aata npoaaa
Pnoaee (noaee,neatb)
H3eAne npOBepeHO. PpeTeH3n He HMeIO.
Cyclobina rapaHTnO3HaKOMaen H corgaceH. nokynateA M.II.
TÜRKÇE
CIHAZIN SARIJ EDILMESI
VAŽNE SIGURNOSNE UPUTE
UPOZORENJE - KAKO BISTE SMANJILI RIZIK OD OPEKLINA, UDARA STRUJE, POZARA ILI OZLJEDA OSoba:
Nikada ne ostavlajte uredaj bez nadzora, posebice, ako je uključen u struju.
Kabel i utikač držite podalje od grijanih povrsina.
▶ Kabel i utikač se ne smiju smočiti.
Ne uključujte i isključujte uredaj mokrim rukama.
Uredaj se ne smije koristiti aku me je ostecen kabel. Mozete zatražiti zamjenu u Remington servinom centru.
Uredaj se puni, koristi i cuya na temperaturi izmedu 150C i 350C.
Prijeciscenja,obveznoiskopcajteuredajizstruje.
Koristiteismo dijelove iz kompleta.
Proizvod drzite izvan dosegae djece. Ako ovaj aparat koriste osobe sa smanjenim fizickim, senzornim ili mentalnim sposobnostima te osobe bez iskustva i znanja, mogle bi se izlozii opasnosti. Osobe odgovorne za njihovu sigurnost moraju im dati jasne upute ili nadzirati uporabu ureda.

ZASTITA OKOLISA
Ovaj proizvod sadrži bateriju tehnologije Nikal-metal hidrid. Ne bacajte šišač u kučni opdat nakon što prestane s radom. Urežaj možete odložiti u Remington servisnom centru ili na odgovarajućim odalgalistma.
OPREZ:
Ne stavljaje u vatu i ne unistavajte pakiranja baterija jer ona mogu izavati plamen ili ispustiti ste tne tvari.

Daljinje informaci o reciklaranju vidjet na: www.remington-europe.com

UKLANJANE BATERIJE
m = 311
aJg aJg JI 1000 1000 1000 1000 1000 1000 1000 1000 1000 1000 1000 1000 1000 1000 1000 1000 1000 1000 1000 1000 100
aoo ooi
STOP
aJgSg aI 100 g, jL Juaa Jlae 110:algLo
joc buiu 2 Liie .agggl 11 Lg g. liui 11 11 11 11
Lggl 1g 1g 1g
JyIgJyIyIyIyIyIyIyIyIyIyIyIyIy
ailll chwll 1g
algo gai jaii Jg jaoj
a 1
J 111111111111111111111111111111111111
p0g10jygljjbjxjg jlgai glgaiw!g
jLg 20 alwll jz11 1
jgl 10 p 10000000000000000000000000000000000000000000000000000000
jI 111111111111111111111


a1 aL

Jscill yLds oog Iocill gio
Loac slgail ic jdlly aolal all w ge gaii iia slo jolal 2
aolal 281
.aoIto 243 jSjgo f Remington aoo jso ooi sao qill no valll
JgLggl aolw ggo jzg Lggl lIg oj zj 1 1 1 1 1 1 1 1 1 1 1 1 1 1 1 1 1 1 1 1 1 1 1 1 1 1 1 1 1 1 1 1 1 1 1 1 1
ai = ( a1 + 1) · bi = ( a1 + 1) ( a_2 + 1) ^2


gai jio 1j8o xblj0j 1olj 1x
aassss sssssssssssssssssssssssssssssssssssssssssssssssssssssssssssssssssssssssssssss
a ≤ b 或 a ≥ 3
gill no a blll agll g jy b y c a l l syl plll g 2. plwlgl no slzlg Jcnil gl zgl sbla plwu w y cdo plwiw w y do plwiw w y do plwiw w y do plwiw w y do plwiw w y do plwiw w y do plwiw w y do plwiw w y do plwiw w y do plwiw w y do plwiw w y do plwiw w y do plwiw w y do plwiw w y do plwiw w y do plwiw w y do plwiw w y do plwiw
L
JLwIg 1000000000000000000000000000000
i 1
- ALL IN ONE GROOMING KIT FOR PRECISE STYLING AND FINISH
- Model No. PG340
- REMINGTON
- INTERNATIONAL SERVICE CENTRE
- Central Europe
- 00800/821700821
- ENGLISH
- CAUTION
- DESCRIPTION
- GETTING STARTED
- CHARGING YOUR PERSONAL GROOMER
- HOW TO USE
- BEFORE YOU BEGIN
- ATTACHING AND REMOVING THE GUIDE COMBS
- TO THIN AND TAPER THE BEARD/MOUSTACHE (Diagram I)
- TO DEFINE THE BEARD/MOUSTACHE LINE (Diagram 2)
- TRIMMING EDGE OF SIDEBURNS (Diagram 3)
- TRIMMING THE NAPE OF YOUR NECK (Diagram 5)
- TO REMOVE HAIR FROM NOSE AND EAR (Diagram 6 & 7)
- TO REMOVE HAIR FROM EYEBROWS (Diagram 8)
- ATTACHING AND REMOVING THE TRIMMER COMB ATTACHMENT
- Tips for best results
- CLEANING CAUTIONS
- STORAGE
- STOP
- IMPORTANT SAFETY INSTRUCTIONS
- WARNING - TO REDUCE THE RISK OF BURNS, ELECTROCUTION, FIRE, OR INJURY TO PERSONS:
- PROTECT THE ENVIRONMENT
- CAUTION:
- BATTERY REMOVAL
- years
- SERVICE AND WARRANTY
- DEUTSCH
- SCHUTZEN SIE UNSERE UMWELT
- UDTYNDING AF SK/EG/OVERSK/EG (diagram I)
- MEPbI IPEAOCTOPOXHOCTH INPNY NCTKE INPNBOPA
- XPAHEHNE
- INHCTPyKUINIIOBE3OJACHOCTN
- BHIMAHNE! -ДАМ CHINSEH涅 PMCKA OXKOTOB, YDAPA 3АLEKTPNUECKM TOKOM, BO3TOGOPAH涅 IAPMbI
- PYCCKN
- 3AUHTA OKPYXKAIOUCEI CPEAbi
- ydaAeHHe AKKymyAToPA
- CEPBHCHOE OBCAYKINBAHNE I TAPAHTNA
- TAPAHNTINHbI TAAOH
- TÜRKÇE
- CIHAZIN SARIJ EDILMESI
- VAŽNE SIGURNOSNE UPUTE
- UPOZORENJE - KAKO BISTE SMANJILI RIZIK OD OPEKLINA, UDARA STRUJE, POZARA ILI OZLJEDA OSoba:
- ZASTITA OKOLISA
- OPREZ:
- UKLANJANE BATERIJE
Brand : REMINGTON
Model : PG6030
Category : Versatile mower