
BHT2000 - Hair clippers REMINGTON - Free user manual and instructions
Find the device manual for free BHT2000 REMINGTON in PDF.
| Brand | REMINGTON |
| Model | BHT2000 |
| Product Type | Hair Trimmer / Body Shaver |
| Power Source | Rechargeable cordless, AC adapter 120-240 V AC, 50-60 Hz |
| Initial Charging Time | 14 to 16 hours |
| Main Features | Body trimming and shaving, 5 length settings (3, 5, 7, 8, 12 mm) |
| Included Accessories | Adjustable comb, dual foil shaver, cleaning brush, blade oil, charging adapter, storage case |
| Usage | Dry or in-shower use (washable) |
| Care and Cleaning | Clean after each use: rinse accessories with warm water, brush, oil blades regularly |
| Safety | For household use only, do not use in bath or shower, keep out of reach of children |
| Spare Parts and Repairability | Removable cutting assembly and shaver, replacement blade available through authorized service center |
| Warranty | 2 years against defects in material or workmanship |
| Country of Manufacture | China |
| Voltage Compatibility | 120-240 V AC, 50-60 Hz (universal adapter) |
| Battery Type | Built-in rechargeable batteries (Ni-MH or Li-ion, not specified) |
Frequently Asked Questions - BHT2000 REMINGTON
User questions about BHT2000 REMINGTON
0 question about this device. Answer the ones you know or ask your own.
Ask a new question about this device
Download the instructions for your Hair clippers in PDF format for free! Find your manual BHT2000 - REMINGTON and take your electronic device back in hand. On this page are published all the documents necessary for the use of your device. BHT2000 by REMINGTON.
USER MANUAL BHT2000 REMINGTON
IMPORTANT SAFETY INSTRUCTIONS
When using an electrical appliance, basic precautions should always be observed, including the following. Read all instructions before using this appliance.
DANGER
To reduce the risk of electric shock:
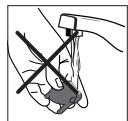
- Do not reach for an appliance that has fallen into water. Unplug it immediately.
Do not use while bathing or in the shower. - Do not place or drop into water or other liquid.
- Do not place or store this appliance where it can fall or be pulled into a tub or sink.
Except when charging, always unplug this appliance from the electrical outlet immediately after using.
Unplug this appliance before cleaning it.
WARNING
To reduce the risk of burns, fire, electric shock or injury to persons:
This appliance is for household use only.
An appliance should never be left unattended when it's plugged in, except when charging a rechargeable appliance.
Close supervision is necessary when this appliance is used by, on, or near children or invalids.
Use this appliance only for its intended use as described in this manual.
- Do not use the mini shaver on your scalp.
Do not use attachments not recommended by Remington.
- Keep the cord away from heated surfaces.
- Never operate this appliance if it has a damaged cord or plug, if it is not working properly, if it has been dropped or damaged, or if it has been dropped into water. If any of these things happen, return the appliance to an authorized service center for examination and repair.
- Never drop or insert any object into any of the appliance's openings.
-
Do not use outdoors or operate where aerosol (spray) products are being used, or where oxygen is being administered.
Always store this appliance and cord in a moisture-free area. Do not store it in temperatures exceeding 140^ (60^)
Make sure the cord is disconnected from the groomer stand when storing. -
Do not use this appliance with a damaged or broken cutter unit, as injury may occur. Always make sure blades are aligned properly.
Always attach plug to appliance, then adapter to outlet. To disconnect, turn all controls to OFF, then remove adapter from outlet, then detach power cord from the clipper for storage. - Do not use an extension cord or a voltage converter with this appliance.
- Do not wrap the cord around the appliance.
KEEP AWAY FROM CHILDREN
SAVE THESE INSTRUCTIONS
Contents
English 1
French 13
Product Features
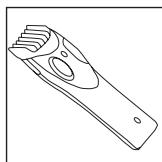
High Precision Body Hair Trimmer | Shaver
The product can be used on all parts of the body where you would like to trim or shave your body hair. Read all instructions before using this trimmer.
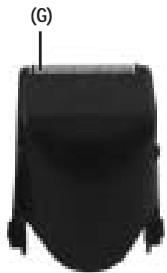
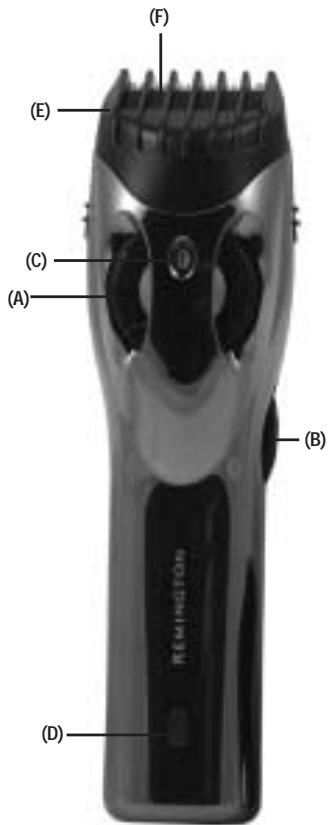
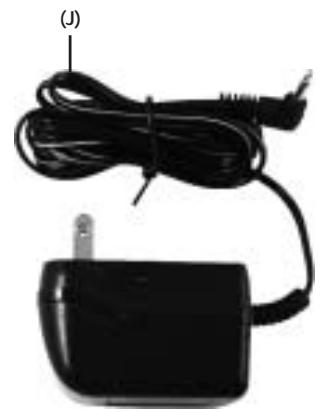
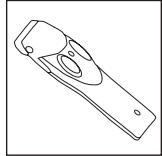
Groomer Parts
(A) 5 position "thumb wheel"
(B) ON/OFF switch
(C) Length position indicator
(D) Charging indicator
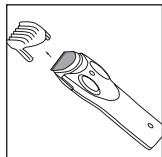
(E) Removable adjustable trimmer comb attachment
(F) Cutting assembly
(G) Removable dual foil shaving attachment
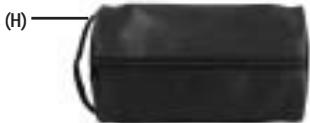
(H) Storage bag
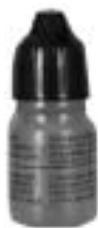
(I) Cleaning brush/Trimmer blade oil
(J) Charging adapter

1. BHT-2000 Trimmer
2. Remove comb cover
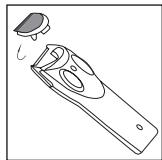
3. Remove blade
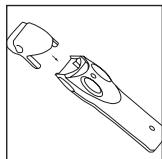
4. Install shaver head
5. BHT-2000 Shaver
6. Remove shaver cover for cleaning
How to Use
Charging the BHT-2000
Before using the for the first time, it must charge for 14-16 hours.
- Make sure the groomer is turned off.
- Connect the cord to the unit, then plug the charging adapter into the electrical outlet. A charging indicator will light up.
- Your groomer cannot be over charged so you can leave it plugged in and charged between uses, but if the unit is not going to be used for an extended period of time (2-3 months) unplug it and fully recharged when you want to use it again.
- Only use the charging adapter supplied with the unit.
- Charging should be done at temperature between 4^ and 35^ , or it could decrease the battery's life.
- To preserve the life of the batteries, let them run out every 6 months, than recharge them for 24 hours.
- This product is intended for cordless use only.
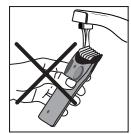
Before using your groomer: The High Precision Body Hair Trimmer Shaver is washable so it can be used in the shower or rinsed under water during cleaning. Therefore, to maintain the performance of the cutters, oil before each use and after rinsing. Turn the trimmer on to distribute the oil evenly. Prior to using, wipe off any excess oil. Be sure that the groomer is truned off when applying the oil.
Take a moment
Be patient when first using your BHT-2000. As with any new product, it may take a little while to familiarize yourself with it, especially if you are using a trimmer for all the first time or are using a different brand.
Take the time to acquaint yourself with your new trimmer, as we are confident you will receive years of enjoyable use and complete satisfaction.
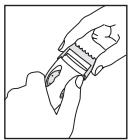
Trimming
Use the thumb wheel to set the trimmer comb to the desired length setting. It's a good idea to begin trimming at one of the longest settings (4 or 5) to avoid accidentally trimming hair too short. As you become familiar with the settings, you can then select your desired length setting.
Turn the unit on.
Place the flat top of the trimmer comb against the skin.
If hair builds up in the trimmer comb during the trimming process, switch the unit off, pull off the adjustable trimmer comb and brush/rinse it off.
For an even closer look and precise shaping, remove the adjustable trimmer comb and trim the hairs along the outer edge.
When you are finished, turn the trimmer off, clean it, and return it to its storage pouch.
Adjusting the trim length
The trimmer comb can be adjusted to give you 5 different trim lengths simply by by turning the thumb wheel to the desired setting. Turn the thumb wheel clockwise for a shorter length, counter-clockwise for longer length. The wheel will click into place as it reaches each setting, and the setting number will appear on the length position indicator. Here's what the length settings mean:
| Setting | Length |
| 1 | 3mm |
| 2 | 5mm |
| 3 | 7mm |
| 4 | 8mm |
| 5 | 12mm |
! Trimmer comb must be attached to the trimmer in order to use the hair length selector.
Edging and shaping
Remove the trimmer comb attachment.
Hold the trimmer at a right angle to your skin and press down gently.
Edge and shape the area as desired.
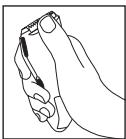
Using the shaver attachment
Hold the shaving head to your skin.
Stretch your skin with your free hand so hairs stand upright.
Only apply light pressure on the shaving head while shaving.
Shave against hair growth.
! The Microscreen shaving technology with circular foil holes is developed to give a controlled close cut.
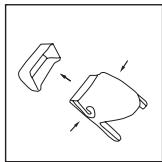
Removing the trimmer comb and cutting assembly
- Be sure trimmer is off. The trimmer comb may be on any setting.
Hold the trimmer in one hand with your thumb firmly on the thumb wheel to keep it from turning.
With your other hand, gently pull the trimmer comb attachment off the trimmer.
Remove the cutting assembly by firmly pushing up on the blade with your thumb. The cutting assembly rests on a gentle spring. Use your other hand to cover the cutting assembly to prevent accidents.
Removing the shaver attachment
Ensure the trimmer is off.
Hold the trimmer in one hand with your thumb firmly on the thumb wheel to keep it from turning.
With your other hand, gently pull the shaver attachment off the trimmer.
Removing the shaver cover
Ensure the trimmer is off.
Gently push the buttons either side of the shaving foil. With the other hand lift the shaver cover. Clean then replace.
Replacing the cutter assembly
Ensure the trimmer is off.
Hold the trimmer in one hand. With your other hand, insert the lower part of the cutter assembly into the trimmer, push down the cutter until firmly attached.
Replacing the trimmer comb and shaver attachment
Hold the trimmer in one hand with your thumb firmly on the thumb wheel to keep it from turning. Ensure that the length position indicator is at 1.
Slide the comb/shaver down the grooves until it clicks into place.
! The trimmer comb and shaver attachment can only be attached in one way. If it does not go on correctly, turn it around and try again.
Cleaning and Maintenance
Clean your trimmer after each use
Turn the trimmer off.
Remove the adjustable trimmer comb and cutter assembly or shaver attachment.
- Shake or blow out any accumulated hairs, alternatively you may also rinse it under running water.
Cleaning cautions
Only the adjustable trimmer comb and cutter assembly may be removed from the trimmer for cleaning.
- Cleaning should be done with a soft brush, such as the brush supplied with the unit.
Only use the light-grade oil supplied or a suitable alternative like sewing machine oil. These oils will not evaporate or slow down the blades.
- Do not use harsh or corrosive cleaners on the units or their cutters.
Do not apply pressure or hard objects to cutters.
Do not disassemble cutter assembly.
Storage
Always store this appliance and cord in a moisture-free area. Do not store it in temperatures exceeding 140^ (60^)
- Do not wrap the cord of the charging adapter around the appliance.
Important Safety Instructions
When using your body hair timer, basic precautions should always be observed, including the following.
Warning
To reduce the risk of burns, electrocution, fire or injury to persons:
This appliance is for household use only.
Use this trimmer only for its intended use as described in this manual. Do not use attachments not recommended by the manufacturer.
Close supervision is necessary when this appliance is being used by, on or near children or invalids.
Always attach the plug to the appliance, then to the outlet. To disconnect, turn all controls OFF, then remove plug form outlet. Detach removable power cords from appliances for storage. Do not plug or unplug this appliance with wet hands.
An appliance should never be left unattended when it is plugged in, except when charging a rechargeable appliance.
- Keep the cord away from heated surfaces.
Never drop or insert any object into any opening.
Clean Your Groomer Regularly
Clean your groomer regularly to ensure your unit's operating life is not prematurely shortened.
Cleaning attachments with water
Remove attachments.
Rinse attachments under warm running water. Do NOT use hot water, which may cause damage to components.
You can use a hair dryer on a cool or medium heat setting to help dry off the attachments, if desired.
Do not use harsh or corrosive cleaners on the unit or its cutters.
! Do not apply pressure or hard objects to cutters.
Cleaning the MiniScreen shaver
! Do NOT rinse or oil MiniScreen shaver attachment. The unit is permanently lubricated.
Press buttons at the ends of the screen head.
Remove head and shake out the clippings
Blow off cutter assembly.
Replace head, making sure it snaps in place.
Cleaning with brush
Thoroughly brush and blow out hair clippings from cutter, bottom of attachments, and top of power handle.
Troubleshooting
? If the cutters do not move
The cutting unit may be dirty and clogged. Clean and lubricate the unit as described above.
? If the groomer doesn't work when turned on
It may simply need charging. Follow the instructions for charging on page 6.
? If the groomer does not hold a charge Fully discharge the BHT-2000 by running it until it stops. Then follow the recharging instructions on page 6. If the time between recharging cycles does not increase, the battery may need replacing.
Performance Guarantee
Full Two-Year Warranty
Spectrum Brands, Inc. warrants this product against any defects that are due to faulty material or workmanship for a two-year period from the original date of consumer purchase. This warranty does not include damage to the product resulting from accident or misuse.
If the product should become defective within the warranty period, we will repair it or elect to replace it free of charge. Return your product and sales receipt with your name, address and day time phone number to: Spectrum Brands, Inc., Attention: Consumer Services, 601 Rayovac Drive, Madison, WI 53711. For more information call 800-736-4648 in the US or 800-268-0425 in Canada.
KEEP ORIGINAL SALES RECEIPT AS PROOF OF PURCHASE FOR WARRANTY PURPOSES.
This warranty does not cover products damaged by the following:
Accident, misuse, abuse or alteration of the product
Servicing by unauthorized persons
Use with unauthorized accessories
- Connecting it to incorrect current and voltage
Wrapping cord around appliance causing premature wear & breakage
Any other conditions beyond our control
SPECTRUM BRANDS, INC. SHALL NOT BE RESPONSIBLE FOR ANY INCIDENTAL, SPECIAL OR CONSEQUENTIAL DAMAGES RESULTING FROM THE USE OF THIS PRODUCT. ALL IMPLIED WARRANTYES INCLUDING BUT NOT LIMITED TO IMPLIED WARRANTYES OF FITNESS AND MERCHANTABILITY, ARE LIMITED IN DURATION TO TWO YEARS FROM DATE OF ORIGINAL PURCHASE.
This warranty gives you specific legal rights and you may also have other rights which vary from state to state or province to province. Some states do not allow the exclusion or limitation of incidental, special or consequential damages.
Spectrum Brands, Inc. Money-back Offer
If within 30 days after you have purchased your Remington® branded product, you are not satisfied and would like a refund, return it with the sales slip indicating purchase price and date of purchase to the retailer from whom it was purchased. Spectrum Brands, Inc. will reimburse all retailers who accept the product within 30 days from the date of purchase. If you have any questions concerning the money-back guarantee, please call 800-736-4648 in the US or 800-268-0425 in Canada.
120-240 VAC 50-60 Hz
Questions or comments:
Call 800-736-4648 in the US
or 800-268-0425 in Canada.
or visit www.remington-products.com
REMINGTON and HIGH PRECISION are
trademarks of ROVCAL, INC.
© 2005 ROVCAL, INC.
07/05 Job# CS27555
T22-17247
Dist. by: Spectrum Brands, Inc.,
Madison, WI 53711
Dist.by: Rayovac Canada, Inc.
Mississauga, ON L4W 2T7
MADE IN CHINA
