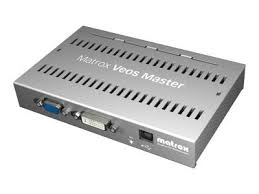
VEOS MASTER UNIT, VEOS MASTER UNIT - Video capture system MATROX - Free user manual and instructions
Find the device manual for free VEOS MASTER UNIT, VEOS MASTER UNIT MATROX in PDF.


| Product Type | Video Capture System |
| Brand | Matrox |
| Model | VEOS MASTER UNIT |
| Dimensions (approx.) | 25 cm x 15 cm x 4 cm |
| Weight (approx.) | 1 kg |
| Power Supply | Via USB or AC adapter (included) |
| Video Interfaces | HDMI, DisplayPort, USB-C |
| Maximum Resolution | 4K (3840 x 2160) at 60 Hz |
| Main Functions | Real-time video capture, multi-screen support (up to 4), simultaneous output, compatible with DualHead and TripleHead |
| Software Compatibility | Windows, macOS, Linux (with Matrox drivers) |
| Compliance | Class A EN55022/CISPR22, WEEE directive |
| Included Accessories | AC adapter, USB cable, HDMI cable, user manual |
| Warranty | 2 years |
| Maintenance and Cleaning | Use a soft, dry cloth. Do not use chemical products. |
| Safety | Avoid shocks, humidity, and extreme temperatures. Disconnect before cleaning. |
| Spare Parts and Repairability | Parts available on the Matrox website. Repair by a certified technician recommended. |
Frequently Asked Questions - VEOS MASTER UNIT, VEOS MASTER UNIT MATROX
User questions about VEOS MASTER UNIT, VEOS MASTER UNIT MATROX
0 question about this device. Answer the ones you know or ask your own.
Ask a new question about this device
Download the instructions for your Video capture system in PDF format for free! Find your manual VEOS MASTER UNIT, VEOS MASTER UNIT - MATROX and take your electronic device back in hand. On this page are published all the documents necessary for the use of your device. VEOS MASTER UNIT, VEOS MASTER UNIT by MATROX.
USER MANUAL VEOS MASTER UNIT, VEOS MASTER UNIT MATROX
Thank you for purchasing Matrox Veos. Your Veos product consists of 3 components—the Master, Display, and Repeater units—that work together to extend your graphics data over 100 meters per unit. Providing high image quality, multiple channels of content, and multi-display support at great distances, your Matrox Veos product is designed to meet the needs of the digital signage market.
Hardware supplied
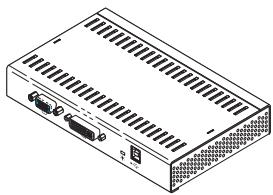
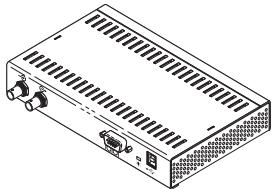
Master unit
natural_image
Isometric line drawing of a rectangular electronic device with ventilation grilles and ports (no text or symbols)Matrox Veos Master Unit
natural_image
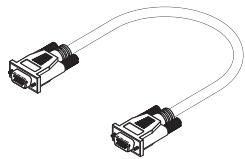
Illustration of two connected VGA connectors (no text or symbols)Matrox cable (HD15-to-HD15)
natural_image
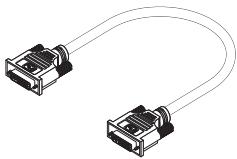
Pure electrical connector diagram showing two connected components (no text or symbols)Matrox cable (DVI-to-DVI)
natural_image
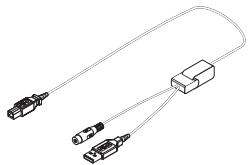
Pure electrical circuit lines without any symbolsPower/USB cable
natural_image
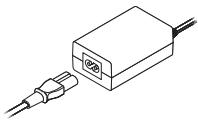
Diagram of a connector with a cable and plug, no text or symbols presentPower supply
Display unit
natural_image
Isometric line drawing of a rectangular electronic device with ventilation grilles and ports (no text or symbols)Matrox Veos Display Unit
natural_image
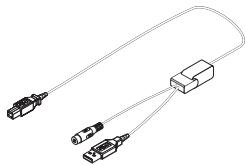
Pure electrical circuit lines without any symbolsPower/USB cable
natural_image
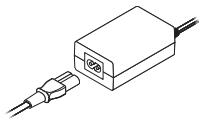
Line drawing of a connector with a cable and plug, no text or symbols presentPower supply
natural_image
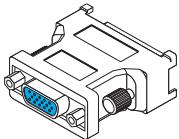
Technical line drawing of a D-sub connector (no text or symbols)2 DVI-to-HD15 adapters
Repeater unit
natural_image
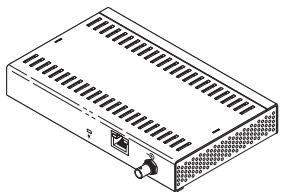
Isometric line drawing of a rectangular electronic device with ventilation grilles and ports (no text or symbols)Matrox Veos Repeater Unit
Additional hardware required
To connect your Matrox Veos product, you also need the following hardware:
■ Supported coaxial cables
■ RS-232 serial cables (only if connecting RS-232 monitors)
■ Repeater unit – PoE (Power Over Ethernet) power supply unit and twisted pair cables (CAT5 or CAT6)
Software supplied (for Windows 2000, Windows XP, Windows XP Professional x64, and Windows Vista)
- Matrox PowerDesk-SE – to use your Matrox product. Matrox makes new display drivers available on the Matrox Technical Support Web site (www.matrox.com/graphics/support/drivers).
Installation overview
To install your Matrox product:
1 Connect your monitors and Veos units – see “Connection setup”, page 4.
2 Install the software – see “Software setup”, page 13.
Connection setup
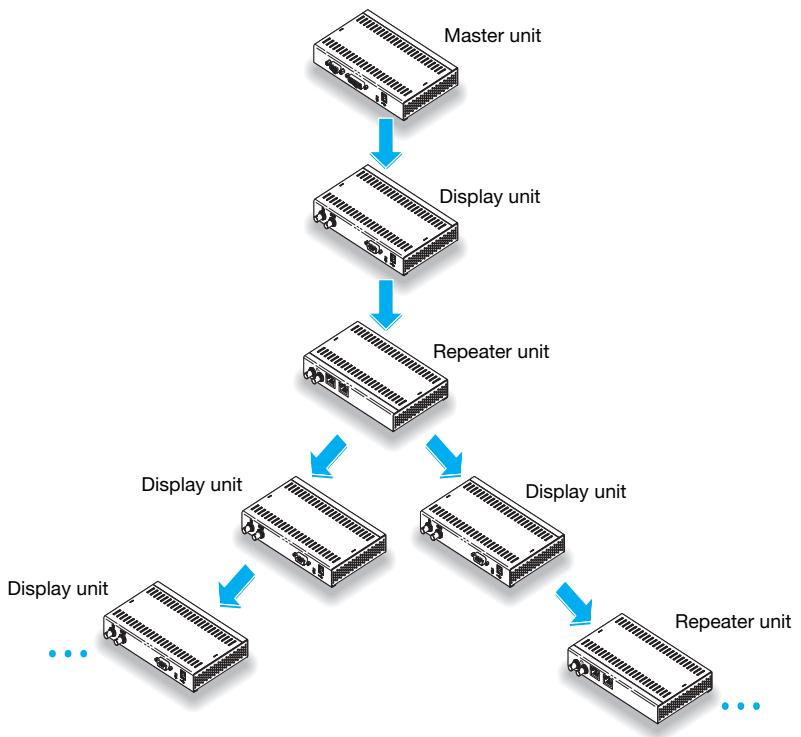
This section describes how to connect your Matrox Veos product. Your Veos product consists of 3 components that work together to extend your graphics data over 100 meters per unit:
■ Master unit (required) – connects to your computer.
- Display unit (required) – connects to your monitors. The input can come from a Master, Display, or Repeater unit. The output can go to a Display or Repeater unit.
- Repeater unit (optional) – connects to another Veos unit. The input can come from a Master, Display, or Repeater unit. The output can go to a Display or Repeater unit.
The following is an example of a possible Veos setup.
flowchart
graph TD
    A["Master unit"] --> B["Display unit"]
    B --> C["Repeater unit"]
    C --> D["Display unit"]
    D --> E["Repeater unit"]
    E --> F["Display unit"]
    F --> G["Display unit"]
    G --> H["Display unit"]
    H --> I["Display unit"]

WARNING: Because your units disperse heat, they may become warm during operation. Make sure your units are located in a well ventilated area and nothing is blocking their ventilation holes.
Connection overview - Master unit
![Matrix cable (HD15-to-HD15)* Input connector (HD-15 ——) Input connector (DVI ——) Output coaxial connector (BNC →) Coaxial cable Matrix cable (DVI-to-DVI)* Power/USB cable Serial cable Input connector (Serial DB-9 [0101])](/content/2019/12/19983/images/ef7d022e1e7e922aacaaee9ffec2d846e290b486b88b634c7a2a6f9910b3a600.jpg)
* Depending on your graphics hardware, you need to attach either the Matrox HD15-to-HD15 cable or the Matrox DVI-to-DVI cable to the input connector on your Master unit.
Step-by-step connection setup - Master unit
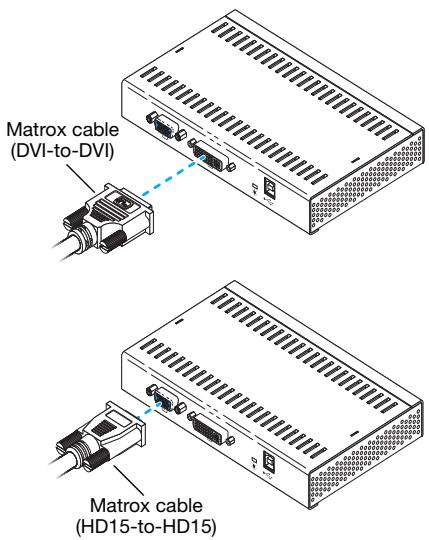
1 Attach the Matrox cable
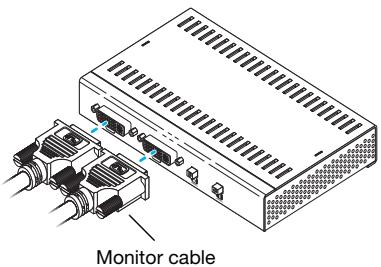
If your graphics hardware has a DVI connector, attach one end of the Matrox cable to the graphics connector on your computer. Attach the other end of the cable to the DVI input connector (—) on your Master unit.
If your graphics hardware has an HD-15 connector, attach one end of the Matrox cable to the graphics connector on your computer. Attach the other end of the cable to the HD-15 input connector (→) on your Master unit.
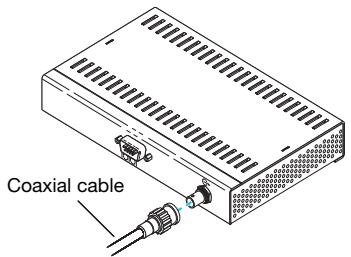
2 Connect the coaxial cable
Connect your coaxial cable to the output coaxial connector ( ) on your Master unit.
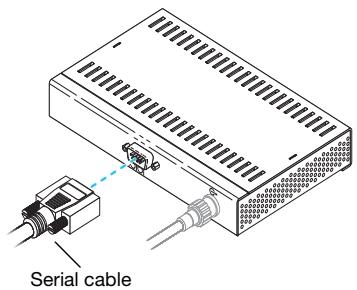
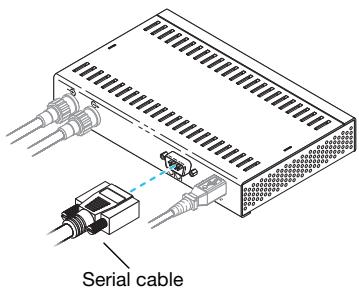
3 Connect the serial cable (optional)
If you want to use a monitor that has an RS-232 serial port connector, you need to connect a serial cable to the DB-9 connector on your Master unit.
Connect one end of your RS-232 serial cable (sold separately) to the RS-232 connector on your computer.
Connect the other end of your cable to the DB-9 input connector (|O|O|) on your Master unit.
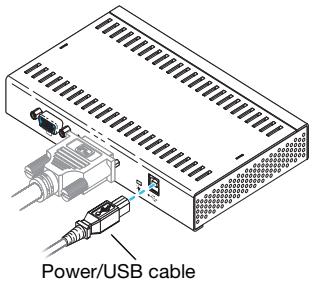
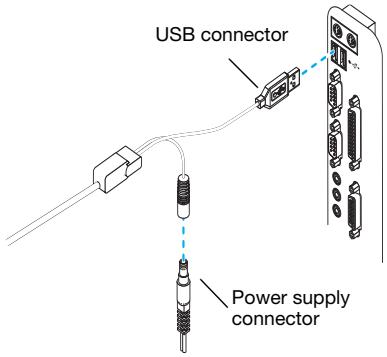
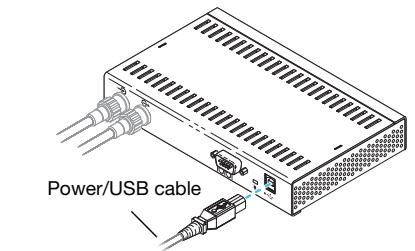
4 Connect the Power/USB cable
Plug one end of the Power/USB cable provided with your Master unit into the USB connector ( ) on your Master unit.
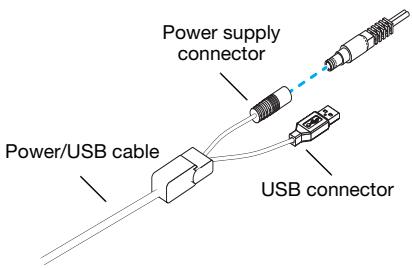
Plug the power supply connector of the Power/USB cable into the external power supply provided with your Master unit.
Plug the USB connector into a USB port on your computer.

Note: For your Master unit to work properly, both the power supply connector and USB connector of the Power/USB cable must be plugged in at the same time.
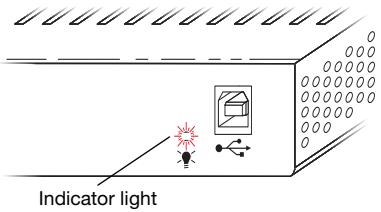
5 Check the indicator light
If the indicator light is on (green or red), your Master unit is properly connected.
If the indicator light is off (black), make sure your Master unit is properly connected and that all connectors are properly fastened. For more information, see “Description of indicator lights”, page 12.
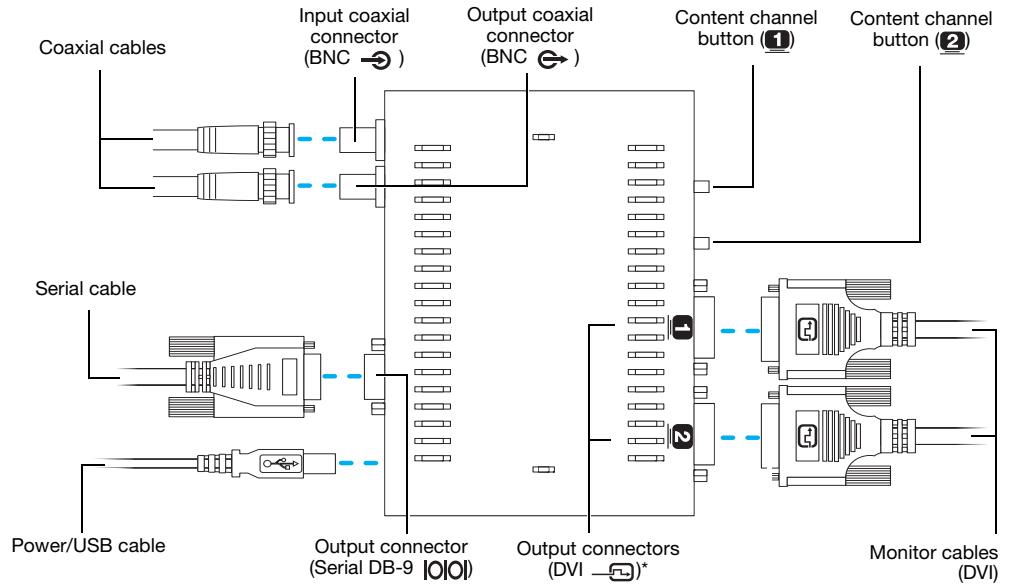
Connection overview – Display unit
flowchart
graph TD
    A["Coaxial cables"] --> B["Input coaxial connector (BNC)"]
    B --> C["Output coaxial connector (BNC)"]
    C --> D["Content channel button 1"]
    C --> E["Content channel button 2"]
    F["Serial cable"] --> G["Power/USB cable"]
    G --> H["Output connector (Serial DB-9 [1010"])]
    H --> I["Output connectors (DVI *"]
    I --> J["Monitor cables (DVI)"]
* If your monitor has an HD-15 connector, use a DVI-to-HD15 adapter included with your Display unit to connect your monitor to the monitor connector on your Display unit.

Note: To get the most out of your Matrox product, we recommend you use identical monitors (that is, monitors that support the same settings such as display resolution, refresh rate, and aspect ratio). For information on the settings your monitor supports, see your monitor documentation.

WARNING: Don't change monitor connections while your computer is turned on. While your computer is turned on, it may be using monitor settings that are specific to the current monitor connections. Some devices may be permanently damaged if incorrect settings are used.
Step-by-step connection setup - Display unit
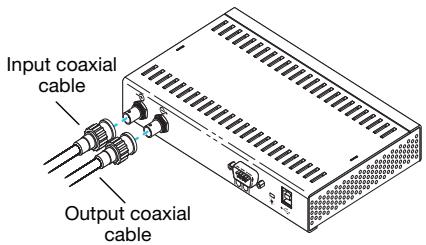
1 Connect the coaxial cable
Connect the input coaxial cable to the input coaxial connector (→) on your Display unit.
To connect your Display unit to another Veos unit (Display or Repeater), connect a second coaxial cable to the output coaxial connector ( ) on your Display unit.
2 Connect your monitors
If your monitor has a DVI connector, connect it directly to the connector labeled (—) on your Display unit.
If your monitor has an HD-15 connector, use a DVI-to-HD15 adapter included with your Display unit to connect your monitor to the monitor connector on your Display unit.
If your monitor has an RS-232 serial port connector, attach one end of your RS-232 serial cable to the connector on your monitor. Attach the other end of the cable to the DB-9 output connector (|O|O|) on your Display unit.

Note: Some monitors that have RS-232 serial port connectors support daisy chaining. For information on the capabilities of your monitor, see your monitor documentation.
3 Connect the Power/USB cable
Plug one end of the Power/USB cable provided with your Display unit into the USB connector ( ) on your Display unit.
Plug only the power supply connector of the Power/USB cable into the external power supply provided with your Display unit. The USB connector remains unplugged.
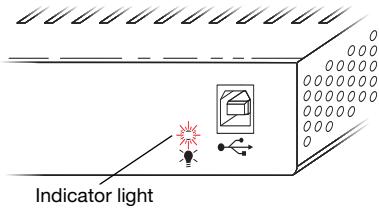
4 Check the indicator light
If the indicator light is on (green or red), your Display unit is properly connected.
If the indicator light is off (black), make sure your Display unit is properly connected and that all connectors are properly fastened. For more information, see “Description of indicator lights”, page 12.
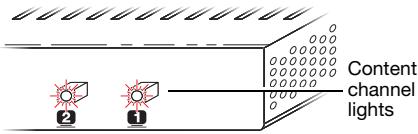
5 Check the content channel lights
If the content channel lights are green, your Display unit is properly connected.
If the content channel lights are red, make sure the coaxial cables are properly connected and that all connectors are properly fastened.
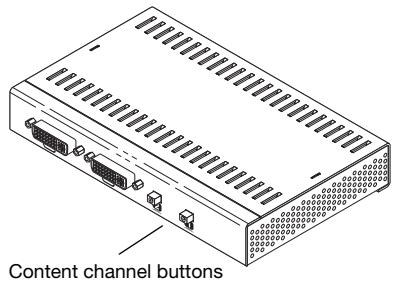
6 Set the content channels
Press button 1 (1) to set the content channel for monitor 1 (1), and press button 2 (2) to set the content channel for monitor 2 (2). You may need to press the buttons repeatedly to cycle through the available content channels (CH01, CH02, or CH03).
Connection overview - Repeater unit
Step-by-step connection setup - Repeater unit
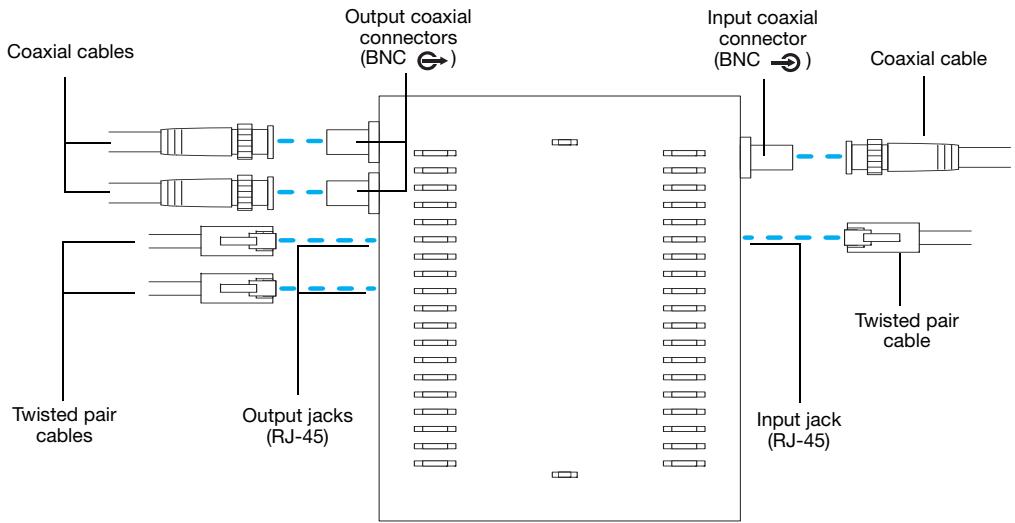
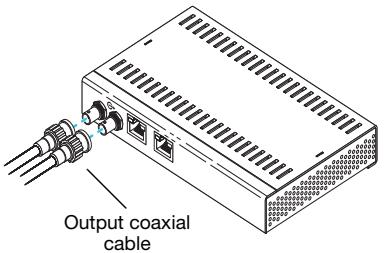
1 Connect the coaxial cable
Connect the input coaxial cable to the input coaxial connector (→) on your Repeater unit.
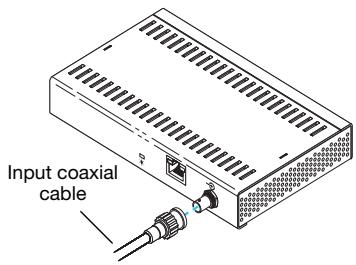
To connect your Repeater unit to another Veos unit (Display or Repeater), connect a second coaxial cable to the output coaxial connector ( ) on your Repeater unit.
2 Connect the twisted pair cable
Plug one end of your twisted pair cable into the RJ-45 input jack on your Repeater unit.
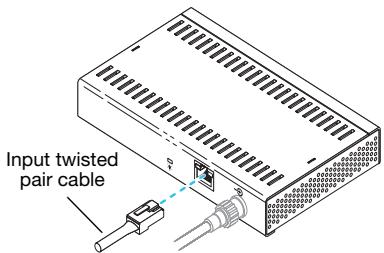
Plug the other end of your twisted pair cable into a PoE (Power Over Ethernet) power supply unit (sold separately), then plug the PoE power cord into your power supply.
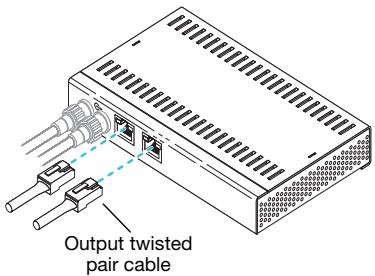
To power another Repeater unit, plug one end of your twisted pair cable into the RJ-45 output jack on your Repeater unit. Plug the other end of your twisted pair cable into the RJ-45 input jack on the next Repeater unit.
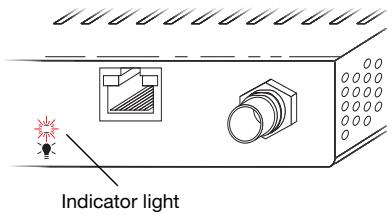
3 Check the indicator light
If the indicator light is on (green or red), your Repeater unit is properly connected.
If the indicator light is off (black), make sure your Repeater unit is properly connected and that all connectors are properly fastened. For more information, see “Description of indicator lights”, page 12.
Your Matrox product is now connected. Restart your computer and install your Matrox software (see "Software setup", page 13).
Description of indicator lights
The indicator lights on your Veos units provide status information on your connection setup. The following describes the different indicator lights on your Veos units:
| Red indicator light | Green indicator light | No indicator light (black) | |
| Master unit | Unit is powered.Unsupported display resolution is selected. | Valid input signal is detected. | Unit isn’t powered. |
| Display unit | Unit is powered.No valid input signal is detected. | Valid input signal is detected. | Unit isn’t powered. |
| Display unit (Content channel lights) | Unit is powered.Coaxial cable may not be connected or an unsupported coaxial cable is connected. | Coaxial cable is supported and properly connected. | Unit isn’t powered. |
| Repeater unit | Unit is powered. | Valid input signal is detected. | Unit isn’t powered. |
After restarting your computer, the indicator lights on your Veos units should all be green. If the indicator lights on your Veos units aren't green, see “Troubleshooting”, page 14.
Software setup

Note: This guide has references that are specific to the Matrox installation CD-ROM. If a CD-ROM wasn't provided with your Matrox product, contact your Matrox representative.
This section describes how to install Matrox software for Windows 2000, Windows XP, Windows XP Professional x64, and Windows Vista.
You may need administrator rights to install certain software. For more information, see Windows documentation or contact your system administrator.
natural_image
Illustration of a CD or DVD disc being placed into a rack, with an arrow indicating direction (no text or symbols present)1 Install your Matrox software
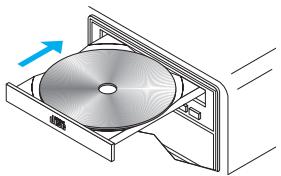
Insert the Matrox installation CD-ROM in your CD-ROM drive – the CD-ROM installation program automatically starts.* Follow the on-screen instructions.
2 Change your display settings (optional)
After the installation is complete, you'll be prompted to change your current display settings (for example, your display resolution). If you want to change your current display settings, use Matrox PowerDesk software to change these settings. For more information on how to change your display settings, see Matrox PowerDesk help.
Accessing PowerDesk
Your Matrox software includes Matrox PowerDesk software. This software helps you get the most out of your Matrox product. Use Matrox PowerDesk software to change certain display settings or access Matrox features. To access PowerDesk, click its icon (m) on your Windows taskbar. To see the PowerDesk icon, you may need to click the Show hidden icons button (◀) on your Windows taskbar.
You can also access Matrox PowerDesk by clicking Start → All programs → Matrox Graphics → Matrox PowerDesk-SE.
For more information on how to use Matrox PowerDesk, see Matrox PowerDesk help.
Troubleshooting
This section addresses possible problems that could prevent you from using your Matrox product.
Problem Computer doesn't display information after Matrox product is connected
Cause Your Matrox product may not be properly connected.
Solution Make sure your Matrox product is properly connected and that all connectors are properly fastened. For more information, see “Connection setup”, page 4.
Cause Your computer may be turned off.
Solution Make sure your computer is turned on.
Cause A display resolution may have been selected in Windows but may not be supported by your Matrox product.
Solution Use Matrox PowerDesk software to change your display resolution. For more information, see Matrox PowerDesk help.
Problem No indicator light (black)
Cause Your Power/USB cable or twisted pair cable may not be properly connected.
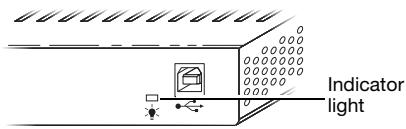
Solution Make sure your Power/USB cable or twisted pair cable are properly connected. For more information, see “Connection setup”, page 4.
Problem Indicator light is red
Cause Master unit only – Your Master unit may not support the selected display resolution.
Solution Make sure your Master unit supports the selected display resolution. For more information, see Matrox PowerDesk help.
Cause The segment length of your coaxial cable may be too long.
Solution Make sure the segment length of your coaxial cable is supported by your Matrox product. For more information, see “Product information”, page 21.
Solution To add more distance, connect one or more Repeater units to your setup. For more information, contact your Matrox representative.
Cause The coaxial cable or connector you're using may not be supported by your Matrox product.
Solution For more information on supported coaxial cables and connectors, see “Product information”, page 21.
Cause The connector on your cable may not be properly crimped.
Solution Try re-crimping the connector on your cable.
Problem Content channel lights on Display unit are red
Cause Your Display unit can't detect an input signal.
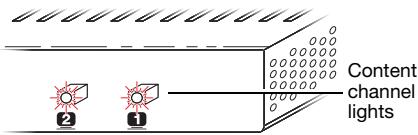
Solution Make sure the coaxial cable is properly connected to the input coaxial connector on your Display unit and all connectors are properly fastened.
Cause The coaxial cable you're using may not be supported by your Matrox product.
Solution For more information on supported coaxial cables, see “Product information”, page 21.
Problem Can't select one or more resolutions supported by your monitor
Cause Windows may list certain display resolutions, even though they may not be supported by your Matrox product.
Solution Make sure your Matrox product supports the selected display resolution. For more information, see Matrox PowerDesk help.
Solution Make sure your Matrox software is installed. For more information, see “Software setup”, page 13.
Cause Windows identifies the highest display mode and discards all modes with a higher vertical or horizontal resolution. In Windows 2000/XP, the highest display mode is the one with the highest horizontal resolution. In Windows Vista, the highest display mode is the one with the highest vertical resolution.
Solution Disable Windows mode filtering to view all available display modes:
Windows XP –
1 Right-click your Windows desktop background, then click Properties → Settings.
2 Select the display for your product, then click Advanced → Monitor. Make sure Hide modes that this monitor cannot display is clear.
3 Click OK → OK.
Windows Vista –
1 Right-click your Windows desktop background, then click Personalize → Display Settings.
2 Select the display for your product, then click Advanced Settings → Monitor. Make sure Hide modes that this monitor cannot display is clear.
3 Click OK → OK.
Problem Display on flat panel monitor appears blurry or uses only a portion of the screen
Cause You may be using different types of monitors.
Solution To get the most out of your Matrox Veos product, we recommend you use identical monitors (that is, monitors that support the same settings such as display resolution, refresh rate, and aspect ratio). For more information on the settings your monitor supports, see your monitor documentation.
Cause The image quality of your displays may need to be adjusted.
Solution Use the Adjust Image Quality option in Matrox PowerDesk to adjust the image quality of your displays. For more information, see Matrox PowerDesk help.
Cause You may be using a lower display resolution than what your flat panel monitor supports. If your monitor supports display scaling, the image on your screen may appear blurry. If display scaling isn't supported, the display may use only a portion of your screen.
Solution Select the highest display resolution available. This generally results in better image quality.
Problem Wrong color balance, screen image off-center, or no picture at all
Cause Your computer may be turned off.
Solution Make sure your computer is turned on.
Cause The power saving settings on your computer or monitor may not be properly set.
Solution Adjust the power saving settings on your computer or monitor.
Cause Your Matrox product may not be properly connected.
Solution Make sure your Matrox product is properly connected and that all connectors are properly fastened. For more information, see “Connection setup”, page 4.
Cause Your secondary display may not be enabled in Windows.
Solution Make sure your display is enabled:
Windows 2000/XP –
1 Right-click your Windows desktop background, then click Properties → Settings.
2 Select any disabled display, enable the Extend my Windows desktop onto this monitor check box, then click Apply.
Windows Vista –
1 Right-click your Windows desktop background, then click Personalize → Display Settings.
2 Select any disabled display, enable the Extend the desktop onto this monitor check box, then click Apply.
Solution If no secondary display is available in Windows, your secondary display may not be enabled on your system. For more information on how to enable your secondary display, see your system or graphics hardware documentation.
Cause You may be using different types of monitors.
Solution To get the most out of your Matrox Veos product, we recommend you use identical monitors (that is, monitors that support the same settings such as display resolution, refresh rate, and aspect ratio). For more information on the settings your monitor supports, see your monitor documentation.
Cause Your monitor video controls may be improperly set.
Solution Adjust your monitor controls (brightness, contrast, and so on). For more information, see your monitor manual.
Cause Your monitor may not be properly connected.
Solution Make sure your monitor is properly connected to the connector on your Display unit.
Solution Make sure the monitor power cable is firmly in place.
Solution Make sure the connection to the back of the monitor is firmly in place.
Cause If your monitor supports multiple input sources (analog/digital), it may be configured to use the wrong source.
Solution Make sure your monitor is using the correct input source. For more information on selecting the input source for your monitor, see your monitor documentation.
Solution Change your connection setup to use a different input source.
Problem After the startup screen, or after display settings are changed, the screen image is garbled or unusable (blank screen, rolling or overlapping screen images)
Cause An unsupported display mode may have been selected.
Solution If one of your displays is usable, use Matrox PowerDesk to change your display mode. For more information, see Matrox PowerDesk help.
Solution If all your displays are unusable, change your display resolution in Windows.
1 Restart your computer in VGA mode.
Windows 2000/XP/Vista –
a Click Start → Shut Down → Restart → OK* to restart your computer. (* Depending on your version and configuration of Windows, this part of the step may not be necessary.)
If your primary monitor is unusable, see your system manual for information on how to restart your computer using a hardware control.
b Before Windows starts, press [F8] for the Windows startup menu to appear. (If [F8] doesn't work, instead try pressing and holding [Ctrl] before Windows starts.)
Select “VGA mode” (or “Low resolution video”), then press [Enter].
2 Change your display resolution:
Windows 2000 –
a Right-click your Windows desktop background, then click Properties → Settings.
b Move the Screen area slider to a lower setting, then click OK.
Windows XP –
a Right-click your Windows desktop background, then click Properties → Settings.
b Move the Screen resolution slider to a lower setting, then click OK.
Windows Vista –
a Right-click your Windows desktop background, then click Personalize → Display Settings.
b Move the Resolution slider to a lower setting, then click OK.
3 Restart your computer normally.
Problem Matrox product isn't automatically detected
Cause Your Matrox product may not be properly connected.
Solution Make sure your Matrox product is properly connected and that all connectors are properly fastened. For more information, see “Connection setup”, page 4.
Cause Your Matrox product may not support the selected display mode.
Solution Make sure your Matrox product supports the selected display mode.
Problem Screen image defects appear (tearing)
Cause You may be using a higher display resolution than what your graphics hardware supports.
Solution Select a lower display resolution. This generally results in better image quality.
Solution If you're using a 32-bit color palette, try using a 16-bit color palette instead.
Problem Program window or dialog box doesn't appear on screen
Cause Another window or dialog box may be covering the window or dialog box you want to see.
Solution Move, close, or minimize any window or dialog box that may be covering the window or dialog box you want to see.
Cause If you're using multi-display mode, the program window or dialog box may be in a display or on a monitor that's unusable. (For example, your monitor may not be properly connected or configured.)
Solution Make sure all the displays and monitors you want to use are usable. For more information, see other troubleshooting items in this guide.
Cause The program window or dialog box may be somewhere off-screen.
Solution If the program window you want to see is named on the Windows taskbar, right-click it and select Maximize. (If you click Restore the program window goes back to its previous position. To fix this problem, see the other solutions.)
Solution Manually move the program window or dialog box:
1 Press [Alt]+[Space].
2 If you see a pop-up menu, click Move. If you don't see a pop-up menu, press [M] (for Move).
3 Press one of the arrow keys once and move your mouse pointer to where you want the window or dialog box to appear, then click that spot on your Windows desktop. The program window or dialog box should appear where you clicked.
Solution Windows 2000/XP/Vista –
1 Click the Matrox PowerDesk icon (m) on your Windows taskbar, then click Desktop Management.
To see the PowerDesk icon, you may need to click the Show hidden icons button (◀) on your Windows taskbar.
2 Enable one or more of the following features:
- Open program windows
- Center dialog boxes and message boxes
3 Choose where you want the program window or dialog box to appear.
For more information, see Matrox PowerDesk help.
Product information
Specifications
| Matrox Veos | |
| Key features | Multi-channel support, configurable RS-232 link, landscape or portrait monitor orientation, unlimited iterations of Display and Repeater units |
| Monitor support | Digital or analog |
| Dimensions | 6.63" (W) x 5.19" (D) x 1.25" (H) |
| Coaxial cable type supported* | Belden 1694A or equivalent SMPTE 424M compliant 75 Ohm coaxial cable (bare copper center conductor, high velocity dielectric insulation, foil/braid shielding) |
| Twisted pair cable type supported | CAT5 or CAT6 |
| Connector type supported | BNC |
| Power supply | Master, Display: external 5 VDC, 3A Repeater: PoE |
| DVI-to-HD15 adapters(included only with Display unit) | 2 |
| RS-232 capability | Unidirectional from Master to Display |
| 1920 x 1080 | |
| Preset display resolutions† | 1360 x 768 |
| 1280 x 768 | |
| 1280 x 720 | |
| Maximum distance per unit | 100 m (328 ft) |
| MTBF | 88,000 Hrs @ 30°C |
| Certifications‡ | Class A: FCC, CE, ACMA, VCCI |
* For a list of supported cables, contact your Matrox representative.
Listed are the manufacturer's default settings. Additional display resolutions are available through Matrox PowerDesk software. For more information, see Matrox PowerDesk help.
‡ For more information, see page 30.
Notes
■ Matrox PowerDesk software supports only Windows 2000, Windows XP, Windows XP Professional ×64, and Windows Vista.
■ The display resolutions and refresh rates available depend on your monitor and software monitor settings. For more information on the capabilities of your monitor, see your monitor documentation.
If you're using multiple monitors, your Matrox hardware uses the same display resolution and monitor settings for all your monitors. The display resolution and monitor settings (such as refresh rate) will be the ones selected in Matrox PowerDesk multi-display settings.
■ While using some graphics hardware and software, certain limitations may apply. For more information on the capabilities of your graphics hardware, see its documentation.
■ Some older monitor models may not be supported by your Matrox Veos product. For more information, contact your Matrox representative.
■ To get the most out of your Matrox product, we recommend you use identical monitors (that is, monitors that support the same settings such as display resolution, refresh rate, and aspect ratio). For more information on the settings your monitor supports, see your monitor documentation.
■ While adjusting your image quality or changing your content channels, your displays may become blank for a few seconds.
■ While using the display rotation feature, all your displays must use the same orientation.
■ While an unsupported display mode is selected, your displays may be unusable.
Customer support
Matrox Web
Matrox is on the Internet with a World Wide Web (WWW) site. Our Web site has product literature, press releases, technical material, a sales office list, trade show information, and other relevant material.
■ Visit the Matrox Graphics Web site at www.matrox.com/graphics.
■ E-mail questions or comments regarding the site to webmaster@matrox.com.
If you have a problem
Matrox values your business and offers preferred support for your Matrox product. For product support, contact your Matrox representative or visit our technical support Web site at www.matrox.com/graphics/support.
Information we need
Please give a complete description of the problem, and include:
■ Matrox product serial number, model number, revision number, display mode (display resolution and refresh rate), firmware version, and PowerDesk version.
■ Graphics hardware model, processor speed, and amount of memory.
■ Operating system, version, and service pack.
■ Brand and model of any other graphics cards and devices installed on your system.
■ Monitor brand and model name.
Where to get information
For information on PowerDesk software:
Windows 2000/XP/Vista –
1 Click the PowerDesk icon (m) on your Windows taskbar to access the main PowerDesk menu. To see the PowerDesk icon in Windows XP/Vista, you may need to click the Show hidden icons button (◀) on your Windows taskbar.
2 Click About.
For system information:
- Windows 2000 – Right-click the My Computer icon on your Windows desktop background, then click Properties.
Windows 2000/XP – Click Start → Programs → Accessories → System Tools → System Information. - Windows XP – Click Start → Settings* → Control Panel → Performance and Maintenance* → System (double-click*). (* Depending on your configuration of Windows, this part of the step may not be necessary.)
- Windows Vista – Click Start → Settings* → Control Panel → System and Maintenance → System (double-click*). (* Depending on your configuration of Windows, this part of the step may not be necessary.)
Warranty
A. Limited Warranty Statement
- Matrox Graphics Inc. (“Matrox”) warrants to the end-user customer, who provides adequate proof of purchase that Matrox hardware products purchased from Matrox authorized dealers will be free from defects in materials and workmanship for a period of three (3) years from the date of purchase. This warranty applies only to the original end-user purchaser and is non-transferable. Conditions and limitations of Matrox’s warranty are stated below.
- Matrox's limited warranty covers only those defects which arise as a result of normal use of the hardware and does not apply to any:
a. improper or inadequate maintenance;
b. incompatibilities due to the user's hardware or software applications with or in which the Matrox product interfaces;
c. product of a special or custom-made nature;
d. unauthorized modification or misuse;
e. improper installation, misapplication or negligence;
f. operation outside the product's environmental specifications;
g. improper site preparation or maintenance;
h. software;
i. other causes that do not relate to a product defect;
j. defects or damage suffered as a result of force majeure (including theft);
k. defects or damage suffered as a result of normal wear and tear, and/or
I. stolen goods.
- If Matrox receives, during the applicable warranty period, notice of a defect in a warranted hardware product and the defective Matrox product in question, Matrox shall at its sole option, either repair or replace the product, and shall return the repaired product or a replacement product within a reasonable delay. The replacement product may not be new, provided that it has functionality at least equal to that of the product being replaced.
- This warranty is valid in any country where Matrox hardware products are distributed by Matrox or its authorized dealers.
- This Limited Warranty Statement gives the customer specific legal rights. The customer may also have other rights which vary from state to state in the United States, from province to province in Canada, and from country to country elsewhere in the world.
B. Limitations of Warranty
- NEITHER MATROX NOR ANY OF ITS THIRD PARTY SUPPLIERS MAKES ANY OTHER WARRANTY OF ANY KIND, WHETHER EXPRESSED OR IMPLIED, WITH RESPECT TO MATROX PRODUCTS. MATROX SPECIFICALLY DISCLAIMS (and the customer, by accepting the Matrox product, specifically accepts such disclaimer and waives) ALL OTHER WARRANTIES, EITHER EXPRESSED OR IMPLIED, INCLUDING BUT NOT LIMITED TO THE IMPLIED WARRANTIES OF MERCHANTABILITY AND FITNESS FOR A PARTICULAR OR INTENDED PURPOSE OR USE AND THE WARRANTY AGAINSTLatENT DEFECTS, WITH RESPECT TO THE HARDWARE AND/OR SOFTWARE. MATROX FURTHER DISCLAIMS ANY WARRANTY THAT MATROX PRODUCTS, IN WHOLE OR IN PART, WILL BE FREE FROM INFRINGEMENT OF ANY THIRD PARTY INTELLECTUAL PROPERTY OR PROPRIETARY RIGHTS.
- To the extent that this Limited Warranty Statement is inconsistent with the law of the locality where the customer purchases the Matrox product, this Limited Warranty Statement shall be deemed modified to be consistent with such local law. Under such local law, certain limitations of this Limited Warranty Statement may not apply to the consumer.
- To the extent allowed by local law, the remedies provided in this Limited Warranty Statement are the customer's sole and exclusive remedies.
C. Limitations of Liability
- EXCEPT FOR THE OBLIGATIONS SPECIFICALLY SET FORTH IN THE LIMITED WARRANTY STATEMENT, IN NO EVENT SHALL MATROX BE LIABLE FOR:
a. any direct, indirect, special, incidental, consequential, foreseeable or unforeseeable, or punitive damages, whether based on contract, tort, delict or any other legal theory and whether advised of the possibility of such damages, and/or
b. damages arising from the loss of use, data, production revenue and/or profit of in connection with the Matrox product or any business interruption.
- Without prejudice to the foregoing, any liability of Matrox for any breach of warranty shall be limited to the amount paid by the customer for the defective hardware in question.
- To the extent allowed by local law, Matrox's entire liability and the customer's exclusive remedy shall be the repair or replacement of any defective product during the warranty period. Matrox does not offer any other warranty with respect to Matrox hardware or software or any other hardware or software.
- Customer shall be responsible for all applicable taxes, duties and customs fees on any replacement unit, as well as all transport, insurance, storage and other charges incurred on all returned products.
D. Obtaining Service
- Verify that your Matrox product was installed and configured according to the information in its accompanying documentation.
- Read the “Troubleshooting” information included with the Matrox product to see if you can solve the problem yourself.
- If you are still experiencing difficulties, please contact your dealer where you purchased your Matrox product.
- If you must return a Matrox product, leave the configuration as it was when you were using it, and leave all identification stickers on the product. Pack the product in its original box and return to your Matrox dealer where the product was purchased, together with your proof of purchase. Your Matrox dealer will return the product for you. Alternatively, if this first option is unavailable to you, you may contact the Matrox Technical Support group who will issue an Return Merchandise Authorization (RMA) number, upon receipt of adequate proof of purchase, and inform you of shipping instructions. DO NOT RETURN THE PRODUCT TO MATROX WITHOUT MATROX'S RMA NUMBER AND EXPRESS AUTHORIZATION.
E. General
This limited warranty shall be governed by the laws of the Province of Quebec, Canada and the federal laws of Canada applicable therein and the courts of the Province of Quebec shall have exclusive jurisdiction to hear and decide any dispute instituted by the customer in connection with this limited warranty; the customer waives, by accepting the product, its rights to institute proceedings in connection with this warranty against Matrox in any jurisdiction other than Quebec.
Software license agreement
Single User Products This Matrox software (the "Software") is copyrighted by Matrox Graphics Inc. All rights are reserved. The purchaser is granted a license to use the software only, subject to the following restrictions and limitations:
- The license is for the original purchaser only, and is not transferable without written permission of Matrox.
- The original purchaser may use the Software on a single computer owned or leased by the original purchaser. You may not use the Software on more than a single computer, even if you own or lease more than one computer, without written consent of Matrox.
- The original purchaser may make back-up copies of the Software for his or her own use only, subject to the use limitations of this license.
- The original purchaser may not engage in, nor permit third parties to engage in, any of the following:
• Providing or disclosing the Software to third parties.
- Providing use of the Software in a computer service business, network, time-sharing, multiple CPU or multi-user arrangement to users who are not individually licensed by Matrox.
- Making alterations or copies of any kind in the Software (except as specifically permitted above).
- Attempting to unassemble, de-compile or reverse engineer the Software in any way.
• Granting sublicenses, leases, or other rights in the Software to others.
- Making copies, or verbal or media translations, of the user's guide.
- Making telecommunication data transmissions of the Software.
Matrox reserves the right to terminate this license if there is a violation of its term or default by the Original Purchaser. Upon termination, for any reason, all copies of the Software must be immediately returned to Matrox, and the Original Purchaser shall be liable to Matrox for any and all damages suffered as a result of the violation or default.
Limited warranty Matrox warrants to you, for a period of 90 days normal use from your date of purchase, that:
-
The CD/disks on which the software is furnished and the documentation are not defective.
-
The Software is properly recorded upon the CD/disks included.
-
The documentation is substantially complete and contains all the information Matrox deems necessary to use the software.
-
The Software functions substantially as described in the documentation.
Matrox's entire liability and your exclusive remedy shall be the replacement of any CD/Disks or documentation not meeting these warranties, which is returned to Matrox or an authorized dealer, together with a copy of your paid receipt. The above is the only warranty of any kind, either express or implied, including, but not limited to the implied warranties of merchantability and fitness for a particular use that is made by Matrox on this Licensed Software. In no event shall Matrox be liable to you or to any third party for consequential, special, indirect or incidental damages which you may incur as a result of using the licensed software, including, but not limited to, loss of data, or information of any kind which you may experience.
Index
C
Cable
Power/USB 6,9
CD-ROM, Matrox 13
Connection setup 4–12, 19
Display unit 7–10, 15
Master unit 5–7, 14
Repeater unit 10–11
Connector
BNC 7,10,21
DB-9 5,6,7,8
DVI 5,8
HD-15 5,8
RJ-45 10
RS-232 6,21
USB 6
Content channel 9, 10, 15, 22
Customer support 23
D
Display
Settings 13
H
Hardware 2
Required 3
|
Indicator light 12
M
Monitor
Connection setup 8, 18
P
Power supply 21
Indicator light 7, 9, 11, 12, 14
Power over ethernet 11
Power/USB cable 6,7,9
PowerDesk 3, 13, 21, 24
Product information 21–22
s
Software
Setup 13
Supplied 3
T
Technical assistance 23
Troubleshooting 14–20
Display unit 15
Master unit 14
Repeater unit 15
V
Veos units
Display 2,4,15,18
Master 2,4
Repeater 3,4
VGA 18
W
Warning 4,8
Warranty 25–26
Web, Matrox 23
Thank you for choosing Matrox
Please register online (http://www.matrox.com/graphics/registration) to be eligible for customer support, new product announcements, and information on special offers and upcoming events.
FCC Compliance Statement
Remark for the Matrox hardware products supported by this guide This equipment has been tested and found to comply with the limits for a Class A digital device, pursuant to Part 15 of the FCC Rules. These limits are designed to provide reasonable protection against harmful interference when the equipment is operated in a commercial environment. This equipment generates, uses, and can radiate radio frequency energy and, if not installed and used in accordance with the instructions manual, may cause harmful interference to radio communications. Operation of this equipment in a residential area is likely to cause harmful interference in which case the user will be required to correct the interference at his own expense.
WARNING Changes or modifications to this unit not expressly approved by the party responsible for the compliance could void the user's authority to operate this equipment. The use of shielded cables for connection of the monitor to the card is required to meet FCC requirements.
CANADA
(English) Industry Canada Compliance Statement
Remark for the Matrox hardware products supported by this guide These digital apparatus does not exceed the Class A limits for radio noise emission from digital devices set out in the Radio Interference Regulation of Industry Canada.
VCCI Compliance Statement
Remark for the Matrox hardware products supported by this guide This is a Class A product based on the standard of the Voluntary Control Council for Interference by Information Technology Equipment (VCCI). If this equipment is used in a domestic environment, radio disturbance may occur, in which case, the user may be required to take corrective actions.
(English) European user's information – Declaration of Conformity
Remark for the Matrox hardware products supported by this guide These devices comply with EC Directive 89/336/EEC for a Class A digital device. They have been tested and found to comply with EN55022/CISPR22 and EN55024/CISPR24. In a domestic environment these products may cause radio interference in which case the user may be required to take adequate measures. To meet EC requirements, shielded cables must be used to connect the monitor and other peripherals to the card. These products have been tested in a typical class A compliant host system. It is assumed that these products will also achieve compliance in any class A compliant system.

(English) European user's information – Directive on Waste Electrical and Electronic Equipment (WEEE)
Please refer to the Matrox Web site (www.matrox.com/environment/weee) for recycling information.

Microsoft Corporation....Aero™, Direct3D®, DirectDraw®, DirectShow™, DirectX™, Microsoft®, MS-DOS®, PowerPoint®, WindowsST®, Windows NT®, Windows Server®, Windows Vista™
Silicon Graphics, Inc. ....OpenGL®
Silicon Image, Inc. ...... PanelLink™
U.S. Environmental Protection Agency ...... Energy Star™
- (English) Registered trademarks are registered in the United States, Canada, and/or other countries. All other nationally and internationally recognized trademarks and tradenames are hereby acknowledged. - (Français) Les marques déposées sont déposées aux États-Unis, au Canada et/ou dans d'autres pays. Toutes les autres marques et tous les autres noms déposés reconnus nationalement ou internationalement sont également reconnus par les présentes. - (Deutsch) Die eingetragenen Warenzeichen sind in den USA, Kanada und/oder anderen Ländern registriert. Alle sonstigen national und international bekannten Warenzeichen und Produktnamen werden hiermit anerkannt. - (Italiano) I marchi registrati sono registrati negli Stati Uniti, in Canada e/o in altri paesi. Tutti gli altri marchi registrati e nomi commerciali riconosciuti a livello nazionale e internazionale sono ugualmente riconosciuti qui. - (Español) Las marcas registradas están registradas en los EE.UU., Canadá u otros países. Por medio del presente se reconocen todas las demás marcas y nombres comerciales reconocidos a nivel nacional e internacional.
(English) Disclaimer
THE INFORMATION IN THIS GUIDE IS SUBJECT TO CHANGE AT ANY TIME AND WITHOUT NOTICE.
Matrox Graphics Inc. reserves the right to make changes in specifications at any time and without notice. The information provided by this document is believed to be accurate and reliable. However, no responsibility is assumed by Matrox Graphics Inc. for its use; nor for any infringements of patents or other rights of third parties resulting from its use. No license is granted under any patents or patent rights of Matrox Graphics Inc.
Dorval, Quebec, Canada H9P 2T4
North America: 1-800-361-1408
International: (514) 822-6000
Email: graphics@matrox.com
Web site: www.matrox.com/graphics
Technical support:
www.matrox.com/graphics/support
To locate the sales office nearest you, visit
www.matrox.com/graphics/contact
- Hardware supplied
- Repeater unit
- Additional hardware required
- Software supplied (for Windows 2000, Windows XP, Windows XP Professional x64, and Windows Vista)
- Installation overview
- Connection setup
- Connection overview - Master unit
- Step-by-step connection setup - Master unit
- Attach the Matrox cable
- Connect the coaxial cable
- Connect the serial cable (optional)
- Connect the Power/USB cable
- Check the indicator light
- Step-by-step connection setup - Display unit
- Connect the coaxial cable
- Connect your monitors
- Connect the Power/USB cable
- Check the indicator light
- Check the content channel lights
- Set the content channels
- Step-by-step connection setup - Repeater unit
- Connect the twisted pair cable
- Check the indicator light
- Description of indicator lights
- Software setup
- Install your Matrox software
- Change your display settings (optional)
- Accessing PowerDesk
- Troubleshooting
- Problem Computer doesn't display information after Matrox product is connected
- Problem No indicator light (black)
- Problem Indicator light is red
- Problem Content channel lights on Display unit are red
- Problem Can't select one or more resolutions supported by your monitor
- Problem Display on flat panel monitor appears blurry or uses only a portion of the screen
- Problem Wrong color balance, screen image off-center, or no picture at all
- Problem After the startup screen, or after display settings are changed, the screen image is garbled or unusable (blank screen, rolling or overlapping screen images)
- Problem Matrox product isn't automatically detected
- Problem Screen image defects appear (tearing)
- Problem Program window or dialog box doesn't appear on screen
- Product information
- Notes
- Customer support
- Matrox Web
- If you have a problem
- Information we need
- Where to get information
- Warranty
- Limited Warranty Statement
- Limitations of Warranty
- Limitations of Liability
- Obtaining Service
- General
- Software license agreement
- Index
- C
- D
- H
- |
- M
- P
- s
- T
- V
- W
- Thank you for choosing Matrox
- FCC Compliance Statement
- CANADA
- (English) Industry Canada Compliance Statement
- VCCI Compliance Statement
- (English) European user's information – Declaration of Conformity
- (English) European user's information – Directive on Waste Electrical and Electronic Equipment (WEEE)
- (English) Disclaimer
Brand : MATROX
Model : VEOS MASTER UNIT, VEOS MASTER UNIT
Category : Video capture system