
AIVIA M8600 - Gaming Mouse GIGABYTE - Free user manual and instructions
Find the device manual for free AIVIA M8600 GIGABYTE in PDF.
| Product Type | Wireless and wired gaming mouse |
| Brand | GIGABYTE |
| Model | AIVIA M8600 |
| Connectivity | Wireless (RF) and wired (Mini USB) |
| Sensor | Pro-laser |
| Resolution (DPI) | 800 / 1600 / 3200 / 5600 (4 levels) |
| Number of buttons | 10 programmable |
| Profiles | 5 configurable profiles |
| LED lighting | Profile indicator (5 colors), battery indicator (green), sensitivity indicator (red) |
| Power | Rechargeable battery (via dock or USB cable), spare battery included |
| Software compatibility | Windows 98, 2000, XP, 7 (GHOST macro engine) |
| Features | Built-in macro, left-handed/right-handed mode, game/energy-saving mode |
| Scroll wheel | 4 ways of scrolling (vertical/horizontal) |
| Feet | Ultra-Durable Teflon |
| Cable | Removable Mini-USB |
| Safety | Do not expose to moisture; use only the provided charger; do not disassemble |
| Maintenance | Clean with a soft dry cloth; do not use solvents |
| Spare parts | Spare battery, Mini-USB cable, charging dock |
Frequently Asked Questions - AIVIA M8600 GIGABYTE
User questions about AIVIA M8600 GIGABYTE
0 question about this device. Answer the ones you know or ask your own.
Ask a new question about this device
Download the instructions for your Gaming Mouse in PDF format for free! Find your manual AIVIA M8600 - GIGABYTE and take your electronic device back in hand. On this page are published all the documents necessary for the use of your device. AIVIA M8600 by GIGABYTE.
USER MANUAL AIVIA M8600 GIGABYTE
M8600 Wireless Macro Gaming Mouse
User's Manual
multi-language:
EN DE FR PT ES RU KO CS HU PL 中

GHOST
MACRO ENGINE
Aivia M8600 Wireless Macro Gaming Mouse
Aivia, an integrated acronymic word, is derived from its key features – advanced, intuitive, and versatile interface archetype. The series is to emphasize the combination of subconscious, design and function as well as the pursuit of archetype. GIGABYTE believes each mouse and keyboard are the scrupulous work of mankind's brainpower. Aivia is not only an extension to the human intellect, but also an intuitive extension to the use of artificial intelligence.
The Aivia M8600 Wireless Macro Gaming mouse breaks free from the constraint of tangled wires while achieving tough mission during game play.
Having ultra-high precision gaming sensor and 2.4GHz gaming-grade wireless technology, Aivia M8600 demonstrates not only excellent performance but also incredible rapid transmission even as a wireless gaming mouse.
The battery life lasts continuously over 24 hours in the gaming mode and with introduction of the unique QSBSTM Technology - Quick-swap Battery System, you will enjoy a fast battery reload and lag-free game.
32KB onboard memory enables 5 profile settings on your M8600, and allows you to bring your personal settings wherever you go. Combining that with 6600DPI and 1000Hz report rate, the Aivia M8600 now becomes your ultimate weapon.
Feature
GamePlay™ Wireless Technology
Over 24hr battery life in game play
- Dual mode wired/ wireless functionality
- GHOST™ Macro Engine
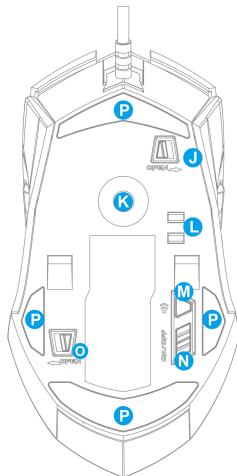
Mouse Introduction


Default button assignments
A Mouse button 1 - Left Click
B Mouse button 2 - Right Click
C Mouse button 3 - Middle Click and 4 ways Scrolling Wheel
D Mouse button 4 - DPI Switching Up
E Mouse button 5 - DPI Switching Down
F Mouse button 6 – Forward
G Mouse button 7-Back
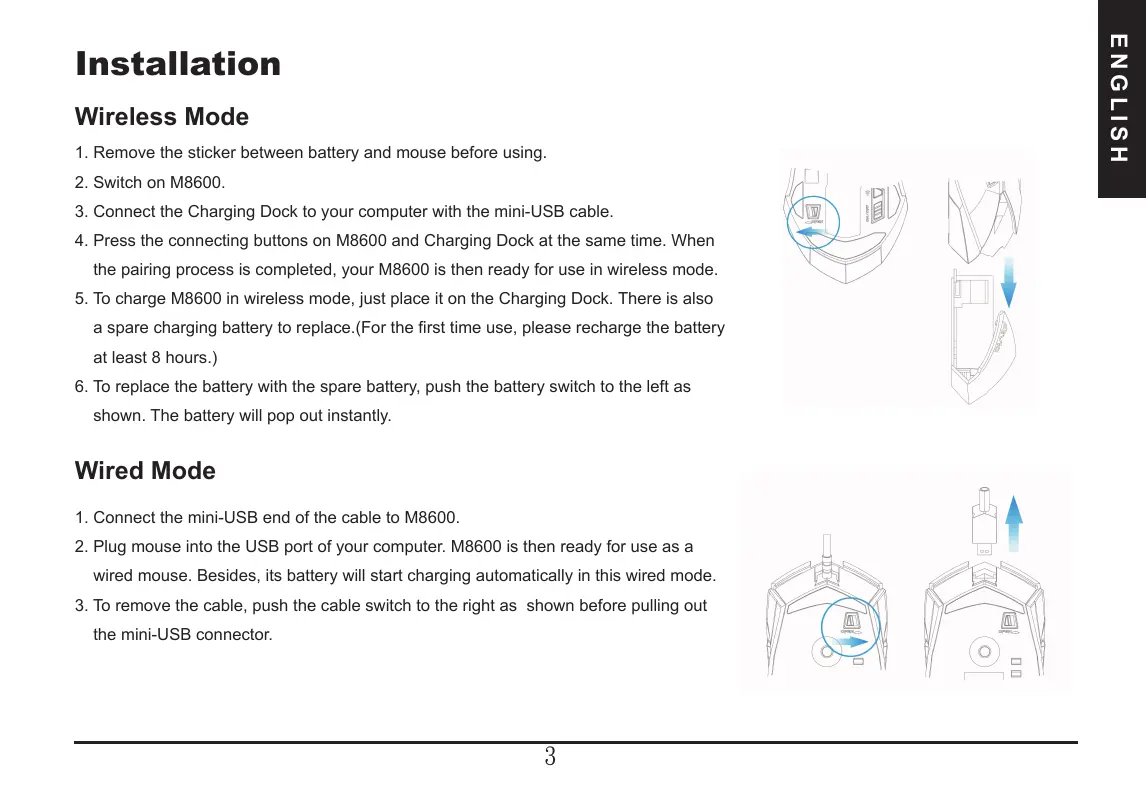
H Mouse button 8 -Profile Change
1 Mouse button 9 - Back
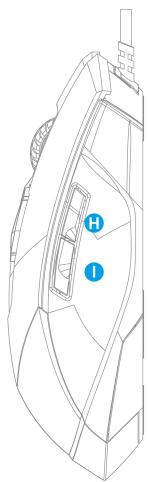
J Cable Lock/ Unlock Switch
K Pro-laser Gaming Sensor
L Battery Charging Connector
M ID Pairing Button
N Power on/off Switch
O Battery Lock/Unlock Switch
P Ultra-DurableTM Teflon feet
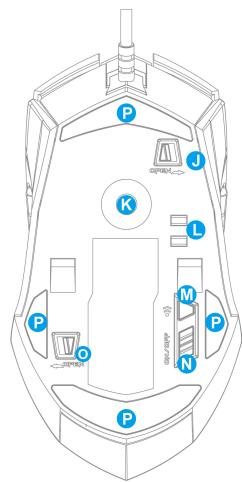
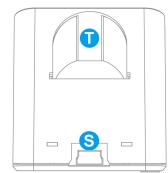
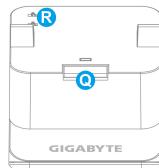
Q Pairing Button
R Charging Contact Spring Band
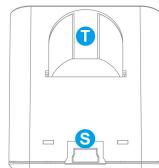
S Connector Jack for mini USB cable
T Battery Slot
Installation
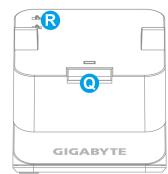
Wireless Mode
- Remove the sticker between battery and mouse before using.
- Switch on M8600.
- Connect the Charging Dock to your computer with the mini-USB cable.
- Press the connecting buttons on M8600 and Charging Dock at the same time. When the pairing process is completed, your M8600 is then ready for use in wireless mode.
- To charge M8600 in wireless mode, just place it on the Charging Dock. There is also a spare charging battery to replace. (For the first time use, please recharge the battery at least 8 hours.)
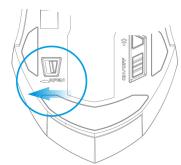
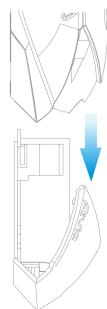
- To replace the battery with the spare battery, push the battery switch to the left as shown. The battery will pop out instantly.
Wired Mode
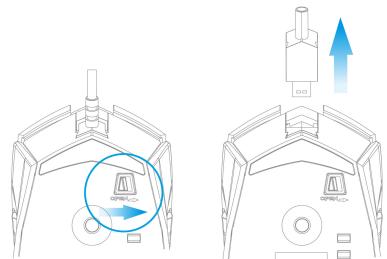
- Connect the mini-USB end of the cable to M8600.
- Plug mouse into the USB port of your computer. M8600 is then ready for use as a wired mouse. Besides, its battery will start charging automatically in this wired mode.
- To remove the cable, push the cable switch to the right as shown before pulling out the mini-USB connector.
Charging Methods
- There are three different charging methods below.
| Place M8600 on the charging dock connected to your PC. There will be running green light on the front side of mouse to indicate charging process. | |
| Insert your battery to battery slot of the charging dock. Connect the charging dock to your PC. The red light on charging dock will turn into green to indicate charging process. When the battery is fully charged, the LED on charging dock will come back to red light. | |
| Connect M8600 to your PC with the mini USB. The mouse will start charging automatically in wired mode |
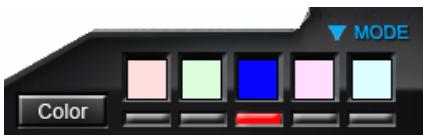
LED Light System
M8600 has a profile/Battery/Sensitivity LED indicator on its front side, which displays the status of profile/ battery life/sensitivity/ stage.
Profile Indicator
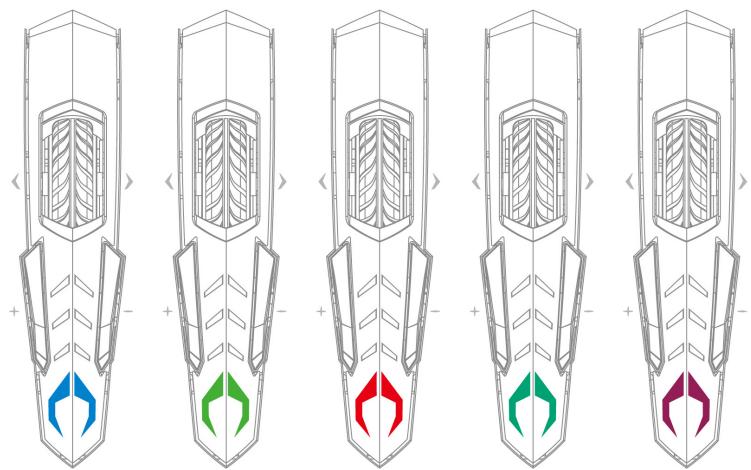
The color of the mode indicator LEDs changes along with profile switch. There are 5 different LED colors corresponding to the 5 available profiles on the mouse.
The LED color can be selected from the GHOST Engine software based on your preference.
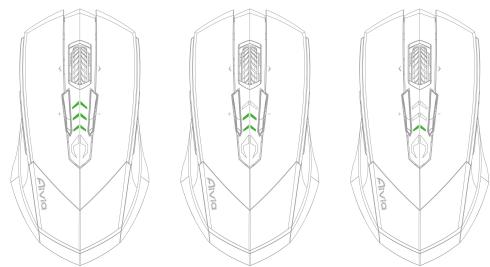
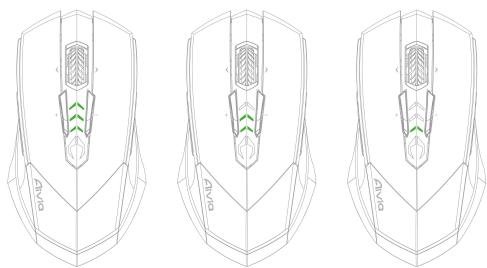
Battery Indicator
The GREEN LEDs show the remaining battery life:
- 61 - 100% Battery: 3 green LED arrows
- 31 - 60% Battery: 2 green LED arrows
- 11 - 30% Battery: 1 green LED arrow
Less than 10% Battery: 3 green blinking LEDs arrows
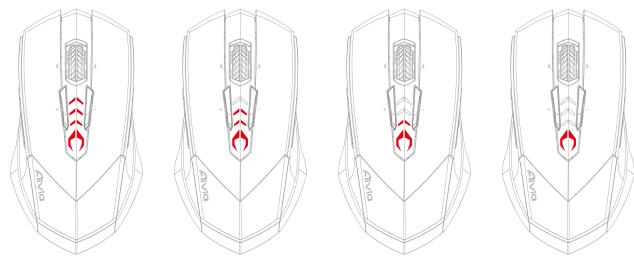
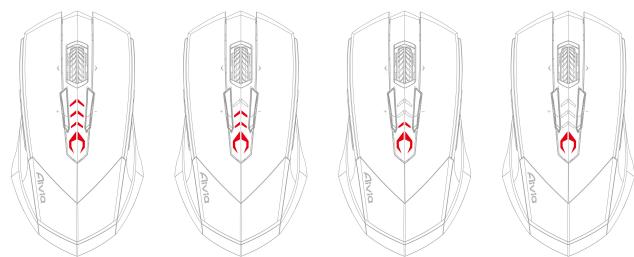
Sensitivity Stage Indicator
The LEDs will turn into RED light while adjusting sensitivity.
- Sensitivity Stage 1: 1 red LED
Sensitivity Stage 2: 2 red LEDs
Sensitivity Stage 3: 3 red LEDs
Sensitivity Stage 4: full red LEDs
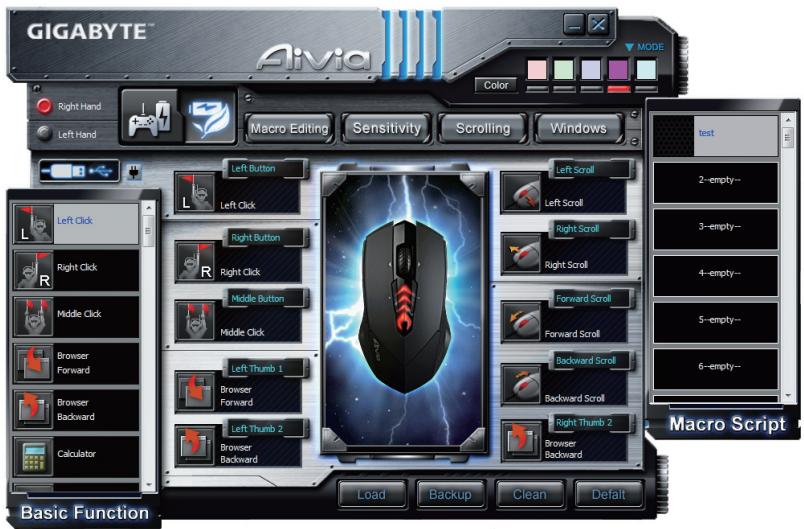
GHOST™ Macro Engine
GHOST™ Macro Engine supports Windows 98, Windows 2000, Windows XP, and Windows7. Install the software to assign buttons and set up your personal profile.
Please make sure to connect your M8600 with mini USB cable to PC while editing macro and assigning buttons through GHOST™ Engine software. (In wireless mode you are only allowed to adjust sensitivity, left-handed/right-handed mode and gaming/power saving mode)
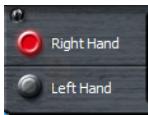
Left Hand/Right hand Mode
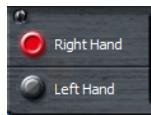
Aivia M8600 is designed both for left-handed and right-handed user. You may simply switch the left hand/ right hand mode from the options of GHOSTTM Engine. The description of the buttons then will swap around symmetrically.
Gaming Mode/ Power Saving Mode

Gaming mode:
In gaming mode, the mouse will stay longer in a standby status before going into sleeping status when mouse is not active. Therefore, it would consume more energy as gaming mode.

- Power Saving mode:
In power saving mode, the mouse will go into sleeping mode sooner when it is not active. The mouse consumes less energy while in power saving mode.
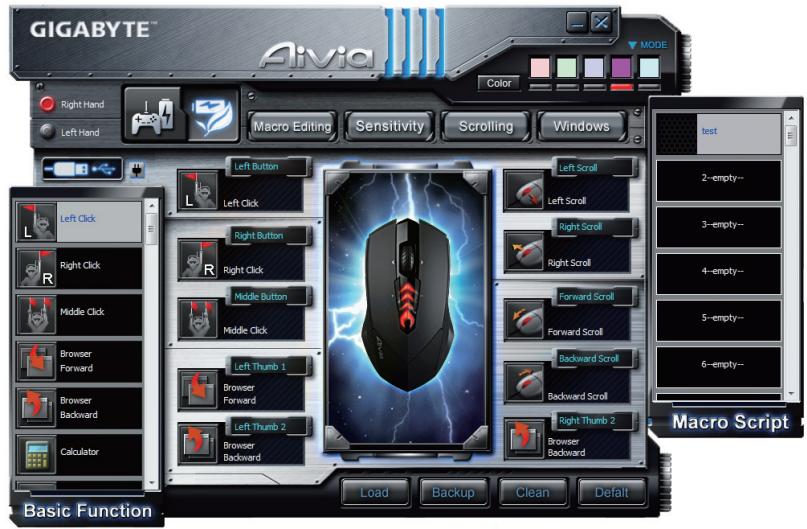
Color Option
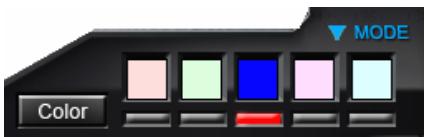
There are five default color LED lights on the panel which indicate five different profiles set up by users.
Each individual profile can be assigned various settings to 10 programmable buttons. Moreover, you can also change the color of LED light for each profile(There are 26 colors and a light-off selection to choose from).
Button Assignment
User can assign various functions to buttons from both "BASIC FUNCTION" and "MACRO SCRIPTS". All you have to do is drag the function icon and simply drop to the button you would like to assign. Remember that you may edit each macro script in the "MACRO EDITING" tab.
More Tips:
- You can swap around two button assignments by dragging one to the other.
- You may delete a button assignment by dragging the function icon out of that button assignment.
The button then becomes no functional.
- Dragging a set function icon to the empty button, you would copy that function to the empty button.
- Load and Backup:
In case you require more profiles (button assignments) and macros and do not wish to delete the existing profiles, simply "backup" the existing profiles to your hard disk and load them back when needed.
Macro Editing
The macro editing tab allows you easily to record all the commands, including key bindings and the press of mouse button.
Each single macro also can be imported and exported onto your hard disk for further usage.
Start with:
Step1 Click "Record the duration or intervals" if you'd like to record intervals between two commands.
Step2 Double-click "Cycle through selection of action mode" to change the execute mode.
Step3 Click "Record" to start creating a macro and recording all the keystrokes or mouse commands.
Step4 Click "Stop" to finish recording this macro when a macro is done.
Step5 You can also insert additional commands on the "Quick-insert bar" left.
Step6 After recording a macro, you may drag commands of the macro and drop into "On-board script" to store this macro on the mouse.
Step7 Double-click on the macro scrip to rename this macro. Moreover, you may also change icon of your personal macro through clicking "change icon".
Step8 Come back to "Button Assign" tab, the macro you had built would become one application of "Macro scrip" in this tab.
Learn more:
Record the duration or intervals (Time lag)
If this function is marked, it allows you to record the intervals between two commands.
Cycle through selection of action mode
- Execute once:
To execute a macro once.
- Loop mode:
Re-pressing to stop: Executing a macro continuously, and re-pressing the assigned button to stop the running macro.
- Fire-button mode:
Executing a macro continuously until you release the assigned button.
Delete
You can delete a command or a whole macro script by dragging the command or the macro script to "Delete" can.
Record Keyboard only
Clicking this option would ignore the press of mouse and just record keystrokes when recording a macro.
Press Pause Key to Stop Recording
Clicking this option would enable you to stop recording by pressing "Pause" key when recording a macro.
Change Icon
Here you can select your preferred icon for the macro. Furthermore, you can make your personal icon with any pictures in jpg or bmp format. What you need to do is click an empty icon of the icon base and press "Replace" to browse your files. Press "Remove" if you would like to remove the icon.
Export
To export your a macro to the PC.
Import
To import a macro to the macro editing in GHOST engine application program.
Re-edit the macro
Dragging the macro script back to macro editing allows you to re-edit this macro.
Sensitivity
Sensitivity:
As default setting, there are four sensitivity stages: 800, 1600, 3200 and 5600DPI (dots per inch). You can set up preferred sensitivity value of four sensitivity stages via GHOST Engine, you can then simply adjust DPI through on-the-fly switch. Check "set X and Y axis separately" option to adjust X-Y sensitivity levels.
Report rate:
The report rate determines the time intervals that your PC retrieves data from your mouse. You can set the report rate to 125Hz (8ms), 250Hz (4ms), 500Hz (2ms), or 1000Hz (1ms) by moving the knob on the slider.
Scrolling
You can adjust vertical & horizontal scroll wheel speed by moving the knob on the slider.
Product Specification
Mouse and Receiver:
Antenna Gain=0dBm
Operating Frequency: 2402/ 2439/ 2450/ 2411/ 2468/ 2425/ 2447/ 2479MHz
Channel Number: 8 channels
Transmitter Output Power: 0 dBm
Modulation:2.4G GFSK modulator
Operating Temperature Range: 0^(32^) 40^(104^)
Power Type of wireless module:
Mouse : Battery supply voltage
Receiver : NB or PC USB Port Supply Voltage
Battery:
Battery Pack: BURNABY INTERNATIONAL TECHNOLOGY
Model: SANYO NP 80/3.7Vdc 1500mAh
Note: Please recharge the battery at least 8 hours for the first use.
Caution:
- Please DO NOT directly look into the laser beam.
- Risk of explosion if battery is replaced by an incorrect type
- Dispose of used batteries according to the instruction
Important information:
Long period of repetitive motion using an improperly set-up workplace, or incorrect body posture may be associated with physical discomfort and injury to nerves, tendons, and muscles.
Safety
FCC Declaration:
- This device has been tested and found to comply with the limits for a Class B digital device, pursuant to Part 15 of the FCC Rules. These limits are designed to provide reasonable protection against harmful interference in a residential installation. This equipment generates, uses and can radiated radio frequency energy and, if not installed and used in accordance with the instructions, may cause harmful interference to radio communications. However, there is no guarantee that interference will not occur in a particular installation. If this equipment does cause harmful interference to radio or television reception, which can be determined by turning the equipment off and on, the user is encouraged to try to correct the interference by
one or more of the following measures:
-Reorient or relocate the receiving antenna.
-Increase the separation between the equipment and receiver.
-Connect the equipment into an outlet on a circuit different from that to which the receiver is connected.
-Consult the dealer or an experienced radio/TV technician for help.
- This device complies with part 15 of the FCC Rules. Operation is subject to the following two conditions: (1) This device may not cause harmful interference, and (2) this device must accept any interference received, including interference that may cause undesired operation.
FCC Caution:
- Changes or modifications not expressly approved by the party responsible for compliance could void the user's authority to operate the equipment.
- The antenna(s) used for this transmitter must not be co-located or operating in conjunction with any other antenna or transmitter.
滑鼠功能說明


滑鼠預設功能
Alternatively, M8600 can be charged through the mini USB cable as a wired mode.
При смени пофигу вид --- --- --- --- --- --- --- --- --- --- --- --- --- --- --- --- --- --- --- --- --- --- --- --- --- --- --- --- --- --- --- --- --- --- --- --- --- --- --- --- --- --- --- --- --- --- --- --- --- --- --- --- --- --- --- --- --- --- --- --- --- --- --- --- --- --- --- --- --- --- --- --- --- --- --- --- --- --- --- --- --- --- --- --- --- --- --- --- --- --- --- --- --- --- --- --- --- --- --- --- — Сооветаюпгля работы мьш.Вы можete вьбразь педноштельныецета Инданци пофигу в погамme GHOST Engine.
Инданковы батар
3eIeHbIe HndnKaTOpbl Noka3bIBaIOT 3apJd 6aTapen:
- 3apЯн 61~100%: 3 зелених Иndикатoga
- 3apЯД 31~ 60%: 2 зелених Иndикатopa
- 3apd11~30%:13eHbI INDkaTOp
- 3apяннke 10%: 3 мигаюших 3еиених ИнданkaTopa
ИндikatopЧуВCTBNTeJIbHOCtN
Pn perynipOBKe yBCTBnteJIbHOCTn INHdNkaTOpbl YBCTBNTeJIbHOCTn roprKpaChbIM.
- YpOBeHb ChBtBnteHbOcTn 1:1 KpaChbI INdikatop
-УpoBHeHyUByCtBnTeIbHoCTn 2:2 KpaChbIX INHДиKaToPA
-УpoBHeHyUbCTBnTeIbHoCTn 3:3 KpaChbIX INHДИKaToPA - UpoBHeB yUbCTBnTeJIbHOcTn 4: BCE KpaChbIe INHdNKaTOpbl
Поррамma GHOST™ Macro Engine
Iporpamma GHOSTTM Macro Engine noDaepxkBaet OC Windows 98,Windows 2000,Windows XP n Windows7. YctaHOBITE 3Ty nporpammy dna ha3nauehna fynkui KhoNOK i NactpoKn BaWero InuHoro npoFInra.
ДлpeдaktnpoBaHnmaKpocOB ha3HaueHnEpyHKnKHOK B nporpaMme GHOSTTM Engine cneIyET noKIOuHTb M8600 K IKNTO KaBeJIO MmN-USB. (B npobOAnHom peXIMe B nporpaMme GHOSTTM Engine moXHo TOnbKO perynipoBaTb cyBCTBntbHocTb,peXIMIrpbI/3heproScbepeRaIoU pEXIM,MeHrTa peXIMbl «IpaBsa/JebBa).
Peknmbi «npaBwa/JeBwa»
MbIb Aivia M8600 MoKHO hAcTpoNTb KaK dIy IpaBUn, TaK iDy IeBUn. Bbl MoKeTe JERKO nepeKIOUaTb peKIMbI «IpaBua/JeBua» KHOJIKAmN B nporpamme GHOSTTM Engine. Ha3NaueHne KHOJOK npn 3To 6ydet CmmMeTpnuHo NepeKIOUaTbcra.
PexkIM nRpbl/3Heproc6eperaIoUoiu pexkIM

-Игравов реким:
B irpoBOM pexIme kdyuynipexim (npn OTCyTcBn nakTBHocTn) npdoJnxaeTcDolbwe, npexKe yemMbIb nepeKIOUHTCBA Cnayuynipexim. I03tomy B irpoBOM pexIme MbIb notpe6nre 6oJIbwe 3heprIn.

- Θheproscbeperaioi ne pexm:
B 3neheprocbeperaioepeximeMbIb (piO oTCyTCTBn aKTNBHOCTN) nepeKJIouaetcra B cnaippe ximmbicptee. B 3neheprocbeperaioepeximeMbIb notpe6pNET Mehwe 3heprnn.
Hactpoika zBeTa
PЯь CBETAUXCRA INHДNKATOPOB Ha nanei nporpaMMbI O6O3HaayOT PЯь pa3HBIX npoФиNe, KOTOpBie HactpaNBAOTcnoIb3ObaTeIeM. B KaKdOM npoФиNe MoXHO Na3HaayTb pa3NHyIbe npaMetpyI dIg 10 HactpaNBAembIX KHOJOK. KpOME TORO, Bbl MOKeTe CMeHHTb ZBeT INHДNKATOPa KaKdORIO n3 npoФиNe (MOXHO BbIbPaTb IIO6oi N3 26 UBeTOB).
HactpoKa KhONok
Khoikam MoxHNo ha3NaaTb pa3nUhIe cyHKcIIN c naHeJe "BASIC FUNCTION" (Ba3ObIe cyHKcIIN) n "MACRO SCRIPTS" (MaKpocbl).ДЯЗTO rHxHNO IInuIpeTaunIb 3naOH KfHKcIIN Ha hyxHyIO KhoNk. POMHInTe, YTO JIObYIO MaKpOKOMaHdy MoXHO OTepaKtnpoBaTb Ha BKnAKe "MACRO EDITING" (PeKaTOp MaKpocOB).
DononHnteIbHbIe COBetbl:
- To6bI cyHKUN KONOK NOMARNCb MeCTAMN, MOXHO pOcTO nepeTaunb ONDy KONky Ha dpuyu.
-Дя OTMeHbI Φункии KONКИ ydaJIte 3aHcOK Φункии n3обЯТи Ha3NaeHЯФунки.Тогla KONКа He 6yIetФункиOnHpoBaTb.
-ПеретговаяЗачok Функции на СвобODну КногК, Вь корпуete Функции, писваьая свобонй KногК. - 3arpy3ka n coxpaHHeNHe KOHΦnIguraN:
EcnBam TpebyoTcDOnOpHnTeNbHbIe npoPhiuN (dJa HAcTpoKn KHOOK), a NMeOuIeCra npoPhiuN Bbl ydaJIaTb He XOTte, pOcTO coXpaHNTe roTOBbIe npoPhiuN Ha JeCTkN dNcK, a ecnIoTpebyoTc - cKnnpyute INx Ha3a,d.
PědačtnopoBaHne makpocob
BknaJa MacRO EDITING (PeJaTOp MaKpocOB) nO3BOJare 3aIncaTb B MaKpoc IIObIe KOMaHdbI, BKJIouyA KOMbHaUcHn Haxatn KHOON Ka KJIaBnAType nMbIuN.
OTdIbHbIe MaKpOcBi MOxHO IMNOpTnPoBaTb IJIIN 3KcNOpTnPoBaTb Ha JecTkN DnCK DJIa NcNoJIb3OBaHnB 6yduuem.
OchOBhIe DeiCTBnIa:
1ar 1 HaxmTe «3aInscB dInTeJIbHOCTn / INTEpBaIOB», ecn XOTnTe 3aIncaTb INTEpBaIbI MeKdy DByMЯ KOMaHdAmN.
Iar 2 IBOHOnIeHOK Ha cyHKcNn «UKNJIuYeCKn BbI6Op peKIMOB» MeHReT peKIM NcNoHHeHn.
Jiar 3 KhoNka «3aanncb» co3daeT MaKpO N BkJIOnuAeT 3aanncb BCEx Opeaun Ha KNaBnataype n MbIiN.
Liar 4 Liar 4: KhoNka «CtoN» 3aBepwaet 3aInncb MaKpOca nocne ero co3dAnHn.
Uar 5 PanaHb «BbIcTpaa BCTaBka» CneBa TaKKe N03BONrE T BCTaBnTb DOONHHTeNbHbe KOMaHdbI.
Uar 6 Iocne 3aInci MaKpOca nepetauuTe KOMaHdbi MaKpOca Ha naneJIb «BcTpoeHHbIe cUeHapnI» dIy 3aInci MaKpOca B nAmrTbMbIuN.
7 BoHnO H eK h cHApH MaKpOa n03BoJraT nepeHMeHOBaTb MaKpoc. KpOe TOrO, 1eKNHy H KONKe «CmeHa 3HaUka», MOxHO CmEHNTb 3HaOH KaWero JInHoro MaKpoca.
Uar 8 BepHntecb Ha BknaIky «HacTpoKa KHOIOK» - co3daHHbI BamM MaKpOc NOBHTcA cpeiMaKpOKOMaHd B pa3deNe «MaKpOcbI».
DOnoJIHnTeIbHo:
3aπncbДπnteIbHocTn/INHTepBaIob(3aIepKka)
YctanobkaФлaxka 3ToI ΦyHKcII(«3aIncbДПnteIbHocTn/INTEpBaIOB(3aIepKka)»)no3BONrET3aIncbIbAtb INTEpBaJIbIMekJdDByM KOMaHdAmN.
Luklueckn Bb6op pexmOB
OndhOKpaTHO:
BbIOpHeHne MaKpOca OIN pa3.
LNIKNIueckn:
ДоВТОРОнжаТЯ:Цкл用电сьеБынгпсЕМakpoСВПNotьdoВТОРОнжаТяНЗHAЗHAЧEHONKHOTKN.
-IOOTKATNA:
LcIKnueckoe HnpepbBHOe BbIOJIHeHne MaKpOca BnIObT do OTKaTna Ha3HaueHHo KhoNKn.
YdaJIeHne
| PC对准端的M8600将自动加载到内存中。请在内存中保存M8600的文件,以供后续使用。 | |
| PC对准端的M8600将自动加载到内存中。请在内存中保存M8600的文件,以供后续使用。 | |
| PC对准端的M8600将自动加载到内存中。请在内存中保存M8600的文件,以供后续使用。 | |
| PC对准端的M8600将自动加载到内存中。请在内存中的文件名中选择“M8600”或“M8600”或“M8600”或“M8600”或“M8600”或“M8600”或“M8600”或“M8600”或“M8600”或“M8600”或“M8600”或“M8600”或“M8600”或“M8 64”或“M8600”或“M8600”或“M8600”或“M8600”或“M8600”或“M8600”或“M8600”或“M8600”或“M8600”或“M8600”或“M8600”或“M8600”或“ M8600”或“M8600”或“M8600”或“M8600”或“M8600”或“M8600”或“M8600”或“M8600”或“M8600”或“M8600”或“M8600”或“M8600”或“M860 64”或“M8600”或“M8600”或“M8600”或“M8600”或“M8600”或“M8600”或“M8600”或“M8600”或“M8600”或“M8600”或“M8600”或“M86 64”或“M8600”或“M8600”或“M8600”或“M8600”或“M8600”或“M8600”或“M8600”或“M8600”或“M8600”或“M8600”或“M8600”或“M8610”或“M8610”或“M8610”或“M8610”或“M8610”或“M8610”或“M8610”或“M8610”或“M8610”或“M8610”或“M8610”或“M8610”或“M8610”或 “M8610”或“M8610”或“M8610”或“M8610”或“M8610”或“M8610”或“M8610”或“M8610”或 “M8610”或“M8610”或“M8610”或“M8610”或“M 64”或“M8610”或“M8610”或“M8610”或“M8610”或“M8610”或 “M8610”或“M8610”或“M8610”或“M8610”或 “M8610”或“M8610”或“M8610”或 “M8610”或“M8610”或 “M8610”或“M8610”或 “M8610”或“M8610”或 “M8610”或“M8610”或 “M8610”或“M8610”或 “M8610”或“M 64”或“M8610”或 “M8610”或“M8610”或 “M8610”或“M8610”或 “M8610”或“M8610”或 “M8610”或“M8610”或 “M8610”或“M8610” 或 “M8610”或“M8610”或 “M8610”或“M8610”或 “M8610”或“M8610”或 “M8610”或“M8610”或 “M8610”或“M8610”或 “M8610” 或 “M8610”或 “M8610”或 “M8610”或 “M8610”或 “M8610”或 “M8610”或 “M8610”或 “M8610”或 “M8610”或 “M8610”或 “M8610” 或 “M8610”或 “M8610”或 “M8610”或 “M8610”或 “M8610”或 “M8610”或 “M8610”或 “M8610”或 "M8610"或 “M8610”或 “M8610”或 “M8610”或 “M8610”或 “M8610”或 “M8610”或 “M8610”或 “M8610”或 “M8610”或 “M8610"或 “M8610"或 “M8610"或 “M8610"或 “M8610"或 “M8610"或 “M8610"或 “M8610"或 “M8610"或 “M8610"或 “M8610”或 “M8610"或 “M8610"或 “M8610"或 “M8610"或 “M8610"或 “M8610"或 “M8610"或 “M8610"或 “M8610”或 “M8610”或 “M8610"或 “M8610"或 “M8610"或 “M8610"或 “M8610"或 “M8610"或 “M8610"或 “M8610”或 “M8610"或 “M8610”或 “M8610"或 “M8610"或 “M8610"或 “M8610"或 “M8610"或 “M8610"或 “M8610"或 “M8610”或 “M8610”或 “M8610”或 “M8610"或 “M8610"或 “M8610"或 “M8610"或 “M8610"或 “M8610"或 “M8610”或 “M8610"或 “M8610"或 “M8610”或 “M8610"或 “M8610"或 “M8610"或 “M8610"或 “M8610"或 “M8610"或 “M8610”或 “M8610"或 “M8610”或 “M8610”或 “M8610"或 “M8610"或 “M8610"或 “M8610"或 “M8610"或 “M8610"或 “M8610”或 “M8610”或 “M8610"或 “M8610”或 “M8610"或 “M8610"或 “M8610"或 “M8610"或 “M8610"或 “M8610"或 “M8610”或 “M8610”或 “M8610”或 “M8610”或 “M8610"或 “M8610"或 “M8610"或 “M8610"或 “M8610"或 “M8610”或 “M8610"或 “M8610"或 “M8610"或 “M8610”或 “M8610"或 “M8610"或 “M8610"或 “M8610"或 “M8610"或 “M8610”或 “M8610"或 “M8610"或 “M8610”或 “M8610”或 “M8610"或 “M8610"或 “M8610"或 “M8610"或 “M8610"或 “M8610”或 “M8610"或 “M8610”或 “M8610"或 “M8610”或 “M8610"或 “M8610"或 “M8610"或 “M8610"或 “M8610"或 “M8610”或 “M8610"或 “M8610”或 “M8610”或 “M8610”或 “M8610"或 “M8610"或 “M8610"或 “M8610"或 “M8610"或 “M8610”或 “M8610”或 “M8610"或 “M8610"或 “M8610”或 “M8610"或 “M8610"或 “M8610"或 “M8610"或 “M8610"或 “M8610”或 “M8610”或 “M8610"或 “M8610”或 “M8610”或 “M8610"或 “M8610"或 “M8610"或 “M8610"或 “M8610"或 “M8610”或 “M8610”或 “M8610”或 “M8610"或 “M8610”或 “M8610"或 “M8610"或 “M8610"或 “M8610"或 “M8610"或 “M8610”或 “M8610”或 “M8610”或 “M8610”或 “M8610”或 “M8610"或 “M8610"或 “M8610"或 “M8610"或 “M8610”或 “M8610"或 “M8610"或 “M8610"或 “M8610"或 “M8610”或 “M8610"或 “M8610"或 “M8610"或 “M8610”或 “M8610”或 “M8610"或 “M8610"或 “M8610"或 “M8610"或 “M8610”或 “M8610"或 “M8610"或 “M8610”或 “M8610"或 “M8610”或 “M8610"或 “M8610"或 “M8610"或 “M8610"或 “M8610”或 “M8610"或 “M8610"或 “M8610”或 “M8610”或 “M8610”或 “M8610"或 “M8610"或 “M8610"或 “M8610"或 “M8610”或 “M8610"或 “M8610”或 “M8610"或 “M8610"或 “M8610”或 “M8610"或 “M8610"或 “M8610"或 “M8610"或 “M8610”或 “M8610"或 “M8610”或 “M8610"或 “M8610”或 “M8610”或 “M8610"或 “M8610"或 “M8610"或 “M8610"或 “M8610”或 “M8610"或 “M8610”或 “M8610”或 “M8610"或 “M8610”或 “M8610"或 “M8610"或 “M8610"或 “M8610"或 “M8610”或 “M8610"或 “M8610”或 “M8610”或 “M8610”或 “M8610”或 “M8610"或 “M8610"或 “M8610"或 “M8610"或 “M8610”或 “M8610”或 “M8610"或 “M8610"或 “M8610"或 “M8610”或 “M8610"或 “M8610"或 “M8610"或 “M8610"或 “M8610”或 “M8610”或 “M8610"或 “M8610"或 “M8610”或 “M8610”或 “M8610"或 “M8610"或 “M8610"或 “M8610"或 “M8610”或 “M8610”或 “M8610"或 “M8610”或 “M8610"或 “M8610”或 “M8610"或 “M8610"或 “M8610"或 “M8610"或 “M8610”或 “M8610”或 “M8610"或 “M8610”或 “M8610”或 “M8610”或 “M8610"或 “M8610"或 “M8610"或 “M8610"或 “M8610”或 “M8610”或 “M8610”或 “M8610"或 “M8610"或 “M8610”或 “M8610"或 “M8610"或 “M8610"或 “M8610"或 “M8610”或 “M8610”或 “M8610”或 “M8610"或 “M8610”或 “M8610”或 “M8610"或 “M8610"或 “M8610"或 “M8610"或 “M8610”或 “M8610”或 “M8610”或 “M8610”或 “M8610"或 “M8610”或 “M8610"或 “M8610"或 “M8610"或 “M8610"或 “M8610”或 “M8610”或 “M8610”或 “M8610”或 “M8610”或 “M8610”或 “M8610"或 “M8610"或 “M8610"或 “M8610”或 “M8610"或 “M8610"或 “M8610"或 “M8610”或 “M8610"或 “M8610”或 “M8610"或 “M8610"或 “M8610"或 “M8610”或 “M8610"或 “M8610"或 “M8610"或 “M8610”或 “M8610”或 “M8610”或 “M8610"或 “M8610"或 “M8610"或 “M8610”或 “M8610"或 “M8610"或 “M8610”或 “M8610"或 “M8610"或 “M8610”或 “M8610"或 “M8610"或 “M8610"或 “M8610”或 “M8610"或 “M8610"或 “M8610”或 “M8610"或 “M8610”或 “M8610”或 “M8610"或 “M8610"或 “M8610"或 “M8610”或 “M8610"或 “M8610"或 “M8610”或 “M8610”或 “M8610"或 “M8610”或 “M8610"或 “M8610"或 “M8610"或 “M8610”或 “M8610"或 “M8610"或 “M8610”或 “M8610”或 “M8610”或 “M8610”或 “M8610"或 “M8610"或 “M8610"或 “M8610”或 “M8610"或 “M8610”或 “M8610"或 “M8610"或 “M8610”或 “M8610”或 “M8610"或 “M8610"或 “M8610"或 “M8610”或 “M8610"或 “M8610”或 “M8610"或 “M8610”或 “M8610"或 “M8610”或 “M8610"或 “M8610"或 “M8610"或 “M8610”或 “M8610"或 “M8610”或 “M8610"或 “M8610”或 “M8610”或 “M8610”或 “M8610"或 “M8610"或 “M8610"或 “M8610”或 “M8610"或 “M8610”或 “M8610”或 “M8610"或 “M8610"或 “M8610”或 “M8610"或 “M8610"或 “M8610"或 “M8610”或 “M8610"或 “M8610”或 “M8610”或 “M8610"或 “M8610”或 “M8610”或 “M8610"或 “M8610"或 “M8610"或 “M8610”或 “M8610"或 “M8610”或 “M8610”或 “M8610”或 “M8610"或 “M8610”或 “M8610"或 “M8610"或 “M8610"或 “M8610”或 “M8610"或 “M8610”或 “M8610”或 “M8610”或 “M8610”或 “M8610”或 “M8610"或 “M8610"或 “M8610"或 “M8610”或 “M8610”或 “M8610"或 “M8610"或 “M8610"或 “M8610”或 “M8610”或 “M8610"或 “M8610"或 “M8610”或 “M8610"或 “M8610”或 “M8610"或 “M8610"或 “M8610"或 “M8610”或 “M8610”或 “M8610"或 “M8610"或 “M8610”或 “M8610”或 “M8610”或 “M8610"或 “M8610"或 “M8610"或 “M8610”或 “M8610”或 “M8610"或 “M8610”或 “M8610"或 “M8610"或 “M8610”或 “M8610"或 “M8610"或 “M8610"或 “M8610”或 “M8610”或 “M8610"或 “M8610”或 “M8610"或 “M8610”或 “M8610”或 “M8610"或 “M8610"或 “M8610"或 “M8610”或 “M8610”或 “M8610"或 “M8610”或 “M8610”或 “M8610"或 “M8610”或 “M8610"或 “M8610"或 “M8610"或 “M8610”或 “M8610”或 “M8610"或 “M8610”或 “M8610”或 “M8610”或 “M8610”或 “M8610"或 “M8610"或 “M8610"或 “M8610”或 “M8610”或 “M8610”或 “M8610"或 “M8610"或 “M8610”或 “M8610”或 “M8610"或 “M8610"或 “M8610"或 “M8610”或 “M8610”或 “M8610”或 “M8610"或 “M8610”或 “M8610"或 “M8610”或 “M8610"或 “M8610"或 “M8610"或 “M8610”或 “M8610”或 “M8610”或 “M8610"或 “M8610”或 “M8610”或 “M8610”或 “M8610"或 “M8610"或 “M8610"或 “M8610”或 “M8610”或 “M8610”或 “M8610”或 “M8610"或 “M8610"或 “M8610”或 “M8610"或 “M8610"或 “M8610"或 “M8610”或 “M8610”或 “M8610”或 “M8610”或 “M8610"或 “M8610”或 “M8610”或 “M8610"或 “M8610"或 “M8610"或 “M8610”或 “M8610”或 “M8610”或 “M8610”或 “M8610”或 “M8610"或 “M8610”或 “M8610"或 “M8610"或 “M8610"或 “M8610”或 “M8610”或 “M8610”或 “M8610”或 “M8610”或 “M8610”或 “M8610”或 “M8610"或 “M8610"或 “M8610”或 “M8610"或 “M8610"或 “M8610”或 “M8610"或 “M8610"或 “M8610”或 “M8610”或 “M8610"或 “M8610"或 “M8610”或 “M8610"或 “M8610"或 “M8610”或 “M8610"或 “M8610”或 “M8610"或 “M8610”或 “M8610"或 “M8610"或 “M8610”或 “M8610"或 “M8610"或 “M8610”或 “M8610"或 “M8610”或 “M8610”或 “M8610”或 “M8610"或 “M8610"或 “M8610”或 “M8610"或 “M8610"或 “M8610”或 “M8610”或 “M8610"或 “M8610”或 “M8610”或 “M8610"或 “M8610"或 “M8610”或 “M8610"或 “M8610"或 “M8610”或 “M8610”或 “M8610”或 “M8610"或 “M8610”或 “M8610"或 “M8610"或 “M8610”或 “M8610"或 “M8610"或 “M8610”或 “M8610”或 “M8610”或 “M8610”或 “M8610”或 “M8610"或 “M8610"或 “M8610”或 “M8610"或 “M8610”或 “M8610"或 “M8610"或 “M8610”或 “M8610"或 “M8610”或 “M8610"或 “M8610"或 “M8610”或 “M8610”或 “M8610”或 “M8610"或 “M8610"或 “M8610”或 “M8610"或 “M8610”或 “M8610"或 “M8610”或 “M8610"或 “M8610”或 “M8610”或 “M8610"或 “M8610"或 “M8610”或 “M8610"或 “M8610”或 “M8610"或 “M8610”或 “M8610”或 “M8610"或 “M8610”或 “M8610"或 “M8610"或 “M8610”或 “M8610"或 “M8610”或 “M8610"或 “M8610”或 “M8610”或 “M8610”或 “M8610”或 “M8610"或 “M8610"或 “M8610”或 “M8610"或 “M8610”或 “M8610”或 “M8610"或 “M8610"或 “M8610”或 “M8610”或 “M8610"或 “M8610"或 “M8610”或 “M8610"或 “M8610”或 “M8610”或 “M8610"或 “M8610”或 “M8610"或 “M8610”或 “M8610"或 “M8610"或 “M8610”或 “M8610"或 “M8610”或 “M8610”或 “M8610"或 “M8610”或 “M8610”或 “M8610”或 “M8610"或 “M8610"或 “M8610”或 “M8610"或 “M8610”或 “M8610”或 “M8610”或 “M8610"或 “M8610”或 “M8610”或 “M8610"或 “M8610"或 “M8610”或 “M8610"或 “M8610”或 “M8610”或 “M8610”或 “M8610”或 “M8610"或 “M8610”或 “M8610"或 “M8610"或 “M8610”或 “M8610"或 “M8610”或 “M8610”或 “M8610”或 “M8610”或 “M8610”或 “M8610”或 “M8610"或 "M8610"或 "M8610"或 "M8610"或 "M8610"或 "M8610"或 "M8610"或 "M8610"或 "M8610"或 "M8610"或 "M8610"或 “M8610"或 "M8610"或 "M8610"或 "M8610"或 "M8610"或 "M8610"或 "M8610"或 "M8610"或 "M8610"或 "M8610'." | |
LED連線電感
"Delete[\\$]” can the eming 10n mkr o s kivlbr to draig h an n the eming 10n tch mkr o kivlbr to k
KIBOENDANGILOKHIGI
此“陆”字当用,即“陆”字的“陆”字。
日
此“言”即为“言”。
ahoiKn
云i里,m的m。
SAWONGJIA
がはいき
Cycle through selection of action mode
Press Pause Key to Stop Recording
- M8600 Wireless Macro Gaming Mouse
- User's Manual
- Aivia M8600 Wireless Macro Gaming Mouse
- Feature
- Mouse Introduction
- Default button assignments
- Installation
- Wireless Mode
- Wired Mode
- Charging Methods
- LED Light System
- Profile Indicator
- Battery Indicator
- The GREEN LEDs show the remaining battery life:
- Sensitivity Stage Indicator
- The LEDs will turn into RED light while adjusting sensitivity.
- GHOST™ Macro Engine
- Left Hand/Right hand Mode
- Gaming Mode/ Power Saving Mode
- Color Option
- Button Assignment
- More Tips:
- Macro Editing
- Start with:
- Learn more:
- Cycle through selection of action mode
- Delete
- Record Keyboard only
- Press Pause Key to Stop Recording
- Change Icon
- Export
- Import
- Re-edit the macro
- Sensitivity
- Sensitivity:
- Report rate:
- Scrolling
- Product Specification
- Mouse and Receiver:
- Power Type of wireless module:
- Battery:
- Caution:
- Important information:
- Safety
- FCC Declaration:
- FCC Caution:
- 滑鼠功能說明
- 滑鼠預設功能
- Инданковы батар
- 3eIeHbIe HndnKaTOpbl Noka3bIBaIOT 3apJd 6aTapen:
- ИндikatopЧуВCTBNTeJIbHOCtN
- Pn perynipOBKe yBCTBnteJIbHOCTn INHdNkaTOpbl YBCTBNTeJIbHOCTn roprKpaChbIM.
- Поррамma GHOST™ Macro Engine
- Peknmbi «npaBwa/JeBwa»
- PexkIM nRpbl/3Heproc6eperaIoUoiu pexkIM
- Hactpoika zBeTa
- HactpoKa KhONok
- DononHnteIbHbIe COBetbl:
- PědačtnopoBaHne makpocob
- DOnoJIHnTeIbHo:
- Luklueckn Bb6op pexmOB
- YdaJIeHne
- LED連線電感
- KIBOENDANGILOKHIGI
- 日
- ahoiKn
Brand : GIGABYTE
Model : AIVIA M8600
Category : Gaming Mouse