
48VLE6522BL - Television GRUNDIG - Free user manual and instructions
Find the device manual for free 48VLE6522BL GRUNDIG in PDF.

| Product type | LED TV |
| Brand | GRUNDIG |
| Model | 48VLE6522BL |
| Screen size | 48 inches (122 cm) |
| Resolution | Full HD (1920 x 1080 pixels) |
| Tuner | DVB-T/T2/C/S/S2 |
| Dimensions (without stand) | 1080 x 630 x 80 mm |
| Dimensions (with stand) | 1080 x 680 x 220 mm |
| Weight (without stand) | 11.5 kg |
| Weight (with stand) | 12.8 kg |
| Power supply | 220-240 V, 50/60 Hz |
| Consumption (standby) | < 0.5 W |
| Consumption (usage) | 65 W |
| Connectivity | 2x HDMI, 1x USB, 1x component input, 1x SCART, optical audio output |
| Speakers | 2 x 8 W |
| Main functions | Teletext, Timer, Parental control, Hotel mode, Screensaver |
| VESA standard | 200 x 200 mm |
| Maintenance and cleaning | Use a soft, dry cloth. Do not use abrasive or solvent-based products. |
| Safety | Do not block the ventilation slots. Secure the TV to the wall if necessary. |
| Spare parts and repairability | Parts available through GRUNDIG after-sales service. Repairability index not disclosed. |
| General information | User manual available for download on the manufacturer's website. |
Frequently Asked Questions - 48VLE6522BL GRUNDIG
User questions about 48VLE6522BL GRUNDIG
0 question about this device. Answer the ones you know or ask your own.
Ask a new question about this device
Download the instructions for your Television in PDF format for free! Find your manual 48VLE6522BL - GRUNDIG and take your electronic device back in hand. On this page are published all the documents necessary for the use of your device. 48VLE6522BL by GRUNDIG.
USER MANUAL 48VLE6522BL GRUNDIG
5 Special features of your television set
6 Receiving digital stations
6 GRUNDIG SCR System
6 Important notes on environmental protection
6 Notes on still images
7 CONNECTION/PREPARATION
7 Connecting the antenna and power cord
8 Inserting batteries in the remote control
9 OVERVIEW
9 Connections on the television set
10 Control buttons on the TV
11 Remote control - main functions
12 Remote control - all functions
13 SETTINGS
13 Initial set-up
14 Initial set-up - overview
15 Arrange Initial set-up
18 Changing the Channel Editor for the digital channels
22 Picture settings
24 Sound settings
31 Network connection
31 Wired network
34 Wireless network
38 Change TV Name
39 Connecting the TV to a "hidden" network
40 SMART Inter@ctive TV 3.0 FEATURE
40 SMART Inter@ctive TV 3.0 internet applications
41 Creating a Grundig Application Store account
42 Logging in with Grundig Application Store account
43 Grundig Application Store
47 Playing the video, music and image files with home network connection
47 Selecting the digital media server
48 Playback
48 Other playback options
49 USB RECORDING
49 Information on recording and playing television programmes
49 Possible limitations when using an external data medium
50 Connecting external data media
50 USB recording settings
52 "Pausing" time shift programmes
52 Recording programmes
53 Programme setting for recording
55 Playback
55 Deleting programmes from the recorded files menu
56 USB OPERATION
56 File formats
57 Connecting external data media
57 Removing the external data media
58 The file browser
58 Settings in the USB setup menu
60 Playback basic functions
61 Additional playback functions
62 TELETEXT MODE
62 TOP text or FLOF text mode
62 Additional functions
63 INTERACTIVE PORTAL (HbbTV)
63 What is HbbTV?
63 Using HbbTV
63 Additional functions for video indexes
64 CONVENIENCE FUNCTIONS
64 TV Settings
64 Language & Keyboard settings
65 Accessibility settings
65 Accessories
66 Advanced settings
66 Power save mode
67 Functions in the "About" menu
67 Software update (OAD)
67 Software update (Internet)
67 Software update (USB)
68 Resetting the television to its original state
68 删除 channel history
68 Timer settings
69 Date and time settings
70 Parental settings
72 USING EXTERNAL DEVICES
72 DIGI LINK
74 High definition - HD ready
74 Connection options
75 Connecting an external device
76 Using a DVD recorder, DVD player, video recorder or set-top box
76 Headphones
76 Hi-fi system
78 What is LIVESHARE?
78 Screen share with Liveshare connection
79 PC MONITOR MODE
79 Connecting a PC
79 Selecting the channel position for the PC
79 Settings for the PC
80 OPERATION WITH COMMON INTERFACE
80 What is common interface?
80 Inserting the CA module
80 Access control for CA module and smart cards
81 SPECIAL SETTINGS
81 Searching for all digital television channels from a satellite automatically
82 Searching for digital television channels from a satellite manually
82 LNB Settings
83 Motor antenna setup (DiSEqC 1.2)
84 Searching for television channels from the cable provider automatically
85 Searching for television channels from the cable provider manually
86 Searching for digital terrestrial TV channels automatically
86 Searching for digital terrestrial TV channels manually
87 Automatic service update
87 Tuning analogue television channels
88 Changing stored analogue channels
90 Displaying signal information
90 Deactivate and activate HbbTV
90 Deactivate and activate digital teletext
91 INFORMATION
91 Product plug
91 Other data
92 Service information for dealers
92 Network interfaces
92 Disposing of the packaging
92 Environmental note
93 Troubleshooting
Please note the following information when setting up your television set.
This television set is designed to receive and display video and audio signals. Any other use is strictly prohibited.
Best viewing distance is 5 times the diagonal length of the screen.
External light falling on the screen impairs picture quality.
To assure sufficient ventilation make sure there is enough space around the television set in the wall unit.
The television set is designed for use in indoors. If you do use it at outdoors, please ensure that it is protected from humid environments such as rain or splashing water as these will create risk of safety.
- Never use the television set in humid environments.
- Do not put objects containing liquid such as vase on the television set. The liquid in it may spill and cause risk of safety.
Place the television set on a solid, level surface.
- Do not place objects such as newspapers on the television set or cloth or similar items beneath it.
- Do not place the television set close to heating units or under direct sunlight, as this will impair cooling.
Higher ambient temperature will shorten the service life of the television set.
- Do not open the television set under any circumstances. Safety risk may arise and also the guarantee of the product can be void if the television set is opened.
Make sure that the power cord or the AC/DC adaptor (if supplied) is not damaged.
- Television set can only be operated with the power cable or the AC/DC adapter supplied with the product.
If the mains plug of the television is grounded, always make sure that it is connected to a grounded socket.
Plug the device into the mains socket only after you have connected the external devices and the antenna.
Make sure that the mains plug/socket of the television is comfortably accessible.
- Do not connect any other equipment while the device is switched on. Switch off the other equipment as well before connecting it.
Thunderstorms are a danger to all electrical devices. Even if the television is switched off, it can be damaged by a lightning strike to the mains or the antenna cable. Always disconnect the mains and antenna plugs during a storm.
Clean the television screen and cabinet with a soft and dry or slightly damp cloth. Do not use wet cloth or detergent (glass cleaners, cologne and all cleaning agents alike). Only use plain water to dampen the cloth.
- When deciding where to install the television set, do not forget that most furniture surfaces are coated with various types of lacquer or plastic which contain chemical additives. These may cause corrosion to the feet of the television, thus resulting in stains on the surface of the furniture.
Screen of your LCD/LED television conforms to the highest quality standards and has been controlled with regard to pixel faults.
Despite the great care taken in manufacturing, technological reasons make it impossible to completely discount the possibility that some pixels may be faulty. Provided they are within the thresholds specified by the DIN norm, pixel faults of this kind cannot be regarded as a defect as defined by the warranty.
To prevent the spread of fire, keep candles or other open flames away from this product at all times.
Please use your television at a location as far as possible from cellular phones, microwave ovens and similar devices operating with high frequency waves. Otherwise your television may malfunction because of such radio waves.
- Do not expose the batteries to excessive heat such as direct sunlight, fire, etc.
Do not use old and unused batteries together.
Only replace the exhausted batteries with those having the same model, value and properties.
By ensuring proper disposal of these batteries, you will have contributed in prevention of potential hazards on the environment and human health that may arise from inappropriate disposal of the batteries.
Warning About the Device Package:
The package of the product can be recycled. Please ensure that the packaging is disposed separately conforming with the local regulations to make sure that the product packaging is recycled environmentally.
Caution:
If you want to use a wall bracket for your television, make sure you read the assembly instructions for the wall bracket carefully or have your specialist dealer mount it for you.
When buying the wall bracket, make sure that all the fastening points needed on the television are there on the wall bracket and that they are all used when it is mounted.
If wall hanger is not going to be used, use your television only with the stand supplied in the box. As your television may tipover without a stand or with a different stand, this will create risk of safety.
Things to do for energy saving
- Do not leave your television turned on if you are not watching it; switch it to standby. If you will not use your television for a long time, leave it in off mode by switching off from the mains (if any) or by unplugging.
Prevent surrounding noises in the room where you watch your television. Keeping the volume of your television at regular levels will help you to save energy. - When determining the position of your television, try to place it so that the sunlight will not fall directly onto the screen of the television but will come from behind of it. Thus, you can use your television without increasing the contrast setting and save energy.
Special features of your television set
- Your television set enables you to receive and watch digital stations (via DVB-S, DVB-T and DVB-C), including the High Definition (HD) ones. At present, reception for these digital television stations in High Definition is only possible in some countries in Europe.
Although this television meets the current DVB-S, DVB-T and DVB-C standards as of August 2012, its compatibility with future DVB-S digital satellite broadcasts, DVB-T digital terrestrial broadcasts and DVB-C digital cable broadcasts is not guaranteed.
This television can receive and process all analogue and all unencrypted digital stations. This television set has an integrated digital and analogue receiver. The digital receiver unit converts the signals from digital stations to provide outstanding audio and picture quality.
The TV guide (only for digital stations) tells you of any schedule changes at short notice, and provides an overview of all the stations' schedules for the next few days. Quite a lot of content such as programme data, channel logos, players, images, fragments, etc. can be reached via the internet through internet connection thanks to the online feature of the TV guide. Detailed information for each channel - if provided by the broadcasting channel - is included in the electronic programme guide. - You can connect various data media, for example, an external hard drive, a USB memory stick or a digital camera to the USB sockets. Using the file browser, you can then select and play the file formats you want (for example, MP4, MP3 or JPEG data).
- With the Time Shift function, you can easily stop and resume a programme with the remote control in a fast and simple way. Programme is recorded to the external data medium.
- You can record any digital TV channel you have chosen, if no limitation has been imposed by the broadcaster.
TV channel is transformed by your television and saved to a USB external data medium.
You can recall and play saved programs from the archive.
While a recording is in progress, you can select and watch another recording from the archive.
For detailed information about saving and playing TV programs, please see page 49.
Smart Inter@ctive TV 3.0 feature provides your TV with Internet applications when your TV is connected to Internet. You can surf through the web pages, visit popular video and photo sharing sites as well as social networks with these applications.
Wireless USB keyboard and mouse support in the Web browsing of your television facilitates surfing through the internet pages for the user.
- DLNA feature allows you to use a wired or wireless (with wireless USN network device) local network to access your content that were recorded with DLNA compatible devices we use at our daily lives such as a PC, mobile phone or NAS (Network Attached Storage) which are operated as DMS (Digital Medial Server). While watching TV, you can play any content you like at any time by using DMC applications on your mobile device or PC without starting DLNA application.
By using DMR feature of your television, you can start playing contents on another mobile device or PC and you can perform controls from these devices in lieu of the TV. For this, you need to have DMC (Digital Media Controller) devices on your devices. In this way, by starting DLNA application on your TV with DMC-supported applications, or without having to start the same, you can start and control the content from your mobile devices or PCs.
Devices that contain and serve video, music or image files are called Server. This television receives video, music and image files from the server through home network, allowing you to access and play such media even when your television is located in a different room then the server. A DLNA compatible device such as a PC, mobile phone, NAS or a NAS-like (Network attached storage) device which operates as a DMS (Digital Media Server) is required in order to use home network.
Receiving digital stations
To receive digital satellite stations (DVB-S) you need a satellite antenna.
To receive digital stations (DVB-T) you need a digital rooftop or indoor antenna (passive or active indoor antenna with its own power supply).
The antenna cable of the cable TV network that broadcast in DVB-C must be plugged into TV in order to receive the DVB-C broadcasts.
Unlike analogue broadcasting, not every station has its own transmission frequency. Instead, several stations are grouped into what are known as bouquets on a regional or national level.
You can find the current transmission information on teletext from various broadcasters, or look in a TV guide or on the Internet.
Various digital television stations from private broadcasters are encrypted (DVB-S, DVB-T and DVB-C). Watching these stations and the recording and playback functions are only possible with the appropriate CI module and a SmartCard. Ask your specialist dealer.
GRUNDIG SCR System
- Your TV supports SCR system (Single Channel Router). With SCR satellite system, several users can individually receive all signals from the satellite simultaneously.
Important notes on environmental protection
Those items mentioned below will help you reduce the consumption of natural resources as well as save your money by reducing electricity bills.
If you will not be using the TV set for several days, it should be disconnected from the mains for environmental and safety reasons. TV will not consume energy in this condition.
If the TV set has main switch, it will be enough to turn the TV off via main switch. TV will reduce energy consumption almost to Zero Watt.
TV consumes less energy on stand by mode. However, some TV sets may have features such as on timer, that require the TV set to be left in standby to work correctly.
TV consumes less energy when brightness is reduced.
Notes on still images
Watching the same image for a long time on the screen may cause a still image remain feebly on the background. Feeble image(s) on the background is originated from LCD/LED technology and does not require any action under guarantee. To avoid such cases and/or minimize the impact, you may observe the tips below.
- Do not allow the same TV channel to stay on the screen for a very long time. Channel logos may cause this situation.
- Do not allow the images, which are not full screen, to constantly stay on the screen; if not streamed in full screen format by the broadcaster, you can convert the images to full screen by changing picture formats.
Higher brightness and/or contrast values will lead this impact to appear faster; therefore, you are recommended to watch your TV in the lowest brightness and contrast levels.
Connecting the antenna and power cord
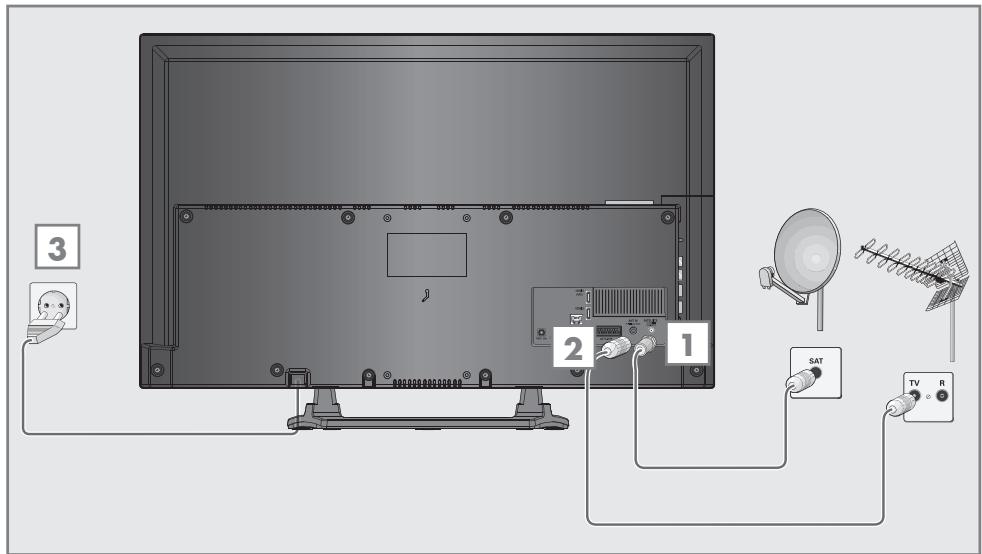
1 To receive digital satellite channels (DVB-S), connect the satellite antenna cable to the antenna socket SATELLITE on the television set; and / or
2a To receive terrestrial digital broadcasters (DVB-T) connect the cable for the rooftop or indoor antenna (passive or active indoor antenna with its own power supply) to the antenna socket «ANT IN« on the television set; or
2b To receive digital cable channels (DVB-C) connect the cable for the rooftop antenna to the antenna socket ANT IN on the television set; or
2c To receive analogue TV channels, connect the cable for the rooftop antenna to the antenna socket ANT IN on the television set.
Note:
- When connecting an indoor antenna you may have to try it out at different positions until you get the best reception.
3 Plug the power cord into the wall socket.
Note:
Only plug the device into the mains socket after you have connected the external devices and the antenna.
- Do not use an adapter plug or extension cable which does not meet the applicable safety standards. Do not make changes on the power cord.
Inserting batteries in the remote control

1 Open the battery compartment by removing the lid.
2 Insert the batteries ( 2 × 1.5 ~V micro; for example R03 or AAA). Observe the polarity (marked on the base of the battery compartment).
3 Close the battery compartment.
Note:
If the television no longer reacts properly to remote control commands, the batteries may be flat. Be sure to remove the exhausted batteries from the battery compartment.
The manufacturer accepts no liability for damage resulting from used batteries.
Environmental note

This symbol on the battery or on the packaging indicates that the battery provided with this product
shall not be treated as household waste. On certain batteries this symbol might be used in combination with a chemical symbol. The chemical symbols for mercury (Hg) or lead (Pb) are added if the battery contains more than 0.0005% mercury or 0.004% lead.
Batteries, including those which contain no heavy metal, may not be disposed of with household waste. Please dispose of used batteries in an environmentally sound manner. Find out about the legal regulations which apply in your area.
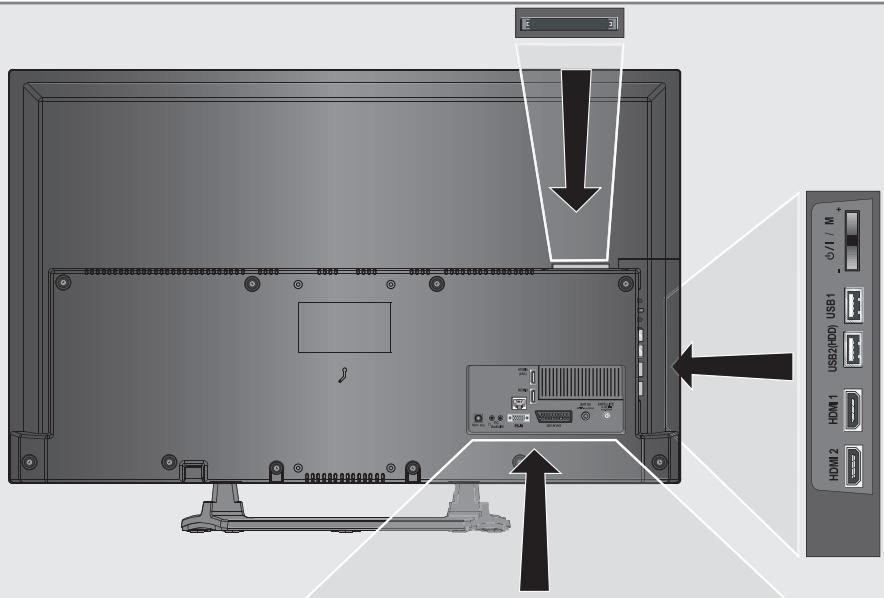
Connections on the television set
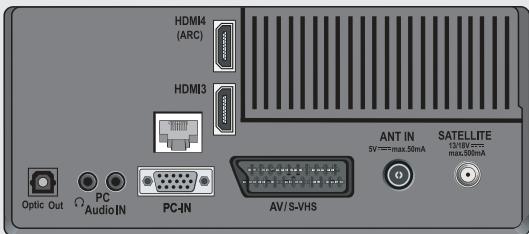
Optic Out
Audio output sockets (optical) for PCM/Dolby Digital signals. It is for digital multichannel audio/video amplifier or AV receiver connections.

Headphone connection (3.5 mm jack);
External audio output (with headphone-RCA converter).
PC Audio IN
Audio signal input for PC; Audio signal input (YUV signal).
PC-IN
VGA socket, video signal input for PC; Video signal input (YUV signal).
AV1/S-VHS
Euro/AV socket (CVBS signal, RGB signal); video signal input for S-Video camera (with Scart-S-VHS converter).
ANT IN
Antenna socket.
SATELLITE
Satellite antenna socket.
HDMI4 (ARC)
HDMI socket, audio/video signal input (HDMI).
HDMI3 HDMI socket, audio/video signal input (HDMI).
LAN Network cable connection socket.
HDMI2 HDMI socket, audio/video signal input (HDMI).
HDMI1 HDMI socket, audio/video signal input (HDMI).
USB2 (HDD) USB Harddisk socket for external data medium and PVR function;
Grundig WiFi USB dongle or wireless keyboard, mouse port.
USB1 USB socket for external data medium and PVR function;
Grundig WiFi USB dongle or wireless keyboard, mouse port.
CI Common interface slot.
Control buttons on the TV
ON·OFF
Power switch, switches the television into standby mode and off.
Multi function switch
Using the multi function switch 1 / 1 / SEL on the television different settings can be made.
There may be no menus visible on the screen.
Pressing the switch, switches in the television from standby mode.
In operation: Pressing the switch displays the navigation menu.
Moving the switch up or down selects the desired menu item:
- Set to Volume Navigation;
- Set to Channel Navigation;
- Open Input Source Menu;
- Go to Standby.
Access function/setting by pressing.
Moving the switch up/down selects the function/setting.
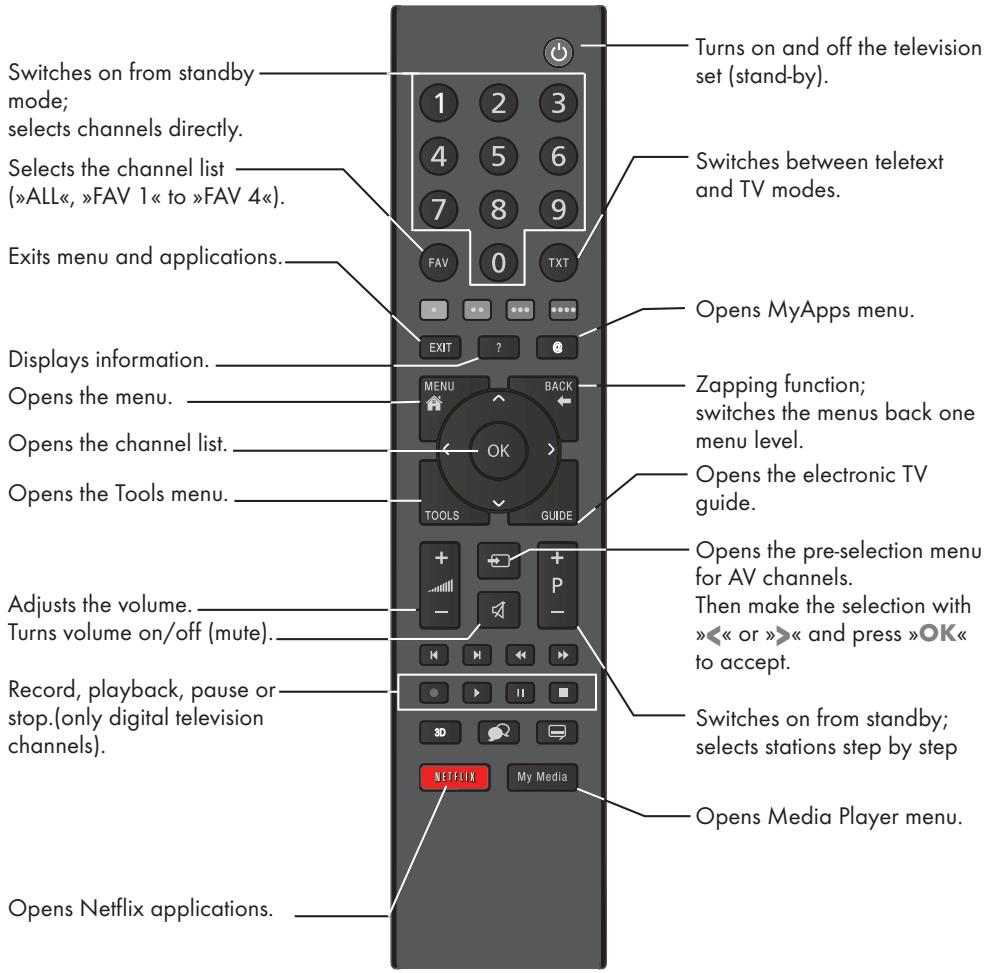
Remote control - main functions
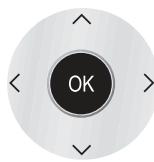
Cursor Control
Moves the cursor up and down in the menus.
Moves the cursor left/right in menus.
Opens channel list; activates various functions.
Remote control - all functions
- (red) Selects a page in teletext mode;
- (green) Selects/activates various functions
- (yellow) in menus.
... (blue)
Switches to double character size in teletext mode; selects the previous track/previous picture in the file browser.
Updates a page in teletext mode; selects the next track/next picture in the file browser.
Page hold in teletext mode; starts the reverse picture search in the file browser.
Show answers in teletext mode; starts the forward picture search in the file browser.
- Starts recording (in digital TV operation, recording only via external data media).
Starts playback in the file browser;
Starts playback in the DLNA menu.
Time shift during live signal (in digital TV operation, only via external data media); Pauses the file executed on the DLNA menu.
Selects the split screen function in teletext mode; ends playback in the file browser; ends recording or playback in the PVR mode; Stops the file executed on the DLNA menu.
Selects different audio language (in digital TV operation).
Selects different subtitles (in digital TV operation).
Initial set-up
The Television is fitted with an "installation assistant", which guides you step by step through the basic settings.
Using the screen dialogue, the user guide enables supposedly complex settings and data entries to be presented simply and clearly for everybody.
Pages and dialogue items appear on the screen, which identify the subsequent and likely operating steps.
To support this, you will also see the required button symbols of the remote control.
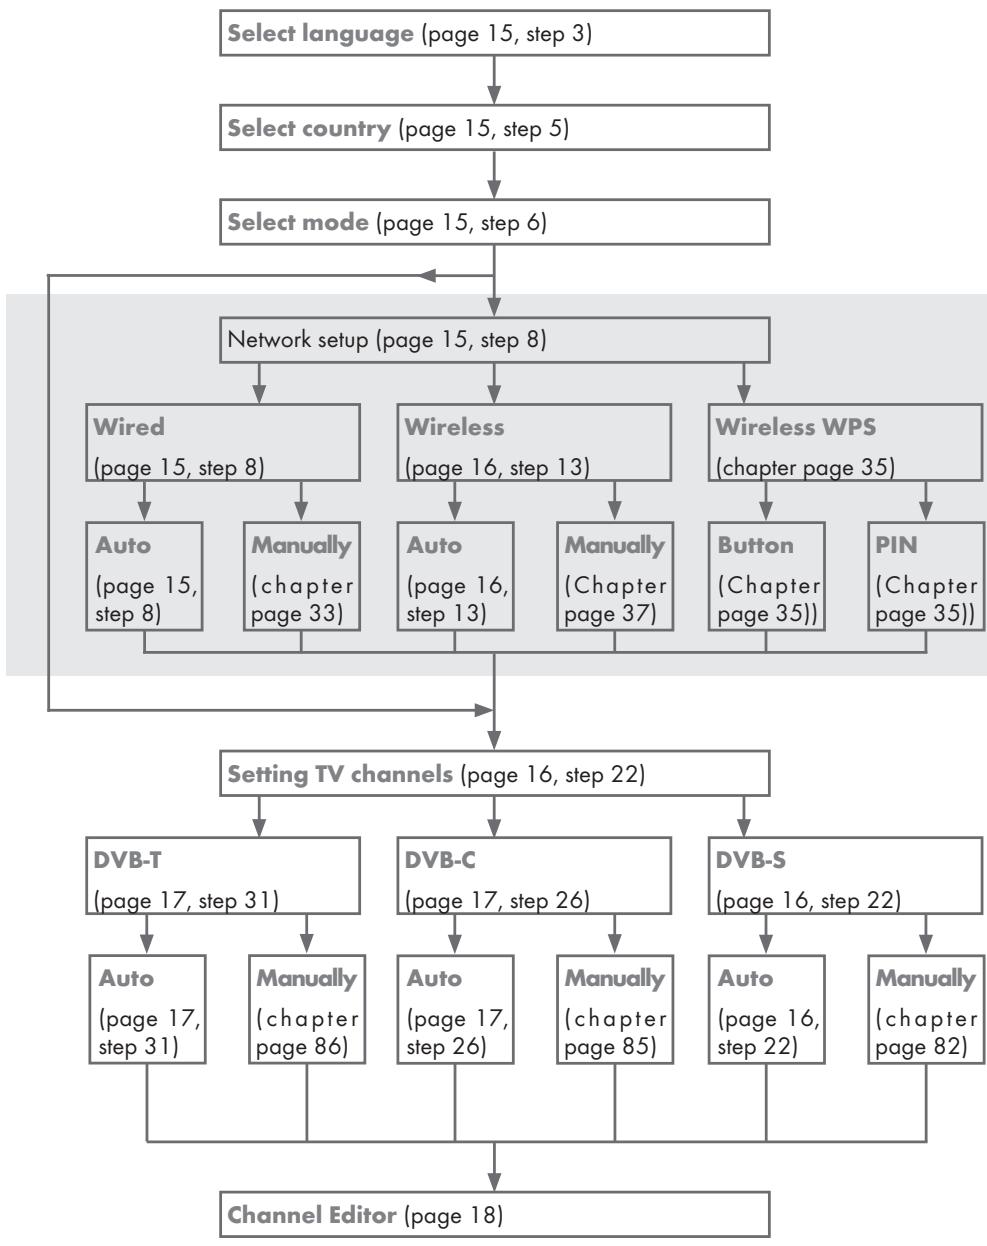
The basic settings in detail:
-language selection
- country selection;
- choice of user mode;
- network settings (if desired);
- Station settings (DVB-S, DVB-T, DVB-C and analogue channels).
The detailed settings can be found on pages 15 and 17.
Settings for connecting to the home network
Depending on the connection to the home network, you connect your television to the home network:
- via a LAN connection or
- without cable via WLAN (only with Grundig WiFi USB Dongle, ask your specialist dealer).
There are two options with the LAN-connection:
Automatic connection,
all data regarding connection settings (IP Address «, «Netmask «, «Gateway « and «DNS«) are obtained from modem automatically.
Manual connection,
all data regarding connection settings (IP Address, Netmask, Gateway and DNS) must be configured manually.
There are various options when using WLAN:
Automatic connection,
all data regarding connection settings (IP Address, Netmask, Gateway and DNS) are obtained from modem automatically.
Depending on the router, you can use the following options:
- Option "WPS-PBC" (Push Button Configuration);
- Connecting with a WPS PIN;
- Connecting by entering the network password.
Manual connection,
all data regarding connection settings (IP Address, Netmask, Gateway and DNS) must be configured manually.
Note:
If you want to connect your television to the home network via wi-fi, you need to connect the wi-fi USB dongle 2 to the «USB1« or «USB2 (HDD)« socket.
Tuning television channels
Depending on the type of antenna connected, you can decide which channels you would like the television to search for.
DVB-S - Tunes digital television channels from the satellite, from page 16.
You have two options for this search:
- the basic installation which presets a standard selection, e.g. the satellite Astra 19.2° East; you need only start the search;
- the professional installation, which allows you to make all required settings and set parameters for your receiver system.
DVB-C - For setting up digital cable channels see page 17.
DVB-T - For setting up digital terrestrial channels see page 17.
See "Special Settings" section on page 87 for searching analog television channels.
Note:
See "Special Settings" section starting from page 81 for more information on digital television channel settings.
Initial set-up - overview
Arrange Initial set-up
1 Switch the television to standby with the power switch ON · OFF.
2 Switch on the television set from standby with , 1 0 , P + or P -
- Basic Setup« menu appears when the device is switched on for the first time.
Help:
If the «Basic Setup« menu does not appear on the screen, make the setting by following the instructions on returning the television to its factory settings on page 67.
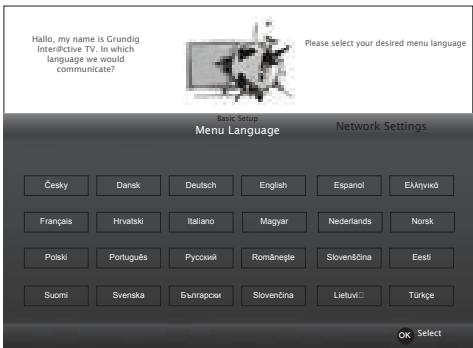
5 Select the country in which the television set is operated with , , or and press OK to confirm.
3 Select the menu language with , or and press OK to confirm.
- Welcome! menu appears.
4 Step-by-step installation will be made to be able to use the television. Press OK to start the installation.
- »User Mode« menu appears, the option »Home Mode« is selected.
6 Confirm the option Home Mode with OK;
or
select the option Enhanced with or and press OK to confirm.
-
»Home Mode« contains preconfigured TV settings that provide energy savings conforming EUP.
-
Enhanced « - if you will use the television for a demo presentation, increased image and volume settings are used in this mode. Increased mode consumes more energy.
7 Press OK to confirm Next.
- «Network Settings« is displayed.
Note:
If you want to connect your television to the home network,
- continue at point 8 for an automatic LAN connection, or
- continue at point 13 for an automatic WLAN connection.
Note:
If connecting to a home network is not necessary, skip the setting using «… (blue). Continue settings at point. 22, 26 or 31.
Connecting to a home network with a LAN cable
Press , the line Change Connection Type is selected and press OK to confirm.
9 Select the option «Wired« with «←« or «» and press «OK« to confirm.
Note:
The settings for a manual LAN connection are on page 33.
10 Press « (red) to select «Connect« option to establish modem connection.
- »Connecting ... Please wait« message will be displayed, and if the connection is established »Connection To Gateway: Success« messages will be displayed.
11 Press (green) to check the performed settings and also if the local network and internet connection has been established.
- Testing ... Please wait message will be displayed, and if the connection is established Connection To Gateway: Success, Internet Connection: Success messages will be displayed.
12 To switch to Source Setup menu press · · · · · · · · · · · · · · · · · · · · · · · · · · · · (blue).
Note:
Continue searching for TV channels with:
- point 22 for DVB-S reception;
- point 26 for DVB-C reception;
- point 31 for DVB-T reception.
Connecting automatically by entering the network password
Note:
Have you connect the WiFi USB Dongle 2 on socket USB1 « or »USB2 (HDD)«?
13 Press , the line Change Connection Type is selected and press OK to confirm.
14 Select the option «Wireless« with «< or »» and press «OK« to confirm.
15 Confirm the message Do you want to turn on Wi-Fi? with (green).
16 Select the line Select Access Point with or and press OK to confirm.
- »Select Access Point« menu appears and available wireless networks are scanned and displayed in the menu.
17 Select the network that you want to connect with , , or and press OK to confirm.
- Wireless connection password screen is displayed.
18 Select the required character with >> , < or > and move to the next character with OK.
- Using «Shift« → «OK«, you can switch between uppercase letters / numbers and lowercase letters / special characters.
- Select »X « to delete the character entered and press »OK « to confirm.
19 Confirm the password with (green).
- »Connecting ... Please wait« message will be displayed, and if the connection is established »Connection To Gateway: Success« messages will be displayed.
20 Press (green) to check the performed settings and also if the local network and internet connection has been established.
- Testing... Please wait message will be displayed, and if the connection is
established «Connection To Gateway: Success«, «Internet Connection: Success« messages will be displayed.
21 To switch to Source Setup menu press (blue).
Note:
Continue searching for TV channels with:
- point 22 for DVB-S reception;
- point 27 for DVB-C reception;
- point 32 for DVB-T reception.
Searching television channels with satellite signal (DVB-S)
22 Select the option «Satellite« with «< or »» and press «OK« to confirm.
- The satellite Astra 19.2^ East is preset.
23 Confirm the push button »Next Page« with OK«.
Notes:
Select the Channel Type.
Press « or » to select whether you want to search for only digital channels (Digital) or only radio channels (Radio) or both (Digital + Radio) and press OK« to select and mark or unmark the « Digital » and/or « Radio » items.
Select Scan Mode.
To select whether you want to search for only free digital television channels (Free), only scrambled digital television channels (Scrambled) or both (Free + Scrambled), press « or » and press OK to select and mark or unmark the Free and/or « scrambled items.
24 Press (red) to start searching.
- »Automatic Channel Search« menu appears and the scan for TV channels begins.
- The scan is complete as soon as the message «Search is completed!« appears.
25 Select the Channel Editor with (red).
Tuning cable digital television channels (DVB-C)
26 Select the option «Cable« with «< or »» and press «OK« to confirm.
27 Select the line Scan Type with V or A.
Select the option Quick or Full with or
- Quick scanning function sets the channels according to the cable operator information in the broadcasting signal.
- Full scan function scans the entire frequency range selected. With this search option, search can take a long time. This search type is recommended. Some cable providers do not support Quick scan.
Note:
You can speed up the search. To do this, frequency and network ID information are required. You may get this data from your cable operator or find it in the Internet forums.
28 Use V to select the push button Next Page and confirm with OK
Note:
29 Press (red) to start searching.
Perform Channel Type selection. Press « or » to select whether you want to search for only digital channels (Digital), only Analog channels (Analog) or both (Digital + Analog) and press OK to select and mark or unmark the Digital and Analog items.
- The »Automatic Channel Search« menu appears, and the search for TV channels begins.
- The scan is complete as soon as the «Search is completed!« appears.
30 Select the Channel Editor with (red).
Tuning terrestrial digital television channels (DVB-T)
31 Select the option «Air« with «or» and press OK to confirm.
Important:
The antenna power supply (5V) may only be switched on if the antenna is an active indoor antenna with a signal amplifier and it is not already supplied with a voltage via a mains plug (or similar supply). Otherwise you may cause a short circuit and irreparably damage your antenna.
32 Select the line Active Antenna Power with × V × or × A × .
Switch on the antenna power supply for the antenna with ( On)
33 Select the line Next Page with V or A and press OK to confirm.
Note:
Perform Channel Type selection. Press « or » to select whether you want to search for only digital channels (Digital), only Analog channels (Analog) or both (Digital + Analog) and press OK to select and mark or unmark the Digital and Analog items.
34 Press (red) to start searching.
- The »Automatic Channel Search« menu appears, and the search for TV channels begins.
- The scan is complete as soon as the «Search is completed!« appears.
35 Select the Channel Editor with * (red).
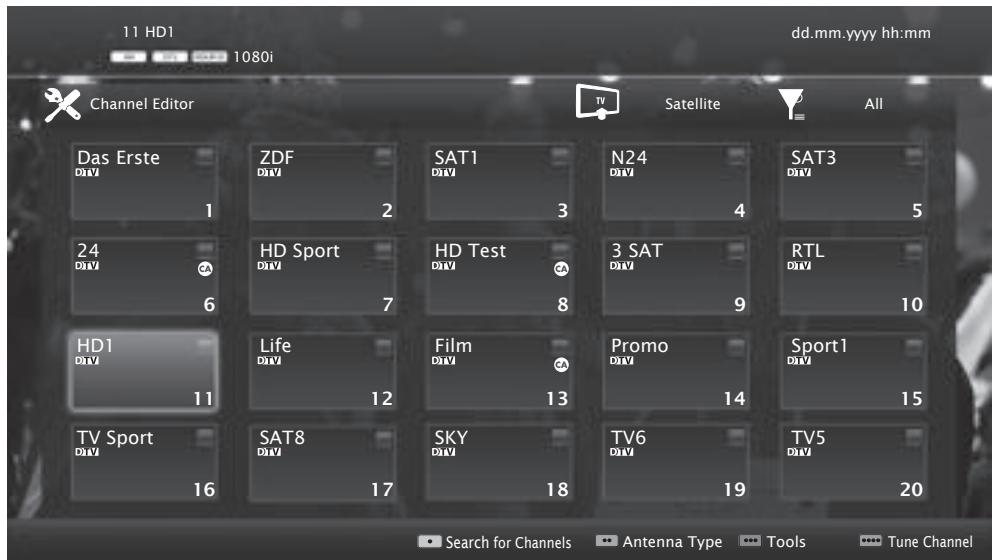
Changing the Channel Editor for the digital channels
Channels found at the end of the search are stored in the «Channel Editor«.
You can delete channels which are not required from the programme table, you can change the order of channels within the programme table and lock individual channels (Parental control).
You can also add channels to the favourites list; in addition, you can change the order of channels within the favourites list.
In Channel Editor, press P + to switch the channel list to the next page, press P - to switch it back to the previous page.
To perform searching in the Channel Editor menu by Channel names, press (red).
To display the channels in the Channel Editor menu by Antenna Type, press (green) and OK.
To use filters and tools in the Channel Editor menu, press (yellow).
Opening the Programme Table
1 Open the menu with MENU.
2 Activate the «Settings« menu with «OK«.
3 Select the option Source Setup with or and press OK to confirm.
4 Select the line Channel Editor with or and press OK to confirm.
- »Channel Editor« menu is displayed.
Important:
Programme table and favourite lists are stored separately for all sources (satellite, cable and air).
Programme table of the current source will be displayed when you select programme table.
Notes:
A CI module and smart card is required to watch the channel if there is a CA sign next to the channel name in Programme Table.
As the recorded data channels are not displayed in the channel list, number of channels displayed in the Channel list may be less than 6000
Searching channels by name in the Channel Editor
While arranging the channels in the Channel Editor, you can search and select the channel name by the first three characters.
1 In the «Channel Editor« menu, select the search mode by pressing «red».
2 Select the first character of the channel name you want to search with , >> or and press 0K to confirm.
Repeat the entry for the next characters.
- Channels found will be listed on the right side of the screen.
3 With switch to result section, select the channel you are searching with or , and highlight this with OK .
Note:
To change the place of, delete or add the channels to favorites lists, continue reading the relevant section.
4 To return to the previous menu, press BACK
5 To exit the «Channel Editor« menu, press «EXIT«.
Deleting channels in the Channel Editor
1 In the «Channel Editor« menu, select the channel(s) you want to delete with «V«, «A«, «< or >», and highlight the television channel by pressing OK.
- Channel is marked with
2 Press (yellow).
- »Tools« menu is displayed.
3 Select the line Delete with V or A and press OK to confirm.
4 To confirm deletion process, press (green);
or
to cancel deletion process, press (red) button.
5 To exit the «Channel Editor« menu, press «EXIT«.
Moving the channels in the channel organizer to different channel positions
1 In the Channel Editor menu, select the channel(s) you want to move with >> , < or > , and highlight the television channel by pressing OK. - Channel is marked with
2 Press (yellow).
-
Tools« menu is displayed.
3 Select the line Move with or and press OK to confirm.
Notes:
In case of changing the order of the channels, channel numbers sent by the broadcaster will be changed.
If more than one channel is selected for moving, channels will be moved one after the other according to the selection order of channels.
4 Select the new place of the channel with , , or and press OK to confirm.
5 To exit the «Channel Editor« menu, press «EXIT«.
Displaying channels in the Channel Editor by antenna type
If you have more than one antenna type, you can display channels in the Channel Editor by antenna type.
To display the channels in the «Channel Editor« menu by antenna type, press «» (green).
2 Select «Air«, «Cable« or «Satellite« with «or »» and press OK.
- Television will switch to the antenna system you have selected and channels will be displayed.
3 To exit the «Channel Editor« menu, press «EXIT«.
Sequencing channels in the Channel Editor
You can sequence the channels in the Channel Editor according to different criteria such as TV, radio or scrambled / unscrambled.
To sequence the channels according to different criteria in the «Channel Editor« menu, press «...» (yellow).
2 Select the sequencing criteria you want with or and press OK to confirm.
- Channels will be displayed in the «Channel Editor« menu by the criteria you have selected.
3 To exit the «Channel Editor« menu, press «EXIT«.
Creating a list of favourites
You can select your favourite channels and save them in up to four lists (FAV1 to FAV4).
Note:
Favourite lists must be created separately for all sources (satellite, cable and air).
Press FAV to select the favorite list.
1 In the «Channel Editor« menu, select the channel(s) you want to add in the favorites list with «V«, «A«, «O« or «», and highlight the television channel by pressing «OK«.
- Channel is marked with
2 Press (yellow).
-
Tools« menu is displayed.
3 Select the line Add to Fav. with or and press OK to confirm.
-»Add to Fav.« menu is displayed.
4 Select the favorite list you want to add the selected channels with or and store with OK.
- The channels are marked in the Channel Editor with 1 , 2 , 3 or 4
- You can add the same channel in more than one favourites list.
Each favourite list can contain maximum 255 channels.
Notes:
You can delete channels from the favourites list. Press (yellow), select the favorites list the channel is in with or and press OK to confirm. Select the channel(s) you want to delete with and highlight the channel by pressing OK.
Press (yellow) and select the line Remove from Fav. with , and confirm with OK. The channel you have selected is now deleted from the favorites list.
- When a channel stored in the favourite channel list is deleted channel order in the favourite list is updated.
5 To exit the «Channel Editor« menu, press «EXIT«.
Sorting channels in the favorites list
You can change the channel sorting in the favorites list.
To select favorites list in the «Channel Editor« press «yellow».
2 Select the favorites list you want to sort with or and press OK to confirm. - Selected favorites list channels will be displayed.
3 Select the channel(s) you want to move with , , 或 and highlight the television channel by pressing OK. - Channel is marked with
4 Press (yellow). - Tools menu is displayed.
5 Select the line Move with or and press OK to confirm.
Note:
If more than one channel is selected for moving, channels will be moved one after the other according to the selection order of channels.
6 Select the new place of the channel with , , or and press OK to confirm.
7 To exit the «Channel Editor« menu, press «EXIT«.
Enter own names for the favourites lists (max. 7 characters)
You can rename all favorites lists.
1 To recall favorites list menu when no menu is opened on the screen, press FAV.
2 Select the favorites list you want to rename with « or « and press « (blue) button.
- Virtual keyboard will be displayed.
3 To delete the current name step by step, press (red).
4 Select the required character/number with , , < or > and move to the next character with OK.
Repeat the same process for all characters/ numbers.
- Using Shift OK , you can switch between uppercase letters / numbers and lowercase letters / special characters.
5 To save the new name with (green).
6 Press EXIT to end the setting.
Renaming AV channels
You can rename AV channels according to the device you have connected. For example, for a PC which you have connected to HDMI1 source of TV with HDMI cable, you can name the source as PC.
1 Open Input Source 念 menu with
2 Select the AV source you will rename with « or « and press « (blue).
- Rename menu is displayed.
3 Press OK and delete the "old" name step by step with (red).
4 Select the required character/number with , , or and move to the next character with OK.
Repeat the same process for all characters/ numbers.
- Using Shift OK , you can switch between uppercase letters / numbers and lowercase letters / special characters.
5 To save the new name with (green).
6 Select the icon appropriate for the device type with « or » and press OK to confirm
7 To save the setting, press (blue).
- Source name and icon will change.
8 Press EXIT to end the setting.
Picture settings
1 Open the menu with MENU*.
2 Activate the menu item >Settings> with OK.
3 Activate the menu item Picture Settings with OK
- «Picture Settings« menu is displayed.
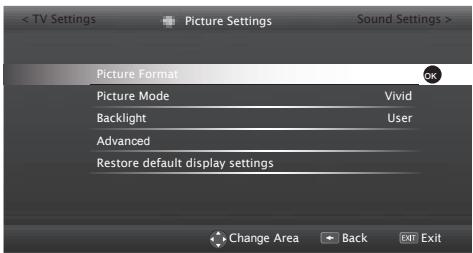
4 Select the required line Picture Mode or Backlight with V or A and press OK to confirm.
Select the option with or and press BACK to return to Picture Settings 空 menu.
Note:
Other settings are available under »Advanced«.
5 Select the line Advanced with and press OK to confirm.
6 Select the required line/function with «V» or «A» and press «OK» to confirm.
Select the value/option with or and press OK to confirm.
Press BACK to return to Picture Settings menu.
7 Press EXIT to end the setting.
Enhanced picture settings
The "enhanced picture settings" are in principal digital image improvements which, however, should be only used when necessary when picture quality and transmission is excellent. They may well improve the display with poor material, but may adversely affect the display where transmission and picture quality are excellent.
Backlight - Manual setting for back lighting (only active if dynamic back lighting is switched to "OFF"). This setting also directly impacts power consumption.
»Dynamic Backlight« - Here the device optimally adjusts the back lighting for the picture content by regulating the back lighting depending on the average picture brightness. If a picture has predominately dark areas, then the black level displayed is improved by downward adjustment of the back lighting (in this case the display of the dark areas is improved), and with predominantly bright picture material the back lighting is maximised in order to display these areas more brightly.
Vibrant Colour - Increases the colour contrast and the contrast adjustment. This setting is mostly too strong for use with normal pictures and should only be used where necessary (low or off) otherwise nuances in the image can be suppressed.
- «Gamma« - This setting establishes which brightness value should be displayed for which digital transmission value. Most recordings are transmitted with a gamma value of 2.2 (all Windows PCs and newer PCs with a MAC operating system work with this, older MAC systems and transmissions without colour profile mostly operate with a gamma value of 1.8).
Dynamic Contrast - The function dynamically and optimally adjusts the contrast for the respective picture content by analysing images and then altering this depending in a change in contrast. This increase the contract, however may also reduce the visible brightness levels in the picture.
Perfect Clear - Improves the general image by means of a gentle blue hue (giving the appearance of greater sharpness) and improves the black level by setting this entirely to black from specific shade of back. This reduces the visible grey values in the dark areas of the picture.
■ Film mode detects and processes feature films automatically for all channel sources. This means you will always receive an optimal picture.
This functions in the modi 480i, 576i and 1080i in TV playback and for other channel sources.
If the «Film mode« is switched on for programmes without a feature film signal, minor problems such as picture freeze, defective subtitles or fine lines in the picture could occur.
MEMC - Improves the display of moving images through the additional computation of intermediate pictures and is only available for devices from 32^ . It is displayed with a PPR of 400 (Picture Perfection Rate). If the adjustment value is too high, this may result in ghosting with poor transmission due to the incorrect computation of the intermediate pictures.
■ Nois Reduction « - Reduces the visible 'snow' by displaying the picture a little less sharply and creating a slight blurring. Should therefore be used minimally with good picture material.
■ «Block Noise Reduction« - This function can only be selected with digital reception sources and AV presets. It reduces any interference from artefacts (pixel blocks) from digital programmes due to MPEG compression (such as from DVB-T receivers and lower transmission rates or DVD players).
or
press (red) to cancel the function.
3 Press EXIT to end the setting.
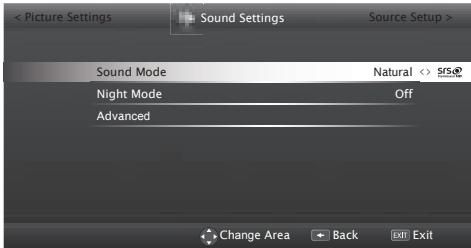
Sound settings
1 Open the menu with MENU*.
2 Activate the menu item >Settings> with OK<.
3 Select the menu item «Sound Settings« with «or « and press OK to confirm. - «Sound Settings« menu is displayed.
Note:
Additional operations are explained in the following sections.
Sound Mode
1 Select the line «Sound Mode« with «V« or «A».
2 Press « or » to select the option « Stand-art Mode«, « Movie« or « User«.
DTS Studio SoundTM
DTS Studio Sound is an advanced surround sound solution suite that accurately extracts and places audio cues for an immersive surround experience over the TVs built-in speakers. To complete the audio experience, post processing and psychoacoustic techniques are implemented to provide 3D audio rendering to match 3D video content, for bass and dialog enhancement and to deliver consistent and level volume across content.
DTS Studio Sound Technology is supported in Film, Natural, Speech and Music settings.
1 Select the line «Sound Mode« with «V« or «A».
2 Select the option Natural SRS, Speech SRS or Music SRS with or
For DTS patents, see http://patents.dts.com. Manufactured under license from DTS Licensing Limited. DTS, the Symbol, & DTS and the Symbol together are registered trademarks and DTS Studio Sound is a trademark of DTS, Inc. © DTS, Inc. All Rights Reserved.
Night Mode
Night Mode prevents sound fluctuations and volume increases.
1 Select the line Night Mode with V or A.
2 Activate (On) or deactivate the night mode by pressing or
Note:
Night Mode appears in menu if SRS has been selected in Sound Mode.
Note:
■ Other settings are available under Advanced. Select the line Advanced with V or A and press OK to confirm.
Stereo/dual channel
If the device receives two channel programmes, e.g. a film with the original sound on sound channel B (display: «Dual II«) and the dubbed version on sound channel A (display: «Dual I«), you can select the desired sound channel.
1 Select the line Sound Type with or and adjust the setting with 或 .
Equalizer
Equalizer offers a sound setting that you can create.
Equaliser is active in the menu when Sound Mode is selected as User .
1 Select the line Advanced from the Sound Settings menu with V or A and press OK to confirm.
2 Select the line Equalizer with or and press OK to confirm. - Equalizer menu opens.
3 It is active in 120Hz frequency band. Adjust the preferred value by using or
4 Select the next frequency band with or to repeat the adjustment procedure.
5 To save adjustment, press BACK .
Automatic volume
The television channels broadcast at different volumes. The automatic volume limiting (AVL) function means the volume is kept the same when you switch between channels.
1 Select the line Advanced from the Sound Settings menu with V or A and press OK to confirm.
2 Select the line AVL with or and then select On with or
Note:
AVL item is active in the menu when Sound Mode is selected as User or Standard Mode .
1 Select the line Enhanced by pressing V or A and press * to confirm.
2 Select the line Sound standard settings by pressing or and press to confirm.
3 Press (green) to confirm the security query; or press (red) to cancel the function.
4 Press EXIT to end the setting.
Concluding the settings
1 Press EXIT to end the setting.
Basic functions
Switching on and off
1 Switch the television to standby with the power switch ON · OFF.
2 Press 1, 0 or P + or P - to switch on the television from standby mode.
3 Press to switch the television to standby.
4 Switch the television to standby with the power switch ON · OFF.
Selecting channels
1 Use 1 0 to select channels directly.
2 Select television channels step by step with P + or P - .
3 Open the channel list by pressing OK, select the channel list by pressing or and confirm with OK, then close the channel list with EXIT.
Notes:
Programme information for the following days an be called up with
Switch to radio channels by calling up the channel list with OK, press << (blue), use << or >> to select the option Radio.. Select radio channels with << or >> and confirm with OK.
Switch back to TV channel lists by calling up the channel lists again with OK, press (blue), using or to select the option Digital and confirm with OK.
To save energy, you can turn off the screen in "Radio mode" (see "CONVENIENCE FUNCTIONS" on page 66).
Selecting stations from lists
You can select stations from various lists, (e.g. ALL, FAV1-FAV4).
Press FAV to recall the favorite list menu. - Select Favorite menu is displayed.
2 Select the channel list with or and open it with OK
3 Select the channel with or and press OK to confirm.
4 Press EXIT to exit the channel list.
Selecting AV channels
1 Open »Select Source« menu with »
2 Select the desired AV channel position with « or » and confirm with OK.
3 Use 1 0 to switch back to the television channel.
Note:
The AV preset descriptions can be changed. See "Settings" section on page 21.
Adjusting the volume
Adjust the volume with - +
Muting
Use to switch the sound off (mute) and to switch it on again.
Displaying information
1 Display information, press repeatedly. - The display disappears automatically after a short while.
Picture settings
1 Open the Tools menu with «TOOLS«.
2 Select the line Picture Mode with or
3 Select the picture setting by pressing or .
Note:
Picture setting "Game" can only be selected in HDMI, Component or PC modes.
4 Press EXIT to end the settings.
Audio settings
1 Open the Tools menu with «TOOLS«.
2 Select the line Sound Presetting with or
3 Select the audio setting by pressing or
- You can change the «User« audio setting; see "Equalizer" on page 24.
4 Press EXIT to end the settings.
Audio language
You can select various languages when watching digital channels. This depends on the programme being broadcast.
Press to open the selection menu.
2 Select the language with V or A and press OK to confirm.
3 Press EXIT to end the settings.
Subtitles
You can select various subtitles when watching digital channels. This depends on the programme being broadcast.
1 Press to open the selection menu.
2 Select the language with V or A and press OK to confirm.
3 Press EXIT to end the settings.
Zoom function
With this function, you can enlarge the picture on the television.
1 Open the Tools menu with «TOOLS«.
2 Select the line «Zoom« with «V« or «A«.
3 Select zoom setting with or and confirm with OK.
- Image is enlarged as center-focused.
4 To navigate in the enlarged picture, press
(red) and move the screen with , or
5 To return to the zoom menu, press BACK
←.
6 Press EXIT to end the settings.
Sleep timer
In the «Sleep Timer« menu you can enter a time for the television to switch off. After this time has elapsed, the television switches to standby mode.
1 Open the Tools menu with «TOOLS«.
2 Select the line «Sleep Timer« with «V« or «A«.
3 Select the switch-off time with or
Note:
Set the function to Off with or to switch it off.
4 Press EXIT to end the settings.
Zap function
This function allows you to save the television channel which you are currently watching and switch to other channels (zapping).
1 Select the channel you want to save in the zap memory with 1 0 or P + , P - (for example, channel 1, BBC 1) and save with BACK
2 Change channels with 1 0 or
3 You can now use BACK to switch between the saved channel (in the example, BBC1) and the channel you were watching before.
4 Press EXIT to quit the zap function.
Electronic TV guide (RoviGuideTM)
Electronic TV guide has two operation modes: online and offline.
In the offline mode, only the broadcast information is received via broadcast.
A lot of content can be received via the Internet connection in the online mode such as, programme information, channel logos, information about players, pictures, fragments, etc.
Log on to the „RoviGuide™//
If you use the Electronic TV guide for the first time, you must log on.
Press GUIDE to start Electronic TV guide. - Terms and Conditions is displayed.
2 With display Terms and Conditions, select the push button 1 Agree and press OK to confirm.
3 Enter the postal code with 1 0
4 Confirm the log on with OK.
The Electronic TV guide in Offline mode
In the offline mode, the electronic programme guide offers an overview of all programmes that will be broadcast in the next week (for digital stations only).
1 Press GUIDE to start Electronic TV guide. - A message is displayed.
2 Select the push button Continue with and press OK to confirm.
Notes:
Not all channels provide a detailed TV guide.
Many broadcasters supply the daily programme but no detailed descriptions.
There are broadcasters which do not provide any information at all.
3 Select the television channel with or
- Information about the actual programme is displayed in the selected television channel.
4 Switch to the information about the current programme using OK.
Notes:
To call up further information about the programme press or repeatedly.
To display a small image of the programme select the Watch button with and confirm with OK.
The programme selected can be recorded (if an external data medium is connected). To do this select the «Watch« button with «», press «V« to select the «Record« button and confirm with «OK«. Confirm the display with «OK«.
To add the programme selected to the reminder timer select the «Watch« button with «, press «V« to select the «Remind« button and confirm with «OK«. Confirm the display with «OK«.
5 Return to the programme overview with «BACK ←«.
6 Press to select information on the next programme and to return to the information for the current programme.
7 Switch back to the channel selection with
Note:
- You can filter certain types of programmes. To do this press to select the option All and press or to select the desired programme type and confirm with OK.
Press EXIT to close the channel guide.
The Electronic TV guide in Online mode
Search and Suggestions options come in the electronic programme guide in the online mode as different from the offline mode. A lot of content can be received via the Internet with these options such as, programme information, channel logos, information about actors, pictures, fragments, etc. (only for digital channels).
1 Press GUIDE to start Electronic TV guide. - Electronic TV guide is displayed.
2 Press twice to display the top menu. - TV Listing* option is marked.
3 Select the line Search with or and press OK to confirm. A keyboard is displayed.
4 Select the required character of the search criterion with , , or and move to the next character with OK. - Using the push button Clear, you can delete the complete search criterion, using the push button Back you can delete the search criterion step by step.
5 Select the push button Search For: with and press OK to confirm. Found results are listed on the right side of the screen.
6 By pressing once the results can be accessed and you can select the results with or and display the subcategories with OK
Note:
To search for specific subjects, press to select the option on Demand and press OK to confirm. Select the desired subject from the list with or and confirm with OK.
7 To exit electronic programme guide press EXIT.
Changing the picture format
The television automatically switches to the 16:9 format if this format is detected via the Euro-AV socket.
1 Open the Tools menu with TOOLS*.
2 Select the line Picture Format with or
3 Select the picture format with or and press OK to confirm.
4 Press EXIT to end the settings.
Note:
You can choose between the following picture formats.
»Auto« format
The picture format is automatically switched to 16:9 for 16:9 programmes.
The picture format is automatically switched to 4:3 for 4:3 programmes.
During programmes in 4:3 format, the picture is stretched horizontally if 16:9 or 14:9 is selected.
The picture geometry is stretched horizontally.
With actual 16:9 signal sources (from a set-top box on the Euro-AV socket) the picture fills the screen completely and with the correct geometry.
>>4:3« format
The picture is shown in 4:3 format.
LetterBox
The letterbox setting is especially suitable for programmes in 16:9.
The black borders which are usually at the top and bottom of the screen are eliminated, 4:3 pictures fill the screen.
The transmitted pictures are enlarged, but are slightly cropped at the top and bottom. The picture geometry remains unchanged.
>Subtitle< format
If you cannot read the subtitles which appear on the bottom of the screen, then select >Subtitle<.
>>Panorama< format
This setting is suited to films with a large width/height ratio.
During programmes in 4:3 format the picture is stretched horizontally if the «Panorama« function is selected. The picture geometry is stretched horizontally.
>Overscan off format
When this mode is selected, high defined picture from HDMI and Component inputs is not cropped and it is displayed in its original size. This is only active in HDMI mode and for resolutions at or above 720p.
To use the functions "GRUNDIG AppLICATION store" and "Operation with Digital Media Server", you must connect the television to your home network with internet access and log on.
Grundig Application Store is a depot where you can find various applications that you may use on your Grundig TV. You can download many applications from Grundig Application Store. These applications include video, picture, music, social networking applications, news and sports applications, weather forecast applications and some specific applications.
Network connection
You can establish a wired or wireless connection between your television and the local network.
If you want to use a wired network connection, please start with the instructions here:
If you use a wireless network connection, please follow the instructions in the "Wireless network connection" section on page 34.
Note:
The following section describes connecting to the home network if you did not carry this out during the "initial set-up".
Wired network
Wired network connection
1 Connect the output of external modem to LAN« socket with Cat 5 cable.

Note:
- Connection cables are not supplied.
Wired network settings
There are two ways of making the wired network settings.
A Automatic connection,
All data regarding connection settings (IP Address, Netmask, Gateway and DNS) are obtained from modem automatically.
B Manual connection,
all data regarding connection settings (IP Address, Netmask, Gateway and DNS) must be configured manually.
Automatic connection
Most of the home networks are Dynamic. If you have a dynamic network, you must use a DSL modem that supports DHCP. Modems and IP sharers that support DHCP obtain the «IP Address«, «Netmask«, «Gateway« and «DNS« values required for internet access automatically, and thus you are not required to enter those values manually.
1 Open the menu with MENU\*.
2 Activate the menu item >Settings with OK.
3 Select the menu item Network Configuration with or and press OK to confirm.
- >Network configuration menu is displayed.

4 Select the line Change Connection Type V or A and press OK to confirm.
5 Select the option «Wired« with «< or »» and press OK to confirm.
6 Select the line Network Configuration with or and use to select AUTO.
7 With (red) select Connect to establish modem connection.
- »Connecting ... Please wait« message will be displayed, and if the connection is established »Connection To Gateway: Success« message will be displayed.
8 Press (green) to check the performed settings and also if the local network and internet connection has been established.
- Testing ... Please wait message will be displayed, and if the connection is established Connection To Gateway: Success, Internet Connection: Success message will be displayed.
9 Press EXIT to end the settings.
Note:
If you do not have a dynamic network, follow the instructions in manual connection section.
Manual connection
Certain networks require Static IP address. If your network requires a Static IP address, you must enter the IP Address , Netmask , Gateway and DNS values manually. You can get IP Adress , Netmask , Gateway and DNS values (IPS) from your Internet Service Provider.
1 Open the menu with MENU\*.
2 Activate the menu item >Settings> with OK<.
3 Select the menu item Network Configuration with or and press OK to confirm.
- >Network configuration« menu is displayed.
4 Select the line Change Connection Type V or A and press OK to confirm.
5 Select the option «Wired« with «< or »» and press «OK« to confirm.
6 Select the line Network Configuration with or sand use or to select Manual.
7 Select the line Advanced with or and press OK to confirm.
- IP Address, DNS, Netmask and Gateway options are active.

8 Select the line IP Address with Enter IP address with 1...0.
9 Select the line DNS with V . Enter IP address with 1...0 .
10 Select the line Netmask with V Enter Netmask address with 1...0.
11 Select the line Gateway with Enter Gateway address with 1...0.
12 With (red) select Connect option to establish modem connection.
- »Connecting... Please wait« message will be displayed, and if the connection is successful, Connection to Gateway: Successful« message will be displayed.
13 Press (green) to check the performed settings and also if the local network and internet connection has been established.
- Testing ... Please wait message will be displayed, and if the connection is established Connection To Gateway: Success, Internet Connection: Successful message will be displayed.
14 Press EXIT to end the settings.
Wireless network
Wireless network connection
There are different ways of making the wireless network settings. »Wireless« and »Wireless WPS« (WiFi Protected Setup).

1 Connect Grundig WiFi USB dongle 2 to the «USB1« or «USB2 (HDD)« socket of your television in order to connect the television to a wireless network.
Note:
- Grundig WiFi USB dongle is not supplied with the product but sold separately. Please contact your dealer from where you have purchased your TV.
Notes:
Wireless LAN adapter supports IEEE 802.11B/G and N communication protocols. We recommend you to use IEEE 802.11N protocol to obtain the best performance in wireless HD video playback.
If you use a modem that supports IEEE 802.11B/G, video playback performance may be poor when compared to a modem that supports IEEE 802.11N since the data transfer rate of IEEE 802.11B/G protocol is lower.
Please note that video playback performance in a DLNA application on a wireless local network and in a SMART Inter@ctive TV 3.0 application on a network with internet connection depends on the number of users on the network as it is the case in every wireless network.
It is recommended to switch off the equipment that are not in use in home network in order to avoid unnecessary network traffic.
Placing the modem or wireless network sharer on an elevated location will increase the wireless connection reception strength.
Wireless connection reception strength may vary depending on the type of the modem and the distance between the modem and television.
Wireless network settings
You have several ways to connect your TV to your home network.
A Automatic connection,
all data regarding connection settings (IP Address «, «Netmask «, «Gateway « and «DNS«) are obtained from modem automatically.
Depending on the router, you can use the following options:
- Option "WPS-PBC" (Push Button Configuration);
- Connecting with a WPS PIN;
- Connecting by entering the network password.
B Manual connection,
all data regarding connection settings (»IP Address«, «Netmask«, «Gateway« and «DNS«) must be configured manually.
Technical requirements
Most of the home networks are Dynamic. If you have a dynamic network, you must use a DSL modem that supports DHCP. Modems and IP sharers that support DHCP obtain the «IP Address«, «Netmask«, «Gateway« and «DNS« values required for internet access automatically, and thus you are not required to enter those values manually.
Wireless WPS network connection through by pressing a button
1 Open the menu with MENU\*.
2 Activate the menu item >Settings with OK.
3 Select the menu item Network Configuration with or and press OK to confirm.
- >Network configuration« menu is displayed.
4 Select the line Change Connection Type with or and press OK to confirm.
5 Select the option «Wireless WPS« with «or »» and press «OK« to confirm.
- WiFi warning screen will be displayed.
6 Activate WiFi with (green).
7 Select the line WPS Type with V or A and select the option Push Button with or

8 With (red) select Connect to establish modem connection.
- »Push the WPS button on your Access Point« message is displayed.
9 Press the WPS button on the router.
10 To continue after pressing the WPS button on the access point, press (green).
- The "Connection to Gateway: Success" message will be displayed.
11 Press (green) to make sure that the network connection is established with the current settings.
- Testing ... Please wait message will be displayed, and if the connection is established Connection To Gateway: Success, Internet Connection: Success messages will be displayed.
12 Press EXIT to end the setting.
Wireless WPS network connection with PIN
1 Open the menu with MENU\*.
2 Activate the menu item >Settings with OK.
3 Select the menu item Network Configuration with or and press OK to confirm.
- >Network configuration« menu is displayed.
4 Select the line Change Connection Type with or and press OK to confirm.
5 Select the option «Wireless WPS« with «or »» and press «OK» to confirm.
- WiFi warning screen will be displayed.
6 Activate WiFi with (green).
7 Select the line WPS Type with V or A and select the option PIN with or

8 Select the line Select Access Point with or and press OK to confirm.
- Present WPS-supported wireless networks are scanned to display in the «Select Access Point« menu.
9 Select the network that you want to connect with , , or and press OK to confirm.
- 8-digit pin code is displayed in the wireless WPS menu.
Note:
Refer to the manual of your router to find out how the PIN is entered via a PC.
10 Use a PC to enter the pin on the router (e.g. AVM FRITZ!Box: menu item WLAN Settings... WPS) and save.
Note:
The 8-digit PIN code must be entered in the modem interface in 2 minutes; otherwise, connection of television with the modem is cut.
11 Press (green) to confirm the registration.
- The message "Connection to Gateway: Success" appears.
12 Press (green) to check the performed settings and also if the local network and internet connection has been established.
- Testing ... Please wait message will be displayed, and if the connection is established Connection To Gateway: Successful, Internet Connection: Successful messages and MAC address will be displayed.
13 Press EXIT to end the setting.
Connecting automatically by entering the network password
Use this method for establishing a connection if your router does not support "WPS-PBC" or WPS PIN entry.
1 Open the menu with MENU\*.
2 Activate the menu item >Settings with OK.
3 Select the menu item Network Configuration with or and press OK to confirm.
- Network configuration: menu is displayed.

4 Select the line Change Connection Type with or and press OK to confirm.
5 Select the option »Wireless« with « or »» and press «OK« to confirm.
- WiFi warning screen will be displayed.
6 Activate WiFi with (green).
7 Select the line Network Configuration with or and select the option AUTO with or .
8 Select the line Select Access Point with or and press OK to confirm.
- »Select Access Point« menu is displayed by scanning available wireless networks.
9 Select the network that you want to connect with , , or and press OK to confirm.
- Wireless connection password screen is displayed.
Note:
For device to discover the wireless modem on the network, the network name should support ASCII characters.
10 Select the required character with >> , or and move to the next character with OK.
- Using Shift OK , you can switch between uppercase letters / numbers and lowercase letters / special characters.
- Select »X « to delete the character entered and press »OK « to confirm.
11 Confirm the password with (green).
- »Connecting ... Please wait« message will be displayed, and if the connection is established »Connection To Gateway: Success« messages will be displayed.
12 Press (green) to check the performed settings and also if the local network and internet connection has been established.
- Testing ... Please wait message will be displayed, and if the connection is established Connection To Gateway: Success, Internet Connection: Success messages will be displayed.
13 Press EXIT to end the setting.
Note:
If you do not have a dynamic network, follow the instructions in manual connection section.
Manual connection
Certain networks require Static IP address. If your network requires a Static IP address, you must enter the IP Address , Netmask , Gateway and DNS values manually. You can get IP Address , Netmask , Gateway and DNS values (IPS) from your Internet Service Provider.
1 Open the menu with MENU\*.
2 Activate the menu item >Settings> with OK.
3 Select the menu item Network Configuration with or and press OK to confirm.
- >Network configuration« menu is displayed.
4 Select the line Change Connection Type with or and press OK to confirm.
5 Select the option «Wireless« with «< or »» and press «OK« to confirm.
- WiFi warning screen will be displayed.
6 Activate WiFi with (green).
7 Select the line Network Configuration with or and select the option Manual with or
8 Select the line Advanced with V or A and press OK to confirm.
- IP Address, DNS, Netmask and Gateway options are active.

9 Select the line IP Address with Enter IP address with 1...0.
10 Select the line DNS with V . Enter DNS address with 1...0 .
11 Select the line Netmask with V . Enter Netmask address with 1...0 .
12 Select the line Gateway with V . Enter Gateway address with 1 0 .
13 Select the line «Select Access Point« with «A« or «V« and press «OK« to confirm. - «Select Access Point« menu is displayed by scanning available wireless networks.
14 Select the network that you want to connect with V , A , C or and confirm with OK. - Wireless connection password screen is displayed.
Note:
For device to discover the wireless modem on the network, the network name should support ASCII characters.
15 Select the required character with >> , < or > and move to the next character with OK.
- Using Shift OK , you can switch between uppercase letters / numbers and lowercase letters / special characters.
- Select »X « to delete the character entered and press »OK« to confirm.
16 Confirm the password with (green).
- »Connecting ... Please wait« message will be displayed, and if the connection is established »Connection To Gateway: Success« messages will be displayed.
17 Press (green) to check the performed settings and also if the local network and internet connection has been established.
- Testing ... Please wait message will be displayed, and if the connection is established Connection To Gateway: Success, Internet Connection: Success messages will be displayed.
18 Press EXIT to end the setting.
Change TV Name
To make it possible to identify your TV in the network, the name "Inter@ctive TV" is assigned at the factory. You can change the name.
1 Open the menu with MENU\*.
2 Activate the menu item «Settings« with «OK«.
3 Select the menu item TV Settings with or and press OK to confirm.
4 Select the line About with or and press OK to confirm.
5 Select the line TV Name with or and press OK to confirm
6 Delete the current name. To do this, select the «Clear« button with «V«, «A«, «C« or «» and confirm with «OK«.
7 Select the required character with >> , < or > and move to the next character with OK.
- Using Shift OK , you can switch between uppercase letters / numbers and lowercase letters / special characters.
- Select »X « to delete the character entered and press »OK « to confirm.
8 Confirm the new name by pressing (green).
9 Press EXIT to end the setting.
Connecting the TV to a "hidden" network
Even if the SSID (Service Set Identifier) of the router is not visible, you can connect your TV to this network.
1 Open the menu with MENU\*.
2 Activate the menu item >Settings> with OK<.
3 Select the menu item Network Configuration with or and press OK to confirm.
- >Network configuration« menu is displayed.
4 Select the line Select Access Point with or and press OK to confirm.
- »Select Access Point« menu appears and available wireless networks are scanned and displayed in the menu.
5 Press (red).
- »Add Network« menu appears.
6 Select the line «Access Point Name« with «V« or «A« and press «OK« to confirm.
- A menu for entering the SSID will be displayed.
Note:
For device to discover the wireless modem on the network, the network name should support ASCII characters.
7 Select the required character with >> , < or > and move to the next character with OK.
- Using Shift OK , you can switch between uppercase letters / numbers and lowercase letters / special characters.
- Select »X « to delete the character entered and press »OK « to confirm.
8 Confirm the SSID by pressing (green).
9 Select the line Security Type with or and select the required option (WEP, WPA or WPA2) with .
Note:
If the WPA option is selected, the security protocol (AES or TKIP) must be selected on the line Encryption. This depends on the settings on the router.
10 Confirm the setting with (red).
- The network is now in the »Select Access Point« menu.
11 Select the network with , , or and press OK to confirm.
- Wireless connection password screen is displayed.
12 Select the required character with >> , < > > and move to the next character with OK.
- Using Shift OK , you can switch between uppercase letters / numbers and lowercase letters / special characters.
- Select »X « to delete the character entered and press »OK « to confirm.
13 Confirm the password by pressing (green).
- >Connecting ... Please wait « message will be displayed.
14 Press (green) to make sure that the network connection is established with the current settings.
- >Testing ... Please wait message will be displayed, and if the connection is established =>Connection To Gateway: Success, =>Internet Connection: Success messages and MAC address will be displayed.
15 Press EXIT to end the setting.
SMART Inter@ctive TV 3.0 internet applications
Smart Inter@ctive TV 3.0 interactive applications provide your television with Internet services and pages.
These applications are designed according to your television.
With SMART Inter@ctive TV 3.0 feature you can run many local and global internet applications. Thanks to Grundig Application Store, you can find many applications that you may use on your Grundig TV. You can download many applications from Grundig Application Store. These applications include video, picture, music, social networking applications, news and sports applications, weather forecast applications and some specific applications.
Notes:
Availability of SMART Inter@ctive TV 3.0, inter@ctive applications may vary from one country to the other.
Smart Inter@ctive TV 3.0 cannot download and save files, cannot upload files to a web site and cannot install add-ins except Login pages of some applications for applications other than the ones in Grundig Smart Apps.
Grundig is not responsible for the content and the quality of content offered by the content providers.
- Local and global internet applications provided through your Smart Inter@ctive TV 3.0 comes with your TV within the framework of special limited duration agreements entered into with the application owners. Application owners may update, modify, restrict or entirely remove those applications with their own decision. Grundig cannot be held responsible for such changes.
Grundig reserves the right to make all changes such as modifications, restrictions, extensions, transfers and removals on internet applications provided through your SMART Inter@ctive TV 3.0.
In Login process of some applications, it may be required to connect to the web page of the related application. Subject web pages may contain links not related to Login process. When connecting those links, TV may access open web and view contents that are not supported by your TV. As you are on open web, your TV cannot control those unsupported contents or cannot be held responsible for them.
Starting Smart Inter@ctive TV
1 Open the menu with MENU.
2 Select the menu item Applications Store with « or »» and press OK to confirm
- Inter@ctive Applications« menu will be displayed. During initial login, registration screen for GRUNDIG Application Store will be displayed.
Notes:
If you press when no menu is open, you can access Quick Apps menu.
If you attempt to start Inter@ctive applications without a cable or wireless adapter connected, the related warning is displayed on the screen. If your wired or wireless adapter is connected but you cannot receive IP or internet is not connected, the Inter@ctive applications cannot be started. In this case, check Network connection settings. see. page 31 or 34.
USB keyboard and mouse
You may connect a keyboard or mouse to both sockets «USB1« or socket «USB2 (HDD)« to use in the Web browser. Keyboards and mice requiring special drive are not supported.
Navigation and enetering text during registration
1 Press to open MyApps menu.
- Grundig Smart Apps registry screen is displayed.

2 Press , , or and select REGISTER to start registration and press OK.
3 Select necessary text areas with , >> or >> and press OK.
- Virtual keyboard will be displayed.
Notes on data entry:
Press (green) for keyboard language.
Data will be entered through virtual keyboard. Select necessary letters/numbers and press OK to confirm.
For upper/ lower case, select Shift and and press 0K to confirm.
Press * (red) to switch to mobile keyboard.
Press (blue) to delete last character/ number. Press (yellow) to delete all characters.
When entry is complete, use «V«, «A«, «C« or «» to select «BACK « option and press «OK« to confirm.
Virtual keyboard will disappear.
Creating a Grundig Application Store account
You must register to access all applications in Grundig Application Store.
Press to open MyApps menu.
- Grundig Smart App registry screen is displayed.
2 Press , , or and select REGISTER to start registration and press OK.
3 Enter your «Name», «Surname», «Phone», (optional), «Place of Birth», and «Gender», Select the letters for the information with «V», «A», «or», «and confirm with OK». After you've entered the data, use «V», «A», «and», «to select», BACK «←« and press «OK» to confirm.
Press for the next line and press OK to display the keyboard.
Use , , and to select Next to proceed to the next screen and confirm with OK.
Note:
Select Back to return back to previous screen and confirm with OK.
4 Enter Device Name, E-mail, Password entry and confirmation:
Enter the data and on the screen keyboard use , , < or > to select and confirm with 0K
Use , , and to select Next to proceed to the next screen and confirm with OK.
5 Enter location:
Enter data and on the screen keyboard use , , < or > to select > < < and confirm with OK.
To complete the registration use , >> or >> to select Register and confirm with 0K
- Registration is completed and Entry screen will be displayed.
Logging in with Grundig Application Store account
If you reset your television to factory settings for any reason with «Save installed applications« unselected, all applications you have downloaded will be deleted, and when you access «Inter@ctive Applications« menu, the registration screen will be displayed again.
You can log-in again with the e-mail and password you have provided during Grundig Application Store registration without the need for re-registration.
Press to open MyApps menu.
- Grundig Smart App entry screen is displayed.
2 Enter your e-mail address:
Enter data, use , , and to select and confirm with OK
3 Enter your password:
Enter data, use «V«, «A«, «C« and «» to select «← and confirm with «OK«.
4 To login use «V« to select «Enter« and press OK.
- Enter to display »Application Synchronization«.
5 Use , , and to select the applications that you want to synchronize and confirm with OK.
Use , , and to select Synchronize and confirm with OK.
6 After the downloading is completed press OK.
- «Grundig My Apps« menu will be displayed.
Selecting internet applications
Press to open MyApps menu.
- My Apps menu will be displayed.

2 Select the required application with >> , < or > and press OK to confirm.
- Main menu of the application will be displayed after a short while.
Notes:
- When you attempt to start any application without a cable or wireless network connection, the related warning is displayed on the screen.
- Applications will not start if your cable is disconnected or you do not have an IP even if you're connected to a network or you do not have internet access. In this case, check Network connection settings. See. page 31 or 34.
Grundig Application Store
Grundig Application Store is an online depot where you can download many applications that you may use on your TV.
Some applications in the »MyApps« menu are loaded in your device as factory settings.
You can download a wide array or applications from Grundig Application Store.
Press to open MyApps menu.
2 To enter «Groundig Application Store«, select the push button «Online Store« with «V«, «A«, «O« or «» and press «OK« to confirm.
- «Grundig Application Store« menu is displayed.
Downloading and installing internet applications
1 Select the desired category in Grundig Online Applications with or and press to pass to application field;

or
select the application you want with criterion:
»Most Popular«,
»Highest Rated«,
»Release Date«;
or
if you want to select the application by searching directed, select the push button
"Search" with V , A , C and confirm with OK and select the search criterion with the Virtual keyboard.
2 Select the application you want to download with «V«, «A«, «C« or «» « and press «OK« to confirm
- Information on the application will be displayed.
3 Start download by confirming the push button Install with OK, then confirm the push button Run with OK.
- Application will be downloaded and installed.
4 To start application press OK;
or
to continue installing application press
»BACK «
Uninstalling internet applications
1 In the My apps menu press (red) and use (or to select categories.
2 Use , , or to select the application that you want to uninstall.
3 Press (green) to activate the tools menu, use or to select Uninstall option and confirm with OK. - A warning message is displayed.
4 Confirm Uninstall with OK . or
to cancel the uninstallation process select Cancel « with « or « and press «OK «.
5 Press OK to finish the process.
Rating internet applications
You can rate applications installed on your TV individually.
Press (red) button in My apps menu and select categories with or
2 Select the application you want to rate in My apps« menu with «V«, «A«, «<« or «».
3 Actiade the tools menu by pressing (blue), select the option Rate with or and press OK to confirm.
4 Press once and select the rating with. or To save application rating select Rate with and press OK to confirm.;
5 Press OK to finish the process.
Adding Internet applications to favorites
You can add frequently used Internet applications to favorites and collect these under «Favor- ites« heading under categories.
Press (red) button in My apps menu and select categories with or
2 Select the application you want to add to favorites in MyApps menu with V, , A, > < > or >>
3 Actiade the tools menu by pressing (blue), select the option Add To Fav. with or and press OK to confirm. - is marked and application is added to favorites.
Smart Inter@ctive TV 3.0 browser main menu
1 Applications.
2 Push button to the Application store.
3 Search bar.
4 Categories menu.
5 Tools menu.
6 Exit.

Navigating in the main menu
1 Press (red) button in My apps menu and select categories with or
2 Select the required application with >> , < or > and press OK to confirm.
- Main menu of the application will be displayed after a short while.
3 Usage of application mostly depends on application's own structure. Follow the notes on the screen.
Playback and other options in the applications
Note:
Some applications do not support all playing options, and playing options may vary among different applications.
1 « starts playing in the applications;
2 pauses playing in the applications;
3 » « stops playing in the applications;
4 In the applications, press « or » to start picture search.
5 In the applications, press « or » to skip forward/backward.
6 , , , allows sliding of the navigation keys in the applications and virtual keyboard.
7 Press OK to confirm the selections in virtual keyboard and applications.
8 1 0 (red), (green), (yellow), (blue) selects/activates various functions in applications.
9 1 switches off the application and goes back to My apps menu.
10 «EXIT« switches off the application and goes back to the last broadcast source you were in.

Web browser menu
1 Menu controls.
2 Active tab.
3 Previous page.
4 Next page.
5 Refresh.
6 New tab.
7 Address bar.
8 Search in site.
9 Favorites.
10 Home page
11 Settings
12 History.
13 Search in Web.
14 Zoom.
15 Close Web browser.
16 Close tab.
Web browser
Web browser allows you to navigate in the Internet.
1 Open the menu with MENU\*.
2 Select the menu item Web Browser with or << and press OK to confirm. -Web Browser is displayed.
3 Select URL entry area with A or V and press OK to confirm. - Virtual keyboard will be displayed.
4 Enter the address and confirm with · · · · · · (blue).
Notes:
- Cookies are turned on in the web browser as default, this means that the web pages that are visited will store some data on your device. If you don't want to store any data on your device you should disable cookie option within the settings.
Other functions are explained on the screen.
You may connect a keyboard or mouse to both sockets «USB1« or socket «USB2 (HDD)« socket to use in the Web browser. Keyboards requiring special driver are not supported.
Playing the video, music and image files with home network connection
With DLNA menu of your television, you can easily access Video, music and photo files on server; and thanks to DMR feature, you can automatically start and stop media playing on devices with DMC feature.
Notes:
TV Set's DMR feature is always ON in the background.
With DMR feature, in a DMC-supporting application, any content on DMS can be played on TV without opening DLNA menu. Such applications provide "play in another device" option and prompts the user to select a DMP (TV) device. When your TV is selected through the DMP device list, the content in question will be played on your TV.
You can share your video, music and image files through devices such as PC, mobile phone or NAS (Network Attached Storage) that function as DMS (Digital Media Server) compatible with DLNA.
If the DMS device and the TV are connected to the wireless network at the same time, there may be lags and freezings during video playback.
TV can also operate with DMS software that can be installed on a computer but, it is not guaranteed that it will run in full compatibility with software without a DMS certificate.
Perform the following steps for a sample DMS setup.
Open Windows Media Player11 on a PC with Windows operating system installed. In «Library» tab, select «Media Sharing», tick on the «Share my media» box on the window that appears and then select «OK». The new window displays the IP numbers of connected devices. To enable the TV to detect the computer, you need to select the television's IP number. If IP is not listed in the window; from «Media Sharing» menu's «Settings» option, you can select the option «Allow new devices and computers automatically» in the pop-up menu. After completing these processes, the television can only view the supported file formats in the Library.
In order not to encounter any problems with media sharing, check the Firewall settings of your modem and computer.
Selecting the digital media server
1 Open the menu with MENU\*.
2 Select the menu item DLNA with or and press OK to confirm.
- »Media Player« menu is displayed.
Note:
If no DMS device appears, check the network connection. See page 31 or 34.
3 Select any DMS device with or and press OK to confirm.
- DMS device content is displayed.

Notes:
File and folder structure of the DMS device in menu may vary depending on the Digital Media Server software in use.
Subtitles are not supported on video files that are played through the DMS device.
Video files played through DMS device support following formats that have obtained DLNA certificate: MPEG_PS_NTSC, MPEG_PS PAL, MPEG_PS_SD_EU and MPEG_PS_EU_ISO.
In videos with high bit rate, lag problem might be seen.
- Folders that appear as unknown in DLNA application cannot be played by the TV. Installing the codec to your computer can solve this problem.
Audio files played through DMS device support following formats that have obtained DLNA certificate: »AAC_ADTS_320«, «LPCM«, «MP3«, «WMABASE« and «WMAFULL«.
Image files played through DMS device support following formats that have obtained DLNA certificate: JPEG_LRG, JPEG_MED and JPEG_SM.
Playback
1 Select the content folder on DMS device with , , or and press OK.
- All titles are displayed. to confirm.
2 Select the desired title with , , or
3 Press to start playback.
Other playback options
Press to pause playback.
2 To resume playback press
3 Press « or » until you reach the desired file.
4 Press to stop playback.
5 Switch back to the content with BACK
6 To exit DLNA feature press EXIT.
7 Confirm the warning screen with (green).
Note:
Also, you can select following playing functions from the menu:
- select repeat functions;
- » « select previous title;
- - picture searche previous;
- , starts/pauses playing;
- > « stops playing;
- > picture search next;
- > select next title.
Information on recording and playing television programmes
- Recording and reproducing programmes, this can only be done with digital television stations (DVB-S, DVB-T and DVB-C).
The digital television stations (DVB-S, DVB-T and DVB-C) you are able to record and playback also depend on the broadcasting station.
- Recording and reproducing programmes, as well as the Time Shift function can only be carried out using an external data medium (hard drive or USB stick).
Recordings can be made with most data mediums on the market. However, we cannot guarantee operation for all data media.
If you record a programme on an external data medium, you can only watch it on your television.
You cannot watch this programme on any other device.
If you send your television to be repaired and hardware components need to be replaced, you might not be able to play the recordings again on the repaired television.
Grundig isn't responsible for any loss of data stored on any external storage device.
It is recommended to play the files saved on DTV by PRnP player. Some recorded files may not play correctly on USB Media Player.
Possible limitations when using an external data medium
Depending on the broadcasting station, you may experience various restrictions on some functions from some television stations.
GRUNDIG has no influence on these restrictions.
- Recording a programme on the external data medium can be disabled by the broadcaster.
If URI^* protected! PVR function blocked is displayed, then recording or time shift is restricted (one recording possible) or disabled (recording not possible) by the broadcaster.
^* URI = user rights information.
If you record and save a programme on the archive of an external data medium, playback can be restricted.
The broadcaster can allow you to see this programme one or more times but could also just make it available for a certain period of time.
Stations from which children are protected, immediately require a PIN number before recording starts. If this authorisation is not given, the recording may not start.
- Copying a programme from a digital television station onto a video or DVD recorder using the «AV1/S-VHS« socket (analog audio/video signal) can also be restricted by the broadcaster. In order to do this, your device must support the copying function.
Connecting external data media
Notes:
It is advised to put the television on stand-by mode before connecting the Skype camera.
Before disconnecting the external data medium, the television must first be switched to standby, otherwise files can be damaged.
There are two USB inputs on the television, namely USB1 and USB2 (HDD)
»USB2 (HDD) « input is intended for USB devices that require additional power (e.g. external hard disk).

1 Plug the external hard disk to the USB2 (HDD) USB interface of the television;
or
plug the memory stick in one of the «USB1« sockets of the television.
Notes:
Both sockets USB1 of the television supports 500~mA current according to the USB standard. Devices such as external hard disk and etc. that consume more power can only be connected to the USB2 (HDD) USB interface of the television.
If you are using a power cable for the external hard disk that you have connected to the «USB2 (HDD)« USB interface, then the power cable of the external hard disk must also be unplugged when the TV is turned off.
You must not disconnect the USB Device from the TV while a file on the USB Device is being read by the TV.
USB recording settings
Selecting the menu
1 Open the menu with MENU\*.
2 Select the menu item PRnP with or and press OK to confirm.
- »Media Player« menu is displayed.
3 Select the option PVR with or and press OK to confirm.
- The content is displayed.
4 Press (green).
- »Media Options« menu is displayed.

5 Select the line Disk Management with V or A and press OK to confirm.
Note:
Additional operations are explained in the following sections.
Disconnecting external data media
1 In the «Disk Management« menu select the line «Safely Remove Disk« with «V« or «A« and press «OK« to confirm.
Note:
- Disk can be safely removed from the socket now.
Selecting external data media
If there are more than one external data media connected to the television, then select one of them.
1 In the «Disk Management« menu select the line «Disk« with «V« or «A« and press «OK« to confirm.
2 Select the external data media with or
3 Switch back with BACK or press EXIT to end the setting.
Selecting a partition on the external media
If there are more than one partitions on the external data media, select one of them.
1 In the «Disk Management« menu select the line «Partition« with «V« or «A« and press «OK« to confirm.
2 Select the desired partition with
3 Switch back with BACK or press EXIT to end the setting.
Testing external data media
You can test the external data media to see if it is suitable for the required functions.
1 In the «Disk Management« menu select the line «Disk« with «V« or «A«. If there are more than one external data media, select the desired data media with «« or «» «.
2 Select the line Partition with or If there are more then one partitions, select the desired partition with or
3 Select the line Check Disk with or and press OK to confirm - Disk information is displayed.
4 Switch back with BACK or press EXIT to end the setting.
Formatting the partition
1 In the «Disk Management« menu select the line «Format Partition« with «V« or «A« and press «OK« to confirm.
2 To confirm deletion process, press (green);
or to cancel deletion process, press (red) button.
3 Switch back with BACK press EXIT to end the setting.
"Pausing" time shift programmes
You can pause any program you are watching. This is a useful function. For instance, if the phone rings when you are watching a movie, you can pause the movie and resume it after the call without missing nothing.
The last scene that was frozen is displayed and time shift is recorded into the external data media.
In Time Shift mode, you can only record as much as the free memory space on the external data media.
You can record current broadcast for approximately 60 minutes.
Note:
For undisturbed "Permanent Timeshift" use an external USB hard disk.
Press during the broadcast.
- Television picture is paused and delay time is displayed.
2 To resume the broadcast, press
- The system continues recording the broadcast while you are watching it.
Note:
Following functions can be used in time shift mode.
- Fast rewind, press « several times for the desired speed;
- Fast forward, press several times for the desired speed;
- To pause press » «.
3 Press to exit the Time Shift function.
- The message «Live Broadcast« appears.
- The scenes in the "time shift memory" are deleted.
Recording programmes
You can record the programmes. Programmes are recorded onto the external data media and the archive is managed via television.
A memory of 44 MB up to 110 MB is required for a 1 minute record.
Other recordings in the archive can be watched while a programme is being recorded.
It is possible to shift channels during recording between unscrambled channels on the same frequency (DVB-T, DVB-C) or on the same transponder (DVB-S).
One-touch programme recording
1 Select the channel with 1 0 or P + >>P - and press to start the recording.
- Recording information is displayed: Recording symbol, channel name, programme time and recording time.
- This information will disappear shortly.
2 To end the recording, press » «.
3 Press (green) to accept; or
to resume recording press (red).
Notes:
- When recording is complete, it will automatically be stored on the external data media.
If you remove the external data media during recording, then the recording is cancelled automatically and no data is recorded onto the external data media.
Recording a programme from the channel list
1 Press OK to open the channel list.
2 Select a channel with « or » and press OK to confirm.
3 Press EXIT to exit from the channel list.
4 Press (red) to start recording.
- Recording information is displayed: Recording symbol, channel name, programme time and recording time.
- These information will disappear after a short while. Recording symbol and recording time will appear on the lower right corner of the screen.
5 To end the recording, press ..
6 Press (green) to accept; or
press (red) to continue the recording.
Programme setting for recording
... with electronic programme guide Electronic programme guide data can be used for recording.
25 EPG reminder and/or recorder can be set in total.
1 Press GUIDE to open the electronic programme guide.
2 Select the preferred TV program with V or A
- Information about the actual TV program is displayed.
3 Press « or » to select the TV program you want to record.
4 To add broadcasts to the timer press OK.
Information for the TV program to be recorded will be displayed.
5 Select the line Record with and press OK to confirm.
- Recording data range appears.
6 Press OK to confirm.
7 Press EXIT to end the menu.
Note:
If the data for the recording is to be changed, open menu with MENU. Select the menu item Schedule List with and confirm with OK. Press (green), change the data and save it with (blue).
Notes:
A warning is displayed before the timer recording starts and counts down for 10 seconds to allow you to switch to the channel. At the end of 10 seconds, the channel to be recorded appears automatically.
If the timer recording starts during playback, playback stops. If you do not select Yes in the warning prompt, recording will start automatically at the end of the countdown.
Only for UPC customers Note: Parts of previous or next files can be included into the record while the programme is being recorded resulting from possible Programme Guide errors. In such cases, keep in mind that the highest family protection level will apply for the whole recording if one or more of those programmes have any level of family protection.
Set the lead/follow-up time
With this function you can change the recording time set by the electronic TV guide.
If you think that a program will start a few minutes earlier or will end several minutes later, you can "add" up to 60 minutes to this time
1 Open the menu with MENU.
2 Select the menu item Schedule List with or < < and press OK to confirm.
3 Activade the «Padding Time« menu with «...» (blue).
4 Change the start time with or>>.
5 Use to switch to the line End and change the end time with or .
6 Save the setting with (green).
7 Press EXIT to end the menu.
... by entering the information manually
25 TV programmes can be preset for the timer recording or as a reminder.
Press GUIDE to open the electronic programme guide.
2 Press (yellow) button.
3 Select the line Manual Record with V or A and press OK to confirm. - Channel is marked.
Note:
If you want to use the reminder function, select the line Manual Reminder\*.
4 From Channel select the channel you want to record with or . To pass to the next item press .
5 In the Date use 1...0 to enter the date you want to record (dd/mm/yyyy). To pass to the next item press
6 In the Start Time use 1 0 to enter starting time (hour:minute). To pass to the next item press
7 In the End Time use 1...0 to enter end time (hour:minute). To pass to the next item press
8 Select Mode( Once, Every Day or Weekly) with or .
9 Select «Save« with «» and confirm with OK. - Recording time range appears.
10 Press OK to confirm. - Recording timer is programmed.
11 Press EXIT to end the menu.
Notes:
A warning is displayed before the timer recording starts and counts down for 10 seconds to allow you to switch to the channel. At the end of 10 seconds, the channel to be recorded appears automatically.
Editing the timer
You can edit programmed timers.
1 Open the menu with MENU\*.
2 Select the menu item «Schedule List« with «» or «> and press OK to confirm. - «Schedule List« menu will be displayed.
3 Select the title of the programme to be changed with or and press (green) to edit the title.
4 With or select the items you want to edit and modify them with 1 0 and .
5 To save the modification, press (blue). - Timer is changed.
6 Press EXIT to end the setting.
Deleting a timer
You can delete programmed timers.
1 Open the menu with MENU\*.
2 Select the menu item Schedule List with or < < and press OK to confirm. - Schedule List menu will be displayed.
3 Select the title of the programme to be deleted with or and and delete the timer with (yellow). - Timer is deleted.
4 To confirm deletion process, press (green); or to cancel deletion process, press (red).
5 Press EXIT to end the setting.
Playback
Either started manually or with the timer function, the recorded programmes are all stored in the external data media. You can display an archive on an external data media from «Media Player« menu.
Selecting a broadcast from the recorded files list
1 Open the menu with MENU<.
2 Select the menu item PRnP with or and press OK to confirm.
- »Media Player« menu is displayed.
3 Select the option PVR with or and press OK to confirm.
- Recorded files are displayed.
4 Select the broadcast you want to play with , , or and start playback with
5 Press to end playback.
- TV returns to media player menu.
Forward/reverse picture search
Press repeatedly to select the playback speed (2x, 4x, 8x, 16x or 32x);
or
press repeatedly to select the playback speed (2x, 4x, 8x, 16x or 32x).
Playback during a recording
You can either watch the current programme that is being recorded or a previously recorded programme while recording takes place.
1 Select the channel with 1 0 or P + _r P - and press to start the recording.
2 To display PVR content press (red) button.
3 Select the programme you want to watch with or and start playback with .
4 Press to stop playback.
5 Press to stop recording.
6 Confirm with (green); or to continue recording, press (red).
Deleting programmes from the recorded files menu
You can delete recorded programmes from the Recorded Files list.
1 Open the menu with MENU\*.
2 Select the menu item PRnP with or and press OK to confirm.
- »Media Player« menu is displayed.
3 Select the option PVR with or and press OK to confirm.
- Recorded files are displayed.
4 Select the broadcasts to be deleted with
5 »To delete the broadcast, press » « (red).
6 Press (green) to confirm deletion process.
Note:
- Files that are being recorded or played back can not be deleted from the »Recorded Files« menu.
7 Press EXIT to end the menu.
File formats
Your television can be operated via the USB input with the following file formats:
Video data
Video compression / decompression (codec) is intended for decreasing the storage area without sacrificing the picture quality.
Your HD Digital Receiver allows you to play compressed video data with, XVID, H.264/ MPEG-4 AVC(L4.1, Ref. Frames:4), MPEG-4, MPEG-2, MPEG-1, MJPEG, MOV standards.
File extensions that the device supports: ".avi", ".mkv", ".mp4", ".ts", ".mov", ".mpg", ".dat", ".vob". In addition to video data, these files also contain audio data compressed and "packaged" by using MP3, AAC, DTS 2.0 or Dolby Digital.
DTS 2.0+Digital Out denotes the dual ability to pass the DTS encoded digital bistream to an external DTS decoder for playback as well as fold down the digital surround soundtrack for playback in a 2-channel environment through analog outputs.Audio data
Your television can play audio data coded with MP3, AAC standards.
MP3 stands for MPEG-1 Volume Level 3 and is based on the MPEG-1 standard developed by MPEG (Motion Picture Expert Group).
AAC indicates the Advanced Audio Coding and is developed by MPEG. AAC provides higher audio quality with the same data rate (bit rate).
WMA (Windows Media Audio) is a compression standard developed by Microsoft for audio data.
These formats enable audio files to be saved on storage devices with a sound quality similar to that of a CD.
File extensions supported by your device: .mp3",.mp2",.wma",.m4a",.aac",.wav" MP3 files can be organised into folders and subfolders similar to the files on a computer.
Image data
Your television can display picture data in JPEG, PNG and BMP formats.
JPEG stands for Joint Picture Experts Group. This process is intended to compress picture files.
PNG and BMP standards are intended to compress picture data without loss.
Picture files can be saved in a data storage medium together with other file types.
Such files can be organized as folders and subfolders.
For DTS patents, see http://patents.dts.com. Manufactured under license from DTS Licensing Limited. DTS, the Symbol, & DTS and the Symbol together are registered trademarks and DTS Studio Sound is a trademark of DTS, Inc. © DTS, Inc. All Rights Reserved.
Connecting external data media
It is advised to put the television on stand-by mode before connecting the external data medium. Connect the device and then switch the television on again.
Before disconnecting the data medium, the television must first be switched to standby, otherwise files can be damaged.
Notes:
The socket USB1 at the side of the television supports 500mA current according to the USB standard. Devices such as external hard disk and etc. that consume more power can only be connected to the USB2 (HDD) interface of the television.
If you are using a power cable for the external hard disk that you have connected to the «USB2 (HDD)« USB interface, then the power cable of the external hard disk must also be unplugged when the TV is turned off.
You must not disconnect the USB Device from the TV while a file on the USB Device is being read by the TV.
A bi-directional data transfer as defined for ITE (Information Technology Equipment) devices in EN 55022/EN 55024 is not possible.
USB transfer is not an operating mode in itself. It is only an additional function.

1 Connect the USB2 (HDD) USB interface on the television and the related data output on the external device (external hard disk, digital camera, card reader or MP3 player) with a USB cable;
or
plug the memory stick in one of the «USB1« sockets at the side of the television.
Removing the external data media
Before removing the external data medium, log off the data medium.
1 Open the menu with MENU\*.
2 Select the menu item «Media Player« with «» or «» and press «OK« to confirm.
3 Select the Option PVR with or and press OK to confirm.
4 Select the »Media Options« with »\*\*\*\* (green).
5 Select the line Disk Management with V or A and press OK to confirm.
6 Select the line « Safely Remove Disk« with «V« or «A« and press «OK« to confirm.
7 Remove the data medium from the socket.
The file browser
The file browser displays the video, audio and picture data that the external data medium provides.
If a data medium contains different file formats, you can deactivate data (Video file, Audio file, Picture file) you do not need for the playback using a filter function.

The main menu of the file browser
1 Preview.
2 Data medium selection.
3 Data type.
4 Name of the data medium.
5 Folders on the data medium.
6 Menu navigation.
Settings in the USB setup menu
Selecting the menu
1 Open the menu with MENU\*.
2 Select the menu item «Media Player« with «» or «» and press «OK« to confirm.
3 Select the external data medium with or and press OK to confirm.
4 Select the »Media Options« with » « (green).
5 Select the line «Disk Management« with «V« or «A« and press «OK« to confirm.
Note:
Additional operations are explained in the following sections.
Selecting the display mode
1 Select the line View Mode with or
2 Press or to select the function.
3 Press EXIT to end the setting.
Switching to automatic preview
If the automatic preview is switched on, you can see the selected file in the main menu of the file browser.
1 Select the line Auto Preview with or
2 Press or to switch the function on.
3 Press EXIT to end the setting.
Selecting the display duration of the slide show
1 Select the line Slide Show Interval with or
2 Select the time (3, 5, 10 seconds) with « or «.
3 Press EXIT to end the setting.
Subtitle settings
If the film has subtitles, you can turn on and off this subtitle, change its size, colour or eliminate synchronisation shift with the subtitle.
1 From »Media Options« menu use «V« or «A« to select «Show Subtitle«, «Subtitle Size«, «Subtitle Color« or «Subtitle Offset Value«.
2 Adjust with
3 Press EXIT to end the setting.
Note:
These adjustments can only be made for external subtitle files. These adjustments cannot be made in subtitles combined with the movie.
Playback basic functions
1 Open the menu with MENU.
2 Select the menu item Media Player with or << and press OK to confirm. - Media Player menu is displayed.
3 Select the external data medium with or and press OK to confirm. Media Player menu of the selected external data medium is displayed.
Note:
If the content of the external data medium is not displayed, press (yellow) to refresh.
4 Select the push button Type with A and A and press OK to confirm.
5 Select the desired type (Movie, Music or Photo) with « or « and press OK to confirm.
6 Select the folder with V or A and press OK to open it. A list of subdirectories appears.
Note:
Go back to the previous folder with BACK
7 Select the track or picture with , >> or >> and press >> to start playing.
Notes:
When playing picture data, press 2 to view information about the resolution and the size.
For playing MP3 or WMA data, information on the album, track and singer is displayed at the left of the menu.
When playing picture data, press to switch on a control panel.
Press » to pause playback.
9 To resume playback press «.
10 Press » « to end playback. - The file browser appears.
Notes:
Use to select Up Folder, when you would like to return to the last folder.
It is possible that some files that are supported in USB mode do not operate due to some problems that may arise depending on how such files are created (compression) although they contain the supported file extension.
If there are more then one audio sources (audio stream) in the video files that are being played, then you can switch between the audio sources with the « while the file is played in full screen mode.
Movies you will be watching from the movie file only supports subtitles with .srt, .sub, .ass, .ssa, .smi format. Names of the subtitle and movie files must be the same. Otherwise, subtitle can not be displayed.
Additional playback functions
Depending on the file formats used, the following additional functions are possible.
Selecting partition
(only supported video files)
1 During playback, select the next chapter with
2 During playback, select the previous chapter with
Selecting titles
(only supported video files)
1 During playback, select the next title with
2 During playback, select the previous title with
Playing selected tracks
Only play the marked tracks.
1 Select the track you want with , >> < < 或 > > 1 and highlight with (yellow).
2 Select the track you want with , < or > and highlight with (yellow).
3 Start playback with
4 Press to end playback.
Note:
To remove the highlighting, select the track with or and remove the marking with (yellow).
Selecting a track or picture in steps (SKIP)
1 During playback, select the next track/picture you want with
2 Select the previous track/picture with Playback begins with the track or picture you selected.
Move to desired time
(only video files)
1 Press OK during playback.
2 Enter the time that you want to move to with 1 0 and confirm with (green).
Searching forward
(only video and audio files)
You can select different speeds (2-fold, 4-fold, 8-fold, 16-fold and 32-fold forwards and backwards).
1 During playback you can select playback speed by pressing « or » «.
2 To resume playback press
Turn the picture display
(only picture files)
The pictures can be rotated by 90^ .
1 During playback, switch on the control panel with OK.
2 Use « or « to select « and press OK.
- The picture rotates 90^ clockwise.
Repeat functions
Options:
- One, the selected track is repeated once;
- Sequence, selected tracks are repeated consecutively;
- Random, selected tracks are repeated in a mixed order;
- None , repetition off.
Press to start playback.
2 During playback, switch on the control panel with OK.
3 Select C_G with or and press OK repeatedly.
- The repeat function will change.
Note:
If you only want to use this "normal" video text, disable the digital video text, see page 90.
TOP text or FLOF text mode
1 Press TXT to switch to the Teletext mode.
2 You can select teletext pages directly with «1...0« or step by step with «V« or «A«.
To return to page 100, press
Note:
At the bottom of the screen, you will see an information line consisting of a red, green and, depending on the channel, yellow and blue text field. Your remote control has buttons with the corresponding colours.
3 Press (red) to scroll one page back.
4 Press (green) to scroll one page forward.
5 Press (yellow) to select section.
6 Press (blue) to select topic.
Press TXT to exit the Teletext mode.
Normal text mode
1 Press TXT to switch to the Teletext mode.
2 You can select teletext pages directly with 1 0
To return to page 100, press
3 Press P to scroll one page back.
4 Press P + to scroll one page forward.
5 Press TXT to exit the Teletext mode.
Additional functions
Skipping the waiting time
While a page is being searched for, you can switch to the television channel.
1 Enter the teletext page number with 1 0 and then press
- As soon as the page is found, the page number is displayed.
2 Press » « to switch to the teletext page.
Increasing character size
If you have difficulty reading the text on the screen, you can double the character size.
To enlarge the character size of a teletext page, press repeatedly.
Page stop
A multiple page may contain several sub-pages, which are automatically scrolled by the transmitting station.
1 Stop the sub-pages with
2 Press » « to quit the function.
Calling up a sub-page directly
If the selected teletext page contains further pages, the number of the current sub-page as well as the total number of pages is displayed.
1 Call up the sub-page with
2 Press « (red) or « (green) to select a sub-page.
3 Press to quit the function.
Reveal answer
Certain teletext pages contain "hidden answers" or information which can be called up.
1 Display information with
2 Conceal the information with
Splitting the screen (Split Screen)
With this function you can see the television channel on the left and the teletext page on the right.
1 To activate the split screen function, press «.
- Television channel and teletext page appear side by side on the screen.
2 To deactivate the split screen function, press «.
What is HbbTV?
HbbTV provides next generation interactive teletext broadcast with its modern structure, content and high definition (HD) image and videos.
To receive HbbTV broadcast, your television must be connected to the Internet.
This service provided by ARD includes "Das Erste Mediathek" along with teletext restructured graphically with high definition images. ZDF service includes "ZDF mediathek" and other programme information.
This feature is only available in countries where the service is provided.

Using HbbTV
When you switch to a TV program that supports HbbTV, an info message will appear stating that HbbTV broadcast is available.
Press * (red) to open HbbTV.
- Information regarding the services will appear on the screen. Additionally, colored buttons necessary for browsing the menus will also appear.
Note:
The range of subjects and selection of individual subjects depend on the programme provider.
Numeric buttons 1 through 0 are used for additional functions.
2 Press (green), (yellow) or (blue) to select the desired topic field.
3 Select the option you want with , >> or in the selected topic field and confirm with OK.
4 Press * (red) to close HbbTV.
Additional functions for video indexes
1 Start playback with
2 Pause playback with
3 Resume playback with
4 Rewind by forward by
5 Stop playback with «.
TV Settings
1 Open menu with MENU button.
2 Activate the menu item >Settings> with OK<.
3 Select the menu item TV Settings with or and press OK to confirm. -TV Settings menu is displayed.

Note:
Additional operations are explained in the following sections.
Language & Keyboard settings
Changing the menu language
1 Select the line «Language & Keyboard« with «V« or «A« and press «OK« to confirm.
2 Select the line Menu Language with V or A and press OK to confirm.
3 Select menu language with , , or and press OK to confirm.
4 Press BACK to go back one menu level or press EXIT to end the setting.
Changing the audio language
(only for digital television channels)
You can define a primary and a secondary audio language.
1 Select the line «Language & Keyboard« with «V« or «A« and press «OK« to confirm.
2 Select the line «Audio Language« with «V« or «A« and press «OK« to confirm.
3 Select the audio language with , >> or and press (red) to set it as the primary audio language or (green) to set it as the secondary audio language. - Primary and secondary languages appear on the upper left corner of the menu.
4 Press BACK to go back one menu level or press EXIT to end the setting.
Changing the subtitle language
(only for digital television channels)
You can disable subtitles, select subtitle language and assign a secondary subtitle language.
1 Select the line «Language & Keyboard« with «V« or «A« and press «OK« to confirm.
2 Select the line Subtitle Language with or and press OK to confirm.
3 Select the subtitle language with >> < , < or > and press * (red) to set it as the primary subtitle language or * (green) to set it as the secondary subtitle language.
- Primary and secondary languages appear on the upper left corner of the menu.
4 Press BACK to go back one menu level or press EXIT to end the setting.
Changing the keyboard language
You can select the language of the keyboard connected to television.
1 Select the line «Language & Keyboard« with «V« or «A« and press «OK« to confirm.
2 Select the line «Keyboard Language« with «V« or «A« and press «OK« to confirm.
3 Select the keyboard language with >> , < or > and press OK to confirm.
4 Press BACK to go back one menu level or press EXIT to end the setting.
Accessibility settings
1 Open menu with MENU button.
2 Activate the menu item >Settings> with OK<.
3 Select the menu item TV Settings with or and press OK to confirm.
4 Select the line «Accessibility Settings« with «V« or «A« and press «OK« to confirm.
Note:
Additional operations are explained in the following sections.
Subtitle Mode
(only for digital television channels)
Subtitles for the deaf and hard of hearing can be switched on and off.
1 From the «Accessibility Settings« menu use «V« or «A« to select the line «Subtitle Mode«.
2 Set the preferred option Off, Hard of Hearing or Basic with or
3 Press BACK to go back one menu level or press EXIT to end the setting.
Audio description (audio subtitles)
Audio description is an additional audio channel for people who are visually handicapped. The activities, surroundings, scene changes or the appearance, the gestures and facial expressions of the actors are described.
This sound is transmitted at the same time as the normal sound with digital television stations. This depends on the programme being broadcast.
1 From the Accessibility Settings« menu use « or « to select the line « Audio Description«.
2 Select On with or>>.
3 Select the line Audio Description Volume with or and use or to adjust volume.
4 Press BACK to go back one menu level or press EXIT to end the setting.
Accessories
Display the status of the connected accessory from this menu to perform various adjustments.
1 Open menu with MENU button.
2 Activate the menu item >Settings> with OK<.
3 Select the menu item TV Settings with or and press OK to confirm.
4 Select the line Accessories with V or A and press OK to confirm.
5 Select the needful line with or and press OK to confirm.
Select the needful function with 或
6 Press BACK to go back one menu level or press EXIT to end the setting.
Notes:
- Accessories are sold individually. They are not provided with your TV. Please contact your dealer from where you have purchased your TV in order to obtain more information about purchasing.
Die Anzeige des Status und die Einstellungen sind abhängig vom verwendeten Zubehor.
Advanced settings
1 Open menu with MENU button.
2 Activate the menu item >Settings> with OK<.
3 Select the menu item TV Settings with or and press OK to confirm.
4 Select the line Advanced Settings with or and press OK to confirm.
Note:
Additional operations are explained in the following sections.
Auto sleep
This function will turn the television to stand-by mode in 4 hours depending on your setup, unless the television receives any signal, or keys or, according to European regulations, the remote remains untouched for 5 minutes.
1 From the Advanced Settings< menu use or to select the line Auto Sleep<.
2 Select the switch-off time with 或
Note:
Set the function to Off with or to switch off.
3 Press BACK to go back one menu level or press EXIT to end the setting.
Fast switching
Using this function the time is taken to switch between channels is changed. (Setting «Yes« 1 to 2 seconds, setting «No« 2 to 5 seconds.)
1 From the Advanced Settings« menu use « or « to select the line «Fast Zapping''.
2 Activade the function with or ( Yes ).
3 Press BACK to go back one menu level or press EXIT to end the setting.
Store logo view
This function is intended for feature introduction at stores. When «On« is selected, feature logos are displayed.
1 From the Advanced Settings menu use or to select the line Shop Logo Display
2 Select Yes with or>>.
Note:
Set the function to No with or to switch off.
3 Press BACK to go back one menu level or press EXIT to end the setting.
Power LED brightness
You can adjust power (stand-by) LED brightness in operation mode of television.
1 From the Advanced Settings« menu use «V« or «A« to select the line «Power LED Brightness«.
2 Use « or » to set the brightness to « High«, « Medium « or « Low «.
3 Press BACK to go back one menu level or press EXIT to end the setting.
Power save mode
It ensures automatic shut off of screen in Antenna, Cable, Satellite and radio channels and USB mode when playing audio files.
1 From the Advanced Settings menu use or to select the line Power Saving Mode.
2 Press « or » to set shut off time of display as 10 Seconds«, 30 Seconds«, 60 Seconds«.
3 Press BACK to go back one menu level or press EXIT to end the setting.
Note:
If the screen closes while listening to music in USB mode, press >MENU and select Off with << or >> to close the feature.
Functions in the "About" menu
1 Open menu with MENU button.
2 Activate the menu item >Settings> with OK.
3 Select the menu item TV Settings with or and press OK to confirm.
4 Select the line About with or and press OK to confirm.
Note:
Additional operations are explained in the following sections.
Product information
1 From the «About« menu use «V« or «A« to select the line «Product Information« and press «OK« to confirm.
- Software version information of the product is displayed.
2 Press BACK to go back one menu level or press EXIT to end the setting.
Software update (OAD)
(only for digital television channels)
1 From the «About« menu use «V« or «A« to select the line «Software Updates« and press «OK« to confirm.
2 Select the option OAD with or and press OK to confirm.
- The search for new software is being carried out.
Note:
If no new software is available the menu automatically switches off.
3 If new software is available, press (green) to install the software.
- The new software will be loaded.
Warning:
Television will restart after update. Do not turn your television's power off during updates.
Note:
For automatic checking of software update, select from Source Setup menu Advanced Settings the line OAD with or Use or to select On.
Software update (Internet)
(only for digital television channels)
1 From the «About« menu use «V« or «A« to select the line «Software Updates« and press «OK« to confirm.
2 Select the option Internet with or >> and press OK to confirm.
- The search for new software is being carried out.
Note:
If no new software is available the menu automatically switches off.
3 If new software is available, press (green) to install the software.
- The new software will be loaded.
Warning:
Television will restart after update. Do not turn your television's power off during updates.
Software update (USB)
1 Plug the memory stick in one of the «USB« sockets at the side of the television.
2 From the «About« menu use «V« or «A« to select the line «Software Updates« and press «OK« to confirm.
3 Select the option USB with or and press OK to confirm.
- The software on the USB memory stick is installed.
Resetting the television to its original state
This function enables you to delete the station lists and all custom settings.
1 From the «About« menu use «V« or «A« to select the line «Restore Factory Defaults« and press «OK« to confirm.
- Warning screen will be displayed.
Note:
If the loaded applications are also to be deleted, select the line «Installed applications« by pressing «A« and remove the small tick with «OK«.
2 Press (green) to confirm the reset function.
- In a short while Installation Guide is displayed.
3 Continue the settings as described in the chapter on first installation and searching for channels on page 16.
Deleting channel history
This function allows you to delete channel history stored in the Main menu.
1 From the «About« menu use «V« or «A« to select the line «Delete Channel History« and press «OK« to confirm.
2 Press (green) to confirm the reset function.
- The preview images in the main menu are deleted.
Timer settings
1 Open menu with MENU button.
2 Activate the menu item >Settings> with OK<.
3 Select the menu item «Timer Apps« with «» or «» and press «OK« to confirm. - «Timer Applications« menu is displayed.

Note:
Additional operations are explained in the following sections.
Sleep timer
In the «Sleep Timer« menu you can enter a time for the television to switch off. After this time has elapsed, the television switches to standby mode.
1 Select the line Sleep Timer with or
2 Select the switch-off time with or
Note:
To switch off the function, use or to set the switch-off time to Off .
3 Press BACK to go back one menu level or press EXIT to end the setting.
On timer
In the On Timer menu, you can enter a switch-on time for the television.
The television switches on with the preset volume and the desired channel after the set time in stand-by mode has elapsed.
1 Select the line Auto On with V or A and press OK to confirm.
2 Select the line Mode with or and use or to select when the television should switch on.
3 Select the line Input Source with or and use or to select the input source.
4 Select the line Service Type with or and use or to select the preferred option (ATV, DTV, Radio or DATA).
5 Select the line Channel with or and use or to select the preferred channel.
Note:
The line Channel is only active when the input signal currently in use has been set. If no entry has been made, then the first channel of the selected input source will be used.
6 Select the line Volume with or and use 或 to set the volume.
7 Select the line Set Hour with or and enter the time with 1 0
8 Press (blue) to save the setting.
9 Press BACK to go back one menu level or press EXIT to end the setting.
Auto Off
In the «Auto Sleep« menu, you can enter a switch-off time for the television. The television switches to stand-by after the entered time has elapsed.
1 Select the line Auto Off with V or A and press OK to confirm.
2 Select the line Mode with or and use < or > to select when the television should switch off.
3 Select the line Set Hour with or and enter the time with 1 0
4 Press · · · · · · · (blue) to save the setting.
5 Press BACK to go back one menu level or press EXIT to end the setting.
Date and time settings
1 Open menu with MENU button.
2 Activate the menu item >Settings> with OK.
3 Select the menu item «Timer Apps« with «» or «» and press «OK« to confirm.
4 Select the line Advanced with or and press OK to confirm.
Note:
Additional operations are explained in the following sections.
Auto tuning
The television automatically detects the local difference to Greenwich Mean Time (the selected channel provides a time signal).
1 From the Advanced menu use V or to select the line Date & Time Set. and press OK to confirm.
2 Select the line Mode with and then select the option AUTO with or - Date and time are automatically updated;
3 Press BACK to go back one menu level or press EXIT to end the setting.
Manual tuning
You can set the local time difference yourself if the time is not detected or is not the same as your local time.
1 From the Advanced menu use V or A to select the line Time Adjustment and press OK to confirm.
2 Select the option Manual with or - Time Zone and Daylight Saving a active.
3 Select the line Time Zone with or and press OK to confirm. - The Time zone selection menu is displayed.
4 Adjust the time zone with V or and press OK to confirm.
5 Select the line Daylight Saving with V or A and then select the option Auto, Off or On with or
6 Press BACK to go back one menu level or press EXIT to end the setting.
Note:
If the option «Auto« is selected in the line «Time Adjustment», the television set automatically adapts the time to the time signal from the respective broadcaster. However, different channels may also use time bases which are different to those of your country e.g. foreign broadcasters. In these cases, reminders and planned recordings may be annulled due to the time difference.
Parental settings
1 Open menu with MENU button.
2 Activate the menu item >Settings with OK.
3 Select the menu item Parental Guidance with or and press OK to confirm. - Parental Guidance menu is displayed.

Note:
Additional operations are explained in the following sections.
Parental Guidance
There are movies with content or scenes which are not suitable for children.
Certain programmes contain information which identifies such content or scenes and have been given an access level from 4 to 18. You can select one of the access levels and thus authorise the playback.
1 From the Parental Guidance menu use or to select the line Parental Guidance and press or to confirm.
2 Enter the PIN code 1234 with 1 0 in the password prompt.
3 Select the access level with « or »».
4 Press BACK to go back one menu level or press EXIT to end the setting.
Note:
When the TV is in review buffer mode, the parental rating of the program in the live broadcast is applied on the content being watched (rather than the actual parental rating of the content being watched). As a result, a parental rated content being watched in the review buffer mode will not necessarily show as parental rated and vice versa. This means that if parental rated program starts in live broadcast the PIN-pop up message will appear in review buffer, or the PIN-pop up message will be dismissed in review buffer as soon as a program without parental rating starts in live broadcast."
Locking the menus
By using this function, you can lock Automatic Channel Search«, Manual Channel Search« and Channel Editor« menus as to be accessed only when the PIN code is entered.
1 From the Parental Guidance menu use or to select the line Menu Lock and press or to confirm.
2 Enter the PIN code 1234 with 1 0 in the password prompt.
3 Activate the lock with 或 ( On)
Note:
To switch off the menu lock, use « or » to select the setting («Off»).
4 Press BACK to go back one menu level or press EXIT to end the setting.
Blocking the multifunction switch
When the key lock is activated, the multi function switch on the television does not function.
1 From the Parental Guidance menu use or to select the line Keypad Lock and press or to confirm.
2 Enter the PIN code 1234 with 1 0 in the password prompt.
3 Activate (On) or deactivate (Off) the panel lock with or
4 Press BACK to go back one menu level or press EXIT to end the setting.
Changing the PIN code
Instead of the default code 1234 you can enter a personal code.
Please take note of your personal code.
1 From the Parental Guidance menu use V or A to select the line Change PIN and press < or > to confirm.
2 Enter the current PIN code 1234 with 1 0
3 Enter your new four-digit personal PIN code with 1 0
4 Reenter your personal PIN code with 1 0
5 Press BACK to go back one menu level or press EXIT to end the setting.
Blocking a television channel
You can block individual television channels which are not suitable for children using a personal PIN code.
1 Open menu with MENU button.
2 Activate the menu item >Settings with OK.
3 Select the menu item Source Setup with or < < and press OK to confirm.
4 Select the line Channel Editor with V or A and press OK to confirm.
5 Select the channel to be blocked with >> , or and highlight with OK. Channel is marked with
6 Activade the «Tools« menu with «...» (yellow).
7 Select the line Channel Lock with or and press OK to confirm.
8 Enter the PIN code 1234 with 1 0 in the password prompt.
9 Confirm the entry with OK<. -Channel is marked with >
Note:
To remove the lock, select the channel again with , , or , activate the Tools menu with (yellow), select the line Unlock Channel with or and press OK to confirm
10 Press EXIT to end the setting.
Watching a blocked television channel
You can watch a TV channel blocked with PIN code by selecting the TV channel and entering the PIN code.
1 Select the blocked channel with 1 0 or P + , P - .
2 Enter the PIN code 1234 with 1 0 in the password prompt. -Blocked channel can be viewed.
Note:
- Channel will be blocked again when you change the channel.
DIGI LINK

Your television is equipped with DIGI LINK feature. This feature utilizes CEC (Consumer Electronics Control) protocol. CEC allows you to make an HDMI
connection between your TV and DVD player, STB or video recorder and control such equipments with the remote control of the television. This feature must also be supported by the device you will connect.
You television supports the following functions. For detailed information about this function, read user manual of the external device.
Turning on external device from standby mode
When you switch on your external device (e.g. DVD player) from standby mode, your television will be turned on from standby mode as well and it will switch to the HDMI source that the external device is connected to.
Depending on the features of the external device (e.g. AV receiver) can start and your television can stay on stand-by mode.
Selecting the HDMI source from the television
When you switch on your external device (e.g. DVD player), your television will switch to the HDMI source that the external device is connected to. (your TV should be open).
Selecting the menu language
When you select menu language on your TV, menu language of the external device will change as well. (If your DVD player supports)
Switching off the device from standby mode
After switching your television to standby, your external device (e.g. DVD player) will also switch to standby if it is switched on.
DIGI LINK is always active on your television.
Refer to the user manual of your external device to learn how to activate this feature on it.
Searching and selecting the active external device
You can connect up to 11 devices that support DIGILINK to this television.
1 Open the Tools menu with «TOOLS«.
2 Select the line «Digilink« with «V« or «A« and press «OK« to confirm.
- Connected devices are searched and the ones that are found are displayed on the Device List menu.
3 Select the device that you want to control with V or A and mark it with OK .
- If the selected device is connected to a different source than the current one, you will automatically switch to the source to which the device is connected.
Device Control
You can determine how the remote control of your television will control the external device.
1 Press and use or to select either one from HDM11 to HDM14 and press OK to confirm.
2 Open the menu with MENU\*.
3 Activate the menu item «Settings« with «OK«.
4 Select the menu item Source Setup with or and press OK to confirm. - Source Setup menu is displayed.

5 Select the line Remote Behavior with or .
6 Select control type (»Pass-Through «, »Deck « or »Zap«) with « or «.
Notes:
Pass-Through is included in the menu as an option that can be selected in every device type. Deck Control and Tuner Control options change depending on the external device connected.
Apply trial and error method to determine the functions of the remote control buttons for the selected control type.
Refer to the user manual of the DIGILINK compatible device for its functions.
7 Press EXIT to end the setting.
Switching the device to standby
This option switches the connected external device to standby.
1 Press and use or to select either one from HDM1 to HDM4 and press OK to confirm.
2 Open the menu with MENU.
3 Activate the menu item >Settings> with OK<.
4 Select the menu item Source Setup with or and press OK to confirm. - Source Setup menu is displayed.
5 Select the line Put device into standby with or and press OK to confirm.
- The connected external device is switched off.
High definition - HD ready

Your television can playback high-definition television signals (HDTV).
You can connect the input sources (HDTV set-top box or High
Definition DVD player) to the «HDMI« socket (digital HDTV signal).
This ensures that you can view digital HDTV programmes, even if they are copy-protected (HDCP High Bandwidth Digital Content Protection).
Connection options
- Which television socket(s) you connect your external devices to depends on the sockets the external device is equipped with and the signals which are available.
Note that with many external devices the resolution of the video signal must be adapted to the input sockets on the television (check the external device's instruction manual). You can find out which values you need to set by referring to the guidelines in the section about connection options.
- Do not connect any other equipment while the device is switched on. Switch off the other equipment as well before connecting it.
Only plug the device into the mains socket after you have connected the external device.


Connecting an external device
With a digital audio/video signal
Suitable devices: Digital satellite receiver, game console, BluRay player, DVD player/ recorder, set-top box, notebook, PC.
Video signal: digital image; definition: standard 576p; HDTV 720p, 1080i, 1080p.
Audio signal: digital sound (stereo, multichannel compression, uncompressed).
Channel position HDMI11, HDMI2, HDMI3 or HDMI4.
1 Connect the HDMI1 _, , HDMI2 _, , HMI3 _, or HMI4 (ARC) _, socket on the television and the corresponding HDMI socket on the external device using a standard HDMI cable (digital video and audio signal).
With an analogue video signal (progressive)
Suitable devices: DVD player/recorder, game console.
Video signal: YUV; definition: standard 576p; HDTV 720p, 1080i, 1080p.
Audio signal: stereo, analog.
Channel position Component\*.
1 Connect the PC-IN sockets on the television and the corresponding sockets on the external device using cinch cables (video signal).
2 Connect the PC Audio IN × sockets on the television to the corresponding sockets on the external device using cinch cables (audio signal).
Using the Euro/AV socket
Suitable devices: Digital satellite receiver, DVD player/recorder, set-top box, game console, video recorder, decoder.
Video signal: CVBS/RGB.
Audio signal: stereo, analog.
Channel position SCART.
1 Connect the AV1/S-VHS input on the television to the corresponding socket on the external device using EURO/AV cable (video and audio signal).
Selecting Scart volume adjustment
1 Open the menu with MENU\*.
2 Activate the menu item >Settings> with OK<.
3 Select the menu item «Sound Settings« with «or « and press OK to confirm. - «Sound Settings« menu is displayed.
4 Select the line Advanced with or and press OK to confirm.
5 Select the line «Scart Output« with «V« or «A».
6 Select the option Fixed or Adjustable with or
Note:
Scart Volume becomes active when Adjustable is selected in the menu.
7 Select the line Scart Volume with or and adjust the volume by using or .
8 Press EXIT to end the setting.
With S-Video signal
Suitable devices: DVD player/recorder, video recorder, camera recorder, notebook, PCs.
Video signal: Y/C.
Audio signal: stereo, analog.
Channel position «S-VIDEO«.
1 Connect the AV1 / S - VHS\& socket on the television to the corresponding socket on the external device using EURO/AV cable (video and audio signal).
Using a DVD recorder, DVD player, video recorder or set-top box
Switch on the video recorder, DVD player or set-top box and select the function you wish to use.
2 Press and use or to select input signal (SCART, S-VHS, HDMI1, HDMI2, HDMI3, HDMI4 (ARC) or COMPONENT) and press OK to confirm.
Headphones
Connecting headphones
Plug the headphone jack (3.5 mm ø jack plug) into the headphone socket of the television.
Selecting the sound settings for the headphones
1 Open the menu with MENU\*.
2 Activate the menu item >Settings> with OK<.
3 Select the menu item «Sound Settings« with «or « and press OK to confirm. - «Sound Settings« menu is displayed.
4 Select the line Advanced with V or A and press OK to confirm.
5 Select the line Headphone Volume with or
6 Adjust the volume with
7 Press EXIT to end the setting.
Note:
Prolonged listening at loud volumes with the earphones can damage your hearing.
Hi-fi system
Connecting digital multi-channel amplifier/AV receiver
1 Connect the »HDMI4 (ARC)« (HDMI 1.4 Audio Return Channel) socket to the relevant socket on the HDMI ARC compliant Digital multichannel amplifier / AV receiver with a standard HDMI cable (digital audio signal); or
2 Connect the «Optic Out« socket on the television to the corresponding socket on the AV receiver using a standard optic digital cable (digital audio signal).
Important:
- Do not use a HDMI cable longer than 5m for HDMI ARC connection.
Apply the device with HDMI ARC function and activate HDMI ARC
Switch on the multi-channel amplifier or the AV receiver. If a Blu-ray Player is connected on the AV receiver, the player must be switched on, too.
2 Open the tools menu with TOOLS\*.
3 Select the line Digilink with or and press OK to confirm.
- Audio device connected to the »HDMI4 (ARC) « source in the »Device List« menu shall be displayed in the list.
4 Start device search with «… (blue).
- Audio device connected to the «HDMI4 (ARC)« source shall be displayed in the list.
5 Select the device with V or A and press OK to confirm.
Note:
If the audio system also has a playing function (e.g. Home theater system including DVD player function), two devices will be listed on the HDMI CEC list. The first one is the player, and the second one is the audio playback.
If a Blu-ray Player is connected to the AV receiver, please remove the Disc from the Player during the registration.
6 Open the menu with MENU.
7 Activate the menu item >Settings> with OK<.
8 Select the menu item «Sound Settings« with «or « and press OK to confirm. - «Sound Settings« menu is displayed.
9 Select the line Advanced with or and press OK to confirm.
10 Select the line ARC with or
11 Press or to select On.
Manufactured under license from Dolby Laboratories. Dolby and double D symbols are trademarks of Dolby Laboratories.
Notes:
The internal speakers of the television are switching off automatically.
The volume of the AV receiver you can adjust with the remote control of the television.
For switching off the HDMI ARC function select Off with or
The ARC function will be deactivated while switching off the television and the internal speakers are active again.
12 Press EXIT to end the setting.
Playing the audio signal via the HiFi system
1 Connect the socket on the television and the corresponding socket on the hi-fi system / AV receiver using a adapter cable.
Note:
When this function is activated, the hi-fi system / AV receiver (connected to socket transmits the audio signal.
2 Open the menu with MENU\*.
3 Activate the menu item >Settings with OK.
4 Select the menu item «Sound Settings« with «or « and press OK to confirm. - «Sound Settings« menu is displayed.
5 Select the line Advanced with V or A and press OK to confirm.
6 Select the line Audio Out with or
7 Select the option Fixed or Adjustable with or
Notes:
If you select »Adjustable«, the volume can be changed in the menu option » Audio Out Volume«.
If you want to obtain the audio output only from hi-fi system / AV receiver, select the option «Off« in the line «TV Speaker with «or »»
8 Press EXIT to end the setting.

What is LIVESHARE?
Liveshare is a wireless technology featured with Android operating system and used to reflect the screen of your mobile device which supports this feature to your television supporting Liveshare. By using this technology you can share your device's content, present a slide show or play your favorite game on a larger screen.
Screen share with Liveshare connection
1 Connect Grundig WiFi USB dongle to the «USB1« or «USB2(HDD)« socket of your television in order to connect the television to a wireless network.
2 Open the menu with MENU\*.
3 Select the menu item «Screen Share« with «» or « and press OK to confirm. - «Liveshare« menu is displayed.
4 Start Liveshare application from your laptop PC or mobile device and select your television.
- Liveshare will begin in a short while and the screen image of your laptop PC or mobile device will be reflected on the television.
5 Press EXIT to end Liveshare.
Note:
To find out if your laptop PC or mobile device supports Liveshare feature or not, please visit the Website of the manufacturer.

Connecting a PC
1 Connect the socket PC-IN × on the television to the corresponding socket on the PC using a VGA cable.
2 Connect the «Audio« socket on the television to the corresponding socket on the PC using a suitable cable.
Note:
Adjust your PC to the monitor (for example, picture resolution 1280 x 768, picture frequency 60 Hz).
Selecting the channel position for the PC
1 Press « and use « or « to select input signal «PC«, then confirm with «OK«.
Settings for the PC
1 Open the menu with MENU\*.
2 Activate the menu item >Settings> with OK<.
3 Select the menu item Source Setup with or < < and press OK to confirm. - Source Setup menu is displayed.

4 Select the function and setting you want using or and set with .
Options:
- »Auto Adjust«, for automatic PC configuration;
- »Auto Adjust Mode«, when set to «On«, automatically makes adjustments in PC mode;
- Position, adjusts the picture position horizontally and vertically;
- Size, sets the cycle frequency;
- Phase , removes horizontal flicker, blurring and horizontal lines.
5 Press EXIT to end the setting.

What is common interface?
Common Interface (CI) is an interface for DVB receivers.
Encrypted channels can only be viewed with a CA module suitable for the encryption system and the corresponding smart card.
The television set is equipped with a Common Interface slot into which CA modules from various providers can be inserted.
- You can insert the provider's smart card into the CA module in order to enable the encrypted channels you want to see.
Inserting the CA module
Note:
Switch off the device before inserting the CA module in the slot.
1 Insert the smart card into the CA module.
2 Insert the CA module with the smart card into the «Cl« slot on the television.
Note:
To see which CA module is in the Common Interface slot, go to the «CA - Module« submenu.
When you insert a CA module into the CI slot on the television for the first time, wait a few moments until the television has registered the CA module.
Access control for CA module and smart cards
1 Open the menu with MENU\*.
2 Activate the menu item >Settings> with OK.
3 Select the menu item Source Setup with or < < and press OK to confirm. - Source Setup menu is displayed.
4 Select the line Advanced with V or A and press OK to confirm.
5 Select the line CA-Module with V or A and press OK to confirm.
Notes:
This menu provides operating instructions and - after you enter your PIN code - access to channels of the PAY-TV provider.
The remaining settings are described in the manuals for your CA module and smart card.
The CA modul is not supported in some countries and regions. Please consult your authorised dealer.
6 Press EXIT to end the setting.
Searching for all digital television channels from a satellite automatically
New satellite channels are added or satellite data is changed frequently. Therefore, we recommend you to run auto search function from time to time.
All transponders are scanned for new channels.
1 Open the menu with MENU.
2 Activate the menu item >Settings with OK.
3 Select the menu item Source Setup with or < < and press OK to confirm. - Source Setup menu is displayed.

4 Select the line Automatic Channel Search with V or A and press OK to confirm.
- Menu is displayed.
5 Select the option Satellite with < < or > > < and press OK to confirm.
6 Confirm the push button »Next Page« with OK «.
7 Select the Channel Type.
Press « or » to select whether you want to search for only digital channels (Digital) or only radio channels (Radio) or both (Digital + Radio) and press OK« to select and mark or unmark the « Digital « and/or « Radio « items.
8 Select Scan Type.
To select whether you want to search for only free digital television channels (Free), only scrambled digital television channels (Scrambled) or both (Free + Scrambled), press « or » and press OK « to select and mark or unmark the « Free » and/or « Scrambled » items.
9 Press the red button to start searching.
Notes:
- When updating via the same satellites a security query is displayed at the start of a search.
If the previously stored channels should be retained in the channel list and the new channels found be added to it, then press (green).
If (red) is pressed, the saved channels will be deleted from the current channel list.
- The «Digital Searching« menu appears, and the scan for TV channels begins.
- The search is complete as soon as the message «Search is completed!« appears.
Note:
The search can be aborted with EXIT.
10 Switch to the channel Editor with (yellow)
or
press EXIT to end the setting.
Searching for digital television channels from a satellite manually
If a certain channel cannot be found with automatic search, you can search it manually by manual search function. You must enter all parameters of the channel correctly. You can obtain the current transponder information from teletext page, satellite TV magazines or internet.
6 Select the required items with or
1 Open the menu with MENU\*.
2 Activate the menu item >Settings with OK.
3 Select the menu item «Source Setup« with «or « and press «OK« to confirm.
4 Select the line Manual Channel Search with or and press OK to confirm.
5 Select the option «Satellite« with «< or »» and press «OK« to confirm.
- Service Type: Press or to select whether you want to search for only television channels (DTV), only radio channels (Radio) or both (Radio+TV).
- »Scan Type«: Press « or » to select whether you want to search for only free digital television channels (Free), only scrambled digital television channels (Scrambled) or both (Free + Scrambled).
- Transponder: Enter channel frequency with 1 0 as a 5-digit number.
- «Symbol Rate«: Enter channel symbol rate with «1...0« as a 5-digit number.
- «Polarization»: Select the channel polarization with « or » as « Horizontal » or «Vertical».
- >Network Search:: Select the network search with «or» «as» On or Off.
7 Press red button to start searching.
- The «Digital Searching« menu appears, and the scan for TV channels begins.
Note:
The search can be aborted with EXIT.
8 Press EXIT to end the setting.
LNB Settings
Notes:
The following description about the LNB settings premise a substantial expertise about the satellite systems. Ask your specialist dealer.
- Your TV supports SCR system (Single Channel Router). If you are using SCR satellite system, follow the steps described in «LNB Type« section.
1 Open the menu with MENU\*.
2 Activate the menu item >Settings with OK.
3 Select the menu item Source Setup with or and press OK to confirm.
4 Select the line Manual Channel Search with or and press OK to confirm.
5 Select the option «Satellite« with «or »» and press OK to confirm.
6 Activate the option Antenna Settings with (blue).
- The «Antenna Settings« menu is displayed.
7 Select the required items with V , A
- >Satellite:: Press OK and use «, » >>, « or « to pick the satellite you wish to get the digital stations from and press OK to confirm
- Transponder:: Press OK, and use , , or to select a transponder and press OK to confirm. Use (red) to add a transponder, use (green) to delete it, or use (blue) to change transponder data
- >LNB Type:: Press OK and use << or >> to select the LNB type used in the satellite system and press >> (green) to confirm. If you are using the SCR System, please perform the >>User Band << KB Frequency and LNB Selection settings. >>User Band:: Select the user band number assigned to the user with >>or >>.
»UB Frequency (MHz) «: Enter the user band frequency assigned to the user band with »1...0«.
»LNB Selection: If more than one satellites are used in the current SCR system, select 1/2 to 2/2 for the satellite corresponding to the relevant positions using « or «.
- >LNB Power: Set the LNB power to Off or set it to 13/18V or 14/19V depending on the LNB type by using « or «.
Notes:
Use installation equipment supported / suggested by your SCR Switch.
- Other users / receivers connected to the system may be affected if the specified user band number and frequency is changed during installation.
- User band and user band frequency is specified on the SCR switch used; and each user / receiver must select a specified user band and user band frequency.
- With SCR satellite system, auto search by several users / receivers at the same time may cause problems.
- «DISEqC Mode»: Based on the number of current satellite system, select the option «Off» «DiSEqC 1.0« or «DiSEqC 1.1« with «or» «.
»Off: For satellite systems with single antenna.
DiSEqC 1.0 switch allows for receiving from maximum four satellites at the same time.
From LNB selection use or to make the 1 / 4 , 2 / 4 , 3 / 4 or 4 / 4 selection for the satellite that corresponds to relevant DiSEqC positions.
»DiSEqC 1.1 « switch allows for receiving from maximum sixteen satellites at the same time.
From LNB selection use or to make the selections between 1/16 and 16/16 for the satellite that corresponds to relevant DiSEqC positions.
8 Press EXIT to end the setting.
Motor antenna setup (DiSEqC 1.2)
Your television supports DiSEqC 1.2 motorized satellite systems. This feature allows to control the satellite through your television.
1 Open the menu with MENU\*.
2 Activate the menu item >Settings> with OK<.
3 Select the menu item Source Setup with or < < and press OK to confirm.
4 Select the line Manual Channel Search with or and press OK to confirm.
5 Select the option «Satellite« with «< or »» and press «OK« to confirm.
6 Activate the option »Antenna Settings« with « (blue).
- The «Antenna Settings« menu is displayed.
7 Select the line DiSEqC Mode with or and select DiSEqC1.2 with or
- The line «DiSEqC 1.2 SETTINGS« is active.
Note:
Additional operations are explained in the following sections.
Settings regarding DiSEqC 1.2 are explained below. Contact an expert or your dealer for DiSEqC 1.2 antenna systems.
DiSEqC 1.2 Settings
Adjust the satellite antenna position according to each satellite. These settings can be stored and the antenna can be moved to a preset position.
1 Select the line DiSEqC 1.2 SETTINGS with V or A and press OK to confirm.
- »DiSEqC 1.2 SETTINGS« menu is displayed.
2 Use or to select necessary items.
- »Moving Mode«: Set the Moving Mode with « or » to « Discrete » or « Continuous «.
- Discrete: Moves the antenna to west or east for the determined step size.
- Continuous: Moves the antenna to west or east continuously.
- >Step Size:: With « or » select the number of steps the antenna has to rotate.
>Step Size« is active when «Moving Mode« is selected as «Discrete«.
- Move Motor: Adjusts the antenna for the selected satellite. Set the antenna to West with and to East with
- >Limit Position: Sets the limit position which the antenna will be able to move and allows the antenna to move within the determined limits. With specify a limit position in direction and with specify a limit position in East direction.
- >Go To Stored Position: Moves the antenna to the preset satellite position. Maximum 50 positions can be saved. Select the setting with (green) button, select predefined position with or and confirm with (green) button. Antenna will mode to saved position.
- «Store Current Position»: Stores antenna's current position. Select setting with « (red) button, select recording position with « or » and confirm with « (green) button.
- Reset DiSEqC 1.2 Limit: Resets the limit positions set for the antenna.
3 Press EXIT to end the setting.
Searching for television channels from the cable provider automatically
1 Open the menu with MENU.
2 Activate the menu item >Settings> with OK<.
3 Select the menu item Source Setup with or < < and press OK to confirm.
4 Select the line Automatic Channel Search with or and press OK to confirm.
5 Select the option «Cable« with «< or »» and press OK to confirm.
- »Automatic Channel Search« menu is displayed.

6 Select the line Scan Type with or and select the option Quick or Full scan type with or
- »Quick« scanning function sets the channels according to the cable operator information in the broadcasting signal. Network ID« performs the installation that is suitable to your network. If you know the Network ID, please enter it. If you do not know the Network ID, please select »Auto« for «Frequency« and «Network ID«.
- If scanning cannot be performed with «Quick« option, select «Full«. All current channels are tuned and stored in «Full« scanning. This scanning process can take a long time. This option is recommended if your cable operator does not support quick scanning function.
Note:
You can speed up the search. To do this, frequency and network ID information are required. You may get this data from your cable operator or find it in the Internet forums.
7 Select the push button »Next Page« with «V« to and press «OK« to confirm.
Note:
Select whether to search for digital or analogue TV channels. To do this press « or » to select the option «Digital« or «Analogue« and press «OK« to remove or apply the "small tick".
Press (red) to start searching.
Notes:
- When updating via the same satellites a security query is displayed at the start of a search.
If the previously stored channels should be retained in the channel list and the new channels found be added to it, then press (green).
If (red) is pressed, the saved channels will be deleted from the current channel list.
- The «Digital Searching« menu appears, and the scan for TV channels begins.
- The search is complete as soon as the message «Search is completed!« appears.
Note:
The search can be aborted with EXIT.
9 Switch to the Channel Editor with (yellow);
or
press EXIT to end the setting.
Searching for television channels from the cable provider manually
1 Open the menu with MENU.
2 Activate the menu item >Settings> with OK<.
3 Select the menu item Source Setup with or < < and press OK to confirm.
4 Select the line Manual Channel Search with or and press OK to confirm.
5 Select the option «Cable« with «< or »» and press OK to confirm.
6 Select whether to search for digital or analogue TV channels.
To to this press or to select the option Digital or Analogue and confirm with OK.
7 With select Frequency (MHz) and enter frequency (4-digit) directly with 1 0 ; search will start.
- The search is finished when the channels found appear in the list.
8 Press EXIT to end the setting.
Searching for digital terrestrial TV channels automatically
1 Open the menu with MENU\*.
2 Activate the menu item >Settings> with OK<.
3 Select the menu item «Source Setup« with «or « and press «OK« to confirm.
4 Select the line Advanced Settings with or and press OK to confirm.
5 Select the line Active Antenna Power with or
Switch on the antenna power supply for the antenna with or ( On
Important:
The antenna power supply (5V) may only be switched on if the antenna is an active indoor antenna with a signal amplifier and it is not already supplied with a voltage via a mains plug (or similar supply). Otherwise you may cause a short circuit and irreparably damage your antenna.
6 Select the line Automatic Channel Search with A or V and press OK to confirm.
7 Select the option «Air« with «or» and press OK to confirm.
8 Select whether to search for digital or analogue TV channels.
To to this press or to select the option Digital or Analogue and confirm with OK.
9 Press (red) to start searching.
Notes:
- When updating via the same satellites a security query is displayed at the start of a search.
If the previously stored channels should be retained in the channel list and the new channels found be added to it, then press (green).
If (red) is pressed, the saved channels will be deleted from the current channel list.
- The «Digital Searching« menu appears, and the scan for TV channels begins.
- The search is complete as soon as the message «Search is completed!« appears.
Note:
The search can be aborted with EXIT.
10 Switch to the Channel Editor with (yellow)
or
press EXIT to end the setting.
Searching for digital terrestrial TV channels manually
1 Open the menu with MENU\*.
2 Activate the menu item >Settings> with OK<.
3 Select the menu item Source Setup with or < < and press OK to confirm.
4 Select the line Advanced Settings with V or A and press OK to confirm.
5 Select the line Active Antenna Power with or
Switch on the antenna power supply for the antenna with ( On)
Important:
The antenna power supply (5V) may only be switched on if the antenna is an active indoor antenna with a signal amplifier and it is not already supplied with a voltage via a mains plug (or similar supply). Otherwise you may cause a short circuit and irreparably damage your antenna.
6 Select the line Manual Channel Search with A or V and press OK to confirm.
7 Select the option «Air« with «< or »» and press «OK« to confirm
- »Manual Channel Search« menu is displayed.
8 Enter frequency (3-digit) directly with 1 0
- Search will start.
- The search is finished when the channels found appear in the list.
9 Press EXIT to end the setting.
Automatic service update
If this function is activated, possible changes of network operators are updated automatically.
The unit must be located in stand-by mode.
This updating affects all types of reception - terrestrial, cable and satellite.
1 Open the menu with MENU\*.
2 Activate the menu item >Settings> with OK.
3 Select the menu item Source Setup with or < < and press OK to confirm. - Source Setup menu is displayed.
4 Select the line Advanced Settings with or and press OK to confirm.
5 Select the line Automatic Service Update with or and select the automatic update with or ( On) .
6 Press EXIT to end the setting.
Tuning analogue television channels
This setting is only necessary if you cannot receive any digital channels and you have not carried out an analogue search during initial setup.
The television channel can be set directly or using the search.
Setting all analogue television channels
The analogue television stations are listed in the channel list after the digital television stations.
Note:
Plug the rooftop antenna cable (for analogue television stations) into the «ANT IN« socket on the television.
1 Open the menu with MENU\*.
2 Activate the menu item >Settings> with OK<.
3 Select the menu item Source Setup with or < < and press OK to confirm. - Source Setup menu is displayed.
4 Select the line Automatic Channel Search with or and press OK to confirm.
5 Select the option «Air« or «Cable« with «or » and confirm the source you are receiving analog broadcast from by pressing OK.
6 Select the option Digital with or and press OK to remove the small tick.
7 Press (red) to start searching.
Notes:
After starting the scan, a security query will appear. Press (green) to confirm the option Yes
- All channel and favourites lists for the analogue channels will be deleted and compiled new.
- The »Analog Searching« menu appears, and the scan for TV channels begins. Depending on the number of television channels received, this can easily take a few minutes.
- The search is complete as soon as the «Search is completed!« appears.
Note:
The search can be ended prematurely with EXIT\*.
Press (yellow) to switch to the Channel Editor;
or
press EXIT to end the setting.
Tuning the analogue television channels by entering the channel numbers
1 Open the menu with MENU\*.
2 Activate the menu item >Settings> with OK<.
3 Select the menu item Source Setup with or < < and press OK to confirm. - Source Setup menu is displayed.
4 Select the line Manual Channel Search with or and press OK to confirm.
5 Select the option «Air« or «Cable« with «or» and confirm the source you are receiving analog broadcast from by pressing OK.
6 Select the option Analog with or and press OK to confirm. - Menu is displayed.

7 Select the line Program No with V or A and press «, «» or «1...0« to select the preset.
8 Select the line Band with or . To select S (special channel) or C (channel) options press << or >> .
9 Select the line Channel with or . To enter the channel number step by step, press or or enter it directly with 1 0 or start a automatic scan with (green) or (yellow).
Note:
The current system is displayed in the System. If the colour and/or sound is not functioning correctly, select System with or. Select the required setting with or
When fine tuning is required, select «Fine Tuning« with «V« or «A« and tune with «< « or «» «.
10 To save the setting press (blue).
Note:
To set other television channels, repeat steps from 7 to 10.
11 Press EXIT to end the setting.
Changing stored analogue channels
If channels were stored with the automatic channel search during the tuning of the television channels, you can delete them. You can also change or enter the name of a channel and skip a channel.
Selecting channel lists
1 Open the menu with MENU\*.
2 Activate the menu item >Settings> with OK<.
3 Select the menu item Source Setup with or < < and press OK to confirm.
4 Select the line Channel Editor with or and press OK to confirm. - Channel Editor menu is displayed.
Note:
Additional operations are explained in the following sections.
Deleting channels
1 In the Channel Editor menu, select the channel(s) you want to delete with , 或 , and highlight the television channel by pressing OK. -Channel is marked with
Note:
If several TV channels are to be deleted, press , , or to select these and mark each one with OK.
2 Activade the «Tools« menu with «●●» (yellow).
3 Select the line Delete with V or A and press OK to confirm.
4 To confirm deletion process with (green); or to cancel deletion process with (red).
5 Press EXIT to close the menu.
Entering the analog channel names (maximum 8 characters)
1 In the Channel Editor menu, select the channel you want to rename with >> , < or >> and highlight it by pressing OK. -Channel is marked with
2 Activade the «Tools« menu with «●●» (yellow).
3 Select the line Rename with or and press OK to confirm.
4 Delete the current channel name, press (red).
5 Select the required character with >> , or and move to the next character with OK. Using Shift OK you can switch between uppercase letters / numbers and lowercase letters / special characters. -Select _X^X to delete the character entered and press OK to confirm.
6 Confirm the channel name with (green).
Note:
To enter other channel names, repeat steps 1 to 6.
Creating a list of favourites - analog channels
You can select your favourite channels and save them in up to four lists (FAV1 to FAV4).
1 In the Channel Editor menu, select the channel(s) you want to add in the favorites list with , , or and highlight the television channel by pressing OK. -Channel is marked with
2 Activade the «Tools« menu with «...» (yellow).
3 Select the line Add To Fav. with or and press OK to confirm. -Add to Fav. menu is displayed.
4 Select the favorite list you want to add the selected channels with or and store with OK. The channels are marked in the Channe Editor with 1 , 2 , 3 or 4 You can add the same channel in more than one favourites list. Each favourite list can contain maximum 255 channels.
Notes:
You can delete channels from the favourites list. Press (yellow), select the favorites list the channel is in with or and press OK to confirm. Select the channel(s) you want to delete with and highlight the channel by pressing OK. Press (yellow) and select the line Remove from Fav. with or and confirm with OK. The channel you have selected is now deleted from the favorites list.
- When a channel stored in the favourite channel list is deleted channel order in the favourite list is updated.
5 Press EXIT to close the menu.
Displaying signal information
(only for digital television channels)
1 Open the menu with MENU\*.
2 Activate the menu item >Settings> with OK<.
3 Select the menu item Source Setup with or < < 其 and press OK to confirm. - Source Setup menu is displayed.
4 Select the line Advanced with or and press OK to confirm.
5 Select the line Signal Information with or and press OK to confirm. - Signal Information menu is displayed.
Notes:
■ Signal information changes depending on the current source.
■ Signal information is shown on the left of the menu. The more «Frequency« and «Signal Strength« bar stretches to the right, the more signal you have.
The signal level not only depends on your receiver system, but also on the channel which is currently active. Remember this when aligning your antenna using the signal level display.
6 Press EXIT to close the menu.
Deactivate and activate HbbTV
This option allows turning off Hbb TV feature, thus warnings shall not be displayed on channels with Hbb TV feature.
1 Open the menu with MENU.
2 Activate the menu item >Settings> with OK<.
3 Select the menu item Source Setup with or < < 其 and press OK to confirm. - Source Setup menu is displayed.
4 Select the line Advanced with or and press OK to confirm.
5 Select the line Hbb TV with or
6 Select the option (»Off«) with « or » «. Note:
To activate HbbTV again, select in step. 6 the option «On«.
7 Press EXIT to end the setting.
Deactivate and activate digital teletext
If you deactivate digital video text, only normal video text can be selected, however the other functions of the interactive service HbbTV are still available.
1 Open the menu with MENU\*.
2 Activate the menu item >Settings> with OK<.
3 Select the menu item Source Setup with or < < and press OK to confirm. - Source Setup menu is displayed.
4 Select the line Advanced with or and press OK to confirm.
5 Select the line Digital Teletext with or
6 Select the option (»Off«) with « or » «. Note:
To reactivate digital teletext, select «On« in step 6.
7 Press EXIT to end the setting.
GRUNDIG 32 VLE 6522 BL
Product Fiche
Energy efficiency class A
Screen size: 80~cm / 32^
Power consumption: in operation mode 40 W / 65 W max.
Annual power consumption: 58 kWh
Stand-by power consumption: < 0.50 W
Max. resolution: 1920 × 1080
Other data
Operating voltage: 220-240 V~ 50-60 Hz
Screen Area (dm2): 28 dm²
Rosh Limits: Pb (Lead) / Hg (Mercury)
Pb (Lead) complies with ROSH directive / 0 mg
Peak Luminance rate: 65%
Audio out: 2 x 20 watt music 2 x 10 sinusoidal wave + 10 W sinusoidal wave (Subwoofer)
Subwoofer feature is optional. Not available in all models.
Default satellite: 20
LNB Power: 13/18V, 14/19V optional, max.500mA
LNB switching signal: 0/22 kHz 650mV +/- 250mVpp
DiSEqC: 1.0 control, 1.1 control, 1.2 control
Reception range:
Satellite:
Ku band 10700MHz - 12750MHz
Modulation: DVBS QPSK, DVBS2 QPSK, 8 PSK IF band 950 MHz - 2150 MHz
Signal level: -25dBm to -65 dBm
Cable:
Full band 110MHz 862MHz
Modulation:16QAM, 32QAM, 64QAM, 128QAM and 256QAM
Symbol rate:4.0Msym/s to 7.2Msym/s
Digital (DVB-T):
VHF/UHF Band width 7 MHz
and 8 MHz
FFT size: 2k, 8k
Modulation: 16QAM, 64QAM,QPSK
Security range: 1/4, 1/8, 1/16, 1/32
Digital (DVB-T2):
VHF/UHF Band width 7 MHz and 8 MHz
FFT size: 1k, 2k, 4k, 8k, 16k, 32k
Modulation: 16QAM, 64QAM, 256QAM, QPSK
Security range: 1/4, 19/256, 1/8, 19/1/16, 1/32, 1/128
This feature is optional. Not available in all models.
Analog:
C02... C80, special channels S01 ... S41
Default channels:
TV/Radio 6000 (Satellite - DVBS), 1000 (Cable - DVBC) / 99 (analog) 1000 (Antenna-DVBT) / 99 (analog) 8 AV,2 USB
Weight:
approx 4,42 kg
Size:
WHD 72,9× 44,9× 7,6cm
Right to make technical changes and errors reserved.
Service information for dealers

This product complies with European Union directives and regulations below:
2006/95/EC: Electrical equipment directive for use
within certain voltage limits.
2004/108/EC: Directive relevant for electromagnetic suitability.
2009/125/EC: Directive and relevant for ecodesign for products using energy as well as its following sub-directives;
278/2009: Regulation regarding eco friendly design requirements regarding energy consumption of uncharged external power sources and average active efficiency (for models with AC/DC adapters);
642/2009: Regulation regarding eco friendly design requirements for televisions.
2010/30/EU: Directive regarding Energy Labelling of Energy-Related products as well as its following sub-directives;
1062/2010: Regulation regarding energy labelling of televisions.
2011/65/EU: Directive on limitations on use of certain hazardous materials on electric, electronic domestic and office equipment.
Network interfaces
This product is intended for connection to the ADSL network.
Disposing of the packaging
The packing materials are dangerous for children. Keep the packing materials out of the reach of children.
The packing of your product is manufactured from recyclable materials. Dispose by classifying in accordance with waste instructions. Do not dispose along with normal household waste.
Environmental note

This product has been made from high-quality parts and materials which can be re-used and recycled.
Therefore, do not dispose of the product with normal household waste at the end of its life. Take it to a collection point for recycling electrical and electronic devices. This is indicated by this symbol on the product, in the operating manual and on the packaging.
Please find out about collection points operated by your local authorities.
Help protect the environment by recycling used products.
Troubleshooting
If the remedies given below do not work, please consult an authorised GRUNDIG dealer. Please bear in mind that malfunctions can also be caused by external devices such as video recorders or satellite receivers.
Problem Possible cause Remedy Screen lit (snow), but no station Antenna cable Is the antenna cable connected? No TV station programmed Start a station search Poor picture contrast Picture settings incorrectly set Adjust the brightness, contrast or colour setting Problem at station Test with a different station Interference to picture and/or sound Interference from other devices Change the position of the device Ghosting, reflection Channel setting Automatic or manual channel setting/fine tuning No colour Antenna Have antenna cable or system checked Colour intensity at maximum Turn up the colour TV standard setting (if setting option is available) Select the correct colour standard Problem at station Test with an another channel Volume set to minimum Turn up or switch on the volume Teletext missing or faulty Problem at station Test with an another channel Television station (has no tele-text) or antenna system Test another channel for fine tuning and ghosts Station signal too weak Check the antenna system Remote control does not work No optical connection Point the remote control at the television set Remote control batteries Check the batteries, change if necessary Operating condition undefined Switch off the television with the main power button for approximately 2 minutes Picture is dark in PC mode Incorrect setting for picture resolution and picture frequency on the PC Change the setting on the PC (for example, picture resolution 1280 x 768, picture frequency 60Hz) DMS device cannot be found DMS device is not switched on or not started Make sure that the DMS device is on and operating. Network connection settings are not made. Check the network settings. Low image quality (pixel) in WLAN mode DMS (for example PC) is connected to the wireless network and away from the modem Bring your DMS closer to the modem Warnings about the con- nection problems on the display Network Cable or wireless USB network device may be discon- nected Check network cable or wireless USB network device Modem do not have Internet connection or has problems Make sure that your modem has Internet connection Videos in video applica- tions are lagging during playback in wireless con- nection Internet connection speed is low. Low Internet speed is a problem that is related with the speed of your subscription or a failure in the Internet infrastructure. Contact with your service provided (ISP). Videos in video applica- tions are lagging during playback in cable con- nection Internet connection speed is low. Low Internet speed is a problem that is related with the speed of your subscription or a failure in the Internet infrastructure. Contact with your service provided (ISP). There are connection problems in Inter@ctive ap- plications. This may occur due to temporary problems in servers of these ap- plications Try connecting to the applications again
Note:
This is a Class A product. During operation the device can cause radio interference. In this case the user may have to remedy this. Please contact your specialist dealer.
>Subtitle< format
If you cannot read the subtitles which appear on the bottom of the screen, then select >Subtitle<.>>Panorama< format
This setting is suited to films with a large width/height ratio. During programmes in 4:3 format the picture is stretched horizontally if the «Panorama« function is selected. The picture geometry is stretched horizontally.>Overscan off format
When this mode is selected, high defined picture from HDMI and Component inputs is not cropped and it is displayed in its original size. This is only active in HDMI mode and for resolutions at or above 720p. To use the functions "GRUNDIG AppLICATION store" and "Operation with Digital Media Server", you must connect the television to your home network with internet access and log on. Grundig Application Store is a depot where you can find various applications that you may use on your Grundig TV. You can download many applications from Grundig Application Store. These applications include video, picture, music, social networking applications, news and sports applications, weather forecast applications and some specific applications.Network connection
You can establish a wired or wireless connection between your television and the local network. If you want to use a wired network connection, please start with the instructions here: If you use a wireless network connection, please follow the instructions in the "Wireless network connection" section on page 34.Note:
The following section describes connecting to the home network if you did not carry this out during the "initial set-up".Wired network
Wired network connection
1 Connect the output of external modem to LAN« socket with Cat 5 cable. Note:
- Connection cables are not supplied.Wired network settings
There are two ways of making the wired network settings. A Automatic connection, All data regarding connection settings (IP Address, Netmask, Gateway and DNS) are obtained from modem automatically. B Manual connection, all data regarding connection settings (IP Address, Netmask, Gateway and DNS) must be configured manually.Automatic connection
Most of the home networks are Dynamic. If you have a dynamic network, you must use a DSL modem that supports DHCP. Modems and IP sharers that support DHCP obtain the «IP Address«, «Netmask«, «Gateway« and «DNS« values required for internet access automatically, and thus you are not required to enter those values manually. 1 Open the menu with MENU\*. 2 Activate the menu item >Settings with OK. 3 Select the menu item Network Configuration with or and press OK to confirm. - >Network configuration menu is displayed.  4 Select the line Change Connection Type V or A and press OK to confirm. 5 Select the option «Wired« with «< or »» and press OK to confirm. 6 Select the line Network Configuration with or and use to select AUTO. 7 With (red) select Connect to establish modem connection. - »Connecting ... Please wait« message will be displayed, and if the connection is established »Connection To Gateway: Success« message will be displayed. 8 Press (green) to check the performed settings and also if the local network and internet connection has been established. - Testing ... Please wait message will be displayed, and if the connection is established Connection To Gateway: Success, Internet Connection: Success message will be displayed. 9 Press EXIT to end the settings.Note:
If you do not have a dynamic network, follow the instructions in manual connection section.Manual connection
Certain networks require Static IP address. If your network requires a Static IP address, you must enter the IP Address , Netmask , Gateway and DNS values manually. You can get IP Adress , Netmask , Gateway and DNS values (IPS) from your Internet Service Provider. 1 Open the menu with MENU\*. 2 Activate the menu item >Settings> with OK<. 3 Select the menu item Network Configuration with or and press OK to confirm. - >Network configuration« menu is displayed. 4 Select the line Change Connection Type V or A and press OK to confirm. 5 Select the option «Wired« with «< or »» and press «OK« to confirm. 6 Select the line Network Configuration with or sand use or to select Manual. 7 Select the line Advanced with or and press OK to confirm. - IP Address, DNS, Netmask and Gateway options are active.  8 Select the line IP Address with Enter IP address with 1...0. 9 Select the line DNS with V . Enter IP address with 1...0 . 10 Select the line Netmask with V Enter Netmask address with 1...0. 11 Select the line Gateway with Enter Gateway address with 1...0. 12 With (red) select Connect option to establish modem connection. - »Connecting... Please wait« message will be displayed, and if the connection is successful, Connection to Gateway: Successful« message will be displayed. 13 Press (green) to check the performed settings and also if the local network and internet connection has been established. - Testing ... Please wait message will be displayed, and if the connection is established Connection To Gateway: Success, Internet Connection: Successful message will be displayed. 14 Press EXIT to end the settings.Wireless network
Wireless network connection
There are different ways of making the wireless network settings. »Wireless« and »Wireless WPS« (WiFi Protected Setup).  1 Connect Grundig WiFi USB dongle 2 to the «USB1« or «USB2 (HDD)« socket of your television in order to connect the television to a wireless network.Note:
- Grundig WiFi USB dongle is not supplied with the product but sold separately. Please contact your dealer from where you have purchased your TV.Notes:
Wireless LAN adapter supports IEEE 802.11B/G and N communication protocols. We recommend you to use IEEE 802.11N protocol to obtain the best performance in wireless HD video playback. If you use a modem that supports IEEE 802.11B/G, video playback performance may be poor when compared to a modem that supports IEEE 802.11N since the data transfer rate of IEEE 802.11B/G protocol is lower. Please note that video playback performance in a DLNA application on a wireless local network and in a SMART Inter@ctive TV 3.0 application on a network with internet connection depends on the number of users on the network as it is the case in every wireless network. It is recommended to switch off the equipment that are not in use in home network in order to avoid unnecessary network traffic. Placing the modem or wireless network sharer on an elevated location will increase the wireless connection reception strength. Wireless connection reception strength may vary depending on the type of the modem and the distance between the modem and television.Wireless network settings
You have several ways to connect your TV to your home network. A Automatic connection, all data regarding connection settings (IP Address «, «Netmask «, «Gateway « and «DNS«) are obtained from modem automatically. Depending on the router, you can use the following options: - Option "WPS-PBC" (Push Button Configuration); - Connecting with a WPS PIN; - Connecting by entering the network password. B Manual connection, all data regarding connection settings (»IP Address«, «Netmask«, «Gateway« and «DNS«) must be configured manually.Technical requirements
Most of the home networks are Dynamic. If you have a dynamic network, you must use a DSL modem that supports DHCP. Modems and IP sharers that support DHCP obtain the «IP Address«, «Netmask«, «Gateway« and «DNS« values required for internet access automatically, and thus you are not required to enter those values manually.Wireless WPS network connection through by pressing a button
1 Open the menu with MENU\*. 2 Activate the menu item >Settings with OK. 3 Select the menu item Network Configuration with or and press OK to confirm. - >Network configuration« menu is displayed. 4 Select the line Change Connection Type with or and press OK to confirm. 5 Select the option «Wireless WPS« with «or »» and press «OK« to confirm. - WiFi warning screen will be displayed. 6 Activate WiFi with (green). 7 Select the line WPS Type with V or A and select the option Push Button with or  8 With (red) select Connect to establish modem connection. - »Push the WPS button on your Access Point« message is displayed. 9 Press the WPS button on the router. 10 To continue after pressing the WPS button on the access point, press (green). - The "Connection to Gateway: Success" message will be displayed. 11 Press (green) to make sure that the network connection is established with the current settings. - Testing ... Please wait message will be displayed, and if the connection is established Connection To Gateway: Success, Internet Connection: Success messages will be displayed. 12 Press EXIT to end the setting.Wireless WPS network connection with PIN
1 Open the menu with MENU\*. 2 Activate the menu item >Settings with OK. 3 Select the menu item Network Configuration with or and press OK to confirm. - >Network configuration« menu is displayed. 4 Select the line Change Connection Type with or and press OK to confirm. 5 Select the option «Wireless WPS« with «or »» and press «OK» to confirm. - WiFi warning screen will be displayed. 6 Activate WiFi with (green). 7 Select the line WPS Type with V or A and select the option PIN with or  8 Select the line Select Access Point with or and press OK to confirm. - Present WPS-supported wireless networks are scanned to display in the «Select Access Point« menu. 9 Select the network that you want to connect with , , or and press OK to confirm. - 8-digit pin code is displayed in the wireless WPS menu.Note:
Refer to the manual of your router to find out how the PIN is entered via a PC. 10 Use a PC to enter the pin on the router (e.g. AVM FRITZ!Box: menu item WLAN Settings... WPS) and save.Note:
The 8-digit PIN code must be entered in the modem interface in 2 minutes; otherwise, connection of television with the modem is cut. 11 Press (green) to confirm the registration. - The message "Connection to Gateway: Success" appears. 12 Press (green) to check the performed settings and also if the local network and internet connection has been established. - Testing ... Please wait message will be displayed, and if the connection is established Connection To Gateway: Successful, Internet Connection: Successful messages and MAC address will be displayed. 13 Press EXIT to end the setting.Connecting automatically by entering the network password
Use this method for establishing a connection if your router does not support "WPS-PBC" or WPS PIN entry. 1 Open the menu with MENU\*. 2 Activate the menu item >Settings with OK. 3 Select the menu item Network Configuration with or and press OK to confirm. - Network configuration: menu is displayed.  4 Select the line Change Connection Type with or and press OK to confirm. 5 Select the option »Wireless« with « or »» and press «OK« to confirm. - WiFi warning screen will be displayed. 6 Activate WiFi with (green). 7 Select the line Network Configuration with or and select the option AUTO with or . 8 Select the line Select Access Point with or and press OK to confirm. - »Select Access Point« menu is displayed by scanning available wireless networks. 9 Select the network that you want to connect with , , or and press OK to confirm. - Wireless connection password screen is displayed.Note:
For device to discover the wireless modem on the network, the network name should support ASCII characters. 10 Select the required character with >> , or and move to the next character with OK. - Using Shift OK , you can switch between uppercase letters / numbers and lowercase letters / special characters. - Select »X « to delete the character entered and press »OK « to confirm. 11 Confirm the password with (green). - »Connecting ... Please wait« message will be displayed, and if the connection is established »Connection To Gateway: Success« messages will be displayed. 12 Press (green) to check the performed settings and also if the local network and internet connection has been established. - Testing ... Please wait message will be displayed, and if the connection is established Connection To Gateway: Success, Internet Connection: Success messages will be displayed. 13 Press EXIT to end the setting.Note:
If you do not have a dynamic network, follow the instructions in manual connection section.Manual connection
Certain networks require Static IP address. If your network requires a Static IP address, you must enter the IP Address , Netmask , Gateway and DNS values manually. You can get IP Address , Netmask , Gateway and DNS values (IPS) from your Internet Service Provider. 1 Open the menu with MENU\*. 2 Activate the menu item >Settings> with OK. 3 Select the menu item Network Configuration with or and press OK to confirm. - >Network configuration« menu is displayed. 4 Select the line Change Connection Type with or and press OK to confirm. 5 Select the option «Wireless« with «< or »» and press «OK« to confirm. - WiFi warning screen will be displayed. 6 Activate WiFi with (green). 7 Select the line Network Configuration with or and select the option Manual with or 8 Select the line Advanced with V or A and press OK to confirm. - IP Address, DNS, Netmask and Gateway options are active.  9 Select the line IP Address with Enter IP address with 1...0. 10 Select the line DNS with V . Enter DNS address with 1...0 . 11 Select the line Netmask with V . Enter Netmask address with 1...0 . 12 Select the line Gateway with V . Enter Gateway address with 1 0 . 13 Select the line «Select Access Point« with «A« or «V« and press «OK« to confirm. - «Select Access Point« menu is displayed by scanning available wireless networks. 14 Select the network that you want to connect with V , A , C or and confirm with OK. - Wireless connection password screen is displayed.Note:
For device to discover the wireless modem on the network, the network name should support ASCII characters. 15 Select the required character with >> , < or > and move to the next character with OK. - Using Shift OK , you can switch between uppercase letters / numbers and lowercase letters / special characters. - Select »X « to delete the character entered and press »OK« to confirm. 16 Confirm the password with (green). - »Connecting ... Please wait« message will be displayed, and if the connection is established »Connection To Gateway: Success« messages will be displayed. 17 Press (green) to check the performed settings and also if the local network and internet connection has been established. - Testing ... Please wait message will be displayed, and if the connection is established Connection To Gateway: Success, Internet Connection: Success messages will be displayed. 18 Press EXIT to end the setting.Change TV Name
To make it possible to identify your TV in the network, the name "Inter@ctive TV" is assigned at the factory. You can change the name. 1 Open the menu with MENU\*. 2 Activate the menu item «Settings« with «OK«. 3 Select the menu item TV Settings with or and press OK to confirm. 4 Select the line About with or and press OK to confirm. 5 Select the line TV Name with or and press OK to confirm 6 Delete the current name. To do this, select the «Clear« button with «V«, «A«, «C« or «» and confirm with «OK«. 7 Select the required character with >> , < or > and move to the next character with OK. - Using Shift OK , you can switch between uppercase letters / numbers and lowercase letters / special characters. - Select »X « to delete the character entered and press »OK « to confirm. 8 Confirm the new name by pressing (green). 9 Press EXIT to end the setting.Connecting the TV to a "hidden" network
Even if the SSID (Service Set Identifier) of the router is not visible, you can connect your TV to this network. 1 Open the menu with MENU\*. 2 Activate the menu item >Settings> with OK<. 3 Select the menu item Network Configuration with or and press OK to confirm. - >Network configuration« menu is displayed. 4 Select the line Select Access Point with or and press OK to confirm. - »Select Access Point« menu appears and available wireless networks are scanned and displayed in the menu. 5 Press (red). - »Add Network« menu appears. 6 Select the line «Access Point Name« with «V« or «A« and press «OK« to confirm. - A menu for entering the SSID will be displayed.Note:
For device to discover the wireless modem on the network, the network name should support ASCII characters. 7 Select the required character with >> , < or > and move to the next character with OK. - Using Shift OK , you can switch between uppercase letters / numbers and lowercase letters / special characters. - Select »X « to delete the character entered and press »OK « to confirm. 8 Confirm the SSID by pressing (green). 9 Select the line Security Type with or and select the required option (WEP, WPA or WPA2) with .Note:
If the WPA option is selected, the security protocol (AES or TKIP) must be selected on the line Encryption. This depends on the settings on the router. 10 Confirm the setting with (red). - The network is now in the »Select Access Point« menu. 11 Select the network with , , or and press OK to confirm. - Wireless connection password screen is displayed. 12 Select the required character with >> , < > > and move to the next character with OK. - Using Shift OK , you can switch between uppercase letters / numbers and lowercase letters / special characters. - Select »X « to delete the character entered and press »OK « to confirm. 13 Confirm the password by pressing (green). - >Connecting ... Please wait « message will be displayed. 14 Press (green) to make sure that the network connection is established with the current settings. - >Testing ... Please wait message will be displayed, and if the connection is established =>Connection To Gateway: Success, =>Internet Connection: Success messages and MAC address will be displayed. 15 Press EXIT to end the setting.SMART Inter@ctive TV 3.0 internet applications
Smart Inter@ctive TV 3.0 interactive applications provide your television with Internet services and pages. These applications are designed according to your television. With SMART Inter@ctive TV 3.0 feature you can run many local and global internet applications. Thanks to Grundig Application Store, you can find many applications that you may use on your Grundig TV. You can download many applications from Grundig Application Store. These applications include video, picture, music, social networking applications, news and sports applications, weather forecast applications and some specific applications.Notes:
Availability of SMART Inter@ctive TV 3.0, inter@ctive applications may vary from one country to the other. Smart Inter@ctive TV 3.0 cannot download and save files, cannot upload files to a web site and cannot install add-ins except Login pages of some applications for applications other than the ones in Grundig Smart Apps. Grundig is not responsible for the content and the quality of content offered by the content providers. - Local and global internet applications provided through your Smart Inter@ctive TV 3.0 comes with your TV within the framework of special limited duration agreements entered into with the application owners. Application owners may update, modify, restrict or entirely remove those applications with their own decision. Grundig cannot be held responsible for such changes. Grundig reserves the right to make all changes such as modifications, restrictions, extensions, transfers and removals on internet applications provided through your SMART Inter@ctive TV 3.0. In Login process of some applications, it may be required to connect to the web page of the related application. Subject web pages may contain links not related to Login process. When connecting those links, TV may access open web and view contents that are not supported by your TV. As you are on open web, your TV cannot control those unsupported contents or cannot be held responsible for them.Starting Smart Inter@ctive TV
1 Open the menu with MENU. 2 Select the menu item Applications Store with « or »» and press OK to confirm - Inter@ctive Applications« menu will be displayed. During initial login, registration screen for GRUNDIG Application Store will be displayed.Notes:
If you press when no menu is open, you can access Quick Apps menu. If you attempt to start Inter@ctive applications without a cable or wireless adapter connected, the related warning is displayed on the screen. If your wired or wireless adapter is connected but you cannot receive IP or internet is not connected, the Inter@ctive applications cannot be started. In this case, check Network connection settings. see. page 31 or 34.USB keyboard and mouse
You may connect a keyboard or mouse to both sockets «USB1« or socket «USB2 (HDD)« to use in the Web browser. Keyboards and mice requiring special drive are not supported.Navigation and enetering text during registration
1 Press to open MyApps menu. - Grundig Smart Apps registry screen is displayed.  2 Press , , or and select REGISTER to start registration and press OK. 3 Select necessary text areas with , >> or >> and press OK. - Virtual keyboard will be displayed.Notes on data entry:
Press (green) for keyboard language. Data will be entered through virtual keyboard. Select necessary letters/numbers and press OK to confirm. For upper/ lower case, select Shift and and press 0K to confirm. Press * (red) to switch to mobile keyboard. Press (blue) to delete last character/ number. Press (yellow) to delete all characters. When entry is complete, use «V«, «A«, «C« or «» to select «BACK « option and press «OK« to confirm. Virtual keyboard will disappear.Creating a Grundig Application Store account
You must register to access all applications in Grundig Application Store. Press to open MyApps menu. - Grundig Smart App registry screen is displayed. 2 Press , , or and select REGISTER to start registration and press OK. 3 Enter your «Name», «Surname», «Phone», (optional), «Place of Birth», and «Gender», Select the letters for the information with «V», «A», «or», «and confirm with OK». After you've entered the data, use «V», «A», «and», «to select», BACK «←« and press «OK» to confirm. Press for the next line and press OK to display the keyboard. Use , , and to select Next to proceed to the next screen and confirm with OK.Note:
Select Back to return back to previous screen and confirm with OK. 4 Enter Device Name, E-mail, Password entry and confirmation: Enter the data and on the screen keyboard use , , < or > to select and confirm with 0K Use , , and to select Next to proceed to the next screen and confirm with OK. 5 Enter location: Enter data and on the screen keyboard use , , < or > to select > < < and confirm with OK. To complete the registration use , >> or >> to select Register and confirm with 0K - Registration is completed and Entry screen will be displayed.Logging in with Grundig Application Store account
If you reset your television to factory settings for any reason with «Save installed applications« unselected, all applications you have downloaded will be deleted, and when you access «Inter@ctive Applications« menu, the registration screen will be displayed again. You can log-in again with the e-mail and password you have provided during Grundig Application Store registration without the need for re-registration. Press to open MyApps menu. - Grundig Smart App entry screen is displayed. 2 Enter your e-mail address: Enter data, use , , and to select and confirm with OK 3 Enter your password: Enter data, use «V«, «A«, «C« and «» to select «← and confirm with «OK«. 4 To login use «V« to select «Enter« and press OK. - Enter to display »Application Synchronization«. 5 Use , , and to select the applications that you want to synchronize and confirm with OK. Use , , and to select Synchronize and confirm with OK. 6 After the downloading is completed press OK. - «Grundig My Apps« menu will be displayed.Selecting internet applications
Press to open MyApps menu. - My Apps menu will be displayed.  2 Select the required application with >> , < or > and press OK to confirm. - Main menu of the application will be displayed after a short while.Notes:
- When you attempt to start any application without a cable or wireless network connection, the related warning is displayed on the screen. - Applications will not start if your cable is disconnected or you do not have an IP even if you're connected to a network or you do not have internet access. In this case, check Network connection settings. See. page 31 or 34.Grundig Application Store
Grundig Application Store is an online depot where you can download many applications that you may use on your TV. Some applications in the »MyApps« menu are loaded in your device as factory settings. You can download a wide array or applications from Grundig Application Store. Press to open MyApps menu. 2 To enter «Groundig Application Store«, select the push button «Online Store« with «V«, «A«, «O« or «» and press «OK« to confirm. - «Grundig Application Store« menu is displayed.Downloading and installing internet applications
1 Select the desired category in Grundig Online Applications with or and press to pass to application field;  or select the application you want with criterion: »Most Popular«, »Highest Rated«, »Release Date«; or if you want to select the application by searching directed, select the push button "Search" with V , A , C and confirm with OK and select the search criterion with the Virtual keyboard. 2 Select the application you want to download with «V«, «A«, «C« or «» « and press «OK« to confirm - Information on the application will be displayed. 3 Start download by confirming the push button Install with OK, then confirm the push button Run with OK. - Application will be downloaded and installed. 4 To start application press OK; or to continue installing application press »BACK «Uninstalling internet applications
1 In the My apps menu press (red) and use (or to select categories. 2 Use , , or to select the application that you want to uninstall. 3 Press (green) to activate the tools menu, use or to select Uninstall option and confirm with OK. - A warning message is displayed. 4 Confirm Uninstall with OK . or to cancel the uninstallation process select Cancel « with « or « and press «OK «. 5 Press OK to finish the process.Rating internet applications
You can rate applications installed on your TV individually. Press (red) button in My apps menu and select categories with or 2 Select the application you want to rate in My apps« menu with «V«, «A«, «<« or «». 3 Actiade the tools menu by pressing (blue), select the option Rate with or and press OK to confirm. 4 Press once and select the rating with. or To save application rating select Rate with and press OK to confirm.; 5 Press OK to finish the process.Adding Internet applications to favorites
You can add frequently used Internet applications to favorites and collect these under «Favor- ites« heading under categories. Press (red) button in My apps menu and select categories with or 2 Select the application you want to add to favorites in MyApps menu with V, , A, > < > or >> 3 Actiade the tools menu by pressing (blue), select the option Add To Fav. with or and press OK to confirm. - is marked and application is added to favorites.Smart Inter@ctive TV 3.0 browser main menu
1 Applications. 2 Push button to the Application store. 3 Search bar. 4 Categories menu. 5 Tools menu. 6 Exit. Navigating in the main menu
1 Press (red) button in My apps menu and select categories with or 2 Select the required application with >> , < or > and press OK to confirm. - Main menu of the application will be displayed after a short while. 3 Usage of application mostly depends on application's own structure. Follow the notes on the screen.Playback and other options in the applications
Note:
Some applications do not support all playing options, and playing options may vary among different applications. 1 « starts playing in the applications; 2 pauses playing in the applications; 3 » « stops playing in the applications; 4 In the applications, press « or » to start picture search. 5 In the applications, press « or » to skip forward/backward. 6 , , , allows sliding of the navigation keys in the applications and virtual keyboard. 7 Press OK to confirm the selections in virtual keyboard and applications. 8 1 0 (red), (green), (yellow), (blue) selects/activates various functions in applications. 9 1 switches off the application and goes back to My apps menu. 10 «EXIT« switches off the application and goes back to the last broadcast source you were in.  Web browser menu 1 Menu controls. 2 Active tab. 3 Previous page. 4 Next page. 5 Refresh. 6 New tab. 7 Address bar. 8 Search in site. 9 Favorites. 10 Home page 11 Settings 12 History. 13 Search in Web. 14 Zoom. 15 Close Web browser. 16 Close tab.Web browser
Web browser allows you to navigate in the Internet. 1 Open the menu with MENU\*. 2 Select the menu item Web Browser with or << and press OK to confirm. -Web Browser is displayed. 3 Select URL entry area with A or V and press OK to confirm. - Virtual keyboard will be displayed. 4 Enter the address and confirm with · · · · · · (blue).Notes:
- Cookies are turned on in the web browser as default, this means that the web pages that are visited will store some data on your device. If you don't want to store any data on your device you should disable cookie option within the settings. Other functions are explained on the screen. You may connect a keyboard or mouse to both sockets «USB1« or socket «USB2 (HDD)« socket to use in the Web browser. Keyboards requiring special driver are not supported.Playing the video, music and image files with home network connection
With DLNA menu of your television, you can easily access Video, music and photo files on server; and thanks to DMR feature, you can automatically start and stop media playing on devices with DMC feature.Notes:
TV Set's DMR feature is always ON in the background. With DMR feature, in a DMC-supporting application, any content on DMS can be played on TV without opening DLNA menu. Such applications provide "play in another device" option and prompts the user to select a DMP (TV) device. When your TV is selected through the DMP device list, the content in question will be played on your TV. You can share your video, music and image files through devices such as PC, mobile phone or NAS (Network Attached Storage) that function as DMS (Digital Media Server) compatible with DLNA. If the DMS device and the TV are connected to the wireless network at the same time, there may be lags and freezings during video playback. TV can also operate with DMS software that can be installed on a computer but, it is not guaranteed that it will run in full compatibility with software without a DMS certificate. Perform the following steps for a sample DMS setup. Open Windows Media Player11 on a PC with Windows operating system installed. In «Library» tab, select «Media Sharing», tick on the «Share my media» box on the window that appears and then select «OK». The new window displays the IP numbers of connected devices. To enable the TV to detect the computer, you need to select the television's IP number. If IP is not listed in the window; from «Media Sharing» menu's «Settings» option, you can select the option «Allow new devices and computers automatically» in the pop-up menu. After completing these processes, the television can only view the supported file formats in the Library. In order not to encounter any problems with media sharing, check the Firewall settings of your modem and computer.Selecting the digital media server
1 Open the menu with MENU\*. 2 Select the menu item DLNA with or and press OK to confirm. - »Media Player« menu is displayed.Note:
If no DMS device appears, check the network connection. See page 31 or 34. 3 Select any DMS device with or and press OK to confirm. - DMS device content is displayed. Notes:
File and folder structure of the DMS device in menu may vary depending on the Digital Media Server software in use. Subtitles are not supported on video files that are played through the DMS device. Video files played through DMS device support following formats that have obtained DLNA certificate: MPEG_PS_NTSC, MPEG_PS PAL, MPEG_PS_SD_EU and MPEG_PS_EU_ISO. In videos with high bit rate, lag problem might be seen. - Folders that appear as unknown in DLNA application cannot be played by the TV. Installing the codec to your computer can solve this problem. Audio files played through DMS device support following formats that have obtained DLNA certificate: »AAC_ADTS_320«, «LPCM«, «MP3«, «WMABASE« and «WMAFULL«. Image files played through DMS device support following formats that have obtained DLNA certificate: JPEG_LRG, JPEG_MED and JPEG_SM.Playback
1 Select the content folder on DMS device with , , or and press OK. - All titles are displayed. to confirm. 2 Select the desired title with , , or 3 Press to start playback.Other playback options
Press to pause playback. 2 To resume playback press 3 Press « or » until you reach the desired file. 4 Press to stop playback. 5 Switch back to the content with BACK 6 To exit DLNA feature press EXIT. 7 Confirm the warning screen with (green).Note:
Also, you can select following playing functions from the menu: - select repeat functions; - » « select previous title; - - picture searche previous; - , starts/pauses playing; - > « stops playing; - > picture search next; - > select next title.Information on recording and playing television programmes
- Recording and reproducing programmes, this can only be done with digital television stations (DVB-S, DVB-T and DVB-C). The digital television stations (DVB-S, DVB-T and DVB-C) you are able to record and playback also depend on the broadcasting station. - Recording and reproducing programmes, as well as the Time Shift function can only be carried out using an external data medium (hard drive or USB stick). Recordings can be made with most data mediums on the market. However, we cannot guarantee operation for all data media. If you record a programme on an external data medium, you can only watch it on your television. You cannot watch this programme on any other device. If you send your television to be repaired and hardware components need to be replaced, you might not be able to play the recordings again on the repaired television. Grundig isn't responsible for any loss of data stored on any external storage device. It is recommended to play the files saved on DTV by PRnP player. Some recorded files may not play correctly on USB Media Player.Possible limitations when using an external data medium
Depending on the broadcasting station, you may experience various restrictions on some functions from some television stations.GRUNDIG has no influence on these restrictions.
- Recording a programme on the external data medium can be disabled by the broadcaster. If URI^* protected! PVR function blocked is displayed, then recording or time shift is restricted (one recording possible) or disabled (recording not possible) by the broadcaster. ^* URI = user rights information. If you record and save a programme on the archive of an external data medium, playback can be restricted. The broadcaster can allow you to see this programme one or more times but could also just make it available for a certain period of time. Stations from which children are protected, immediately require a PIN number before recording starts. If this authorisation is not given, the recording may not start. - Copying a programme from a digital television station onto a video or DVD recorder using the «AV1/S-VHS« socket (analog audio/video signal) can also be restricted by the broadcaster. In order to do this, your device must support the copying function.Connecting external data media
Notes:
It is advised to put the television on stand-by mode before connecting the Skype camera. Before disconnecting the external data medium, the television must first be switched to standby, otherwise files can be damaged. There are two USB inputs on the television, namely USB1 and USB2 (HDD) »USB2 (HDD) « input is intended for USB devices that require additional power (e.g. external hard disk).  1 Plug the external hard disk to the USB2 (HDD) USB interface of the television; or plug the memory stick in one of the «USB1« sockets of the television.Notes:
Both sockets USB1 of the television supports 500~mA current according to the USB standard. Devices such as external hard disk and etc. that consume more power can only be connected to the USB2 (HDD) USB interface of the television. If you are using a power cable for the external hard disk that you have connected to the «USB2 (HDD)« USB interface, then the power cable of the external hard disk must also be unplugged when the TV is turned off. You must not disconnect the USB Device from the TV while a file on the USB Device is being read by the TV.USB recording settings
Selecting the menu
1 Open the menu with MENU\*. 2 Select the menu item PRnP with or and press OK to confirm. - »Media Player« menu is displayed. 3 Select the option PVR with or and press OK to confirm. - The content is displayed. 4 Press (green). - »Media Options« menu is displayed.  5 Select the line Disk Management with V or A and press OK to confirm.Note:
Additional operations are explained in the following sections.Disconnecting external data media
1 In the «Disk Management« menu select the line «Safely Remove Disk« with «V« or «A« and press «OK« to confirm. Note: - Disk can be safely removed from the socket now.Selecting external data media
If there are more than one external data media connected to the television, then select one of them. 1 In the «Disk Management« menu select the line «Disk« with «V« or «A« and press «OK« to confirm. 2 Select the external data media with or 3 Switch back with BACK or press EXIT to end the setting.Selecting a partition on the external media
If there are more than one partitions on the external data media, select one of them. 1 In the «Disk Management« menu select the line «Partition« with «V« or «A« and press «OK« to confirm. 2 Select the desired partition with 3 Switch back with BACK or press EXIT to end the setting.Testing external data media
You can test the external data media to see if it is suitable for the required functions. 1 In the «Disk Management« menu select the line «Disk« with «V« or «A«. If there are more than one external data media, select the desired data media with «« or «» «. 2 Select the line Partition with or If there are more then one partitions, select the desired partition with or 3 Select the line Check Disk with or and press OK to confirm - Disk information is displayed. 4 Switch back with BACK or press EXIT to end the setting.Formatting the partition
1 In the «Disk Management« menu select the line «Format Partition« with «V« or «A« and press «OK« to confirm. 2 To confirm deletion process, press (green); or to cancel deletion process, press (red) button. 3 Switch back with BACK press EXIT to end the setting."Pausing" time shift programmes
You can pause any program you are watching. This is a useful function. For instance, if the phone rings when you are watching a movie, you can pause the movie and resume it after the call without missing nothing. The last scene that was frozen is displayed and time shift is recorded into the external data media. In Time Shift mode, you can only record as much as the free memory space on the external data media. You can record current broadcast for approximately 60 minutes.Note:
For undisturbed "Permanent Timeshift" use an external USB hard disk. Press during the broadcast. - Television picture is paused and delay time is displayed. 2 To resume the broadcast, press - The system continues recording the broadcast while you are watching it.Note:
Following functions can be used in time shift mode. - Fast rewind, press « several times for the desired speed; - Fast forward, press several times for the desired speed; - To pause press » «. 3 Press to exit the Time Shift function. - The message «Live Broadcast« appears. - The scenes in the "time shift memory" are deleted.Recording programmes
You can record the programmes. Programmes are recorded onto the external data media and the archive is managed via television. A memory of 44 MB up to 110 MB is required for a 1 minute record. Other recordings in the archive can be watched while a programme is being recorded. It is possible to shift channels during recording between unscrambled channels on the same frequency (DVB-T, DVB-C) or on the same transponder (DVB-S).One-touch programme recording
1 Select the channel with 1 0 or P + >>P - and press to start the recording. - Recording information is displayed: Recording symbol, channel name, programme time and recording time. - This information will disappear shortly. 2 To end the recording, press » «. 3 Press (green) to accept; or to resume recording press (red).Notes:
- When recording is complete, it will automatically be stored on the external data media. If you remove the external data media during recording, then the recording is cancelled automatically and no data is recorded onto the external data media.Recording a programme from the channel list
1 Press OK to open the channel list. 2 Select a channel with « or » and press OK to confirm. 3 Press EXIT to exit from the channel list. 4 Press (red) to start recording. - Recording information is displayed: Recording symbol, channel name, programme time and recording time. - These information will disappear after a short while. Recording symbol and recording time will appear on the lower right corner of the screen. 5 To end the recording, press .. 6 Press (green) to accept; or press (red) to continue the recording.Programme setting for recording
... with electronic programme guide Electronic programme guide data can be used for recording. 25 EPG reminder and/or recorder can be set in total. 1 Press GUIDE to open the electronic programme guide. 2 Select the preferred TV program with V or A - Information about the actual TV program is displayed. 3 Press « or » to select the TV program you want to record. 4 To add broadcasts to the timer press OK. Information for the TV program to be recorded will be displayed. 5 Select the line Record with and press OK to confirm. - Recording data range appears. 6 Press OK to confirm. 7 Press EXIT to end the menu.Note:
If the data for the recording is to be changed, open menu with MENU. Select the menu item Schedule List with and confirm with OK. Press (green), change the data and save it with (blue).Notes:
A warning is displayed before the timer recording starts and counts down for 10 seconds to allow you to switch to the channel. At the end of 10 seconds, the channel to be recorded appears automatically. If the timer recording starts during playback, playback stops. If you do not select Yes in the warning prompt, recording will start automatically at the end of the countdown. Only for UPC customers Note: Parts of previous or next files can be included into the record while the programme is being recorded resulting from possible Programme Guide errors. In such cases, keep in mind that the highest family protection level will apply for the whole recording if one or more of those programmes have any level of family protection.Set the lead/follow-up time
With this function you can change the recording time set by the electronic TV guide. If you think that a program will start a few minutes earlier or will end several minutes later, you can "add" up to 60 minutes to this time 1 Open the menu with MENU. 2 Select the menu item Schedule List with or < < and press OK to confirm. 3 Activade the «Padding Time« menu with «...» (blue). 4 Change the start time with or>>. 5 Use to switch to the line End and change the end time with or . 6 Save the setting with (green). 7 Press EXIT to end the menu.... by entering the information manually
25 TV programmes can be preset for the timer recording or as a reminder. Press GUIDE to open the electronic programme guide. 2 Press (yellow) button. 3 Select the line Manual Record with V or A and press OK to confirm. - Channel is marked.Note:
If you want to use the reminder function, select the line Manual Reminder\*. 4 From Channel select the channel you want to record with or . To pass to the next item press . 5 In the Date use 1...0 to enter the date you want to record (dd/mm/yyyy). To pass to the next item press 6 In the Start Time use 1 0 to enter starting time (hour:minute). To pass to the next item press 7 In the End Time use 1...0 to enter end time (hour:minute). To pass to the next item press 8 Select Mode( Once, Every Day or Weekly) with or . 9 Select «Save« with «» and confirm with OK. - Recording time range appears. 10 Press OK to confirm. - Recording timer is programmed. 11 Press EXIT to end the menu.Notes:
A warning is displayed before the timer recording starts and counts down for 10 seconds to allow you to switch to the channel. At the end of 10 seconds, the channel to be recorded appears automatically.Editing the timer
You can edit programmed timers. 1 Open the menu with MENU\*. 2 Select the menu item «Schedule List« with «» or «> and press OK to confirm. - «Schedule List« menu will be displayed. 3 Select the title of the programme to be changed with or and press (green) to edit the title. 4 With or select the items you want to edit and modify them with 1 0 and . 5 To save the modification, press (blue). - Timer is changed. 6 Press EXIT to end the setting.Deleting a timer
You can delete programmed timers. 1 Open the menu with MENU\*. 2 Select the menu item Schedule List with or < < and press OK to confirm. - Schedule List menu will be displayed. 3 Select the title of the programme to be deleted with or and and delete the timer with (yellow). - Timer is deleted. 4 To confirm deletion process, press (green); or to cancel deletion process, press (red). 5 Press EXIT to end the setting.Playback
Either started manually or with the timer function, the recorded programmes are all stored in the external data media. You can display an archive on an external data media from «Media Player« menu.Selecting a broadcast from the recorded files list
1 Open the menu with MENU<. 2 Select the menu item PRnP with or and press OK to confirm. - »Media Player« menu is displayed. 3 Select the option PVR with or and press OK to confirm. - Recorded files are displayed. 4 Select the broadcast you want to play with , , or and start playback with 5 Press to end playback. - TV returns to media player menu.Forward/reverse picture search
Press repeatedly to select the playback speed (2x, 4x, 8x, 16x or 32x); or press repeatedly to select the playback speed (2x, 4x, 8x, 16x or 32x).Playback during a recording
You can either watch the current programme that is being recorded or a previously recorded programme while recording takes place. 1 Select the channel with 1 0 or P + _r P - and press to start the recording. 2 To display PVR content press (red) button. 3 Select the programme you want to watch with or and start playback with . 4 Press to stop playback. 5 Press to stop recording. 6 Confirm with (green); or to continue recording, press (red).Deleting programmes from the recorded files menu
You can delete recorded programmes from the Recorded Files list. 1 Open the menu with MENU\*. 2 Select the menu item PRnP with or and press OK to confirm. - »Media Player« menu is displayed. 3 Select the option PVR with or and press OK to confirm. - Recorded files are displayed. 4 Select the broadcasts to be deleted with 5 »To delete the broadcast, press » « (red). 6 Press (green) to confirm deletion process.Note:
- Files that are being recorded or played back can not be deleted from the »Recorded Files« menu. 7 Press EXIT to end the menu.File formats
Your television can be operated via the USB input with the following file formats:Video data
Video compression / decompression (codec) is intended for decreasing the storage area without sacrificing the picture quality. Your HD Digital Receiver allows you to play compressed video data with, XVID, H.264/ MPEG-4 AVC(L4.1, Ref. Frames:4), MPEG-4, MPEG-2, MPEG-1, MJPEG, MOV standards. File extensions that the device supports: ".avi", ".mkv", ".mp4", ".ts", ".mov", ".mpg", ".dat", ".vob". In addition to video data, these files also contain audio data compressed and "packaged" by using MP3, AAC, DTS 2.0 or Dolby Digital. DTS 2.0+Digital Out denotes the dual ability to pass the DTS encoded digital bistream to an external DTS decoder for playback as well as fold down the digital surround soundtrack for playback in a 2-channel environment through analog outputs.Audio data Your television can play audio data coded with MP3, AAC standards. MP3 stands for MPEG-1 Volume Level 3 and is based on the MPEG-1 standard developed by MPEG (Motion Picture Expert Group). AAC indicates the Advanced Audio Coding and is developed by MPEG. AAC provides higher audio quality with the same data rate (bit rate). WMA (Windows Media Audio) is a compression standard developed by Microsoft for audio data. These formats enable audio files to be saved on storage devices with a sound quality similar to that of a CD. File extensions supported by your device: .mp3",.mp2",.wma",.m4a",.aac",.wav" MP3 files can be organised into folders and subfolders similar to the files on a computer.Image data
Your television can display picture data in JPEG, PNG and BMP formats. JPEG stands for Joint Picture Experts Group. This process is intended to compress picture files. PNG and BMP standards are intended to compress picture data without loss. Picture files can be saved in a data storage medium together with other file types. Such files can be organized as folders and subfolders. For DTS patents, see http://patents.dts.com. Manufactured under license from DTS Licensing Limited. DTS, the Symbol, & DTS and the Symbol together are registered trademarks and DTS Studio Sound is a trademark of DTS, Inc. © DTS, Inc. All Rights Reserved.Connecting external data media
It is advised to put the television on stand-by mode before connecting the external data medium. Connect the device and then switch the television on again. Before disconnecting the data medium, the television must first be switched to standby, otherwise files can be damaged.Notes:
The socket USB1 at the side of the television supports 500mA current according to the USB standard. Devices such as external hard disk and etc. that consume more power can only be connected to the USB2 (HDD) interface of the television. If you are using a power cable for the external hard disk that you have connected to the «USB2 (HDD)« USB interface, then the power cable of the external hard disk must also be unplugged when the TV is turned off. You must not disconnect the USB Device from the TV while a file on the USB Device is being read by the TV. A bi-directional data transfer as defined for ITE (Information Technology Equipment) devices in EN 55022/EN 55024 is not possible. USB transfer is not an operating mode in itself. It is only an additional function.  1 Connect the USB2 (HDD) USB interface on the television and the related data output on the external device (external hard disk, digital camera, card reader or MP3 player) with a USB cable; or plug the memory stick in one of the «USB1« sockets at the side of the television.Removing the external data media
Before removing the external data medium, log off the data medium. 1 Open the menu with MENU\*. 2 Select the menu item «Media Player« with «» or «» and press «OK« to confirm. 3 Select the Option PVR with or and press OK to confirm. 4 Select the »Media Options« with »\*\*\*\* (green). 5 Select the line Disk Management with V or A and press OK to confirm. 6 Select the line « Safely Remove Disk« with «V« or «A« and press «OK« to confirm. 7 Remove the data medium from the socket.The file browser
The file browser displays the video, audio and picture data that the external data medium provides. If a data medium contains different file formats, you can deactivate data (Video file, Audio file, Picture file) you do not need for the playback using a filter function.  The main menu of the file browser 1 Preview. 2 Data medium selection. 3 Data type. 4 Name of the data medium. 5 Folders on the data medium. 6 Menu navigation.Settings in the USB setup menu
Selecting the menu
1 Open the menu with MENU\*. 2 Select the menu item «Media Player« with «» or «» and press «OK« to confirm. 3 Select the external data medium with or and press OK to confirm. 4 Select the »Media Options« with » « (green). 5 Select the line «Disk Management« with «V« or «A« and press «OK« to confirm.Note:
Additional operations are explained in the following sections.Selecting the display mode
1 Select the line View Mode with or 2 Press or to select the function. 3 Press EXIT to end the setting.Switching to automatic preview
If the automatic preview is switched on, you can see the selected file in the main menu of the file browser. 1 Select the line Auto Preview with or 2 Press or to switch the function on. 3 Press EXIT to end the setting.Selecting the display duration of the slide show
1 Select the line Slide Show Interval with or 2 Select the time (3, 5, 10 seconds) with « or «. 3 Press EXIT to end the setting.Subtitle settings
If the film has subtitles, you can turn on and off this subtitle, change its size, colour or eliminate synchronisation shift with the subtitle. 1 From »Media Options« menu use «V« or «A« to select «Show Subtitle«, «Subtitle Size«, «Subtitle Color« or «Subtitle Offset Value«. 2 Adjust with 3 Press EXIT to end the setting.Note:
These adjustments can only be made for external subtitle files. These adjustments cannot be made in subtitles combined with the movie.Playback basic functions
1 Open the menu with MENU. 2 Select the menu item Media Player with or << and press OK to confirm. - Media Player menu is displayed. 3 Select the external data medium with or and press OK to confirm. Media Player menu of the selected external data medium is displayed.Note:
If the content of the external data medium is not displayed, press (yellow) to refresh. 4 Select the push button Type with A and A and press OK to confirm. 5 Select the desired type (Movie, Music or Photo) with « or « and press OK to confirm. 6 Select the folder with V or A and press OK to open it. A list of subdirectories appears.Note:
Go back to the previous folder with BACK 7 Select the track or picture with , >> or >> and press >> to start playing.Notes:
When playing picture data, press 2 to view information about the resolution and the size. For playing MP3 or WMA data, information on the album, track and singer is displayed at the left of the menu. When playing picture data, press to switch on a control panel. Press » to pause playback. 9 To resume playback press «. 10 Press » « to end playback. - The file browser appears.Notes:
Use to select Up Folder, when you would like to return to the last folder. It is possible that some files that are supported in USB mode do not operate due to some problems that may arise depending on how such files are created (compression) although they contain the supported file extension. If there are more then one audio sources (audio stream) in the video files that are being played, then you can switch between the audio sources with the « while the file is played in full screen mode. Movies you will be watching from the movie file only supports subtitles with .srt, .sub, .ass, .ssa, .smi format. Names of the subtitle and movie files must be the same. Otherwise, subtitle can not be displayed.Additional playback functions
Depending on the file formats used, the following additional functions are possible.Selecting partition
(only supported video files) 1 During playback, select the next chapter with 2 During playback, select the previous chapter withSelecting titles
(only supported video files) 1 During playback, select the next title with 2 During playback, select the previous title withPlaying selected tracks
Only play the marked tracks. 1 Select the track you want with , >> < < 或 > > 1 and highlight with (yellow). 2 Select the track you want with , < or > and highlight with (yellow). 3 Start playback with 4 Press to end playback.Note:
To remove the highlighting, select the track with or and remove the marking with (yellow).Selecting a track or picture in steps (SKIP)
1 During playback, select the next track/picture you want with 2 Select the previous track/picture with Playback begins with the track or picture you selected.Move to desired time
(only video files) 1 Press OK during playback. 2 Enter the time that you want to move to with 1 0 and confirm with (green).Searching forward
(only video and audio files) You can select different speeds (2-fold, 4-fold, 8-fold, 16-fold and 32-fold forwards and backwards). 1 During playback you can select playback speed by pressing « or » «. 2 To resume playback pressTurn the picture display
(only picture files) The pictures can be rotated by 90^ . 1 During playback, switch on the control panel with OK. 2 Use « or « to select « and press OK. - The picture rotates 90^ clockwise.Repeat functions
Options: - One, the selected track is repeated once; - Sequence, selected tracks are repeated consecutively; - Random, selected tracks are repeated in a mixed order; - None , repetition off. Press to start playback. 2 During playback, switch on the control panel with OK. 3 Select C_G with or and press OK repeatedly. - The repeat function will change.Note:
If you only want to use this "normal" video text, disable the digital video text, see page 90.TOP text or FLOF text mode
1 Press TXT to switch to the Teletext mode. 2 You can select teletext pages directly with «1...0« or step by step with «V« or «A«. To return to page 100, pressNote:
At the bottom of the screen, you will see an information line consisting of a red, green and, depending on the channel, yellow and blue text field. Your remote control has buttons with the corresponding colours. 3 Press (red) to scroll one page back. 4 Press (green) to scroll one page forward. 5 Press (yellow) to select section. 6 Press (blue) to select topic. Press TXT to exit the Teletext mode.Normal text mode
1 Press TXT to switch to the Teletext mode. 2 You can select teletext pages directly with 1 0 To return to page 100, press 3 Press P to scroll one page back. 4 Press P + to scroll one page forward. 5 Press TXT to exit the Teletext mode.Additional functions
Skipping the waiting time
While a page is being searched for, you can switch to the television channel. 1 Enter the teletext page number with 1 0 and then press - As soon as the page is found, the page number is displayed. 2 Press » « to switch to the teletext page.Increasing character size
If you have difficulty reading the text on the screen, you can double the character size. To enlarge the character size of a teletext page, press repeatedly.Page stop
A multiple page may contain several sub-pages, which are automatically scrolled by the transmitting station. 1 Stop the sub-pages with 2 Press » « to quit the function.Calling up a sub-page directly
If the selected teletext page contains further pages, the number of the current sub-page as well as the total number of pages is displayed. 1 Call up the sub-page with 2 Press « (red) or « (green) to select a sub-page. 3 Press to quit the function.Reveal answer
Certain teletext pages contain "hidden answers" or information which can be called up. 1 Display information with 2 Conceal the information withSplitting the screen (Split Screen)
With this function you can see the television channel on the left and the teletext page on the right. 1 To activate the split screen function, press «. - Television channel and teletext page appear side by side on the screen. 2 To deactivate the split screen function, press «.What is HbbTV?
HbbTV provides next generation interactive teletext broadcast with its modern structure, content and high definition (HD) image and videos. To receive HbbTV broadcast, your television must be connected to the Internet. This service provided by ARD includes "Das Erste Mediathek" along with teletext restructured graphically with high definition images. ZDF service includes "ZDF mediathek" and other programme information. This feature is only available in countries where the service is provided. Using HbbTV
When you switch to a TV program that supports HbbTV, an info message will appear stating that HbbTV broadcast is available. Press * (red) to open HbbTV. - Information regarding the services will appear on the screen. Additionally, colored buttons necessary for browsing the menus will also appear.Note:
The range of subjects and selection of individual subjects depend on the programme provider. Numeric buttons 1 through 0 are used for additional functions. 2 Press (green), (yellow) or (blue) to select the desired topic field. 3 Select the option you want with , >> or in the selected topic field and confirm with OK. 4 Press * (red) to close HbbTV.Additional functions for video indexes
1 Start playback with 2 Pause playback with 3 Resume playback with 4 Rewind by forward by 5 Stop playback with «.TV Settings
1 Open menu with MENU button. 2 Activate the menu item >Settings> with OK<. 3 Select the menu item TV Settings with or and press OK to confirm. -TV Settings menu is displayed. Note:
Additional operations are explained in the following sections.Language & Keyboard settings
Changing the menu language
1 Select the line «Language & Keyboard« with «V« or «A« and press «OK« to confirm. 2 Select the line Menu Language with V or A and press OK to confirm. 3 Select menu language with , , or and press OK to confirm. 4 Press BACK to go back one menu level or press EXIT to end the setting.Changing the audio language
(only for digital television channels) You can define a primary and a secondary audio language. 1 Select the line «Language & Keyboard« with «V« or «A« and press «OK« to confirm. 2 Select the line «Audio Language« with «V« or «A« and press «OK« to confirm. 3 Select the audio language with , >> or and press (red) to set it as the primary audio language or (green) to set it as the secondary audio language. - Primary and secondary languages appear on the upper left corner of the menu. 4 Press BACK to go back one menu level or press EXIT to end the setting.Changing the subtitle language
(only for digital television channels) You can disable subtitles, select subtitle language and assign a secondary subtitle language. 1 Select the line «Language & Keyboard« with «V« or «A« and press «OK« to confirm. 2 Select the line Subtitle Language with or and press OK to confirm. 3 Select the subtitle language with >> < , < or > and press * (red) to set it as the primary subtitle language or * (green) to set it as the secondary subtitle language. - Primary and secondary languages appear on the upper left corner of the menu. 4 Press BACK to go back one menu level or press EXIT to end the setting.Changing the keyboard language
You can select the language of the keyboard connected to television. 1 Select the line «Language & Keyboard« with «V« or «A« and press «OK« to confirm. 2 Select the line «Keyboard Language« with «V« or «A« and press «OK« to confirm. 3 Select the keyboard language with >> , < or > and press OK to confirm. 4 Press BACK to go back one menu level or press EXIT to end the setting.Accessibility settings
1 Open menu with MENU button. 2 Activate the menu item >Settings> with OK<. 3 Select the menu item TV Settings with or and press OK to confirm. 4 Select the line «Accessibility Settings« with «V« or «A« and press «OK« to confirm.Note:
Additional operations are explained in the following sections.Subtitle Mode
(only for digital television channels) Subtitles for the deaf and hard of hearing can be switched on and off. 1 From the «Accessibility Settings« menu use «V« or «A« to select the line «Subtitle Mode«. 2 Set the preferred option Off, Hard of Hearing or Basic with or 3 Press BACK to go back one menu level or press EXIT to end the setting.Audio description (audio subtitles)
Audio description is an additional audio channel for people who are visually handicapped. The activities, surroundings, scene changes or the appearance, the gestures and facial expressions of the actors are described. This sound is transmitted at the same time as the normal sound with digital television stations. This depends on the programme being broadcast. 1 From the Accessibility Settings« menu use « or « to select the line « Audio Description«. 2 Select On with or>>. 3 Select the line Audio Description Volume with or and use or to adjust volume. 4 Press BACK to go back one menu level or press EXIT to end the setting.Accessories
Display the status of the connected accessory from this menu to perform various adjustments. 1 Open menu with MENU button. 2 Activate the menu item >Settings> with OK<. 3 Select the menu item TV Settings with or and press OK to confirm. 4 Select the line Accessories with V or A and press OK to confirm. 5 Select the needful line with or and press OK to confirm. Select the needful function with 或 6 Press BACK to go back one menu level or press EXIT to end the setting.Notes:
- Accessories are sold individually. They are not provided with your TV. Please contact your dealer from where you have purchased your TV in order to obtain more information about purchasing. Die Anzeige des Status und die Einstellungen sind abhängig vom verwendeten Zubehor.Advanced settings
1 Open menu with MENU button. 2 Activate the menu item >Settings> with OK<. 3 Select the menu item TV Settings with or and press OK to confirm. 4 Select the line Advanced Settings with or and press OK to confirm.Note:
Additional operations are explained in the following sections.Auto sleep
This function will turn the television to stand-by mode in 4 hours depending on your setup, unless the television receives any signal, or keys or, according to European regulations, the remote remains untouched for 5 minutes. 1 From the Advanced Settings< menu use or to select the line Auto Sleep<. 2 Select the switch-off time with 或Note:
Set the function to Off with or to switch off. 3 Press BACK to go back one menu level or press EXIT to end the setting.Fast switching
Using this function the time is taken to switch between channels is changed. (Setting «Yes« 1 to 2 seconds, setting «No« 2 to 5 seconds.) 1 From the Advanced Settings« menu use « or « to select the line «Fast Zapping''. 2 Activade the function with or ( Yes ). 3 Press BACK to go back one menu level or press EXIT to end the setting.Store logo view
This function is intended for feature introduction at stores. When «On« is selected, feature logos are displayed. 1 From the Advanced Settings menu use or to select the line Shop Logo Display 2 Select Yes with or>>.Note:
Set the function to No with or to switch off. 3 Press BACK to go back one menu level or press EXIT to end the setting.Power LED brightness
You can adjust power (stand-by) LED brightness in operation mode of television. 1 From the Advanced Settings« menu use «V« or «A« to select the line «Power LED Brightness«. 2 Use « or » to set the brightness to « High«, « Medium « or « Low «. 3 Press BACK to go back one menu level or press EXIT to end the setting.Power save mode
It ensures automatic shut off of screen in Antenna, Cable, Satellite and radio channels and USB mode when playing audio files. 1 From the Advanced Settings menu use or to select the line Power Saving Mode. 2 Press « or » to set shut off time of display as 10 Seconds«, 30 Seconds«, 60 Seconds«. 3 Press BACK to go back one menu level or press EXIT to end the setting.Note:
If the screen closes while listening to music in USB mode, press >MENU and select Off with << or >> to close the feature.Functions in the "About" menu
1 Open menu with MENU button. 2 Activate the menu item >Settings> with OK. 3 Select the menu item TV Settings with or and press OK to confirm. 4 Select the line About with or and press OK to confirm.Note:
Additional operations are explained in the following sections.Product information
1 From the «About« menu use «V« or «A« to select the line «Product Information« and press «OK« to confirm. - Software version information of the product is displayed. 2 Press BACK to go back one menu level or press EXIT to end the setting.Software update (OAD)
(only for digital television channels) 1 From the «About« menu use «V« or «A« to select the line «Software Updates« and press «OK« to confirm. 2 Select the option OAD with or and press OK to confirm. - The search for new software is being carried out.Note:
If no new software is available the menu automatically switches off. 3 If new software is available, press (green) to install the software. - The new software will be loaded.Warning:
Television will restart after update. Do not turn your television's power off during updates.Note:
For automatic checking of software update, select from Source Setup menu Advanced Settings the line OAD with or Use or to select On.Software update (Internet)
(only for digital television channels) 1 From the «About« menu use «V« or «A« to select the line «Software Updates« and press «OK« to confirm. 2 Select the option Internet with or >> and press OK to confirm. - The search for new software is being carried out.Note:
If no new software is available the menu automatically switches off. 3 If new software is available, press (green) to install the software. - The new software will be loaded.Warning:
Television will restart after update. Do not turn your television's power off during updates.Software update (USB)
1 Plug the memory stick in one of the «USB« sockets at the side of the television. 2 From the «About« menu use «V« or «A« to select the line «Software Updates« and press «OK« to confirm. 3 Select the option USB with or and press OK to confirm. - The software on the USB memory stick is installed.Resetting the television to its original state
This function enables you to delete the station lists and all custom settings. 1 From the «About« menu use «V« or «A« to select the line «Restore Factory Defaults« and press «OK« to confirm. - Warning screen will be displayed.Note:
If the loaded applications are also to be deleted, select the line «Installed applications« by pressing «A« and remove the small tick with «OK«. 2 Press (green) to confirm the reset function. - In a short while Installation Guide is displayed. 3 Continue the settings as described in the chapter on first installation and searching for channels on page 16.Deleting channel history
This function allows you to delete channel history stored in the Main menu. 1 From the «About« menu use «V« or «A« to select the line «Delete Channel History« and press «OK« to confirm. 2 Press (green) to confirm the reset function. - The preview images in the main menu are deleted.Timer settings
1 Open menu with MENU button. 2 Activate the menu item >Settings> with OK<. 3 Select the menu item «Timer Apps« with «» or «» and press «OK« to confirm. - «Timer Applications« menu is displayed. Note:
Additional operations are explained in the following sections.Sleep timer
In the «Sleep Timer« menu you can enter a time for the television to switch off. After this time has elapsed, the television switches to standby mode. 1 Select the line Sleep Timer with or 2 Select the switch-off time with orNote:
To switch off the function, use or to set the switch-off time to Off . 3 Press BACK to go back one menu level or press EXIT to end the setting.On timer
In the On Timer menu, you can enter a switch-on time for the television. The television switches on with the preset volume and the desired channel after the set time in stand-by mode has elapsed. 1 Select the line Auto On with V or A and press OK to confirm. 2 Select the line Mode with or and use or to select when the television should switch on. 3 Select the line Input Source with or and use or to select the input source. 4 Select the line Service Type with or and use or to select the preferred option (ATV, DTV, Radio or DATA). 5 Select the line Channel with or and use or to select the preferred channel.Note:
The line Channel is only active when the input signal currently in use has been set. If no entry has been made, then the first channel of the selected input source will be used. 6 Select the line Volume with or and use 或 to set the volume. 7 Select the line Set Hour with or and enter the time with 1 0 8 Press (blue) to save the setting. 9 Press BACK to go back one menu level or press EXIT to end the setting.Auto Off
In the «Auto Sleep« menu, you can enter a switch-off time for the television. The television switches to stand-by after the entered time has elapsed. 1 Select the line Auto Off with V or A and press OK to confirm. 2 Select the line Mode with or and use < or > to select when the television should switch off. 3 Select the line Set Hour with or and enter the time with 1 0 4 Press · · · · · · · (blue) to save the setting. 5 Press BACK to go back one menu level or press EXIT to end the setting.Date and time settings
1 Open menu with MENU button. 2 Activate the menu item >Settings> with OK. 3 Select the menu item «Timer Apps« with «» or «» and press «OK« to confirm. 4 Select the line Advanced with or and press OK to confirm.Note:
Additional operations are explained in the following sections.Auto tuning
The television automatically detects the local difference to Greenwich Mean Time (the selected channel provides a time signal). 1 From the Advanced menu use V or to select the line Date & Time Set. and press OK to confirm. 2 Select the line Mode with and then select the option AUTO with or - Date and time are automatically updated; 3 Press BACK to go back one menu level or press EXIT to end the setting.Manual tuning
You can set the local time difference yourself if the time is not detected or is not the same as your local time. 1 From the Advanced menu use V or A to select the line Time Adjustment and press OK to confirm. 2 Select the option Manual with or - Time Zone and Daylight Saving a active. 3 Select the line Time Zone with or and press OK to confirm. - The Time zone selection menu is displayed. 4 Adjust the time zone with V or and press OK to confirm. 5 Select the line Daylight Saving with V or A and then select the option Auto, Off or On with or 6 Press BACK to go back one menu level or press EXIT to end the setting.Note:
If the option «Auto« is selected in the line «Time Adjustment», the television set automatically adapts the time to the time signal from the respective broadcaster. However, different channels may also use time bases which are different to those of your country e.g. foreign broadcasters. In these cases, reminders and planned recordings may be annulled due to the time difference.Parental settings
1 Open menu with MENU button. 2 Activate the menu item >Settings with OK. 3 Select the menu item Parental Guidance with or and press OK to confirm. - Parental Guidance menu is displayed. Note:
Additional operations are explained in the following sections.Parental Guidance
There are movies with content or scenes which are not suitable for children. Certain programmes contain information which identifies such content or scenes and have been given an access level from 4 to 18. You can select one of the access levels and thus authorise the playback. 1 From the Parental Guidance menu use or to select the line Parental Guidance and press or to confirm. 2 Enter the PIN code 1234 with 1 0 in the password prompt. 3 Select the access level with « or »». 4 Press BACK to go back one menu level or press EXIT to end the setting.Note:
When the TV is in review buffer mode, the parental rating of the program in the live broadcast is applied on the content being watched (rather than the actual parental rating of the content being watched). As a result, a parental rated content being watched in the review buffer mode will not necessarily show as parental rated and vice versa. This means that if parental rated program starts in live broadcast the PIN-pop up message will appear in review buffer, or the PIN-pop up message will be dismissed in review buffer as soon as a program without parental rating starts in live broadcast."Locking the menus
By using this function, you can lock Automatic Channel Search«, Manual Channel Search« and Channel Editor« menus as to be accessed only when the PIN code is entered. 1 From the Parental Guidance menu use or to select the line Menu Lock and press or to confirm. 2 Enter the PIN code 1234 with 1 0 in the password prompt. 3 Activate the lock with 或 ( On)Note:
To switch off the menu lock, use « or » to select the setting («Off»). 4 Press BACK to go back one menu level or press EXIT to end the setting.Blocking the multifunction switch
When the key lock is activated, the multi function switch on the television does not function. 1 From the Parental Guidance menu use or to select the line Keypad Lock and press or to confirm. 2 Enter the PIN code 1234 with 1 0 in the password prompt. 3 Activate (On) or deactivate (Off) the panel lock with or 4 Press BACK to go back one menu level or press EXIT to end the setting.Changing the PIN code
Instead of the default code 1234 you can enter a personal code. Please take note of your personal code. 1 From the Parental Guidance menu use V or A to select the line Change PIN and press < or > to confirm. 2 Enter the current PIN code 1234 with 1 0 3 Enter your new four-digit personal PIN code with 1 0 4 Reenter your personal PIN code with 1 0 5 Press BACK to go back one menu level or press EXIT to end the setting.Blocking a television channel
You can block individual television channels which are not suitable for children using a personal PIN code. 1 Open menu with MENU button. 2 Activate the menu item >Settings with OK. 3 Select the menu item Source Setup with or < < and press OK to confirm. 4 Select the line Channel Editor with V or A and press OK to confirm. 5 Select the channel to be blocked with >> , or and highlight with OK. Channel is marked with 6 Activade the «Tools« menu with «...» (yellow). 7 Select the line Channel Lock with or and press OK to confirm. 8 Enter the PIN code 1234 with 1 0 in the password prompt. 9 Confirm the entry with OK<. -Channel is marked with >Note:
To remove the lock, select the channel again with , , or , activate the Tools menu with (yellow), select the line Unlock Channel with or and press OK to confirm 10 Press EXIT to end the setting.Watching a blocked television channel
You can watch a TV channel blocked with PIN code by selecting the TV channel and entering the PIN code. 1 Select the blocked channel with 1 0 or P + , P - . 2 Enter the PIN code 1234 with 1 0 in the password prompt. -Blocked channel can be viewed.Note:
- Channel will be blocked again when you change the channel.DIGI LINK
 Your television is equipped with DIGI LINK feature. This feature utilizes CEC (Consumer Electronics Control) protocol. CEC allows you to make an HDMI connection between your TV and DVD player, STB or video recorder and control such equipments with the remote control of the television. This feature must also be supported by the device you will connect. You television supports the following functions. For detailed information about this function, read user manual of the external device.Turning on external device from standby mode
When you switch on your external device (e.g. DVD player) from standby mode, your television will be turned on from standby mode as well and it will switch to the HDMI source that the external device is connected to. Depending on the features of the external device (e.g. AV receiver) can start and your television can stay on stand-by mode.Selecting the HDMI source from the television
When you switch on your external device (e.g. DVD player), your television will switch to the HDMI source that the external device is connected to. (your TV should be open).Selecting the menu language
When you select menu language on your TV, menu language of the external device will change as well. (If your DVD player supports)Switching off the device from standby mode
After switching your television to standby, your external device (e.g. DVD player) will also switch to standby if it is switched on. DIGI LINK is always active on your television. Refer to the user manual of your external device to learn how to activate this feature on it.Searching and selecting the active external device
You can connect up to 11 devices that support DIGILINK to this television. 1 Open the Tools menu with «TOOLS«. 2 Select the line «Digilink« with «V« or «A« and press «OK« to confirm. - Connected devices are searched and the ones that are found are displayed on the Device List menu. 3 Select the device that you want to control with V or A and mark it with OK . - If the selected device is connected to a different source than the current one, you will automatically switch to the source to which the device is connected.Device Control
You can determine how the remote control of your television will control the external device. 1 Press and use or to select either one from HDM11 to HDM14 and press OK to confirm. 2 Open the menu with MENU\*. 3 Activate the menu item «Settings« with «OK«. 4 Select the menu item Source Setup with or and press OK to confirm. - Source Setup menu is displayed.  5 Select the line Remote Behavior with or . 6 Select control type (»Pass-Through «, »Deck « or »Zap«) with « or «.Notes:
Pass-Through is included in the menu as an option that can be selected in every device type. Deck Control and Tuner Control options change depending on the external device connected. Apply trial and error method to determine the functions of the remote control buttons for the selected control type. Refer to the user manual of the DIGILINK compatible device for its functions. 7 Press EXIT to end the setting.Switching the device to standby
This option switches the connected external device to standby. 1 Press and use or to select either one from HDM1 to HDM4 and press OK to confirm. 2 Open the menu with MENU. 3 Activate the menu item >Settings> with OK<. 4 Select the menu item Source Setup with or and press OK to confirm. - Source Setup menu is displayed. 5 Select the line Put device into standby with or and press OK to confirm. - The connected external device is switched off.High definition - HD ready
 Your television can playback high-definition television signals (HDTV). You can connect the input sources (HDTV set-top box or High Definition DVD player) to the «HDMI« socket (digital HDTV signal). This ensures that you can view digital HDTV programmes, even if they are copy-protected (HDCP High Bandwidth Digital Content Protection).Connection options
- Which television socket(s) you connect your external devices to depends on the sockets the external device is equipped with and the signals which are available. Note that with many external devices the resolution of the video signal must be adapted to the input sockets on the television (check the external device's instruction manual). You can find out which values you need to set by referring to the guidelines in the section about connection options. - Do not connect any other equipment while the device is switched on. Switch off the other equipment as well before connecting it. Only plug the device into the mains socket after you have connected the external device.  Connecting an external device
With a digital audio/video signal
Suitable devices: Digital satellite receiver, game console, BluRay player, DVD player/ recorder, set-top box, notebook, PC. Video signal: digital image; definition: standard 576p; HDTV 720p, 1080i, 1080p. Audio signal: digital sound (stereo, multichannel compression, uncompressed). Channel position HDMI11, HDMI2, HDMI3 or HDMI4. 1 Connect the HDMI1 _, , HDMI2 _, , HMI3 _, or HMI4 (ARC) _, socket on the television and the corresponding HDMI socket on the external device using a standard HDMI cable (digital video and audio signal).With an analogue video signal (progressive)
Suitable devices: DVD player/recorder, game console. Video signal: YUV; definition: standard 576p; HDTV 720p, 1080i, 1080p. Audio signal: stereo, analog. Channel position Component\*. 1 Connect the PC-IN sockets on the television and the corresponding sockets on the external device using cinch cables (video signal). 2 Connect the PC Audio IN × sockets on the television to the corresponding sockets on the external device using cinch cables (audio signal).Using the Euro/AV socket
Suitable devices: Digital satellite receiver, DVD player/recorder, set-top box, game console, video recorder, decoder. Video signal: CVBS/RGB. Audio signal: stereo, analog. Channel position SCART. 1 Connect the AV1/S-VHS input on the television to the corresponding socket on the external device using EURO/AV cable (video and audio signal).Selecting Scart volume adjustment
1 Open the menu with MENU\*. 2 Activate the menu item >Settings> with OK<. 3 Select the menu item «Sound Settings« with «or « and press OK to confirm. - «Sound Settings« menu is displayed. 4 Select the line Advanced with or and press OK to confirm. 5 Select the line «Scart Output« with «V« or «A». 6 Select the option Fixed or Adjustable with orNote:
Scart Volume becomes active when Adjustable is selected in the menu. 7 Select the line Scart Volume with or and adjust the volume by using or . 8 Press EXIT to end the setting.With S-Video signal
Suitable devices: DVD player/recorder, video recorder, camera recorder, notebook, PCs. Video signal: Y/C. Audio signal: stereo, analog. Channel position «S-VIDEO«. 1 Connect the AV1 / S - VHS\& socket on the television to the corresponding socket on the external device using EURO/AV cable (video and audio signal).Using a DVD recorder, DVD player, video recorder or set-top box
Switch on the video recorder, DVD player or set-top box and select the function you wish to use. 2 Press and use or to select input signal (SCART, S-VHS, HDMI1, HDMI2, HDMI3, HDMI4 (ARC) or COMPONENT) and press OK to confirm.Headphones
Connecting headphones
Plug the headphone jack (3.5 mm ø jack plug) into the headphone socket of the television.Selecting the sound settings for the headphones
1 Open the menu with MENU\*. 2 Activate the menu item >Settings> with OK<. 3 Select the menu item «Sound Settings« with «or « and press OK to confirm. - «Sound Settings« menu is displayed. 4 Select the line Advanced with V or A and press OK to confirm. 5 Select the line Headphone Volume with or 6 Adjust the volume with 7 Press EXIT to end the setting.Note:
Prolonged listening at loud volumes with the earphones can damage your hearing.Hi-fi system
Connecting digital multi-channel amplifier/AV receiver
1 Connect the »HDMI4 (ARC)« (HDMI 1.4 Audio Return Channel) socket to the relevant socket on the HDMI ARC compliant Digital multichannel amplifier / AV receiver with a standard HDMI cable (digital audio signal); or 2 Connect the «Optic Out« socket on the television to the corresponding socket on the AV receiver using a standard optic digital cable (digital audio signal).Important:
- Do not use a HDMI cable longer than 5m for HDMI ARC connection.Apply the device with HDMI ARC function and activate HDMI ARC
Switch on the multi-channel amplifier or the AV receiver. If a Blu-ray Player is connected on the AV receiver, the player must be switched on, too. 2 Open the tools menu with TOOLS\*. 3 Select the line Digilink with or and press OK to confirm. - Audio device connected to the »HDMI4 (ARC) « source in the »Device List« menu shall be displayed in the list. 4 Start device search with «… (blue). - Audio device connected to the «HDMI4 (ARC)« source shall be displayed in the list. 5 Select the device with V or A and press OK to confirm.Note:
If the audio system also has a playing function (e.g. Home theater system including DVD player function), two devices will be listed on the HDMI CEC list. The first one is the player, and the second one is the audio playback. If a Blu-ray Player is connected to the AV receiver, please remove the Disc from the Player during the registration. 6 Open the menu with MENU. 7 Activate the menu item >Settings> with OK<. 8 Select the menu item «Sound Settings« with «or « and press OK to confirm. - «Sound Settings« menu is displayed. 9 Select the line Advanced with or and press OK to confirm. 10 Select the line ARC with or 11 Press or to select On. Manufactured under license from Dolby Laboratories. Dolby and double D symbols are trademarks of Dolby Laboratories.Notes:
The internal speakers of the television are switching off automatically. The volume of the AV receiver you can adjust with the remote control of the television. For switching off the HDMI ARC function select Off with or The ARC function will be deactivated while switching off the television and the internal speakers are active again. 12 Press EXIT to end the setting.Playing the audio signal via the HiFi system
1 Connect the socket on the television and the corresponding socket on the hi-fi system / AV receiver using a adapter cable.Note:
When this function is activated, the hi-fi system / AV receiver (connected to socket transmits the audio signal. 2 Open the menu with MENU\*. 3 Activate the menu item >Settings with OK. 4 Select the menu item «Sound Settings« with «or « and press OK to confirm. - «Sound Settings« menu is displayed. 5 Select the line Advanced with V or A and press OK to confirm. 6 Select the line Audio Out with or 7 Select the option Fixed or Adjustable with orNotes:
If you select »Adjustable«, the volume can be changed in the menu option » Audio Out Volume«. If you want to obtain the audio output only from hi-fi system / AV receiver, select the option «Off« in the line «TV Speaker with «or »» 8 Press EXIT to end the setting. What is LIVESHARE?
Liveshare is a wireless technology featured with Android operating system and used to reflect the screen of your mobile device which supports this feature to your television supporting Liveshare. By using this technology you can share your device's content, present a slide show or play your favorite game on a larger screen.Screen share with Liveshare connection
1 Connect Grundig WiFi USB dongle to the «USB1« or «USB2(HDD)« socket of your television in order to connect the television to a wireless network. 2 Open the menu with MENU\*. 3 Select the menu item «Screen Share« with «» or « and press OK to confirm. - «Liveshare« menu is displayed. 4 Start Liveshare application from your laptop PC or mobile device and select your television. - Liveshare will begin in a short while and the screen image of your laptop PC or mobile device will be reflected on the television. 5 Press EXIT to end Liveshare.Note:
To find out if your laptop PC or mobile device supports Liveshare feature or not, please visit the Website of the manufacturer. Connecting a PC
1 Connect the socket PC-IN × on the television to the corresponding socket on the PC using a VGA cable. 2 Connect the «Audio« socket on the television to the corresponding socket on the PC using a suitable cable.Note:
Adjust your PC to the monitor (for example, picture resolution 1280 x 768, picture frequency 60 Hz).Selecting the channel position for the PC
1 Press « and use « or « to select input signal «PC«, then confirm with «OK«.Settings for the PC
1 Open the menu with MENU\*. 2 Activate the menu item >Settings> with OK<. 3 Select the menu item Source Setup with or < < and press OK to confirm. - Source Setup menu is displayed.  4 Select the function and setting you want using or and set with . Options: - »Auto Adjust«, for automatic PC configuration; - »Auto Adjust Mode«, when set to «On«, automatically makes adjustments in PC mode; - Position, adjusts the picture position horizontally and vertically; - Size, sets the cycle frequency; - Phase , removes horizontal flicker, blurring and horizontal lines. 5 Press EXIT to end the setting. What is common interface?
Common Interface (CI) is an interface for DVB receivers. Encrypted channels can only be viewed with a CA module suitable for the encryption system and the corresponding smart card. The television set is equipped with a Common Interface slot into which CA modules from various providers can be inserted. - You can insert the provider's smart card into the CA module in order to enable the encrypted channels you want to see.Inserting the CA module
Note:
Switch off the device before inserting the CA module in the slot. 1 Insert the smart card into the CA module. 2 Insert the CA module with the smart card into the «Cl« slot on the television.Note:
To see which CA module is in the Common Interface slot, go to the «CA - Module« submenu. When you insert a CA module into the CI slot on the television for the first time, wait a few moments until the television has registered the CA module.Access control for CA module and smart cards
1 Open the menu with MENU\*. 2 Activate the menu item >Settings> with OK. 3 Select the menu item Source Setup with or < < and press OK to confirm. - Source Setup menu is displayed. 4 Select the line Advanced with V or A and press OK to confirm. 5 Select the line CA-Module with V or A and press OK to confirm.Notes:
This menu provides operating instructions and - after you enter your PIN code - access to channels of the PAY-TV provider. The remaining settings are described in the manuals for your CA module and smart card. The CA modul is not supported in some countries and regions. Please consult your authorised dealer. 6 Press EXIT to end the setting.Searching for all digital television channels from a satellite automatically
New satellite channels are added or satellite data is changed frequently. Therefore, we recommend you to run auto search function from time to time. All transponders are scanned for new channels. 1 Open the menu with MENU. 2 Activate the menu item >Settings with OK. 3 Select the menu item Source Setup with or < < and press OK to confirm. - Source Setup menu is displayed.  4 Select the line Automatic Channel Search with V or A and press OK to confirm. - Menu is displayed. 5 Select the option Satellite with < < or > > < and press OK to confirm. 6 Confirm the push button »Next Page« with OK «. 7 Select the Channel Type. Press « or » to select whether you want to search for only digital channels (Digital) or only radio channels (Radio) or both (Digital + Radio) and press OK« to select and mark or unmark the « Digital « and/or « Radio « items. 8 Select Scan Type. To select whether you want to search for only free digital television channels (Free), only scrambled digital television channels (Scrambled) or both (Free + Scrambled), press « or » and press OK « to select and mark or unmark the « Free » and/or « Scrambled » items. 9 Press the red button to start searching.Notes:
- When updating via the same satellites a security query is displayed at the start of a search. If the previously stored channels should be retained in the channel list and the new channels found be added to it, then press (green). If (red) is pressed, the saved channels will be deleted from the current channel list. - The «Digital Searching« menu appears, and the scan for TV channels begins. - The search is complete as soon as the message «Search is completed!« appears.Note:
The search can be aborted with EXIT. 10 Switch to the channel Editor with (yellow) or press EXIT to end the setting.Searching for digital television channels from a satellite manually
If a certain channel cannot be found with automatic search, you can search it manually by manual search function. You must enter all parameters of the channel correctly. You can obtain the current transponder information from teletext page, satellite TV magazines or internet. 6 Select the required items with or 1 Open the menu with MENU\*. 2 Activate the menu item >Settings with OK. 3 Select the menu item «Source Setup« with «or « and press «OK« to confirm. 4 Select the line Manual Channel Search with or and press OK to confirm. 5 Select the option «Satellite« with «< or »» and press «OK« to confirm. - Service Type: Press or to select whether you want to search for only television channels (DTV), only radio channels (Radio) or both (Radio+TV). - »Scan Type«: Press « or » to select whether you want to search for only free digital television channels (Free), only scrambled digital television channels (Scrambled) or both (Free + Scrambled). - Transponder: Enter channel frequency with 1 0 as a 5-digit number. - «Symbol Rate«: Enter channel symbol rate with «1...0« as a 5-digit number. - «Polarization»: Select the channel polarization with « or » as « Horizontal » or «Vertical». - >Network Search:: Select the network search with «or» «as» On or Off. 7 Press red button to start searching. - The «Digital Searching« menu appears, and the scan for TV channels begins.Note:
The search can be aborted with EXIT. 8 Press EXIT to end the setting.LNB Settings
Notes:
The following description about the LNB settings premise a substantial expertise about the satellite systems. Ask your specialist dealer. - Your TV supports SCR system (Single Channel Router). If you are using SCR satellite system, follow the steps described in «LNB Type« section. 1 Open the menu with MENU\*. 2 Activate the menu item >Settings with OK. 3 Select the menu item Source Setup with or and press OK to confirm. 4 Select the line Manual Channel Search with or and press OK to confirm. 5 Select the option «Satellite« with «or »» and press OK to confirm. 6 Activate the option Antenna Settings with (blue). - The «Antenna Settings« menu is displayed. 7 Select the required items with V , A - >Satellite:: Press OK and use «, » >>, « or « to pick the satellite you wish to get the digital stations from and press OK to confirm - Transponder:: Press OK, and use , , or to select a transponder and press OK to confirm. Use (red) to add a transponder, use (green) to delete it, or use (blue) to change transponder data - >LNB Type:: Press OK and use << or >> to select the LNB type used in the satellite system and press >> (green) to confirm. If you are using the SCR System, please perform the >>User Band << KB Frequency and LNB Selection settings. >>User Band:: Select the user band number assigned to the user with >>or >>. »UB Frequency (MHz) «: Enter the user band frequency assigned to the user band with »1...0«. »LNB Selection: If more than one satellites are used in the current SCR system, select 1/2 to 2/2 for the satellite corresponding to the relevant positions using « or «. - >LNB Power: Set the LNB power to Off or set it to 13/18V or 14/19V depending on the LNB type by using « or «.Notes:
Use installation equipment supported / suggested by your SCR Switch. - Other users / receivers connected to the system may be affected if the specified user band number and frequency is changed during installation. - User band and user band frequency is specified on the SCR switch used; and each user / receiver must select a specified user band and user band frequency. - With SCR satellite system, auto search by several users / receivers at the same time may cause problems. - «DISEqC Mode»: Based on the number of current satellite system, select the option «Off» «DiSEqC 1.0« or «DiSEqC 1.1« with «or» «. »Off: For satellite systems with single antenna. DiSEqC 1.0 switch allows for receiving from maximum four satellites at the same time. From LNB selection use or to make the 1 / 4 , 2 / 4 , 3 / 4 or 4 / 4 selection for the satellite that corresponds to relevant DiSEqC positions. »DiSEqC 1.1 « switch allows for receiving from maximum sixteen satellites at the same time. From LNB selection use or to make the selections between 1/16 and 16/16 for the satellite that corresponds to relevant DiSEqC positions. 8 Press EXIT to end the setting.Motor antenna setup (DiSEqC 1.2)
Your television supports DiSEqC 1.2 motorized satellite systems. This feature allows to control the satellite through your television. 1 Open the menu with MENU\*. 2 Activate the menu item >Settings> with OK<. 3 Select the menu item Source Setup with or < < and press OK to confirm. 4 Select the line Manual Channel Search with or and press OK to confirm. 5 Select the option «Satellite« with «< or »» and press «OK« to confirm. 6 Activate the option »Antenna Settings« with « (blue). - The «Antenna Settings« menu is displayed. 7 Select the line DiSEqC Mode with or and select DiSEqC1.2 with or - The line «DiSEqC 1.2 SETTINGS« is active.Note:
Additional operations are explained in the following sections. Settings regarding DiSEqC 1.2 are explained below. Contact an expert or your dealer for DiSEqC 1.2 antenna systems.DiSEqC 1.2 Settings
Adjust the satellite antenna position according to each satellite. These settings can be stored and the antenna can be moved to a preset position. 1 Select the line DiSEqC 1.2 SETTINGS with V or A and press OK to confirm. - »DiSEqC 1.2 SETTINGS« menu is displayed. 2 Use or to select necessary items. - »Moving Mode«: Set the Moving Mode with « or » to « Discrete » or « Continuous «. - Discrete: Moves the antenna to west or east for the determined step size. - Continuous: Moves the antenna to west or east continuously. - >Step Size:: With « or » select the number of steps the antenna has to rotate. >Step Size« is active when «Moving Mode« is selected as «Discrete«. - Move Motor: Adjusts the antenna for the selected satellite. Set the antenna to West with and to East with - >Limit Position: Sets the limit position which the antenna will be able to move and allows the antenna to move within the determined limits. With specify a limit position in direction and with specify a limit position in East direction. - >Go To Stored Position: Moves the antenna to the preset satellite position. Maximum 50 positions can be saved. Select the setting with (green) button, select predefined position with or and confirm with (green) button. Antenna will mode to saved position. - «Store Current Position»: Stores antenna's current position. Select setting with « (red) button, select recording position with « or » and confirm with « (green) button. - Reset DiSEqC 1.2 Limit: Resets the limit positions set for the antenna. 3 Press EXIT to end the setting.Searching for television channels from the cable provider automatically
1 Open the menu with MENU. 2 Activate the menu item >Settings> with OK<. 3 Select the menu item Source Setup with or < < and press OK to confirm. 4 Select the line Automatic Channel Search with or and press OK to confirm. 5 Select the option «Cable« with «< or »» and press OK to confirm. - »Automatic Channel Search« menu is displayed.  6 Select the line Scan Type with or and select the option Quick or Full scan type with or - »Quick« scanning function sets the channels according to the cable operator information in the broadcasting signal. Network ID« performs the installation that is suitable to your network. If you know the Network ID, please enter it. If you do not know the Network ID, please select »Auto« for «Frequency« and «Network ID«. - If scanning cannot be performed with «Quick« option, select «Full«. All current channels are tuned and stored in «Full« scanning. This scanning process can take a long time. This option is recommended if your cable operator does not support quick scanning function.Note:
You can speed up the search. To do this, frequency and network ID information are required. You may get this data from your cable operator or find it in the Internet forums. 7 Select the push button »Next Page« with «V« to and press «OK« to confirm.Note:
Select whether to search for digital or analogue TV channels. To do this press « or » to select the option «Digital« or «Analogue« and press «OK« to remove or apply the "small tick". Press (red) to start searching.Notes:
- When updating via the same satellites a security query is displayed at the start of a search. If the previously stored channels should be retained in the channel list and the new channels found be added to it, then press (green). If (red) is pressed, the saved channels will be deleted from the current channel list. - The «Digital Searching« menu appears, and the scan for TV channels begins. - The search is complete as soon as the message «Search is completed!« appears.Note:
The search can be aborted with EXIT. 9 Switch to the Channel Editor with (yellow); or press EXIT to end the setting.Searching for television channels from the cable provider manually
1 Open the menu with MENU. 2 Activate the menu item >Settings> with OK<. 3 Select the menu item Source Setup with or < < and press OK to confirm. 4 Select the line Manual Channel Search with or and press OK to confirm. 5 Select the option «Cable« with «< or »» and press OK to confirm. 6 Select whether to search for digital or analogue TV channels. To to this press or to select the option Digital or Analogue and confirm with OK. 7 With select Frequency (MHz) and enter frequency (4-digit) directly with 1 0 ; search will start. - The search is finished when the channels found appear in the list. 8 Press EXIT to end the setting.Searching for digital terrestrial TV channels automatically
1 Open the menu with MENU\*. 2 Activate the menu item >Settings> with OK<. 3 Select the menu item «Source Setup« with «or « and press «OK« to confirm. 4 Select the line Advanced Settings with or and press OK to confirm. 5 Select the line Active Antenna Power with or Switch on the antenna power supply for the antenna with or ( OnImportant:
The antenna power supply (5V) may only be switched on if the antenna is an active indoor antenna with a signal amplifier and it is not already supplied with a voltage via a mains plug (or similar supply). Otherwise you may cause a short circuit and irreparably damage your antenna. 6 Select the line Automatic Channel Search with A or V and press OK to confirm. 7 Select the option «Air« with «or» and press OK to confirm. 8 Select whether to search for digital or analogue TV channels. To to this press or to select the option Digital or Analogue and confirm with OK. 9 Press (red) to start searching.Notes:
- When updating via the same satellites a security query is displayed at the start of a search. If the previously stored channels should be retained in the channel list and the new channels found be added to it, then press (green). If (red) is pressed, the saved channels will be deleted from the current channel list. - The «Digital Searching« menu appears, and the scan for TV channels begins. - The search is complete as soon as the message «Search is completed!« appears.Note:
The search can be aborted with EXIT. 10 Switch to the Channel Editor with (yellow) or press EXIT to end the setting.Searching for digital terrestrial TV channels manually
1 Open the menu with MENU\*. 2 Activate the menu item >Settings> with OK<. 3 Select the menu item Source Setup with or < < and press OK to confirm. 4 Select the line Advanced Settings with V or A and press OK to confirm. 5 Select the line Active Antenna Power with or Switch on the antenna power supply for the antenna with ( On)Important:
The antenna power supply (5V) may only be switched on if the antenna is an active indoor antenna with a signal amplifier and it is not already supplied with a voltage via a mains plug (or similar supply). Otherwise you may cause a short circuit and irreparably damage your antenna. 6 Select the line Manual Channel Search with A or V and press OK to confirm. 7 Select the option «Air« with «< or »» and press «OK« to confirm - »Manual Channel Search« menu is displayed. 8 Enter frequency (3-digit) directly with 1 0 - Search will start. - The search is finished when the channels found appear in the list. 9 Press EXIT to end the setting.Automatic service update
If this function is activated, possible changes of network operators are updated automatically. The unit must be located in stand-by mode. This updating affects all types of reception - terrestrial, cable and satellite. 1 Open the menu with MENU\*. 2 Activate the menu item >Settings> with OK. 3 Select the menu item Source Setup with or < < and press OK to confirm. - Source Setup menu is displayed. 4 Select the line Advanced Settings with or and press OK to confirm. 5 Select the line Automatic Service Update with or and select the automatic update with or ( On) . 6 Press EXIT to end the setting.Tuning analogue television channels
This setting is only necessary if you cannot receive any digital channels and you have not carried out an analogue search during initial setup. The television channel can be set directly or using the search.Setting all analogue television channels
The analogue television stations are listed in the channel list after the digital television stations.Note:
Plug the rooftop antenna cable (for analogue television stations) into the «ANT IN« socket on the television. 1 Open the menu with MENU\*. 2 Activate the menu item >Settings> with OK<. 3 Select the menu item Source Setup with or < < and press OK to confirm. - Source Setup menu is displayed. 4 Select the line Automatic Channel Search with or and press OK to confirm. 5 Select the option «Air« or «Cable« with «or » and confirm the source you are receiving analog broadcast from by pressing OK. 6 Select the option Digital with or and press OK to remove the small tick. 7 Press (red) to start searching.Notes:
After starting the scan, a security query will appear. Press (green) to confirm the option Yes - All channel and favourites lists for the analogue channels will be deleted and compiled new. - The »Analog Searching« menu appears, and the scan for TV channels begins. Depending on the number of television channels received, this can easily take a few minutes. - The search is complete as soon as the «Search is completed!« appears.Note:
The search can be ended prematurely with EXIT\*. Press (yellow) to switch to the Channel Editor; or press EXIT to end the setting.Tuning the analogue television channels by entering the channel numbers
1 Open the menu with MENU\*. 2 Activate the menu item >Settings> with OK<. 3 Select the menu item Source Setup with or < < and press OK to confirm. - Source Setup menu is displayed. 4 Select the line Manual Channel Search with or and press OK to confirm. 5 Select the option «Air« or «Cable« with «or» and confirm the source you are receiving analog broadcast from by pressing OK. 6 Select the option Analog with or and press OK to confirm. - Menu is displayed.  7 Select the line Program No with V or A and press «, «» or «1...0« to select the preset. 8 Select the line Band with or . To select S (special channel) or C (channel) options press << or >> . 9 Select the line Channel with or . To enter the channel number step by step, press or or enter it directly with 1 0 or start a automatic scan with (green) or (yellow).Note:
The current system is displayed in the System. If the colour and/or sound is not functioning correctly, select System with or. Select the required setting with or When fine tuning is required, select «Fine Tuning« with «V« or «A« and tune with «< « or «» «. 10 To save the setting press (blue).Note:
To set other television channels, repeat steps from 7 to 10. 11 Press EXIT to end the setting.Changing stored analogue channels
If channels were stored with the automatic channel search during the tuning of the television channels, you can delete them. You can also change or enter the name of a channel and skip a channel.Selecting channel lists
1 Open the menu with MENU\*. 2 Activate the menu item >Settings> with OK<. 3 Select the menu item Source Setup with or < < and press OK to confirm. 4 Select the line Channel Editor with or and press OK to confirm. - Channel Editor menu is displayed.Note:
Additional operations are explained in the following sections.Deleting channels
1 In the Channel Editor menu, select the channel(s) you want to delete with , 或 , and highlight the television channel by pressing OK. -Channel is marked withNote:
If several TV channels are to be deleted, press , , or to select these and mark each one with OK. 2 Activade the «Tools« menu with «●●» (yellow). 3 Select the line Delete with V or A and press OK to confirm. 4 To confirm deletion process with (green); or to cancel deletion process with (red). 5 Press EXIT to close the menu.Entering the analog channel names (maximum 8 characters)
1 In the Channel Editor menu, select the channel you want to rename with >> , < or >> and highlight it by pressing OK. -Channel is marked with 2 Activade the «Tools« menu with «●●» (yellow). 3 Select the line Rename with or and press OK to confirm. 4 Delete the current channel name, press (red). 5 Select the required character with >> , or and move to the next character with OK. Using Shift OK you can switch between uppercase letters / numbers and lowercase letters / special characters. -Select _X^X to delete the character entered and press OK to confirm. 6 Confirm the channel name with (green).Note:
To enter other channel names, repeat steps 1 to 6.Creating a list of favourites - analog channels
You can select your favourite channels and save them in up to four lists (FAV1 to FAV4). 1 In the Channel Editor menu, select the channel(s) you want to add in the favorites list with , , or and highlight the television channel by pressing OK. -Channel is marked with 2 Activade the «Tools« menu with «...» (yellow). 3 Select the line Add To Fav. with or and press OK to confirm. -Add to Fav. menu is displayed. 4 Select the favorite list you want to add the selected channels with or and store with OK. The channels are marked in the Channe Editor with 1 , 2 , 3 or 4 You can add the same channel in more than one favourites list. Each favourite list can contain maximum 255 channels.Notes:
You can delete channels from the favourites list. Press (yellow), select the favorites list the channel is in with or and press OK to confirm. Select the channel(s) you want to delete with and highlight the channel by pressing OK. Press (yellow) and select the line Remove from Fav. with or and confirm with OK. The channel you have selected is now deleted from the favorites list. - When a channel stored in the favourite channel list is deleted channel order in the favourite list is updated. 5 Press EXIT to close the menu.Displaying signal information
(only for digital television channels) 1 Open the menu with MENU\*. 2 Activate the menu item >Settings> with OK<. 3 Select the menu item Source Setup with or < < 其 and press OK to confirm. - Source Setup menu is displayed. 4 Select the line Advanced with or and press OK to confirm. 5 Select the line Signal Information with or and press OK to confirm. - Signal Information menu is displayed.Notes:
■ Signal information changes depending on the current source. ■ Signal information is shown on the left of the menu. The more «Frequency« and «Signal Strength« bar stretches to the right, the more signal you have. The signal level not only depends on your receiver system, but also on the channel which is currently active. Remember this when aligning your antenna using the signal level display. 6 Press EXIT to close the menu.Deactivate and activate HbbTV
This option allows turning off Hbb TV feature, thus warnings shall not be displayed on channels with Hbb TV feature. 1 Open the menu with MENU. 2 Activate the menu item >Settings> with OK<. 3 Select the menu item Source Setup with or < < 其 and press OK to confirm. - Source Setup menu is displayed. 4 Select the line Advanced with or and press OK to confirm. 5 Select the line Hbb TV with or 6 Select the option (»Off«) with « or » «. Note: To activate HbbTV again, select in step. 6 the option «On«. 7 Press EXIT to end the setting.Deactivate and activate digital teletext
If you deactivate digital video text, only normal video text can be selected, however the other functions of the interactive service HbbTV are still available. 1 Open the menu with MENU\*. 2 Activate the menu item >Settings> with OK<. 3 Select the menu item Source Setup with or < < and press OK to confirm. - Source Setup menu is displayed. 4 Select the line Advanced with or and press OK to confirm. 5 Select the line Digital Teletext with or 6 Select the option (»Off«) with « or » «. Note: To reactivate digital teletext, select «On« in step 6. 7 Press EXIT to end the setting.GRUNDIG 32 VLE 6522 BL
Product Fiche
Energy efficiency class A Screen size: 80~cm / 32^ Power consumption: in operation mode 40 W / 65 W max. Annual power consumption: 58 kWh Stand-by power consumption: < 0.50 W Max. resolution: 1920 × 1080Other data
Operating voltage: 220-240 V~ 50-60 Hz Screen Area (dm2): 28 dm² Rosh Limits: Pb (Lead) / Hg (Mercury) Pb (Lead) complies with ROSH directive / 0 mg Peak Luminance rate: 65% Audio out: 2 x 20 watt music 2 x 10 sinusoidal wave + 10 W sinusoidal wave (Subwoofer) Subwoofer feature is optional. Not available in all models. Default satellite: 20 LNB Power: 13/18V, 14/19V optional, max.500mA LNB switching signal: 0/22 kHz 650mV +/- 250mVpp DiSEqC: 1.0 control, 1.1 control, 1.2 controlReception range:
Satellite:
Ku band 10700MHz - 12750MHz Modulation: DVBS QPSK, DVBS2 QPSK, 8 PSK IF band 950 MHz - 2150 MHz Signal level: -25dBm to -65 dBmCable:
Full band 110MHz 862MHz Modulation:16QAM, 32QAM, 64QAM, 128QAM and 256QAM Symbol rate:4.0Msym/s to 7.2Msym/sDigital (DVB-T):
VHF/UHF Band width 7 MHz and 8 MHz FFT size: 2k, 8k Modulation: 16QAM, 64QAM,QPSK Security range: 1/4, 1/8, 1/16, 1/32Digital (DVB-T2):
VHF/UHF Band width 7 MHz and 8 MHz FFT size: 1k, 2k, 4k, 8k, 16k, 32k Modulation: 16QAM, 64QAM, 256QAM, QPSK Security range: 1/4, 19/256, 1/8, 19/1/16, 1/32, 1/128 This feature is optional. Not available in all models.Analog:
C02... C80, special channels S01 ... S41Default channels:
TV/Radio 6000 (Satellite - DVBS), 1000 (Cable - DVBC) / 99 (analog) 1000 (Antenna-DVBT) / 99 (analog) 8 AV,2 USBWeight:
approx 4,42 kgSize:
WHD 72,9× 44,9× 7,6cm Right to make technical changes and errors reserved.Service information for dealers
 This product complies with European Union directives and regulations below: 2006/95/EC: Electrical equipment directive for use within certain voltage limits. 2004/108/EC: Directive relevant for electromagnetic suitability. 2009/125/EC: Directive and relevant for ecodesign for products using energy as well as its following sub-directives; 278/2009: Regulation regarding eco friendly design requirements regarding energy consumption of uncharged external power sources and average active efficiency (for models with AC/DC adapters); 642/2009: Regulation regarding eco friendly design requirements for televisions. 2010/30/EU: Directive regarding Energy Labelling of Energy-Related products as well as its following sub-directives; 1062/2010: Regulation regarding energy labelling of televisions. 2011/65/EU: Directive on limitations on use of certain hazardous materials on electric, electronic domestic and office equipment.Network interfaces
This product is intended for connection to the ADSL network.Disposing of the packaging
The packing materials are dangerous for children. Keep the packing materials out of the reach of children. The packing of your product is manufactured from recyclable materials. Dispose by classifying in accordance with waste instructions. Do not dispose along with normal household waste.Environmental note
 This product has been made from high-quality parts and materials which can be re-used and recycled. Therefore, do not dispose of the product with normal household waste at the end of its life. Take it to a collection point for recycling electrical and electronic devices. This is indicated by this symbol on the product, in the operating manual and on the packaging. Please find out about collection points operated by your local authorities. Help protect the environment by recycling used products.Troubleshooting
If the remedies given below do not work, please consult an authorised GRUNDIG dealer. Please bear in mind that malfunctions can also be caused by external devices such as video recorders or satellite receivers.| Problem | Possible cause | Remedy |
| Screen lit (snow), but no station | Antenna cable | Is the antenna cable connected? |
| No TV station programmed | Start a station search | |
| Poor picture contrast | Picture settings incorrectly set | Adjust the brightness, contrast or colour setting |
| Problem at station | Test with a different station | |
| Interference to picture and/or sound | Interference from other devices | Change the position of the device |
| Ghosting, reflection | Channel setting | Automatic or manual channel setting/fine tuning |
| No colour | Antenna | Have antenna cable or system checked |
| Colour intensity at maximum | Turn up the colour | |
| TV standard setting (if setting option is available) | Select the correct colour standard | |
| Problem at station | Test with an another channel | |
| Volume set to minimum | Turn up or switch on the volume | |
| Teletext missing or faulty | Problem at station | Test with an another channel |
| Television station (has no tele-text) or antenna system | Test another channel for fine tuning and ghosts | |
| Station signal too weak | Check the antenna system | |
| Remote control does not work | No optical connection | Point the remote control at the television set |
| Remote control batteries | Check the batteries, change if necessary | |
| Operating condition undefined | Switch off the television with the main power button for approximately 2 minutes | |
| Picture is dark in PC mode | Incorrect setting for picture resolution and picture frequency on the PC | Change the setting on the PC (for example, picture resolution 1280 x 768, picture frequency 60Hz) |
| DMS device cannot be found | DMS device is not switched on or not started | Make sure that the DMS device is on and operating. |
| Network connection settings are not made. | Check the network settings. | |
| Low image quality (pixel) in WLAN mode | DMS (for example PC) is connected to the wireless network and away from the modem | Bring your DMS closer to the modem |
| Warnings about the con- nection problems on the display | Network Cable or wireless USB network device may be discon- nected | Check network cable or wireless USB network device |
| Modem do not have Internet connection or has problems | Make sure that your modem has Internet connection | |
| Videos in video applica- tions are lagging during playback in wireless con- nection | Internet connection speed is low. | Low Internet speed is a problem that is related with the speed of your subscription or a failure in the Internet infrastructure. Contact with your service provided (ISP). |
| Videos in video applica- tions are lagging during playback in cable con- nection | Internet connection speed is low. | Low Internet speed is a problem that is related with the speed of your subscription or a failure in the Internet infrastructure. Contact with your service provided (ISP). |
| There are connection problems in Inter@ctive ap- plications. | This may occur due to temporary problems in servers of these ap- plications | Try connecting to the applications again |
Note:
This is a Class A product. During operation the device can cause radio interference. In this case the user may have to remedy this. Please contact your specialist dealer.- CONNECTION/PREPARATION
- OVERVIEW
- SETTINGS
- SMART Inter@ctive TV 3.0 FEATURE
- USB RECORDING
- USB OPERATION
- TELETEXT MODE
- INTERACTIVE PORTAL (HbbTV)
- CONVENIENCE FUNCTIONS
- USING EXTERNAL DEVICES
- PC MONITOR MODE
- OPERATION WITH COMMON INTERFACE
- SPECIAL SETTINGS
- INFORMATION
- Caution:
- Things to do for energy saving
- Special features of your television set
- Receiving digital stations
- GRUNDIG SCR System
- Important notes on environmental protection
- Notes on still images
- Connecting the antenna and power cord
- Note:
- Inserting batteries in the remote control
- Environmental note
- Connections on the television set
- Optic Out
- PC Audio IN
- PC-IN
- AV1/S-VHS
- ANT IN
- SATELLITE
- HDMI4 (ARC)
- Control buttons on the TV
- Multi function switch
- Remote control - all functions
- Initial set-up
- Settings for connecting to the home network
- Automatic connection,
- Manual connection,
- Tuning television channels
- Initial set-up - overview
- Arrange Initial set-up
- Help:
- or
- Connecting to a home network with a LAN cable
- Connecting automatically by entering the network password
- Searching television channels with satellite signal (DVB-S)
- Notes:
- Tuning cable digital television channels (DVB-C)
- Tuning terrestrial digital television channels (DVB-T)
- Important:
- Changing the Channel Editor for the digital channels
- Opening the Programme Table
- Searching channels by name in the Channel Editor
- Deleting channels in the Channel Editor
- Moving the channels in the channel organizer to different channel positions
- Displaying channels in the Channel Editor by antenna type
- Sequencing channels in the Channel Editor
- Creating a list of favourites
- Sorting channels in the favorites list
- Enter own names for the favourites lists (max. 7 characters)
- Renaming AV channels
- Picture settings
- Enhanced picture settings
- Sound settings
- Sound Mode
- DTS Studio SoundTM
- Night Mode
- Stereo/dual channel
- Equalizer
- Automatic volume
- Concluding the settings
- Basic functions
- Switching on and off
- Selecting channels
- Selecting stations from lists
- Selecting AV channels
- Adjusting the volume
- Muting
- Displaying information
- Audio settings
- Audio language
- Subtitles
- Zoom function
- Sleep timer
- Zap function
- Electronic TV guide (RoviGuideTM)
- Log on to the „RoviGuide™//
- The Electronic TV guide in Offline mode
- The Electronic TV guide in Online mode
- Changing the picture format
- »Auto« format
- >>4:3« format
- LetterBox The letterbox setting is especially suitable for programmes in 16:9. The black borders which are usually at the top and bottom of the screen are eliminated, 4:3 pictures fill the screen. The transmitted pictures are enlarged, but are slightly cropped at the top and bottom. The picture geometry remains unchanged. >Subtitle< format
- >>Panorama< format
- >Overscan off format
- Network connection
- Wired network
- Wired network connection
- Wired network settings
- Automatic connection
- Manual connection
- Wireless network
- Wireless network connection
- Wireless network settings
- Technical requirements
- Wireless WPS network connection through by pressing a button
- Wireless WPS network connection with PIN
- Change TV Name
- Connecting the TV to a "hidden" network
- SMART Inter@ctive TV 3.0 internet applications
- Starting Smart Inter@ctive TV
- USB keyboard and mouse
- Navigation and enetering text during registration
- Notes on data entry:
- Creating a Grundig Application Store account
- Logging in with Grundig Application Store account
- Selecting internet applications
- Grundig Application Store
- Downloading and installing internet applications
- Uninstalling internet applications
- Rating internet applications
- Adding Internet applications to favorites
- Smart Inter@ctive TV 3.0 browser main menu
- Navigating in the main menu
- Playback and other options in the applications
- Web browser
- Playing the video, music and image files with home network connection
- Selecting the digital media server
- Playback
- Other playback options
- Information on recording and playing television programmes
- Possible limitations when using an external data medium
- GRUNDIG has no influence on these restrictions.
- Connecting external data media
- USB recording settings
- Selecting the menu
- Disconnecting external data media
- Selecting external data media
- Selecting a partition on the external media
- Testing external data media
- Formatting the partition
- "Pausing" time shift programmes
- Recording programmes
- One-touch programme recording
- Recording a programme from the channel list
- Programme setting for recording
- Set the lead/follow-up time
- ... by entering the information manually
- Editing the timer
- Deleting a timer
- Selecting a broadcast from the recorded files list
- Forward/reverse picture search
- Playback during a recording
- Deleting programmes from the recorded files menu
- File formats
- Video data
- Image data
- Removing the external data media
- The file browser
- Settings in the USB setup menu
- Selecting the display mode
- Switching to automatic preview
- Selecting the display duration of the slide show
- Subtitle settings
- Playback basic functions
- Additional playback functions
- Selecting partition
- Selecting titles
- Playing selected tracks
- Selecting a track or picture in steps (SKIP)
- Move to desired time
- Searching forward
- Turn the picture display
- Repeat functions
- TOP text or FLOF text mode
- Normal text mode
- Additional functions
- Skipping the waiting time
- Increasing character size
- Page stop
- Calling up a sub-page directly
- Reveal answer
- Splitting the screen (Split Screen)
- What is HbbTV?
- Using HbbTV
- Additional functions for video indexes
- TV Settings
- Language & Keyboard settings
- Changing the menu language
- Changing the audio language
- Changing the subtitle language
- Changing the keyboard language
- Accessibility settings
- Subtitle Mode
- Audio description (audio subtitles)
- Accessories
- Advanced settings
- Auto sleep
- Fast switching
- Store logo view
- Power LED brightness
- Power save mode
- Functions in the "About" menu
- Product information
- Software update (OAD)
- Warning:
- Software update (Internet)
- Software update (USB)
- Resetting the television to its original state
- Deleting channel history
- Timer settings
- On timer
- Auto Off
- Date and time settings
- Auto tuning
- Manual tuning
- Parental settings
- Parental Guidance
- Locking the menus
- Blocking the multifunction switch
- Changing the PIN code
- Blocking a television channel
- Watching a blocked television channel
- DIGI LINK
- Turning on external device from standby mode
- Selecting the HDMI source from the television
- Selecting the menu language
- Switching off the device from standby mode
- Searching and selecting the active external device
- Device Control
- Switching the device to standby
- High definition - HD ready
- Connection options
- Connecting an external device
- With a digital audio/video signal
- With an analogue video signal (progressive)
- Using the Euro/AV socket
- Selecting Scart volume adjustment
- With S-Video signal
- Using a DVD recorder, DVD player, video recorder or set-top box
- Headphones
- Connecting headphones
- Selecting the sound settings for the headphones
- Hi-fi system
- Connecting digital multi-channel amplifier/AV receiver
- Apply the device with HDMI ARC function and activate HDMI ARC
- Playing the audio signal via the HiFi system
- What is LIVESHARE?
- Screen share with Liveshare connection
- Connecting a PC
- Selecting the channel position for the PC
- Settings for the PC
- What is common interface?
- Inserting the CA module
- Access control for CA module and smart cards
- Searching for all digital television channels from a satellite automatically
- Searching for digital television channels from a satellite manually
- LNB Settings
- Motor antenna setup (DiSEqC 1.2)
- DiSEqC 1.2 Settings
- Searching for television channels from the cable provider automatically
- Searching for television channels from the cable provider manually
- Searching for digital terrestrial TV channels automatically
- Searching for digital terrestrial TV channels manually
- Automatic service update
- Tuning analogue television channels
- Setting all analogue television channels
- Tuning the analogue television channels by entering the channel numbers
- Changing stored analogue channels
- Selecting channel lists
- Deleting channels
- Entering the analog channel names (maximum 8 characters)
- Creating a list of favourites - analog channels
- Displaying signal information
- Deactivate and activate HbbTV
- Deactivate and activate digital teletext
- GRUNDIG 32 VLE 6522 BL
- Product Fiche
- Other data
- Reception range:
- Satellite:
- Cable:
- Digital (DVB-T):
- Digital (DVB-T2):
- Analog:
- Default channels:
- Weight:
- Size:
- Service information for dealers
- Network interfaces
- Disposing of the packaging
- Troubleshooting
Brand : GRUNDIG
Model : 48VLE6522BL
Category : Television