
TRAV40 - Hard Drive QUANTUM - Free user manual and instructions
Find the device manual for free TRAV40 QUANTUM in PDF.


| Product Type | Internal magnetic tape drive (Travan 40) |
| Brand | QUANTUM |
| Model | TRAV40 |
| Storage Capacity | 40 GB compressed (20 GB uncompressed) per Travan 40 cartridge |
| Interface | ATAPI (Secondary IDE) |
| Transfer Rate | Up to 240 MB/min (compressed) |
| Technology | Quantum FastSense™ for transfer optimization |
| Cartridge Compatibility | Read/Write: Travan 40; Read Only: Travan 20/NS20 (TR-5) |
| Dimensions (approx.) | 146 x 41 x 203 mm (5.25-inch half-height form factor) |
| Weight (approx.) | 0.5 kg |
| Power Supply | 5V and 12V via internal 4-pin power connector |
| Power Consumption | Not specified |
| Operating Temperature | Not specified |
| Operating Humidity | Not specified |
| Main Functions | Data backup and restore on magnetic tape |
| Maintenance and Cleaning | Clean heads every 24 hours of use with dry cleaning cartridge; retension tape before each use |
| Security | Write-protect switch on cartridge (lock/unlock) |
| Spare Parts and Repairability | Travan 40 tape cartridges, cleaning cartridges; user not intended to repair |
| Warranty | Not specified |
| General Information | Made in USA, July 2005; compliant with WEEE directives |
Frequently Asked Questions - TRAV40 QUANTUM
User questions about TRAV40 QUANTUM
0 question about this device. Answer the ones you know or ask your own.
Ask a new question about this device
Download the instructions for your Hard Drive in PDF format for free! Find your manual TRAV40 - QUANTUM and take your electronic device back in hand. On this page are published all the documents necessary for the use of your device. TRAV40 by QUANTUM.
USER MANUAL TRAV40 QUANTUM
User's Guide User's Guide User's Guide User's Guide User's Guide User's Guide
Travan 40GB Internal Storage System
Quantum Travan 40 GB Internal Storage System, P/N 50002765, B01, July 2005 Made in USA.
Quantum Corporation provides this publication "as is" without warranty of any kind, either express or implied, including but not limited to the implied warranties of merchantability or fitness for a particular purpose. Quantum Corporation may revise this publication from time to time without notice.
COPYRIGHT STATEMENT
Copyright 2005 by Quantum Corporation. All rights reserved.
Your right to copy this manual is limited by copyright law. Making copies or adaptations without prior written authorization of Quantum Corporation is prohibited by law and constitutes a punishable violation of the law.
TRADEMARK STATEMENT
Quantum and the Quantum logo are all registered trademarks of Quantum Corporation. Other trademarks may be mentioned herein which belong to other companies.


Contents
Chapter 1 Introduction 1
About This Manual. 1
About Your Travan Tape Drive 2
Chapter 2 Installing the Drive 3
What You Will Need 3
Important Precautions. 3
Installation Procedure 4
Using The Tape Drive 12
Chapter 3 Operation and Maintenance 13
Loading and Unloading Cartridges 13
HandlingTravan Cartridges. 14
Setting the Write-Protection Switch. 15
Retensioning Tapes. 16
Cleaning the Tape Drive Mechanism. 16
Recommended Tape Cartridges 17
| Chapter 4 | Troubleshooting | 19 |
| Installation troubleshooting | 19 | |
| Tape Operations Troubleshooting | 20 |
Appendix A Disposal of Electrical and Electronic Equipment 21


Chapter 1
Introduction
About This Manual
This manual describes how to install and operate your new Quantum Travan 40GB tape drive. The manual also contains information on troubleshooting and technical support for your new drive.
Note: Wherever a page number is referenced in this online manual, you can click on the page number to jump to that page. You can return to the original page by clicking the back button in your viewer software.
About Your Travan Tape Drive
The Travan 40GB can store up to 40 Gbytes on a single Travan 40 cartridge, and features a data transfer rate of up to 240 Mbytes per minute.
Note: These values are based on 2:1 data compression. Uncompressed values are one half as high. Capacities, backup speeds and transfer rates will vary with file type and system configuration.
This drive also includes Quantum FastSense™ technology for optimizing drive and host data transfer rates.
The Travan 40GB can read and write Travan 40 cartridges. It can read but not write Travan 20 or NS20 (TR-5) cartridges.
Note: This drive cannot use TR-1, TR-2, TR-3, TR-4, or QIC-80 cartridges.


Chapter 2
Installing the Drive
What You Will Need
You will need a standard flat-bladed screwdriver and a PHILLIPS® screwdriver to install the tape drive in your computer.
This tape drive must be attached to a secondary IDE port. If your computer has two IDE ports, and the secondary port is not being used, you may need to obtain a 40-pin IDE interface cable for your tape drive.
If your computer has only a single IDE port, you will need to obtain a new ATAPI host adapter that provides a secondary IDE port for the tape drive. You will also need a second 40-pin IDE interface cable for your tape drive.
Important Precautions
To protect your computer and drive from electrostatic damage, follow these guidelines:
Before you open your computer or remove the drive from its antistatic bag, ground yourself by touching the metal chassis of your computer or
some other grounded object. For optimal protection, use an electrostatic grounding strap.
Note: To be properly grounded, your computer must be plugged into a grounded electrical outlet.
Do not touch any printed circuit boards or electronic chips on your drive or in your computer.
Installation Procedure
Follow the steps below to install the Travan 40GB drive in your computer.
We recommend that you install your backup software before you install your tape drive. For more information, see the instructions that came with the backup software.
1 Decide where to attach the tape drive
Before you install your tape drive, you should determine how many IDE ports your computer has. You may find this information in the manual for your computer. You can also look inside your computer and compare your system with figure 1, figure 2, and figure 3.
If your computer has two IDE ports:
Most modern computers have two IDE ports. Each port can support up to two devices (on a single IDE cable). A hard disk is usually attached to the primary IDE port, see figure 1. However, the Travan 40 should not be attached to an IDE port that is being used by a hard disc or a sound card. Thus, you must use the secondary IDE port for your tape drive.
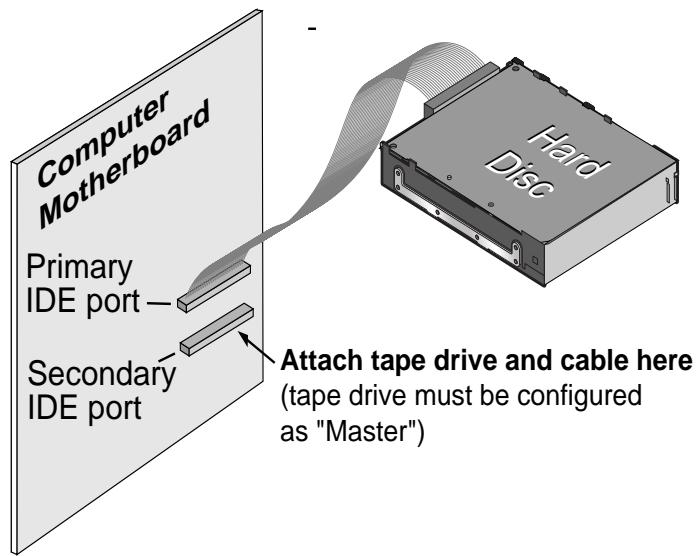
Figure 1 Existing Computer With Two IDE Ports (Hard Disc Attached to the Primary IDE Port)
If no devices or cables are attached to the secondary IDE port (see figure 1) you will need to obtain a second IDE cable for your tape drive.
If a CD-ROM or other compatible device is attached to the secondary IDE port (see figure 2) you can install the tape drive on the same cable as the CD-ROM.
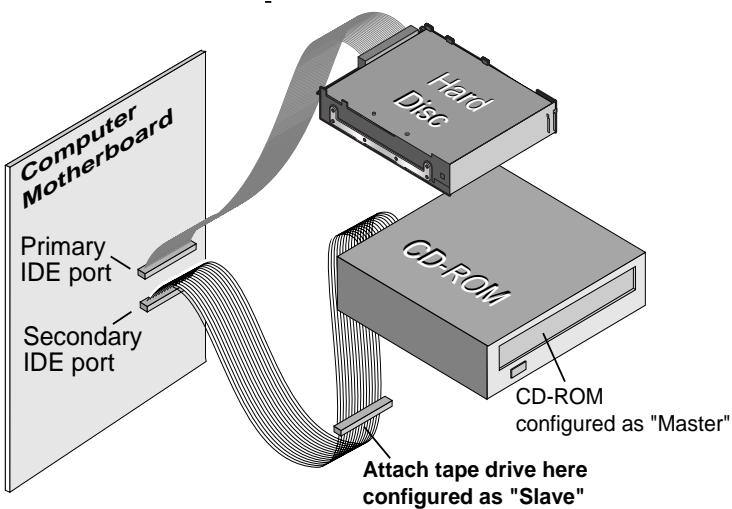
Figure 2 Existing Computer with Two IDE Ports (ATAPI Devices on Both Primary and Secondary IDE Ports)
Continue to page 7 for instructions on setting the master/slave jumpers.
If your computer has only one IDE port:
If your computer has only a single IDE port (see figure 3) it is probably being used by the hard disc drive. You should not attach your tape drive to an IDE port that is being used by a hard disc or a sound card.
In this situation, before you can install the tape drive, you must purchase an ATAPI host adapter that provides a second IDE port. You will also need a second IDE cable for the tape drive. After installing the host adapter, set the master/slave jumpers.
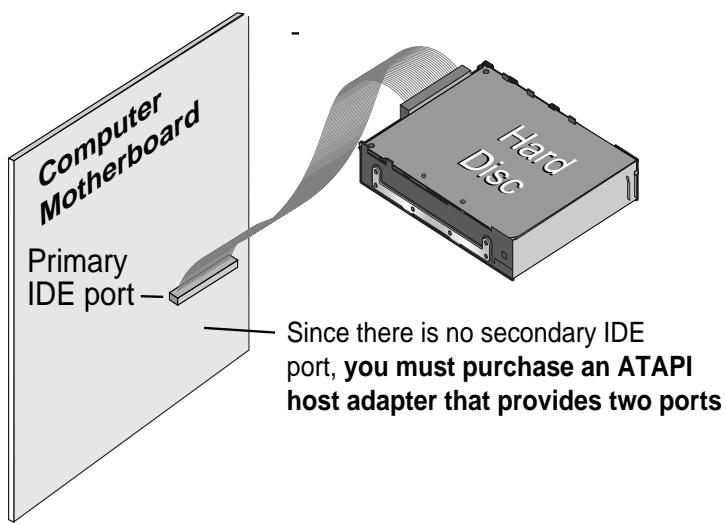
Figure 3 Existing computer with only one IDE port (hard disc attached to primary port)
2 Set the master/slave jumpers
Will the tape drive be sharing the secondary IDE port with any other devices?
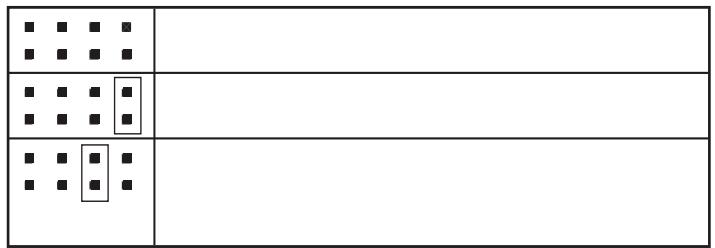
If a compatible ATAPI device, such as a CD-ROM, is already attached to your secondary IDE port (see figure 2) make sure that the existing ATAPI device is configured as a "master." Configure the tape drive as a "slave," (see figure 4).
Note: Do not attach your tape drive to an IDE port that is being used by a hard disc or a sound card.
If your tape drive will be the only device on the IDE cable, you need to configure your tape drive as a "master" (see figure 4).
If your IDE cable supports "Cable Select," configure the drive for "Cable Select" (see figure 4). The second ATAPI device must also be configured for "Cable Select."

Figure 4 Second ATAPI Device Configured for "Cable Select"
3 Attach or remove mounting brackets
Are you mounting the drive in a 3.5-inch or 5.25-inch drive bay?
If you are mounting the drive in a 5.25-inch drive bay and your drive did not come with brackets already attached, you must attach mounting brackets to each side of the drive (see figure 5).
If you are mounting the tape drive in a 3.5-inch drive bay, you may need to remove the mounting brackets from each side of the drive.
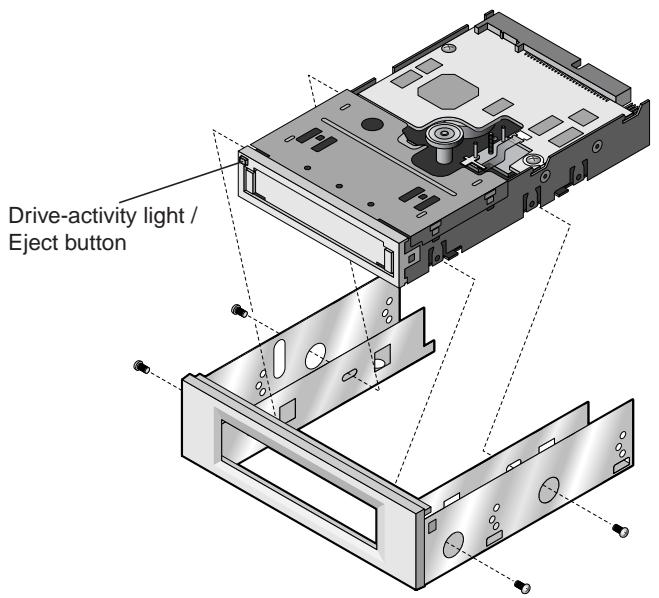
Figure 5 You may have to remove the mounting brackets
4 Mount the drive
Slide the drive into an unused drive bay until the bezel is flush with the front of the computer. The Drive-activity light/Eject button should be on the upper left (see figure 6). Secure the drive using four mounting screws. Do not overtighten the screws.
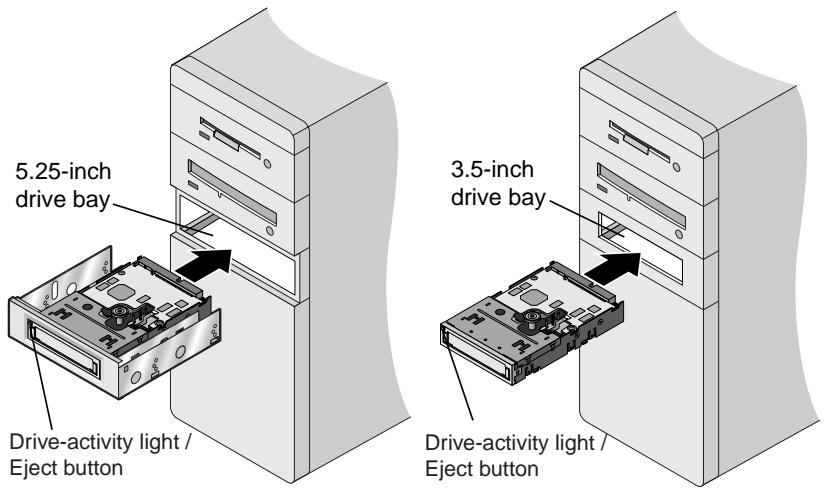
Figure 6 The Drive-Activity Light/Eject Button Should Be On
5 Attach your tape drive to the secondary IDE port
Are any other devices attached to your secondary IDE port?
If you already have a CD-ROM or other device attached to your secondary IDE port, attach the tape drive to the middle connector on the IDE cable (see figure 7).
Note: Do not attach your tape drive to a cable that is already being used by a hard disc or a sound card.
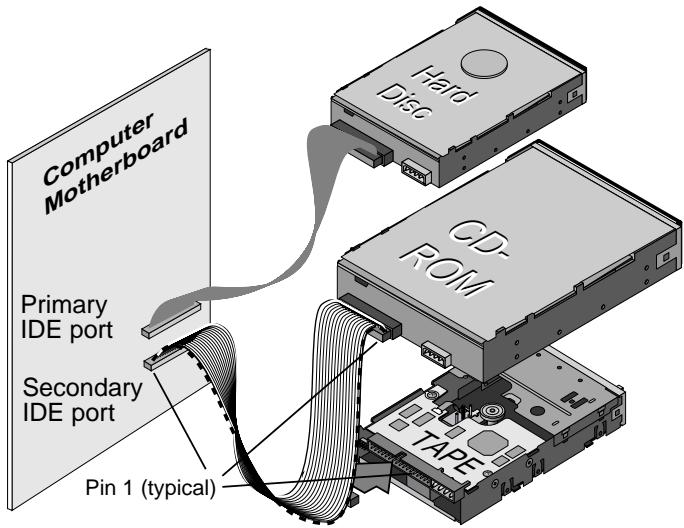
Figure 7 If a CD-ROM is Attached, Attach the Tape Drive to the Middle Connector
If no other devices are attached to your secondary IDE port, use a new 40-pin IDE cable to attach the tape drive to the secondary IDE port (see figure 8).
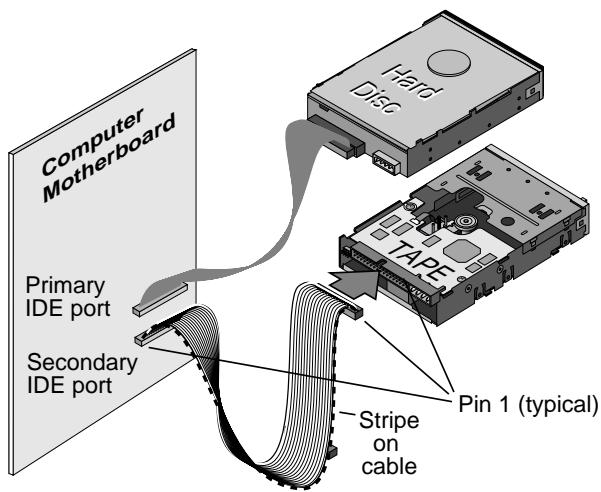
Figure 8 Use a Mew 40-Pin IDE Cable
In either case, make sure that pin 1 on the tape drive (located next to the power connector) is connected to pin 1 on the IDE cable and on the IDE port connector. Pin 1 on the IDE cable is indicated by a stripe on the edge of the cable.
6 Connect the power cable
Connect a 4-pin power cable to the back of the tape drive (see figure 9). If all the power cables in your computer are being used by other devices, you can purchase a Y-shaped power-cable splitter from your computer dealer.
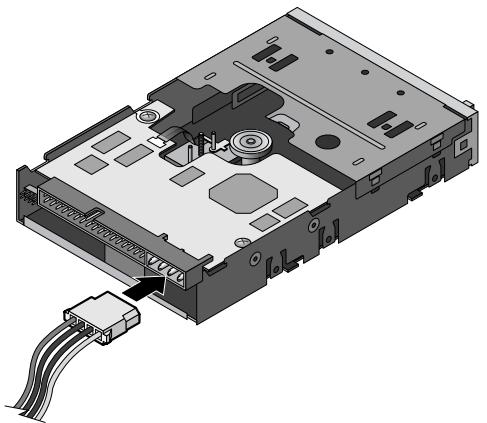
Figure 9 4-Pin Power Cable Connection
7 Check all cables in your computer system
Make sure that no cables have loosened during the installation. Make sure that all cables are routed so that they will not bind or become crimped when you replace the cover of your computer.
8 Reinstall your computer cover
Your new tape drive is ready for use. However, you may need to install drivers for your operating system, as described in step 9.
9 Install drivers (Windows systems only)
The first time you restart your computer after installing the Travan 40 tape drive, the Windows operating system will try to identify the drive. To complete this process, you need to install the Windows tape drivers supplied on your Quantum Tape Resource CD.
Windows systems include a driver installation wizard, which will step you through the process. When asked to locate the drivers, insert your Quantum Tape Resource CD into your CD-ROM drive and select to have the wizard find the drivers automatically on the CD.
Using The Tape Drive
For instructions on using and maintaining your Travan 40 tape drive and cartridges, see chapter 3. For instructions on using your backup software, see the online manual that came with your software.


Chapter 3
Operation and Maintenance
Loading and Unloading Cartridges
On the front of your drive is an opening for inserting Travan cartridges. A protective door covers the opening. Above and to the left of the door is the drive-activity light that doubles as a cartridge-eject button.
To Load a Cartridge
Insert the cartridge in the drive with the metal base plate facing down and the red write-protect tab on the left (see figure 10). The cartridge only fits in one orientation. Push the cartridge gently into the drive until it is gripped by the drive mechanism and pulled into the drive.
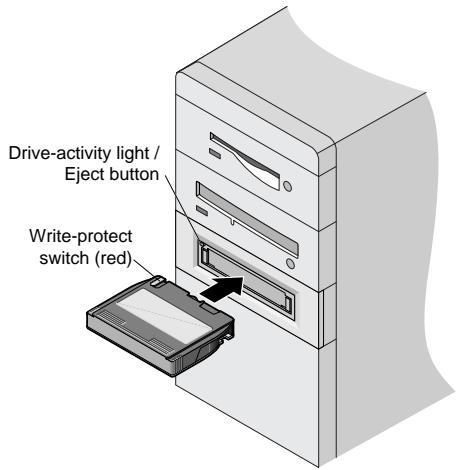
Figure 10 To Load a Cartridge
To Unload a Cartridge
Wait until the Drive-activity/Eject button light is off. Then push the Eject button. When the cartridge has been ejected by the drive, grasp the exposed sides of the cartridge and pull the cartridge straight out. If the drive-activity light has gone out, but you believe your backup or restore operation did not complete, repeat the backup or restore.
Caution: Do not remove a tape cartridge while the drive-activity light is on.
Handling Travan Cartridges
Although Travan tape cartridges are ruggedly built, they must be handled with care. Observe the following precautions:
- Store cartridges in their protective cases when you are not using them.
- Keep cartridges away from dust, dirt and moisture.
-
Keep cartridges away from direct sunlight and heat sources, such as radiators or warm air ducts.
-
Do not expose cartridges to temperature extremes or rapid changes in temperature.
- Keep cartridges away from sources of strong electromagnetic fields, such as telephones, computer monitors, printers, dictation equipment, mechanical or printing calculators, motors or bulk tape erasers.
- Do not open the tape access door of a cartridge or touch the tape itself. One fingerprint can prevent the drive from reading information on the tape.
Setting the Write-Protect Switch
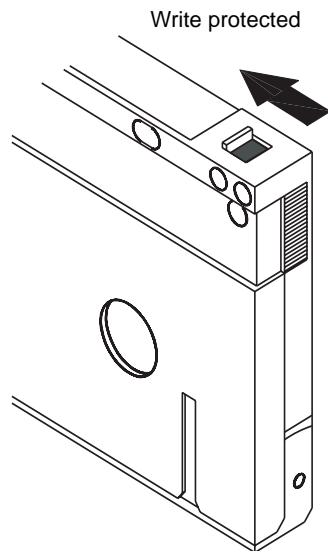
Travan cartridges feature a write-protect or "lock" switch near the upper left corner of the cartridge (see figure 11). When the write-protect switch is in the "unlocked" position, the cartridge is ready for normal writing and reading. When the write-protect switch is in the "locked" position, the drive can read data from the cartridge, but cannot write to the cartridge. Cartridges are shipped from the factory with the write-protect switch set to the "unlocked" position.
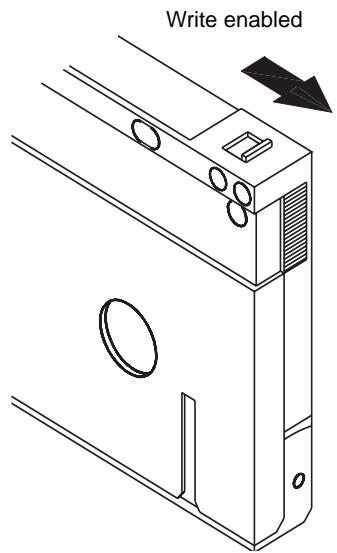
Figure 11 Write-Protect Feature
Retensioning Tapes
Travan tapes must be retensioned frequently to ensure data integrity and optimize drive performance. If you ever have a problem reading a tape, retensioning may solve the problem. Some backup software automatically retensions Travan media before a backup or restore. See your software manual for tape retensioning instructions.
We recommend retensioning whenever a cartridge:
Is being used for the first time
- Has not been used for over a month
Has been dropped
Hasbeen shipped from one location to another
- Has been exposed to a significant change in temperature
For optimum performance, cartridges should be retensioned prior to each use if your backup software does not retension them automatically. See the literature included with your tape cartridge for additional cartridge operating recommendations.
Cleaning the Tape Drive Mechanism
Under typical conditions, the tape heads should be cleaned after every twenty-four hours of use. However, in adverse conditions or when error rates become high, the tape drive recording mechanism should be cleaned after every eight hours of use.
Use only a dry-process cleaning cartridge to clean this drive. When you insert a cleaning cartridge in the drive, the drive recognizes the cleaning cartridge and automatically starts the cleaning process. After about 10 seconds, when the cleaning process is complete, the DRIVE LED stops flashing and the cleaning cartridge is ejected.
Recommended Tape Cartridges
Table 1 summarizes the types of tape cartridges that can be used with Quantum Travan 40GB drives. All other tape formats are incompatible.
Note: The capacities shown below are based on 2:1 data compression. Uncompressed values are one half as high. Capacities, backup speeds and transfer rates will vary with file type and system configuration.
Table 1 Tape Information
| Tape Frame | Capacity | Length |
| Travan 40 Quantum model CTM40 | 40 Gbytes | 750 ft |
| Travan 20/NS20 (TR-5)* Quantum model CTM20 | 20 Gbytes | 740 ft |
Note: The Quantum Travan 40 drive can read but not write to TR-5 cartridges.
Installation troubleshooting
If, after installing the Travan 40GB drive, your computer does not recognize your tape drive or CD-ROM:
Make sure all cables are attached firmly.
- Check with the manufacturer of your ATAPI controller chip set to make sure that you have the latest drivers for your operating system. Outdated or incorrect drivers provide limited hardware support and can result in Windows being unable to detect your tape drive.
- You may need to reconfigure your tape drive as a "master" or "slave" using the master/slave jumpers (see figure 12).
- If the tape drive is the only device on the IDE cable, set the jumper to configure it as a "master."
- If there are two ATAPI devices on a single cable, make sure that the tape drive is configured as a "slave." Set the other device as a "master."
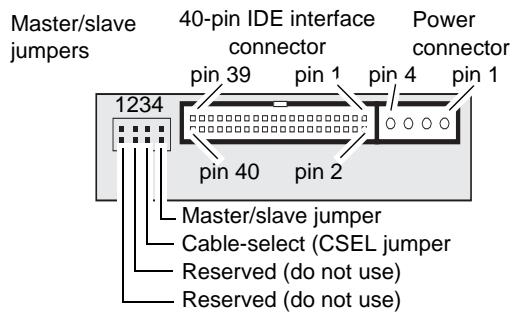
Figure 12 Master/ Slave Jumpers Reconfiguration
Jumper settings for Travan 40 tape drive
| Tape drive set as “slave” |
| Tape drive set as “master” |
| Tape drive set for “cable select” (tape drive is master or slave depending on the interface table. |
Tape Operations Troubleshooting
If, after a period of successful operation, the tape drive appears to fail during a backup or restore.
- Retension the tape. See the backup-software manual for instructions.
- Make sure the drive-activity light is off. Remove the cartridge and reinsert it into the drive. Retry the backup or restore procedure.
Try a different cartridge—preferably one that has never been used. - Make sure you are using the correct type of tape cartridge (see table 1). You cannot use TR-1, TR-2, TR-3, TR-4, or QIC-80 tapes with this drive.
- Clean the tape mechanism.
- Check to make sure all cables are securely connected and all jumpers are set appropriately.
- Turn off the computer. Wait for the computer to power down. Then restart the system. Restart the backup software, making sure that no other programs (such as virus scanners) are running.


Appendix A
Disposal of Electrical
and Electronic Equipment


This symbol on the product or on its packaging indicates that this product should not be disposed of with your other waste. Instead, it should be handed over to a designated collection point for the recycling of electrical and electronic equipment. The separate collection and
recycling of your waste equipment at the time of disposal will help to conserve natural resources and ensure that it is recycled in a manner that protects human health and the environment. For more information about where you can drop off your waste equipment for recycling, please visit our website at: http://qcare.quantum.com or contact your local government authority, your household waste disposal service or the business from which you purchased the product.
- Travan 40GB Internal Storage System
- COPYRIGHT STATEMENT
- TRADEMARK STATEMENT
- Contents
- Chapter 1 Introduction 1
- Chapter 2 Installing the Drive 3
- Chapter 3 Operation and Maintenance 13
- Chapter 1
- Introduction
- About This Manual
- About Your Travan Tape Drive
- What You Will Need
- Important Precautions
- Installation Procedure
- Set the master/slave jumpers
- Attach or remove mounting brackets
- Mount the drive
- Connect the power cable
- Using The Tape Drive
- Loading and Unloading Cartridges
- To Load a Cartridge
- To Unload a Cartridge
- Handling Travan Cartridges
- Setting the Write-Protect Switch
- Retensioning Tapes
- Cleaning the Tape Drive Mechanism
- Recommended Tape Cartridges
- Installation troubleshooting
- Tape Operations Troubleshooting
- Disposal of Electrical
- and Electronic Equipment
Brand : QUANTUM
Model : TRAV40
Category : Hard Drive