ANTI-VIRUS 5.7 - Security Software KASPERSKY - Free user manual and instructions
Find the device manual for free ANTI-VIRUS 5.7 KASPERSKY in PDF.

User questions about ANTI-VIRUS 5.7 KASPERSKY
0 question about this device. Answer the ones you know or ask your own.
Ask a new question about this device
Download the instructions for your Security Software in PDF format for free! Find your manual ANTI-VIRUS 5.7 - KASPERSKY and take your electronic device back in hand. On this page are published all the documents necessary for the use of your device. ANTI-VIRUS 5.7 by KASPERSKY.
USER MANUAL ANTI-VIRUS 5.7 KASPERSKY
Revision date: October, 2006
Contents
CHAPTER 1. INTRODUCTION. 7
1.1.What's new in version 5.7? 8
1.2.Hardware and software requirements 8
1.3. Distribution kit 8
1.4. Help Desk for Registered Users 9
1.5.Conventions 10
CHAPTER 2. KASPERSKY ANTI-VIRUS 5.7 FOR NOVELL NETWARE BASICS 11
2.1. Deploying protection on servers 11
2.2. Basic concepts and operation scheme of the application 12
2.3. Maintaining the antiviral protection system 13
CHAPTER 3. INSTALLING, UPDATING, AND UNINSTALLING THE APPLICATION 14
3.1. Installation from the distribution package 14
3.1.1. Installing Kaspersky Anti-Virus for Novell NetWare 16
3.1.2.InstallingSnapin for Console One 19
3.1.3.Installing Web management module 19
3.1.4. Installing Kaspersky Administration Kit Network Agent 20
3.2. Deploying the application across the network 21
3.3. Installing application on cluster volume 23
3.4.Uninstalling the application 24
3.5. Updating the application version 24
CHAPTER 4. SETTING UP THE APPLICATION 26
4.1. Starting the application 26
4.2. Application interface 26
4.3. Default protection of the server 29
4.4. Starting/stopping the application on the server 30
4.5. Setting up the application 33
CHAPTER 5. UPDATING THE ANTI-VIRUS DATABASE 36
5.1.Creating an update task 37
5.2. Setting up the task 38
5.3. Batch task setup 43
5.4. Starting/stopping a task 46
5.5. Deleting a task 46
CHAPTER 6. SCANNING THE SERVER FOR VIRUSES 48
6.1. Creating tasks for Real-Time Protection and On-Demand Scan 49
6.2. Setting up a task 51
6.3. Batch task setup 55
6.4. Starting/stopping a task 57
6.5. Deleting a task 58
CHAPTER 7. GENERATING AND VIEWING LOGS, RECEIVING NOTIFICATIONS 60
7.1. Viewing the anti-virus database updating results 61
7.2.Viewing the server scanning results.. 65
7.3. Summarized results of the task execution 70
7.4. Notification regarding detected viruses 72
CHAPTER 8. LICENSE MANAGEMENT 73
8.1.Licensing policy 73
8.2. Installing the license key 76
CHAPTER 9. MANAGING KASPERSKY ANTI-VIRUS USING KASPERSKY ADMINISTRATION KIT 78
9.1. Managing policies 79
9.1.1.Creating a policy 79
9.1.2.Viewing and editing policy settings 86
9.1.2.1 Viewing information about the application 87
9.1.2.2 Viewing policy enforcement results 88
9.1.2.3.Configuring event logging settings 89
9.1.2.4.Specifying CPU usage during scans 90
9.1.2.5 SELECTing the updating source for the anti-virus database 90
9.1.2.6.Configuring settings for the on-demand scan task 91
9.1.2.7. Selecting actions for the on-demand scan task 92
9.1.2.8.Configuring settings for the real-time protection task 94
9.1.2.9. Selecting actions for the real-time protection task 95
9.2. Managing application settings 96
9.2.1.1 Viewing the information about the application 98
9.2.1.2 Viewing the information about the location of objects 98
9.2.1.3 Viewing connection settings and CPU usage 99
9.2.1.4 Viewing information about license keys 100
9.2.1.5 Viewing information about events 101
9.3. Managing tasks 102
9.3.1. Configuring specific task settings 104
9.3.1.1.Specifying the settings specific to updating the anti-virus database... 104
9.3.1.2. Configuring specific settings for the on-demand scan and real-time protection tasks 106
9.3.1.3.Configuring specific settings for the license key installation task..... 109
9.3.2. Starting and stopping tasks 110
APPENDIX B. APPLICATION SETTINGS 112
B.1. The General Tab 112
B.2. The Folders Tab 113
B.3. The Advanced Tab 115
B.4. The E-mail Notification tab 116
B.5. The Schedule Tab 117
B.6.The Task Tab 120
APPENDIX C. TASK SETTINGS 122
C.1. The Update Task 122
C.1.1. The Recipients Tab 122
C.1.2. The Updating source Tab 124
C.1.3. The Event log Tab 129
C.1.4. The Proxy Tab. 131
C.1.5. The Schedule Tab. 133
C.1.6. The E-mail notification tab 137
C.2. The On-Demand Scan and Real-Time Protection Tasks 139
C.2.1. The Scan settings Tab 139
C.2.1.1. Code analyzer 142
C.2.1.2.Extracting Engine 142
C.2.1.3. Executable Module Extracting Engine 143
C.2.2. The Actions Tab 144
C.2.3. The Event log Tab 146
C.2.3.1. Messages regarding infected files 148
C.2.3.2. Messages Regarding Suspicious Files 149
C.2.3.3.Warnings 150
C.2.3.4. Messages Regarding Packed Executable Files 150
C.2.3.5. Messages Regarding Archive Files 151
C.2.3.6. Messages Regarding Uninfected Files 151
C.2.4. The NW-Notification Tab 151
C.2.5. The E-mail Notification Tab 153
C.2.6. The Schedule Tab. 155
APPENDIX D. KASPERSKY LAB 160
Other Kaspersky Lab Products 161
Contact Us 169
CHAPTER 1. INTRODUCTION
Kaspersky Anti-Virus 5.7 for Novell NetWare (hereafter, referred to as Kaspersky Anti-Virus) is an anti-virus application designed to protect LAN file servers running the Novell NetWare operating system.
Kaspersky Anti-Virus has the following functions:
- Real-time server protection - scans all started or modified files, then disinfects and/or deletes infected objects.
- On-demand server scan - successively scans the files on the server on administrator's demand or according to a schedule with user-specified frequency. The anti-virus application can disinfect and/or delete infected objects.
- Anti-virus database updating – updates the anti-virus database used to search for viruses, and distributes the downloaded updates to other servers on the Novell NetWare network. The database can be scheduled for automatic updating. The application will download the latest updates via the Internet or the LAN and distribute these among the specified servers. Prior to updating the anti-virus database on a server the program will back up all the files being modified, thus making it possible to revert to the latest update if necessary.
- Quarantine - moves infected or suspicious files to a special storage location called 'quarantine'. Quarantined files can be analyzed by the administrator or sent to the Kaspersky Lab for examination.
Event log keeping - creates detailed logs and writes the results of the on-demand server scanning, real-time protection and anti-virus database updating. The logs can be viewed and printed. - Backup - saves backup copies of any suspicious or infected files prior to disinfecting or deleting them. This makes it possible to restore the data in the event of disinfection, deletion failure or error.
- Notification - notifies users and administrators of finished scans, warns about found dangerous objects using Novell NetWare network and by email.
Kaspersky Anti-Virus is based on the client-server architecture. Its server part consists of two modules: Kaspersky Anti-Virus, dealing with anti-virus functionality, and Anti-virus database updating, responsible for updating the anti-virus database and application modules. The client part consists of Snapin for ConsoleOne, a web module, and a module for managing the application using Kaspersky Administration Kit that provide the user interface for the
application administrative services and enable the user to install the application, set it up, and manage the server part.
1.1. What's new in version 5.7?
Version 5.7 of Kaspersky Anti-Virus for Novell NetWare has the following main difference from the previous version: now Kaspersky Anti-Virus can be managed from a remote location using Kaspersky Administration Kit.
1.2. Hardware and software requirements
Software requirements:
- A server with installed Novell NetWare ver. 5.x or 6.0, 6.5.
- Installed Servlet container (for installing and using the web management interface).
Viewing the task performance log within a web interface requires the presence of an installed Novell NetWare client on the computer.
-
Installed Support Packs:
-
For Novell NetWare 5.x - Support Pack 6 or higher
- For Novell NetWare 6.0.x - Support Pack 3 or higher
Microsoft Internet Explorer 6.0 or higher.
Hardware requirements:
- An Intel Pentium processor or higher.
- About 12 MB of available (free) RAM.
- About 8 MB of free hard-disk space on the server's volumes.
1.3. Distribution kit
You can purchase Kaspersky Anti-Virus 5.7 for Novell NetWare either from our distributors (retail box) or online at one of our Internet shops (for example, www.kaspersky.com – select the E-Store link).
The retail box includes:
- A sealed envelope with an installation CD containing files for the software product
- User Guide
A license key written on the installation CD
License agreement
Before you unseal the envelope containing the CD, be sure to thoroughly review the license agreement.
If you buy Kaspersky Anti-Virus for Novell NetWare online, you download the installation file of the product from the Kaspersky Lab website. This installation file includes this User Guide and the license key. The license key can also be sent to you by e-mail after receiving your payment.
The License Agreement (LA) is a legal agreement between you and the manufacturer (Kaspersky Lab Ltd.) describing the terms on which you may use the anti-virus product which you have purchased.
Make sure you read the License Agreement!
If you do not agree to the terms of this LA you can return the unused product to your Kaspersky Anti-Virus dealer for a full refund, making sure the envelope containing the CD is sealed.
By unsealing the envelope or installing the program, you agree to all the terms of the LA.
1.4. Help Desk for Registered Users
Kaspersky Lab offers a large service package enabling its registered customers to enjoy all available features of Kaspersky Anti-Virus.
If you register and purchase a subscription you will be provided with the following services for the period of your subscription:
- New versions of this anti-virus software product provided free of charge.
- Phone or e-mail advice on matters related to the installation, configuration, and operation of this anti-virus product.
- Information about new Kaspersky Lab products and about new computer viruses (for those who subscribe to the Kaspersky Lab newsletter).
Kaspersky Lab does not provide information related to operation and use of your operating system or various other technologies.
1.5. Conventions
In this book we use various conventions to emphasize different meaningful parts of the documentation. The table below lists the conventions used in this Guide.
| Convention | Meaning |
| Bold font | Menu titles, commands, window titles, dia-log elements, etc. |
| Attention | Additional information, notes |
| Warning! | Critical information |
| To perform action: 1. Step 1. 2. ... | Actions that must be taken |
| Task, Example | Formulation of the problem or an example of how to use the product. |
CHAPTER 2. KASPERSKY ANTI-VIRUS 5.7 FOR NOVELL NETWARE BASICS
2.1. Deploying protection on servers
Building of the file server antiviral protection system using Kaspersky Anti-Virus must begin with installation of Snapin for Novell ConsoleOne and/or the web management module1.
Snapin for ConsoleOne is installed from the distribution package on one of the workstations running Windows or on a NetWare server, where the Novell ConsoleOne network administration utility is installed.
The Web management module is also installed from the distribution package on a Windows workstation or on a NetWare server with the installed Tomcat servlet container.
Snapin for ConsoleOne and the Web module can be installed on only one of the computers as they provide centralized access to all network resources from a single administrator workbench. However, if in the event that several administrators are working jointly, the management modules can be installed on each of their computers.
If none of the modules is installed, the anti-virus functionality of the application will be limited to real-time server protection mode with default settings. Scanning will be launched automatically when starting the server and will be stopped when the server is shut down. Stopping or starting the scanning forcibly will only be possible from the command line by closing or starting the application.
The next step is installation of the server side application on all the NetWare file servers across the network. Kaspersky Anti-Virus and Anti-virus database updating modules can be installed on the server either using the distribution package or without it, by using the Snapin for ConsoleOne or web interface.
2.2. Basic concepts and operation scheme of the application
The antiviral protection system is based on creation of tasks, which maximize the basic functionality of the application.
A task is a specific action performed by the application. Tasks are divided into several types according to their function. Kaspersky Anti-Virus uses three types of task:
Real-time protection
- Scan on-demand
- Anti-virus database updating
The tasks can be started according to a schedule, manually, or upon an application event. Each task has a corresponding set of parameters that specify how the application will work when running this task.
The set of application parameters common for all its task types makes up the application settings. The application parameters specific to each type of task make up task settings.
Because of the distributed architecture of Kaspersky Anti-Virus, obtaining access to its anti-virus functionality requires starting its server part - Kaspersky AntiVirus or Anti-virus database updating module - to carry out the update. Updating can be started using the Snapin for Novell ConsoleOne, the web module (see section 4.4 on page 30), or the Kaspersky Administration Kit management module.
In order to initiate execution of the required function, the user must set the application parameters (see section 4.5 on page 33), create the respective task (see section 5.1 on page 37 and section 6.1 on page 49), set its generic parameters (see section 5.2 on page 38 and section 6.2 on page 51) and run this task (see section 5.4 on page 46 and section 6.4 on page 57). If the scheduled start mode or start on event mode is selected, the task is launched automatically.
Access to the application administrative functions, and creation and running of the tasks is granted to the users2 who possess administrator rights. The user rights are checked based on their authentication in the Novell Netware network.
2.3. Maintaining the antiviral protection system
Maintenance of the server antiviral protection system involves the following processes:
- Reception and processing of virus detection messages
- Regular checking of anti-virus database update reception and distribution reports
An important factor that determines the quality of infected object detection by anti-virus programs is completeness of their anti-virus database. The procedure of searching and removing viruses is based on the records of the anti-virus database, which stores descriptions of every virus known at the time along with methods of cleaning objects infected by them.
Kaspersky Lab adds descriptions of new viruses to the anti-virus database daily and places the updates on the Internet for downloading. It is recommended to download these updates daily.
The anti-virus database versions must be the same on all the protected servers. In order to save traffic, the update process can be set up in such a way that the anti-virus database updates will be downloaded from the Internet by the "main" server. All the other servers will receive the updates from the shared folder located on the "main" server.
A server can receive updates only from the server located in the same NDS tree. Therefore, it is necessary to create at least one server responsible for updating the anti-virus database in every NDS tree whose servers are to be protected from viruses.
CHAPTER 3. INSTALLING, UPDATING, AND UNINSTALLING THE APPLICATION
Prior to installing Kaspersky Anti-Virus for Novell NetWare please make sure that hardware and software of the server/workstation meets the program's requirements. The minimal possible requirements are specified in section 1.1 on page 8.
3.1. Installation from the distribution package
Kaspersky Anti-Virus is installed from a computer running Windows 9x/NT/2000/Me/XP.
To install Kaspersky Anti-Virus,
run the installer (setup.exe) from the CD with the application distribution package.
This will start the installation wizard. Follow its directions. Most of the settings required for installation will be made by default or will be based on the choice you make. Please read carefully the text in each window of the wizard. Make any desired changes if necessary.
A detailed description of the installation steps is provided below.
- First of all, the license agreement will be displayed. You must accept it in order to proceed with the installation.
- After that you should select the application components to install (see Figure 1). You can install both the server-side application and the client application simultaneously (full installation) or install the Snapin for ConsoleOne first and then deploy the application via Novell ConsoleOne. To install the server-side application select Kaspersky Anti-Virus; for the client application select Snapin for ConsoleOne, the Web management module, and / or Kaspersky Network Agent.
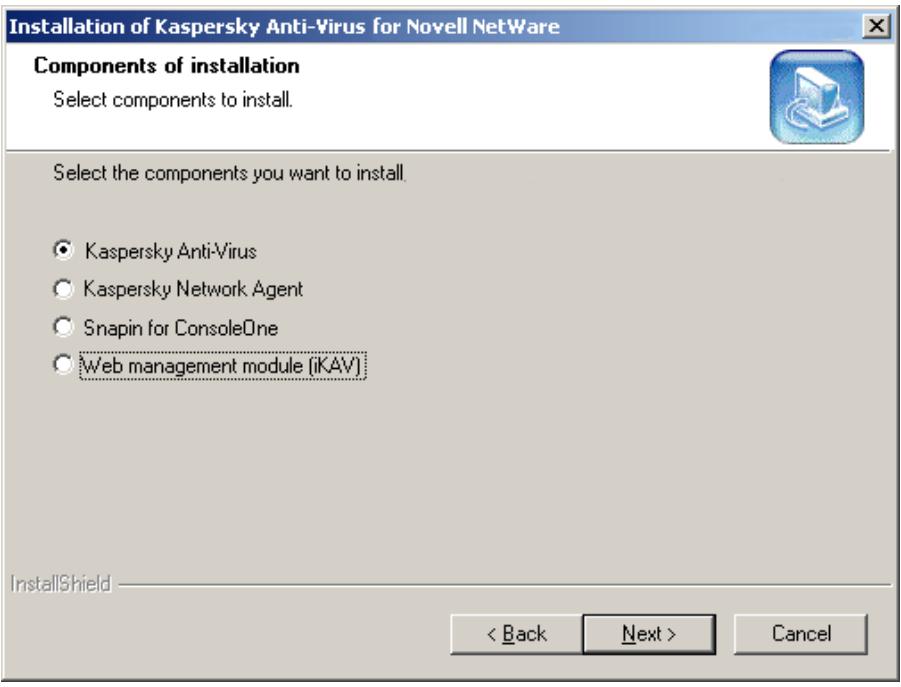
Figure 1. Selecting the components to install
-
Further installation process depends on the component you want to install.
-
Kaspersky Anti-Virus for Novell NetWare (see 3.1.1 on page 16)
Snapin for ConsoleOne
Web management module
Kaspersky Network Agent -
Next, the files will be copied to the server and the settings will be stored in the NDS.
- After the wizard successfully completes its work, in the final window (see Figure 2) you will be offered the opportunity to modify the AUTOEXEC.NCF file so as to start the server-side application whenever the server is started. In addition, you will be offered the
possibility of loading the server-side application immediately after the application is installed on the server. Enable the necessary checkboxes.
The AUTOEXEC.NCF is modified automatically and does not require additional settings to be made.
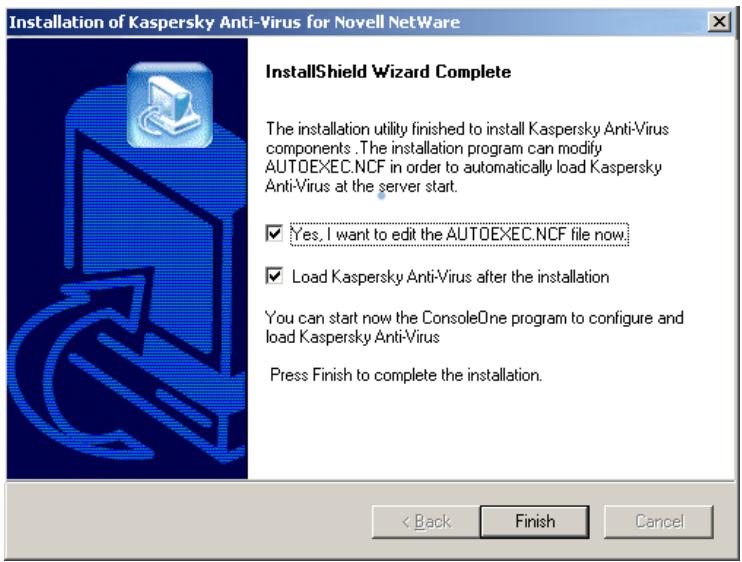
Figure 2. The final window of the setup wizard
3.1.1. Installing Kaspersky Anti-Virus for Novell NetWare
To install Kaspersky Anti-Virus for Novell NetWare:
- Specify servers for the installation (Figure 3). Select the required servers from the list of those currently connected.
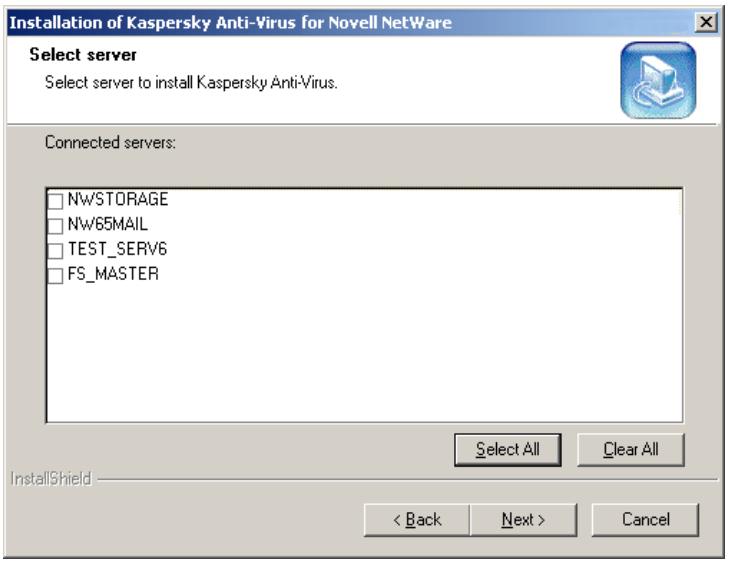
Figure 3. Selecting servers for the Kaspersky Anti-Virus installation
- Specify the directories in which to install the components of Kaspersky Anti-Virus 5.6 for Novell NetWare. The server-side application is installed in the SYS/KAV folder. If you are installing the product on only one server, you can specify another destination folder in the volume structure of the server. The group of elements of the component is only displayed if it was selected for installation.
- In the license key installation window please specify the license key file (*.keys), using which Kaspersky Anti-Virus will check the validity of the license agreement and its deadline (see Figure 5).
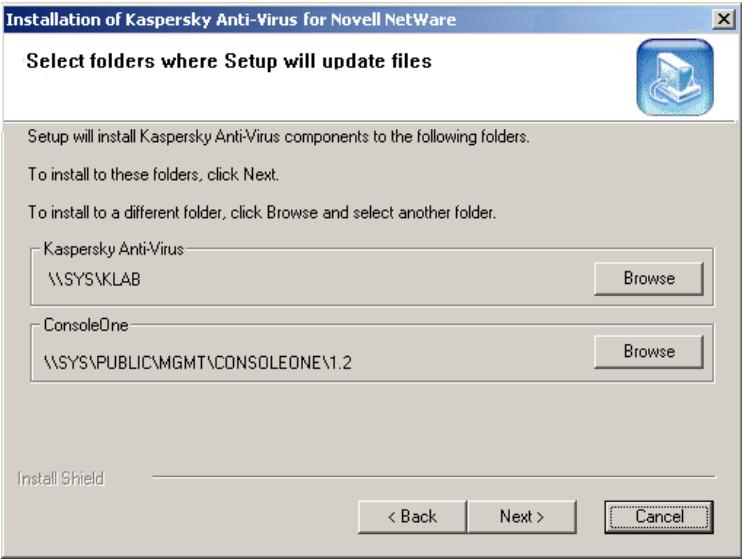
Figure 4. Installation folders selection
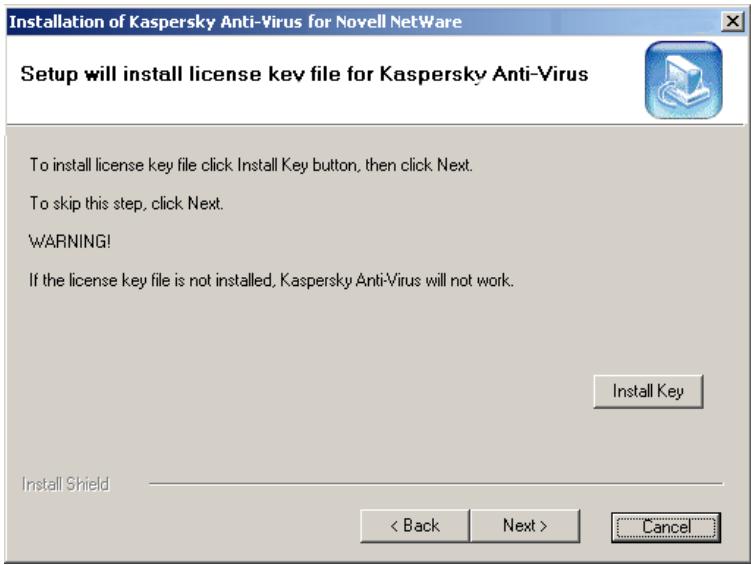
Figure 5. The License Key installation window
The license key is your personal "key", which stores the information required for full-featured operation of the application and some reference information. This information includes:
- Support information (who provides it and where it can by obtained).
- Name, number and the expiration date of the license.
Your license key can be enclosed with the distribution package or sent to you by e-mail after the product is purchased. The program will not run without the key file.
3.1.2. Installing Snapin for Console One
To install Snapin for ConsoleOne,
Select the install folder. The installation directory for Novell ConsoleOne should be Novell ConsoleOne Install folder on the computer from which the application control utility will be started. By default this field contains the server's directory SYS\Public\Imgmt\ConsoleOne\1.2 of the workstation's directory Wovell\ConsoleOne\1.2. You can change it.
3.1.3. Installing Web management module
To install the Web management module (iKAV)
- Specify servers for the installation (Figure 3). Select the required servers from the list of those currently connected.
- Select the destination folder. By default, the Web management module (iKAV) is installed in the
\SYS\Tomcat4 directory.
This path is correct if you are running a server version 6.0 or higher.
For a server version 5.x, check the version of Tomcat launched at startup and specify the path
If you want to install only the web management module, the default installation directory is C:\Tomcat\4. You can change the path by
specifying the Tomcat directory on your local drive or simply copy the module files to the Tomcat directory after the installation.
After installing web management module to Tomcat you need to restart Tomcat
3.1.4. Installing Kaspersky Administration Kit Network Agent
To install Kaspersky Administration Kit Network Agent
- Specify servers for the installation (Figure 3). Select the required servers from the list of those currently connected.
- Specify address and port number of the administration server, which works as a central storage for information about Kaspersky Lab applications installed in the network.
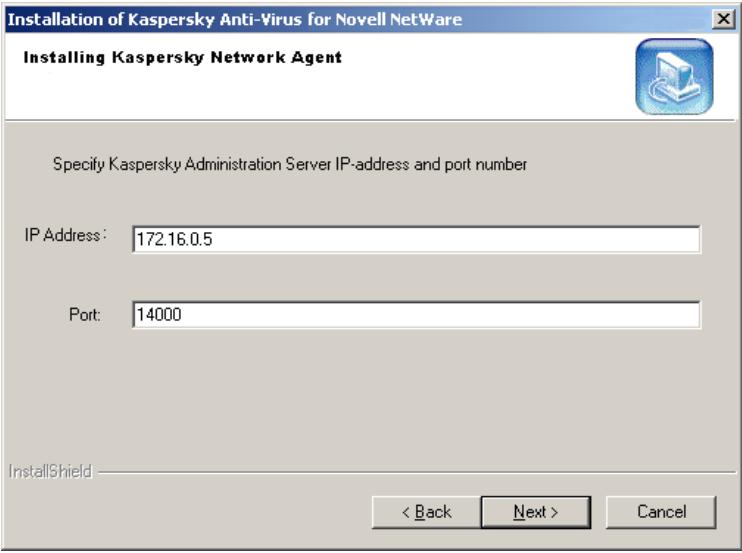
Figure 6. Specify address and port number of the administration server
3.2. Deploying the application across the network
If the Snapin for Novell ConsoleOne and/or the Web management module are already installed on a computer (server or workstation), then the server-side application can be installed on other servers without using the distribution package. This is done via Novell ConsoleOne or the web module using the Install Kaspersky Anti-Virus shortcut menu command of the NDS console tree.
You can install the server-side application of Kaspersky Anti-Virus on both a server selected in the console tree and several servers at the same time.
To install Kaspersky Anti-Virus on a group of servers:
Select a node in the console tree that contains the required servers and right click your mouse button to open the shortcut menu. In the shortcut menu, select the Install Kaspersky Anti-Virus option. If this option is unavailable in the shortcut menu, Kaspersky Anti-Virus is already installed on all the servers of this node.
During installation, the program will ask you to select the servers on which you want to install Kaspersky Anti-Virus and specify the path to the license key file (see Figure 7). The list of servers available for installation includes only those servers on which Kaspersky Anti-Virus has not been installed. The license key file is selected in the same manner as installation from the distribution package (see section 3.1 on page. 14).
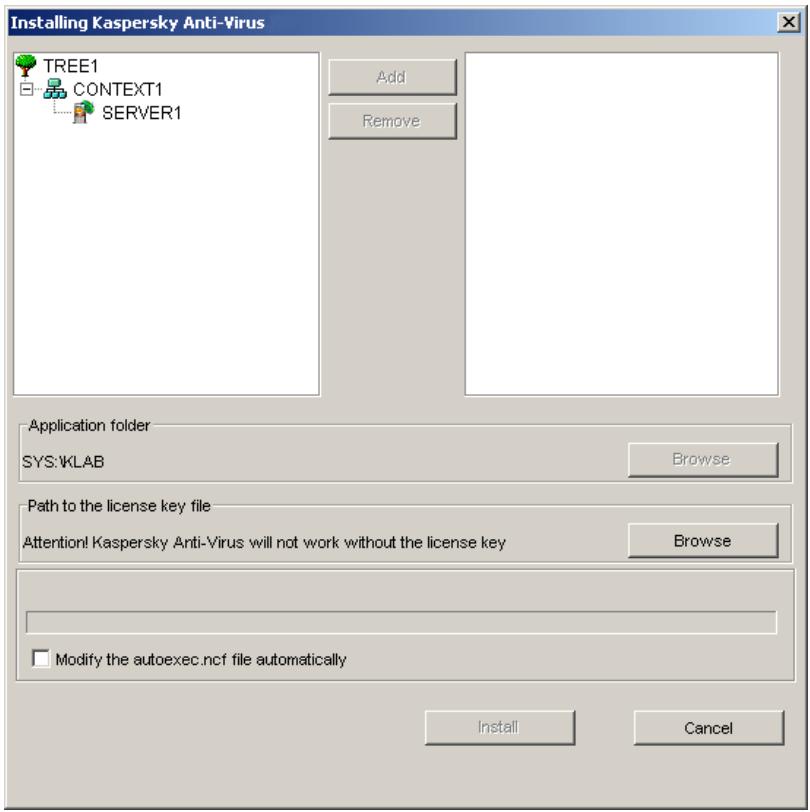
Figure 7. Installing the application on a group of servers via Novell ConsoleOne
In order to make the server-side part of the application launch automatically at the server start, update the AUTOEXEC.NCF file by checking the Modify the autoexec.ncf file automatically box.
To install Kaspersky Anti-Virus on one server:
Select a node in the console tree that contains the required servers, open the shortcut menu, and select the Install Kaspersky Anti-Virus option. During installation the program will ask you to specify the directory in which to install the server-side application and the path to the license key file. You will also be prompted to update the AUTOEXEC.NCF configuration file to make the server-side part of the application launch at the server's start (similarly to These operations are the same as those described above (see section 3.1 on page. 14).
3.3. Installing application on cluster volume
If the Snapin for Novell ConsoleOne and/or the Web management module are already installed on a computer (server or workstation), then Kaspersky Anti - virus can be installed on cluster volume without using the distribution package.
To install Kaspersky Anti-Virus on cluster volume:
- Run the Web management module or Snapin for Novell ConsoleOne.
- Select a node in the console tree that contains the required cluster volume, open the shortcut menu, and select the Install Kaspersky Anti-Virus option.
- During installation the program will ask you to specify the directory in which to install the server-side application (SYS/KLAB by default) and the path to the license key file. You can install the license key via ConsoleOne after the application is installed.
After installing the application on cluster volume you are not recommended to modify AUTOEXEC.NCF. This can lead to application failure!
Click Install button to install the application.
The install process will start, it is similar to one described in 3.1.1 on page. 16
To enable automatic load of server scripts, add the following lines to the beginning of startup scripts:
SEARCH ADD SYS:/KLAB
LOAD KLABAV.NLM
KAVSCH5.NCF
To enable automatic shut down of server scripts on system shut down, add the following lines to the ending of shutdown scripts:
UNLOAD KLABAV.NLM
UKAVSCH5.NCF
3.4. Uninstalling the application
Uninstalling Kaspersky Anti-Virus means removing the application's server part from the file servers and removing its client part from the computers on which it was installed (see section 3.1 on page. 14).
The application's server part can be uninstalled from the file server selected in the NDS structure via Novell ConsoleOne using the Remove Kaspersky AntiVirus command in the shortcut menu of the console tree. You will be asked to confirm that you really want to uninstall the application. After the last installed server part is removed, the NDS structure will be cleared - the Kaspersky AntiVirus 5 class and all its attributes will be deleted.
To uninstall the client part, Snapin for ConsoleOne and/or Web management module, it must be removed from the computer on which it is installed (see section 3.1 on page 14) using the available file manager. The following files and directories must be removed from the Novell ConsoleOne installation directory:
For the Snapin for ConsoleOne:
- kav500.jar file from the snapins\mach directory;
- kavResource500.jar file from the resources\mach directory;
InstallAVP subdirectory from the jre directory;
KasperskyAV subdirectory from the help directory
For the Web management module:
- For version tomcat 33: the tomcat\33\webapps\ikav directory and the ikav.war file, the tomcat\33\work\default directory;
- For version tomcat 4: the tomcat\4\work\standalone\localhost\ikAV directory.
3.5. Updating the application version
In order to upgrade Kaspersky Anti-Virus from version 4.0 to 5.7, you must first uninstall version 4.0 and install the new version, according to the instructions contained in this document (see section 3.1 on page 14).
To update the application from version 5.x to version 5.7, do the following:
- Install one of the management modules, either for ConsoleOne on the web module:
- In the Kaspersky Anti-Virus 5 namespace, select a server on which you want to upgrade the application version;
3. Open the shortcut menu and select the Update Kaspersky Anti-Virus option.
After this, all previous settings will be saved and the current license key will be applied to the new version of Kaspersky Anti-Virus.
Kaspersky Anti-Virus for Novell NetWare supports the anti-virus database formats used in the previous versions of the program.
After software update from version 5.x to 5.7 on the server, you will have to update the program on all servers included into the list for distribution of updates. Otherwise updating of the anti-virus databases on those computers will become impossible.
CHAPTER 4. SETTING UP THE APPLICATION
4.1. Starting the application
The application is launched, set up, and controlled using Novell ConsoleOne, the web interface, or Kaspersky Administration Kit.
To start the application from ConsoleOne
Run this utility on your computer.
- To launch the application from the web interface:
- Open your web browser.
- In the address bar, enter the following address:
http://Server IP Address/iKAV
where:
Server IP address is the address of the server on which the Web management module is installed;
port is the port on the server (default port is 8080).
Attention! Commands in tomcat version 4 are case sensitive.
- On the authorization page that opens, enter the required data.
To launch the application using Kaspersky Administration Kit
Start Kaspersky Administration Kit on your computer.
4.2. Application interface
Hereinafter, all instructions and explanations are based on the interface of Sapin for ConsoleOne. All differences between the Sapin for ConsoleOne and Web module will be discussed separately. See Chapter 9 on page 78 about managing Kaspersky Anti-Virus using Kaspersky Administration Kit.
The main window of Novell ConsoleOne contains the menu, the control panel, the review panel and the results panel (see Figure 8). The menu provides the functions for controlling files and windows, and provides access to the help system. The set of buttons on the tools panel provides direct access to some of the most frequently used main menu items. The review panel displays, in a console tree form, the name spaces installed in Novell ConsoleOne. The result panel displays the list of elements of the object selected in the tree.
After installing the Snapin for Novell ConsoleOne, a Kaspersky Anti-Virus 5 name space is created in the console tree. It is marked by the icon.

Figure 8. Novell ConsoleOne window after installation of the Snapin
This space contains the list of NDS trees with which connection is established. Each tree is marked with the icon and displays the hierarchy of its servers with an indication of their context. The servers that have no server part installed are marked with the icon.
The servers on which the Kaspersky Anti-Virus module is installed are marked with the symbol and contain the list of task types of Kaspersky Anti-Virus:
Real-Time Protection
On-Demand Scan
Anti-Virus Database Updating
- In turn, for each task type a list of created tasks is provided. If the task is being executed its icon is colored, otherwise it is black and white.
The umbrella icon becomes gray if Kaspersky Anti-Virus module is not running on the server. When the module is started, this icon becomes green.
- Each object category in the Kaspersky Anti-Virus 5 name space has its own shortcut menu. In addition to Novell ConsoleOne standard menu commands, it contains several others that can be used for setting up and controlling the application. The list of objects and their respective shortcut menu commands are shown in the table below.
| Object | Command | Function |
| Server | Load/Unload Kaspersky Anti-Virus | Starts / Stops Kaspersky Anti-Virus module on the server. |
| Install Kaspersky Anti-Virus / Uninstall Kasper-sky Anti-Virus | Installs the program on the server / Removes the program from the server. | |
| View Event Log | Displays the event log that keeps data on the tasks performed on the server. | |
| View statistics | Displays the general statistics on the tasks performed on the server. | |
| Properties | Opens the application set-up window. | |
| Register license key | Installs the license key for the application (only for the web interface). | |
| Container | Install/Uninstall Kasper-sky Anti-Virus | Installs / Uninstalls Kaspersky Anti-Virus module on the server |
| Task type | Create task | Creates a task. |
| Delete all tasks | Deletes all the tasks of this type. | |
| Task | Start task / Stop task | Starts the task / Stops the task. |
| Delete task | Deletes the task. | |
| View log | Opens the report window with the data regarding the object and the actions taken with it. | |
| Properties | Opens the task set-up window. | |
| Load/Unload anti-virus database updating module | Start/stop the Anti-Virus database updating module on the server. |
4.3. Default protection of the server
Antiviral protection of the server begins immediately after installing Kaspersky Anti-Virus, upon launching the program on the server for the first time.
As a result of the installation, two tasks are created on the server: a real-time protection task named Real-Time Protection, and an on-demand scan task named On Demand Scan.
The Real-Time Protection task starts automatically together with the server part of the program. For a more detailed check of the server the administrator can run the On-Demand Scan task.
The Real-Time Protection and On-Demand Scan tasks are created automatically with the optimal default settings recommended by Kaspersky Lab's experts.
The Real-Time Protection task runs with the following settings:
Start at the Kaspersky Anti-Virus start.
- Scan all the volumes of the server.
- All the files that can potentially be infected are to be analyzed when they are opened for reading, writing, and execution.
Use heuristic code analyzer.
- Do not scan:
- The directory containing application event log files.
-
Archives and mail format files.
-
Upon detection of an infected object the application attempts to disinfect it. If disinfection is impossible it outputs an appropriate message to the report.
-
If a suspicious object is detected, the application places it under quarantine.
The On-demand Scan task can be started with the following settings:
- Scan all volumes of the server.
- Scan all files.
- Scan archives and packed files, mail files in text format, and mail databases.
Use the heuristic code analyzer. - Upon detection of an infected object the application attempts to disinfect it. If disinfection is impossible it outputs an appropriate message to the report.
- If a suspicious object is detected, the application places it under quarantine.
Use heuristic code analyzer.
The above settings are also applied when the administrator creates a task using the Default template.
4.4. Starting/stopping the application on the server
The server part of Kaspersky Anti-Virus and Anti-virus database updating modules is started and stopped on the server from a workstation or a server on which the Snapin for Novell ConsoleOne or the web management module is installed.
The user can start/stop the modules using the shortcut menu in the left panel of Novell ConsoleOne window.
In order to start the Kaspersky Anti-Virus module on the server,
select the required server in Kaspersky Anti-Virus 5 name space in the console tree. Open the shortcut menu and select the Load Kaspersky Anti-Virus option.
This will initiate checking of whether the number of running modules of Kaspersky Anti-Virus matches the number of registered license agreements. If the user attempts to run a module in excess of the number allowed by the registered license agreements or such an agreement is not registered at all, a warning will be displayed on the respective server and the module will not start.
If the numbers match, the application kernel – the KAV.NLM module, the antiviral engine – KAVSCAN.NLM and the anti-virus database will be loaded to the server's memory. The program kernel controls the antiviral functions of the application, while the antiviral engine scans files for viruses. The antiviral engine is loaded to the protected address space. More than one antiviral engine may be running at the same time. The number of concurrently executed file scan requests depends upon the number of simultaneously running copies of the antiviral engine. By default, there are two copies running at the same time. The user can change this value in the application settings on the Advanced tab (see section A.3 on page 115), or load additional antiviral engine copies manually from the server command line (see below).
As a result, Kaspersky Anti-Virus module will be started on the server selected in the console tree. After the module starts, the real-time scanning and scan on demand tasks will be started if they are configured to run at application startup on the server.
After the Kaspersky Anti-Virus module is started on the server, separate screens display general statistical information on the module operation and individual information on every active task. The first screen is created when the module is started; it contains information about the application and statistical information regarding the module execution (see Figure 9). When a server scanning task is launched, a new screen is created. The screen name matches that of the task and it displays the task settings and its execution statistics (see Figure 10). After the task is completed the screen is removed.
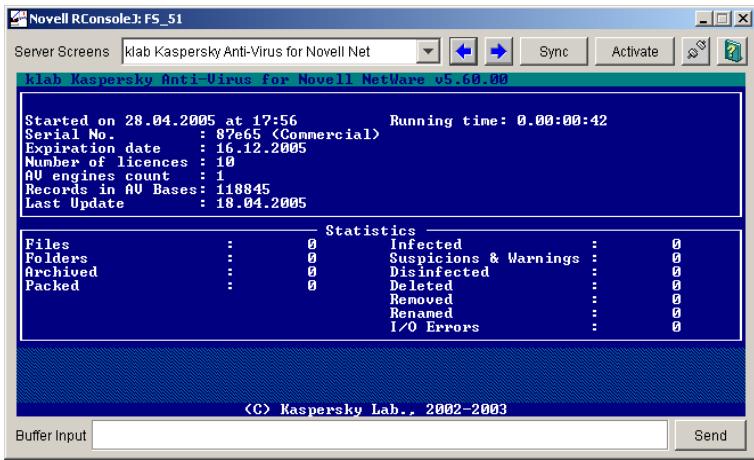
Figure 9. Server screen when the Kaspersky Anti-Virus module is started
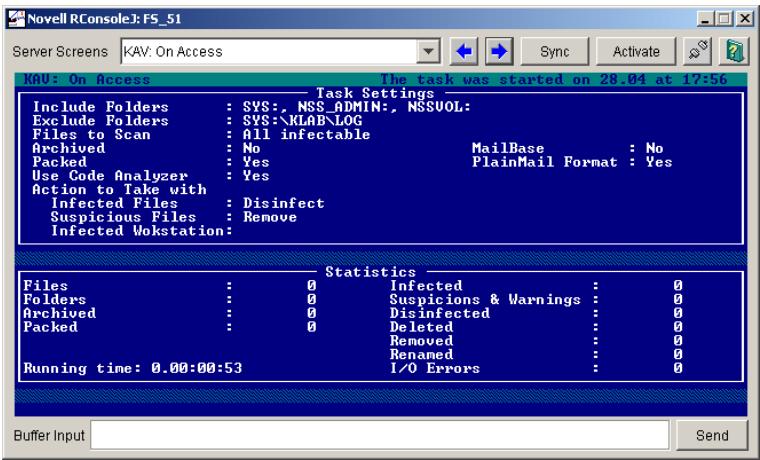
Figure 10. Server screen during execution of the real-time protection task
Similar information is represented in the results pane when the user selects the server running the Kaspersky Anti-Virus module in the console tree (see Figure 8).
To stop the Kaspersky Anti-Virus module on the server:
Select the required server in Kaspersky Anti-Virus 5 name space in the console tree. Open the shortcut menu and select the Unload Kaspersky Anti-Virus command.
Moreover, you can start / stop the Kaspersky Anti-Virus module on the General tab in the application parameters setup window using the Load Kaspersky AntiVirus / Unload Kaspersky Anti-Virus buttons (see section A.1 on page 112).
The web interface has no General tab. To start / stop the application through the web interface, select the Load / Unload Kaspersky Anti-Virus options in the shortcut menu. To open the shortcut menu, click your right mouse button on the server name in the NDS tree.
To start/stop the Anti-virus database updating module on the server:
Select the required server in the Kaspersky Anti-Virus 5 name space in the console tree. Select the Anti-Virus Database Updates task type. Call the shortcut menu and run the Load / Unload anti-virus database updating module command.
As a result, the Anti-virus database updating module will be started / stopped on the server selected in the console tree.
You can start / stop the Kaspersky Anti-Virus and Anti-virus database updating modules, and load / unload additional antiviral engines directly from the server command line using the following commands:
- LOAD SYS:\KAV\KAV.NLM - start Kaspersky Anti-Virus module
- KAVSCH5/.NCF - start Anti-virus database updating module
- UNLOAD KAV.NLM - stop Kaspersky Anti-Virus module
UKAVSCH5.NCF - stop Anti-virus database updating module - LOAD ADDRESS SPASE KAV(N) RESTART SYS:KAV\KAVSCAN.NLM - load additional N^th antiviral engine
- UNLOAD ADDRESS SPASE=KAV(N) - unload additional N^th anti-viral engine.
4.5. Setting up the application
After installation, Kaspersky Anti-Virus begins working with the minimal number of settings, most of which are set by default.
We recommend that after starting the application you familiarize yourself with its options and, if necessary, change the settings as required. These parameters are common for all the task types of this server and cannot be changed at the moment of creating a task.
The application is set up from a workstation or a server on which the Snapin for Novell ConsoleOne or the Web management module is installed. Individual windows are used for each server. This operation can be carried out regardless of whether the application is running on the server or not.
To open the application setup window,
select the required server in Kaspersky Anti-Virus 5 name space in the console tree. Open the shortcut menu and select the Properties... item.
The Kaspersky Anti-Virus 5.7 on

Figure 11. The Kaspersky Anti-Virus 5.6 on
On the General tab (see Figure 11) you can view general information about the Kaspersky Anti-Virus module, start/stop the program on the server, or renew the license agreement (for more details please refer to section A.1 on page 112).
This tab is unavailable in the Web management module. You can view this information (except for registering the license key and unloading Kaspersky AntiVirus) on the server information page displayed in the left pane when a specific server is selected in the console tree.
The Folders tab displays information regarding the location of the following directories used by the application (for more details please refer to section A.2 on page 113):
- The directory in which the current and the previous versions of the antivirus database are stored.
- Quarantine directories for infected files and suspicious objects.
Work directory for storing temporary files. - The directory for storing anti-virus database updates.
On the Advanced tab the user can specify the parameters of connection between the Snapin for ConsoleOne and the server on which the module of Kaspersky Anti-Virus being set up is installed, the parameters of connection with the anti-virus database update server, allowable server's resources usage for the Kaspersky Anti-Virus module, and the number of file scan requests simultaneously processed by the server (the number of concurrently scanned connections) (for more details please refer to section A.3 on page 115).
On the E-mail notification tab you must specify the parameters of connection between the Snapin for ConsoleOne and the mail server. These parameters will be used for sending e-mail notifications and providing sender address. As a sender address, use an email address registered on your mail server (for more details, refer to section A.4 on page 116).
The Schedule tab displays a complete schedule of unattended startups for all the tasks created for the server. The tasks are viewed by their type. The user can choose to view either the server scanning tasks startup schedule (both scan by demand and real-time protection), or the update tasks. The user can change any of the elements of the schedule (for more details please refer to section A.4 on page 116).
The Task tab displays a full list of the tasks created for the server. The tasks are viewed by their type. The user can choose to review either the server scanning tasks (both scan by demand and Real-Time Protection), or the updating tasks. You can change the settings for any task, delete tasks, create new ones, and review the log with the results of any task execution. In addition you can carry out batch setup of the task parameters (for more details please refer to section A.6 on page 120).
CHAPTER 5. UPDATING THE ANTI-VIRUS DATABASE
The procedure of searching out and removing viruses is based on the records of the anti-virus database, which contains descriptions of every virus known at the time, along with methods of cleaning the files infected by them.
Keeping the database up-to-date is of the utmost importance since new viruses appear every day. We recommend that you update the anti-virus database immediately after installing the application since the database included in the distribution package will be outdated from the moment you install the program. In Kaspersky Anti-Virus 5.6 for Novell NetWare, the anti-virus database is updated by creating and running the update tasks.
The Anti-virus database updating module deals with database updating. It is included in the application's server part. When executing the update task the server connects to the Internet or to a shared directory at the scheduled time, downloads the anti-virus database updates, and saves them in a special directory. Then the updates are distributed to the servers included in the mailing list and saved in the directories for storing the used anti-virus database. Backup copies of all the updated objects are created.
Prior to updating the anti-virus database, the updater automatically creates a backup copy of all data from the directory containing received updates. The copy will be placed in the special Backup directory so that the last update can be rolled back, if necessary.
To do this, the user must copy the anti-virus database from the back-up directory (the default location is SYS:\KAV\BASES\BACKUP) to the current database location (the default directory is SYS:\KAV\BASES)
To ensure that the server that executes the update task updates its own antivirus database it must be included in the mailing list along with the other servers.
To ensure the server is able to save the anti-virus database in the directories of the servers it updates, it must have access rights for the file systems of these servers.
All the tasks can be started either manually at the user's (administrator's) request, or using the scheduler. The task scheduler allows tasks to be started at any desired time and also allows the duration of the task execution to be specified. Executing the tasks requires Kaspersky Anti-Virus or Anti-virus database updating module to be running on the server.
After the tasks are completed, the user can review the anti-virus database update log.
5.1. Creating an update task
To create a new task for updating the anti-virus database on the server, do the following:
- In the Kaspersky Anti-Virus 5 name space in the console tree select the server which will execute the anti-virus database update.
- Expand the task types list and select Anti-virus Database Updates.
- Open the shortcut menu and select the Create the task item.
-
The Create Task dialog window (see Figure 12) will display the following information about the task to be created:
-
Task name - the name of the task, which will be used to represent it in the list of created tasks of this type. If necessary, enter the name manually. It must be unique within this server.
- Task type - the type of task. The set value is Anti-Virus Database Updates, and it is detected automatically depending on your selection.
-
Template - the template for creating the task. You can create tasks by example, selecting a previously created task from the list as a template. In this case, the parameter values set for the new task will be exactly the same as those set in the template task. To create a task with the default parameters use the Default template.
-
When you have finished making changes, click on the OK button.
As a result, the Anti-Virus Database Updates task will be assigned to the selected server. The name of this new task specified in the Task name field will appear in the list of tasks assigned to this server. After this, you must set the task parameters.
The task can be created regardless of whether the Anti-virus database updating module is running on the server or not.
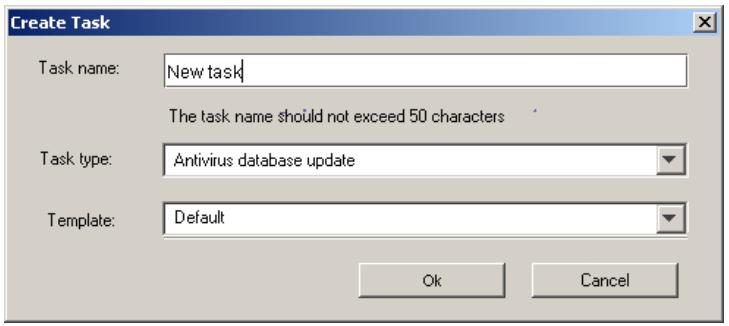
Figure 12. Creating the anti-virus database update task
A task can also be created using the application setup window Kaspersky AntiVirus on
To create a new update task in the application setup window, do the following:
- In the Kaspersky Anti-Virus 5 name space in the console tree select the server which will execute the anti-virus database update. Open the shortcut menu and select the Properties item.
- In the next window Kaspersky Anti-Virus on
select the Task tab (see Figure 14). - Select Anti-virus database updating task as the tasks view mode.
- Click on the Create button located in the group of buttons on the right.
- Make the desired settings (as described above) in the dialog window Create Task (see Figure 12) that will open, and click on the OK button.
As a result, a new element will appear in the tasks list with the name specified in the Task name field. After you close the application setup window this task will appear in the Anti-Virus Database Updates task list in the console tree. Now you need to set up the task.
5.2. Setting up the task
The parameters that the application will use when executing a task depend on the task settings. The task settings can be changed regardless of whether the Anti-virus database updating module is running on the server or not.
To set up the update task parameters, do the following:
- In the Kaspersky Anti-Virus 5 name space in the console tree select the server which will execute the anti-virus database update.
- Open the task types list and select Anti-Virus Database Updates. Open the list of created update tasks and select the one for which you want to set up parameters.
- Open the shortcut menu and select the Properties item.
This will open the task properties window Anti-virus database updating (
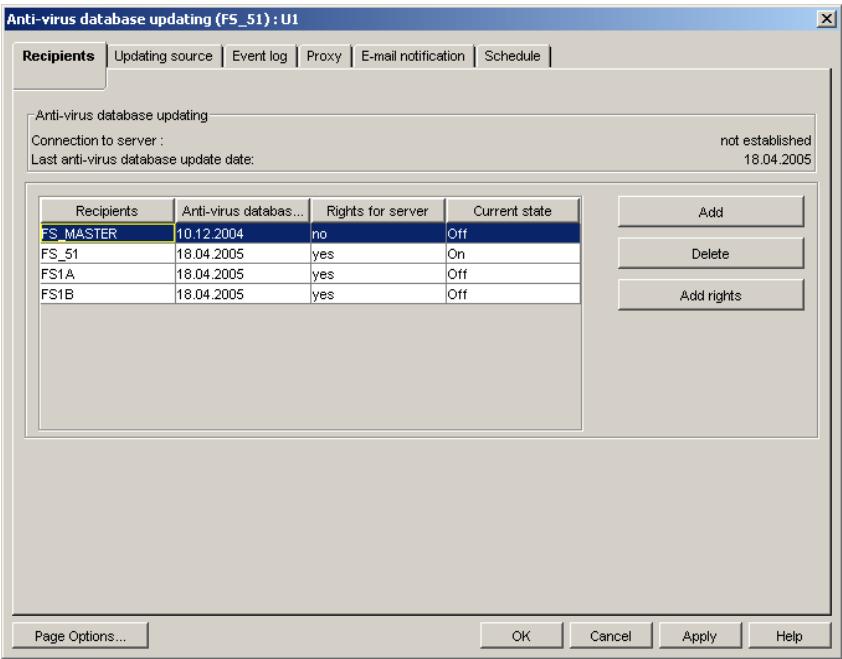
Figure 13. Setting up the Anti-virus database updating task. The Recipients tab
First of all you need to create a list of servers to which the notifications will be sent during execution of the task. The list is created on the Recipients tab using the buttons Add and Delete (see Figure 13). After that, you should check if the server you create the task for has the rights to access the file systems of the servers you have specified. If there is a 'no' value in the Rights column in the
mailing list table, it means there are no rights for the respective server. The rights can be granted using the Add rights button (for more details please refer to section B.1.1 on page 122).
After that switch to the Updating source tab and set the update receiving parameters: (for more details please refer to section B.1.2 on page 124):
- Updating source - from the Internet, LAN resources, or using Kaspersky Administration Kit. If you update the database via the Internet, the dialog box will display a list of HTTP and FTP servers of Kaspersky Lab. If you push updates from a network resource, a list of shared directories will be displayed. If you select Kaspersky Administration Kit as an updating source, the anti-virus database will be updated from the Administration Server of Kaspersky Administration Kit.
In case of disconnection from the main source of updates, three more attempts will be made within the 15-minute interval (the next attempt is made in the event that the previous connection fails). Using the Schedule tab you can change the number of repeated attempts to connect with the source, and the interval. During each attempt to connect, the list of update source addresses is used from the beginning (the main address). The addresses are tried in sequence until the connection is established or the list of addresses is exhausted.
- Updates copying mode - specifies what files will be downloaded from the update source; all the anti-virus databases available from the source or only the new and changed ones.
If you have selected an Internet server as a source of the updates and plan to use a proxy server to connect to the ISP, you will have to set up its parameters on the Proxy tab (for more details please refer to section B.1.4 on page 131).
Then go to the Schedule tab and schedule the unattended start of the task and set the reconnection parameters in the event of disconnection during the updates downloading (for more details please refer to section B.1.5 on page 133).
On the Event log tab you can specify the name and the location of the log file, which will contain detailed information about the results of the task execution. In addition, you can set the log file size and specify the events to be logged (for more details please refer to section B.1.3 on page 129).
On the E-mail notification tab, you can enable notifications about task completion for a specified group of users. The program uses the mail system installed in the network to deliver its notifications.
To make your settings come into effect, use the Apply button located in the lower part of the dialog window Anti-virus database updating (<Server
name>):
The task settings can also be changed in the application setup window Kaspersky Anti-Virus on
To set up the task in the application setup window, do the following:
- Select the required server in the Kaspersky Anti-Virus 5 name space in the console tree. Open the shortcut menu and select the Properties item.
- In the next window, Kaspersky Anti-Virus on
select the Task tab (see Figure 14).
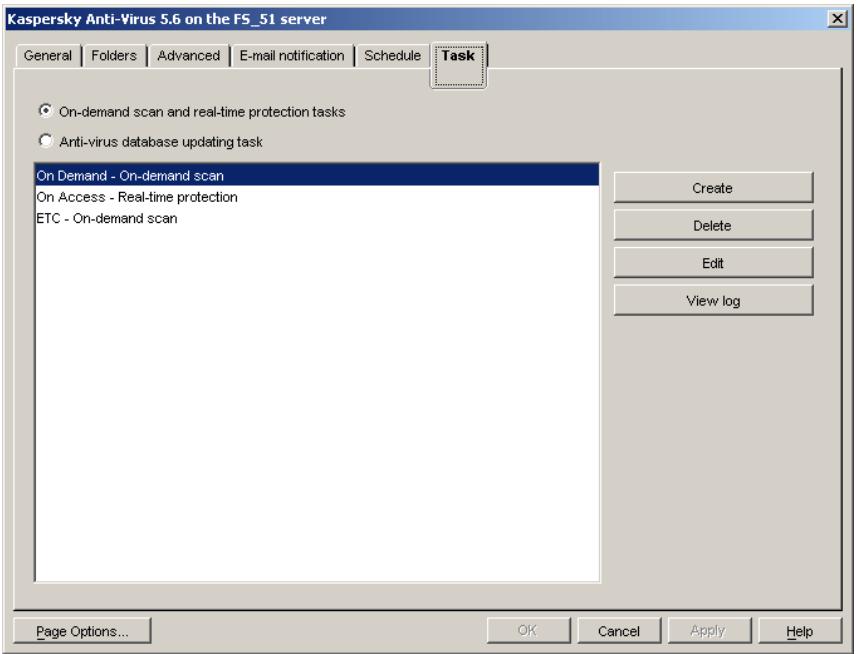
Figure 14. The Kaspersky Anti-Virus on
- Select Anti-virus database updating task as the tasks view mode.
-
In the task list, select the task you wish to set up. Click Edit in the group of buttons on the right.
-
This will open the Change task settings window (see Figure 15) with the tabs: Recipients, Updating source, Proxy, Event log and E-mail notification. These tabs are exactly the same as those in the task setup window Anti-virus database updating (
): . Make all the desired changes and click on Apply or OK to save the settings.
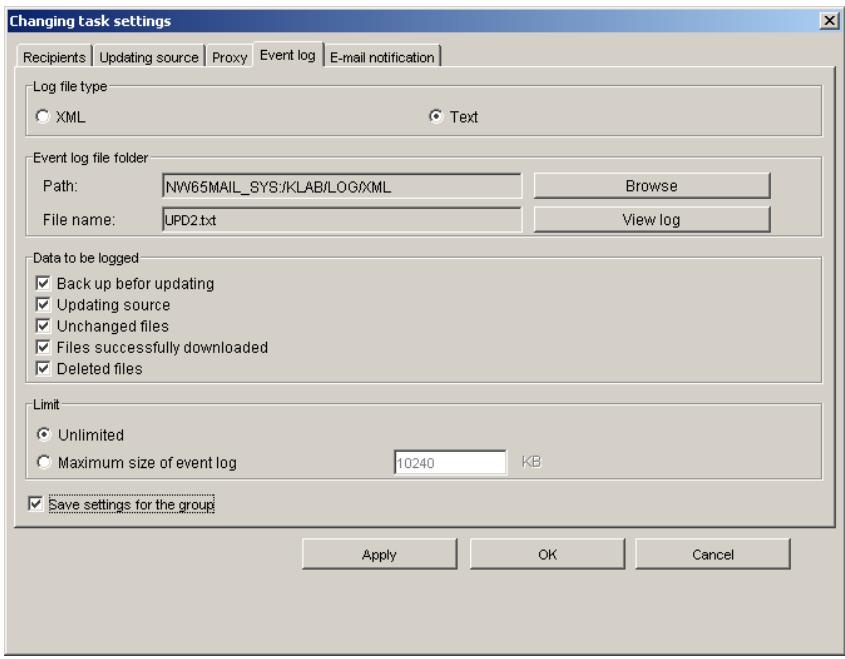
Figure 15. The Change task settings window. Event log tab
- Now it is necessary to schedule the task start. In the window, Kaspersky Anti-Virus 5.7 on
select the Schedule tab. - Select Anti-virus database updating task schedule as the tasks view mode. Click on the Add button at the right side of the schedule.
- In the Create new schedule for the task dialog box (see Figure 16) select the task you want to schedule and specify the parameters of its start (for more details please refer to section A.4 on page 116). The task is selected from the list in the left part of the
window. The schedule parameter setting procedure is exactly the same as the one described above. After finishing, click OK.
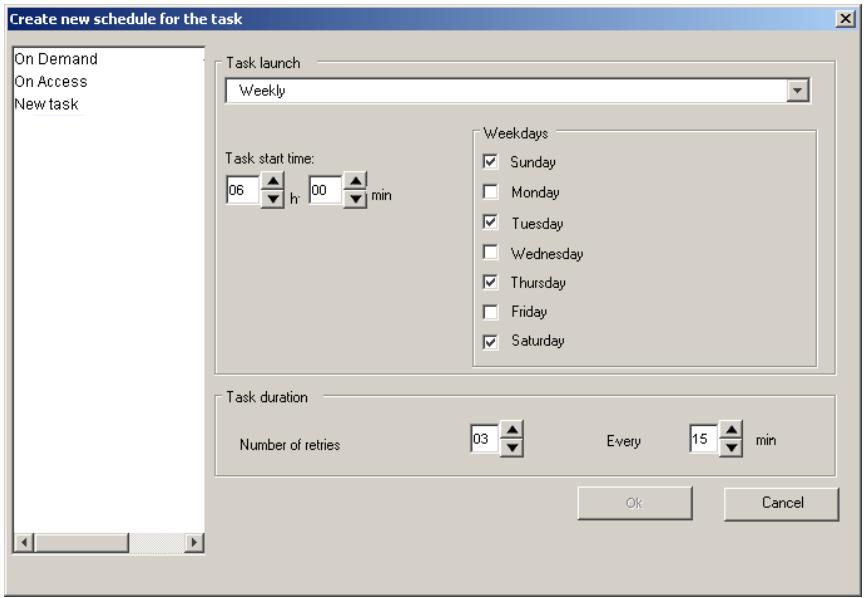
Figure 16. The Create new schedule for the task dialog box
5.3. Batch task setup
You can make identical settings for a group of tasks using the batch setup option. In this case, one of the tasks serves as a basis. If necessary, its settings can be modified.
To carry out batch setting of update tasks, do the following:
- In the Kaspersky Anti-Virus 5 name space in the console tree select the server whose tasks you wish to set up. Open the shortcut menu and select the Properties item.
- In the next window, Kaspersky Anti-Virus on
select the Task tab. -
Select Anti-virus database updating task as the tasks view mode.
-
In the task list select the group of tasks you wish to set up (see Figure 17). Click on the Edit button located in the group of buttons on the right.
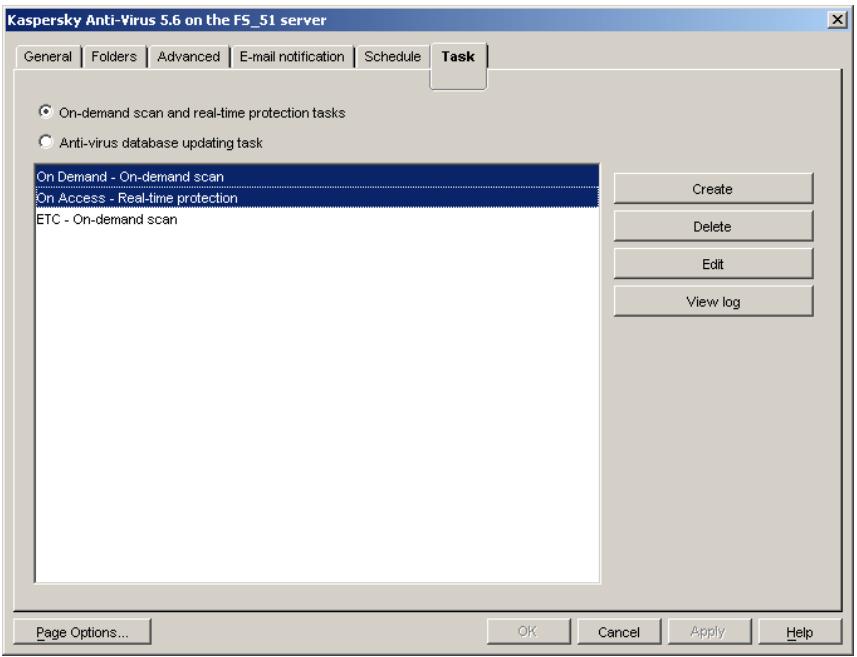
Figure 17. Selecting a group of tasks to set up
- In Select task template window that will open (see Figure 18) select the task to use as a basis from the list of tasks you have included in the batch. Click OK.
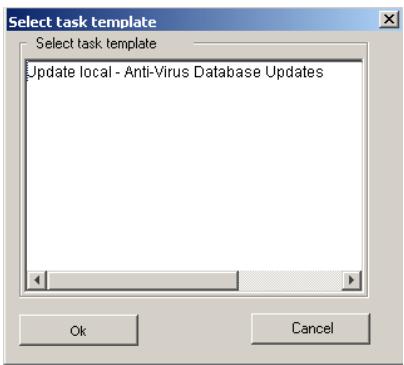
Figure 18. The Select task template window
- This will open the Edit window (see Figure 19). Using the tabs in this window, you can customize settings for the task selected in the previous window. To apply these settings to the whole batch of tasks check the Save group settings checkbox in the lower part of the window on each of the tabs.
In Web management module to perform group settings you need to check the box on settings tab header.
After this, those fields on the tabs become available for editing, and their values can be set the same for the whole batch of tasks. Make the desired changes and click on Apply or OK to save the settings.
As a result, the settings you have made will be saved for the whole batch of tasks. A common log will be shared by these tasks. You can change the tasks schedule on the Schedule tab individually for each task.
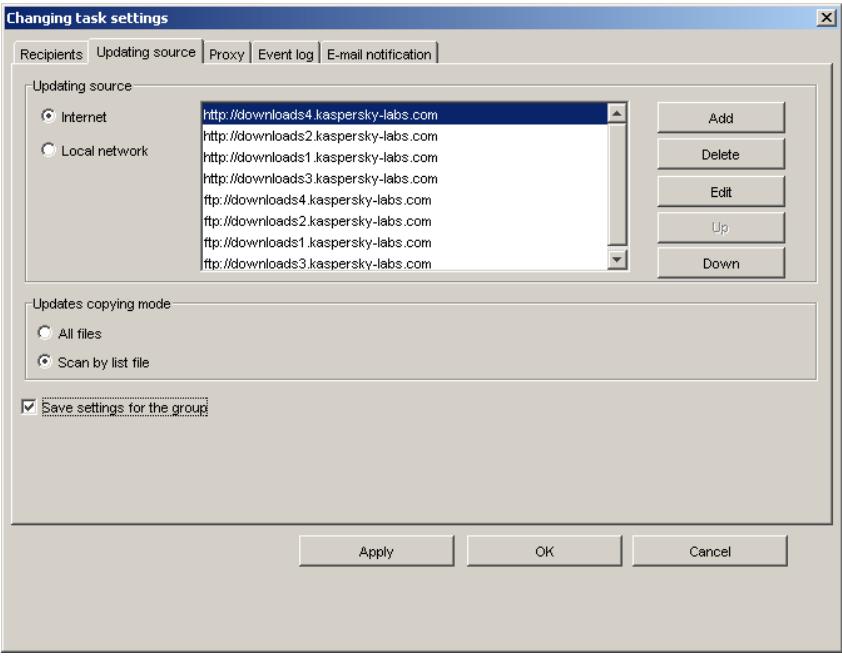
Figure 19. The Change task settings window. Batch task setup
5.4. Starting/stopping a task
Tasks can be started and stopped automatically according to the scheduler settings, or manually, using the Snapin for Novell ConsoleOne, the Web management module, or Kaspersky Administration Kit.
The update tasks can only be started when the Anti-virus database updating module is running on the server. If the module is stopped, all the running update tasks are cancelled.
To start an update task manually, do the following:
- In the Kaspersky Anti-Virus 5 name space in the console tree select the server that you wish to scan.
- Open the task types list and select Anti-Virus Database Updates.
- Expand the list of the created tasks and select the task to start.
- Open the shortcut menu and select the Start task item.
If the Start task item is not available check that the Anti-virus database updating module is running on the server.
The tasks are completed automatically after the updates are sent to the specified servers or after executing the preset number of attempts to reconnect to the antivirus database source.
In addition you can stop the task manually before its execution is complete.
To stop a task manually, do the following:
- In the Kaspersky Anti-Virus 5 name space in the console tree select the server you wish to stop scanning.
- Expand the task types list and select Anti-Virus Database Updates.
- Expand the list of the created tasks and select the task to stop.
- Open the shortcut menu and select the Stop task item.
5.5. Deleting a task
To delete a task, do the following:
-
In the Kaspersky Anti-Virus 5 name space in the console tree select the server to which the task you wish to delete relates.
-
Expand the task types list and select Anti-Virus Database Updates.
- Expand the list of the created tasks and select the task to delete.
- Open the shortcut menu and select the Delete task item.
You can delete a task regardless of whether the Anti-virus database updating module is running on the server or not and whether the task is being executed or not.
It is also possible to delete a batch of tasks.
To delete all the update tasks, do the following:
- In the Kaspersky Anti-Virus 5 name space in the console tree select the server to which the task you wish to delete relates.
- Expand the task types list and select Anti-Virus Database Updates.
- Open the shortcut menu and select the Delete all tasks item.
A task can also be deleted using the application setup window Kaspersky AntiVirus on
To delete an update task from the application setup window, do the following:
- Select the required server in the Kaspersky Anti-Virus 5 name space in the console tree. Call the shortcut menu and select the Properties item.
- In the next window, Kaspersky Anti-Virus on
select the Task tab. - Select Anti-virus database updating task as the tasks view mode.
- In the task list select the task you wish to delete. Click Delete in the group of buttons on the right. Click Yes in the next window to confirm deletion.
As a result, the task is removed from the list. After the window is closed with the OK button, the task is deleted from the update task list in the console tree.
CHAPTER 6. SCANNING THE SERVER FOR VIRUSES
The server can be scanned for viruses by creating and running two types of task:
Real-Time Protection
- On-Demand Scan
The Real-Time Protection task is unattended real-time scanning ('on-the-fly' scanning) of all the files on the server accessed by other workstations and servers. The files are scanned prior to their opening/starting, thus preventing infected files from being started or copied. In addition, the files are scanned immediately after they are modified. Only one task of the server's Real-Time Protection can be executed at a time. It can be set up to be started and stopped simultaneously with Kaspersky Anti-Virus module startup and shut down on the server.
A Real-Time Protection task running on the server slows down its performance slightly. Therefore, it is not recommended to enable archive unpacking mechanism for this type of task.
During scanning on demand, the program scans the directory tree of the selected volumes on the server and virus checks the files specified in the settings. This type of task is intended for scheduled inspections of the server. More than one scanning task with different settings can be executed at the same time.
All the tasks can be started either manually or automatically, using the scheduler. The scheduler allows tasks to be started either according to the schedule or upon an event (e.g. after an application start). You can also set the duration of task execution.
If, during scanning the server (as part of Real-Time Protection or on demand), the program detects infected or suspicious files (detected using the heuristic code analyzer) it will undertake actions specified by the administrator in the task settings.
After the tasks are completed, the user can review the server scanning log.
6.1. Creating tasks for Real-Time Protection and On-Demand Scan
In order to create a new Real-Time Protection / On-demand Scan task for the server, do the following:
- In the Kaspersky Anti-Virus 5 name space in the console tree select the server you wish to scan.
- Expand the task types list and select On-Demand Scan / Real-Time Protection.
- Open the shortcut menu and select the Create task item.
-
The Create Task dialog box (see Figure 20) displays the following information about the task to be created:
-
Task name - the name of the task. This name will be used to represent the task in the list of created tasks of this type. If necessary, enter the name manually. It must be unique within this server.
- Task type - the type of the task. The set value is Real-Time Protection / On-Demand Scan. It is detected automatically based on your selection.
-
Template – the template for task creation. You can create tasks by example, by selecting a previously created task from the list as a template. In this case the parameter values set for the new task will be exactly the same as those set in the template task. To create a task with the default parameters use the Default template.
-
When you have finished making changes, click the OK button.
As a result, the list of tasks of the server you have selected will have a new element. Its name is the one you have specified in the Task name field. Now you must set the task parameters.
A task can be created regardless of whether the program is running on the server or not.
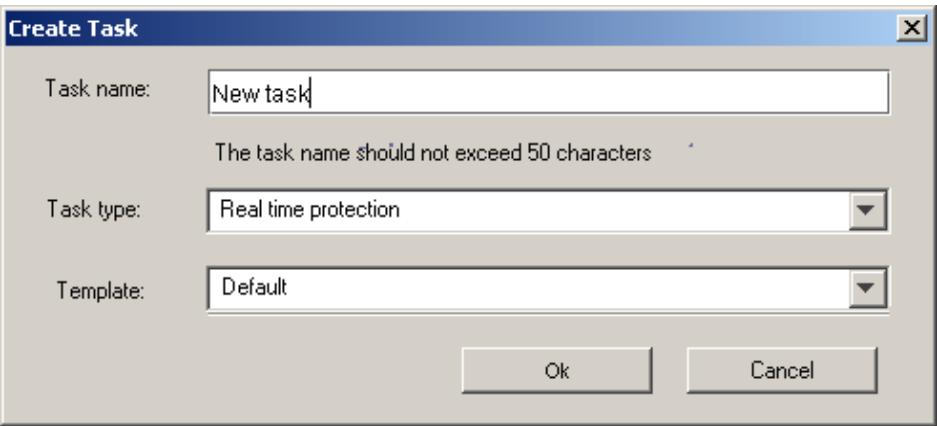
Figure 20. Creating a Real-Time Protection Task
A task can also be created using the Kaspersky Anti-Virus on
- In order to create a new Real-Time Protection / On-Demand Scan task for the server in the application setup window, do the following:
- Select the required server in the Kaspersky Anti-Virus 5 name space in the console tree. Open the shortcut menu and select the Properties item.
- In the next window, Kaspersky Anti-Virus on
, select the Task tab. - Select the mode for reviewing the Real-Time Protection and On-demand Scan tasks – On-demand scan and real-time protection tasks.
- Click on the Create button located in the group of buttons on the right.
- Make the desired settings (as described above) in the dialog window Create Task (see Figure 20) that opens and then click on the OK button.
As a result, a new element will appear in the tasks list with the name specified in the Task name field. After the application setup window is closed with the OK button, the newly created task will appear in the respective task type list in the console tree. Now you need to set up the task.
6.2. Setting up a task
The parameters that the application will use when executing a task depend on the task settings. Task parameters can be set up regardless of whether the program is running on the server or not.
To set up the update task parameters, do the following:
- In the Kaspersky Anti-Virus 5 name space in the console tree select the server that you wish to scan.
- Expand the task types list and select On-demand Scan/ Real-Time Protection.
- Open the list of the created tasks of the desired type and select the one for which you want to set up parameters.
- Open the shortcut menu and select the Properties item.
This will open the task properties window On-Demand Scan (
You can take the following actions:
- Specify regions for scanning, file types to be scanned, regions to be excluded from scanning, and activate advanced scanning modes, namely: scan by wildcard, archive scanning, packed executables scanning and use of heuristic code analyzer. This can be done on the Scan settings tab (see Figure 21) (for more details please refer to section B.2.1 below 139).
- Specify actions to be applied to infected or suspicious files if these detected, as well as actions to be applied to a workstation that attempts to store an infected object on the server. This can be done on the Actions tab (for more details please refer to section B.2.2below 144).
- Specify the location of the log file that will contain detailed information about the results of the task execution, set the log file size and specify the events to be logged. This can be done on the Event log tab (for more details please refer to section B.2.3 on page 146).
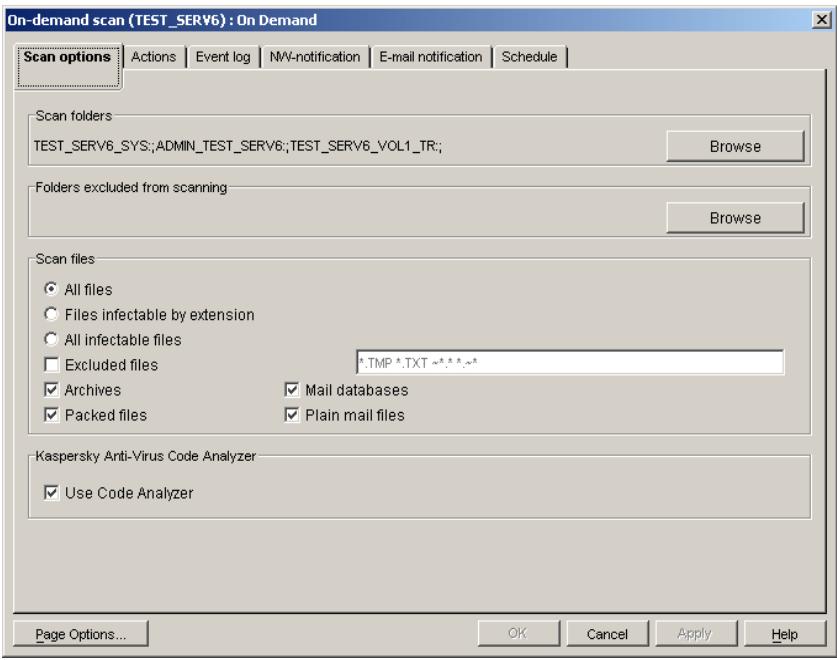
Figure 21. Setting up the Real-Time Protection task. The Scan settings tab
- Set the notification mode to alert the administrator and network users about detected viruses and specify the messages to be sent out. Use the NW-Notification tab to configure notifications sent using the Novell NetWare messaging tools (for more details please refer to section B.2.4 on page 151). Use the E-mail notification tab to configure settings for sending notifications using your mail system (for more details, see section B.2.5 on page 153).
- Schedule unattended starts of the task and specify how long they will run. This can be done on the Schedule tab (for more details please refer to section B.2.6 on page 155).
To make your settings come into force, click the Apply button or save changes and close the window using the OK button. To close the window without saving changes, click Cancel.
The task settings can also be made in the application setup window Kaspersky Anti-Virus on
To set up the task in the application setup window, do the following:
- Select the required server in the Kaspersky Anti-Virus 5 name space in the console tree. Open the shortcut menu and select the Properties item.
- In the new window, Kaspersky Anti-Virus on
, select the Task tab (see Figure 14). - Select the mode for reviewing the Real-Time Protection and On-demand Scan tasks - On-demand scan and real-time protection tasks.
- In the list of tasks created for the server select the one you wish to set up. Click on the Edit button located in the group of buttons on the right.
- This will open the Edit window (see Figure 22), with the tabs: Scan settings, Actions, Event log, NW-notification and E-mail notification. These tabs are exactly the same as those in the task setup window On-Demand Scan (
): /Real-Time Protection ( ): . Make all the desired changes and click on Apply or OK to save the settings. - Now it is necessary to schedule the task start. In the window Kaspersky Anti-Virus 5.6 on
select the Schedule tab. - Select the mode for reviewing the Real-Time Protection and On-demand Scan tasks – On-demand scan and real-time protection task schedule.
- Click on the Add button at the right side of the schedule.
- In the Create new schedule for the task (see Figure 23) dialog box select the task you want to schedule and specify the parameters of its start (see section A.4 on page 116). The task is selected from the list in the left part of the window. The start parameters setting procedure is exactly the same as the one described above. After finishing, click OK.

Figure 22. The Scan settings tab of the Change task settings window

Figure 23. The Create new schedule for the task window. Scheduling the task to run every week
6.3. Batch task setup
You can make identical settings for a group of tasks using the batch setup option. In this case, one of the tasks serves as a basis. If necessary, its settings can be modified.
To carry out batch task setting, do the following:
- In the Kaspersky Anti-Virus 5 name space in the console tree select the server whose tasks you wish to set up. Open the shortcut menu and select the Properties item.
- In the next window, Kaspersky Anti-Virus on
, select the Task tab (see Figure 14). - Select the mode for reviewing the Real-Time Protection and On-demand Scan tasks – On-demand scan and real-time protection tasks.
- In the list of tasks created for the server select the group of tasks you wish to set up. The selection is made in a standard way, by
pressing the
- In Select task template window that will open (see Figure 24) select the task to use as a basis from the list of tasks you have included in the batch. Click OK.
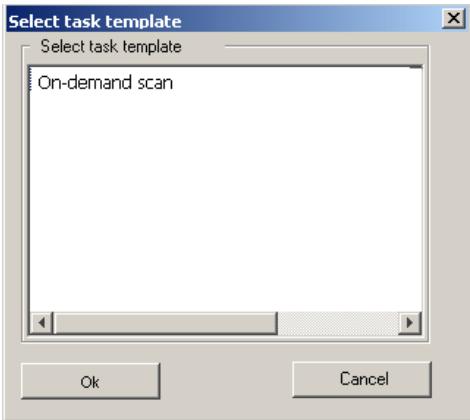
Figure 24. The Select task template window
- This will open the Change task settings window (see Figure 25), the tabs of which contain the settings of the task selected in the previous window. To apply these settings to the whole batch of tasks from the Snapin for ConsoleOne, check the Save checkbox in the lower part of window on each of the tabs. If you are using the web management interface, check the box located near the name of the relevant tab.
After this, the fields on the tabs become available for editing and their values can be set the same for this batch of tasks. Make the desired changes and click on Apply or OK to save the settings.
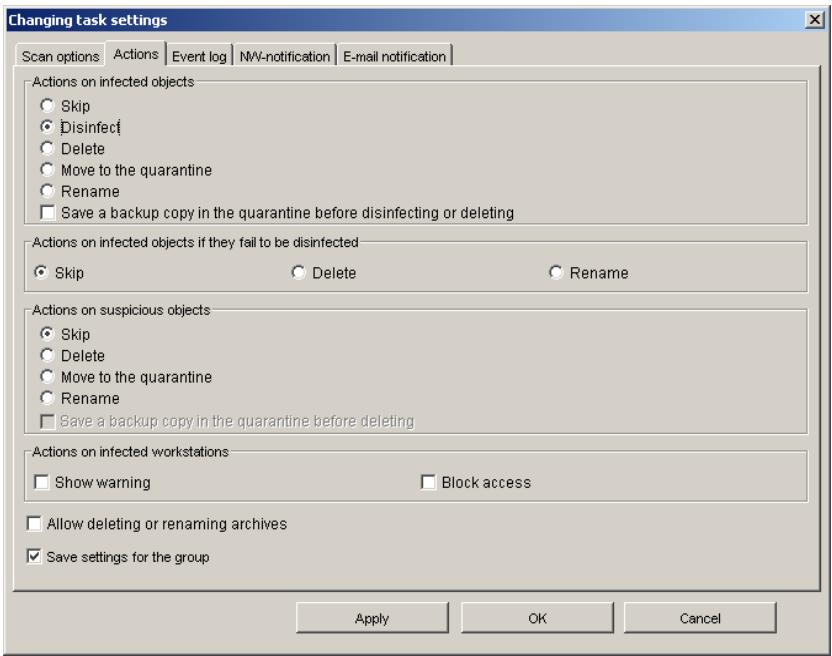
Figure 25. The Change task settings window. Batch task setting
As a result, the settings you have made will be saved for the whole batch of tasks. A common log will be shared by these tasks. You can change the tasks schedule on the Schedule tab individually for each task (see section A.4 on page 116).
6.4. Starting/stopping a task
Tasks can be started and stopped automatically according to the scheduler settings, or manually, using the Snapin for Novell ConsoleOne, web interface, or Kaspersky Administration Kit.
A task can be started only if the application is running on the server. If the server is stopped, all the tasks are cancelled.
In order to start scanning the server for viruses manually, do the following:
-
In the Kaspersky Anti-Virus 5 name space in the console tree select the server that you wish to scan.
-
Expand the task types list and select On-Demand Scan/ Real-Time Protection.
- Expand the list of the created tasks of the type you need and select the task to start.
- Open the shortcut menu and select the Start task item.
If the Start task item is not available, make sure that the application is running on the server.
Several on-demand Scan tasks with different settings can be running simultaneously with one Real-Time Protection task.
The tasks are completed after scanning all the specified files and directories, or terminate after the preset time elapses.
You can stop the task before its execution is complete.
To stop the task manually, do the following:
- In the Kaspersky Anti-Virus 5 name space in the console tree select the server you wish to stop scanning.
- Expand the task types list and select On-demand Scan/ Real-Time Protection.
- Expand the list of the created tasks of the type you need and select the task to stop.
- Open the shortcut menu and select the Stop task item.
6.5. Deleting a task
To delete a task, do the following:
- In the Kaspersky Anti-Virus 5 name space in the console tree select the server whose task you wish to delete.
- Expand the task types list and select On-Demand Scan/ Real-Time Protection.
- Expand the list of the created tasks of the type you need and select the task to delete.
- Open the shortcut menu and select the Delete task item.
You can delete a task regardless of whether the program is running on the server or not and whether the task is being executed or not.
It is also possible to delete a batch of tasks.
To delete all the tasks of the same type, do the following:
- In the Kaspersky Anti-Virus 5 name space in the console tree select the server, you wish to delete the tasks for.
- Expand the list of task types and select the type of tasks you wish to delete.
- Open the shortcut menu and select the Delete all tasks item.
A task can also be deleted using the application setup window Kaspersky AntiVirus 5.7 on
In order to delete a Real-Time Protection / On-demand Scan task in the application setup window, do the following,
- Select the required server in the Kaspersky Anti-Virus 5 name space in the console tree. Open the shortcut menu and select the Properties item.
- In the next window, Kaspersky Anti-Virus 5.7 on
, select the Task tab. - Select the mode for reviewing the Real-Time Protection and On-demand Scan tasks – On-demand scan and real-time protection tasks (see Figure 14).
- In the task list, select the task you wish to delete. Click Delete in the group of buttons on the left. Click OK in the next window to confirm deletion.
As a result, the task is removed from the list. After the window is closed with the OK button, the task is deleted from the respective task type list in the console tree.
CHAPTER 7. GENERATING AND VIEWING LOGS, RECEIVING NOTIFICATIONS
All the events that take place during execution of the tasks are logged and the information about them is saved in the log file. This version of Kaspersky AntiVirus is capable of working with two log formats: text and XML.
Text format is the traditional type, providing the opportunity to record and view task execution results.
The XML format, apart from having the features of the text format, has a number of extra capabilities. The information recorded in XML logs can be filtered and sorted using various criteria. In addition, it is possible to merge different task logs and obtain summarized results. The above mentioned functions are provided by a number of auxiliary files located in the View directory nested in the Log.
In the event that the View directory is deleted or moved, the functions of filtering, sorting, searching or merging the log data become unavailable.
To view any journals, use the Microsoft Internet Explorer 6.0.
Viewing the xml format log is only possible if Microsoft Internet Explorer 6.0 is installed on your computer.
By default a separate log file is created for each task. The log file is located in the Log directory, which is created during the installation of the application in the installation directory of the server along with other auxiliary directories. txt-files are saved in the root of this directory, while xml log files are saved in the nested XML directory. To assist in viewing the XML logs auxiliary htm-files are created, which are also stored in the root of the Log directory.
The user can view the log via the computer file system or using the Snapin for ConsoleOne or the web module (if the Novell NetWare client is installed on the local computer).
The log can only be deleted by means of removing the respective files from the XML and Log directories.
The log keeping parameters and the information to be recorded can be set during adjustment of the respective task using the Event log tab (for more details please refer to section B.1.3 on page 129 and section B.2.3 on page146).
The log keeping system provides the administrator with quick, convenient and unified access to the task execution results.
7.1. Viewing the anti-virus database updating results
In order to view the updating task results log, do the following:
- In the Kaspersky Anti-Virus 5 name space in the console tree select the server on which the desired task was executed.
- Expand the task types list and select Anti-Virus Database Updates. Open the list of created update tasks and select the one for which you want to view parameters.
- Open the shortcut menu and select the View log item.
The updating task results log will be displayed in the Microsoft Internet Explorer window. The view of the results log is displayed in the format defined by the task settings (see section B.1.3 on page 129).
If you are using the Snapin for Novell ConsoleOne, the task execution results log can also be viewed from the Anti-Virus Database Updates (
If you are using the web management interface, the task results log can be accessed from the shortcut menu for the target task. Select the task, open the shortcut menu for this task, and click the View log option.
The XML log file structure and its use are more complicated, therefore we provide a detailed description below.
The left pane of the log contains the list of all the task launch sessions in the form of hyperlinks (see Figure 26). This information includes the time and the date.
The right pane displays the task name, full path to the report file, and a table with information about the task session selected in the left pane. The session date and time are displayed in the header of the right pane. Below is the group of checkboxes used to set up the filter, and a set of buttons that can be used for:
- Refreshing the table contents and applying the filter settings - Apply
-
Checking all the filter setting boxes at the same time - Select All
-
Unchecking all the filter setting boxes at the same time - Clear
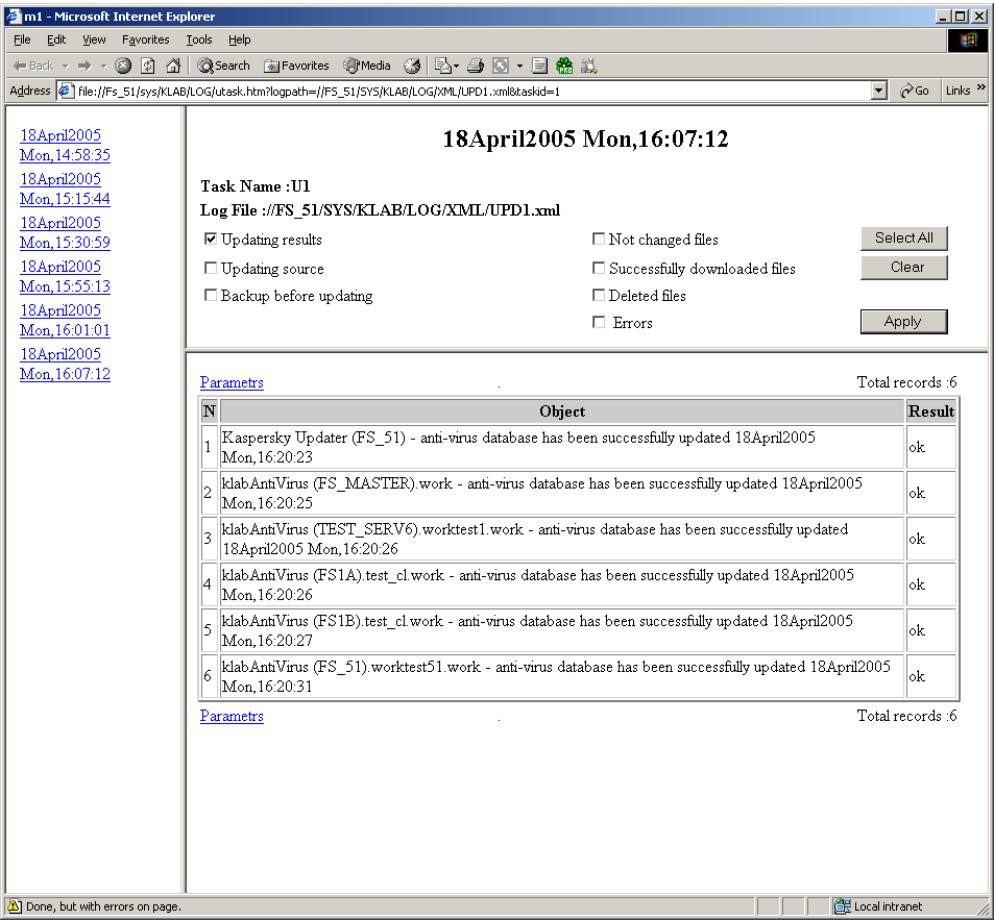
Figure 26. Viewing the XML log of the update results
In order to view the parameters used with the updating session and view the updating results, do the following:
Select the desired session in the left pane. This will display the required information in the right pane.
The table displays the updating session results: the Object column shows the list of events, and the Result column shows the results of these events. The displayed information depends on the settings made on the Event log tab (see
section B.2.3 on page 146) and the activated filter. By default, the information about the anti-virus database updating results is displayed.
The information is output at 100 lines per page, and the lines are numbered. The Total Records field displays the total number of records. To navigate through the log records you can use the navigation buttons located above and below the table.
To facilitate viewing and searching the information, the program offers the opportunity to set up user filters. The filters allow searching and discarding of currently unnecessary information when it complicates viewing. After the filter is applied, only that information that meets the requirements of the filter is displayed. This has great importance since the log stores large volumes of information.
To set up the filter for the information displayed in the table, do the following:
-
Check the boxes corresponding to the information to be displayed in the table:
-
Updating results - information regarding the results of the server anti-virus database update download (this box is checked by default).
- Updating source - information regarding the results of connection to the update source.
- Backup before updating – whether the backup copy of the previous version of the anti-virus database was created before updating.
- Not changed files - information regarding the anti-virus database files that were not modified.
- Successfully downloaded files - information regarding successfully updated anti-virus database.
- Deleted files – information regarding the deleted files.
- Errors - information about errors in the event that the update fails.
You can check all the boxes using the Select All button, or uncheck all the boxes using the Clear button.
- In order to refresh the information in the table click on the Apply button.
Using the Parameters hyperlink you can view the task settings that were to be used during this session. This will open the task settings window (see Figure 27), which displays the following information:
- To - a list of servers on which anti-virus database must be updated as a result of executing the task.
- Backup before updating - status of the backup mode set for the antivirus database prior to updating.
- Copying mode - the mode used to copy the anti-virus database from the update source.
- Updating source - the method used to download the updates (via the Internet or LAN).
- List - a list of update sources.
- Proxy - parameters of the proxy server used for connecting to the update source.
- Schedule - task starting mode (Daily, Weekly, Monthly).
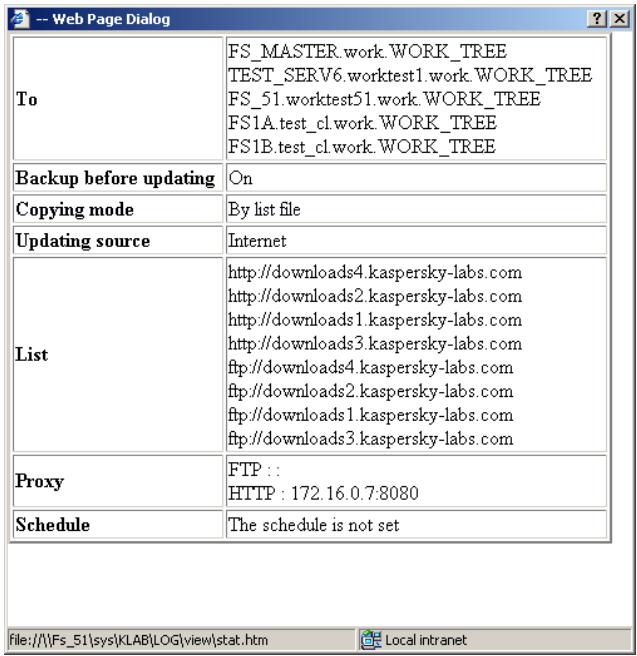
Figure 27. Update task parameters window
7.2. Viewing the server scanning results
In order to view the scan on demand / real-time protection task execution log, do the following:
- In the Kaspersky Anti-Virus 5 name space in the console tree select the server on which the desired task was executed.
- Expand the task types list and select On-Demand Scan / Real-Time Protection. Open the list of the respective tasks and select the one for which you want to view parameters.
- Open the shortcut menu and select the View log item.
The task results log will be displayed in the Microsoft Internet Explorer window. The view of the results log is displayed in the format defined by the task settings (see section B.2.3 on page 146).
If you are using the Snapin for Novell ConsoleOne, the task execution results log file can also be viewed from the On-Demand Scan (
If you are using the web management interface, the task results log can be accessed from the shortcut menu for the target task. Select the task, open the shortcut menu for this task, and click the View log option.
The text format log contains detailed information and overall statistics on the results of all the task execution sessions that have taken place (see Figure 28).

Figure 28. Viewing the real-time server protection task log in the text format
The XML log file structure and its use are more complicated, therefore we provide a detailed description below.
The displayed information depends on the settings made on the Event log tab (see section B.2.3 on page 146) and the activated filter. By default, the information regarding the infected files detected is displayed.
The left pane of the log contains a list of all the task launch sessions in the form of hyperlinks. The information on the task start includes the date and the time.
The right pane displays the task name, full path to the report file, and a table with information about the session selected in the left pane. The session date and time are displayed in the header of the right pane. Below is the group of checkboxes used to set up the filter, and a set of buttons that can be used for:
- Refreshing the table contents and applying the filter settings - Apply
- Checking all the filter setting boxes at the same time - Select All
- Unchecking all the filter setting boxes at the same time - Clear
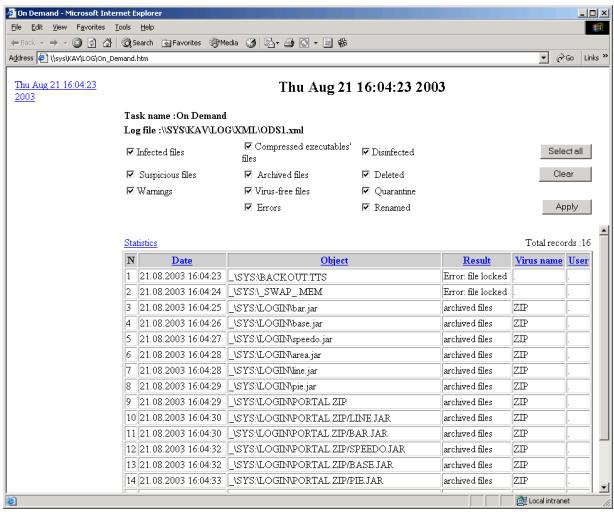
Figure 29. Viewing the real-time server protection task log in the XML format
In order to view the parameters of the server scanning task and its results, do the following:
Highlight the desired line in the list in the left pane. This will display the required information in the right pane.
The table displays the following information regarding the task execution results:
- Date – the date and the time of the event.
- Object - the event registered.
Result - the result of the event. - Virus name - the name of the detected virus or the archive name.
- User—the name of the user who was accessing the infected object.
The displayed information depends on the settings specified on the Event log tab (see section B.2.3 on page 146) and the activated filter. By default, the information regarding the infected files detected is displayed.
The information is output by 100 lines per page and the lines are numbered. The Total Records field displays the total number of records. To navigate through the log records you can use the navigation buttons located above and below the table.
The records in the table can be arranged by the contents of one of the columns. To the left of the name of the column by which the records are sorted there is a symbol showing whether they are arranged in ascending or descending order. To sort the table records by a column left-click on the desired column header.
To facilitate viewing and searching the information, the program offers the opportunity to set up user filters. The filters allow searching and discarding of currently unnecessary information when it complicates viewing. After the filter is applied, only that information that meets the requirements of the filter is displayed. This has great importance since the log stores large volumes of information.
To set up the filter for the information displayed in the table, do the following:
-
Check the boxes corresponding to the information to be displayed in the table:
-
Infected files - messages regarding infected files.
- Suspicious files – messages regarding suspicious files.
-Warnings - alerts regarding detection of a modified or a damaged virus in a file. - Compressed executables – information regarding compressed executable files.
- Archives – information regarding archive files.
- Virus-free files – information regarding uninfected files.
- Errors - information regarding the application errors during execution of the task.
Disinfected files - information regarding disinfected files. - Deleted – information regarding deleted files.
- Quarantine - information regarding the files moved to the quarantine directory.
- Renamed - information regarding renamed files.
You can check all the boxes using the Select all button or uncheck all the boxes using the Clear button.
- In order to refresh the information in the table click on the Apply button.
Using the Statistics hyperlink you can view the statistical information on the results of the last task execution (either real-time protection or on-demand scanning task). A click on this hyperlink will open the window (see Figure 30) with the following information:
- Scanned files - the number of files scanned.
- Scanned folders – the number of directories scanned.
- Archives scanned – the number of archive files scanned.
- Compressed executables – the number of packed files scanned.
- Errors - the number of errors when attempting to access files.
- Infected files - the number of infected files detected.
- Suspicious files—messages regarding suspicious files and alerts about detection of a modified or a dam-aged virus in a file.
- Disinfected files – information regarding disinfected files.
- Deleted files – information regarding deleted files.
- Quarantine - information regarding the files moved to the quarantine directory.
- Renamed files – information regarding renamed files.
- Scan time - scanning duration.
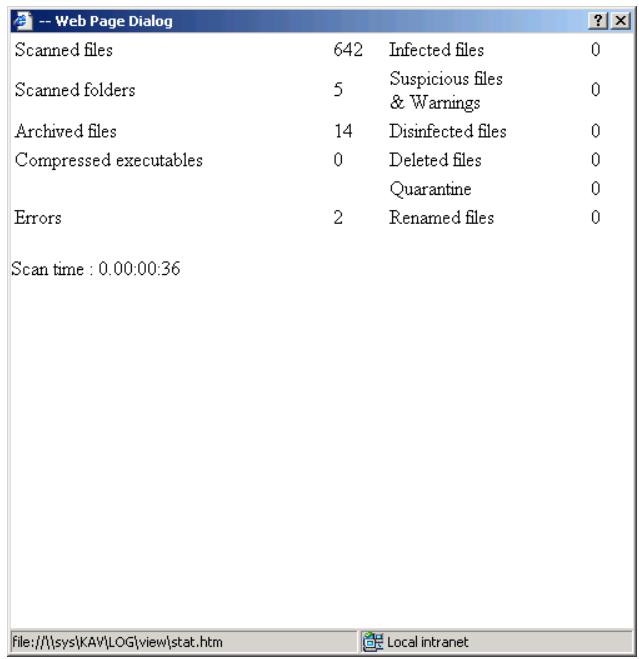
Figure 30. The server scanning statistics window
7.3. Summarized results of the task execution
With the XML logs you can create and view composite logs with information about the results of several tasks. Different logs are created for the server updating and scanning tasks.
In order to create a composite log with the results of several server updating/scanning tasks, do the following:
- In the Kaspersky Anti-Virus 5 name space in the console tree select the server for which tasks are to be set up. Open the shortcut menu and select the Properties item.
- In the next window, Kaspersky Anti-Virus on
, select the Task tab (see Figure 14). - Select the viewing mode corresponding to the desired task type:
Anti-Virus Database Updating Tasks.
- On Demand Scanning and Real-Time Protection Tasks.
- In the list of tasks created for the server select the group of tasks for which you wish to create a composite log. The selection is made in a standard way, using the Shift and Ctrl keys. Click on the View log button.
If only one task is selected, a click on the View log button will display the log of this task.
-
In the View log window (see Figure 31 and Figure 32) that will open set up the parameters of the composite log:
-
Specify the amount of information you need by means of checking the desired box in the Period field group. You can select all the information logged for every task – All records, or the information regarding the events logged during the specified time interval – Period.
-
Adjust the filters using the Filter group of check boxes. Check the boxes corresponding to the information to be output to the composite log. The structure of the check boxes depends on the task type. Match the log filter settings for this type of task.
-
After you finish configuring settings, click Save to create, save, and view the composite log. In the standard Save dialog box, specify the file name and location of the log. This opens a Microsoft Internet Explorer window, in which you can view the composite log.
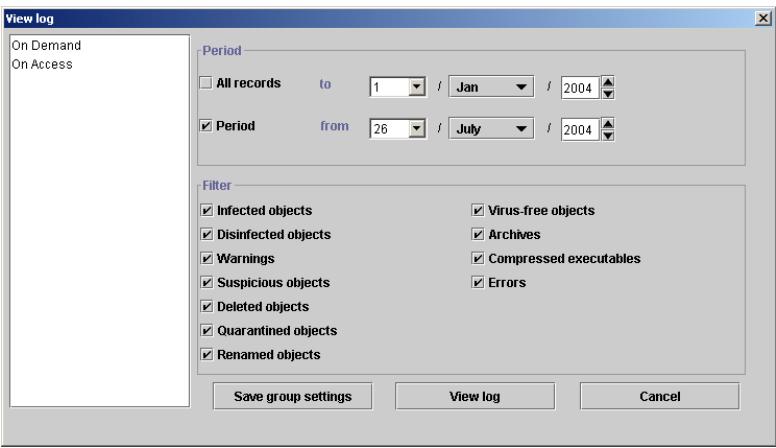
Figure 31. Setting up the parameters of the composite log with the update tasks results

Figure 32. Setting up the parameters of the composite log with the server scanning tasks results
- To create, save and view the composite log after the parameters are set, click on the Save button. In the standard file save dialog window specify the name and the path to save the file. This will create the composite log file at the specified address and start the Microsoft Internet Explorer application. The composite log of the tasks execution will be opened in the Explorer window.
The left pane of the log contains the task type and the list of selected tasks launch sessions (see Figure 27). This information includes the time, the date and the name of the task.
Except for this, the composite log is similar to the logs created for this type of task and can be used in the same way.
If you only wish to view the composite log, without saving it to a separate file, click the View log button in the View log window. This will launch Microsoft Internet Explorer and display the log in its window.
7.4. Notification regarding detected viruses
Kaspersky Anti-Virus can alert network users about any infected or suspicious objects detected, thus allowing the infection to be contained and preventing its further spread. The information can be sent via the Novell NetWare network or by e-mail.
The user notification procedure, information sending method, and the text of the messages to be sent are set during adjustment of the real-time server protection and on-demand scanning tasks on the E-mail notification (see section B.2.5 on page 153) and NW-Notification (see section B.2.4 on page 151) tabs.
CHAPTER 8. LICENSE
MANAGEMENT
8.1. Licensing policy
When purchasing Kaspersky Anti-Virus for Novell NetWare you conclude a license agreement with Kaspersky Lab, based on which you are granted the right to use this software on one or more computers for one year after installing it.
During the license period you are provided with the following opportunities:
- To use the anti-virus functionality of the application.
To update the anti-virus database.
To update the versions of the application. - To seek consultations on questions concerning the installation, setting up and operation of the application. The consultations can be provided on the telephone or by e-mail.
- To send any infected and suspicious objects detected to Kaspersky Lab for analysis.
The application detects the availability of the license agreement and ascertains its validity period using the license key – an integral part of any product produced by Kaspersky Lab. The application may have only one valid license key. It contains the limitations set for the operation of Kaspersky Anti-Virus. These limitations can be checked by special procedures built into the application. You can install the application and the license key on as many Novell-servers in the network as you wish, but copies above the number allowed by the license key will be inoperative.
In the event of violation of the limitations set by the license agreement, Kaspersky Lab may cancel the agreement unilaterally. In such a case, the license key number is included in the cancelled keys list, the so-called "black list". Having detected its key in the "black list", the application terminates the license key and notifies the user that the license agreement has been cancelled by Kaspersky Lab.
In the event that the user attempts to interfere in the license canceling procedure (e.g. removes the "black list" file) the application notifies the user that the license agreement has been violated and switches to the 'No features' mode until the interference effects are eliminated.
Kaspersky Anti-Virus will notify you about the license expiration two weeks prior to the expiration date. A reminder message will contain information about the expiration date of the current license key (see Figure 33).
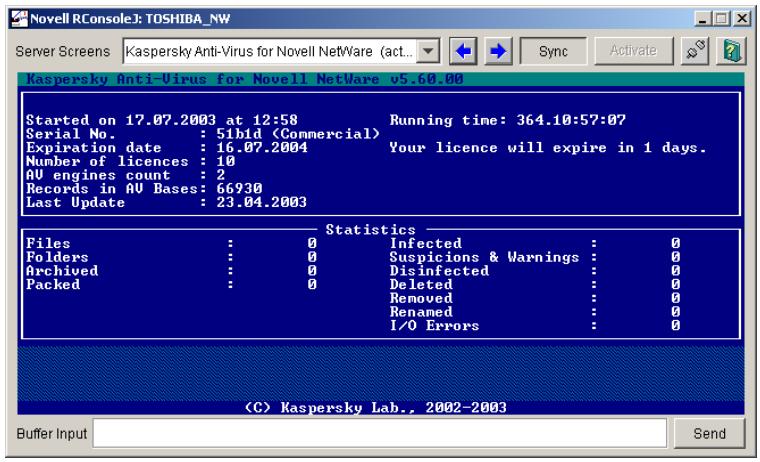
Figure 33. The server screen with a reminder message about the license expiration date
To find out the license expiration date, do the following:
Select the desired server in the Kaspersky Anti-Virus 5 name space in the console tree, open the shortcut menu and select the Properties item. The license expiration date is shown in the License expiration date field on the General tab of the Kaspersky Anti-Virus on
After the license expires, Kaspersky Anti-Virus retains its functionality except for the anti-virus database and application module update services and technical support provided by the company. During execution of the application, the screen displaying the module information will contain the message regarding the license key expiration (see Figure 34).
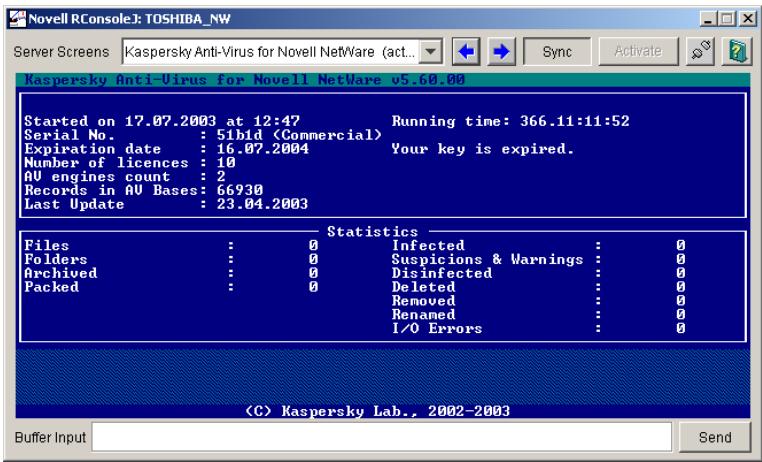
Figure 34. The server screen displaying the license expiration message
You still will be able to scan your server for viruses and disinfect any infected objects detected, but the program will use an outdated version of the anti-virus database. In such a situation, complete protection against new viruses can hardly be guaranteed.
To avoid possible infection of your computer by new viruses, you are advised to renew your Kaspersky Anti-Virus license.
To renew your license, you must purchase and install a new license. To obtain a new key:
Contact the vendor from whom you purchased the product and purchase a new Kaspersky Anti-Virus for Novell NetWare license key.
or:
purchase a new license key directly from Kaspersky Lab. To do this, send a request directly to the Sales Department of our company (sales@kaspersky.com) or fill in a form at our web site (www.kaspersky.com) in the Products Renew Your License section. Upon receipt of your payment, we will send a new license key to the email address specified in your order.
8.2. Installing the license key
To install a new license key through the Snapin for Novell ConsoleOne, do the following:
- In the Kaspersky Anti-Virus 5 namespace in the console tree, select the server whose license you wish to renew. Open the shortcut menu and select the Properties item.
- In the next window, Kaspersky Anti-Virus on
, select the General tab. - Click the Register license key button.
To install a new license key using the web management module,
- In the Kaspersky Anti-Virus 5 namespace, select a server for which you want to renew the license. Open the shortcut menu and click the Register license key option.
-
This will open the License key for Kaspersky Anti-Virus window (see Figure 35) with a list of license keys installed on this server. The following information is displayed for each key:
-
File name - name of the license key file.
Serial number. - Number of licenses - number of Novell servers in the LAN on which Kaspersky Anti-Virus applications can be running at the same time.
Validity period- license expiry date.
Application - product name. - Type - the type of installed key, e.g. commercial, trial etc.

Figure 35. The License key for Kaspersky Anti-Virus window
Click on the Add key button and in the Select a License Key window (see Figure 36) specify the file of the key you wish to install (.key).
If the key is selected correctly its file will be added to the list of Kaspersky AntiVirus keys. Select it in the list and click on Apply.
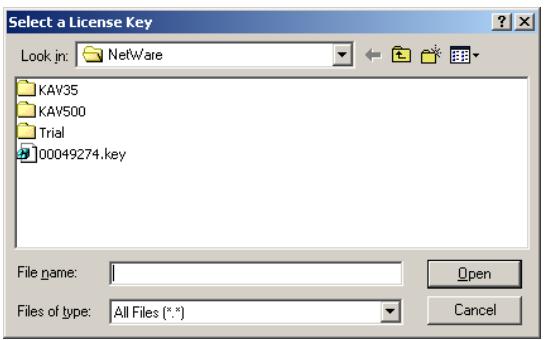
Figure 36. Selecting the key file
After this, the license validity period will be extended until the expiry date for the new license key.
If the new license key is installed before the current one expires, the new key will have effect from the current expiration date.
CHAPTER 9. MANAGING KASPERSKY ANTI-VIRUS USING KASPERSKY ADMINISTRATION KIT
Kaspersky Administration Kit is a system for centralized management of antivirus security system based on the applications included into the Kaspersky Anti-Virus Business Optimal suite.
Kaspersky Anti-Virus for Novell NetWare is one of Kaspersky Lab applications, which can be managed through either the application interface (as described in the earlier chapters) or using Kaspersky Administration Kit (if your computer is a member of the system of remote centralized management).
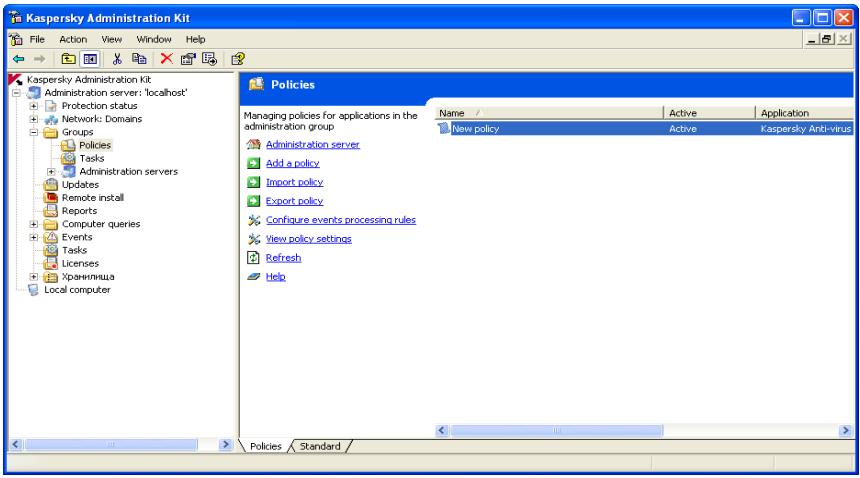
Figure 37. The Administration Console of Kaspersky Administration Kit
To manage the application through Kaspersky Administration Kit, the administrator creates and configures policies, tasks, and application settings. Protection is provided based on these settings.
Centralized management is provided by grouping several computers together and managing their settings through group policies.
A policy is a set of Kaspersky Anti-Virus settings defined at the group level of the logical network.
Using policies, the administrator can fully manage anti-virus protection because policies include both Kaspersky Anti-Virus settings and task settings (except only the settings that should take effect at task startup, for example, task schedule settings).
A policy might also limit or prohibit changes of task or applications settings. The administrator can apply these limits from either the local ConsoleOne interface, web interface, or Kaspersky Administration Kit interface.
A task is a named action performed by the application. According to functionality, tasks are divided into the following types:
Real-time protection task;
- On-demand scan task;
- Database updating task;
Install license key task.
Every task has own task settings, which are settings of Kaspersky Anti-Virus used to perform the task.
Application settings are additional settings of Kaspersky Anti-Virus.
9.1. Managing policies
This section describes how to create and configure a policy for Kaspersky Anti-Virus for Novell Netware.
9.1.1. Creating a policy
To create a policy, do the following:
- In the Groups node of the console tree, select a group of computers to which you want to apply the new policy.
- Right-click the Policies node inside the selected group and choose Create Policy from the shortcut menu. You will see a dialog box for creating a new policy.
Policies are created using a Microsoft Windows wizard in several steps. To move to a next step or to a previous step, use the Next and Back buttons. To finish creating a policy, click Finish at the last step. To exit the wizard, click Cancel at any step.
At any step during creation of a new policy, you can lock policy settings from changes by clicking the icon. If the lock icon is closed, only the settings of the policy you are creating now will take effect on client computers (if the policy is applied to them).
1. Specifying general information about the policy
The first step of the New Policy wizard is an introductory step. In the first dialog box, specify the name of the policy (Name field) and in the second dialog box, select the Kaspersky Anti-Virus for Novell NetWare application from the Application name drop-down list. To enable the policy immediately after its creation, select the Enable policy checkbox.
2. Specifying CPU usage settings
At this step, you can specify how much of the server CPU resources can be consumed by Kaspersky Anti-Virus. The lower the CPU usage, the slower Kaspersky Anti-Virus works when executing the on-demand scan task.
You can also specify the number of antiviral engine copies concurrently loaded when the Kaspersky Anti-Virus module is started on the server. This value defines the number of files that can be scanned for viruses simultaneously. Using this option, you can increase the speed of anti-virus scans.
In the CPU usage settings dialog box (see Fig. 38), you can select the level of CPU usage and define the number of anti-virus kernel copies (see section A.3 on page 115).
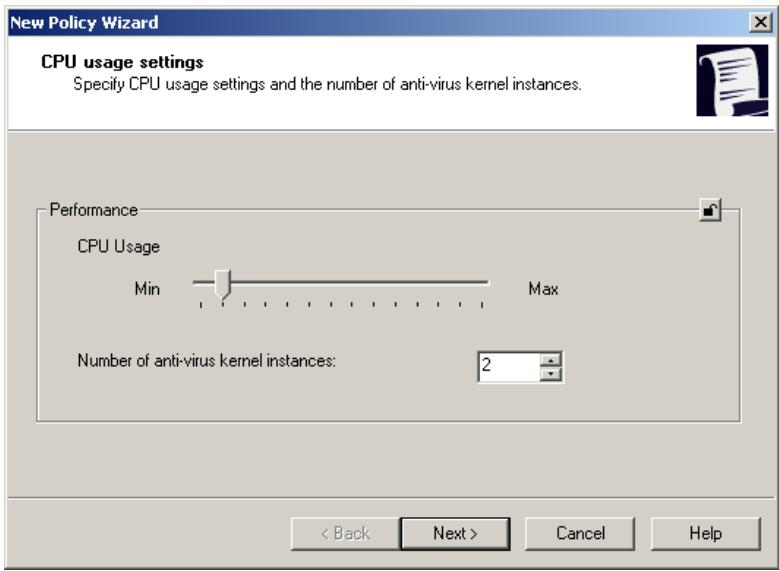
Figure 38. Specifying CPU usage
3. Selecting updating source
At this step, you can specify the database updating source and connection settings. As an update source, you can select either Kaspersky Administration Kit or a Kaspersky Lab update server.
In the Updating source dialog box (see Fig. 39), select a source from which to retrieve database updates. If an FTP- or HTTP-server of Kaspersky Lab is selected, the following buttons become active:
- Add - add a new updating source in a new dialog box.
- Connection settings - configure proxy settings in a new dialog box.
The settings are similar to those used when configuring the application via its local interface (see section B.1.4 on page 131).
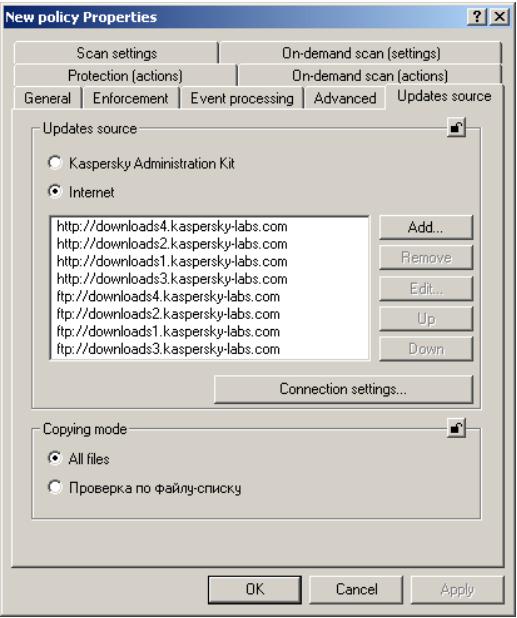
Figure 39. Selecting an updating source
4. Specifying actions for the real-time protection task
The real-time protection task is a set of actions and settings that protect your computer from unauthorized access from the external network.
In the Actions for the real-time protection task (see Fig. 40) dialog box, you can specify the actions for the application to perform on infected objects and on the objects that could not be disinfected. Using the Allow deleting or renaming archives checkbox, you can prohibit / allow the actions to be applied to archives that were flagged by Kaspersky Anti-Virus as suspicious (see section B.2.2 on page 144).
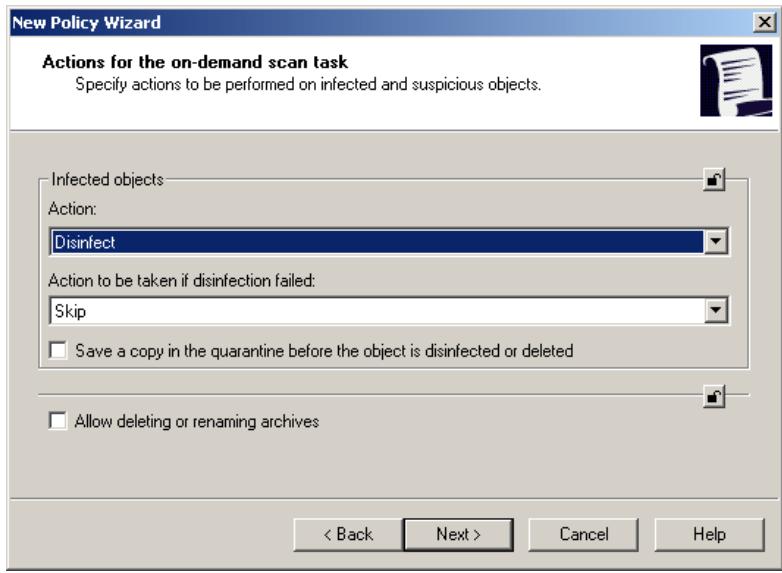
Figure 40. Specifying actions for the real-time protection task
5. Specifying actions for the on-demand scan task
The on-demand scan task is a set of actions and settings that protect your computer from viruses based on preset schedule.
In the Actions for the on-demand scan task dialog box (see Fig. 41), you can specify the actions for the application to perform on infected objects and on the objects that could not be disinfected. You can also prohibit / allow the actions to be applied to archives that were flagged by Kaspersky Anti-Virus as suspicious (see section B.2.2 on page 144).
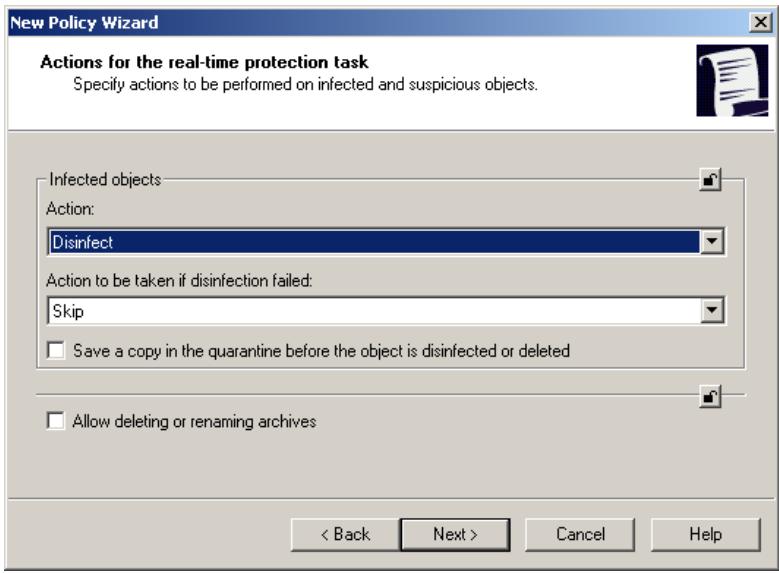
Figure 41. Specifying actions for the on-demand scan task
6. Specifying the method of first policy enforcement
At this step, in the Policy enforcement dialog box (see Fig. 42), you can specify how this policy will be enforced for the first time on the user computer:
- Do not modify local settings – the local settings that are locked by the new policy will be changed after the policy is applied for the first time. After the policy is deleted, the original values of these settings are restored. The settings that are not locked by the policy will not change after the policy is applied. The values of settings can be modified through the local application interface. After the policy is deleted, the original values are not restored.
- Apply mandatory policy settings to the local settings on the first policy application – the local settings that are locked by the new policy will be changed after the policy is applied for the first time. After the policy is deleted, the original values of these settings are not restored. The settings that are not locked by the policy will not change after the policy is applied. The values of settings can be modified through the local application interface. After the policy is deleted, the original values are not restored.
- Apply all policy settings to the local settings on the first policy application – the local settings that are locked by the new policy will be changed after the policy is applied for the first time. After the policy is deleted, the original values of these settings are not restored. The settings that are not
locked by the policy will also change after the policy is applied. The values of settings can be modified through the local application interface. After the policy is deleted, the original values are not restored.
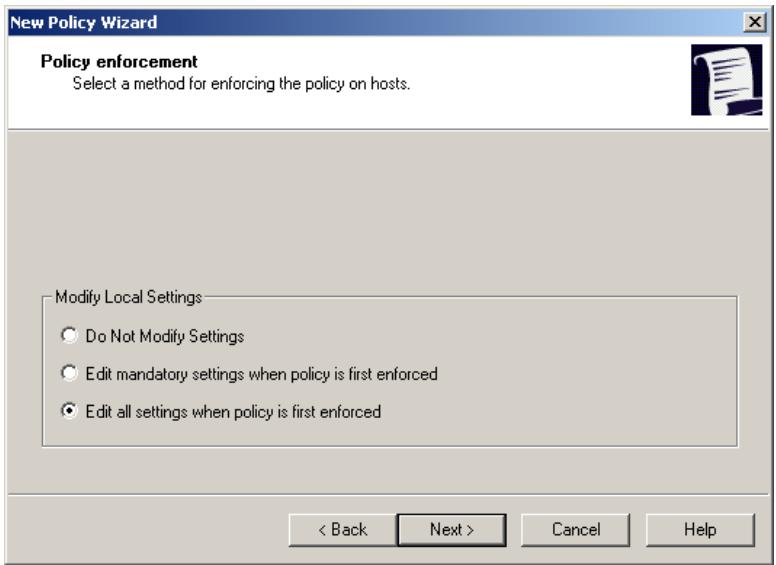
Figure 42. Specifying the method of the first policy enforcement
7. Finishing creating a policy
The last wizard dialog box (see Fig. 43) informs you that the new policy has been successfully created.
After you exit the wizard, the policy for Kaspersky Anti-Virus 5.7 for Novell Netware is added to the Policies folders for the corresponding group and displayed in the results pane.
For this policy, you can configure its settings and lock local settings using the icon. The user will be unable to modify the locked settings through the local interface of Kaspersky Anti-Virus. The policy will take effect on client computers during the first synchronization of the clients with the Administration Server.
Using the Copy/Paste, Cut/Paste, and Delete commands on the context menu and the Actions menu, you can move policies from one group to another and delete them.
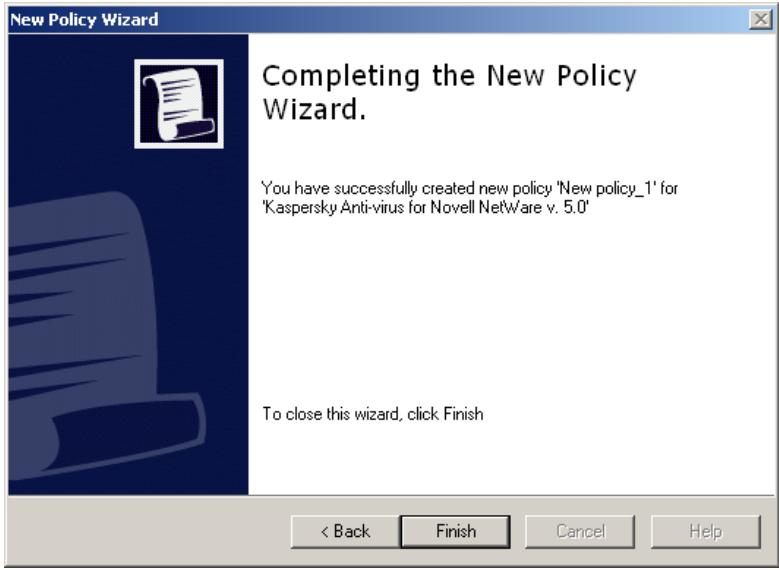
Figure 43. Finishing creating a policy
9.1.2. Viewing and editing policy settings
You can modify a policy, lock policy settings for nested groups, and lock application and task settings.
- In the Groups node of the console tree, select a group of computers for which you want to edit policy settings.
- For the selected group, select the Policies node. The details pane will display all policies created for this group.
- In the list of policies, select the policy for Kaspersky Anti-Virus for Novell NetWare (the application name is shown in the Application field).
- In the context menu, select Properties.
A dialog box with the policy settings for this application opens.
The General, Enforcement, and Events tabs are standard tabs for Kaspersky Administration Kit (see the Administrator's Guide for Kaspersky Administration Kit).
Other tabs contain settings specific for Kaspersky Anti-Virus for Novell NetWare. Below you can see descriptions of each of these tabs.
When editing the policy, use the icon to lock the policy settings from modifications through the local interface. The user will be unable to modify the locked settings through the local interface of Kaspersky Anti-Virus.
9.1.2.1. Viewing information about the application
On the General tab (see Fig. 44), you can see the general information about the policy: policy name, application name, application version, date and time of policy creation, and the date and time when the policy was last modified.
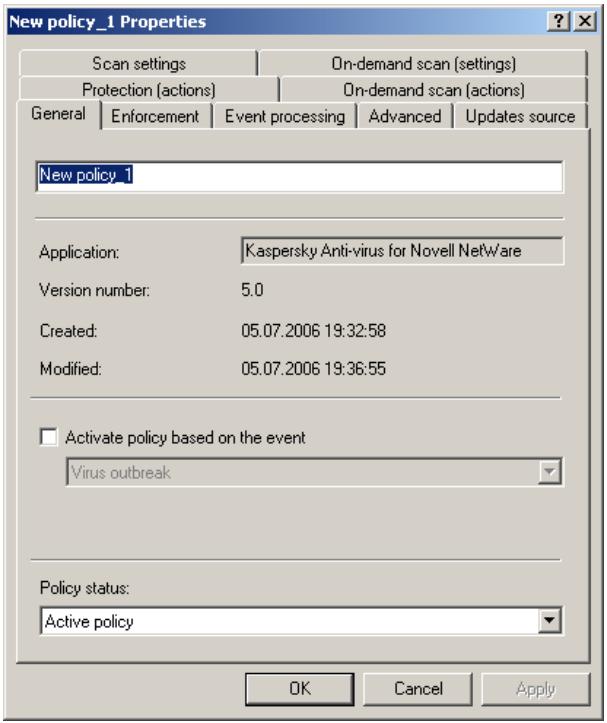
Figure 44. The General tab
In this window, you can change the policy name, enable or disable the policy, and configure the policy to be enabled upon a specified event.
9.1.2.2. Viewing policy enforcement results
The Enforcement tab (see Fig. 45) displays the statistics of policy enforcement on the computers in the group, such as the number of computers on which this policy was:
created;
enforced;
- pending;
- failed.
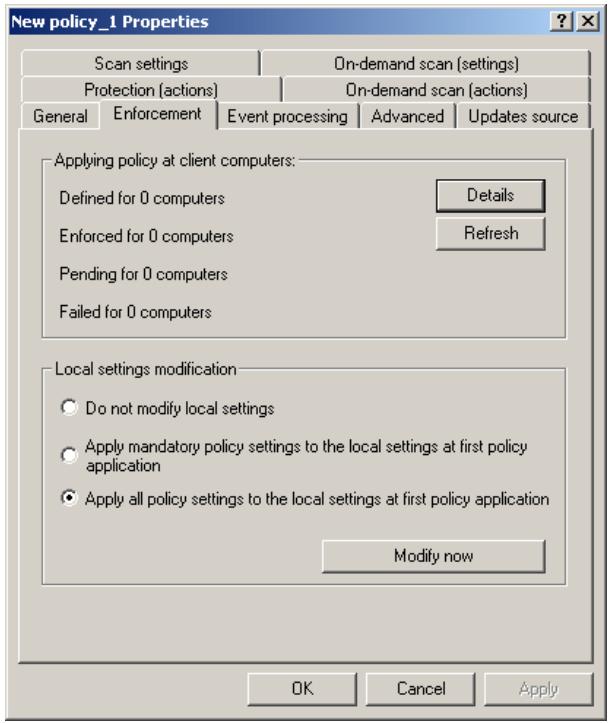
Figure 45. The Enforcement tab
Click the Details button to see detailed information about policy enforcement for each computer (see the Administrator' Guide for Kaspersky Administration Kit 5.0).
9.1.2.3. Configuring event logging settings
During operation, Kaspersky Anti-Virus generates a list of events, and each of these events is characterized by the level of event importance. There are four severity levels for events: critical event, failure, warning, and information.
Depending on the situation, events of the same type can have a different severity level.
The Event processing tab (см. рис. 46) displays the types of events that might occur during application performance and be logged in the report. You can also see and edit the log file location and the settings for notifying the administrator and / or other users.
To view the types of events, select the desired severity level from the Severity level drop-down list. The types of events for the selected level will be displayed below.
For each event, you can specify whether to include this event in the report and notify the administrator upon this event.
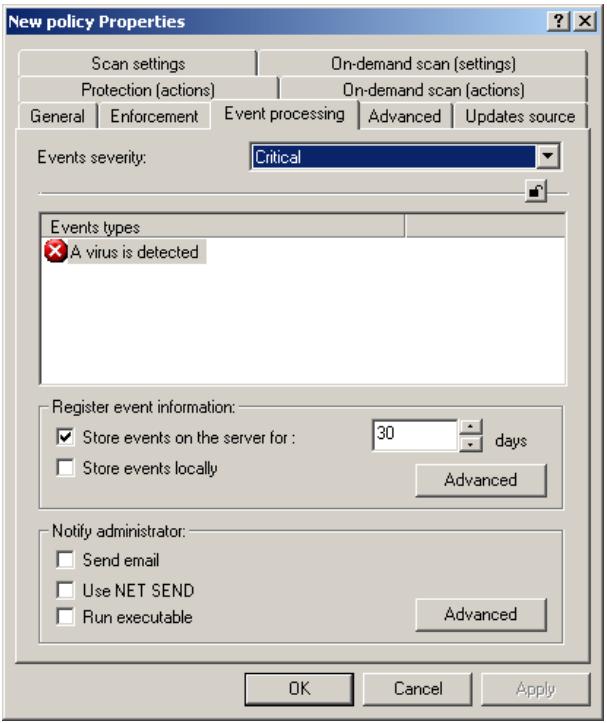
Figure 46. The Event processing tab
For more information about the settings on the Event processing tab, see the Administrator' Guide for Kaspersky Administration Kit 5.0.
9.1.2.4. Specifying CPU usage during scans
On the Advanced tab (see Fig. 47), you can specify the how much of the server CPU resources can be consumed by Kaspersky Anti-Virus. The lower the CPU usage, the slower Kaspersky Anti-Virus works. This window also displays the number of antiviral engine copies concurrently loaded when Kaspersky Anti-Virus is started on the server. This value defines the number of files that can be scanned concurrently (see section A.3 on page 115).
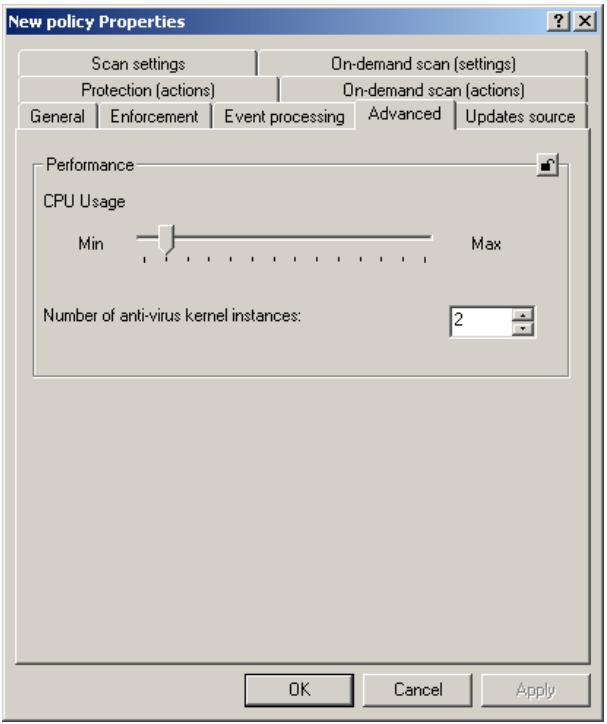
Figure 47. The Advanced tab
9.1.2.5. Selecting the updating source for the anti-virus database
On the Updating source tab (see Fig. 48), you can select the updating source and specify connection settings. As an updating source, you can select either
Kaspersky Administration Kit or a Kaspersky Lab update server. You can also set the mode of anti-virus database copying from the source: copy all available updates or only modified.
In this window, click the Connection settings button to configure proxy server settings (see section B.1.4 on page 131).

Figure 48. The Updating source tab
9.1.2.6. Configuring settings for the on-demand scan task
On the Scan settings tab (see Fig. 49), you can define settings for scanning the server for viruses on demand. Specify the scan area by selecting the type of files to scan from the drop-down list:
All files
- Files infectable by extension
- All infectable files
You can define the types of files to be excluded from scans. For this, select the Excluded files checkbox and specify the list of exclusions.
You can also specify the additional scan modes, such as scanning mail databases, archives, packed executable files, plain mail files, and whether to use an heuristic code analyzer (see section B.2.1 on page 139).
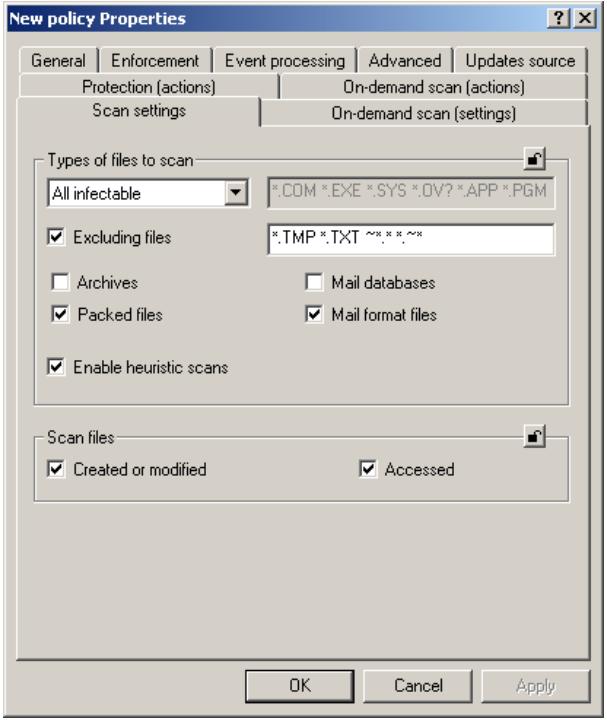
Figure 49. The Scan settings tab
9.1.2.7. Selecting actions for the on-demand scan task
On the Actions tab (see Fig. 50), you can specify the actions to be performed on:
- Infected and suspicious files detected during scans
- Objects that could not be disinfected
-
Infected workstation, which attempted to transfer an infected file to the server
-
Suspicious archives (see section B.2.2 on page 144).
To specify an action on infected objects, select one of the following items from the drop-down list:
- Skip - do not apply any actions.
Disinfect - Delete
- Move to the quarantine - move the file to the quarantine directory.
- Rename - change the file extension to .vir (or .vi1, .vi2 etc, if a file with the same name exists).
If disinfection of an infected object failed, select one of the following:
- Skip - leave the file intact and save the information about it in the log.
- Delete
- Rename - save the file under another name.
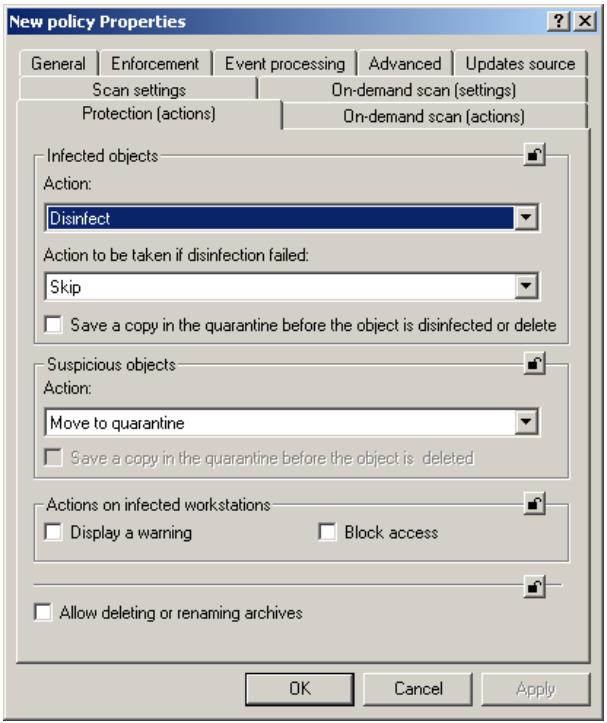
Figure 50. The Actions tab
9.1.2.8. Configuring settings for the real-time protection task
On the Scan settings tab (see Fig. 51), you can define settings for scanning the filesystem for viruses. Specify the scan area by selecting the type of files to scan from the drop-down list:
All files
- Files infectable by extension
- All infectable files
You can define the types of files to be excluded from scans. For this, select the Excluded files checkbox and specify the list of exclusions.
You can also specify the additional scan modes, such as scanning mail databases, archives, packed executable files, plain mail files, and whether to use an heuristic code analyzer (see section B.2.1 on page 139).
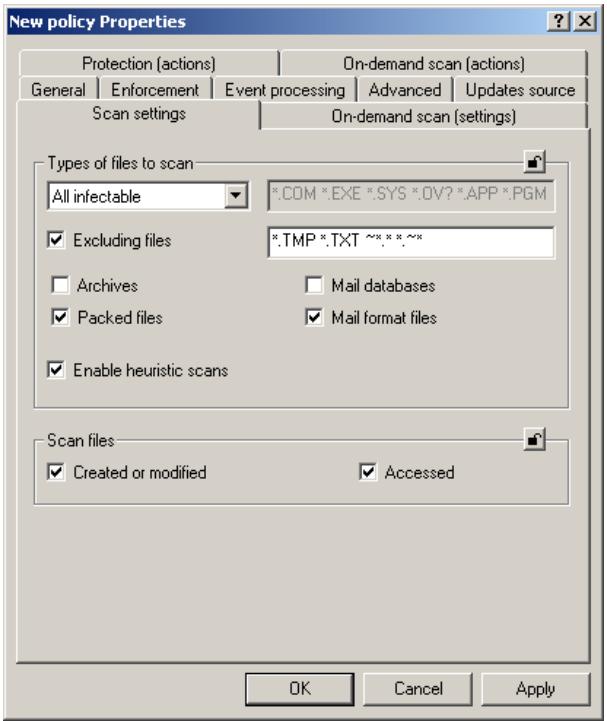
Figure 51. The Scan settings tab
9.1.2.9. Selecting actions for the real-time protection task
On the Actions (see Fig. 52), you can specify the actions to be performed on:
- Infected and suspicious files detected during scans
- Objects that could not be disinfected
- Infected workstation that attempted to transfer an infected file to the server
- Suspicious archives (see section B.2.2 on page 144).
To specify an action on infected objects, select one of the following items from the drop-down list:
- Skip - do not apply any actions.
Disinfect - Delete
- Move to the quarantine - move the file to the quarantine directory.
- Rename - change the file extension to .vir (or .vi1, .vi2 etc, if a file with the same name exists).
If disinfection of an infected object failed, select one of the following:
- Skip - leave the file intact and save the information about it in the log.
- Delete
- Rename - save the file under another name.
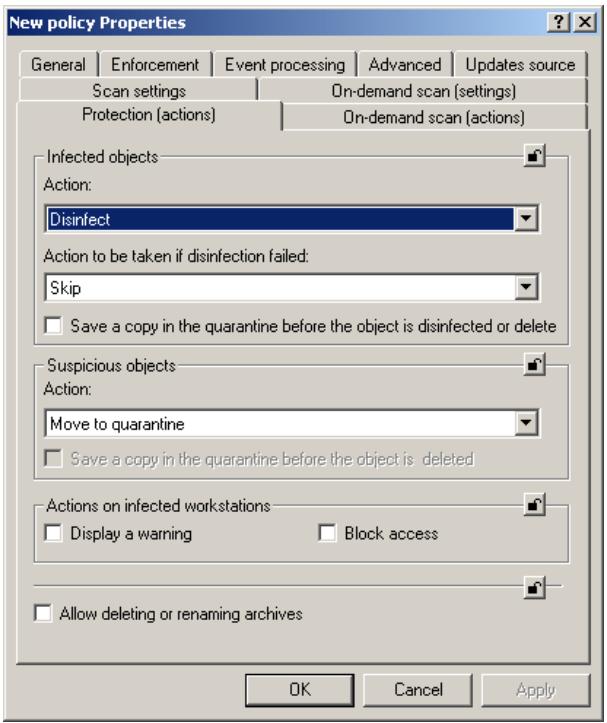
Figure 52. The Actions tab
9.2. Managing application settings
- Using application settings, you can modify the settings for Kaspersky Anti-Virus either for separate client computers in a group or for the local computer. You can modify only the settings that are not locked by a policy (see section 9.1 on page 79).
To modify policy settings:
- In the Groups node, select a folder with the name of the group that contains your client computer.
- In the details pane, select the computer for which you want to modify application settings. Choose Properties in the context menu or on the Actions menu.
To modify the settings of the anti-virus application installed on your client computer, in the console tree select Local computer (see Fig. 37) and choose Properties in the shortcut menu.
- As the result, the Properties:
dialog box opens in the application main window. Select the Applications tab (see Fig. 53). On this tab, you can see a full list of Kaspersky Lab applications installed on this client computer.
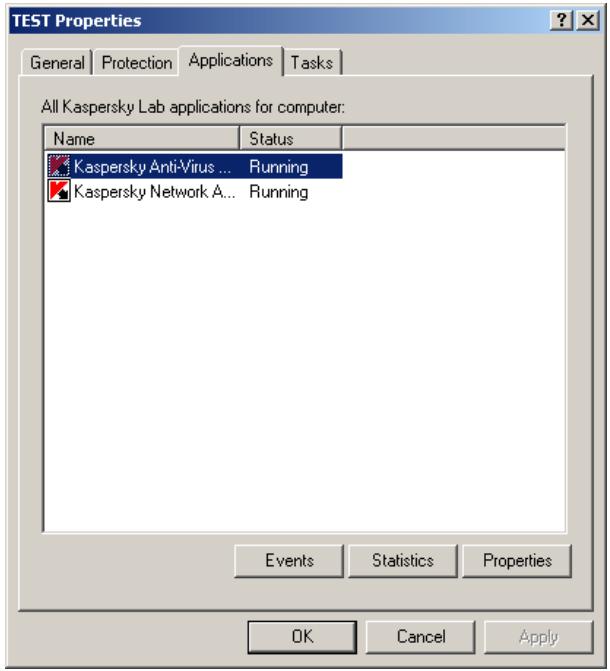
Figure 53. The dialog box displaying the client computer properties. The Applications tab
-
Select Kaspersky Anti-Virus for Novell NetWare. Under the list, you can see the following buttons:
-
Events - view all events that occurred on the client computer and registered on the Administration Server.
- Statistics - view statistic information on application performance.
Properties - configure the application in the new dialog box Properties of Kaspersky Anti-Virus for Novell NetWare.
9.2.1.1. Viewing the information about the application
On the General tab (see Fig. 54), you can view the information about Kaspersky Anti-Virus 5.7 for Novell NetWare.
The upper part of the window displays the name of the installed application, its version number, installation date, its status (stopped or running on the local computer), and the anti-virus database status.
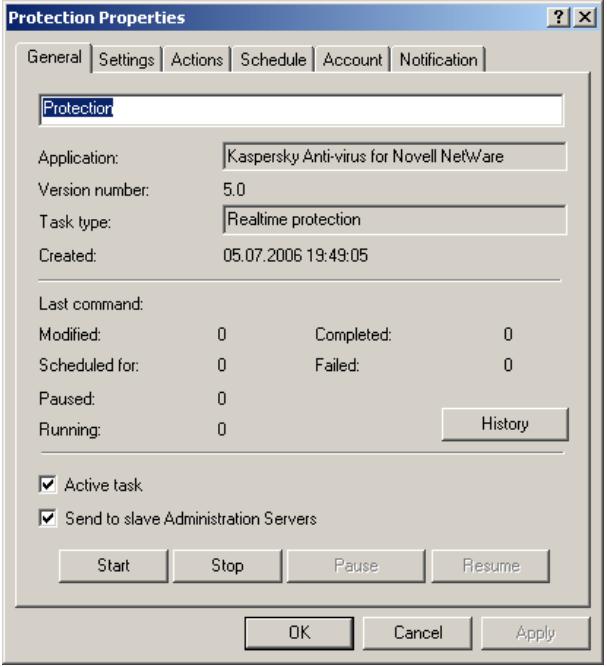
Figure 54. The dialog box with application properties. The General tab
9.2.1.2. Viewing the information about the location of objects
The Folders tab (see Fig. 55) displays the location of the directories used by the application, such as the directory containing the current anti-virus database and its backup copy, the quarantine folder for infected and suspicious objects, the temporary files folder, and the folder that stores database updates.
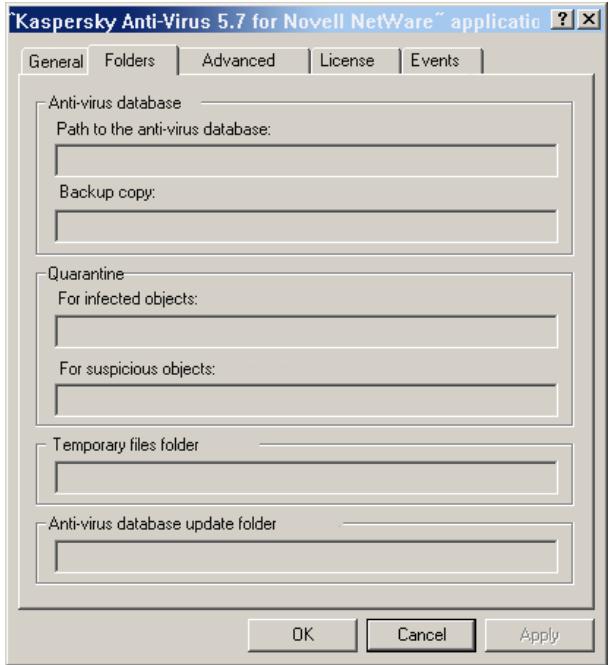
Figure 55. The Folders tab
9.2.1.3. Viewing connection settings and CPU usage
The Advanced tab (see Fig. 56) displays information about the parameters for communication with the server and application performance settings.
The following connection parameters are provided in the Information section:
- Server IP address - numeric IP address of the server.
- Port - decimal number of communication port used for connection with the Kaspersky Anti-Virus module. The default value is 8195.
- Port (for updating) - decimal number of communication port used to connect with the Anti-virus database updating module. The default value is 8196.
The CPU usage scale specifies how much of the server CPU resources can be consumed by the Kaspersky Anti-Virus module. The lower the CPU usage, the slower the Kaspersky Anti-Virus module works.
The Number of anti-virus kernel instances field specifies the number of antiviral engine copies concurrently loaded when the Kaspersky Anti-Virus module is started on the server. This value defines the number of files that can be scanned for viruses simultaneously (see section A.3 on page 115).
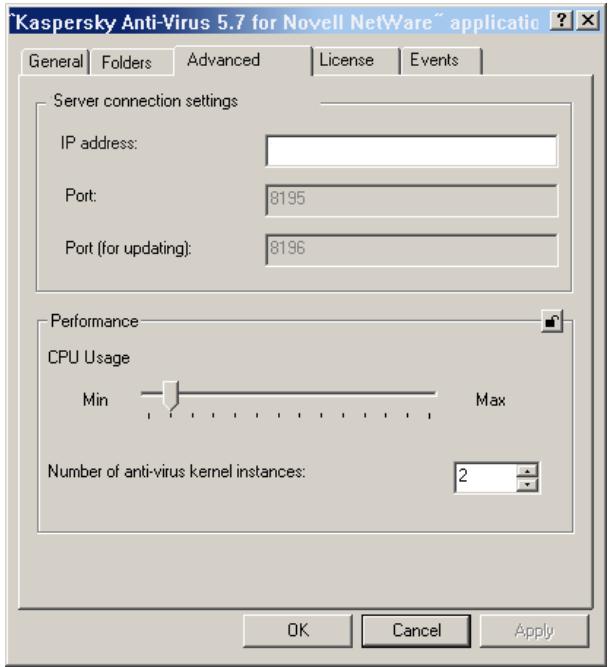
Figure 56. The Advanced tab
9.2.1.4. Viewing information about license keys
The Licenses tab (see Fig. 57) displays information about the current or backup license keys installed on this computer. You can also view the type of the key, its validity period, and limitations. The dates of key activation and expiry are also shown for the current license key.
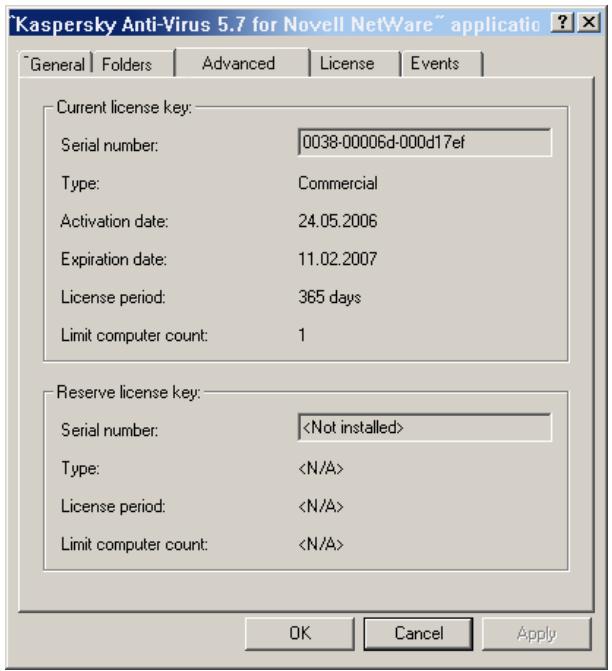
Figure 57. The Licenses tab
9.2.1.5. Viewing information about events
When loaded, Kaspersky Anti-Virus generates specific events. Each event is characterized by the level of its importance, or severity. Events can be of the following severity levels: critical event, failure, warning, and informational events.
The events of the same type can be of different severity levels, depending on the situation when this event occurred.
The Events tab (see Fig. 58) shows the types of events that occur during application performance and are recorded in a log file, the location of the log file, and the settings for notifying the administrator and / or other users about the event.
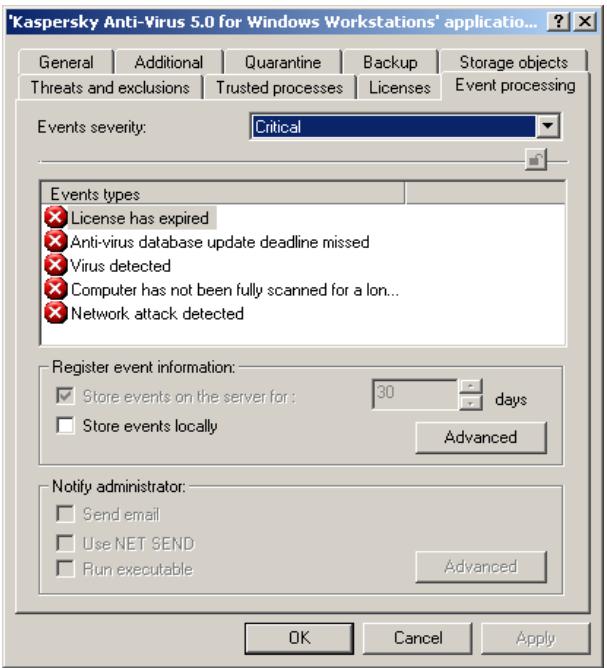
Figure 58. The Events tab
9.3. Managing tasks
Several system tasks are created during the installation of Kaspersky Anti-Virus. These tasks include (see Fig. 59) the real-time protection task, on-demand scan task, license key installation task, and anti-virus database updating task.
Only once instance of a system task is created for each server. You can start these tasks, edit their settings, and schedule them to start automatically. Note that these tasks cannot be deleted!
In addition to the mandatory system tasks, you can create and run user tasks, for example, the license key installation task when you need to renew your license for Kaspersky Anti-Virus for Novell NetWare.
- To view and manage tasks:
- In the Groups node, select the group that includes your client computer.
- Select the computer on which you want to modify task settings. Click Properties on the context menu or the Actions menu.
To view and edit the tasks for an application installed on your local computer, in the console tree select Local computer (see Fig. 59) and choose Properties on the contextual menu of this folder.
- Open the Tasks tab (see Fig. 59). This tab lists all tasks created for this computer.
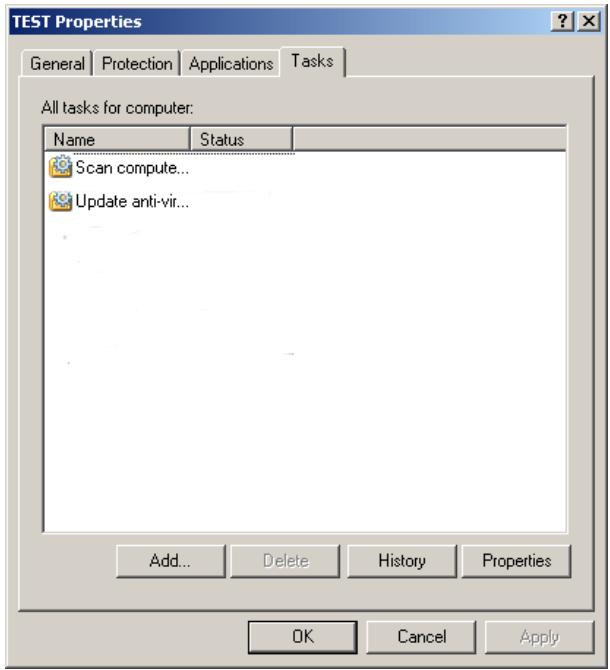
Figure 59. Viewing the properties of a client computer. The Tasks tab
The lower part of the window contains buttons used to manage tasks. To create a new task, click Add (for more information about creating tasks, see the Administrator's Guide for Kaspersky Administration Kit 5.0). To delete a task, click Delete.
To view and edit task settings, click Properties to open the Task Properties:
Other tabs for all tasks are similar:
- General - view general information about the task, start or stop the task.
-
Schedule - create a schedule for the task to run.
-
Account - configure the task to run under a privileged user account (for details, see the Administrator's Guide for Kaspersky Administration Kit 5.0).
- Notification - configure sending notifications to the administrator with the results of task performance (for details, see the Administrator's Guide for Kaspersky Administration Kit 5.0).
9.3.1. Configuring specific task settings
9.3.1.1. Specifying the settings specific to updating the anti-virus database
The following settings are configured only for the task of updating the anti-virus database:
- Updating source
- Connection settings
Viewing a list of recipient servers
On the Updating source tab (see Fig. 60), you can select the updating source and specify connection settings. As an updating source, you can select either Kaspersky Administration Kit or a Kaspersky Lab update server. You can also set the mode of anti-virus database copying from the source: copy all available updates or only modified.
On this tab, you can define the above settings and configure proxy server settings by clicking the Connection settings button (see section B.1.4 on page 131).
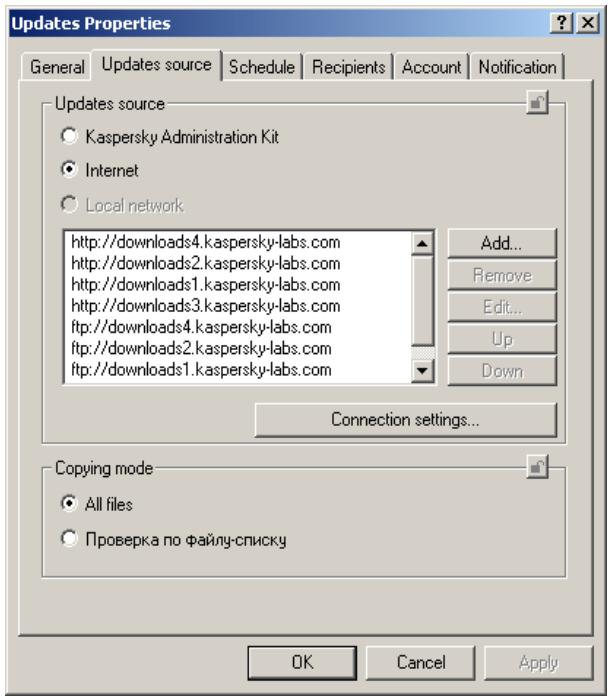
Figure 60. The task of updating the anti-virus database. The Updating source tab
The Recipients tab (see Fig. 61) contains a list of servers which will receive database updates (for details, see section B.1.1 on page 122).
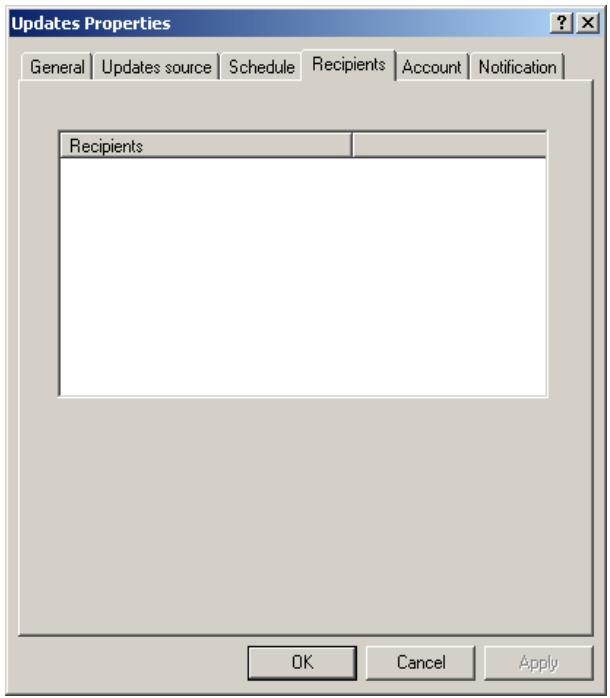
Figure 61. The task of updating the anti-virus database. The Recipients tab
9.3.1.2. Configuring specific settings for the on-demand scan and real-time protection tasks
The following settings are configured only for the real-time protection and on-demand scan tasks:
- Scan scope
- Types of files to scan
Additional scan modes - Actions on infected and suspicious objects
- Actions on suspicious archives
On the Scan settings tab (see Fig. 62), you can define the scan scope (and, if necessary, the scope excluded from scans) and the types of files to scan. You
should also specify additional scan options, such as scanning mail databases, archives, and packed files, plain mail files, and using an heuristic code analyzer (see also section B.2.1 on page 139).
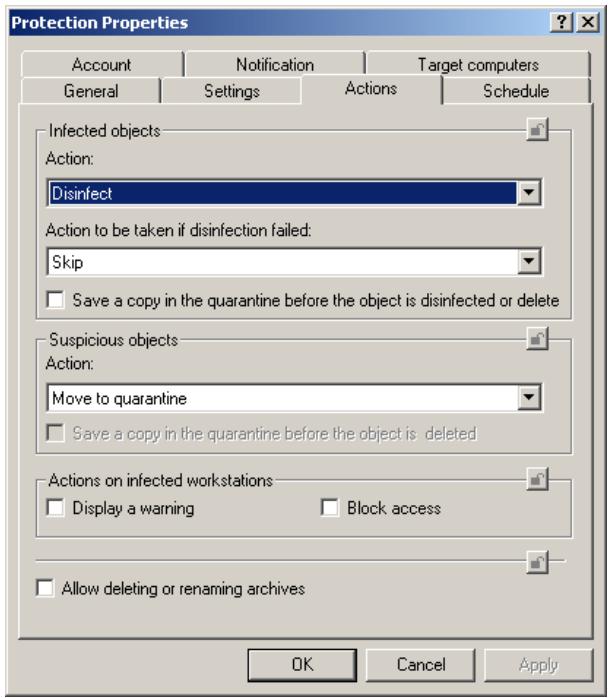
Figure 62. Real-time protection and on-demand scan tasks. The Scan settings tab
On the Actions tab (see Figs. 63 and 64), you can select an action to be performed on the following objects:
- Infected and suspicious files if they are detected
- Objects that failed to be disinfected
- Infected workstation that attempted to transfer an infected file to the server (for the real-time protection task)
- Suspicious archives (see section B.2.2 on page 144).
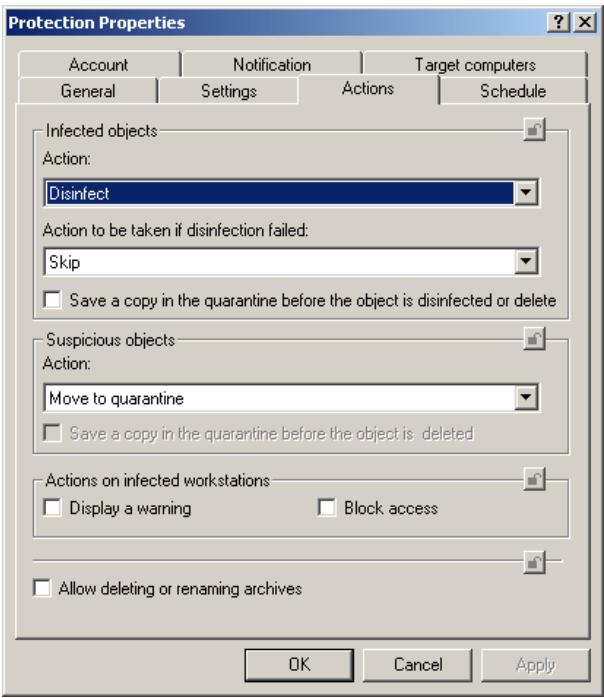
Figure 63. The real-time protection task. The Actions tab
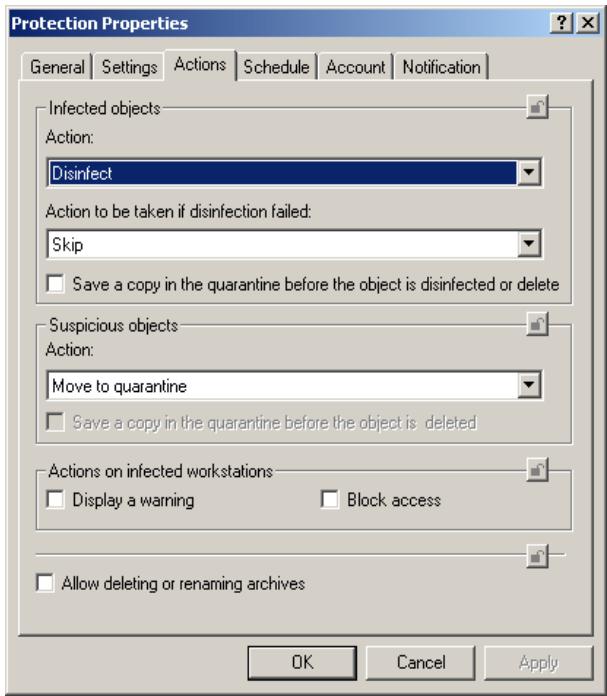
Figure 64. The on-demand scan task. The Actions tab.
9.3.1.3. Configuring specific settings for the license key installation task
On the Settings tab (see Fig. 65), you can install a license key, view information about the current license and its expiry date (for more information about managing licenses, see Chapter 8 on page 73).
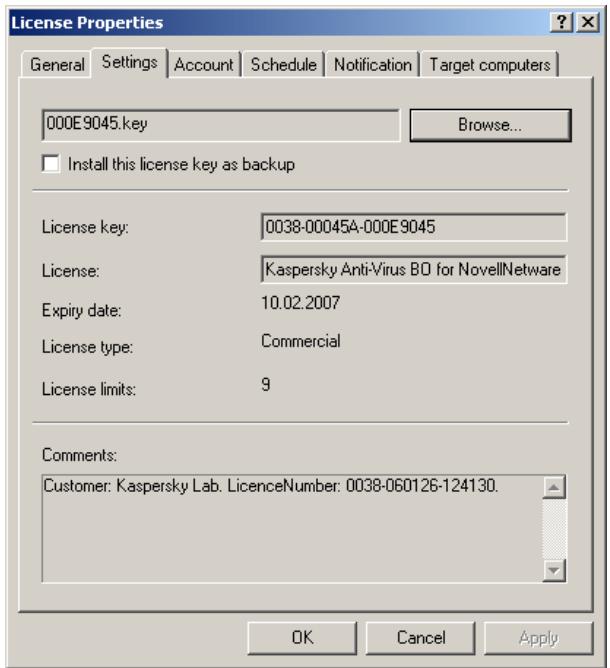
Figure 65. The license installation task. The Settings tab
9.3.2. Starting and stopping tasks
Tasks can be started only if the application is running. When you close the application, all running tasks are terminated.
Tasks are started in accordance with their schedules. You can temporarily disable the start of scheduled tasks. In this case, the tasks are not deleted, but they will not start at the specified time.
In addition, you can start tasks manually from the dialog box that displays a list of all tasks (see Fig. 59) and from the dialog box with task settings.
You can also run or stop a task by choosing the Start / Stop commands in the context menu.
To manually start / stop a task:
Right-click a task in the list (see Fig. 59) and choose Start / Stop in the shortcut menu.
You can also start and stop tasks from the task settings window on the General tab (see Fig. 66).
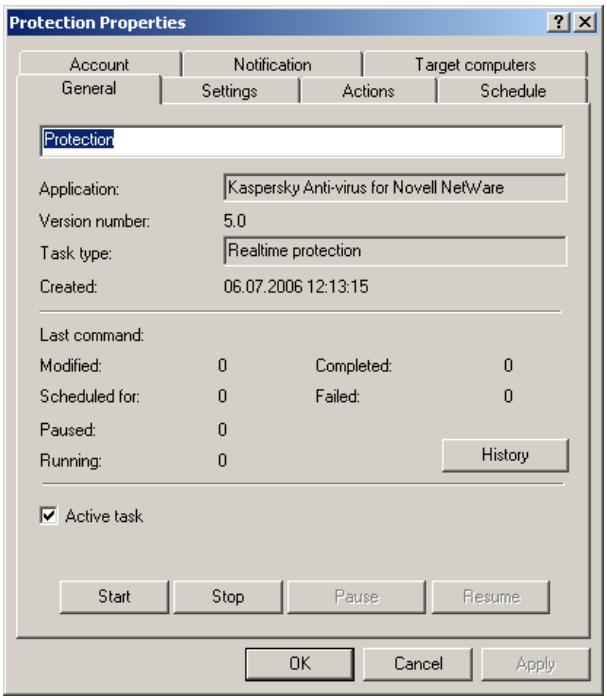
Figure 66. Configuring task settings. The General tab
APPENDIX A. APPLICATION SETTINGS
A.1. The General Tab
Attention! This tab is unavailable in the Web management module. The information about the application is displayed in the module window if a server is selected in the console tree.
On the General tab (see Figure 67) you can review general information about the Kaspersky Anti-Virus module, start/stop the application on the server and renew the license (register a new license key).
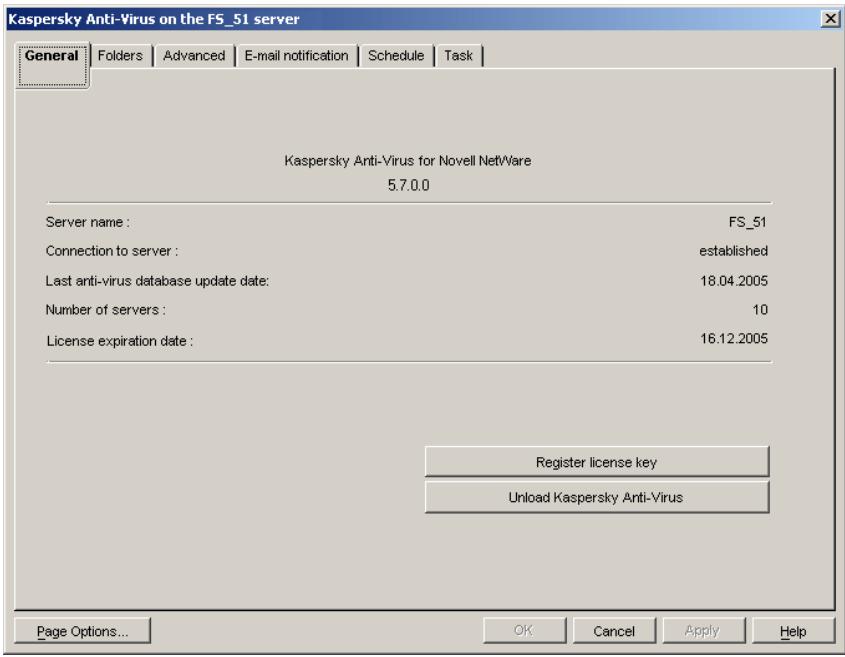
Figure 67. Configuring the application. The General tab
The upper part of the General tab contains the name of the application, its version, and the following information:
- Server name - the name of the server on which the Kaspersky AntiVirus module is installed.
- Connection to server - availability of connection between the Snapin for ConsoleOne and the server. This string can have the following values: Established - the Snapin for ConsoleOne has established connection with Kaspersky Anti-Virus; Not established - the Snapin for ConsoleOne has failed to connect to Kaspersky Anti-Virus.
- Last anti-virus database update date – the date of the previous update of the server's anti-virus database.
- Number of server - the number of Kaspersky Anti-Virus applications concurrently running on Novell NetWare servers in the LAN. This corresponds to the number of servers specified in the license key.
- License expiration date - expiry date of the license for Kaspersky AntiVirus for Novell NetWare.
In the lower part of the tab, you can see the following two buttons:
- Register license key - register a new license key.
- Unload Kaspersky Anti-Virus - start/stop the Kaspersky Anti-Virus module on the server.
In the web module, the Load Kaspersky Anti-Virus / Unload Kaspersky AntiVirus buttons are available as shortcut menu options. To open the shortcut menu, select a server in the tree and click your right mouse button. If you are using the web module, the license key can be installed only during the installation of Kaspersky Anti-Virus.
A.2. The Folders Tab
The Folders tab (see Figure 68) displays information regarding the location of the directories used by the application.
The Current database field in the Anti-virus database storage folders group contains the path to the directory where the current version of the anti-virus database used for the scanning is stored. The Backup of the anti-virus database field contains the folder where the previous version of the anti-virus database is stored.
The Quarantine folder for infected objects field in the Storage folders for quarantined objects group contains the path to the quarantine directory where the infected files are stored, while the Quarantine folder for suspicious objects field contains the path to the directory for storing suspicious objects.
In order to prevent virus propagation, access to the quarantine directories used to store infected and suspicious objects should only be granted to the system administrator.
The Storage folder for temporary files group contains the path to the directory for storing temporary files created during server scanning. This directory is used as a temporary storage location for unpacking the packed files and archives.
The Anti-virus database updates folder group contains the path to the directory where the anti-virus database updates downloaded to the server are stored.
In each group, to the right of the fields, there is a Browse button, which can be used to change the directory location.
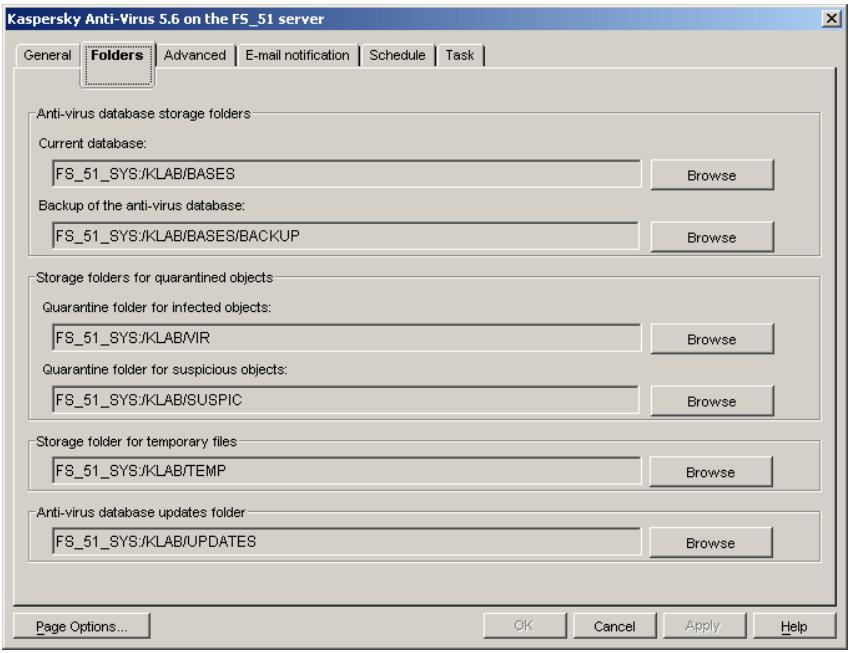
Figure 68. Configuring the application. The Folders tab
A.3. The Advanced Tab
The Advanced tab (see Figure 69) contains the following information:
-
The Information field group contains the following parameters of communication between the Snapin for ConsoleOne and the server on which the Kaspersky Anti-Virus module being adjusted is installed:
-
In the Server IP address field, the numeric IP address of the server should be entered.
- The Port field shows the decimal number of communication port used for connection with the Kaspersky Anti-Virus module. The default value is 8195.
-
The Port (for updating) field shows the decimal number of communication port used for connection with the Anti-virus database updating module. The default value is 8196.
-
The CPU usage scale specifies how much of the server CPU resources can be consumed by the Kaspersky Anti-Virus module. Use your mouse to move the slider and specify the desired level in the range between the lowest and the highest rate of server resources utilization.
The lower the CPU usage (i.e. the closer the slider to the Min. setting of the CPU usage scale), the slower the Kaspersky AntiVirus module works when executing the scan-on-demand task.
- The Number of anti-virus kernel instances field specifies the number of antiviral engine copies concurrently loaded when the Kaspersky Anti-Virus module is started on the server. This value defines the number of files that can be scanned for viruses simultaneously. Two copies of the antiviral engine are started by default. The optimal number should be determined by the administrator depending on the server resources available.
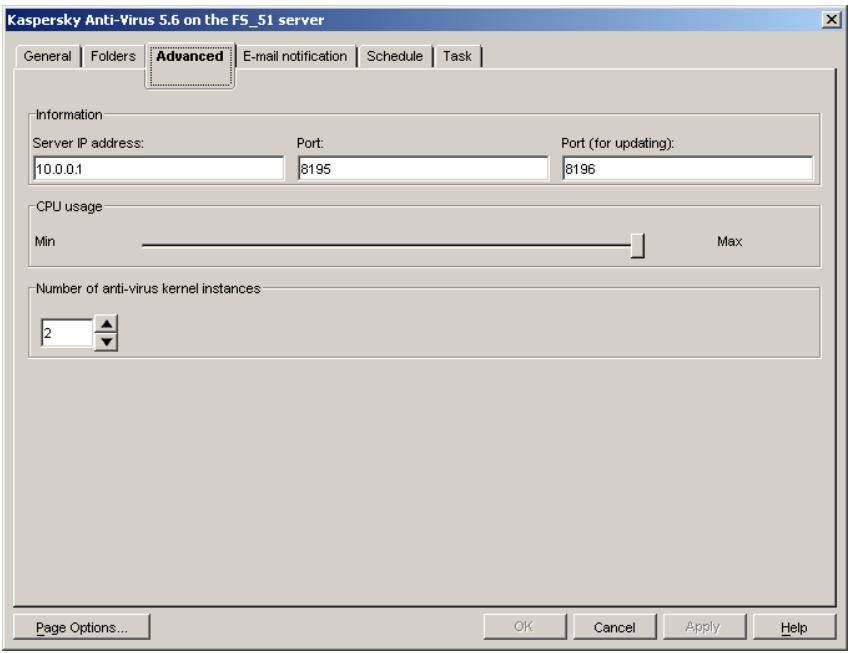
Figure 69. Configuring the application. The Advanced tab
A.4. The E-mail Notification tab
The E-mail notification tab (see Fig. 70) contains the group of fields titled Information about the mail server used to define the parameters of connection between the Snapin for ConsoleOne and the mail server:
- In the SMTP-server IP address field the numeric IP address of the server should be entered.
- In the SMTP port field enter the decimal number of the SMTPserver communication port. The default value is 25.
- In the Sender field enter the notification message sender data. It is advised that you use an electronic address registered within this mail server.
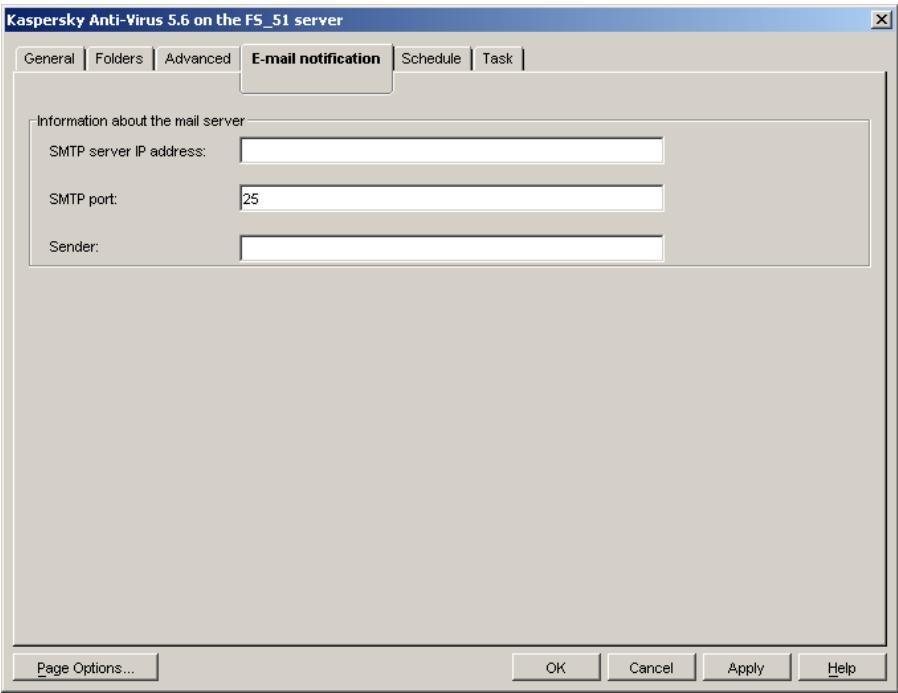
Figure 70. Configuring the application. The E-mail notification tab
A.5. The Schedule Tab
The Schedule tab (see Figure 71) displays a table with the complete schedule of unattended startup for all the tasks created for the server. The table contains the following columns:
- Task name - the name of the task to be started.
- Frequency - time the task will be started including the start mode, the time, the date and the day of week.
Duration - the time after which the task will be stopped.
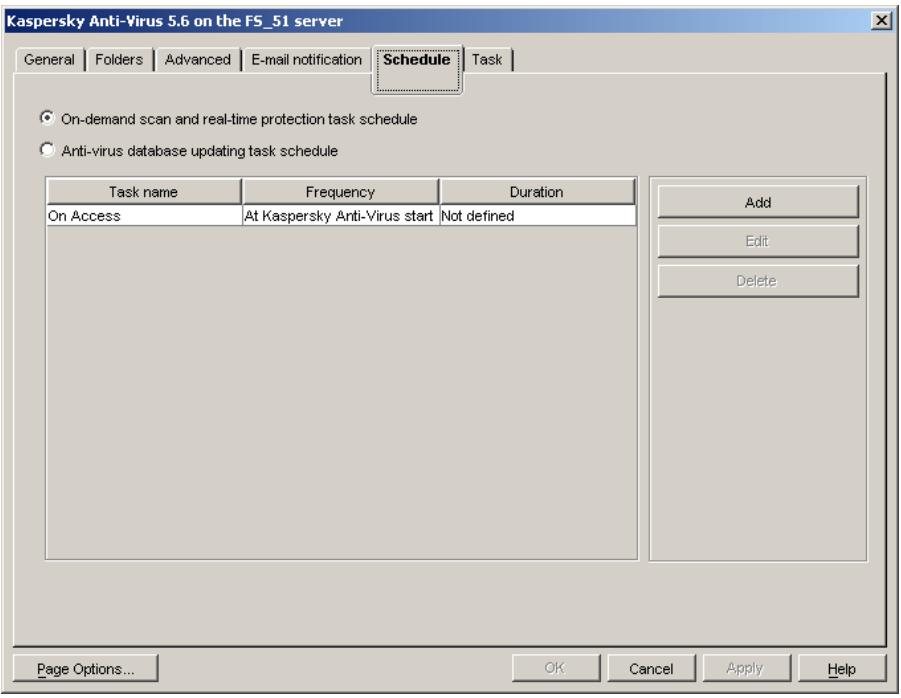
Figure 71. Configuring the application. The Schedule tab
The buttons to the right of the table are used to work with the schedule. They include the following buttons:
- Add - add a task to the schedule.
- Edit - change the task start-up parameters.
- Delete - delete the task from the schedule.
The tasks in the schedule are viewed by their types. You can select one of the following two variants:
- On-demand scan and real-time protection task schedule - review the scheduled tasks of the server on-demand scanning and real-time protection.
- Anti-virus database updating task schedule - review the scheduled tasks of the anti-virus database updating.
To add a task to the schedule, do the following:
- Select the desired task type view mode.
- Click on the Add button.
- In the Create new schedule for the task window (see Figure 72) select the task you want to schedule and specify the parameters of its start. The task is selected using the mouse in the left pane of the window.
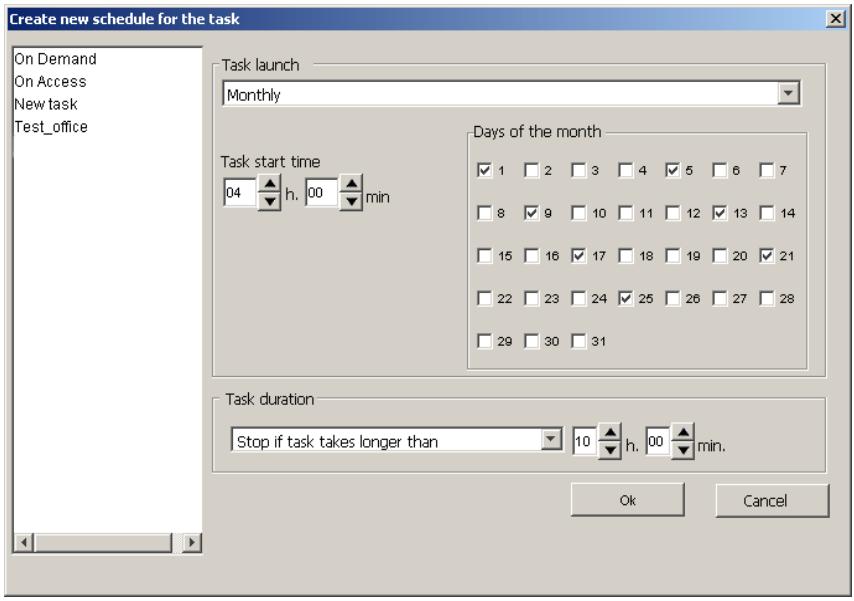
Figure 72. Scheduling the task to run monthly
-
In the Task launch group select one of the following start modes from the drop-down list:
-
At the Kaspersky Anti-Virus start - run when the module is started on the server.
Daily
Weekly
Monthly -
Set the schedule parameters in the group of fields corresponding to the selected mode (for more details please refer to section B.1.5 on
page 133 and section B.2.6 on page 155). After completing, click OK.
In order to change the schedule of an existing task, do the following:
- Select the desired task type view mode.
- Click on the Edit button at the right side of the schedule.
- This will open the window titled Edit the task schedule
(see Figure 73), with the selected schedule item parameters. Make the desired changes and click OK.
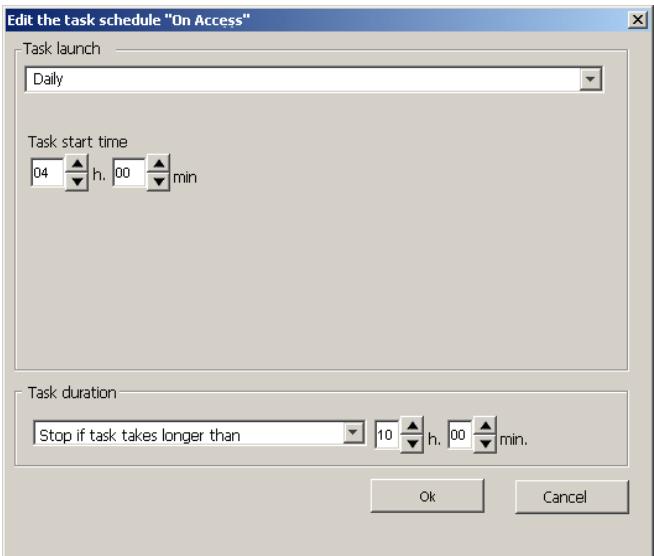
Figure 73. Changing the task start parameters
A.6. The Task Tab
The Task tab (see Figure 74) displays a full list of the tasks created for the server.
The tasks in the list are viewed by their types. You can select one of the following two variants:
-
On-demand scan and real-time protection tasks - review the scheduled tasks of the server on-demand scanning and real-time protection.
-
Anti-virus database updating task - review the scheduled tasks of the anti-virus database updating.
You can change the settings for any task, delete tasks, create new ones and review the log with the results of any task execution. In addition, you can set up parameters for the group of tasks.
To the right of the list there is a group of buttons used to handle the tasks and view the log of their execution. This group includes the following buttons:
Create
- Delete
- Edit - change task parameters
- View log. This button is unavailable in the web module. To view the log for a target task, click the task name in the console tree, open the shortcut menu and select the View log option.
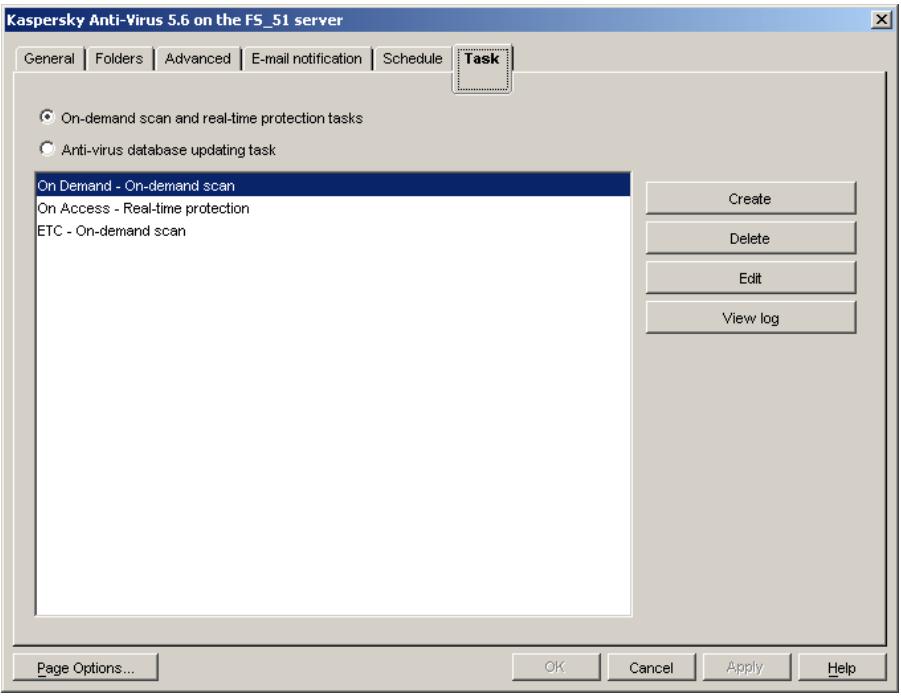
Figure 74. Configuring the application. The Task tab
APPENDIX B. TASK SETTINGS
B.1. The Update Task
B.1.1. The Recipients Tab
On the Recipients tab (see Fig. 75) the user can create a list of servers whose anti-virus databases will be updated as a result of executing the task. In addition, on this tab you can specify the server's rights to access file systems of the servers included in the mailing list.
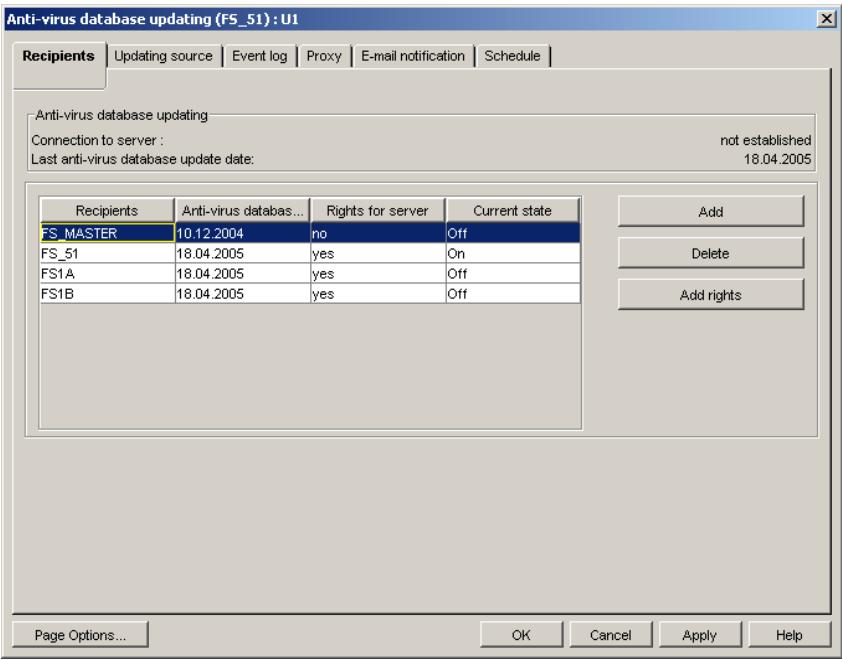
Figure 75. Setting up the anti-virus database updating task. The Recipients tab
In the Snapin for ConsoleOne module, the upper part of the Recipients tab has the Anti-virus database updating group, which displays the following information:
- Connection to server - availability of connection between the Snapin for ConsoleOne and the server. This string can take on the following values: Established - the Snapin for ConsoleOne has established connection with the Anti-virus database updating module; Not established - the Snapin for ConsoleOne has failed to connect to the Anti-virus database updating module.
- Last anti-virus database update date - the time and the date of the latest update of the server's anti-virus database.
In the web module, this information is not available on the tab. The date of the last update can be viewed on the application properties page. To open this page, select the target server in the tree.
At the center of the Recipients tab there is a table displaying a list of servers on which anti-virus databases will be updated.
The table contains the following columns:
Recipients - server name.
- Anti-virus database date - the date and the time of the previous update of the server's anti-virus database.
- Rights for server - shows whether the server running the update task has the rights to access this server's file system (yes/no).
- Current state - the server's current status (on/off).
To the right of the table there are action buttons used to create the list of servers and grant access to their file systems, namely: Add, Delete and Add rights.
In order to add a server to the list of servers whose anti-virus databases will be updated in the result of executing the task, do the following:
- Click on the Add button.
- The next dialog window titled Selecting recipient server will display the list of servers on which Kaspersky Anti-Virus 5.6 for Novell NetWare is installed. Select the desired one (see Figure 76) and click OK.
The list contains servers belonging to the same NDS tree as the server for which the update task is being created. You cannot update anti-virus databases on the servers belonging to other NDS trees.
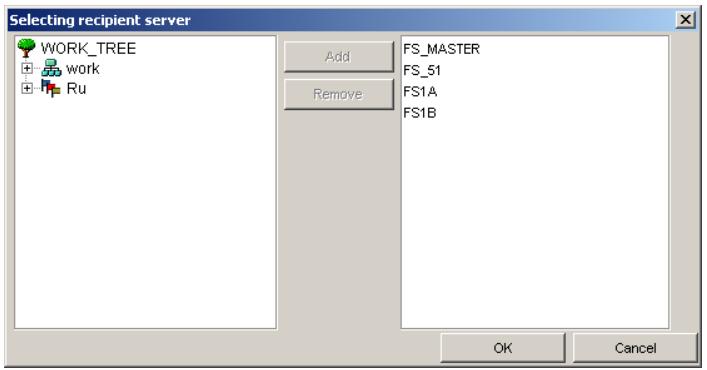
Figure 76. The Selecting recipient server dialog box
As a result, the selected server will be added to the mailing list. The server for which this updating task is created will be granted the rights to access the file system of this server.
If for some reason the rights were not granted or they were cancelled, when you select such a server in the table the Add rights button becomes active.
In order to grant the server rights to access the file systems of the updated server:
select the desired server in the table and click on the Add rights button.
To remove a server from the list of servers to which the Anti-virus database updating module sends the updates:
select it in the table and click on the Delete button.
B.1.2. The Updating source Tab
The Updating source tab (see Figure 77) is used for selecting the method and specifying the sources of the database updating, as well as for setting the mode of anti-virus database copying from the source.
If the values were locked using the icon in the module for Kaspersky Administration Kit, you cannot modify them on the Updating source tab. For such locked settings, the following message is displayed near the name of the tab section: locked by the security policy.
To configure downloading updates from Kaspersky Lab update servers, do the following:
- Select the update source - Internet (see Figure 77).
- Create the list of HTTP and FTP servers from which to download the updates (update sources). The primary update server is the one placed first in the list. Other servers will be tried one after another in the event the connection with the primary update server fails. The servers are tried in sequence until the update is completed successfully or the list of addresses is exhausted.
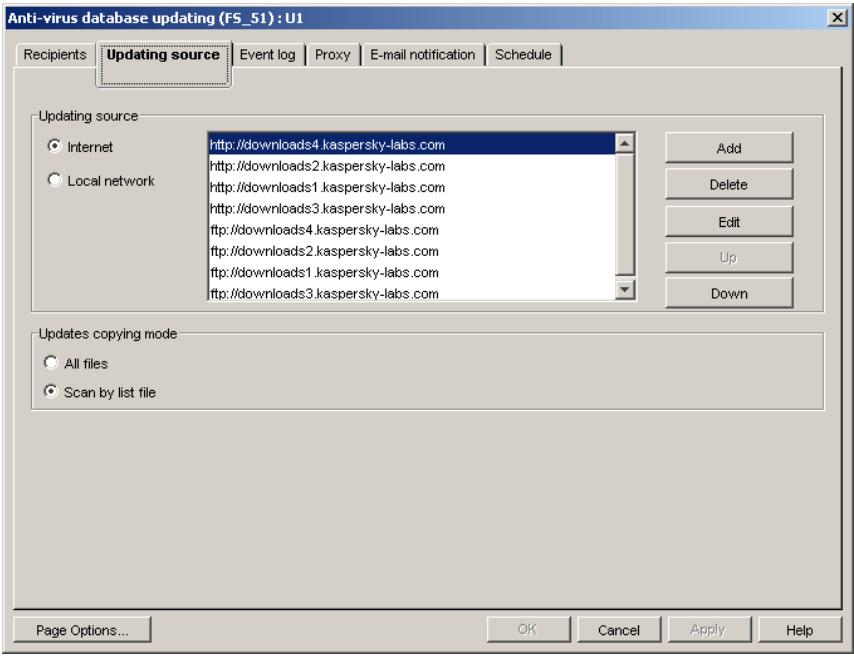
Figure 77. Configuring the anti-virus database updating task. The Updating source tab. Updating via the Internet
By default the list contains the addresses recommended by Kaspersky Lab for downloading anti-virus database updates. The list can modified using the buttons on the right:
- Add - add a new address to the list. In the dialog window titled New update address select the type of address to be added: HTTP or FTP, then enter the address in the text field and click OK (see Figure 78).
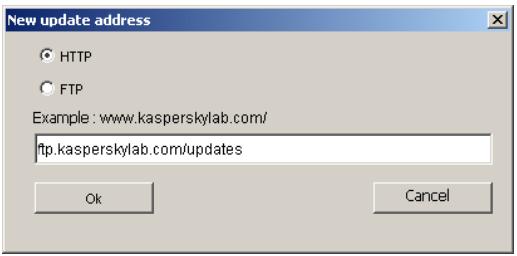
Figure 78. The New update address dialog window
- Delete - remove the selected address.
- Edit - edit the selected address. The address is edited in the same way it is added.
- Up - move the selected address in the list one line up.
- Down - move the selected address in the list one line down.
To set up downloading updates from a network resource, do the following:
- Select the update source - Local network (see Figure 79).
- Create the list of the shared folders from which to download the updates (update sources). The primary update folder is the one placed first in the list. Other folders will be tried one after another in the event the primary update folder is unavailable. The folders are tried in sequence until the update is completed successfully or the list of folders is exhausted.
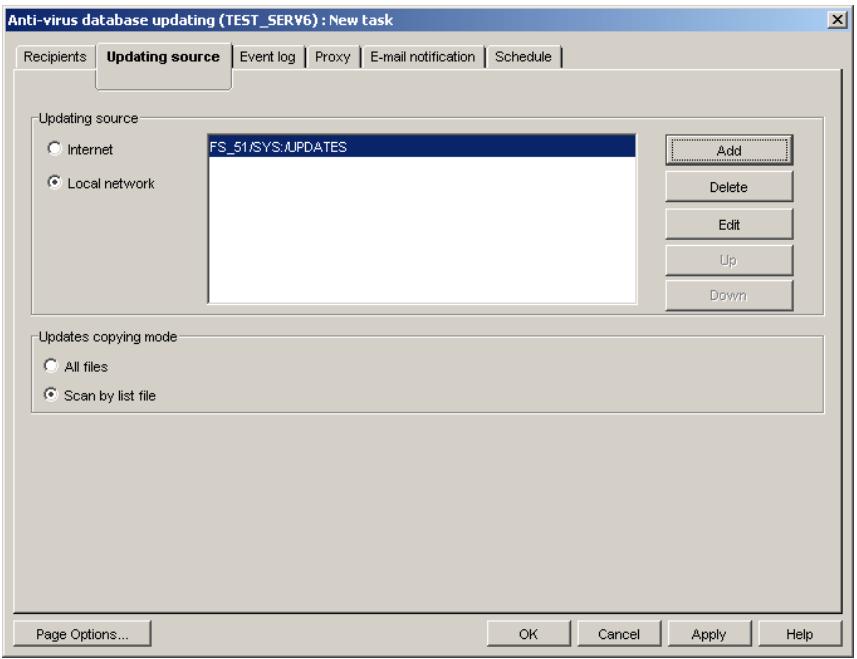
Figure 79. Setting up the anti-virus database updating task. The Updating source tab. Updating from the shared folder
By default, the folder list is empty. It is created using the buttons on the right:
- Add - add a new shared folder to the list. In the dialog window Select the server that will open select the server where the anti-virus database updates are stored and click OK (see Figure 80). In the next dialog window titled Select folder (see Figure 81) specify the folder on the previously selected server where the updates are stored - the update source. After specifying the directory click OK.
- Delete - remove the selected address.
- Edit - edit the selected address. The address is edited in the same way it is added.
- Up - move the selected address in the list one line up.
- Down - move the selected address in the list one line down.
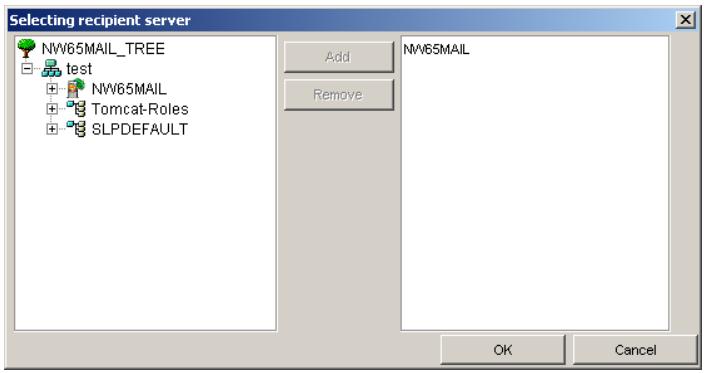
Figure 80. Dialog window for server selection
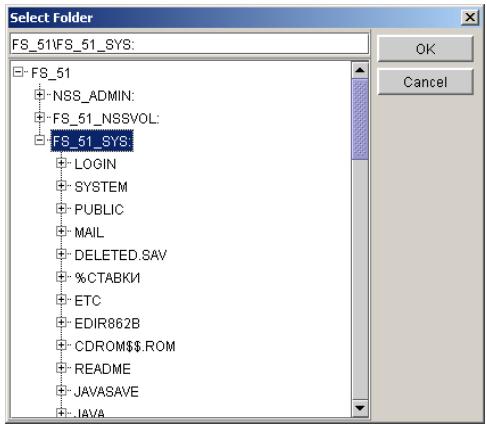
Figure 81. Dialog window for the update directory selection
Regardless of the updating method you have chosen you must set up the antivirus database download mode. By default, only changed and new anti-virus databases will be downloaded from the update source.
To set up the anti-virus database copy mode, do the following
Select the desired mode in the Updates copying mode group:
-
All files - download all the anti-virus databases available from the source.
-
Scan by file list- only download changed and new anti-virus databases. The information regarding the changes is obtained by means of comparing the database description files stored on the update server and the server running the update task. The mode is enabled by default.
B.1.3. The Event log Tab
The Event log tab (see Figure 82) is used for setting up the parameters of logging the update task execution results, including: the log file type, its location and size, the list of events to be logged, and the file name in which to save the log. A separate log file is created for each task.
In the Log file type group select the format of the log file:
- XML - two formats: xml and htm. The htm-type log can be viewed using Microsoft Internet Explorer 6.0. This is the default format.
- Text - is a *.txt file. The Microsoft Internet Explorer 6.0 will be also used to display the text, although the journal will have rather traditional view like most of text-files.
The log file name and its location directory are displayed in the Event log file folder group, in the Path and File name fields, respectively. The default directory for storing log files is LogXml. The directory can be changed with the Browse button in the Path selection window. The File name is set automatically based on the task type and its internal ID. The file name cannot be changed by the administrator.
The event log records the task settings used during its execution and information about updating results. The structure of the latter can be adjusted by the user. By default it contains the information regarding the update source and the results of downloading the updates from this source.
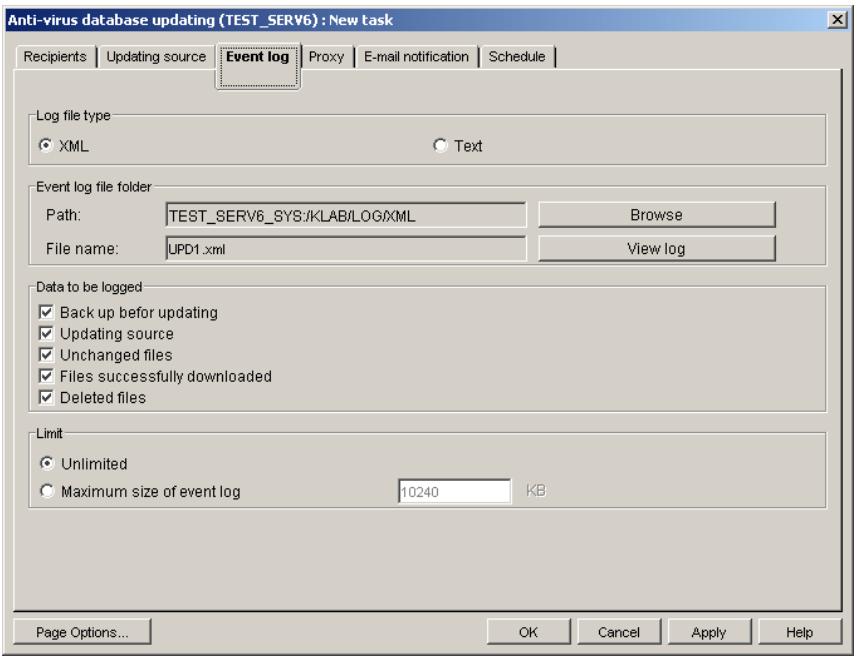
Figure 82. Setting up the anti-virus database updating task. The Event log tab
The user can select the following data to be added to the log:
- Date and time of the task execution - in years, months, days, hours, minutes and seconds.
- The list of servers on which anti-virus database must be updated as a result of running the task.
- The backup mode set for the anti-virus database prior to their updating -- enabled or disabled.
- The anti-virus database downloading mode.
- The update downloading method.
The list of update sources. - Proxy-server parameters.
The task starting parameters.
To specify what information will be logged, do the following
In the Data to be logged group check the desired boxes of the following list:
- Backup before updating – whether the backup copy of the previous version of the anti-virus database was created before updating.
- Updating source - information about the update source and the results of connecting to it.
- Unchanged files - information regarding the anti-virus database files that were not modified.
- Files successfully downloaded – information regarding new and modified anti-virus database files.
- Deleted files – information regarding the deleted files.
The user can limit the log file size by setting its maximum allowable size. After reaching this size the log file will be overwritten.
To do this:
- In the Limit group check the Maximum size of event log box.
- In the input field enter the maximum file size in kilobytes. The default log file size limit is 10240 KB.
Select the Unlimited option if you do not wish to limit the file size; then the data will be added to the end of the existing file.
In the Snapin for ConsoleOne, click the View log button to view changes you have made to the log settings.
The View log button is unavailable in the Web module. To view the task results log, select the View log option in the shortcut menu of the target task. To open the shortcut menu, right-click the task name selected in the NDS tree.
B.1.4. The Proxy Tab
The Proxy tab (see Figure 83) is used to set up the proxy server parameters.
If the values were locked using the icon in the module for Kaspersky Administration Kit, you cannot modify them on the Proxy tab. For such locked settings, the following message is displayed near the name of the tab section: locked by the security policy
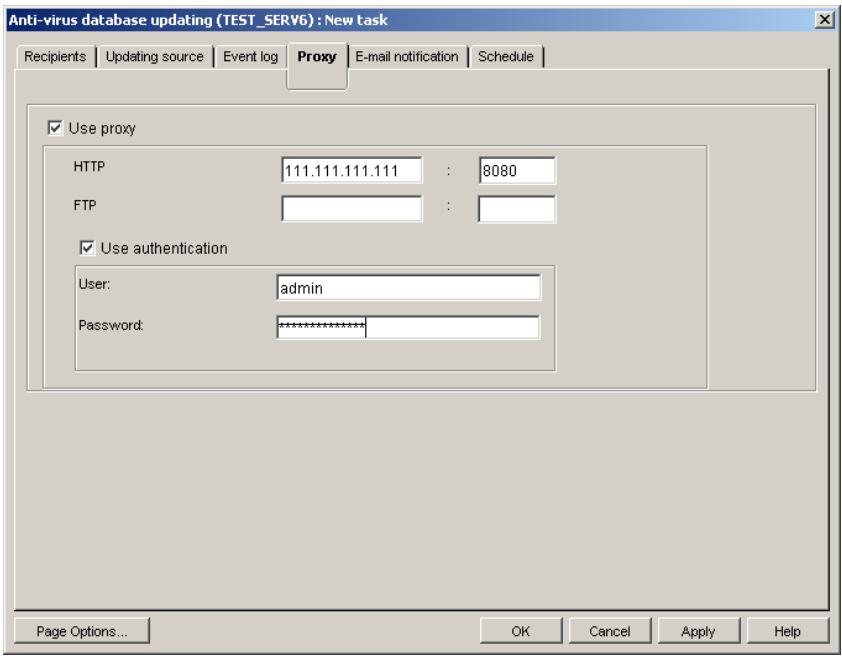
Figure 83. Setting up anti-virus database update tasks. The Proxy tab
To set up the parameters of connection via a proxy server, do the following,
- Check the Use proxy box in the upper part of the Proxy tab.
-
In the field group below the check box specify the parameters of connection to the proxy server for the protocols used - HTTP and/or FTP:
-
In the first field enter the address. Only decimal input is allowed, e.g. 10.0.0.1.
-
In the second field enter the port number. Only decimal input is allowed, e.g. 3128.
-
If a password is required to access the proxy server, specify the user authentication parameters. To do so:
-
Check the Use authentication box.
- Enter the proxy server user name in the User field.
- Enter the proxy server access password in the Password field.
For more detailed information regarding the above connection settings please contact your LAN administrator.
B.1.5. The Schedule Tab
The Schedule tab (see Figure 84) is used for setting the automatic task start-up schedule and the parameters of reconnection with the update source in the event of disconnection.
In the left part of the tab there is a table containing all the scheduled runs of the task. It consists of two columns and includes the following information:
- Frequency - the time the task will be started including the start-up mode the time, the date and the day of week.
- Duration - parameters of reconnection with the update source.
The buttons to the right of the table are used to work with the schedule. They include the following buttons:
- Add - add a task.
- Edit - change the task launching parameters.
- Delete - delete the task from the schedule.
To add a task to the schedule, do the following:
- Click on the Add button. This will open the Create new schedule for the task window.

Figure 84. Setting up anti-virus database update tasks. The Schedule tab
- In the Task launch group select one of the following start modes from the drop-down list:
Daily
Weekly
Monthly
The default value is Daily; the default start time is 0:00.
-
Set the schedule parameters in the group of fields corresponding to the selected mode:
-
If you have selected daily start you should set the task start-up time in the Task start time field (see Figure 85): enter the hour value in the first field and the minute value in the second field. The field values are set using the scroll buttons on the right.
- If you have selected the weekly start mode, check the boxes against the days of the week on which you wish the task to be
started (see Figure 86). You can check more than one box if necessary. After that, you must specify the start-up time in the Task start time field group (see above).
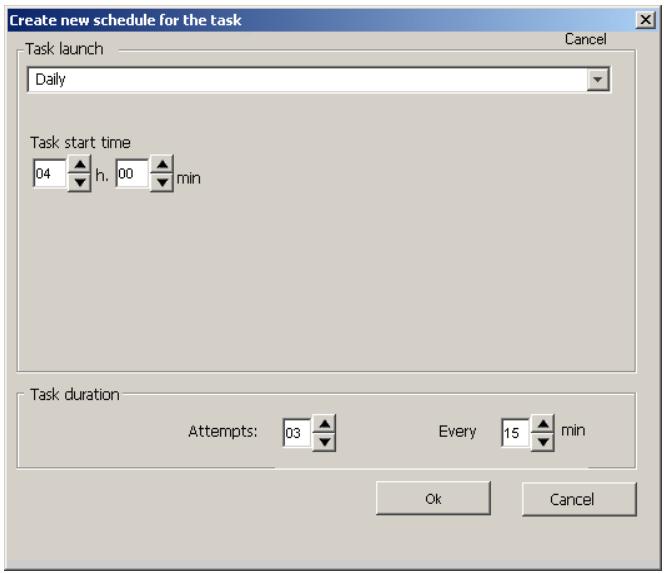
Figure 85. Scheduling the update task to start every day
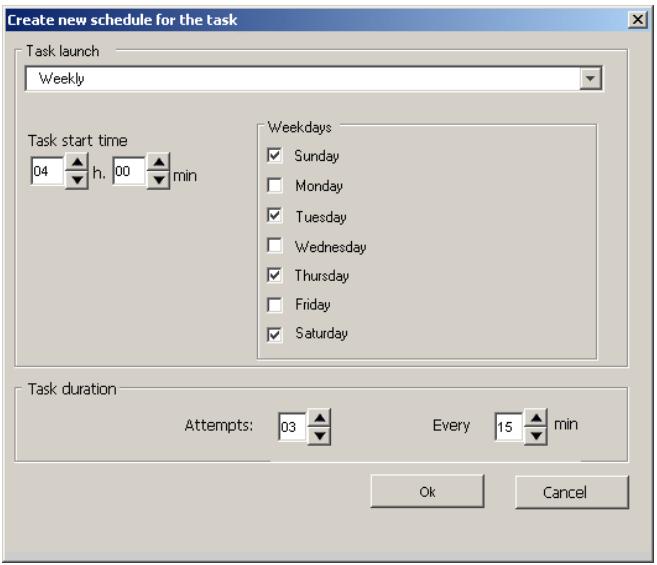
Figure 86. Scheduling the update task to run weekly
- If you have selected the monthly start mode, check the boxes against the days of the month on which you wish the task to be started (see Figure 87). You can check more than one box if necessary. After that, you must specify the time for updates downloading. To do so, create the Task start time list (see above).
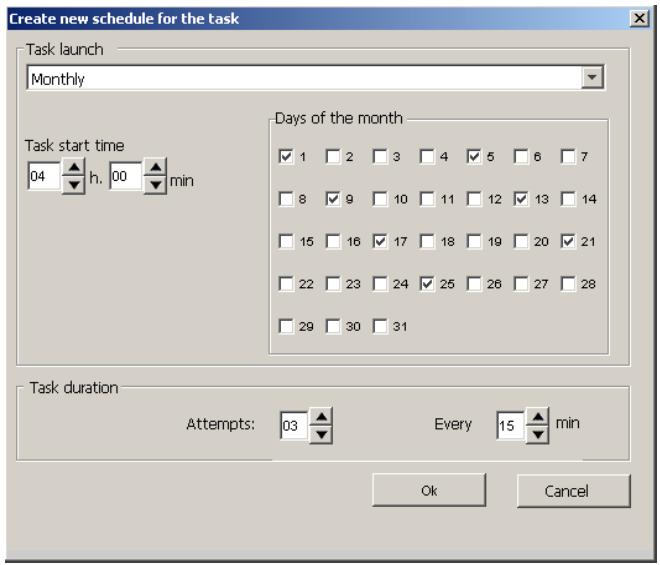
Figure 87. Setting up monthly start of the update task
-
In the Task duration group specify the parameters of reconnection with the update source:
-
In the Attempts field enter the number of reconnection attempts.
-
In the every field enter the time interval between the attempts to reconnect.
-
After completing, click OK. The specified date of the task execution and the parameters of reconnection with the update source will be displayed in the schedule.
B.1.6. The E-mail notification tab
The E-mail notification tab (see Fig. 88) is used to set up notifications sent to the administrator and network users to inform about completion of the updating task. The program delivers notifications using the mail system installed within the network.
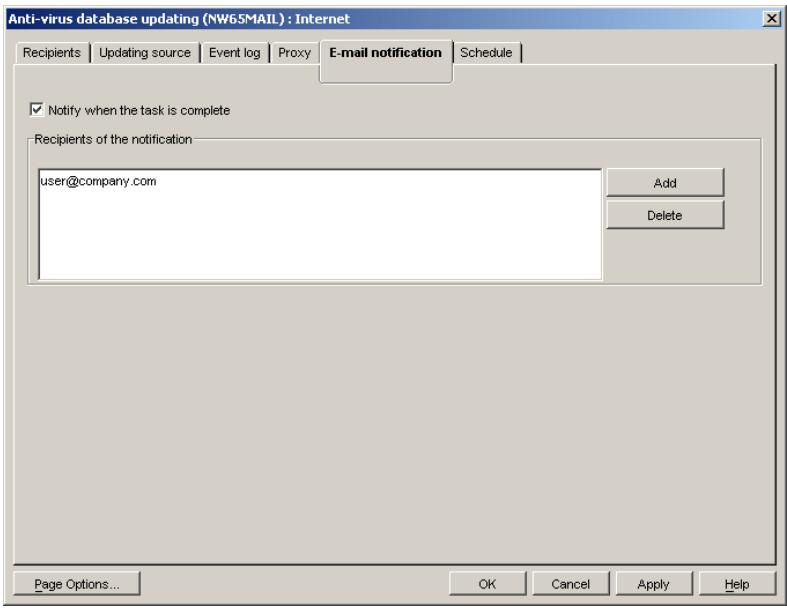
Figure 88. Configuring the anti-virus database updating task. The E-mail notification tab
In order to enable delivery on notifications to users via a mail server,
- Enable the Notify when the task is complete checkbox.
-
Use the Recipients of the notification field to create a list of e-mail addresses where the notifications will be sent:
-
Click the Add button to open the Select Recipients dialog window (see Fig. 89).
- Enter the required address manually and click OK.
- You can delete an address from the list by clicking the Delete button.
The resulting selection of addresses will appear in the Recipients of the notification list.
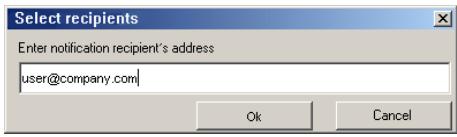
Figure 89. Adding e-mail addresses
B.2. The On-Demand Scan and Real-Time Protection Tasks
B.2.1. The Scan settings Tab
On the Scan settings tab (see Figure 90) the user can specify the server antivirus scanning parameters, including the locations and file types to be scanned, the locations to be excluded from scanning. Additional scanning modes can also be activated, namely: mail bank scanning, archive scanning, packed executable files scanning, and mail format files scanning. The heuristic code analyzer can also be enabled/disabled here.
If the values were locked using the icon in the module for Kaspersky Administration Kit, you cannot modify them on the Scan settings tab. For such locked settings, the following message is displayed near the name of the tab section: locked by the security policy
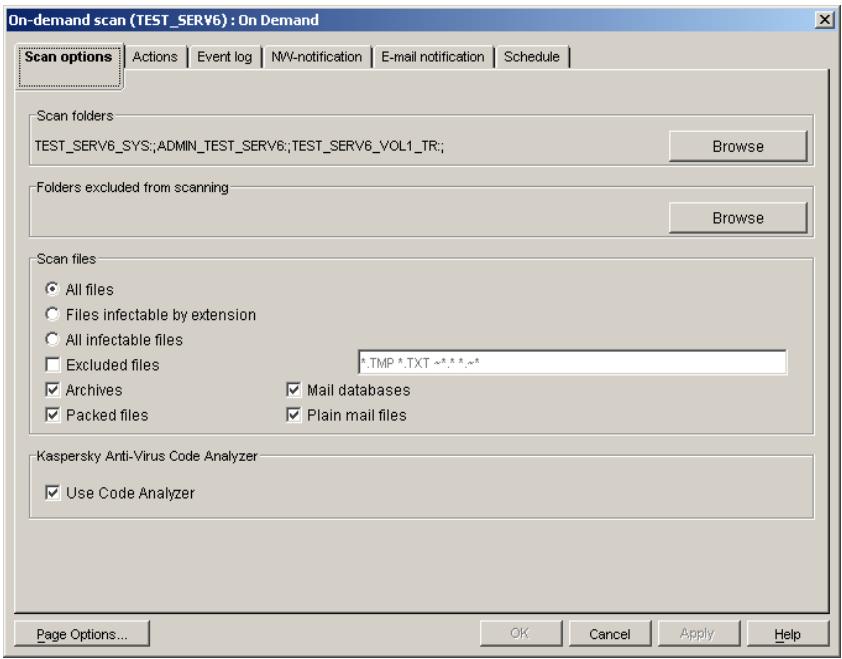
Figure 90. Setting up the on-demand scan parameters. The Scan options tab
To define the location to be scanned, do the following:
In the Scan folders field specify the list of directories that will be scanned for viruses. To do so, click on the Browse button to open the Select folder window and using the Add and Remove buttons create the desired list.
By default, the list includes all the volumes of the server, which means that the entire server will be scanned.
To define the location to be excluded from scanning, do the following:
In the Folders excluded from scanning field specify the list of directories that will not be scanned for viruses. The list is created in the same way as the Scan folders list. By default, the list is empty for the On-Demand Scan task; for the Real-Time Protection task the folder containing log files is excluded.
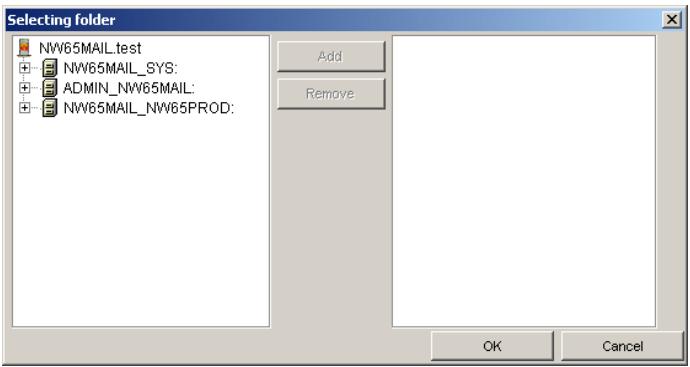
Figure 91. Creating the folders list
To specify the file formats to be scanned, do the following:
- In the Scan files field specify the files you wish to be scanned:
All files - all files (the default value).
- Files infectable by extension - the files specified using wildcards. Edit the list of files that will appear on the right. Remove the unnecessary files and add the desired ones.
You can specify file masks separating them by spaces, e.g.: .exe .com. Any wildcards allowable in MS-DOS file names can be used (for example, . means that files with all extensions will be scanned).
-
All infectable files - scan all the files that can potentially be infected.
-
If you wish to exclude some files from the scanning process, check the Excluded files box and enter the desired file masks in the text field on the right.
You can specify file masks separating them by spaces, e.g.: .tmp .txt.
- If you wish to scan archive files check the Archives box (for more details about extracting engine refer to section B.2.1.2 on page 142).
- If you wish to scan packed executable files check the Packed files box (for more details about the procedure of extracting packed executables refer to section B.2.1.3 on page 142).
-
If you wish to scan the mail repository check the Mail databases box.
-
If you wish to scan mail format files check the Plain mail files box.
You can enable the heuristic file-checking mode (see section B.2.1.1 on page 142) to enable detection of viruses yet unknown to the program.
To do so, check the Use Code Analyzer box.
B.2.1.1. Code analyzer
Code analyzer scans file and sector codes using different paths of the Kaspersky Anti-Virus algorithm and detects virus-like instructions. If Code Analyzer detects a sequence of commands like file opening, file writing, interrupt vector intercept etc. such a file is considered "suspicious" and an appropriate message is displayed.
Of course, like any heuristic algorithm, Code Analyzer can give false responses. However, it has been tested with a very large number of objects and did not give any real false response. If you ever experience false responses with uninfected files, please send copies of these files to Kaspersky Lab for analysis.
When scanning the code for the presence of possible viruses, heuristic analyzer checks multiple paths of the program's algorithm including several sub-layers. This procedure detects about 92% of viruses (including many encrypted ones) from the range of viruses known to Kaspersky Lab. Therefore we expect that new and unknown viruses will be detected with similar probability.
B.2.1.2. Extracting Engine
The Extracting Engine is used for searching viruses in archived files (ZIP, ARJ, LHA and RAR). If the extracting engine is disabled, archives will be scanned as usual files. This means that only viruses that have infected the archive itself will be detected, but not the files stored in it.
The current version of Extracting Engine is capable of unpacking all the existing versions of ARJ, ZIP, LHA, RAR, CAB, and ICE archives.
Detecting viruses in archives is of the utmost importance, since a virus can be stored in an archive as long as several months or even years bringing no harm, but can then spread very quickly causing a lot of trouble.
Using its Extracting Engine, Kaspersky Anti-Virus detects viruses in archived files and informs the user.
Extracting Engine does not unpack password-protected archives.
Kaspersky Anti-Virus does not disinfect archived files; it only detects viruses in them. To disinfect such files you should extract the files from the archive, disinfect them, delete the old archive and repack the clean files.
Extracting Engine unpacks the archived files to the temporary file storage and passes them to the main module for scanning. After scanning, the temporary files are deleted.
Temporary files are stored in a special working directory. You can manually specify the path to this directory (see section A.2 on page 113).
B.2.1.3. Executable Module Extracting Engine
The Executable module extracting engine is used for searching and removing viruses from packed executable files.
Packed executables contain a special unpacking program. When such a file is launched, the main program is first unpacked in the RAM and then executed. Infected files can be packed in the same way as uninfected ones. Regular scans will recognize such infected files as clean, since the virus body is packed with the program code.
With the executable module Extracting Engine enabled the anti-virus program will unpack files created with different versions of the most popular packing utilities, including DIET, PKLITE, LZEXE, EXPACK etc., into the temporary file area and then rescan them using the main module. After scanning, the temporary files are deleted.
Temporary files are stored in a special working directory. You can manually specify the path to this directory (see section A.2 on page 113).
If a known virus is detected in the packed file, it can be removed (if disinfection is set as an action to be applied to infected files – see section B.2.2 on page 144). The initial file will be replaced with its unpacked and disinfected copy. With the extracting engine disabled, executable modules will be scanned as unpacked and a virus can only be detected if it has infected the packed file itself.
The extracting engine works correctly with iteratively packed files. In addition, it works with some versions of file immunizers - the programs that protect executable files from infecting by adding checksums (CPAV and F-XLOCK), as well as with some versions of encryption software (CryptCOM).
If both archive and executable file extracting engines are enabled, then Kaspersky Anti-Virus will detect an infected file even if it is, for example, encrypted with CryptCOM, then packed with PKLITE and finally archived using PKZIP.
B.2.2. The Actions Tab
On the Actions tab (see Figure 92) the user can specify the actions to be taken by the program to any infected or suspicious files if they are detected, as well as the actions to be applied to a workstation that attempts to upload an infected object to the server.
In addition, you can allow/prohibit renaming or deleting of archives during the scanning procedure. To do so, enable or disable the Allow deleting or renaming archives checkbox.
If the values were locked using the icon in the module for Kaspersky Administration Kit, you cannot modify them on the Actions tab. For such locked settings, the following message is displayed near the name of the tab section: locked by the security policy
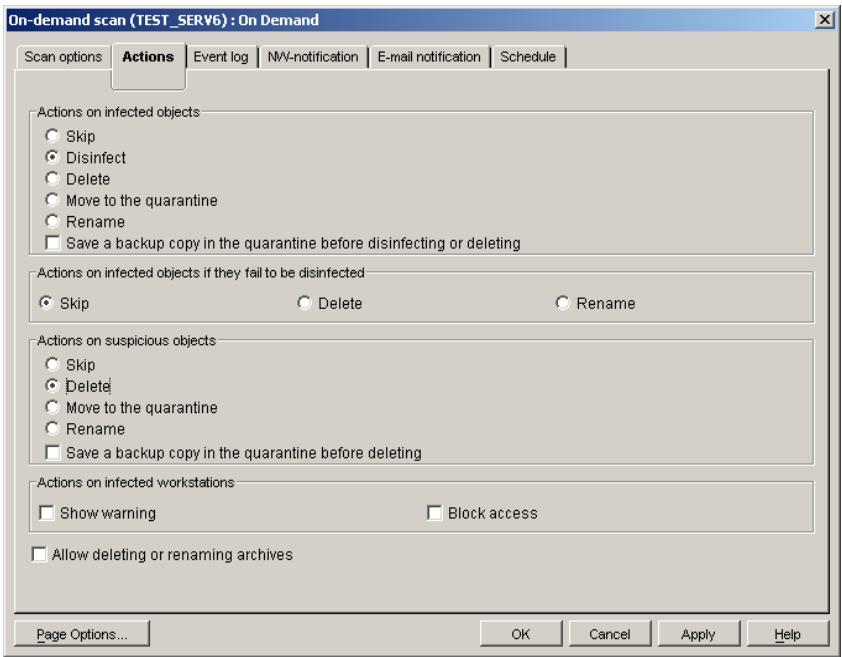
Figure 92. Setting up the on-demand scan task. The Actions tab
To specify the actions to be taken to the infected files, do the following:
-
In the Actions on infected objects group select one of the variants from the following list:
-
Skip - do not apply any actions.
- Disinfect - disinfect the file (if possible).
- Delete - delete the file.
- Move to the quarantine - move the file to the quarantine directory.
-
Rename - change the file extension to .vir (or .vi1, .vi2 etc, if a file with the same name exists).
-
If you have chosen to disinfect or delete infected files, you can configure the program to save copies of infected files in the quarantine directory. To do so, check the Save a backup copy in the quarantine before disinfecting or deleting box.
-
In the Actions on infected objects if they fail to be disinfected field specify what actions should be taken to the infected file in the event that it fails to be disinfected. You can select one of the following options:
-
Skip - leave the file intact and save the information about it in the log.
- Delete - delete the file.
- Rename - save the file under another name.
To specify the actions to be taken to suspicious files, do the following:
- In the Actions on suspicious objects field select one of the following options:
Suspicious files are those detected with the Code Analyzer.
-
Skip - do not apply any actions.
-
Delete - delete the file.
- Move to the quarantine - move the object to the quarantine directory.
-
Rename - change the file extension to .vir (or .vi1, .vi2 etc, if a file with the same name exists).
-
If you have selected to delete the suspicious files you can instruct the program to save copies of them in the quarantine directory. To do so check the Save a backup copy in the quarantine before deleting box.
To specify the actions to be taken to a workstation that attempts to upload an infected file to the server, do the following:
In the Actions on infected workstation group check one of the following boxes:
- Show warning - if you wish to send an alert to the workstation.
A message will be sent to the workstation as defined on the NW-Notification or E-mail notification tabs (see section B.2.4 on page 151 and section B.2.5 on page 153).
- Block access - if you wish to prevent the workstation from accessing the server.
The workstation will be denied access to the server file systems. It will only be able to regain access after rebooting or reloading Kaspersky Anti-Virus on the server.
B.2.3. The Event log Tab
The Event log tab (see Figure 93) is used for setting up the parameters for logging the update task execution results, including the log file type, its location and size, the list of events to be logged, as well as the file name in which to save the log. A separate log file is created for each task.
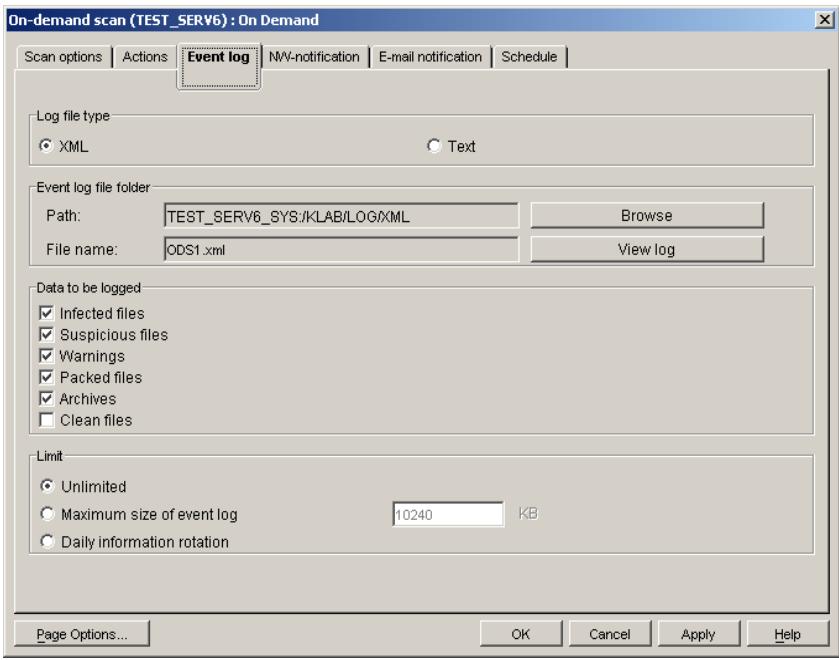
Figure 93. Setting up the on-demand scan task. The Event log tab
In the Log file type group you can select the format of the log file:
- XML - two formats: xml and htm. The htm-type file can be viewed using Microsoft Internet Explorer 6.0. This is the default format.
- Text - is a *.txt file. The Microsoft Internet Explorer 6.0 will be also used to display the text, although the journal will have rather traditional view like most of text-files.
The log file name and its location directory are displayed in the Event log file folder group, in the Path and File name fields, respectively. The default directory for storing the log files is LogXml. The directory can be changed with the Browse button in the Path window. The File name is set automatically, based on the task type and its internal ID. The file name cannot be changed by the user.
In order to specify what messages should be logged, do the following:
In the Data to be logged group check the desired boxes of the following list:
-
Infected files - messages regarding infected files.
-
Suspicious files - messages regarding suspicious files.
-Warnings - alerts regarding detection of a modified or a damaged virus in a file. - Packed files – information regarding packed executable files.
- Archives—information regarding archive files.
- Clean files – information regarding uninfected files.
In addition, records about the task start and completion are automatically logged. Below is the detailed structure of various messages.
- You can limit the scanning results log file size to a certain value. To do this:
- In the Limit group check the Maximum size of event log box.
- In the entry field enter the maximum file size in kilobytes. Upon reaching the specified size the log file will be overwritten. The default log file size limit is 10240 KB.
Select the Unlimited option if you do not wish to limit the file size; then the data will be added to the end of the existing file. If you select the Daily information rotation option, the program will generate a new event log file every day.
In the Snapin for ConsoleOne, click the View log button to view changes you have made to the log settings.
The View log button is unavailable in the Web module. To view the task results log, select the View log option in the shortcut menu of the target task. To open the shortcut menu, right click the task name selected in the NDS tree.
B.2.3.1. Messages regarding infected files
In the event that an infected file is detected, the following record will be created in the event log file:
<DATE> <TIME> SYS:\TEST\MY_FILE.EXE : infected::
<NAME> (User : <USER_NAME>)
SYS:\TEST\MY_FILE.EXE : <ACTION>,
where:
<DATE> - detected date,
<TIME> - detected time,
<NAME> - virus name,
<USER_NAME> - the name of the user whose file contained the virus,
disinfected - the virus is removed
- deleted - the file is deleted
removed-the file is quarantined
- renamed – the file extension is changed to .vir (or .vi1, .vi2 etc., if a file with the same name existed).
If you decide not to take any action on the infected file (the No Action option), then the log record will contain only one line:
<DATE> <TIME> SYS:\TEST\MY_FILE.EXE : infected::
<NAME> (User : <USER_NAME>)
If for some reason the user-selected action cannot be applied to the infected file, the log record will look as follows:
<DATE> <TIME> SYS:\TEST\MY_FILE.EXE : infected::
<NAME> (User : <USER_NAME>)
<DATE> <TIME> SYS:\TEST\MY_FILE.EXE : <FAILURE>,
where the
Disinfection error
- Deletion error
- Quarantining error
- Renaming error
B.2.3.2. Messages Regarding Suspicious Files
In the event that a suspicious file is detected, the following record will be created in the event log file:
<DATE> <TIME> SYS:\TEST\MY_FILE.EXE:suspicion TYPE(TYPE),
where <TYPE> is one of the following strings:
Com - the file appears to be infected with an unidentified virus capable of damaging com-files.
Exe - the file appears to be infected with an unidentified virus capable of damaging exe-files.
ComExe – the file appears to be infected with an unidentified virus capable of damaging COM and EXE file formats.
ComTSR, ExeTSR, SysTSR, ComExeTSR – the file appears to be infected with an unidentified resident virus capable of damaging COM, EXE and SYS file formats.
Boot - the file/sector appears to be infected with an unidentified boot-virus or something like a boot-virus installer.
Trojan – the file appears to be a Trojan horse.
Trivial – the file appears to be infected with an unidentified virus capable of replacing executable files in the current directory (the size of this virus is usually less than 300 bytes).
HLL – the file appears to be infected with an unidentified virus capable of damaging executable files and written in a high-level language (C, Pascal etc.)
Win32 – the file appears to be infected with an unidentified Windows-virus.
Formula - the Excel file contains suspicious commands.
Macro.Word97.Fs - a Macro.Word97.Fs family virus suspected.
RemoteTemplate - the document contains a link to a template automatically loaded when the file is opened.
HTML.SecurityBreach.2 - HTML file or an HTML format e-mail message contains a link to a suspicious object.
IRC-Worm.Generic - the file appears to be infected with an unidentified worm spreading via IRC channels.
BAT – the file appears to be a file infected with an unidentified virus capable of damaging BAT format files.
VBS.I-Worm - the file appears to be infected with an unidentified worm spreading via e-mail.
B.2.3.3.Warnings
In the event that a modified or damaged virus is detected, the following record will be created in the event log file:
B.2.3.4. Messages Regarding Packed Executable Files
When a packed executable file is extracted by the anti-virus program, a record will be added to the event log with information about the packer used to pack the file. The format of the record is as follows:
B.2.3.5. Messages Regarding Archive Files
When an archive is unpacked by the anti-virus program, a record will be added to the event log with information about the archiver used to create the file. The format of the record is as follows:
B.2.3.6. Messages Regarding Uninfected Files
The following record regarding uninfected files is added to the event log:
The NW-Notification tab (see Figure 94) is used to set the procedure of notifying the administrator and/or other network users about viruses and suspicious objects detected during the task execution. In addition, the text of the notification message can be specified on this tab (see Figure 95).
The messages are sent via the Novell NetWare network.
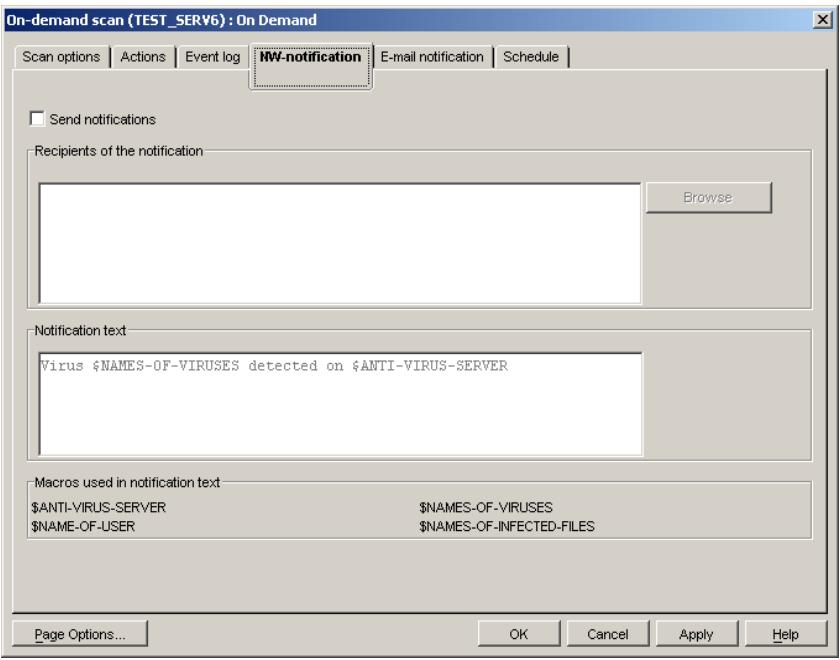
Figure 94. Setting up the on-demand scan task. The NW-Notification tab
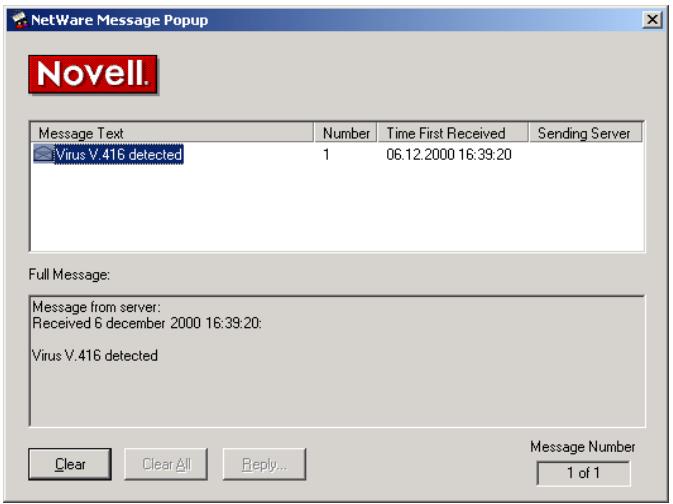
Figure 95. The message received by the user when a virus is detected on the server
In order to organize delivery of notifications to the Novell NetWare network users, do the following:
- Check the Send notifications box.
-
In the Recipients of the notification field create a list of network users who will receive the notifications regarding detected viruses. To do so:
-
Click on the Browse button, this will open the Selecting recipient dialog window (see Figure 96).
- Select the desired user from the list of those registered in the network and click OK.
- If you want to remove a user from the list of those who receives the notifications, select him or her in the Recipients of the notification dialog window and click Delete.
The users can be added to or removed from the list individually.
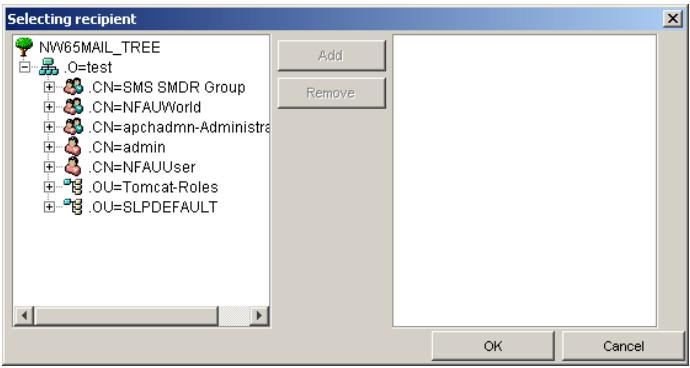
Figure 96. Selecting the users who will receive the virus notifications
- In the Notification text field manually create the notification text. You can use the following macros:
\$NAME-OF-USER
User name
$NAMES-OF-INFECTED
Infected file name
FILES
$NAMES-OF-VIRUSES
Virus name
$ANTI-VIRUS-SERVER
Server name
B.2.5. The E-mail Notification Tab
The E-mail notification tab (see Figure 97) is used for setting the mode of administrator and network users' notification about completion of scanning tasks
and detected viruses by e-mail using the mail system installed in the network. In addition, the list of messages to be sent is defined on this tab.
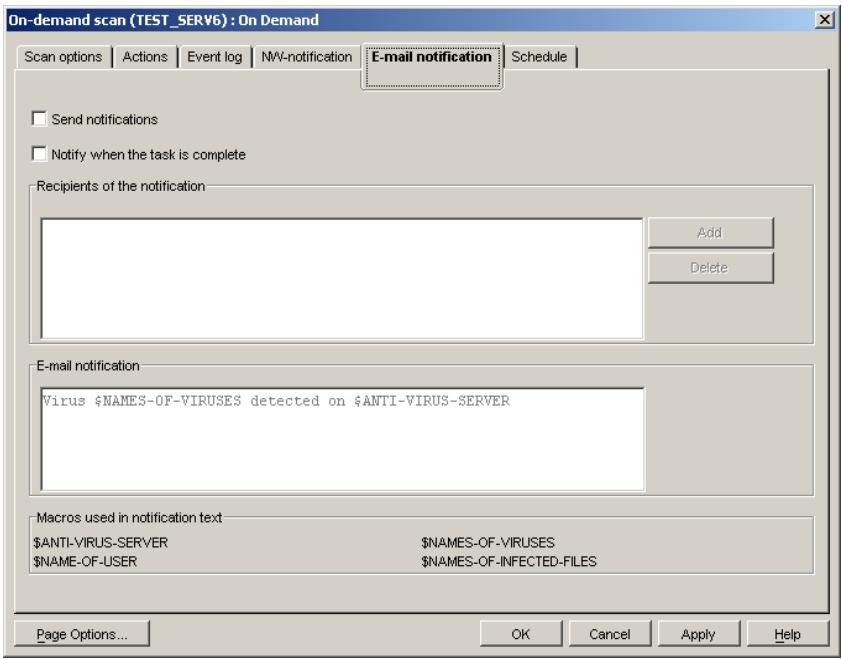
Figure 97. Setting up the on-demand scan task.
The E-mail notification tab
In order to organize delivery of notifications via the mail server, do the following:
- Check the Notify when the task is complete box to enable delivery of corresponding notifications by e-mail and the Send notifications box to receive information about detected viruses.
-
In the Recipients of the notification field create a list of the e-mail addresses that will receive the notifications regarding the viruses detected. To do so:
-
Click on the Add button, this will open the Select Recipients dialog window (see Figure 98).
- Manually type in the desired address and click OK.
- An address can be removed from the mailing list using the Delete button.
As a result, the list you have created will be displayed in the Recipients of the notification list.
- In the E-mail notification field create the notification text manually. You can use the macros described above.
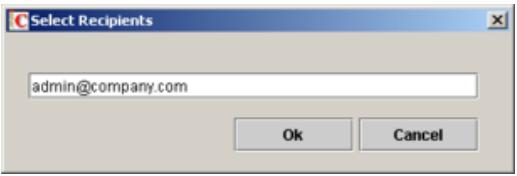
Figure 98. Adding e-mail addresses
B.2.6. The Schedule Tab
The Schedule tab (see Figure 99) is used for setting up the automatic task launching schedule and specifying the time interval after which the task must be terminated.

Figure 99. Setting up the on-demand scan task. The Schedule tab
In the right part of the tab there is a table containing all the scheduled runs of the task. It consists of two columns and includes the following information:
- Frequency - the time the task will be started including the start-up mode, the time, the date and the day of week.
- Duration – the time during which the task must be completed.
The buttons to the right of the table are used to work with the schedule. They include the following buttons:
- Add - add a task to the schedule.
- Edit - change the task launching parameters.
- Delete - delete the task from the schedule.
To add a task to the schedule, do the following:
- Click on the Add button. This will open the Create new schedule for the task window (see Figure 100).
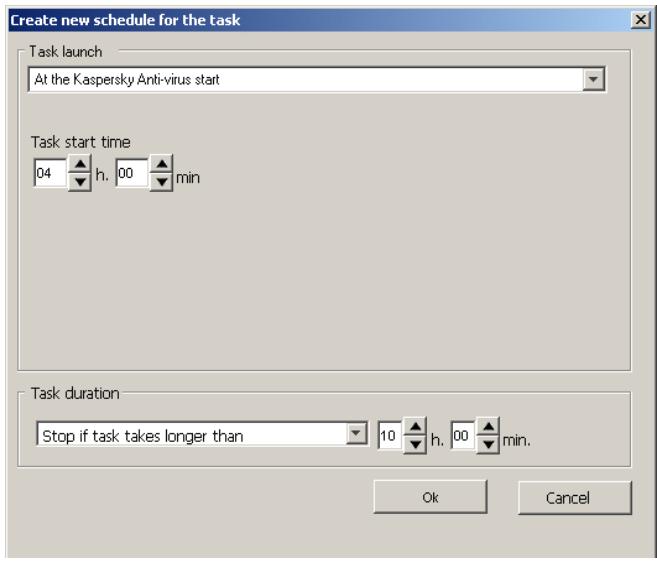
Figure 100. Setting the server scanning to start simultaneously with the Kaspersky Anti-Virus module
-
In the Task launch group select one of the following start modes from the drop-down list:
-
At the Kaspersky Anti-Virus start - run when the module is started on the server.
Daily
Weekly
Monthly
The default value is Daily, start time is 0:00.
-
Set the schedule parameters in the group of fields corresponding to the selected mode:
-
No additional settings are required if you have selected the At the Kaspersky Anti-Virus start mode.
- If you have selected daily start you should specify the task startup time in the Task start time field (see Figure 101). Enter the hour value in the first field and the minute value in the second field. The field values are set using the scroll buttons on the right.
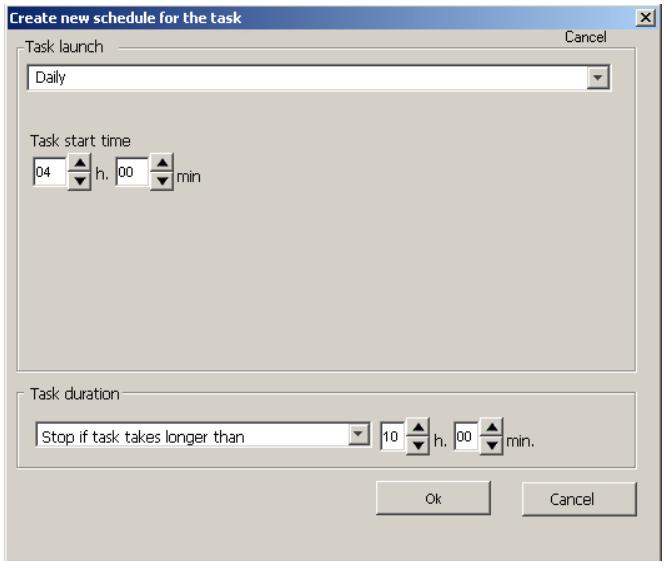
Figure 101. Setting up daily server scanning
- If you have selected the weekly start mode, check the boxes against the days of week on which you wish the task to be started (see Figure 102). You can check more than one box if necessary. After that you must specify the start-up time in the Task start time field group (see above).
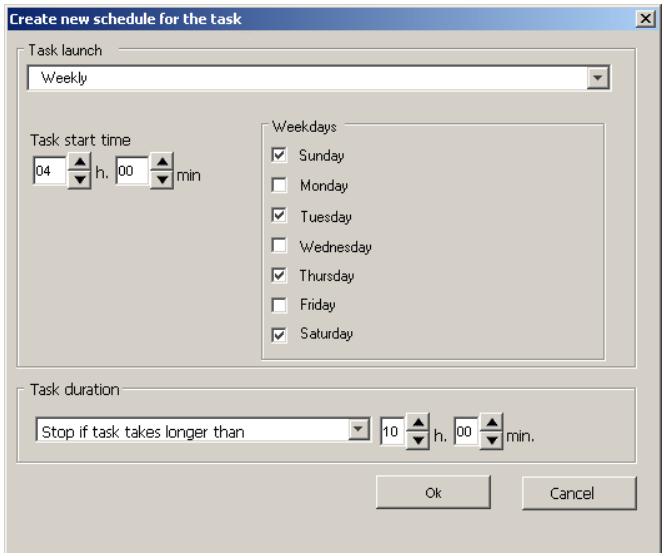
Figure 102. Setting up weekly update downloading
-
If you have selected the monthly start mode, check the boxes against the days of month on which you wish the task to be started (see Figure 103). You can check more than one box if necessary. After that you must specify the start-up time in the Task start time field group (see above).
-
In the Task duration group specify the time after which the task must be terminated. To do so, select the desired option from the drop-down list:
Not defined - the task execution time is unlimited.
- Stop in (at the latest) – the task must be completed at the specified time after its start. Specify the time interval in the fields on the right. Enter the hour value in the first field and the minute value in the second field.
After completing, click OK. The start and the termination dates you have entered will appear in the schedule.
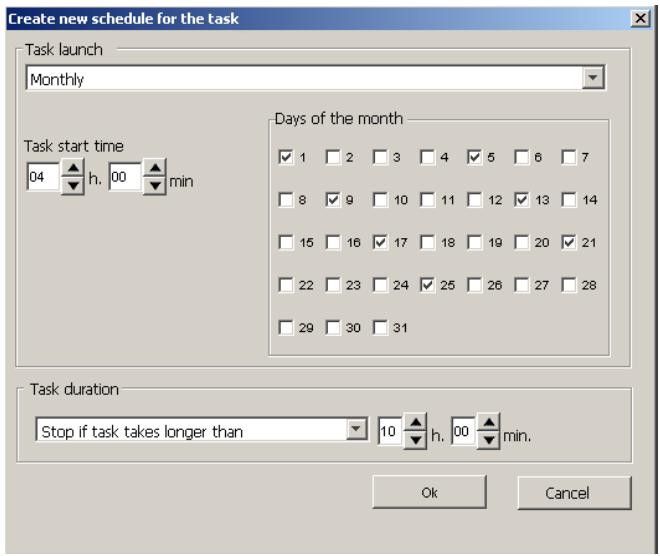
Figure 103. Setting up monthly server scanning
APPENDIX C. KASPERSKY LAB
Founded in 1997, Kaspersky Lab has become a recognized leader in information security technologies. It produces a wide range of data security software and delivers high-performance, comprehensive solutions to protect computers and networks against all types of malicious programs, unsolicited and unwanted e-mail messages, and hacker attacks.
Kaspersky Lab is an international company. Headquartered in the Russian Federation, the company has representative offices in the United Kingdom, France, Germany, Japan, USA (CA), the Benelux countries, China, Poland, and Romania. A new company department, the European Anti-Virus Research Centre, has recently been established in France. Kaspersky Lab's partner network incorporates more than 500 companies worldwide.
Today, Kaspersky Lab employs more than 450 specialists, each of whom is proficient in anti-virus technologies, with 10 of them holding M.B.A. degrees, 16 holding Ph.Ds, and senior experts holding membership in the Computer Anti-Virus Researchers Organization (CARIO).
Kaspersky Lab offers best-of-breed security solutions, based on its unique experience and knowledge, gained in over 14 years of fighting computer viruses. A thorough analysis of computer virus activities enables the company to deliver comprehensive protection from current and future threats. Resistance to future attacks is the basic policy implemented in all Kaspersky Lab's products. At all times, the company's products remain at least one step ahead of many other vendors in delivering extensive anti-virus coverage for home users and corporate customers alike.
Years of hard work have made the company one of the top security software manufacturers. Kaspersky Lab was one of the first businesses of its kind to develop the highest standards for anti-virus defense. The company's flagship product, Kaspersky Anti-Virus, provides full-scale protection for all tiers of a network, including workstations, file servers, mail systems, firewalls, Internet gateways, and hand-held computers. Its convenient and easy-to-use management tools ensure advanced automation for rapid virus protection across an enterprise. Many well-known manufacturers use the Kaspersky Anti-Virus kernel, including Nokia ICG (USA), F-Secure (Finland), Aladdin (Israel), Sybari (USA), G Data (Germany), Deerfield (USA), Alt-N (USA), Microworld (India) and BorderWare (Canada).
Kaspersky Lab's customers benefit from a wide range of additional services that ensure both stable operation of the company's products, and compliance with specific business requirements. Kaspersky Lab's anti-virus database is updated every hour. The company provides its customers with a 24-hour technical
support service, which is available in several languages to accommodate its international clientele.
Other Kaspersky Lab Products
Kaspersky Anti-Virus® Personal
Kaspersky Anti-Virus® Personal has been designed to provide anti-virus protection to personal computers running Microsoft Windows 98/ME or Microsoft Windows 2000/NT/XP against all known viruses, including potentially dangerous software. Kaspersky Anti-Virus Personal provides real-time monitoring of all sources of virus intrusion - e-mail, Internet, floppy disks, CD, etc. The unique system of heuristic data analysis allows efficient neutralization of yet unknown viruses. This application can work in the following modes (that can be used separately or jointly):
Real-time computer protection - anti-virus scanning of all objects run, opened on or saved to the user's computer.
- On-demand computer scan - scanning and disinfection of the entire user's computer or of individual disks, files or folders. You can start such scan manually or configure an automatic scheduled scan.
Kaspersky Anti-Virus® Personal does not re-scan objects that had already been scanned during a previous scan and have not changed since then not only when performing real-time protection, but also during an on-demand scan. This feature considerably increases the speed of the program's operation.
The application creates a reliable barrier against viruses when they attempt to intrude your computer via e-mail. Kaspersky Anti-Virus® Personal performs automatic scan and disinfection of all incoming and outgoing mail sent or received using POP3 and STMP protocols and provides highly efficient detection of viruses in mail databases.
The application supports over 700 formats of archived and compressed files and provides automatic scanning of their content as well as removal of malicious code from ZIP, CAB, RAR, ARJ, LHA and ICE archives.
Configuring the application is made simple and intuitive due to the possibility to select one of three preset protection levels: Maximum Protection, Recommended or High Speed.
The anti-virus database is updated every hour and its delivery to your computer is guaranteed even when your computer gets temporarily disconnected from the Internet or the connection has to be changed.
Kaspersky Anti-Virus® Personal Pro
This package has been designed to deliver comprehensive anti-virus protection to home computers running Microsoft Windows 98/ME, Microsoft Windows 2000/NT, Microsoft Windows XP as well as MS Office applications. Kaspersky Anti-Virus Personal Pro includes an easy-to-use application for automatic retrieval of daily updates for the anti-virus database and the program modules. A unique second-generation heuristic analyzer efficiently detects unknown viruses. A simple and convenient interface allows users to configure the program quickly making work with it easier than ever.
Kaspersky Anti-Virus® Personal Pro has the following features:
On-demand scan of local disks.
Real-time automatic protection of all accessed files from viruses.
- Mail Filter automatically scans and disinfects all incoming and outgoing mail for any mail client that uses POP3 and SMTP protocols and effectively detects viruses in mail databases.
- Behavior blocker that provides maximum protection of MS Office applications against viruses.
- Archive scanning - Kaspersky Anti-Virus recognizes over 900 formats of archived and compressed files and ensures automatic anti-virus scanning of their content and removal of malicious code from files within ZIP, CAB, RAR, ARJ, LHA and ICE archives.
Kaspersky® Anti-Hacker
Kaspersky® Anti-Hacker is a personal firewall that is designed to safeguard a computer running any Microsoft Windows operating system. It protects your computer against unauthorized access and external hacker attacks from either the Internet or the local network.
Kaspersky® Anti-Hacker monitors the TCP/IP network activity of all applications running on your machine. When it detects a suspicious action, Kaspersky® Anti-Hacker blocks the suspicious application from accessing the network. This helps ensure enhanced privacy and 100% security of confidential data stored on your computer.
The product's SmartStealth™ technology prevents hackers from detecting your computer from the outside. In this stealthy mode, the application works seamlessly to keep your computer protected while you are on the Web. The application provides conventional transparency and accessibility of information.
Kaspersky® Anti-Hacker also blocks most common network hacker attacks and monitors attempts to scan computer ports.
Configuration of the application is simply a matter of choosing one of five security levels. By default, the application starts in self-learning mode, which will
automatically configure your security system depending on your responses to various events. This makes your personal guard adjustable to your specific preferences and your particular needs.
Kaspersky® Personal Security Suite
Kaspersky® Personal Security Suite is a software suite designed for organizing comprehensive protection of personal computers running Microsoft Windows. The suite prevents malicious and potentially dangerous programs from penetrating through any possible data sources and protects you from unauthorized attempts to access your computer's data, as well as blocking spam.
Kaspersky Personal Security Suite has the following features:
- anti-virus protection of data saved on your computer
- protection against spam for users of Microsoft Office Outlook and Microsoft Outlook Express
- protection of your computer from unauthorized access, and also from network hacker attacks from your LAN or the Internet.
Kaspersky Lab News Agent
The News Agent is intended for timely delivery of news published by Kaspersky Lab, for notifications about the current status of virus activity and fresh news. The program reads the list of available news channels and their content from news server of Kaspersky Lab with specified frequency.
The product performs the following functions:
It visualizes in the system tray the current status of virus activity.
- The product allows the users to subscribe and unsubscribe from news channels.
It retrieves news from each subscribed channel with the specified frequency and notifies about fresh news.
It allows reviewing news on the subscribed channels.
It allows reviewing the list of channels and their status.
It allows opening pages with news details in your browser.
News Agent is a stand-alone Microsoft Windows application, which can be used independently or may be bundled with various integrated solutions offered by Kaspersky Lab Ltd.
Kaspersky® OnLine Scanner
The program is a free service offered to the visitors of Kaspersky Lab's corporate website. The service allows an efficient online anti-virus scan of your computer. Kaspersky OnLine Scanner runs directly from your browser. Thus, users can quickly test their computers in case of a slightest suspicion of malicious infection. Using the service, visitors can:
Exclude archives and e-mail databases from scanning.
- Select standard/extended anti-virus databases for scanning.
- Save a report on the scanning results in txt or html formats.
Kaspersky® OnLine Scanner Pro
The program is a subscription service offered to the visitors of Kaspersky Lab's corporate website. The service allows an efficient online anti-virus scan of your computer and disinfection of dangerous files. Kaspersky OnLine Scanner Pro runs directly from your browser. Using the service, visitors can:
Exclude archives and e-mail databases from scanning.
- Select standard/extended anti-virus databases for scanning.
- Save a report on the scanning results in txt or html formats.
Kaspersky Anti-Virus 6.0
Kaspersky Anti-Virus 6.0 is designed to safeguard personal computers against malicious software as an optimal combination of conventional methods of antivirus protection and new proactive technologies.
The program provides for complex anti-virus checks including:
- Anti-virus scanning of e-mail traffic on the level of data transmission protocol (POP3, IMAP and NNTP for incoming mail and SMTP for outgoing messages) irrespectively of the mail client being used as well as disinfection of e-mail databases.
Real-time anti-virus scanning of Internet traffic transferred via HTTP. - Anti-virus scanning of individual files, directories or drives. In addition, a preset scan task can be used to initiate anti-virus analysis exclusively for critical areas of the operating system and start-up objects of Microsoft Windows.
Proactive protection offers the following features:
Control of changes within file system. The program allows users to create a list of applications, which it will control on a per component basis. It
helps protect application integrity against the influence of malicious software.
Monitoring of processes in random-access memory. Kaspersky AntiVirus 6.0 in a timely manner notifies users whenever it detects dangerous, suspicious or hidden processes or in case when unauthorized changes in standard processes occur.
Monitoring of changes in OS registry due to internal system registry control.
Blocking of dangerous VBA macros in Microsoft Office documents.
System restoration after malicious spyware influence accomplished due to recording of all changes in the registry and computer file system and an opportunity to perform their roll-back at user's discretion.
Kaspersky® Internet Security 6.0
Kaspersky® Internet Security 6.0 is an integrated solution for protection of personal computers against the main information-related threats, i.e. viruses, hackers, spam and spyware. A common user interface allows configuration and management of all solution components.
The anti-virus protection feature includes:
- Anti-virus scanning of e-mail traffic on the level of data transmission protocol (POP3, IMAP and NNTP for incoming mail and SMTP for outgoing messages) irrespectively of the mail client being used. The program includes plug-ins for popular e-mail clients (Microsoft Office Outlook, Microsoft Outlook Express and The Bat!) and supports disinfection of their e-mail databases.
Real-time anti-virus scanning of Internet traffic transferred via HTTP. - File system protection: anti-virus scanning of individual files, directories or drives. In addition, the application can perform anti-virus analysis exclusively for critical areas of the operating system and start-up objects of Microsoft Windows.
- Proactive protection: the program performs constant monitoring of application activity and processes running in random-access memory preventing dangerous changes to the file system and registry, and restores the system after malicious influence.
Protection against Internet-fraud is guaranteed owing to the ability to recognize phishing attacks, which helps prevent confidential data leaks (first of all, your passwords, bank account and credit card numbers), and block execution of dangerous scripts on web pages, pop-up windows and advertisement banners. The feature blocking charged phone calls helps identify software that
attempts to use your modem for hidden unauthorized connection to paid phone services and prevents such activity.
Kaspersky® Internet Security 6.0 registers attempts to scan the ports of your computer, which frequently precede network attacks, and successfully defends against typical hacker attacks. The program uses defined rules as a basis for control over all network transactions tracking all incoming and outgoing data packets. Stealth mode (owing to the SmartStealth™ technology) prevents computer detection from outside. When you switch into that mode, the system will block all network activity except for a few transactions allowed in user-defined rules.
The program employs complex approach to anti-spam filtering of incoming e-mail messages:
Verification against black and white lists of recipients (including addresses of phishing sites).
Inspection of phrases in message body.
Analysis of message text using a self-learning algorithm.
Recognition of spam sent in image files.
Kaspersky® Security for PDA
Kaspersky® Security for PDA provides reliable anti-virus protection for data saved on various types of hand-held computers and smartphones. The program includes an optimal set of anti-virus defense tools:
- anti-virus scanner that scans information (saved both in internal memory of PDA and smartphones or on memory cards of any type) on user demand:
- anti-virus monitor to intercept viruses in files that are either copied from other handhelds or are transferred using HotSync™ technology.
Kaspersky® Security for PDA protects your handheld (PDA) from unauthorized intrusion by encrypting both access to the device and data stored on memory cards.
Kaspersky Anti-Virus Mobile
Kaspersky Anti-Virus Mobile provides antivirus protection for mobile devices running Symbian OS and Microsoft Windows Mobile. The program provides comprehensive virus scanning, including:
- On-demand scans of the mobile device's onboard memory, memory cards, an individual folder, or a specific file. If an infected file is detected, it is moved to Quarantine or deleted.
Real-time scanning - all incoming and outgoing files are automatically scanned, as will as files when attempts are made to access them
Scheduled scans of data stored in the mobile device's memory
Protection from text message spam
Kaspersky Anti-Virus® Business Optimal
This package provides a unique configurable security solution for small- and medium-sized corporate networks.
Kaspersky Anti-Virus® Business Optimal guarantees full-scale anti-virus protection3 for:
Workstations running Microsoft Windows 98/ME, Microsoft Windows NT/2000/XP Workstation and Linux.
- File servers running Microsoft Windows NT 4.0 Server, Microsoft Windows 2000/2003 Server/Advanced Server, Microsoft Windows 2003 Server, Novell Netware, FreeBSD and Linux: Samba file storage
- E-mail systems including Microsoft Exchange 2000/2003, Lotus Notes/Domino, postfix, exim, sendmail, and gmail mail systems
- Internet gateways: CheckPoint Firewall -1; Microsoft ISA Server 2000 Standard Edition, Microsoft ISA Server 2004 Standard Edition
The Kaspersky Anti-Virus® Business Optimal distribution kit includes Kaspersky® Administration Kit, a unique tool for automated deployment and administration.
You are free to choose from any of these anti-virus applications, according to the operating systems and applications you use.
Kaspersky® Corporate Suite
This package provides corporate networks of any size and complexity with comprehensive, scalable anti-virus protection. The package components have been developed to protect every tier of a corporate network, even in mixed computer environments. Kaspersky® Corporate Suite supports the majority of operating systems and applications installed across an enterprise. All package components are managed from one console and have a unified user interface. Kaspersky® Corporate Suite delivers a reliable, high-performance protection
system that is fully compatible with the specific needs of your network configuration.
Kaspersky® Corporate Suite provides comprehensive anti-virus protection for:
Workstations running Microsoft Windows 98/ME, Microsoft Windows NT/2000/XP Workstation and Linux;
- File servers running Microsoft Windows NT 4.0 Server, Microsoft Windows 2000, 2003 Server/Advanced Server, Novell Netware, FreeBSD, Linux; Samba file storage
- E-mail systems, including Microsoft Exchange Server 2000/2003, Lotus Notes/Domino, sendmail, postfix, exim, and qmail mail systems
- Internet gateways: CheckPoint Firewall -1; Microsoft ISA Server 2000 Enterprise Edition, Microsoft ISA Server 2004 Enterprise Edition
- Hand-held computers (PDAs), running Symbian OS, Microsoft Windows CE and Palm OS, and also smartphones running Microsoft Windows Mobile 2003 for Smartphone and Microsoft Smartphone 2002.
The Kaspersky® Corporate Suite distribution kit includes Kaspersky® Administration Kit, a unique tool for automated deployment and administration.
You are free to choose from any of these anti-virus applications, according to the operating systems and applications you use.
Kaspersky® Anti-Spam
Kaspersky® Anti-Spam is a cutting-edge software suite that is designed to help organizations with small- and medium-sized networks wage war against the onslaught of unsolicited e-mail messages (spam). The product combines the revolutionary technology of linguistic analysis with modern methods of e-mail filtration, including DNS Black Lists and formal letter features. Its unique combination of services allows users to identify and wipe out up to 95% of unwanted traffic.
Installed at the entrance to a network, where it monitors incoming e-mail traffic streams for spam, Kaspersky® Anti-Spam acts as a barrier to unsolicited e-mail. The product is compatible with any mail system and can be installed on either an existing mail server or a dedicated one.
Kaspersky® Anti-Spam's high performance is ensured by daily updates to the content filtration database adding samples provided by the Company's linguistic laboratory specialists. Databases are updated every 20 minutes.
Kaspersky Security® for Microsoft Exchange 2003
Kaspersky Security for Microsoft Exchange performs anti-virus processing of incoming and outgoing mail messages as well as messages stored at the server, including letters in public folders and filters out unsolicited correspondence using "smart" spam recognition techniques in combination with Microsoft technologies. The application scans all messages arriving at an Exchange Server via SMTP protocol checking them for the presence of viruses using Kaspersky Lab's antivirus technologies and for the presence of SPAM attributes. It filters out spam based on formal attributes (mail address, IP address, letter size, heading) and analyzes the content of messages and of their attachments using "smart" technologies, including unique graphic signatures for identifying graphic SPAM. The application scans both the message body and the attached files.
Kaspersky® Mail Gateway
Kaspersky Mail Gateway is a comprehensive solution that provides complete protection for users of mail systems. This application installed between the corporate network and the Internet scans all components of e-mail messages for the presence of viruses and other malware (Spyware, Adware, etc.) and performs centralized anti-spam filtration of e-mail stream. The application contains a number of advanced tools for filtering e-mail traffic by name and MIME attachments and a series of tools that reduce the load on the mail system and prevent hacker attacks.
Kaspersky Anti-Virus® for Proxy Servers
Kaspersky Anti-Virus® for Proxy Server is an antivirus solution for protecting web traffic transferred over HTTP protocol through a proxy server. The application scans Internet traffic in real time, protects against malware penetrating your system while web surfing, and scans files downloaded from the Internet.
Kaspersky Anti-Virus® for MIMESweeper for SMTP
Kaspersky Anti-Virus® for MIMESweeper for SMTP provides high-speed antivirus scans of SMTP traffic on servers running Clearswift MIMESweeper.
The program is designed as a plug-in for Clearswift MIMESweeper for SMTP and scans for viruses and processes incoming and outgoing e-mails in real time.
Contact Us
If you have any questions, comments, or suggestions, please refer them to one of our distributors or directly to Kaspersky Lab. We will be glad to assist you in any matters related to our product by phone or via e-mail. Rest assured that all of your recommendations and suggestions will be thoroughly reviewed and considered.
| Technical support | Please find the technical support information at http://www.kaspersky.com/supportinter.html Helpdesk: www.kaspersky.com/helpdesk.html |
| General information | WWW: http://www.kaspersky.com http://www.viruslist.com E-mail: info@kaspersky.com |