
BANG & OLUFSEN BEOLAB 2 - Speakers BANG & OLUFSEN - Free user manual and instructions
Find the device manual for free BANG & OLUFSEN BEOLAB 2 BANG & OLUFSEN in PDF.


| Product type | Active subwoofer |
| Brand | Bang & Olufsen |
| Model | BeoLab 2 |
| Category | Audio speaker for surround or stereo system |
| Usage | Indoor, dry household environment |
| Connection | Power Link 8-pin |
| Power supply | Mains (100-240 V AC, 50/60 Hz) |
| Operating temperature | 10 - 40 °C |
| SETUP switch | 3 positions (1, 2, 3) to adjust sensitivity to BeoLab speakers |
| POSITION switch | 3 positions (CORNER, WALL, FREE) to compensate for room effect |
| Standby indicator | Red LED (standby), green (on) |
| Protection | Overheating protection circuit with sound reduction or cut-off |
| Cleaning | Soft lint-free cloth with lukewarm water and mild detergent; vacuum cleaner for the speaker |
| Safety | Do not expose to rain or moisture; do not open the cabinet |
| Included cable | Power Link 8-pin cable and cable cover |
| Compatibility | Bang & Olufsen active speakers with Power Link |
| Recommended placement | On the floor, in the front half of the room, facing the listening position |
| Power on | Automatic with the Bang & Olufsen system |
| Configuration | Stereo, Dolby Pro Logic, Dolby Digital |
| Caution | Do not block speaker movement; do not lift by the sides |
Frequently Asked Questions - BANG & OLUFSEN BEOLAB 2 BANG & OLUFSEN
User questions about BANG & OLUFSEN BEOLAB 2 BANG & OLUFSEN
0 question about this device. Answer the ones you know or ask your own.
Ask a new question about this device
Download the instructions for your Speakers in PDF format for free! Find your manual BANG & OLUFSEN BEOLAB 2 - BANG & OLUFSEN and take your electronic device back in hand. On this page are published all the documents necessary for the use of your device. BANG & OLUFSEN BEOLAB 2 by BANG & OLUFSEN.
USER MANUAL BANG & OLUFSEN BEOLAB 2 BANG & OLUFSEN
CAUTION: To reduce the risk of electric shock, do not remove cover (or back).
No User-serviceable parts inside. Refer servicing to qualified service personnel.
WARNING: To prevent fire or electric shock, do not expose this appliance to rain or moisture.

This symbol indicates that a dangerous voltage constituting a risk of electric shock is present within this unit.

This symbol indicates that there are important operating and maintenance instructions in the literature accompanying this unit.
DOLBY, DOLBY DIGITAL, PRO LOGIC are trademarks of Dolby Laboratories Licensing Corporation.
This Guide describes how to connect the BeoLab 2 subwoofer, and adapt it so that it functions optimally in your speaker setup.
Likewise, the Guide provides guidelines for how to place the BeoLab 2.
Before you start...
4 Cautions
NOTE! Read this before you start setting up your NeoLab 2.
Connect your speaker system
6 Speaker connections
6 Connection to the mains
7 Setup examples
Dolby Digital system
Dolby Pro Logic system
- Stereo system
Adapt BeoLab 2 to your setup
8 Setting the SETUP switch
8 Placement guidelines
9 Setting the POSITION switch
Daily use
10 Switching on and off - indicator
10 Loudspeaker protection
10 Cleaning GeoLab 2
We recommend that you follow this procedure when setting up the BeoLab 2 subwoofer:
- Read and abide by the cautions on these two pages.
- Disconnect your system from the mains.
- Connect your speaker system as described in Connect your speaker system.
- Set the SETUP switch and the POSITION switch to the correct settings as described in Adapt BeoLab 2 to your setup.
- Place BeoLab 2 according to the guidelines in Adapt BeoLab 2 to your setup.
- Finally, connect your system to the mains.
To make a neat cable installation, we suggest that you run the cables through the enclosed cable cover.
Cautions
The BeoLab 2 subwoofer is intended for use with Bang & Olufsen active (Power Link) loudspeaker systems only - it cannot be used with other speakers.
Make sure that the BeoLab 2 is placed and connected in accordance with the instructions in this Guide.
Do not in any way block the free movement of the BeoLab 2 speaker units, and do not apply any force to them, as this may result in permanent damage!
Place your GeoLab 2 on the floor on its black rubber foot.
The BeoLab 2 is designed for indoor use in dry, domestic environments only, and for use within a temperature range of 10 - 40^ (50-105° F).
Remember that all speakers in a setup must be connected to a mains outlet, and that they are designed to be connected to the mains at all times, as this allows them to switch on automatically.
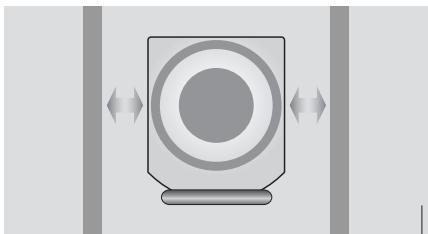
Leave enough space for the speaker units to move - both in front and to the sides of BeoLab 2.
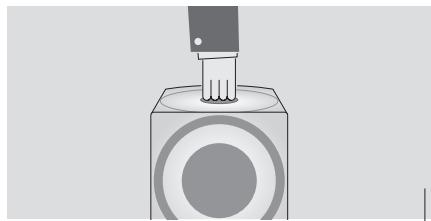
Use the top hole as a carrying 'handle' when you lift BeoLab 2.
Take care not to damage the speaker units, and never lift BeoLab 2 by gripping its sides!
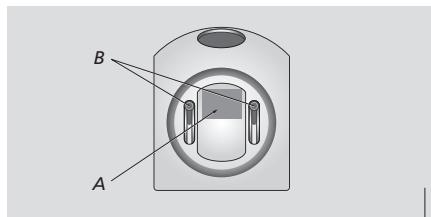
Bottom view of BeoLab 2 showing the location of the product identification label (A). If you wish to adjust the black rubber foot, place BeoLab 2 upside down and use the two adjustment screws (B).
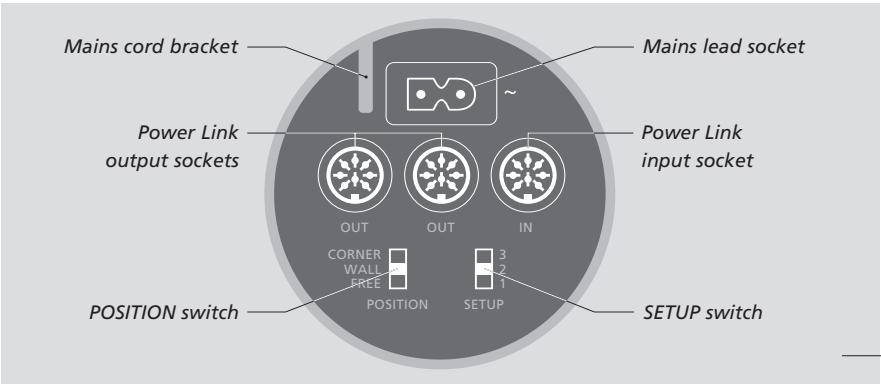
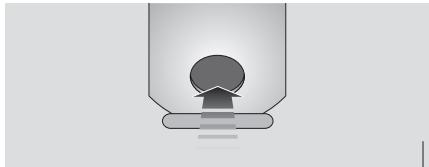
Rear view of BeoLab 2 showing the location of the socket and switch panel.
Overview of the socket and switch panel.
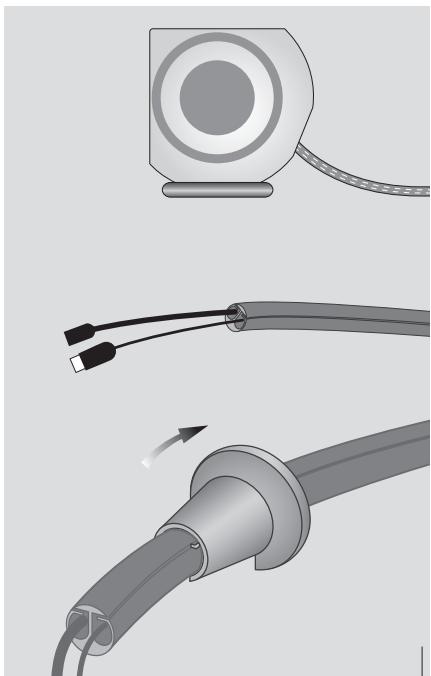
Cable cover: Use the enclosed tool to seal the cable cover when you have placed both the mains cord and the Power Link cable inside it.
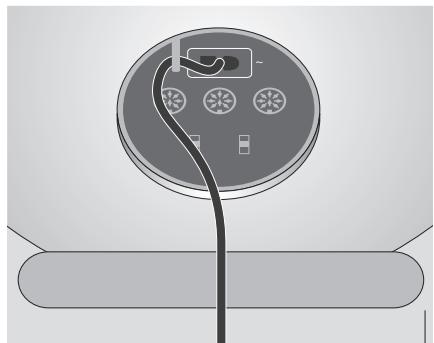
For safety reasons you must fasten the mains lead behind the mains cord bracket.
You gain access to the BeoLab 2 socket panel through the hole on the rear.
For reference, when locating the sockets, use the overview on the previous page and the graphics imprinted on the socket panel.
For specific information about the other speakers and units in your Bang & Olufsen system, please refer to the Guides enclosed with these systems.
You might find it easier to "thread" the cables into the enclosed cable cover before you connect them, as shown on the previous page.
Speaker connections
Connect the BeoLab 2 to your system using the enclosed 8-pin Power Link cable.
On the next page you can see examples of three different setups: two surround sound setups, and a stereo setup. In each example it is explained which sockets to use.
Dolby Digital system: The system has a dedicated SUBWOOFER socket, and all speakers are connected directly to your Bang & Olufsen system.
Dolby Pro Logic system: This system has no dedicated subwoofer socket. The front set of speakers is connected to BeoLab 2, and BeoLab 2 is connected to your Bang & Olufsen system. The rear set of speakers is connected directly to your Bang & Olufsen system.
Stereo system: The left and right speakers are connected to BeoLab 2, and BeoLab 2 is connected to your Bang & Olufsen system
Remember to set the L R LINE switch to the correct setting on each of your front and rear speakers.
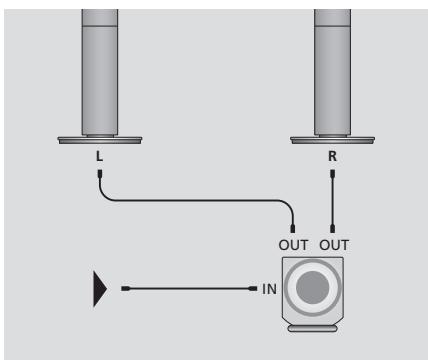
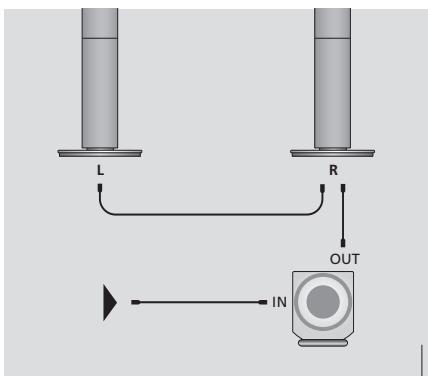
Looping the signals through from speaker to speaker: To avoid cables running from both front speakers to BeoLab 2, you may choose to loop the signal through from speaker to speaker.
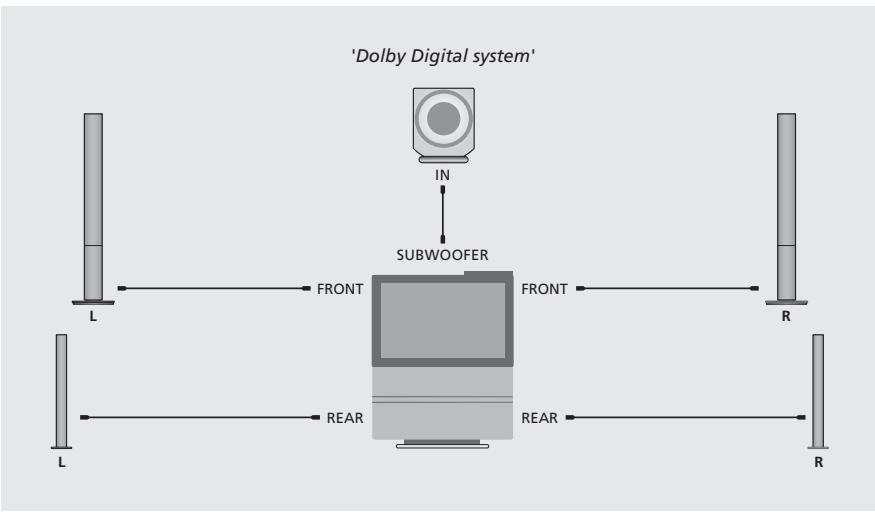
Setup examples
Dolby Digital system:
Connect one end of the cable to the socket marked IN on BeoLab 2, and the other end to the socket marked SUBWOOFER on your Bang & Olufsen system.
Connect your front set of speakers to the sockets marked FRONT on your Bang & Olufsen system.
Connect your rear set of speakers to the sockets marked REAR on your Bang & Olufsen system.
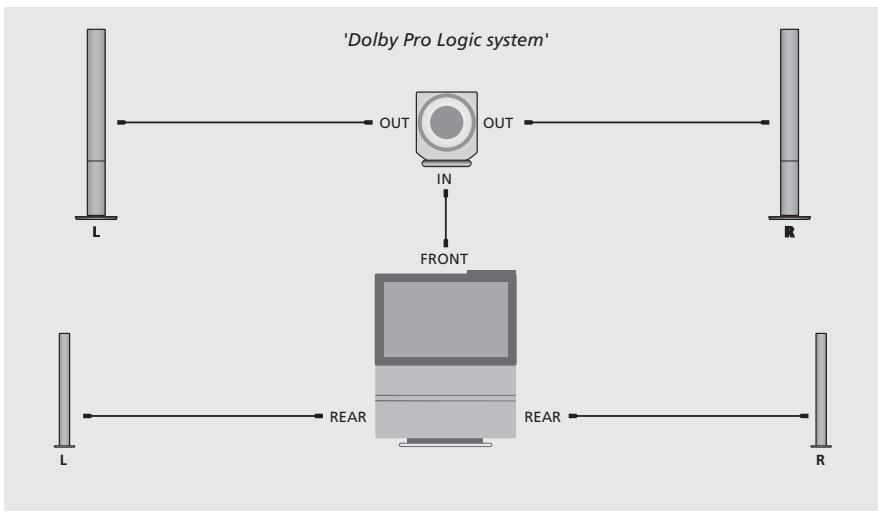
Dolby Pro Logic system:
Connect one end of the cable to the socket marked IN on BeoLab 2, and the other end to one of the sockets marked FRONT on your Bang & Olufsen system.
Connect your front set of speakers to the sockets marked OUT on BeoLab 2.
Connect your rear set of speakers to the sockets marked REAR on your Bang & Olufsen system.
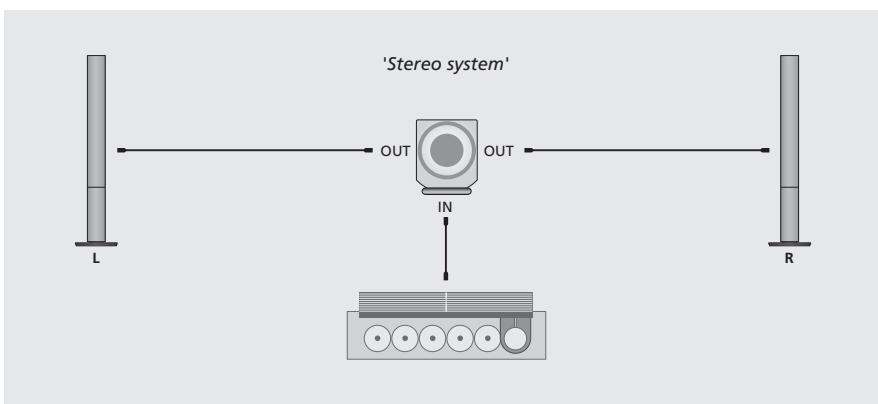
Stereo system:
Connect one end of the cable to the socket marked IN on BeoLab 2, and the other end to one of the speaker sockets on your Bang & Olufsen system.
Connect your left and right set of speakers to the sockets marked OUT on BeoLab 2.
BeoLab 2 can be placed almost anywhere in a room. However, the most natural sound and best stereo/surround sound experience is obtained if BeoLab 2 is set up according to the guidelines on these two pages.
To adapt to the sensitivity of the speaker system connected to BeoLab 2, it has a SETUP switch with three settings.
To filter out the natural bass change obtained if a loudspeaker is placed e.g. in a corner, as compared to a more freestanding position, BeoLab2 has a POSITION switch with three settings as well.
Setting the SETUP switch
Use the SETUP switch to adapt the output from BeoLab 2 to the sensitivity levels of the different BeoLab speakers.
The switch has three settings (1, 2, and 3), and which switch setting to choose depends on your speaker setup. The table to the right shows which setting to use with the different models of BeoLab speakers.
If, for example, you have a pair of BeoLab 1 speakers connected to BeoLab 2, you should set the SETUP switch to 1, and so on...
If you have a Dolby Digital system, and therefore no speakers are directly connected to BeoLab 2, we recommend that you set the SETUP switch to 3.
SETUP
3 BeoLab 2500
2 BeoLab Penta, BeoLab 8000, BeoLab 6000, BeoLab 4500, BeoLab 4000
1 BeoLab 1
If you connect BeoLab Penta to BeoLab 2, we recommend that you set the INPUT LEVEL switch on the BeoLab Penta to its middle position.
Placement - guidelines
Placement is flexible and easy with BeoLab 2. Due to its relative small size it can easily be integrated in most home environments, and may be placed almost anywhere you wish in the room.
However, to obtain the most natural sound you should place BeoLab 2 on the floor in the front half of the room, and with the front speaker unit facing your listening position.
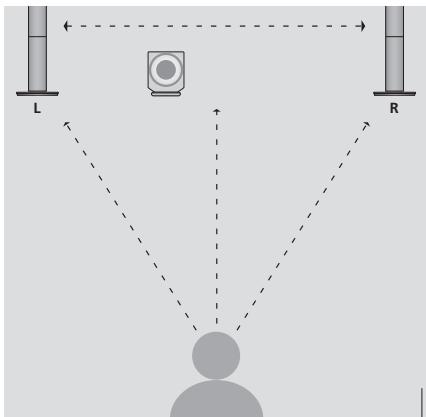
Ideally BeoLab 2 should be placed at about the same distance from your favourite listening position as the front set of speakers, that is, the left, (centre) and right speakers. If possible, you should choose a placement between the two front speakers.
Setting the POSITION switch
Use the POSITION switch to ensure that the bass response suits the placement of BeoLab 2, and thus the surroundings.
Which switch setting to choose depends on the distance from BeoLab 2 to the walls and corners of the room.
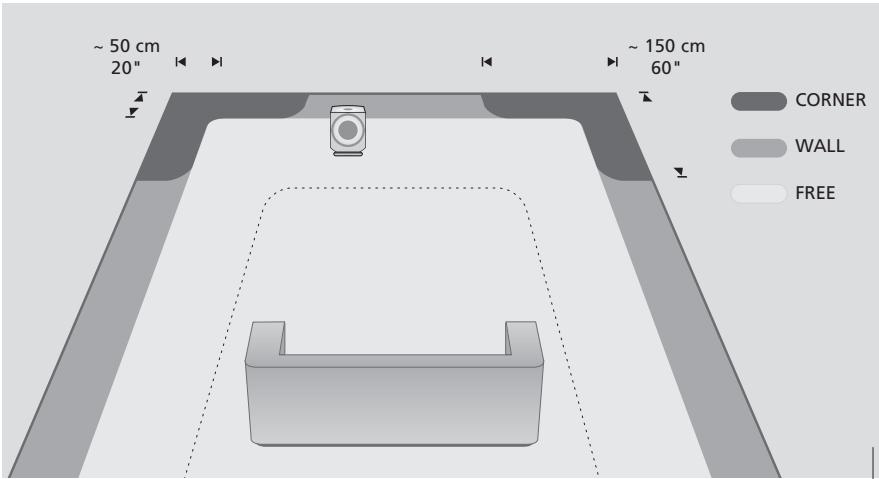
The POSITION switch has three settings:
CORNER: Use this setting if BeoLab 2 is placed in a corner - shown by the dark grey areas in the illustration.
WALL: Use this setting if NeoLab 2 is placed closer than approx. 50~cm (20^ ) to a wall, and no closer to a corner than approx. 150~cm (60^ ) - shown by the medium grey areas along the walls in the illustration.
FREE: Use this setting if BeoLab 2 is placed more than approx. 50~cm (20^ ) from the wall - shown by the light grey area in the illustration.
The dimensions mentioned are guidelines only. You may, of course, set the switch to any of the three positions you prefer.
Never place BeoLab 2 behind your listening position. We recommend that you avoid placing any of your loudspeakers in the area inside the thin dotted line.
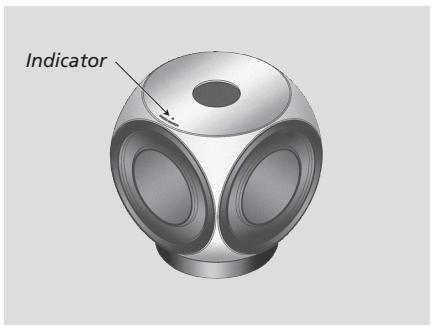
When Beolab 2 is connected to the mains, the stand-by indicator lights up in red, indicating that BeoLab 2 is in stand-by and ready to be used.
BeoLab 2 is designed to be left in stand-by mode when not in use, i.e. the power should not be switched off at the mains.
Please note: BeoLab 2 is designed to protect itself if the active speaker unit becomes overheated. The loudspeaker protection circuit may become active after a period of playing at a high volume level.
Switching on and off - indicator
When you switch on your Bang & Olufsen system, BeoLab 2 switches on simultaneously. The red stand-by indicator light turns green, indicating that BeoLab 2 is switched on.
When you switch off your system, or mute the sound, the red indicator light appears immediately, indicating that GeoLab 2 is not in use.
Loudspeaker protection
If the active speaker unit becomes overheated, BeoLab 2 will instantly reduce the sound level. Once the situation has stabilised, the sound level is slowly returned to normal. If the speaker is played constantly at such a high level, BeoLab 2 will eventually mute the sound completely.
Should BeoLab 2 mute the sound, the indicator light turns red.
To restore the sound:
Disconnect BeoLab 2 from the mains.
Allow the active speaker unit time to cool off.
Reconnect BeoLab 2 to the mains.
Should the problem persist, please contact your Bang & Olufsen retailer.
Cleaning BeoLab 2
Clean the surfaces of BeoLab 2 using a soft, lint-free cloth which you have wrung firmly in a solution of lukewarm water containing a few drops of e.g. dish washing detergent.
The speaker units may be cleaned with a vacuum cleaner, set to the lowest level.
Never use alcohol or other solvents to clean any part of your BeoLab 2!
NOTE: This equipment has been tested and found to comply with the limits for a class B digital device, pursuant to part 15 of the FCC Rules. These limits are designed to provide reasonable protection against harmful interference in a residential installation.
This equipment generates, uses and can radiate radio frequency energy and, if not installed and used in accordance with the instructions, may cause harmful interference to radio communications. However, there is no guarantee that interference will not occur in a particular installation. If this equipment does cause harmful interference to radio or television reception, which can be determined by turning the equipment off and on, the user is encouraged to try to correct the interference by one or more of the following measures:
- Reorient or relocate the receiving antenna.
- Increase the separation between the equipment and receiver.
- Connect the equipment into an outlet on a circuit different from that to which the receiver is connected.
- Consult the dealer or an experienced radio/TV technician for help.
This class B digital apparatus meets all requirements of the Canadian Interference-Causing Equipment Regulations.
For the Canadian market only!
CAUTION: To prevent electric shock do not use the polarized plug, attached to this apparatus, with an extension cord, receptacle or other outlet unless the blades can be fully inserted to prevent blade exposure.

This product fulfils the conditions stated in the EEU directives 89/336 and 73/23.
- Before you start...
- Connect your speaker system
- Adapt BeoLab 2 to your setup
- Daily use
- Cautions
- Speaker connections
- Setup examples
- Dolby Digital system:
- Dolby Pro Logic system:
- Stereo system:
- Setting the SETUP switch
- SETUP
- Placement - guidelines
- Setting the POSITION switch
- The POSITION switch has three settings:
- Switching on and off - indicator
- Loudspeaker protection
- To restore the sound:
- Cleaning BeoLab 2
- For the Canadian market only!
Brand : BANG & OLUFSEN
Model : BANG & OLUFSEN BEOLAB 2
Category : Speakers