
S1902D - Electronic device TEAC - Free user manual and instructions
Find the device manual for free S1902D TEAC in PDF.


| Product type | LED Television |
| Brand | TEAC |
| Model | S1902D |
| Screen size | 19 inches (48 cm) |
| Resolution | 1366 x 768 pixels (HD) |
| Dimensions (W x H x D) | 440 x 290 x 80 mm |
| Weight | 3.2 kg |
| Power supply | 100-240 V ~ 50/60 Hz |
| Power consumption | 30 W (standby < 0.5 W) |
| Main functions | DTT (DVB-T), USB, HDMI, VGA, built-in speakers |
| Maintenance and cleaning | Soft dry cloth, avoid solvents |
| Safety | Do not expose to moisture, use on a stable surface |
| Spare parts | Remote control, power adapter, stand |
| Repairability | Repairability score: 6.5/10 |
| Interference class | Digital class B (compliant) |
Frequently Asked Questions - S1902D TEAC
User questions about S1902D TEAC
0 question about this device. Answer the ones you know or ask your own.
Ask a new question about this device
Download the instructions for your Electronic device in PDF format for free! Find your manual S1902D - TEAC and take your electronic device back in hand. On this page are published all the documents necessary for the use of your device. S1902D by TEAC.
USER MANUAL S1902D TEAC
This device complies with part 15 of the FCC Rules. Operation is subjected to the following two conditions:
- This device may not cause harmful interference, and
- This device must accept any interference received, including interference that may cause undesired operation.
FCC WARNING
This equipment has been tested and found to comply with the limits for a Class B digital device, pursuant to Part 15 of the FCC Rules. These limits are designed to provide reasonable protection against harmful interference in a residential installation.
This equipment generates, uses and can radiate radio frequency energy and, if not installed and used in accordance with the instructions, may cause harmful interference to radio communications.
However, there is no guarantee that interference will not occur in a particular installation. If this equipment does cause harmful interference to radio or television reception, which can be determined by turning the equipment off and on, the user is encouraged to try to correct the interference by one or more of the following measures:
Reorient or relocate the receiving antenna.
- Increase the separation between the equipment and the receiver.
- Connect the equipment into an outlet different from that to which the receiver is connected.
- Consult the dealer or an experienced radio/TV technician for help.
Caution:
To comply with the limits for an FCC Class B computing device, always use the shielded signal cord supplied with this unit.
The Federal Communications Commission warns that changes or modifications of the unit not expressly approved by the party responsible for compliance could void the user's authority to operate the equipment.
Radio Frequency Interference Statement
Warning:
This is a Class B product. In a domestic environment, this product may cause radio interference in which case the user may be required to take adequate measures.
Canadian Doc Notice
For Class B Computing Devices
This digital apparatus does not exceed the Class B limits for radio noise emissions from digital apparatus as set out in the Radio Interference Regulation of the Canadian Department of Communications.
Please read the following instructions carefully. This manual should be retained for future use.
- To clean the LCD Monitor screen, first, make sure the Monitor is in the power off mode. Unplug the Monitor from its power source before cleaning it. Do not spray liquid cleaners directly onto the unit. Stand away from the LCD Monitor and spray cleaning solution onto a rag. Without applying excessive pressure, clean the screen with the slightly dampened rag.
- Do not place your LCD Monitor near a window. Exposing the Monitor to rain, water, moisture or sunlight can severely damage it.
- Do not place anything on top of the Monitor-to-PC signal cord. Make sure the cord is placed in an area where it will not be stepped on.
- Do not apply pressure to the LCD screen. Excessive pressure may cause permanent damage to the display.
- Do not remove the cover or attempt to service this unit by yourself. You may void the warranty. Servicing of any nature should be performed only by an authorized technician.
- Safe storage of the LCD Monitor is in a range of -20^ to +60^ (-4^ 140^) . Storing your LCD Monitor outside this range could result in permanent damage.
- If any of the following occurs, immediately unplug your Monitor and call an authorized technician.
The power or Monitor-to-PC signal cord is frayed or damaged.
- Liquid has been spilled onto the Monitor, or it has been exposed to rain.
The Monitor has been dropped or the case has been damaged.
-
Only with use of supplied adaptor, in case of loss or replacement contact the retailer or service center.
-
If you lost the power cord that we given, you must to purchase a same configuration/type of power cord (with ground-connection)
Japan: VCTF type, 3 wires or with ground-wire, T-mark approval is required.
U.S.: VW-1; 18AWG X 3C; SVT with national approval as UL and/or CSA approval/number(s)
Europe : VDE/ÖVE and/or KEMA approval; H05VV-F, 3G, 0.75mm^2 or equivalent.
Above power cord should bear with the type and manufacturer name on.
TABLE OF CONTENTS
PREFACE. I
TABLE OF CONTENTS
CHAPTER 1
Unpacking 1
Identifying Components 2
Hot-Key Buttons for Quick Adjustment of Monitor Settings 2
The LCD Monitor — Rear View 3
Adjusting the Viewing Angle 4
Connecting AC Power, Video, Audio and USB Cable (Optional) 6
Power Management System 6
CHAPTER 2 7
The LCD Monitor's Display Controls 7
Adjusting the Monitor's Display 8
OSD Main Menu (Please refer to Chapter 1 for details on functions) 8
APPENDIX A 15
LCD Monitor Specifications 15
APPENDIX B. 17
APPENDIX C 18
Troubleshooting Procedures 18
The LCD Monitor
Unpacking
After you unpack your LCD Monitor; make sure the following items are included in the box and in good condition:
LCD Monitor
Monitor-to-PC Analog signal cable (15-pin)
Monitor-to-PC Digital signal cable (24-pin) (optional)
- Stereo Jack Audio Cable (optional)
USB Cable (optional)
Power cord
- User's manual
If you find that any of these items are missing or appear damaged, contact your dealer immediately. Do not throw away the packing material or shipping carton in case you need to ship or store the LCD Monitor in the future.
Identifying Components
Hot-Key Buttons for Quick Adjustment of Monitor Settings
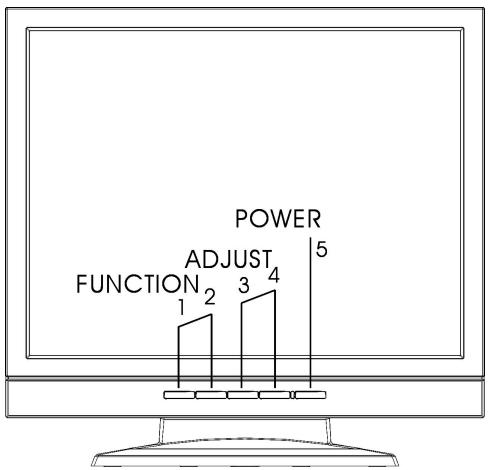
Figure 1-1: Hot-Key buttons
1."Auto-adjust" short-cut button:
Press button 2 to apply the monitor setting automatically. A small "AUTO ADJUST" OSD is also displayed.
2."Adjust-volume"short-cut button:
Press button 3 to allow you to adjust the audio volume directly.
3." Contrast-adjust" short-cut button:
Press button 4 to allow you to adjust the contrast of the display directly.
AUTO ADJUST
AUDIO-VOLUME

24
CONTRAST

24
** To close the small OSD windows, press the power button (button 5).
The LCD Monitor — Rear View
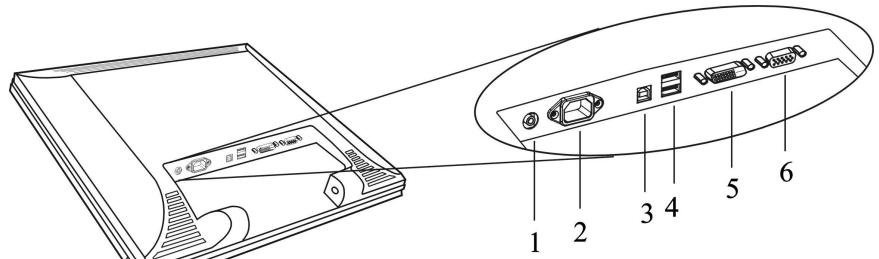
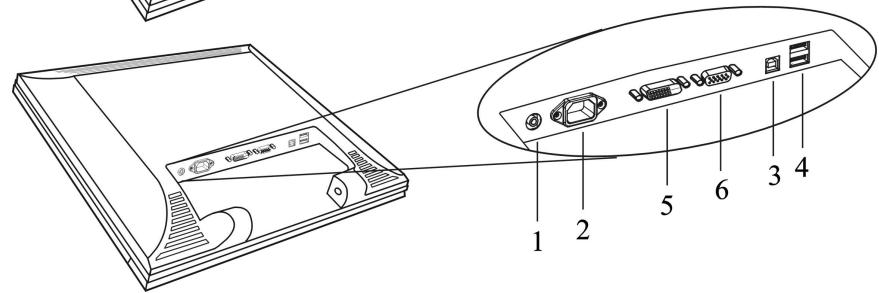
Figure 1-2: LCD Monitor's Rear Ports
- Audio Line-in (optional)
- AC Power Jack
3.Upstream USB Port (optional) - Downstream USB Ports (optional)
- Digital VGA Cable Connect (optional)
- VGA Cable Connector
Adjusting the Viewing Angle
The LCD Monitor's vertical angle setting range is from -3^ to 20^ . Please see Figure 1-3.
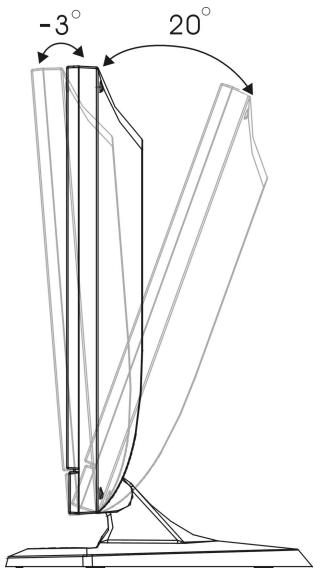
Figure 1-3: Angle Settings
Raising Your Monitor to an Upright Position and Adjusting Monitor Angle
Raising Your Monitor to an Upright Position
Please
When handling the monitor, take care to hold only the frame. Holding or applying pressure to the LCD panel may cause damage to your monitor.
① Firmly grip and hold down the monitor stand while you gently rotate your monitor upward.
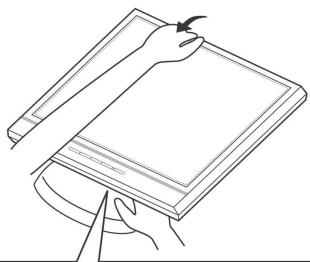

Caution!
Be careful not to catch your fingers or hand between the stand and the monitor.
② Some parts of the apparatus will tighten in the process of adjusting your monitor. When this happens, apply greater force and continue to adjust until the screen is standing upright and can not be adjusted further.
Some parts of the apparatus will tighten in the process of adjusting your monitor. When this happens, apply greater force and continue to raise your monitor to an upright position.
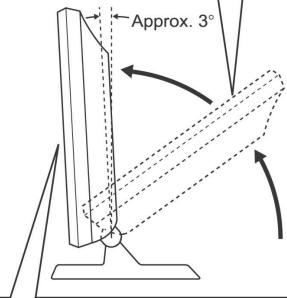
Continue to adjust the position of your monitor until it can not move any further forward. (Adjust until the monitor is tilted approximately 3^ toward you.
③ At this point you may freely adjust to a comfortable position.
Adjusting the Angle of Your Monitor
Firmly grip and hold down the monitor stand while you gently adjust your monitor to a desired angle.
Approx. 3^
Approx. 20^
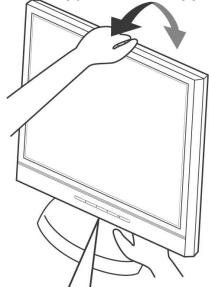

Caution!
Be careful not to catch your fingers or hand between the stand and the monitor.
Approx. 3^
Approx. 20^
Do not use in this range
Caution!
Do not use your monitor pushed back more than 20^ . Doing so may cause your monitor to fall over and lead to your injury or malfunction of the monitor.
Connecting AC Power, Video, Audio and USB Cable (Optional)
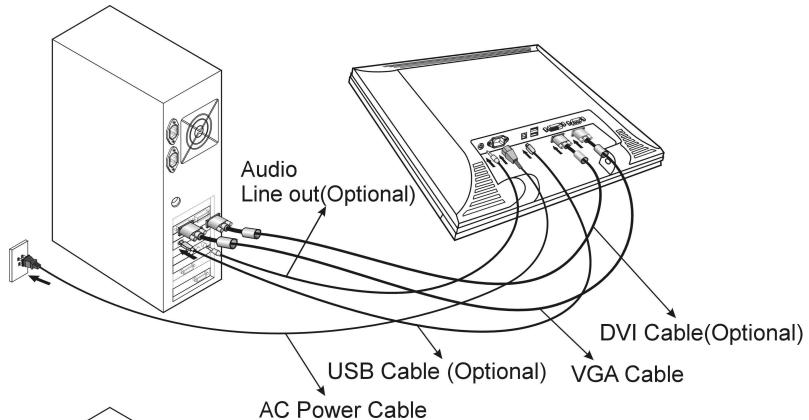
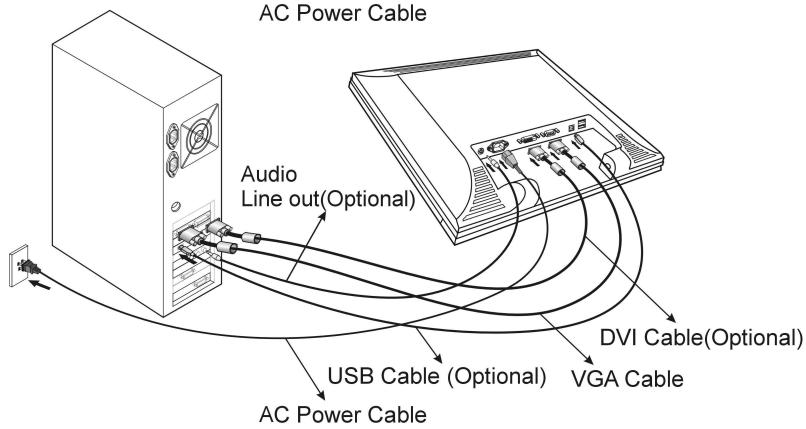
Figure 1-4:Connecting the LCD Monitor to the PC
Power Management System
The LCD Monitor complies with the VESA DPMS (version 1.0p) power management proposal. The VESA DPMS proposal provides four phases of power saving modes by detecting the horizontal or vertical sync signal.
When the LCD Monitor is in power saving mode or detects an incorrect timing, the Monitor screen will go blank and the power LED indicator will start to blink.
The Display Controls
The LCD Monitor's Display Controls
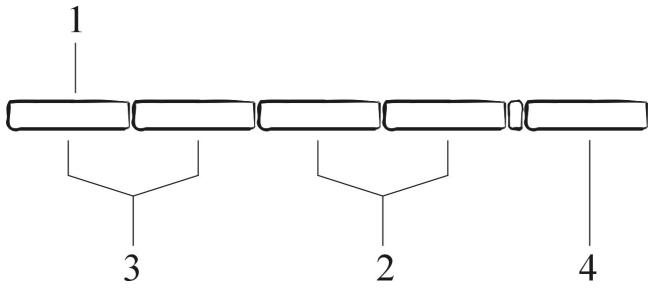
Figure 2-1: The LCD Monitor Panel
1. OSD Menu Button
Press this button to pop up the OSD (On-Screen Display) menu. This button is also a Function Select button.
2. Adjustment Control Buttons
These two buttons allow you to adjust the selected control functions in the OSD.
3. Function Select Buttons
These two buttons allow you to select the control functions in the OSD. Press either button to scroll through the main menu and submenu items.
4. Power Switch
Push the power switch to turn the monitor on and off. This switch is also a hot-key button to close the OSD menu while the OSD appears.
Adjusting the Monitor's Display
OSD Main Menu (Please refer to Chapter 1 for details on functions)
To access the OSD main menu, press the OSD Menu button. Use the Function Select buttons to scroll between the OSD main menu options. The option that is currently selected is highlighted.
Analog mode:
Each main menu and submenu item is covered below.
Pressing the OSD Menu button causes the following screen to appear (an example):
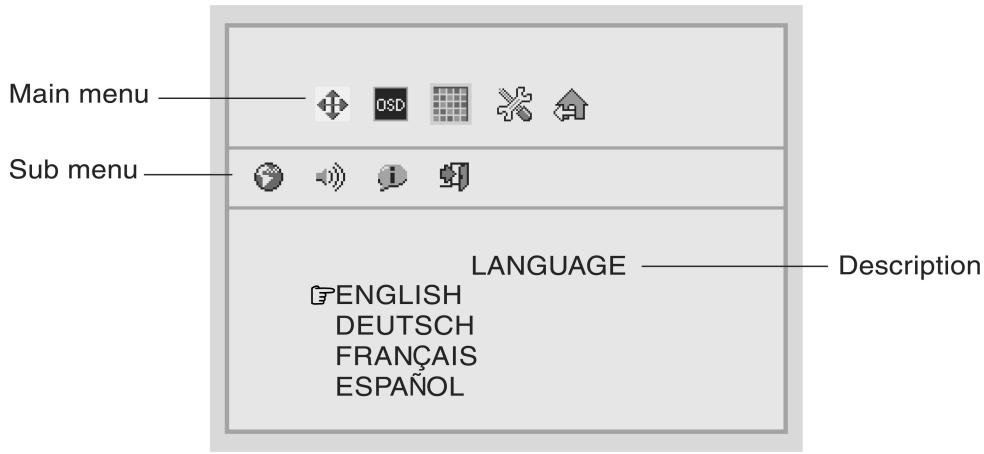
Figure 2-2: The OSD Main Menu
The Monitor-Control Option
The Monitor-Control option allows you to adjust the LCD monitor's display characteristics.

With the Monitor-Control icon selected, press the Function Enter button to display the submenu.
Use the Function Enter buttons to select one of the following submenu options:

AUTO-ADJUST: Use the Adjustment Control buttons to apply the automatic monitor settings.

H-POSITION: Use the Adjustment Control buttons to move the LCD monitor's display left or right on a horizontal plane.

V-POSITION: Use the Adjustment Control buttons to move the LCD monitor's display up or down on a vertical plane.

PHASE: Use the Adjustment Control buttons to adjust the focus and clarity of the display.

CLOCK: Use the Adjustment Control buttons to adjust the display pixel number alignment.

RESET: Pressing either of the Adjustment Control buttons resets H-Position, V-Position, Phase and Clock parameters.

GRAPH./TEXT: Press the Function Enter button to switch between the text and graphic options.

PORT-SELECT: Press the Adjust buttons to change input between VGA port and DVI digital port (optional).

EXIT: Pressing the Function Enter button exits the Monitor-Control submenu.
OSD-Control Option
The OSD-Control menu option lets you adjust the position of the OSD on the screen.

With the OSD-Control icon selected (use the Function select buttons), press the Function Enter button to display the submenu.
Use the Function Select buttons to select one of the following submenu options:

OSD-H-POSITION: Use the Adjustment Control buttons to change the position of the OSD on a horizontal plane.


OSD-V-POSITION: Use the Adjustment Control buttons to change the position of the OSD on a vertical plane.
OSD-TIMER : Use the Adjustment Control buttons to change the OSD display time.
EXIT: Pressing the Function Enter button exits the OSD-Control menu.
Graphic-Control Option
The Graphic-Control option lets you make adjustments that effect the contrast, brightness and color of the LCD monitor's display.
With the Graphic-Control icon selected, press the Function Enter button to display the submenu.
Use the Function Select buttons to select one of the following submenu options:

CONTRAST: Use the Adjustment Control buttons to adjust the difference between the lightest and darkest areas of the LCD monitor's display screen.

BRIGHTNESS: Use the Adjustment Control buttons to adjust the light level on the LCD monitor's display screen. It should be adjusted in conjunction with the Contrast item.

COLOR: Use either of the Adjustment Control buttons to select the LCD monitor's color display. The available options are 9300, 6500 and User. The 9300 and 6500 options let you set the Color Temperature to CIE coordinates 9300^ or 6500^ respectively. Selecting the user option lets you make individual adjustments to the R, G and B items.

R, G and B: Use these submenu items to make individual adjustments to the Red Blue Green (RGB) gain for the color temperature

Before adjusting these fields, you must select the User option in the Color submenu.


AUTO-LEVEL: To adjust automatically to perfect the white balance display.

RESET: Pressing either of the Adjustment Control buttons resets Contrast, Brightness and Color parameters.

EXIT: Pressing the Function Enter button exits the Graphic-Control submenu.
Misc-Control Option
The Misc-Control menu option lets you select the OSD display language, adjust the volume setting and view system information.

With the Misc-Control icon selected (use the Function select buttons), press the Function Enter button to display the submenu.
Use the Function Select buttons to select one of the following submenu options:

LANGUAGE: Use the Adjustment Control buttons to scroll to the desired OSD display language. The supported languages are German, English, French, Spanish, and Italian.

AUDIO-VOLUME: Use the Adjustment Control buttons to increase or decrease the volume of the LCD monitor's sound system.

INFORMATION: The Information submenu option is a display only item that provides information on the display mode and firmware version.

EXIT: Pressing the Function Enter button exits the MiscControl submenu.
OSD Exit Option
Use the OSD Exit item to close the OSD program.

Press the Function Enter button, with the OSD Exit item selected, to exit the OSD program.
The OSD will close by itself if left inactive.
Digital mode: (Optional)
Pressing the OSD Menu button causes the following screen to appear (an example):
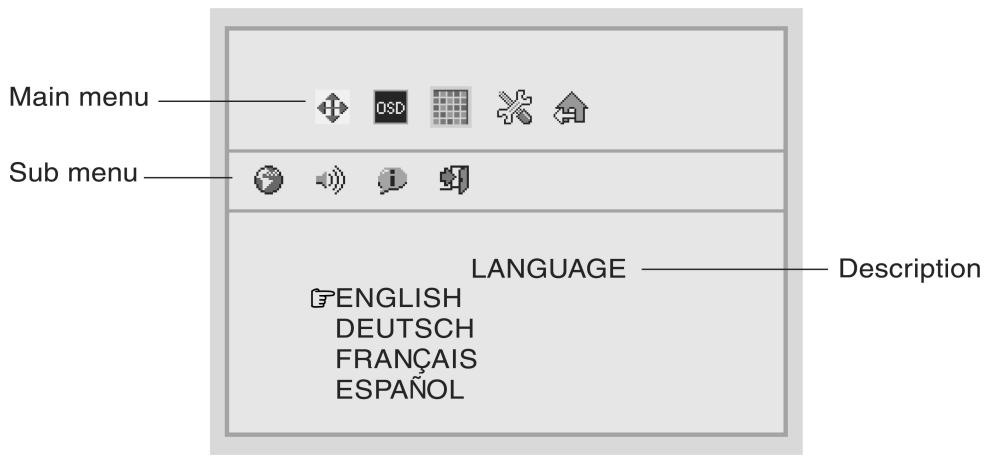
Figure 2-3: The OSD Main Menu
The Monitor-Control Option
The Monitor-Control option allows you to adjust the LCD monitor's display characteristics.

With the Monitor-Control icon selected, press the Function Enter button to display the submenu. Use the Function Enter buttons to select one of the following submenu options:

PORT-SELECT: Press the Adjust buttons to change input between VGA port and DVI digital port (optional).

EXIT: Pressing the Function Enter button exits the Monitor-Control submenu.
OSD-Control Option
The OSD-Control menu option lets you adjust the position of the OSD on the screen.

With the OSD-Control icon selected, press the Function Enter button to display the submenu. Use the Function Select buttons to select one of the following submenu options:

OSD-H-POSITION: Use the Adjustment Control buttons to change the position of the OSD on a horizontal plane.

OSD-V-POSITION: Use the Adjustment Control buttons to change the position of the OSD on a vertical plane.

OSD-TIMER : Use the Adjustment Control buttons to change the OSD display time.

EXIT: Pressing the Function Enter button exits the OSD-Control menu.
Graphic-Control Option
The Graphic-Control option lets you make adjustments that effect the contrast, brightness and color of the LCD monitor's display.

With the Graphic-Control icon selected, press the Function Enter button to display the submenu.
Use the Function Select buttons to select one of the following submenu options:

CONTRAST: Use the Adjustment Control buttons to adjust the difference between the lightest and darkest areas of the LCD monitor's display screen

BRIGHTNESS: Use the Adjustment Control buttons to adjust the light level on the LCD monitor's display screen. It should be adjusted in conjunction with the Contrast item.

RESET: Pressing either of the Adjustment Control buttons resets Contrast, Brightness and Color parameters.

EXIT: Pressing the Function Enter button exits the Graphic-Control submenu.
Misc-Control Option
The Misc-Control menu option lets you select the OSD display language, adjust the volume setting and view system information.

With the Misc-Control icon selected, press the Function Enter button to display the submenu.
Use the Function Select buttons to select one of the
following submenu options:

LANGUAGE: Use the Adjustment Control buttons to scroll to the desired OSD display language. The supported languages are German, English, French, Spanish, and Italian.

AUDIO-VOLUME: Use the Adjustment Control buttons to increase or decrease the volume of the LCD monitor's sound system.

INFORMATION: The Information submenu option is a display only item that provides information on the display mode and firmware version.

EXIT: Pressing the Function Enter button exits the MiscControl submenu.
OSD Exit Option
Use the OSD Exit item to close the OSD program.

Press the Function Enter button, with the OSD Exit item selected, to exit the OSD program. The OSD will close by itself if left inactive.
Note:
1. NOVIDEO
When the monitor is ON and there is no Video signal received, the "NOVIDEO" message will be displayed.
NOVIDEO
2. Signal out of monitor's supported range (Please refer to Addendum)
When the frequency range is out of the monitor's specifications, or the incoming resolution is higher than 1280x1024.
In this case, the video data will be turned off and a warning message "OVER RANGE" will be displayed.
OVER RANGE
Technical Information
LCD Monitor Specifications
| LCD Panel | 19" SXGA | |
| Control Functions Power | Software Power switch with LED indicator | |
| On-Screen Display (OSD) | Main Menu | Submenu |
| Monitor Control | Auto Adjust / Horizontal Position / Vertical Position / Phase / Clock / Reset / Graph./Text / Port Select / Exit | |
| OSD Control | OSD Horizontal Position / OSD Vertical Position / OSD Timer / Exit | |
| Graphic Control | Contrast / Brightness / Color / R / G / B / Auto Level / Reset / Exit | |
| Misc. Control | Language / Audio Volume / Information / Exit | |
| OSD Exit | ||
| Display Area (mm) | 376.32x 301.056mm(19 inch diagonal) | |
| Display Colors | 16.7M | |
| Video Interface | Analog port: VGA Compatible Analog RGB (15-pin D-Sub)Separate Sync. /Composite / Sync On GreenDigital port: DDWG compliant Single Link Tmds Digital VisualInterface (DVI)(Optional) | |
| Input Detection | AUTO-detection and OSD item for manual selection | |
| Scanning Frequency | 24-80k | |
| H/V, Hz | 50-75 | |
| (Analog mode) | ||
| Scanning Frequency | 30-80k | |
| H/V, Hz | 50-75 | |
| (Digital mode) | ||
| Power Management | Meets VESA DPMS | |
| Power Consumption (ON/OFF, W) | ON (Without USB):45W max. OFF:5W max. ON (With USB):50W max. OFF:5W max. (Measured from AC inlet) | |
| Dimensions WxHxD mm | 419 x 420 x 241 (1A) | |
| Net Weight (Kg) (Approx.) | 6.5±1 | |
| Power Supply | Built-In Universal Input Off-Line Power Supply | |
| Options | Wall-mounted bracket, Arm-mounted bracket (VESA Compliance) USB Ver1.1 Self-Powered Hub 1up / 2down stream ports | |
| Environment | Operating Temperature: 0 to 40°C Relative Humidity: 10% to 85% | |
| Audio (Two 1 Watt speakers with amplifier) | Yes | |
| Regulatory | N, cUL,TÜV / GS, CE, VCCI, FCC B DoC, TÜV-Ergonomics, TCO '99 (Optional) | |
Supported Timing
| Item | Standards | Resolution | DotClock(MHz) | VerticalScanningFrequency(Hz) | HorizontalScanningFrequency(kHz) | Sync Polarity or composite sync (H/V) | Operating Mode |
| 1 | NEC PC98 | 640x400 | 25.20 | 70.15 | 31.50 | -/- | A/D/G |
| 2 | NEC PC98 | 640x400 | 21.05 | 56.42 | 24.83 | -/- | A/G |
| 3 | MAC 13" mode | 640x480 | 30.24 | 66.67 | 35.00 | -/- | A/D/G |
| 4 | MAC 16" mode | 832x624 | 57.28 | 74.55 | 49.73 | -/- | A/D/G |
| 5 | MAC 17" mode | 1024x768 | 80.00 | 75.02 | 60.24 | -/- | A/D/G |
| 6 | VGA | 640x350 | 25.18 | 70.09 | 31.47 | +/- | A/D/G |
| 7 | VGA | 640x400 | 25.18 | 70.09 | 31.47 | -/+ | A/G |
| 8 | VGA | 640x480 | 25.18 | 59.94 | 31.47 | -/- | A/D/G |
| 9 | VESA | 640x480 | 31.50 | 72.81 | 37.86 | -/- | A/D/G |
| 10 | VESA | 640x480 | 31.50 | 75.00 | 37.50 | -/- | A/D/G |
| 11 | VESA | 800x600 | 36.00 | 56.25 | 35.16 | +/+ | A/D/G |
| 12 | SVGA | 800x600 | 40.00 | 60.32 | 37.88 | +/+ | A/D/G |
| 13 | VESA | 800x600 | 50.00 | 72.19 | 48.08 | +/+ | A/D/G |
| 14 | VESA | 800x600 | 49.50 | 75.00 | 46.88 | +/+ | A/D/G |
| 15 | VGA | 720x400 | 28.32 | 70.09 | 31.47 | -/+ | A/G |
| 16 | XGA | 1024x768 | 65.00 | 60.00 | 48.36 | -/- | A/D/G |
| 17 | VESA | 1024x768 | 75.00 | 70.07 | 56.48 | -/- | A/D/G |
| 18 | VESA | 1024x768 | 78.75 | 75.03 | 60.02 | +/+ | A/D/G |
| 19 | 1024x768 | 71.64 | 66.13 | 53.96 | +/+ | A/D/G | |
| 20 | VESA | 1152x864 | 108.00 | 75.00 | 67.50 | +/+ | A/D/G |
| 21 | 1152x870 | 100 | 75.06 | 68.68 | -/- | A/D/G | |
| 22 | VESA | 1280x960 | 108.0 | 60.0 | 60.0 | +/+ | A/D/G |
| 23 | VESA | 1280x1024 | 108.0 | 60.02 | 63.98 | +/+ | A/D/G |
| 24 | VESA | 1280x1024 | 127.0 | 69.85 | 74.88 | +/+ | A/D/G |
| 25 | VESA | 1280x1024 | 135.0 | 75.03 | 79.98 | +/+ | A/D/G |
| 26 | SUN | 1024x768 | 64.13 | 59.98 | 48.29 | H+V | A |
| 27 | SUN | 1024x768 | 74.25 | 70.04 | 56.59 | H+V | A |
^A = Analog Mode; D = Digital Mode; G = Sync On Green Mode
Once a mode is optimized, there is no need to make any further adjustment as long as the VGA card remains unchanged.
*Specifications are subject to change without notice.
Troubleshooting
Troubleshooting Procedures
This LCD Monitor was pre-adjusted in the factory with standard VGA timing. Due to output timing differences among various VGA cards, you may initially experience an unstable or unclear display when a new display mode or new VGA card is selected.

This LCD Monitor Supports Multiple VGA Modes. Refer to Addendum for a listing of the factory preset modes supported by this LCD Monitor.
PROBLEM: Display is Unclear and Unstable
To stabilize and clarify your display, follow this procedure in this order:
- It's best to adjust the display on a screen displaying of vertical lines. In Windows, load a wallpaper bitmap that has vertical lines in it. (or you can select the window shut down screen)
- After you have the wallpaper loaded, open the OSD and select the "Clock" function. Press the top (or bottom) Adjustment Control button and continue pressing the button until you see vertical dark and light lines across the screen.
- When you can see distinct light and dark vertical bands, stop pressing the Adjustment Control button. Now press the opposite (top or bottom) Adjustment Control button. The vertical dark and light bands will decrease in number. Keep pressing the button until the distinct bands disappear and you have a clear display.
- Next, press the Function Control button to choose the "Phase" function. The Phase will adjust the horizontal display. Press the top (or bottom) Adjustment Control button and you will see horizontal dark and light lines appear. The number of lines increases as you press the button. Now press the bottom (or top)
PROBLEM: There is no LCD Display
If there is no display on the LCD, please perform the following steps:
- Make sure that the power indicator on the LCD Monitor is lit, all connections are secure, and the system is running on the correct timing. Refer to the Addendum for information on timing.
- Turn off the LCD Monitor and then turn it back on again. Press the upper Function Control button (refer to Chapter 2) once and then press either the upper or lower Adjustment Control button several times. If there is still no display, press the other Adjustment Control button several times.
- If step 2 doesn't work, connect your PC system to another external CRT. If your PC System functions properly with a CRT Monitor but it does not function with the LCD Monitor, and the LCD Monitor's power LED is blinking, the output timing of the PC's VGA card may be out of the LCD's synchronous range. Please change to an alternate mode listed in Addendum or replace the VGA card and repeat steps 1 and 2.
- If the PC doesn't function with the CRT monitor neither, check BIOS to see if there is a dual scan setting under the display mode item. Set the BIOS display mode to Dual Scan or CRT and try again. If there is still no display, then there may be a problem with your system. Contact technical support.
- If the power LED is not lit, check to see if the AC power connector is securely connected. Verify that the AC adapter LED is lit. If the AC adapter LED is not lit, please contact your dealer for assistance.
- FCC WARNING
- Caution:
- Radio Frequency Interference Statement
- Warning:
- Canadian Doc Notice
- For Class B Computing Devices
- TABLE OF CONTENTS
- PREFACE. I
- CHAPTER 1
- CHAPTER 2 7
- APPENDIX A 15
- APPENDIX B. 17
- APPENDIX C 18
- The LCD Monitor
- Unpacking
- Identifying Components
- Hot-Key Buttons for Quick Adjustment of Monitor Settings
- 1."Auto-adjust" short-cut button:
- 2."Adjust-volume"short-cut button:
- 3." Contrast-adjust" short-cut button:
- The LCD Monitor — Rear View
- Adjusting the Viewing Angle
- Raising Your Monitor to an Upright Position and Adjusting Monitor Angle
- Raising Your Monitor to an Upright Position
- Caution!
- Adjusting the Angle of Your Monitor
- Connecting AC Power, Video, Audio and USB Cable (Optional)
- Power Management System
- The Display Controls
- The LCD Monitor's Display Controls
- OSD Menu Button
- Adjustment Control Buttons
- Function Select Buttons
- Power Switch
- Adjusting the Monitor's Display
- OSD Main Menu (Please refer to Chapter 1 for details on functions)
- Analog mode:
- The Monitor-Control Option
- OSD-Control Option
- Graphic-Control Option
- Misc-Control Option
- OSD Exit Option
- Digital mode: (Optional)
- Note:
- NOVIDEO
- Signal out of monitor's supported range (Please refer to Addendum)
- Technical Information
- Supported Timing
- Troubleshooting
- Troubleshooting Procedures
- PROBLEM: Display is Unclear and Unstable
- PROBLEM: There is no LCD Display
Brand : TEAC
Model : S1902D
Category : Electronic device