
DV-W58G - DVD Player TEAC - Free user manual and instructions
Find the device manual for free DV-W58G TEAC in PDF.
| Product Type | Internal DVD Drive (IDE ATAPI) |
| Brand | TEAC |
| Model | DV-W58G |
| Supported Formats (Read) | DVD-ROM, DVD-Video (single and dual layer), DVD±R, DVD±RW, CD-ROM (Mode-1), CD-ROM XA, CD-DA (Audio CD), Video CD, Photo CD, CD-Extra, CD Plus, CD-Text, CD-R, CD-RW |
| Supported Formats (Write) | DVD+R, DVD-R, DVD+RW, DVD-RW, CD-R, CD-RW |
| DVD-ROM Read Speed | 5.2x - 12x (CAV) |
| CD-ROM Read Speed | 16x - 40x (CAV) |
| DVD+R Write Speed (8x media) | 8x (Zone-CLV) |
| DVD-R Write Speed (4x media) | 4x (CLV) |
| CD-R Write Speed | 18x - 40x (Partial CAV) |
| Maximum Disc Capacity | DVD: 4.7 GB, CD-R: 700 MB (type 80), 650 MB (type 74) |
| Dimensions (W x H x D) | 148.4 mm x 42.8 mm x 170.0 mm |
| Weight | 900 g |
| Power Supply | +5 V, +12 V |
| Interface | IDE (ATAPI), ATA/ATAPI-5 |
| Buffer Memory | 2 MB |
| Access Time (DVD-ROM) | 160 ms typical |
| Access Time (CD-ROM) | 160 ms typical |
| Rear Connectors | Power, 40-pin IDE, Audio Output (line out), Configuration Jumpers |
| Front Panel | Eject/Inject Button, Bicolor LED, Headphone Jack (stereo mini-jack), Volume Dial |
| Operating Temperature | 5 to 45 °C |
| Operating Humidity | 15 to 80 % (non-condensing) |
| Safety Standards | UL, TÜV, FCC, CE |
| Reliability (MTBF) | 70,000 hours (25% duty cycle) |
| Maintenance and Cleaning | Do not use brush-type cleaning CDs or compressed air. Clean discs with a soft cloth. |
| Safety | Class 1 laser radiation. Do not open the case; serious injury may occur. |
Frequently Asked Questions - DV-W58G TEAC
User questions about DV-W58G TEAC
0 question about this device. Answer the ones you know or ask your own.
Ask a new question about this device
Download the instructions for your DVD Player in PDF format for free! Find your manual DV-W58G - TEAC and take your electronic device back in hand. On this page are published all the documents necessary for the use of your device. DV-W58G by TEAC.
USER MANUAL DV-W58G TEAC
TEAC DV-W58G Dual DVD ± R/RW Drive
Quick Installation Guide
The TEAC DV-W58G is a modern high performance Dual DVD+/-R/RW drive. It offers reading speeds of 12x for DVD-ROM media and 40x for CD-ROM media. The maximum writing speed is rated to 8x for DVD+Rs, to 4x for DVD-Rs, to 4x for DVD+RWs, to 2x for DVD-RWs, to 40x for CD-Rs, and to 24x for CD-RWs. DVD+/-Rs and DVD+/-RWs media allow to store up to 4.7GB.
Caution:
Use of controls or adjustments or performance of procedures other than those specified herein may result in hazardous radiation exposure.
If the protective housing of the device listed above is opened without the consideration of the appropriate processing, serious injuries may result caused by the effect of the laser beam.
Components
Quick Installation Guide;
Kit version only: 4 mounting screws M3x5mm, 40-pin IDE data cable, audio cable.
The kit version can be identified if the product name ends with the letter "K" or "Kit".
System requirements
Your DV-W58G supports all major operating systems (with the exception of Windows 3.1x) and all major hardware platforms. To get the full performance it is recommended to use a system environment which's computing power is equivalent to an IBM compatible PC with a Pentium II CPU with 300MHz clock frequency or more, 64MByte RAM or more and a fixed disk with an access time of 12ms or less.
Important:
To use the DV-W58G, an IDE (ATAPI) controller is required. The necessary drivers are shipped with the corresponding controller card or they are available from the manufacturer of the controller.
Please do not install your DV-W58G near sources of radiating heat like hard disks.
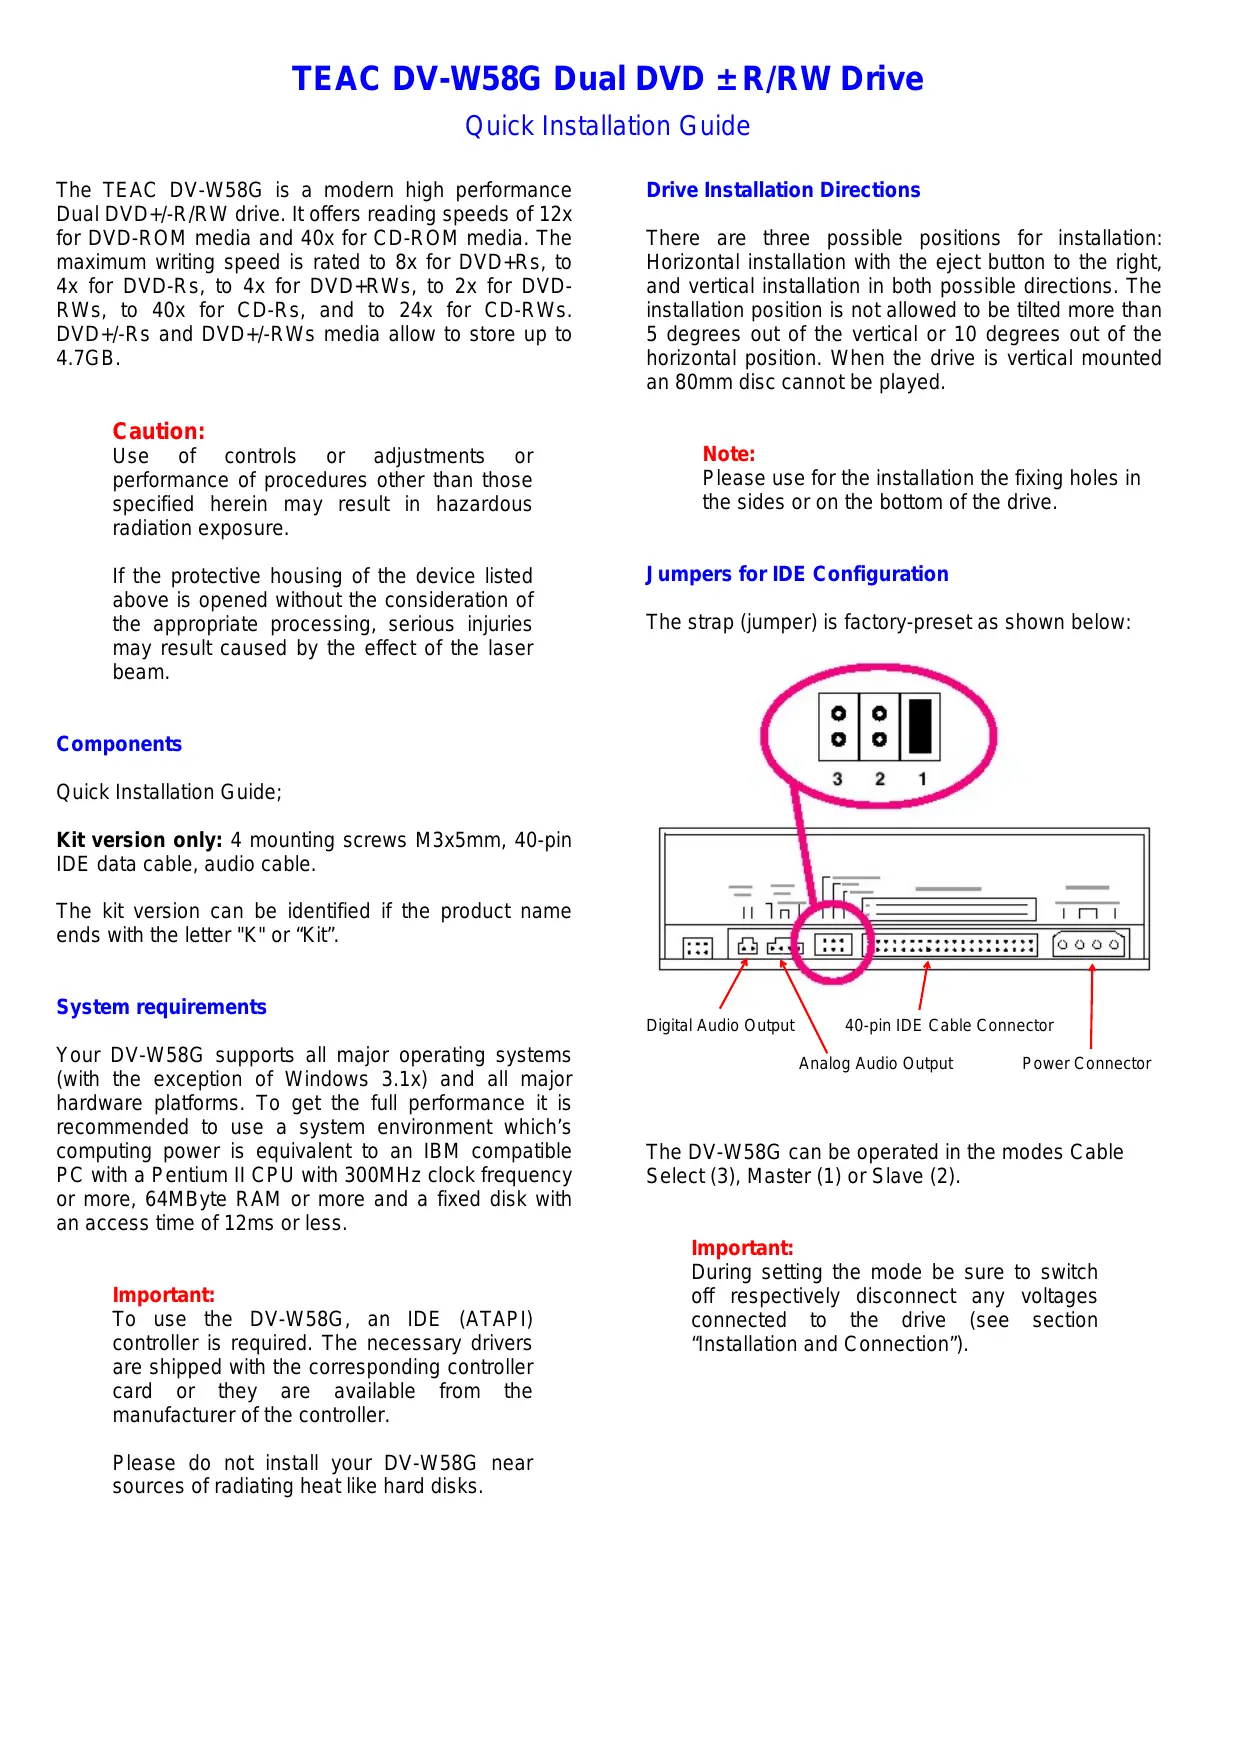
Drive Installation Directions
There are three possible positions for installation: Horizontal installation with the eject button to the right, and vertical installation in both possible directions. The installation position is not allowed to be tilted more than 5 degrees out of the vertical or 10 degrees out of the horizontal position. When the drive is vertical mounted an 80mm disc cannot be played.
Note:
Please use for the installation the fixing holes in the sides or on the bottom of the drive.
Jumper for IDE Configuration
The strap (jumper) is factory-preset as shown below:

The DV-W58G can be operated in the modes Cable Select (3), Master (1) or Slave (2).
Important:
During setting the mode be sure to switch off respectively disconnect any voltages connected to the drive (see section "Installation and Connection").
| 1 | 2 | 3 | Remarks |
| - | - | x | Master: The DV-W58G is configured as first IDE drive (basic setting). This configuration can be used only if the DV-W58G is connected to the second IDE controller (secondary IDE). If a hard disk is already operated at the secondary IDE controller (configured as master) the jumper setting at the DV-W58G has to be changed to slave. |
| - | X | - | Slave: The DV-W58G is configured as second IDE drive. If there is only one hard disk in the PC the optical drive can be operated at the same IDE connection parallel to this hard disk. Important: The data rates of both devices may be decreased. |
| X | - | - | Cable Select: Master/slave detection is achieved by the controller. |
Installation and Connection
Very important:
Switch off your PC and any attached devices and disconnect the power cord(s). It is not sufficient to switch off the power switch! Do the same if the optical drive is reconfigured.
(1) Open the case of your PC and lift it off carefully.
(2) Configure the optical drive if necessary.
(3) Locate a free slot for 13.3cm / 5.25 drives and install the Drive using the provided four screws.
Important:
Do not use screws which are longer than 5 mm!
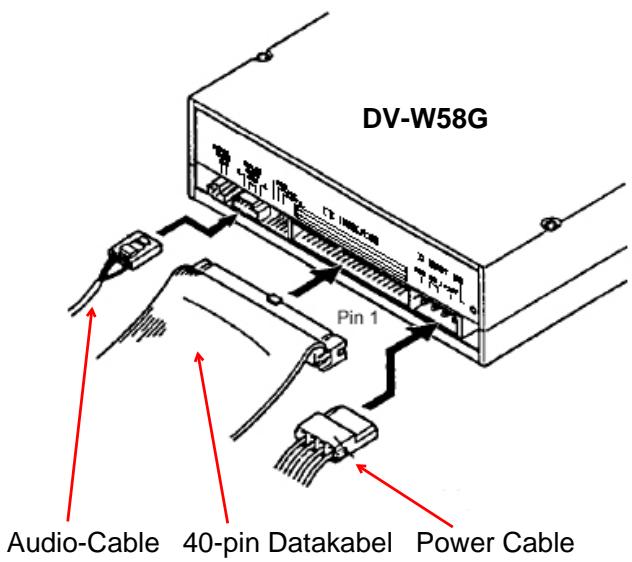
(4) Connect the power cable and the 40-pin data cable (assure the correct orientation, pin 1 is often marked with a color stripe) to the drive. Connecting in the wrong orientation may damage the drive and the PC!
(5) Connect the provided audio cable to the sound card.
Usually sound cards offer more than one connector to connect an audio cable to. Please refer to the manual of the sound card to find the connector in question.
(6) Close the case of the PC. Do not forget to connect other devices and accessories if there are any.
(7) Connect the PC to the wall outlet and switch it on
Important:
If your PC will not start up correctly switch it off immediately and check all of the connections and jumper settings.
Controls and Functions at the Front Panel
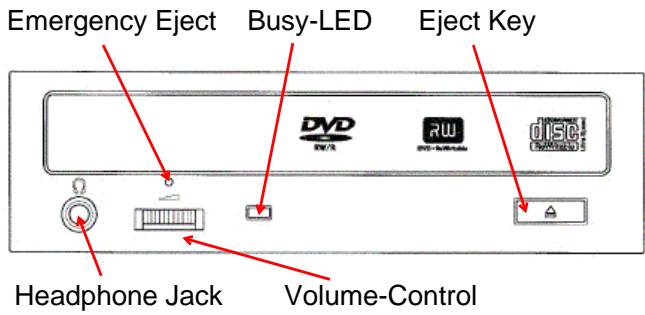
ON/BUSY indicator
The indicator LED light in Seek, Play, Read, and Write operation. In the following table you will find a list including a description of the different drive states and their associated indicator states.
| Operation | LED |
| Write | Red LED lights |
| Audio Play | Green LED flashes |
| Seek/Data Transfer | Green LED lights |
| At start | Green LED flashes |
Cleaning and maintenance of your DV-W58G
DV-W58G will not need maintenance if used as specified in this manual. Usually there are only problems with dirty or defective CD/DVDs.
Important:
Do not use cleaning CDs which will remove dirt of the lense of the laser aided by a little brush. Do not clean the inner parts of your DV-W58G with compressed air. Any of these methods may cause damage to your DV-W58G.
Handling:
Check the CD/DVD before inserting it into the drive. It should not have finger prints or other dirt on it. Especially at high reading velocities dirt may increase the number of reading errors.
Very important:
Shape CD/DVDs, a kind of CD/DVD which is not shaped like the normal round CD/DVD, are not allowed to be used in this drive. Otherwise rotational forces may cause severe damage to the drive.
Installing Drivers and the Writer Software
As a general precaution the installation of the hardware has to be carried out as described before. The software installation starts with activating the reading functionality of the drive as this is well known with any conventional CD-ROM drive. If the reading functionality is available the next installation step is to achieve the writing functionality provided of the writer software. More details according the installation of your writer software you will find in its documentation.
Installing Drivers with Windows 95/98/ME/2000/XP
According to the Plug-and-Play conventions the optical drive is recognized as a standard CD-ROM drive first. To make this possible the drives hardware installation must have been carried out correctly. After switching on your computer, Windows 95/98/ME /2000/XP will install the necessary driver automatically.
Caution:
Do not install any additional drivers with Windows 95/98/ME/2000/XP.
Installing Drivers with Windows NT 4.0 and OS/2
After installing the hardware, the reading functionality of the optical drive is activated with installing the drivers shipped with the corresponding operating system. The drivers may be configured and activated aided by the system control. Please refer to the manual of your operating system for any details.
Compatibility or Interoperability to other IDE Devices
If there are any problems if other drives are connected to the same IDE port (especially IDE-Changer, Phase Change Drive, ZIP-Drive, and others), the optical drive has to be connected as master as a single drive.
| 1 | Disc | |
| Applicable discs | DVD; DVD-ROM, DVD-Video (single and dual layer), DVD+/-R, DVD+/-RW (note: DVD-RAM is not supported) CD; CD-ROM (Mode-1), CD-ROM XA, CD-DA (Audio CD), Video CD, Photo CD (single or multi-session), CD-Extra, CD Plus, CD-Text, CD-R, CD-RW | |
| Writable discs | DVD+/-R 4.7GB, DVD+/-RW 4.7GB CD-R 700MB (type 80), 650MB (type 74), CD-RW | |
| Disc diameter | 12cm, 8cm | |
| Write methods | DVD+/-R; Disc At Once (un-interrupted), Incremental DVD+/-RW; Sequential Recording: Disc At Once (un-interrupted) and Incremental, Restricted overwrite CD-R/-RW; Disc At Once, Session At Once, Track At Once, Variable Packet Write | |
| Disc rotation speed | 8,200rpm approx. (40x CAV) | |
| 2 | Rotation speed (read mode) | |
| 5.2x - 12x (CAV) | DVD-ROM (single layer) | |
| 3.5x - 8x (CAV) | DVD-ROM (dual layer) | |
| 2.5x - 6x (CAV) | DVD-R, DVD+R, DVD-RW, DVD+RW | |
| 16x - 40x (CAV) | CD-ROM, CD-R, CD-DA (DAE) | |
| 13x - 32x (CAV) | CD-RW | |
| 3 | Rotation speed (write mode) | |
| 8x (Zone-CLV) | DVD+R (8x media) | |
| 4x (CLV) | DVD-R (4x media) | |
| 4x (CLV) | DVD+RW (4x media) | |
| 2x (CLV) | DVD-RW (2x media) | |
| 18x - 40x (Partial CAV) | CD-R | |
| 10x - 24x (Partial CAV) | CD-RW (Ultra speed media | |
| Under some circumstances, the maximum write speed may not be achieved due to external factors (e.g. supported DVD-R/CD-R media speed or data transfer rate of the PC) | ||
| 4 | Drive Performance | |
| Data transfer rate (Asynchronous transfer) | Programmed I/O: 16.6MB/s max. (Default: PIO Mode-4) Burst DMA: 16.6MB/s max. (Default: MW DMA Mode-2) Burst UDMA: 33.3MB/s max. (Default: ULTRA DMA Mode-2) | |
| Access time | DVD-ROM: 160ms typical (random stroke) CD-ROM : 160ms typical (random stroke), by TEAC standard | |
| Starting time from power on | 18sec of less (average) (excluding the multisession photo CD), by TEAC standard | |
| Data buffer capacity | 2MB | |
| 5 | Data read error rate | Block/10-15bits (DVD-ROM) Block/10-12bits (CD-ROM Mode-1) Block/10-9bits (CD-ROM Mode-2, ECC off) |
| 6 | Front Panel | |
| Button | Auto eject or Auto inject | |
| Indicator (LED) | 1x dual Color LED | |
| Headphone Output | Stereo mini-jack 0.7+/-0.2Vrms 33Ohm | |
| Volume control | Thumb wheel knob | |
| 7 | Rear panel | |
| Power supply | +5V, +12 | |
| Interface connector | IDE (ATAPI): ATA/ATAPI-5 | |
| Audio Output | Line out 0.85+/-0.15Vrms 47kOhm | |
| Strap switch | Mode setting straps (Master) | |
| 8 | Operating environment | |
| Place of Operation | Temperature 5 to 45degC, Humidity 15 to 80% (non-condensation) | |
| Place of storage | Temperature -40 to 60degC, Humidity 15 to 95% (non-condensation) | |
| 9 | Dimensions/weight | |
| Dimensions (WxHxD) | 148.4mm x 42.8mm x 170.0mm | |
| Weight | 900g | |
| 10 | Safety standards | UL, TÜV, FCC, CE |
| 11 | Reliability: MTBF | 70,000 POH (duty 25%) |
- TEAC DV-W58G Dual DVD ± R/RW Drive
- Quick Installation Guide
- Caution:
- Components
- System requirements
- Important:
- Drive Installation Directions
- Note:
- Jumper for IDE Configuration
- Installation and Connection
- Very important:
- Controls and Functions at the Front Panel
- ON/BUSY indicator
- Cleaning and maintenance of your DV-W58G
- Handling:
- Installing Drivers and the Writer Software
- Installing Drivers with Windows 95/98/ME/2000/XP
- Installing Drivers with Windows NT 4.0 and OS/2
- Compatibility or Interoperability to other IDE Devices
Brand : TEAC
Model : DV-W58G
Category : DVD Player