
DV-W50D - DVD player TEAC - Free user manual and instructions
Find the device manual for free DV-W50D TEAC in PDF.


| Product Type | Internal DVD Drive |
| Brand | TEAC |
| Model | DV-W50D |
| Dimensions (W x H x D) | 148 x 42.3 x 197.7 mm |
| Weight | 1100 g |
| Power Supply | +5 V / +12 V DC |
| Power Consumption (typical CD playback) | 8.73 W |
| Power Consumption (typical DVD playback) | 9.61 W |
| Power Consumption (typical CD-R writing) | 11.28 W |
| Power Consumption (typical DVD-R writing) | 9.18 W |
| Interface | IDE (ATAPI) ATA/ATAPI-5 |
| Max CD-ROM Read Speed | 32x CAV |
| Max DVD-ROM Read Speed (single layer) | 12x CAV |
| Max CD-R Write Speed | 16x CLV |
| Max CD-RW Write Speed | 10x CLV (High Speed) |
| Max DVD-R/DVD+R Write Speed | 4x CLV |
| Max DVD-RW Write Speed | 2x CLV |
| Max DVD+RW Write Speed | 2.4x CLV |
| Formats Read | DVD-ROM, DVD-Video, DVD-Audio, DVD-R, DVD-RW, DVD+R, DVD+RW, CD-ROM, CD-DA, CD-ROM XA, CD-I, Video CD, CD-Text, CD-R, CD-RW, Photo-CD |
| Formats Written | DVD-R, DVD+R, DVD-RW, DVD+RW, CD-R, CD-RW |
| DVD Disc Capacity | 4.7 GB per layer |
| Data Buffer | 2 MB |
| Access Time (DVD) | 140 ms typ. |
| Access Time (CD) | 130 ms typ. |
| Analog Audio Connector | Line output 0.7 V, 10 kΩ |
| Jumper Configuration | Master (MA), Slave (SL), Cable Select (CS) |
| Operating Temperature | 5 to 45 °C |
| Operating Humidity | 5 to 85 % (non-condensing) |
| Storage Temperature | -20 to 60 °C |
| Storage Humidity | 5 to 90 % (non-condensing) |
| Safety Standards | UL, CSA, TÜV, CE |
| Reliability (MTBF) | 60,000 hours (10% duty cycle) |
| Maintenance | Clean only discs with a soft cloth; do not use cleaning discs or compressed air inside the drive. |
| Safety | Class 1 laser; do not open the case to avoid exposure to radiation. |
| Spare Parts and Repairability | Contact TEAC technical support or an authorized dealer for spare parts and repairs. |
Frequently Asked Questions - DV-W50D TEAC
User questions about DV-W50D TEAC
0 question about this device. Answer the ones you know or ask your own.
Ask a new question about this device
Download the instructions for your DVD player in PDF format for free! Find your manual DV-W50D - TEAC and take your electronic device back in hand. On this page are published all the documents necessary for the use of your device. DV-W50D by TEAC.
USER MANUAL DV-W50D TEAC
To ensure the smooth handling of your warranty please write the serial number of your drive into the box. In the case of warranty you are expected to send it together with a copy of your invoice to your nearest TEAC sales representative.
- Changes in specifications and features may be made without notice or obligation.
Copyright © 2003, TEAC Deutschland GmbH. All rights reserved. First edition: June 2003 - Company and product names provided herein are trademarks of their respective companies.
CONTENTS
TO THE USER 26
SAFETY CONSIDERATIONS RELATING TO THE FCC RULE PART 15 27
DECLARATION OF CONFORMITY 27
SAFETY CONSIDERATIONS RELATED TO LASER PRODUCTS 28
INDRODUCTION 30
1.COMPORTS 30
2. SYSTEM REQUIREMENTS 31
3. PRECAUTIONS FOR INSTALLATION AND OPERATION 32
Important Safety Instructions 32
4.CONTROLS AND FUNCTIONS 34
4.1 Front Panel 34
4.2 Rear panel 36
- CONNECTION TO A PERSONAL COMPUTER 40
5.1 Drive Installation Directions 40
5.2 Installation and Connection 40
- CONNECTION TO AUDIO EQUIPMENT 42
- INSTALLING DRIVERS AND THE WRITER SOFTWARE 42
7.1 Installing Drivers with Windows 98SE/ME/2000/XP 42
7.2 Installing Drivers with Windows NT 4.0 and OS/2 42
7.3 Compatibility or Interoperability to Other IDE Devices 43
- TECHNICAL SUPPORT 43
8.1 Product Warranty 43
8.2 Technical Service Depots (Europe) 43
- SPECIFICATIONS 45
Specifications (continued) 46
TO THE USER
This equipment has been tested and found to comply with the limits for a Class B digital device, pursuant to Part 15 of the FCC Rules. These limits are designed to provide reasonable protection against interference in a residential area. This device generates and uses radio frequency energy and if not installed and used in accordance with the instructions, it may cause interference to radio or TV reception. If this unit does cause interference with TV or radio reception, you can try to correct the interference by one or more of the following measures:
(a) Reorient or relocate the receiving antenna.
(b) Increase the separation between the equipment and the receiver.
(c) Plug the equipment into a different outlet so that it is not on the same circuit as the receiver.
(d) Consult the dealer or an experienced radio/TV technician for help.
CAUTION
Changes or modifications to this equipment not expressly approved by TEAC for compliance could void the user's authority to operate this equipment.
To ensure that the use of this product does not contribute to interference, it is necessary to use shielded I/O cables.
SAFETY CONSIDERATIONS RELATING TO THE FCC RULE PART 15
Declaration of Conformity
Model Number: DV-W50D
Trade Name: TEAC
Responsible party: TEAC AMERICA, INC.
Address: 7733 Telegraph Road, Montebello,
California, U.S.A.
Telephone Number: 1-213-726-0303
This device complies with Part 15 of the FCC Rules.
Operation is subject to the following two conditions:
(1) This device may not cause harmful interference,
and
(2) this device must accept any interference received, including interference that may cause undesired operation.
DECLARATION OF CONFORMITY
We declare that the product drive TEAC DV-W50D is in conformity with the following standards:
EMC: EN 55022:1998; EN 55024:1998
Safety: EN 60950:1992 + A1:1993 + A2:1993 + A3:1995 +
A4:1997 + A11:1997; EN 60825-1:1994 + A11:1996
The device conforms with the protection requirements of council directives 73/23/EEC, 89/336/EEC, and 93/68/EEC relating to safety and electromagnetic compatibility.
SAFETY CONSIDERATIONS RELATED TO LASER PRODUCTS
This product has been designed and manufactured according to FDA regulations „title 21, CFR, chapter 1, subchapter J. based on the radiation Control for Health and Safety Act of 1968", and is classified as a class 1 laser product. There is no hazardous invisible laser radiation during operation because invisible laser radiation emitted inside of this product is completely confined in the protective housings.
CAUTION
Use of controls or adjustments or performance of procedures other than those specified herein may result in hazardous radiation exposure.
Important:
If the protective housing of the device listed above is opened without the consideration of the appropriate processing, serious injuries may result caused by the effect of the laser beam.
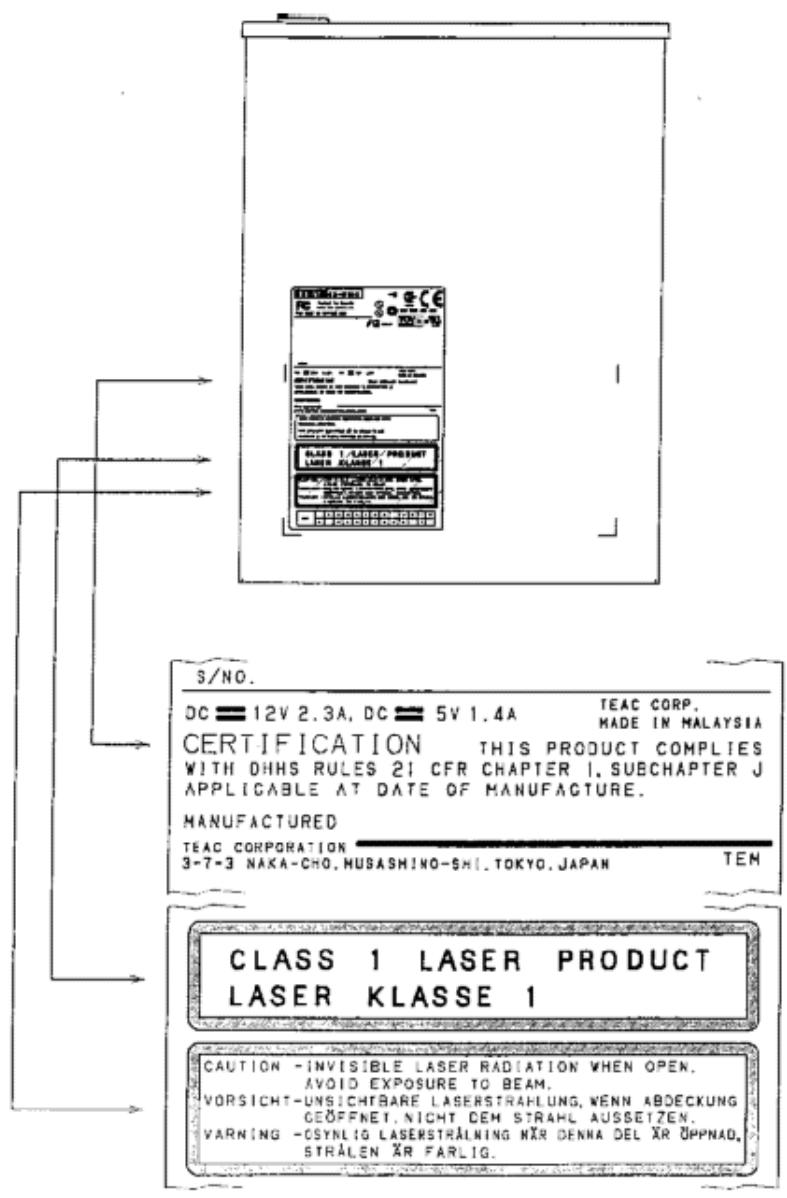
Label with safety remarks on your device
INDRODUCTION
The TEAC DV-W50D is a modern high performance DVD±R/DVD±RW drive. It offers reading speeds of 12x for DVD-ROM media and 32x for CD-ROM media. The maximum writing speed is rated to 4x for DVD-Rs/DVD+Rs, to 2.4x for DVD+RWs, to 2x for DVD-RWs, to 16x for CD-Rs and to 10x for CD-RWs. DVD-Rs and DVD-RW media allow to store up to 4.7GB.
1. COMPONENTS
The drive is shipped with the following components. Open the packing box and confirm that none of the parts are missing.
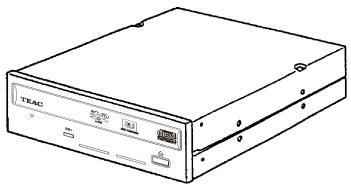

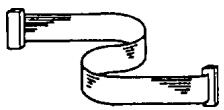
① DV-W50D drive
② Mounting screws (M3x5)
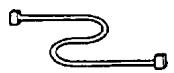
③ Interface cable
④ Audio cable
⑤ User's manual (CD)
Warranty booklet
For any other accessories please refer to the printed notes on the packaging.
2. SYSTEM REQUIREMENTS
Your TEAC drive supports all major operating systems (with the exception of MS-DOS, Windows 3.1x and Windows 95) and all major hardware platforms. To get the full performance it is recommended to use a system environment which's computing power is equivalent to:
- IBM compatible PC with a Pentium III CPU with 600MHz clock frequency or more
- 128MByte RAM or more
- Minimum 10GByte Free HDD Capacity
- 24 bit Colour Graphic Display with 1024 × 768 resolution
- Windows 98SE/2000/ME/NT/XP
Important:
- To use the TEAC drive, an IDE (ATAPI) controller is required. Usually these controllers are integrated into the system board of your PC. The drivers necessary to run the TEAC DV-W50D are available at your dealer or they are a standardized part of your operating system.
- Please do not install your TEAC drive near sources of radiating heat like hard disks.
Selecting the DVD-R/DVD-RW/DVD+R/DVD+RW and CD-R/CD-RW media for your TEAC drive
An actual list of media recommended by TEAC can be found at TEACs web site under www.teac.de/support. Please select the menu "CD-Medias".
3. PRECAUTIONS FOR INSTALLATION AND OPERATION
Important Safety Instructions
Do not install any abnormal disk or DVD into the TEAC DV-W50D, which has a warp, a crack, and/or a sticker on it. Do not install a Shape-DVD/CD into the drive.
In no event shall TEAC be liable for any damages caused by such a problem due to a defective disk.
Installation
Avoid installation in places with
high rates of moisture
- temperatures above the specified maximum
- large temperature differences
- large amounts of dust and dirt
- vibrations and
- direct exposure to sun light.
Operation
Do not operate your TEAC drive under operating conditions exceeding the conditions discussed in this manual. If you believe your TEAC drive to be defective please contact your dealer or any of the TEAC facilities.
Important Hints for Using the drive
What is stated in the specification must be observed for the user to get the most out of the drive. Especially, the following precautions must be observed for quality of recording.
(a) Avoid vibration or impact.
During recording or playing, don't subject the drive to vibration or impact. Vibration or impact especially during recording can result
in poor recording. The following problems also can result occasionally:
- The disk (DVD-R, DVD-RW, DVD+R, DVD+RW respectively CD-R, CD-RW) becomes defective because of faulty recording, and cannot be read.
- Additional recording cannot be made because of faulty previous recording.
(b) Data protection
Recording may not be completed normally in some cases due to a malfunction of the drive, a defective medium, etc. Therefore, use the following precautions.
- Be sure to confirm the recording status by playing back the newly recorded data after completing the recording operation.
- Be sure to store the source file from which the data is recorded until the recording is confirmed.
- Do not repair the drive or replace a part of the drive under circumstances other than designated assurance conditions.
Cleaning and maintenance of your TEAC drive
TEAC drive will not need maintenance if used as specified in this manual. Usually there are only problems with dirty or defective DVDs/CDs.
Important:
Do not use cleaning CDs which will remove dirt of the.
lense of the laser aided by a little brush. Do not clean
the inner parts of your TEAC drive with compressed air.
Any of these methods may cause damage to your TEAC drive.
4. CONTROLS AND FUNCTIONS
4.1 Front Panel
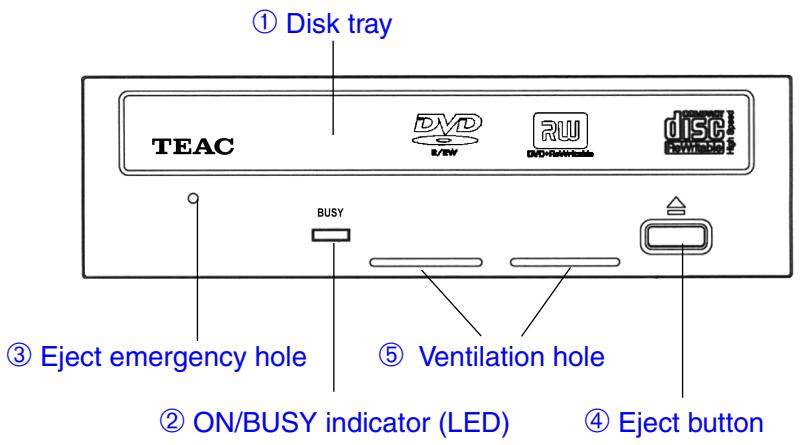
① Disk tray
Insert the disk (DVD, CD) with its label facing up.
Note:
Please ensure the DVD/CD is inserted in a way where the plugs at the rear of the disk tray and the spring loaded plug on the front prevent the disk from falling out of the tray. This is of major importance if the drive is used in one of the vertical positions.
When using an 8cm-CD disk in horizontal position, place it on the specified position at the center of the tray. Never use it in the vertical position.
② ON/BUSY indicator
The indicator LED lights in Seek, Play, Read, and Write operation. In the following table you will find a list including a description of the different drive states and their associated indicator states.
| Operation mode | Indicator |
| During reading/data transfer | LED lit |
| During writing | LED lit |
| Audio Play | LED lit |
| Seek | Lit when SEEK command is issued |
| Boot up (Power on PC) | LED lit |
| Tray open/close | LED lit |
③ Eject emergency hole
When the power is switched OFF and the eject button does NOT function, insert a metal rod (diameter of 1.2mm or less) into this hole at a right angle to the front panel, then push the rod to eject the disk. Do this only when the device is switched off and the ON/ BUSY indicator is NOT lit. Wait more than one minute until the disk rotation is stopped when access the eject hole.
④ Eject button
Press this button to open or close the disk tray.
⑤ Ventilation hole
Cooling air intake port. Do not block the hole by other objects.
4.2 Rear panel
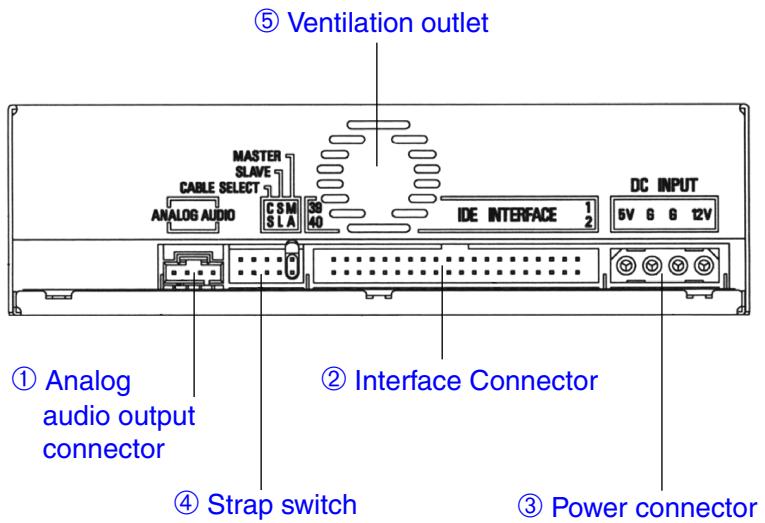
① Analog Audio output connector
For stereo audio signal output.
When driving external speakers, connect this connector to the audio input connector on the Sound Card or Interface Card.
Note:
Mating connectors: Molex 70553 or equivalent.
| Connector No. | Audio signal |
| 1 | Left channel Signal |
| 2 | Ground |
| 3 | Ground |
| 4 | Right channel Signal |
② Interface connector
Connect to the IDE interface card using the 40-pin flat cable.
Cable-side mating connectors: 5320-40AGS1 Molex, or equivalent. Total length of the cable must be less than 46cm .
③ Power connector
Connect to the +5 VDC and +12 VDC power source.
Cable-side mating housing: 8981-4P Molex
Cable-side mating terminal: 8980-3L Molex
Current consumption TEAC DV-W50D
| 5V | 12V | Power consumption | |
| Idle (typ.) | 0.48A | 0.15A | 4.2W |
| Stand-by (typ.) | 0.20A | 0.04A | 1.48W |
| Read (typ. CD-ROM) | 0.69A | 0.44A | 8.73W |
| Read (typ. DVD-ROM) | 0.65A | 0.53A | 9.61W |
| Access (max.) | 1.10A | 0.70A | 13.9W |
| Write (typ. CD-R) | 0.96A | 0.54A | 11.28W |
| Write (typ. DVD-R) | 0.90A | 0.39A | 9.18W |
| Start Up (max.) | 1.10A | 1.40A | 22.3W |
Power interface connector pin number
| Pin No. | Power |
| 1 | +12VDC |
| 2 | 0V |
| 3 | 0V |
| 4 | +5VDC |
④ IDE Configuration Jumpers (wrap swich)
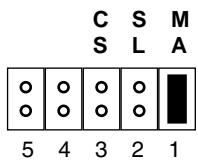
The drive has a Master/Slave/cable select jumper which must be correctly set before the drive is installed.
The strap is factory-preset as shown:
Important:
During setting the mode be sure to switch off respectively disconnect any voltages connected to the drive (see section "5.2 Installation and Connection").
The TEAC DV-W50D can be operated in the modes Cable Select (CS), Master (MA) or Slave (SL).
| Jumper | Name | Function |
| 1 | MA | Short socket is set (factory-preset): The drive is used in Master mode. |
| 2 | SL | Short socket is set: The drive is used in Slave mode. |
| 3 | CS | Short socket is set: Cable Select. Master or Slave drive is set by using Cable Select terminal. |
| 4 | reserved | reserved |
| 5 | reserved | reserved |
Today PCs are equipped with primary and secondary IDE connectors. Usually there is also a 40 pin flat ribbon cable available at each of the connectors. It is possible to connect up to two IDE drives to each of the cables. Regardless if the two drives are connected to the primary or the secondary cable it is necessary to
configure for each of the cables one of the drives as master and the other one as slave drive.
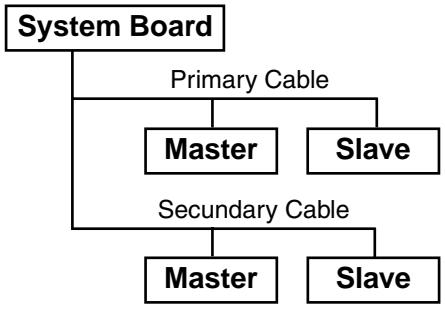
Please take into consideration that the IDE controller adapts itself to the slower one of the both drives. This may affect the performance of your system. Though it is possible to run a drive together with a hard disk at the same IDE connector this is not recommended. Configurations should be selected where the hard disk runs at the primary and the drive at the secondary cable.
Recommended configurations:
| Primary Cable | Secondary Cable | Notes | ||
| Master | Slave | Master | Slave | |
| ATA hard disk drive | - | - | - | One hard disk drive on one cable. |
| DVD (Master) | - | - | - | One drive on one cable. |
| DVD (Master) | DVD (Slave) | - | - | Two drives on one cable. |
| ATA hard disk drive | ATA hard disk drive | - | - | Two hard disk drives on one cable. |
| ATA hard disk drive | - | DVD (Master) | - | One hard disk drive on one cable and one drive on a second cable. |
| ATA hard disk drive | ATA hard disk drive | DVD (Master) | - | Two hard disk drives on one cable and one drive on a second cable. |
⑤ Ventilation outlet
Cooling air outlet port. Do not block the outlet by other objects!
5. CONNECTION TO A PERSONAL COMPUTER
5.1 Drive Installation Directions
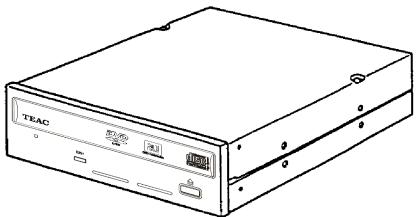
There are three possible positions for installation: Horizontal installation with the eject button to the right, and vertical installation in both possible directions. The installation position is not allowed to be tilted more than ± 5 degrees out of the vertical or horizontal position.
Note:
Please use for the installation the fixing holes in the sides or on the bottom of the drive.
5.2 Installation and Connection
Very important:
Switch off your PC and any attached devices and disconnect the power cord(s). It is not sufficient to switch off the power switch!
Do the same if the drive is reconfigured.
(1) Open the case of your PC and lift it off carefully.
(2) Configure the drive if necessary.
(3) Locate a free half-height-drive slot for 13.3cm / 5.25 drives. Carefully slide the drive into the opening so that the disk tray shows at the front of the computer. It may be easier to connect the cables first before you push the drive fully into the slot and to fix it with screws.
(4) Connect the power cable and the 40-pin data cable (assure the correct orientation, pin 1 is often marked with a color stripe) to the drive. Connecting in the wrong orientation may damage the drive and the PC!
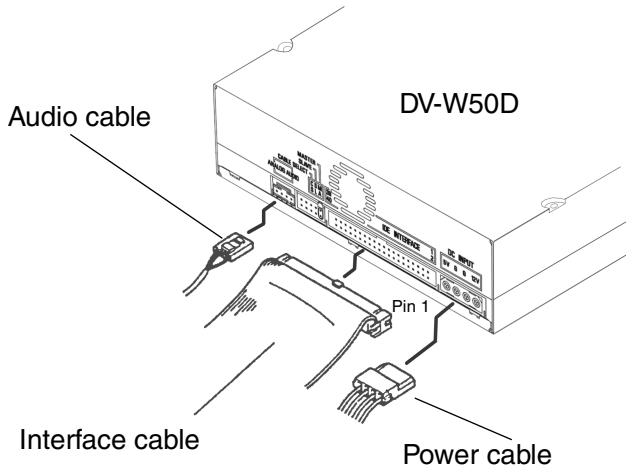
(5) Connect the drive to your sound card. Use the audio cable provided with your sound card.
Usually sound cards offer more than one connector to connect an audio cable to. Please refer to the manual of the sound card to find the connector in question.
(6) Fix the drive in place with the factory supplied screws.
Note:
Be sure to use the mounting screws provided. If longer than specified screw is used, the DV-W50D may be damaged.
(7) Close the case of the PC. Do not forget to connect other devices and accessories if there are any.
(8) Connect the PC to the wall outlet and switch it on.
Important:
If your PC will not start up correctly switch it off immediately and check all of the connections and jumper settings.
6. CONNECTION TO AUDIO EQUIPMENT
It is possible to connect audio devices to the audio connector on the rear.
7. INSTALLING DRIVERS AND THE WRITER SOFTWARE
As a general precaution the installation of the hardware has to be carried out as described before. The software installation starts with activating the reading functionality of the drive as this is well known with any conventional CD-ROM drive. If the reading functionality is available the next installation step is to achieve the writing functionality provided of the writer software. More details according the installation of your writer software you will find in its documentation [Help].
7.1 Installing Drivers with Windows 98SE/ME/2000/XP
According to the Plug-and-Play conventions the drive is recognized as a standard CD-ROM drive first. To make this possible the drives hardware installation must have been carried out correctly. After switching on your computer, Windows 98SE/ME/2000/XP will install the necessary driver automatically.
Caution:
Do not install any additional drivers with Windows 98SE/ME/2000/XP.
7.2 Installing Drivers with Windows NT 4.0 and OS/2
After installing the hardware, the reading functionality of the drive is activated with installing the drivers shipped with the corresponding operating system. The drivers may be configured and activated aided by the system control. Please refer to the manual of your operating system for any details.
7.3 Compatibility or Interoperability to Other IDE Devices
If there are any problems if other drives are connected to the same IDE port (especially IDE-Changer, Phase Change Drive, IOMEGA, and others), the DV-W50D has to be connected as master or as a single drive.
8. TECHNICAL SUPPORT
In case the DV-W50D does not operate normally in the environment specified in this manual, contact the representative from whom you purchased the drive or our nearest sales office to you.
8.1 Product Warranty
Two years following the purchase of this unit is the guarantee period. Any failures arising from the design or production of this unit are to be repaired free of charge within two years following purchase. For details, refer to the warranty card provided with the unit.
8.2 Technical Service Depots (Europe)
Technical Support Tel: 0180 5999 588 (EUR 0.12/min (Germany))
Mo-Fr from 8:30-20:00 CET
Sa from 10:00 - 16:00 CET
Technical Support Fax: +49 (0) 611 7158 666
Online RMA: http://www.teac.de/RMA
Technical Support Freecall: 0800 08 53 704 (U.K. only)
Mo-Fr from 8:30-20:00 CET
Sa from 10:00 - 16:00 CET
Technical Support Fax: +49 (0) 611 7158 666
Online RMA: http://www.teac.de/RMA
TEAC FRANCE S.A. (France)
Technical Support Tel: +33 (0) 155590155
Mo-Fr from 9:00-16:00 CET
Technical Support Fax: +33 (0) 1 55 59 01 56
Online RMA: http://www.teac.de/RMA
Contact us by email: Support@teac.fr
TEAC Service Centre Poland
Galaktyczna 23
80-299 Gdansk
Technical Support Tel: +48 (0) 58 34 02 300
Mo-Fr from 9:00-16:00 CET
Online RMA: http://www.teac.de/RMA
Contact us by email: support_pl@teac.de
All other countries please call:
+496117158600
9. SPECIFICATIONS
- Media
| Applicable DVDs | DVD-ROM (single and dual layer), DVD Video, DVD AudioDVD-R (vers. 2.00), DVD-RW (vers. 1.0+1.1),DVD+R (vers. 1.0+1.1),DVD+RW (vers. 1.2)DVD-RAM is not supported |
| Applicable CDs | CD-ROM Mode-1/650 MB/700 MB, CD-DA/74 min/79 min,CD-ROM XA Mode-2 (Form-1)/650 MB/700 MB,CD-ROM XA Mode-2 (Form-2)/738 MB/795 MBPhoto-CD (Single and Multisession), CD-I, CD-Extra (CD PLUS),Video CD, CD-Text, CD-R, CD-RW (AM2, High Speed CD-RW) |
| Writable DVDs* | DVD-R/DVD+R 4.7 GB, DVD-RW/DVD+RW 4.7 GB |
| Writable CDs* | 12 cm CD-R /CD-RW |
| * Specific application programs are required for writing.An actual list of media recommended by TEAC can be found at TEACs web site underwww.teac.de/support. Please select the menu "CD-Medias". | |
| Disk diameter | 12 cm, 8 cm |
| Write methodsfor DVD-Rfor DVD-RWfor DVD+Rfor DVD+RWfor CD-R and CD-RW | Disk at once, Incremental recording, multi-border recordingRestricted overwritingIncremental recordingRandom recordingDisk at once, Track at once, Session at once, Packet write |
| Disk rotational speed(32 X CAV) | ca. 7,200rpm max. |
| 2. Rotational speed (read mode) | |
| 12X (CAV) | DVD-ROM (single layer) |
| 8X (CAV) | DVD-ROM (dual layer) |
| 6X (CAV) | DVD-R (4X media), DVD-RW (2X media), DVD+R, DVD+RW |
| 2X (CLV) | DVD-R (2X media), DVD-RW (1X media) |
| 32X (CAV) | CD-ROM, CD-R, CD-RW, CD-DA (DAE),Video CD (not Mode-2, Form-2) |
| 10X (CAV) | CD-Audio Play |
| 4X (CLV) | Video CD Mode-2 (Form-2) |
| 3. Rotational speed (write mode) | |
| DVD-R | CLV: 1X, 2X, 4X (4X media) |
| DVD-RW | CLV: 1X, 2X (2X media) |
| DVD+R | CLV: 2.4X, 4X (4X media) |
| DVD+RW | CLV: 2.4X |
| CD-R | CLV: 4X, 8X, 12X, 16X |
| CD-RW | CLV: 4X, 10X (High speed CD-RW) |
| Under some circumstances the maximum write speed may not be achieved due to externalfactors (e.g. supported DVD-R/CD-R media speed or data transfer rate of the computer). | |
Specifications (continued)
| 4. | Drive performance | |
| Data transfer rate | Programm I/O: 16.6MB/s max. (Default: PIO Mode-4) Burst DMA: 16.6MB/s max. (Default: MW DMA Mode-2) Burst UDMA: 33.3MB/s max. (Default ULTRA DMA Mode-2) | |
| Access time | DVD: 140msec typical (Random stroke) CD: 130msec typical (Random stroke) by TEAC standard | |
| Data buffer capacity | 2MByte | |
| 5. | Data read error rate | Block/1012 bits (Mode-1 and Mode-2, Form-1) Block/109 bits (Mode-2, Form-2 and CD-DA) |
| 6. | Front panel | |
| Button | Auto eject or Auto inject | |
| Indicator (LED) | Yellow green | |
| 7. | Rear panel | |
| Power Supply | +5V, +12V | |
| Interface connector | IDE (ATAPI): ATA/ATAPI-5 and SFFC INF-8090i Ver. 5.11 | |
| Audio output | Line out 0.7±0.1V 10 kOhm | |
| Strap switch | Mode setting straps (Master) | |
| 8. | Operating environment | |
| Place of operation | Temperature 5 to 45 °C (within 10°C/hour deviation) Humidity 5 to 85 % (non condensing, within 10%/hour deviation) | |
| Place of storage | Temperature -20 to 60 °C (within 10°C/hour deviation) Humidity 5 to 90 % (non condensing, within 10%/hour deviation) | |
| 9. | Dimensions/weight | |
| Dimensions (WHD) | 148 x 42.3 x 197.7mm | |
| Weight | 1,100g | |
| 10. | Safety standards | UL, CSA, TÜV, CE |
| 11. | Reliability | |
| MTBF | 60.000 POH (Duty 10%) | |
- CONTENTS
- TO THE USER
- CAUTION
- SAFETY CONSIDERATIONS RELATING TO THE FCC RULE PART 15
- Declaration of Conformity
- SAFETY CONSIDERATIONS RELATED TO LASER PRODUCTS
- Important:
- INDRODUCTION
- COMPONENTS
- SYSTEM REQUIREMENTS
- Selecting the DVD-R/DVD-RW/DVD+R/DVD+RW and CD-R/CD-RW media for your TEAC drive
- PRECAUTIONS FOR INSTALLATION AND OPERATION
- Important Safety Instructions
- Installation
- Operation
- Important Hints for Using the drive
- Cleaning and maintenance of your TEAC drive
- CONTROLS AND FUNCTIONS
- Front Panel
- Note:
- ② ON/BUSY indicator
- ③ Eject emergency hole
- ④ Eject button
- ⑤ Ventilation hole
- Rear panel
- ⑤ Ventilation outlet
- CONNECTION TO A PERSONAL COMPUTER
- Drive Installation Directions
- Installation and Connection
- Very important:
- CONNECTION TO AUDIO EQUIPMENT
- INSTALLING DRIVERS AND THE WRITER SOFTWARE
- Installing Drivers with Windows 98SE/ME/2000/XP
- Caution:
- Installing Drivers with Windows NT 4.0 and OS/2
- Compatibility or Interoperability to Other IDE Devices
- TECHNICAL SUPPORT
- Product Warranty
- Technical Service Depots (Europe)
- TEAC FRANCE S.A. (France)
- TEAC Service Centre Poland
- SPECIFICATIONS
- Specifications (continued)
Brand : TEAC
Model : DV-W50D
Category : DVD player