
IP1 - Speaker IHOME - Free user manual and instructions
Find the device manual for free IP1 IHOME in PDF.
| Product Type | Dock speaker for iPhone/iPod |
| Brand | iHome |
| Model | IP1 |
| Power Supply | Provided AC adapter |
| Main Functions | Docking and charging iPod/iPhone, composite and component video output, Bongiovi DPS audio processing, 3.5 mm line-in |
| Auxiliary Input | 3.5 mm line-in jack for other audio devices |
| Video Output | Composite and component (depending on iPod/iPhone model) |
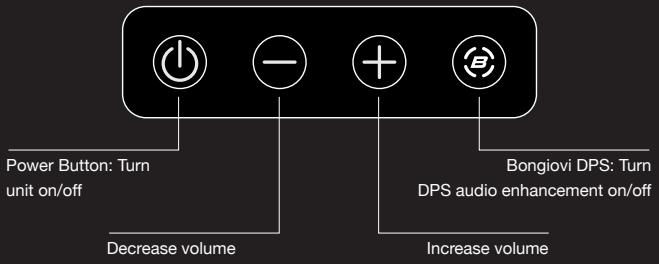
| Controls | Power button, volume +/-, Bongiovi DPS button, rear support adjustment wheel |
| Care and Cleaning | Soft cloth slightly dampened with mild soapy water. Do not use harsh chemicals. |
| Safety | Do not expose to water or moisture, do not block ventilation openings, unplug during storms or extended periods of non-use. |
| General Information | Bongiovi Acoustics DPS technology for real-time audio enhancement, compatible with iPod/iPhone with recommended firmware update. |
Frequently Asked Questions - IP1 IHOME
User questions about IP1 IHOME
0 question about this device. Answer the ones you know or ask your own.
Ask a new question about this device
Download the instructions for your Speaker in PDF format for free! Find your manual IP1 - IHOME and take your electronic device back in hand. On this page are published all the documents necessary for the use of your device. IP1 by IHOME.
USER MANUAL IP1 IHOME
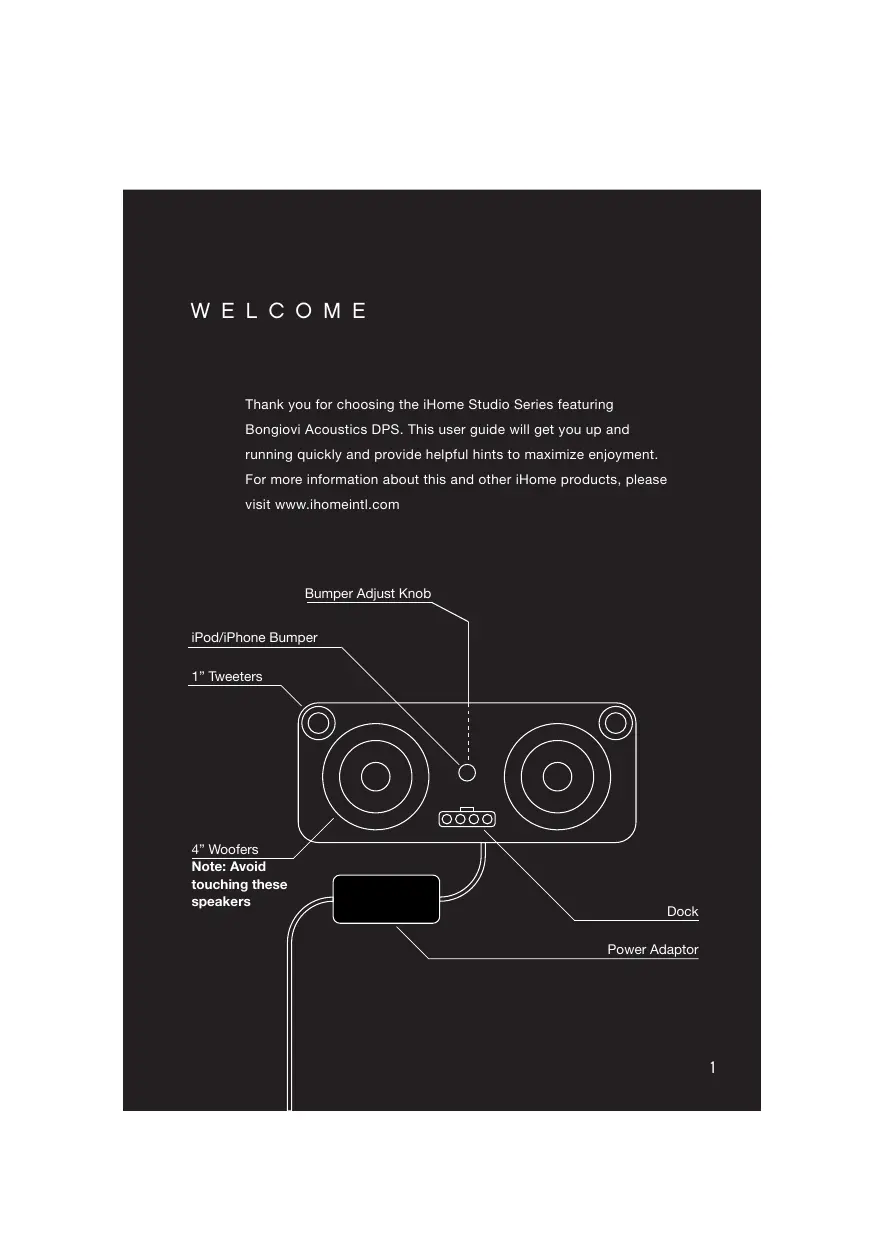
Thank you for choosing the iHome Studio Series featuring Bongiov Acoustics DPS. This user guide will get you up and running quickly and provide helpful hints to maximize enjoyment. For more information about this and other iHome products, please visit www.ihomeintl.com
GETTING STARTED
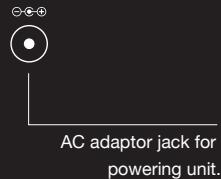
Place unit on a stable surface. Plug the power adaptor into the AC jack on back of the unit and the other end into a wall socket.


MAIN CONTROLS
BONGIOVI DPS
The iHome Studio Series featuring Bongiovì Acoustics DPS (Digital Power Station) represents a genuine breakthrough in audio processing. This unique and powerful processor, years in the making, was developed by a team of audio engineers that have over 40 years of experience in the music and motion picture recording industries. Audio is digitally restored in real time, adding missing harmonics, improving clarity, presence, and bass resonance. Your music comes alive in ways never before possible.
Docking & Charging your iPhone or iPod
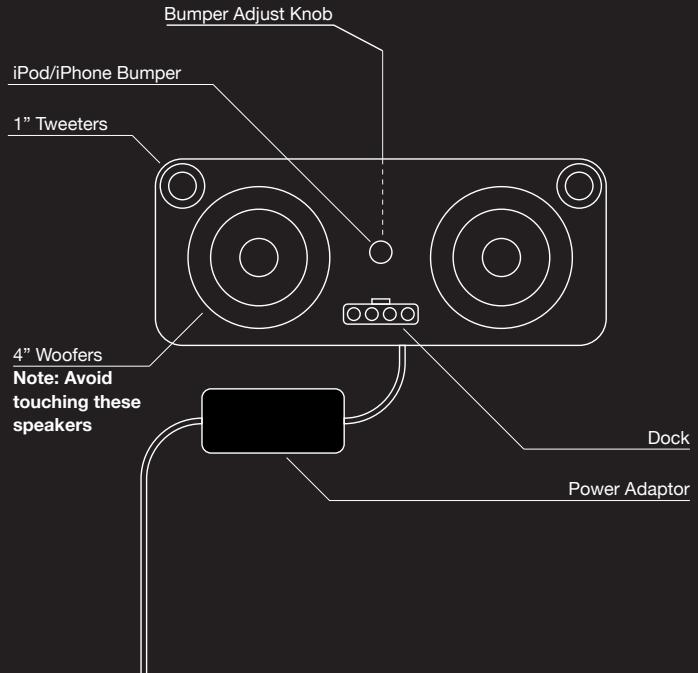
Make sure your iPod/iPhone's firmware is up to date via iTunes before use. Remove your iPod/iPhone from case or skin before docking. Carefully dock your iPod/iPhone onto the dock. Turn the Bumper Adjust Knob on the back of the unit until the bumper touches the back of your iPod/iPhone. Bumper should not push your iPod/iPhone too far forward. Your iPhone or iPod will charge while docked.


Listening to iPhone or iPod
Press the Power Button to turn the unit on. Press Play on iPhone or iPod to listen to music. Adjust levels with - or + Buttons. When unit is off, docking an already playing iPhone or iPod will turn it on.
USING LINE-IN
LINE-IN JACK
Connect one end of a standard stereo 3.5mm audio cable (not included) into the line-in jack on the back of your iHome and the other into the headphone or output jack of your audio device. Turn the device on and press play. Press the Power Button on the unit to turn it on. Adjust volume on your audio device and the unit as needed. Do not play an line-in audio device and a docked iPhone or iPod at the same time or you will hear both sources.
VIDEO-OUT
Your iHome is capable of outputting video stored on your iPod/iPhone to your television via the jacks on the rear. Depending on your model of iPod/iPhone, the supported video-out characteristics vary. See below.
For component video, use the three jacks on rear
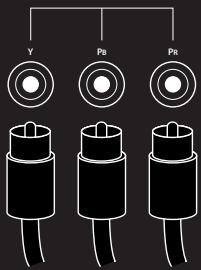
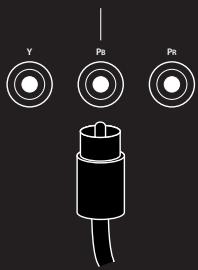
For composite video, use only the center jack
iPod classic, 3G iPod nano, 4G iPod nano, 2G iPod touch, iPhone 3GS: These iPod models can output progressive scan component video.
1G iPod touch, iPhone, iPhone 3G: These models can output interlaced scan component video.
All iPod/iPhone models also output composite video. To switch to composite video, turn your iHome on, hold Bongiovip DPS button (on front) and press volume down (-) button. To switch back to component video, hold Bongiovip DPS button and press volume up (+) button. These steps will be necessary each time you dock your iPod/iPhone.
5G iPod: Only composite video is supported.
TROUBLESHOOTING
| Symptom | Possible reason | Solution |
| Unit won't turn on | AC adaptor isn't plugged into a working wall socket or not plugged into the power jack on back of the unit | Plug the AC adaptor into a working wall socket and plug the connector into the supply jack on the unit |
| Unit won't respond | Unit may require a reset | If unit is plugged in and doesn't respond, try resetting the unit by following these steps: a) remove iPhone/iPod from dock b) unplug unit from power source c) wait 3 minutes, then resume use |
| iPhone/iPod is not docked properly | Remove your iPhone/iPod from the dock and check for obstruction on the connectors in the dock and on your iPhone/iPod. Then reseat it in the dock. | |
| iPhone/iPod does not respond to the unit and/or iPhone/iPod is playing but no sound comes out | iPhone/iPod is not docked properly | |
| Your iPhone/iPod software is too old | Upgrade software on your iPhone/iPod via iTunes on your computer | |
| iPhone/iPod is locked up or plays but no sound comes out | Check the volume setting. Make sure your iPhone/iPod is working properly before docking into the unit. Please refer to your iPhone/iPod manual for details. See above for software upgrade information. You may need to reset your iPhone/iPod. Refer to your iPhone or iPod user guide for details on how to perform a reset. |
TROUBLESHOOTING
| Symptom | Possible reason | Solution |
| Erratic performance | External interference | Move unit away from potential sources of external interference such as computers, modems, wireless devices (routers) or fluorescent light. |
| No sound | Volume is too low | Turn volume up |
| Sound distorted | Volume is too high | Turn volume down |
| Sound source is distorted | If the iPhone/iPod original sound file (MP3) is old or of poor quality, distortion and noise are easily noticed with high-power speakers. Try a different audio source such as an audio CD. | |
| Bongiovī DPS and/or eq settings are set too high | Turn Bongiovī DPS off if necessary. | |
| iPod/iPhone doesn't charge up | iPhone/iPod is locked up/ frozen | Please make sure your iPhone/iPod is working properly before docking into the unit. Please refer to your iPhone/iPod manual for details. |
| iPhone/iPod battery has problem | ||
| iPhone/iPod is not docked properly | Remove your iPhone/iPod from the dock and check for obstruction on the connectors in the dock and on your iPhone/iPod. |
IMPORTANT SAFETY TIPS
When used in the directed manner, this unit has been designed and manufactured to ensure your personal safety. However, improper use can result in potential electrical shock or fire hazards. Please read all safety and operating instructions carefully before installation and use, and keep these instructions handy for future reference. Take special note of all warnings listed in these instructions and on the unit.
- Water and Moisture - The unit should not be used near water. For example: near a bathtub, washbowl, kitchen sink, laundry tub, swimming pool or in a wet basement.
- Ventilation - The unit should be situated so that its location or position does not interfere with its proper ventilation. For example, it should not be situated on a bed, sofa, rug or similar surface that may block ventilation openings. Also, it should not be placed in a built-in installation, such as a bookcase or cabinet, which may impede the flow of air through the ventilation openings.
- Heat - The unit should be situated away from heat sources such as radiators, heat registers, stoves or other appliances (including amplifiers) that produce heat.
- Power Sources - The unit should be connected to a power supply only of the type described in the operating instructions or as marked on the appliance.
- Power-Cable Protection - Power supply cables should be routed so that they are not likely to be walked on or pinched by items placed upon or against them. It is always best to have a clear area from where the cable exits the unit to where it is plugged into an AC socket.
- Cleaning - The unit should be cleaned only as recommended. See the Maintenance section of this manual for cleaning instructions.
- Objects and Liquid Entry - Care should be taken so that objects do not fall and liquids are not spilled into any openings or vents located on the product.
- Attachments - Do not use attachments not recommended by the product manufacturer.
- Lightning and Power Surge Protection – Unplug the unit from the wall socket and disconnect the antenna or cable system during a lightning storm or when it is left unattended and unused for long periods of time. This will prevent damage to the product due to lightning and power-line surges.
- Overloading - Do not overload wall sockets, extension cords, or integral convenience receptacles as this can result in a risk of fire or electric shock.
- Damage Requiring Service - The unit should be serviced by qualified service personnel when:
A. the power supply cable or plug has been damaged.
B. objects have fallen into or liquid has been spilled into the enclosure.
C. the unit has been exposed to rain.
D. the unit has been dropped or the enclosure damaged.
E. the unit exhibits a marked change in performance or does not operate normally.
- Periods of Non use - If the unit is to be left unused for an extended period of time, such as a month or longer, the power cable should be unplugged from the unit to prevent damage or corrosion.
- Servicing - The user should not attempt to service the unit beyond those methods described in the user's operating instructions. Service methods not covered in the operating instructions should be referred to qualified service personnel.
- Magnetic Interference: This product's speakers contain powerful magnets which could cause interference or damage to sensitive equipment such as hard drives, CRT televisions and monitors, as well as medical, scientific, and navigational devices. Keep this unit away from these products at all times.
A GUIDE TO PRODUCT SAFETY

This product bears the selective sorting symbol for waste electrical and electronic equipment (WEEE).
This means that this product must be handled pursuant to European Directive 2002/96/EC in order to be recycled or dismantled to minimize its impact on the environment.
CE
For further information, please contact your local or regional authorities.
Electronic products not included in the selective sorting process are potentially dangerous for the environment and human health due to the presence of hazardous substances.
Maintenance
- Place the unit on a level surface away from sources of direct sunlight or excessive heat.
- Protect your furniture when placing your unit on a natural wood and lacquered finish. A cloth or other protective material should be placed between it and the furniture.
- Clean your unit with a soft cloth moistened only with mild soap and water. Stronger cleaning agents, such as Benzene, thinner or similar materials can damage the surface of the unit.

Questions? Visit www.ihomeintl.com
Brand : IHOME
Model : IP1
Category : Speaker