
EB295610 - Built-in oven GAGGENAU - Free user manual and instructions
Find the device manual for free EB295610 GAGGENAU in PDF.


| Product type | Double built-in oven |
| Brand | GAGGENAU |
| Model | EB295610 |
| Dimensions (W x H x D) | 660 x 1085 x 580 mm |
| Weight (with accessories) | 130 kg |
| Power supply | AC 208/220-240 V, 40 A |
| Total power | 7100 / 8650 W |
| Number of ovens | 2 (upper and lower) |
| Cooking modes | True Convection, convection + bottom heat, static heat (top/bottom), grill, fan grill, economy grill, rotisserie, pizza stone, pyrolysis |
| Temperature range | 150 - 550 °F / 50 - 300 °C |
| Special functions | Meat probe (33-210 °F / 1-99 °C), rotisserie, child lock, vacation lock, timer (duration/end), delayed programming, Eco mode, actual temperature display |
| Cleaning | Pyrolytic (adjustable durations: 2 h, 2 h 30, 3 h) and manual |
| Safety | Automatic shut-off after 12 h, door lock during pyrolysis, overheating protection, 40 A fuses |
| Lighting | Halogen lamp (ref. 157312) |
| Included accessories | 2 wire racks, 2 baking sheets, 2 drip trays, rotisserie with frame, meat probe |
| Spare parts available | Baking sheet (KB 091-054), rack (GR 090-054), rack for drip tray (GR 095-054), drip tray (GP 091-054), halogen lamp (157312), meat probe (156838) |
| Repairability | Repair by authorized technician only; contact GAGGENAU customer service |
| Installation | Connection by qualified electrician; requires a 40 A fuse per phase; mandatory grounding |
| General information | User and installation manual included; warranty subject to compliance with instructions |
Frequently Asked Questions - EB295610 GAGGENAU
User questions about EB295610 GAGGENAU
0 question about this device. Answer the ones you know or ask your own.
Ask a new question about this device
Download the instructions for your Built-in oven in PDF format for free! Find your manual EB295610 - GAGGENAU and take your electronic device back in hand. On this page are published all the documents necessary for the use of your device. EB295610 by GAGGENAU.
USER MANUAL EB295610 GAGGENAU
Operating and Installation Instructions
EB 294/295-6..
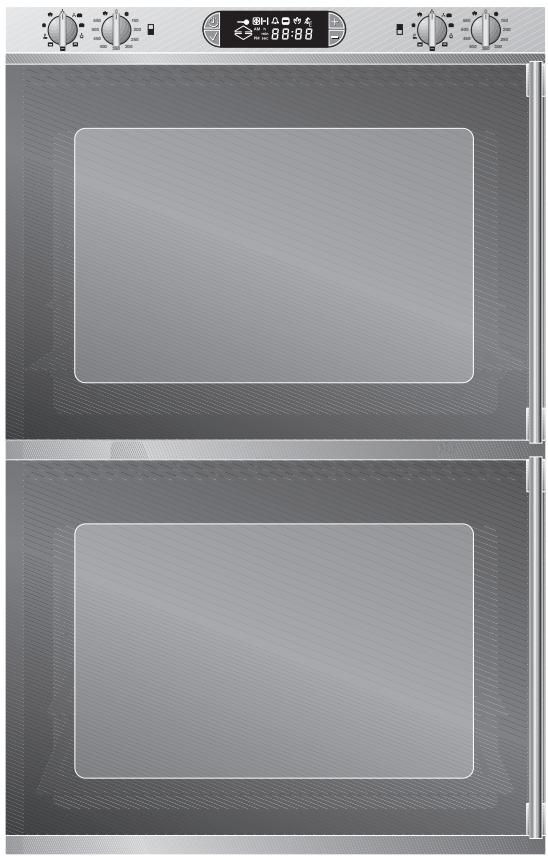
Built-in Double Oven
GAGGENAU
Preface
| Important safeguards | Page 3 |
| Important instructions | Page 4 |
| 1. Important notes | Page 5-7 |
| 1.1 For your safety | Page 5 |
| 1.2 Operating for the first time | Page 6 |
| 1.3 About use | Page 7 |
| 2. Structure and operating principle | Page 8-14 |
| 2.1 Structure | Page 8-9 |
| 2.2 Accessories / special accessories | Page 10 |
| 2.3 Operating principle of the operating modes | Page 11-13 |
| 2.4 Special functions | Page 14 |
| 3. Operation | Page 15-28 |
| 3.1 Overview | Page 15 |
| 3.2 Operating the timer | Page 16-20 |
| Time of day | Page 17 |
| Short time | Page 18 |
| Elapsing timer | Page 18 |
| Programming a duration | Page 19 |
| Programming a switch-off time | Page 20 |
| Duration and switch-off time programming | Page 20 |
| 3.3 Hot air operation (True convection) | Page 21 |
| 3.4 Top and / or bottom heat | Page 22 |
| 3.5 Hot air (True convection) and bottom heat | Page 22 |
| 3.6 Broiling | Page 23 |
| 3.7 Rotisserie | Page 24 |
| 3.8 Meat probe | Page 25-26 |
| 3.9 Special functions | Page 27-28 |
| Child lock | Page 27 |
| Display of the current oven temperature | Page 27 |
| Vacation lock | Page 27 |
| Options menu | Page 28 |
| 4. Baking and roasting table | Page 29-32 |
| 5. Cleaning and care | Page 33-36 |
| 5.1 Manual cleaning | Page 33 |
| 5.2 Pyrolytic self-cleaning | Page 34-36 |
| 6. Maintenance | Page 37-38 |
| 6.1 General | Page 37 |
| 6.2 Replacing the lamp | Page 37 |
| 6.3 Disassembly of the front window | Page 38 |
| 7. Hints and tricks | Page 39-40 |
| 8. Assembly instructions | Page 41-42 |
| 8.1 Technical data | Page 41 |
| 8.2 How to do it | Page 41-42 |
Preface

Baking with your new oven will be even more fun than before.
The appliance offers you the following advantages:
- Very rapid heating up in the hot air and bottom heat modes.
- The appliance features porcelain interior (Clean Enamel) and a catalytic converter for air cleaning.
- Two separate ovens offer you greater flexibility.
- The pyrolytic self-cleaning automatically achieves an optimum cleaning result.
To ensure that you will be able to use this appliance in all its diversity, read through the operating and assembly instructions conscientiously before operating it for the first time. The instructions contain important notes on use, installation and maintenance of the appliance.
You will find notes on page 3 that you ought to observe before operating the appliance for the first time.
The chapters entitled "Structure and operating principle" and "Operation" will tell you all the things your oven is capable of doing and how it is operated.
The chapter entitled "Cleaning and care" will make sure that your appliance will stay operable and beautiful for a long time.
We have also compiled some "Hints and tricks" for you.
And now we wish you lots of fun with your oven.
Important safeguards
- Read all instructions.
- Do not touch hot surfaces. Use handles or knobs.
- To protect against electrical shock do not immerse cord or plug in water or liquid.
- Close supervision is necessary when any appliance is used by or near children.
- Switch off oven completely when not in use and before cleaning. Allow to cool before putting on or taking off parts.
- Do not operate any appliance with a damaged cord or plug or after the appliance malfunctions or has been damaged in any manner. Contact your nearest authorized service agent (1-800-828-9165) for examination.
- The use of accessory attachments not recommended by the appliance manufacturer may cause injuries.
- Do not use outdoors.
- Do not let cord hang over edge of table or counter, or touch hot surfaces.
- Do not place on or near a hot gas or electric burner, or in a heated oven.
- Extreme caution must be used when moving an appliance containing hot oil or other hot liquids.
- Do not use appliance for other than intended use.
-
To reduce the risk of fire, do not place any heating or cooking appliance beneath the appliance.
-
To reduce the risk of fire, do not mount unit over or near any portion of a heating or cooking appliance.
- Save these instructions.
Important instructions
- a) Proper installation - Be sure your appliance is properly installed and grounded by a qualified electrician.
b) Never use your appliance for warming or heating the room.
c) Do not leave children alone - Children should not be left alone or unattended in areas where the appliance is in use. They should never be allowed to sit or stand on any part of the appliance.
d) Wear proper apparel - Loose-fitting or hanging garments should never be worn while using the appliance.
e) User servicing - Do not repair or replace any part of the appliance unless specifically recommended in the manual. All other servicing should be referred to a qualified technician.
f) Storage in appliance - Flammable materials should not be stored in an oven or near surface units.
g) Do not use water on grease fires - Smother fire or flame or use dry chemical or foam type extinguisher.
h) Use only dry pot holders - Moist or damp pot holders on hot surfaces may result in burns from steam. Do not let pot holders touch hot heating elements. Do not use a towel or other bulky cloth. - a) Use care when opening door - Let hot air or steam escape before removing or replacing food.
b) Do not heat unopened food containers - Build-up of pressure may cause container to burst and result in injury.
c) Keep oven vent ducts unobstructed.
d) Use care when using meat probe, that it does not contact any heating elements.
e) Placement of oven racks - Always place oven racks in desired location while oven is cool. If rack must be moved while oven is hot, do not let pot holder contact hot heating element in oven.
f) Accessories supplied with this oven are intended only for use in this oven.
3.DO NOT TOUCH HEATING ELEMENTS OR INTERIOR SURFACES OF OVEN -
Heating elements may be hot even though they are dark in color. Interior surfaces of an oven become hot enough to cause burns. During and after use, do not touch, or let clothing or other flammable materials contact heating elements or interior surfaces of oven until they have had sufficient time to cool. Other surfaces of the appliance may become hot enough to cause burns.
4.a) Do not clean door gasket - The door gasket is essential for a good seal. Care should be taken not to rub, damage, or move the gasket.
b) Do not use oven cleaners - No commercial oven cleaner or oven liner protective coating of any kind should be used in or around any part of the oven.
c) Clean only parts listed in manual.
d) Oven must be in the OFF position before attempting to attach or install any accessory.
e) Before Self-Cleaning the Oven - Remove broiler pan and other accessories.
1. Important notes
1.1 For your safety
You must not operate the appliance if it is damaged.
The appliance must only be connected by an authorized specialist, paying attention to the relevant regulations of the power supply companies and the regional construction regulations. Observe the assembly instructions!
When connecting electrical appliances and devices in the proximity of cooking surfaces and ovens, make sure that connecting cables do not become jammed under the hot oven door or come into contact with hot cooking surfaces.
As the user, you yourself are responsible for maintenance and proper use in the household.
Only operate the appliance under supervision.
Caution: Fire risk! Do not store any combustible items in your oven. During operation, only leave the parts in the cooking compartment that you actually need.
Caution! The appliance and, until the cooling fan is switched on, also the control panel get hot during operation. Keep children away!
For technical reasons, simultaneous pyrolytic self-cleaning of the upper and lower ovens is not possible.
During the pyrolytic self-cleaning of one oven it is possible to bake or roast in the other oven. Broiling, economy broiling and baking stone operation are not possible.
Please note: The meat probe cannot be used in combination with the rotisserie. The rotisserie will not function if the meat probe is plugged in the socket in the oven.
Note: To avoid jeopardizing the electrical safety of the appliance, it is forbidden to use high-pressure or steam jet cleaning devices.
The appliance must be isolated from the power main during all maintenance. To this end, remove the power main plug or actuate the corresponding fuse.
Repairs may only be carried out by authorized electricians, in order to guarantee the safety of the appliance.
No warranty claims can be lodged for any damage resulting from failure to observe these instructions.
Technical modifications reserved.
1.2 Operating for the first time
Before operating the appliance for the first time, please pay attention to the following notes:
Read through these instructions attentively before operating your appliance for the first time.
The appliance must be installed and connected by a specialist.
Remove the packaging from the appliance and dispose of it properly.
Pay attention to the fact that there are accessories in the base of the packaging.
Keep packaging elements away from children.
Before operating the appliance for the first time, make sure that the power main connection is in proper working order.
After first installation or a power failure, the symbol
(Door Lock) flashes in the display. Please do not open the oven door! Then, 08:00 and the time unit symbol flash in the display. You can set the current time by pressing the + and - keys. When you turn one of the control knobs or press a key, the displayed time of day is set as the current time of day.
Before using the oven for the first time, remove all removable interior parts (wire rack, tray ...). Now operate the oven for one hour at 550^ / 300^ in the hot air mode. During this time, pay attention to ensuring that the room is ventilated well, thus removing any newness smells.
Thoroughly clean the appliance and accessories before using them for the first time (see chapter entitled "Cleaning and care").
The rating plate for this appliance is visible when you open the appliance door. An additional rating plate is included on a separate sheet of the instructions. For warranty reasons, store this rating plate in the same location as your operating and assembly instructions.
1.3 About use
The appliance is intended solely for use in the household and must not be put to any other uses.
Use the appliance to prepare meals only. It must not be used to heat up the room in which it is installed.
Caution!
You will subject yourself to an accident risk if you close the door improperly. You might jam and crush your fingers and hands.
Do not store any combustible objects in your oven and, when operating the oven, never leave any items inside the oven compartment other than the ones needed.
Make sure that the bottom of the oven compartment is never covered up during operation or lined with aluminum foil.
Never pour water directly into the hot oven. This could damage the enamel.
Always preheat your oven in the mode in which you intend to bake or roast.
Tip: You have a possibility of heating up the appliance very quickly. To do this, use the hot air and bottom heat program.
The symbol "Heating Upper Oven" or "Heating Lower Oven" in the control panel goes off as soon as the set temperature has been reached.
Observe caution with oils and fats.
They may overheat and burn easily.
Note!
Fruit acids such as the juice of lemons or plums etc. should be removed after every baking operation, thus making sure that they will not cause spots on the oven's enamel.
After baking/roasting, open the door completely or close it. The oven door must not be left half open as otherwise the control panel and kitchen furniture may be damaged.
Caution: Risk of burns.
The inside of the door gets very hot during operation; observe appropriate caution when opening the appliance. Make sure that the open door does not swing back when you are standing in front of the appliance.
Built-in temperature protection prevents overheating of the appliance and of kitchen furniture.
Return the "Temperature" knob to "0" after baking.
If malfunctions should occur, first check the fuses in your household. If there is no fault in the power supply, consult your dealer or the nearest authorized Gaggenau service center.
All heating elements and the fan are switched off when door is opened.
After completion of baking or roasting, the cooling fan will continue to run for a time and will then switch off automatically.
2. Structure and operating principle
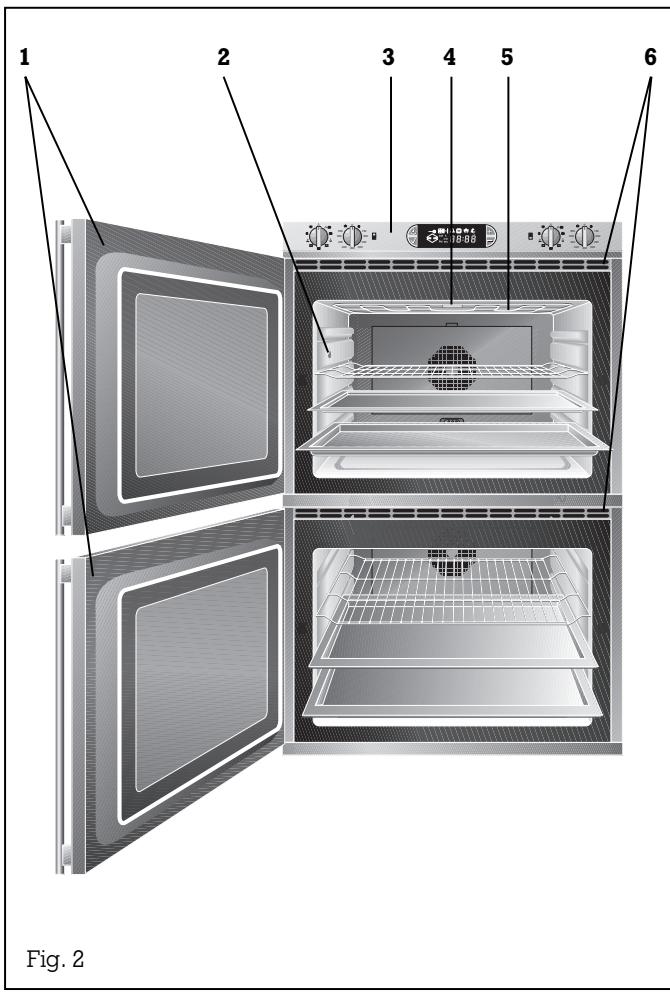
2.1 Structure
1 Oven door
2 Socket for meat probe
3 Control panel
4 Oven lighting
5 Broil and top heating elements
6 Ventilation slots
The operation of the upper and lower ovens is identical using the control panel.
The upper oven has the following additional features: Rotisserie and meat probe.
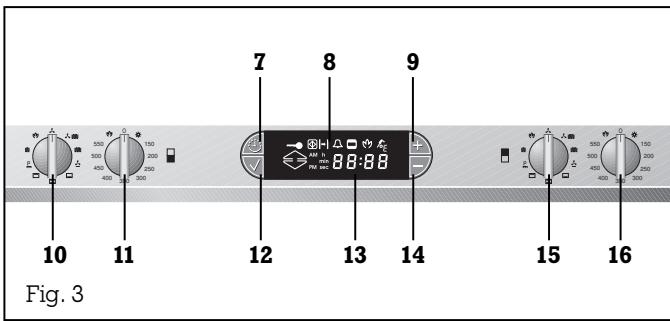
7 Timer key
8 Display with timer
9 "Plus" key
10 "Mode" knob lower oven
11 "Temperature" knob lower oven
12 "Confirmation" key
13 Time / temperature display
14 "Minus" key
15 "Mode" knob upper oven
16 "Temperature" knob upper oven
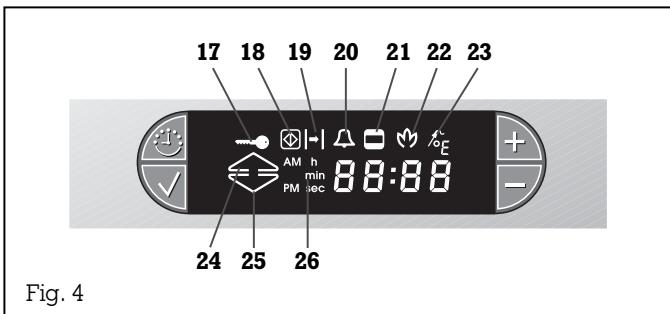
17 "Door Lock" symbol
18 "Child Lock" symbol
19 "Duration", "End" or "Rotisserie" symbol
20 "Short Timer" symbol
21 "Cooking Time" symbol
22 "Pyrolysis" symbol
23 "Meat probe" symbol
24 "Heating Upper Oven" symbol or "Temperature Display Upper Oven" symbol or "Timer Setting Upper Oven" symbol
25 "Heating Lower Oven" symbol or "Temperature Display Lower Oven" symbol or "Timer Setting Lower Oven" symbol
26 "Time Unit" symbol
2.2 Accessories / special accessories

Fig. 5

Fig. 6

Fig. 7

Fig. 8
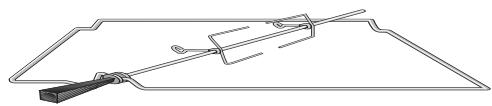
Fig. 9
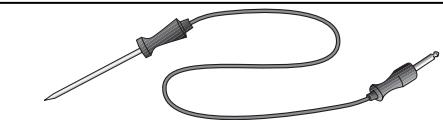
Fig. 10
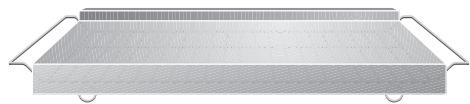
Fig. 11
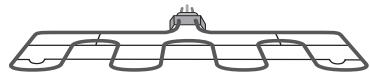
Fig. 12
As standard, your appliance comes with the following accessories:
-GR 090-054 (2):
Wire rack for cake tins, roasts, grilled pieces and crockery (Fig. 5)
- KB 091-054 (2):
Baking tray for cakes, biscuits and crisp-up items (Fig. 6)
- GP 091-054 (2):
Broil pan for roasts or as a grease collecting tray (Fig. 7)
-GR 095-054 (2):
Wire rack for broil tray (Fig. 8)
- Rotisserie with support frame (Fig. 9)
-FT 100-060:
Meat probe (Fig. 10)
You can order the following special accessories:
-PS 027-001:
Baking stone (Fig. 11) and wooden pizza spatula
-HZ 026-001:
Heating element for roaster and pizza stone, variable up to 550^ / 300^ (Fig. 12)
2.3 Operating principle of the operating modes
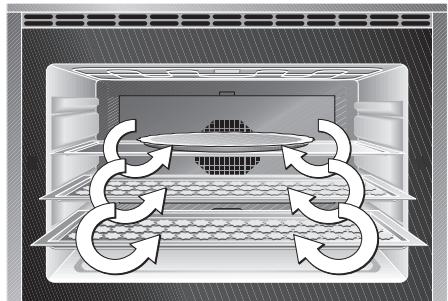
Fig. 13

Fig. 14
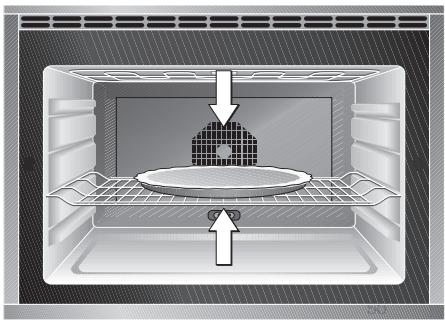
Fig. 15
Hot Air (True Convection)
In the true convection mode, all prepared meals are cooked at the same temperature. Diverse or similar meals can be prepared on several levels without any transfer of taste. You can bake, roast and sterilize (can foods) with hot air.
Baking with Hot Air (True Convection)
This is the ideal operating mode for baking several trays and tins at the same time. (Fig. 13)
Roasting with Hot Air (True Convection)
Meat is evenly browned on all sides. When roasting on the grid, insert the broil pan one level lower to collect dripping fat.
Hot Air (True Convection) and Bottom Heat
When this function is used, the bottom heating element is additionally in operation.
The fan wheel ensures a uniform distribution of heat. Heat is also generated from below. (Fig. 14)
Top and Bottom Heat
Two heating elements (top and bottom heat) are operated jointly. When baking with top and bottom heat, you can only use one level. Best baking and roasting results are on the second level from below. (Fig. 15)
This unit allows you to select the top and bottom heat elements separately. In these modes of operation you can deliberately choose to bake or roast food from the top or the bottom.
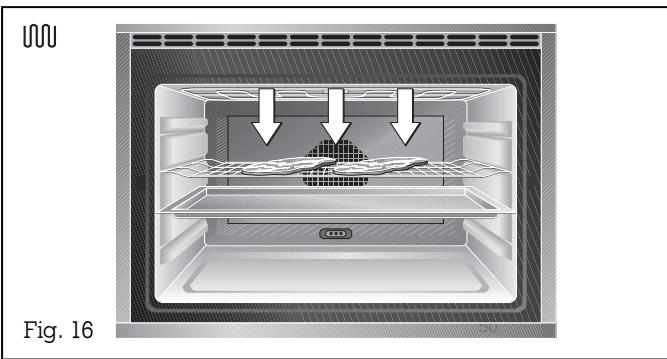
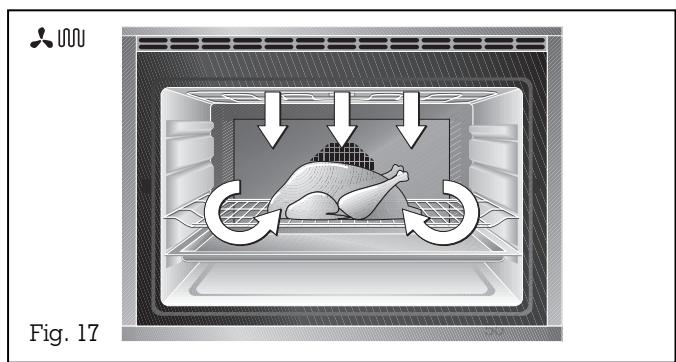
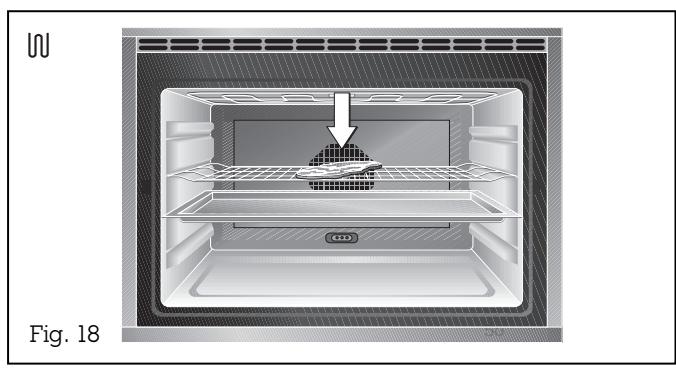
Broiling
When broiling, food is cooked/roasted at a temperature of 300 - 550^ / 150 - 300^ from above.
Note: During baking stone operation in the upper oven it is not possible to broil in the bottom oven.
A distinction can be made between the following types of broiling:
Temperature-controlled Broiling
During temperature-controlled broiling, the heating element emits a greater or lesser amount of infrared radiation depending on the setting of the temperature selector switch. (Fig. 16)
This method of broiling is suitable for flat pieces of meat and for browning or gratins.
Do not forget to turn broiled food!
Broiling with the Hot Air Fan (Convection
Broiling) ensures better all-round warming-up, even when the wire rack is full. There is no need to turn the food frequently. (Fig. 17)
Economy Broiling
Only the middle area of the broil heating element is heated, therefore saving energy when broiling smaller portions. (Fig. 18)
Do not forget to turn broiled food!
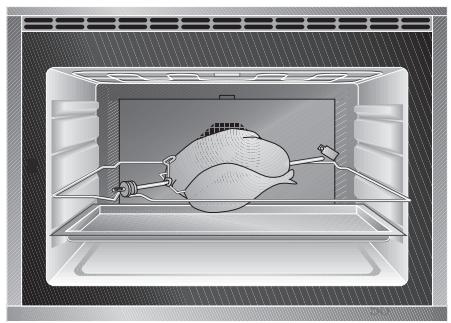
Fig. 19
Broiling with the rotisserie (upper oven only) produces a crispy crust and even browning allround. (Fig. 19) Insert the support frame for the rotary spit in the second level from below. Insert the broil pan one level further down to collect fat. Please note: The meat probe cannot be used in combination with the rotary spit. The rotary spit will not function if the meat probe is plugged in the socket in the oven.
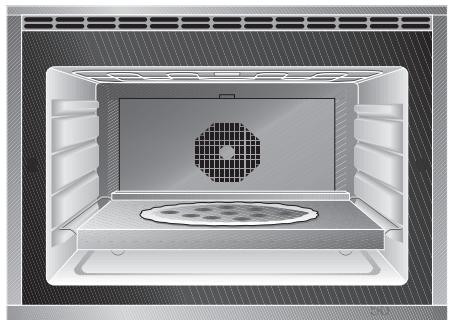
P
Fig. 20
Baking stone operation (with special accessories PS 027 and HZ 026 only)
Be it crispy pizza or fresh bread - with the baking stone you produce baking results that are comparable to those of a solid stone oven. (Fig. 20)
Note: During baking stone operation in the upper oven it is not possible to broil in the lower oven.
2.4 Special functions
Display of the current oven temperature (Thermotest)
The current oven temperature of the upper oven is displayed for a few seconds when you press the (Confirmation) key once.
The symbol lights up.
The current oven temperature of the bottom oven is displayed for a few seconds when you press the (Confirmation) key twice.
The symbol lights up
Note: When the oven is operated continuously, temperature fluctuations of up to 10^ / 5^ , which are inherent to the system, may occur.
Meat probe
(upper oven only)
You can measure the core temperature of your food exactly using the meat probe.
You can select and set the core temperature between 33^ / 1^ and 210^ / 99^ .
Power failure safeguard
The appliance will bridge a power failure lasting 5 minutes. Any longer and the oven will stay off until turned off and on again manually.
Vacation lock
Every oven heating process is cancelled after 12 hours if the oven has not been operated during this time. This function is not active if the timer has been programmed.
Child lock
The child lock prevents inadvertent activation of the oven.
Eco program
When you use the power-saving Eco mode, the light is switched off during the cooking process. If a cooking time has been programmed, the oven also switches off the heating element before expiry of the programmed time to make use of the residual heat. You can switch the Eco mode on and off in the options menu.
3. Operation
3.1 Overview
Inserting the baking tray
- Insert the baking tray at the same height on both sides.
- Make sure that the notch on the baking tray is at the rear or that the handle is at the front.
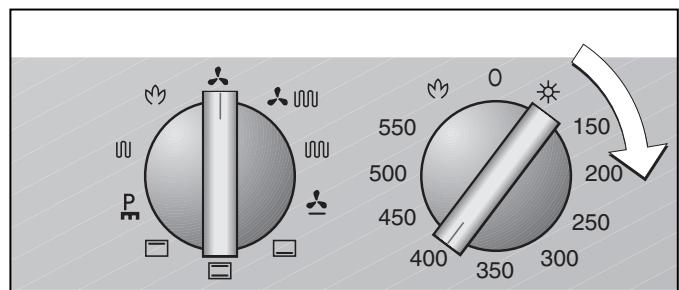
Switching on
Fig. 21
Switching off
"Temperature" knob:
The temperature can be set within the range from 150 - 550^ / 50 - 300^ .
"Mode" knob:
You can choose from 10 programs:
- Hot Air (True Convection)
-Grilling with Hot Air (True Convection Broil)
-Grilling (Broil)
- Hot Air (Convection) with Bottom Heat
- Bottom Heat
- Top and Bottom Heat
-Top Heat
- Baking Stone Operation (with special accessories baking stone PS 027 and heating element HZ 026 only)
Economy Broil
Pyrolytic Self-Cleaning
Switching on (Fig. 21)
Turn the "Temperature" control knob to operate the appliance.
You can set any temperature by turning the "Temperature" control knob to the right. The control knob has latching positions. The first latching position on the right is the lighting level. The set temperature is shown on the display for a few seconds.
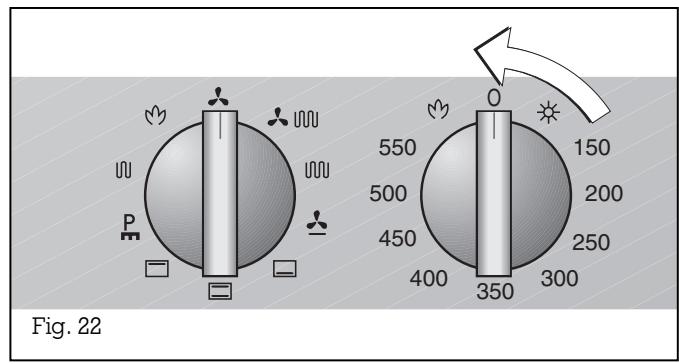
Switching off (Fig. 22)
To switch off, turn the "Temperature" control knob to the 0 position. The lighting goes off and now only the current time of day appears on the display.
3.2 Operating the timer
The required mode and temperature can be set before and after time programming by turning the "Temperature" or "Mode" knob.
As long as one or several symbol(s) in the display flash(es), no input is possible and no value is programmed or an invalid value has been programmed.
All time values are entered by means of the (Timer), +,- and (Confirmation) keys. Every input triggers an audible and a visible signal.
If you select a program (e.g. end), but you do not enter a value, the current time will appear on the display after 20 seconds.
An entered value (e.g. duration programming) must be confirmed within 20 seconds (Confirmation key). Entered values are not stored if they are not confirmed.
Press the (Confirmation) key if you wish to confirm a value during programming. If you press any other key instead, the entered value will not be stored and will disappear.
You can query set values by pressing the (Timer) key. The value appears on the display for around 10 seconds. During this time, you can modify the value by pressing the + or - key and you can confirm it by pressing the (Confirmation) key.
Press the + and - keys at the same time if you wish to clear a value.
If you have already programmed a time value once (e.g. a duration) on the appliance, this previously programmed value will be proposed to you when programming a value again.
The longer you press the + or - key when programming a time, the faster the time elapses on the display.
After completion of time programming, the corresponding symbol flashes on the display. For example, if you have programmed an end time, the (End time) symbol will flash. An audible signal is also sounded. Heating is deactivated and the oven lighting goes off. You can restart the previously selected mode by pressing any key on the display. You end the baking process by turning the "Temperature" knob to 0.
Switching from the automatic mode to the "normal mode":
Turn the temperature control knob back to 0.
The oven will then no longer heat. The previously programmed time value is retained. An audible signal sounds after the entered time has elapsed.
Every alarm shuts off after 3 minutes.
Note: All time programming functions can be programmed simultaneously.
Setting the time of day
Proceed as follows:
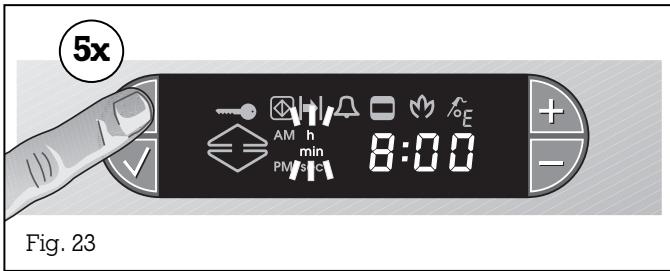
- Press the (Timer) key 5 times. The _min^h (Time unit) symbol flashes on the display. The time display shows the currently set time of day (Fig. 23).
- You can select the required time by pressing the + or - key.
- Press the (Confirmation) key to confirm the entered value. An audible signal is sounded.
Note:
After first installation or a power failure, the symbol (Door lock) flashes in the display. Please do not open the oven door! Then, 08:00 and the time unit symbol flash in the display. You can set the current time by pressing the + and - keys. When you turn one of the control knobs or press a key, the displayed time of day is set as the current time of day.
The last programmed value is proposed to you each time you program a short time.
Short time
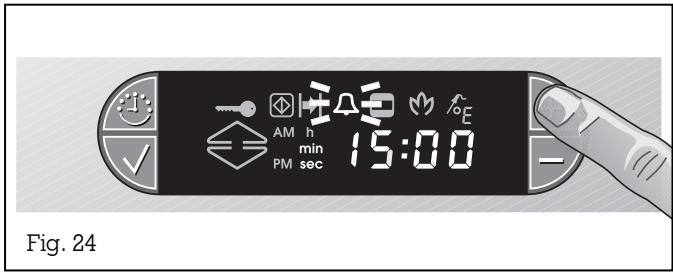
You can program a period of time with the short time function without automatic activation or deactivation. You can use this mode of operation even when the appliance is switched off as an egg timer, for example. The range that can be set is between ten seconds (00:10) and 23.59 hours (23:59)
Proceed as follows:
- Press the + key. The short time symbol flashes (Fig. 24).
- The entered value appears on the display, which you can modify by pressing the + or - key. The time unit symbol min sec lights up.
- Press the (Confirm) key to confirm the entered value.
- The elapsing time is displayed.
Note: Once values have been entered, if nothing is entered for 5 seconds, the short time starts even if the key (Confirm) is not pressed.
Once the short time has elapsed, an audible signal sounds and the (Short time) symbol flashes on the display. The signal shuts off when you press any key. The short time reminder can be switched off at any time by pressing the + and - minus keys at the same time.
Elapsed timer
Proceed as follows:
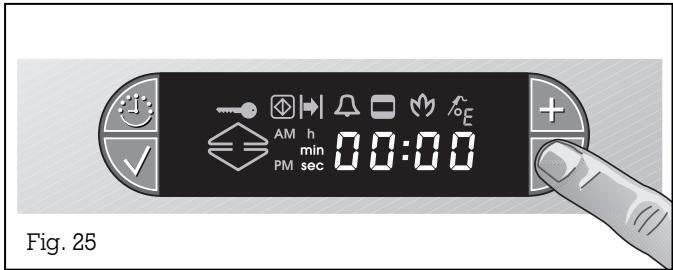
- Press the - key (Fig. 25).
- The time, beginning at 00:00, is displayed (maximum display: value 12 hours).
Thus, you can continuously display the elapsed cooking time without programming automatic deactivation.
When you press the - key again, the timer is switched off.
Upper oven
Lower oven
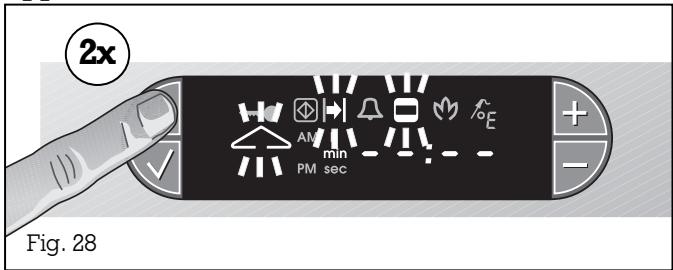
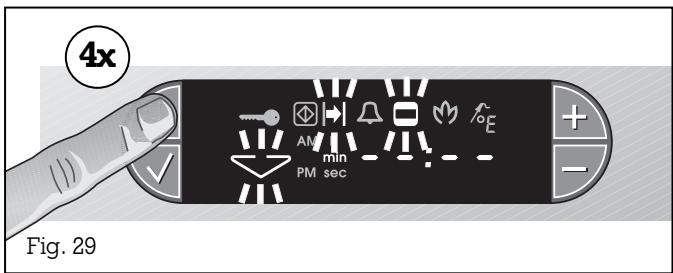
The end time is displayed automatically if you press the (Timer) key twice (upper oven) or four times (lower oven).
Every other time you program a duration, the value programmed last is proposed to you when you press the + key.
Programming a duration
The appliance is operated for a specific period of time. The range that can be set is between one minute (00:01) and 23 hours and 59 minutes (23:59).
Proceed as follows:
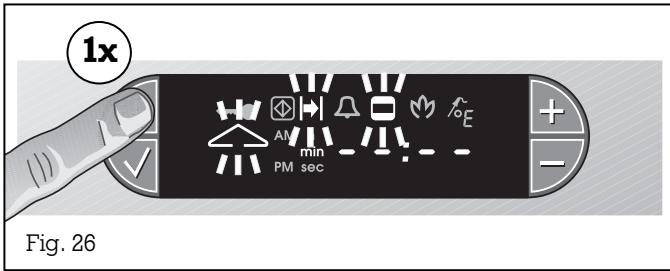
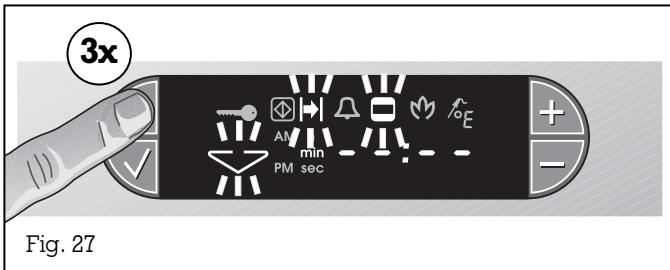
- Press the (Timer) key once (upper oven) or three times (lower oven). The (Duration) symbol, the (Cooking Time) symbol and the (upper oven) or the (lower oven) symbol flash on the display. Dashes appear on the display (i.e. no value programmed) (Fig. 26 and 27).
- Press the + or the - key to set the required duration.
- Press the (Confirm) key to confirm the set value. An audible signal is sounded. The Cooking Time symbol lights up on the display.
Note:
- A signal is sounded after the programmed duration has elapsed. At the same time, the oven switches off automatically.
- Press any key to switch off the signal.
- The programmed duration can be queried by pressing the 忍 (Timer) key.
Clearing incorrectly programmed values:
- Press the (Timer) key once (upper oven) or three times (lower oven).
- Press the + and - keys at the same time.
An audible signal is sounded.
Upper oven
Lower oven
Note:
The time of day that is set on the appliance is the starting point for programming the switch-off time.
Programming a switch-off time
The appliance switches off automatically at a time that you have chosen. The starting point is the time of day set on the appliance.
Proceed as follows:
- Press the (Timer) key twice (upper oven) or four times (lower oven). The (End) symbol, the (Cooking Time) symbol and the (upper oven) or the (lower oven) symbol flash on the display. Dashes appear on the display (i.e. no value programmed) (Fig. 28 and 29).
- Press the + or - key to set the required time. You can choose any switch-off time within a period of 24 hours.
- Press the (Confirmation) key to confirm the entered value. An audible signal is sounded. The Cooking time symbol lights up on the display.
After the set time has elapsed, the (Cooking time) symbol flashes and an audible signal is sounded.
By pressing any key, you can switch off the signal and heating will start again. Turn the temperature selector switch to 0 to end the operation.
Programming a duration and a switch-off time (Delay Start)
This mode enables you to start and end baking and cooking in your absence.
Proceed as follows:
- Enter a required duration (see page 19).
- Press the (Confirmation) key.
- Enter the required switch-off time (see above).
- Press the (Confirmation) key.
The automatic mode becomes active as soon as the switch-off time is programmed and you have pressed the (Confirmation) key.
3.3 Hot air operation (True convection) Switching on
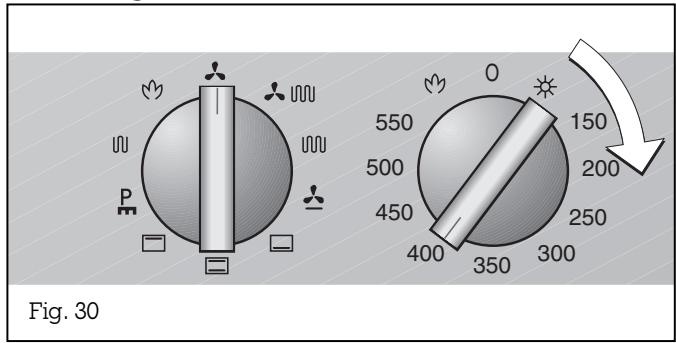
Turn the "Temperature" control knob to the temperature you require. Turn the "Modes" control knob until the (Hot air / True convection) symbol appears on the display. (Fig. 30)
You can bake, roast, and can foods with hot air.
Switching off
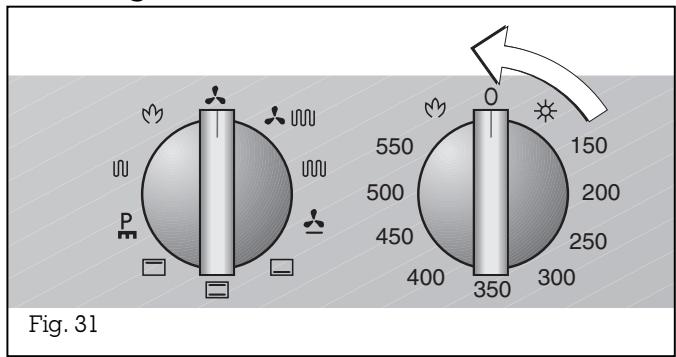
Turn the temperature selector switch to the 0 position. The oven lights go off and the hot air fan switches off. (Fig. 31)
Sterilizing (Canning)
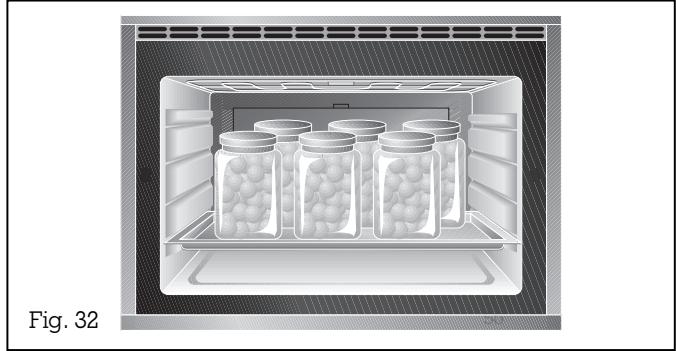
Place bottles (no more than 6) containing fruit or vegetables in the broil pan / glass tray filled with water, making sure that they do not touch each other. (Fig. 32) Heat them at 350^ / 175^ until the liquid in the glasses begins to bubble, then:
- Sterilize vegetables at 180 - 210^ F / 80 - 100^ C for app. 30-60 minutes.
- After the onset of bubbling, switch off the oven to sterilise fruit for app. 5-15 minutes.
3.4 Top and / or bottom heat
Switching on
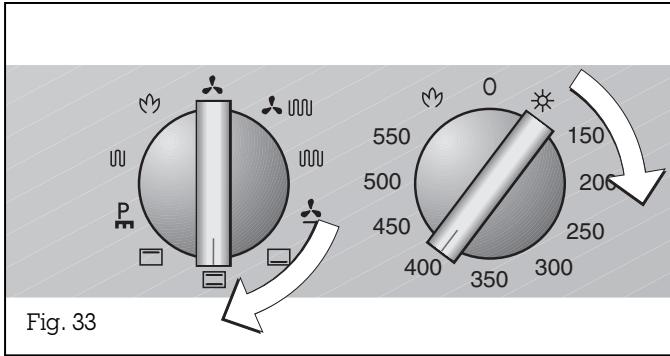
This unit allows you to select the top and bottom heat elements separately. In these modes of operation you can deliberately choose to bake or roast food from the top or the bottom.
Switching on:
Turn the "Mode" control knob to the top and/or bottom heat symbol and set the "Temperature" control knob to the required temperature. (Fig. 33)
Switching off:
Turn the "Temperature" knob to the 0 position. The oven lighting goes off.
Note:
Baking with top and bottom heat
In this mode of operation you can bake in the usual manner on one level.
Roasting with top and bottom heat
Place the meat on the wire rack or in the broil pan / glass tray. When cooking on the wire rack, you can insert the broil pan / glass tray one level lower to collect fat.
3.5 Hot air (Convection) and bottom heat
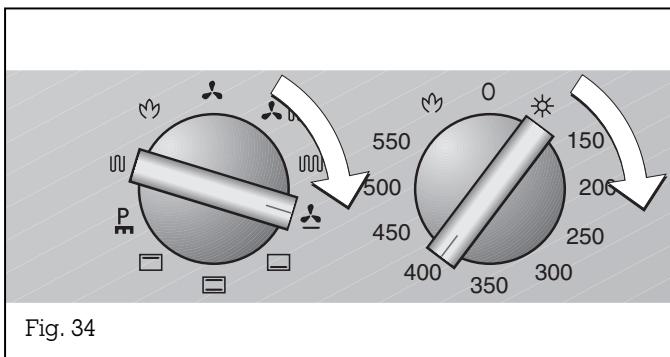
Switching on:
Turn the "Mode" control knob to the (Hot air and bottom heat) symbol.
Set the "Temperature" control knob to the required temperature. (Fig. 34)
Switching off:
Turn the "Temperature" knob to the 0 position. The oven lighting goes off.
3.6 Broiling
Switching on
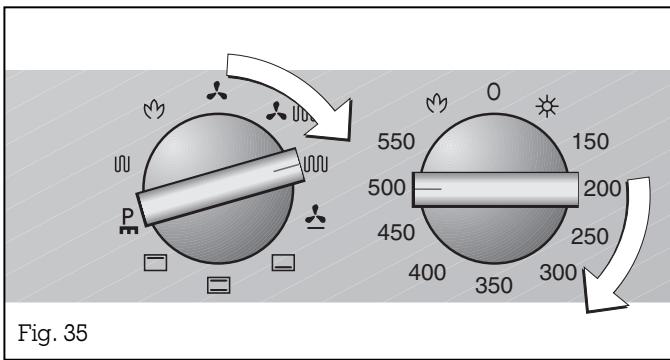
Note: Broiling is possible only when the oven is closed.
Temperature-controlled broiling
Switching on:
Turn the "Mode" control knob to the (Broiling) symbol.
Turn the "Temperature" control knob to the temperature you require. (Fig. 35)
Switching off:
Turn the "Temperature" control knob to the 0 position.
Note:
When cooking on the wire rack, you can insert the broil pan / glass tray one level lower to collect fat.
Switching on
Caution!
Very high temperatures occur during broiling, and these also warm up doors and frames. Observe the appropriate caution and keep children away!
Note:
During baking stone operation in the upper oven it is not possible to broil in the lower oven.
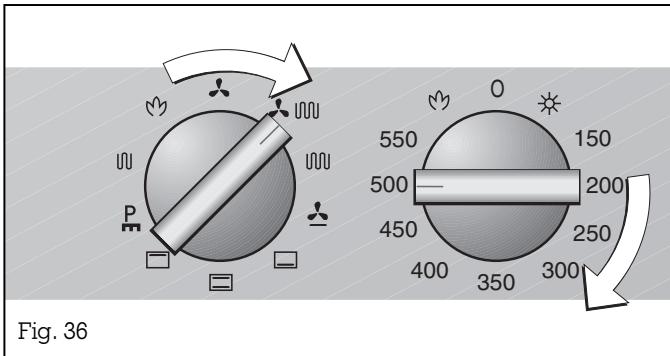
Broiling with the hot air fan
Switching on:
Turn the "Mode" control knob to the (Broiling with hot air) setting and set the "Temperature" control knob to the required temperature. (Fig. 36)
Switching off:
See above.
Economy broiling
Switching on:
Turn the "Mode" control knob to the (Economy broiling) setting and set the "Temperature" control knob to the required temperature.
Switching off:
See above.
3.7 Rotisserie
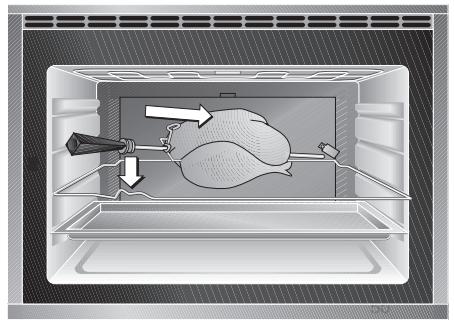
Fig. 37
Note: Broiling is possible only when the oven is closed.
Grilling with the rotisserie (upper oven only) produces a crispy crust and even browning all-round. You can use the rotisserie in all modes except the baking stone function. You get the best results in the broil or top heat modes, however.
Proceed as follows:
- Insert the support frame for the rotary spit in the upper oven on the second level from below. Insert the grilling tray one level lower down to collect dripping fat.
- Turn the "Temperature" control knob of the top oven to the temperature you require. Turn the "Modes" control knob of the top oven to the desired mode. Preheat the oven.
- Place the food you want to prepare on the rotary spit and secure it with the two retaining clips. Secure protruding parts (e.g. wings) to make sure they do not touch the broil heating elements.
- Fit the rotary spit in the rotary spit drive. (Fig. 37) Unscrew the handle from the rotary spit and close the oven door.
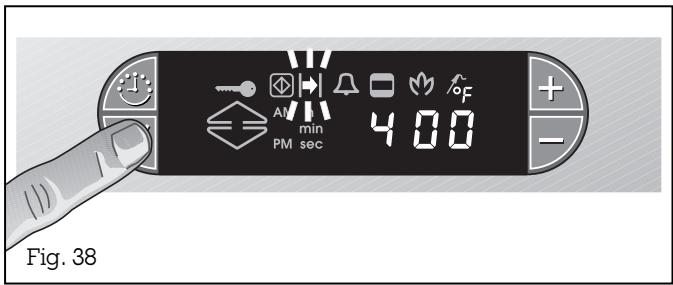
- Press the (Confirm) key and keep it pressed, until the (Rotisserie) symbol flashes. (Fig. 38) Remove your finger from the key. The rotary spit then begins to turn. Repeat the above to stop the rotary spit turning.
Note:
The meat probe cannot be used in combination with the rotary spit. The rotary spit will not function if the meat probe is plugged in the socket in the oven.
3.8 Meat probe
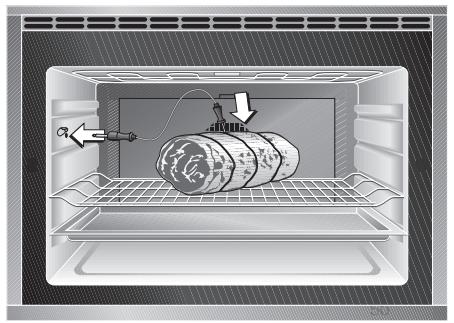
Fig. 39
Note:
You cannot set a temperature on the meat probe that is lower than the core temperature of the food you are preparing.
If you set programming with the meat probe and the timer at the same time, the programming that reaches the entered value first will switch off the oven.
It is not possible to use the short time function while the meat probe is plugged in.
Using the meat probe (upper oven only), during the cooking process you can measure the core temperature of the food you are preparing exactly between 33^ / 1^ and 210^ / 99^ . The sensor measures the temperature in the interior of the meat. It indicates when the set core temperature has been reached and the meat has been cooked to satisfaction.
The meat probe
- enables exact cooking to the spot.
- prevents overcooking of roasts.
- provides you with a display of the actual temperature for total control of the cooking process.
Proceed as follows:
- Preheat the oven.
- Insert the cooking insert with the food.
- Insert the meat probe in the front left socket in the oven. (Fig. 39)
Caution: The side panels are hot. Use a glove.
- Insert the tip of the meat probe in the middle of the food, at its thickest point; not in the middle in the case of poultry (hollow), but between the belly and the thigh.
The measuring tip must not touch any bones and should not be inserted into fatty tissue. - Close the oven door.
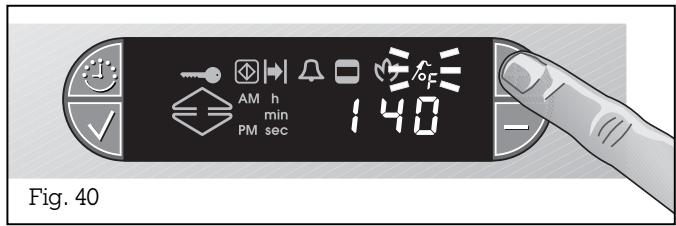
- Press the + key. The (Meat probe) symbol flashes and the suggested value of 140^ / 60^ appears on the display. (Fig. 40)
- You can enter a value between 33^ / 1^ and 210^ / 99^ (see table) by pressing the + and - keys.
- Press the (Confirmation) key to confirm the entered value. An audible signal is sounded.
An audible signal sounds as soon as the programmed core temperature has been reached. The oven switches off automatically. The (Meat probe) and -1 (End) symbols flash on the display. Caution: Pull out the meat probe before removing the food. Use a glove to do this because the meat probe gets very hot during operation.
Note:
When you press the (Confirmation) key three times, the temperature on the meat probe is displayed for a few seconds.
Clearing the core temperature
- Press the + or - key. The (Meat probe) symbol flashes on the display.
- Press the + and - keys at the same time.
- An audible signal sounds and the (Meat probe) symbol shuts off. Switch off the appliance.
To clean it, simply rub the meat probe with a moist cloth.
Note:
Remove the meat probe from the oven when it is not in use.
Only ever use the included original meat probe. You can order the meat probe as a spare part (Order No. 156838).
| Recommended core temperature values | |
| Beef | |
| Roast beef / fillet of beef | |
| rare | 45-50°C/110-120°F |
| medium-rare | 55-65°C/130-150°F |
| well-done | 70-80°C/160-180°F |
| Beef roast | 80-85°C/180-190°F |
| Boiled fillet of beef | 90°C/190°F |
| Pork | |
| Roast pork | 75-80°C/170-180°F |
| Back of pork | 65-70°C/150-160°F |
| Meat loaf | 85°C/190°F |
| Veal | |
| Roast veal | 75-80°C/170-180°F |
| Breast of veal, stuffed | 75-80°C/170-180°F |
| Back of veal medium-rare | 65-70°C/150-160°F |
| Venison | |
| Leg of venison | 75-80°C/170-180°F |
| Back of hare / venison | 65-70°C/150-160°F |
| Poultry | |
| Chicken | 85°C/190°F |
| Goose | 85-90°C/190°F |
| Turkey, duck | 80-85°C/180-190°F |
| Duck breast | 70°C/160°F |
| Lamb | |
| Leg of lamb medium-rare | 55-65°C/130-150°F |
| Lamb well-done | 75-80°C/170-180°F |
| Mutton | |
| Leg of mutton medium-rare | 75-80°C/170-180°F |
| Back of lamb well-done | 80°C/180°F |
| Bread | 90°C/190°F |
3.9 Special functions Child lock
Display of the current oven temperature (Thermotest)
Note: When the oven is operated continuously, temperature fluctuations of up to 5^ / 10^ , which are inherent to the system, may occur.
Vacation lock
The child lock prevents inadvertent activation of the oven.
Proceed as follows:
Switching on
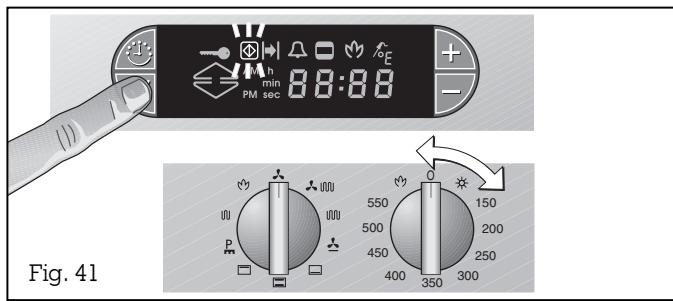
- Turn the "Temperature" control knob on the right (upper oven) to any position on the right.
- Press the (Confirmation) key and keep it pressed.
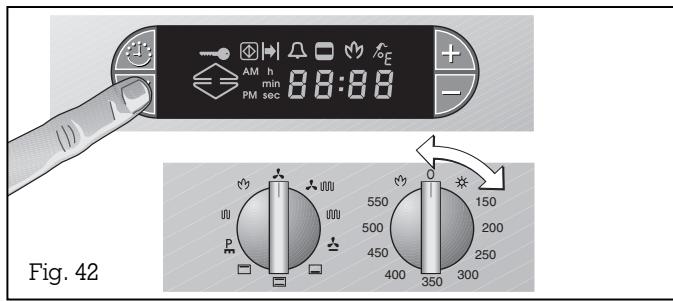
Turn the "Temperature" control knob on the right (upper oven) to the 0 position. (Fig. 41)
The symbol (Child lock) flashes on the display.
Switching off
- Press the (Confirmation) key and keep it pressed.
Turn the "Temperature" control knob on the right (upper oven) to any position on the right. - Release the (Confirmation) key.
- Turn the "Temperature" control knob on the right (upper oven) to the 0 position. (Fig. 42)
The 包 symbol (Child lock) disappears from the display.
The current oven temperature of the upper oven is displayed for a few seconds when you press the
(Confirmation) key once.
The symbol lights up.
The current oven temperature of the lower oven isdisplayed for a few seconds when you press the
(Confirmation) key twice.
The symbol lights up.
For your protection, the oven features vacation lock.
Every heating operation is switched off after 12 hours if the appliance is not operated during this time. Flashing dashes appear on the display.
Turn all control knobs to 0. You can then operate the appliance in the way to which you are accustomed.
Options menu
Fig. 43
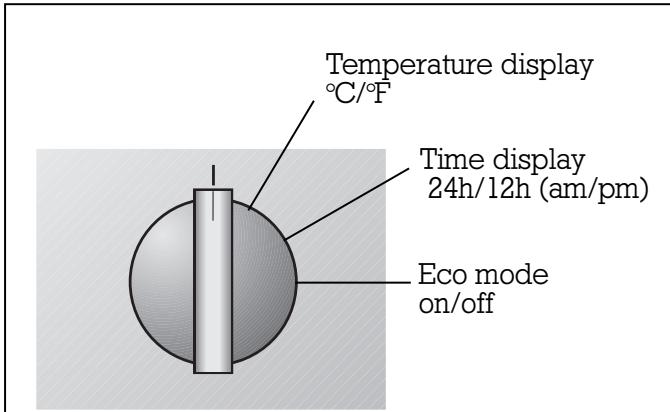
With the aid of the Options menu, you can
- choose between ^ C and F on the temperature display.
- choose between 12h and 24h (am/pm) on the time display.
- switch the Eco mode (power-saving mode) on or off. When you use the power-saving Eco mode, the light is switched off during the cooking process. When a duration is programmed, the oven also switches off the heating element before the cooking time has elapsed, thus exploiting the residual heat.
Proceed as follows:
- Turn all four control knobs to the topmost position.
- Press the (Confirmation) key and keep it pressed.
- Turn the "Modes" control knob on the right (top oven) to the right.
- Release the (Confirmation) key.
- By turning the "Modes" control knob on the right (top oven), you can now choose the various functions (Fig. 43):
Position 1: temperature display either in ^ C or F.
Position 2: time display in 24 hours or 12 hours (am and pm)
Position 3: Eco mode on or off
- Set the required option by pressing the + or - key.
- Press the (Confirmation) key.
- To quit the options menu, turn the "Modes" control knob back up or turn the "Temperature" control knob.
4. Baking table
| Cakes and biscuits | True convection | Convection and bottom heat | Top and bottom heat | Baking time | |||
| Level* | Temp. °F | Level* | Temp. °F | Level* | Temp. °F | min. | |
| Swiss roll | 2 | 410 | 7-9 | ||||
| Flan base | 2 | 350 | 30-35 | ||||
| Fruit flan on yeast dough | 2 | 330 | 2 | 350 | 40-45 | ||
| Fruit flan on short-crust pastry | 2 | 330 | 2 | 330 | 2 | 350 | 40-45 |
| Small flaky pastry cakes** | 1+3 / 2 | 360 | 2 | 370 | 15-20 | ||
| Cheesecake (high) | 2 | 330 | 2 | 330 | 2 | 330-350 | 90-100 |
| Cheesecake slices (flat) | 2 | 330 | 2 | 330 | 2 | 330-350 | 45-50 |
| Cake mix (round) | 2 | 320-350 | 2 | 350-360 | 50-60 | ||
| Loaf cake | 2 | 320-350 | 2 | 350-360 | 50-60 | ||
| Yeast dough ring cake (tall) | 1 | 320-350 | 1 | 350 | 40-50 | ||
| Biscuits** | 1+3 / 2 | 320-350 | 2 | 350 | 15-20 | ||
| ‘Hefezopf’ | 2 | 330 | 2 | 330-350 | 30-40 | ||
| Cake baked on a tray (dry coating) | 2 | 330-340 | 2 | 350 | 40-50 | ||
| Cake baked on a tray (moist coating) | 2 | 340 | 2 | 350 | 40-50 | ||
| Cream puffs | 1+3 / 2 | 360 | 2 | 370 | 20-25 | ||
| Mixed-grain bread*** | 2 | 390/340 | 2 | 410/340 | 40-50 | ||
- Level from below
In the true convection mode, you can bake simultaneously on several levels.
* Preheat the appliance to the specified temperature. Switch back to the second temperature when inserting the food.
Note: The values given above must be looked upon as recommended values. You are advised to always preheat the oven. The recommended mode is printed in bold.
Roasting table
| Dish | Level from below | True convection Temp. °F | Convection broil Temp. °F | Top and bottom heat Temp. °F | Cooking time minutes | Meat probe |
| Beef | ||||||
| Roast beef (casserole*) 1,5kg | 2 | 360 | 360 | 60-90 | ||
| Roast beef rare 1,5 kg** | 2 | 450/360 | 450/360 | 45-50 | 115-120°F | |
| Roast beef medium 1,5 kg** | 2 | 450/360 | 450/360 | 60-70 | 130-175°F | |
| Roast beef well-done 1,5 kg** | 2 | 450/360 | 90-100 | 160-175°F | ||
| Pork | ||||||
| Pork roast 1,5 kg** | 2 | 450/360 | 450/360 | 60-70 | 170-175°F | |
| Pork roast with rind 1,5 kg*** | 2 | 360/390 | 360/390 | 60-70 | 170-175°F | |
| Smoked pork 1,5 kg** | 2 | 360/320 | 40-50 | 150-160°F | ||
| Leg of pork*** | 2 | 300/390 | 300/390 | 50-60 | 175-185°F | |
| Collared roast** | 2 | 450/360 | 450/360 | 60-70 | 170-175°F | |
| Veal | ||||||
| Roast veal** | 2 | 450/360 | 450/360 | 60-70 | 170-175°F | |
| Leg of veal*** | 2 | 300/360 | 300/360 | 50-60 | 170°F | |
| Loin of veal | 2 | 320-340 | 20 | 160-170°F | ||
| Stuffed breast of veal* | 2 | 250-270 | 120 | 170-175°F | ||
- First brown the meat all-round in the casserole on the cooker.
** Brown the meat at a high heat level, switching back to a lower temperature after 15-20 minutes.
***Cook the meat at a low temperature and set the temperature higher during the last 15-20 minutes.
Note: The values given above must be looked upon as recommended values. You are advised to always preheat the oven. The recommended mode is printed in bold.
Roasting table
| Dish | Level from below | True convection Temp. °F | Convection broil Temp. °F | Top and bottom heat Temp. °F | Cooking time minutes | Meat probe |
| Venison | ||||||
| Roast boar (casserole*) | 340-360 | 60-90 | ||||
| Leg of venison (casserole*) | 340-360 | 60-80 | 165-175 °F | |||
| Saddle of venison | 2 | 330-350 | 340-360 | 20-25 | 150-160 °F | |
| Leg of lamb (casserole*) | 360-390 | 35-45 | 150-165 °F | |||
| Poultry | ||||||
| Duck 2-3 kg** | 2 | 320/360 | 320/380 | 100-120 | 175-185 °F | |
| Duck breast | 2 | 320 | 320 | 15-20 | 160 °F | |
| Goose 2-3 kg** | 2 | 320/380 | 320/380 | 100-120 | 185-195 °F | |
| Turkey 3-4 kg** | 2 | 320/380 | 320/380 | 120-180 | 185-195 °F | |
| Roast chicken | 2 | 360 | 360 | 50-60 | 185 °F | |
- First brown the meat all-round in the casserole on the cooker.
** Cook the meat at a low temperature and set the temperature higher during the last 15-20 minutes.
Note: the values given above must be looked upon as recommended values. You are advised to always preheat the oven. The recommended mode is printed in bold.
Broiling table
| Dish | Level* | Pre-heat | Temp.℉ | Broil minutes | Convection broil minutes | Total cooking time [min] | ||
| 1. side | 2. side | 1. side | 2. side | |||||
| Sliced pork belly | 3 | X | 360-390 | 6 | 4 | 5 | 5 | |
| Kebab | 3 | X | 370 | 8 | 8 | |||
| Fried sausage | 3 | X | 390 | 5 | 4 | |||
| Merguez (grilled sausage) | 3 | X | 390 | 6 | 6 | |||
| Roast chicken** | 2 | 360 | 30 | 30 | ||||
| Leg of chicken | 3 | X | 360 | 20 | 20 | 15 | 15 | |
| Spare ribs | 3 | X | 360-390 | 15 | 15 | 12 | 12 | |
| Leg of pork*** | 2 | X | 300/390 | 50-60 | ||||
| Trout | 3 | X | 360-390 | 8 | 8 | |||
| Vegetable kebabs | 3 | X | 390 | 7 | 7 | |||
| Shrimp kebab | 3 | X | 350 | 7 | 7 | |||
| Preparing au gratin | ||||||||
| Toasted sandwich | 3 | X | 370 | 5-7 | ||||
| Crème caramel**** | 4 | 480 | ||||||
| Crème brulée**** | 4 | 480 | ||||||
| Cake with meringue**** | 3 | X | 390 | |||||
Important: Only ever broil with the oven door closed.
You are advised to place the broil pan in the lowest level to collect dripping fat.
Level from below
* In the case of appliances featuring rotisserie, you are advised to use the spit in the broil mode.
*** Do not turn the leg of pork. Set the temperature high for the last 15-20 minutes.
You must bake this dish au gratin until it has reached the level of browning you require.
Note: The values given above must be looked upon as recommended values. You are advised to always preheat the oven. The recommended mode is printed in bold.
5. Cleaning and care
5.1 Manual cleaning
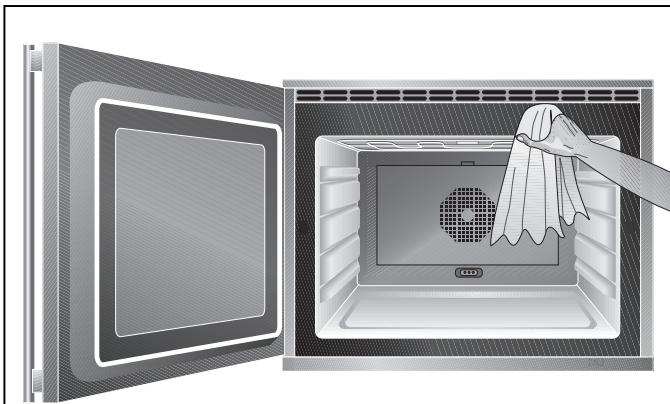
Fig. 44
Thoroughly clean the appliance before operating it for the first time and after every use, thus avoiding baking in of residues. After residues have baked in several times, they are then difficult to remove.
Commercially available oven sprays must not be used to clean the oven.
The outer surfaces must only be cleaned using a soft cloth. Please do not use any commercially available stainless steel cleaners as these may be aggressive to the coating (especially the door of the appliance).
Clean control panel areas, glass surfaces and operator controls with a moist cloth and gentle rinsing detergent and wipe them dry with a soft dry cloth. Do not use any abrasive or nitro polishing agents for cleaning!
Do not use any abrasive sponges either. Use commercially available window cleaner and apply it to a soft, moist cloth. Do not spray it onto the switch panel.
If possible, only clean accessories (baking tray, wire rack and broil pan) with hot water or detergent.
Do not scrape off baked in food remainders. Soften them with a moist cloth and detergent instead.
Note:
This appliance must not be cleaned by means of steam as cleaning device or water pressure as this would involve a risk of short-circuits!
Cleaning (Baking stone)
Remove coarse siolng from the baking stone. Turn the baking stone round before using it again. This will ensure self-cleaning. Dough residues can then be removed using a soft brush.
Note:
Do not clean the baking stone with water and detergents.
5.2 Pyrolytic self-cleaning
Caution!
Very high temperatures occur during the pyrolytic self-cleaning process.
Observe the appropriate caution and keep children away.
In this mode of operation, even stubborn soiling is burnt away at temperatures around 915^ / 485^ . After the pyrolytic self-cleaning process, you can remove the ash easily from the oven using a moist cloth.
For technical reasons, simultaneous pyrolytic self-cleaning of the upper and lower ovens is not possible.
During the pyrolytic self-cleaning of one oven it is possible to bake or roast in the other oven. Broil, economy broil and baking stone operation are not possible.
You can choose the duration of the pyrolytic self-cleaning (2, 2^1/2 and 3 hours) depending on the level of soiling.
It is imperative that you observe the following safety notes:
- Remove extreme fatty soiling, roast juice and food remainders before the pyrolytic cleaning process. These can cause a fire risk!
- Baking trays, broil pans, wire racks, the rotary spit or the baking stone must not be cleaned pyrolytically.
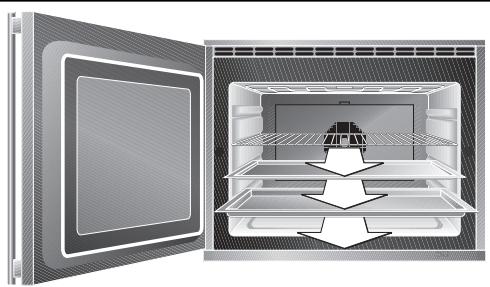
Fig. 45
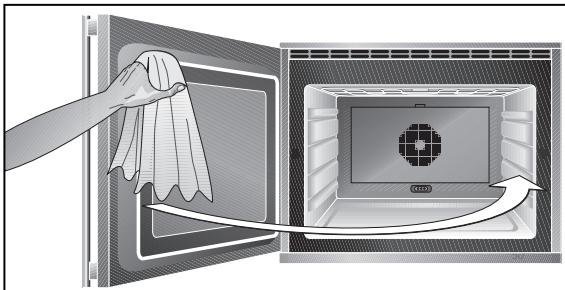
Fig. 46
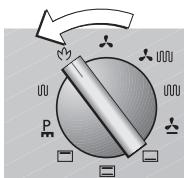
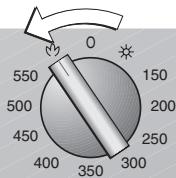
Fig. 47
If you press the (Timer) key once (upper oven) or three times (lower oven), the remaining pyrolysis duration is shown on the display.
If you press the (Timer) key twice (upper oven) or four times (lower oven), the end time of the pyrolysis is shown on the display.
Before you start pyrolytic self-cleaning
- Remove extreme soiling from the oven.
- Manually clean the door seals, the inside of the door and the glass panel because the pyrolytic cleaning process does not clean these parts.
- Important!
Check that the oven door is firmly closed on the oven.
Proceed as follows: Switching On
- Remove all loose interior parts (e.g. wire rack or meat probe) from the oven com-partment. There must be no objects left in the oven compartment!
- Close the oven door.
- Turn the "Temperature" and "Modes" knobs of the oven to be cleaned to the left to the (Pyrolysis) symbol. The recommended time 03:00 and the symbols (Door Lock), (Duration) and (Pyrolysis) flash in the display.
- You can change the recommended time by pressing the - or + key. You can choose between 02:00, 02:30 and 3:00.
- Press the (Confirm) key. An audible signal is sounded.
- For your safety, the oven door is locked. This process takes 30 seconds. The (Door Lock) symbol flashes and the oven lighting goes off.
- The (Door Lock), (Duration) and (Pyrolysis) symbols light up in the display during pyrolysis.
Do not try to open the oven door during the self cleaning process.
Note: During the pyrolysis process, it is not possible to query the temperature value.
Tip: Wait until the appliance indicates that the pyrolysis process has ended. This ensures that you will achieve an optimum cleaning result.
End of pyrolytic self-cleaning
- After the pyrolysis process has ended, an audible signal sounds and the (Duration) and (Pyrolysis) symbols flash.
- Press any key and turn the "Temperature" control knob to the 0 position and the "Modes" knob to a position other than Pyrolysis. Pay attention to the fact that the door is not unlocked until at a temperature of 300^ / 150^ or less.
Wait until the oven has cooled down; then, you can remove any pyrolysis residues (e.g. ash) from the oven compartment.
Ending the pyrolytic self-cleaning before expiry of the entered time
- Turn the "Temperature" control knob to the 0 position and the "Modes" control knob to a position other than Pyrolysis.
- Pay attention to the fact that the door is not unlocked until at a temperature of 300^ / 150^ or less.
Delay starting pyrolytic self-cleaning
- Turn the "Temperature" and "Modes" knobs of the oven to be cleaned to the left to the (Pyrolysis) symbol. The recommended time 03:00 and the symbols (Door Lock), uration) and (Pyrolysis) flash in the display.
- You can change the recommended time by pressing the - or + key. You can choose between 02:00, 02:30 and 3:00.
- Press the (Confirm) key.
- Press the (Timer) key twice (upper oven) or four times (lower oven). The (End), (Duration) and (upper oven) or (lower oven) symbols flash in the display. Dashes appear on the display (i.e. no value programmed).
- Press the + key to enter the required switch-off time.
- Press the (Confirm) key to confirm the entered value. A signal is sounded. The (Duration) symbol lights up on the display.
Pyrolytic self-cleaning in both ovens
It is possible to conduct in both ovens pyrolytic self-cleaning in succession. Begin the pyrolysis in one oven as described. Turn both knobs of the second oven to the (Pyrolysis) symbol. Choose the desired pyrolysis time and confirm by pressing the (Confirm) key. The second oven begins pyrolysis as soon as the first oven has cooled down sufficiently. The total duration for pyrolytic self-cleaning in both ovens is about 6 hours.
6. Maintenance
6.1 General
6.2 Replacing the lamp
The appliance must always be disconnected from the power main when being repaired.
If the appliance does not function correctly, check the fuses first.
If the power supply is functioning correctly, but your appliance still does not work, notify your Gaggenau dealer, who will provide you with the address and telephone number of your nearest factory authorized service agent or contact Gaggenau USA, tel. (800) 828-9165.
Repairs may only be carried out by authorized electricians, in order to guarantee the safety of the appliance.
Unauthorized tampering with the appliance will invalidate any warranty claims.
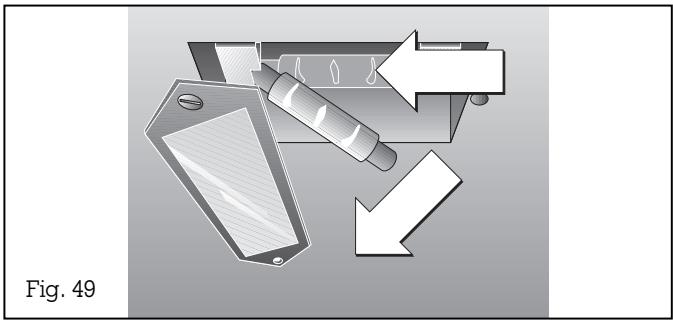
You can obtain spare lamps from Gaggenau Customer Service or a dealer. We recommend that you use these lamps only. (Order number 157312)
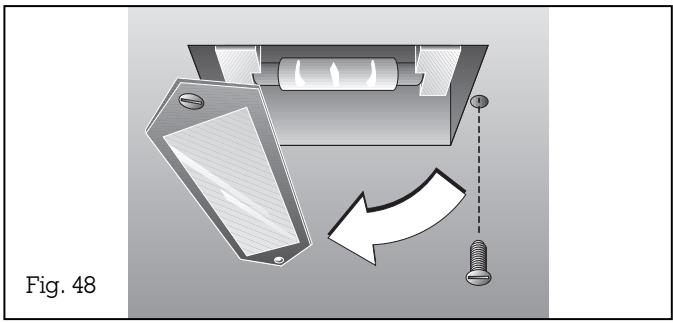
Proceed as follows:
- Disconnect fuses.
- Remove one of the lamp cover screws.
- Swivel the cover to the side.
Caution: The lamp cover may still be hot.
- Push the lamp to the side by about 3/16". The lamp can now be titled down and removed.
- Insert the lamp in the reverse order. Swivel the cover back to its original position and screw it on. (Caution: Secure the seal properly!)
Note:
Do not touch the halogen lamp with your hands. Use a cloth and only touch the edges of the lamp.
6.3 Disassembly of the front window
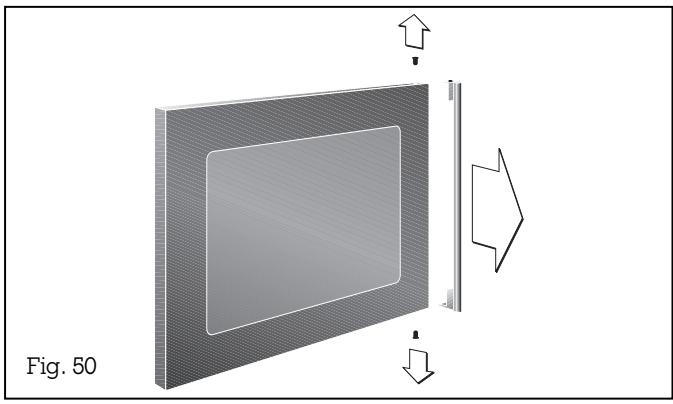
The oven door is actively ventilated. Dust and grease particles may therefore settle after some time. Detach the front window to remove this soiling.
Proceed as follows:
- Remove the bottom screw from the door handle.
- Remove the top screw from the door handle and detach the door handle.
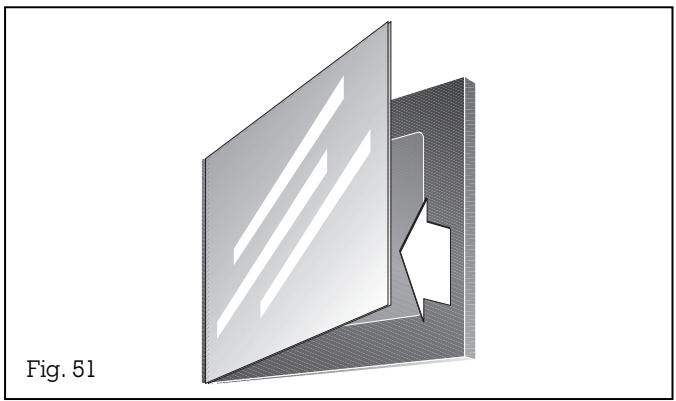
- Hold the front window with one hand and lightly shake the door to and fro. The glass window can be removed towards you.
You can now clean the front window.
Install in the reverse order. In doing so, make sure that you first insert the window on the hinge side and that you hold it with one hand to stop it from falling out.
7. Hints and tricks
- You can use any heat-resistant crockery. Place crockery in the middle of the grid. You can also use the broil pan for large roasts. After removing glass crockery, pace it on a dry kitchen cloth or grid. Do not place it on a cold or wet support surface. The glass could crack.
- You are advised to use dark metal baking forms. You may also use light baking forms in the hot air mode/true convection mode. In this case, the baking time is longer.
- The values in the cooking tables apply to the preheated oven. The temperature and duration depend on the quantity and consistency of the dough. This is why the tables list temperature ranges. You are advised to begin with the lowest temperature the first time. If required, set it higher the next time. Remember: A lower temperature ensures more even browning.
- If you want to bake according to your own recipes, orientate yourself to similar recipes in the table.
-
To find out if your cake mixture has baked properly, insert a wooden stick at the highest point of the cake around 5-10 minutes before expiry of the baking time specified in the recipe. The cake is ready if dough no longer sticks to the wood.
-
The result of roasting depends on the type and quality of the meat. Add 2 to 3 tablespoons of liquid to lean meat. Depending on the size, add 8 to 10 tablespoons to pot roasts. Turn large roasts after half of the roasting time.
- Always broil with the oven door closed. If possible, broiled pieces should be equally thick, at least 2 to 3cm . When this is the case, they will brown evenly and will stay nice and juicy. Never broil steaks salted!
Place pieces for broiling directly on the grid.
- Poultry becomes particularly crispy brown if you coat it with butter, salt water, dripped-off fat or orange juice.
- At 100 - 120^ F , even sensitive frozen food is thawed gently and fast. Place the frozen food on the wire rack and turn the "Temperature" control knob to the "Light" position. Use the broil pan to collect the liquid from thawing.
- If you only want to broil one piece of meat, place it in the middle of the grid for best results. Place the broil pan on the first level. This ensures that the juices of the meat are collected and the oven stays clean.
- Turn broiled pieces after two-thirds of the time specified in the tables.
- You might notice that the broil element goes on and off automatically during the broiling time. This is normal. The number of times it switches itself on and off depends on the cooking level you have chosen.
- In the case of duck or goose, pierce the skin under the wings to allow the fat to drain off.
Energy-saving tips
- Use dark baking forms. These absorb the temperature better.
- In the case of long baking times, you can switch off the oven 5-10 minutes before the end of the baking time and you can use the remaining heat to complete the baking process.
- If you want to bake several cakes, do not bake them on different levels, but next to one another.
Cleaning and care
- Do not use any abrasive cleaning agents, strong agents or implements that might produce scratches.
- Do not scrape off baked-in remainders of food. Instead, soak them with a moist cloth and detergent.
- Do not use any special cleaners such as sprays for aluminum and plastic parts.
- You should not use any commercially available stainless steel cleaners for control panels, glass doors or handles because they may be aggressive to the imprint. Do not use any sponges with rough surfaces either.
- Apply commercially available detergents on a soft, moist cloth or a window leather.
- If your appliance features a reflecting glass frontage, do not use any abrasive agents or sponges with rough surfaces.
- Use commercially available window cleaning detergents and apply them on a soft, moist cloth or a window-cleaning cloth. Do not spray the switch panel.
- You are best advised to clean the oven after every use, particularly after roasting or grilling. By doing so, you will prevent food residues from becoming baked-in because it is difficult to remove residues that have baked onto the oven surface after several baking operations.
- If the oven is only slightly soiled, clean it with a hot detergent rinse while it is still warm and leave it open to dry.
- Do not use a steam pressure cleaner as this poses a risk of short-circuits.
8. Assembly instructions
8.1 Technical data
Rating: AC 208/220-240 V; 7100/8650 W; 40 A
Heating power:
Infrared broil 3100 W
Hot air heating element 2300 W
Top heat 1100W
Bottom heat 1100 W
Power circuit 3600 W
Exterior dimensions (W× H× D) ..
660 x 1085 x 580 mm
You can order the following spare parts by stating the specified numbers:
Baking tray KB 091-054
Wire rack GR 090-054
Wire rack GR 095-054
Broil pan GP 091-054
Halogen lamp 157312
Core temperature sensor 156838
Technical modifications without notice.
8.2 How to do it
The appliance must only be connected by an authorized specialist, paying attention to the relevant regulations of the power supply companies and the regional construction regulations.
The electrician is responsible for the correct functioning of the appliance at the time of installation. He must instruct the user on how to operate the appliance correctly on the basis of the
Operating Instructions, and the user must be instructed on how to disconnect the appliance in an emergency.
We accept no liability for damage caused by failure to comply with these instructions.
Repairs carried out improperly may involve substantial risks for you.
Connection to the power main
The power main to which the oven is to be connected is fused with 40A in each phase. Connect the flexible cable to the power supply.
The appliance must be earthed.
The manufacturer cannot be held liable for damages that might arise from improper or nonexistent earthing of the appliance.
For installation in Canada only:
When you install the appliance you need a special fuse-box with circuit breakers which have to be connected between the appliance and the socket. When installing the fuse box and circuit breakers please make sure that you have installed the right breakers in each circuit. Please contact your dealer or an electrician.
Follow the information on the enclosed wiring diagram for connection details.
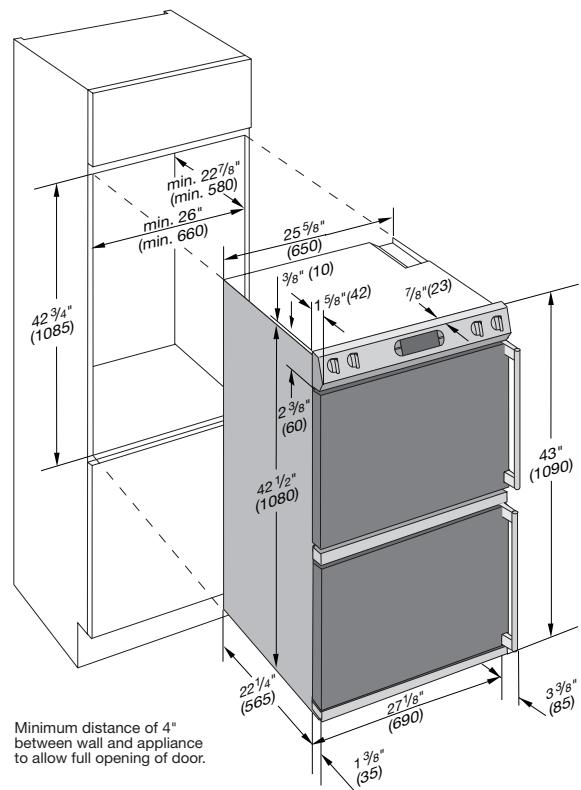
Fig. 52
Note:
The appliance must only be transported in an upright position!
Do not lift the appliance by the door handle!
Installation
Note: Weight of the unit with accessories is 130 kg (286 lb). The supporting surface of the built-in cupboard must be designed for a load carrying capacity of at least 140 kg (308 lb).
Proceed as follows:
- When unpacking the appliance, check it for transport damage.
- Please remove the adhesive tapes that protect the door during transport.
- A flexible cable should be used as the power main lead. The cross-section must be selected according to the rated current consumption and the type of connection.
- Push the appliance into the item of furnishing. Use the included wood screws to firmly bolt it to the face timber surface of the conversion cabinet on the handle and hinge side, directly underneath the bottom panel.
Note: Use a level to check that the oven is installed exactly horizontally.
- After installing, ensure that wires are protected against contact.
- Finally test the oven for correct functioning.
- Thoroughly clean the appliance and accessories before using them for the first time. (see "Cleaning and Care")
GAGGENAU
GAGGENAU HAUSGERÄTE GMBH
P.O. BOX 10 02 50 · 80076 MUNCHEN
GERMANY
(089)45 90-03
FAX (089) 45 90-23 47
GAGGENAU
5551 McFADDEN AVENUE
HUNTINGTON BEACH, CA 92649
USA
(800) 828-9165·FAX (714) 901-0979
www.gaggenau-usa.com
- EB 294/295-6..
- Preface
- Baking with your new oven will be even more fun than before.
- Important safeguards
- Important instructions
- 3.DO NOT TOUCH HEATING ELEMENTS OR INTERIOR SURFACES OF OVEN -
- Important notes
- For your safety
- Operating for the first time
- About use
- Caution!
- Observe caution with oils and fats.
- Note!
- After baking/roasting, open the door completely or close it. The oven door must not be left half open as otherwise the control panel and kitchen furniture may be damaged.
- Caution: Risk of burns.
- Structure and operating principle
- Accessories / special accessories
- Operating principle of the operating modes
- Hot Air (True Convection)
- Baking with Hot Air (True Convection)
- Roasting with Hot Air (True Convection)
- Hot Air (True Convection) and Bottom Heat
- Top and Bottom Heat
- Broiling
- Temperature-controlled Broiling
- Do not forget to turn broiled food!
- Broiling with the Hot Air Fan (Convection
- Economy Broiling
- Baking stone operation (with special accessories PS 027 and HZ 026 only)
- Special functions
- Display of the current oven temperature (Thermotest)
- Meat probe
- (upper oven only)
- Power failure safeguard
- Vacation lock
- Child lock
- Eco program
- Operation
- Overview
- Inserting the baking tray
- "Temperature" knob:
- "Mode" knob:
- Switching on (Fig. 21)
- Switching off (Fig. 22)
- Operating the timer
- Setting the time of day
- Proceed as follows:
- Note:
- Short time
- Elapsed timer
- Programming a duration
- Clearing incorrectly programmed values:
- Programming a switch-off time
- Programming a duration and a switch-off time (Delay Start)
- Hot air operation (True convection) Switching on
- Switching off
- Sterilizing (Canning)
- Top and / or bottom heat
- Switching on:
- Switching off:
- Baking with top and bottom heat
- Roasting with top and bottom heat
- Hot air (Convection) and bottom heat
- Broiling
- Switching on
- Broiling with the hot air fan
- Rotisserie
- Meat probe
- The meat probe
- Clearing the core temperature
- Special functions Child lock
- Baking table
- Roasting table
- Broiling table
- Important: Only ever broil with the oven door closed.
- Cleaning and care
- Manual cleaning
- Cleaning (Baking stone)
- Pyrolytic self-cleaning
- For technical reasons, simultaneous pyrolytic self-cleaning of the upper and lower ovens is not possible.
- It is imperative that you observe the following safety notes:
- Before you start pyrolytic self-cleaning
- Proceed as follows: Switching On
- Do not try to open the oven door during the self cleaning process.
- End of pyrolytic self-cleaning
- Ending the pyrolytic self-cleaning before expiry of the entered time
- Delay starting pyrolytic self-cleaning
- Pyrolytic self-cleaning in both ovens
- Maintenance
- General
- The appliance must always be disconnected from the power main when being repaired.
- Disassembly of the front window
- Hints and tricks
- Energy-saving tips
- Cleaning and care
- Assembly instructions
- Technical data
- Heating power:
- Exterior dimensions (W× H× D) ..
- You can order the following spare parts by stating the specified numbers:
- How to do it
- Connection to the power main
- For installation in Canada only:
- Installation
- GAGGENAU
Brand : GAGGENAU
Model : EB295610
Category : Built-in oven