Milky Cream Separator - Electric cream separator Coburn - Free user manual and instructions
Find the device manual for free Milky Cream Separator Coburn in PDF.


| Brand | Coburn |
| Model | Milky Separator |
| Product type | Electric cream separator |
| Supply voltage | 230 V / 50 Hz or 115 V / 60 Hz depending on model |
| Motor power | 70 W |
| Maximum rotation speed | 9500 rpm |
| Maximum hourly capacity | 90 l/h or 130 l/h depending on version |
| Tank capacity | 12 l or 10 l depending on version |
| Recommended skimming capacity | Up to 60 l or 100 l per cycle depending on version |
| Net weight | 3.50 kg or 4.70 kg depending on version |
| Protection type | IP 23 |
| Functions | Cream/milk separation, centrifugal skimming |
| Control | Main switch |
| Maintenance | Manual cleaning of parts, damp cloth for the housing |
| Safety | Power off before cleaning, IP23 protection |
| Spare parts | Bowl, discs, gaskets, lid, screws, etc. |
| Included accessories | Brush, wrench, spare gasket, fixing screws |
| Installation | Flat and stable surface, screw fixing possible |
Frequently Asked Questions - Milky Cream Separator Coburn
User questions about Milky Cream Separator Coburn
0 question about this device. Answer the ones you know or ask your own.
Ask a new question about this device
Download the instructions for your Electric cream separator in PDF format for free! Find your manual Milky Cream Separator - Coburn and take your electronic device back in hand. On this page are published all the documents necessary for the use of your device. Milky Cream Separator by Coburn.
USER MANUAL Milky Cream Separator Coburn
TABLE OF CONTENTS
General safety recommendations 2
Technical Specifications 3
Unpacking and Set Up 3
Accessories 3
Assembling Procedure 4
List of composing parts 5
Top Bowl assembling Procedure 6
Skimming Procedure 7
Skimming Regulation 8
Maintenance and Cleaning 9
Top Bowl cleaning Procedure 10
Spare parts ordering Procedure 11
Warranty 11
- Before any installation read this manual very carefully.
• Make sure, that you have closed top bowl fixing nut tightly enough. - Disconnect device from mains before cleaning.
- Don't repair the device by yourself, in case of malfunction rather call authorized service provided by your distributor.
- Take care that water or humidity will not come into the device, specially by cleaning procedures.
- In case of serious malfunctions unplug the device from mains and call authorized service.
- In case that device is not functioning properly even you have exactly followed instructions described in this manual, you are allowed to use only those procedures which are allowed by manual. Use of any other procedures or adjustments could result in device destruction or longer service time. Injuries connected with such procedures can not be matter of any product liability claims.
We are glad that you decide to buy our cream separator and we promise you that it will serve you for a long time if you will use and clean it according to descriptions stated in this User's manual.
TECHNICAL SPECIFICATIONS
| 90 l | 130 l | ||
| Operating Voltage (model 230V) | V / Hz | 230 / 50 | 230 / 50 |
| Operating Voltage (model 115V) | V / Hz | 115 / 60 | 115 / 60 |
| Motor Power | W | 70 | 70 |
| Max. Rotating speed | RPM | 9500 | 9500 |
| Max. Capacity | l / h | 90 | 130 |
| Max. Container capacity | l | 12 | 10 |
| Recommended capacity for skimming | l | to 60 | to 100 |
| Net weight | kg | 3,50 | 4,70 |
| Protection type | IP 23 | IP 23 | |
Recommended skimming capacity is volume of the milk that can be skimmed within one skimming cycle. It depends how much solid parts are in the milk. If the flow of the skimmed milk is reduced than the discs and the bowl must be cleaned.
UNPACKING AND SET UP
Take the device out of the cardboard box and remove packing inserts. Place it on the plain and stable surface in clear and dry place. Fixing the device on the surface is recommended. If you want to fix it on the surface, take the screws and fix it on the surface.
ACCESSORIES
In each package you will find also following accessories:
- Operating Manual
- Cleaning brush 371067
• Key for bowl fixing nut and cream screw 371069 - Spare rubber washer 371033
- Screws
Please note!
Be careful not to use cream separator with damaged mains cord!
Be careful that the socket is not damaged!
ASSEMBLING PROCEDURE
- Put the housing on a desk or other plain and stable surface.
- Put assembled top bowl on the conical motor beam and softly press it.
- Put skimmed milk funnel on the top of the housing and then also cream funnel on the top of previous one.
- Turn top bowl with hand and check if is not touching one the funnels and adjust funnels to desired position for skimming.
- Place the holder for milk container on the top of both funnels. Place floating device in it. Then place milk container on the top. Fix all together with holder on housing (look picture below).
- Place closing cork in the hole situated in the middle of milk container. The narrow side of the closing cork handle must be turned away from the cut in the container (see picture). The milk outflow will be closed.


Fixing parts with rubber holder (detail).
Please note!
The closing cork must be closed, when you fill the container. This means that the thick side of the closing cork handle must be turned to opposite direction of the cut in the container.
Cream separator FJ-130
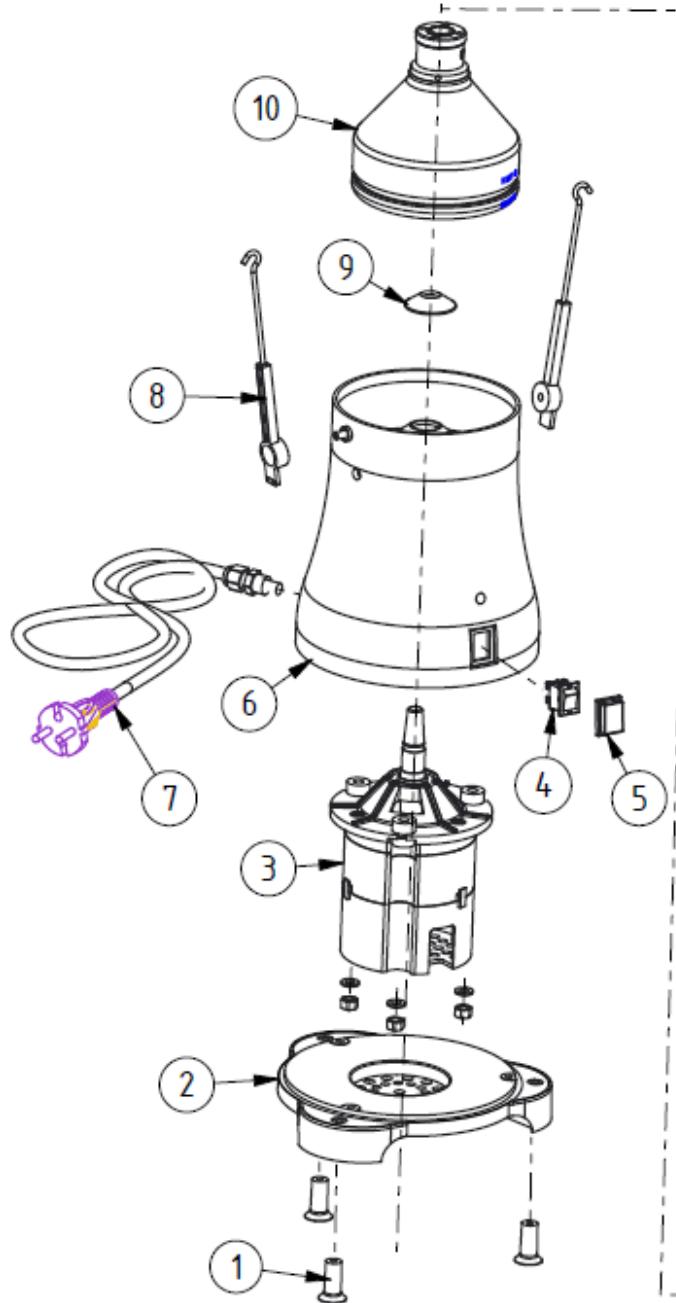

List of composing parts (Spare parts list)
| Part name | Part number | |
| 1 | Foot | 3711019 |
| 2 | Bottom cover | 3711017 |
| 3 | Motor BL 230V | 26000 |
| 3 | Motor BL 115V | 26001 |
| 4 | Main switch | 371151 |
| 5 | Cover of main switch | 371153 |
| 6 | Housing green | 3752005-G |
| 6 | Housing blue | 3752005-B |
| 6 | Housing silver | 3752005-S |
| 7 | Mains cord assembly 230V | 26002 |
| 7 | Mains cord assembly 115V | 26003 |
| 8 | Holder assembly | 375069 |
| 9 | Bearing cover | 371013 |
| 10 | Top bowl assembly | 375021 |
| 11 | Outlet for milk | 375037 |
| 12 | Outlet for cream | 375045 |
| 13 | Container holder | 375051 |
| 14 | Floater inox | 375059 |
| 15 | Container | 375063 |
| 16 | Container washer | 371055 |
| 17 | Closing cork | 371061 |

Cream separator FJ-130
Top bowl assembly - exploded view
- Put the rubber washer in to the notch of top bowl bottom part.
- Place the metal discs. You have to take care by discs placement- device uses two different types of disks-plain disks and relief disks. first you have to insert relief disk, then plain disk and repeat "the procedure until all disks are placed. By disk placement avoid any use of force. With gently shaking and turning of the top bowl bottom part all the disks will find their place very easily.
- Put the plastic partition in the top bowl cover part.
- When assembling place both assembled parts of top bowl together. Take care that top bowl cover part mark "0" and top bowl bottom part mark "0" are in the same direction.
- Screw the top bowl fixing nut with hand and fix it strongly with key the key. The mark "0" must stay in the same direction. The fixing nut must be strongly fixed, because it is exposed to high forces.

List of composing parts (Spare parts list)
| Part name | Part number | |
| 1 | Top bowl assembly | 3752021 |
| 2 | Rubber washer | 3711033 |
| 3 | Metal disc 1 | 3711025 |
| 4 | Metal disc 2 | 3711026 |
| 5 | Plastic partition | 3711029 |
| 6 | Cream regulation screw | 103444 |
| 7 | Fixing key assembly | 3712069 |
| 8 | Cleaning brush | 371067 |

Cream separator FJ 90

List of composing parts (Spare parts list)
| Part name | Part number | |
| 1 | Foot | 3711019 |
| 2 | Bottom plate | 3711017 |
| 3 | Motor 230V | 17595 |
| 3 | Motor 115V | 17596 |
| 4 | Main switch | 371151 |
| 5 | Cover of main switch | 371153 |
| 6 | Housing-green | 3712005-G |
| 6 | Housing-blue | 3712005-B |
| 6 | Housing-silver | 3712005-S |
| 7 | Mains cord assembly 230V | 26002 |
| 7 | Mains cord assembly 115V | 26003 |
| 8 | Bearing cover | 3711013 |

| 9 | Top bowl assembly | 3712021 |
| 10 | Outlet for milk | 3711037 |
| 11 | Outlet for cream | 3711039 |
| 12 | Container holder-green | 3711041-G |
| 12 | Container holder-blue | 3711041-B |
| 12 | Container holder-silver | 3711041-S |
| 13 | Floater | 3752045 |
| 14 | Container | 371051 |
| 15 | Closing cork | 3711061 |

List of composing parts (Spare parts list)
| Part name | Part number | |
| 1 | Top bowl assembly | 3712021 |
| 2 | Rubber washer | 3711033 |
| 3 | Metal disc 1 | 3711025 |
| 4 | Metal disc 2 | 3711026 |
| 5 | Plastic partition | 3711029 |
| 6 | Cream regulation screw | 103444 |
| 7 | Fixing key assembly | 3712069 |
| 8 | Cleaning brush | 371067 |
Cream separator FJ-90
Top bowl assembly - exploded view
-
Put the rubber washer in to the notch of top bowl bottom part.
-
Place the metal discs. You have to take care by discs placement- device uses two different types of disks-plain disks and relief disks. first you have to insert relief disk, then plain disk and repeat the procedure until all disks are placed. By disk placement avoid any use of force. With gently shaking and turning of the top bowl bottom part all the disks will find their place very easily.
-
Put the plastic partition in the top bowl cover part.
-
When assembling place both assembled parts of top bowl together. Take care that top bowl cover part mark "0" and top bowl bottom part mark "0" are in the same direction.
-
Screw the top bowl fixing nut with hand and fix it strongly with key the key. The mark "0" must stay in the same direction. The fixing nut must be strongly fixed, because it is exposed to high forces.


SKIMMING PROCEDURE
Best skimming results are achieved if you start to skim immediately after milking. If milk is cooled, you have to warm it up to temperature between 30 to 35 °C. You can not skim milk with temperature lower than 30 °C. When the milk is properly warmed up, pour it in the container.
- Switch on cream separator with switcher 0 / I and wait 30 seconds that top bowl reaches working speed.
Cream separator FJ 130 has above the switcher a signal lamp which, by switching on the separator, shines red, and when machine reaches working speed starts to shine green. - Only then you are allowed to turn closing cork to open position. The end of the closing cork is turned to the cut (tooth) in the container and flow is opened.
-
If milk is coming out of the housing hole means, that:
-
You have opened closing cork before the motor had reached working speed,
○ Top bowl nut was not fixed enough, - Rubber washer is placed badly or it is destroyed.
When this is the case, close the closing cork, turn the milk separator OFF and correct the problem.
Please note!
After you have finished skimming procedure pour approximately 1/2 l of skimmed milk back into milk container. This will clean the rest of cream in the top bowl. After all procedures taken, simply turn OFF the device and wait until motor stops.
Closing cork must always be closed before you turn off the device!
Before each skimming procedure, the bowl must be clean and dry
Please note!
Always check if rubber washer is damaged or too much extended. In such case you have to replace it with new one.
SKIMMING REGULATION
The cream separator is factory adjusted, so you get around 10 % of cream from whole milk volume at milk temperature 35 °C. If you want different density or volume of cream, you can adjust hexagonal adjusting screw (placed in the plastic partition in top bowl upper part).
- If you want more density cream – smaller volume, you have to turn it towards right (clockwise)
- If you want less density cream – higher volume, you have to turn it towards left (counter clockwise). In most cases it is enough to turn adjusting screw for 1/4 of the rotation.
Cream adjusting screw details and function
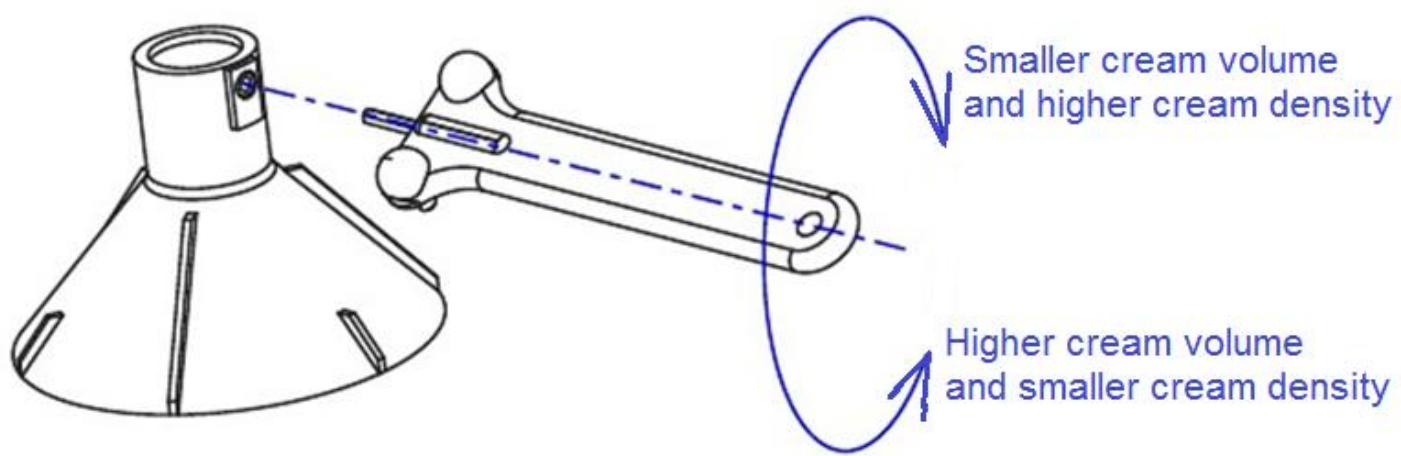
Please note!
You have to take care that not fix the adjusting screw too deep, because you can harm the screw coil! You have to take care not to unscrew the regulation screw too much. If you have done so, you will have problems by disassembling the plastic partition and the top bowl upper part.
MAINTENANCE AND CLEANING
- All parts of the top bowl should be cleaned with hot water in which you should add some detergent.
- Rests of milk, cream or other impairs should be cleaned with soft duster or cleaning brush. Specially take care, that you clean very precisely all the holes in top bowl upper part, top bowl bottom part and in adjusting screw. For cleaning this parts cleaning brush is strongly recommended! Other parts of the separator that come in touch with milk, should also be cleaned with hot water in which some detergent is added. Then rinse parts in clean water.
- If milk or cream rests get dry do not remove them with sharp objects or sharp duster. It can easily happen that you ruin galvanic protection cover or plastic parts.
- Before cleaning cream separator housing you must before such procedure always disconnect device from mains. Clean it first with wet duster and then try it with dry duster. Take care that water doesn't come into the device.
Ensure that no water comes into contact with the motor and other electric part.
Please note!
Device is protected against direct water access, but you should always take care to avoid that water comes into the device!
Before cleaning device must always be disconnected from main supply!
TOP BOWL CLEANING PROCEDURE
With the key, which is packed with the cream separator, unscrew top bowl fixing nut as it is shown on the picture.

The easiest way to perform this procedure is:
- Fix key into the holes, which are on the top bowl fixing nut
- With stronger press on the other key end turn fixing nut until you release it. After that you can unscrew the nut easily with hand.
- Dismount the top bowl cover with help of fixing nut key and separate all different pieces you will find under the cover - plastic partition, metal discs and rubber washer and clear them with hot water. To achieve better results, cleaning detergent can be added to the hot water.

- Wash all the parts with hot water and dry them with dry and soft duster.
Please note!
If you can not mount top bowl off the motor after skimming, shake it gently.
Please avoid to use force – you can harm the device most precise parts.
SPARE PARTS ORDERING PROCEDURE
Fast and reliable shipment of spare parts is possible only if their description is clear enough. At the time of ordering please state clearly:
- Type of cream separator.
- Serial number printed on label plate at the rare side of device.
- Part name and code number of wished spare part.
WARRANTY
- In case of troubles consult with your salesman or call authorized service organized established distributor.
- Equipment is warranted to be free from defects in material and workmanship for a period of 12 months against faulty components and assembly. Our obligation under this warranty is limited to the repair or replacement of the instrument or part thereof, which shall within 12 months after date of shipment prove to be defective after our examination.
-
Defects or injuries of the device, which are result or improper assembly, use, connect or maintenance are not covered by this warranty.
-
The warranty also doesn't cover:
• Motor, destroyed by water or milk inflow,
- Mains cord.
-
The given technical specifications are valid only when all conditions in this user's manuals are fulfilled.
-
Other rights, that are not mentioned in upper obligations of the manufacturer, especially responsibility for personal injury, are excluded.
Dear Customer!
We are sure, that you will find out our cream separator as a helpful tool and we believe that it will serve you for a long time without any problems! We hope it will be recommended also your friends!
Thank you for buying it!
- TABLE OF CONTENTS
- UNPACKING AND SET UP
- ACCESSORIES
- ASSEMBLING PROCEDURE
- PLEASE NOTE
- CREAM SEPARATOR FJ
- TOP BOWL ASSEMBLY - EXPLODED VIEW
- SKIMMING PROCEDURE
- SKIMMING REGULATION
- MAINTENANCE AND CLEANING
- TOP BOWL CLEANING PROCEDURE
- THE EASIEST WAY TO PERFORM THIS PROCEDURE IS
- SPARE PARTS ORDERING PROCEDURE
- WARRANTY
- DEAR CUSTOMER
Brand : Coburn
Model : Milky Cream Separator
Category : Electric cream separator