DMS 650 - Network audio player Cary Audio - Free user manual and instructions
Find the device manual for free DMS 650 Cary Audio in PDF.


| Product type | High-end network audio player with DAC and digital preamplifier |
| Brand | Cary Audio |
| Model | DMS-650 |
| Dimensions (W x H x D) | 432 x 115 x 394 mm (17 x 4.5 x 15.5 in) |
| Weight | 10 kg (22 lb) |
| Power supply | 100-240 V AC, 50/60 Hz |
| Main features | Network playback, MQA, DSD, Bluetooth aptX HD, Wi-Fi MU-MIMO, TruBit upsampling, OSO reclocking |
| Digital inputs | USB, SD card, SPDIF (optical and coaxial) |
| Audio outputs | Balanced XLR, unbalanced RCA |
| Network connectivity | Ethernet RJ45, dual-band MU-MIMO Wi-Fi |
| Bluetooth | aptX and aptX HD with fi™ technology |
| Supported formats | PCM up to 768 kHz, DSD up to DSD512, MQA |
| Upsampling | TruBit™: PCM to DSD conversion, PCM and DSD upsampling |
| Reclocking | OSO™ technology for ultra-precise clocking |
| Control | Streamer 2.0 app (iOS/Android), IR remote control, front display |
| Pure Audio Mode | Pure audio mode for maximum quality |
| Safety | Unplug before cleaning, do not expose to moisture |
| Maintenance and cleaning | Soft dry cloth, do not use solvents |
| Spare parts and repairability | Contact an authorized center, no user-serviceable parts |
| General information | Manufacturer's warranty included, online user manual |
Frequently Asked Questions - DMS 650 Cary Audio
User questions about DMS 650 Cary Audio
0 question about this device. Answer the ones you know or ask your own.
Ask a new question about this device
Download the instructions for your Network audio player in PDF format for free! Find your manual DMS 650 - Cary Audio and take your electronic device back in hand. On this page are published all the documents necessary for the use of your device. DMS 650 by Cary Audio.
USER MANUAL DMS 650 Cary Audio
Network Audio Player
NOTE: Before installing your new component, please read this manual carefully as it will inform you of the product specifications, proper installation and correct operating procedures for your unit. Also included in this manual are guidelines on how to service and care for your new Cary Audio Design product.
TABLE OF CONTENTS
Important Safety Instructions ....5
Welcome 8
Thank You....8
Useful Terms....9
About the DMS-650....10
Installation....11
Unpacking....11
Warranty Card 11
Placement....11
Features....12
USB and SD Card NAS Drive.... 12
MQA Certified Full Decoding to 768 KHZ 12
aptX™ and aptX™ HD with Cary Audio's fi™ BLUETOOTH implementation.... 12
Advanced MU-MIMO WI-FI 12
TruBit™ DSD and PCM Upsampling and PCM to DSD Conversion 13
OSO™ Reclocking....13
Controls and Displays 15
Front Panel 15
Rear Panel....16
IR Remote Control 18
Using Remote Alphanumeric Keys 19
User Tips....19
Now Playing Screen (Network, USB, SD, Internet).... 20
MQA Now Playing Screen (Network, USB, SD, Internet) 20
Now Playing Screen (SPDIF) 20
Alternate Now Playing Display Screens.... 21
App Control for iOS and Andriod.... 22
Tutorial Videos for Controlling DMS via App 22
Volume Control and Output.... 23
Using as a Source (Connecting to a Preamplifier, etc.) 23
Using as a Digital Preamplifier (Connecting Directly to an Amplifier) 23
Maximum Output Voltage.... 23
Pure Audio Mode 23
Settings Menu Overview 24
Main Setting Menu.... 24
Volume Menu....24
IR Control Menu 25
Network Menu 25
User Tip Menu 26
Startup Menu 26
Firmware Update Menu 27
Change the IR Code 28
Factory Reset 28
Wired (Ethernet) 29
Wireless (Wi-Fi) Setup 30
WiFi Setup Using Streamer 2.0 App .... 30
WiFi Setup Using IR Remote Only 31
Network and Internet Playback Operation 33
Network Audio Setup 33
Local Master Browser and Start Samba (SMB) 34
Media Server and PC Share Differences.... 34
Media Server and PC Share Method 34
Renderer Method....36
Internet Music Services 38
Spotify Connect 38
USB and SD Card Operation 39
USB and SD Card Playback (Direct Method) 39
USB and SD Card NAS Setup....40
USB and SD Card NAS Playback 41
Queues and Playlists....46
Queues....46
Playlists 48
SPDIF Source Operation 51
SPDIF Inputs....51
SPDIF Outputs....51
SPDIF Outputs While Playing MQA Files 51
Playing Music from and to Portable Devices 52
Airplay and Phoneshare Connection 52
Airplay Playback 52
Phoneshare Playback 53
Bluetooth Connection 54
Bluetooth Pairing....54
Bluetooth Playback (Receive) 55
Bluetooth Output (Send) 56
File Conversion and Upsampling 57
PCM to DSD Conversion 57
PCM and DSD Upsampling 57
DSD Operation....59
DSD PLAYBACK....59
MQA Operation 60
MQA Playback and Notification 60
Room Ready Operation 61
ROON Overview....61
ROON Setup....61
Balanced Operation....64
Specifications....65
DMS-650 Basic Specifications.... 65
Service and Care 67
Care and Cleaning....67
AC Power Fuse Replacement 67
Factory Service 67
Non-Warranty Repairs....67
Product Warranty and Registration 68
IMPORTANT SAFETY INSTRUCTIONS
The lightning flash with arrowhead, within an equilateral triangle, is intended to alert the user to the presence of uninsulated "dangerous voltage" within the product's enclosure that may be of sufficient magnitude to constitute a risk of electric shock to persons.
WARNING: TO REDUCE RISK OF FIRE OR ELECTRICAL SHOCK, DO NOT EXPOSE THIS EQUIPMENT TO RAIN OR MOISTURE.


The exclamation point within an equilateral triangle is intended to alert the user to the presence of important operating and maintenance (servicing) instructions in the literature accompanying the appliance.
ATTENTION:
RISQUE DE CHOC ELECTRIQUE - NE PAS OUVRIR
NO USER-SERVICEABLE PARTS INSIDE. REFER SERVICING TO QUALITIFED PERSONNEL.
TO PREVENT THE RISK OF ELECTRIC SHOCK, DO NOT REMOVE COVER OR BACK. NO USER-SERVICEABLE PARTS INSIDE.

Protective Earthing
Additional Safety Information specific to this product may be contained in the Owner's Manual supplied with this product

Hot Surface
Please read these important safety instructions before operating this equipment.
-
Before powering up the equipment, read all safety and operating instructions and follow them as instructed. Retain the safety and operating instructions for future reference.
-
Do not place the unit on an unstable cart, stand, tripod, bracket, or table. The unit may fall, causing injury to a person or damage to the unit. Mount the unit according to the manufacturer's instructions with the suggested mounting accessory.
-
Mount the unit to a wall or ceiling only in the manner recommended by the manufacturer.
-
Do not use the unit near water (for example, near a swimming pool, bathtub, wash bowl, kitchen sink, or laundry tub) or in a damp environment (like a basement or outside in the rain).
-
Clean only with a dry cloth.
-
Do not push objects of any kind into the unit through openings as they could touch dangerous voltage points and short-out parts, possibly resulting in a fire or electric shock. Avoid spilling liquid of any kind on the unit. If water or any metal object (such as a paper clip, coin, or staple) accidentally falls inside the unit, disconnect it from the AC power source immediately and contact Cary Audio Design for further instructions.
-
Position the unit away from heat sources such as radiators, heat registers, stoves, or other units (including amplifiers) that produce heat.
-
This unit is not intended to be used on soft supported items (like blankets, pillows, etc.).
-
This unit is not suitable for use in locations where children are likely to be present.
-
Slots and openings in the cabinet create ventilation to protect the component from overheating. These openings on the top and bottom panels must remain unobstructed. Allow at least 6 inches (16cm) of clearance above the unit and an opening behind the unit for airflow. Do not place the unit on a bed, sofa, rug, built-in bookcase, or rack without adequate ventilation.
-
Use only those attachments recommended by the unit manufacturer, as others may cause hazards.
-
This unit requires a reliable connection to the socket/outlet with protective earthing by means of specified power cord set.

the
-
As a safety feature, the unit may be equipped with a polarized alternating current line plug in which one blade is wider than the other. This plug will fit into the power outlet only one way. If you cannot insert the plug fully into the outlet, try reversing the plug. If the plug still will not fit, contact a licensed electrician to update your obsolete outlet. Do not defeat the safety purpose of the polarized plug.
-
Operate the unit only from the power source indicated on the marking label. If you are unsure of the type of power supplied to your home, consult your unit dealer or local power company.
-
Arrange power supply cords so that they do not suffer from foot traffic or pinching by items placed on or against them. Pay close attention to cords where plug enter the AC outlet and where they exit from the unit.
-
For added protection during a lightning storm or when the component is idle for long periods of time, unplug the unit from the wall outlet and disconnect the antenna or cable system. This will help protect the unit from lightning and power line surge damage.
- Do not locate an outside antenna system in the vicinity of overhead power lines or other electric light or power circuits. When installing an outside antenna system, take extreme care to avoid touching the power lines or circuits; contact with them could be fatal.
- Do not overload wall outlets, extension cords, or integral convenience receptacles as this increases the risk of fire or electric shock.
- External wiring connected to terminals of this unit shall be installed by a skilled person.
- When replacement parts are required, be sure the service technician has used replacement parts specified by the manufacturer or those having the same characteristics as the original parts. Unauthorized substitutions may result in fire, electric shock, or other hazards.
- Upon completion of any service or repairs to the unit, ask the service technician to perform safety checks to ensure the unit is in proper operating condition.
- Before connecting a new product to your audio or home theater system, turn off all other equipment (preferably unplugging them from the AC power source). Many audio components feature automatic turn-on circuits that may activate during an installation, potentially causing damage to electronic components and/or speakers. This type of damage is not covered by product warranties, and Cary Audio specifically disclaims responsibility for any such damage.
- The removable power cord provided with your unit was specifically designed for use with this product, but other AC cords may be used. Consult your dealer for advice on AC power cords and high-quality wire in your system.
- The fuse is located inside the chassis and is not user serviceable. If the unit does not power up, contact an authorized service representative
- Cables running inside walls should have the appropriate markings to indicate compliance and listing by the UL, CSA or other standards required by the UL, CSA, NEC, or your local building code. Questions about cables inside of walls should be referred to a qualified custom installer, a licensed electrician, or low-voltage contractor.
- Recording of copyrighted material for other than personal use is illegal without permission of the copyright holder.

CAUTION: High current. Connect to earth before connecting to supply of unit. Unplug the unit before performing any service.
Unit can be hot. Be careful of burned fingers when handling parts. Wait one half hour after switching off to handle parts.


NOTE TO CATV SYSTEM INSTALLER: This reminder is provided to call the CATV system installer's attention to article 820-40 of the NEC, ANSI/NFPA 70, which provides guidelines for proper grounding and specifies that the cable ground shall be connected to the grounding system of the building as close to the point of cable entry as practical.
FCC INFORMATION FOR USER:
- CAUTION: Any changes or modifications not expressly approved by Cary Audio Design could void the user's authority to operate the equipment.
- NOTE: This equipment has been tested and found to comply with the limits for a Class B digital device pursuant to Part 15 of the FCC Rules.
- These limits are designed to provide reasonable protection against harmful interference in a residential installation. This equipment generates and can radiate radio frequency energy, and if not installed and used in accordance with the instructions it may cause harmful interference to radio communications. However, there is no guarantee that interference will not occur in a particular installation. If this equipment does cause harmful interference to radio or

television reception, which can be determined by turning the equipment off and on, the user is encouraged to try to correct the interference by one or more of the following measures:
- Reorient or relocate the receiving antenna.
- Connect the equipment into an outlet on a circuit different from where the receiver is connected.
OUTDOOR ANTENNA INSTALLATION/SAFE ANTENNA AND CABLE CONNECTION:
- If an outside antenna or cable system is connected to the equipment, be sure the antenna or cable system is grounded to provide protection against built-up static charges and voltage surges. Article 810 of the National Electrical Code, ANSI/NFPA 70 (in Canada, Part 1 of the Canadian Electrical Code) provides information regarding proper grounding of the mast and supporting structure, grounding of the lead-in wire to an antenna discharge unit, size of grounding conductors, location of antenna discharge unit, connection to grounding electrodes and requirements for the grounding electrode.

- Outside antenna system should be located well away from power lines, electric light, or power circuits and where it will never come into contact with these power sources if it should happen to fall. When installing an outside antenna, extreme care should be taken to avoid touching power lines, circuits, or other power sources as this could be fatal. Because of the hazards involved, antenna installation should be left to a professional.
DISPOSAL INSTRUCTIONS:
• NORTH AMERICAN WASTE OF ELECTRICAL AND ELECTRONIC EQUIPMENT DIRECTIVE
When discarding the unit, comply with local rules or regulations. Batteries should thrown away or incinerated but disposed of in accordance with the local concerning battery disposal.

never be regulations
• EUROPEAN UNION (EU) WASTE OF ELECTRICAL AND ELECTRONIC EQUIPMENT (WEEE) DIRECTIVE
The European Union's WEEE directive requires that products sold into EU countries must have the crossed-out trash bin label on the product (or the package in some cases). As defined by the WEEE directive, this cross-out trash bin label means that customers and end-users in EU countries should not dispose of electronic and electrical equipment or accessories in household waste. Customers or end-users in EU countries should contact their local equipment supplier representative or service center for information about the waste collection system in the country.
THANK YOU
Cary Audio would like to thank you for purchasing our products.
Since its founding in 1989, Cary Audio has stayed at the forefront of home entertainment equipment by stubbornly adhering to the principles of quality and musicality upon which it was founded. It's not enough just to be able to build great sounding gear, but it needs to be well-made, reliable, and maintain its performance and value for many years. Cary Audio has certain criteria that have guided us since we began and are still our primary focus.
We firmly believe in high performance products that offer incredible value for the money, backed by superior engineering and design, and supported by exceptional customer service. Whether a headphone amplifier or a world-class network audio player, Cary Audio uses the highest quality components available within the audio circuit, resulting in extraordinary sound quality. This is a well-known hallmark of all Cary Audio products.
For more than a quarter of a century, Cary Audio has provided the best in high performance music systems. We remain committed to our goals of building the very best products, at real-world prices, and supporting them with world-class service. Let our passion for the very finest sound help you better enjoy your music! Thank you for your continued support!
The Cary Audio Team
USEFUL TERMS
Network Connection – A connection to a home network router (needed for Network Music) which in turn is typically connected to the Internet. Although an Internet connection is not necessary for a home network or Network Music, it is needed for Internet Music. A network connection can be either wired, or wireless.
Client – A component that finds music stored on network devices and retrieves it for playback over its own music playing software.
Renderer – A component that lets other devices such as computers or Apps push music to the component for playback via the media player of the computer or App.
Wired Connection (Ethernet) – A connection to the router with an Ethernet (Cat5e, etc.) cable.
Wireless Connection (Wi-Fi) – A connection to the router via a components built-in Wi-Fi. Router must also be Wi-Fi capable.
Network Music – A broad term that refers to music originating from a computer or NAS drive that is connected to a home network for playback over a Digital Music Streamer/Network Audio Player.
Digital Music Streamer/Network Audio Player – An audio component like the DMS-650 that connects to a home network that can access Network Music for playback.
NAS Drive – (Network Attached Storage) An external hard drive that connects to a network router (wired or wirelessly) instead of to a computer. This drive can then be accessible from other network locations.
Internet Music – Music from an Internet music service, such as Pandora, Internet Radio, etc. Requires a router connected to the Internet.
Server – for the purposes of this manual, a server is a software application installed on a computer or NAS drive that monitors a music library and “serves” files to a Digital Music Streamer/Network Audio Player. Server software can be lite background “server only” applications (i.e., Twonky), or part of a larger suite of software within a Media Player application (i.e., JRiver).
Computer-less –Playback that doesn't require a computer or network setup. For example, directly connecting a USB HDD, flash/thumb drive, or SD Card to the DMS-650 for playback.
Local Music – This includes Computer-less USB HDD, flash/thumb drives, SD Cards, or other components (CD players, Cable Boxes, etc.) connected directly to the DMS-650 for playback.
Phoneshare – For Android phones and tables, you can stream stored music on them to the DMS over the network with Phoneshare. This is like Airplay for Android.
App or Control App – A free iOS or Android App that can take the place of the handheld IR remote to control all functions of the DMS-650 from a comfortable position away from the unit itself.
ABOUT THE DMS-650
The DMS-650 is the latest product in our DMS platform. While it replaces the DMS-550, it surpasses the renown DMS-600 in performance. The DMS-650 packs a BIG punch! Much more so than just calling it a “replacement.” Built around the AK4497EQ VERITA DAC (same as our previous flagship DMS-600), the DMS-650 is a no-compromise killer. It delivers gorgeous clarity and richness with a sense of ease that Cary Audio is famous for. It combines wonderful amounts of detail and fantastic bass articulation yet retains a texture of naturalness that makes you forget you’re listing to a digital source, allowing you to fall back into your music. DMS customers are routinely taken aback at the foundation, dimensionality, openness, and transparent sound the DMS delivers. The DMS-650 is capable of native 32-bit / 768kHz PCM and DSD 512. It’s also Roon Ready and MQA Certified. Like other DMS products, the DMS-650 allows streaming from on-board TIDAL, Qobuz, Spotify, Spotify Connect, vTuner, or from files stored on a network computer or NAS Drive. If that wasn’t enough, it includes three (3) USB-A ports for listening from connected USB hard drives, flash drives, and even from a SD card. As an extra measure for convenience, the DMS-650 also includes aptX™ HD input and output (output for Bluetooth speakers or headphones) as well as Airplay.
The DMS-650 has a slight cosmetic redesign that features a black-out appearance (for black units), which includes a black display frame and black power button. For both black and silver units, the right-side groove now includes a “swoosh” design as well as a faceplate devoid of silkscreened logos for an ultra-clean sleek look.
Additional features include Ethernet or Wi-Fi connectivity, TruBit ™ 7-step Selectable PCM upsampling to 768kHz, and selectable PCM to DSD conversion with selectable 3-step DSD upsampling. Digital inputs include Coaxial (x2), Optical (x1), and AES/EBU (x1) as well as Coaxial and Optical digital outputs, RCA and XLR fully balanced outputs, OSO ™ Re-clocking, MU-MIMO Wi-Fi, and a full 3-volt output and variable volume control for direct-to-amplifier connection.
UNPACKING
This section describes the proper unpacking and installation procedures.
Unpacking
All Cary Audio shipping cartons have been specially designed to protect their contents and special care has been taken to prevent damage under normal shipping conditions. Mishandling should be evident upon inspection of the shipping container. If shipping damage is found after visual inspection, take care not to destroy the evidence. If necessary, document the damage with photographs and contact the transport carrier immediately.
Carefully remove your new component from its packing carton and examine it closely for signs of shipping damage. We strongly recommend saving all original packing cartons to protect your component from damage should you wish to store it or ship it at a later date.
Power Requirements
The DMS-650 Digital to Analog Converter is designed to operate from AC main current. The design AC voltage is either 110V-120V or 220V-240V AC at 50-60 Hz.
In the Box
When unpacking your DMS-650, make sure the following accessories are included. You should find the following items within the box:
- Power Cable
- Remote Handset
- Antennas (3)
WARRANTY CARD
IN THE USA: If you are the original purchaser of a new unit purchased from an authorized Cary Audio dealer, please go online here https://www.caryaudio.com/warranty-registration/ to fill out a warranty registration within 15 days of your purchase. Cary Audio also suggests that you keep your original packing cartons in case you ever need to ship the unit. Warranty restrictions apply. Consult the warranty section at the end of this manual for details. Please be certain to keep a copy of the original sales receipt from your direct purchase from Cary Audio or your authorized Cary Audio dealer to validate the warranty if ever needed. The warranty is for the original purchaser only and does not transfer to any subsequent owner.
OUTSIDE THE USA: Your local authorized Cary Audio distributor will make his own warranty policy for your country. Please check with them for the terms of warranty for your new amplifier.
PLACEMENT
In general, the location of your new DMS-650 is not critical. Certain precautions must be taken to ensure optimum performance. Avoid extremely hot locations such as near radiators or other heating units. Keep the top of the DMS-650 clear of books, paper, or other equipment to protect against overheating.
FEATURES
The following section describes the DMS-650 advanced features. Please read the Operation Section of this manual to learn more on these unique features. The features are subject to change without notice or obligation.
USB AND SD CARD NAS DRIVE
The DMS-650 has expanded the function of the 3 USB-A and SD Card Slot inputs to be accessible from a networked computer. This means when the DMS is powered on, any storage connected to the DMS will act as a NAS Drive (Network Attached Storage). This allows you to copy your music file directly onto the USB or SD Card from a network computer without needing to disconnect them. This simply turns any USB drive or SD Card connected to the DMS into a NAS drive. Playback from these drives can be direct (computer-less) or monitored and controlled from a computer-based server i.e., JRiver, Twonky, etc., or even via Roon. What's more? If you have more than one DMS, you can play files from one DMS to another.
MQA CERTIFIED FULL DECODING TO 768 KHZ
MQA is a technology that captures the full magic of an original studio performance. Using pioneering scientific research into how people hear, MQA delivers master quality audio in a file that is small enough to stream or download – the days of sacrificing quality for convenience are over. Every nuance and subtlety of the artist's performance – every tiny drop of emotion is authentically reproduced. When you listen, you will be transported right into the very moment of creation. The DMS-650 MQA decoder uses 16x rendering for 768 or 705.6 kHz playback. The DMS-650 uses the latest in optimization for AKM DACs, making for an even greater musical experience.
APTX™ AND APTX™ HD WITH CARY AUDIO'S FI™ BLUETOOTH IMPLEMENTATION
Bluetooth modules are a fantastic and convenient way in which to share and listen to music from online and mobile sources. It is not unusual for companies to use such modules as a complete end-to-end or add on solution whereby using the cheap low-grade onboard DAC chips included in the modules and simply passing the analog signal of the module to the analog output section. Our solution is to fully integrate (fi™) the digital information from the Qualcomm aptX™ HD Bluetooth receiver, up to native 24 bit / 48kHz better than CD audio, into the entire digital circuit of the DMS-650. This approach ensures that Bluetooth sources have the potential to sound like any other expensive input source whereby utilizing our sophisticated digital topology of parallel DACs and our other integrated digital features such as TruBit™ Upsampling, and OSO™ Reclocking. Now your Bluetooth sources can truly be high fi.
ADVANCED MU-MIMO WI-FI
The DMS-650 is now compatible with the latest MU-MIMO Wi-Fi routers, which means x2 faster data transfer in the 5 GHz band while multiple devises are accessing data simultaneously. Additionally, MU-MIMO advantages only operated at the 5Ghz band. So, if you have a MU-MIMO capable router and the DMS-650 is within a reasonable distance, set the router to 5Ghz. If the DMS-650 is much further away or on different floors than the router, the 2.4 GHz band may be better since it uses the SU-MIMO protocol. General rule of thumb is 5 GHz band is faster for short ranges between router and device while 2.4 GHz is slower but has a greater range.
TRUBIT™ DSD AND PCM UPSAMPLING AND PCM TO DSD CONVERSION
Upsampling can be messy, leaving behind lots of digital artifacts resulting in noise and inaccurate signal generation. On the surface, upsampling may seem like a good idea. But if not implemented properly it can be disastrous. Typically, upsampling is done as a predefined one-size-fits-all approach, such as 96 kHz or 384 kHz. Utilizing a dedicated 128-bit DSP engine, Cary Audio's TruBit™ Upsampling allows for up to 10 different selectable sample rates and an increased bit depth of 32 bits. The result is a signal free from digital artifacts that sounds accurate, pure, and a joy to listen to. What's more? PCM sources can be converted to DSD (DSD64, 128, or 256). Alternatively, a lower native DSD source can be Upsampled to a higher DSD rate. PCM to DSD conversion and DSD upsampling takes our TruBit™ technology to whole new level of pure silky-smooth analog-like sound like never before from a digital source.
OSO™ RECLOCKING
Once a digital signal is transferred into Cary Audio's digital ecosystem via the digital inputs, it is processed with extreme care to ensure the best possible sound achievable. As a digital source transfers from one point A to point B it creates an insidious digital problem called 'jitter.' To deal with this, Cary Audio developed something we call OSO™ Re-clocking. This solution re-clocks all signals again once onboard to ensure all jitter is virtually eliminated to a minute degree. We call this OSO™, short for "Onboard Signal Origination," because this re-clocking and buffering creates a signal so stable and jitter free it is as if the origin of the signal was generated onboard and not from an external source.
THE OPERATION OF THE DMS-650 ASSUMES ALL USERS HAVE A MINIMUM OF A MODERATE LEVEL OF UNDERSTANDING OF COMPUTERS, PHONES OR TABLETS, FILE SHARING PRINCIPLES, COMPUTER NETWORKS, AND OTHER ASSOCIATED PERIPHERALS SUCH AS: ROUTERS, ETHERNET, WI-FI, USB HARD DISC AND FLASH DRIVES, SD CARDS, NAS DRIVES, COMPUTER OPERATING SYSTEMS, THIRD PARTY SOFTWARE SUCH AS MEDIA/MUSIC SERVERS AND MEDIA PLAYERS, DIGITAL MUSIC DOWNLOADING AND STORAGE, MUSIC LIBRARY AND FILE MANAGEMENT SUCH AS TAGGING, IMBEDDING OF ARTWORK, ETC.
CARY AUDIO MAKES NO WARRANTIES REGARDING SUCH ITEMS AND IS NOT RESPONSIBLE FOR SUPPORTING SUCH ITEMS AS IT RELATES TO THE INSTALLATION AND OPERATION OF THE DMS-650 BEYOND WHAT IS DISCUSSED WITHIN THIS MANUAL. ALL OPERATION METHODS HEREIN REFER TO THE DMS-650'S HANDHELD IR REMOTE CONTROL OPERATION UNLESS OTHERWISE SPECIFIED. FOR MORE INFORMATION OPERATING THE DMS-650 VIA THE CARY STREAMER 2.0 APP, PLEASE VISIT OUR WEBSITE TO WATCH THE TUTORIAL VIDEOS. PLEASE KNOW THAT SOME VIDEOS MAY VARY SLIGHTLY FROM YOUR PARTICULAR DMS PRODUCT OR SMART DEVICE. IN SUCH CASE, ALL GENERAL OPERATING PRINCIPLES APPLY FROM PREVIOUS GENERATION DMS PRODUCTS UP TO THE DMS-650.
THIS MANUAL APPLIES SPECIFICALLY TO THE DMS-650. HOWEVER, DEPICTED IMAGES, LOGOS, GRAPHICAL USER INTERFACE, COLOR SCHEMES, FEATURES AND CERTAIN OPERATIONAL PROCEDURES MAY VARY SLIGHTLY DEPENDING ON YOUR DMS MODEL. THIS MANUAL WILL ATTEMPT TO MAKE NOTE WHERE APPLICABLE.
FRONT PANEL

1. POWER
Press once to turn the power ON. The blue indicator ring will blink until the unit is ready to operate. Press again to turn the power OFF.
2. LCD FRONT PANEL DISPLAY
The color LCD panel displays all playback information, navigation, and user settings in a simple easy to use user interface. Tutorial prompts (Tips) are also displayed on the front panel display to help guide you until you are familiar with the interface.
3. IR REMOTE SENSOR
Line of sight IR eye sensor for handheld IR remote control.
4. SD CARD SLOT
For playback of music files from SD Cards up to 32 GB for SD and up to 2 TB for SDXC. Any SD Card inserted will function as a NAS Drive and will be accessible from a networked computer.
5. USB TYPE-A INPUT
For playback of music files from USB hard disc drives (HDD) and USB flash/thumb drives up to 7 TB. Any drive you have connected to it will function as a NAS Drive and will be accessible from a networked computer. NOT FOR CONNECTING TO A COMPUTER.

- RIGHT CHANNEL ANALOG OUTPUT JACK (XLR BALANCED)
Use this jack for connecting to the preamplifier/amplifier's balanced XLR input jack.
- RIGHT CHANNEL ANALOG OUTPUT JACK (RCA UNBALANCED)
Use this jack for connecting to the preamplifier/amplifier's RCA unbalanced input jack.
- LEFT CHANNEL ANALOG OUTPUT JACK (RCA UNBALANCED)
Use this jack for connection to the preamplifier/amplifier's RCA unbalanced input jack.
- LEFT CHANNEL ANALOG OUTPUT JACK (XLR BALANCED)
Use this jack for connecting to the preamplifier/amplifier's balanced XLR input jack.
- DIGITAL OUTPUT JACK (TOSLINK)
16 – 24 Bit, 44.1 kHz – 192 kHz, DSD64 (DoP) digital data output.
(See SPDIF inputs & Outputs section below for more detailed information).
- DIGITAL OUTPUT JACK (COAXIAL)
16 - 24 Bit, 44.1 kHz - 384 kHz, DSD64, DSD128 (DoP) digital data output.
(See SPDIF inputs & Outputs section below for more detailed information).
- USB 2 INPUT (TYPE-A)
For playback of music files from USB hard disc drives (HDD) and USB flash/thumb drives up to 7 TB. Any drive you have connected to it will function as a NAS Drive and will be accessible from a networked computer. NOT FOR CONNECTING TO A COMPUTER.
- USB 3 INPUT (TYPE-A)
For playback of music files from USB hard disc drives (HDD) and USB flash/thumb drives up to 7 TB. Any drive you have connected to it will function as a NAS Drive and will be accessible from a networked computer. NOT FOR CONNECTING TO A COMPUTER.
9. ETHERNET RJ45 JACK
Connect to a network router for online music streaming and networked computer(s) or NAS drive(s) via a wired Ethernet connection. Also used for network control via apps or control system.
10. MINI USB FIRMWARE
For internal service use only. DO NOT USE.
11. POWER INPUT (AC IN)
Connect to AC main using the included power supply cord.
12. BLUETOOTH ANTENNA
24 Bit / 48 kHz Qualcomm aptX™ HD wireless digital audio receive port. NOTE: Use only the provided antennas included with your product. Attempting to use any other antenna may result in permanent damage.
13. DIGITAL INPUT JACK (OPTICAL)
16 – 24 Bit, 44.1 kHz - 192 kHz DSD64 (DoP) digital data Input. MQA files cannot be inputted.
14. DIGITAL INPUT JACK (COAXIAL 1)
16 – 24 Bit, 44.1 kHz - 384 kHz, DSD64, DSD128 (DoP) digital data Input. MQA files cannot be inputted.
15. DIGITAL INPUT JACK (COAXIAL 2)
16 – 24 Bit, 44.1 kHz - 384 kHz, DSD64, DSD128 (DoP) digital data Input. MQA files cannot be inputted.
16. DIGITAL INPUT JACK (AES/EBU)
16 – 24 Bit, 44.1 kHz - 384 kHz, DSD64, DSD128 (DoP)digital data Input. MQA files cannot be inputted.
17. DC TRIGGER INPUT TERMINALS
Connection of devices that have DC + 12V output for remote turn-on/off the DMS-650.
18. IR INPUT
Connection of external IR sensors.
19. Wi-Fi ANTENNAS
For connecting to a Wi-Fi router for network music streaming of networked computer(s) or NAS drive(s) via a wireless Wi-Fi connection. NOTE: Use only the provided antenna included with your product. Attempting to use any other antenna may result in permanent damage.
This section explains how to use the remote control to set up and operate the DMS-650.
1. POWER
Use to turn the power on and off.
2. ALPHANUMERIC KEYS
Use for searching music library as well as entering network settings, such as Wi-Fi security key, etc.
3. ADD/DELETE
Press add or delete on music selections to create or edit a song queue or playlist.
4. HOME
Press to return to the home screen of the source.
5. PLAY MODE
Press to switch between Play, Shuffle, Repeat, and Repeat All.
6. NAVAGATION/PLAY HUB
Use the corresponding keys to navigation up, down, right, left, and Enter for menus/lists and to Play, Skip, Search, and Pause during music playback.
7. DISPLAY
Use to select the player displays various brightness levels or turn the display off.
8. INPUT SOURCE SELECTOR
Use to select the desired input source.
9. VOLUME -/+
Decrease or increase volume.
10. MUTE
Use to mute sound. Press again to resume sound.
11. QUEUE
Press to display the song queue for playback of queue or to save a queue as a playlist.
12. MENU
Press to go to the Setting Menu of the DMS-650. For DMS-650 only, Press and hold for 5 seconds to change the IR code set.
13. NOW PLAYING
Press to jumps to the now playing screen of the current source.
14. SRC
(Sample Rate Converter). Press to select one of the
many PCM & DSD TruBit™ upsample-rates. This can also convert any playing PCM signal to a DSD (Direct Stream Digital) signal. This function does not work with MQA files as they are fixed at 16x, or 705.6 kHz.
15. BT OUT
Press to send the audio from the DMS-650 to Bluetooth headphones or Bluetooth speakers.

USING REMOTE ALPHANUMERIC KEYS
There are multiple operations of the DMS-650 that require text and/or numbers. These include network settings such as Wi-Fi security keys, network username and password, naming, or re-naming playlists, and searching (jumping to) a number or letter when browsing library lists. Simply press the number key to scroll the number and associated alpha keys (just like on a phone). It will show a pop-up box with both upper and lower case except when searching library lists. For example, each time you press the #5 key is will display as follows; simply stop on the number or letter to select it.
NOTE: For spaces, press the "0" key for a blank box. For special characters, press the *._ / key.


USER TIPS
Navigating various screens are intuitive and straight forward via the IR remote control. Many screens have a pop-up box outlined in green that functions as a tutorial for that screen as examples below show. Some screens may have a Tip prompt in the upper right corner of the display screen. Simply scroll up to the Tip by pressing the Up-Arrow key on the remote twice and press enter to show the tutorial. Once you are familiar with all the screens and can command control of the DMS-650, you can hide all user tips from the Settings Menu.

NOW PLAYING SCREEN (NETWORK, USB, SD, INTERNET)

MQA NOW PLAYING SCREEN (NETWORK, USB, SD, INTERNET)

NOW PLAYING SCREEN (SPDIF)

ALTERNATE NOW PLAYING DISPLAY SCREENS
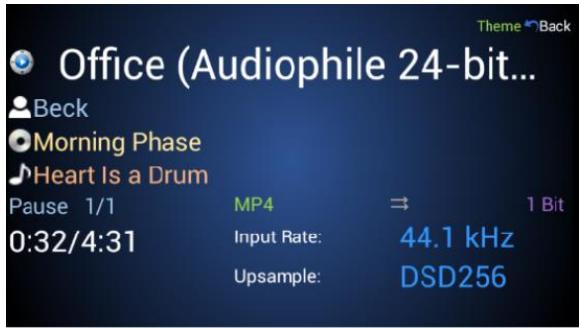
To change the DMS-650 front panel display from the default display to high contrast or large font/icon-based displays, press the IR remote UP button 3 times to highlight “Theme” on the DMS front panel. Use the IR up/down keys to select the desired theme. Use this “color wheel” icon in the app’s Now Playing Screen to change theme.
Theme Selection Menu

Default Color Scheme

Large Text & Icon only
High Contrast

APP CONTROL FOR IOS AND ANDRIOD
You can download a free Control App for either iOS on iTunes Store, or Android on Google Play Store. Each app is highly intuitive and easy to operate. The app has user tips built into them (which can also be hidden) and they are much more powerful and feature laden then they may appear. For example, Long-Pressing on a Track, Album, Artist, etc., displays a pop-up selection for playback, editing, playlist, and queues options. Try it!

Download on the App Store

GET IT ON Google Play
TUTORIAL VIDEOS FOR CONTROLLING DMS VIA APP
It is also highly recommended to visit our App Tutorial Video on YouTube here. DMS Tutorial Videos | Cary Audio. Below are links to each tutorial video. Depending on DMS model some procedures may vary slightly.
Connecting DMS
https://youtu.be/ids5sdBphto
How to Connect DMS to Wi-Fi https://youtu.be/gFKJZQEhD0
Explore Music based off of Now Playing https://youtu.be/dfdUKJJvO_0
Going Back to Source Home Screen https://youtu.be/uxy72gJyPqk
Main Screen Features https://youtu.be/IMTcoLQOBg8
MQA Notifications https://youtu.be/JKWnULcwpKI
Now Playing Screen Features https://youtu.be/clAdGXtruul
How to Enable Roon from DMS https://youtu.be/2ak9R9Onsfc
How to Update DMS Firmware https://youtu.be/A1-DD66iWwc
Searching for New Music https://youtu.be/vCve-503IIU
Selecting Inputs https://youtu.be/OLpg3OS6Cqw
Sorting and Changing Views https://youtu.be/6HemxyKBR-M
Using and Managing Playlists https://youtu.be/gzvUIJxZwRQ
Using and Managing Queues https://youtu.be/RTheulKxuQo
Using Long-Press Feature https://youtu.be/D5b6N4PH6GI
How to Enable Roon from App https://youtu.be/hYETwgPWRqw
VOLUME CONTROL AND OUTPUT
USING AS A SOURCE (CONNECTING TO A PREAMPLIFIER, ETC.)
When using the DMS-650 as a source unit and connecting to a preamplifier, integrated amplifier, or receiver, you can set the volume to MASTER or INDEPENDENT Mode. Master setting adjusts volume output of the DMS-650 the same for all source inputs. The Independent Volume setting allows for adjusting the volume independently for each input source of the DMS-650. This is useful for when some sources have a much greater or lesser output then others, allowing for volume matching of input sources. See PURE AUDIO MODE below.
NOTE: The default Reset Master Volume setting is -30.0 and the default Reset Independent Volume setting is -13.5
USING AS A DIGITAL PREAMPLIFIER (CONNECTING DIRECTLY TO AN AMPLIFIER)
When using the DMS-650 as a digital preamplifier (connecting it directly to a power amplifier input), you can select either MASTER or INDEPENDENT based on your personal preferences. However, if using the DMS-650 as a digital preamplifier, be sure to turn on the DMS-650 BEFORE turning on your amplifier. Then, set the DMS-650 volume to -30.0 (or mute). Only after being sure the volume is turned down, turn on your power amplifier and gradually turn up the DMS-650 volume to an appropriate listening level. Otherwise, extreme damage may occur to your amplifier, speakers, or hearing. Reverse each step when turning off and repeat each sequence for each listen session.
The maximum output voltage of the DMS-650 is 3.0 volts when volume is set to +8.0. Check the preferred maximum input voltage of your preamplifier, Integrated amplifier, receiver, or amplifier. If 2.0 volts is required, set DMS volume to 0.0. Check with your audio products manufacturer to be sure. Typically, 3.0 is the recommended setting for best sound quality.
PURE AUDIO MODE
For the greatest sonic benefit when using the DMS-650 as a source, it is recommended to set and leave the volume to +8.0, controlling subsequent volume via your preamplifier, integrated amplifier, or receiver. Doing so will activate PURE AUDIO MODE. Pure Audio Mode bypass all digital volume control circuits and provides the best, purest audio path for exceptional sound. For all practical purposes this can only be achieved when using the DMS-650 as a source and NOT as a preamplifier. When using the DMS-650 as a preamplifier it is unlikely you will ever have the volume maxed out at +8.0 directly feeding your amplifier. This is yet another reason to consider using component preamplifier when using a separate power amplifier.

SETTINGS MENU OVERVIEW
Within the Setting Menu you can adjust, control, and customize the DMS-650 operation and setting as follows:
MAIN SETTING MENU
Using the Up/Down arrow keys on the IR remote to scroll to the desired selection and press Enter or press the Right arrow key to expand.

VOLUME MENU
Select Master when using the DMS-650 as a digital preamplifier. Select Independent when connecting the DMS-650 to a preamplifier, integrated amplifier, or receiver.

IR CONTROL MENU
This selects which IR sensors are activated.
WARNING: Do not select Rear if you do not have a rear mounted IR sensor. Otherwise, you could be locked out of all IR command control. If this happens and you have previously connected an iOS or Android app to the DMS, you can use the app to change this setting. If not, you must reset the DMS.

NETWORK MENU
Setup of Ethernet/Wi-Fi or DHCP/Static network connections. See Establishing A Network Connection further in this manual.

This turns the on-screen user tips on or off as desired.

STARTUP MENU
This sets the default input at system startup. Only one input from all available inputs can be selected.
I. Network
√ Source Screen (List of available servers/PC Share's on network).
√ Last Server (Selects the last server or PC Share used, if available).
II. USB
√ Source Screen (List of connected USB sources).
√ Select USB 1, 2, or 3 input at startup.
III. SD Card
√ Select SD Card input at startup.
IV. Internet
√ Select your preferred Internet Music Service at startup.
√ Select Coaxial 1 or 2 input at startup.
V. Coaxial
VI. Optical
√ Selects Optical input at startup.
VII. AES/EBU
√ Select AES/EBU input at startup.
VIII. Bluetooth
√ Select Bluetooth input at startup.
SETTINGS MENU
Volume
IR Control
Network
User Tips
Startup
Firmware
MQA Decoder
Roon Ready
Network
USB/SD
Internet
Coaxial
Optical
AES/EBU
Bluetooth
Source Screen
USB 1 (Front)
USB 2 (Rear)
USB 3 (Rear)
SD Card
This displays the current firmware version and serial number as well as checks for new firmware via the System Update.
- To check for new firmware, make sure DMS-650 is connected to your network, select System Update and press Enter.

- Select Check Now and press Enter. If new firmware is available, it will say so and ask if you wish to install it. Otherwise, it will say you have the most current version. You can also check the Automatic Update Notification box and the DMS will automatically notify you on the DMS-650 screen when an update is available.

NOTE: You MUST ALWAYS check for an app update to the Cary Audio Streamer 2.0 App each time there is a firmware update. Conversely, if you notice there has been a Cary Audio Streamer 2.0 app update, check if there is also a firmware update. If after doing a firmware update the DMS-650 or app are acting not as expected, you should do as mentioned above and do a factory reset of the unit. Once the factory reset has completed, unplug the unit for 10 minutes and try again. See Reset section of this manual for more.
CHANGE THE IR CODE
If your IR remote control shares common Phillips RC-50 codes with your other products, such as volume control, power, etc., you can change the command codes in the IR remote and DMS-650 as follows. The default settings are IR Code A (Blue Power LED). To change, follow these steps.
- Select IR Code and press the right arrow key.
- Highlight IR Code A (Red Power LED) and press Enter on the IR remote.

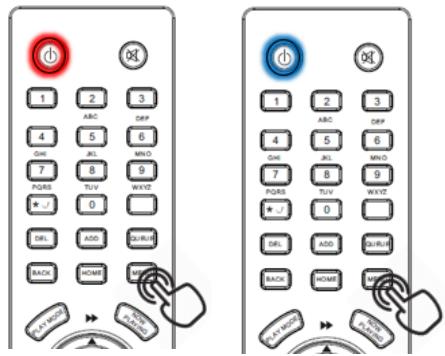
You will notice the IR remote no longer works after change the setting in the DMS-650. You now need to match the IR remote codes to the same IR Code set of the DMS.
Press and hold the Menu button on the IR remote for 5 seconds until the Power button flashes RED. Now the DMS and IR remote control IR Codes will match with the DMS and should not interfere with your other electronics. To switch back, simple repeat processes in steps 1-3 to IR Code A (Blue Power LED). Resetting the DMS-650 defaults back to Code A/Blue.
FACTORY RESET
This Resets the DMS-650 to factory default. If at any time the DMS-650 is not functioning normally, it is recommended to do a Factory Reset. To go one step further, unplug the DMS-650 after the Factory Reset is complete for 10 minutes then plug the DMS-650 back in. Wait another 5 minutes before turning the DMS-650 back on. While it is unplugged, you can also delete and reinstall the Cary Audio Streamer 2.0 app. All settings will default to factory, requiring reconnecting to network as well as re-indexing of connected USB HDDs and SD cards and reset all other system defaults.


IF YOU ARE CONNECTING THE DMS WITH WIRED ETHERNET, DO NOT CONNECT THE TWO WI-FI ANTENNAS.
This step assumes you have an active home network and router installed in your home.
- Place the DMS-650 within a cable run of your router or Ethernet port of which is wired back to the router.
- Connect an Ethernet cable to the back of the DMS-650 and plug the other end into your router, or Ethernet Port.
- If connection is not automatically established, Press Menu on the IR remote and navigate to Network Settings and select Wired and DHCP (for automatic configuration) and press Connect. If you prefer assigning a manual IP address, select Static and enter your Port number and IP address. However, DHCP is the most common method. If you encounter issues connecting, try to reset network by selecting “RESET.”


WIRELESS (WI-FI) SETUP
IF YOU ARE CONNECTING THE DMS WITH WI-FI, DO NOT CONNECT THE ETHERNET CABLE. This step assumes you have an active wireless home network and router installed in your home. The quality and stability of the audio signal depends on the bandwidth and range of your Wi-Fi router. This is especially true for exceptionally high-resolution files, such as DSD files or PCM files greater than 192kHz. When possible, a wired (Ethernet) connection is preferred.
WIFI SETUP USING STREAMER 2.0 APP
Before proceeding, have the Cary Audio Streamer 2.0 app downloaded to your phone, but NOT opened.
- Place the DMS-650 anywhere within the routers Wi-Fi range. Make sure BOTH Wi-Fi antennas are connected. (Do NOT connect the Ethernet cable).
- Turn on the DMS-650. If the below screen does not appear, press Network input source on IR handheld remote.
- Use the IR handheld remote to select "Connect to Wi-Fi with App."

- Once selected or if no action is taken within 30 seconds, the DMS-650 will open a Wi-Fi Hotspot called "DMS-WiFi." Make not of the password; 12345678.
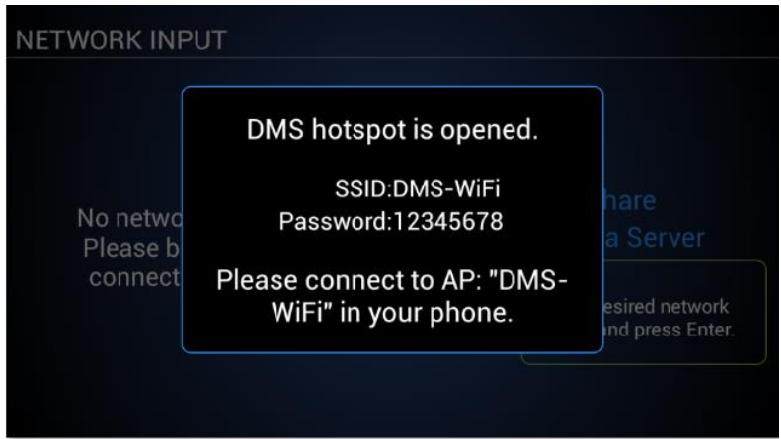
- Open your phones WiFi setup Menu and connect to DMS WiFi.
- Once connected to DMS Wi-Fi, open the Cary Audio Streamer 2.0 app and following the prompts to "Setup a new DMS."
- After following the onscreen instructions on your phone and you have successfully connected the DMS-650 to your home Wi-Fi network, check your phone's WIFI setup Menu to make sure the phone has reconnected back to your home Wi-Fi network.
WIFI SETUP USING IR REMOTE ONLY
- Place the DMS-650 anywhere within the routers Wi-Fi range. Make sure Wi-Fi antenna are connected. (Do NOT connect the Ethernet cable).
- Turn on the DMS-650. Once on, press the Network Input Source on the IR remote. The following prompt will display. Select "Connect to Wi-Fi with IR Remote."

- A prompt will appear confirming you wish to search and setup a Wi-Fi Connection. Select YES.

- Select your Wi-Fi network and press Enter.

- Using the alphanumeric keys on the hand-held IR remote, enter your Security Key, and select Connect. If you selected Static, enter your Port number and IP address as well. A message will appear confirming connection to Wi-Fi. Select your desired input source.

The DMS-650 is an extremely versatile network audio component and can access/stream music in multiples ways. With respect to network audio, the DMS-650 is a Client, meaning it finds and request playback of audio files from computer servers using its own custom apps for iOS and Android devices, or from its handheld IR remote control. It can also act as a Renderer, meaning you can push music to it from computer servers via third party DLNA/UPnP apps. The DMS-650 can also play music from portable devices in a variety of ways, including Qualcomm aptX™ HD Bluetooth, Airplay, and Phoneshare. This section will discuss each of these options.
NETWORK AUDIO SETUP
Make sure the DMS-650 is connected to your network either by a wired Ethernet connection, or via Wi-Fi (but not both) as outlined in the Establishing a Network Connection section of this manual. This section assumes you are familiar with third party media server software, computers, file sharing settings, etc.
Networked computers can either have server software running on them to “serve” files to the DMS-650, i.e., Media Server (Server) method. Additionally, the DMS-650 can stream music from a computer that is not using server software and we call this PC Share method. PC Share method uses standard Service Message Block (SMB) file sharing protocol from Windows and Apple. The DMS-650 can also act as a Renderer which is when using media player software and the media players own app or a third-party DLNA/UPnP app, or from the media server desktop software. The DMS-650 can also use Roon. Please see the Roon section of this manual for more information on Roon and Roon Ready. So, before going further make sure your media server software is installed and running on the server computer and all file sharing and permission settings for everyone are setup for your computer(s) and music folder, subfolders, etc., to share files across your network.
Note: Window Media Player includes a server (Window Media Server). Using the Windows Media severely limits support for various file types and resolutions. It is not recommended but will show up as an available server. For the advanced user, we suggest using dedicated media server software, such as JRiver, Foobar2000, Minimserver, etc. For the less advanced user, PC Share requires very little setup and no third-party software. PC Share uses Service Message Block (SMB) protocol to communicate with a PC or MAC. Even though PC Share is suggested for the less advanced user, it is sometimes preferred due to easy setup and support for any file type and resolutions. Using the DMS-650 as Renderer is also quite simple. However, the computer or app media player software used to do this can affect playback.


Windows Media Server will display icons like these.
PC Share/Phone Share displays the following icon.
Media Servers will display specific icons, like these.
Renderer Mode and Airplay will display this icon.
Roon Ready Mode will display this icon.
LOCAL MASTER BROWSER AND START SAMBA (SMB)
Local Master Browser allows one DMS/AiOS unit to playback USB HDD and SD Card files stored on another DMS/AiOS unit.
The DMS/AiOS will show up as a PC Share in the Network Input Source just like any PC Share computer.
Samba starts Samba Sharing protocols (SMB) and should also be enable. This allows the USB HDD and SD Card to be accessed and used like a NAS Drive from a networked computer. This means you can copy files directly to them from a computer provided the DMS is powered on. Go to the USB & SD Card Operation section of this manual to learn more about NAS function.
Note: Both Local Master Browser and Samba are enabled by default.

MEDIA SERVER AND PC SHARE DIFFERENCES
While both methods stream music files stored on a network computer/hard drive, etc., the easiest way to delineate between the two methods are as follows; Using third party server software such as Roon, JRiver, etc., installed on a networked PC to monitor your music folder(s) and “serve” files to the DMS is Media Server Method. If you do not use third party software to share and stream files from a PC to the DMS, it is PC Share method.
MEDIA SERVER AND PC SHARE METHOD
Network streaming allows the playback of digital music files stored on computers or NAS Drives connected to your network. The advantage of network streaming is you do not have to have the computer(s) or NAS Drive(s) located anywhere near the DMS-650 or your audio system. However, the computer(s) or NAS Drives must remain powered on for the DMS-650 or any network audio player to access them. The other advantage to network streaming is that virtually every feature of the DMS-650 can be accessed using the Cary Audio Streamer 2.0 App allowing control from the comfort of your listening position.
- Press the Network button on the IR remote. This will show a list of all available “PC Share” and/or “Media Servers” on the network. The DMS-650 also lets you filter by PC Share or Media Servers by checking the associated box to the right of the list.
- Navigate to your preferred Network source with the Up, down keys and select it by pressing Enter.
- If you do not see the computer (PC Share) you are looking for, you can manually add a PC Share by highlighting the Add button and pressing Enter. Type in the computer name (case sensitive) and any needed username and password. The new PC Share should now appear.


NOTE: When selecting a PC Share for the first time it must index the PC Share library. This can take a while depending on the size of the library. While indexing, you will see the below pop-up.
- Navigate to your selections by using the up and down keys. To expand the selection, press Enter or press > on the handheld remote to expand.

Notice the Hierarchy difference between a Media Server and PC Share Home Screens. The folder view(s) for media Servers are dependent on how your media server software is setup and configured on your computer. PC Share is set by the DMS as below.
Media Server

PC Share


- Navigate to your desired music selection and press Play. You can also press the Play All when available to play all selections beneath it. Once playback is initiated, the Now Playing Screen will display as follows.

NOTE: You can also select Add or Delete from the IR remote to create a Queue or playlist. See Queue and Playlist section of the manual.
RENDERER METHOD
Using the DMS-650 as a Renderer is somewhat different and it also requires server software to be installed on your computer(s) as described above, and the use of the server/media players own app or a third party DLNA/UPnP app. The advantage for some is that they may prefer to use a different app instead of the Cary Audio Streamer 2.0 app. For example, one may prefer JRiver's JRRemote or Gizmo, Bubble UPnP, Plug Player, 8Player, etc. The disadvantage is that the third-party app can only play network audio and cannot access all features of the DMS-650, so a combination of a third-party app and IR remote must be used. Renderer operation is very simple as outlined below.
- Turn on the DMS-650. It does NOT matter what inputs source the DMS-650 is set to.
- Open your preferred third party DLNA/UPnP app.
- Select "CARY DMS-650" from the available renderers within the third-party app and initiate playback in accordance with the third-party app.
- The Now Playing screen will display your selection. All music selections and playback can only be controlled by the third-party app.
Another way to push music to the DMS-650 in renderer mode is from a computer. To do so follow these steps:
- Turn on the DMS-650. It does NOT matter what inputs source the DMS-650 is set to.
- Turn on your computer (preferably Windows 7 or MAC OS X or later) and open your preferred media player software.
- Right click on a music selection and Send to/Cast to Cary DMS-650 right from the computer. See example below. Function may vary depending on media player software being used.
JRiver MC21 Example
| Name | Artist | Album ↑2 | Rating | Genre | Tr... ↑4 | Durati... | Bitr... | File Type | Date | |
| Good Times Bad Times | Led Zeppelin | Led Zeppelin (Delu... | ★★★★★ | Rock | 1 | 2:40 | 3131 | flac | 1968 | |
| Babe I'm Gonna Leave You | Led Zeppelin | Led Zeppelin (Delu... | ······ | Rock | 2 | 6:42 | 3050 | flac | 1968 | |
| You Shook Me | Led Zeppelin | Led Zeppelin (Delu... | ★★★★★ | Rock | 3 | 6:28 | 3105 | flac | 1968 | |
| Dazed and Confused | Led Zeppelin | Led Zeppelin (Delu... | ······ | Rock | 4 | 6:28 | 3142 | flac | 1968 | |
| Your Time Is Gonna Come | Led Zeppelin | Led Zeppelin (Delu... | ······ | Rock | 5 | 4:34 | 3087 | flac | 1968 | |
| Black Mountain Side | Led Zeppelin | Led Zeppelin (Delu... | ······ | Rock | 6 | 2:12 | 3088 | flac | 1968 | |
| Communication Breakdo... | Led Zeppelin | Led Zeppelin (Delu... | ★★★★★ | Rock | 7 | 2:30 | 3204 | flac | 1968 | |
| I Can't Quit You Baby | Led Zeppelin | Led Zeppelin (Delu... | ······ | Rock | 8 | 4:42 | 3028 | flac | 1968 | |
| How Many More Times | Led Zeppelin | Led Zeppelin (Delu... | ······ | Rock | 9 | 8:27 | 3143 | flac | 1968 | |
| Good Times Bad Times, C... | Led Zeppelin | Led Zeppelin (Delu... | ★★★ | Rock | 10 | 4:05 | 1621 | flac | 1968 | |
| I Can't Quit You Baby (Liv... | Led Zeppelin | Led Zeppelin (Delu... | ··· | Rename F2 | 6:41 | 1670 | flac | 1968 | ||
| Heartbreaker (Live in Pari... | Led Zeppelin | Led Zeppelin (Delu... | ··· | Play | 3:49 | 1730 | flac | 1968 | ||
| Dazed and Confused (Liv... | Led Zeppelin | Led Zeppelin (Delu... | ··· | Add to Playing Now | 15:01 | 1671 | flac | 1968 | ||
| White Summer, Black Mo... | Led Zeppelin | Led Zeppelin (Delu... | ··· | More Play Options | 9:19 | 1641 | flac | 1968 | ||
| You Shook Me (Live in Pa... | Led Zeppelin | Led Zeppelin (Delu... | ··· | 11:55 | 1581 | flac | 1968 | |||
| Moby Dick (Live in Paris ... | Led Zeppelin | Led Zeppelin (Delu... | ··· | Tag Alt+Enter | 9:21 | 1565 | flac | 1968 | ||
| How Many More Times (... | Led Zeppelin | Led Zeppelin (Delu... | ··· | 11:12 | 1572 | flac | 1968 | |||
| Whole Lotta Love | Led Zeppelin | Led Zeppelin II (Del... | ★★ | Rename F2 | 5:34 | 3182 | flac | 1969 | ||
| What Is And What Shoul... | Led Zeppelin | Led Zeppelin II (Del... | ★★ | Delete | 4:46 | 3062 | flac | 1969 | ||
| The Lemon Song | Led Zeppelin | Led Zeppelin II (Del... | ··· | Edit Commands | 6:19 | 3329 | flac | 1969 | ||
| Thank You | Led Zeppelin | Led Zeppelin II (Del... | ··· | Send To | Play (Cary DMS-700) | 1969 | ||||
| Heartbreaker | Led Zeppelin | Led Zeppelin II (Del... | ★★ | Library Tools | 1969 | |||||
| Living Loving Maid (She's... | Led Zeppelin | Led Zeppelin II (Del... | ★★ | Cover Art | Play (Player) | 1969 | ||||
| Ramble On | Led Zeppelin | Led Zeppelin II (Del... | ★★ | Locate | Play (Cary AiOS) | 1969 | ||||
| Moby Dick | Led Zeppelin | Led Zeppelin II (Del... | ··· | Links | Play (Cary DMS-700) | 1969 | ||||
| Bring It On Home | Led Zeppelin | Led Zeppelin II (Del... | ★★ | Stacks | Playlist | 1969 | ||||
| Whole Lotta Love (Rough... | Led Zeppelin | Led Zeppelin II (Del... | ··· | View Extras | Drives & Devices | 1969 | ||||
| What Is And What Shoul... | Led Zeppelin | Led Zeppelin II (Del... | ··· | Email / Web | 1969 | |||||
| Thank You (Backing Track) | Led Zeppelin | Led Zeppelin II (Del... | ······ | Rock | 12 | Gallery | 1969 | |||
| Heartbreaker (Rough Mix... | Led Zeppelin | Led Zeppelin II (Del... | ······ | Rock | 13 | Send To (external) | 1969 | |||
| Living Loving Maid (She's... | Led Zeppelin | Led Zeppelin II (Del... | ······ | Rock | 14 | 3:11 | 2007 | flac | 1969 | |
| Ramble On (Rough Mix ... | Led Zeppelin | Led Zeppelin II (Del... | ······ | Rock | 15 | 4:44 | 2793 | flac | 1969 | |
| Moby Dick (Backing Track) | Led Zeppelin | Led Zeppelin II (Del... | ······ | Rock | 16 | 1:38 | 2884 | flac | 1969 | |
| La La (Intro,Outro Rough ... | Led Zeppelin | Led Zeppelin II (Del... | ······ | Rock | 17 | 4:07 | 3024 | flac | 1969 | |
Window Media Player 12 Example
| Album | # | Title | Length | Rating | Contributing artist | Composer | |
| 10,000 Maniacs | |||||||
| [1K4G4] In My Tribe 1 What's The Matter Here? 4:50Natalie Merchant | |||||||
| Jerome Augusty | |||||||
| Dennis Drew | |||||||
| Cat Stevens | |||||||
| 192.168.1.101 - Sonos CONNECT | |||||||
| CARY DMS-500 | |||||||
| Office | |||||||
- The Now Playing screen of the DMS-650 will display your selection.
INTERNET MUSIC SERVICES
Listening to Internet Music Services; Tidal, Qobuz, Spotify, and vTuner requires a network and router connected to the internet. Unlike network streaming audio, your computer(s) or NAS Drives do NOT need to be turned on since it is accessing the music stream from the Internet and not from your computer(s). However, make sure a network connection to the DMS-650 is established and internet access is available from your network.
- Press the Internet button on the IR remote or from the Control App.
- Navigate to your preferred Internet music services and follow the prompts on screen or from the Cary Streamer 2.0 App.
NOTE: Due to login requirements of the service(s), login must be done via the Cary Audio Streamer 2.0 App.

SPOTIFY CONNECT
For Spotify users, the DMS-650 includes a feature called Spotify Connect. Spotify Connect allows you to use Spotify's own native app (instead of the Cary Streamer 2.0 app) to control and playback Spotify over the DMS. Your smartphone simply acts as a remote while the DMS accesses the music services stream directly from Spotify's servers.
- Open the Spotify app on your device and tap this icon in the Now Playing Screen.

- Select the DMS-650 and continue to use the Spotify app as normal.

USB AND SD CARD PLAYBACK (DIRECT METHOD)
Direct Playback Method plays files directly from these drives with the audio signal bypassing all network or computer routing. Using the IR remote eliminates all network needs and can make playback of your stored music files very simple and easy. If you wish to use the Cary Audio Streamer 2.0 app to access and control playback, the DMS-650 will need a network connection just for control purposes. The audio signal path will still bypass all network and computer routing.
The USB and SD Card inputs include USB 1 (Front), USB 2, 3 (Rear), and SD Card (Front). Like PC Share, The DMS-650 must index the drive's library the first time it is selected. Please note, this can take a while depending on the size of your drive. USB connected HDDs are limited to 7 TB. Additionally, it is best to only insert a USB drive into the DMS before powering it on and not while playing.
NOTE: SD Cards must be formatted to FAT, FAT32 or NTFS. DMS-650 supports SDHC 32GB & SDXC up to 2TB.
- Insert a USB hard disc drive, USB flash/thumb drive or SD Card into the desired port. Once inserted a pop-up message will say, "The USB 2 Port is mounted," meaning the DMS-650 has successfully connected to it.

- Navigate to your preferred USB or SD Card source with the Up, Down keys and select it by pressing Enter.
- Navigate to your selections by using the Up and Down keys. To expand the selection, press Enter or press > on the handheld remote.
- Navigate to your desired music selection and press Play. You can also press the Play All when available to play all selections beneath it.
NOTE: You can also select Add or Delete from the IR remote to create a Queue or playlist. See Queue and Playlist section of the manual.
USB AND SD CARD NAS SETUP
Another option for playback of USB and SD Card is via NAS method. When enabling LOCAL MATER BROWSER AND SAMBA in the DMS-650 Setup Menu (See LOCAL MATER BROWSER AND SAMBA section in this manual), it makes these drives accessible from a network computer and location. This allows copying of music files directly to the USB drives and SD Card that are inserted into the DMS-650 from a computer, making these inputs Network Attached Storage (NAS).
To view these drives, the DMS-650 must be powered on and all permissions for these drives must be set to share. Once this feature is turned on, you may need to reboot your computer to see and access these drives.
- Open your Network view on your computer. Click on the DMS-650-XXX network location to view the USB and SD Card folders.

- From here, you can manage or copy files into these folders from your computer.

USB AND SD CARD NAS PLAYBACK
To playback files via the NAS method, you can do so with Media Server Software or PC Share method since the USB and SD storage acts like any other network folder being monitored by the Media Server software. Roon can also monitor and playback from these locations.
Monitor/Play USB and SD Card Storage via Media Server
This will vary depending on the Media Server Software you are using. However, in principle they will all be similar in that you will need to create a new Library, then navigate to the DMS-650's USB or SD location and select it.

Monitor/Play USB and SD Card Storage via ROON Method
- Open your Network view on your computer. Click on the DMS-650-XXX network location to view the USB and SD Card folders connected to the DMS-650. Determine which folder (USB HDD/SD Card) you want to monitor. In this example, "udisk0."

- Find the IP address of the DMS-650. The easiest way is to open the Cary Streamer 2.0 app and go to Settings>>PC Share

Open Roon Core
- Go to Settings>>Storage
- Click + Add Network share
- Type the IP address of the DMS-650 and path of the USB/SD drive as example below.
- Enter Username if location is protected. Otherwise leave blank.
- Enter Password if location is protected. Otherwise leave blank.
- Click the Add Network Share to finish.

- Select the USB HDD or SD Folder you just added in the Folder list on the left (select a specific sub folder on the right, if applicable), then click, "Select This Folder" to add.

- Select other options according to your needs, click "Add" to complete.

- This method is just like using PC Share function as outlined above. Make sure "Local Master Browser" and "Samba" are enabled in the DSM Setup Menu.

- Select NETWORK input source and be sure "PC Share" is checked.
- Select the DMS PC Share icon of which you wish to access and let it index to access and play USB or SD files via PC Share method.

NOTE: Notice when Local Master Brower and Samba are enabled on multiple DMS products, you can see and select them to play files stored on one DMS's USB/SD Card drives to another DMS unit.
QUEUES AND PLAYLISTS
QUEUES
A Queue is a temporary list of music. This includes all music that is played during a given session from multiple sources, or manually added to the queue while listening. All music played during a session is stored in the Queue with the most current selection(s) being added to the bottom of the list. All music stored in the queue will be cleared at turn off. To save the Queue, please see Playlists Section below.
To Add Music to a Queue
Highlight an Artist, Album or Track and press the Add button on the remote. A pop-up message will display saying the selection has been added to the queue.
Note: Pressing and holding the Add Button for more than 2 seconds on an item will pop-up additional options for Queue and Playlist selections as follows:

To View a Queue
Press Queue button on remote and the queue list will display.
Alternatively, when in the Home Screen you can highlight Queue and press enter.


To Edit a Queue
While viewing the Queue, highlight any track and press the Delete key on the remote to remove that selection from the Queue.
To Play the Queue
While viewing the Queue, press the Play command in the blue box to the right of the list.

To Clear a Queue
While viewing the Queue, press the Clear command in the blue box to the right of the list.

Saving Queues
Please see Playlists section below.
PLAYLISTS
A Playlist is created from the Queue or by selecting individual items while browsing. Queues and selections can be saved as a new playlist or save to an existing playlist. There are different types of playlists depending upon the source in question and where and how they are created/saved. These are as follows:
MY (Qobuz, TIDAL, Spotify) Playlists. – When creating or saving a playlist from any given services whether from the services own app, desktop software, or Cary Audio Streamer 2.0 App, it will carry over to the DMS-650 upon logging into the service from the Cary Audio Streamer 2.0 app. You can access these playlists from the Home Screen of the service and selecting My Music>>My (Qobuz, TIDAL, Spotify) Playlists. For obvious reasons tracks specific to Qobuz, TIDAL, and Spotify can only be saved as, or in a playlist that corresponds to that service. For example, you cannot save TIDAL tracks to a Qobuz Playlist.
DMS Playlist – A DMS playlist saves all the tracks in a queue regardless of which service (Qobuz, TIDAL, Spotify) or source, (network HDD, NAS, USB HDD SD Card) the tracks are sourced from. From any sources Home Screen, you can select DMS Playlists to access these playlists.
Server Playlists – These are playlists created within server software such as JRiver, Twonky, etc., not from the DMS-650. Server Playlists can only be accessed by selecting the server in question from the DMS-650 Network Input and navigating to the folder that stores these playlists. This is all dependent on how you have setup the server playlists folder and navigation within your media player software.
To Save as Playlist
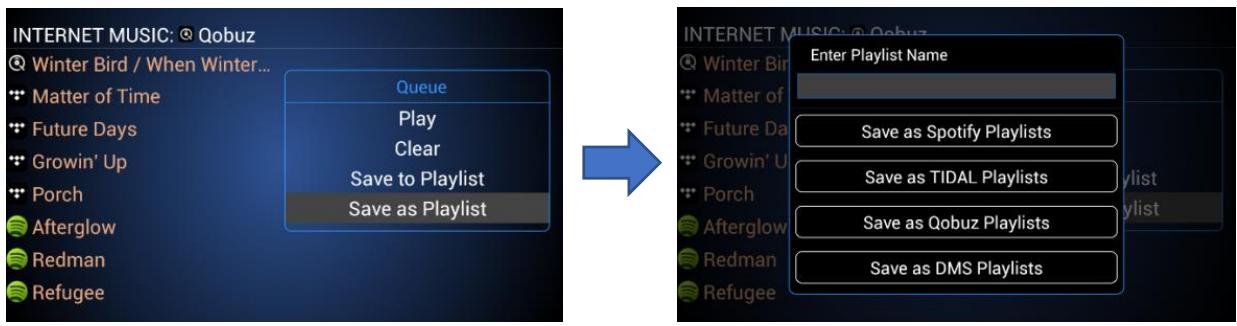
While viewing your queue, Press the Save as Playlist command in the blue box to the right of the list. Type the name you wish to name it and select the type of playlist you wish to save it as. See Playlist introduction above for more.
To Save to Playlist
While viewing your queue, Press the Save to Playlist command in the blue box to the right of the list. Highlight the Playlist you wish to add to the queue. Press Enter on the remote. Note: Only tracks from the same services playlist you select will be saved. If you want to save all tracks from multiple services to a playlist, you must select a Cary Audio DMS Playlist.

NOTE: Pressing and holding the Add Button for more than 2 seconds on an item will pop-up additional options for Queue and Playlist (specific to the source).

To View Playlists
Press the Home button on the remote to go to the current Home Screen. Highlight DMS Playlists then select the Playlists of choice and press enter.

Or, for Spotify, TIDAL, or Qobuz, highlight My Music, then select My Qobuz Playlists (or My TIDAL, My Spotify Playlists depending on service), and press enter.

To Play a Playlist
While viewing Playlists as per the previous step, highlight the desired Playlist and press Enter.
To Edit a Playlist
While viewing Playlists, highlight the desired Playlist and press the > button on the remote. Select EDIT from the blue box to the right and press Enter. Highlight the selection you wish to remove from the Playlist and press the Delete button on the remote. When finished, press the < button on the remote to go back to the Playlist view.

To Delete a Playlist
While viewing Playlists, highlight the desired Playlist and press the > button on the remote. Select DELETE from the blue box to the right and press Enter. Confirm your choice.

To Rename a Playlist
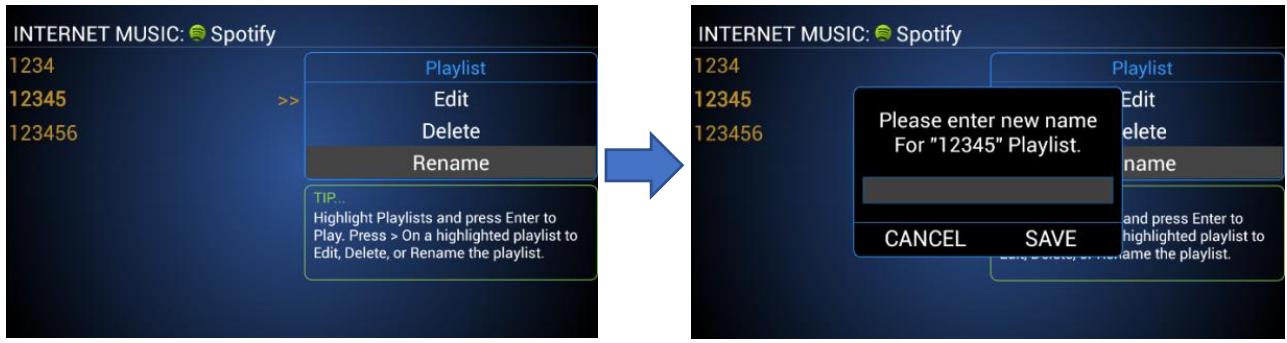
While viewing Playlists, highlight the desired Playlist and press the > button on the remote. Select RENAME from the blue box to the right and press Enter. Enter name and select Save.
SPDIF INPUTS
The SPDIF inputs include COAXIAL 1, COAXIAL 2, OPTICAL, and AES/EBU.
- Select the desired input by pressing COAXIAL 1 or 2, AES/EBU or OPTICAL button on the IR remote or control App.
- If no source is connected to the selected input, it will say so.
- Initiate playback of the corresponding SPDIF source.
NOTE: SDPIF inputs accept DSD and PCM signals (see DSD Section below for more on this topic). PCM inputs and output rates over coaxial and AES/EBU can be up to 24-bit / 384kHz. PCM input and output rates over optical can be up to 24-bit / 192kHz. They can also accept an MQA signal but will not decode MQA. However, it will playback at better than CD quality in native FLAC 16 bit/44.1kHz/48kHz/88.2kHz/96kHz format. Please refer the specifications section of this manual for more information.
SPDIF OUTPUTS
The SPDIF outputs include one each of COAXIAL and OPTICAL.
When playing DSD or PCM files of 16 – 24 Bit, 44.1 kHz - 768 kHz, digital output from SPDIF will match the source.
SPDIF OUTPUTS WHILE PLAYING MQA FILES
When playing MQA files, the SPDIF digital outputs will function differently based on the type of MQA Decoder that is selected in the DMS MQA Decoder system settings. Selecting anything other than “Full Decoder” is only useful if needing to pass through the MQA signal to an additional outboard MQA Certified DAC. The type of MQA Decoder selected will affect the MQA playback sound quality of the DMS analog outputs. Please see the MQA Operation section of the manual to learn how each MQA decoder affects the analog sound quality of the DMS.
The selected decoder will affect the SPDIF digital outputs as follows:
| Full Decoder | Core Decoder | Authenticating Decoder | |
| SPDIF Digital Output | None | MQA Core file (up to 24/96) | Full MQA file (up to 24/384) |
PLAYING MUSIC FROM AND TO PORTABLE DEVICES
Besides playing music from local or network hard drives, SD Cards, TIDAL, Qobuz, Spotify, and vTuner, the DMS can play music, podcasts, audiobooks, and more from most any music/audio app or music/audio stored on a phone/tablet with Airplay, Bluetooth, and PhoneShare. Keep in mind that any service or stored music that is lower than CD quality (as most are) will not suffer in audio quality and could be as high as or even better than CD quality depending on method and associated hardware. Please read below to learn more about each method.
AIRPLAY AND PHONESHARE CONNECTION
Airplay is primarily for iOS devices while PhoneShare is for Android devices. They both require a wireless Wi-Fi connection from your portable device to your network router. The DMS-650 must also be connected to your router (either via Wi-Fi or wired Ethernet). The advantages of Airplay and PhoneShare is that since it relies on Wi-Fi the range of which you can send music to the DMS-650 from your portable device is much greater than Bluetooth.

AIRPLAY PLAYBACK
- Open your desired music app and look for this icon


-
Tap on the icon and wait for available device(s) to appear.
-
Select "Cary DMS-650" Airplay Icon (the Speaker Icons are Airplay) and start playback of your music selection.

- The DMS-650 will display all track information including artwork on the front panel.

PHONESHARE PLAYBACK
- From the Cary Streamer 2.0 app on your Android device, select Phoneshare from "Stream" input source on app Main Screen.
- Navigate to your music selection as you would with a PC Share source and play selection. Notice DMS-650 Now Playing Screen will show "Phoneshare" as the source.

NOTE: To get the most of Airplay or PhoneShare during playback, you can utilize our TruBit™ PCM and DSD Upsampling for a superior listening experience of these sources.
BLUETOOTH CONNECTION
Bluetooth can work for both iOS and Android devices. The advantage of Bluetooth is that it is a point-to-point signal, meaning no Wi-Fi or router connection is required to work. However, the range of Bluetooth is much shorter.
Qualcomm aptX™ HD Bluetooth audio is capable of 24 Bit / 48 kHz better than CD quality audio with the DMS-650 when using Bluetooth devices capable of aptX™ and aptX™ HD. For more information, please visit Qualcomm's website at https://www.aptx.com/aptx-hd.

BLUETOOTH PAIRING
When connecting a Bluetooth device to the unit for the first time, you must "pair" it to the DMS-650. Once pairing is completed, subsequent connection can be made with a couple of easy steps.
- Select the BLUETOOTH input on the DMS-650 and the display will show as follows.
Bluetooth
Pairing
Please select "CARY DMS-700" from the Bluetooth settings of the device you wish to connect to The DMS-700.
-
Go to the "Settings" of your portable device and find Bluetooth settings and make sure Bluetooth function is ON and in search mode.
-
"CARY DMS-650" should appear on your portable device (left picture below). Once it does, select it to connect (right picture below).


NOTE: If unable to connect to the DMS-650, you may have to tap the blue "I" information button to the right and select "Forget Device" and reconnect as per the above steps. This is because the DMS-650 includes a Bluetooth Send function and only send or receive can be functioning at any given time.
BLUETOOTH PLAYBACK (RECEIVE)
Once pairing has successfully been completed, you can easily enjoy music from your portable devices as follows:
- Select the BLUETOOTH input on the DMS-650 front panel or on the handheld remote.
- Double check your device's Bluetooth setting and make sure "CARY DMS-650" is selected as per the above steps.
- Begin playback of music on your device's music app or from stored music on your device.
- If you see a "play to" icon, ▲ or 🔒, in your music app, tap it and select "CARY DMS-650" (one with the Bluetooth icon) to ensure the signal is playing to the DMS-650.
- The display of the DMS-650 will show as follows once you initiate playback from your portable device.
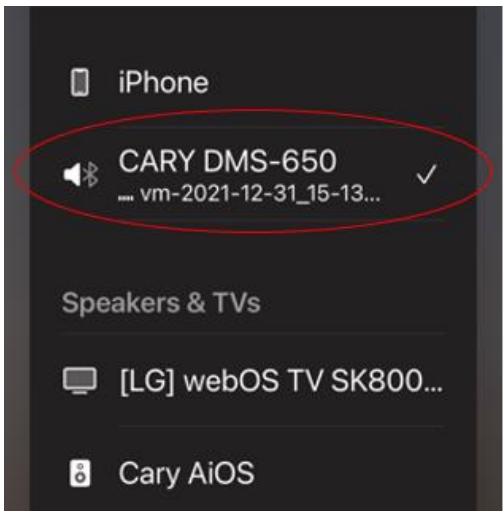

NOTE: A) To get the most of our fi™Bluetooth Implementation during playback, you can utilize our TruBit™ PCM and DSD Upsampling for a superior listening experience from Bluetooth sources. B) If pairing information is deleted from your device, you will need to perform pairing of that device again to connect.
BLUETOOTH OUTPUT (SEND)
Bluetooth output (or SEND) is different. This sends a Bluetooth signal out of the DMS-650 to a Bluetooth receiver, such as Bluetooth speakers or headphones. Bluetooth Receive, as per the previous steps, is sending a Bluetooth signal to the DMS-650 from a phone or tablet.
- Set your Bluetooth headphones or speakers to paring mode.
- Go to Menu>>Bluetooth Send in the DMS-650 menu. Switch to ON. DMS-650 will search for Bluetooth devices and list them.

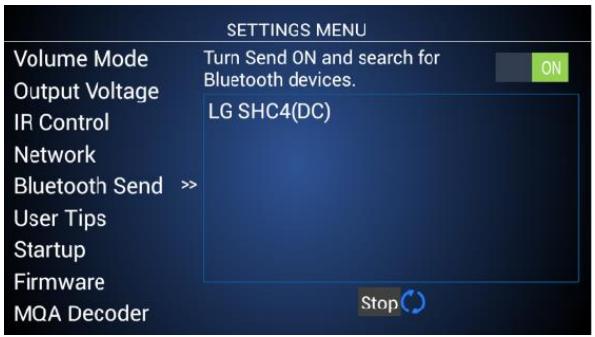
- Select the desired Bluetooth device and press Enter to connect.

- Initiate playback from any DMS-650 source as normal (excluding Bluetooth Input source) and sound will only output to your connected Bluetooth speakers or headphones.
NOTE: Normal output of the analog RCA and XLR jacks will cease when Bluetooth send is enabled.
PCM TO DSD CONVERSION
Through use of our TruBit™ Upsampling technology as described below, it is now possible to convert PCM files to DSD. For those who prefer DSD, this is an extremely powerful feature. Imagine taking any source or sample rate from network, internet, Bluetooth, AirPlay, or SPDIF and converting it to DSD64, 128 or 256. Whether you are in the PCM or DSD camp, the DMS-650 accommodates both! Not only can you convert any PCM sample rate up to 768 kHz in the PCM domain, but TruBit™ Upsampling also allows you to convert that 16, 24-bit PCM to a 1-bit direct stream digital signal with sample rates of 2.8224 MHz (64 or standard rate), 5.6448 MHz (128 or Double rate), or 11.2 MHz (256 or Quad rate). You can even up convert a native DSD64 file to a higher level of DSD128 or DSD256. By using superior no compromise AKM DACs, any native DSD or PCM to DSD converted signal is processed as true DSD. In other words, the DMS-650 does NOT convert a DSD signal to PCM within the DAC chips. This is somewhat rare as many so called DSD players convert the DSD signal to PCM without you knowing it.
PCM AND DSD UPSAMPLING
TruBit™ Upsampling is a powerful upsampling technology used to upsample lower sample rates to a higher sample rate, increasing the bit depth to 32 bits for PCM and 1-bit for DSD in the digital domain via a dedicated 128-bit DSP engine prior to analog conversion. This can be very useful in achieving a more enjoyable listening experience. Once a native input signal is changed to a selected higher sample rate, the bit depth will also automatically increase to 32-bits for PCM or change to 1-bit for DSD conversion. However, like all-powerful tools, this too should be used prudently. We do not take a blanket “higher is better” approach to upsampling. It is important to experiment with different rates depending on your source or source material. Many times, a native rate might be preferred whereas some recordings or file formats might benefit from a higher sampling rate, and so on.
The available selectable sample rates depend on the input signals original sample rate. For example, above 192 kHz the available PCM rate(s) will only be in multiples of either 44.1 kHz or 48 kHz as follows:
Input signal rates of 44.1 or multiples of:
BYPASS (44.1) --> 48 --> 88.2 --> 96 --> 176.4 --> 192 --> 352.8 --> 705.6
---> DSD64 ---> DSD128 ---> DSD256.
Input signal rates of 48 or multiples of:
BYPASS (44.1) --> 48 --> 88.2 --> 96 --> 176.4 --> 192 --> 384 --> 768
---> DSD64 ---> DSD128 ---> DSD256.
Pressing the "SRC" button on the handheld remote will cycle through the available sample rates.
"BYPASS" next to Upsample Rate means the DMS-650 will pass the input signal rate out in its native rate without any upsampling.
When an upsample rate is selected higher than the native input rate, the DMS-650 will upsample all incoming rates lower than the selected upsample rate up to the selected upsample rate (as well as change the bit depth to 32-bits for PCM or 1-bit for DSD). Any signals played that are equal to or higher than the selected upsample rate will playback unchanged as evident by the displays, “Upsample Rate” showing “BYPASS,” or the same upsample rate as the input rate. Subsequent playback of lower input rates behaves as described above. Each of the DMS-650 inputs will remember the upsample rate as set for that input.
NOTE: Anytime an upsample rate is selected, the bit depth will change to purple signifying the bit depth conversion from its native rate to either 32-bit for PCM upsampling, or 1-bit for PCM to DSD conversion.
Native Playback

PCM Upsampling

PCM to DSD Conversion

DSD PLAYBACK
The DMS-650 is capable of playing native DSD files up to 512 via both wired Ethernet and wireless Wi-Fi inputs as well as from USB-A and SD Card inputs. If using Wi-Fi as your network connection, it is recommended to have a very robust signal at the DMS-650 location. For the fastest and most reliable playback, a wired Ethernet connected is recommend.
*NOTE: DSD output over coaxial is DSD64/128 (DoP). Optical DSD output is DSD64 (DoP).
DSD input over coaxial AES/EBU is DSD64/128 (DoP). Optical DSD inputs is DSD64 (DoP).
MQA PLAYBACK AND NOTIFICATION
The DMS-650 is full MQA decoder that uses advanced 16x MQA rendering. This means the MQA file's original sample rate will further render to 705.6 kHz or 768 kHz while also including propriety DAC optimization and tuning for the AKM DACs during MQA playback.
In the “MQA Decoder” menu settings, there are three (3) choices of MQA decoders to select from, Full Decoder, Core Decoder, and Authenticating Decoder. Each decoder handles the MQA decoding and MQA SPDIF pass through differently.
| DMS MQA Sound Quality | DMS SPDIF Digital Outputs w/MQA | DMS MQA Decoder Processing | |
| FULL DECODER | Highest | None | MQA up to 24/384 and rendering to 768 with optimization and tuning for DMS AKM DAC chips |
| CORE DECODER | High | MQA Core Stream | MQA up to 24/96 with NO rendering or DAC optimization/tuning |
| AUTHENTICATING DECODER | Good | Full MQA Stream | No MQA decoding but better than CD quality |

NOTE: Using Core or Authenticating Decoder is for when needing to pass an MQA signal out the DMS SPDIF digital outputs. Otherwise, it is always suggested to us the Full Decoder (Default) setting.
MQA Blue indicates the file has either been approved in the studio by the artist/producer or has been verified by the copyright owner as provenance to what was heard in the studio. MQA Green indicates a file that has been MQA encoded without provenance. MQA Magenta indicates a MQA Core stream. This means the file's first unfold was decoded by external software (only up to 88.2 kHz or 96 kHz), such as by Roon or Audirvana. Core decoding can typically be turned off or bypassed in the third-party software program to allow for the full MQA stream and all decoding be handled by the DMS-650.


Ethernet, Wi-Fi, USB-A, and SD Card inputs are all MQA capable. SPDIF inputs of the DMS-650 is not capable of MQA playback. However, the DMS-650 can play a MQA stream from the SPDIF inputs at better than CD quality standard FLAC.
The DMS-650 is Roon Ready Certified endpoints. This means if you subscribe to Roon and have the Roon Core software installed on your PC or MAC, you can use the Roon tablet or Phone app to playback music from your network storage to the DMS-650. When you use the Roon ecosystem for playback, your control of the DMS-650 is limited to the Roon app's ability. For example, you can turn the DMS-650 on or off from the Roon app and control volume options as well as any other Roon integrated features,
such as TIDAL and Qobuz. However, all other DMS-650 features are only accessible from the DMS-650 IR or app remotes.

ROON SETUP
Roon Ready is enable by default. If needing to change or verify this, go to MENU>>Roon Ready

Before proceeding you must download and install the Roon Core software on your computer (https://roonlabs.com/downloads.html) and setup your library monitoring and other personal preferences within the Roon Core software. Below are details how to enable the DMS-650 as a Roon Ready endpoint within Roon Core and select it as a Play to Zone.
For more in-depth details of operation Roon Core and Roon App(s), please refer to the Roon Web Site. https://kb.roonlabs.com/Roon_User_Guide.
- In Roon Core software, select Settings, then Audio.
- Go down to the "Roon Ready" section to find the DMS-650.
- Click the "Enable" box.

- Once you click on "Enable" it will ask you to name the device.

- Click the "Play to Zone" icon in the lower right and select the DMS-650.

BALANCED OPERATION
The pin assignments of ALL the XLR-type male analog outputs, the XLR-type male digital output and XLR-type female digital inputs are:

Pin 1: Signal ground
Pin 2: Signal + (non-inverting)
Pin 3: Signal - (inverting)
Connector ground lug: chassis ground
Refer to your amplifier's operating manual to verify that the XLR pin assignments of its input connectors correspond to the DMS-650. If they are different, wire the XLR cable so that the appropriate XLR output pin connects to the equivalent XLR input pin.

Pin 1: Signal ground
Pin 2: Signal + (non-inverting)
Pin 3: Signal - (inverting)
Connector ground lug: chassis ground
Refer to your digital input source signal player or other digital source's operating manual to verify that the XLR pin assignments of its input connectors correspond to the DMS-650. If they are different, wire the XLR cable so that the appropriate input pin connects to the equivalent input pin.

Pin 1: Signal ground
Pin 2: Signal + (non-inverting)
Pin 3: Signal - (inverting)
Connector ground lug: chassis ground
Refer to your digital source's operating manual to verify that the XLR pin assignments of its input connectors correspond to the DMS-650. If they are different, wire the XLR cable so that the appropriate output pin connects to the equivalent output pin.
SPECIFICATIONS
This section describes the basic specifications of the DMS-650 at the time of printing. Specifications are subject to change without notice or obligation. When the following cautionary terms are used in this manual, these definitions apply:
WARNING: ELECTRICAL HAZARD! MISUSE OR FAILURE TO FOLLOW INSTRUCTIONS PROPERLY MAY RESULT IN PERSONAL INJURY OR DEATH!
CAUTION: NO RISK OR PERSONAL INJURY; HOWEVER, MISUSE OR FAILURE TO FOLLOW INSTRUCTIONS MAY RESULT IN DAMAGE TO EQUIPMENT.
NOTE: NO RISK OF PERSONAL INJURY OR EQUIPMENT DAMAGE; HOWEVER, MISUSE OR FAILURE TO FOLLOW INSTRUCTIONS MAY PREVENT PROPER PERFORMANCE OF THE EQUIPMENT.
DMS-650 BASIC SPECIFICATIONS
| Master Clock Jitter | Below measurable levels |
| Digital Sampling Rates (Fs) | 44.1 kHz to 768 kHz, DSD64 to DSD512 |
| Digital Filter | 32-Bit 8x Oversampling Digital Filter |
| Digital/Analog Converters | (2) - 2 channel AK4497EQ for working on true balanced output |
| BLUETOOTH | CSR Bluetooth v 4.0 with aptX® HD for 24 Bit / 48 kHz high-definition audio |
| Analog Filter | 3rd Order Bessel |
| Analog Outputs | Balanced XLR, Single – Ended RCA |
| Digital Outputs | Coaxial operating at Sample Frequency (Fs) from 44.1 kHz to 384 kHz, 16 bit to 24 bit, DSD64 to DSD128 (DoP)Toslink operating at Sample Frequency (Fs) from 44.1 kHz to 192 kHz, 16 bit to 24 bit, DSD64 (DoP) |
| Digital Inputs | USB x 3, SD Card x 1BLUETOOTH x1AES/EBU x1, Coaxial x2, Toslink x1 |
| Digital Input Sample Rate | USB/HDD operating at Sample Frequency (Fs) from 44.1 kHz to 768 kHz, 16 bit to 32 bit, DSD 64, 128, 256, 512.BLUETOOTH Sample Frequency (Fs) 48 kHz, 24 bit.AES/EBU, Coaxial operating at Sample Frequency (Fs) from 44.1 kHz to 384 kHz, 16bit to 24 bit, DSD64 to DSD128Toslink operating at Sample Frequency (Fs) from 44.1 kHz to 192 kHz, 16bit to 24 bit, DSD64 |
| Control | Trigger input 12VDC x1IR control x1 |
| Communication | Ethernet RJ45 full remote configuration interfaceWi-Fi 802.11 b/g/n/ac with MU-MIMO support |
| Power Input | Configured at factory for either 110-120 or 220-240 VAC, 50-60 Hz |
| Power Consumption | 45 Watts |
| Dimensions | 3.75” H x 17.25” W x 16.25” D |
| Weight | 23.5 lbs. |
Audio (LPCM)
| Frequency Range | 2 Hz - 22 kHz (44.1 kHz) |
| Amplitude Linearity | 0.1 dB (20 Hz – 20 kHz) |
| Phase Linearity | 3 degrees (20 Hz - 20 kHz) |
| Dynamic Range | 121 dB (1 kHz) |
| Signal-to-Noise Ratio | 115 dB (1 kHz) |
| Channel Separation | 107 dB (1 kHz) |
| Total Harmonic Distortion | 0.0004% (1 kHz) |
| Audio Output Level | 2.0V RMS (220 Ω output impedance) for Volume in 0.0dB3.0V RMS (220 Ω output impedance) for Volume in +8.0dB |
| Balanced XLR Output | +/- 2.0V RMS (440 Ω output impedance) for Volume in 0.0dB+/- 3.0V RMS (440 Ω output impedance) for Volume in +8.0dB |
Network, USB, SD Card Playback
| Playback Format Supply | .dsf, .dff (DSD64, 128, 256, 512), .aif, .aiff, .alac, .flac, .m4a, .mp4, .wav, .ape, .mp3, .aac, .wma, .ogg, .asf |
| Frequency Range | 2 Hz - 100 kHz |
| Signal System | 16, 20, 24, & 32 bit PCM and 1 bit DSD |
| Sampling Frequency | 44.1 kHz to 384 kHz PCM and 2.822MHz – 22.5792 MHz DSD |
| Dynamic Range | 121 dB |
| DSD System Clock | Frequency 22.5792 MHz |
SPDIF Playback, Coaxial, Toslink, AES/EBU (IPCM)
| Frequency Range | 2 Hz - 100 kHz |
| Signal System | 16, 20, and 24 bit |
| Sampling Frequency | 44.1 kHz to 768 kHz PCM DSD64, DSD128 (DoP) |
| Dynamic Range | 121 dB |
| System Clock | Frequency 22.5792 MHz |
| Signal-to-Noise Ratio | 127 dB |
| Audio Output Level | 2.0V RMS (220 Ω output impedance) for Volume in 0.0dB3.0V RMS (220 Ω output impedance) for Volume in+8.0dB |
| Balanced XLR Output | +/- 2.0V RMS (440 Ω output impedance) for Volume in 0.0dB+/- 3.0V RMS (440 Ω output impedance) for Volume in +8.0dB |
Master Quality Authenticated (MQA)
The DMS-650 includes MQA technology, which enables you to play back MQA audio files and streams, delivering the sound of the original master recording. This ensures that MQA-encoded audio files and streams sound exactly like the source. 'MQA' (Green Dot) indicates that the unit is decoding and playing an MQA stream. 'MQA' (Magenta Dot) indicates that the unit is receiving an MQA signal by Core decoding outside the unit. 'MQA Studio' (Blue dot) denotes provenance to ensure that the file and sound is approved by the artist, producer, and or original engineer.
SERVICE AND CARE
CARE AND CLEANING
The cabinet housing and front panel of the DMS-650 may be cleaned with a soft cloth and Windex or a window cleaner. The frequency of cleaning will be governed by how many hours the DMS-650 is operated and by operating environment cleanliness.
CAUTION: DO NOT LET ANY LIQUIDS SPILL INTO THE VENTS ON TOP OF THE UNIT.
AC POWER FUSE REPLACEMENT
The fuse is located inside the chassis and is not user serviceable. If the unit does not power up, contact an authorized service representative. Never replace the fuse with any other value than a two (2) amp slow blow fuse 250V. The AC Power Cord must be unplugged from the AC Power jack on the back of the unit prior to replacing the fuse. Set the unit Power On/Off switch to the Off position and plug the AC Power cord back into the AC Power jack. Then set the Power On/Off switch to the on position and verify proper operation. Contact Cary Audio for advice if the fuse repeatedly blows.
FACTORY SERVICE
Careful consideration has been given to the design of your DMS-650 to keep maintenance problems to a minimum. Any problems or requests for service should be referred to our Customer Service Department at 919-355-0010. DO NOT return the DMS-650 to the factory without a Return Merchandise Authorization (RMA) number from our online Customer Service Center (caryaudio.com/service-center/).
Cary Audio will assume no responsibility if the shipping company refuses to pay for damage due to your improper packing or lack of insurance should the unit be lost or damaged in shipment. Please retain and always use the original shipping carton for shipping the player. Also, Cary Audio reserves the right to return products sent in for service in a new box set at the customer's expense if the original packing material was damaged in the initial shipment, or if it is deemed unsatisfactory to use in return shipping.
NON-WARRANTY REPAIRS
Cary Audio will provide repair service for its products charging on a time and expense basis. Currently, the standard non-warranty service bench fee is \140 for the first hour and \110 per hour thereafter. Parts used for repairs as well as return shipping are additional. This may change and is not a quote for service. Please call us at 919-355-0010 for more information about out-of-warranty service and repair fees.
CAUTION: NEVER REMOVE OR INSERT THE BACK-PANEL AC PLUG WHEN THE UNIT I SON OR THE AC CORD IS PLUGGED INTO THE WALL.
PRODUCT REGISTRATION AND WARRANTY
Please click here to register your new Cary Audio product online.
Please click here to view our product warranty.
Logos, Trademarks, and Licensing
The Cary Audio Design AiOS incorporates copyright protected technology that is protected by U.S. patents and other intellectual property rights. The AiOS uses the following technologies:

MOA
The MQA logo is a trademark of MQA Limited. © MQA Limited 2021

Roon Ready is a trademark of Roon Labs © 2021

Qualcomm aptX HD
Qualcomm aptX is trademark of ©2021 Qualcomm Technologies International, Ltd. and/or its affiliated companies.

Direct-Stream Digital (DSD) is the trademark of © 2021 Sony Corporation and 2021 © Koninklijke Philips
Written Offer for Source Code
For third party technology that you receive from Cary Audio in binary form which is licensed under an open source license that gives you the right to receive the source code for that binary, you can obtain a copy of the applicable source code by downloading here.
CARY AUDIO
6301 Chapel Hill Road
Raleigh, NC 27607
919.355.0010
caryaudio.com
carydirect.com
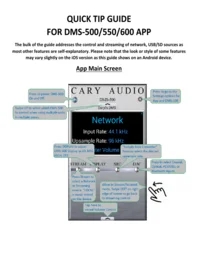
- NETWORK AUDIO PLAYER
- TABLE OF CONTENTS
- IMPORTANT SAFETY INSTRUCTIONS
- ATTENTION
- FCC INFORMATION FOR USER
- OUTDOOR ANTENNA INSTALLATION/SAFE ANTENNA AND CABLE CONNECTION
- DISPOSAL INSTRUCTIONS
- THANK YOU
- USEFUL TERMS
- ABOUT THE DMS
- UNPACKING
- POWER REQUIREMENTS
- IN THE BOX
- WARRANTY CARD
- PLACEMENT
- FEATURES
- USB AND SD CARD NAS DRIVE
- MQA CERTIFIED FULL DECODING TO 768 KHZ
- APTX™ AND APTX™ HD WITH CARY AUDIO'S FI™ BLUETOOTH IMPLEMENTATION
- ADVANCED MU-MIMO WI-FI
- TRUBIT™ DSD AND PCM UPSAMPLING AND PCM TO DSD CONVERSION
- OSO™ RECLOCKING
- FRONT PANEL
- POWER
- LCD FRONT PANEL DISPLAY
- IR REMOTE SENSOR
- SD CARD SLOT
- USB TYPE-A INPUT
- ETHERNET RJ45 JACK
- MINI USB FIRMWARE
- POWER INPUT (AC IN)
- BLUETOOTH ANTENNA
- DIGITAL INPUT JACK (OPTICAL)
- DIGITAL INPUT JACK (COAXIAL 1)
- DIGITAL INPUT JACK (COAXIAL 2)
- DIGITAL INPUT JACK (AES/EBU)
- DC TRIGGER INPUT TERMINALS
- IR INPUT
- WI-FI ANTENNAS
- ALPHANUMERIC KEYS
- ADD/DELETE
- HOME
- PLAY MODE
- NAVAGATION/PLAY HUB
- DISPLAY
- INPUT SOURCE SELECTOR
- VOLUME
- MUTE
- QUEUE
- MENU
- NOW PLAYING
- SRC
- BT OUT
- USING REMOTE ALPHANUMERIC KEYS
- USER TIPS
- ALTERNATE NOW PLAYING DISPLAY SCREENS
- APP CONTROL FOR IOS AND ANDRIOD
- DOWNLOAD ON THE APP STORE
- GET IT ON GOOGLE PLAY
- TUTORIAL VIDEOS FOR CONTROLLING DMS VIA APP
- VOLUME CONTROL AND OUTPUT
- USING AS A SOURCE (CONNECTING TO A PREAMPLIFIER, ETC.)
- USING AS A DIGITAL PREAMPLIFIER (CONNECTING DIRECTLY TO AN AMPLIFIER)
- PURE AUDIO MODE
- SETTINGS MENU OVERVIEW
- MAIN SETTING MENU
- VOLUME MENU
- IR CONTROL MENU
- NETWORK MENU
- STARTUP MENU
- SETTINGS MENU
- CHANGE THE IR CODE
- FACTORY RESET
- WIRELESS (WI-FI) SETUP
- WIFI SETUP USING STREAMER 2.0 APP
- WIFI SETUP USING IR REMOTE ONLY
- NETWORK AUDIO SETUP
- LOCAL MASTER BROWSER AND START SAMBA (SMB)
- MEDIA SERVER AND PC SHARE DIFFERENCES
- MEDIA SERVER AND PC SHARE METHOD
- RENDERER METHOD
- INTERNET MUSIC SERVICES
- SPOTIFY CONNECT
- USB AND SD CARD PLAYBACK (DIRECT METHOD)
- USB AND SD CARD NAS SETUP
- USB AND SD CARD NAS PLAYBACK
- MONITOR/PLAY USB AND SD CARD STORAGE VIA MEDIA SERVER
- MONITOR/PLAY USB AND SD CARD STORAGE VIA ROON METHOD
- OPEN ROON CORE
- QUEUES AND PLAYLISTS
- QUEUES
- TO ADD MUSIC TO A QUEUE
- TO VIEW A QUEUE
- TO EDIT A QUEUE
- TO PLAY THE QUEUE
- TO CLEAR A QUEUE
- SAVING QUEUES
- PLAYLISTS
- TO SAVE AS PLAYLIST
- TO SAVE TO PLAYLIST
- TO VIEW PLAYLISTS
- TO PLAY A PLAYLIST
- TO EDIT A PLAYLIST
- TO DELETE A PLAYLIST
- TO RENAME A PLAYLIST
- SPDIF INPUTS
- SPDIF OUTPUTS
- SPDIF OUTPUTS WHILE PLAYING MQA FILES
- PLAYING MUSIC FROM AND TO PORTABLE DEVICES
- AIRPLAY AND PHONESHARE CONNECTION
- AIRPLAY PLAYBACK
- PHONESHARE PLAYBACK
- BLUETOOTH CONNECTION
- BLUETOOTH PAIRING
- BLUETOOTH
- BLUETOOTH PLAYBACK (RECEIVE)
- BLUETOOTH OUTPUT (SEND)
- PCM TO DSD CONVERSION
- PCM AND DSD UPSAMPLING
- DSD PLAYBACK
- MQA PLAYBACK AND NOTIFICATION
- ROON SETUP
- BALANCED OPERATION
- SPECIFICATIONS
- MASTER QUALITY AUTHENTICATED (MQA)
- SERVICE AND CARE
- CARE AND CLEANING
- AC POWER FUSE REPLACEMENT
- FACTORY SERVICE
- NON-WARRANTY REPAIRS
- PRODUCT REGISTRATION AND WARRANTY
- LOGOS, TRADEMARKS, AND LICENSING
- MOA
- WRITTEN OFFER FOR SOURCE CODE
- CARY AUDIO
Brand : Cary Audio
Model : DMS 650
Category : Network audio player