HELIOS - Television Gryphon Audio - Free user manual and instructions
Find the device manual for free HELIOS Gryphon Audio in PDF.


| Product Type | True Dual Mono Preamplifier |
| Brand | Gryphon Audio |
| Model | Helios |
| Design | Dual-mono with separate PSU 5 power supply chassis |
| Inputs | 3 x Balanced XLR, 2 x Single-ended RCA |
| Outputs | 2 x Balanced XLR, 1 x Single-ended RCA |
| Volume Control | 85-step relay attenuator with precision resistors |
| Gain | +18 dB |
| Bandwidth (-3dB) | 0.1 Hz - 1.5 MHz |
| THD + N | 0.003% @ 1kHz (balanced output) |
| Display | 4.3" TFT capacitive touch screen with 4mm hardened glass |
| Input Impedance (Balanced) | 25 kΩ |
| Input Impedance (Single-ended) | 12.5 kΩ |
| Output Impedance | 8 Ω |
| Power Consumption | ≤0.5W (standby), approx. 90W (idle) |
| AC Voltage | 110-120V or 220-240V (not user changeable) |
| Dimensions (Preamplifier) | 47.5 x 38.7 x 17.3 cm (WxDxH) |
| Weight (Preamplifier) | 13.9 kg |
| Dimensions (PSU 5) | 47.5 x 38.7 x 17.3 cm (WxDxH) |
| Weight (PSU 5) | 18.2 kg |
| Optional Modules | DAC3 Digital Module, PS3 Phono Module |
| Remote Control | Infrared with Philips RC-5 protocol |
| Green Bias | Automatic bias control for compatible Gryphon power amplifiers |
| Made In | Denmark |
Frequently Asked Questions - HELIOS Gryphon Audio
User questions about HELIOS Gryphon Audio
0 question about this device. Answer the ones you know or ask your own.
Ask a new question about this device
Download the instructions for your Television in PDF format for free! Find your manual HELIOS - Gryphon Audio and take your electronic device back in hand. On this page are published all the documents necessary for the use of your device. HELIOS by Gryphon Audio.
USER MANUAL HELIOS Gryphon Audio

THE
GRYPHON

HELIOS
Preamplifier
Owner's Manual
VOLUME 12
INPUT
ETHOS


THE GRYPHON HELIOS
TABLE OF CONTENT
Introduction 9
Heritage 10
The Gryphon Helios 11
Placement 12
AC Voltage 12
Care & Maintenance 12
Choice of Cables 13
Setup 14
Installation 14
Main Switch 15
Burn-in & Warm-up 15
User Instructions 16
Rear Panel 21
Remote Control 24
Remote Codes & Battery 25
Green Bias 26
Features 27
Specifications 28
Dimensions 29
Error Indication 31
Optional - PS3 Module 32
Optional - DAC3 Module 38
Warranty & Support 46
IMPORTANT SAFETY INSTRUCTIONS 47
INTRODUCTION
At Gryphon Audio Designs, music is not just heard — it is felt, experienced, and cherished. Since our founding in 1985, Gryphon has been devoted to one singular goal: to bridge the gap between the artist's vision and the listener's soul, offering a listening experience that is as pure and untainted as the music itself.
Born from a profound love for music, Gryphon Audio Designs transcends the world of audio equipment. Every amplifier, every loudspeaker, every creation reflects our belief that music deserves nothing less than reverence. Manufactured using state-of-the-art precision machinery in Denmark, each Gryphon product is a masterpiece of engineering, where cutting-edge technology meets the highest standards of quality and craftsmanship.
At Gryphon, we are not swayed by fleeting trends. Our mission is clear and steadfast: to bring the essence of live music into your home, to capture every note, every breath, and every subtle nuance with such authenticity that you feel as though the artist is right there with you. Our vision is to create an experience so rich and immersive that the boundaries between listener and performance vanish entirely.
This manual is not just a guide — it is your gateway into a world where music reigns supreme. It is an invitation to join a passionate community of audiophiles and music lovers who share a deep devotion to musical perfection. We call them Gryphonistas, and they are united by the pursuit of sonic truth, beauty, and excellence.
As you embark on your journey with Gryphon, know that every detail of your system has been meticulously crafted using high-precision machinery to serve the music. We welcome you to the Gryphon family, where passion for sound is matched only by our dedication to creating an experience that is nothing short of extraordinary.
Thank you for choosing Gryphon. Your trust in our products means the world to us, and we are honored to accompany you on your musical journey. Together, we celebrate the beauty of sound, and we look forward to being a part of your world for years to come.
HERITAGE
Upon its introduction in 2012, the Gryphon Pandora immediately established a new standard in Line Preamplifier performance. Each of its two elegant enclosures housed two separate, monaural circuits: two completely independent analog power supplies—each with its own AC Power inlet—and two discrete, monaural preamplifier circuits. Thanks to the engineering genius of Tom Moeller, Gryphon's Chief Designer, each of these components defined the State-of-the-Art in preamplifier design.
The Gryphon Pandora was instantly recognized as the finest Line Stage available and its fourteen-year residency in the Gryphon product line is testimony to both its sonic excellence and timeless circuit topology.
For more than a quarter century, Gryphon has been designing and manufacturing some of the finest preamplifiers in history—each of which represented an evolutionary step forward in circuit refinement—culminating in The Gryphon Commander, widely regarded as the finest preamplifier ever created.
Now, Gryphon is proud to introduce The Gryphon Helios, the long-awaited successor to our legendary Pandora. The Helios benefits both from the heritage of The Pandora and design innovations developed for The Commander in order to deliver astonishing performance and versatility.
Since its founding in 1985, Gryphon has been nearly as well-regarded for its sculpturally stunning cosmetics as for its standards-setting performance. For forty years, all Gryphon components featured chassis aesthetics penned by Flemming Rasmussen, Gryphon's founder, culminating in the award-winning Diablo 333 Integrated Amplifier.
The Gryphon Helios is the first Gryphon product in a new era of design. The Helios' bold, modern appearance at once signifies a new visual design language for Gryphon while honoring the "Nordic Noir" aesthetic that has been a Gryphon hallmark for more than forty years.
Inspired by the power and grace of a waterfall, The Helios' faceplate at once honors its aesthetic heritage and predicts the future of Gryphon visual design. The iconic, inverted triangle which has distinguished the front panels of our Apex, Commander, Essence, and Diablo 333 is retained, but this unique detailing only becomes apparent when the Preamplifier chassis is stacked atop the PSU 5: a subtle design flourish that Gryphon cognoscenti will recognize and appreciate.
Executed in thick, richly anodized aluminum, Helios' two chassis echo the heirloom build quality of the circuitry within.
THE GRYPHON HELIOS
Like its venerable predecessor, The Gryphon Helios is built as a true dual-mono design, with each enclosure housing two discrete monaural chassis. The extensive use of extruded and CNC-machined aluminum provides exceptional rigidity while helping to control unwanted vibrations. Both enclosures rest on four proprietary Gryphon-designed spikes, carefully engineered to manage energy and resonance. Special coasters allow Helios to be placed directly atop its matching PSU 5 Dual Mono Power Supply Unit.
At the center of each faceplate, a 4mm thick tempered glass panel frames Helios' 4.3" touch-control display, seamlessly integrated behind the glass for both elegance and protection.
The Gryphon Helios builds upon the proven Class A input topology of the Pandora, now refined with a new, ultra-low-noise dual JFET. The simplicity of the circuit allows the musical signal to pass with remarkable purity, delivering a sound that is transparent, effortless and natural—while retaining the rich, tactile presence for which Gryphon components are celebrated.
The relay-based volume control has been further refined with a precise 85-step attenuator, ensuring smooth, accurate control and an even greater sense of openness and bandwidth.
The Helios signal path is fully balanced from inputs to outputs. Single-ended inputs will, as on the Commander, be converted to balanced signal right after entering the Helios via Gryphon's proprietary gold-plated RCA sockets. As with all Gryphon preamplifiers, the design remains free from global negative feedback, preserving the immediacy and vitality of the music. Carefully selected components—from custom toroidal transformers to premium capacitors and precision resistors—ensure the lowest possible noise and the highest level of musical integrity throughout the design.
The Gryphon Helios was conceived not simply as a preamplifier, but as the heart of a truly sophisticated music system. Home Theater Bypass is available through both XLR and RCA connections, allowing the Helios to integrate seamlessly into multimedia environments, while all inputs can be individually named and gain-matched for effortless system tailoring.
Building on the versatility of the Pandora, the Helios can be expanded with both digital and analog modules. Two rear panel slots allow installation of Gryphon's DAC3 Digital Module or PS3 Phono Module.
(NOTE: The Gryphon DAC3 and PS3 Modules must be installed by Authorized Gryphon Dealers ONLY.)
Following the design philosophy of the Pandora and the Commander, the Helios PSU 5 also provides a second set of DC outputs, enabling it to power external Gryphon source components such as the Legato Legacy Phono Preamplifier. With its combination of flexibility, refinement and musical authority, the Helios stands ready to serve as the centerpiece of the most ambitious high-end systems.
PLACEMENT
Do not place your Gryphon component on or near any source of heat such as power amplifiers.
Do not place any object on the top covering the ventilation holes or heat sinks of your Gryphon component.
Do not place it in an enclosed space such as a cabinet, unless ample ventilation is provided. Failure to observe guidelines may result in overheating.
We suggest utilizing the Gryphon StandArt Rack
AC VOLTAGE
Your Gryphon unit is especially made for the AC voltage of the country to which it has been shipped. If the voltage of your Gryphon has been changed, the warranty is void and the product may be unsafe or malfunction. Correct AC polarity contributes greatly to optimum performance. If you are not using a three-pin, non-reversible power plug, please experiment with the orientation of the plug for optimum performance.
CARE & MAINTENANCE
Gryphon products are handcrafted by individuals who take great pride in the high level of fit and finish which we achieve. To maintain your Gryphon components in pristine condition, please follow these simple instructions. Metal surfaces may be cleaned with a damp cloth or dry microfiber cloth. Some products made for treatment of vinyl interiors in cars may be useful. Test the product on a non-visible surface before using any fluids. Acrylic surfaces should only be wiped with a very soft, dry cloth. Small scratches may be removed with acrylic surface polish. Fingerprints may be removed with a damp cloth or dry microfiber cloth. In order to avoid damage to your Gryphon's finish, do NOT use spirits or paper tissue.
CHOICE OF CABLES
Gryphon's basic philosophy is one of sonic neutrality. We prefer to leave interpretation to the musicians and singers. Therefore, you should not need a cable with a particular “sound” of its own to balance or “equalize” your system. Unfortunately, in some circles, cables have become an acceptable equalizer in the High-End audio industry.
Take the advice of your authorized Gryphon dealer in selecting interconnects and loudspeaker cables for your Gryphon equipment and for that matter power cords as well. After all, we are listening to current “converted” into music! Naturally, Gryphon’s own range of interconnects, loudspeaker cables and power cords are used in the development of Gryphon products. Gryphon cables are designed for ultimate neutrality and resolution. They are extremely revealing and will allow the ultimate quality of your Gryphon system or any fine audio components to come through clearly and undiminished.
All Gryphon amplifiers are designed and manufactured with an extreme bandwidth and in some cases the wrong choice of speaker cable can become an issue and will create potential problems in the collaboration between the amplifier and the speakers, with the speaker cable as an interactive factor. Gryphon recommends that no speaker cable on a Gryphon amplifier should be with a coaxial design, active shielding or special boxes that will add-on different types of filtration. A speaker cable with a coaxial design or with active shielding will in most cases have a much lower bandwidth than the amplifier and therefore the amplifier will be met with a too high capacitive load and might cause oscillation of the amplifier. There is no need to actively add filtration on an analog amplifier. It doesn't serve the final reproduction of the music any good.
Gryphon recommends using speaker cables with a low capacitance and a wide bandwidth in order to match the specs of the amplifier's bandwidth and output impedance. There is no need to add more "negative" filtration to the system as Gryphon is striving to have the finest level of tonal balance and neutrality. Choose your cables with the highest level of attention to the actual parameters of the cable design (e.g. cable geometry, capacitance, bandwidth, insulation, conductor material and connectors) and aim for low capacitance, low resistance and sonic neutrality.
SETUP
Please refer to separate Setup instruction document included with your unit. You can also find this document on our website. WARNING: The Gryphon Helios and PSU 5 are equipped with spikes for optimal performance. Please note that these spikes are hard and pointed and might damage the surface if not the necessary considerations are taken.
INSTALLATION
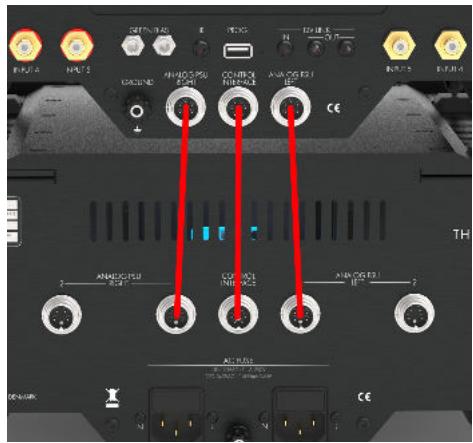
The Gryphon Helios and PSU 5 is delivered with a set of DC cables to connect the Preamplifier to the Power Supply. The DC cable set consists of one DC77 and two DC6 cables.
Do NOT connect the AC power cords before having connected the DC cables as shown below.
Do NOT disconnect DC cables before having powered the PSU 5 fully OFF.
Connect the DC77 cable between "Control Interface" sockets on the Helios and the PSU 5.
Connect the DC6 cables respectively between
"Analog PSU Left" socket on the Helios and "Analog PSU 1 Left" socket on the PSU 5. "Analog PSU Right" socket on the Helios and "Analog PSU 1 Right" socket on the PSU 5.
Connect two AC power cords from mains to the two AC inlets on the PSU 5.
MAIN SWITCH
The main ON/OFF switch for the Helios Preamplifier are located on the bottom panel of the PSU 5 Power Supply, near the front. Engaging the power switch will illuminate the ON/STB (Standby) indicator on the Helios Preamplifier.

SAFETY INSTRUCTIONS
Hazardous live AC power! Please find important safety instructions on p. 45
BURN-IN & WARM-UP
Your Gryphon unit has been thoroughly tested and burned-in before shipping; however, performance will continue to improve during the first 40 – 50 hours of normal use. After this period, optimum performance will be reached approximately 45 minutes after turn-on.
USER INSTRUCTIONS

ON/STB touch Button:
Touch the ON/STB (Standby) symbol to turn the Gryphon Helios ON or to engage Standby mode. When the preamplifier is ON, the symbol turns green. (A red symbol indicates STB)
Note: ALWAYS turn the preamplifier on, BEFORE turning on the power amplifier(s).
ALWAYS turn the power amplifier(s) off, BEFORE turning off the preamplifier.


The Gryphon Helios has two display view modes: "Simple View" and "Detail View".
In "Simple View" mode, the selected input and the volume level are displayed with a large font to make them easily readable from the listening position.
When touching the display area, the Gryphon Helios display will enter "Detail View" mode.
The Display will return to "Simple View" mode after 6 seconds if not being operated at the display panel.
"Simple View" mode can be disabled in the menu.


VOLUME
The Gryphon Helios preamplifier uses a unique volume control. It is not a digital device, but a discrete solution based on fixed resistors in an ultra-short signal path involving a very small number of relays selected for perfect function and "sonic invisibility." This technology can sometimes - depending on the material played - make a very small clicking noise when used. This is not a sign that anything is wrong and is normal. Use the up/down arrows to adjust the volume for desired listening level. The minimum level is 0 and the default maximum level is 84. The start-up and maximum level can be set in the menu. See the description under "Menu Activated Functions".
MUTE
When the volume level is above 0, use this function to immediately mute the signal. Mute is indicated in Simple View mode with an X over the volume level - and in Detail View mode with an white MUTE button with black text.
INPUT SELECT
Use these touch buttons to select the desired input. Additional inputs (Phono, DAC) will be available when optional modules are installed. The names for each input can be customized using the Menu. See the description under "Menu Activated Functions".
MENU
Touch the MENU button to enter the Main Menu


MAIN MENU:
Select any of the menu items or press EXIT to leave the menu.
DAC SETTINGS and PHONO STAGE sub-menus available only with optional modules installed.
In the following section, each menu item will be described in detail".
START VOLUME:
Use the "Up" and "Down" arrows to adjust the desired start volume. The next time the Gryphon Helios is powered up, the volume will be set to the MAX VOLUME:
Use the "Up" and "Down" arrows to adjust the desired Max Volume.
BALANCE:
Use the "Left" and "Right" arrows to adjust the inter-channel balance in 1 dB steps (+/-dB)
DISPLAY:
Select fixed display intensity in four levels 25, 50, 75 or 100%.
Alternatively, select AUTO OFF or AUTO DIM.
AUTO DIM: when the Gryphon Helios display is in "Detail View" mode, the display intensity will be 100%. In "Simple View" mode, the display will be 100% when the Gryphon Helios is operated from the remote control and after eight seconds the intensity will lower to 25%, rendering the display unobtrusive and prolonging its lifespan.
AUTO OFF: when the Gryphon Helios display is in "Detail View" mode, the display intensity will be 100%. In "Simple View" mode, the display will be 100% when the Gryphon Helios is operated from the remote control and after eight seconds the display will switch off. This will prolong the lifespan of the display. Any operation of the Gryphon Helios will turn the display on again.
SIMPLE VIEW ON / OFF:
Select SIMPLE VIEW OFF if you want the display in "Detail View" mode only.



IR SOURCE:
It is possible to connect an external active IR receiver to the rear panel of the Gryphon Helios. To use this option; select Rear Panel IR Connector.
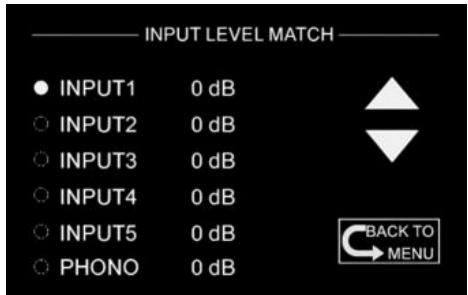
INPUT LEVEL MATCH:
This option enables individually trimming the gain level of each input to maintain consistent volume when switching between sources.
Select the desired input and use the arrows up and down to adjust the level from 0 - +8dB.
Display showing optional Phono Stage installed.
NAME INPUT:
Select the desired input and touch RENAME INPUT.
Use the QWERTY keyboard to enter the new input name and press OK to confirm. The input name can have a maximum of 8 characters.
AV INPUT:
This option allows you to use Input 3 (balanced) and/or Input 4 (single-ended) as a "Unity Gain" input for a source (e.g. Home Theater Processors) with its own volume control. The signal will be passed through from selected input(s) with no attenuation. (Input Level Match settings will be ignored). It is thus not possible to set the level with the volume control.

GREEN BIAS:
Select the volume level where you want your Gryphon Power Amplifier(s) to change Class A bias when connected via the Green Bias control feature.
Please also refer to the description in the chapter: "Green Bias".
(All Gryphon Class A power amplifiers are compatible, but some models are programmed to change at another volume level).
The Antileon- and Essence series will change at volume level 26-27
respectively 38-39 depending on the setting here.
Please note that selecting "BIAS L" on the Gryphon Power Amplifier will disable Green Bias control.

RESTORE SETTINGS:
This option allows for resetting all settings to default, per below:
Start Volume: 0
Max Volume: 84
Balance: 0 (centered)
IR Source: Front Panel IR Sensor
Input Level Match: OdB for all inputs
Input Names for Input 1-5: INPUT1-INPUT5
Input name for Phono input: PHONO
Input name for DAC input: USB, AES/EBU, S/PDIF1, S/PDIF2 and
TOSLINK
AV Input: None
Display mode: Auto Dim
Simple View ON
MM/MC setting is not changed.

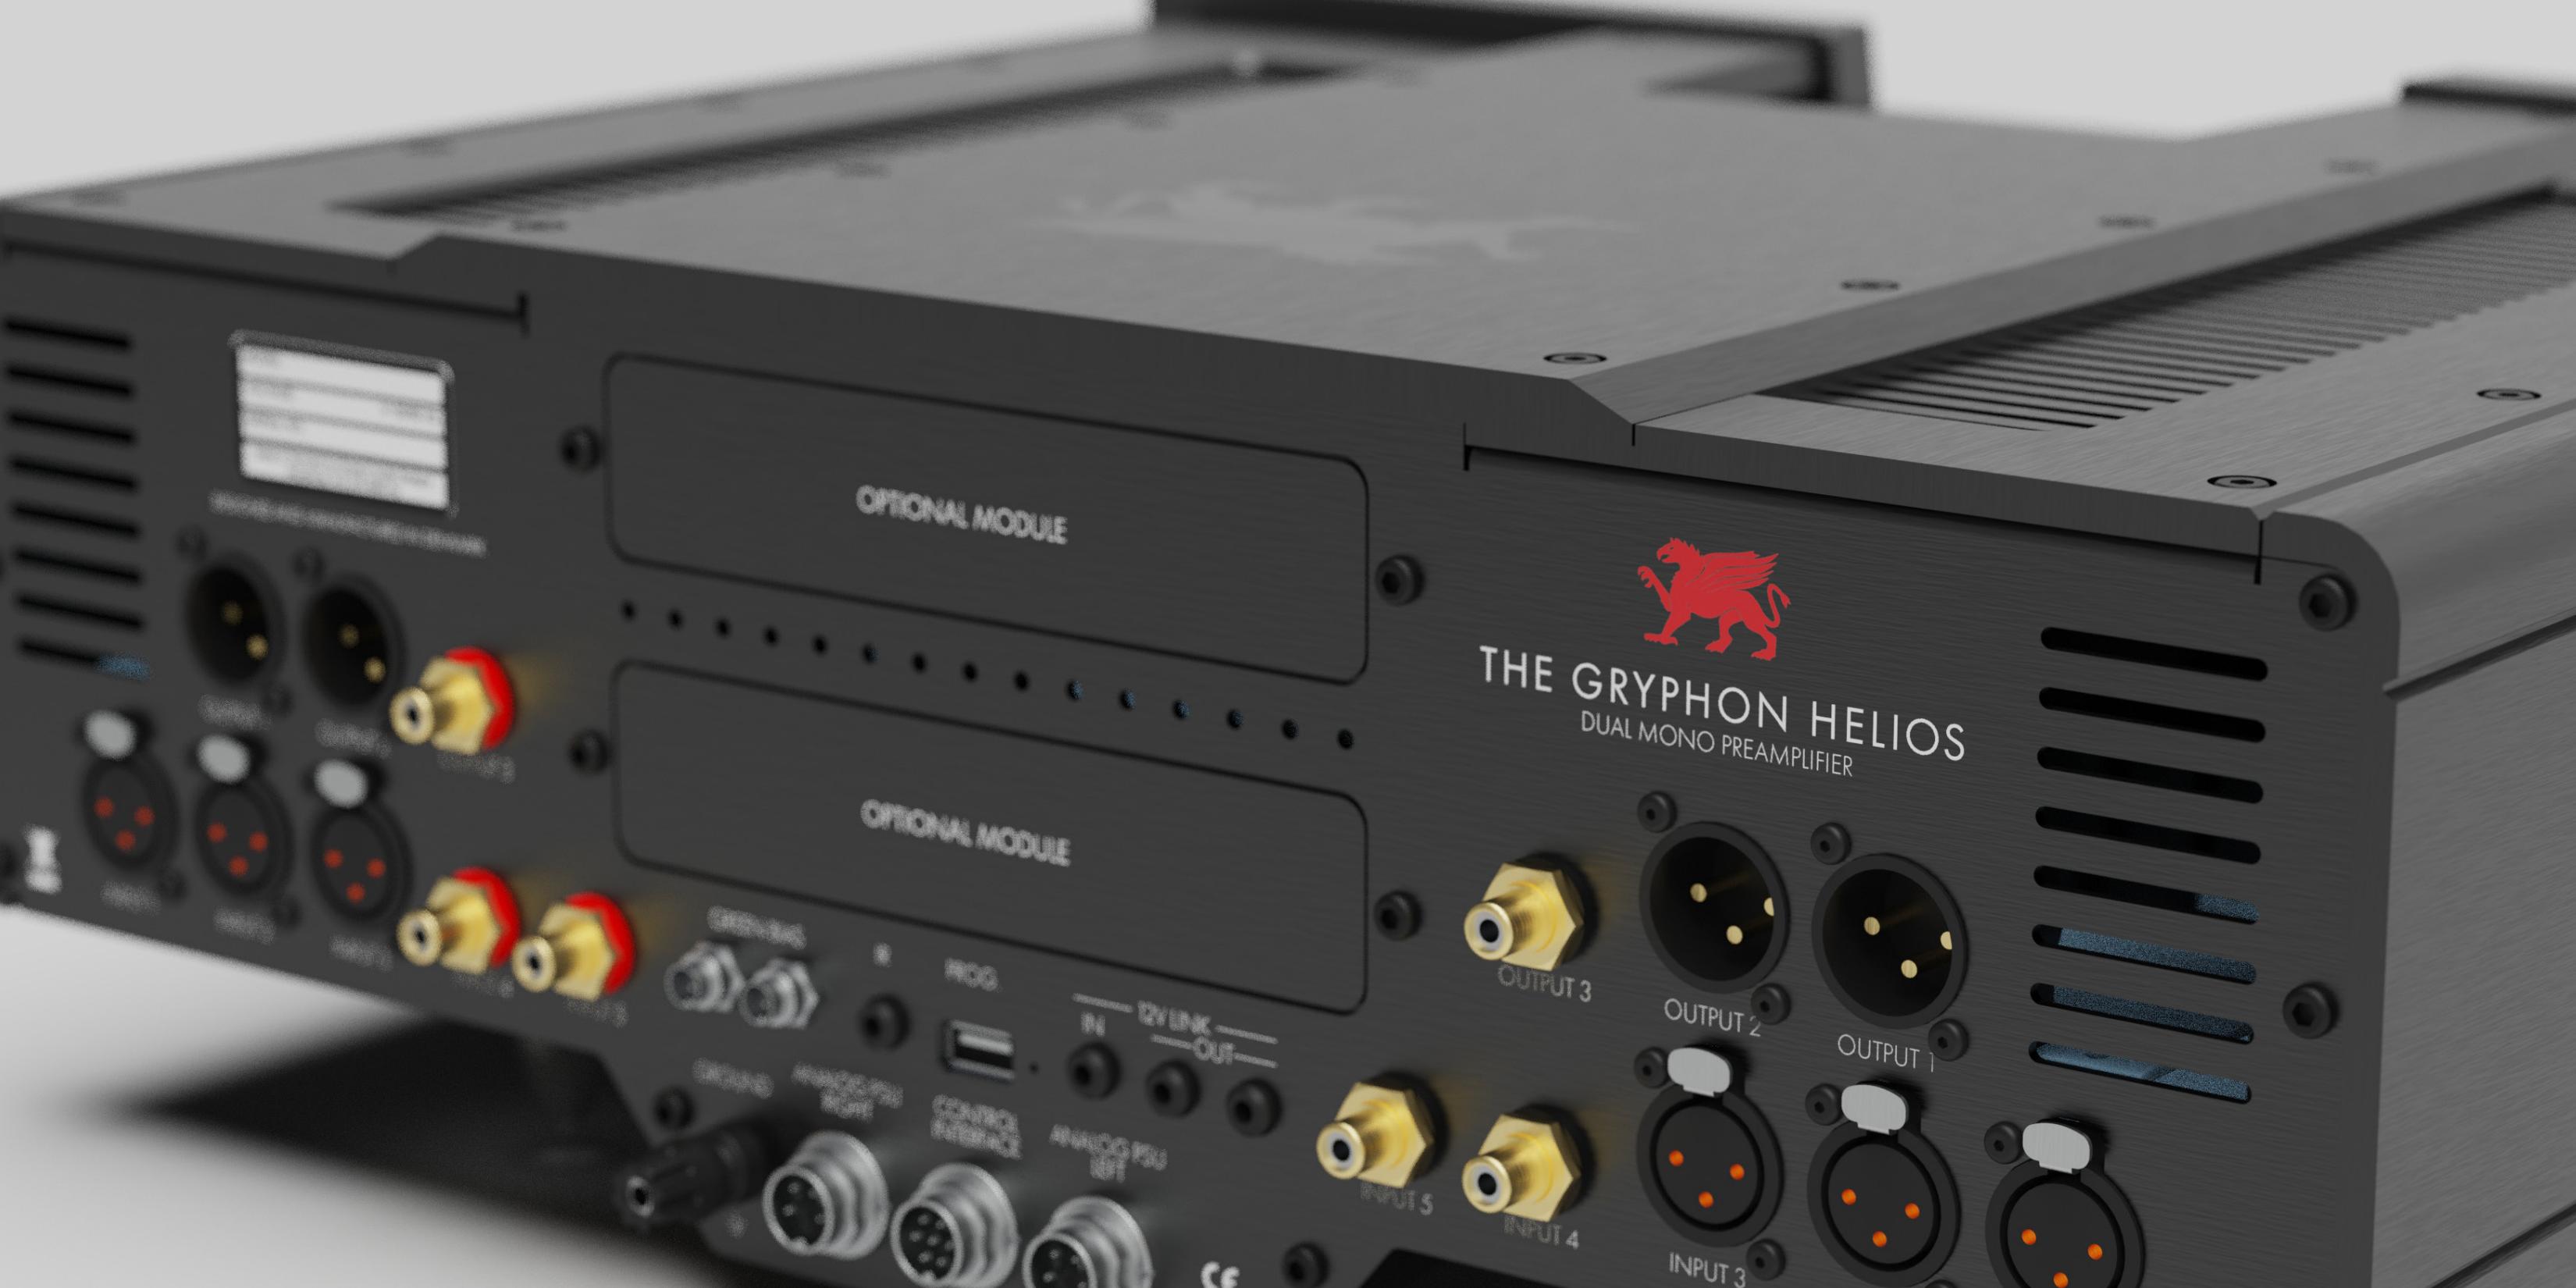
REAR PANEL, THE HELIOS PREAMPLIFIER

INPUT 1 - INPUT 3
Balanced XLR inputs to connect balanced sources.
INPUT 4 - INPUT 5
Single-ended RCA inputs to connect single-ended sources.
OUTPUT 1 - OUTPUT 2
Balanced, fully discrete, DC-coupled Class A preamplifier outputs to drive power amplifier(s).
OUTPUT 3
Single-ended, DC-coupled preamplifier output to drive power amplifier.
BALANCED CONNECTIONS
All Gryphon products follow the AES standard for balanced connections:
-
Ground
-
Positive
-
Negative
Gryphon recommends the use of dedicated, balanced XLR interconnect cables.
Avoid the use of RCA-to-XLR adaptors as they will degrade system performance.
GREEN BIAS
For Green Bias control of compatible Gryphon power amplifier(s). Please also refer to the description in the chapter:
"Green Bias" - and to the Owner's Manual of your power amplifier.
IR
IR input for an external active IR receiver.
3.5mm Stereo (TRS) mini-jack:
Tip: 5VDC (max. 100mA) output for active IR-eye, Ring: IR-data input, Sleeve: GND.
12V LINK IN
For switching the Helios between STB (Standby) and ON when connected to a unit with compatible link output.
3.5mm mono mini-jack: Tip: 12V link input, Sleeve: 0V.
12V LINK OUT
For switching other units with compatible link inputs between STB and ON following the STB/ON status of the Helios.
3.5mm mono mini-jack: Tip: 12V (max. 100mA) link output, Sleeve: GND.
ANALOG PSU and DIGITAL PSU
Connect these inputs to the PSU 5 Power Supply as described in the "Installation" section of this manual.
GROUND
Binding post for chassis ground.
USB
The USB port is solely used for possible future Gryphon Helios firmware updates.
Instructions how to perform a firmware update, will be conveyed if a firmware update is released.
REAR PANEL, THE PSU 5

ANALOG PSU 1 LEFT and RIGHT
Analog power supply output for The Helios Preamplifier.
ANALOG PSU 2 LEFT and RIGHT
Analog power supply output for the Gryphon Legato or Legato Legacy.
CONTROL INTERFACE
Power supply output for the Helios control circuits.
GROUND
Binding post for chassis ground.
MAINS INPUT SOCKETS
Two IEC appliance C14 inlets (for power cords with IEC C13 receptacle)
AC FUSE HOLDERS AND FUSE VALUES
100-120Vac: T1A / 250V 220-240Vac: T500mA / 250V
REMOTE CONTROL

ON/STB
Places the Gryphon Helios "ON" or in "STB" (Standby)
MUTE
When the volume level is above 0, use this function to immediately mute the signal. Mute is indicated in Simple View mode with an X over the volume level - and in Detail View mode with an white MUTE button with black text.
DISPLAY
This remote button toggles through the different display intensity options. The selected option will show in the display. After 5 seconds, the display will return to normal.
VOLUME Up and Down
Raises and lowers the Gryphon Helios volume setting.
INPUT Up and Down
Enables user to toggle between inputs.
INPUT 1 - 5 and PHONO
The numbered buttons from 1 to 4 are used to directly selects the desired input. The PHONO button directly select the phono input from the optional PS3 Phono Stage module.
DAC3 module, direct INPUT selection
If a DAC3 module is installed, the five digital input buttons are used to directly select the desired input: USB, AES/EBU, S/PDIF1, S/PDIF2 and TOSLINK.
DAC3 module remote functions
FILTER button: toggles between the digital filters. DSD LP button: toggles the DSD format analog low pass filter ON/OFF. 0/-6dB button: if -6dB is chosen, the output level from all digital inputs is lowered -6dB.
REMOTE CODES & BATTERY
The Gryphon Helios Preamplifier remote control uses the Philips RC-5 standard for infrared communication. The following RC-5, system 15 codes are used for the Gryphon Helios Preamplifier:
| ON/STB | 12 |
| MUTE | 13 |
| VOL UP | 16 |
| VOL DOWN | 17 |
| INPUT UP | 32 |
| INPUT DOWN | 33 |
| DISPLAY | 15 |
| POWER ON | 123 |
| POWER OFF | 124 |
DAC3 & Digital Input codes
| DAC3 FILTER | 50 |
| DAC3 DSD LP | 48 |
| DAC3 0/-6dB | 36 |
Direct Input Select
| INPUT 1 | 1 |
| INPUT 2 | 2 |
| INPUT 3 | 3 |
| INPUT 4 | 4 |
| INPUT 5 | 6 |
| PHONO | 5 |
| USB | 7 |
| AES/EBU | 8 |
| S/PDIF1 | 9 |
| S/PDIF2 | 0 |
| TOSLINK | 11 |
The remote control uses a single LR2450 / CR2450 coin cell battery. Please replace the battery if the red indicator doesn't light up when pressing a button: Carefully remove the screws holding the rear panel of the remote control using a 2mm hex socket screwdriver or Allen key. Remove the rear panel and carefully slide the small battery drawer forward to release the battery. Observe the orientation of the battery and replace with the new battery.
GREEN BIAS
If you are using a compatible Gryphon Class A power amplifier, you may choose to connect the Green Bias control link to automatically change bias with reference to the current position of the preamplifier's volume control.
Green Bias offers TRUE, PURE CLASS A with considerably lower power consumption than traditional solutions.
Green bias in the Gryphon power amplifier allows the user to select the amount of Class A required to run his speakers fully in Class A at any given time, encompassing such factors as speaker sensitivity, room size, musical dynamics and overall volume level. Green bias improves on our programmable bias by giving Gryphon system owners the option of enabling the preamplifier to automatically control bias.
Please note that the green bias system and cable is not a part of the signal path and only has reference to the volume control position of the preamplifier.
The power amplifier will change bias setting corresponding to pre-programed switching points from the preamplifier's volume control. It is possible to change these volume control switching points in your Helios. Please refer to "Green Bias" under "Menu Activated Functions".
Please also refer to the Owner's Manual of your power amplifier.
Please note that selecting "BIAS L" on the Gryphon Class A Power Amplifier will disable Green Bias control.
FEATURES
• True Dual Mono configuration.
• Zero negative global feedback.
- Microprocessor-controlled 85-step relay, volume attenuator featuring precision resistors and ultra-low capacitance relays for best sonic performance.
- Super-fast discrete Class A input buffer developed for best possible sonic performance.
- Fully discrete balanced dual differential Class A line stage circuitry followed by a very fast current amplifying Class A stage.
- DC servo coupling.
- Four-layer printed circuit boards with pure copper traces up to 70my thickness.
- PCB-mounted sockets eliminate wiring and shorten signal path.
- Two separate custom made 65VA toroidal transformers, one for each channel.
- Massive power supply capacitor bank for each channel; total of 2 x 83,000uF.
- Polypropylene capacitors for local power supply decoupling.
- Separate power supply for both digital and individual left/right channel analog circuits.
- Fully regulated extremely low noise power supply for all voltage amplifying stages.
- Local shunt regulators for best noise suppression.
- PSU 5 Power Supply chassis with additional DC outputs for external Gryphon sources.
- Optional DAC3 module with one USB, two S/PDIF, one AES/EBU and one TOSLINK input.
- Optional PS3 MM/MC phono stage module.
- Gold-plated Neutrik XLR sockets for three balanced (Source) inputs and two (Main) outputs.
- Gold-plated Gryphon RCA phono sockets with Teflon insulation for 2 (Source) inputs and one single-ended preamplifier (Main) output.
- Fixed-level AV inputs for seamless integration with surround systems.
- Adjustable channel balance, source level matching, start-up volume and maximum volume level.
• Infrared remote control.
• 12V Link In/Out for remote power On/Off control. - Green Bias control for Gryphon power amplifiers.
• Infrared receiver input on rear panel. - 4.3" TFT capacitive touch screen with 4mm hardened glass in front.
- Firmware upgradeable via USB 2.0 socket on rear panel.
- Separate mechanical chassis for Power Supply and Amplifier circuits.
• Standby current consumption ≤0.5W.
• Designed and built in Denmark.
SPECIFICATIONS
• Input Impedance, balanced: 25KΩ
• Input Impedance, single ended 12K5Ω
• Output impedance: 8Ω
• Bandwidth (-3dB): 0.1 Hz to 1.5 MHz
- Gain: +18dB
- THD + N: 0.003% @ 1kHz and BW 10Hz – 30KHz, balanced output
• Max input level, balanced: 20Vrms
• Max input level, single-ended: 10Vrms
• Power consumption: ≤ 0.5W (standby), approx. 90W (idle, including PS3 and DAC3 modules installed)
- AC voltage range: 110-120V OR 220-240V – not changeable.
• AC inlets: 2 x IEC C14 inlets (for power cords with IEC C13 receptacle)
- Operating ambient temperature range: 15 - 30°C / 59 - 86°F
- Dimensions Preamplifier unit, WxDxH: 47,5 x 38,7 x 17,3 cm, net unit weight: 13,9 kg
- Dimensions PSU 5 unit, WxDxH: 47,5 x 38,7 x 17,3 cm, net unit weight: 18,2 kg
• Shipping dimensions: Two crates; each LxWxH: 58 x 57 x 28, respectively 25,2 kg and 29,2 kg
Please also see following pages
MENU-controlled functions:
Volume Max Level
Volume Start Level
Balance, Left/Right. (6dB in 1dB steps)
Display Intensity: (100%-75%-50%-25%, Auto Dim and Auto OFF)
Green Bias setup
Infrared source (Front or Rear Panel)
Input Level Match
Input Naming
Dedicate Input 3 (XLR) or Input 4 (RCA) to Fixed-level AV-input
Restore Settings
Phono Stage MM/MC selection (optional)
DAC level and filter settings (optional)
Note: Specifications can be changed without notice.
DIMENSIONS, THE HELIOS PREAMPLIFIER


DIMENSIONS, THE PSU 5


ERROR INDICATION & HANDLING
LEFT SIDE AC POWER MISSING.
Check left side power cord or inlet fuse.
The left side AC power is missing.
Please check that the left-side power cord is properly inserted or if the inlet fuse is blown.
AC VOLTAGE MISMATCH!
Required voltage is printed on the serial number label.
The detected AC voltage does not match the Gryphon Helios and PSU 5
Please refer to the AC voltage stated on the serial number labels.
Please disconnect the Helios and PSU 5 from AC power.
Please check the serial number a have it hand when contacting your
Authorized Gryphon Dealer or Distributor.


PHONO STAGE 3 BALANCED DUAL MONO MM/MC PHONOSTAGE


PS3 PHONO STAGE MODULE - OPTIONAL
Gryphon Audio Designs has consistently supported the LP format with high performance phono stages. These optional modules are purpose-designed for installation in Gryphon preamplifiers and integrated amplifiers at all price points across our product range. Based on the legendary Legato phono stage, the Gryphon PS3 MM/MC Phono Stage Module is a true balanced dual-mono design which offers enhanced channel separation, capable of extracting every musical detail for ultimate realism, and fully balanced signal handling from input to output. The PS3 offers an extended range of MC cartridge impedance loading options accessible through the rear panel. The PS3 module can be optionally added to the Gryphon Helios.
PS3 INSTALLATION
Installation MUST be performed by authorized dealers or technicians only. Unauthorized installation might void warranty.
SAFETY INSTRUCTIONS
Hazardous live AC power! Please find important safety instructions on p. 45
BURN-IN & WARM-UP
Your Gryphon unit has been thoroughly tested and burned-in before shipping; however, performance will continue to improve during the first 40 – 50 hours of normal use. After this period, optimum performance will be reached approximately 45 minutes after turn-on.
PS3 PHONO STAGE MODULE - OPTIONAL


Set-up Menu
Select the PHONO STAGE sub-menu to select between MM (Moving Magnet) and MC (Moving Coil) mode.
Changing setting will alter the total gain through the PS3 module. During the change, internal electrical circuit needs to settle in, taking approximately 25 seconds. A progress bar will appear until this period is timed out and normal function can proceed.
Please refer to Menu Activated Functions for Phono Stage Input Level Match and Input Naming.
PS3 PHONO STAGE MODULE - OPTIONAL

INPUT LEFT - INPUT RIGHT
Balanced XLR inputs to connect balanced phono cartridges.
Avoid the use of RCA-to-XLR adaptors as they will degrade system performance.
MC (Moving Coil) Load setting switches no. 1-8
Set the desired MC load in both sides according to the table below.
Figure 1: Example 100 Ω

Figure 2: Example 300 Ω

| SW1 | SW2 | SW3 | SW4 | SW5 | SW6 | SW7 | SW8 | RLOAD Ω |
| ON | ON | ON | ON | ON | ON | ON | 20 | |
| ON | ON | ON | ON | 30 | ||||
| ON | 40 | |||||||
| ON | ON | ON | ON | 50 | ||||
| ON | ON | ON | 60 | |||||
| ON | ON | ON | ON | ON | 85 | |||
| ON | PN | ON | 100 | |||||
| ON | ON | ON | 120 | |||||
| ON | 150 | |||||||
| ON | ON | 210 | ||||||
| ON | 300 | |||||||
| ON | 500 | |||||||
| ON | 750 | |||||||
| ON | 1000 | |||||||
| 1600 |
PS3 PHONO STAGE MODULE - OPTIONAL
FEATURES
- True Dual Mono Class A topology with no global negative feedback.
- Discrete build balanced topology.
- Designed to fully exploit the inherently balanced nature of the phono cartridge.
- MC load impedance can be set externally with rear panel switches.
- Changeable MM/MC setting via Gryphon HELIOS menu.
- Polypropylene capacitors used in RIAA correction stages.
- Matched Low Noise High Speed transistors in differential stages.
• DC-coupled topology from input to output
• Gold plated Neutrik XLR balanced input sockets. - Ultra-short signal path with minimal internal/external wiring.
- Low noise +/- 23VDC regulated voltage supplies for excellent analog THD and noise suppression.
- Four-layer printed circuit board with 70µm copper traces.
- Totally electrical and mechanical separated left and right channels for optimal channel separation.
- Designed and built in Denmark.
SPECIFICATIONS
- Gain: MC: 64dB
MM: 42dB
- Impedance settings: MC: 20Ω to 1600Ω ref. to table.
MM: 47KΩ // 220pF
- Signal to Noise ratio: MC: (Input 2.5 mV, 1 kHz): >72 dB
MM: (Input 100 mV, 1 kHz): >84 dB
• Maximum input voltage: MC: Input 7mV,
MM: input 100mV
- Net weight: 1.15kg – 2.5lb
Note: Specifications can be changed without notice.
WARNING
Exceeding the maximum input voltage can lead to damage of the PS3 module


S/N:574-001
CE

THE GRYPHON

THE
GRYPHON DAC 3 DUAL MONO CLASS A


DAC3 MODULE - OPTIONAL
The DAC3 is the perfect match for the new Gryphon Helios Preamplifier, adding five high performance digital inputs to the Gryphon Helios's existing five analog inputs and optional phonostage input. Based on the newest ESS Technology Sabre flagship digital-to-analog converter, ES9039PROit is capable of extracting every musical detail for ultimate realism. The ES9039PRO has seven built-in pre-programmed digital filters which allows discerning users to tune the sound to their own personal taste. Multiple local Ultra-low noise voltage supply stages together with discrete analog circuitry driven in full Class A, ensures the best possible sound performance. With the DAC3 module built in, the Gryphon Helios displays the chosen digital input Sampling frequency, PCM/DSD format and chosen digital filter setting. The DAC3 is an updated version of our renowned DAC 300 module, offering an extended range of digital filter settings and next-level performance. The DAC3 module can be optionally added to the Gryphon Helios at any time, separate or together with the PS3 Phono Stage module
DAC3 INSTALLATION
Installation MUST be performed by authorized dealers or technicians only. Unauthorized installation might void warranty.
SAFETY INSTRUCTIONS
Hazardous live AC power! Please find important safety instructions on p. 45
BURN-IN & WARM-UP
Your Gryphon unit has been thoroughly tested and burned-in before shipping; however, performance will continue to improve during the first 40 – 50 hours of normal use. After this period, optimum performance will be reached approximately 45 minutes after turn-on.
DAC3 MODULE - OPTIONAL

SELECTING DIGITAL INPUTS:
Use the designated buttons on the remote control – or touch the display area to enter "Operation View" mode. When in "Operation View" mode, touch the ANALOG/DIGITAL button to toggle between Analog- and Digital Inputs.


DAC3 INPUT SELECTION AND DISPLAY INFORMATION:
Use the touch buttons to select the desired input: USB, AES/EBU, S/PDIF 1, S/PDIF 2, or TOSLINK. The default names can be renamed in the NAME INPUT sub-menu.
The center section of the display provides information about the actual chosen digital input. The information shown depends on input choice and digital format:
FS:
Actual sample frequency of source material.
PCM Digital filter:
Setting for PCM format only.
DSD ANALOG LP ON/OFF:
Analog Low Pass filter state for DSD format only.
GAIN:
0dB or -6dB output level of the DAC3 module.
Padlock symbol:
DAC3 locked/unlocked to input signal.
Battery charging / battery full symbol:
USB Super-Cap supply charging / fully charged.
DAC3 MODULE - OPTIONAL

DAC3 SETTINGS:
The PCM FILTER, DSD LP filter and 0/-6dB gain settings can be changed by the HELIOS remote control on the fly. When the display is in "Simple View" mode, the selected setting will show in large text on the display for 5 seconds. (PCM Filter / DSD LP Filter can be changed only when playing respectively PCM or DSD format). See DAC PCM FILTER example to the left.

Select DAC SETTINGS sub-menu: to set the DAC3 settings without the HELIOS remote control.

PCM FILTER setting:
1: "MINIMUM PHASE"
2: "LINEAR PHASE APODIZING"
3: "LINEAR PHASE FAST ROLL-OFF"
4: "LINEAR PHASE SLOW ROLL-OFF" (default)
5: "MINIMUM PHASE FAST ROLL-OFF"
6: "MINIMUM PHASE SLOW ROLL-OFF"
7: "MINIMUM PHASE SLOW ROLL-OFF LOW DISPERSION"
DSD ANALOG LOW PASS FILTER setting: ON or OFF (default)
The DSD ANALOG LP filter, when set to ON, is active only when playing back DSD format.
GAIN setting: DAC output level (for all five digital inputs) 0dB (default) or -6dB.
DAC3 MODULE - OPTIONAL

USB: Connect to preferred Streamer, PC or MAC.
Accepted USB formats and Sample Frequency:
PCM (Pulse Code Modulated): FS up to and inclusive 384 kHz.
DSD (Direct-Stream Digital): FS up to and inclusive DSD512.
No drivers needed for MAC and Linux with UAC2 compliant kernel.
DAC3 kernel/ASIO combined driver installation file can be downloaded at www.gryphon-audio.com.
AES/EBU: Connect a digital source with balanced 110Ω output to this XLR input.
S/PDIF 1-2: Connect digital sources with single-ended 75Ω output to these BNC inputs.
TOSLINK: Connect a digital source with optical 2 channel output to this input.
DAC3 MODULE - OPTIONAL
FEATURES
• True Dual Mono discrete build Class A Analog configuration.
• Zero global negative feedback.
• Sabre High-Performance ES9039PRO D/A converter.
• USB input compatible with following audio formats via PC/MAC/Linux: PCM: 44.1, 48, 88.2, 96, 176.4, 192, 352.8 and 384 kHz, up to 32 bits. DSD via USB: DSD64, DSD128, DSD256 and DSD512.
- AES/EBU and S/PDIF inputs compatible with PCM: 22.05, 24, 32, 44.1, 48, 64, 88.2, 96, 176.4 and 192 kHz, up to 32 bits.
• TOSLINK input compatible with PCM: 22.05, 24, 32, 44.1, 48, 64, 88.2, 96 kHz, up to 24 bits.
• Seven user-selectable PCM digital roll-off filters.
• Temperature-compensated, ultra-low jitter crystal oscillator with better than 5 parts per million accuracy.
• Super-Capacitor (12.5 Farad!) power supply for USB module - acts like a true battery supply.
• First-order PCM analog filters and second-order DSD analog filters with Polypropylene capacitors.
- Analog output stages with ultra-low noise +/- 22VDC regulated voltage supplies for best analog THD and noise suppression.
• Multiple Local Voltage regulators for best digital noise suppression.
• Separate left/right channel ultra-low noise power supply for analog section of ES9039PRO DAC.
• Ultra-short signal path.
• Minimal internal wiring.
• Six-layer printed circuit boards.
• PCB-mounted input sockets eliminate wiring and shorten signal path.
• Gold-plated Neutrik XLR socket for one balanced 110Ω AES source.
• Gold-plated 75Ω BNC sockets with Teflon insulation for 2 S/PDIF sources.
• One TOSLINK optical fiber input.
• Designed and built in Denmark.
Note: Features and specifications can be changed without notice.
WARRANTY & SUPPORT
The Gryphon Helios Preamplifier is warranted against failures arising through faulty workmanship and materials for a period of 5 years from date of purchase. The warranty is not transferable.
This warranty is only valid in the country where the product was purchased.
All claims under this warranty must be made to the distributor in the buyers' country by returning the unit securely packed in the original box with all accessories, postage/freight prepaid and insured. The unit will be repaired or replaced at no charge for parts and labor.
This warranty will be void if the serial number of the unit has been defaced or removed.
No user serviceable parts inside. This warranty will be void if the unit has been repaired or modified by non-authorized Gryphon dealers or distributors. Optional modules must be installed by authorized dealers and distributors only.
This warranty does not cover damage due to misuse, accident or neglect.
This warranty is not valid if the operation voltage of the product has been changed.
The distributor or manufacturer, Gryphon Audio Designs, Denmark, retains the exclusive right to make such judgement on the basis of inspection.
The retailer, distributor or manufacturer of the Gryphon shall not be liable for consequential damage arising from the use, misuse or failure of this product, including injuries to persons or property.
Please do not directly contact Gryphon for repair, warranty issues or technical questions. Our local representatives are competent and happy to help you.
To qualify for this warranty; you must register your purchase online at gryphon-audio.com
| Gryphon Model: | |
| Serial Number: | |
| Date of Purchase | |
| Dealer: | |
| Country: |
IMPORTANT SAFETY INSTRUCTIONS
Read these instructions.
Keep these instructions.
Heed all warnings.
Follow all instructions.
Do not use this apparatus near water.
Clean only with dry cloth.
Do not block any ventilation openings.
Install in accordance with the manufacturer's instructions.
Do not install near any heat sources such as radiators, heat registers, stoves, or other apparatus (including amplifiers) that produce heat.
Do not defeat the safety purpose of the polarized or grounding-type plug.
US power plugs (NEMA5-15) only: A polarized plug has two blades with one wider than the other. A grounding type plug has two blades and a third grounding prong. The wide blade or the third prong is provided for your safety. If the provided plug does not fit into your outlet, consult an electrician for replacement of the obsolete outlet.
Protect the power cord from being walked on or pinched particularly at plugs, convenience receptacles, and the point where they exit from the apparatus.
Only use attachments/accessories specified by the manufacturer.
Unplug this apparatus during lightning storms or when unused for long periods of time.
Refer all servicing to qualified service personnel. Servicing is required when the apparatus has been damaged in any way, liquid has been spilled or objects have fallen into the apparatus, the apparatus has been exposed to rain or moisture, does not operate normally, or has been dropped
Do not open the equipment to reduce the risk of electrical shock. Refer all disassembling to qualified service personnel.
WARNING: To reduce the risk of fire or electric shock, this apparatus should not be exposed to rain or moisture and objects filled with liquids, such as vases, should not be placed on this apparatus.
To completely disconnect this equipment from the mains, disconnect the power supply cord plugs from the receptacle. The mains plug of the power supply cords shall remain readily operable.
No naked flame sources, such as lighted candles, should be placed on the apparatus.


This symbol alerts you to the presence of uninsulated dangerous voltage within the product's enclosure that might be of sufficient magnitude to constitute a risk of electric shock. Do not open the product's case.

This symbol informs you that important operating and maintenance instructions are included in the literature accompanying this product.
WARNING Chemical Burn Hazard
If the coin/button cell battery is swallowed, it can cause severe internal burns in just 2 hours and can lead to death.
If you think batteries might have been swallowed or placed inside any part of the body, seek immediate medical attention.
WARNING Danger of Explosion
Danger of explosion if battery is incorrectly replaced Replace only with the same or equivalent type.
GRYPHON AUDIO DESIGNS 1985 ONWARDS



- THE
- GRYPHON
- HELIOS
- VOLUME
- INPUT
- ETHOS
- TABLE OF CONTENT
- INTRODUCTION
- HERITAGE
- THE GRYPHON HELIOS
- PLACEMENT
- AC VOLTAGE
- CARE & MAINTENANCE
- CHOICE OF CABLES
- SETUP
- INSTALLATION
- MAIN SWITCH
- SAFETY INSTRUCTIONS
- BURN-IN & WARM-UP
- USER INSTRUCTIONS
- MUTE
- INPUT SELECT
- MENU
- MAIN MENU
- START VOLUME
- BALANCE
- DISPLAY
- SIMPLE VIEW ON / OFF
- IR SOURCE
- INPUT LEVEL MATCH
- NAME INPUT
- AV INPUT
- GREEN BIAS
- RESTORE SETTINGS
- REAR PANEL, THE HELIOS PREAMPLIFIER
- INPUT 1 - INPUT
- INPUT 4 - INPUT
- OUTPUT 1 - OUTPUT
- OUTPUT
- BALANCED CONNECTIONS
- V LINK IN
- V LINK OUT
- ANALOG PSU AND DIGITAL PSU
- GROUND
- USB
- REAR PANEL, THE PSU
- ANALOG PSU 1 LEFT AND RIGHT
- ANALOG PSU 2 LEFT AND RIGHT
- CONTROL INTERFACE
- MAINS INPUT SOCKETS
- AC FUSE HOLDERS AND FUSE VALUES
- REMOTE CONTROL
- ON/STB
- VOLUME UP AND DOWN
- INPUT UP AND DOWN
- INPUT 1 - 5 AND PHONO
- DAC3 MODULE, DIRECT INPUT SELECTION
- DAC3 MODULE REMOTE FUNCTIONS
- REMOTE CODES & BATTERY
- FEATURES
- SPECIFICATIONS
- MENU-CONTROLLED FUNCTIONS
- DIMENSIONS, THE HELIOS PREAMPLIFIER
- DIMENSIONS, THE PSU
- ERROR INDICATION & HANDLING
- LEFT SIDE AC POWER MISSING
- AC VOLTAGE MISMATCH
- PHONO STAGE 3 BALANCED DUAL MONO MM/MC PHONOSTAGE
- PS3 PHONO STAGE MODULE - OPTIONAL
- PS3 INSTALLATION
- SET-UP MENU
- INPUT LEFT - INPUT RIGHT
- WARNING
- DAC3 MODULE - OPTIONAL
- DAC3 INSTALLATION
- SELECTING DIGITAL INPUTS
- DAC3 INPUT SELECTION AND DISPLAY INFORMATION
- DAC3 SETTINGS
- PCM FILTER SETTING
- WARRANTY & SUPPORT
- IMPORTANT SAFETY INSTRUCTIONS
- WARNING CHEMICAL BURN HAZARD
- WARNING DANGER OF EXPLOSION
- GRYPHON AUDIO DESIGNS 1985 ONWARDS
Brand : Gryphon Audio
Model : HELIOS
Category : Television