8804 Dual EQ - Audio Mixer AMS Neve - Free user manual and instructions
Find the device manual for free 8804 Dual EQ AMS Neve in PDF.


| Product Type | Fader pack for the 8816 Summing Mixer |
| Brand | AMS Neve |
| Model | 8804 Dual EQ |
| Dimensions (W x H x D) | 48.2 cm x 17.6 cm x 3.2 cm (19" x 3U x 1.5") |
| Weight | 2.1 kg |
| Power Source | Powered via USB connection from a computer or powered hub |
| Number of Channels | 16 |
| Channel Fader Gain Range | -∞ to +15 dB |
| Master Fader Gain Range | -∞ to 0 dB |
| Frequency Response | ±0.2 dB from 10 Hz to 20 kHz; ±0.5 dB from 10 Hz to 40 kHz |
| Distortion | Less than 0.005% (20 Hz to 20 kHz) at fader 0 dB |
| Noise | Less than -90 dB (20 Hz to 20 kHz) at fader 0 dB |
| Direct Outputs | Balanced, on a 50-way D-type or two 25-way D-type connectors |
| Connectivity | USB, 50-way Fader I/O to 8816, Direct Outputs |
| Functions | Fader level control, Direct Outputs, Mute and Solo control, Auxiliary send with 8816 |
| Auxiliary Send | Pre-fade send level control from 8816 rotary controls |
| Recall Software Support | Windows 2000/XP/Vista, Mac OS 10.3.9 or later |
| USB Requirements | Direct USB or powered hub, not passive hub |
| Mounting Options | 19-inch rack mount, tabletop (tilt bar), custom furniture |
| Included Accessories | CD with software and manuals, 50-pin audio cable, USB cable, ribbon cable |
| Safety | Read and follow all safety instructions in the manual |
| Cleaning | Clean only with a dry cloth |
| Spare Parts and Repairability | Refer servicing to qualified personnel; contact AMS Neve support for spare parts |
Frequently Asked Questions - 8804 Dual EQ AMS Neve
User questions about 8804 Dual EQ AMS Neve
0 question about this device. Answer the ones you know or ask your own.
Ask a new question about this device
Download the instructions for your Audio Mixer in PDF format for free! Find your manual 8804 Dual EQ - AMS Neve and take your electronic device back in hand. On this page are published all the documents necessary for the use of your device. 8804 Dual EQ by AMS Neve.
USER MANUAL 8804 Dual EQ AMS Neve
Neve 8804
Fader Pack
User Manual
527 - 369
Issue 2.7

The 8804 fader pack is a complimentary product for the 8816 Summing Mixer. It provides fader level control and Direct Outputs control from each channel, plus Mute and Solo function.
For your own safety and for the protection of others, please observe the following safety instructions:
- Read these instructions.
• Heed all safety warnings. - Do not use near water.
- Clean only with a dry cloth.
- Do not install near heat sources.
- Do not block ventilation openings.
- Protect the power cord.
- Only use accessories specified by the manufacturer.
• Unplug when unused for long periods of time.
• Refer all servicing to qualified personnel only.
AMS NEVE
Billington Road
Burnley
Lancs
BB11 5UB
England
Phone +44 (0)1282 457011
Fax: +44 (0)1282 417282
Email: info@ams-neve.com
Web: www.ams-neve.com
Support: http://www.ams-neve.info/crm/fault_report.html
© 2007-2010 AMS Neve Ltd own the copyright of all information and drawings contained in this manual which are not to be copied or reproduced by any means or disclosed in part or whole to any third party without written permission.
As part of our policy of continual product improvement, we reserve the right to alter specifications without notice but with due regard to all current legislation.
Disclaimer: The information in this manual has been carefully checked and is believed to be accurate at the time of publication. However, no responsibility is taken by us for inaccuracies, errors or omissions nor any liability assumed for any loss or damage resulting either directly or indirectly from use of the information contained within it.
Trademarks: All trademarks are the property of their respective owners and are hereby acknowledged.
Table of Contents
Health & Safety Notice......2
Customer Service....3
Overview......4
System Requirements......4
Getting Started....5
The 8804 Unit....6
Rear Connections....6
USB Port......6
Direct Outputs....6
Fader I/O....7
Unpacking....7
Mounting....7
Operation......8
Channel Faders....8
Master Faders....8
Cut/Solo Channel Switches......8
Cut/Solo Master Switch....9
Direct Outputs....9
Auxiliary Send....9
Recall....9
Setting Up....9
Master / Slave settings....10
Recall Software Installation....11
Installation for PC....11
Installation for Mac....13
New Versions of Recall Software for Mac.....13
Firmware Upgrades....14
Selecting a File for Transfer....14
File Downloading....15
Corrupted or Old Firmware....15
Pin outs....16
Direct Outputs - 50 way connector.....16
Direct Outputs - 2 x 25 way......17
Audio link between 8804 & 8816......18
Unit Specifications....19

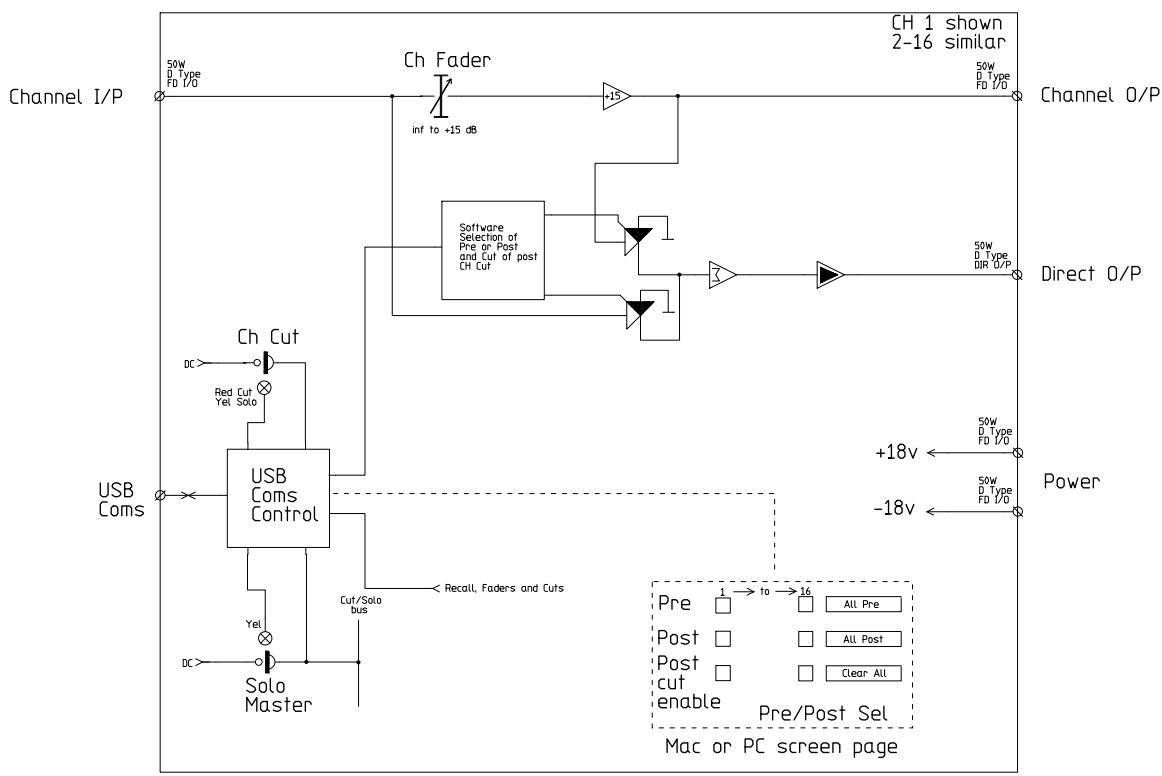
A3 Circuit Block Diagrams
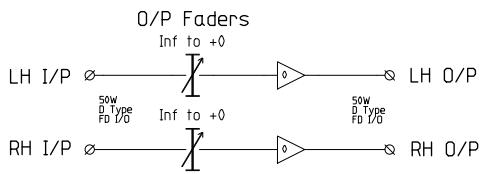
8804
Optional control with 8816 Summing Mixer
Customer Service
In the unlikely even that this unit should malfunction or develop a fault, then please register the fault details on our website, by clicking the link below.
You will also need to enter the unit's serial number when you do this, so please have this to hand.
http://www.ams-neve.info/crm/fault_report.html
Once the fault details have been registered, one of our technical support team will be in touch via email.
This link should also be used for further operational or technical help, or any general enquiry about the unit.
The 8804 fader pack is a complementary product for the 8816 Summing Mixer (please see the separate 8816 User Manual).

When adding an 8804 to an 8816 that was previously used in standalone mode, it will be necessary to change jumper settings within the 8816. Please refer to the 8816 User Manual on how to do this.
8816 units shipped with an 8804 fader pack will be ready for use with the 8804.
On older 8816 models it may also be necessary to update the firmware, please refer to page 14 on how to do this. If in doubt please consult your local Neve Dealer.
8804 provides fader level control, direct outputs from each channel, mute and solo control.
With an 8804 attached, the level control on the 8816 is re-assigned as an Auxiliary Pre-fade Send.
Settings on the 8804 may be stored and recalled using the same Recall software as the 8816 and other members of the Neve 88 Outboard series.
System Requirements
The 8804 may be used as a standalone unit.
If you wish to use the units Recall facility, it should be connected directly to the computer or via a powered USB hub but not via a passive USB hub.
If you wish to use the Neve Recall software to store and reload user configurations you must have one of the following supported operating systems:
PC:
• Windows 2000, Service Pack 4 or later
• Windows XP, Service Pack 3 or later
• Vista, Service Pack 1 or later
Mac:
• Mac OS 10.3.9 or later
Getting Started
▶ Install the Recall software provided on to your PC or Mac and then start it running.
Please refer to page 11 on how to do this.
▶ Connect the 8804 USB port to a PC (or Mac) using a USB cable.
It should be connected directly to the computer or via a powered USB hub but not via a passive USB hub.
The 8804 has no power supply, and takes it's power from the computer via USB.
▶ Connect the 50 pin Fader I/O socket on the rear of the 8804 to the 50 pin socket on the rear of the 8816 using the cable provided.
▶ Connect the associated 8816 to the same PC (or Mac) using a USB cable.
If the Recall software has been started, the 8804 fader pack will now control the level of signals on the 8816 channel inputs and master outputs.
Mutes and Solos may be controlled from either the 8804 or the 8816 Mute / Solo switches.
The Mute and Solo buttons will not synchronise between the two units until both units are connected to the PC (or Mac) via USB and the Recall software is running.
Rear Connections
The rear of the 8804 has connections for:
- USB
• Audio connection to the 8816 (Fader I/O) - Direct Outputs
Depending on the age of the unit, the Direct Outputs will either be on a 50-way connector as shown here...

.....or on 2 x 25-way D-type connectors, each handling 8 audio paths:

USB Port
The USB port should be connected to either a PC or a Mac.
During normal operation the USB provides communication between the 8804 unit and the associated 8816 unit (sending Cut and Solo commands from one to the other), plus providing power to the 8804.
For this reason, when connecting the unit to a PC (or Mac), it must either be connected directly to an available USB port, or via a powered hub not via a passive hub.
It also provides a link to the PC or Mac for the saving and restoring of 8804 settings.
Please see the separate Recall manual.
Direct Outputs
Depending on the age of the unit, these will either be available on a single 50-way connector, or on two x 25-way D-type connectors. We do not include cables for the Direct Output connections.
The Direct Outputs are balanced.
Please refer to page 16 for connector pin-out information.
Fader I/O
This 50-way D-type connector is the analogue audio link between the 8816 and the 8804.
This cable is provided with the 8804.
▶ Connect one end to the 8804, connect the other end to the 50 way D-type socket on the associated 8816 unit.
Please refer to page 18 for connector pin-out information should you need it.
Unpacking
The 8804 is shipped in a purpose made protective box.
Beneath the 8804 unit is a polystyrene floor, underneath this floor should be:
• a CD containing software and manuals
• a 50 pin audio cable
- a USB cable
- a ribbon cable for installation inside an 8816 unit.
Mounting
The 8804 can be rack mounted, used on a table top or mounted in custom furniture:
▶ To mount in a standard 19 inch rack the securing screws should be placed through the mounting holes using plastic washers to avoid scratching the unit surface.
▶ For table top use, the tilt bar on the rear of the unit should be extended, supporting the unit at a convenient working angle.
▶ The 8804 may be placed in custom studio furniture using the lip of the unit for support.
Channel Faders

Sixteen 100mm channel faders on the 8804 surface control the levels on channels 1 - 16 with a gain range from -∞dB to +15dB.
Having 15dB gain in hand is a useful creative tool, particularly when riding levels in the mix.
Care should be taken not to overload the workstation or other recording device by using too much boost across multiple channels simultaneously.
With the 8804 fader pack attached, the 8816 rotary pots are taken out of the main circuit and retasked as an auxiliary send level control.
These auxes will always be pre-fader, and cannot be changed to post-fader, and in this situation, the 8816 Master Level pot is no longer used.
Master Faders
Two master faders control the Mix Left and Mix Right output levels with a gain range from -∞ dB to 0dB.
With both faders at the top of their range the mix gain is unity.
Cut/Solo Channel Switches
Cut/Solo buttons above each channel activate the Mute relays in the 8816 via the USB connection.
The switches on the 8816 or on the 8804 may both be used, each will illuminate to reflect changes made from the other.
• In Cut mode each button mutes the associated channel.
• In Solo mode each button solos the associated channel.
The solo type is Solo In Place, where all non-soloed channels are muted.
Cut/Solo Master Switch

The Cut/Solo switch on the upper right of the 8804 sets the mode of the Cut/Solo channel switches.
- When the Master switch is illuminated yellow the channel buttons are in Solo mode.
- When the switch is unlit all channel switches are in Mute mode (left).
Direct Outputs

The 8804 provides balanced Direct Outputs from each of the 16 channels. These can be used for recording or as sends to effects units and processors.
The Direct Outputs can be set Pre- or Post- faders within the Recall software.
If a channel Direct Output is set to post-fader, the user can select whether this Direct Output will be muted by the Cut/Solo switch.
Please see the separate Recall Manual for how to set up the Direct Outputs as Pre- or Post- Fader.
The Direct Output balanced circuits will be on either on a 50 pin D-type connector, or on two 25-way D-type connectors on the rear of the 8804.
Please refer to page 16 for Direct Output wiring pin outs.
Auxiliary Send

With the levels controlled from the 8804 faders, the rotary level control on the 8816 is available to use as an auxiliary pre-fade send level control.
The output appears on Circuit 4 of Connector 3 on the 8816.
Please see the 8816 User Manual for details of this connector.
Recall

Setting Up
▶ Connect the 8804 and 8816 units to the PC (or Mac) via USB cables.
▶ Ensure that both of the 8804 and 8816 units have been set to the same state, [M (Master) or S (Slave)], using the Recall Setting switch on the back of each unit.
▶ With the 8816 unit and 8804 connected to the PC (or Mac), start the Neve Recall software.
The Cut/Solo switches are automatically synchronised between the two units, therefore both units reflect the same Cut or Solo state as each other.
NB:
No more than two 8804 units can be connected at any time to a PC (or Mac) and Recalled or synchronised with their respective 8816 units.
In the default set-up mode the 8816 becomes the control unit for mutes during Recall, this can be switched to the 8804.
Please see the Recall manual for more information.

Set to SLAVE
Master / Slave settings
It is possible to have a maximum of two 8816 units and two optional 8804 fader packs connected via USB to the Recall software.
▶ If you only have one 8816 and one 8804 fader pack connected, both units must be set to SLAVE so the Recall software will operate correctly, as shown left.

▶ If you have two 8816s and two 8804 fader packs, then one 8816 and 8804 must be set to MASTER, and the other 8816 and 8804 must be set to SLAVE.
In this diagram, the 8816 on the left is the master in terms of audio, with the unit on the right feeding submix signals into it.
Installation for PC

Insert the CD into the drive and the Setup program should automatically launch.
If the application fails to launch automatically on inserting the CD, then go to the CD Drive in Windows Explorer and double-click the NeveRecall.msi file or the setup.exe file to launch the Setup program manually.
▶ Click Next.

▶ Click I Agree, then click Next.
If you click I Do Not Agree, the install procedure will terminate.

The installation programme will select a default location for files to be copied and created to.
▶ Click Next to keep the default location, or click Browse to select another location.

▶ Click Next.
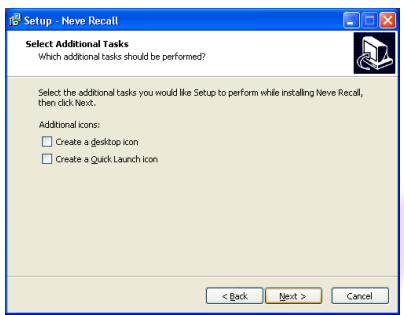
▶ Tick as desired then click Next.

▶ Click Install.
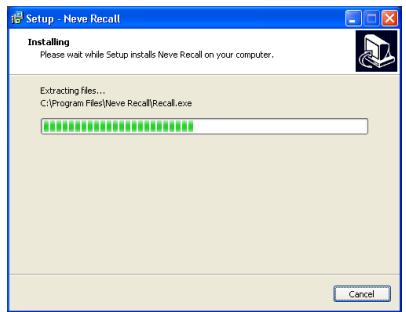
The install will start and the progress displayed.

If you wish to launch Recall, tick the Launch Neve Recall box.
▶ Click Finish.
The software will now be ready to use, and will be accessible from Start Menu / Programs / Neve Recall / Neve Recall, or from the Recall icon on the Windows Desktop.
Installation for Mac

Insert the CD containing the software into the Mac, and the install programme will launch automatically.
▶ Click Continue.

Select the location where you wish the software to be installed to.
▶ Click Continue.
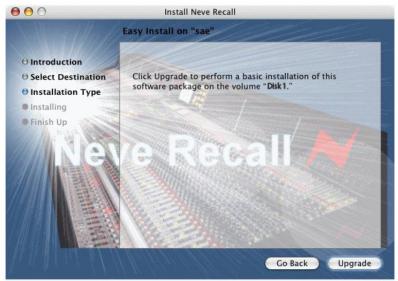
▶ Click Upgrade, and the software will start to install.

The progress bar will show the state of the installation.
▶ Once completed, click Close.
The software is now ready to use.
New Versions of Recall Software for Mac
Where you wish to install a new version of the Recall software on a Mac, you will need to uninstall the previous version first and remove some files:
From the Applications folder, move the Neve Recall folder to the Trash;
From the //System Library/Extensions folder, move Neve8816.kext to the Trash (move this file, regardless of the actual outboard units you may have connected via USB)
From the //Library/Receipts folder, move Neve Recall.pkg to the Trash.
You will now be able to install the new version.
Firmware Upgrades
In order to get the most from your Neve unit, the latest firmware should be installed.

Upgrading your software is a simple process with on screens prompts to guide you.
▶ Start the Recall software.
On the main screen, right-click the window title bar (Mac users select Recalls)
▶ Click Upgrade Firmware.
▶ Select the file to transfer.

You will be prompted about removing other units.

When updating units, only the unit that is being updated should be connected via USB. All other units should have their USB disconnected.
Even if you are updating two units of the same model, they should be connected individually and updated in two separate operations. If more than one unit is connected via USB when the Update is about to be performed, a screen will prompt you to disconnect the other units.

A prompt screen will confirm the software number & version you should select, and display the current version of firmware for the unit.
▶ Click OK.
Selecting a File for Transfer

The Open File dialog will appear.
To locate the firmware file, browse to the location:
• PC users: C:\Program Files\Neve Recall\Firmware
• Mac users: Applications\Neve Recall\Firmware
The file names follow the format down_88XY_V.hex where XY are the last two digits of the 88 unit name (e.g. '16' for 8816) and V is the software version number.
A typical filename could be down_8804_3.hex.
▶ Double click on the latest filename which matches your unit.
If an incorrect file is selected the user will be prompted to select another file.
File Downloading

Once the file is selected, the transfer will begin and the Recall screen will display that the download is under way.
This process may take up to two minutes for each unit.
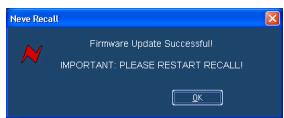
Upon completion, the message Firmware Update Successful will be displayed.
▶ Click OK to continue.
You can continue to update other units successfully without restarting Recall, but the Recall software must be restarted once this process is finished.

If the transfer fails (for example if the USB is removed by accident or power is lost to the unit), a warning message will prompt to the user to try again.
If Recall is started with a unit that has no firmware, the user will be prompted to upgrade the firmware, as the unit cannot be used in Recall unless the firmware installation is successful.
Corrupted or Old Firmware
If the firmware is corrupted or the unit has an old version of firmware, a prompt will appear upon starting the Recall software to indicate that firmware must be updated before the user can proceed.
The process described above can then be followed to update the latest firmware.
The Direct Outputs will either be available on a single 50-way connector (earlier model), or on two x 25-way connectors (later model), depending on when your unit was manufactured.
Direct Outputs - 50 way connector
| 50 | 33 | 17 |
| 49 | 32 | 16 |
| 48 | 31 | 15 |
| 47 | 30 | 14 |
| 46 | 29 | 13 |
| 45 | 28 | 12 |
| 44 | 27 | 11 |
| 43 | 26 | 10 |
| 42 | 25 | 9 |
| 41 | 24 | 8 |
| 40 | 23 | 7 |
| 39 | 22 | 6 |
| 38 | 21 | 5 |
| 37 | 20 | 4 |
| 36 | 19 | 3 |
| 35 | 18 | 2 |
| 34 | 1 |
| Pin Number / Cable | |
| 1 Channel 1 Hot | 26 Channel 9 Shield |
| 2 Channel 2 Hot | 27 Channel 10 Shield |
| 3 Channel 3 Hot | 28 Channel 11 Shield |
| 4 Channel 4 Hot | 29 Channel 12 Shield |
| 5 Channel 5 Hot | 30 Channel 13 Shield |
| 6 Channel 6 Hot | 31 Channel 14 Shield |
| 7 Channel 7 Hot | 32 Channel 15 Shield |
| 8 Channel 8 Hot | 33 Channel 16 Shield |
| 9 Channel 9 Hot | 34 Channel 1 Cold |
| 10 Channel 10 Hot | 35 Channel 2 Cold |
| 11 Channel 11 Hot | 36 Channel 3 Cold |
| 12 Channel 12 Hot | 37 Channel 4 Cold |
| 13 Channel 13 Hot | 38 Channel 5 Cold |
| 14 Channel 14 Hot | 39 Channel 6 Cold |
| 15 Channel 16 Hot | 40 Channel 7 Cold |
| 16 Channel 16 Hot | 41 Channel 8 Cold |
| 17 - not used - | 42 Channel 9 Cold |
| 18 Channel 1 Shield | 43 Channel 10 Cold |
| 19 Channel 2 Shield | 44 Channel 11 Cold |
| 20 Channel 3 Shield | 45 Channel 12 Cold |
| 21 Channel 4 Shield | 46 Channel 13 Cold |
| 22 Channel 5 Shield | 47 Channel 14 Cold |
| 23 Channel 6 Shield | 48 Channel 15 Cold |
| 24 Channel 7 Shield | 49 Channel 16 Cold |
| 25 Channel 8 Shield | 50 - not used - |
The metal shell of the Connector should be connected to the 8804 chassis.
Direct Outputs - 2 x 25 way
On newer issues of the 8804 fader pack, this single 50-way D-connector has been replaced by two 25 way D-connectors.
Both of these connectors use standard Tascam wiring, so any cables that adhere to this convention can be used.

Looking at the fader pack from the rear, the connector on the right is for channels 1 - 8.
| Circuit | Channel | Pin | ||
| Hi | Lo | Screen | ||
| 1 | 1 | 24 | 12 | 25 |
| 2 | 2 | 10 | 23 | 11 |
| 3 | 3 | 21 | 9 | 22 |
| 4 | 4 | 7 | 20 | 8 |
| 5 | 5 | 18 | 6 | 19 |
| 6 | 6 | 4 | 17 | 5 |
| 7 | 7 | 15 | 3 | 16 |
| 8 | 8 | 1 | 14 | 2 |
The connector on the left is for channels 9 - 16.
| Circuit | Channel | Pin | ||
| Hi | Lo | Screen | ||
| 1 | 9 | 24 | 12 | 25 |
| 2 | 10 | 10 | 23 | 11 |
| 3 | 11 | 21 | 9 | 22 |
| 4 | 12 | 7 | 20 | 8 |
| 5 | 13 | 18 | 6 | 19 |
| 6 | 14 | 4 | 17 | 5 |
| 7 | 15 | 15 | 3 | 16 |
| 8 | 16 | 1 | 14 | 2 |
Audio link between 8804 & 8816
| 50 | 33 | 17 |
| 49 | 32 | 16 |
| 48 | 31 | 15 |
| 47 | 30 | 14 |
| 46 | 29 | 13 |
| 45 | 28 | 12 |
| 44 | 27 | 11 |
| 43 | 26 | 10 |
| 42 | 25 | 9 |
| 41 | 24 | 8 |
| 40 | 23 | 7 |
| 39 | 22 | 6 |
| 38 | 21 | 5 |
| 37 | 20 | 4 |
| 36 | 19 | 3 |
| 35 | 18 | 2 |
| 34 | 1 |
| Pin Number / Cable | |
| 1 Channel 1 In | 26 Channel 11 Out |
| 2 Channel 2 Out | 27 Channel 12 In |
| 3 Channel 3 Out | 28 Channel 13-14 Gnd |
| 4 Channel 4 In | 29 Channel 15 In |
| 5 Channel 5-6 Gnd | 30 Channel 16 Out |
| 6 Channel 7 In | 31 Mix Left Out |
| 7 Channel 8 Out | 32 Mix Right Out |
| 8 Channel 9 Out | 33 Direct Even Gnd |
| 9 Channel 10 In | 34 Channel 1 Out |
| 10 Channel 11-12 Gnd | 35 Channel 2 In |
| 11 Channel 13 In | 36 Channel 3-4 Gnd |
| 12 Channel 14 Out | 37 Channel 5 In |
| 13 Channel 15 Out | 38 Channel 6 Out |
| 14 Channel 16 In | 39 Channel 7 Out |
| 15 Mix Left Gnd | 40 Channel 8 In |
| 16 Mix Right Gnd | 41 Channel 9-10 Gnd |
| 17 +16v | 42 Channel 11 In |
| 18 Channel 1-2 Gnd | 43 Channel 12 Out |
| 19 Channel 3 In | 44 Channel 13 Out |
| 20 Channel 4 Out | 45 Channel 14 In |
| 21 Channel 5 Out | 46 Channel 15-16 Gnd |
| 22 Channel 6 In | 47 Mix Left In |
| 23 Channel 7-8 Gnd | 48 Mix Right In |
| 24 Channel 9 In | 49 Direct Odd Gnd |
| 25 Channel 10 Out | 50 -16v |
NB:
The metal shell of the connector should be connected to the 8804 chassis.
NB:
IN means an input to 8804
OUT means an output from the 8804
Unit Specifications
| 8804 Specifications | |
| Dimensions | Width 48.2 cm / 19" |
| Height 17.6 cm / 3U | |
| Depth 3.2 cm / 1 1/2 " | |
| Weight | 2.1 kg |
| Level | Channels 1-16 -∞ to +15dB |
| Mix L & R -∞ to +0dB | |
| Frequency Response | +/- 0.2dB: 10Hz to 20kHz |
| +/- 0.5dB: 10Hz to 40kHz | |
| Distortion | Measurement Window: 10Hz to 80kHz |
| Fader @ 0dB: Distortion <0.005% (20Hz to 20kHz) | |
| Noise | Measurement Window: 10Hz to 22kHz |
| Fader @ 0dB: Noise <90dB (20Hz to 20kHz) | |
| A | Issue | Drn. | RAP | TITLE 8804 | USED ON | EB20553 | |||
| 26/06/06 | Date | Traced | RAP | 16 Channel | Drg. No. | ||||
| C.N. No. | Checked | Fader pack | SHT. | 1 of 1 | |||||
| Checked | AMS NEVE Plc. 2006 19 © A1 | ||||||||


C
| INSTALLATION PROCEDURE | TOOL REQUIRED |
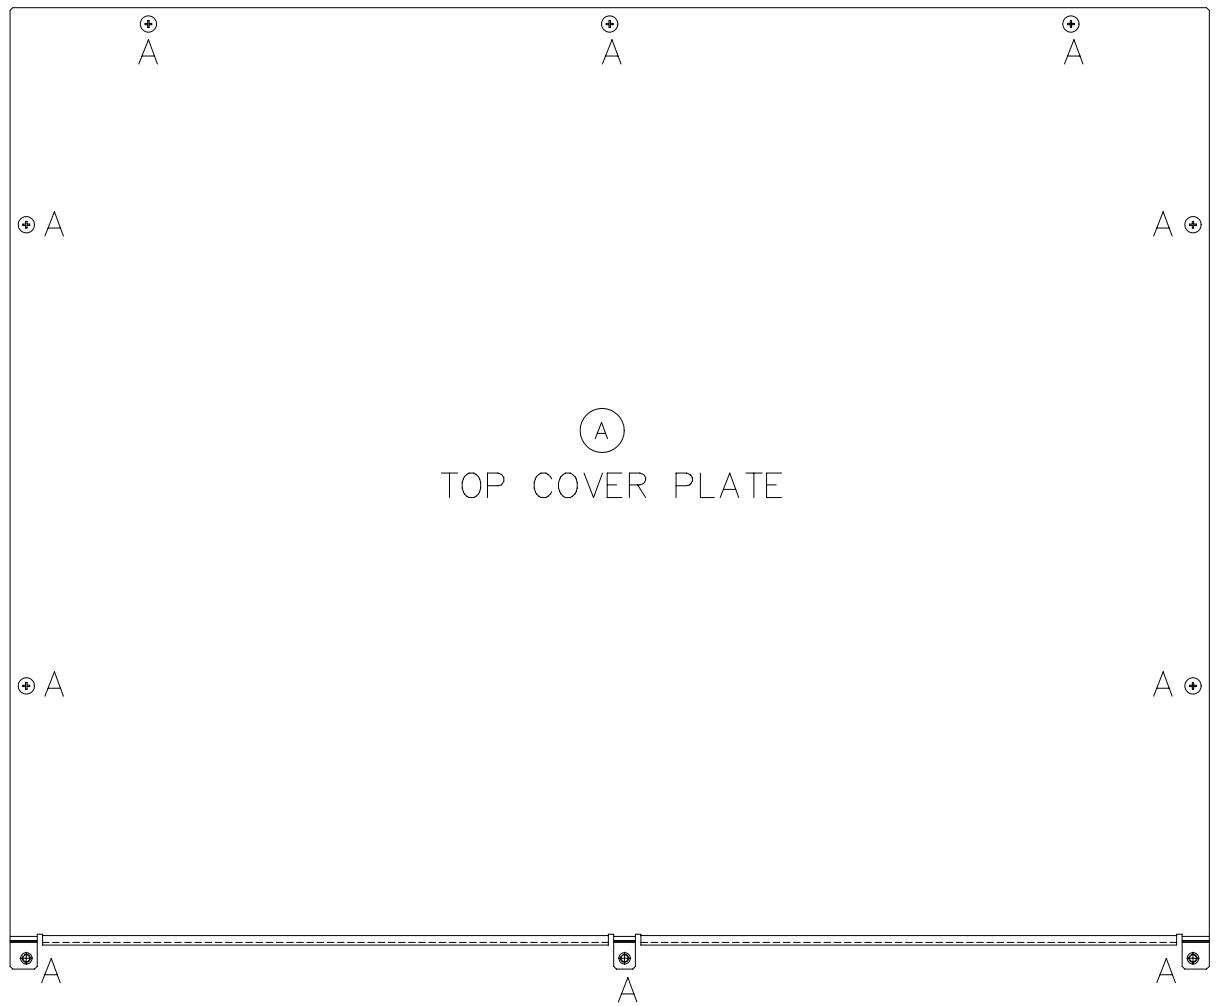
| A REMOVE 10off SCREWS (MARKED A) & TOP COVER PLATE FROM THE UNIT & KEEP SAFE TO RE-USE - SEE ITEME |  |
| B REMOVE EXISTING SCREWS, NUTS, WASHERS & COVER PLATE - DISCARD OR DRILL OUT EXISTING PILLARS FROM REAR USING 6mm DIA DRILL BEING CAREFUL NOT TO BREAK THROUGH THE CHASSIS WALL FULLY |   |
| C SWITCH EXISTING 19off JUMPERS FROM DEFAULT POSITION TO NEW POSITION AS SHOWN | |
| D FIT CABLE NN5415 TO CONNECTOR SHOWN ON MOTHERBOARD SMN812-369 & TO REAR PANEL WHERE SHOWN. SECURE USING 2off JACK POSTS SUPPL (MARKED D) DO NOT OVER TIGHTEN |  |
| E RE-FIT TOP COVER PLATE USING EXISTING 10off SCREWS FROM ITEM A |  |
| TOOLS YOU WILL NEED |
| POZI-DRIVE SCREWDRIVER |
| PLIERS |
| 6mm DIA DRILL |
| SMW | ---- | 17.5.06 | 1 |
| NAME | MOD. No. | DATE | ISS. |
| THIRD ANGLE PROJECTIONDRAWN TO B.S.308 | AMS NEVE PLC. owns the copyright to this drawing. It must not be copied in whole or in part, used for manufacture or otherwise disclosed without prior written consent of the company. © AMS NEVE PLC. | TITLE: AM5393 - MODS TO 8816 TO FIT 8804 FADER UNIT |  | |||||
| DRAWN | APP'D | DATE | AMS NEVE LTD. BILLINGTON ROAD, BURNLEY, LANCS. BB11 5UB. ENGLAND. TEL. (01282) 457011 FAX. (01282) 417282. | DRG No. | SHT | |||
| SCALE 1:1 | SMW | 17.5.06 | AM5393 | 3 | ||||



- NEVE
- FADER PACK
- USER MANUAL
- FOR YOUR OWN SAFETY AND FOR THE PROTECTION OF OTHERS, PLEASE OBSERVE THE FOLLOWING SAFETY INSTRUCTIONS
- TABLE OF CONTENTS
- HEALTH & SAFETY NOTICE
- OVERVIEW
- THE 8804 UNIT
- OPERATION
- RECALL SOFTWARE INSTALLATION
- FIRMWARE UPGRADES
- PIN OUTS
- A3 CIRCUIT BLOCK DIAGRAMS
- CUSTOMER SERVICE
- SYSTEM REQUIREMENTS
- PC
- MAC
- GETTING STARTED
- REAR CONNECTIONS
- USB PORT
- DIRECT OUTPUTS
- FADER I/O
- UNPACKING
- MOUNTING
- CHANNEL FADERS
- MASTER FADERS
- CUT/SOLO CHANNEL SWITCHES
- CUT/SOLO MASTER SWITCH
- AUXILIARY SEND
- RECALL
- SETTING UP
- MASTER / SLAVE SETTINGS
- INSTALLATION FOR PC
- INSTALLATION FOR MAC
- NEW VERSIONS OF RECALL SOFTWARE FOR MAC
- SELECTING A FILE FOR TRANSFER
- FILE DOWNLOADING
- CORRUPTED OR OLD FIRMWARE
- DIRECT OUTPUTS - 2 X 25 WAY
Brand : AMS Neve
Model : 8804 Dual EQ
Category : Audio Mixer