
TT MTM2 - Electric heating Heatstrip - Free user manual and instructions
Find the device manual for free TT MTM2 Heatstrip in PDF.
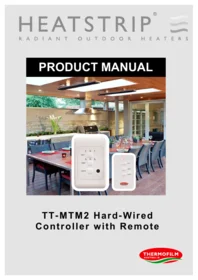


| Product Type | Hard-Wired Wall Controller |
| Brand | Heatstrip |
| Model | TT-MTM2 |
| Compatibility | Designed for HEATSTRIP electric heaters |
| Voltage Rating | 240 V |
| Maximum Current | 16 A |
| Dimensions (H x W x D) | 120 x 75 x 45 mm |
| Unit Weight | 0.3 kg |
| Power Settings | High, Medium, Low |
| Timer Modes | 1 hour, 2 hours, 4 hours, or continuous |
| Remote Control | Included, with CR2025 3V lithium battery |
| Remote Range | Over 8 meters in a straight line |
| Multiple Controller Pairing | Yes, all units operate on the same frequency |
| Thermal Cut-Out Protection | Yes, cuts power if controller overheats |
| Warm Up Mode | Runs on High for first 15 minutes regardless of setting |
| Installation Location | Indoor, away from wet conditions |
| Cleaning Method | Dust with dry cloth; avoid water and harsh cleaners |
| Battery Type (Remote) | CR2025 3V lithium battery |
| Default Setting on Power On | High power, permanently on (no timer) |
| Output Modulation | Timed on/off, not voltage modulation |
Frequently Asked Questions - TT MTM2 Heatstrip
User questions about TT MTM2 Heatstrip
0 question about this device. Answer the ones you know or ask your own.
Ask a new question about this device
Download the instructions for your Electric heating in PDF format for free! Find your manual TT MTM2 - Heatstrip and take your electronic device back in hand. On this page are published all the documents necessary for the use of your device. TT MTM2 by Heatstrip.
USER MANUAL TT MTM2 Heatstrip
PRODUCT MANUAL

TT-MTM2 Hard-Wired Controller with Remote
TT-MTM2 Hard-Wired Controller with Remote
Rev D JUN16
TT-MTM2 Wall Controller
This controller is a custom designed and manufactured controller for HEATSTRIP heaters. It has been designed for ease of use and to provide low running costs of your heater. It provides both temperature control (allowing the user to turn the heat output up or down depending on the ambient temperature and conditions) and a timer for automatic heater shut-off operation.
The timer function has four settings: 1 hour, 2 hours, 4 hours or constantly on. This feature is ideal for applications such as BBQ, alfresco areas, restaurant dining, assembly line production etc. when continuous heat is not required. The timer also reduces the likelihood of heaters being inadvertently left turned on.
Depending on the ambient temperature there may be a requirement to control the heat output of the heater. The controller has 3 settings, they are High, Medium and Low.
The controller allows a combination of the multiple timer (1/2/4 hour) and heat outputs (High/Medium/Low).
The controller comes with a remote control unit which provides convenient control of the heater power output and timer functions.
Controlling multiple heaters
It is possible to use one wall controller to control multiple heaters. The wall controller is rated at 16 Amps and 240 volts. For a larger current draw, talk to your electrician who can use a relay to connect more units.
Remote pairing
All units operate using the same remote control frequency, therefore, multiple wall controllers can be operated using a single remote control.
The remote will function at distances of over 8m when used in a straight line. This distance reduces when used at an angle.
Dimmers
The use of dimmers with the HEATSTRIP is NOT recommended.


| MODEL | MAXIMUM VOLTAGE (Volts) | MAXIMUM CURRENT (Amps) | DIMENSIONS (mm) | UNIT WEIGHT (kg) |
| TT-MTM2 | 240 | 16 | 120 (H) x 75 (W) x 45 (D) | 0.3 |
Operation
Press "ON/OFF" button to turn power on and off.
Once turned on, the controller will default to High power setting and will be permanently on (no timer function).
Press "POWER" button to select the desired power setting by cycling through: HIGH – MEDIUM – LOW.
When power setting is at high the controller will provide continuous power. When power setting is at “MEDIUM” or “LOW” the output alternates between being on and off so that it delivers a lower output to the heater.
Press “TIMER” button to set the timer to 1, 2, 4 hours or permanently on. When permanently on, none of the TIMER LED’s will be illuminated. Once the timer is selected, the timer will be started immediately. When the timer has ended, power will turn off and all LED’s will be also turn off.
All features can be accessed using either the wall controller buttons or the remote control unit.
Thermal Cut-Out Protection
This controller is protected by a thermal cut-out switch. This switch is activated when the temperature of the controller is too high. The controller will cut all power until it has sufficiently cooled. Once it cools the unit will continue working as usual.
Warm Up Mode
The controller is programmed to operate continuously (High setting) for the first 15 minutes of operation regardless of the selected power setting. This is to allow time for the heater to warm up. After this time it will operate as selected.
Safety
The TT-MTM2 controller is to be mounted indoors. It needs to be away from wet conditions.
Ensure the connections are properly connected.
The controller needs to be installed according to your local wiring guidelines and regulations.
Do not allow any cables, furnishings, flammable materials or other items to obstruct the vents of the controller.
Never block the air vents of the controller.
Do not put anything in the vents of the controller.
This appliance is not intended for use by persons (including children) with reduced physical, sensory or intellectual capabilities, or lack of experience and knowledge, unless they have been given supervision or instruction concerning use of the appliance by a person responsible for their safety. Children should be supervised to ensure they do not play with the appliance.
Maintenance
The TT-MTM2 Controller is made from durable materials, however regular care and maintenance of your controller will help prolong the life of the product.
It is recommended that you dust the controller to keep the surface clean. Cleaning at least every three months will reduce the amount of dust build up and keep it looking at its best.
Do not use any abrasive materials or products to clean the controller, this includes solvents, citrus based cleaners or other harsh cleaning products. Do not use water or a damp cloth to clean the controller.
The remote uses a CR2025 3V lithium battery. If the red light on the remote stops working then change the battery.
TT-MTM2 CONTROLLER INSTALLATION GUIDE
Controller Wiring Example

The TT-MTM2 controller requires sufficient air circulation in order to provide continuous operation on the high power load setting. The vents must remain clear at all times; never block or cover the vents.
An ideal controller installation will provide significant space around the back of the controller. Installing into restricted spaces, such as brick walls, may result in overheating if adequate ventilation is not provided.
Heater wiring schematic diagrams
It is recommended to install an ON/OFF isolation switch before the controller and ensure the unit is turned OFF after use.
Multiple heaters can be operated using a single controller, however the maximum current rating of 16A must not be exceeded. For direct wiring to the controller, the maximum is generally one heater unit unless the combined maximum current is less than 16A. For example, 2x THH1800A can be connected directly to the controller.
Below are example circuits indicating potential installation configurations.
Always check with your electrician and ensure all wiring is in accordance with local regulations.
For multiple units from one wall controller it is recommended to talk your electrician who will use a relay or contactor.

Heater wiring schematic diagram with relays
When more heating units need to be connected from the same controller a relay or contactor will be required. Below is an example circuit indicating one potential installation configuration. Always check with your electrician and ensure all wiring is in accordance with local regulations.
Note to electrician: The controller modulates the heat output using a “timed on / timed off” function. The controller does not modulate the voltage output. A relay is therefore suitable for this application.
CAUTION: A MINIMUM 250W LOAD MUST BE PLACED ACROSS THE CONTROLLER
Failure to provide this minimum load will potentially damage both the relay/contactor AND the controller.
INCORRECT WIRING

TT-MTM2 WALL CONTROLLER MAXIMUM 16A


ACTIVE
NEUTRAL
EARTH
ACTIVE NEUTRAL EARTH
ACTIVE NEUTRAL EARTH
ACTIVE NEUTRAL EARTH
IN SWITCHBOARD

4 x THH3200A
Warranty Terms & Conditions
The below Warranty Terms and Conditions apply for New Zealand and Australia only. For international warranty please refer to international warranty terms and conditions.
Thermofilm warrants to the original owner that TT-MTM2 Wall Controller products will be free from defects in materials and workmanship for a period of 12 months from the date of purchase in accordance with the following warranty terms and conditions.
Provision of this warranty is subject to:
- The TT-MTM2 Wall Controller product must be installed in accordance with the Installation Instructions and relevant electrical standards and codes.
- The TT-MTM2 Wall Controller product must be maintained and cleaned according to instructions detailed in the Installation Manual.
- There is no warranty expressed or implied with regard to capacity requirements. The selection of the unit or units depends entirely upon the system design and capacities as determined by the purchaser.
- The customer has not repaired, opened or altered the product in any unauthorised manner.
- This warranty excludes damage to the product or components arising from circumstances outside the control of Thermofilm, including, but not limited to, where the product is not used for intended purpose; where the product has been rectified in any way; incorrect installation; incorrect power supply; damaged caused during delivery; misapplication, misuse, abuse, vandalism, lack of maintenance or accident.
- Thermofilm's obligations under this warranty are limited to repair or replacement at Thermofilm's factory of any components of the product which Thermofilm identifies to its satisfaction to be defective.
- Transportation charges involved in return of the product to the Thermofilm factory (or any other location authorised in writing by Thermofilm) is the sole responsibility of the customer.
- All products are inspected and tested before despatch and are at the risk of the purchaser after the shipment from the Thermofilm factory, if not delivered by Thermofilm to destination.
- No products or components will be supplied in advance of an examination of the faulty product or components by Thermofilm or an authorized representative of Thermofilm.
- Thermofilm does not participate in any site related costs or labour expenses incidental to replacement of parts, repairing, removing, installing, servicing, transportation or handling of parts to complete products, and assumes no liability on parts repaired or replaced without written authorisation. Thermofilm shall not be liable for any default or delay in performance of its warranty obligations caused by any circumstances beyond its control, including, but not limited to, judicial or government restrictions, strikes, fires, floods, abnormal weather conditions, delayed supply of components.
Should products be determined as damaged on arrival, immediately notify the transport company of the condition and have them noted on the freight documents. If damage is discovered after unpacking, demand immediate inspection by the transportation company and insist that a record of the damage is made on the freight documentation.
The customer warrants using the product in accordance with:
- Any instructions provided to it by Thermofilm from time to time.
- All government and local regulations, including but not limited to all relevant electrical, environmental laws and regulations governing the installation, storage, use, handling and maintenance of the goods.
- All necessary and appropriate precautions and safety measures relating to the installation, storage, use, handling and maintenance of goods.
Our goods come with guarantees that cannot be excluded under the Australian Consumer Law. You are entitled to a replacement or refund for a major failure and for compensation for any other reasonably foreseeable loss or damage. You are also entitled to have the goods repaired or replaced if the goods fail to be of acceptable quality and the failure does not amount to a major failure.
All warranty requests for repairs or replacements must be accompanied by a complete “Warranty Claim Form” available from Thermofilm, together with proof of purchase (and where possible, photos of the installation) and the heater returned to the place of purchase.
In the event of a warranty claim, the goods need to be returned to the distributor/retailer for repair/replacement. Contact
Thermofilm Australia Pty Ltd
17 Johnston Court, Dandenong South, Victoria 3175, Australia
Telephone: (03) 9562 3455
Email: info@thermofilm.com.au


- PRODUCT MANUAL
- TT-MTM2 HARD-WIRED CONTROLLER WITH REMOTE
- TT-MTM2 WALL CONTROLLER
- CONTROLLING MULTIPLE HEATERS
- REMOTE PAIRING
- DIMMERS
- OPERATION
- THERMAL CUT-OUT PROTECTION
- WARM UP MODE
- SAFETY
- MAINTENANCE
- TT-MTM2 CONTROLLER INSTALLATION GUIDE
- HEATER WIRING SCHEMATIC DIAGRAMS
- HEATER WIRING SCHEMATIC DIAGRAM WITH RELAYS
- CAUTION: A MINIMUM 250W LOAD MUST BE PLACED ACROSS THE CONTROLLER
- INCORRECT WIRING
- WARRANTY TERMS & CONDITIONS
Brand : Heatstrip
Model : TT MTM2
Category : Electric heating