
VMP71 - Screen Mount VIEWSONIC - Free user manual and instructions
Find the device manual for free VMP71 VIEWSONIC in PDF.

| Product type | Screen mounting bracket |
| Brand | VIEWSONIC |
| Model | VMP71 |
| Compatible VESA standard | 100 x 100 mm, 75 x 75 mm |
| Maximum supported weight | 10 kg |
| Main material | Steel |
| Tilt angle | -5° to +15° |
| Rotation | 360° (by pivot) |
| Landscape/portrait pivot | Yes |
| Distance from wall | 45 mm |
| Type of wall mounting | Fixation on solid wall (concrete, brick) |
| Package contents | Bracket, screw kit, installation manual |
| Recommended cleaning | Soft dry cloth |
| Manufacturer warranty | 2 years |
| Country of manufacture | China |
Frequently Asked Questions - VMP71 VIEWSONIC
User questions about VMP71 VIEWSONIC
0 question about this device. Answer the ones you know or ask your own.
Ask a new question about this device
Download the instructions for your Screen Mount in PDF format for free! Find your manual VMP71 - VIEWSONIC and take your electronic device back in hand. On this page are published all the documents necessary for the use of your device. VMP71 by VIEWSONIC.
USER MANUAL VMP71 VIEWSONIC
Network media player
-User Guide
- Guide de l'utilisateur
-Guia del usuario
Bedienungsanleitung
-Guida dell'utente
- Podrcznik uzytkownika
-PykoBoDCTBO nonb3ObaTeJra
-使用手册(繁中)
- 使用手册(简中)
Compliance Information
FCC Statement
This device complies with part 15 of FCC Rules. Operation is subject to the following two conditions: (1) this device may not cause harmful interference, and (2) this device must accept any interference received, including interference that may cause undesired operation.
This equipment has been tested and found to comply with the limits for a Class B digital device, pursuant to part 15 of the FCC Rules. These limits are designed to provide reasonable protection against harmful interference in a residential installation. This equipment generates, uses, and can radiate radio frequency energy, and if not installed and used in accordance with the instructions, may cause harmful interference to radio communications. However, there is no guarantee that interference will not occur in a particular installation. If this equipment does cause harmful interference to radio or television reception, which can be determined by turning the equipment off and on, the user is encouraged to try to correct the interference by one or more of the following measures:
Reorient or relocate the receiving antenna.
- Increase the separation between the equipment and receiver.
- Connect the equipment into an outlet on a circuit different from that to which the receiver is connected.
- Consult the dealer or an experienced radio/TV technician for help.
Warning: You are cautioned that changes or modifications not expressly approved by the party responsible for compliance could void your authority to operate the equipment.
For Canada
CE Conformity for European Countries
The device complies with the EMC Directive 2004/108/EC and Low Voltage Directive 2006/95/EC.
Following information is only for EU-member states:
The mark is in compliance with the Waste Electrical and Electronic Equipment Directive 2002/96/EC (WEEE).
The mark indicates the requirement NOT to dispose the equipment including any spent or discarded batteries or accumulators as unsorted municipal waste, but use the return and collection systems available.
If the batteries, accumulators and button cells included with this equipment, display the chemical symbol Hg, Cd, or Pb, then it means that the battery has a heavy metal content of more than 0.0005% Mercury or more than, 0.002% Cadmium, or more than 0.004% Lead.

Declaration of RoHS Compliance
This product has been designed and manufactured in compliance with Directive 2002/95/ EC of the European Parliament and the Council on restriction of the use of certain hazardous substances in electrical and electronic equipment (RoHS Directive) and is deemed to comply with the maximum concentration values issued by the European Technical Adaptation Committee (TAC) as shown below:
| Substance | Proposed Maximum Concentration | Actual Concentration |
| Lead (Pb) | 0.1% | < 0.1% |
| Mercury (Hg) | 0.1% | < 0.1% |
| Cadmium (Cd) | 0.01% | < 0.01% |
| Hexavalent Chromium (Cr6+) | 0.1% | < 0.1% |
| Polybrominated biphenyls (PBB) | 0.1% | < 0.1% |
| Polybrominated diphenyl ethers (PBDE) | 0.1% | < 0.1% |
Certain components of products as stated above are exempted under the Annex of the RoHS Directives as noted below:
Examples of exempted components are:
- Mercury in compact fluorescent lamps not exceeding 5mg per lamp and in other lamps not specifically mentioned in the Annex of RoHS Directive.
- Lead in glass of cathode ray tubes, electronic components, fluorescent tubes, and electronic ceramic parts (e.g. piezoelectronic devices).
- Lead in high temperature type solders (i.e. lead-based alloys containing 85% by weight or more lead).
- Lead as an allotting element in steel containing up to 0.35% lead by weight, aluminium containing up to 0.4% lead by weight and as a cooper alloy containing up to 4% lead by weight.
Copyright Information
Copyright © ViewSonic Corporation, 2010. All rights reserved.
ViewSonic, the three birds logo, OnView, ViewMatch, and ViewMeter are registered trademarks of ViewSonic Corporation.
Disclaimer: ViewSonic Corporation shall not be liable for technical or editorial errors or omissions contained herein; nor for incidental or consequential damages resulting from furnishing this material, or the performance or use of this product.
In the interest of continuing product improvement, ViewSonic Corporation reserves the right to change product specifications without notice. Information in this document may change without notice.
No part of this document may be copied, reproduced, or transmitted by any means, for any purpose without prior written permission from ViewSonic Corporation.
For Your Records
Product Name: VMP71
ViewSonic Network Media Player
Model Number: VS13406
Document Number: VMP71_UG_ENG Rev. 1A 04-18-10
Serial Number:
Purchase Date:
Product disposal at end of product life
ViewSonic is concerned about the preservation of our environment. Please dispose of this product properly at the end of its useful life. Your local waste disposal company may provide information about proper disposal.
Introduction 1
Features 1
System Requirements 1
The Remote Control. 2
Buttons 2
Parts and Functions 3
Quick Start 4
PC Connection 5
OS Support 5
Connecting via USB 5
Upgrading Firmware 6
Formattling the Internal HDD. 6
Network Connection. 7
Connecting Wired Ethernet 7
Connecting Wireless 7
Accessing Shared Folders on PC 9
Mapping Network Drive from PC 15
BitTorrent 15
TV Connection 17
Connecting to AV Equipments 17
Using the AV Playback Function 20
Browsing Media Files 20
Setup 23
Misc. 23
Audio 23
Video 23
Network 24
System 24
Appendix 25
Specifications 25
Copyright and Trademarks 26
Introduction
Features
Plays back Blu-ray ISO/H.264/WMV/VC-1/Xvid/MPEG-1/MPEG-2/RM/RMVB movie files, MP3/WMA/OGG/FLAC/AAC music files, JPEG/BMP/GIF/PNG photo and graphic files.
Supports NTFS/FAT32 file system.
Supports both NTSC and PAL TV systems.
Supports 1080p video output.
Supports HDMI and component video output.
Supports Music Slideshow
Supports external USB storage media playback.
Supports playback via SAMBA Ethernet protocol.
Supports USB wireless dongle.
System Requirements
A desktop or notebook PC with Ethernet port
Available USB connection
350 MHz Pentium class processor or higher
Operating systems: Microsoft® Windows® 7 / Windows Vista™ / Windows® XP SP2
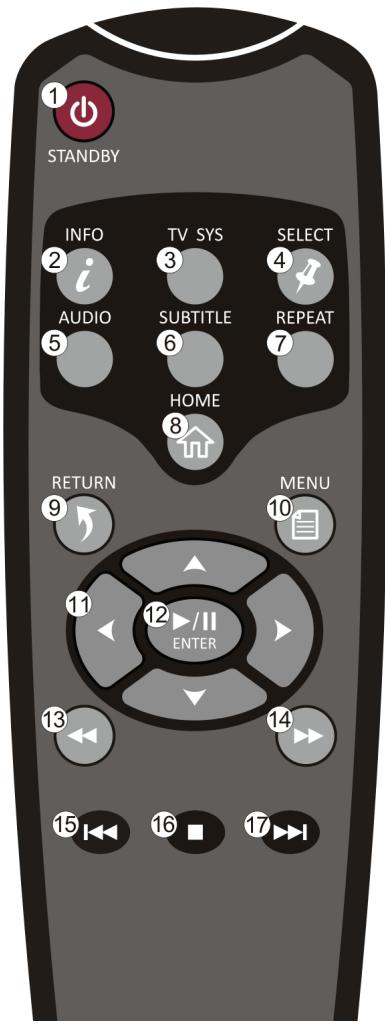
The Remote Control Buttons
STANDBY: Activate this device / Return to Standby
2 INFO: Display file properties / played time
3 TV SYS Switch output TV system to NTSC/PAL
SELECT: No function
5 AUDIO: Switch audio tracks in a movie
6 SUBTITLE: Switch DVD subtitles; Switch Xvid subtitle On/Off
7 REPEAT: Change the repeat mode
HOME: Return to Home Menu
9 RETURN: Return to parental folder
18 10 MENU: Show menu dialogue box (in browsing mode only)
Ω Cursor buttons
12 ENTER: Play/Pause the current selected file or folder
Ω: Fast rewind
Fast forward
13 Play the previous file
Stop current playback
17 Play the next file

Note:
- This device must be activated before it will respond to commands from the remote control.
- When using the remote control, point the remote control towards the front of this device.
- The icon will appear on the screen when a button of non-available operation is pressed.
Parts and Functions
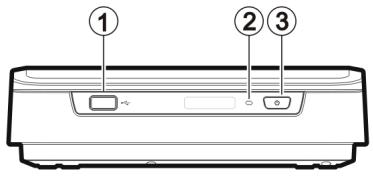
USB type A connector: Connect the USB mass storage devices/ USB wireless dongle with this device using a USB cable.
Power LED: (Blue) Blinking: Received a remote control signal.
Off: Power off.
On: Power on.
Fast blinking: Booting up/ Accessing data through PC connection.
3 Power switch: Press this button to turn on this device.
Press and hold this button for about 3 seconds to turn off this device.
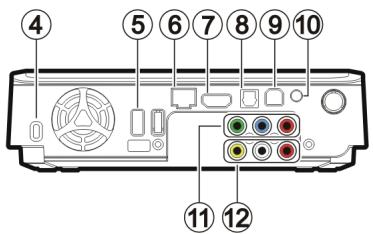
Kensington Security Connects to a Kensington lock pin.
Slot:
5 USB type A connector: Connect the USB mass storage devices/ USB wireless dongle with this
device using a USB cable.
6 RJ45 connector: Connect this device to Local Area Network (LAN) using a RJ45 cable.
(cable not provided)
HDMI connector: Outputs digital video.audio signals with a HDMI cable.
Optical digital audio Output S/PDIF digital audio signal. Connect this jack to an AV receiver
connector: with a TOSLINK cable. (cable not provided)
USB type B connector: Connecting this device with a PC using a USB cable.
Power connector: Connect to the AC adapter. (DC 12V, 2.5A)
Component video Output component video signals.
output connector: The colors of the jacks are green, blue and red. (cable not provided)
Composite audio/video Output composite video音频 signals.
output connector: The colors of the jacks are yellow, red and white.
Quick Start
Read before use.
- Do not operate electronics with wet hands.
- Do not operate this device in a bathroom or near water.
- Do not bend cables in a sharp angle.
- Keep this device and cables out of reach of children.
- Keep this device and its accessories away from heat sources.
How do I use this device?
This device plays media contents stored in its internal HDD, in an external USB storage connected to it, or on a server via SAMBA Ethernet protocol. In the Home Menu, select the mode and the medium you want to browse, and then press the ENTER button to start playback.
How do I copy media files into it?
- Connect the AC adapter to this device.
- Connect this device to your computer with the USB cable.
- Press the Power Switch on the front panel to turn on this device.
- Copy files just like using a USB external HDD. (No additional software is needed!)
- Disconnect this device from your computer using safe remove procedure of your OS.
How do I play media files on my TV?
- Connect this device to your TV with correct cables.
- Plug the AC adapter into the Power Connector.
- Press the Power Switch on the front panel to turn on this device.
-
Press the STANDBY button on the remote control to activate this device.
-
Browse with the cursor buttons and the ENTER button.
What if my TV screen displays unstable image?
Press the TV SYS button repeatedly until the image goes steady. (This only works at startup)
What if my USB wireless dongle does not work?
This device works with certified USB wireless dongles only. Please consult your local distributor to purchase a certified USB wireless dongle. Please refer to Connecting Wireless for more information. (page 7)
How to configure settings?
Select and enter the SETUP option in the Home Menu.
PC Connection
OS Support
This device supports Microsoft® Windows® 7 / Windows Vista™ / Windows® XP SP2.

Some USB 2.0 Host Controllers may require updated device driver files to operate properly. If you have problems with your USB connection, visit the Windows Update web site to make sure you have the latest Service Packs and device drivers installed on your PC before contacting technical support.
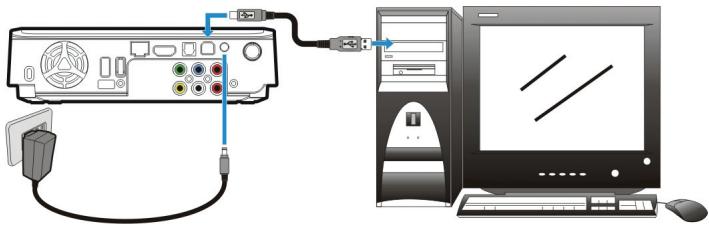
Connecting via USB
- Connect the plug of AC adapter to the connector marked "DC IN", plug the other end into an electric outlet.

Note: When connecting the USB cable, be sure that the LED is off.
- Connect the USB cable to the USB type B connector. Then connect the other end to computer's USB port.
- Press the Power Switch on the front panel to turn on this device.
- The computer will detect this device and you can start accessing the drive.

Note: Always remove USB cable before activating this device for playback.
Transferring Files on a USB Connection
Copy files into the internal HDD of this device just like using a USB external HDD. You can do it with Windows Explorer or any other applications appropriate for this job in your specific OS.

Always check that files have been copied to the device successfully. Always keep two copies of important files (an original and a backup). We are not liable for data loss or damage during file transfer or while store on the device.
Disconnecting from USB
-
Close all programs or Explorer windows that are accessing this device.
-
Click the Safely Remove Hardware icon (or on the System Tray and select the drive letter assigned to this device. When the system message "safely removed" appears, unplug the USB cable from the computer.
Upgrading Firmware
- Please consult your local distributor or vendor website for a firmware file.
- Save the firmware file to the root folder of an USB mass storage device.

Note: Do not copy the firmware file to a folder, else the update will not work
- Connect this device to a TV and then connect the USB mass storage device to this device.
- Press the STANDBY button on the remote control to activate this device.
- Select Setup System System Upgrade in the Home Menu to perform upgrade. It may takes 3 5 minutes for the installation to complete. For a firmware update operation, the LED may blink during the installation process.

Note: This device will automatically reboot several times to finish the installation. Do not turn it off during the installation process.
- This device will return to Home Menu after the firmware installation is completed.
- All settings in the Setup Menu will be set to default values after upgrade.
Formatting the Internal HDD
This device supports NTFS/FAT32 file system. Connect this device to a computer via USB connection (page 5), and then use the format utility of your OS to format the internal HDD. You may need to refer to the manual of your OS for detailed instruction of its format utility.

Formatting the drive will erase all existing data! If you have files on the drive you want to save, move them to another drive before reformatting.

Note: Do not partition the internal HDD - leave it as a single large volume. Partitioning the internal HDD may cause this device to halt.
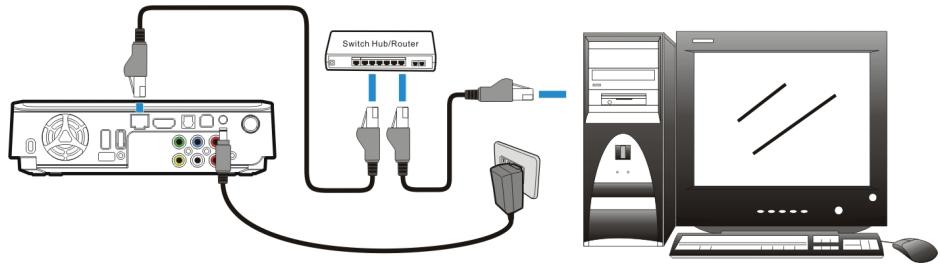
Network Connection Connecting Wired Ethernet
- Use a RJ45 Ethernet cable to connect this device to a network router, hub, or switch; or connect this device to the Ethernet port on a networked computer.
- If you have not already done so, connect this device to your TV.
- Connect the power supply to this device.
- Press the Power Switch on the front panel to turn on this device.
- Activate this device by pressing the STANDBY button on the remote control. The LED on the front cover will light up during booting-up. This device will be ready to use when the LED lights up steadily.
- This device is automatically configured so you can browse and play back files stored on your network volumes. If you want to copy files from your network volumes to this device, you need to connect to it using a computer on the network.
Connecting Wireless

Note:
This device only supports wireless dongle with Realtek RTL8187B/RTL8192/ RTL8191SU controller. Please consult your local distributor or vendor website for a certified USB wireless dongle.
- Connect the wireless dongle to the USB host port.
- If you have not already done so, connect this device to your TV.
- Turn on your TV and change the input setting as needed to receive input from this device. Refer to the manual that came with the TV if you are uncertain how to do this.
- Connect the power supply to this device.
- Press the Power Switch on the front panel to turn on this device.
- Activate this device by pressing the STANDBY button on the remote control.
- When the Home Menu displays on the TV, select Setup and press the ENTER button.
-
Select Network and press the ENTER button.
-
Select Wireless and press the ENTER button.
- This device will list available wireless networks. Select your network and press the ENTER button.


Note:
To enter a username and password to login to a network volume, press the
ENTER button on the remote control. This will bring up a virtual keyboard on this device TV display. Use the remote control cursor buttons and the
ENTER button to select the necessary characters. The password can use any combination of numbers and letters (lower case or caps). It can also use periods. It cannot use extended punctuation characters (such as!, @, #, $, %, &, etc.)
- When the configuration is complete, this device will automatically connect to the wireless network.
- Press the HOME button to return to Home Menu.

Accessing Shared Folders on PC
- Make sure the Workgroup of your PC are set as WORKGROUP.
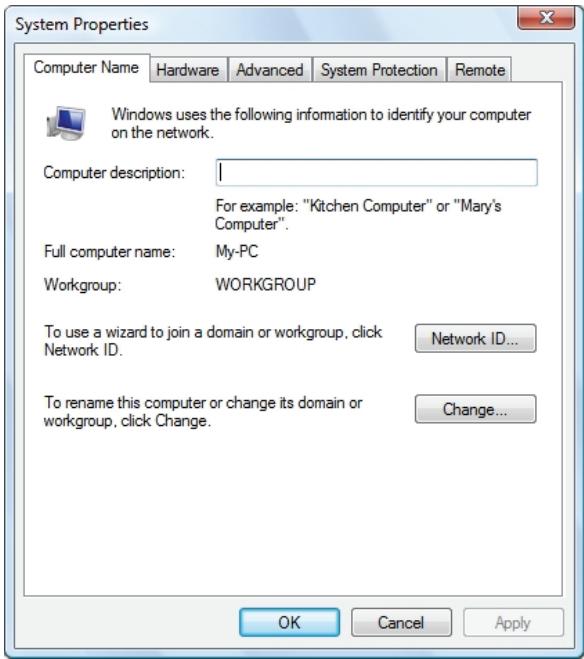
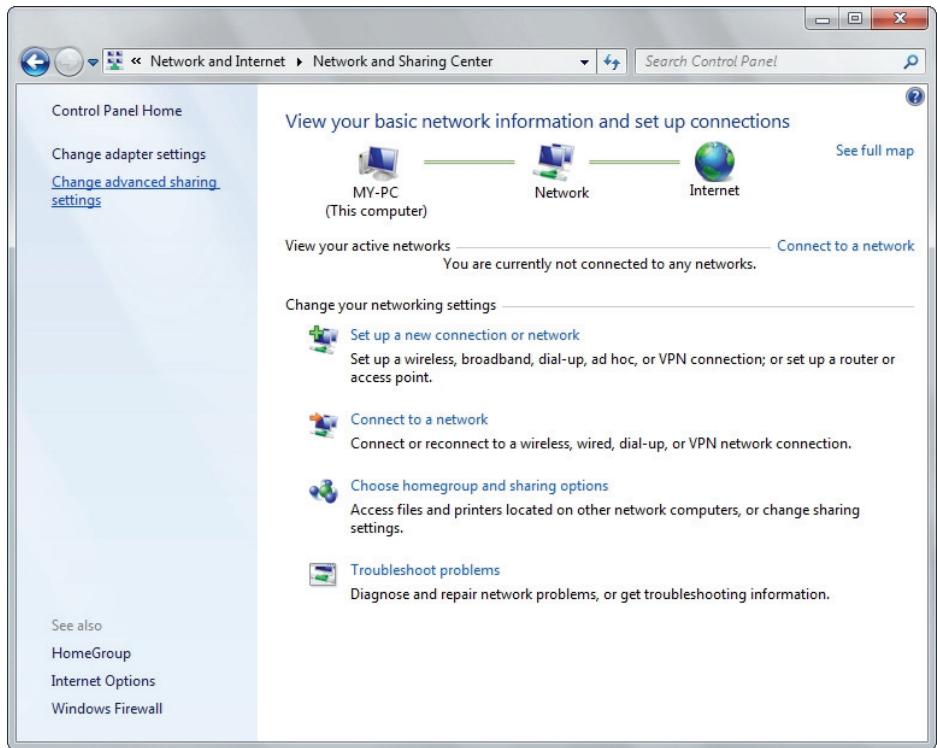
- From your Windows 7/Windows Vista PC, go to:
Control Panel > Network and Internet > Network and Sharing Center.

Network and Internet
Connect to the Internet
View network status and tasks
Choose homegroup and sharing options

Network and Sharing Center
View network status and tasks
Connect to a network
View network computers and devices
Add a wireless device to the network
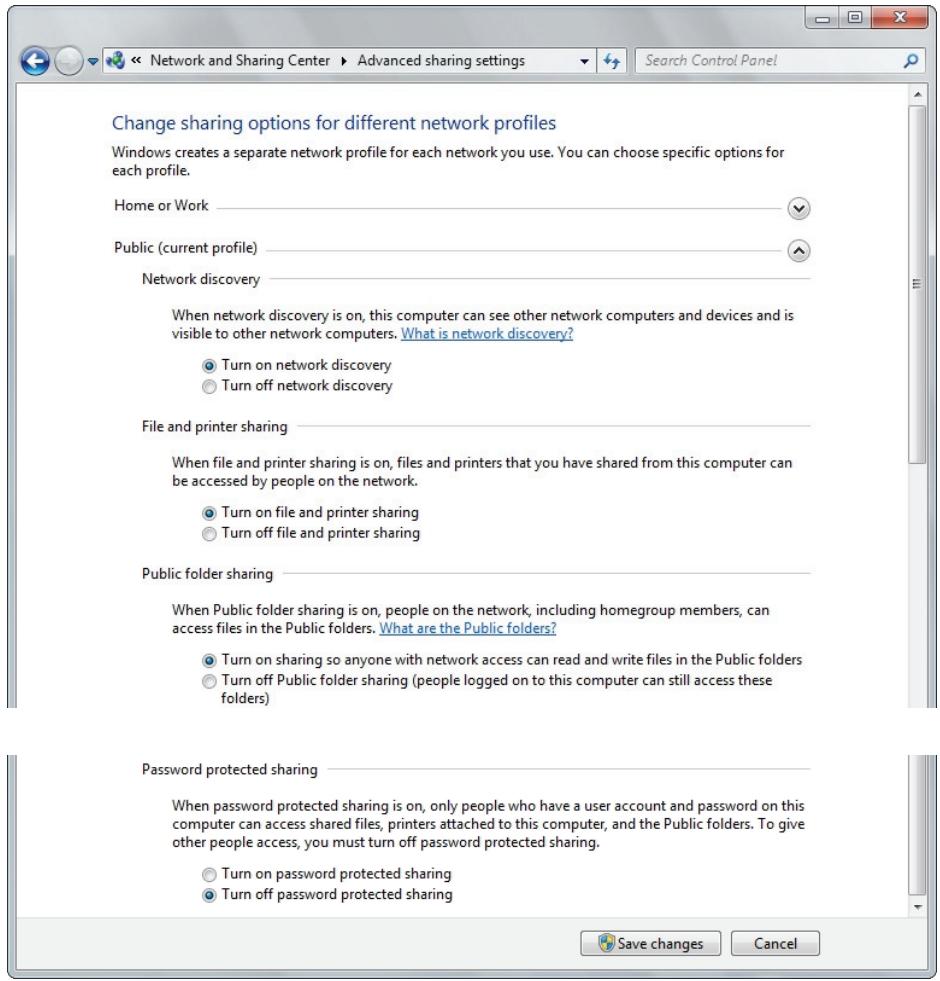
- (For Windows 7) Click on Change advanced sharing settings.
- (For Windows 7) Select Turn on network discovery, Turn on file and printer sharing, Turn on sharing so anyone with network access can read and write files in the Public folders and Turn off password protected sharing.
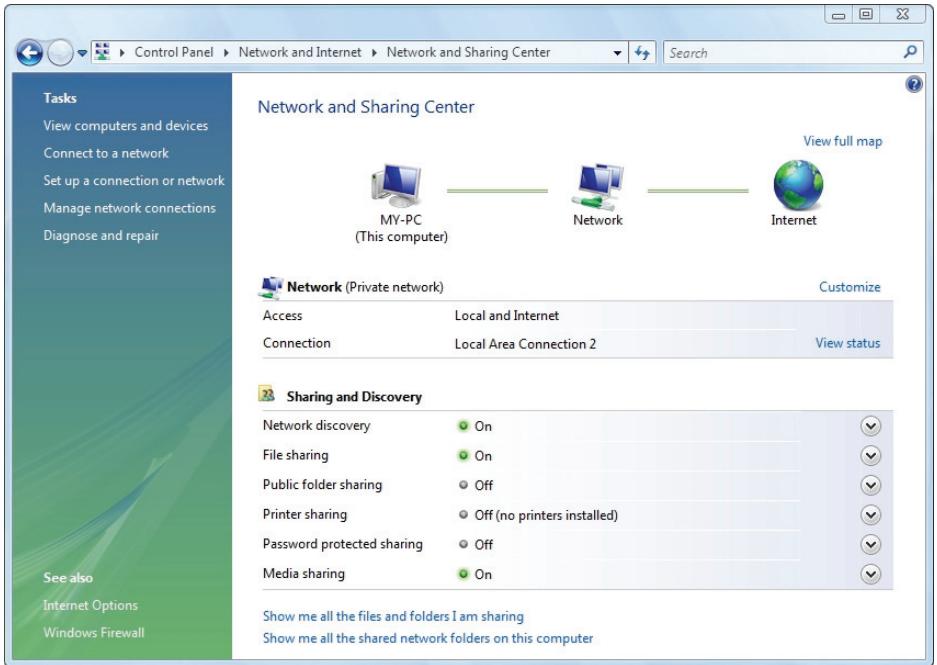
- (For Windows Vista) Click to turn on Network discovery, File sharing and Media sharing, and click to turn off Password protected sharing.
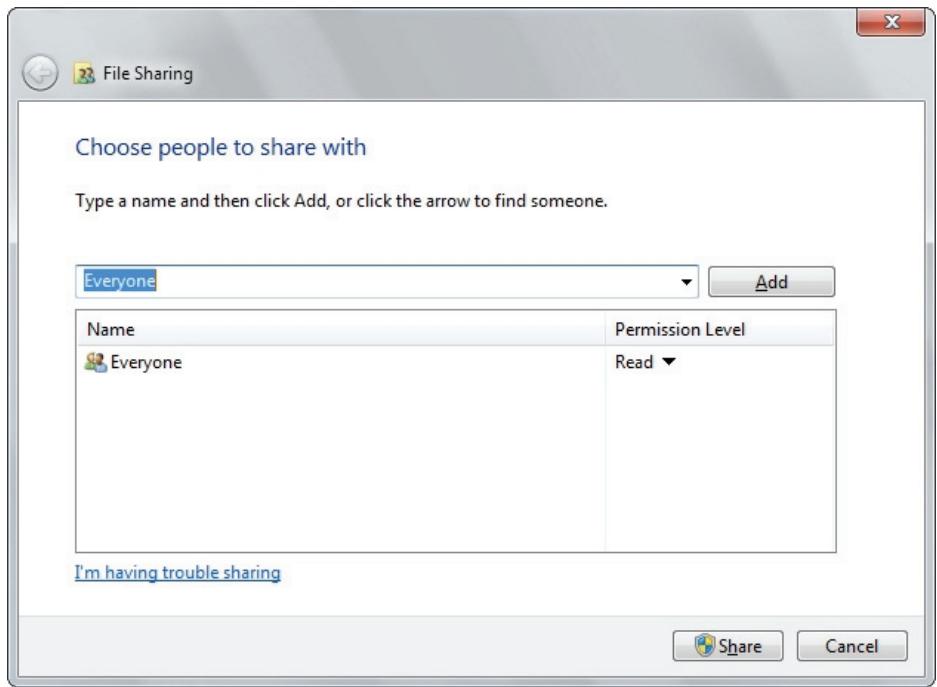
- Right click on the folder you wish to share and select Properties.
- Go to tab Sharing and click Share.
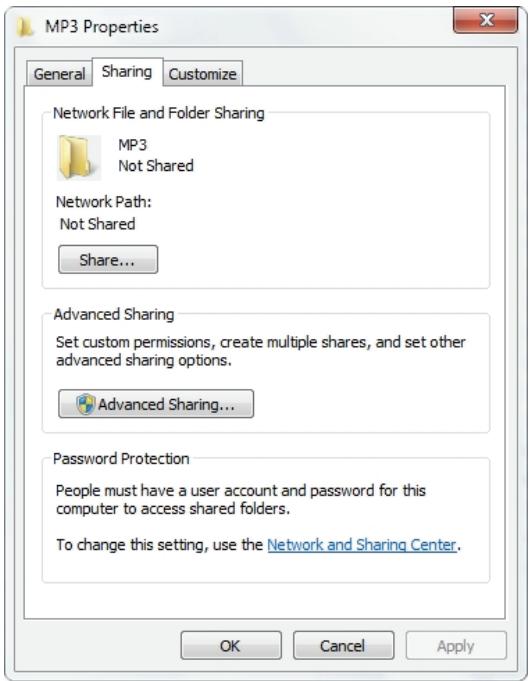
- Click the drop-down list to choose Everyone and click Add. Make sure that Everyone is in the list and click Share button.
Mapping Network Drive from PC
- Open Windows Explorer and go to Tools Map Network Drive.
- Assign the drive letter you like to use and key in \ip_address\MEDIA_HDD at the folder section. Then click Finish. The IP address of this device can be found in Setup → Network.
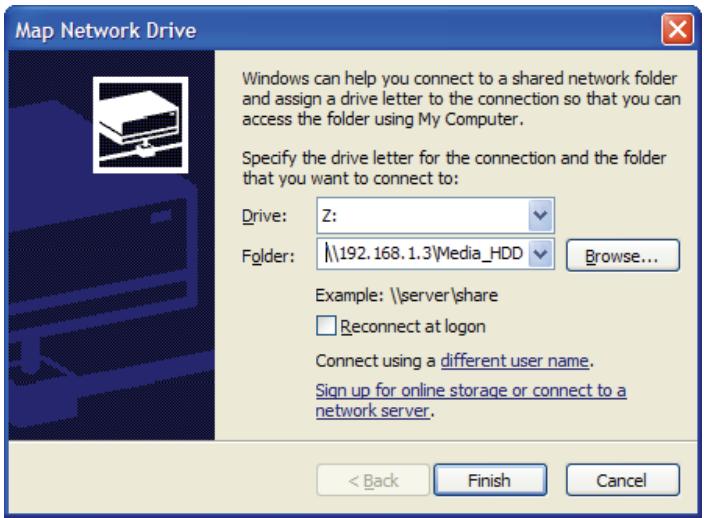
- An extra drive letter will appear in your Windows Explorer of My Computer.
BitTorrent
- If you have not already done so, connect this device to the Internet.
- Turn on BitTorrent service in Setup Network BitTorrent.
- Open your web browser on your computer. In the address bar, enter the IP address of this device, which you can find in Setup Network.
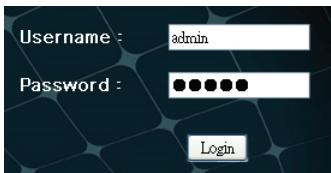
- Enter username and password, and then click Login button. The default value of username and password are as below:
Username: admin
Password: admin
BitTorrent Download
- Click Add New Torrent button.
- Select a torrent file from your PC and then click Yes.
- The select torrent file will be displayed. Check the box of a torrent file, and then you can select Start, Stop, Delete, Refresh, Down, and Up setting of this file.
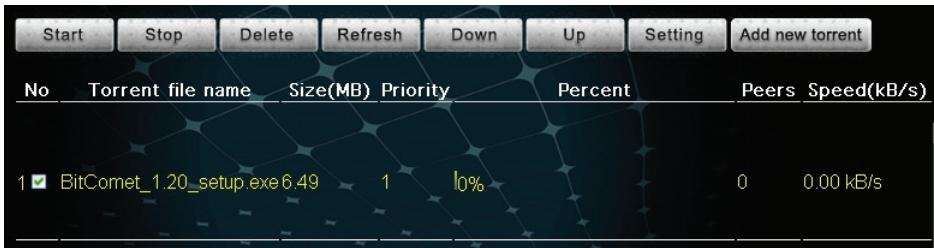
- Click Setting to set download/upload rate, seed setting, and simultaneous setting of your download.
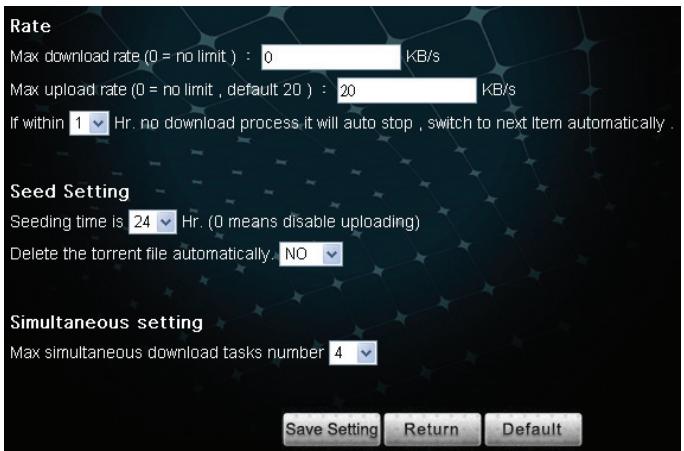
Visit Neighbor
This function works with Microsoft IE browser only. Click Visit Neighbor to open the internal HDD as shared folder of this device. The option in Setup Network Network
Sharing must be set as On for this function to take effect.
Account Management
Change the password of user admin.
TV Connection
Connecting to AV Equipments
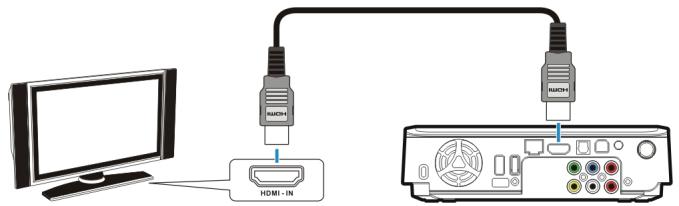
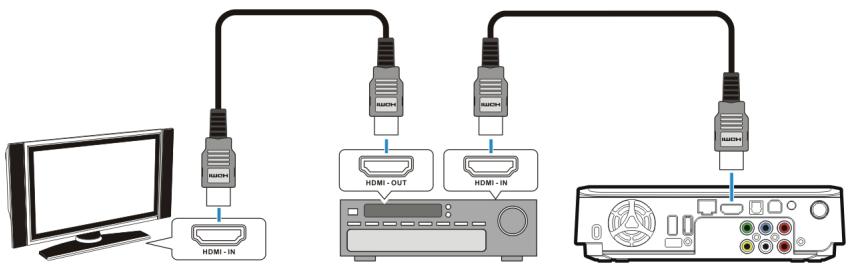
HDMI Connection
The HDMI connector can output both digital audio/video signals. Many HDTV sets and digital AV receivers support this type of connection.
To a TV:
To an AV receiver:

Note:
Some TV sets are equipped with DVI input ports, which will receive video signals only, but these DVI ports use HDMI connectors instead of standard DVI connectors. If you find no audio signal output while using HDMI connection, connect the Composite Audio Connection or the Optical digital audio Connection as an auxiliary.
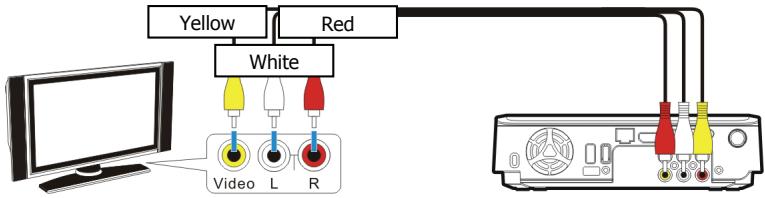
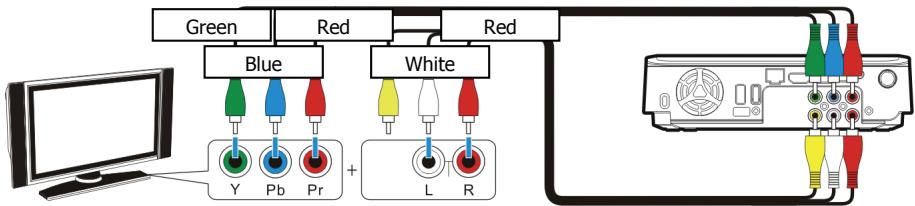
Composite Audio/Video Connection
The composite audio/video is compatible with most TV sets and AV amplifiers (receivers.)
Yellow: Video signal; White: Left audio channel; Red: Right audio channel.
Component Video Connection (Y/Pb/Pr)
If your TV supports Component Video input (Y/Pb/Pr), you can connect it for better video quality. You will have to connect the audio cable for audio output.

Note: Some TV sets are equipped with separate composite and component audio inputs. Be sure that you have connected the correct one.
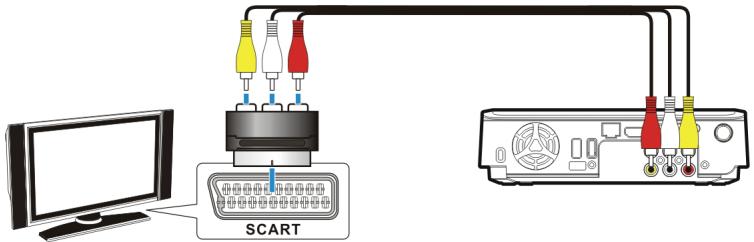
SCART Video Connection
If your TV is equipped with SCART input, connect the Composite connectors to a SCART adapter to output the audio/video signal. (SCART adapter not provided)
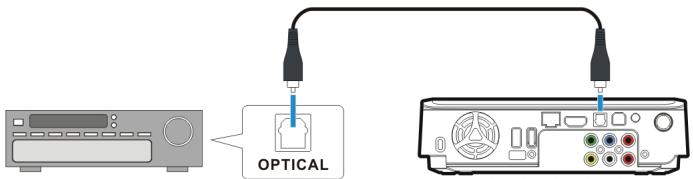
Optical Audio Connection
For a high quality digital audio, connect this connector to an AV receiver which equips a digital audio decoder. (TOSLINK optical cable not provided)
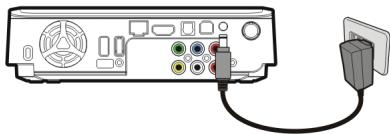
Power Connection
Connect the DC jack of the AC adapter to the connector marked "DC IN" and plug the other end into an electrical outlet.
Activating for Playback
- Turn on your TV and AV receiver.
- Press the Power Switch on the front panel to turn on this device.
- Press the STANDBY button on the remote control to activate this device. The activation takes about 5-7 seconds, and the LED will blink at the same time.
- After the LED stops blinking and glows steadily bright, this device is ready to use for playback.
- After playback, press the STANDBY button again to return to Standby mode.

Note:
- Always remove USB cable before activating this device.
- When using the remote control, point the remote control towards the front of this device.

When turning the HDD into Standby mode, please avoid moving it for 2-3 minutes due to spin down of the device. Moving the HDD while it is still spinning may damage it. We are not liable for any data loss or damage caused by inappropriate or careless use.

It is recommended to unplug the unit from the power socket completely when not in use.
Using the AV Playback Function
When this device is connected to a TV and activated for playback, the Home Menu will display on the TV screen. You can also jump to the Home Menu during playback or while browsing other menus by pressing the HOME button on the remote control.
You can use the cursor buttons on the remote control to navigate through menus, options, or files. Press the ENTER button to open a folder, select an option, or play a file. Press the RETURN button to return to a previous page or menu. Playlists can only be seen in All and Music modes.
All
All media files will be listed.
Video
Only video files will be listed.
Photo
Only photo files will be listed. Files and folders will be shown in large icons.
Music
Only music files will be listed.
IMS
Access Internet Media Services. (Picasa, Flickr and Weather)
Setup
Set up configuration options for this device.
Browsing Media Files
Browse media files in local storage media (HDD/USB) and in network storage media (NET).
HDD
Browse folders and files located on the internal HDD.

Note:
HDD option will automatically be hidden if the internal HDD is absent.
USB
Browse folders and files located on an external USB device connected to the USB 2.0 host port on this device.

Note:
- If USB bus power is insufficient to power up the USB HDD, connect the AC adapter to the USB HDD.
- Do not connect 2 USB HDDs to this device at the same time.

Note:
- The USB device must be formatted NTFS or FAT32 to support playback on the TV.
NET
Browse shared network volumes via SAMBA protocol when this device is connected to network.
UPNP
Browse media files in a UPnP AV MediaServer in the same LAN with this device.
Playing Media Files from HDD/USB
- Select a location to browse for the media file you want to play. Select HDD if the file is saved on the internal HDD or USB if the file is located on an external USB device connected to this device.
- Browse to the folder containing the media file you want to play (use the cursor buttons on the remote control to navigate through listed folders; press the ENTER button to open a folder or subfolder).
- Select a media file and press the ENTER button to start playback.
Playing Media Files from NET
You can use this device to play media files from your network on your TV.
- Connect this device to your home network.
- From the Home Menu, select NET and press the ENTER button.
- The NET menu will show volumes available on your network. Use the cursor buttons on the remote control to browse and to select media files you want to play.

Note: If you need to enter a username and password to login to a network volume, press the ENTER button on the remote control. This will bring up a virtual keyboard on the TV display. Use the remote control cursor buttons and the ENTER button to select the necessary characters. The password can use any combination of numbers and letters (lower case or caps). It can also use periods. It cannot use extended punctuation characters (such as!, @, #, $, %, &, etc.)
Playing Slideshow/Music Slideshow
- Select the image file you want to start the slideshow, then press the ENTER button. This device will display all photo images in the folder consecutively with the selected display interval.
-
To set the display interval for your slideshow, select Setup in the Home Menu to access the Setup Menu. Select Misc → Slideshow Interval, and select the time you want each photo to display. (page 23)
-
If you want to play music with your slideshow, copy the music tracks to the same folder or subfolder as the image files. Name the music tracks in the order you would like them to play, for example, track01, track02, track03, etc. The option in Setup Misc Background Music must be set as On.
Playing a DVD Folder
A DVD folder contains complete files for a DVD movie. This device can play back a movie from a DVD folder just like playing back a DVD disc. To create a DVD folder, connect this device to your computer, insert the DVD disc into the computer's optical drive, and use My Computer or Windows Explorer to browse the disc. Copy the entire "VIDEO_TS" folder from the DVD to this device. To play the DVD movie, navigate to the Video_TS folder, select the Video_TS IFO file and press the ENTER ENTER button on the remote control.

Note:
If the DVD folder is incomplete, you can still play back the VOB files directly. Functions controlled by the IFO file, such as the selection of subtitles, chapters, and angles, will be lost.

Some DVD discs cannot be copied because they have been protected with CSS protection. Always obey copyright and intellectual property rights. Do not copy DVDs with copyright and do not distribute them to others.
Performing Copy, Paste, or Delete Operation
By pressing the MENU button on a file in HDD, you can select Copy, Paste, Delete, or Unmark to perform these operations. You can only select Copy or Unmark in USB/NET. Copy: Copy the selected file.
Paste: Paste the selected file to HDD.
Delete: Delete the selected file in HDD.
Unmark: Cancel selection.

Note:
Pasting a file to USB/NET is prohibited.
Editing Playlist
In the Music mode, by pressing the MENU button on a music file saved on the internal HDD, you can select Add to Playlist to add this music file to Quick_List.m3u in /Playlist folder on the internal HDD. By pressing the MENU button on a playlist file, you can select Edit to edit the playlist, or select Save As to save it as another m3u file. You can select Delete by pressing the MENU button on an item in the playlist to delete it.

Note:
Copy/Paste/Delete and Add to Playlist option will automatically be hidden if the internal HDD is absent.
Setup
Select SETUP in Home Menu to enter Setup Menu. Use the cursor buttons to select items.
Press the ENTER button to enter a submenu or to confirm a selection. Press the
RETURN button to return to previous folder. Press the HOME button to return to Home Menu.
Misc
Slideshow Interval
Set time to display each photo during slideshow.
Transition Effect
Set fade or transition options for slideshow display.
Background Music
This function allows you to play photo slide show and music at the same time.
Audio
Output
SPDIF RAW: Use with an optical audio connection. Outputs digital audio without decoding.
SPDIF LPCM: Use with an optical audio connection. Outputs two channel audio signal.
HDMI RAW: Use with an HDMI connection. Outputs digital audio without decoding.
HDMI LPCM: Use with an HDMI connection. Outputs two channel audio signal.
Volume
Adjust audio volume.
Video
Video System
The following video systems are available:
NTSC/ PAL/480P/576P/720P 50HZ/720P 60HZ/1080i 50HZ/1080i 60HZ/1080p 50HZ/1080p 60HZ.
Aspect Ratio
Pan Scan 4:3: Displays the 16:9 images in "Pan and Scan" with a 4:3 ratio TV connected.
Letter Box 4:3: Displays the 16:9 images in "Letter Box" with a 4:3 ratio TV connected.
16:9: Displays 16:9 images on a wide screen TV.
Brightness
Adjust brightness setting for video output to the TV.
Contrast
Adjust contrast setting for video output to the TV.
Network
When this device is connected to a network, the Network setup menu will display the IP address for either wired network with DHCP or wireless network.
Wired
DHCP: IP address for this device will be automatically assigned by the Network.
Manual: Use to manually assign the IP Address, Subnet Mask, and Default Gateway used by this device. Use number pad on the remote control to enter the desired addresses.
Wireless
Available SSIDs will be shown. Input Authentic code to gain access.

Note: Please select "Open System", "WEP-PSK 64bit/128bit", and "WPA1/2-PSK-AES/TKIP" authentication when setting up your wireless AP.
BitTorrent
Set BitTorrent service On/Off.
Network Sharing
Set Network Sharing (SAMBA server) service On/Off.

Note: BitTorrent and Network Sharing option will automatically be hidden if the internal HDD is absent.
System
Menu Language
Select the language used to display the OSD menus and information.
Text Encoding
Select a language code page for additional ANSI local code subtitle support.
Restore Default
Reset all settings to default values.
System Upgrade
Upgrade system firmware.
Version
Show system firmware version.
Appendix
Specifications
HARD DRIVE SUPPORT
Internal Storage
3.5" SATA I/ SATA II HDD
File System
NTFS/ FAT32
INTERFACE
USB 2.0
USB 2.0 type A host port x 2
USB 2.0 type B device port x 1
Ethernet
10/100M RJ45 connector x 1
Wireless Ready
Wireless
802.11g (Realtek RTL8187B controller only)
(not included)
802.11n (Realtek RTL8192/RTL8191SU controller only)
(Support certified USB wireless dongle only)
AUDIO/VIDEO INTERFACE
Analog Output
Composite video and stereo audio out (RCA x 3)
Component video jack (Y/Pb/Pr) (RCA x 3)
Digital Output
HDMI connector x 1
Optical S/PDIF output (TOSLINK x1)
MEDIA SUPPORT
Audio Support
MP3, WAV, OGG, WMA, AAC, FLAC, Dolby Digital®, DTS®
Video Support
MPEG-1(MPG/DAT),
Blu-ray ISO,
DVD Folder(IFO)/DVD ISO,
MPEG-2(MPG/VOB/TS/M2TS),
MPEG-4(Xvid/AVI/MP4/MOV/M4V),
H.264/AVC/AVCHD(AVI/MKV/FLV/MOV/M4V/TS/M2TS),
VC-1(AVI/MKV/M2TS)
WMV9 (AVI/WMV/MKV),
RM/RMVB(720p)
File Extension
AVI, MKV, MPG, VOB, IFO, TS, M2TS, MOV, M4V, WMV, FLV, RM, RMVB, ISO
Photo Support
JPEG (baseline), BMP, GIF, PNG
DVD Folder
DVD Menu/Audio/Subtitle/Angle Selection
Xvid Subtitle Format
IDX/SUB, SRT, ASS, SSA, SMI, PSB, SUB
Music Slideshow
Music playback during photo slideshow
Max. Content Resolution
Video
1920 x 1080 pixels
JPEG
5120 x 3840 pixels (baseline)
VIDEO OUTPUT
TV System
NTSC / PAL
Screen Ratio
4:3/16:9
Component
480i / 480p / 576i / 576p / 720p(50/60Hz) / 1080i(50/60Hz) /
1080p(50/60Hz)
HDMI
480p / 576p / 720p(50/60Hz) / 1080i(50/60Hz) / 1080p(50/60Hz)
GENERAL
Dimensions
202(L) x 151(W) x 52(H) mm
7.95(L) x 5.94(W) x 2.05(H) inch
Weight
482g (without Hard Disk Drive)

Specifications are subject to change without prior notice.

It is recommended to unplug the unit from the power socket completely when not in use.

Always check that files have been copied to the device successfully. Always keep two copies of important files (an original and a backup). We are not liable for data loss or damage during file transfer or while store on the device.

When turning the HDD into Standby mode, please avoid moving it for 2-3 minutes due to spin down of the device. Moving the HDD while it is still spinning may damage it. We are not liable for any data loss or damage caused by inappropriate or careless use.
Copyright and Trademarks
Microsoft, Windows, and Windows Media Player are registered trademarks of Microsoft
Corporation. This product is protected by certain intellectual property rights of Microsoft. Use or distribution of such technology outside of this product is prohibited without a license from Microsoft.
"Dolby" and the double-D symbol are trademarks of Dolby Laboratories. Manufactured under license from Dolby Laboratories.
Manufactured under license under U.S. Patent #s: 5,451,942; 5,956,674; 5,974,380;
5,978,762; 6,487,535 & other U.S. and worldwide patents issued & pending. DTS and the
Symbol are registered trademarks, & DTS 2.0+ Digital Out and the DTS logos are trademarks of DTS, Inc. Product includes software. © DTS, Inc. All Rights Reserved.
All other products are trademarks or registered trademarks of their respective owners and are hereby recognized as such.
Customer Support
For technical support or product service, see the table below or contact your reseller.
Note : You will need the product serial number.
| Country/Region | Web Site | T=TelephoneF=Fax | |
| Australia/New Zealand | www.viewsonic.com.au | AUS=1800 880 818NZ=0800 008 822 | service@au.viewsonic.com |
| Canada | www.viewsonic.com | T (Toll-Free)= 1-866-463-4775T (Toll)= 1-424-233-2533F= 1-909-468-3757 | service.ca@viewsonic.com |
| Europe | www.viewsoniceurope.com | www.viewsoniceurope.com/uk/Support/Calldesk.htm | |
| Hong Kong | www.hk.viewsonic.com | T= 852 3102 2900 | service@hk.viewsonic.com |
| India | www.in.viewsonic.com | T= 1800 11 9999 | service@in.viewsonic.com |
| Ireland (Eire) | www.viewsoniceurope.com/uk/ | www.viewsoniceurope.com/uk/support/call-desk/ | service_ie@viewsoniceurope.com |
| Korea | www.kr.viewsonic.com | T= 080 333 2131 | service@kr.viewsonic.com |
| Latin America(Argentina) | www.viewsonic.com/la/ | T= 0800-4441185 | soporte@viewsonic.com |
| Latin America(Chile) | www.viewsonic.com/la/ | T=1230-020-7975 | soporte@viewsonic.com |
| Latin America(Columbia) | www.viewsonic.com/la/ | T= 01800-9-157235 | soporte@viewsonic.com |
| Latin America(Mexico) | www.viewsonic.com/la/ | T= 001-8882328722 | soporte@viewsonic.com |
| Renta y Datos, 29 SUR 721, COL. LA PAZ, 72160 PUEBLA, PUE. Tel: 01.222.891.55.77 CON 10 LINEASElectroser, Av Reforma No. 403Gx39 y 41, 97000 Merida, Yucatan. Tel: 01.999.925.19.16Other places please refer to http://www.viewsonic.com/la/soperte/index.htm#Mexico | |||
| Latin America(Pucre) | www.viewsonic.com/la/ | T= 0800-54565 | soporte@viewsonic.com |
| Macau | www.hk.viewsonic.com | T= 853 2870 0303 | service@hk.viewsonic.com |
| Middle East | ap.viewsonic.com/me/ | Contact your reseller | service@ap.viewsonic.com |
| Puerto Rico & Virgin Islands | www.viewsonic.com | T= 1-800-688-6688 (English)T= 1-866-379-1304 (Spanish)F= 1-909-468-3757 | service.us@viewsonic.comsoporte@viewsonic.com |
| Singapore/Malaysia/Thailand | www.viewsonic.com.sg | T= 65 6461 6044 | service@sg.viewsonic.com |
| South Africa | ap.viewsonic.com/za/ | Contact your reseller | service@ap.viewsonic.com |
| United Kingdom | www.viewsoniceurope.com/uk/ | www.viewsoniceurope.com/uk/support/call-desk/ | service_gb@viewsoniceurope.com |
| United States | www.viewsonic.com | T (Toll-Free)= 1-800-688-6688T (Toll)= 1-424-233-2530F= 1-909-468-3757 | service.us@viewsonic.com |
Limited Warranty
ViewSonic Network Media Player
What the warranty covers:
ViewSonic warrants its products to be free from defects in material and workmanship, under normal use, during the warranty period. If a product proves to be defective in material or workmanship during the warranty period, ViewSonic will, at its sole option, repair or replace the product with a like product. Replacement product or parts may include remanufactured or refurbished parts or components.
How long the warranty is effective:
ViewSonic Network Media Player are warranted for 1 year for labor from the date of the first customer purchase.
Who the warranty protects:
This warranty is valid only for the first consumer purchaser.
What the warranty does not cover:
- Any product on which the serial number has been defaced, modified or removed.
- Damage, deterioration or malfunction resulting from:
a. Accident, misuse, neglect, fire, water, lightning, or other acts of nature, unauthorized product modification, or failure to follow instructions supplied with the product.
b. Repair or attempted repair by anyone not authorized by ViewSonic.
c. Causes external to the product, such as electric power fluctuations or failure.
d. Use of supplies or parts not meeting ViewSonic's specifications.
e. Normal wear and tear.
f. Any other cause which does not relate to a product defect.
- Any product exhibiting a condition commonly known as "image burn-in" which results when a static image is displayed on the product for an extended period of time.
How to get service:
- For information about receiving service under warranty, contact ViewSonic Customer Support (please refer to Customer Support page). You will need to provide your product's serial number.
- To obtain warranted service, you will be required to provide (a) the original dated sales slip, (b) your name, (c) your address, (d) a description of the problem, and (e) the serial number of the product.
- Take or ship the product freight prepaid in the original container to an authorized ViewSonic service center or ViewSonic.
- For additional information or the name of the nearest ViewSonic service center, contact ViewSonic.
Limitation of implied warranties:
There are no warranties, express or implied, which extend beyond the description contained herein including the implied warranty of merchantability and fitness for a particular purpose.
Exclusion of damages:
ViewSonic's liability is limited to the cost of repair or replacement of the product. ViewSonic shall not be liable for:
- Damage to other property caused by any defects in the product, damages based upon inconvenience, loss of use of the product, loss of time, loss of profits, loss of business opportunity, loss of goodwill, interference with business relationships, or other commercial loss, even if advised of the possibility of such damages.
- Any other damages, whether incidental, consequential or otherwise.
- Any claim against the customer by any other party.
4.3: ViewSonic DMP Warranty
- Network media player
- Compliance Information
- FCC Statement
- For Canada
- CE Conformity for European Countries
- Following information is only for EU-member states:
- Declaration of RoHS Compliance
- Copyright Information
- For Your Records
- Product disposal at end of product life
- Introduction
- Features
- System Requirements
- The Remote Control Buttons
- Parts and Functions
- Quick Start
- Read before use.
- How do I use this device?
- How do I copy media files into it?
- How do I play media files on my TV?
- What if my TV screen displays unstable image?
- What if my USB wireless dongle does not work?
- How to configure settings?
- PC Connection
- OS Support
- Connecting via USB
- Transferring Files on a USB Connection
- Disconnecting from USB
- Upgrading Firmware
- Formatting the Internal HDD
- Network Connection Connecting Wired Ethernet
- Connecting Wireless
- Note:
- Accessing Shared Folders on PC
- Mapping Network Drive from PC
- BitTorrent
- BitTorrent Download
- Visit Neighbor
- Account Management
- TV Connection
- Connecting to AV Equipments
- HDMI Connection
- Composite Audio/Video Connection
- Component Video Connection (Y/Pb/Pr)
- SCART Video Connection
- Optical Audio Connection
- Power Connection
- Activating for Playback
- Using the AV Playback Function
- All
- Video
- Photo
- Music
- IMS
- Setup
- Browsing Media Files
- HDD
- USB
- NET
- UPNP
- Playing Media Files from HDD/USB
- Playing Media Files from NET
- Playing Slideshow/Music Slideshow
- Playing a DVD Folder
- Performing Copy, Paste, or Delete Operation
- Editing Playlist
- Misc
- Slideshow Interval
- Transition Effect
- Background Music
- Audio
- Output
- Volume
- Video System
- Aspect Ratio
- Brightness
- Contrast
- Network
- Wired
- Wireless
- Network Sharing
- System
- Menu Language
- Text Encoding
- Restore Default
- System Upgrade
- Version
- Appendix
- Specifications
- HARD DRIVE SUPPORT
- INTERFACE
- Wireless Ready
- AUDIO/VIDEO INTERFACE
- MEDIA SUPPORT
- Max. Content Resolution
- VIDEO OUTPUT
- GENERAL
- Copyright and Trademarks
- Customer Support
- Limited Warranty
- ViewSonic Network Media Player
- What the warranty covers:
- How long the warranty is effective:
- Who the warranty protects:
- What the warranty does not cover:
- How to get service:
- Limitation of implied warranties:
- Exclusion of damages:
Brand : VIEWSONIC
Model : VMP71
Category : Screen Mount