
HYPERPEN 8000U PRO - Graphic tablet AIPTEK - Free user manual and instructions
Find the device manual for free HYPERPEN 8000U PRO AIPTEK in PDF.
| Product Type | Graphics Tablet |
| Brand | AIPTEK |
| Model | HYPERPEN 8000U PRO |
| Dimensions (approx.) | 200 x 150 x 10 mm |
| Weight (approx.) | 300 g |
| Stylus Power | 1 AAA battery (approx. 1 year life) |
| Tablet Power | USB |
| Connectivity | USB |
| Active Area | Approx. 152 x 114 mm (6 x 4.5 inches) |
| Included Software | Tablet Manager, NetMeeting, CADIX, Pen Soft, Free Notes, Office Ink, Art Dabbler |
| Operating Systems | Windows (Mac OS 9.0 only) |
| Pressure Function | Yes, adjustable |
| Mouse/Stylus Mode | Selectable |
| Side Buttons | 2 customizable buttons |
| Maintenance | Clean with a dry cloth, avoid chemicals |
| Safety | Do not wet, do not disassemble, repairs by qualified personnel |
| Repairability | Refer to a qualified technician |
Frequently Asked Questions - HYPERPEN 8000U PRO AIPTEK
User questions about HYPERPEN 8000U PRO AIPTEK
0 question about this device. Answer the ones you know or ask your own.
Ask a new question about this device
Download the instructions for your Graphic tablet in PDF format for free! Find your manual HYPERPEN 8000U PRO - AIPTEK and take your electronic device back in hand. On this page are published all the documents necessary for the use of your device. HYPERPEN 8000U PRO by AIPTEK.
USER MANUAL HYPERPEN 8000U PRO AIPTEK
The product provides you with good-quality writing and drawing convenience. It offers you 7 kinds of software, including Tablet Manager, NetMeeting, CADIX, Pen Soft, Free Notes, Office Ink and Art Dabbler. With those applications, it's easier for you to interact with your PC and to do more creative works. To make the best use of the product, please read the contents carefully.
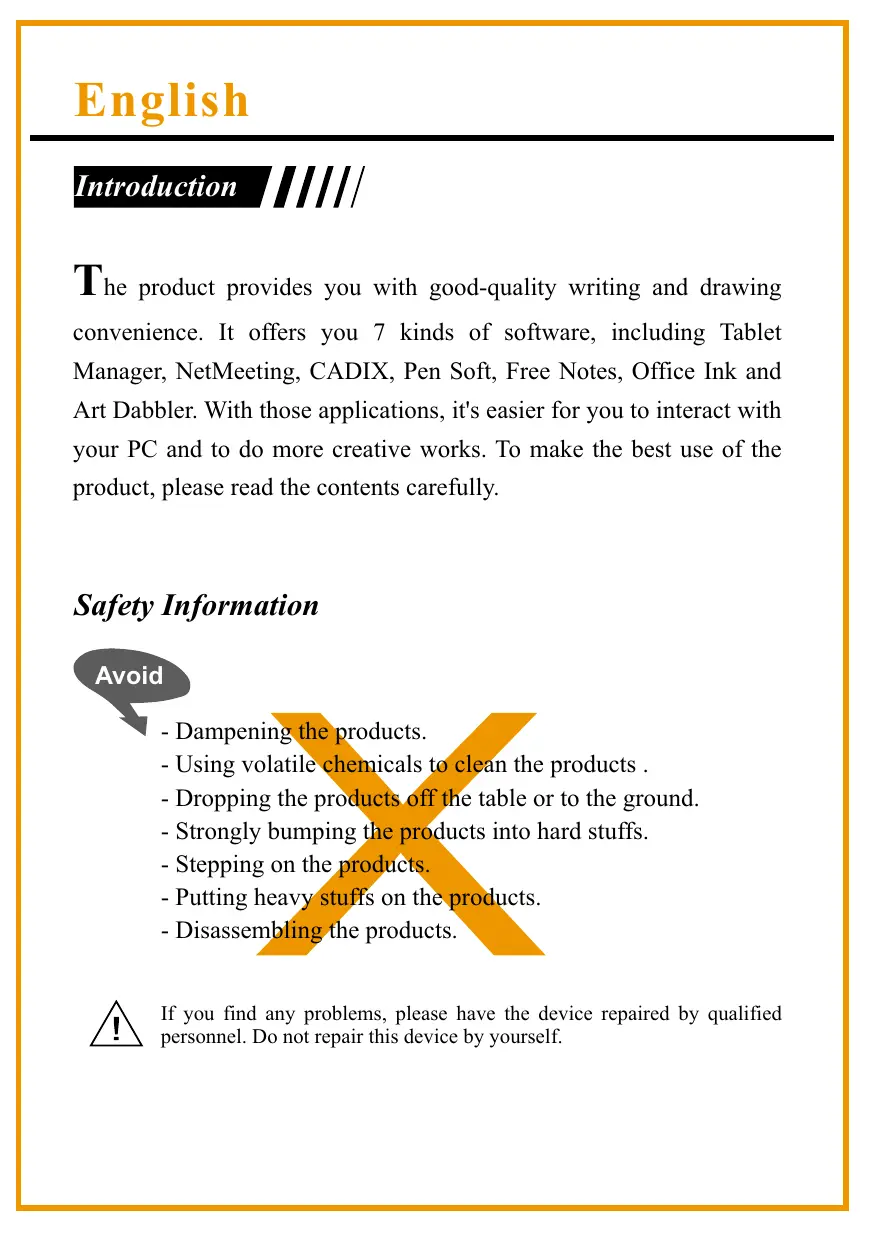
Safety Information
Avoid
- Dampening the products.
- Using volatile chemicals to clean the products.
- Dropping the products off the table or to the ground.
- Strongly bumping the products into hard stuffs.
- Stepping on the products.
- Putting heavy stuffs on the products.
- Disassembling the products.

If you find any problems, please have the device repaired by qualified personnel. Do not repair this device by yourself.
Chapter 1: Installation
Hardware
Step 1 Connect the Product with Your PC
Plug the USB cable into the USB port of your PC.
Step 2 Check the Power
Check the small square on the tablet. If the small square shows blinking light, your product is successfully powered.
Step 3 Insert the Battery
Unwind your pen and insert one AAA battery into the compartment, positioning the + and-ends as shown below. Then wind your pen.

natural_image
Two black cylindrical objects with internal structures, one marked with a plus sign and the other with a minus sign (no text or symbols on the objects themselves)* The battery life span is around one year.
□ Software
Step 1 Placing the CD driver
Place the installation CD in your CD drive.
Step 2 Showing Tablet
The screen shows the Tablet.
OR
If the screen doesn't show the Tablet, click Start and choose Run. Type "d" or where your CD drive is located and click OK.
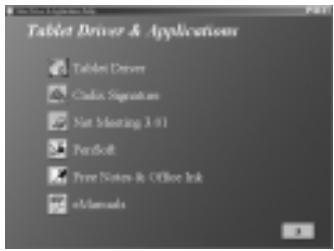
Step 3 Choosing the Application You Want
There are7 applications on the Tablet. They are Tablet Driver, Cardix Signature, Net Meeting 3.01, Free Notes, Office Ink and Pen Soft. To use Art Dabbler, please insert the other Art Dabbler CD driver. To choose the application, click the icon beside each application. Please follow the directions on the screen to install.
Note
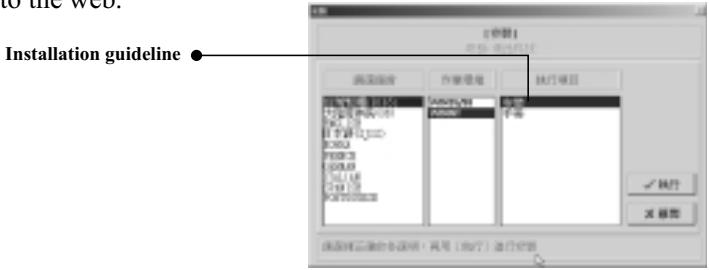
The guidelines of Cardix Signature, Net Meeting 3.01, Pen Soft, Free Notes, Office Ink and Art Dabbler are not included in this user guide. To see more information of the applications, go to the Tablet. As you click the AP icon, the next screen shows the installation guideline icon on the right. This would be ineffective if your PC is unable to connect to the web.
| Application | Use |
| Tablet Driver | Adjusts functions of the tablet and the pen in the Tablet. |
| Cardix Signature | Supports handwriting signature recognition when opening screen saver. |
| Net Meeting 3.01 | Supports on-line handwriting talk. |
| Pen Soft | Supports handwriting recognition & annotation functions. |
| Art Dabbler (in the other CD) | Supports a variety of drawing functions. |
| Free Notes | Shows your real handwriting and drawing in Email. |
| Office Ink | Special handwriting inking in any software. |
Chapter 2: Getting Started
Step 1 Click on the tablet icon at the bottom right of the tool bar (The tablet icon appears when the cable is plugged in.)

Step 2 You enter the Tablet screen. To select functions, click on buttons on the tool bar.
![Print [name] menu [menu: menu] New Help Show Print Show Print Table1.doc (100%) Table2.doc (100%) Table3.doc (100%) Import/Export (1.5) OK Cancel](/content/2019/11/169809/images/2c17ef8252d20f21d1301993b75d38d657f7e2ee9c7a5179d5a146842bd6eae2.jpg)
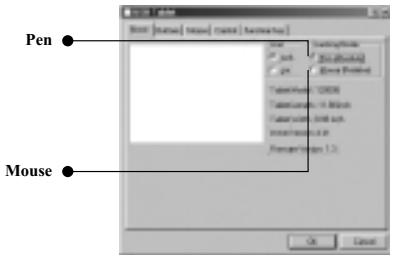
Using the Pen
Side buttons/
Click on Buttons to customize side buttons.
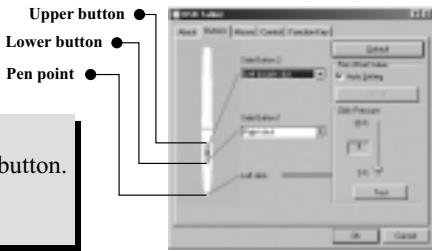
Default settings
The upper button = left double-click mouse button.
The lower button = right mouse button.
The pen point = left mouse button.
Pressure/
Move the slide up and down to adjust the pen pressure.
Mouse/
The pen is used as normal handwriting pen or mouse. To change mode, select
"Pen" or "Mouse".

Please put your pen on the hollow of the tablet while idle. If you place the pen on the tablet, the mouse is seriously affected.
Using the Tablet
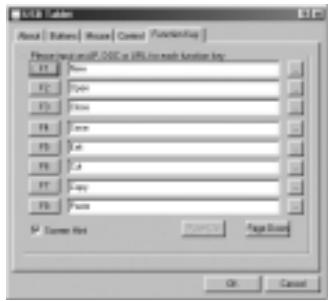
☐ Selecting the function keys
Steps
- Click on the Function Key icon on the tool bar.
- Key in the path name or URL.
- Click "OK".
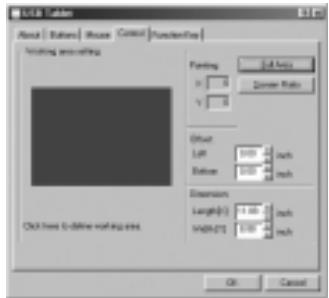
□ Adjusting the workspace
The workspace of your tablet is in proportion to the size of the screen. To reduce the scope of the workspace, click "Control" and customize the size.
Chapter 3: Q & A
| No | Question | Answer |
| 1. | Does Mac support the product? | Only for OS 9.0 version. |
| 2. | Standard mouse can't move on the screen. | Remove the wireless pen from the tablet. |
| 3. | The tablet can't work with the other PC peripherals. | Please go to upgrade new driver. |
| 4. | What is proximity? | It's the height between the wireless pen and the tablet. Within a certain height, the wireless pen is effective on the tablet. |
| 5. | What can't be put on the tablet? | Heavy stuffs or stuffs with frequency. |
| 6. | PC screen is interfered when the tablet placed aside. | Move the tablet away from the PC screen. |
| 7. | The pen has leaking problem | Go to the Tablet icon and click "Button". Then select "Pen offset value" to test the pen. |
| 8. | No connection to the computer | Re-plug in the cable. |
Einführung

natural_image
Two black pens with a plus and minus signs, no visible text or symbols on the pens or body.Capitolo 3: D & R
natural_image
Two black cylindrical objects with a plus and minus signs, one larger and one smaller, connected by a line (no text or symbols visible)Utilizando la pluma
Botones laterales/
Capítulo 3: P & R
De pen gebruiken
□ Zijknoppen/
natural_image
Two black cylindrical objects with internal structures, one open and one closed, showing no visible text or symbols.Capítulo 3 : Perguntas e Respostas
- Safety Information
- Avoid
- Chapter 1: Installation
- Hardware
- Step 1 Connect the Product with Your PC
- Step 2 Check the Power
- Step 3 Insert the Battery
- □ Software
- Step 1 Placing the CD driver
- Step 2 Showing Tablet
- OR
- Step 3 Choosing the Application You Want
- Note
- Chapter 2: Getting Started
- Using the Pen
- Side buttons/
- Default settings
- Pressure/
- Mouse/
- Using the Tablet
- ☐ Selecting the function keys
- Steps
- □ Adjusting the workspace
- Einführung
- Utilizando la pluma
- Botones laterales/
- De pen gebruiken
- □ Zijknoppen/
Brand : AIPTEK
Model : HYPERPEN 8000U PRO
Category : Graphic tablet