
P105B67 - Riding mower PARTNER - Free user manual and instructions
Find the device manual for free P105B67 PARTNER in PDF.
User questions about P105B67 PARTNER
0 question about this device. Answer the ones you know or ask your own.
Ask a new question about this device
Download the instructions for your Riding mower in PDF format for free! Find your manual P105B67 - PARTNER and take your electronic device back in hand. On this page are published all the documents necessary for the use of your device. P105B67 by PARTNER.
USER MANUAL P105B67 PARTNER
Self-propelled Ride-on lawnmower
Mechanical gear version
Hydrostatic gear version
We wish to thank you for choosing our Ride-on lawnmower. We are confident that the high quality of our machine will meet with your satisfaction and appreciation and that your lawn mower will give you long-lasting service.Before starting to use your machine, make sure to read with care this manual, which has been purposely drawn up to provide you with all the necessary information for proper use, in compliance with basic safety requirements.
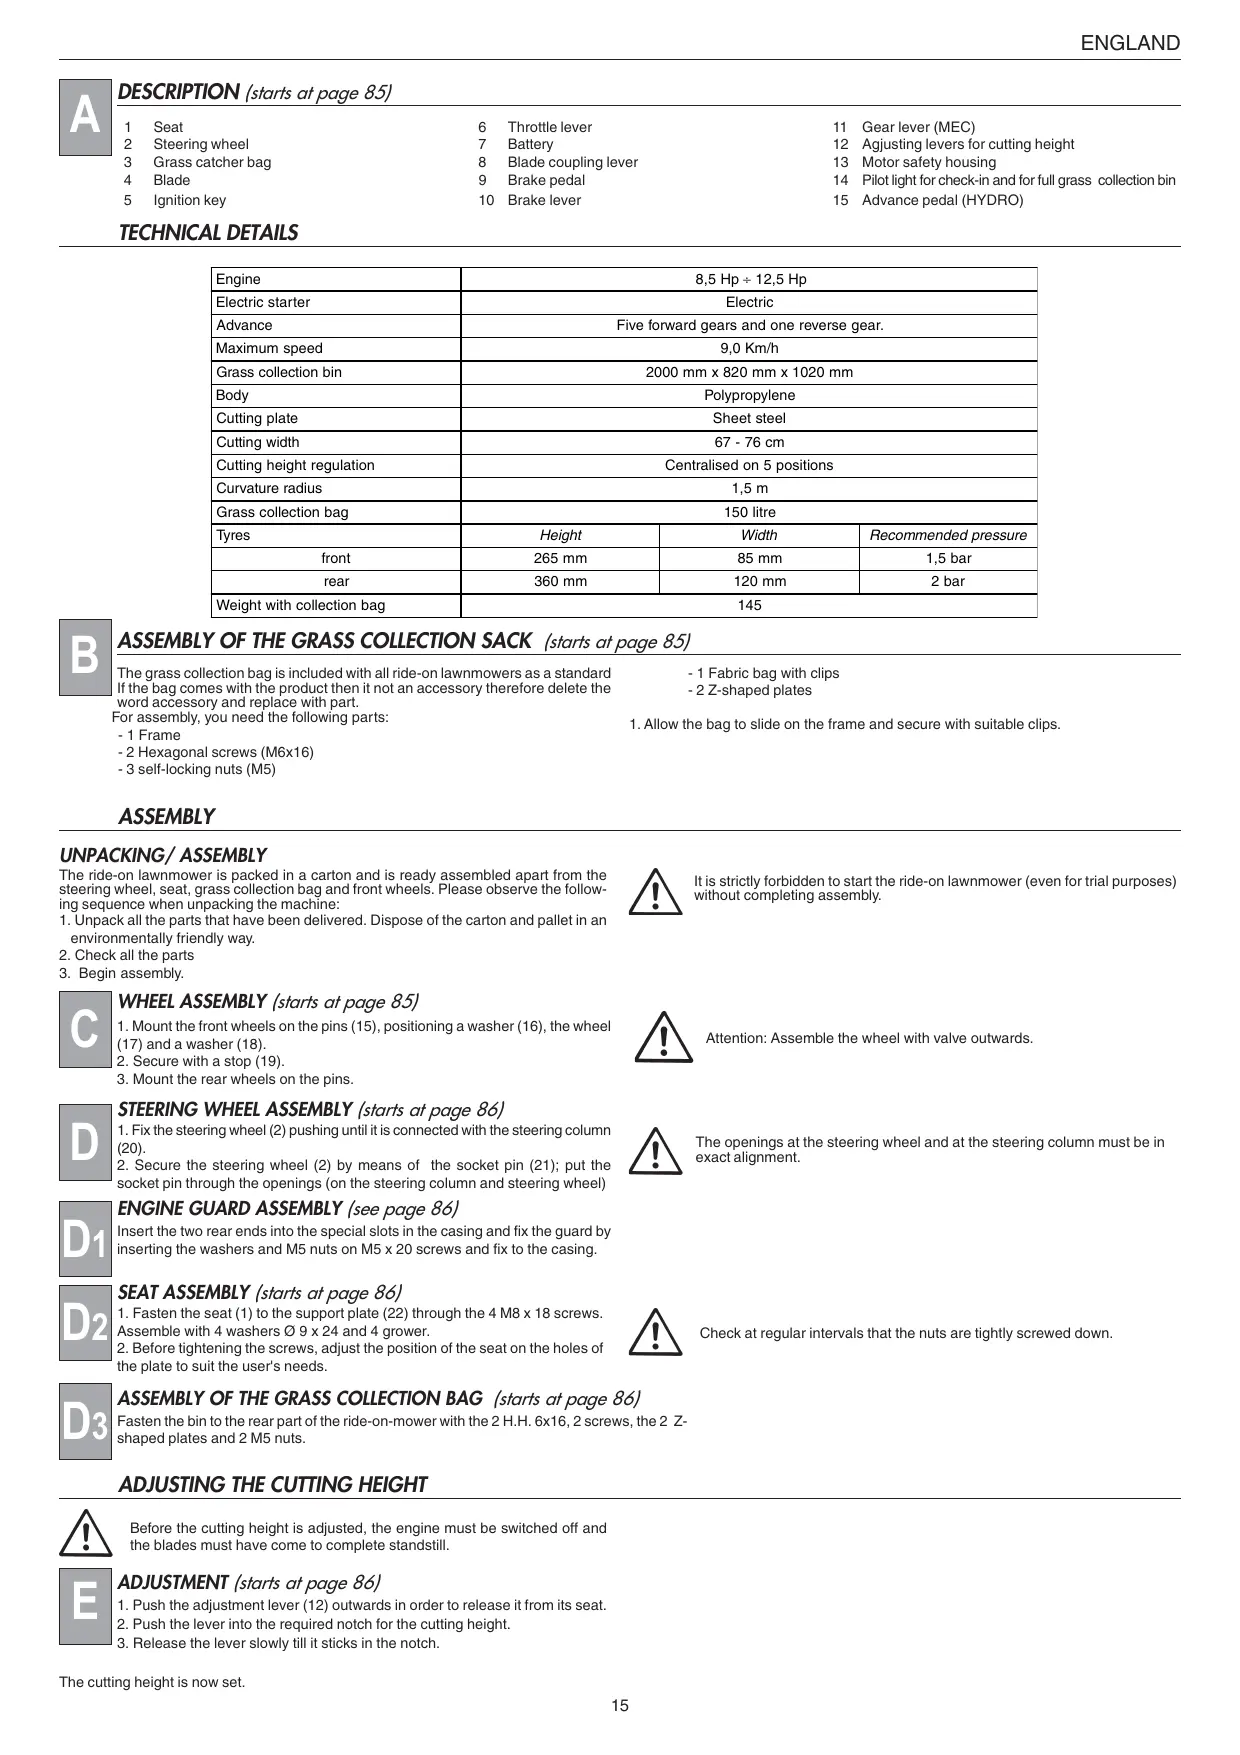
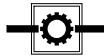
Risk of explosion! Do not top up with fuel with engine running.
Caution! Hot surface
Before carrying out any operations on the cutting tool, disconnect the plug
From top to left:
- Attention, danger
-Read the instruction manual before operating the ride-on lawnmower
- Rotating blade, risk of limb injury
- Danger, hurling objects
- Remove the ignition key and read the instruction manual before carrying out any service or maintenance work on the ride-on lawnpower.
- Keep the safety distance from the operating ride-on lawnmower (except operator)
- Max. work slope: 10^
- Noise level in accordance with the law
Generelle Warnetakte
Warning: risk of limb injury. Rotating parts.
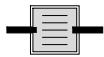
Warning: opening part.
Differential release
Diferential-Freigabe
Ontgrendeling differential
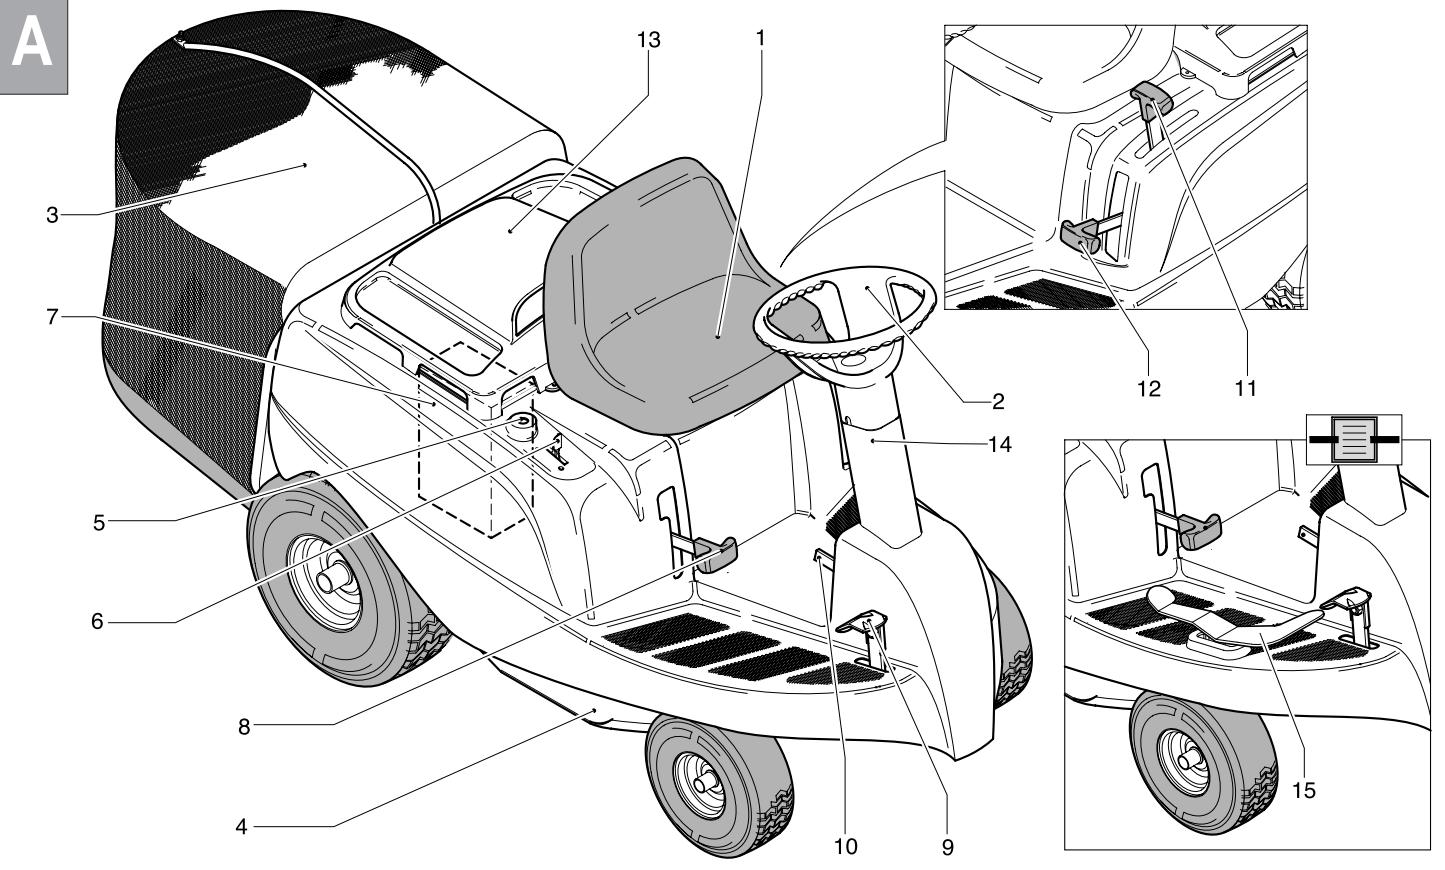
1 Seat
2 Steering wheel
3 Grass catcher bag
4 Blade
5 Ignition key
6 Throttle lever
7 Battery
8 Blade coupling lever
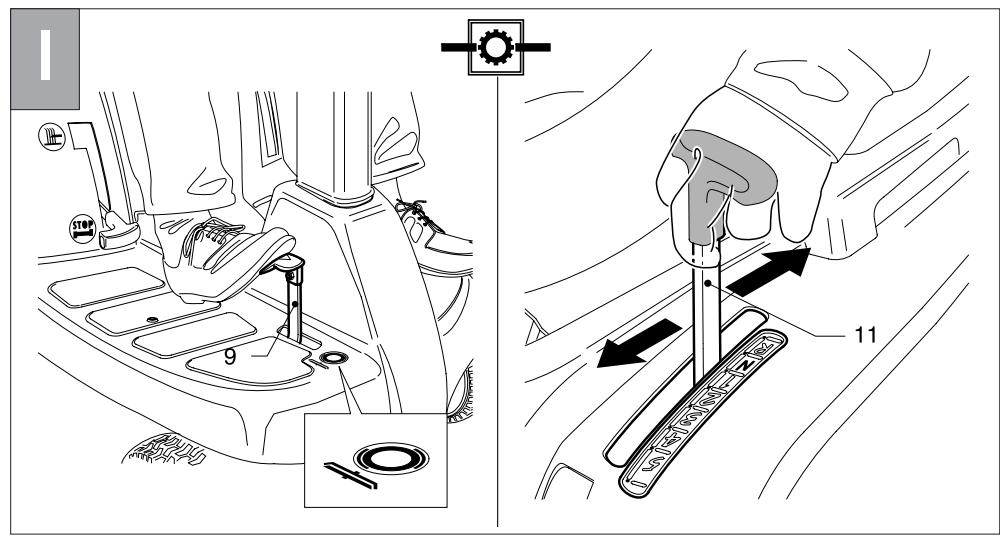
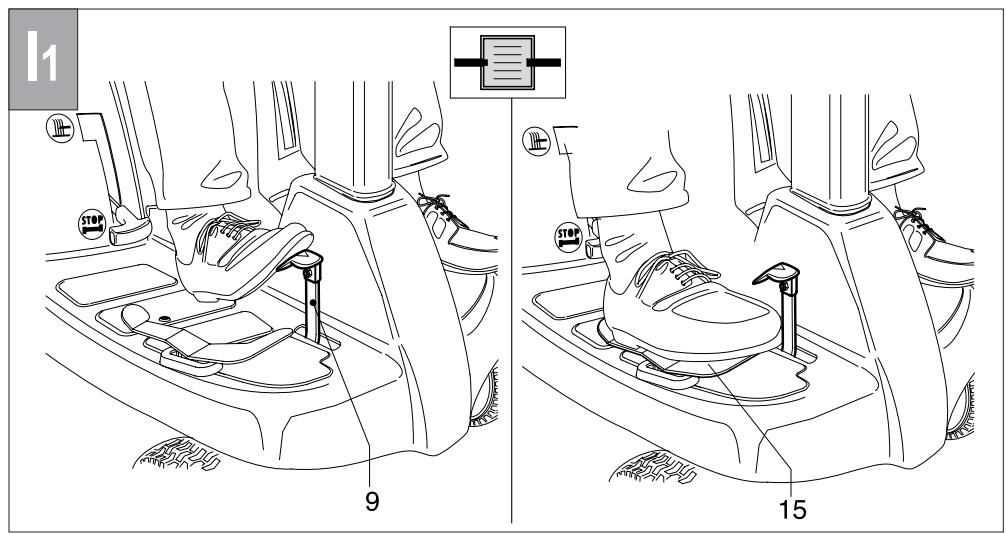
9 Brake pedal
10 Brake lever
11 Gear lever (MEC)
12 Agjusting levers for cutting height
13 Motor safety housing
14 Pilot light for check-in and for full grass collection bin
15 Advance pedal (HYDRO)
TECHNICAL DETAILS
| Engine | 8,5 Hp ÷ 12,5 Hp | ||
| Electric starter | Electric | ||
| Advance | Five forward gears and one reverse gear. | ||
| Maximum speed | 9,0 Km/h | ||
| Grass collection bin | 2000 mm x 820 mm x 1020 mm | ||
| Body | Polypropylene | ||
| Cutting plate | Sheet steel | ||
| Cutting width | 67 - 76 cm | ||
| Cutting height regulation | Centralised on 5 positions | ||
| Curvature radius | 1,5 m | ||
| Grass collection bag | 150 litre | ||
| Tyres | Height | Width | Recommended pressure |
| front | 265 mm | 85 mm | 1,5 bar |
| rear | 360 mm | 120 mm | 2 bar |
| Weight with collection bag | 145 | ||

ASSEMBLY OF THE GRASS COLLECTION SACK (starts at page 85)
The grass collection bag is included with all ride-on lawnmowers as a standard. If the bag comes with the product then it not an accessory therefore delete the word accessory and replace with part.
For assembly, you need the following parts:
-1 Frame
- 2 Hexagonal screws (M6x16)
- 3 self-locking nuts (M5)
-
1 Fabric bag with clips
-2Z-shaped plates -
Allow the bag to slide on the frame and secure with suitable clips.
ASSEMBLY
UNPACKING/ ASSEMBLY
The ride-on lawnmower is packed in a carton and is ready assembled apart from the steering wheel, seat, grass collection bag and front wheels. Please observe the following sequence when unpacking the machine:
- Unpack all the parts that have been delivered. Dispose of the carton and pallet in an environmentally friendly way.
- Check all the parts
- Begin assembly.

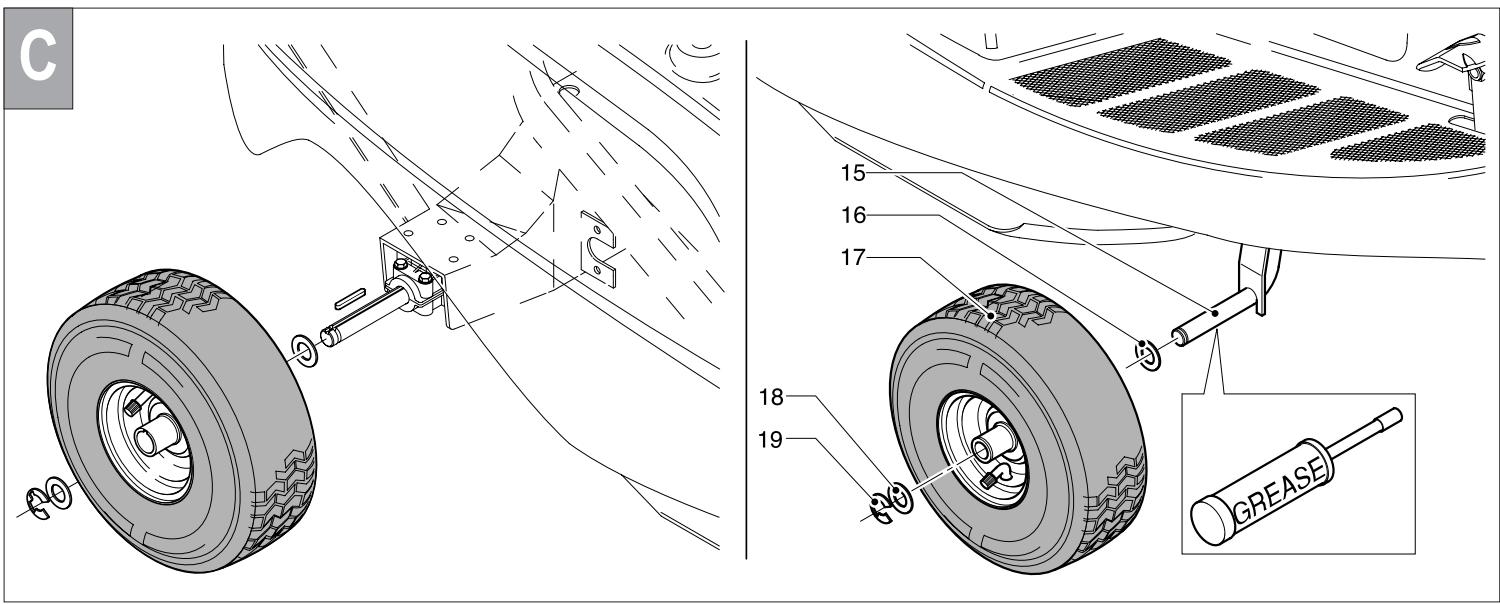
WHEEL ASSEMBLY (starts at page 85)
- Mount the front wheels on the pins (15), positioning a washer (16), the wheel (17) and a washer (18).
- Secure with a stop (19).
- Mount the rear wheels on the pins.

It is strictly forbidden to start the ride-on lawnmower (even for trial purposes) without completing assembly.

STEERING WHEEL ASSEMBLY (starts at page 86)
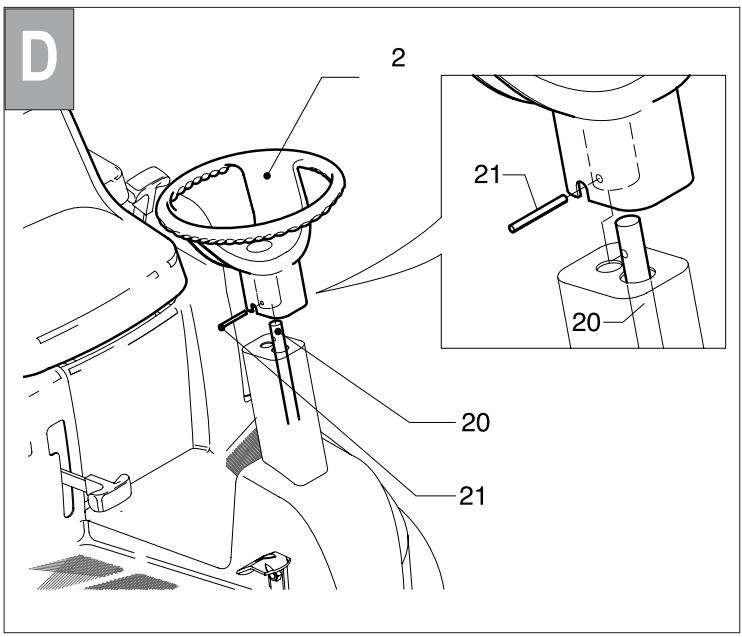
- Fix the steering wheel (2) pushing until it is connected with the steering column (20).
- Secure the steering wheel (2) by means of the socket pin (21); put the socket pin through the openings (on the steering column and steering wheel)

The openings at the steering wheel and at the steering column must be in exact alignment.

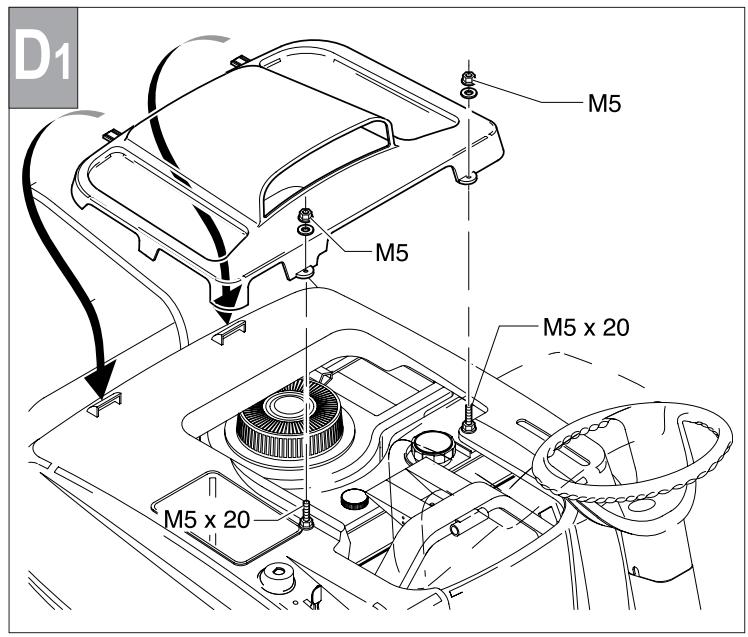
ENGINE GUARD ASSEMBLY (see page 86)
Insert the two rear ends into the special slots in the casing and fix the guard by inserting the washers and M5 nuts on M5 x 20 screws and fix to the casing.

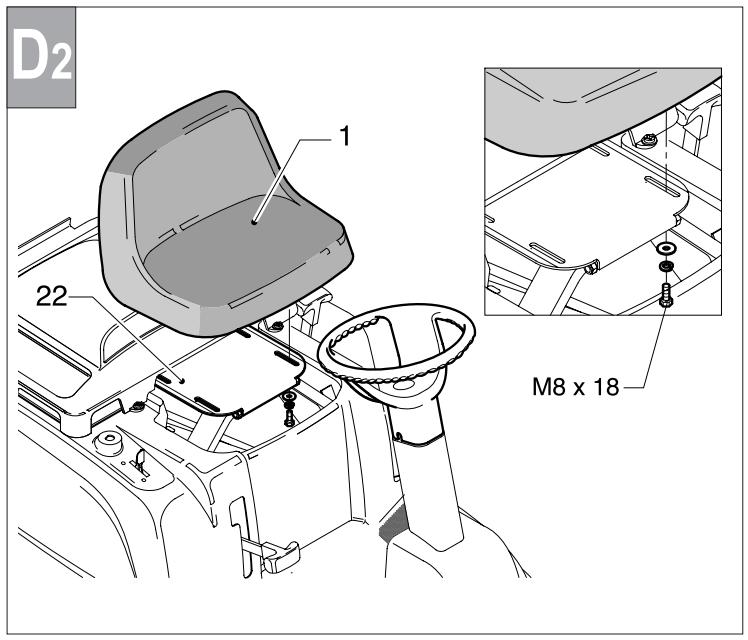
SEAT ASSEMBLY (starts at page 86)
-
Fasten the seat (1) to the support plate (22) through the 4 M8 x 18 screws. Assemble with 4 washers 09 × 24 and 4 grower.
-
Before tightening the screws, adjust the position of the seat on the holes of the plate to suit the user's needs.

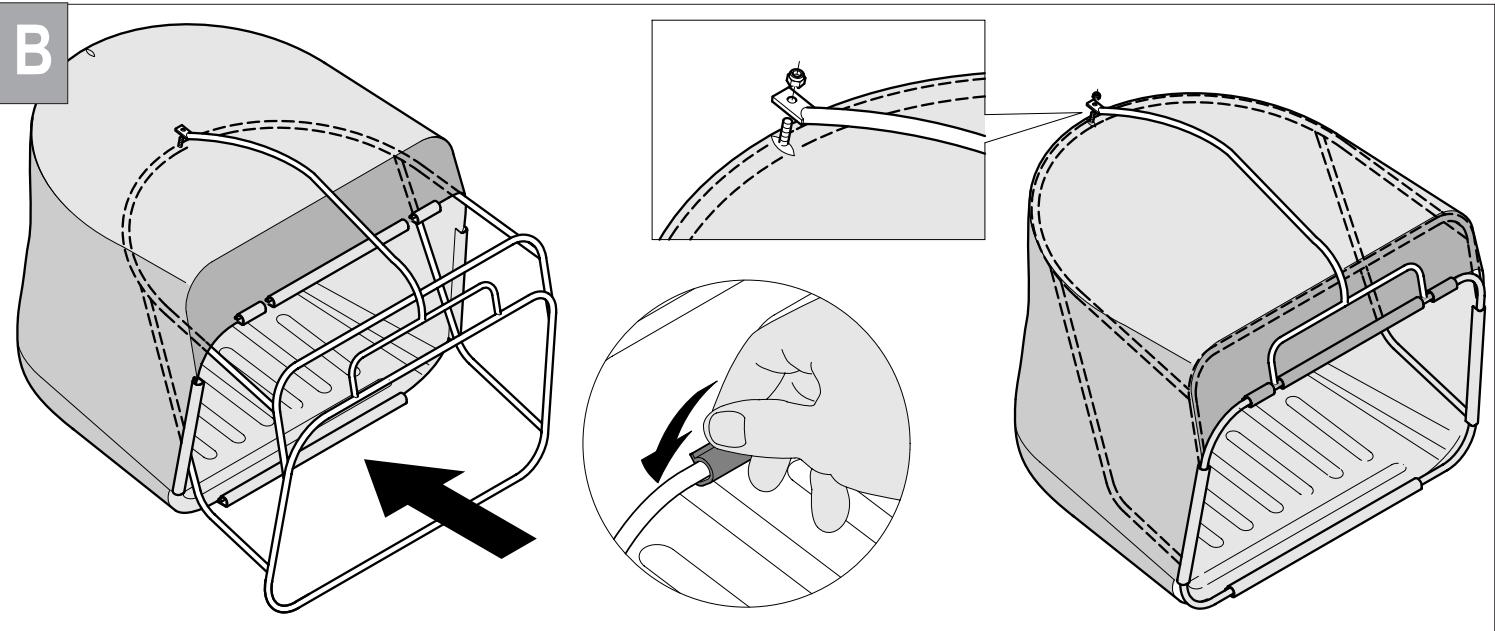
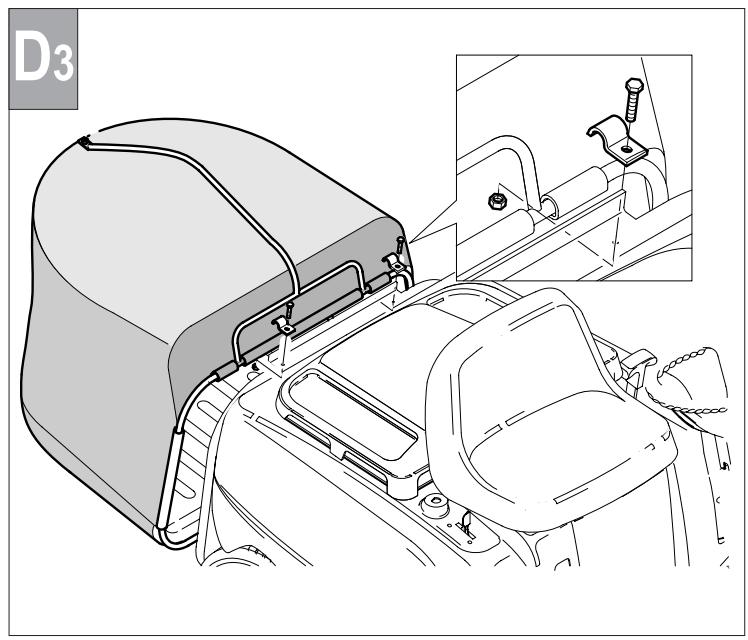
ASSEMBLY OF THE GRASS COLLECTION BAG (starts at page 86)
Fasten the bin to the rear part of the ride-on-mower with the 2 H.H. 6x16, 2 screws, the 2 Z-shaped plates and 2 M5 nuts.

Check at regular intervals that the nuts are tightly screwed down.

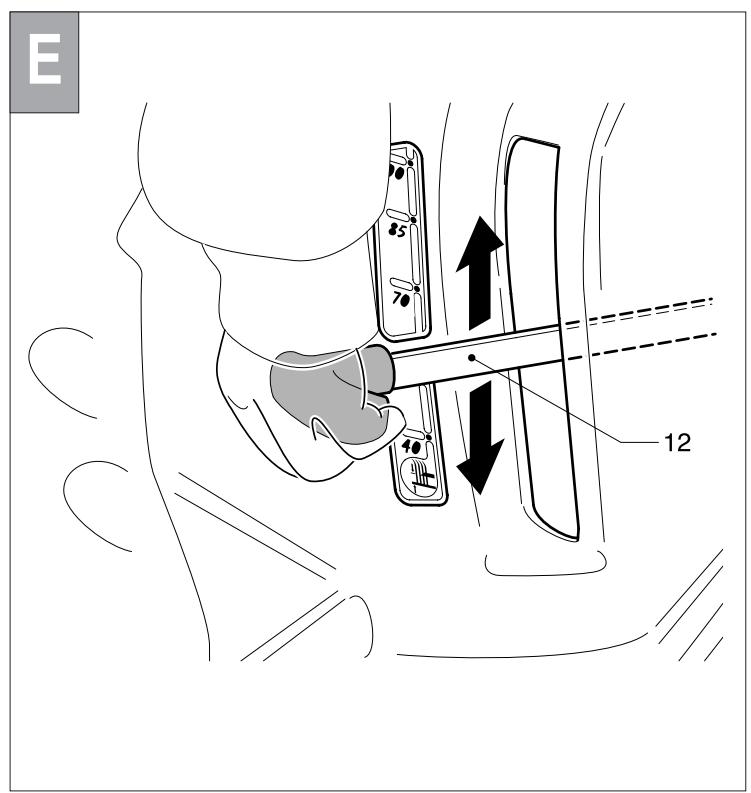
Before the cutting height is adjusted, the engine must be switched off and the blades must have come to complete standstill.

ADJUSTMENT (starts at page 86)
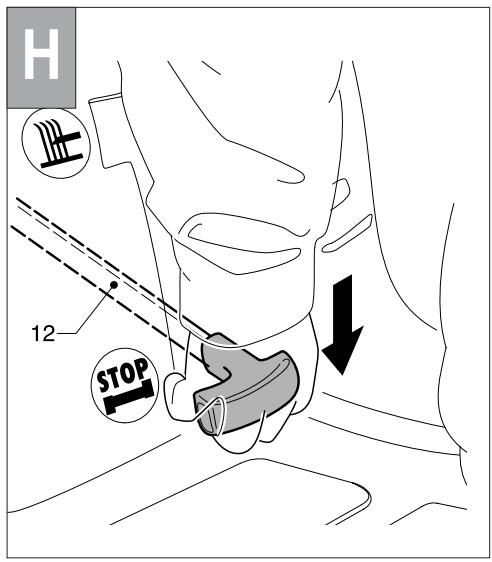
- Push the adjustment lever (12) outwards in order to release it from its seat.
- Push the lever into the required notch for the cutting height.
- Release the lever slowly till it sticks in the notch.

EMPTYING THE GRASS COLLECTION BAG(starts at page 86)

Empty the grass collection bag in time before it overflows. The red light situated under the steering wheel shows that the bin is full.
Don't go on filling the grass collection bin when the red light situated under the steering wheel is on.
Switch off the engine.
1. Hold the rod and swivel the bag. Shake the bag twice until it is completely empty.
2. Let the grass collection bag return slowly to its original position.
3. Switch on the engine.
CARE OF THE LAWN AND MOWING
The modern gardening technology has designed and developed labour-saving devices (mower with grass collection bag). For a good, healthy green lawn, it is essential to mow and aerate it regularly.
Fertilising is also essential.
Always make sure the blades are sharp and in perfect conditions to avoid grass fraying and yellowing of the lawn.
You will achieve a clean cut with regular and straight windows.
The mowing tracks should always overlap a few centimetres to avoid any uncut strips in between.
Lawn cutting frequency depends on the rate of growth. In the main growing season (May-June) often (twice a week) or at least once a week. The cutting height should be between 4-6 cm. and the growth before the next cut should not be more than 4-5 cm.
During hot and dry periods, the lawn should be cut 1,5cm . higher than normal, to avoid ground and root drying out.
If the grass is somewhat higher than normal, you should not make the mistake of cutting it immediately; you can damage the lawn. Do no cut to more than half the necessary height.

SAFETY PRECAUTIONS (starts at page 87)
Before mowing, remove all foreign objects from the lawn which may be thrown by the machine. While mowing, stay alert for any foreign objects which may have been missed.

(starts at page 87)
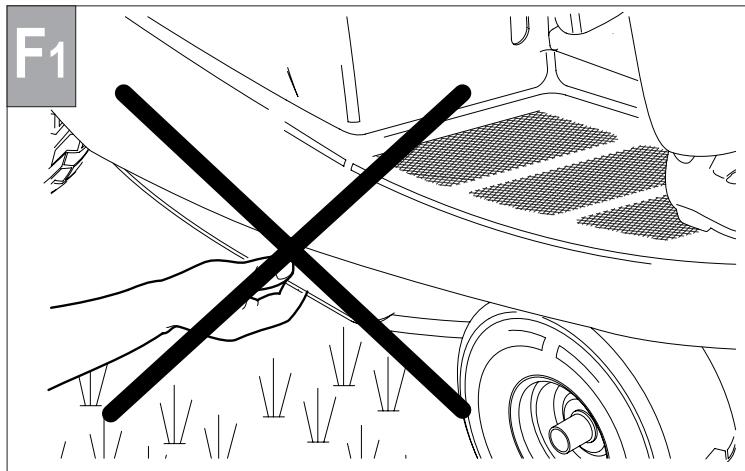
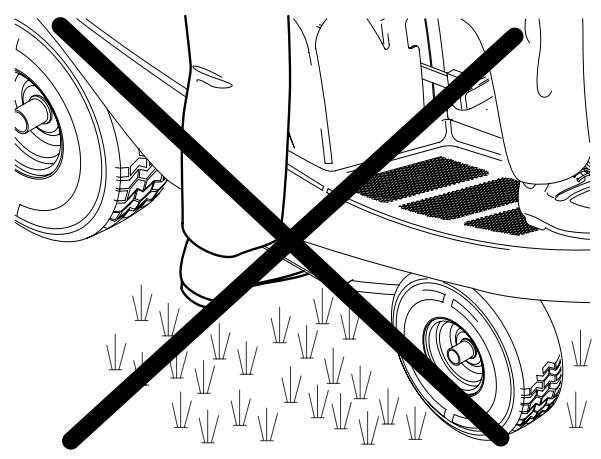
Never place your hands or feet underneath the deck or into the rear discharge chute while the engine is running.
OPERATION
Don't put the ride-on lawnmower into operation before you have completely finished its assembly. Before putting the ride-on lawnmower into operation for the first time, don't forget to fill it with petrol and oil. Connect the red cables to the positive terminal and the black cables to the negative terminal (the battery is placed in battery holder under the motor safety housing on the right of the seat).
The ride-on lawn mower may be put into operation for the first time only by trained persons only who have read and fully understand the operating instructions.
Use the following on your ride-on lawn mower:

Petrol engine oil
lead free (min. octane rating 77)
SAE 30 ("SE", "SF" O "SG")
STARTING THE ENGINE

Start up the engine only after filling the tanks with sufficient petrol and oil.
Carefully follow the instructions in the enclosed engine manufacturer's operating and maintenance manual.

REFUELLING (starts at page 87)

Danger of explosion! Fill the tank only only in an open area! Never refuel while the engine is running or is very hot! Do not smoke!
The petrol tank is placed in the engine block below the seat.
- Lift the seat
- Unscrew the tank cap (23) and fill up with lead-free petrol.
- Screw the tank cap back.
TOPPING UP WITH OIL


Use only oil of type SAE 30 ("SE", "SF" or "SG"). Ensure that no oil is spilt onto the ground.
The oil filler cap is placed in the engine block, below the seat.
- Lift the seat
- Unscrew the oil filler cap (24)
- Fill up the oil until the "MAX." mark on the dip stick is reached
- Replace the oil filler cap.
ELECTRIC ENGINE START

The exhaust fumes contain carbon monoxide, an odourless and deadly gas. Never start the engine in closed or badly ventilated rooms.

(starts at page 88)
Look for a flat piece of ground with short grass for starting the engine.
Operate the electric start only when sitting on the tractor with the blade clutch (8) in stop position and with brake engaged.
- Set the clutch blade (8) to STOP position
- Set the throttle lever (6) to START position
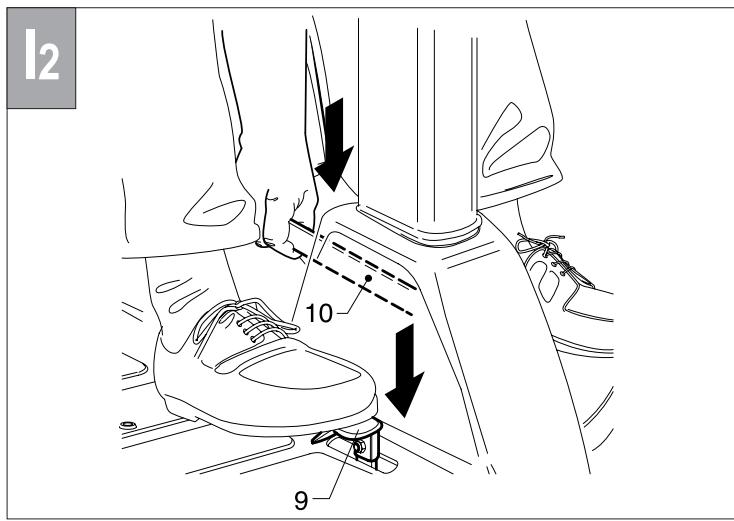
- Press the brake pedal (9 - Fig.1).

(starts at page 88)
-
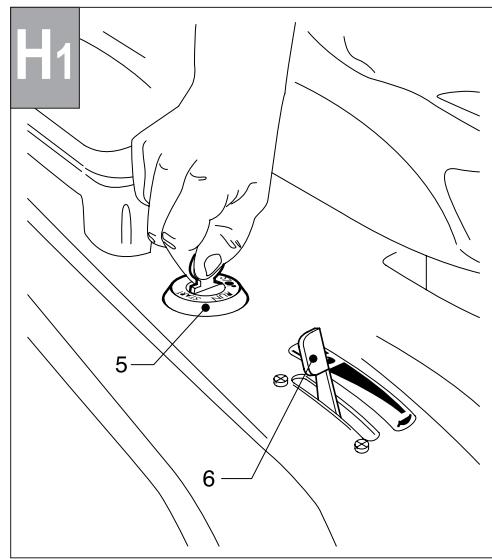
Insert the ignition key in the ignition block (5)
-
Turn the key to the right and release it, after starting in "RUN" position. The green light positioned beneath the steering wheel control remains on. Should the engine fail to start within 5 seconds, to avoid damaging the battery, wait a further 10 ten seconds before trying again.

(starts at page 88)
- Set the lever (6) between and until you judge the revis to be correct for your work

Do not touch ignition key while running.
SWITCHING OFF THE ENGINE
To switch off the engine position the key to "STOP". The red light goes off.
Only switch the engine off when the machine is at a complete standstill.
Always remove the ignition key to prevent accidental starting.
STARTING UP

Before starting up check the oil and petrol levels.
Do not smoke during the oil and petrol refuelling and checking operations.
Top up with petrol or oil if necessary (as described in detail in the previous chapter).

MOVING WITHOUT GEAR PEDAL ENGAGED (starts at page 88)

Movement without power.
Only possible with the engine off.
Pushing the mower may be necessary to move it to the storage area.
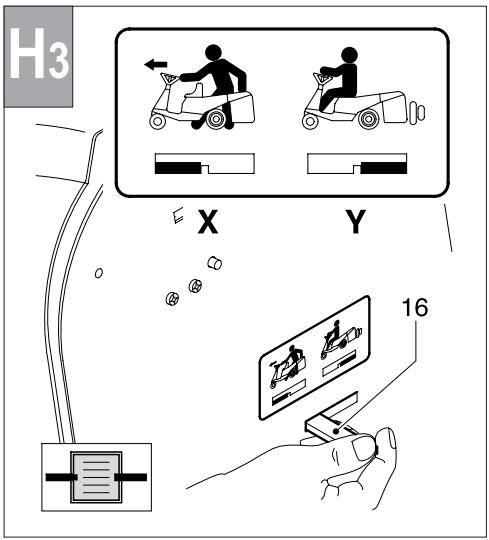
Should it be necessary to manually move the mower the gear lever must be in the neutral position 'X'.
Warning! For all manual shift operations the engine must be off and the ignition key removed.

DRIVING INSTRUCTIONS (starts at page 88)
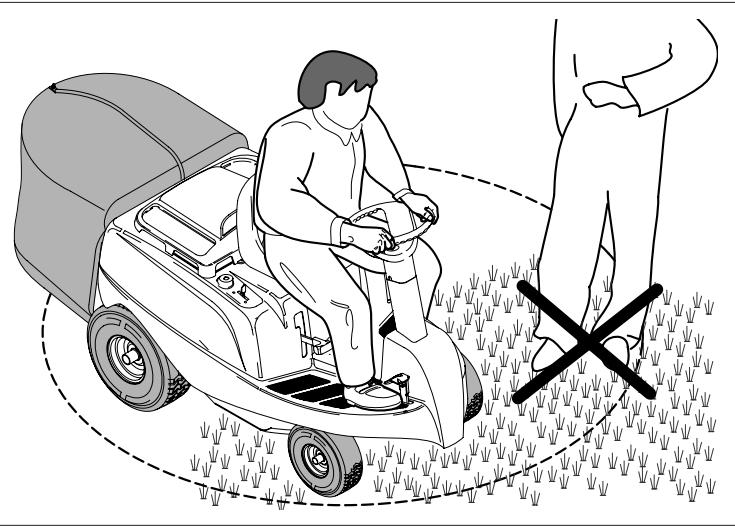
Ensure that there are no persons or animals within the operating vicinity of the machine.
Select the required speed and drive carefully. Transportation of other persons is strictly forbidden.

DRIVING (starts at page 88)
-
Press the brake pedal (9) which acts as a clutch, activate the lever (11 pic l) according to chosen gear, then slowly release it starts up. To engage reverse gear, stop, and engage the reverse gear (11 pic l) into reverse (R) by pressing the brake pedal (9), easing the brake pedal (9) again.
-
Advance speed may also be varied by manually operating the gas throttle lever (6 pic H1).

BRAKING (starts at page 88)
Press the brake pedal (9 pic 11).
To lock the brake pedal (9) use the lever (10).
The mower mechanism can only be switched on when the machine is at a standstill (parking brake engaged), with engine running, and throttle on (full) and with operator seated on the mower.

ENGAGING THE MOWER MECHANISM (starts at page 88)
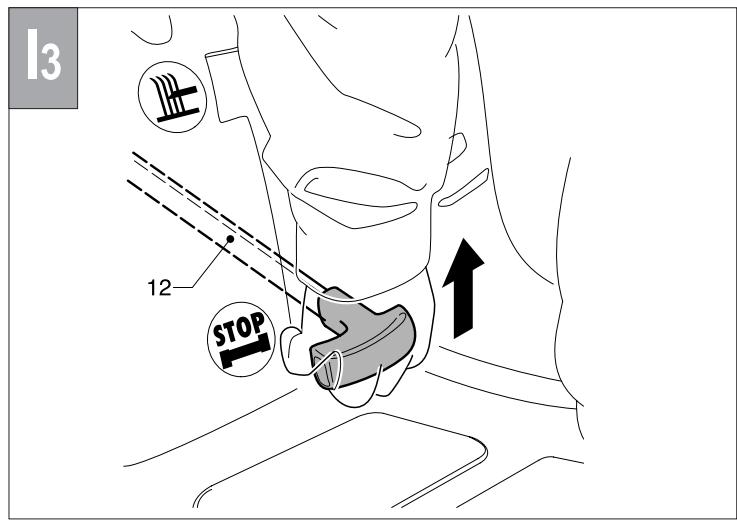
- Engage the brake (9)
- Set the lever (12) on START position
The mower mechanism is now engaged and the blade is rotating.
SWITCHING OFF THE MOWER GEAR
Set the clutch blade lever (12) into STOP position.

The blade stops turning in about 5 seconds.
SAFETY RULES
1) All persons operating the ride-on lawnmower must be familiar with the operating instructions.
- Very important regulation: anybody under the age of 16 or under the effects of alcohol or medicines cannot operate the machine.
2) Exhaust fumes from petrol engines: these fumes contain harmful carbon monoxide, never operate the engine in closed environments.
3) When operating on the ride-on lawnmower make sure that no other persons, especially children or pets, are in the vicinity of the ride-on lawnmower.
4)Please ensure that foreign matters (strips, twigs, iron wire, etc.) are removed from the lawn. Splinters can be hurled outwards or the blades can get damaged.
5)No smoking in the vicinity of the mower during operation.
6)Only mow during daylight or under good lighting conditions.
7)Only Mow up or downwards a slope NEVER at an angle to the slope. Special care is needed when changing direction on slopes.
8) When driving to the area to be mowed, the ride-on lawnmower mechanism must not be switched on.
9)Never use machine in the event of damage to the bodywork or without protective equipment (i.e. grass collector bag, etc).
10)The correct position of the engine block has been specifically designed and set at the factory and must not be altered
11)Start by pressing the drive pedal with the greatest care, following the manufacturer's instructions. Pay attention to feet positioning at a sufficient distance from the cutting blade.
12)Do not tilt the engine when departing and starting up.
13)This ride-on lawnmower has a safety device which switches off the engine every time that the operator leaves his seat.
14)Keep your hands or feet away from the rotating blades. Stay away from the discharge opening whilst the blade are rotating.
15) Do not manually move or lift the machine with engine running.
16) In the event of engine blockage, clogging of the discharge channel and in all maintenance operations on the cutter mechanism and in cases of temporary removal of the safety protections the engine must be switched off and the cutter mechanism disengaged.
Starting up (engine start) must be carried out as described in detail under the heading "initial starting up".
Never change gear while driving, the mower must always be at a standstill. Never mow the grass with reverse gear engaged.
- Position the gear level (11 pic l) to N (neutral). The mover can be moved and pushed without any problem.
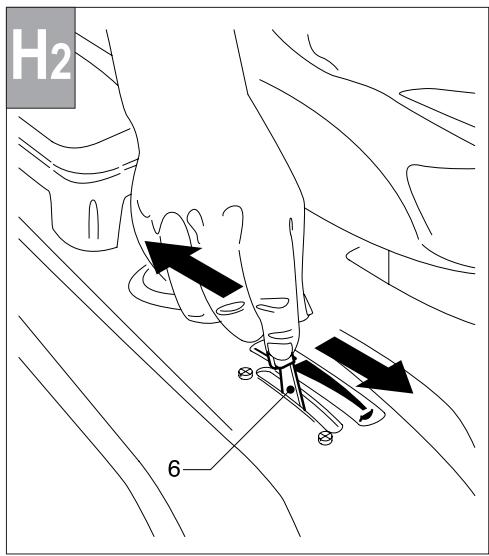
- Position the hydrostatic gear block level (16 pic H3) on the discharge plate to neutral X. At the end of the manual push operation, reposition lever 16 to drive engagement pos. Y.
Transmission occurs on the rear wheels by means of the hydrostatic gear, braking is by pressing the pedal (9) on the right of the steering wheel column.

DRIVING
-
Release the lever (10) and press the brake pedal (15) slowly fully down.
-
Advance speed may also be varied by manually operating the gas throttle lever (6 pic H1).

BRAKING
Remove the right foot from the drive pedal (15 pic I1). Press the brake pedal (9). To activate the parking brake, pull the lever (10 pic I2) upwards.
Pressing by the brake, the drive pedal will automatically position itself on neutral.
DRIVING NOTICE
If possible, avoid driving at full throttle.
- It is possible to begin cutting in forward gear after having released the brake pedal.
If the user stands up from the seat during the mowing, the engine switches off.
Important: remove the ignition key.
17)The engine must also be switched off:
- when you leave the machine or during its transportation
before refuelling
- during the grass collection bag emptying operations.
18)Take the greatest care during the cutter regulation operations. Risk of injury!! Keep fingers away from the area between cutter and bodywork. Wear gloves.
19)Only empty the petrol tank in the open.
20)Before storing in a closed room, let the engine cool down.
21) In order to avoid risk of fire, the engine and exhaust must be kept free of grass, leaves and leaking grease.
22)The grass collection bag must regularly be checked for signs of damage
23)Do not mow in reverse
Maintenance and storage
1)Make sure that all nuts, bolts, and screws are kept well tightened to keep the mower in a safe operating condition.
2)Never leave the machine with fuel in the tank within an enclosed area where the fuel vapours could reach naked flames or sparks.
3)Allow the engine to cool before storing in any enclosure.
4)Keep the engine, silencer, battery compartment and petrol tank free from grass, leaves and excess lubricant, in order to reduce the danger of fire.
5)Frequently check the grass bag for wear or deterioration
6)For safety reasons, be sure to replace worn-out or damaged parts in due time.
7) If the fuel tank has to be drained, it is essential that this be done outdoor.
8)Assemble the blades following the corresponding instructions and use only blades bearing the maker's name or the trademark of the manufacturer or supplier and marked with the reference number.
9) To protect hands during disassembly or assembly of the blades, it is absolutely essential to wear suitable protective gloves.
MAINTENANCE

All maintenance, service and cleaning work must be carried out only after the engine has stopped and cooled off. The following operations may be carried out by the user himself. All other maintenance, service and repair works must be carried out by an authorized dealer.
| AFTER USING EACH TIME | AFTER FIRST 5 HOURS | OFTEN | MONTHLY | EVERY 25 OPERATING HOURS | EVERY 25 OPERATING HOURS | EVERY 25 OPERATING HOURS | AT THE BEGINNING OF EVERY SEASON | PRIOR TO STORING | |
| Engine check | ■ | ■ | ■ | ||||||
| Oil change | ■ | ■ | |||||||
| Filter cleaning | ■ | ||||||||
| Spark plug checke | ■ | ■ | |||||||
| Air filter replacement | ■ | ||||||||
| Air duct cleaning | ■ | ||||||||
| Switch check | ■ | ||||||||
| Battery and terminal cleaning | ■ | ||||||||
| Brake check | ■ | ■ | |||||||
| Tyre pressure check | ■ | ■ | ■ | ||||||
| Blade sharpening or replacement | ■ | ||||||||
| Loose part check | ■ | ■ | |||||||
| Mower cleaning | ■ | ■ |

In the event of using this ride-on lawnmower under extreme conditions and very high temperatures, check more often.
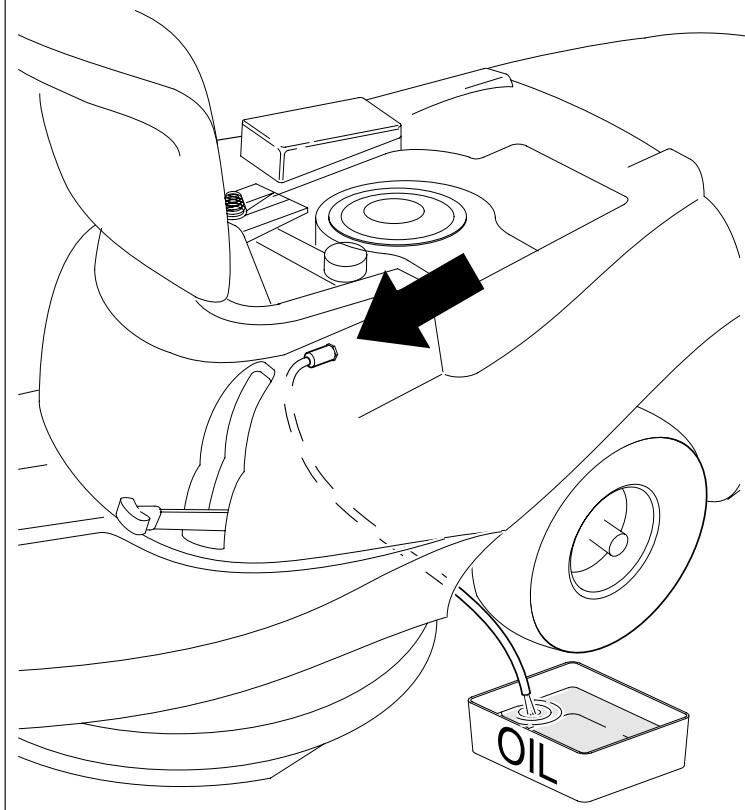
OIL LEVEL CHECK
You can check the motor oil level with the dip stick placed in the oil filler tank cap. The oil level must be between "MAX." and "MIN." notches.

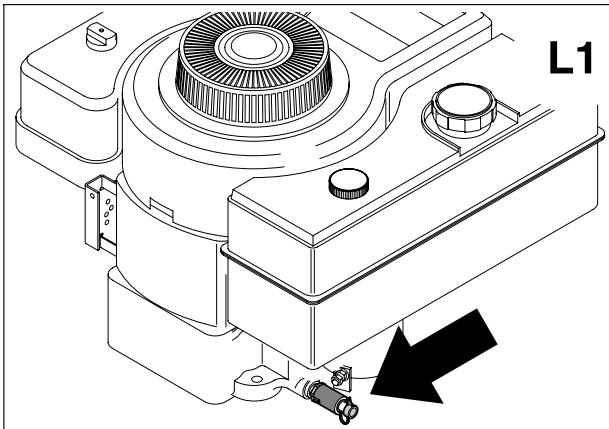
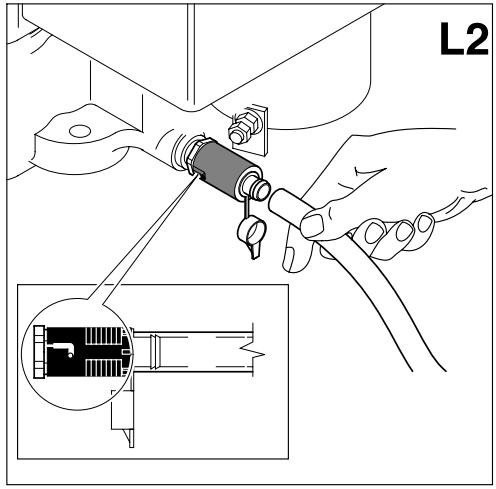
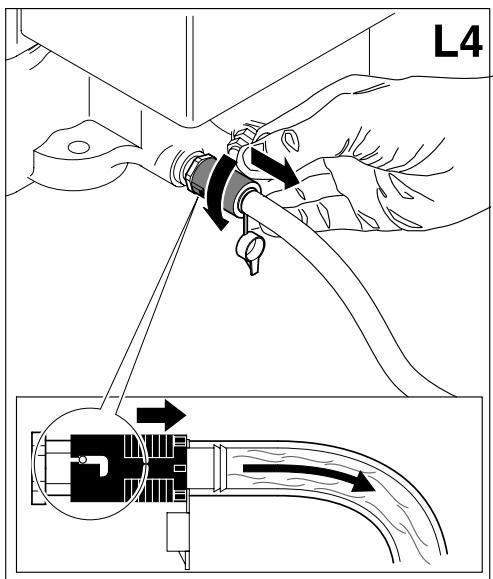
OIL CHANGE (starts at page 89)
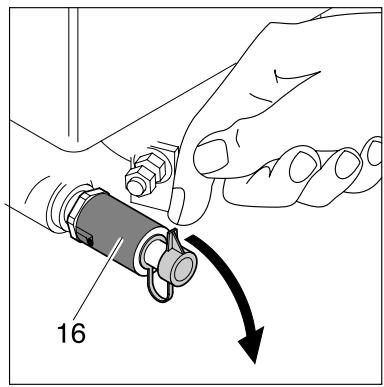
Used oil can be removed from the oil tank mouth by means of an adapter (16).
Undertake the operations according to the sequence indicated in Fig. L. Once done repeat the same operations in reverse order being sure to close connection (16), replace the cap and remove the tube used for the exhaust oil.
AIR FILTER AND SPARK PLUG
Please follow the engine manufacturers operating instructions enclosed with this ride-on lawnmower and the fault finding guide.

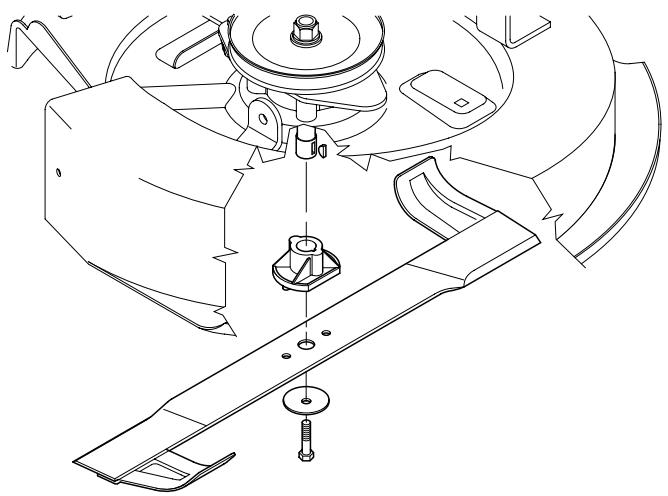
BLADE SHARPENING AND REPLACEMENT (starts at page 89)
Always use only original spares!
Should you not have the necessary tools to undertake this operation, take the ride-on lawnmower to an authorized dealer for blade sharpening or replacement.
Remove the ignition key and always wear protective gloves when you replace the blade.
BATTERY
Remove the battery during storage!
The ride-on lawnmower can be fitted with various types of battery (see battery sheet for instructions and use).
BATTERY CONNECTION
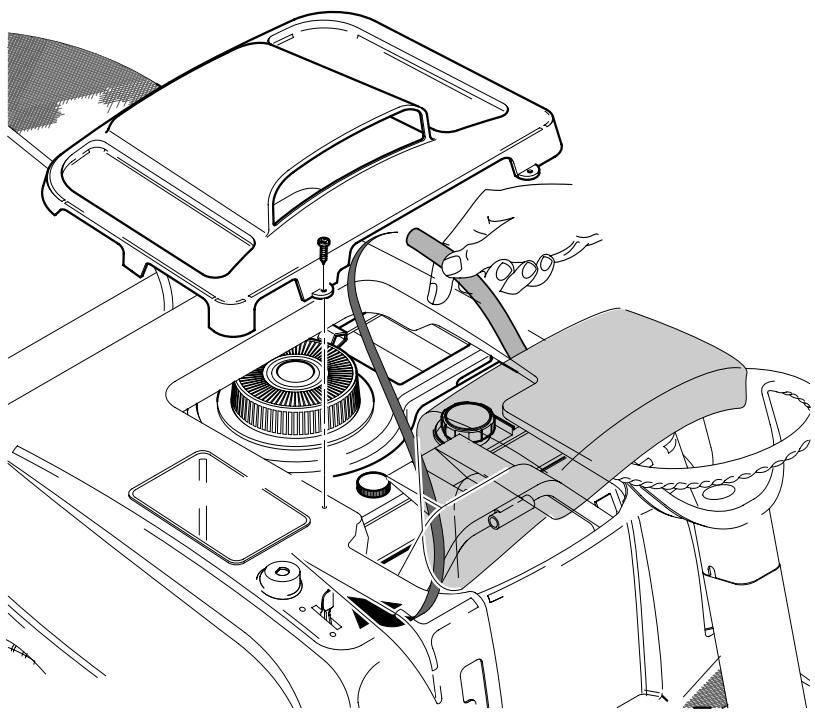
- Open the engine cover (Fig.G)
- Insert the battery (as illustrated in the relative instruction sheet)
- Connect the red wire to the positive pole and the black wire to the negative pole
- Replace the cover after connection.

Recharge the battery only in a dry room.
IMPORTANT! Protect the contacts from dirt, damp and moisture.
DO NOT SPRAY WITH WATER!

Used oil must not be drained into the sewer system or waterworks. In order to prevent any pollution to the water-table.
Most garages have used oil deposits, or use the authorized deposits according to your local authority regulations.
- Release the blade. Fit a new blade or re-sharpen the old one and re-fit.

For safety reasons the blade should only be re-sharpened by an Authorsied Service Dealer.
BATTERY DISPOSAL
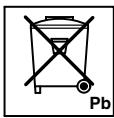
Those batteries marked with a "crossed out waste disposal bin" and bearing the chemical symbol Pb (battery containing lead) are not to be disposed in domestic waste bins.

The user is legally obliged to take the used batteries to special collection points or to return them to the retailer.
MOWER CLEANING

For engine cleaning, remove the ignition key and wait 10-15 minutes for the engine to cool down.
With the mower tilted the carburettor must always point upwards. Always clean the mower with engine off.
FURTHER MAINTENANCE AND REPAIR ADVICE
Always wear protective gloves when handling the blades (during checking or cleaning operations).

Regularly check that the grass collection device is in good condition. Due to the risk of fire it is essential that both the engine and exhaust are kept free of grass, leaves or any combustible material!
For safety reasons always replace used and or damaged parts immediately (by an authorized dealer).
Do not hose the engine casing from the outside to prevent any water getting onto the spark plugs or carburettor causing damage.
Use cloths or brushes to clean away any dirt of grass residue.
Frequently check the blade for damage.
The lawn mower must be checked by a SERVICE DEALER.
STORAGE

Never store your mower with petrol in the tank in places where petrol vapours could come into contact with naked flames or sparks.
Before storing the mower in a closed room allow the engine to cool!
In any event never leave the machine unattended and with ignition key inserted in the ignition block.
TROUBLES - REMEDIES
| FAULT | POSSIBLE CAUSES | CORRECTION |
| Engine does not start | No petrol | Fill the tank, check that petrol reaches the carburettor, check the tank venting by sticking a needle into the hole over the cover. |
| Poor, contaminated petrol | Always use clean, fresh petrol. Clean then the carburettor | |
| Fails to arrive at "START" and "STOP" position | Seek assistance from Service Workshop. | |
| Dirty air filter | Clean the spark plug and replace if necessary. | |
| Engine does not start | No spark | Clean the spark plug and replace if necessary. Check the cable. |
| Difficulty in starting, flooded engine. | Unscrew the plug and dry it. | |
| Flat battery | Recharge. | |
| Starter cord incorrectly connected | Check the connection. | |
| Engine stalls | Grass too high or damp. | Adjust the cutting height, in high position create air flow by reversing. |
| Mower casing blocked | Clean the casing (Important: before cleaning extract the spark plug lead) | |
| Blade badly worn | Replace the blade. | |
| Closed throttle | Open throttle by moving lever to MAX. pos. | |
| Dirty air filter | Clean air filter (see engine instructions also). | |
| Carburettor calibration incorrect | Seek assistance from Service Workshop. | |
| Poor cut | Blunt blade | Replace or sharpen blade |
| Incorrect cutting height | Adjust the cutting height | |
| Grass bag fails to fill | Grass too heavy or too damp to be conveyed by the air stream | Wait until the lawn surface has dried off. |
| Blade badly worn, blunt | Replace or sharpen the blade. | |
| Grass is too high causing poor collection. | Cut the lawn twice, altering the cutting height accordingly. | |
| Casing blocked with previous grass cutting | Clean the casing (do not use water) NB: remember to remove the spark plug connector. | |
| The drive does not function | Drive cable detached | Insert the cable |
| Defective belt | Seek assistance from Service Workshop. | |
| Defective drive chain. | Seek assistance from Service Workshop. | |
| Blade clutch does not function | Bowden pulley maladjusted | Seek assistance from Service Workshop. |
| Cabling defect | Seek assistance from Service Workshop. | |
| Clutch damage | Seek assistance from Service Workshop. | |
| Charging current fuse defect | Seek assistance from Service Workshop. |


Tapposcaricoolio
Bouchon de vidange d'huile
Oil drain plug
OlablaBstutzer
Tapón vaciado aceite
Olie-aftapod
Bojão de esvazamento do oleo
Korek spustu oleju
Olajleeresztó dugo
Vypoušteci otvor motorového oleje
Olieaftapningsp
Lock for oljeurtappning
Plugg for oljeavtapping
Moottorioljyn tyhennyskorkki
Zamašek za izpust olja
Tana exwpoToon ealou
L3
M