
CD-355 - CD player TASCAM - Free user manual and instructions
Find the device manual for free CD-355 TASCAM in PDF.

| Product Type | 5-Disc CD Changer |
| Brand | TASCAM |
| Model | CD-355 |
| Dimensions (W x H x D) | 482 x 131 x 376 mm (without feet) |
| Weight | 7.2 kg |
| Power Supply | AC 230 V, 50 Hz (European model) / AC 120 V, 60 Hz (US/Canada model) |
| Power Consumption | 12 W |
| Operating Temperature | +5 °C to +35 °C |
| Operating Humidity | 5% to 85% (non-condensing) |
| Frequency Response | 20 Hz - 20 kHz, ±2 dB |
| Total Harmonic Distortion | Less than 0.02% (1 kHz) |
| Signal-to-Noise Ratio | More than 98 dB |
| Channel Separation | More than 83 dB (1 kHz) |
| Analog Audio Outputs | 2 Vrms (RCA), 4 Vrms (Balanced XLR) |
| Digital Audio Outputs | Coaxial and Optical TOSLINK |
| Supported Formats | Audio CD, finalized CD-R, CD-RW, MP3 (CD-R/RW) |
| Playback Functions | Random playback, repeat (1/all), program (32 tracks), intro check (10 s) |
| Supplied Accessories | RC-355C remote control, AA batteries (2), power cord, rack mount kit, manual |
| Rack Mounting | 19 inches, 1U, ventilation space required above and behind |
| Maintenance | Clean with a soft dry cloth; do not use solvents |
| Safety | Do not expose to moisture; unplug during storms; do not open the enclosure |
| Repairability | No user-serviceable parts; contact authorized service |
Frequently Asked Questions - CD-355 TASCAM
User questions about CD-355 TASCAM
0 question about this device. Answer the ones you know or ask your own.
Ask a new question about this device
Download the instructions for your CD player in PDF format for free! Find your manual CD-355 - TASCAM and take your electronic device back in hand. On this page are published all the documents necessary for the use of your device. CD-355 by TASCAM.
USER MANUAL CD-355 TASCAM
TEAC Professional Division
CD-355
Compact Disc Changer
OWNER'S MANUAL


| CAUTION: TO REDUCE THE RISK OF ELECTRIC SHOCK, DO NOT REMOVE COVER (OR BACK). NO USER-SERVICEABLE PARTS INSIDE. REFER SERVICING TO QUALIFIED SERVICE PERSONNEL. | |
 | The lightning flash with arrowhead symbol, within equilateral triangle, is intended to alert the user to the presence of uninsulated “dangerous voltage” within the product’s enclosure that may be of sufficient magnitude to constitute a risk of electric shock to persons. |
 | The exclamation point within an equilateral triangle is intended to alert the user to the presence of important operating and maintenance (servicing) instructions in the literature accompanying the appliance. |
This appliance has a serial number located on the rear panel. Please record the model number and serial number and retain them for your records. Model number ____ Serial number ____
WARNING: TO PREVENT FIRE OR SHOCK HAZARD, DO NOT EXPOSE THIS APPLIANCE TO RAIN OR MOISTURE.
For U.S.A.
TO THE USER
This equipment has been tested and found to comply with the limits for a Class B digital device, pursuant to Part 15 of the FCC Rules. These limits are designed to provide reasonable protection against harmful interference in a residential installation. This equipment generates, uses, and can radiate radio frequency energy and, if not installed and used in accordance with the instruction manual, may cause harmful interference to radio communications.
However, there is no guarantee that interference will not occur in a particular installation. If this equipment does cause harmful interference to radio or television reception, which can be determined by turning the equipment off and on, the user is encouraged to try to correct the interference by one or more of the following measures.
• a) Reorient or relocate the receiving antenna.
- b) Increase the separation between the equipment and receiver.
- c) Connect the equipment into an outlet on a circuit different from that to which the receiver is connected.
- d) Consult the dealer or an experienced radio/TV technician for help.
CAUTION
Changes or modifications to this equipment not expressly approved by TEAC CORPORATION for compliance could void the user's authority to operate this equipment.
CAUTION
- DO NOT REMOVE THE EXTERNAL CASES OR CABINETS TO EXPOSE THE ELECTRONICS. NO USER SERVICEABLE PARTS ARE WITHIN!
- IF YOU ARE EXPERIENCING PROBLEMS WITH THIS PRODUCT, CONTACT TEAC FOR A SERVICE REFERRAL. DO NOT USE THE PRODUCT UNTIL IT HAS BEEN REPAIRED.
- USE OF CONTROLS OR ADJUSTMENTS OR PERFORMANCE OF PROCEDURES OTHER THAN THOSE SPECIFIED HEREIN MAY RESULT IN HAZARDOUS RADIATION EXPOSURE.
For CANADA
AC POWER CORD CONNECTION
CAUTION:
TO PREVENT ELECTRIC SHOCK, MATCH WIDE BLADE OF PLUG TO WIDE SLOT, FULLY INSERT.
Pour le CANADA
CORDE DE CONNEXION CA
ATTENTION:
POUR ÉVITER LES CHOCS ÉLECTRIQUES, INTRODUIRE LA LAME LA PLUS LARGE DE LA FICHE DANS LA BORNE CORRESPONDANTE DE LA PRISE ET POUSSER JUSQU'AU FOND.
1 Read these instructions.
2 Keep these instructions.
3 Heed all warnings.
4 Follow all instructions.
5 Do not use this apparatus near water.
6 Clean only with dry cloth.
7 Do not block any ventilation openings. Install in accordance with the manufacturer's instructions.
8 Do not install near any heat sources such as radiators, heat registers, stoves, or other apparatus (including amplifiers) that produce heat.
9 Do not defeat the safety purpose of the polarized or grounding-type plug. A polarized plug has two blades with one wider than the other. A grounding type plug has two blades and a third grounding prong. The wide blade or the third prong are provided for your safety. If the provided plug does not fit into your outlet, consult an electrician for replacement of the obsolete outlet.
10 Protect the power cord from being walked on or pinched particularly at plugs, convenience receptacles, and the point where they exit from the apparatus.
11 Only use attachments/accessories specified by the manufacturer.
12 Use only with the cart, stand, tripod, bracket, or table specified by the manufacturer, or sold with the apparatus. When a cart is used, use caution when moving the cart/apparatus combination to avoid injury from tip-over.
natural_image
Symbolic illustration of a person using a large tool inside a circle with a diagonal line (no text or symbols)13 Unplug this apparatus during lightning storms or when unused for long periods of time.
14 Refer all servicing to qualified service personnel. Servicing is required when the apparatus has been damaged in any way, such as power-supply cord or plug is damaged, liquid has been spilled or objects have fallen into the apparatus, the apparatus has been exposed to rain or moisture, does not operate normally, or has been dropped.
- Do not expose this apparatus to drips or splashes.
- Do not place any objects filled with liquids, such as vases, on the apparatus.
- Do not install this apparatus in a confined space such as a book case or similar unit.
- The apparatus should be located close enough to the AC outlet so that you can easily grasp the power cord plug at any time.
- An apparatus with Class I construction shall be connected to an AC outlet with a protective grounding connection.
- Batteries (battery pack or batteries installed) should not be exposed to excessive heat such as sunshine, fire or the like.
- Excessive sound pressure from earphones and headphones can cause hearing loss.
- The apparatus draws nominal non-operating power from the AC outlet with its STANDBY/ON in the Standby position.
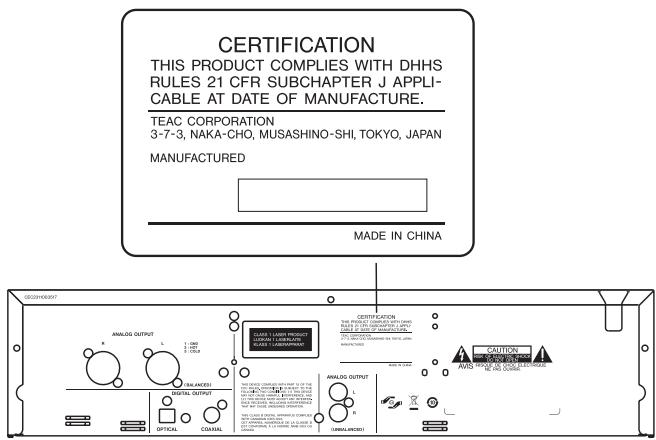
This product has been designed and manufactured according to FDA regulations "title 21, CFR, chapter 1, subchapter J, based on the Radiation Control for Health and Safety Act of 1968", and is classified as a class 1 laser product. There is no hazardous invisible laser radiation during operation because invisible laser radiation emitted inside of this product is completely confined in the protective housings.
The label required in this regulation is shown at ①.
① For U.S.A.
CAUTION
- DO NOT REMOVE THE PROTECTIVE HOUSING USING A SCREWDRIVER.
- USE OF CONTROLS OR ADJUSTMENTS OR PERFORMANCE OF PROCEDURES OTHER THAN THOSE SPECIFIED HEREIN MAY RESULT IN HAZARDOUS RADIATION EXPOSURE.
- IF THIS PRODUCT DEVELOPS TROUBLE, CONTACT YOUR NEAREST QUALIFIED SERVICE PERSONNEL, AND DO NOT USE THE PRODUCT IN ITS DAMAGED STATE.
Optical pickup:
Type: SF-P101NXR
Manufacturer: SANYO Electric Co., Ltd
Laser output: Less than 0.5 mW on the objective lens
Wavelength: 765 to 815 nm
Rack-mounting the Unit
Use the supplied rack-mounting kit to mount the unit in a standard 19-inch rack, as shown below. Remove the feet of the unit before mounting.
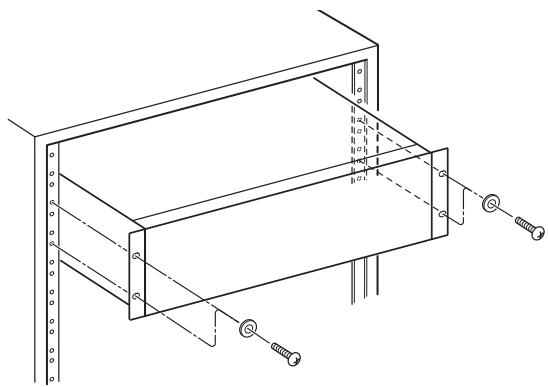
natural_image
Technical line drawing of a mechanical assembly with mounting brackets and bolts (no text or symbols)NOTE
- Leave 1U of space above the unit for ventilation.
- Allow at least 10 cm (4 in) at the rear of the unit for ventilation.
Contents
Thank you for choosing TASCAM CD-355. Read this manual carefully to get the best performance from this unit.
Before Use 6
Discs....7
Name and Function....8
Remote Control Unit....9
Connection.... 10
Playback 1 ...... 11
Playback 2 12
Repeat Playback 13
Shuffle Playback 13
Programed Playback 14
Intro Check.... 15
Time Display 16
Troubleshooting 17
Specifications 17
Environmental considerations
The CD-355 may be used in most areas, but to maintain top performance, and prolong operating life, observe the following environmental conditions:
- The nominal temperature should be between 5°C and 35°C (41°F and 95°F).
- Relative humidity should be between 5% and 85% non-condensing.
- As the unit may become hot during operation, always leave sufficient space above the unit for ventilation. Do not install this unit in a confined space such as a bookcase, and do not put anything on top of the unit.
- Avoid installing this unit on top of any heat-generating electrical device such as a power amplifier.
- Make sure that the unit is mounted in a level position for correct operation.
- The voltage supplied to the unit should match the voltage as printed on the rear panel. If you are in any doubt regarding this matter, consult an electrician.
- Do not open the cabinet as this might result in damage to the circuitry or electrical shock. If a foreign object should get into the unit, contact your dealer or service company.
- When removing the power plug from the wall outlet, always pull directly on the plug, never yank the cord.
- To keep the laser pickup clean, do not touch it, and always close the disc tray.
- Do not attempt to clean the unit with chemical solvents as this might damage the finish. Use a clean, dry cloth.
- Keep this manual in a safe place for future reference.
Do not move the unit during playback
During playback, the disc rotates at high speed. Do NOT lift or move the unit during playback. Doing so may damage the disc or the unit.
When moving this unit
When changing places of installation or packing the unit for moving, be sure to remove the disc and return the disc tray to its closed position in the player. Then, press the power switch to turn the power off, and disconnect the power cord. Moving this unit with the disc loaded may result in damage to this unit.
Beware of condensation
If the unit (or a compact disc) is moved from a cold to a warm place, or used after a sudden temperature change, there is a danger of condensation; vapor in the air could condense on the internal mechanism, making correct operation impossible. To prevent this, or if this occurs, let the player sit for one or two hours at the new room temperature before using.
Maintenance
If the surface of the unit gets dirty, wipe with a soft cloth or use diluted neutral cleaning liquid. Be sure to remove any fluid completely. Do not use thinner, benzine or alcohol as they may damage the surface of the unit.
Discs which can be played on this unit
- Conventional audio CDs bearing the COMPACT DISC DIGITAL AUDIO logo on the label:

• Properly finalized CD-R and CD-RW discs
- MP3 CDs
Note:
- Depending on the quality of the disc and/or the condition of the recording, some CD-R/CD-RW discs may not be playable.
- Music discs with copy control, a copy-protection system, have been released from several record companies in an attempt to protect the copyright. Since some of these discs do not comply with the CD specifications, they may not be playable on the CD-355.
- Always place the disc on the disc tray with the label side up. (Compact discs can be played or recorded only on one side.)
- To remove a disc from its storage case, press down on the center of the case and lift the disc out, holding it carefully by the edges.
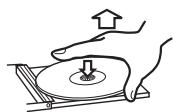
How to remove the disc

How to hold the disc

- Should the disc become dirty, wipe the surface radially (from the center hole outward towards the outer edge) with a soft, dry cloth.

- Never use such chemicals as record sprays, antistatic sprays or fluid, benzine or thinner to clean the discs. Such chemicals will do irreparable damage to the disc's plastic surface.
- Discs should be returned to their cases after use to avoid dust and scratches that could cause the laser pickup to "skip."
- Do not expose discs to direct sunlight or high humidity and temperature for extended periods. Long exposure to high temperatures will warp the disc.
- Do not play any disc that is warped, deformed or damaged. Playing such discs may cause irreparable harm to the playing mechanisms.
-
CD-R and CD-RW discs are more sensitive to the effects of heat and ultraviolet rays than ordinary CDs. It is important that they are not stored in a location where direct sunlight will fall on them, and away from sources of heat such as radiators or heat-generating electrical devices.
-
Printable CD-R and CD-RW discs aren't recommended, as the label side might be sticky and damage the unit.
- Do not stick papers or protective sheets on the discs and do not use any protective coating spray.
- Use a soft oil-based felt-tipped pen to write the information on the label side. Never use a ball-point or hard-tipped pen, as this may cause damage to the recorded side.
- Never use a stabilizer. Using commercially available CD stabilizers with this unit will damage the mechanisms and cause them to malfunction.
- Do not use CDs with an irregular shape (octagonal, heart shaped, business card size, etc.). CDs of this sort can damage the unit:

- If you are in any doubt as to the care and handling of a CD-R/CD-RW disc, read the precautions supplied with the disc, or contact the disc manufacturer directly.
MP3 files
- This unit can play MP3 files recorded on a CD-R or CD-RW.
- File names of MP3 should be alphanumeric characters. This unit cannot display symbols and full-size or double-byte characters (such as Japanese, Chinese, etc.) correctly. Also, be sure to use the file extension. (“.mp3”)
- MP3 files are monaural or stereo MPEG-1 Audio Layer 3 format. This unit can play MP3 files with sampling frequency 44.1 kHz or 48 kHz, bit-rate 320 kbps or less.
- The disc must be finalized in order to play.
- The CD-ROM must be ISO 9660 compatible.
- When more than 512 files (including folders) are recorded on the disc, the unit might not be able to play it correctly.
- When a MP3 disc is loaded, it may take several minutes until the unit can start to play depending on the numbers of recorded files or the complexity of the folder tree.
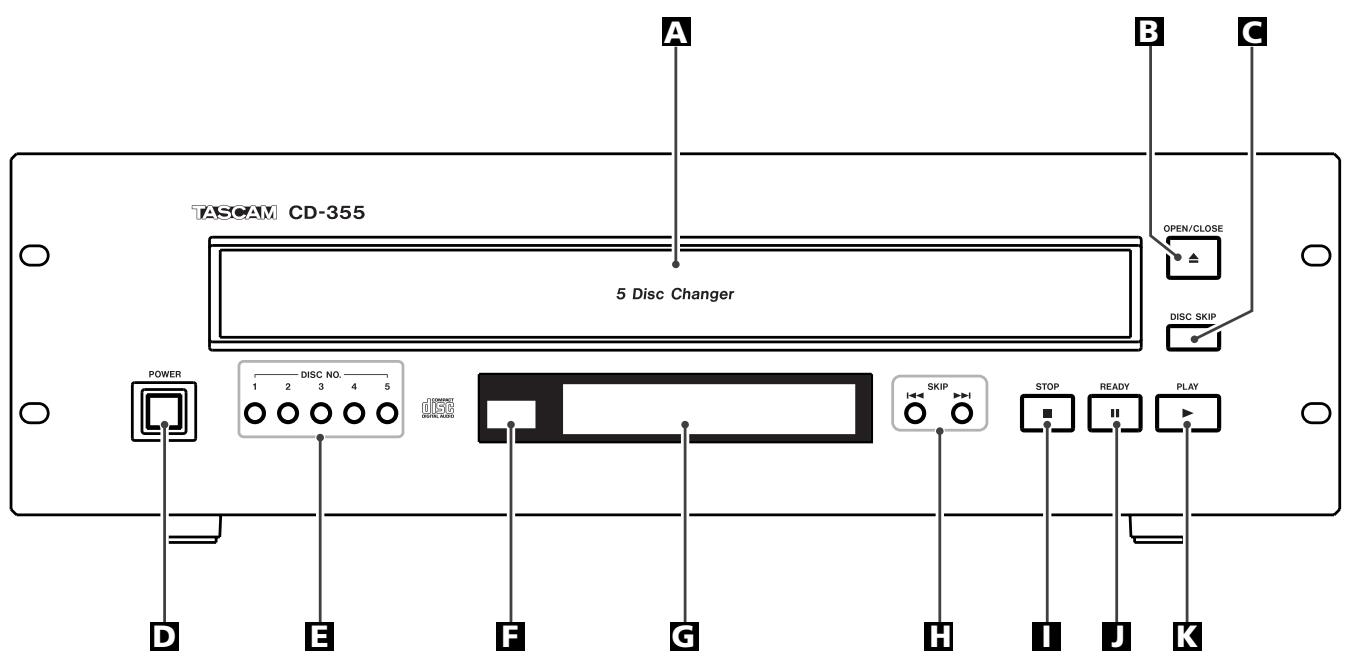
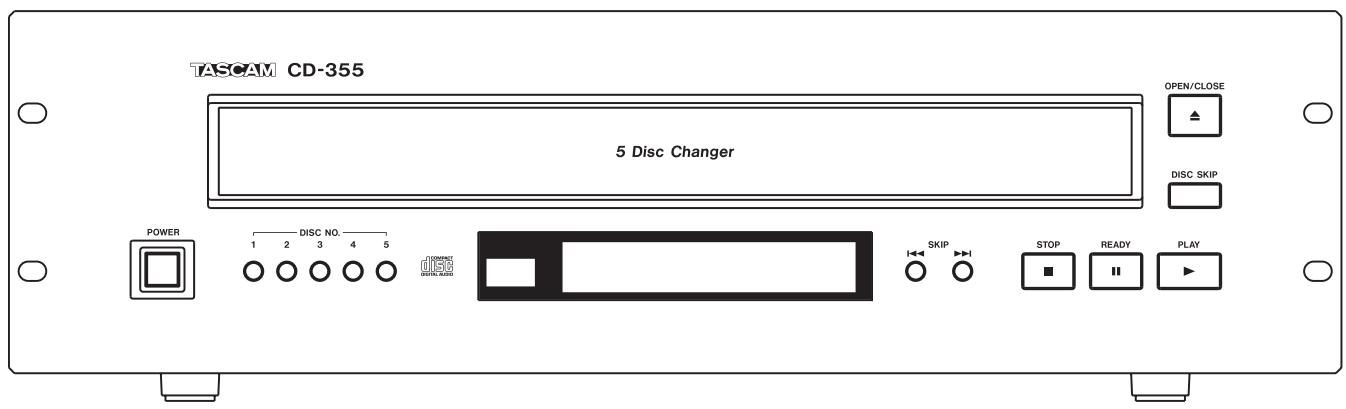
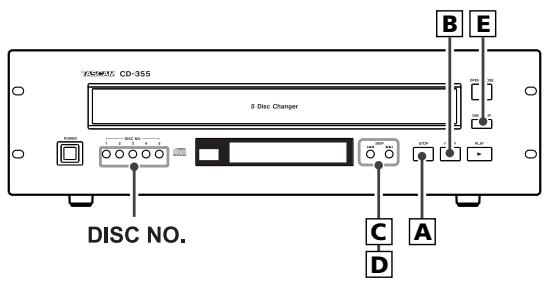
A Disc tray
B OPEN/CLOSE
Use this button to open and close the disc tray.
C DISC SKIP
Use this button to skip discs.
D POWER
Press this button to turn the unit on or off.
The equipment draws nominal non-operating power from the AC outlet with its POWER switch in the OFF position.
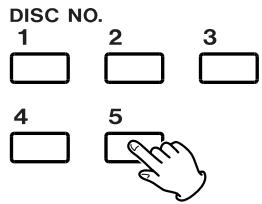
E DISC NO.
Use these buttons to select a disc.
F Remote Sensor
When operating the remote control unit, point it towards the remote sensor.
G Display
H Skip/Search buttons
Use these buttons to skip or search tracks.
I STOP (■)
Use this button to stop playback.
J READY (II)
Use this button to standby for playback.
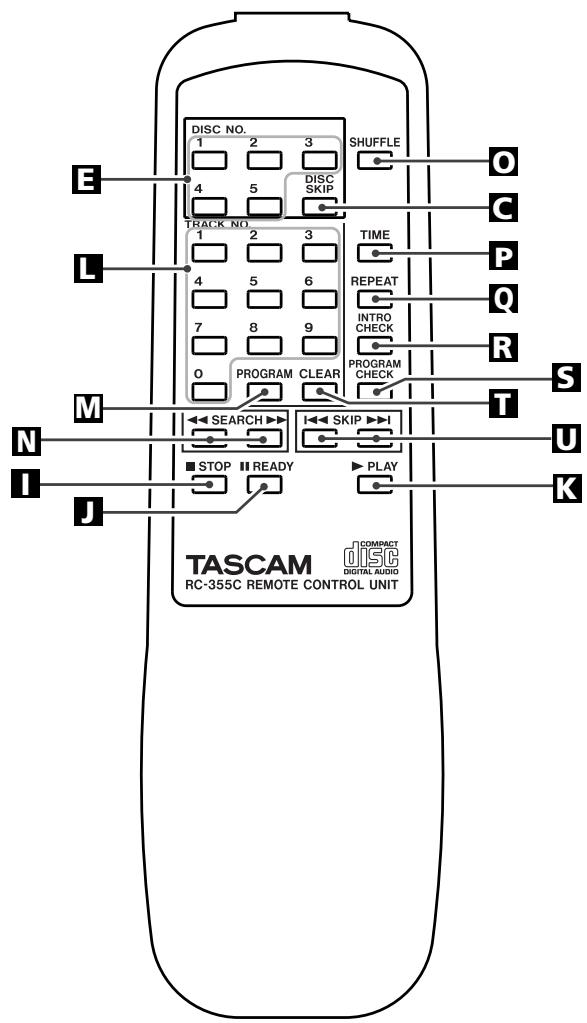
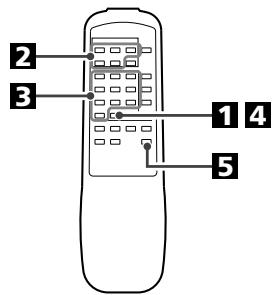
Remote Control Unit
K PLAY (▶)
Use this button to start playback.
L TRACK NO.
Use these buttons to select a track number.
For instance, to select track number 35, press "3" and "5".
M PROGRAM
Use this button to enter the program mode. In program mode, use this button to enter selections.
N SEARCH (◄◄/►►)
During playback, use these buttons to search the part you want to listen to.
O SHUFFLE
Use this button for shuffle playback.
P TIME
During playback, use this button to change the time display.
Q REPEAT
Use this button to select repeat modes.
R INTRO CHECK
Use this button to start the intro check playing.
S PROGRAM CHECK
Use this button to check programmed contents.
T CLEAR
Use this button to clear a program.
SKIP (◄◄◄ / ►►►)
Use these buttons to skip tracks.
The provided Remote Control Unit allows the unit to be operated from a distance.
When operating the remote control unit, point it towards the REMOTE SENSOR on the front panel of the unit.
- Even if the remote control unit is operated within the effective range, remote control operation may be impossible if there are any obstacles between the unit and the remote control.
- If the remote control unit is operated near other appliances which generate infrared rays, or if other remote control devices using infrared rays are used near the unit, it may operate incorrectly. Conversely, the other appliances may operate incorrectly.
Battery Installation
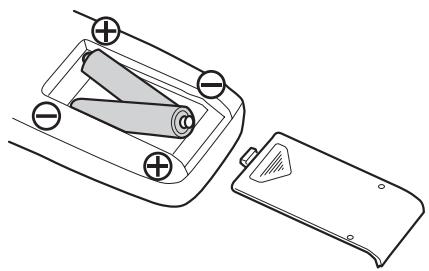
natural_image
Diagram of a battery pack with two batteries and a separate battery casing (no text or symbols)-
Remove the battery compartment cover.
-
Insert two "AA" dry batteries. Make sure that the batteries are inserted with their positive "⊕" and negative "⊖" poles positioned correctly.
-
Close the cover.
Battery Replacement
If the distance required between the remote control unit and main unit decreases, the batteries are exhausted. In this case replace the batteries with new ones.
Precautions concerning batteries
- Be sure to insert the batteries with correct positive “⊕” and negative “⊖” polarities.
- Use batteries of the same type. Never use different types of batteries together.
- Rechargeable and non-rechargeable batteries can be used. Refer to the precautions on their labels.
- When the remote control unit is not to be used for a long time (more than a month), remove the batteries from the remote control unit to prevent them from leaking. If they leak, wipe away the liquid inside the battery compartment and replace the batteries with new ones.
- Do not heat or disassemble batteries and never dispose of old batteries by throwing them in a fire.
Audio device (CD Recorder, Amplifier, etc.)
CAUTION:
- Switch off the power to all equipment before making connections.
- Read the instructions of each component you intend to use with this unit.
- Be sure to insert each plug securely. To prevent hum and noise, avoid bundling the signal interconnection cables together with the AC power cord or speaker cables.
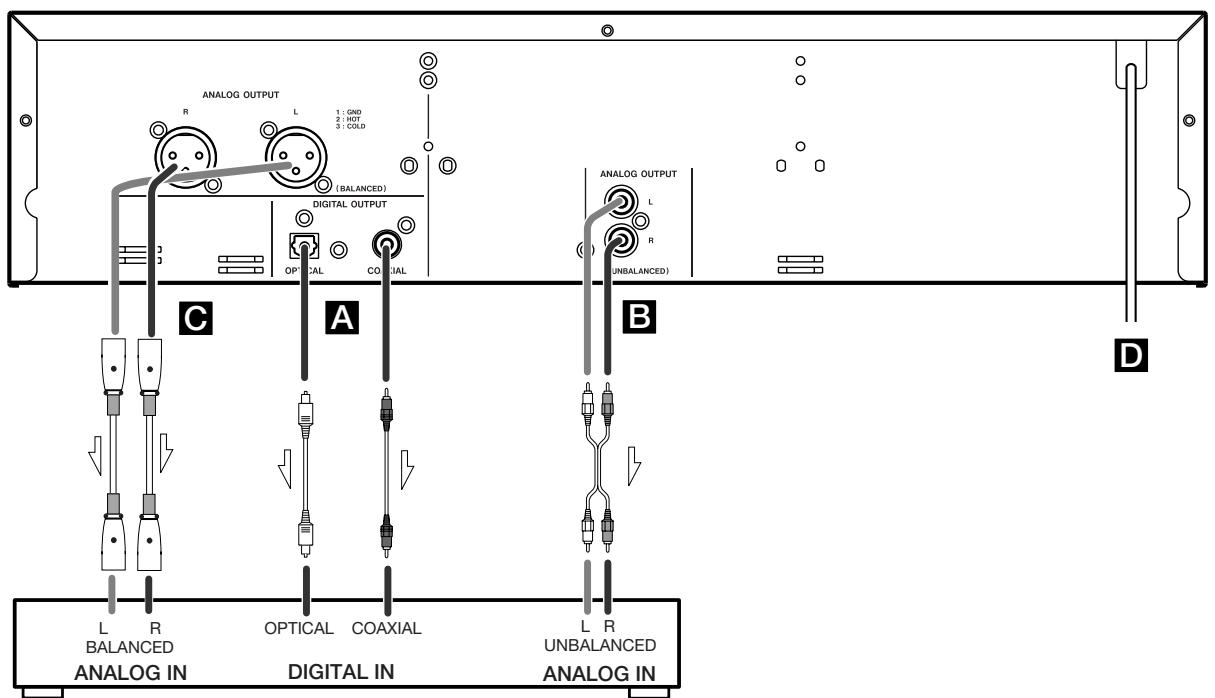
A DIGITAL OUT terminal
Connect the digital output terminal to the digital input terminal of a digital device such as a CD recorder, MD deck, etc. Use a commercially-available optical or coaxial digital cable.
- Keep the supplied cap to cover the optical digital terminal when it is not in use.
B LINE OUT jack
Analog 2-channel audio signal is output from this jack. Connect this jack to the input jack of the Audio device with an RCA.
Make sure to connect : RCA white plug → white jack (L: left channel) red plug → red jack (R: right channel)
C ANALOG OUT (BALANCED) (L, R)
These XLR connectors output analog audio signals at +4 dBu to suitably-equipped units.
Make sure to connect : XLR 1=GND, 2=HOT, 3=COLD
D AC Power Cord
After all other connections are complete, connect the plug to the AC wall socket.
Be sure to connect the power cord to an AC outlet which supplies the correct voltage.
Grasp the plug, not the cord when plugging or unplugging the power cord.
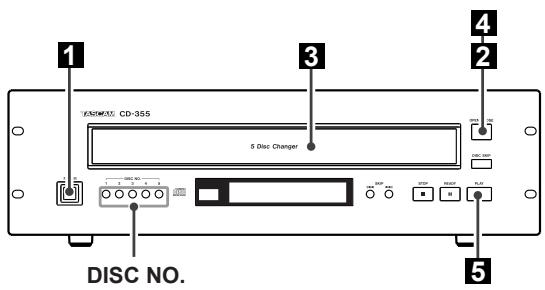
1 Press the POWER button to turn the unit on.
2 Press the OPEN/CLOSE button (▲).
3 Place a disc on a tray with the printed label face up.
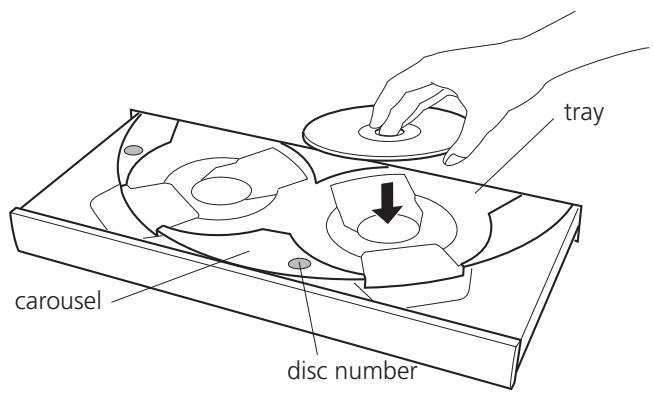
- Never place more than a disc on a tray.
- To place a disc on the hidden tray, press the DISC SKIP button.
- Do not touch the carousel while it is rotating.
- The disc must be loaded centrally into the disc tray. If the disc is not correctly loaded, it may not be possible to open the tray again once it has closed, so you should ensure the disc is always centrally loaded in the tray.
- Do not force open or close the tray.
4 Press the OPEN/CLOSE button (▲) to close the tray.

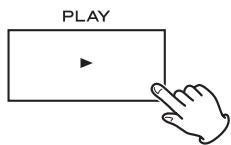
5 Press the PLAY button (▶) to start playback.
The unit starts searching disc. If a disc is found the playback will start.
- If you want to select other disc, press the DISC SKIP button or the desired DISC NO. button.
- All the buttons and switches still function normally even when the tray is opening or closing.
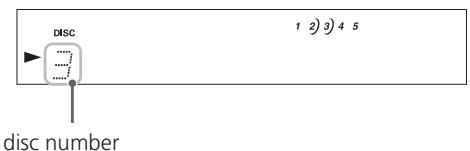
- When the unit detects a disc on the tray, the disc mark “)” will light.
When the unit detects no disc on the tray, the disc number will go out. - If the disc is CD, the music calendar lights to show the available unplayed tracks. If there are more than 14 tracks on the disc, the track number 1-14 and OVER will light.
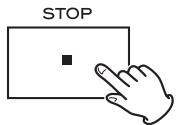
A To stop playback
Press the STOP button (■) to stop playback.
B To suspend playback temporarily (ready mode)
Press the READY button (■) during playback.

Playback stops at the current position, and ■ is displayed.
To resume playback, press the PLAY button (▶) or the READY button (■).
C To skip to the next or a previous track/file
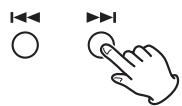
During playback, repeatedly press the SKIP button (I◄◄ or ►►I) until the desired track/file is found. The selected track/file will be played from the beginning.
In the stop or ready mode, press the SKIP button (I◄◄ or ►►) repeatedly until the track you want to listen to is found. Press the PLAY button (►) to start playback from the selected track.
- When the ◀◀ button is pressed during playback, the track being played will be played from the beginning. To return to the beginning of the previous track, press the ◀◀ button twice.
- When the ▶▶1 button is pressed during playback of the last track of the disc, the first track of same disc will be played. When the ◀◀ button is pressed twice during playback of the first track of the disc, the last track of the same disc will be played.
- During programmed playback, the next or previous track in the program is played.
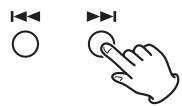
D Search for a part of a track/file
During playback, hold down the ◀◀◀ or ▶▶▶ button and release it when the part you want to listen to is found.
On the remote control use the SEARCH button (◀◀ or ▶▶).
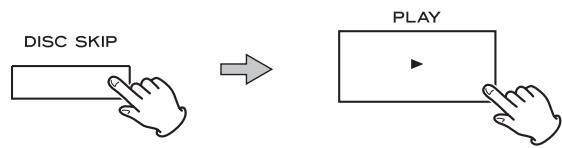
E To select a disc
Press the DISC SKIP button repeatedly until the desired disc number is displayed, then press the PLAY button (▶).
Or press the DISC NO. button you want to listen to. The selected disc will be played automatically.
- When tracks/files are programmed, the DISC SKIP button and the DISC NO. buttons don't work.
F Direct Playback
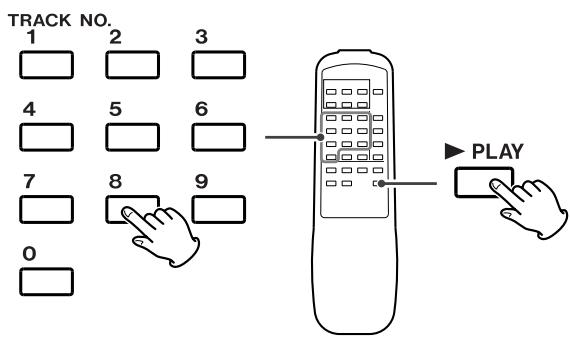
During stop or playback of CD, you can use the numeric buttons of the remote control to select tracks/files.
Press the numeric buttons to select a track/file, then press the PLAY (▶) button. Playback starts from the selected track/file.
For instance, to select track number 35, press "3" and "5".
- Direct Playback do not work with MP3 discs. When you want to select a file, use the SKIP buttons (I◄◄/►►I).
Repeat Playback
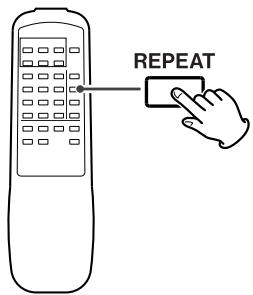
Each time the REPEAT button is pressed, the mode is changed as follows:

REPEAT ALL
All tracks or files of all discs will be played repeatedly.
REPEAT ONE
The track/file being played will be played repeatedly. If you select another track/file in REPEAT ONE mode, the track/file selected will be played repeatedly.
- During programmed playback, if the REPEAT button is pressed, the programmed contents will be played repeatedly.
- If both the INTRO CHECK and REPEAT buttons are pressed, the first 10 seconds of tracks/files will be played repeatedly.
- If both the SHUFFLE and REPEAT buttons are pressed, the disc shuffle play will start. When all tracks/files of a disc have been played once, the next disc will start playing. All tracks/files on all discs are thus continuously shuffle played.
- If the INTRO CHECK, REPEAT and SHUFFLE buttons are all pressed, the first 10 seconds of tracks/files are shuffle played. When shuffle intro play of a disc is once over, the next disc will start playing. The first 10 seconds of all tracks/files on all discs are thus continuously shuffle played.
Shuffle Playback
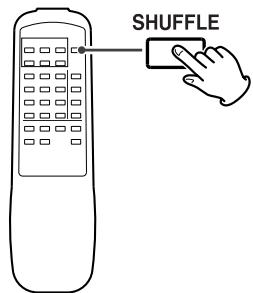
Shuffle mode turns on/off by pressing the SHUFFLE button.
During shuffle mode, SHUFFLE indicator lights. In shuffle mode the tracks/files of the disc are played randomly.
When all tracks/files of a disc have been played once, the next disc will shuffle play. The unit will stop when all discs have been played.
- If you press the ▶▶▶ button during shuffle playback, next track/file will be randomly selected and played. If you press the ◀◀◀ button, the currently played track/file will be played from the beginning. In any other cases, one and the same track/file is not replayed.
- The numeric buttons does not work during shuffle playback.
- If tracks/files are programmed, the SHUFFLE button does not work.
- If both the SHUFFLE and REPEAT buttons are pressed, the disc shuffle play will start. When all tracks/files of a disc has been played once, the next disc will start playing. All tracks/files on all discs are thus continuously shuffle played.
- If the INTRO CHECK, REPEAT and SHUFFLE buttons are all pressed, the first 10 seconds of tracks/files are shuffle played. When shuffle intro play of a disc is once over, the next disc will start playing. The 10 seconds of all tracks/files on all discs are thus continuously shuffle played.
- Up to 32 tracks can be programmed in the desired order.
- If the shuffle mode is on, the PROGRAM button does not work.
1 Press the PROGRAM button in the stop mode.

"PROGRAM" lights on the display.
2 If you want to select a track/file in another disc, press the corresponding DISC NO. button (1-5).
3 Press the numeric button to select a track or file.

You can also use the SKIP buttons (I◄◄/►►) to select a track.
- If the unit has not yet detected the contents of the disc, you can not enter 3-digit numbers with the numeric buttons. In this case use the SKIP buttons (1◄◄/►►1).
- You can not also enter numbers other than those detected as specifying tracks/files in the disc.
- Before you press the numeric buttons, "A" is displayed instead of the track/file number. If you press the PROGRAM button without pressing the numeric buttons, you can program a whole disc.
4 Press the PROGRAM button to enter your selection.

Repeat steps 2 to 4 to program more tracks/files.
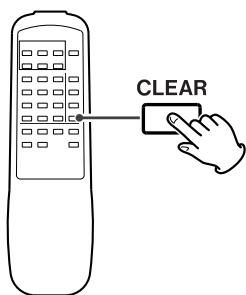
- If you made a mistake, press the CLEAR button. The last programmed number will be deleted.
- Up to 32 tracks/files can be programmed.
5 When programing has been finished, press the PLAY button to start programmed playback.

When playback of all the programmed tracks has finished, or if one of the following buttons is pressed, the programmed playback stops:
STOP, OPEN/CLOSE
But the programmed contents aren't lost. You can return to the programmed playback by pressing the PLAY button.
- If the power is turned off, the programmed contents will be erased.
- When in the program mode, the following buttons don't work:
SHUFFLE, DISC NO., DISC SKIP
To check the programmed order
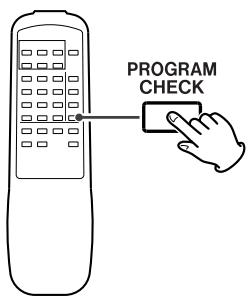
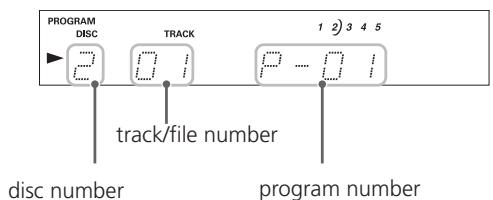
In the stop mode, press the PROGRAM CHECK button repeatedly. The track and program numbers will be shown on the display.
To add a track/file to the program

If you want to add a track/file to the end of the program, press the PROGRAM CHECK button repeatedly until "A" appears after the end of the program.
Then select a track/file number using the numeric buttons and press the PROGRAM button. The track/file is added to the program.
- If “A” is displayed in the middle of the program, it means a whole disc is programmed.
- If you want to rewrite a track/file, press the PROGRAM CHECK button repeatedly until the program number which you want to rewrite appears on the display.
Then select a new track/file.
To delete a track/file from the program
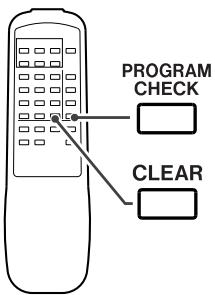
In the stop mode, press the PROGRAM CHECK button repeatedly until the program number to be deleted appears on the display, then press the CLEAR button. The selected track/file is deleted from the program.
To clear the program
In the stop mode, press and hold the CLEAR button for more than 2 seconds.
- If the power is turned off, the programmed contents will be erased.
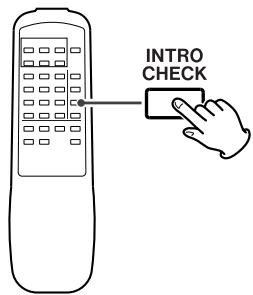
Intro check mode turns on/off by pressing the INTRO CHECK button
In intro check mode, INTRO indicator lights. During playback the first 10 seconds of the tracks/files are played.
When all tracks/files have been played once, the unit will stop playback.
- If the INTRO CHECK, REPEAT and SHUFFLE buttons are all pressed, the first 10 seconds of tracks/files are shuffle played. When shuffle intro play of a disc is once over, the next disc will start playing. The 10 seconds of all tracks/files on all discs are thus continuously shuffle played.
- During programmed playback, if the INTRO CHECK button is pressed, the first 10 seconds of the tracks/files will be played in a programmed order.
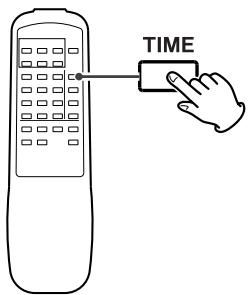
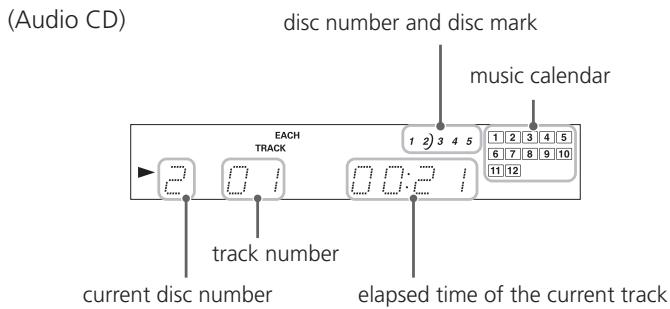
During playback, each time the TIME button is pressed the display changes as follows:
When the disc is CD:
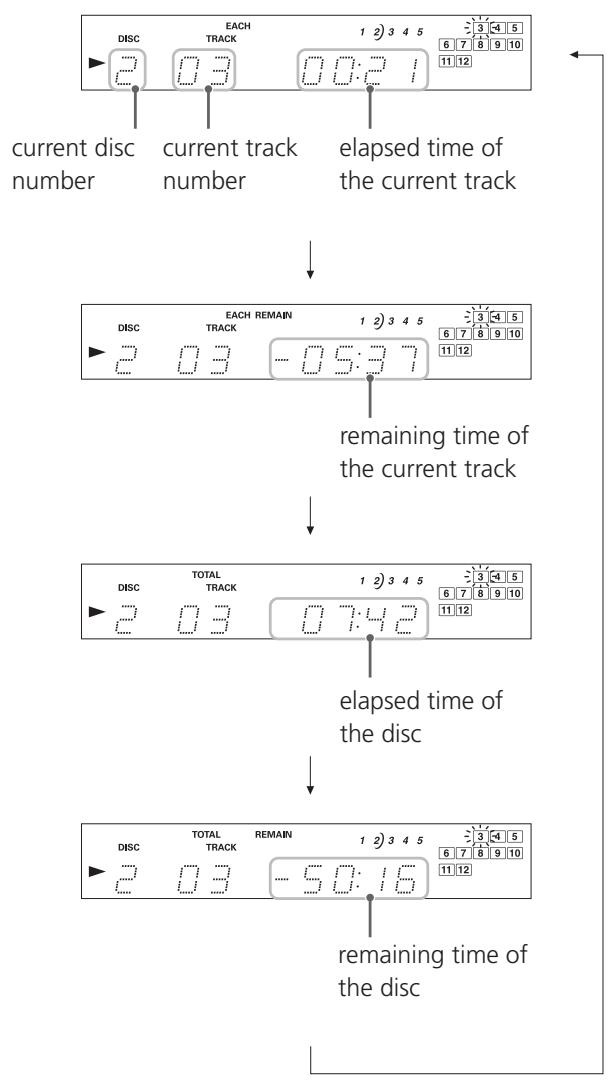
flowchart
graph TD
    A["DISC"] --> B["0.3"]
    B --> C["0.0:2"]
    C --> D["1 2) 3 4 5"]
    D --> E["6 7 8 9 10 11 12"]
    F["current disc number"] --> G["current track number"]
    H["elapsed time of the current track"] --> I["remaining time of the current track"]
    I --> J["DISC EACH REMAIN TRACK 1 2) 3 4 5"]
    J --> K["6 7 8 9 10 11 12"]
    L["ELapsed time of the disc"] --> M["elapsed time of the disc"]
    M --> N["DISC TOTAL TRACK 1 2) 3 4 5"]
    N --> O["6 7 8 9 10 11 12"]
    P["Remaining time of the disc"] --> Q["remaining time of the disc"]
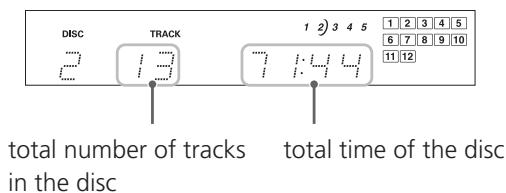
In stop mode:
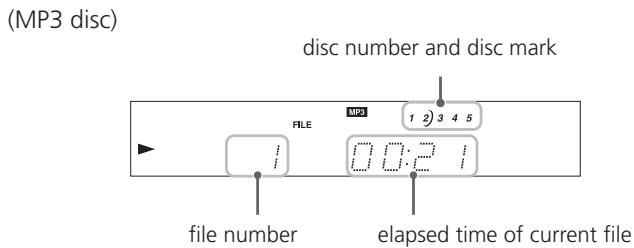
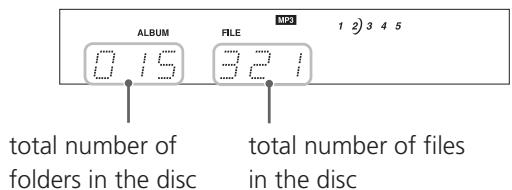
When the disc is MP3:
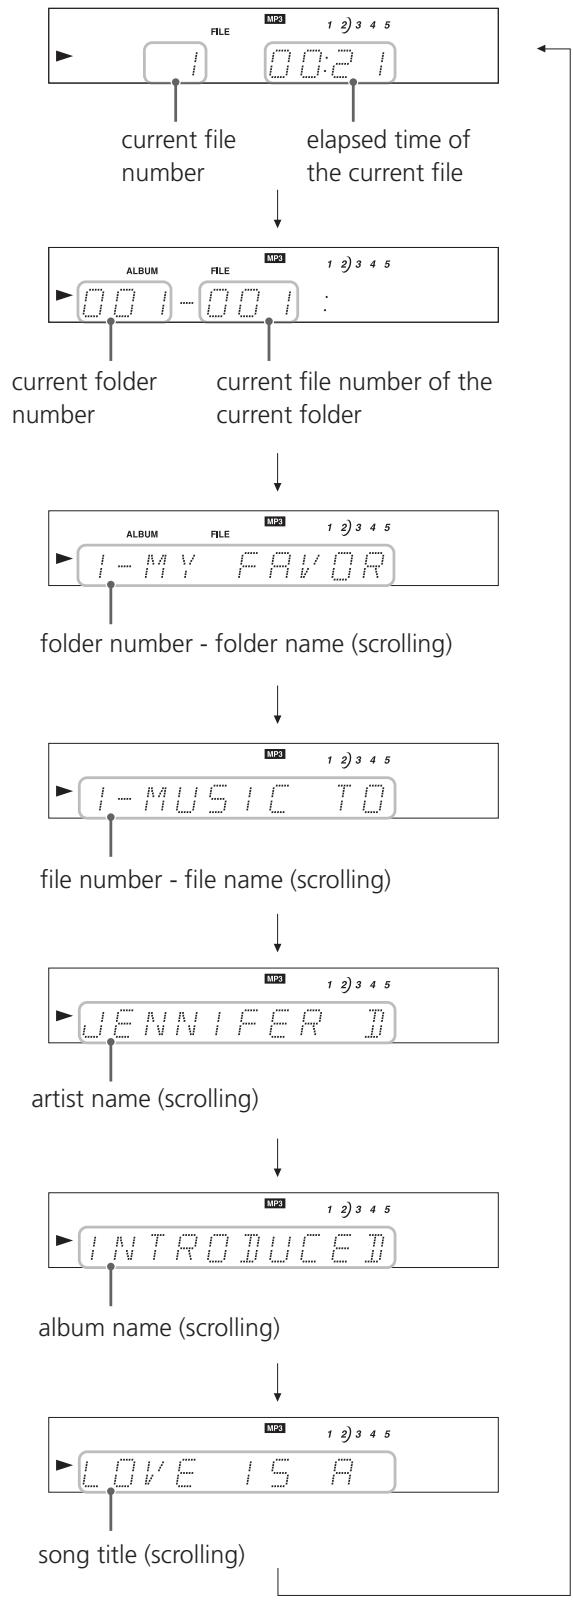
flowchart
graph TD
    A["current file number"] --> B["elapsed time of the current file"]
    B --> C["current folder number"]
    C --> D["current file number of the current folder"]
    D --> E["folder number - folder name (scrolling)"]
    E --> F["file number - file name (scrolling)"]
    F --> G["artist name (scrolling)"]
    G --> H["album name (scrolling)"]
    H --> I["song title (scrolling)"]
In stop mode:
Troubleshooting
If you experience any problems with the unit, please take a moment to look through this chart and see if you can solve the problem yourself before you call your dealer or a TEAC service center.
General
No power
→ Check the connection to the AC power supply. Check and make sure the AC source is not a switched outlet and that, if it is, the switch is turned on. Make sure there is power to the AC outlet by plugging another item such as a lamp or fan.
No sound
→ Check the connection to the amplifier.
→ Check the operation of the amplifier.
Cannot play.
→ Load a disc with the playback side facing down.
→ If the disc is dirty, clean the surface of the disc.
→ A blank disc has been loaded. Load a prerecorded disc.
→ Depending on the disc, etc. it may not be possible to play back CD-R/CD-RW discs. Try again with another disc.
→ You cannot play back unfinalized CD-R/CD-RW discs. Finalize such a disc in a CD recorder and try again.
Sound skips.
→ Place the unit on a stable place to avoid vibration and shock.
→ If the disc is dirty, clean the surface of the disc.
→ Don't use scratched, damaged or warped discs.
Remote Control Unit
Remote control doesn't work.
→ If the batteries are exhausted, change the batteries.
→ Use remote control unit within an effective range (5m) and point at the front panel.
→ Clear obstacles between the remote control unit and the main unit.
→ If a fluorescent light is near the unit, turn it off.
MP3
There is no sound even if the PLAY button (▶) is pressed.
→ Non-playable file formats cannot be played.
Some unknown characters are displayed on the display panel.
This unit cannot display symbols and full-size or double-byte characters (such as Japanese, Chinese, etc.) correctly. File name of MP3 should be alphanumeric characters.
If normal operation cannot be recovered, unplug the power cord from the outlet and plug it again.
Specifications
CD Player
Pickup 3-beam laser
D/A converter....Dual 1-bit linear
Digital filter .....4-times oversampling
Frequency Response.... 20 Hz - 20 kHz, ±2dB
Total Harmonic Distortion....Less than 0.02 % (1 kHz)
Signal-to-Noise Ratio (S/N) .... More than 98 dB
Channel separation .... More than 83 dB (1 kHz)
Output..... Analog: 2 Vrms (RCA)
Analog:4 Vrms (XLR)
Digital: COAXIAL/TOS OPTICAL
General
Power Requirement ..... AC 230 V, 50 Hz (European Model) AC 120 V, 60 Hz (U.S.A./Canada Model)
Power Consumption....12 W
Dimensions (W x H x D) . . . . . 482 x 131 x 376 (Without legs) (19" x 5" x 15")
Weight (Net) 7.2 kg (15.6 lb)
Operating temperature....+5°C - +35°C
Operating humidity .....5% to 85% (no condensation)
Storage temperature -20^ + 55^
Standard Accessory ..... Remote control unit (RC-355C) x 1
Batteries (AA) x 2
Owner's manual x 1
Warranty card x 1
Rack-mounting screw kit x 1
TASCAM
TEAC Professional Division
CD-355
TEAC CORPORATION
Phone: +81-422-52-5082
3-7-3, Nakacho, Musashino-shi, Tokyo 180-8550, Japan
TEAC AMERICA, INC.
Phone: +1-323-726-0303
7733 Telegraph Road, Montebello, California 90640
TEAC CANADA LTD.
Phone: +1905-890-8008 Facsimile: +1905-890-9888
5939 Wallace Street, Mississauga, Ontario L4Z 1Z8, Canada
TEAC MEXICO, S.A. De C.V
Phone: +52-555-581-5500
Campesinos No. 184, Colonia Granjes Esmeralda, Delegacion Iztapalapa CP 09810, Mexico DF
TEAC UK LIMITED
Phone: +44-8451-302511
Unit 19 & 20, The Courtyards Hatters Lane, Watford, Hertfordshire. WD18 8TE, U.K.
TEAC EUROPE GmbH
Phone: +49-611-71580
- TEAC Professional Division
- CD-355
- Compact Disc Changer
- OWNER'S MANUAL
- WARNING: TO PREVENT FIRE OR SHOCK HAZARD, DO NOT EXPOSE THIS APPLIANCE TO RAIN OR MOISTURE.
- For U.S.A.
- TO THE USER
- CAUTION
- For CANADA
- CAUTION:
- Pour le CANADA
- ATTENTION:
- Optical pickup:
- Rack-mounting the Unit
- NOTE
- Contents
- Thank you for choosing TASCAM CD-355. Read this manual carefully to get the best performance from this unit.
- Environmental considerations
- Do not move the unit during playback
- When moving this unit
- Beware of condensation
- Maintenance
- Discs which can be played on this unit
- Note:
- MP3 files
- Remote Control Unit
- K PLAY (▶)
- L TRACK NO.
- M PROGRAM
- N SEARCH (◄◄/►►)
- O SHUFFLE
- P TIME
- Q REPEAT
- R INTRO CHECK
- S PROGRAM CHECK
- T CLEAR
- SKIP (◄◄◄ / ►►►)
- Battery Installation
- Battery Replacement
- Precautions concerning batteries
- A DIGITAL OUT terminal
- B LINE OUT jack
- C ANALOG OUT (BALANCED) (L, R)
- D AC Power Cord
- A To stop playback
- B To suspend playback temporarily (ready mode)
- C To skip to the next or a previous track/file
- D Search for a part of a track/file
- E To select a disc
- F Direct Playback
- Repeat Playback
- REPEAT ALL
- REPEAT ONE
- Shuffle Playback
- To check the programmed order
- To add a track/file to the program
- To delete a track/file from the program
- To clear the program
- Intro check mode turns on/off by pressing the INTRO CHECK button
- Troubleshooting
- General
- No power
- No sound
- Cannot play.
- Sound skips.
- Remote control doesn't work.
- MP3
- There is no sound even if the PLAY button (▶) is pressed.
- Some unknown characters are displayed on the display panel.
- Specifications
- CD Player
- TASCAM
- TEAC CORPORATION
Brand : TASCAM
Model : CD-355
Category : CD player