
TEW-644UB - USB Wi-Fi Adapter TRENDNET - Free user manual and instructions
Find the device manual for free TEW-644UB TRENDNET in PDF.


| Product Type | USB Wi-Fi Adapter |
| Brand | TRENDNET |
| Model | TEW-644UB |
| Wireless Standard | IEEE 802.11b/g/n |
| Maximum Speed | 150 Mbps (N), 54 Mbps (g), 11 Mbps (b) |
| Interface | USB 2.0 |
| Frequency | 2.4 GHz |
| Wireless Security | WEP 64/128 bits, WPA/WPA2, WPA-PSK/WPA2-PSK |
| Antenna | Built-in |
| Supported Operating Systems | Windows 7/8/10/11, Mac OS X, Linux |
| Dimensions (L x W x H) | 75 x 25 x 10 mm |
| Weight | 20 g |
| Power Supply | Via USB port (5 V) |
| Power Consumption | 2.5 W max |
| Operating Temperature | 0 °C to 40 °C |
| Operating Humidity | 10% to 90% (non-condensing) |
| Maintenance | Clean with a soft, dry cloth. Do not use solvents. |
| Safety | Do not expose to moisture, extreme temperatures, or direct sunlight. |
| Spare parts | No detachable parts. The device is not user-serviceable. |
| Warranty | 3 years (according to manufacturer) |
Frequently Asked Questions - TEW-644UB TRENDNET
User questions about TEW-644UB TRENDNET
0 question about this device. Answer the ones you know or ask your own.
Ask a new question about this device
Download the instructions for your USB Wi-Fi Adapter in PDF format for free! Find your manual TEW-644UB - TRENDNET and take your electronic device back in hand. On this page are published all the documents necessary for the use of your device. TEW-644UB by TRENDNET.
USER MANUAL TEW-644UB TRENDNET
natural_image
Abstract logo with a blue wave inside a black circular frame on a grid background (no text or symbols)TRENDNET®
User's Guide
Federal Communication Commission Interference Statement
This equipment has been tested and found to comply with the limits for a Class B digital device, pursuant to Part 15 of the FCC Rules. These limits are designed to provide reasonable protection against harmful interference in a residential installation. This equipment generates, uses and can radiate radio frequency energy and, if not installed and used in accordance with the instructions, may cause harmful interference to radio communications. However, there is no guarantee that interference will not occur in a particular installation. If this equipment does cause harmful interference to radio or television reception, which can be determined by turning the equipment off and on, the user is encouraged to try to correct the interference by one of the following measures:
- Reorient or relocate the receiving antenna.
- Increase the separation between the equipment and receiver.
- Connect the equipment into an outlet on a circuit different from that
to which the receiver is connected. - Consult the dealer or an experienced radio/TV technician for help.
FCC Caution: Any changes or modifications not expressly approved by the party responsible for compliance could void the user's authority to operate this equipment.
This device complies with Part 15 of the FCC Rules. Operation is subject to the following two conditions: (1) This device may not cause harmful interference, and (2) this device must accept any interference received, including interference that may cause undesired operation.
IMPORTANT NOTE:
Radiation Exposure Statement:
This equipment complies with FCC radiation exposure limits set forth for an uncontrolled environment. End users must follow the specific operating instructions for satisfying RF exposure compliance. To maintain compliance with FCC RF exposure compliance requirements, please follow operation instruction as documented in this manual.
This transmitter must not be co-located or operating in conjunction with any other antenna or transmitter.
SAR compliance has been established in typical laptop computer(s) with USB slot, and product could be used in typical laptop computer with USB slot. Other application like handheld PC or similar device has not been verified and may not compliance with related RF exposure rule and such use shall be prohibited.
Europe – EU Declaration of Conformity
This device complies with the essential requirements of the R&TTE Directive 1999/5/EC. The following test methods have been applied in order to prove presumption of conformity with the essential requirements of the R&TTE Directive 1999/5/EC:
EN 60 950-1: 2001 +A11: 2004
Safety of Information Technology Equipment
EN 50392: (2004-01)
Generic standard to demonstrate the compliance of electronic and electrical apparatus with the basic restrictions related to human exposure to electromagnetic fields (0 Hz - 300 GHz)
EN 300 328 V1.7.1: (2006-10)
Electromagnetic compatibility and Radio spectrum Matters (ERM); Wideband Transmission systems; Data transmission equipment operating in the 2.4 GHz ISM band and using spread spectrum modulation techniques; Harmonized EN covering essential requirements under article 3.2 of the R&TTE Directive
EN 301 489-1 V1.6.1: (2005-09)
Electromagnetic compatibility and Radio Spectrum Matters (ERM); ElectroMagnetic Compatibility (EMC) standard for radio equipment and services; Part 1: Common technical requirements
EN 301 489-17 V1.2.1 (2002-08)
Electromagnetic compatibility and Radio spectrum Matters (ERM); ElectroMagnetic Compatibility (EMC) standard for radio equipment and services; Part 17: Specific conditions for 2.4 GHz wideband transmission systems and 5 GHz high performance RLAN equipment
This device is a 2.4 GHz wideband transmission system (transceiver), intended for use in all EU member states and EFTA countries, except in France and Italy where restrictive use applies.
In Italy the end-user should apply for a license at the national spectrum authorities in order to obtain authorization to use the device for setting up outdoor radio links and/or for supplying public access to telecommunications and/or network services.
This device may not be used for setting up outdoor radio links in France and in some areas the RF output power may be limited to 10 mW EIRP in the frequency range of 2454 – 2483.5 MHz. For detailed information the end-user should contact the national spectrum authority in France.
CE0560!
| cs Česky [Czech] | TRENDnet tímto prohlašuje, že tento TEW-644UB je ve shodě se základními požadavky a dalšími příslušnými ustanoveními směrnice 1999/5/ES. |
| da Dansk [Danish] | Undertegnede TRENDnet erklærer herved, at følgende udstyr TEW-644UB overholder de væsentlige krav og øvrige relevante krav i direktiv 1999/5/EF. |
| de Deutsch [German] | Hiermit erklärt TRENDnet dass sich das Gerät TEW-644UB in Übereinstimmung mit den grundlegenden Anforderungen und den übrigen einschlägigen Bestimmungen der Richtlinie 1999/5/EG befindet. |
| et Eesti [Estonian] | Käesolevaga kinnitab TRENDnet seadme TEW-644UB vastavust direktiivi 1999/5/EÜ põhinõuetele ja nimetatud direktiivist tulenevatele teistele asjakohastele sätetele. |
| en English | Hereby, TRENDnet declares that this TEW-644UB is in compliance with the essential requirements and other relevant provisions of Directive 1999/5/EC. |
| es Español [Spanish] | Por medio de la presenteTRENDnetdeclara que elTEW-644UBcumple con los requisitos esenciales y cualesquiera otras disposiciones aplicables o exigibles de la Directiva 1999/5/CE. |
| el Ελληνική [Greek] | ME THN ΠΑΡΟΥΣΑTRENDnetΔΗΛΩΝΕΙΟΤΙTEW-644UBΣΥΜΜΟΡΦΩΝΕΤΑΙΠΡΟΣΤΙΣΟΥΣΙΩΔΕΙΣΑΠΑΙΤΗΣΕΙΣΚΑΙΤΙΣΛΟΙΠΕΣΣΧΕΤΙΚΕΣΔΙΑΤΑΞΕΙΣΤΗΣΟΔΗΓΙΑΣ1999/5/EK. |
| fr Français [French] | Par la présenteTRENDnetdéclare que l'appareilTEW-644UBest conforme aux exigences essentielles et aux autres dispositions pertinentes de la directive 1999/5/CE. |
| it Italiano [Italian] | Con la presenteTRENDnetdichiara che questoTEW-644UBè conforme ai requisiti essenziali ed alle altre disposizioni pertinenti stabilite dalla direttiva 1999/5/CE. |
| Latviski [Latvian] | Ar šoTRENDnetdeklarē, kaTEW-644UBatbilst Direktīvas 1999/5/EK būtiskajām prasībām un citiem ar to saistītajiem noteikumiem. |
| Lietuvių [Lithuanian] | ŠiuoTRENDnetdeklaruoja, kad šisTEW-644UBatitinka esminius reikalavimus ir kitas 1999/5/EB Direktyvos nuostatas. |
| nl Nederlands [Dutch] | Hierbij verklaartTRENDnetdat het toestelTEW-644UBin overeenstemming is met de essentiële eisen en de andere relevante bepalingen van richtlijn 1999/5/EG. |
| mt Malti [Maltese] | Hawnhekk,TRENDnet,jiddikjara li danTEW-644UBjikkonforma mal-ħtiġijiet essenzjali u ma provvedimenti ohrajn relevanti li hemm fid-Dirrettiva 1999/5/EC. |
| hu Magyar [Hungarian] | Alulírott,TRENDnetnyilatkozom, hogy aTEW-644UBmegfelel a vonatkozó alapvetõ követelményeknek és az 1999/5/EC irányelv egyéb előírásainak. |
| pl Polski [Polish] | NiniejszymTRENDnetoświadcza, żeTEW-644UBjest zgodny z zasadniczymi wymogami oraz pozostałymi stosownymi postanowieniami Dyrektywy 1999/5/EC. |
| pt Português [Portuguese] | TRENDnetdeclara que esteTEW-644UBestá conforme com os requisitos essenciais e outras disposições da Directiva 1999/5/CE. |
| sl Slovensko [Slovenian] | TRENDnetizjavlja, da je taTEW-644UBv skladu z bistvenimi zahtevami in ostalimi relevantnimi določili direktive 1999/5/ES. |
| Slovensky [Slovak] | TRENDnettýmto vyhlasuje, žeTEW-644UBsplňa základné požiadavky a všetky príslušné ustanovenia Smernice 1999/5/ES. |
| fi Suomi [Finnish] | TRENDnetvakuuttaa täten ettäTEW-644UBtyppinen laite on direktiivin 1999/5/EY oleellisten vaatimusten ja sitä koskevien direktiivin muiden ehtojen mukainen. |
| sv Svenska [Swedish] | Härmed intygarTRENDnetatt dennaTEW-644UBstår I överensstämmelse med de väsentliga egenskapskrav och övriga relevanta bestämmelser som framgår av direktiv 1999/5/EG. |

TABLE OF CONTENT
Introduction ...... 1
Overview of this User's Guide .... 1
Unpacking and Setup.... 2
Unpacking 2
Setup 2
Connecting the USB Extension Cable.... 2
Software Installation.... 3
Windows Based Utility Installation.... 3
Wireless Utility Setting 5
Link Information 5
Configuration....6
Site Survey 10
Profile 11
WPS....14
About....19
Mac OS X Software Installation.... 20
Installation 20
Uninstall 25
Configuration.... 28
Congratulations on your purchase of this Wireless N USB Adapter.
This manual contains detailed instructions regarding the operation of this product. Please keep this manual for future reference.
With the Wireless N USB Adapter, a desktop or laptop computer can communicate with another computer wirelessly. An easy-to-use utility is bundled with the Wireless USB Adapter for configuration, monitoring, and diagnostic purposes.
The Wireless N USB Adapter can wirelessly transmit and receive data, at a speed of up to 54 megabits per second.
The Wireless N USB Adapter provides users with access to real-time information anywhere in their organization. The mobility of the Wireless N USB Adapter provides productivity and service, which are not available under wired networks. The Wireless N USB Adapter can easily adapt from peer-to-peer networks, suitable for a small number of users, to full infrastructure networks of thousands of users that allow roaming around a broad area.
Overview of this User's Guide
Introduction. Describes the Wireless N USB Adapter and its features.
Unpacking and Setup. Helps you get started with the basic installation of the Wireless N USB Adapter.
Hardware Installation. Describes the LED indicator on the Adapter.
Software Installation. Describes how to setup the driver and the utility setting.
Technical Specifications. Lists the technical (general, physical and environmental) specifications of the Wireless N USB Adapter.
Note: The user's guide is written
UNPACKING AND SETUP
This section provides unpacking and setup information for the Wireless N USB Adapter.
Unpacking
The box should contain the following items:
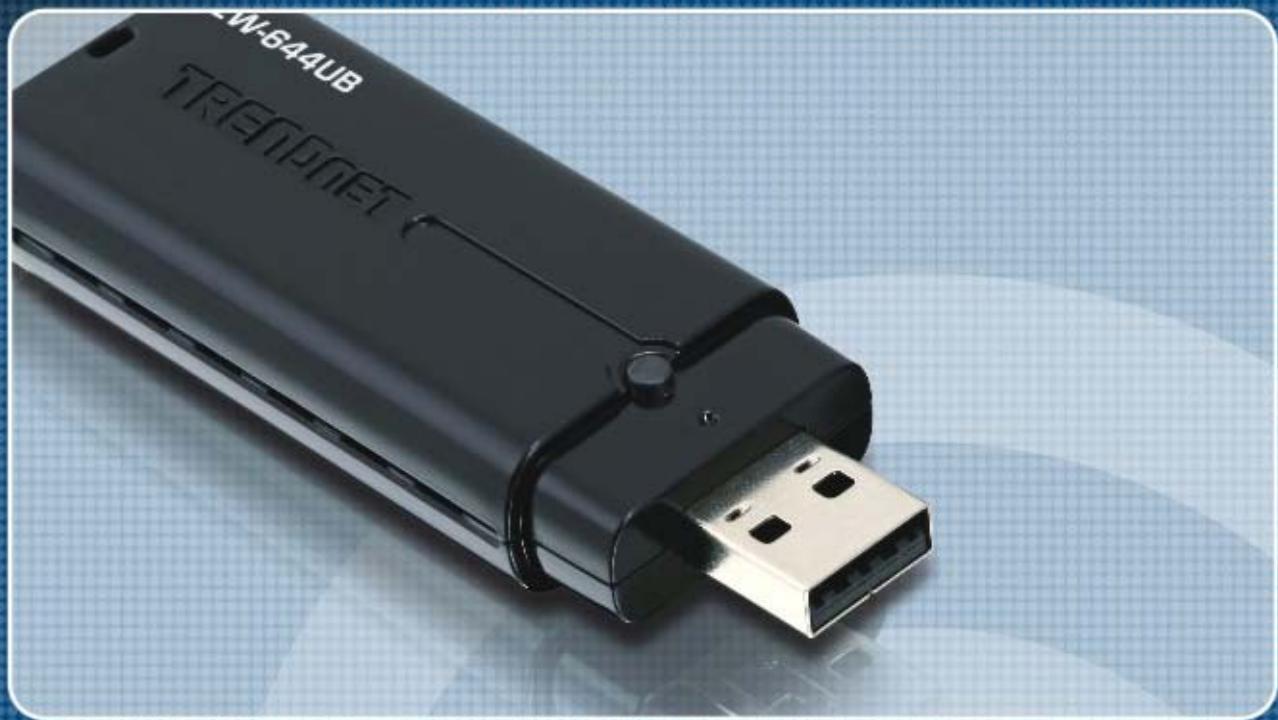
One TEW-644UB Wireless N USB Adapter
One Driver & Utility CD-ROM
◆ One Multi-Language Quick Installation Guide
One USB extension cable
If any item is found missing or damaged, please contact your local reseller for replacement.
Setup
Before installation, check the following:
◆ Make sure your computer is running at least a 300MHz or above processor with 256MB RAM or above
◆ Make sure the USB ports are is USB 2.0 port
- The operating system on your computer must be the following: Windows 2000 (Service Pack 4), XP (Service Pack 2), Windows Vista
◆ A draft 802.11n or 802.11b/g access point.
◆ Make sure the environment has minimal interference and obstructions.
Connecting the USB Extension Cable
The USB extension cradle that comes with the Adapter has Type A connectors on both ends. One end of the cradle is a male Type A connector that plugs into the PC's USB port. The other end of the cradle is a female Type A connector that plugs into the Adapter.
This USB extension cradle can be adjusted to improve the wireless connection. It is recommended that the Wireless N USB Adapter is perpendicular to the ground.
This section describes how to install the driver and utility for the Wireless N USB Adapter.
Windows Based Utility Installation
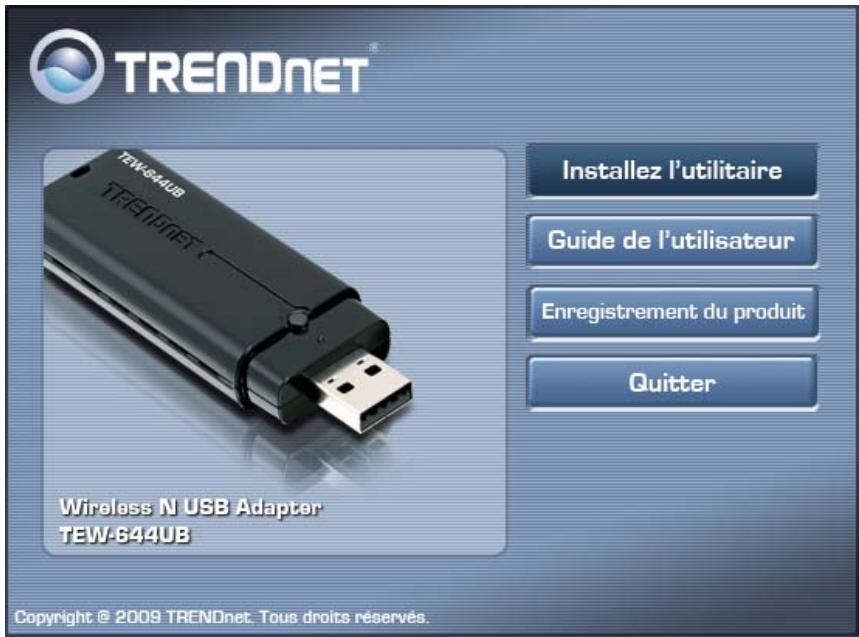
1) Insert the Utility and Driver CD-ROM into your computer's CD-ROM Drive and then click Install Utility.
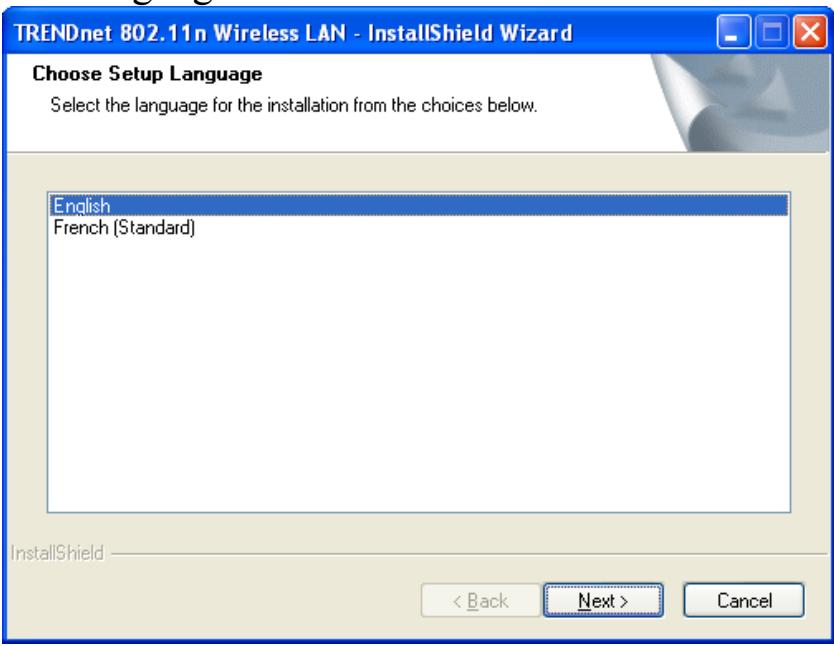
2) Select the desired language and then click Next.
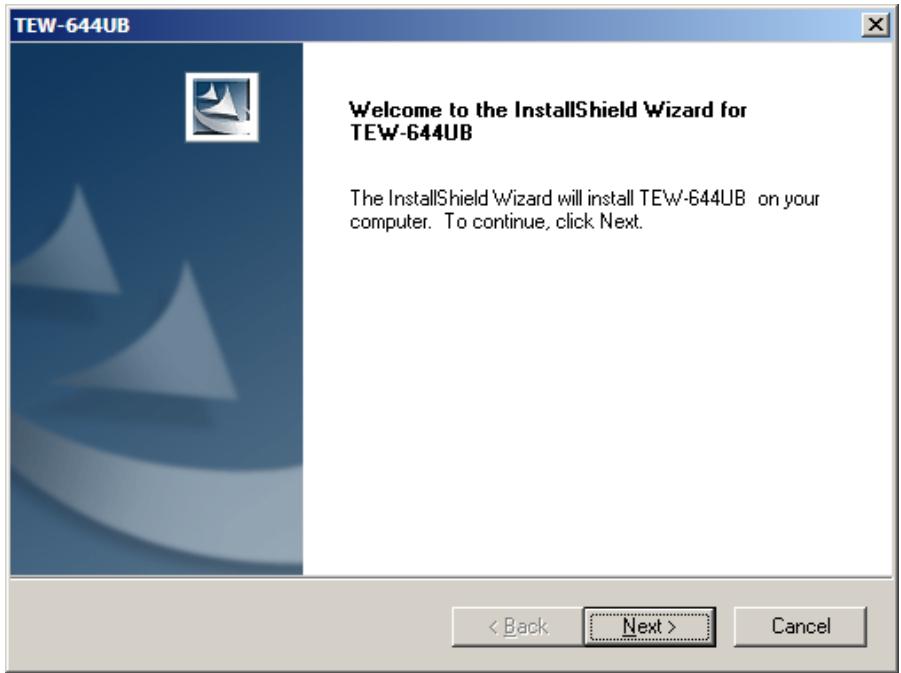
3) Follow the InstallShield Wizard Instructions
4) Click Finish.
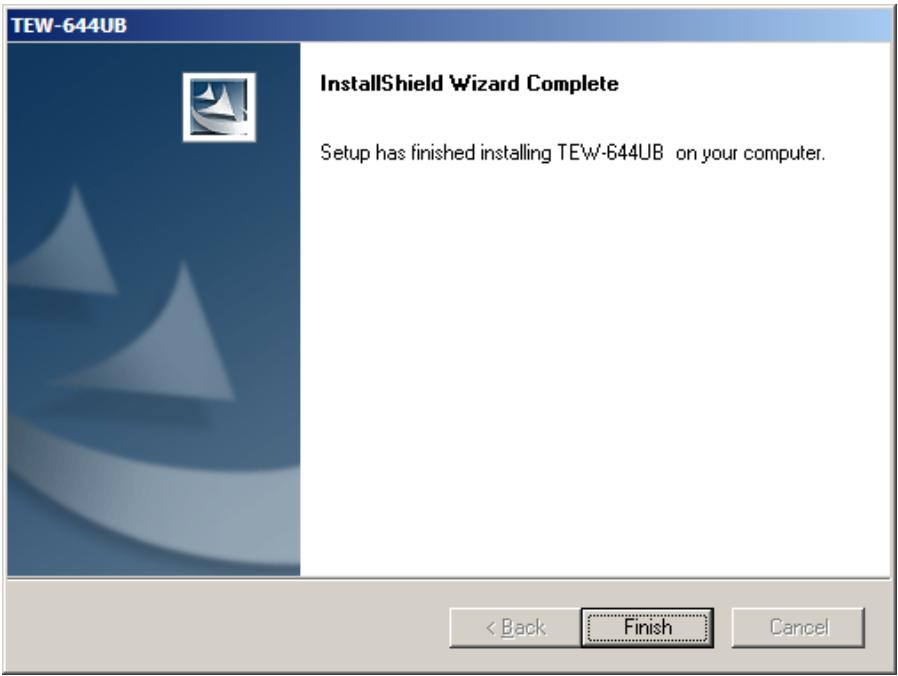
5) Reboot your PC and plug in the Wireless N USB Adapter into an available USB slot on your computer.
The user can configure the wireless settings using the Wireless Adapter Configuration Utility. Double-click the utility icon that appears in the taskbar.
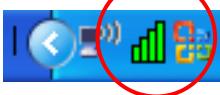
3:50 PM
The Wireless Adapter Configuration Utility is divided into five sections: Link Info, Configuration, Site Survey, Profile, WPS and About.
Link Information
This is the default screen after launching the Utility program.
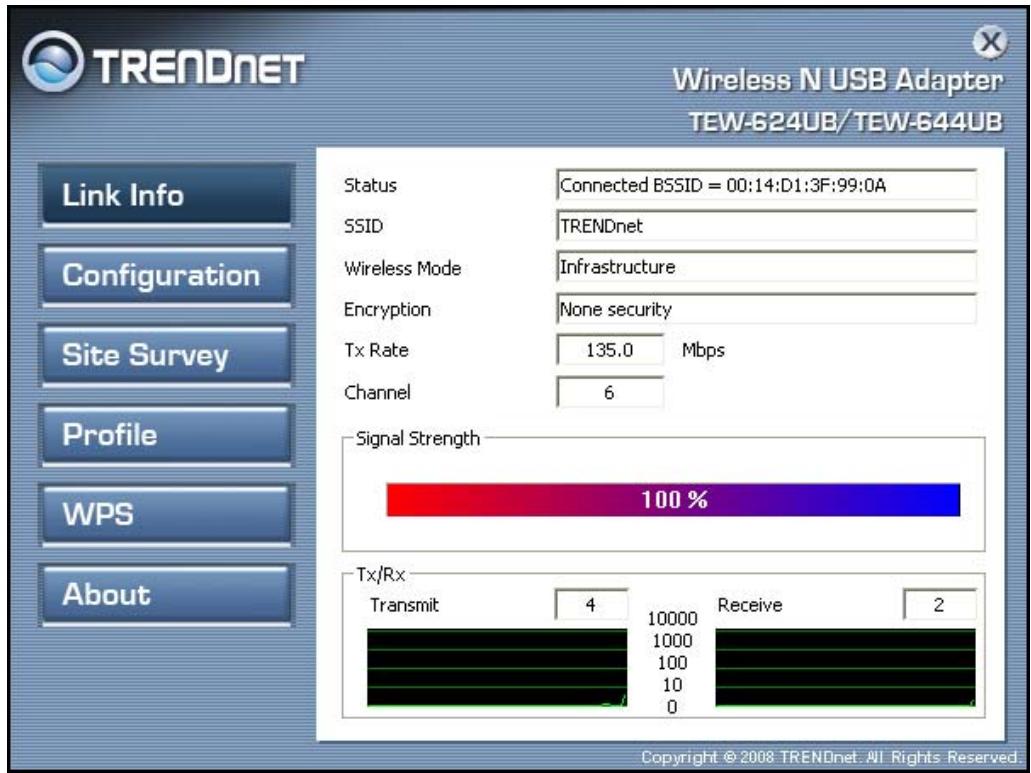
Status: Shows the associated BSSID, which can be used to identify the wireless access point.
SSID: Shows the current SSID, which must be the same on the wireless client and AP in order for communication to be established.
Frequency: Shows the current frequency used for the wireless network.
Wireless Mode: Shows the current wireless mode used for wireless communication.
Encryption: Shows the current encryption mode used on the wireless network.
TxRate: Shows the current data rate used for transmitting.
Channel: Shows the current channel for communication.
Note : For FCC domain device, you can only select Channel 1\~11.
For ETSI domain device, you can only select Channel 1\~13.
Link Quality: Shows the link quality of the Wireless N USB Adapter with the Access Point when operating under Infrastructure mode.
Signal Strength: Shows the wireless signal strength of the connection between the Wireless N USB Adapter with the Access Point.
Data Rate: Shows the statistics of data transfer, and the calculation is based on the number of packets transmitted and received.
Configuration
This screen is where you set the basic wireless settings for the Wireless N USB Adapter
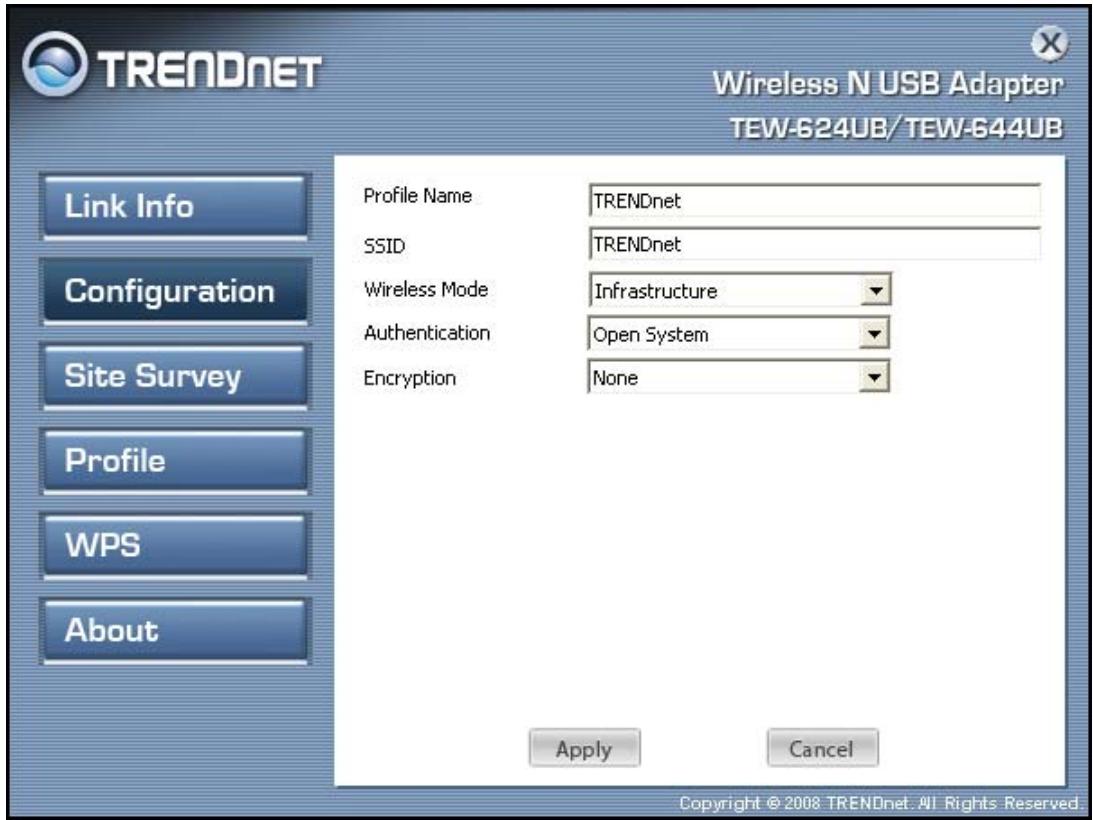
Profile Name: Shows the Profile Name.
SSID: Service Set Identifier, which is a unique name shared among all clients in a wireless network. The SSID must be identical for each client in the wireless network.
Wireless Mode: There are two modes available for selection
- Infrastructure – to establish wireless communication with the LAN and other wireless clients through the use of Access Points.
- Ad-Hoc – to establish point-to-point wireless communication directly with other wireless client devices.
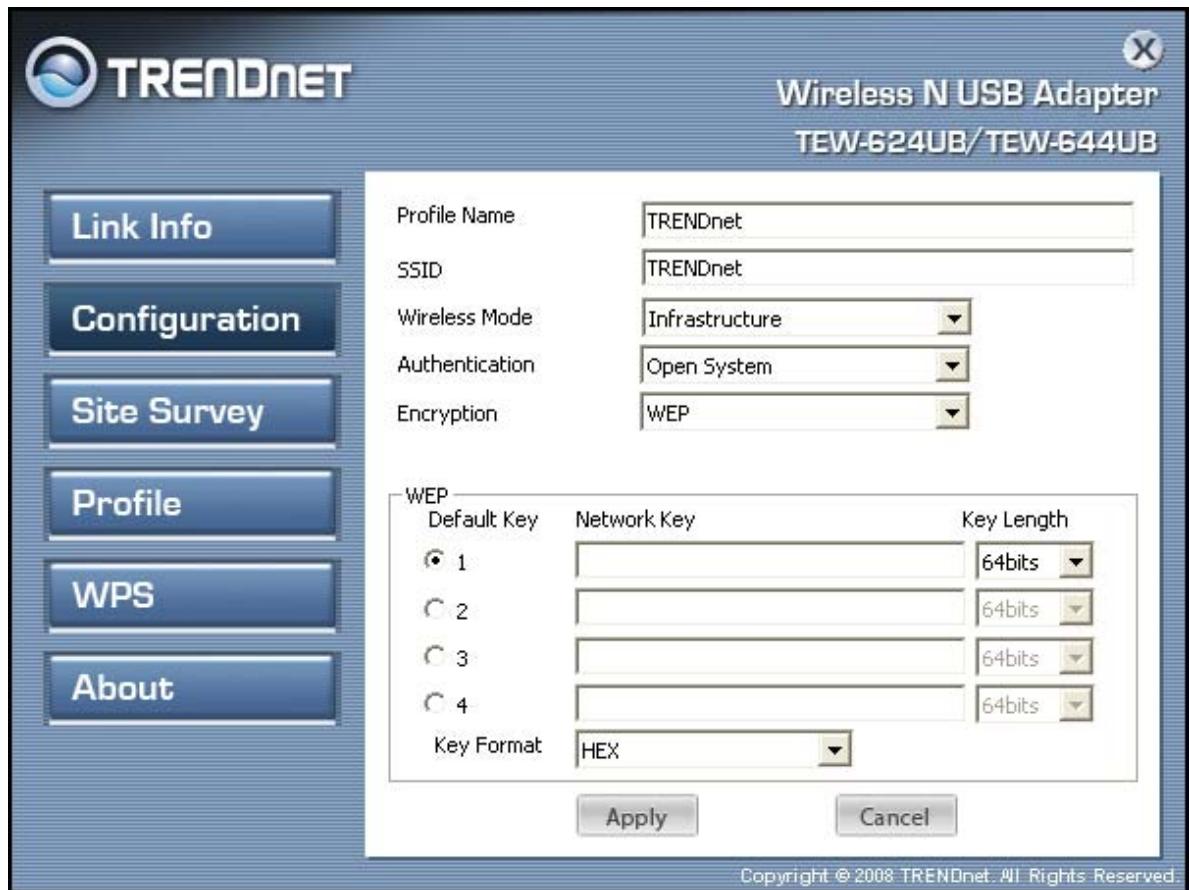
Authentication: The following options are available: Open System, Shared Key, WPA-PSK, WPA2-PSK, WPA EAP-TLS, WPA2 EPA-TLS. Select Open System, Shared Key for WEP data encryption feature.
Open System and Shared Key
Open System and Shared Key requires the user to set a WEP key to exchange data with other wireless clients that have the same WEP key. The following will be activated when Open, Shared Key or Auto is enabled:
● Default Key: select one of the 4 keys to use.
- Network Key: choose the encryption way, either in HEX or ASCII formats, and enter the password in the blank space.
● Key Length: select 64 or 128 bits as the length of the keys
Key Format: ASCII or HEX
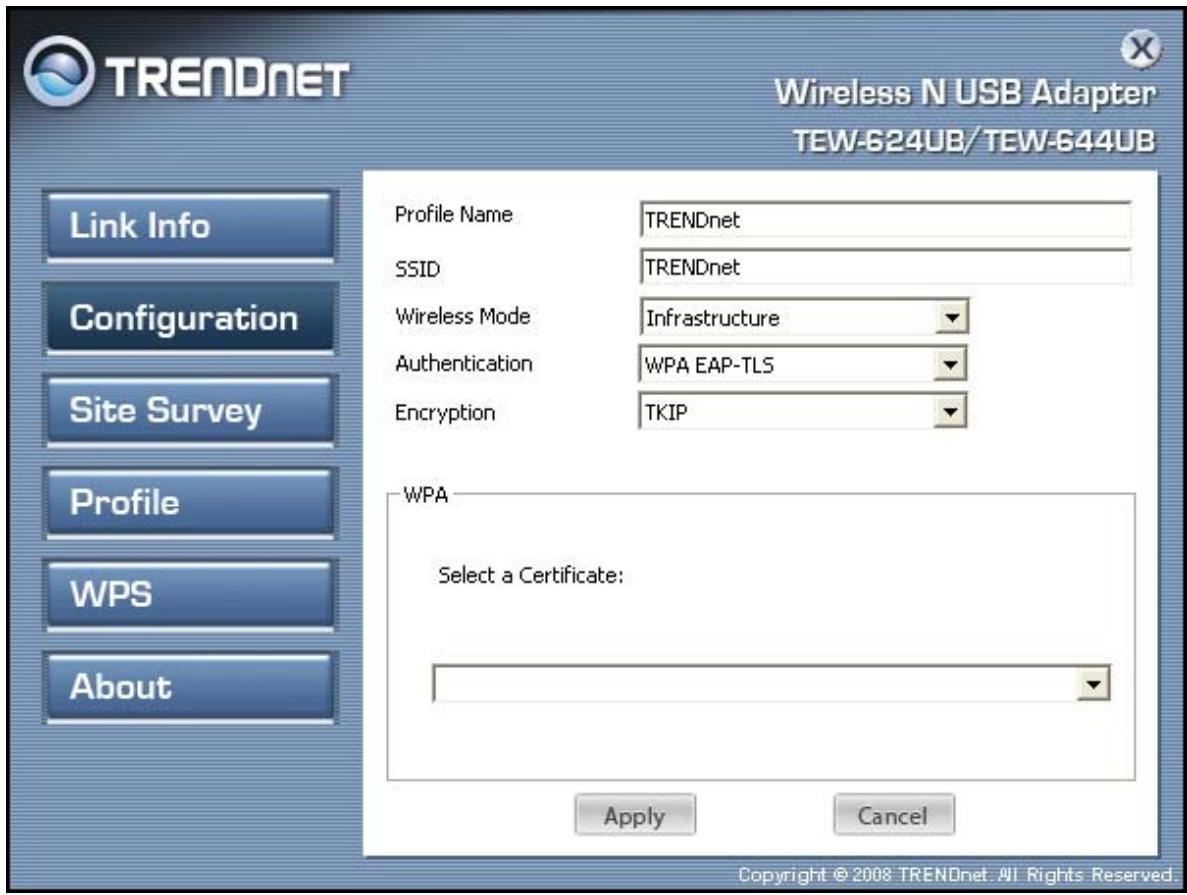
WPA/WPA2 EAP-TLS
If using the WPA/WPA2 EAP-TLS authentication method, please select the Encryption type for TKIP or AES then select the WPA/WPA2 Certificate from drop down list.
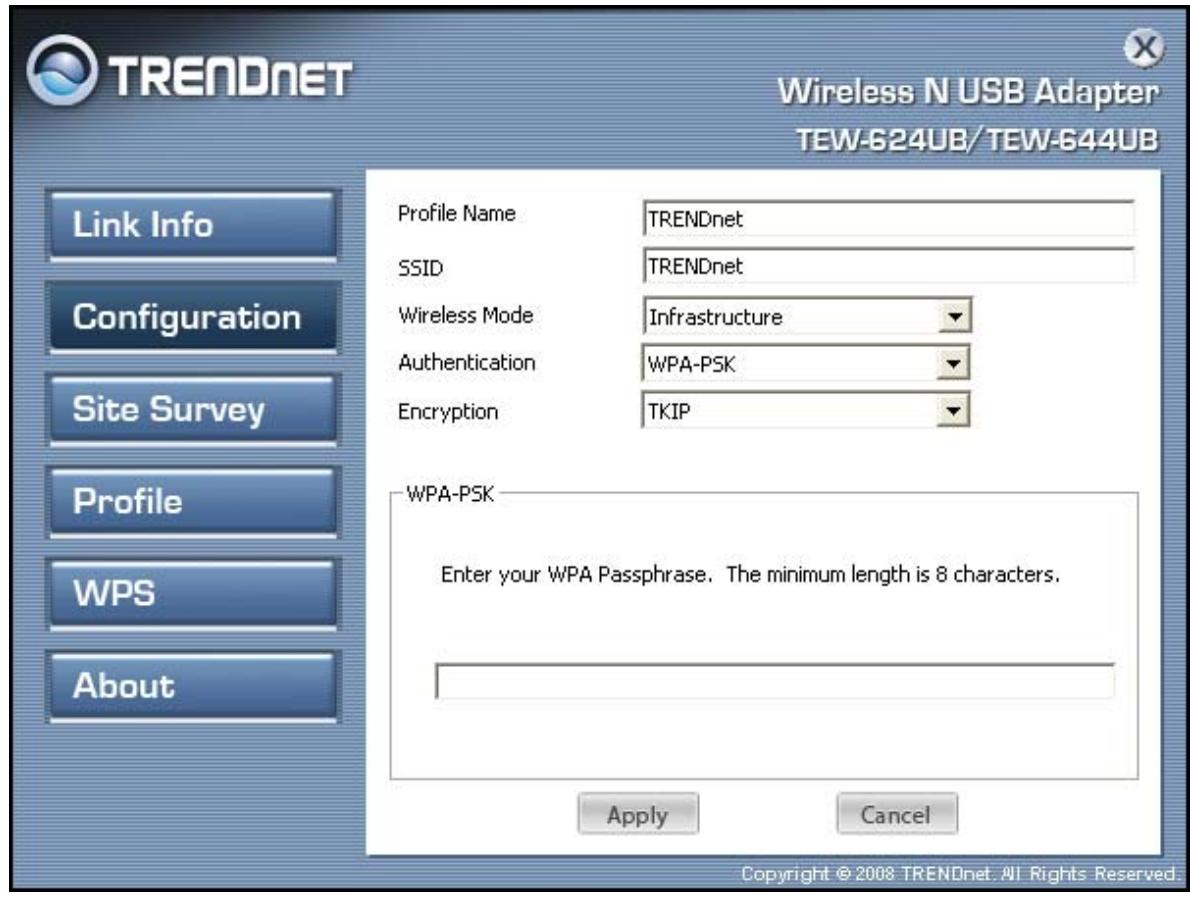
WPA/WPA2-PSK
If using the WPA-PSK/WPA2-PSK authentication method, please select the Encryption type for TKIP or AES then enter the Passphrase key.
Site Survey
This screen allows the user to scan for available wireless networks (wireless clients and Access Points). It also allows the user to establish wireless communications with an available wireless network.
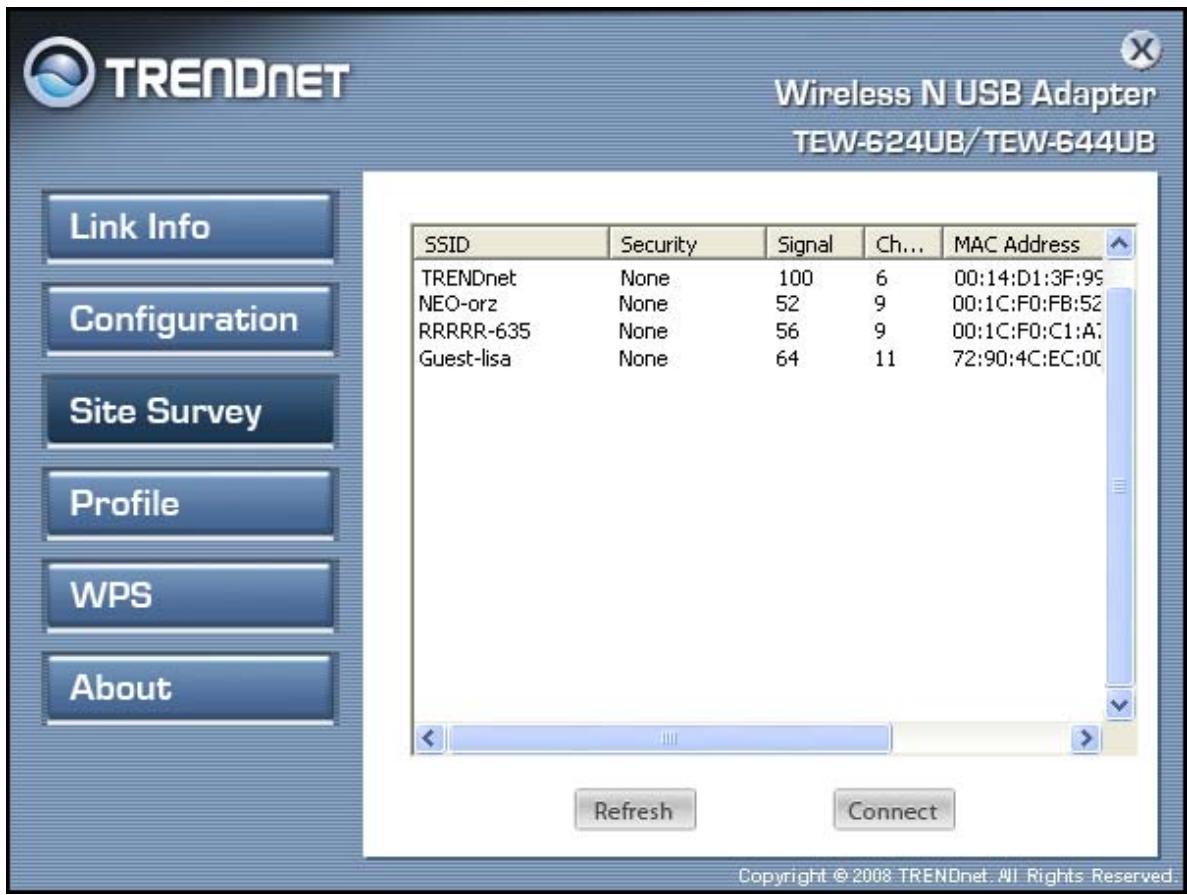
Select any one of the wireless networks by double-clicking on it or clicking on the “Connect” button.
Click the “Refresh” button to scan for available networks.
Profile
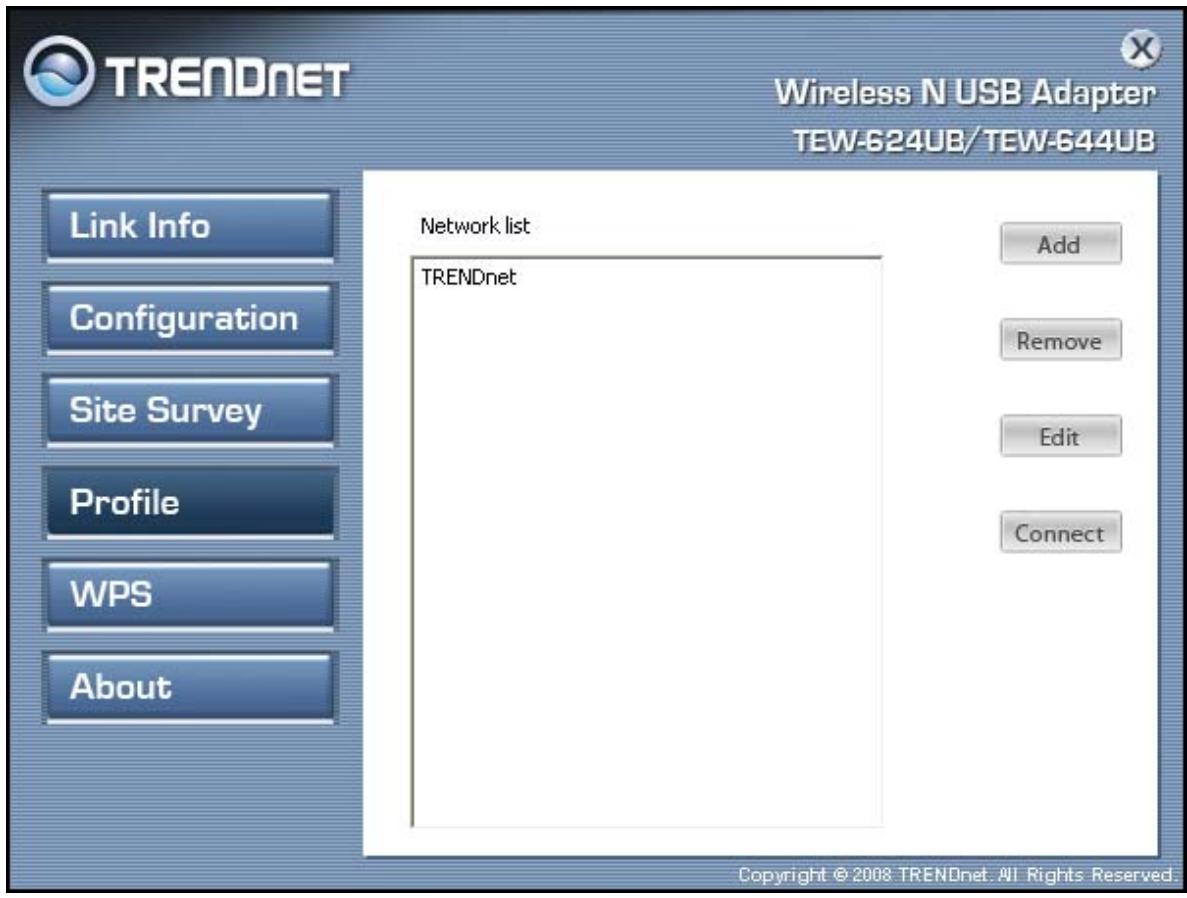
The user can create and manage the created profiles for home, work or public areas. By double-clicking on one of the created profile, the setting will adjust to the specific setting such as SSID, channel, and encryption as saved by that particular profile.
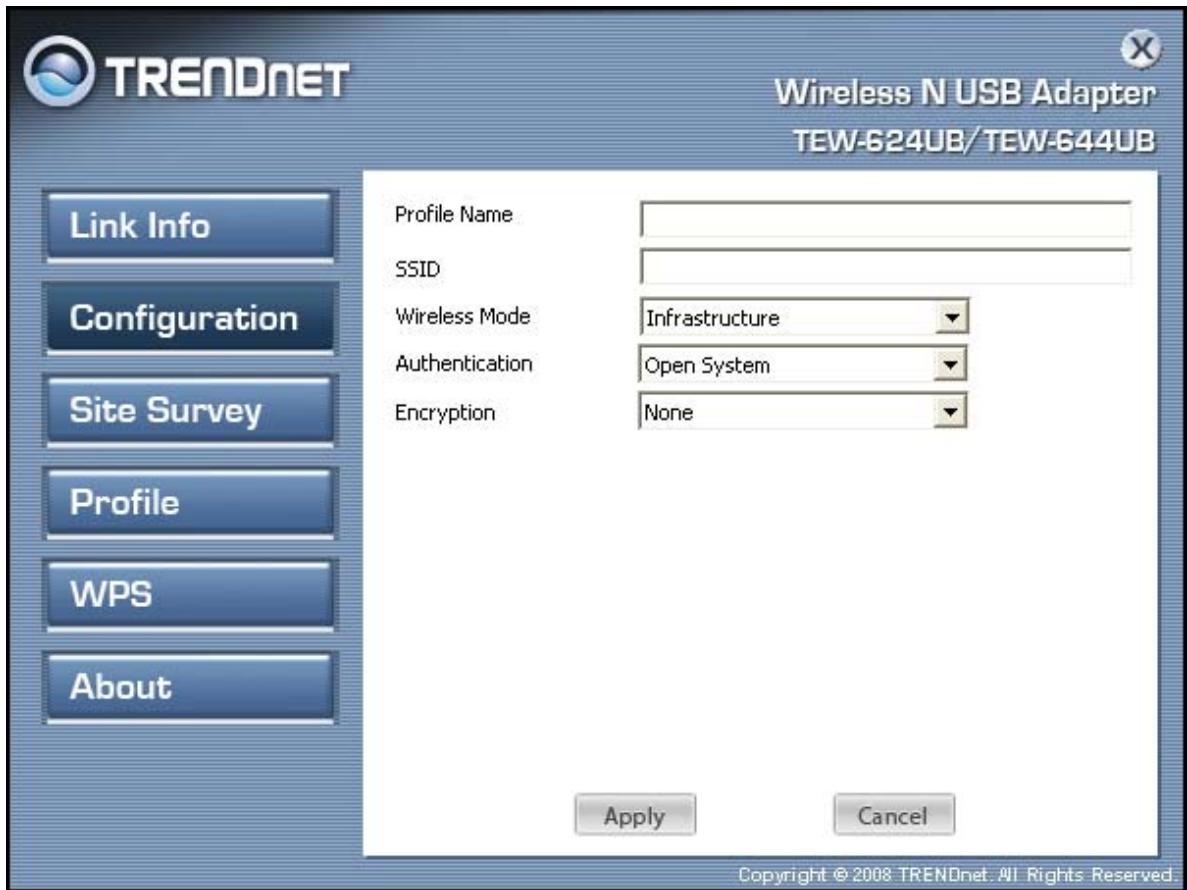
Add: Adds a new profile. The following screen will appear. Enter the Profile Name, SSID and select the Wireless Mode, Authentication and Encryption then click Apply to save the new profile.
Remove: Delete the selected profile.
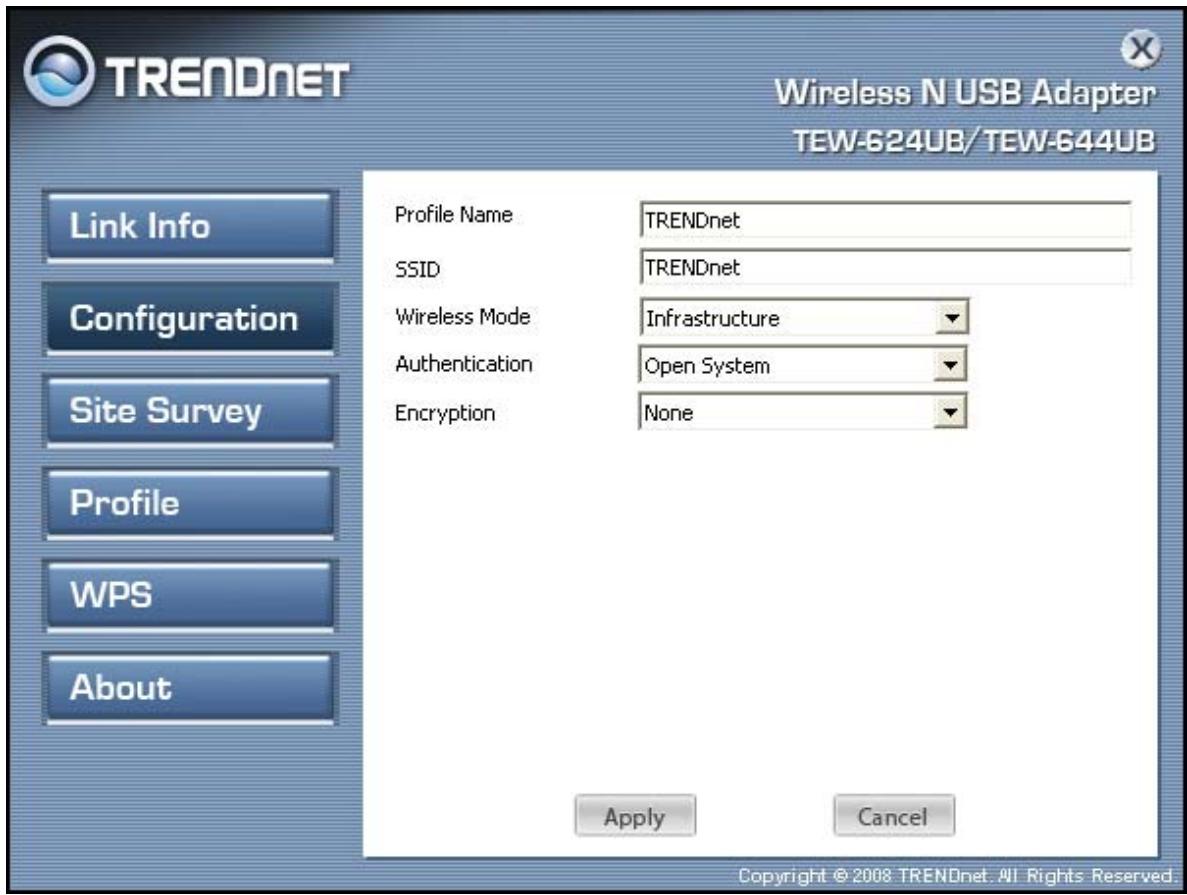
Edit: Edit an exist profile. The following screen will appear. Edit the SSID and select the Wireless Mode, Authentication and Encryption then click Apply to save the profile. When the Profile name was changed, a new profile will be added in the list.
Connect: Selected a profile from list then click the Connect to connecting to the wireless network with the profile setting.
WPS
Wi-Fi Protected Setup (WPS) is an optional certification program from the Wi-Fi Alliance that is designed to ease the task of setting up and configuring security on a wireless network. There are two methods used in the WPS as below instruction.
Push the button on my access point
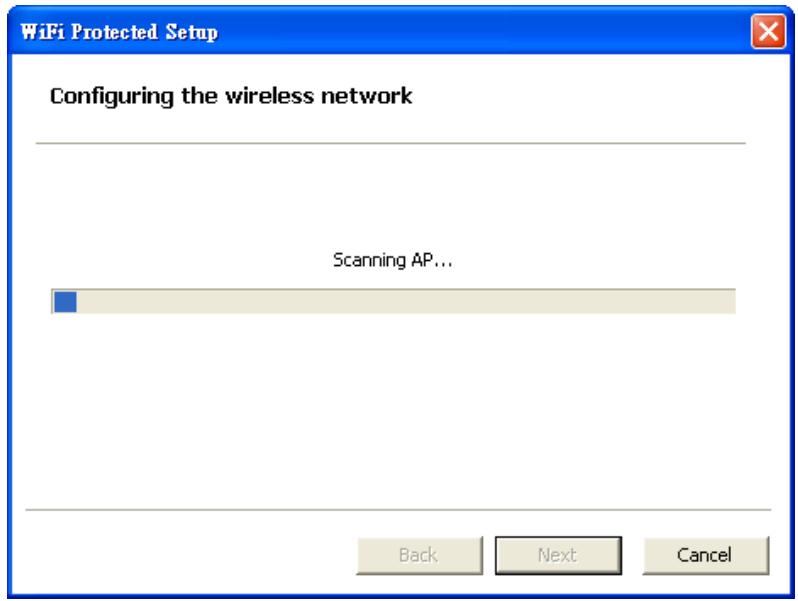
Using the WPS configuration with the “Push the button on my access point” method, the configuration steps as below:
1) Selected the “Push the button on my access point”.
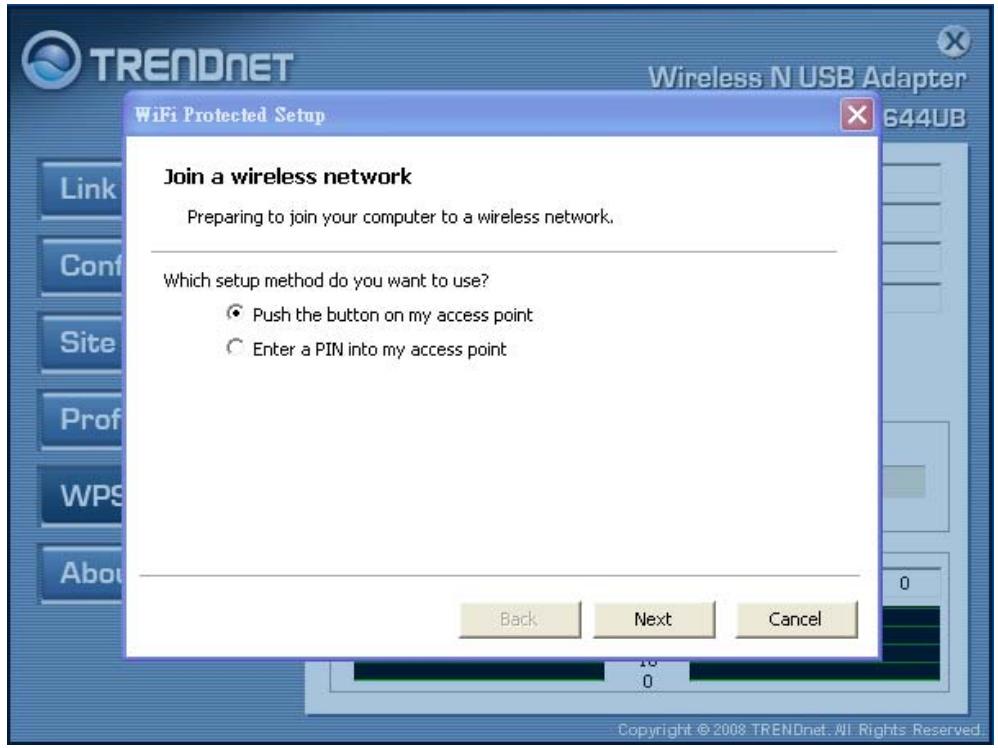
2) Push the WPS configuration button on your wireless access point or router.
3) Cliek the Next button start the WPS configuration.
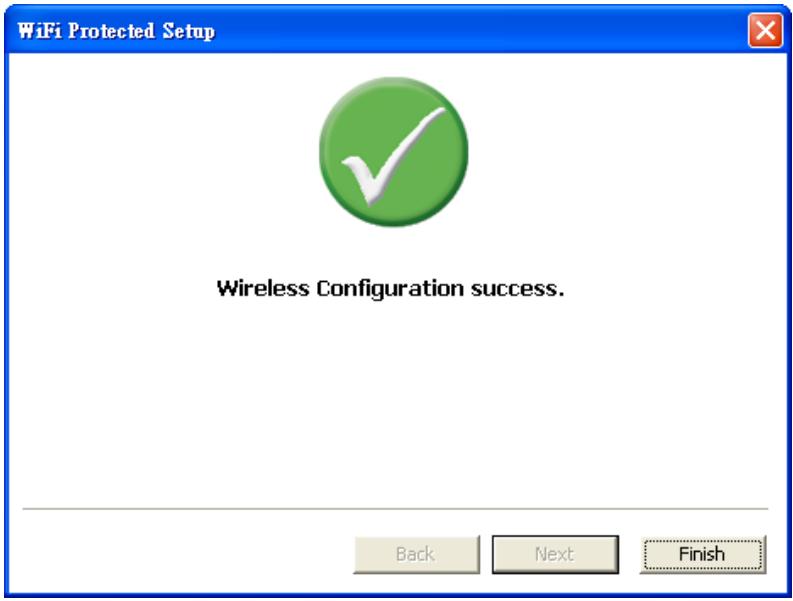
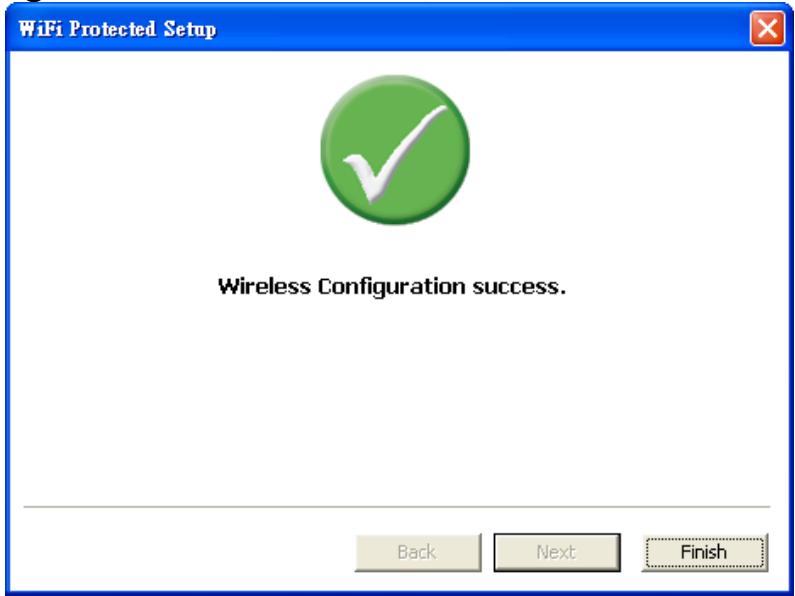
4) If the WPS configuration was successful, the follow window will show on.
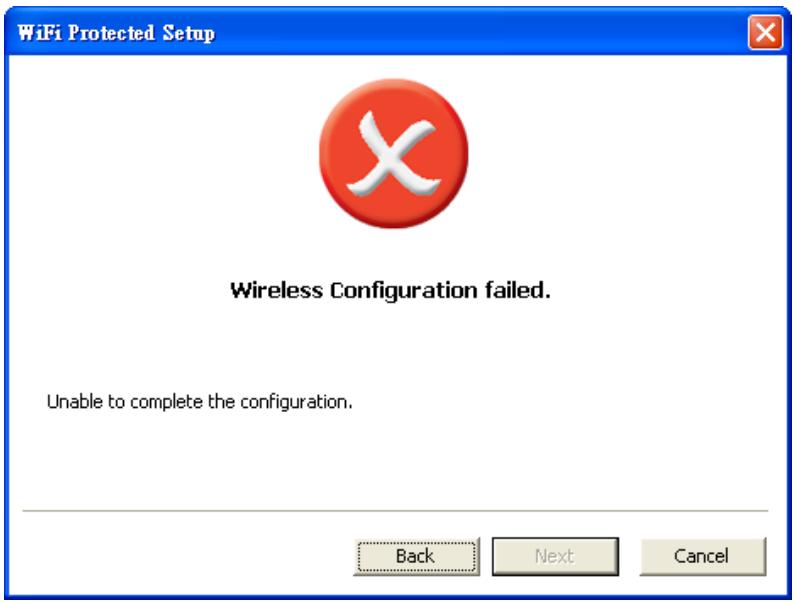
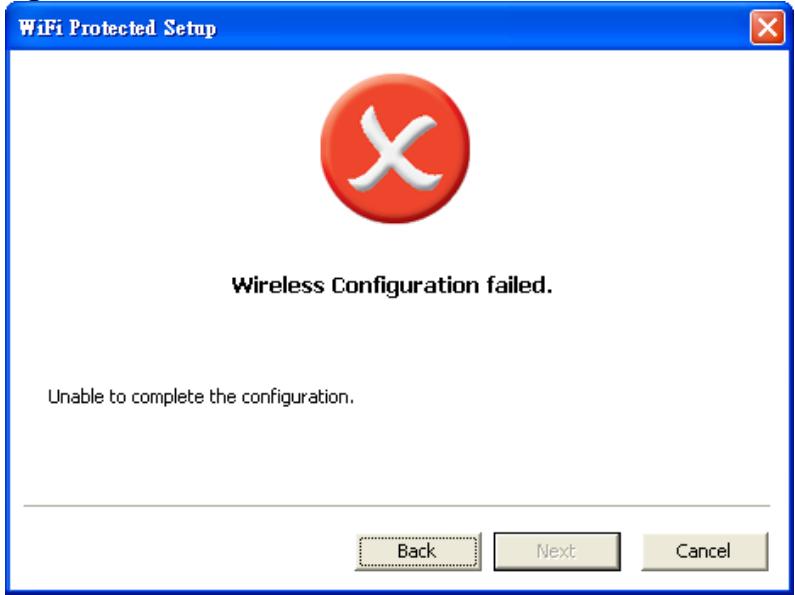
5) If the WPS configuration was failed, the follow window will show on.
Enter a PIN into my access point
Using the WPS configuration with the “Enter a PIN into my access point” method, the configuration steps as below:
1) Selected the “Enter a PIN into my access point”, the PIN will be show on the button of the windows.
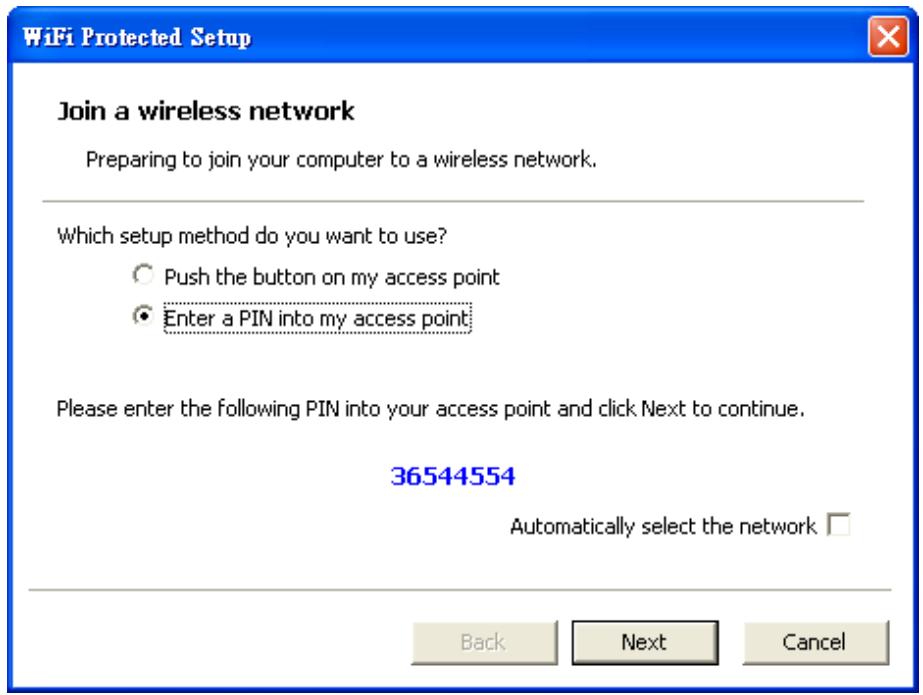
2) Enter the PIN code into the WPS “Clint PIN number” of you wireless access point or router then click the Start PIN button, the wireless access point or router will start the WPS configuration process.
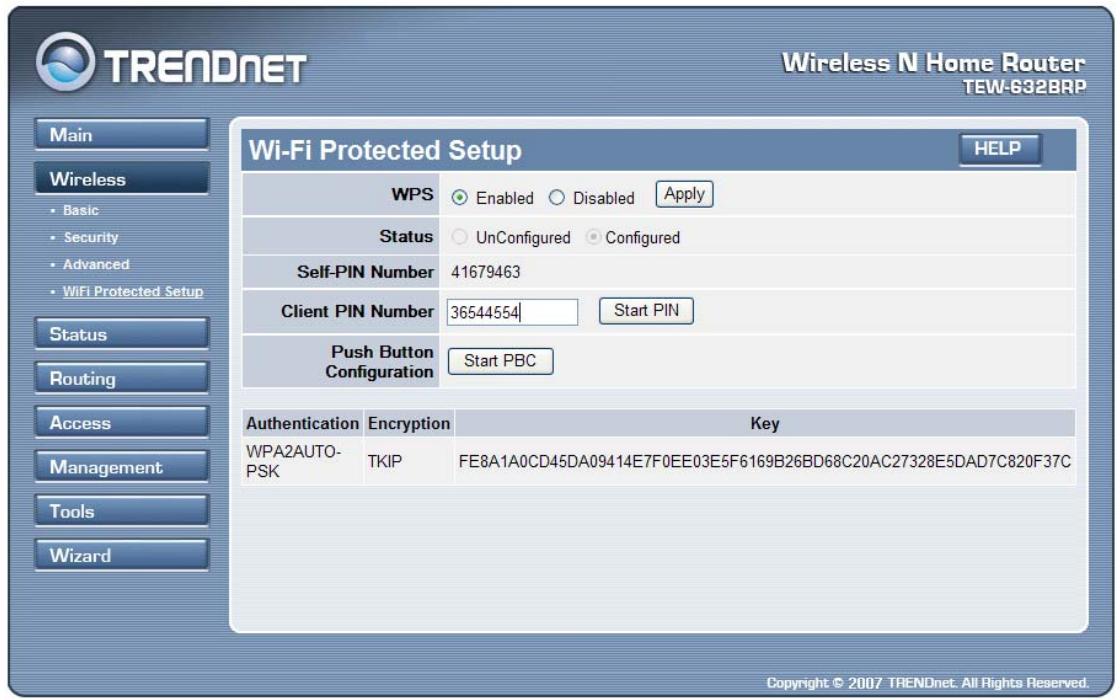
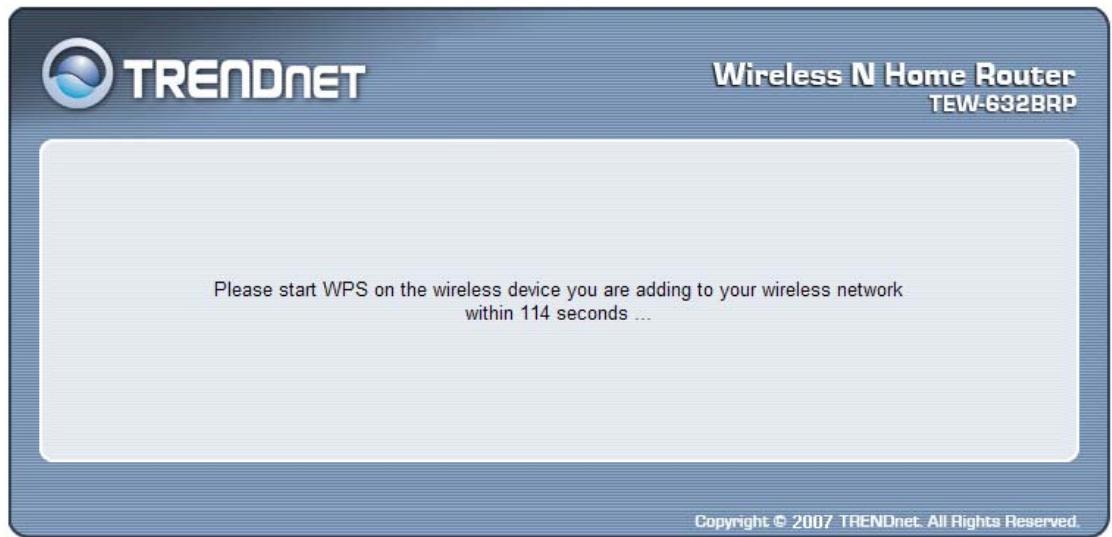
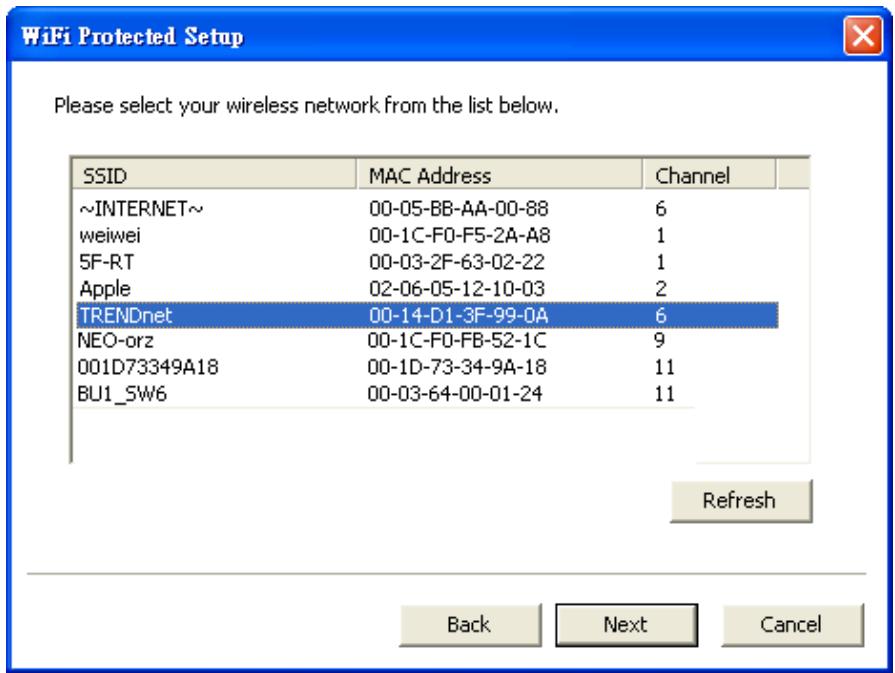
3) Selected a wireless access point or router which one will be connecting then click the Next button start the WPS configuration. If the “Automatically select the network” was checked, the setup step will be skip.
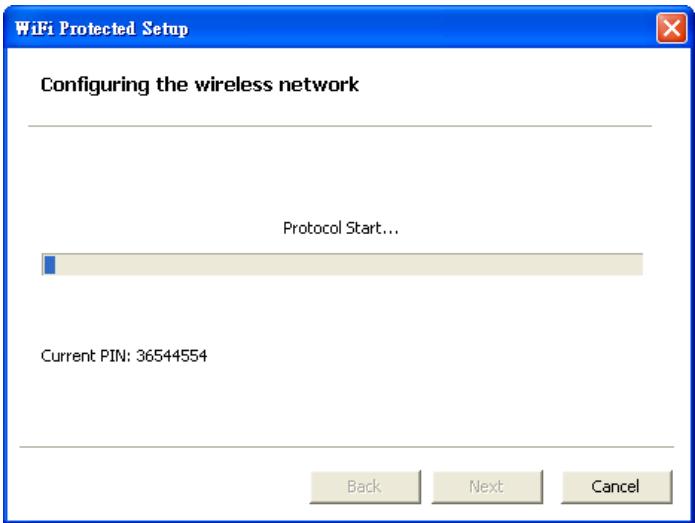
4) If the WPS configuration was successful, the follow window will show on.
5) If the WPS configuration was failed, the follow window will show on.
About
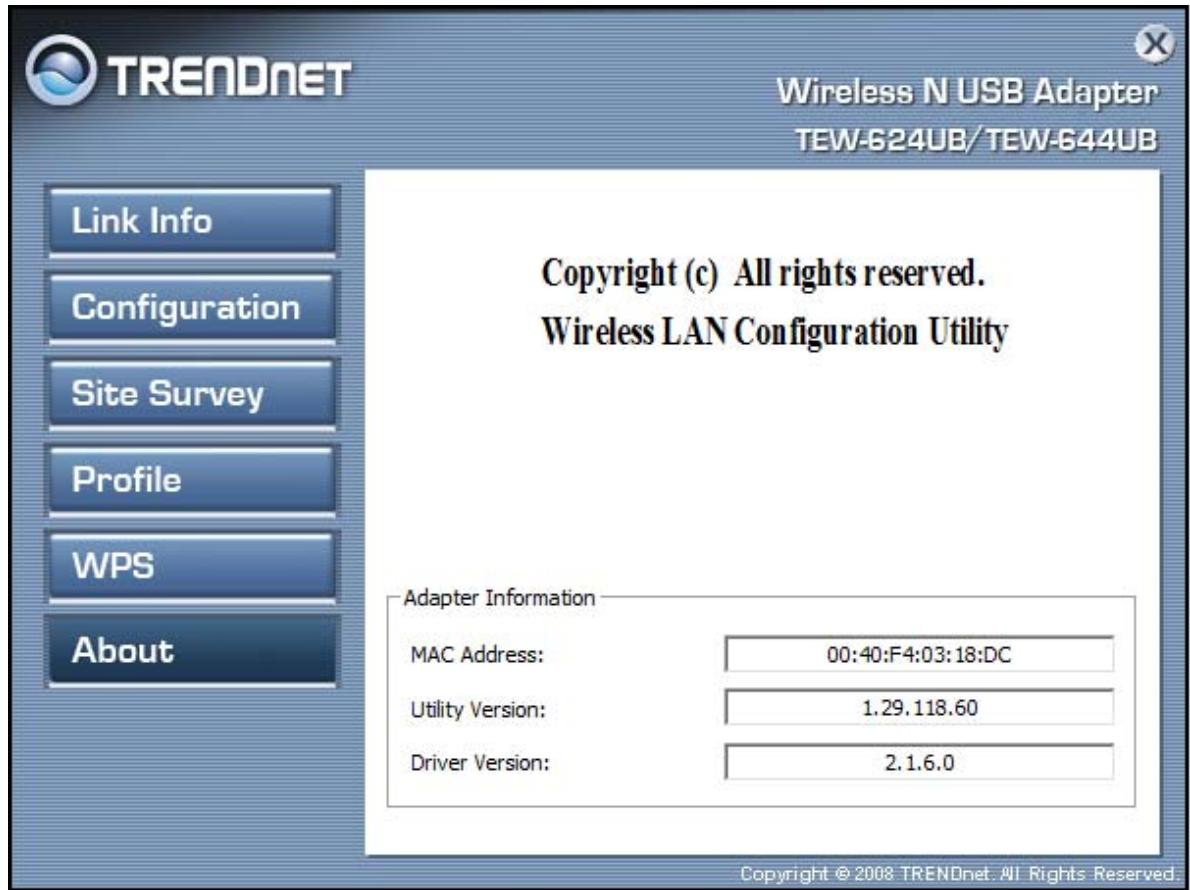
This screen displays information about the Wireless N USB Adapter, such as the Driver and Utility version. When a new version of the utility becomes available for upgrade, users will be able to identify by version numbers.
This section will lead you to install the driver and utility of the TEW-644UB on your Apple computer with Mac OS X 10.4/10.5.
Before insert the TEW-644UB into USB port of your computer, please install the Utility Program first. Make sure that the TEW-644UB is NOT inserted into the USB slot.
Installation
- Insert the TEW-644UB Driver & Utility CD into the CD-ROM Drive
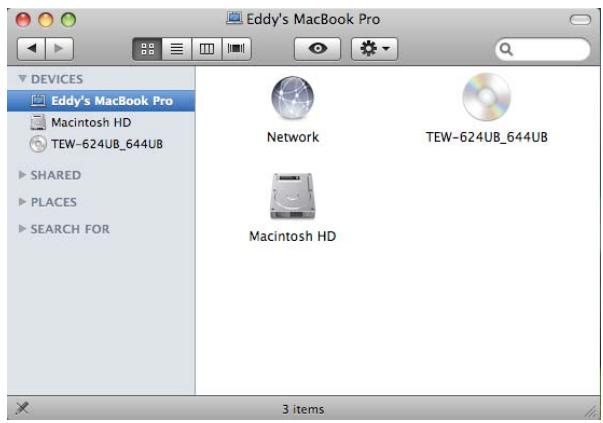
- Browse the TEW-644UB CD-ROM and go to the MAC OS X folder.
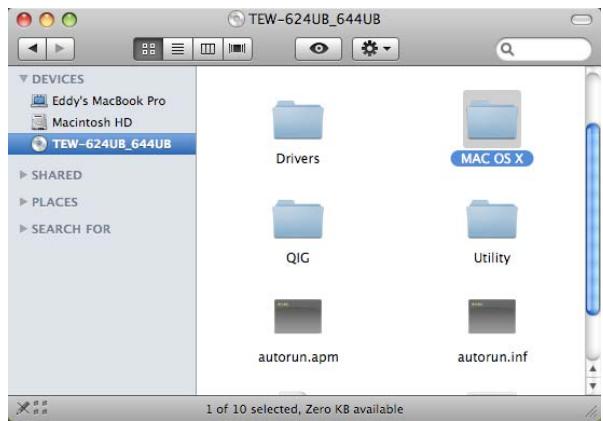
- Click the TEW-624UB_TEW-644UB_MAC_OS_X.dmg, that is TEW-644UB driver/utility disk image file for Mac OS X.
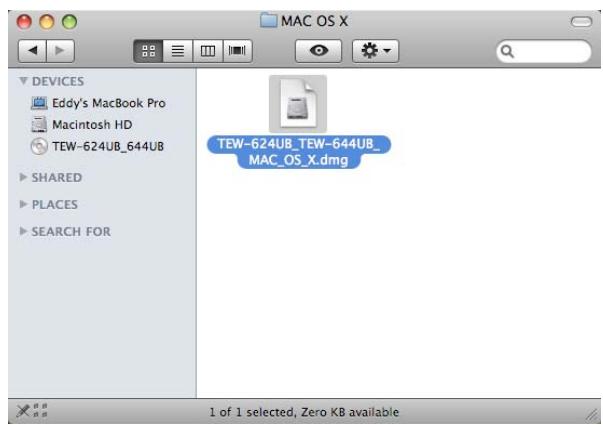
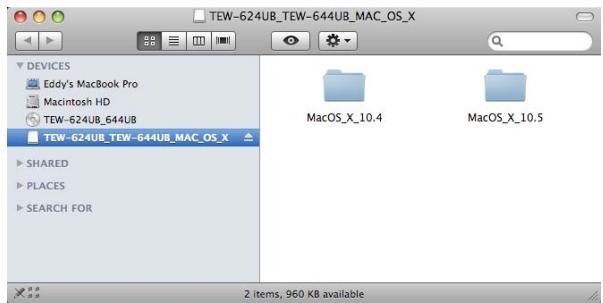
- Browse the contents of TEW-644UB_MAC_OS_X and select MacOS_X_10.4 or MacOS_X_10.5 folder whichever applicable on your Apple computer
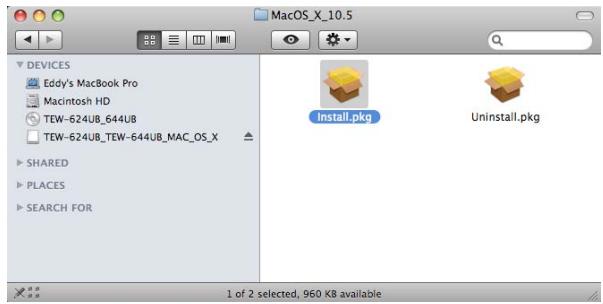
- Double click on the install.pkg to start the installation of the TEW-644UB driver/utility.
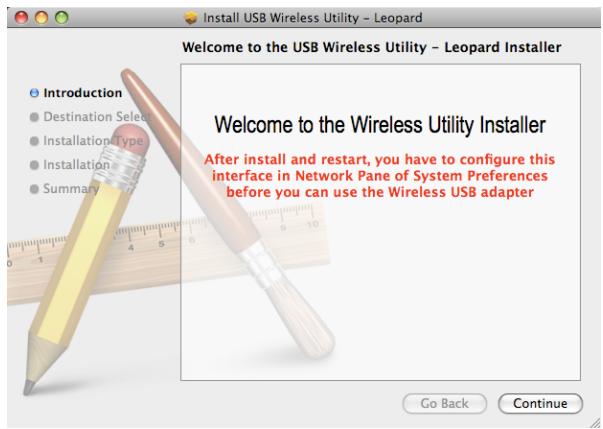
6. Click "Continue" button.
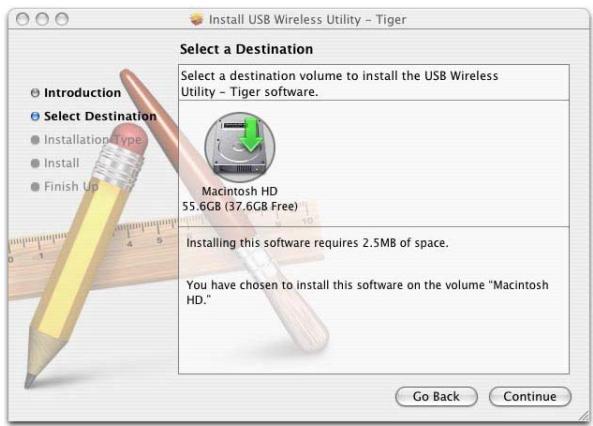
7. If prompted to, select a destination volume to install the utility and then click Continue.
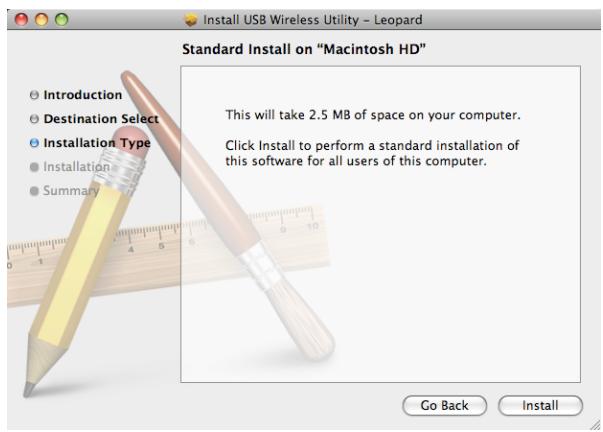
8. Click "Install" button.
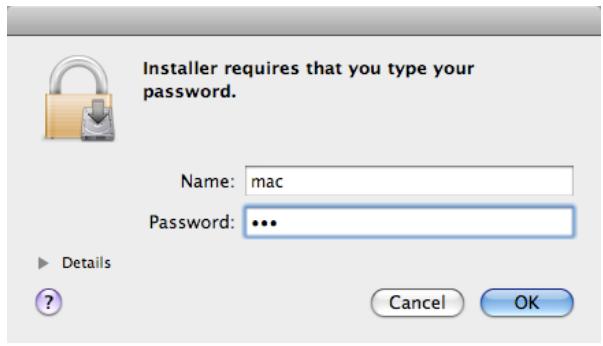
- Input your password then click "OK" button.
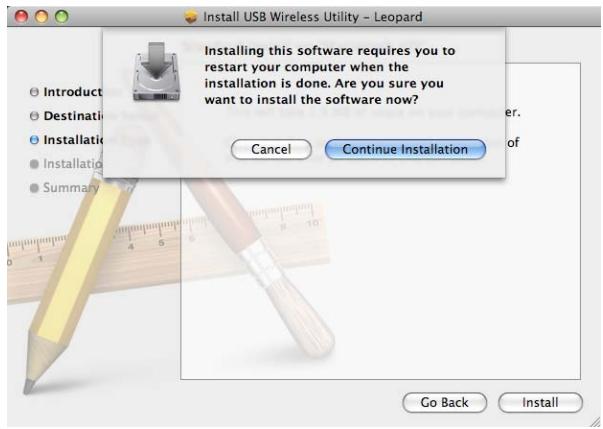
- Click “Continue Installation”.
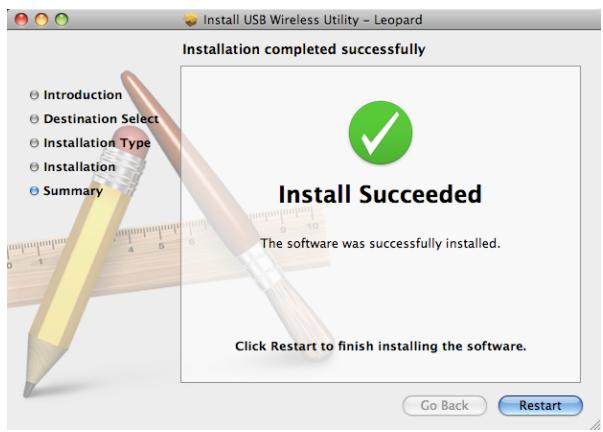
- Click “Restart” to reboot your computer.
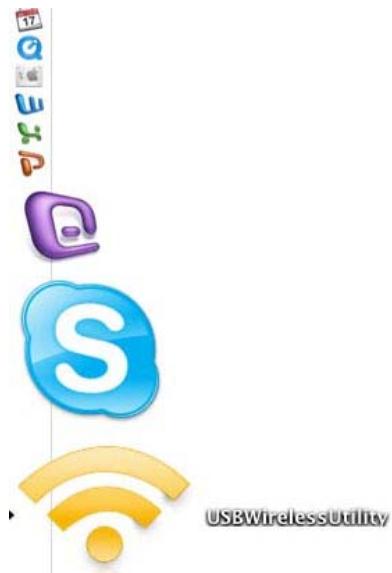
- Insert the TEW-644UB on your Mac. The USB Wireless Utility will automatically appear. If the utility does not appear, you will find the “USBWirelessUtility” icon in the Dock menu. Click on the USB WirelessUtility icon to start the TEW-644UB configuration.
OS X 10.5
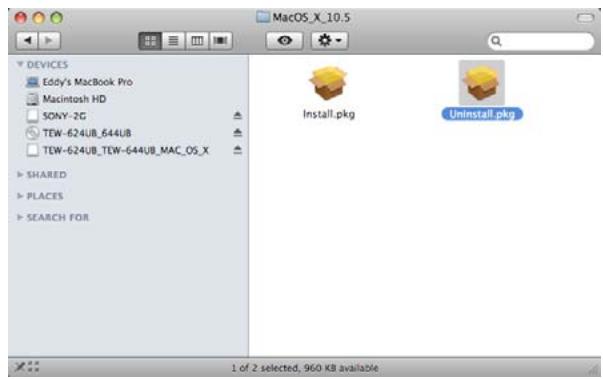
- Double click on the “Uninstall.pkg” start the un-installation of the TEW-644UB driver/utility.
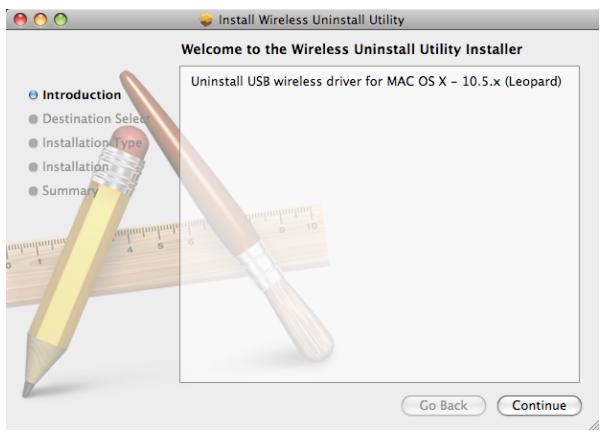
- Click "Continue" button.
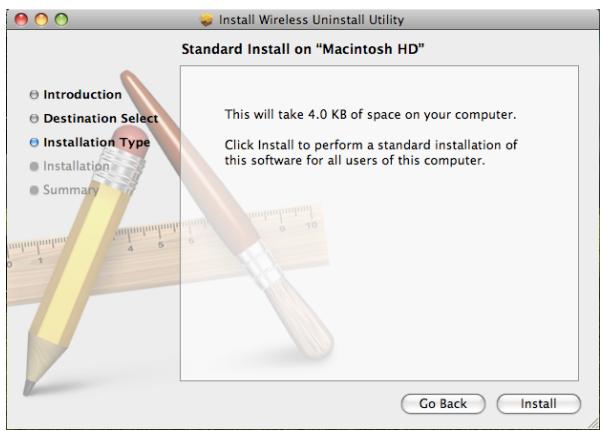
- Click "Install" button.
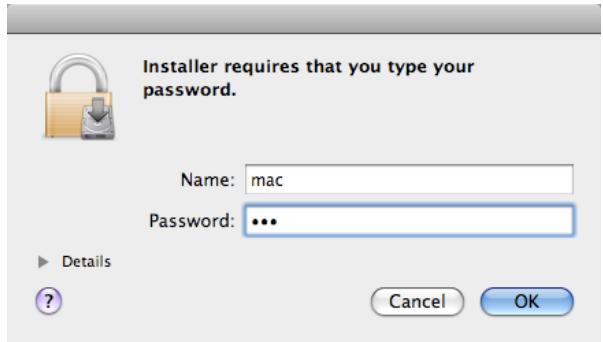
- Input your password then click "OK" button.
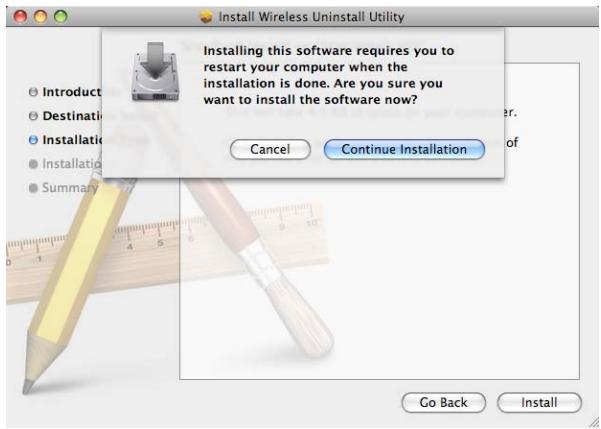
- The computer will restart when the installation is done, click “Continue Installation” start the software installation.
- Click “Restart” to reboot your computer.
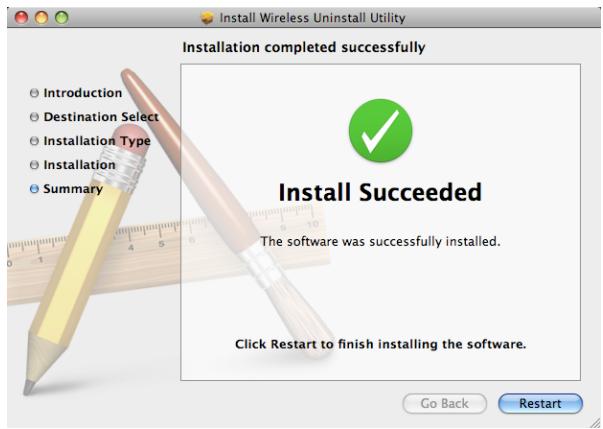
- Disconnect the adapter from your computer.
OS X 10.3/10.4
- Double click on the “Uninstall.command”.
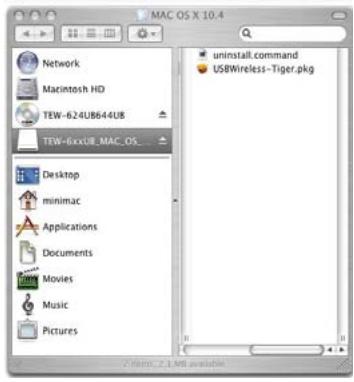
- Enter the password for your computer and hit "Enter".
![Last login: Tue Feb 3 15:42:44 on console /Volumes/TEW-6xxUB_MAC_OS_X_20081014/MAC\ OS\ X\ 10.4/uninstall.command; exit Welcome to Darwin! macusers-computer:~ minimac$ /Volumes/TEW-6xxUB_MAC_OS_X_20081014/MAC\ OS\ X\ 10 .4/uninstall.command; exit Removing Startup Items... Password:[]](/content/2020/05/167017/images/7f581b1054e9454cd3c6be7f1edf126dc74f11f5c58beb191554741907b1d042.jpg)
- The utility is now uninstalled from your computer. Disconnect the adapter from your computer.
![Last login: Tue Feb 3 15:42:44 on console /Volumes/TEW-6xxUB_MAC_OS_X_20081014/MAC\ OS\ X\ 10.4/uninstall.command; exit Welcome to Darwin! macusers-computer:~ minimac$ /Volumes/TEW-6xxUB_MAC_OS_X_20081014/MAC\ OS\ X\ 10 .4/uninstall.command; exit Removing Startup Items... Password: Removing Driver... Removing Wireless Utility... Removing Package Uninstall Complete. logout [Process completed]](/content/2020/05/167017/images/a9de0dda8abf9776936e233c2659d0258a383afb643e45b5997a9c5b669e9351.jpg)
Link Status
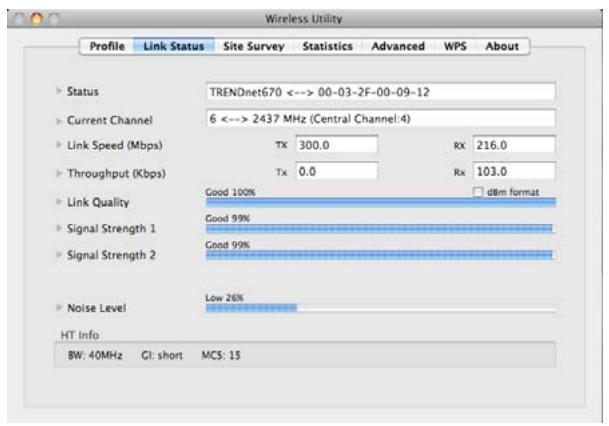
Status: Shows the current connected SSID and BSSID, which must be the same on the wireless client and AP in order for communication to be established.
Current Channel: Shows the current channel for communication.
Link Speed: Shows the current linking speed for transmit and receive.
Throughput: Shows the current throughput.
Link Quality: Shows the current wireless link quality.
Signal Strength: Shows the current wireless signal strength.
Noise Level: Shows the current wireless noise level.
HT Info: Shows the HT information including bandwidth 20 or 40MHz, GI (Guard Interval) short or long, MCS index when connect in 802.11n mode.
Profile
The user can create and manage the created profiles for home, work or public areas.
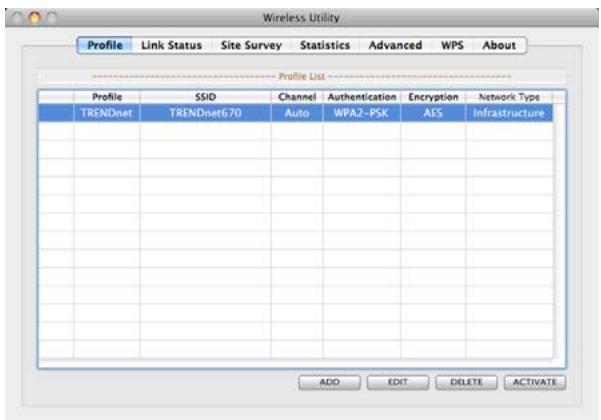
Add: Adds a profile, user can enter the necessary information required for accessing Access Points or Wireless Router.
Edit: View and edit the existing profile.
Remove: Deletes the selected profile.
Remove: Duplicate the selected profile.
Activate: Selected a profile from list then click the Activate to connecting to the wireless network with the profile setting.
Site Survey
This site survey allows the user to scan for available wireless networks (ad-hoc wireless clients and wireless access points). It also allows the user to establish wireless communications with an available wireless network.
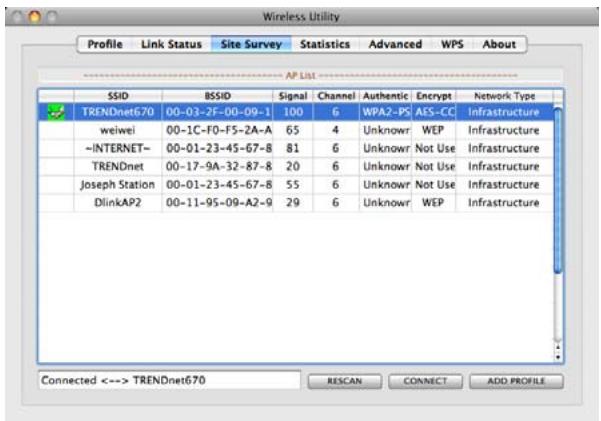
Rescan: Click the “RESCAN” button to rescan for available networks.
Connect: Select any one of the available wireless networks from list then click Connect button to establishing the wireless connection.
Add Profile: Select any one of the available wireless networks from list then click ADD PROFILE button to add on to the profile list.
Advanced Setting
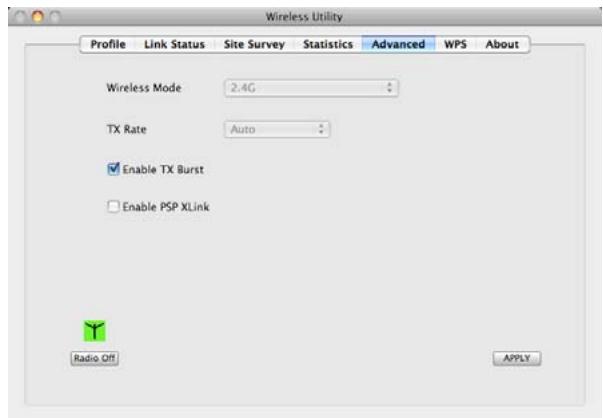
Enable TX Burst: Enable/Disable the TX Bust function on the TEW-644UB to improve data transmit throughput.
Enable PSP XLink: Enable/Disable the PSP XLink Mode on the TEW-644UB.
Reado Off: Click to turn off the wireless LAN.
Apply: Click to apply the new setting.
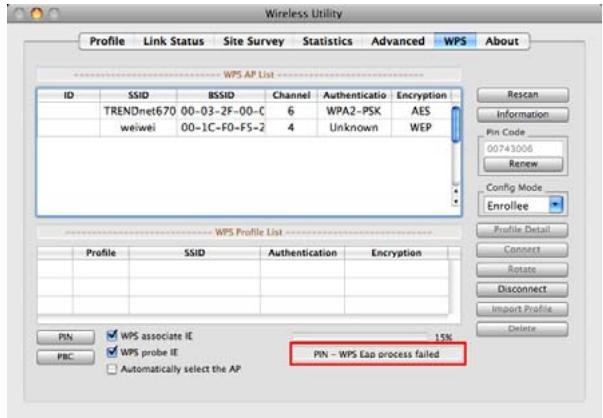
WPS
WiFi Protected Setup (WPS) is an optional certification program from the Wi-Fi Alliance that is designed to ease the task of setting up and configuring security on a wireless network. There are two methods used in the WPS as below instruction.
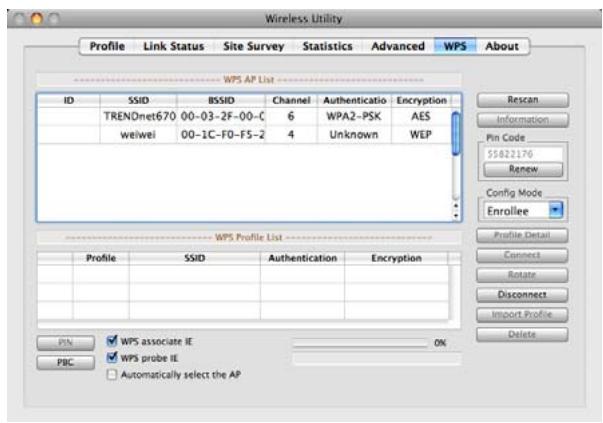
Using the WPS configuration with the “PBC” method, the configuration steps as below:
- Push the WPS configuration button on your wireless access point or router.
- Click the PBC button start the WPS configuration.
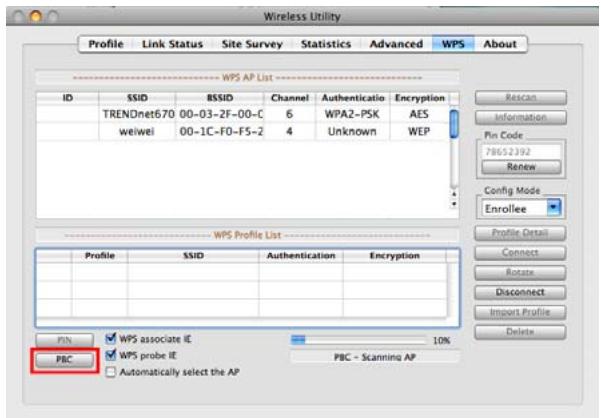
- If the WPS configuration was successful, the follow window will show on.

- If the WPS configuration was failed, the follow window will show on.
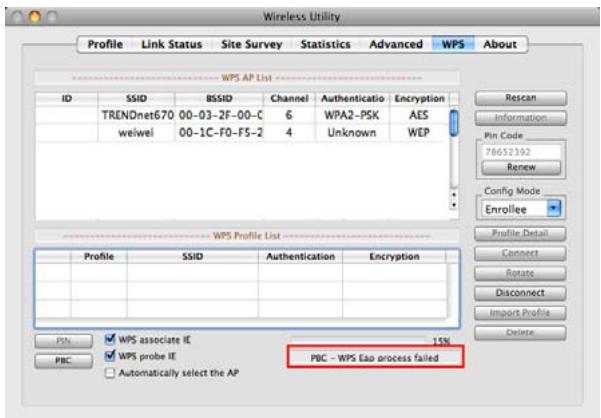
Using the WPS configuration with the “PIN” method, the configuration steps as below:
- Enter the PIN code into the WPS “Clint PIN number” of you wireless access point or router then click the Start PIN button, the wireless access point or router will start the WPS configuration process.
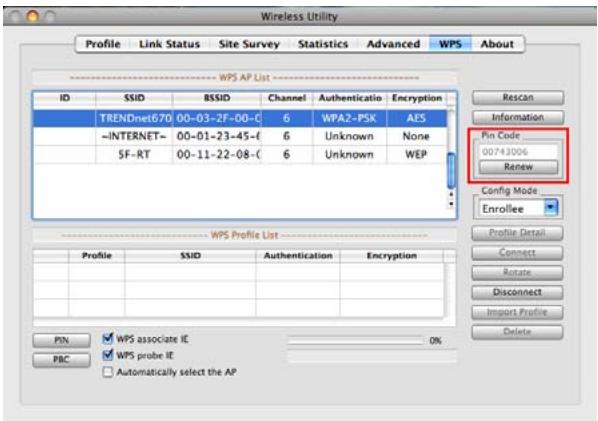
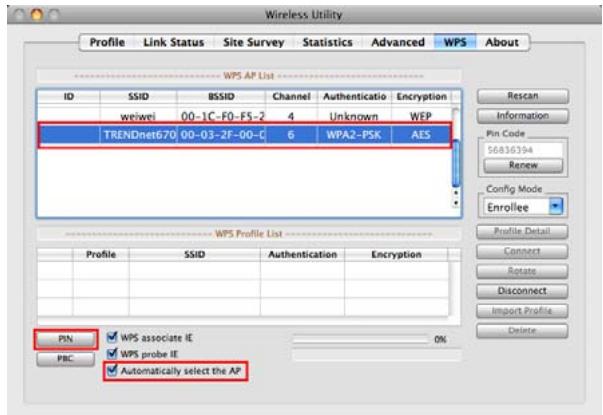
- Selected a wireless access point or router which one will be connecting then click the PIN button start the WPS configuration. If the “Automatically select the network” was checked, the setup step will be skip.
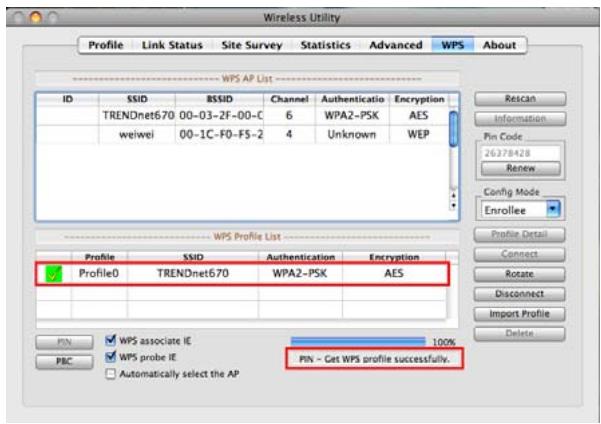
- If the WPS configuration was successful, the follow window will show on.
- If the WPS configuration was failed, the follow window will show on.
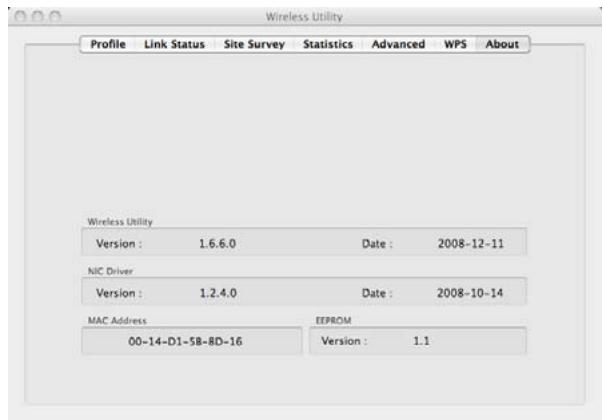
About
This screen displays information about the TEW-644UB, such as the Wireless Utility Version, NIC Driver Version and MAC Address. When a new version of the utility becomes available for upgrade, users will be able to identify by version numbers.
Limited Warranty
TRENDnet warrants its products against defects in material and workmanship, under normal use and service, for the following lengths of time from the date of purchase.
TEW-644UB Wireless N USB Adapter
Three years
If a product does not operate as warranted above during the applicable warranty period, TRENDnet shall, at its option and expense, repair the defective product or deliver to customer an equivalent product to replace the defective item. All products that are replaced will become the property of TRENDnet. Replacement products may be new or reconditioned.
TRENDnet shall not be responsible for any software, firmware, information, or memory data of customer contained in, stored on, or integrated with any products returned to TRENDnet pursuant to any warranty.
There are no user serviceable parts inside the product. Do not remove or attempt to service the product through any unauthorized service center. This warranty is voided if (i) the product has been modified or repaired by any unauthorized service center, (ii) the product was subject to accident, abuse, or improper use (iii) the product was subject to conditions more severe than those specified in the manual.
Warranty service may be obtained by contacting TRENDnet office within the applicable warranty period for a Return Material Authorization (RMA) number, accompanied by a copy of the dated proof of the purchase. Products returned to TRENDnet must be pre-authorized by TRENDnet with RMA number marked on the outside of the package, and sent prepaid, insured and packaged appropriately for safe shipment.
WARRANTIES EXCLUSIVE: IF THE TRENDNET PRODUCT DOES NOT OPERATE AS WARRANTED ABOVE, THE CUSTOMER'S SOLE REMEDY SHALL BE, AT TRENDNET'S OPTION, REPAIR OR REPLACEMENT. THE FOREGOING WARRANTIES AND REMEDIES ARE EXCLUSIVE AND ARE IN LIEU OF ALL OTHER WARRANTIES, EXPRESSED OR IMPLIED, EITHER IN FACT OR BY OPERATION OF LAW, STATUTORY OR OTHERWISE, INCLUDING WARRANTIES OF MERCHANTABILITY AND FITNESS FOR A PARTICULAR PURPOSE. TRENDNET NEITHER ASSUMES NOR AUTHORIZES ANY OTHER PERSON TO ASSUME FOR IT ANY OTHER LIABILITY IN CONNECTION WITH THE SALE, INSTALLATION, MAINTENANCE OR USE OF TRENDNET'S PRODUCTS.
TRENDNET SHALL NOT BE LIABLE UNDER THIS WARRANTY IF ITS TESTING AND EXAMINATION DISCLOSE THAT THE ALLEGED DEFECT IN THE PRODUCT DOES NOT EXIST OR WAS CAUSED BY CUSTOMER'S OR ANY THIRD PERSON'S MISUSE, NEGLECT, IMPROPER INSTALLATION OR TESTING, UNAUTHORIZED ATTEMPTS TO REPAIR OR MODIFY, OR ANY OTHER CAUSE BEYOND THE RANGE OF THE INTENDED USE, OR BY ACCIDENT, FIRE, LIGHTNING, OR OTHER HAZARD.
LIMITATION OF LIABILITY: TO THE FULL EXTENT ALLOWED BY LAW TRENDNET ALSO EXCLUDES FOR ITSELF AND ITS SUPPLIERS ANY LIABILITY, WHETHER BASED IN CONTRACT OR TORT (INCLUDING NEGLIGENCE), FOR INCIDENTAL, CONSEQUENTIAL, INDIRECT, SPECIAL, OR PUNITIVE DAMAGES OF ANY KIND, OR FOR LOSS OF REVENUE OR PROFITS, LOSS OF BUSINESS, LOSS OF INFORMATION OR DATE, OR OTHER FINANCIAL LOSS ARISING OUT OF OR IN CONNECTION WITH THE SALE, INSTALLATION, MAINTENANCE, USE, PERFORMANCE, FAILURE, OR INTERRUPTION OF THE POSSIBILITY OF SUCH DAMAGES, AND LIMITS ITS LIABILITY TO REPAIR, REPLACEMENT, OR REFUND OF THE PURCHASE PRICE PAID, AT TRENDNET'S OPTION. THIS DISCLAIMER OF LIABILITY FOR DAMAGES WILL NOT BE AFFECTED IF ANY REMEDY PROVIDED HEREIN SHALL FAIL OF ITS ESSENTIAL PURPOSE.
Governing Law: This Limited Warranty shall be governed by the laws of the state of California.
Note: AC/DC Power Adapter, Cooling Fan, Cables and Power Supply carry 1-Year Warranty
Product Warranty Registration
Please take a moment to register your product online. Go to TRENDnet's website at http://www.trendnet.com/register
- TRENDNET®
- Federal Communication Commission Interference Statement
- IMPORTANT NOTE:
- Radiation Exposure Statement:
- Europe – EU Declaration of Conformity
- EN 50392: (2004-01)
- EN 300 328 V1.7.1: (2006-10)
- EN 301 489-1 V1.6.1: (2005-09)
- EN 301 489-17 V1.2.1 (2002-08)
- CE0560!
- TABLE OF CONTENT
- Overview of this User's Guide
- UNPACKING AND SETUP
- Unpacking
- Setup
- Connecting the USB Extension Cable
- Windows Based Utility Installation
- Link Information
- Configuration
- Open System and Shared Key
- WPA/WPA2 EAP-TLS
- WPA/WPA2-PSK
- Site Survey
- Profile
- WPS
- Push the button on my access point
- Enter a PIN into my access point
- About
- Installation
- Click "Continue" button.
- If prompted to, select a destination volume to install the utility and then click Continue.
- Click "Install" button.
- OS X 10.5
- OS X 10.3/10.4
- Link Status
- Advanced Setting
- Limited Warranty
- Product Warranty Registration
Brand : TRENDNET
Model : TEW-644UB
Category : USB Wi-Fi Adapter