USER MANUAL RC014SR MARANTZ
This equipment has been tested and found to comply with the limits for a Class B digital device, pursuant to Part 15 of the FCC Rules. These limits are designed to provide reasonable protection against harmful interference in a residential installation. This equipment generates, uses and can radiate radio frequency energy and, if not installed and used in accordance with the instructions, may cause harmful interference to radio communications. However, there is no guarantee that interference will not occur in a particular installation. If this equipment does cause harmful interference to radio or television reception, which can be determined by turning the equipment off and on, the user is encouraged to try to correct the interference by one or more of the following measures:
- Reorient or relocate the receiving antenna.
- Increase the separation between the equipment and receiver.
- Connect the equipment into an outlet on a circuit different from that to which the receiver is connected.
- Consult the dealer or an experienced radio/TV technician for help.
NOTE:
Changes or modifications may cause this unit to fail to comply with Part 15 of the FCC Rules and may void the user's authority to operate the equipment.
This Class B digital apparatus complies with Canadian ICES-003.
This device complies with Part 15 of the FCC rules. Operation is subject to the following conditions: (1) This device may not cause harmful interference, and (2) this device must accept any interference received, including interference that may cause undesired operation.
U.S. Responsible Party: Marantz America, Inc.
100 Corporate Drive,
Mahwah, NJ, 07430, U.S.A.
TEL: 201-762-6500
Type of Product: Remote controller
Model: RC101
ENGLISH
WARRANTY
For warranty information, contact your local Marantz distributor.
RETAIN YOUR PURCHASE RECEIPT
Your purchase receipt is your permanent record of a valuable purchase. It should be kept in a safe place to be referred to as necessary for insurance purposes or when corresponding with Marantz.
IMPORTANT
When seeking warranty service, it is the responsibility of the consumer to establish proof and date of purchase. Your purchase receipt or invoice is adequate for such proof.
FOR U.K. ONLY
This undertaking is in addition to a consumer's statutory rights and does not affect those rights in any way.
FRANÇAIS
GARANTIE
The RC101 is in conformity with the EMC directive and low-voltage directive.

Français
- Do not expose the equipment to rain or moisture.
- Do not remove the cover from the equipment.
- No naked flame sources, such as lighted candles, should be placed on the equipment.
- When disposing of used batteries, please comply with governmental regulations or environmental public instruction's rules that apply in your country or area.
- No objects filled with liquids, such as vases, shall be placed on the equipment.
Français
AVERTISSEMENTS
A NOTE ABOUT RECYCLING ...... 1
FEATURES....1
SPECIFICATIONS....1
FUNCTION AND OPERATION......2
CAUTIONS ON BATTERIES....3
CONTROLLING MARANTZ
COMPONENTS......4
CONTROLLING MARANTZ RECEIVER / AV AMPLIFIER ..4
CONTROLLING MARANTZ SOURCE
COMPONENTS......4
CONTROLLING A MARANTZ TV (TV)....4
CONTROLLING A MARANTZ DVD PLAYER (DVD) .....5
CONTROLLING A MARANTZ VCR DECK (VCR1/VCR2)5
CONTROLLING A MARANTZ SATELLITE
BROADCASTING TUNER (DSS) 5
CONTROLLING A MARANTZ TUNER (T1/T2) 5
CONTROLLING A MARANTZ CD PLAYER (CD) ......6
CONTROLLING A MARANTZ CD RECORDER (CDR)....6
CONTROLLONG A MARANTZ TAPE DECK (TAPE)......6
CONTROLLING A MARANTZ UNIVERSAL DOCK (AUX1/AUX2) ..6
BASIC OPERATION......7
NORMAL MODE....7
SETTING THE BACK LIGHT 7
PRESET MODE....7
PROGRAMMING WITH THE 4-DIGIT CODE ....7
SCANNING THE CODE TABLE....7
CHECKING THE CODE....7
RESETTING THE CODE 7
LEARN MODE....8
LEARNING PROCEDURE....8
ERASING PROGRAMMED CODES (RETURNING TO
INITIAL SETTINGS) 8
CLONE MODE....9
OTHER OPERATIONS......9
CHANGE THE MULTI ROOM CONTROL COMMANDS
FOR EACH ZONE 9
CHANGE THE CONTROL COMMANDS OF MULTI
SPEAKER FUNCTION FROM MULTI ROOM....9
INTRODUCTION
Thank you for purchasing the Marantz RC101 Learning remote controller.
This remarkable component has been engineered to provide you with many years of home theater enjoyment. Please take a few minutes to read this manual thoroughly before you operate the RC101.
A NOTE ABOUT RECYCLING


This product's packaging materials are recyclable and can be reused. This product and the accessories packed together are the applicable product to the WEEE directive except batteries.
Please dispose of any materials in accordance with your local recycling regulations.
When discarding the unit, comply with your local rules or regulations.
Batteries should never be thrown away or incinerated but disposed of in accordance with your local regulations concerning chemical wastes.
FEATURES
Integrated Control of 12 Devices via multi room control of Marantz AV Receiver
You can control up to 12 types of devices with Marantz AV receiver in your theater room used multi room control of Marantz AV receiver from another area.
Wide Range of Preset Codes
This remote controller is provided with remote control signals for Marantz products and DVD/TV/CD/DSS equipment by major manufacturers.
You can enable the remote control operation of your AV equipment by simply selecting the manufacturer code corresponding to your equipment.
In the factory default setting, the remote controller is preset for signals for multi room control of Marantz AV Receiver and Marantz AV equipment products.
Learning Function
If you have an infrared-based remote controller, you can use a simple operation to enable this remote controller to learn its codes.
This remote controller uses non-volatile memory so that the learned codes are retained even if the batteries are removed.
Lighting Function
This remote controller features the backlight buttons so that it can be used in a darkened location such as a home theater.
Cloning Function
This remote controller features a cloning system.
This enables you to clone the programmed information from one RC101 to another, by simply pushing a series of buttons.
You can select whether to copy all programmed information or copy the information for each source.
SPECIFICATIONS
System...... Infrared programmable remote controller
Learning and transmittable infrared carrier frequency band .... < 80 kHz
Transmission infrared wavelength band 940 nm
Power supply ...... Size AAA batteries x 2
Dimensions....224 (H) x 50 (W) x 24 (D) mm
(8 7/8 (H) x 2 (W) x 1 (D) inches)
Weight....110 g (0.242 lbs)
Accessories ...... Batteries x 2
. User guide
Product warranty for USA/Canada
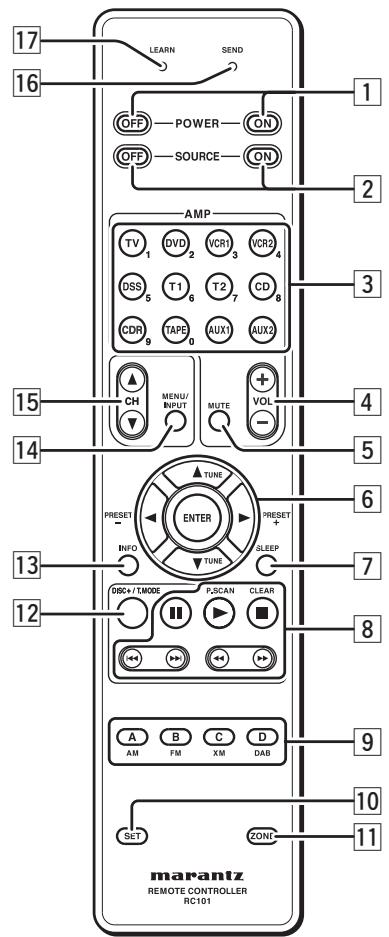
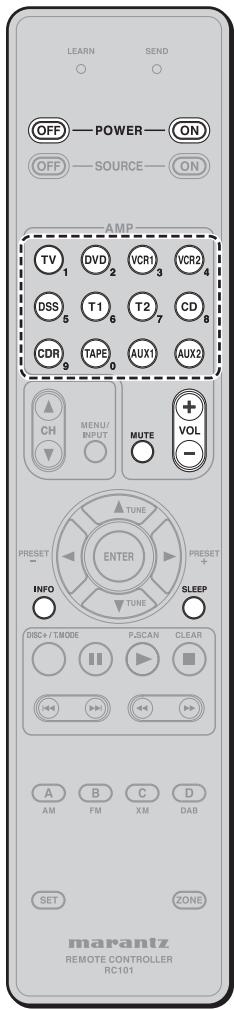
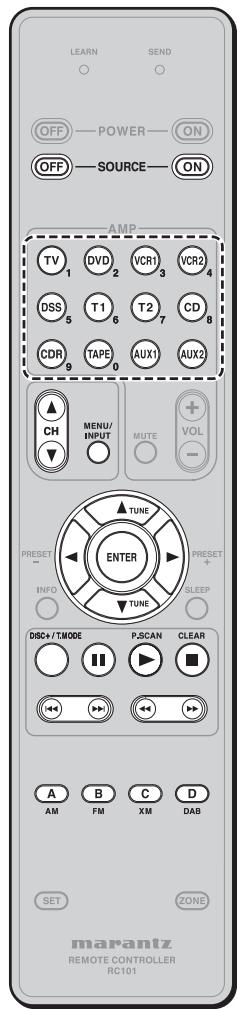
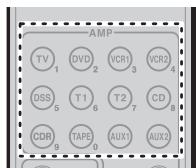
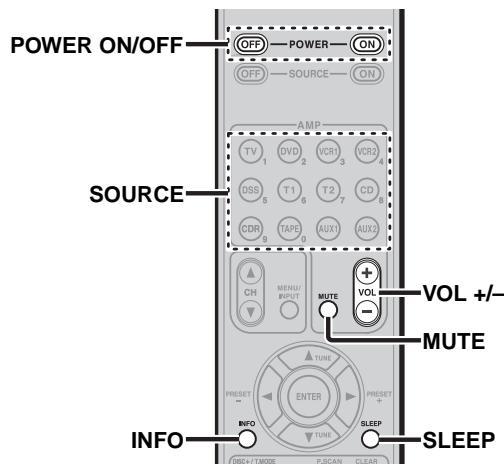
The remote controller is a universal remote controller. The SOURCE ON/OFF button and control buttons are used in common across different input source components.
The input source controlled with the remote controller changes when one of the input selector buttons is pressed.
(When Zone A/B/C mode is selected)
These buttons are used to turn on or off, for the multi room control or multi speaker control of Marantz AV receiver.
(When Zone D mode is selected)
These buttons are used to turn on or off, for the Marantz AV receiver in main room.
These buttons are used to turn on or off a specific source (such as a DVD player) independently from the rest of the system.
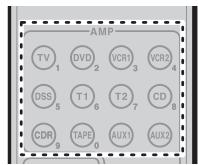
These buttons are used to switch the source of your A/V Receiver / amplifier. Each time a source button is pressed, the remote control changes to the source which was pressed.
This remote controller can control 12 types of equipment. To change the A/V Receiver / amplifier source, press this button twice within two seconds. The signal is sent when it is pressed the second time.
(When Zone A/B/C mode is selected)
These buttons are used to select the source for the multi room/multi speaker control of Marantz AV receiver.
(When Zone D mode is selected)
These buttons are used to select the source for the Marantz AV receiver in main room.
Use these buttons only for preset setting.
(When Zone A/B/C mode is selected)
These buttons are used to adjust the volume for the multi room control or multi speaker.
(When Zone D mode is selected)
These buttons are used to adjust the volume for the Marantz AV receiver in main room.
(When Zone A/B/C mode is selected)
This button is used to mute the audio for the multi room control or multi speaker control of Marantz AV receiver.
(When Zone D mode is selected)
These buttons are used to mute the audio for the Marantz AV receiver in main room.
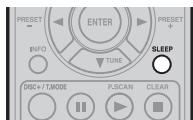
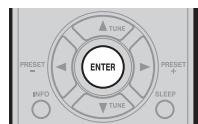
These buttons are used when operating cursor of a source.
(When Tuner mode (T1 or T2) mode is selected)
Used to select a preset station up and down.
Used to tune a frequency station up and down.
(When Zone A/B/C mode is selected)
This button is used for setting the sleep timer of multi room control mode.
(When Zone D mode is selected)
This button is used for setting the sleep timer of Marantz AV receiver in main room.
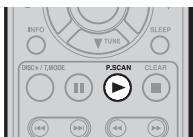
These buttons are used when operating PLAY, STOP, PAUSE and other commands of a source.
(When TUNER mode (T1 or T2) is selected)
Used to start preset scan.
Used to stop preset scan.
(When TUNER mode (T1 or T2) is selected)
Used to select the band of tuner (AM/FM/XM/DAB).
(When the other source is selected)
Reserve key for the learning commands.
This button is used to enter learn mode, preset mode and clone mode.
This button is used to set the zone area.
12 DISC+/T.MODE
(When TUNER mode (T1 or T2) is selected)
Used to select auto stereo mode or mono mode when the FM band is selected.
The "AUTO" indicator lights in the auto stereo mode.
(When CD/DVD/CDR mode is selected)
Used to change the disc for the CD/DVD/CDR changer.
(When Zone A/B/C mode is selected)
When this button is pressed, the current setting for selected multi room control of AV receiver is displayed on the TV monitor.
(When Zone D mode is selected)
When this button is pressed, the current setting for AV receiver are displayed on the TV monitor.
(When DVD mode is selected)
Used to menu command.
(When TV mode is selected)
Used to select the TV video input.
These buttons are used to change channels in TV mode and DSS mode.
16 SEND indicator
Indicates when the remote controller is transmitting a signal.
17 LEARN indicator
Indicates when the remote controller is in the LEARN mode.
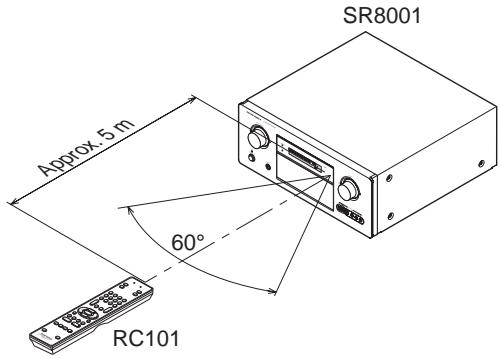
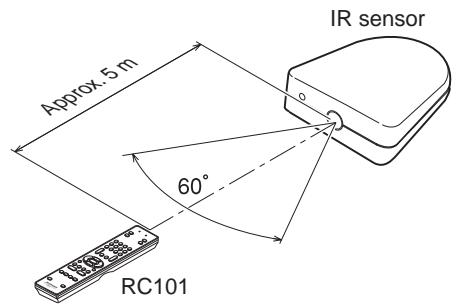
The distance between the transmitter of the remote controller and the IR SENSOR of the AV Receiver/IR Receiver should be less than 5 meters. If the remote controller is pointed in a direction other than the IR SENSOR or if there is an obstacle between them, use of the remote controller may not be possible.
Remote-controllable range
LOADING BATTERIES
The life of the batteries used with the remote controller is about 4 months with normal use. Also be sure to replace batteries earlier when you notice that they are getting weak.
- Remove the back cover.
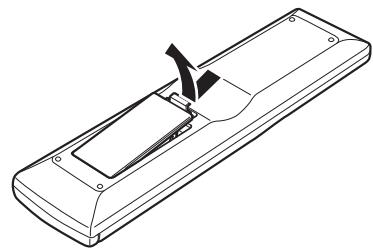
natural_image
Line drawing of a remote control box with a handle and ventilation slots (no text or symbols)
- Insert the new batteries (AAA type) with correct and polarity.
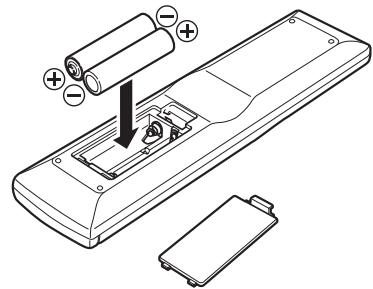
- Close the cover until it clicks.
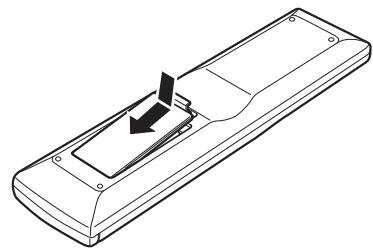
natural_image
Line drawing of a remote control with a scroll wheel and directional arrow (no text or symbols)
Notes:
- Do not mix alkaline and manganese batteries.
- Do not mix old and new batteries.
CAUTIONS ON BATTERIES
- Use "AAA" type batteries in this remote controller.
• We recommend that you use alkali batteries.
- If the remote controller does not operate from close to the main unit, replace the batteries with new ones, even if less then a year has passed.
- The included battery is only for verifying operation. Replace it with a new battery as soon as possible.
- When inserting the batteries, be careful to do so in the proper direction, following the + and - marks in the remote controller's battery compartment.
• To prevent damage or battery fluid leakage:
- Do not use a new battery with an old one.
- Do not use two different types of batteries.
- Do not short-circuit, disassemble, heat or dispose of batteries in flames.
- Remove the batteries when not planning to use the remote controller for a long period of time.
- If the batteries should leak, carefully wipe off the fluid from the inside of the battery compartment, then insert new batteries.
- When disposing of used batteries, please comply with governmental regulations or environmental public instruction's rules that apply in your country or area.
CONTROLLING MARANTZ COMPONENTS
CONTROLLING MARANTZ RECEIVER / AV AMPLIFIER
(Refer to p. 9)
Zone A: Multi room A control
Zone B: Multi room B control
Zone C: Multi room C control
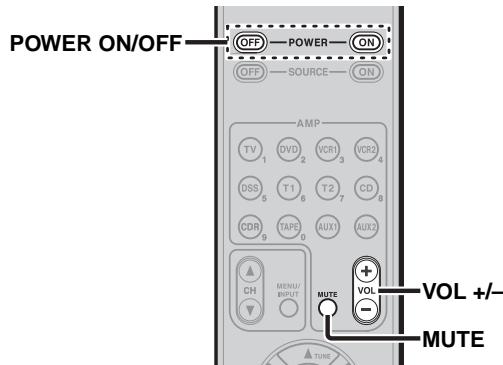
| POWER ON/OFF | Turns on or off for each multi zone of Marantz AV receiver / amplifier. |
| SOURCE | Selects a particular source component for each multi zone. |
| VOL +/- | Adjusts the over all sound level for each multi zone. |
| MUTE | Decreases the sound temporarily. |
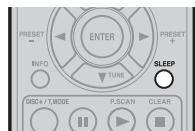
| SLEEP | Sets the sleep timer function. |
| INFO | Turns on or off the “On Screen Display” for the multi zone. |
Zone D: Main room control
| POWER ON/OFF | Turns on or off for main room of Marantz AV receiver. |
| SOURCE | Selects a particular source component for main zone. |
| VOL +/- | Adjusts the over all sound level for Main room. |
| MUTE | Decreases the sound temporarily. |
| SLEEP | Sets the sleep timer function. |
| INFO | Turns on or off the “On Screen Display” for the main room. |
CONTROLLING MARANTZ SOURCE COMPONENTS
- Press the desired SOURCE button.
-
Press the desired operation buttons to play the selected component.
-
For details, refer to the component's user guide.
- It may not be possible to operate some models.
CONTROLLING A MARANTZ TV (TV)
| SOURCE ON/OFF | Turns the TV on and off |
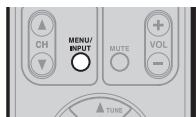
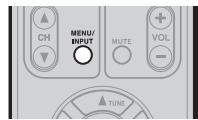
| MENU/INPUT | Select the TV video input |
| CH▲/▼ | Selects TV channel up or down |
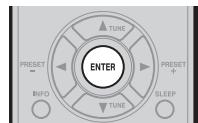
| ENTER | Moves the cursor for setting in TV menu |
| ▲(CURSOR) |
| ▼(CURSOR) |
| ▶(CURSOR) |
| ◀(CURSOR) |
| ▶ | - |
| ■ | - |
| || | - |
| ▶▶ | - |
| |◀◀ | - |
| ▶▶ | - |
| ◀◀ | - |
| DISC+/T.MODE | - |
| A | Reserve for learning |
| B | Reserve for learning |
| C | Reserve for learning |
| D | Reserve for learning |
CONTROLLING A MARANTZ DVD PLAYER (DVD)
- (*) RC101 dose not have the PRESET code library for this key.
| SOURCE ON/OFF | Turns the DVD Player on and off |
| MENU/INPUT | Select the DVD menu |
| CH▲/▼ | - |
| ENTER | Moves the cursor for setting in DVD menu |
| ▲(CURSOR) |
| ▼(CURSOR) |
| ►(CURSOR) |
| ◀(CURSOR) |
| ► | Play |
| ■ | Stop |
| || | Pause |
| ▶▶ | Skips to forward chapter/track |
| ◀◀ | Skips to previous chapter/track |
| ▶▶ | Searchs forward |
| ◀◀ | Searchs backward |
| DISC+/T.MODE | DVD changer next disc (*) |
| A | Reserve for learning |
| B | Reserve for learning |
| C | Reserve for learning |
| D | Reserve for learning |
CONTROLLING A MARANTZ VCR DECK (VCR1/VCR2)
- RC101 dose not have the PRESET code library for this device.
| SOURCE ON/OFF | Turns the VCR deck on and off |
| MENU/INPUT | - |
| CH▲/▼ | - |
| ENTER | Moves the cursor for setting in VCR menu |
| ▲(CURSOR) |
| ▼(CURSOR) |
| ►(CURSOR) |
| ◀(CURSOR) |
| ► | Play |
| ■ | Stop |
| II | Pause |
| ▶▶ | Skips to forward track |
| ◀◀ | Skips to previous track |
| ▶▶ | Searchs forward |
| ◀◀ | Searchs backward |
| DISC+/T.MODE | - |
| A | Reserve for learning |
| B | Reserve for learning |
| C | Reserve for learning |
| D | Reserve for learning |
CONTROLLING A MARANTZ SATELLITE BROADCASTING TUNER (DSS)
- (*) RC101 dose not have the PRESET code library for this key.
| SOURCE ON/OFF | Turns the satellite broadcasting tuner on and off |
| MENU/INPUT | Select the satellite tuner menu |
| CH▲/▼ | Selects satellite tuner channel up or down |
| ENTER | Moves the cursor for setting in SATELLITE Broadcasting TUNER menu |
| ▲(CURSOR) |
| ▼(CURSOR) |
| ►(CURSOR) |
| ◄(CURSOR) |
| ► | Play (*) |
| ■ | Stop (*) |
| II | PAUSE (*) |
| ►► | - |
| ◄◄ | - |
| ►► | Searchs forward (*) |
| ◄◄ | Searchs backward (*) |
| DISC+/T.MODE | - |
| A | Reserve for learning |
| B | Reserve for learning |
| C | Reserve for learning |
| D | Reserve for learning |
CONTROLLING A MARANTZ TUNER (T1/T2)
- RC101 dose not have the PRESET code library for this device.
| SOURCE ON/OFF | Turns the Tuner on and off |
| MENU/INPUT | - |
| CH▲/▼ | - |
| ENTER | - |
| ▲(CURSOR) | Tunes a frequency station up and down |
| ▼(CURSOR) | Tunes a frequency station up and down |
| ►(CURSOR) | Selects a preset station up and down |
| ◄(CURSOR) | Selects a preset station up and down |
| ► | Starts preset scan |
| ■ | Stop preset scan |
| || | - |
| ►| | - |
| ◄◄ | - |
| ►► | - |
| ◄◄ | - |
| DISC+/T.MODE | Selects the auto stereo mode or mono mode |
| A | Selects AM mode |
| B | Selects FM mode |
| C | Selects XM mode |
| D | Selects DAB mode |
CONTROLLING A MARANTZ CD PLAYER (CD)
- (*) RC101 dose not have the PRESET code library for this key.
| SOURCE ON/OFF | Turns the CD Player on and off |
| MENU/INPUT | - |
| CH▲/▼ | - |
| ENTER | - |
| ▲(CURSOR) | - |
| ▼(CURSOR) | - |
| ►(CURSOR) | - |
| ◀(CURSOR) | - |
| ► | Play |
| ■ | Stop |
| II | Pause |
| ▶▶ | Skips to forward track |
| ◀◀ | Skips to previous track |
| ▶▶ | Searchs forward |
| ◀◀ | Searchs backward |
| DISC+/T.MODE | CD changer next disc (*) |
| A | Reserve for learning |
| B | Reserve for learning |
| C | Reserve for learning |
| D | Reserve for learning |
CONTROLLING A MARANTZ CD RECORDER (CDR)
- RC101 dose not have the PRESET code library for this device.
| SOURCE ON/OFF | Turns the CD Recorder on and off |
| MENU/INPUT | - |
| CH▲/▼ | - |
| ENTER | - |
| ▲(CURSOR) | - |
| ▼(CURSOR) | - |
| ►(CURSOR) | - |
| ◀(CURSOR) | - |
| ► | Play |
| ■ | Stop |
| || | Pause |
| ▶▶ | Skips to forward track |
| i◀◀ | Skips to previous track |
| ▶▶ | Searchs forward |
| ◀◀ | Searchs backward |
| DISC+/T.MODE | CDR changer next disc |
| A | Reserve for learning |
| B | Reserve for learning |
| C | Reserve for learning |
| D | Reserve for learning |
CONTROLLONG A MARANTZ TAPE DECK (TAPE)
- RC101 dose not have the PRESET code library for this device.
| SOURCE ON/OFF | Turns the tape deck on and off |
| MENU/INPUT | - |
| CH▲/▼ | - |
| ENTER | - |
| ▲(CURSOR) | - |
| ▼(CURSOR) | - |
| ►(CURSOR) | - |
| ◀(CURSOR) | - |
| ► | Play |
| ■ | Stop |
| II | Pause |
| ▶▶ | Skips to forward track |
| ◀◀ | Skips to previous track |
| ▶▶ | Searchs forward |
| ◀◀ | Searchs backward |
| DISC+/T.MODE | - |
| A | Reserve for learning |
| B | Reserve for learning |
| C | Reserve for learning |
| D | Reserve for learning |
CONTROLLING A MARANTZ UNIVERSAL DOCK (AUX1/AUX2)
- RC101 dose not have the PRESET code library for this device.
| SOURCE ON/OFF | Turns the Universal Dock on and off |
| MENU/INPUT | Call up the menu |
| CH▲/▼ | - |
| ENTER | Moves the cursor for setting in Universal dock menu |
| ▲(CURSOR) |
| ▼(CURSOR) |
| ►(CURSOR) |
| ◄(CURSOR) |
| ► | Play |
| ■ | Stop |
| II | Pause |
| ►► | Skips to forward track |
| |◄◄ | Skips to previous track |
| ►► | Searchs forward |
| ◄◄ | Searchs backward |
| DISC+/T.MODE | Change the userinterface mode |
| A | Reserve for learning |
| B | Reserve for learning |
| C | Reserve for learning |
| D | Reserve for learning |
BASIC OPERATION
NORMAL MODE
(When operating Marantz AV equipment products)
This remote controller is preset with a total of 12 types of remote codes, including Marantz TV (television), DVD, VCR (VCR deck), DSS (satellite broadcasting tuner), TUNER 1, TUNER 2, CD, CD-R, TAPE (tape deck), AUX1 and AUX2.
Learning is not necessary for Marantz products. You can use these products without setting any codes.
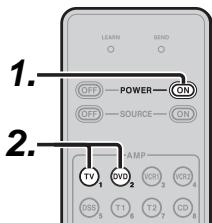
- Press the SOURCE button.
For this example, press DVD.
Pressing the SOURCE button once changes the remote control to the settings for the source that was pressed.
To change the amplifier on other source, press the SOURCE button twice (double-click). The code is sent, and then the amplifier source changes to DVD.
SETTING THE BACK LIGHT
Each time press the buttons, illuminate button 2 seconds.
To turn off back light, press and hold down the SET and ◀◀◀ button until SEND indicator blinks twice.
To turn on it again, press and hold down the SET and
▶▶ button until SEND indicator blinks twice.
Initial is back light ON.
PRESET MODE
(When operating non-Marantz AV equipment products)
This remote controller is preset with remote control codes from AV equipment by other manufacturers. The preset codes are TV, DVD, CD and DSS. Settings can be made in one of two ways.
When the preset codes are set, the following codes are contained in the source button of the remote controller.
See the attached manufacturer number list for the preset manufacturers, devices, preset numbers, and other settings.
| Remote control source name | Corresponding preset code | Device name |
| TV | TV | Television |
| DVD | DVD | DVD player |
| CD | CD | CD player |
| DSS | SATELLITE | Satellite broadcasting tuner equipment |
Importants:
- Some codes may be not match your equipment. In this case, you can use LEARN mode to store these codes.
- The preset codes do not cover full functions. If you need extra function, use LEARN mode to store extra function.
- When the batteries are getting weak, the preset procedure is not successful.
PROGRAMMING WITH THE 4-DIGIT CODE
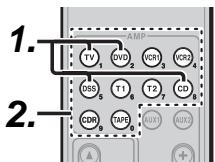

- Press and hold down the SOURCE button (ex TV) for the appliance which should be controlled and press SET button until the SEND indicator blinks twice. Then back light flushes.
- Press the 4-digit code by numeric keys for appliance (code table at the end of this book) When the procedure is successful, the SEND indicator will blink twice.
Note:
If the indicator did not blink twice, then repeat steps 1 through 2 and try entering the same code again.
SCANNING THE CODE TABLE
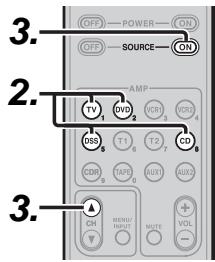
- Switch on the appliance which should be controlled.
- Press and hold down the SOURCE button for appliance which should be controlled and press SET button until the SEND indicator blinking twice. Then back light flushes.
-
Aim the remote controller at the appliance and alternately press the CH+ and SOURCE ON buttons slowly.
-
Stop when the appliance turns off.
- Press ENTER button once to lock in the code.
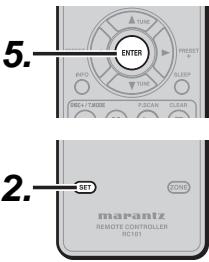
CHECKING THE CODE
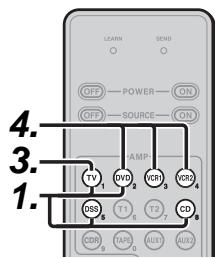
flowchart
graph TD
    A["Power"] --> B["AMP"]
    C["Source"] --> B
    D["Control"] --> E["1."]
    F["2."] --> G["3."]
    H["4."] --> I["5."]
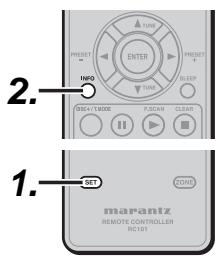
- Press and hold down the SOURCE button for appliance which should be controlled and press SET button until the SEND indicator blinking twice then back light flushes.
- Press the INFO button.
The SEND indicator will blink twice.
- To view the code for first digit, press 1 once.
Count the SEND indicator blinks (e.g. 3 blinks = 3) and write down the number.
Note:
If a code digit is “0”, the SEND indicator will not blink.
- Repeat step 3 three more times for remaining digits. Use 2 for the second digit, 3 for the third digit, and 4 for the fourth digit.
RESETTING THE CODE
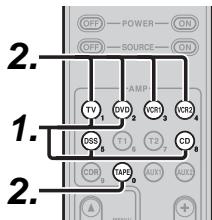
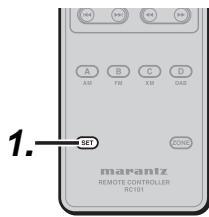
- Press and hold down the SOURCE button for appliance which should be controlled and press SET button until the SEND indicator blinking twice.
Then back light flushes.
- Press the below codes to reset.
TV : 1000
DVD:2000
CD :3000
DSS:4000
The indicator will blink twice.
Note:
After this procedure, the selected SOURCE button is set initial code.
LEARN MODE
This remote controller is capable of learning and storing codes used by other remote controls that you already own.
For codes which are not learned, the remote controller will transmit either the Marantz preset codes from the initial settings, or remote codes from another manufacturer's AV equipment which is set by the customer.
The receiver sensor for the remote control signals is located at the top of the remote controller.
Notes:
- This remote controller is capable to learn around 60 codes.
- When the batteries are getting weak, the learning procedure is not successful.
LEARNING PROCEDURE
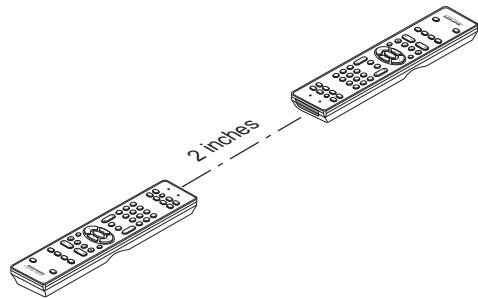
- Place the remote controller so that its infrared signal transmitter is facing the infrared signal receiver on the Marantz remote controller at a distance of about 2 inches (0.05 m).

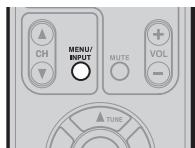
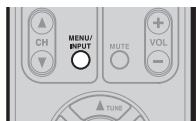
- Press and hold down the SET and MENU/INPUT buttons until LEARN indicator blinks.
- Select the SOURCE button to select the SOURCE.

- Select the button to be learned.
• LEARN indicator lights up.
When the following key learned
- SOURCE buttons
The learning function is unavailable for all SOURCE buttons in any mode.
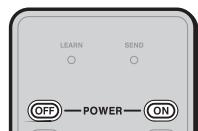
- POWER ON button
- POWER OFF button
- VOL +/- button
- MUTE button
- INFO button
- SLEEP button
The above keys are common use in each device mode. It can be learned in TV mode.
-
Press and hold the button of the original remote controller to learn until the SEND indicator blinks twice.
-
When the SEND indicator blinks once, repeat this step.
-
When the memory of the RC101 is full, the LEARN and SEND indicators blink once. If you want to learn the code, you should erase other learned button.
-
Repeat steps 4 and 5 to learn other buttons in same SOURCE.
- Repeat steps 3 to 6 to learn other SOURCE.
- When you have finished programming the remote controller, press the SET button, then LEARN indicator stops blinking and exits from the LEARN mode.
Notes:
- When the SEND indicator blinks once again, the transmitting code is unavailable for RC101, or the transmitting signal is intercepted by noise.
- If no buttons are pressed for approximately 1 minutes while in the LEARN mode, the remote controller automatically exits from the LEARN mode.
ERASING PROGRAMMED CODES (RETURNING TO INITIAL SETTINGS)
Codes can be erased in three ways: by buttons, sources, and by all memory contents.
- Press and hold down the SET and MENU/INPUT buttons until LEARN indicator blinks.
- Select the SOURCE button to select the button to be erased.
- Press and hold down the SLEEP button and press the learned button twice to be erased.
- SEND indicator blinks twice and the mode returns to LEARN mode.
- To return the NORMAL mode, press the SET button.
Erasing the code by SOURCE
- Press and hold down the SET and MENU/INPUT buttons until LEARN indicator blinks.
- Press and hold down the SLEEP button and press the learned SOURCE button twice to be erased.
- LEARN indicator lights.
-
Press ENTER button to continue erasing.
-
The SEND indicator blinks twice and the mode returns to LEARN mode.
- To cancel the erasing operation, do not press ENTER button and simply touch any other button.
- To return the NORMAL mode, press the SET button.
Erasing the all SOURCES
- Press and hold down the SET and MENU/INPUT buttons until LEARN indicator blinks.
- Press and hold down the SLEEP button and press POWER ON and POWER OFF button.
- LEARN indicator lights.
-
Press ENTER button to continue erasing.
-
The SEND indicator blinks twice and the mode returns to LEARN mode.
- To cancel the erasing operation, do not press ENTER button and simply touch any other button.
- To return the NORMAL mode, press the SET button.
Note:
Erasing codes will return to the factory preset code, or there will leave empty if the button has no factory preset code.
CLONE MODE
Creating copies using clone mode
All of the codes programmed to the RC101 remote controller can be copied to another RC101 using a few simple operations.
- The remote controller can copy the entire contents.
- When copying the entire contents, all programmed codes are copied.
Note:
The clone function can only be used for copying when using the same model (RC101) for both the transmitting and receiving remote controller.
Copying entire contents
- Place the receiver sensor of the receiving remote controller (top) so that it is facing the transmitter of the transmitting remote controller (top) at a distance of about 2 inches (5 cm).
- Press SET button and PLAY button of the transmitting remote controller until the SEND indicator blinks twice.

Then backlight flushes
The transmitting side is now ready.
- Press SET button and STOP button of the receiving remote controller until the LEARN indicator blinks twice.
- Press the ENTER cursor button on the receiving remote controller.
Then back lights tune off.
- Press the ENTER cursor button on the transmitting remote controller.
Then backlights tune off.
- When copying is started, the SEND indicator of transmitting remote controller and the LEARN indicator of receiving remote controller start to blink.
When the copying operation is completed, the back lights of transmitting remote controller and receiving remote controller are turned on.
Do not touch either of the remote controls during the copying operation. Doing so could cause copying to fail.
If the copying fails in the middle of the copying process, back light of receiving remote are flush. Press the SET button to return the normal mode. Check and perform steps 1 to 5 again.
Copying takes about 30 seconds to complete when the transmitting remote controller has been programmed to 100% capacity.
- Once copying is completed, press the SET button on both remote controls.
Then backlight flushes.
The receiving side is now ready.
OTHER OPERATIONS
CHANGE THE MULTI ROOM CONTROL COMMANDS FOR EACH ZONE
(When operating Marantz AV Receiver by Multi Zone connected)
• Zone A: Multi room A control (Default)
• Zone B: Multi room B control
• Zone C: Multi room C control
• Zone D: Main room control
Change the control commands for each zone.
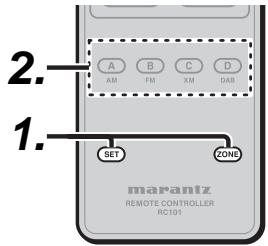
- Press SET button and ZONE button until the SEND indicator blinks twice.
Then backlight flushes.
- Press each zone button(A/B/C/D button)
When the procedure is successful, the SEND indicator will blink twice.
These buttons change a special code of each zone.
Tuner mode operation remote code (Refer to p.5)
CHANGE THE CONTROL COMMANDS OF MULTI SPEAKER FUNCTION FROM MULTI ROOM.
- Press SET button and POWER ON button until the SEND indicator blinks twice.
Then backlight flushes.
-
Press the 1-digit code by numeric keys.
-
Multi room mode: 1 (Default)
- Multi speaker mode: 2
Note
In case of Zone D, only control for main room is possible.
- Press ENTER button once to lock in the code.
When the procedure is successful, the SEND indicator will blink twice.
These buttons change a special code of multi room mode or multi speaker mode.
Note
The control commands can be set independently in ZONE A/B/C.
SETUP CODES
TV
| Acer | 1141 |
| Admiral | 1002, 1009, 1089 |
| Aiko | 1059 |
| Aiwa | 1117, 1118 |
| Akai | 1001 |
| Amtron | 1023 |
| Anam | 1113 |
| Anam National | 1023, 1069, 1092 |
| AOC | 1003, 1024, 1049, 1127 |
| Audiovox | 1023 |
| Bell & Howell | 1009, 1025 |
| Benq | 1104, 1142 |
| Broksonic | 1003, 1097, 1098, 1113 |
| Celebrity | 1001 |
| Citizen | 1003, 1013, 1023 |
| 1026, 1059, 1063 |
| Colortyme | 1003, 1043 |
| Contec | 1113 |
| Contec/Cony | 1023, 1045, 1047 |
| Craig | 1020, 1022, 1023, 1113 |
| Crown | 1023, 1067 |
| Curtis Mathes | 1003, 1013, 1025 |
| 1026, 1062, 1103, 1110 |
| Daewoo | 1003, 1013, 1024, 1035 |
| 1036, 1059, 1084, 1101 |
| Daytron | 1003, 1013, 1016 |
| Dimensia | 1103, 1110 |
| Dumont | 1003, 1010, 1153 |
| Electroband | 1001 |
| Electrohome | 1001, 1003, 1069, 1133 |
| Emerson | 1003, 1013, 1015 |
| 1020, 1021, 1022, 1023 |
| 1025, 1038, 1044, 1045 |
| 1048, 1055, 1061, 1094 |
| 1096, 1099, 1101, 1113 |
| Envision | 1003 |
| Fisher | 1025, 1051, 1091, 1160 |
| Fujitsu | 1038, 1124, 1125, 1155 |
| Funai | 1023, 1038, 1113 |
| Gateway | 1150 |
| GE | 1003, 1018, 1022, 1046 |
| 1054, 1069, 1085, 1103 |
| 1110, 1113, 1133, 1136, 1153 |
| Goldstar | 1003, 1013, 1024 |
| 1030, 1045, 1080 |
| 1100, 1112, 1154 |
| Hallmark | 1003 |
| Hisense | 1116 |
| Hitachi | 1003, 1012, 1031, 1032 |
| 1037, 1041, 1045, 1047 |
| 1065, 1068, 1082, 1088 |
| 1094, 1139, 1140, 1145, 1159 |
| Infinity | 1067 |
| Janeil | 1134 |
| JBL | 1067 |
| JC Penney | 1003, 1013, 1018 |
| 1019, 1024, 1026 |
| 1046, 1047, 1054 |
| 1063, 1083, 1085 |
| 1100, 1103, 1110 |
| 1112, 1133, 1154 |
| Jensen | 1003 |
| JVC | 1028, 1029, 1045 |
| 1047, 1050, 1060, 1065 |
| Kawasho | 1001, 1003 |
| Kenwood | 1003 |
| Kloss Novabeam | 1023, 1056, 1057, 1134 |
| KTV | 1013, 1023, 1033 |
| 1034, 1073, 1099, 1113 |
| LG | 1024, 1030 |
| M.Wards | 1002, 1009, 1038 |
| Magnavox | 1003, 1052, 1053 |
| 1056, 1057, 1063 |
| 1067, 1081, 1106 |
| Marantz | 1003, 1031, 1067, 1122 |
| Mitsubishi | 1003, 1024, 1051 |
| 1115, 1122, 1133 |
| Motorola | 1014, 1069 |
| NEC | 1003, 1012, 1024, 1043, 1069 |
| NET-TV | 1137, 1150 |
| Orion | 1020, 1096 |
| Panasonic | 1017, 1067, 1069, 1095, 1111 |
| Philips | 1003, 1011, 1045, 1052 |
| 1054, 1056, 1057, 1058 |
| 1063, 1067, 1069, 1106 |
| Pioneer | 1003, 1018, 1037 |
| 1070, 1071, 1094 |
| 1145, 1147, 1149 |
| Plasmsync | 1135 |
| Portland | 1003, 1013, 1024, 1059 |
| Price Club | 1026 |
| Prism | 1018 |
| Proscan | 1004, 1005, 1006, 1007 |
| 1008, 1085, 1103, 1110 |
| Proton | 1003, 1045 |
| Quasar | 1010, 1069, 1073, 1111, 1153 |
| Radio Shack......1003, 1013, 1015 |
| 1023, 1024, 1025, 1045 |
| 1100, 1103, 1110, 1113 |
| RCA......1003, 1004, 1005 |
| 1006, 1007, 1008 |
| 1014, 1024, 1049, 1069 |
| 1075, 1079, 1085, 1087 |
| 1088, 1093, 1094, 1101 |
| 1103, 1110, 1113, 1153 |
| Realistic......1013, 1015, 1023, 1025 |
| 1045, 1100, 1103, 1110 |
| Runco......1010, 1153 |
| Sampo......1150 |
| Samsung......1003, 1013, 1024, 1026 |
| 1040, 1045, 1062, 1078 |
| 1083, 1090, 1100, 11051114 |
| 1120, 1121, 1146, 1148, 1157 |
| Sansui......1119 |
| Sanyo......1003, 1025, 1051, 1072 |
| 1077, 1091, 1156, 1157, 1158 |
| Sharp......1003, 1013, 1014 |
| 1015, 1045, 1055, 1064 |
| 1066, 1076, 1089, 1123 |
| Signature......1009 |
| Sony......1001, 1102, 1108 |
| Soundesign .... 1003, 1023, 1038, 1063, 1113 |
| Starlite......1023 |
| Supre-Macy......1134 |
| Sylvania......1003, 1039, 1042 |
| 1052, 1053, 1056, 1057 |
| 1063, 1067, 1089, 1151 |
| Symphonic......1023, 1039, 1044 |
| Tandy......1014 |
| Tatung......1069 |
| Technics......1018 |
| Techwood......1003, 1018 |
| Teknika......1003, 1009, 1013, 1023 |
| 1024, 1026, 1038, 1045 |
| 1047, 1059, 1063, 1111, 1113 |
| Telecaption......1074 |
| Toshiba......1003, 1019, 1025 |
| 1026, 1042, 1074, 1098 |
| 1107, 1111, 1135, 1136 |
| Totevision......1013 |
| Universal......1046, 1054 |
| Video Concepts......1113 |
| Viewsonic......1006, 1022, 1109 |
| 1128, 1129, 1130, 1131 |
| 1138, 1143, 1145, 1150 |
| Wards | 1003, 1009, 1015 |
| 1024, 1038, 1044, 1046 |
| 1052, 1054, 1056, 1057 |
| 1067, 1086, 1103, 1110 |
| White Westinghouse | 1001, 1101 |
| Yamaha | 1003, 1024 |
| Zenith | 1003, 1009, 1010 |
| 1132, 1144, 1153 |
CD
| AIWA | 3001, 3002, 3003 |
| AKAI | 3004, 3005, 3006 |
| AUDIO | 3007 |
| AUDIO LABS | 3008 |
| CALIFORNIA | 3008 |
| CARVER | 3010, 3011, 3009 |
| CASIO | 3012, 3020 |
| CURTIS | 3020, 3012 |
| DENON | 3013 |
| EMERSON | 3014 |
| FISHER | 3011, 3015, 3016, 3017, 3018 |
| GE | 3019 |
| GENEXXA | 3014, 3021, 3020 |
| HARMON | 3022, 3023, 3051 |
| HITACHI | 3020 |
| INKEL | 3024 |
| JC PENNEY | 3012, 3020, 3025 |
| JVC | 3026, 3027 |
| KARDON | 3022, 3051, 3023 |
| KENWOOD | 3028, 3029, 3030, 3031 |
| 3032, 3033 |
| KRELL | 3010 |
| LUXMAN | 3035, 3036, 3037, 3038 |
| LX I | 3012, 3020, 3014 |
| MAGNAVOX | 3010, 3039, 3040 |
| MARANTZ | 3010, 3041, 3042, 3043 |
| MATHES | 3012, 3020 |
| MCS | 3012, 3020 |
| MGA | 3023 |
| MISSION | 3010 |
| MITSUBISHI | 3023, 3044 |
| NAD | 3034, 3045 |
| NAKAMICHI | 3046, 3047, 3048 |
| NEC MCS | 3025 |
| NIKKO | 3007, 3016 |
| ONKYO | 3049, 3050, 3051, 3052 |
| 3055, 3098 |
| OPTIMUS | 3011, 3014, 3020, 3028, 3053 |
| 3054, 3056, 3057, 3058, 3059 |
| PANASONIC | 3008, 3060, 3061 |
| PHILIPS | 3009, 3010, 3010, 3040 |
PIONEER...... 3020, 3021, 3062, 3063, 3064
QUASAR 3008
RCA.... 3011, 3014, 3065, 3066, 3067
3068, 3069
REALISTIC.... 3011, 3014, 3020, 3042
3054, 3057
ROTEL 3010
RS ORIGINAL....3070
SAE 3010, 3083
SAMSUNG 3071
SANSUI.... 3014, 3068, 3072, 3073
SANYO...... 3011, 3018, 3074, 3075, 3076
SCOTT 3014
SEARS ...... 3012, 3014, 3020, 3028, 3042
SHARP....3028, 3042, 3077
SHERWOOD... 3042, 3056, 3070, 3078, 3024
SHURE....3025
SONY .... 3039, 3079, 3080, 3081, 3082, 3097
SYLVANIA 3010
SYMPHONIC 3083
TEAC.... 3016, 3042, 3057, 3083, 3084
3085, 3086
TECHNICA..... 3007, 3008, 3061, 3087, 3088
THETA DIGITAL....3040
TOSHIBA....3045
VICTOR....3026
YAMAHA ...... 3007, 3089, 3090, 3091, 3092
ZENITH ...... 3016, 3093, 3094, 3095, 3096
DVD
Aiwa....2036, 2037
Apex ..... 2012, 2017, 2018, 2019, 2021, 2034
BOSE 2038, 2039
Denon....2047, 2048
Funai 2049
GE 2009, 2020, 2029, 2033
Harman Kardon....2061
Hitachi 2008, 2012, 2031
JVC....2006, 2010, 2040
2041, 2042, 2043
Kenwood 2053, 2054
Koss....2058
Magnavox.... 2007, 2011, 2023, 2025
Marantz 2025
Mitsubishi 2011, 2015
Onkyo 2062
Oritron 2009, 2030
Panasonic.... 2003, 2015, 2016, 2055
Philips....2007, 2011, 2058
Pioneer 2002, 2014, 2056
Proscan 2009, 2020, 2032
RCA....2005, 2009, 2020, 2035, 2057
Sampo 2041
Samsung ...... 2008, 2012, 2022, 2024, 2027
Sanyo 2050, 2052
Sharp....2044, 2045
Sherwood 2051
Sony 2001, 2013, 2059
Toshiba 2004, 2008, 2026, 2028
Yamaha 2046, 2060
Zenith 2010
DSS
Alphastar 4027
BSB 4021
Chaparral 4039
DIRECTV 4001, 4016
DISH Network 4030
Drake 4026
Echostar ...... 4007, 4017, 4018, 4019, 4020
Express Vu 4017
Fujitsu 4025
GE 4002, 4008, 4009
General Instruments ...... 4036, 4037
Hitachi 4001, 4015
Hughes....4001, 4016
Janeil 4025
JVC....4017
Mitsubishi 4001
Panasonic....4004, 4010
Philips....4031, 4035
Proscan 4002, 4008, 4009, 4011
Radio Shack......4036, 4037
RCA.... 4002, 4008, 4009, 4029
Realistic 4040
Rural Cable 4036
Samsung 4022, 4027
Sony 4003, 4012, 4014
Star Choice 4032
Star Trak 4024
STS 4038
SuperDish 4028
Toshiba....4001, 4034
Uniden....4005, 4006, 4013
Video Pall 4025
Zenith 4025, 4033
www.marantz.com
You can find your nearest authorized distributor or dealer on our website.
marantz® is a registered trademark.