
RC3001 - Remote control MARANTZ - Free user manual and instructions
Find the device manual for free RC3001 MARANTZ in PDF.
| Product Type | Universal remote control |
| Brand | MARANTZ |
| Model | RC3001 |
| Dimensions (L x W x H) | Approximately 20 x 5 x 2 cm |
| Weight (with batteries) | Approximately 150 g |
| Power supply | 2 AAA (LR03) 1.5 V batteries |
| Infrared range | Approximately 10 meters |
| Transmission angle | ±30 degrees |
| Number of keys | Approximately 40 keys |
| Main functions | Control of TV, amplifier, DVD/Blu-ray player, game console, etc. |
| Programming | Manual by codes or automatic search |
| Memory | Retains codes for up to 10 minutes without battery |
| Care and cleaning | Wipe with a soft, dry cloth. Do not use solvents. |
| Safety | Do not expose to moisture or extreme temperatures. |
| Batteries | Use alkaline batteries. Remove used batteries promptly. |
| Repairability | Spare parts available on request from after-sales service |
| Operating temperature | 0°C to 40°C |
| Compatibility | Wide range of brands (Sony, Samsung, Panasonic, etc.) |
| Warranty | 2 years (parts and labor) |
Frequently Asked Questions - RC3001 MARANTZ
User questions about RC3001 MARANTZ
0 question about this device. Answer the ones you know or ask your own.
Ask a new question about this device
Download the instructions for your Remote control in PDF format for free! Find your manual RC3001 - MARANTZ and take your electronic device back in hand. On this page are published all the documents necessary for the use of your device. RC3001 by MARANTZ.
USER MANUAL RC3001 MARANTZ
This equipment has been tested and found to comply with the limits for a Class B digital device, pursuant to part 15 of the FCC Rules. These limits are designed to provide reasonable protection against harmful interference in a residential installation. This equipment generates, uses and can radiate radio frequency energy and, if not installed and used in accordance with the instructions, may cause harmful interference to radio communications. However, there is no guarantee that interference will not occur in a particular installation. If this equipment does cause harmful interference to radio or television reception, which can be determined by turning the equipment off and on, the user is encouraged to try to correct the interference by one or more of the following measures:
- Reorient or relocate the receiving antenna.
- Increase the separation between the equipment and receiver.
- Connect the equipment into an outlet on a circuit different from that to which the receiver is connected.
- Consult the dealer or an experienced radio/TV technician for help.
Modifications not expressly approved by the manufacturer could void the user's authority to operate the equipment under FCC rules.
This Class I license-exempt low-power radio communication devices (LPDs) complies with Canadian RSS-210.
For Europe
ENGLISH
WARRANTY
For warranty information, contact your local Marantz distributor.
RETAIN YOUR PURCHASE RECEIPT
Your purchase receipt is your permanent record of a valuable purchase. It should be kept in a safe place to be referred to as necessary for insurance purposes or when corresponding with Marantz.
IMPORTANT
When seeking warranty service, it is the responsibility of the consumer to establish proof and date of purchase. Your purchase receipt or invoice is adequate for such proof.
FOR U.K. ONLY
This undertaking is in addition to a consumer's statutory rights and does not affect those rights in any way.
FRANÇAIS
GARANTIE
- Do not expose the equipment to rain or moisture.
- Do not remove the cover from the equipment.
- No naked flame sources, such as lighted candles, should be placed on the equipment.
- When disposing of used batteries, please comply with governmental regulations or environmental public instruction's rules that apply in your country or area.
- No objects filled with liquids, such as vases, shall be placed on the equipment.
- Do not expose the unit to excessive heat such as direct sunlight, fire or the like.
Français
AVERTISSEMENTS
Thank you for purchasing the Marantz RC3001 remote controller.
This remarkable component has been engineered to provide you with many years of home theater enjoyment. Please take a few minutes to read this manual thoroughly before you operate the RC3001.
CHECKING THE ACCESSORIES
After opening the cover of the packing box, check that the following accessories are included.
• RC3001: Remote controller
- RX3001: RF Extender
- Rechargeable battery pack
- Multi Voltage AC adapter x2 (RC3001 (Charging) and RX3001)
• IR Emitter cable (3m (10ft)) x5
• 3.5mm Mono plug cable (3m (10ft))
- USB cable
- User guide
FEATURES
RC3001 : Remote controller
- Versatile Learning Capability with 4Mbit (512KB) User Memory (Max 1000 codes)
- Backlit Hard Buttons and LCD Display
- Programmable One Button Operation via "Multi Command" Macros (Max. Total 8000 Steps).
• Multiple Page Creation Capability - Customize RC3001 by Using Wizz.it3 Software
- Built-in Multi Brand Database via Wizz.it3 Software
- Advanced Timer Function
- IR/RF Transmission
RX3001 : RF Extender
• IR Emitter Output with Two Group Codes
- Flexible Antenna
- 6 IR Emitter Outputs
- Adjustable IR Emitter Level
• Wall Mount Capability
TABLE OF CONTENTS
BEFORE USE....2
LOAD THE RECHARGEABLE BATTERY PACK
INTO THE REMOTE CONTROLLER....2
CHARGING THE BATTERY PACK....3
NAMES AND FUNCTIONS...... 4
REMOTE CONTROLLER 4
REMOTE CONTROLLER LCD....5
RX3001 6
INSTALLATION 7
MOUNTING THE RX3001 TO A WALL....7
USING THE REMOTE CONTROLLER WITH
INFRARED RAYS....9
USING THE REMOTE CONTROLLER WITH RADIO
FREQUENCY 9
CHANGING THE IR / RF SETTINGS....9
CONNECTING THE RX3001 WITH OTHER
DEVICES 10
SETUP 12
SETTING THE IR OUTPUT LEVEL.... 12
SETTING THE CHANNEL....12
SETTING THE GROUP ID SELECTOR.... 13
BASIC OPERATION.... 14
RC3001 BUTTON SETTINGS 14
SLEEP TIMER 14
OTHER OPERATION 15
MAIN MENU 15
1. LEARNING FUNCTION ...... 15
2. TIMER....17
3. SYS.SETUP 20
4. STATUS INDICATOR 25
5. RESET 25
6. PROGRAMMABLE CODES.... 25
SPECIFICATIONS....26
OTHERS 28
BEFORE USE
LOAD THE RECHARGEABLE BATTERY PACK INTO THE REMOTE CONTROLLER
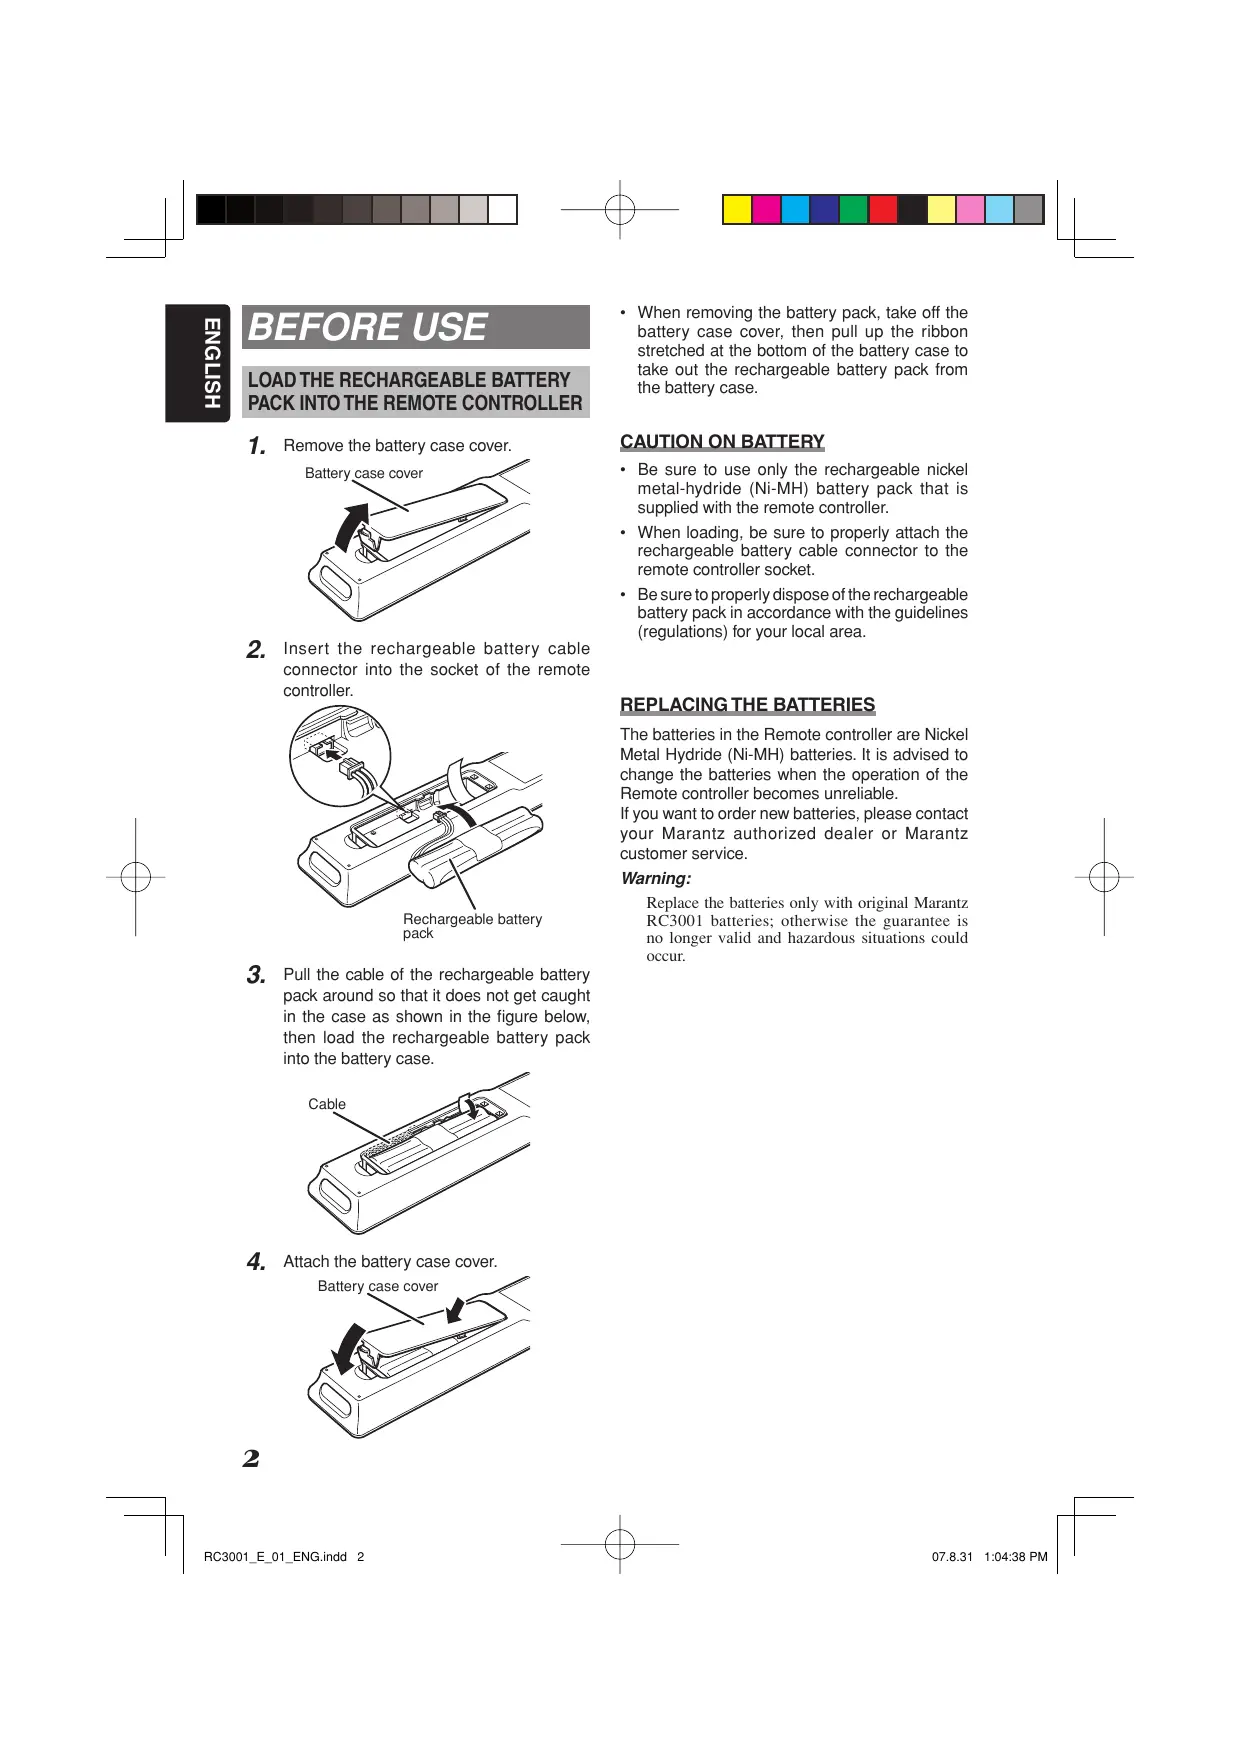
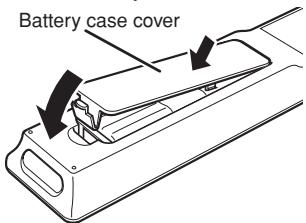
1. Remove the battery case cover.
2. Insert the rechargeable battery cable connector into the socket of the remote controller.

natural_image
Diagram of a cable connector assembly with a magnified inset showing cable connection (no text or symbols)Rechargeable battery pack
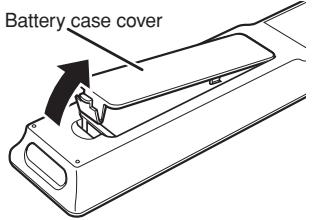
3. Pull the cable of the rechargeable battery pack around so that it does not get caught in the case as shown in the figure below, then load the rechargeable battery pack into the battery case.
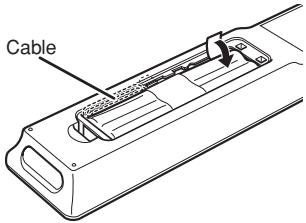
4. Attach the battery case cover.
- When removing the battery pack, take off the battery case cover, then pull up the ribbon stretched at the bottom of the battery case to take out the rechargeable battery pack from the battery case.
CAUTION ON BATTERY
- Be sure to use only the rechargeable nickel metal-hydride (Ni-MH) battery pack that is supplied with the remote controller.
- When loading, be sure to properly attach the rechargeable battery cable connector to the remote controller socket.
- Be sure to properly dispose of the rechargeable battery pack in accordance with the guidelines (regulations) for your local area.
REPLACING THE BATTERIES
The batteries in the Remote controller are Nickel Metal Hydride (Ni-MH) batteries. It is advised to change the batteries when the operation of the Remote controller becomes unreliable.
If you want to order new batteries, please contact your Marantz authorized dealer or Marantz customer service.
Warning:
Replace the batteries only with original Marantz RC3001 batteries; otherwise the guarantee is no longer valid and hazardous situations could occur.
CHARGING THE BATTERY PACK
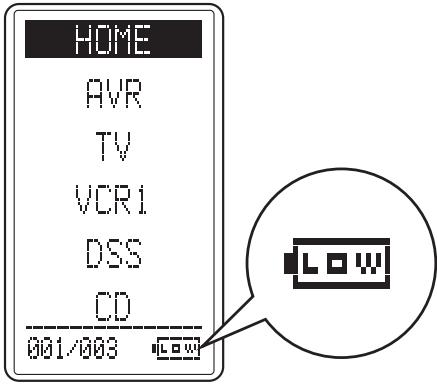
Once the rechargeable battery pack is loaded, power is immediately supplied automatically to the remote controller, and Home mode is displayed on the LCD.
When it is first unpacked, the supplied battery pack is not fully charged. Be sure to fully charge it before usage.
Also, if the remaining power is low, the remaining power level indicator at the bottom right of the LCD changes to the LOW BATTERY warning.
Charge the battery pack as soon as this warning is displayed.
- Connect the AC plug adapter matching your usage region to the supplied AC adapter.
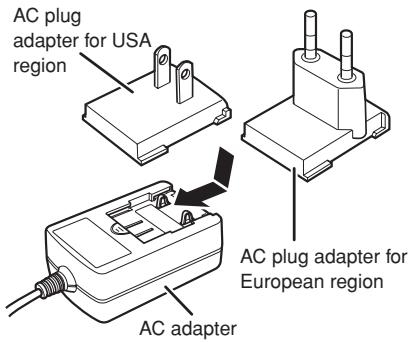
- Remove the bottom cover of the remote controller, and connect the AC adapter to the charging terminal next to the USB port.
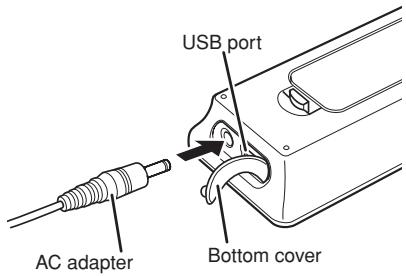
- Charging starts as soon as the AC adapter is plugged into a household outlet. The battery indicator changes to indicate the charging status. It takes about three hours to fully charge the battery pack.
- After charging is completed, the battery indicator shows a full charge. Disconnect the AC adapter from the remote controller.

Notes:
- When charging the remote controller, be sure to always use the supplied AC adapter.
- Do not try to charge devices other than the remote controller with the supplied AC adapter. This could damage the AC adapter or the connected device.
- Remote controller operation is possible even when charging.
- The settings remain saved in the remote controller even if the power completely runs out. However, the time setting will be lost, and so please set the time setting again.
- Although it is not a problem if the remote controller is recharged before the power completely runs out, to prolong the lifespan of the rechargeable battery, charging is recommended after “LOW” is displayed.
REMOTE CONTROLLER
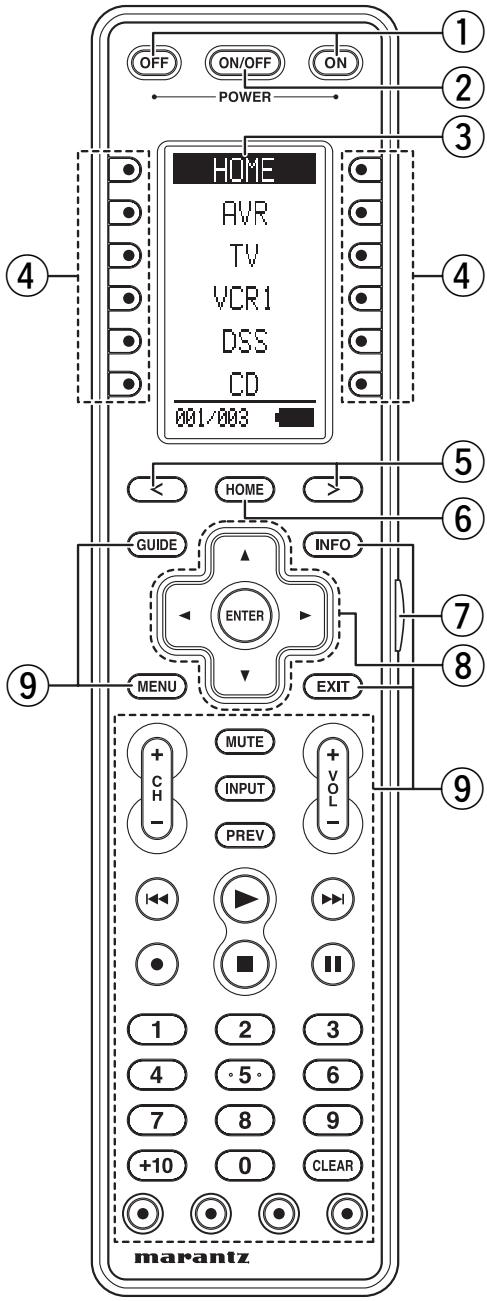
① POWER ON and OFF buttons
These buttons are used when controlling devices that have been set with separately powered on and off remote commands.
② SOURCE ON/OFF button
This button is used when controlling devices that have been set with a single power on/off remote command.
③ LCD Display
Remote controller display
④ Programable soft buttons
These buttons are used by the Wizz.it 3 editor software to make LCD display and button operation settings.
These buttons are also used to adjust the number of pages for each device.
⑤ Page Scroll buttons
These buttons are used when scrolling pages in Home mode and the device modes.
⑥ Home button
This button is used to select Home mode.
To select a device that will be controlled, first select Home mode, then select the device.
⑦ Light button
This button is used to turn on the backlight for the buttons and LCD.
⑧ Cursor, ENTER buttons
⑨ Programmable Hard buttons
These buttons are used by the Wizz.it 3 editor software to make the remote controller command settings for learning and macro operations.
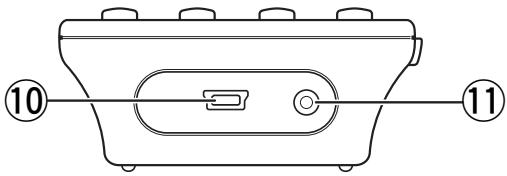
⑩ USB port
This port is used to connect the remote controller and a PC with the supplied USB cable to enable editing with the Wizz.it 3 editor software.
⑪ Charging terminal
This terminal is used to connect the supplied AC adapter used to charge the remote controller.
REMOTE CONTROLLER LCD
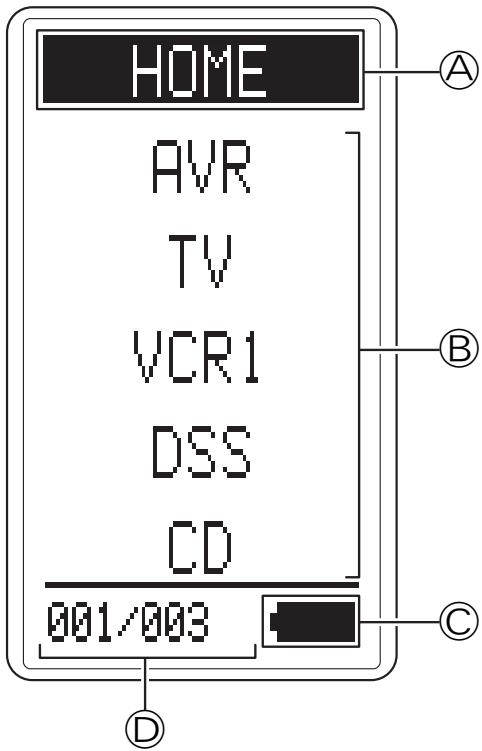
Ⓐ Mode display area
Home:
This is displayed during Home mode.
Device Name:
This displays the device mode name that is currently active.
This area is always highlighted.
⑧ Command display area
This displays the information that has been set for the display items in the device modes.
© Battery indicator
This displays the remaining battery power.
D Sub info. Area
Normal operation:
The page number that has been set for the respective mode is displayed.
When sending IR command:
The command name that has been set for the respective button is highlighted.
Operation when not sending an IR command (such as jump operation):
The operation name that has been set for the button is displayed normally (not highlighted).
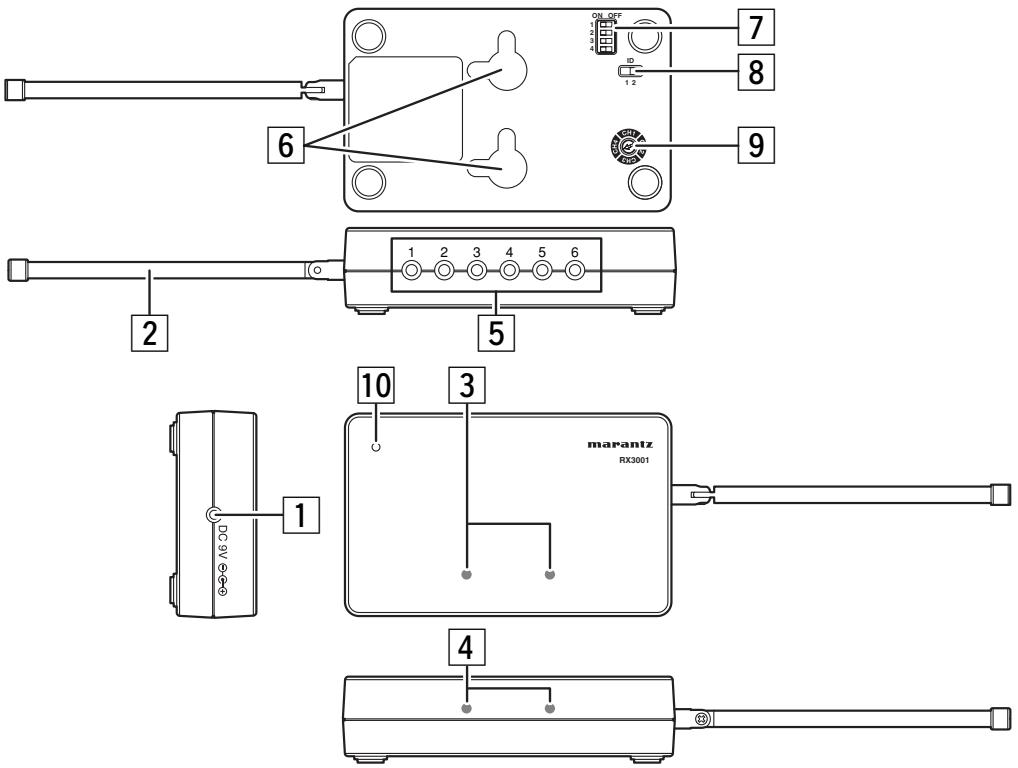
1 DC jack
This jack connects to the supplied AC adapter.
2 Antenna
This is a rod antenna for receiving RF signals.
3 IR blasters (upper direction)
These transmit IR signals. The Wizz.it 3 editor software can be used to turn transmission of the IR signals on and off.
4 IR blasters (front direction)
These transmit IR signals. The Wizz.it 3 editor software can be used to turn the IR signal transmissions on and off.
5 IR output jack
This jack connects the supplied IR emitter cable.
6 Key holes
These holes are used to mount the remote controller to a wall. For the mounting procedure, see “Mounting the RX3001 to a Wall” on page 8.
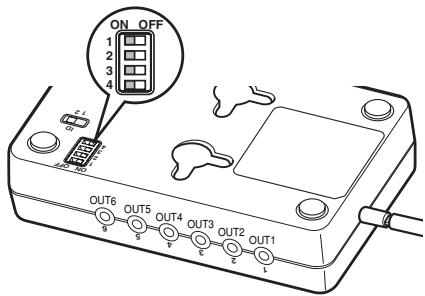
7 IR output level switches
These DIP switches set the IR transmission level from IR output jacks 1 to 3 and IR output jacks 4 to 6.
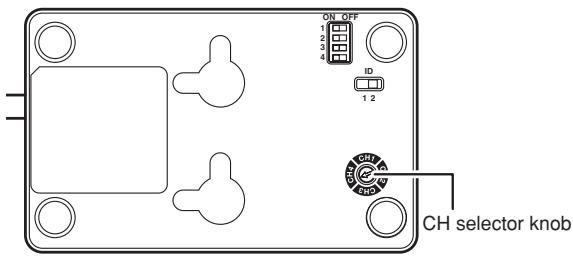
8 Group ID selector switch
This switch sets the IR output group ID for IR output jacks 1 to 3 and IR output jacks 4 to 6.
9 CH selector switch
This switch sets the reception channel. Set to the same channel as the RC3001.
Note:
The CH selector has eight setting positions, but only four channel positions can be set.
10 Power indicator
The red LED turns on when the AC adapter is connected. The red LED flashes when receiving signals.
MOUNTING THE RX3001 TO A WALL
MOUNTING LOCATION PRECAUTIONS
- Before mounting, check the material and structure of the mounting location. If the location does not have the proper material or structure, the RX3001 can fall and cause an injury.
- Use commercial items that best match the wall structure and material for the screws and other fixtures.
- Do not mount near a kitchen counter, humidifier, or other location in which it can be exposed to smoke or steam. Doing so could cause a fire or electrical shock.
- Do not mount in locations with high humidity or large amounts of dust. Doing so could cause a fire or electrical shock.
- Do not mount to locations subject to high temperatures, high humidity, or exposed to water. Doing so could cause a fire or electrical shock.
- Do not mount to locations subject to large amounts of vibration, large jolts, or large forces. These could cause an injury if the RX3001 falls and breaks.
MOUNTING PROCEDURE PRECAUTIONS
- Do not modify parts or use the RX3001 in ways other than its intended use. Doing so could cause the RX3001 to fall and result in an injury.
- Be sure to fully check that there are no electrical wires or pipes inside the wall before mounting.
- If any of the screws are loose, the RX3001 can fall and cause an injury. Do not mount the RX3001 with the screws still loose.
- Check that the two screws mounted to the wall are fully inserted into the key holes of the RX3001. Otherwise, the RX3001 can fall and cause an injury.
- Do not mount the RX3001 so that it sticks out from the wall edge. It could get hit by people's bodies or objects and cause an injury.
- Marantz will not be liable for any accidents or injuries that occur due to improper mounting or handling.
- When mounting, be careful not to get your fingers pinched or injure your hands.
MOUNTING PROCEDURE
The RX3001 can be mounted to a wall or wooden racks using the two key holes in the bottom case. The RX3001 can be oriented horizontally or vertically. Mount in the best way for your installation conditions.
Notes:
- The reception sensitivity varies depending on the antenna direction. Find the direction providing the best reception by adjusting the antenna direction before mounting the RX3001.
- No screws are provided for mounting to a wall.
-
Before mounting to a wall, be sure to fully read the precautions.
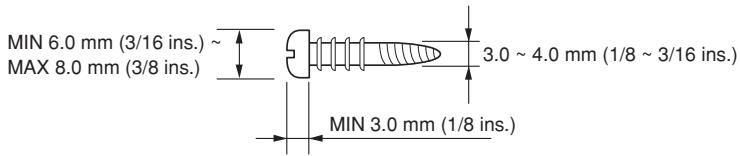
-
Obtain two screws suitable for the wall strength and material. The screw size is shown in the figure below.
- The positional relationship between the RX3001 key holes and the screw mounting positions are shown in the figure below.
Notes:
- When mounting the screws to the wall, leave a space between the wall and screw cap as shown in the figure.
- You can use attached template sheet for the position of screws.
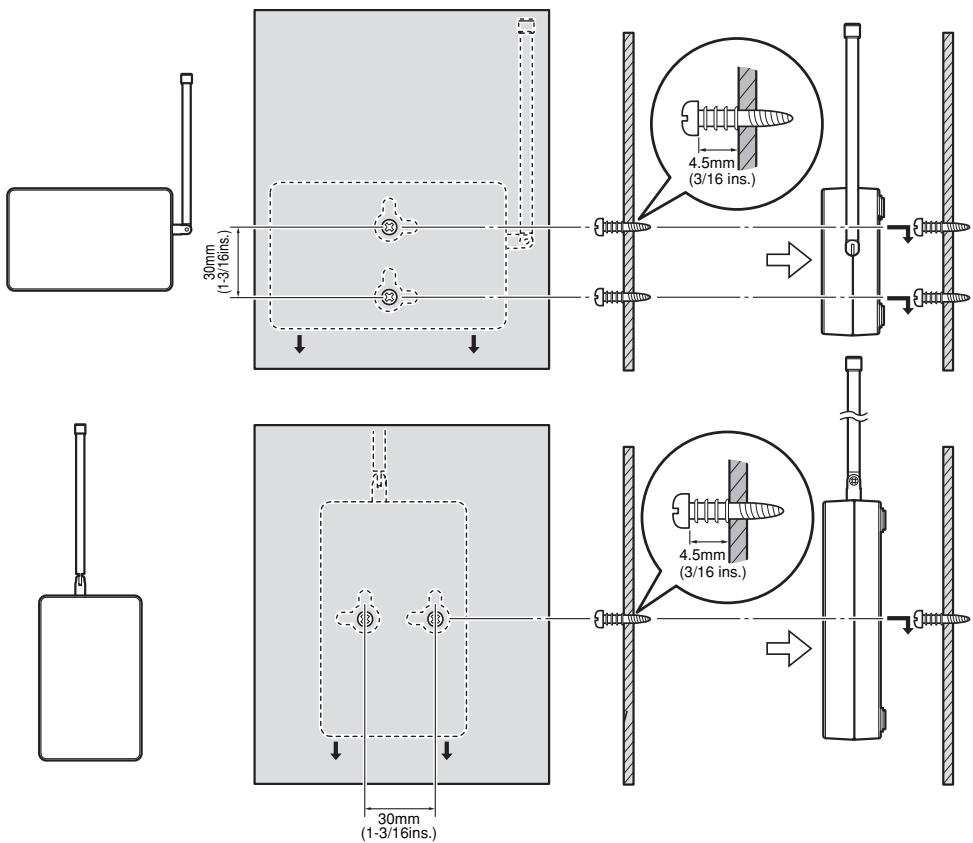
- Insert the RX3001 key holes onto the two screws mounted to the wall, and then slide downward to secure in place.
- After securing the RX3001 to the wall, connect the AC adapter and cables to the RX3001.
Notes:
- Check that the RX3001 is firmly secured to the wall.
-
Insert the AC adapter and IR emitter cable so that they are firmly connected to the RX3001.
-
When removing the RX3001 from the wall, lift up the RX3001, then pull it towards you.
USING THE REMOTE CONTROLLER WITH INFRARED RAYS
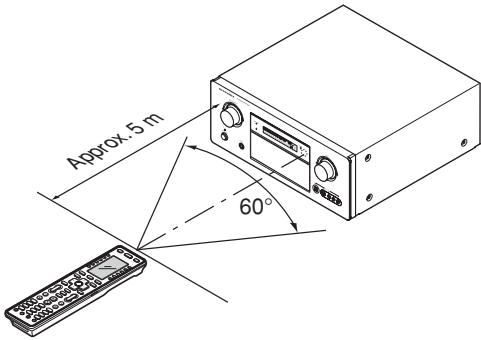
By default, the remote controller uses infrared (IR) signals to operate devices.
This means that you have to point the IR sending eye of the remote controller towards the devices you are operating.
Operate the device with the remote controller within the range of the illustration below.
Precautions:
- Do not allow direct sunlight, an inverter fluorescent light or other strong source of light to shine onto the player's infrared signal reception window (remote sensor). Otherwise, the operation of the remote controller may be disabled.
- Bear in mind that operating the remote controller may cause other devices operated by infrared rays to be operated by mistake.
- The remote controller cannot be operated if the space between the remote controller and the device's remote sensor is obstructed.
- Do not place any objects on top of the remote controller. Doing so may cause one or more buttons to be held down which will cause the batteries to run down.
USING THE REMOTE CONTROLLER WITH RADIO FREQUENCY
You can choose to operate devices using Radio Frequency (RF) signals instead of IR signals.
RF signals can, unlike IR signals, go through obstacles like furniture or walls.
The RF signals sent out by the unit are picked up by the RX3001 RF Extender.
The RX3001 translates the RF signals in IR signals and sends the IR signals to the appropriate devices.
Therefore, the RX3001 has to be placed near the devices you are operating with the RX3001's sending eye pointed to the device or the RX3001 is connected to IR Emitters referring to page 10, 11.
The devices will always receive IR signals either directly from the RC3001 or from the RX3001.
Precaution:
This product would not perform normally under a strong electrostatic environment.
CHANGING THE IR / RF SETTINGS
All devices are set up by default to work with IR signals.
To be able to operate one or more devices with RF signals, you have to change the IR/RF settings of the RC3001 by PC editor "Wizz.it3" for those devices.
1. CONNECTING TO MARANTZ EQUIPMENT
Note:
When connecting to other equipment, set the REMOTE CONTROL switch on the rear panel of the connected equipment to EXT.

flowchart
graph TD
    A["RC3001 Remote controller"] -->|IR| B["RX3001"]
    A -->|RF| B
    C["SA-CD Player"] --> D["daisy-chained remote control cable"]
    E["CD Changer"] --> F["External Internal"]
    G["Tuner"] --> H["External Internal"]
    I["DVD player"] --> J["External Internal"]
    K["AV Receiver"] --> L["Remote Control"]
    K --> M["Remote Control Out"]
    K --> N["IR Flasher IN"]
    O["TV"] --> P["Connect a MONO cable to IR Flasher IN. or Affix the IR emitter to Front panel."]
2. CONNECTING TO NON-MARANTZ EQUIPMENT
Notes:
- When affixing the IR emitter, be sure to affix it in front of the IR receiver of the equipment to which it will be connected.
- Do not connect a commercial dual IR emitter to the IR output jack. In some cases, this could disable operation.
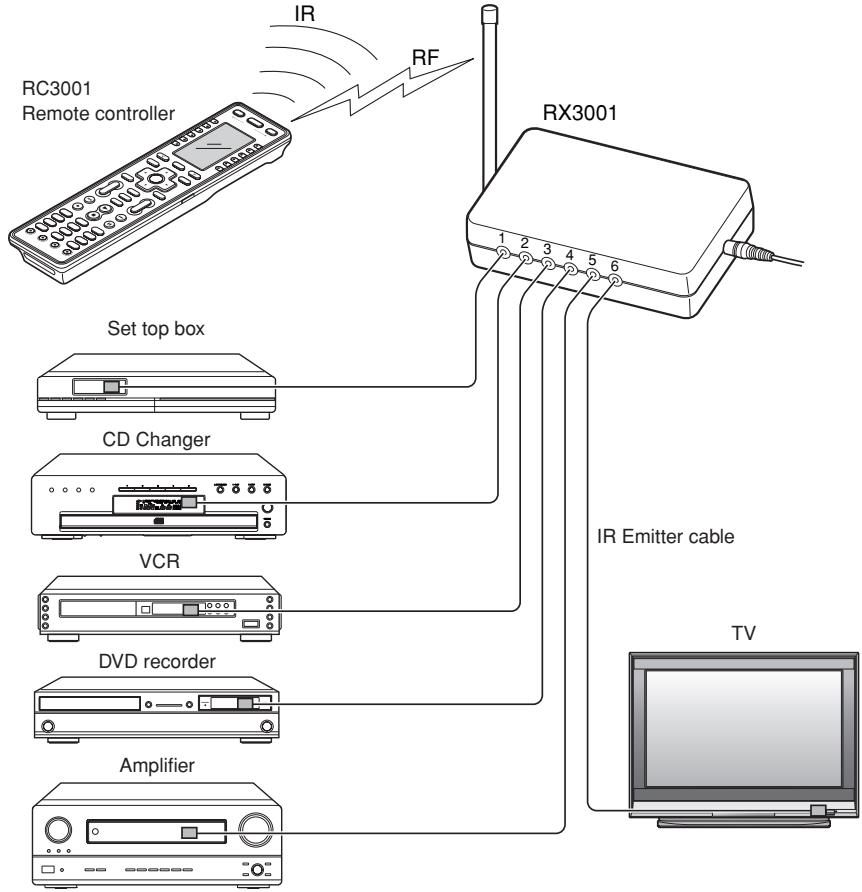
flowchart
graph TD
    A["RC3001 Remote controller"] -->|IR| B["RX3001"]
    A -->|RF| B
    C["Set top box"] --> D["CD Changer"]
    D --> E["VCR"]
    E --> F["DVD recorder"]
    F --> G["Amplifier"]
    G --> H["TV"]
3. CONNECTING TO AN AC ADAPTER
Connect the supplied AC adapter to the DC jack.
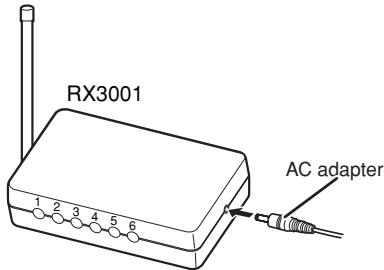
Note:
Use only the supplied AC adapter.
SETTING THE IR OUTPUT LEVEL
The DIP switches at the bottom of the RX3001 can be used to set the IR output levels from IR output jacks 1 to 3 and IR output jacks 4 to 6.
Note:
The default setting is high output (LEVEL 4), and so when the IR emitter is affixed to a device, the output level can be so high that remote commands cannot be controlled properly.
Be sure to set the IR output level according to the status of the connected device.
| LEVEL | OUTPUT 4+5+6 | OUTPUT 1+2+3 | ||
| SW 1 | SW 2 | SW 3 | SW 4 | |
| 1 | OFF | OFF | OFF | OFF |
| 2 | OFF | ON | OFF | ON |
| 3 | ON | OFF | ON | OFF |
| 4 | ON | ON | ON | ON |
SETTING THE CHANNEL
Use the CH selector knob to set to the same channel as the RC3001.
Notes:
- When setting the channel with the CH selector, the available channels are CH1 to CH4 with two setting positions for each channel.
  |   |   |   |
| CH1 | CH2 | CH3 | CH4 |
- The RC3001 default channel is channel 1.
- To change the channel of the remote controller, change the channel setting in the Wizz.it 3 editor.
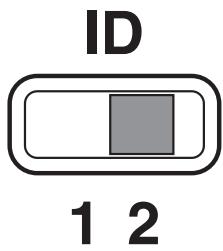
SETTING THE GROUP ID SELECTOR
The RC3001 can use the Wizz.it 3 editor to set the group ID for each device.
If a different ID signal is sent from the remote controller, no control signal is output from the RX3001.
Normally, set to "ID1" when not using the group ID function.
| Receiver side | ||
| Group ID | Emitter Output | |
| 1 | 1 | Set ID 1 |
| 2 | Set ID 1 | |
| 3 | Set ID 1 | |
| 4 | Set ID 1 | |
| 5 | Set ID 1 | |
| 6 | Set ID 1 | |
| Receiver side | ||
| Group ID | Emitter Output | |
| 2 | 1 | Set ID 1 |
| 2 | Set ID 1 | |
| 3 | Set ID 1 | |
| 4 | Set ID 2 | |
| 5 | Set ID 2 | |
| 6 | Set ID 2 | |
Output from the Output jack is controlled as shown below based on the remote device ID setting and receiver ID setting.
| Remote device ID | Receiver | ||
| GROUP ID | GROUP ID SW | Emitter Output | OUTPUT signal |
| 1 | 1 | 1 | OUTPUT |
| 2 | OUTPUT | ||
| 3 | OUTPUT | ||
| 4 | OUTPUT | ||
| 5 | OUTPUT | ||
| 6 | OUTPUT | ||
| GROUP ID | GROUP ID SW | Emitter Output | OUTPUT signal |
| 2 | 1 | 1 | NO-OUT |
| 2 | NO-OUT | ||
| 3 | NO-OUT | ||
| 4 | NO-OUT | ||
| 5 | NO-OUT | ||
| 6 | NO-OUT | ||
| GROUP ID | GROUP ID SW | Emitter Output | OUTPUT signal |
| 2 | 2 | 1 | NO-OUT |
| 2 | NO-OUT | ||
| 3 | NO-OUT | ||
| 4 | OUTPUT | ||
| 5 | OUTPUT | ||
| 6 | OUTPUT | ||
| GROUP ID | GROUP ID SW | Emitter Output | OUTPUT signal |
| 1 | 2 | 1 | OUTPUT |
| 2 | OUTPUT | ||
| 3 | OUTPUT | ||
| 4 | NO-OUT | ||
| 5 | NO-OUT | ||
| 6 | NO-OUT |
BASIC OPERATION
RC3001 BUTTON SETTINGS
The Wizz.it 3 editor software can be used to make the settings for the IR Command, LINK, JUMP, One Touch Operation (Macro) and other functions in the RC3001.
This enables a customized user interface, optimized for the customer's environment, to be built.
The Wizz.it 3 editor software can be downloaded from www.marantz.com. For more information about the setting procedures, see the PC Editor Software Wizz.it 3 User Guide.
This is the basic operation procedure for the RC3001.
- Press the Home button to enter Home mode for the RC3001.
- Select the devices that are set in Home mode.
- Perform operation of the device that you want to control in the selected device mode.
- To control another device, return to Home mode and select another device.
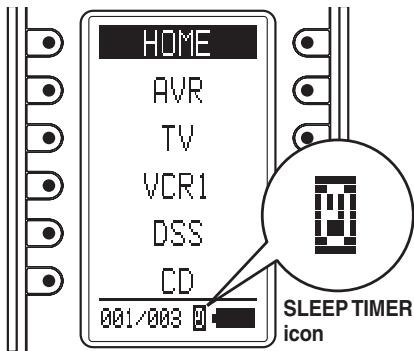
The preinstalled default user file is used to control Marantz products. The AV receiver device input switching code is assigned to the button next to the displayed device name of the device mode.
Example:
After DVD mode is selected in the remote controller, pressing the button next to DVD, shown in the first column in the LCD, transmits the AV receiver DVD input command.
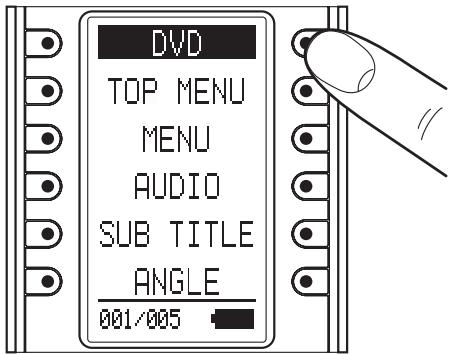
DVD input command for Marantz AV Receiver.
SLEEP TIMER
The SLEEP TIMER is a function that sends a preset remote command after the sleep time has elapsed.
- The setting is made using the Wizz.it 3 editor, and the buttons that are assigned to the sleep timer are operated as shown below.
- This is a convenient function for devices that do not have a sleep timer or for setting the sleep timer using multiple devices.
-
The RC3001 performs regular operation even when the sleep timer is activated.
-
Press the button that will be assigned to the sleep timer. The message "PROCEED?" is displayed on the LCD.
- Each time the button is pressed, the sleep setting time changes in the cycle shown below.
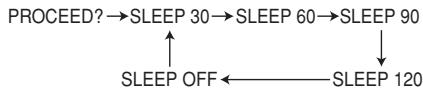
flowchart
graph TD
    A["SLEEP 30"] --> B["SLEEP 60"]
    B --> C["SLEEP 90"]
    C --> D["SLEEP 120"]
    A --> E["SLEEP OFF"]
    B --> E
    C --> E
-
When the time that you want to set is displayed, wait at the setting for three seconds.
-
The sleep setting screen is no longer displayed on the LCD, and the sleep timer is automatically started.
And the sleep timer icon is displayed in Sub Info area of the LCD. - When the remaining time for the sleep timer setting is 10 minutes, the remaining time is displayed in the SubInfo area of the LCD.
OTHER OPERATION
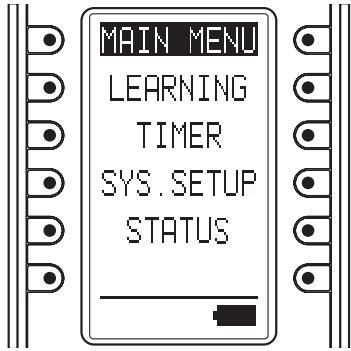
MAIN MENU
The various settings for the remote device are made in the main menu.
ENTERING THE MAIN MENU
- Press the Home button to enter Home mode for the RC3001.
- Hold down the Home button and Menu button at the same time for three seconds to display MAIN MENU on the LCD.
1. LEARNING FUNCTION
- Place the remote controller so that its infrared signal transmitter is facing the infrared signal receiver on the Marantz remote controller at a distance of about 2 inches (0.05 m).

natural_image
Illustration of two remote control devices connected by a dashed line (no text or symbols)- Display the MAIN MENU on the LCD of the RC3001, and then press the button next to the "LEARNING" indicator.
- The screen appears as shown below. Either press the ENTER button or wait for three seconds.

- This screen changes to HOME mode. Press the button next to the displayed device name whose commands you want to learn.
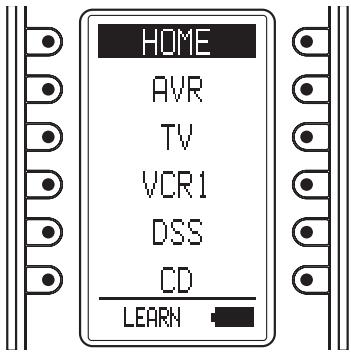
Note:
In Home mode, learning cannot be performed with the SOFT button using the procedure shown below. Use the Wizz.it 3 editor to make any changes.
- After selecting the device name, press the button whose command you want to learn.
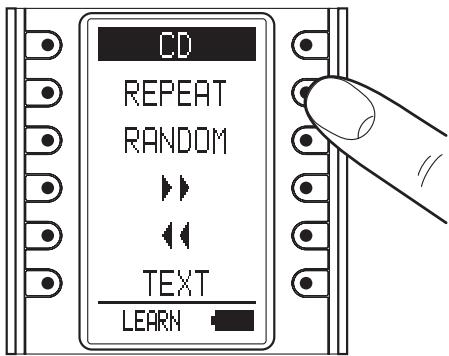
- This enters the learning standby mode. Send the remote controller code that you want to learn.
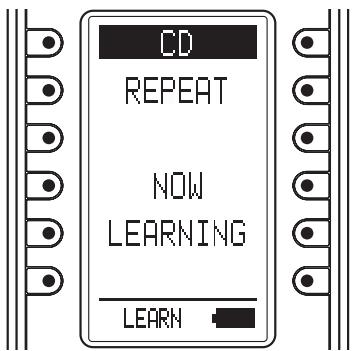
-
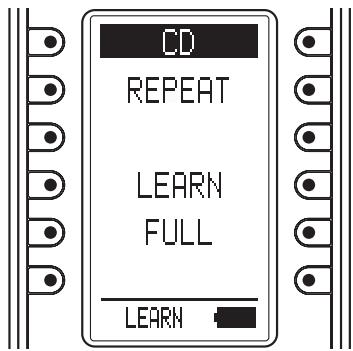
The remote controller has completed learning when "LEARN OK" is displayed on the LCD.
-
Pressing the ENTER button enables you to continue learning commands for another button in the same device mode.
- When the learning mode is completed, press the Home button three times to return the LCD to the MAIN MENU.
Notes:
- If learning could not be performed, “LEARN ERROR” is displayed on the LCD. Try performing steps 5 to 6 again.
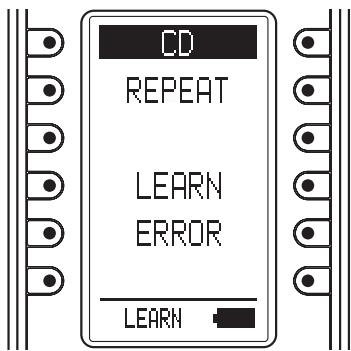
- When making the learning settings, the “LEARN ERROR” message may occasionally be displayed repeatedly on the LCD. In some cases, this can be due to transmission of a special remote controller signal code. Learning cannot be performed when a special remote controller signal code is used.
- The RC3001 can learn up to a maximum of 1,000 remote controller codes. Once 1,000 codes are programmed for learning, “LEARNFULL” is displayed on the LCD, and learning can no longer be performed.
To perform further learning, use the Wizz.it 3 editor to delete any unneeded learning codes.
2. TIMER
The timer function of the RC3001 can be used to send a preset remote controller command at a programmed time.
The Wizz.it 3 editor can be used to operate multiple devices. One Touch Operation (Macro) can also use the timer function for transmission.
CHECKING THE SETTINGS
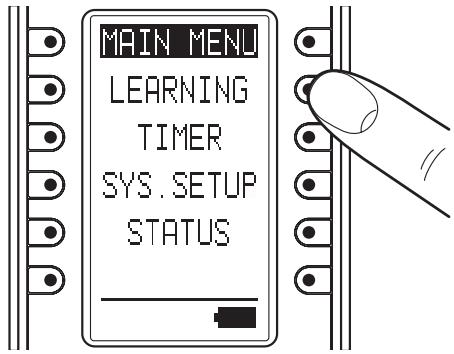
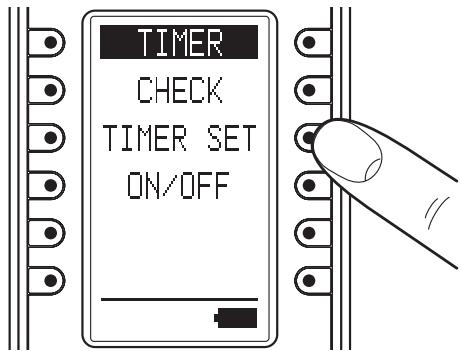
- Display the MAIN MENU on the LCD of the RC3001, then press the button next to the "TIMER" indicator.
- The TIMER menu is displayed. Pressing the button next to the "CHECK" indicator on the LCD displays the timer settings.

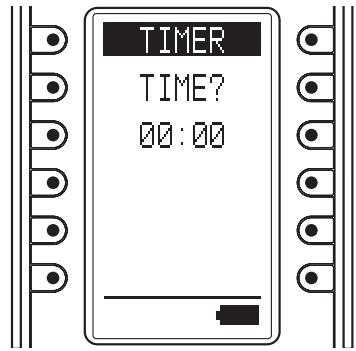
When the LCD appears as shown below, the timer has not been set.

- Either press the ENTER button or wait three seconds for the LCD to automatically return to the TIMER menu.
- Pressing the Home button from the TIMER MENU screen returns the LCD to the MAIN MENU.
OPERATION SETTINGS
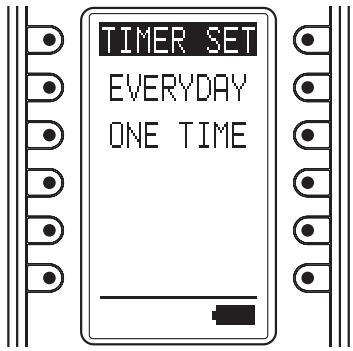
- Press the button next to the "TIMER SET" indicator in the LCD in the TIMER menu screen to display the timer programming setting screen.
- Use the numeric buttons (0 to 9) and cursor buttons (◀ and ▶) to set the time for the timer. After making the setting, press the ENTER button.
-
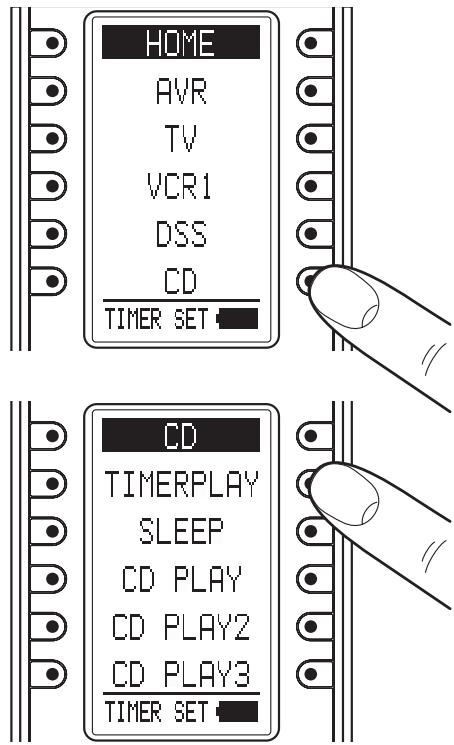
Home mode is shown in the LCD. Select the commands and devices for the commands that will be sent by timer programming.
-
If a command assigned to the HARD button is to be sent by timer programming, press the HARD button when selecting the command to make the setting.
- If a command assigned to the SOFT button is to be sent by timer programming, use the < and > buttons when selecting the command to move the page, and select the command assigned to the SOFT button.
Note:
The timer setting for the SOFT button cannot be used in Home mode.
- Press a button next to the "EVERYDAY" or "ONE TIME" indicators on the LCD to set timer operation to either everyday or one-time only operation.
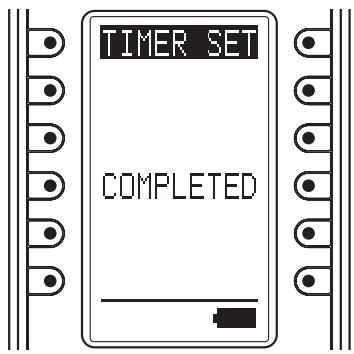
- The timer settings are displayed. Check that the settings are correct.

- Either press the ENTER button or wait three seconds so that "COMPLETED" is displayed on the LCD and the operation settings are automatically completed.
- Either press the ENTER button or wait three seconds for the LCD to automatically return to the MAIN menu.
- Press the button next to the "ON/OFF" indicator in the TIMER menu screen on the LCD to display the timer operation ON/OFF setting screen.
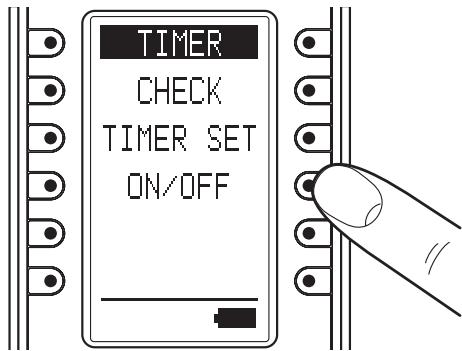
- Press the button next to the "TIMER ON" (Enable) or "TIMER OFF" (Disable) indicators on the LCD to either enable or disable timer operation.
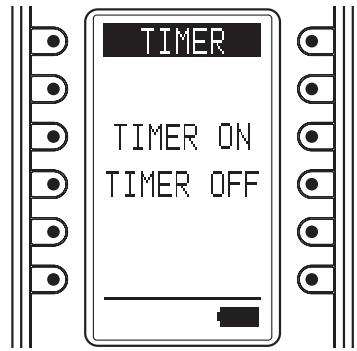
- Either press the ENTER button or wait three seconds so that "COMPLETED" is displayed on the LCD and the operation settings are automatically completed.
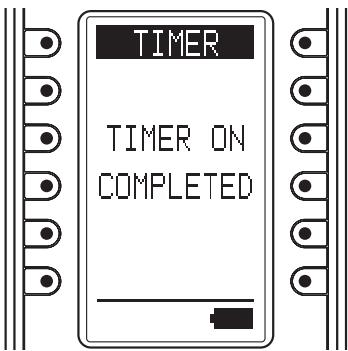
- Either press the ENTER button or wait three seconds for the LCD to automatically return to the MAIN menu.
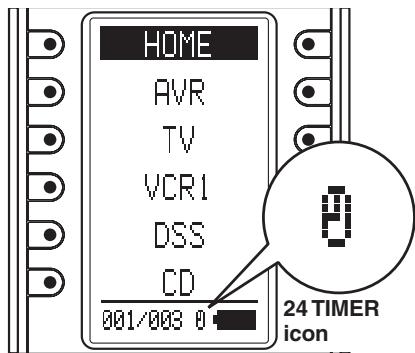
- When timer operation is set to ON, the timer icon is displayed in the Sub Info area of the LCD.
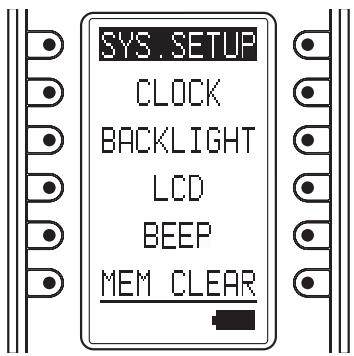
3. SYS.SETUP
Display the MAIN MENU on the LCD of the RC3001, then press the button next to the "SYS. SETUP" indicator.
The items below can be set in the SYS.SETUP screen.
- CLOCK (Clock setting)
- BACK LIGHT (Backlight illumination time setting)
- LCD (LCD setting)
• BEEP (Beep sound setting)
• MEM CLEAR (Initialization setting)
CLOCK (CLOCK SETTING)
This sets the clock for the RC3001.
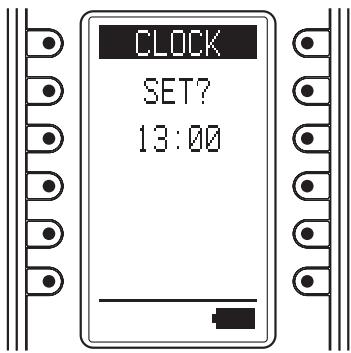
- Press the button next to the "CLOCK" indicator in the SYS.SETUP menu screen in the LCD to display the clock setting screen.
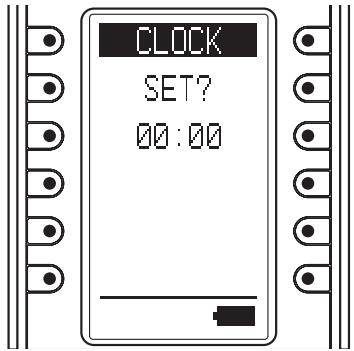
- Use the numeric buttons (0 to 9) and cursor buttons (◀ and ▶) to set the current time. After setting the correct time, press the ENTER button.
- The message "COMPLETED" is displayed in the LCD to indicate that the clock setting is completed.
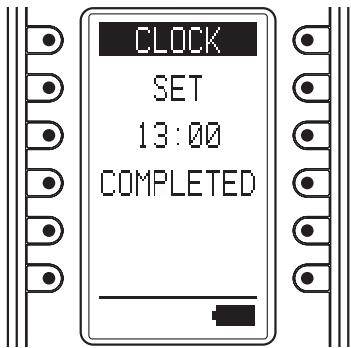
- Either press the ENTER button or wait three seconds for the LCD to automatically return to the SYS.SETUP menu.
- Pressing the Home button returns the LCD to the MAIN MENU.
Notes:
The clock can become out of sync over time. Please check it occasionally and set to the correct time if necessary.
The clock setting is not backed up when the battery pack is replaced. Please reset the time after replacing the battery pack.
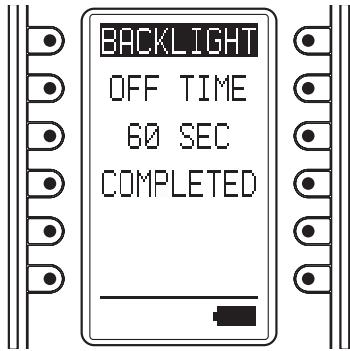
BACKLIGHT(BACKLIGHTILLUMINATION TIME SETTING)
Press the LIGHT button on the RC3001 to turn on the backlight, then set the time until the backlight turns off.
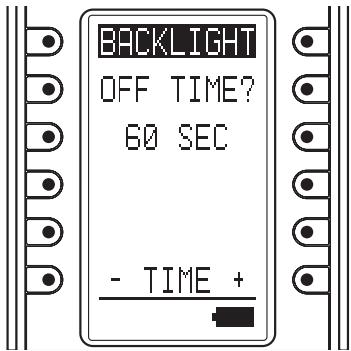
- Press the button next to the "BACKLIGHT" indicator in the SYS.SETUP menu screen in the LCD to display the backlight illumination time setting screen.
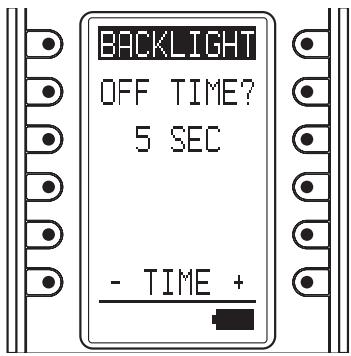
- Press the buttons (right: +, left: -) displayed next to TIME to set the illumination time. The time can be set in 1-second intervals from 0 to 60 seconds.
After deciding the settings, press the ENTER button.
- The message "COMPLETED" is displayed on the LCD to indicate that the illumination time setting is completed.
- Either press the ENTER button or wait three seconds for the LCD to automatically return to the SYS.SETUP menu.
- Pressing the Home button returns the LCD to the MAIN MENU.
Note:
Setting the BACK LIGHT TIMER to 0 sec is equivalent to turning off the backlight so that the backlight does not turn on even when the LIGHT button is pressed.
LCD (LCD SETTING)
Press the button next to the "LCD" indicator in the SYS.SETUP menu screen in the LCD.
The LCD setting menu is displayed.
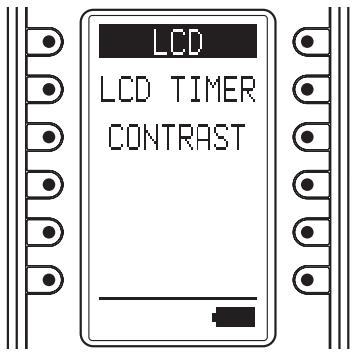
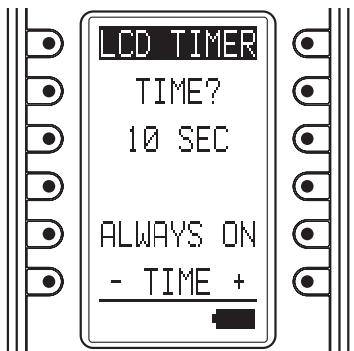
LCD TIMER (LCD timer setting)
This sets the time that the LCD remains on, after a button is pressed on the RC3001.
When there are no operations and the LCD is turned off, this setting enables power consumption to be reduced and the life of the battery pack to be extended.
The default setting is 10 seconds.
- The LCD setting menu is displayed, and so press the button next to "LCD TIMER" in the LCD display.
- Press the buttons (right: +, left: -) displayed next to TIME to set the display time. The time can be set in 1-second intervals from 10 to 60 seconds.
To leave the LCD always on, press the button next to the “ALWAYS ON” indicator. However, please note that this setting will shorten the life of the battery pack.
After deciding the settings, press the ENTER button.
- The message "COMPLETED" is displayed on the LCD to indicate that the display time setting is completed.
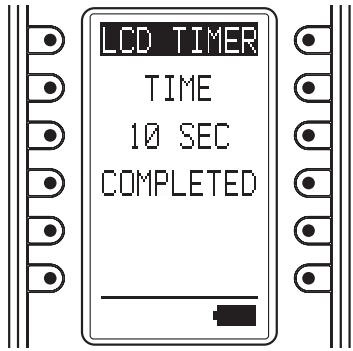
- Either press the ENTER button or wait three seconds for the LCD to automatically return to the SYS.SETUP menu.
- Pressing the Home button returns the LCD to the MAIN MENU.
Note:
If the LCD is turned off by the LCD timer, pressing any of the buttons on the remote controller will turn it on again. When the LCD is turned on, the pressed command is not activated.
To execute a command operation, press the button while the LCD is on.
CONTRAST
(LCD CONTRAST ADJUSTMENT)
This enables the LCD contrast to be adjusted.
Adjust for maximum visibility according to your viewing environment.
- The LCD setting menu is displayed, and so press the buttons next to "CONTRAST" in the LCD display.
- Press the side buttons (right: +, left: -) to adjust the contrast level.

After deciding the settings, press the ENTER button.
The message “COMPLETED” is displayed on the LCD to indicate that the setting is completed.

- Either press the ENTER button or wait three seconds for the LCD to automatically return to the SYS.SETUP menu.
- Pressing the Home button returns the LCD to the MAIN MENU.
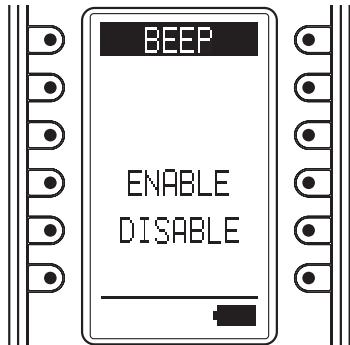
BEEP (BEEP SOUND SETTING)
This sets the built-in beep sound in the RC3001.
-
Press the button next to the "BEEP" indicator in the SYS.SETUP menu screen in the LCD to display the beep setting screen.
-
Press the button next to the "ENABLE" or "DISABLE" indicators on the LCD to either enable or disable the beep sound.
- Either press the ENTER button or wait three seconds so that "ENABLE" or "DISABLE" is displayed on the LCD and the settings are automatically completed.
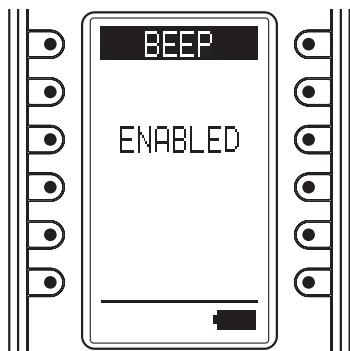
- Either press the ENTER button or wait three seconds for the LCD to automatically return to the SYS. SETUP menu.
- Pressing the Home button returns the LCD to the MAIN MENU.
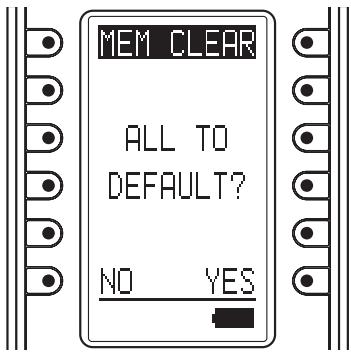
MEM CLEAR (INITIALIZATION SETTING)
This returns the settings made in the RC3001 to their initial settings.
- Press the button next to the "MEM CLEAR" indicator in the SYS.SETUP menu screen in the LCD to display the initialization setting screen.
- Press the button next to the "NO" (Disable) or "YES" (Enable) indicators on the LCD to either enable or disable initialization.
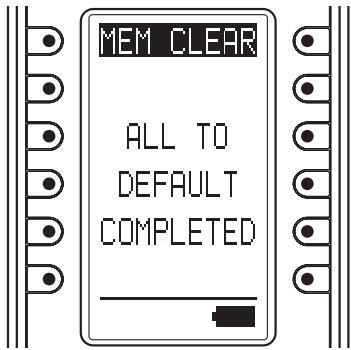
- Pressing the NO button automatically returns the LCD to the SYS.SETUP menu. Pressing the YES button displays "COMPLETED" on the LCD and completes initialization.
The setting items that are initialized are shown below.
The LEARNING and CLOCK settings are not initialized.
- Either press the ENTER button or wait three seconds for the LCD to automatically return to the SYS.SETUP menu.
- Pressing the Home button returns the LCD to the MAIN MENU.
4. STATUS INDICATOR
This displays the settings made in the MAIN MENU and the status of the remote device.
CHECKING THE STATUS
-
Display the MAIN MENU on the LCD of the RC3001, then press the button next to the "STATUS" indicator.
-
Pressing the ENTER button cycles through the statuses of each of the items below.
• Remaining learning memory
• Remaining macro steps
- LCD timer setting
- Backlight timer setting
- Beep setting
- Firmware version
- Current clock time
Either press the ENTER button or wait three seconds so that the LCD returns to the MAIN MENU.
5. RESET
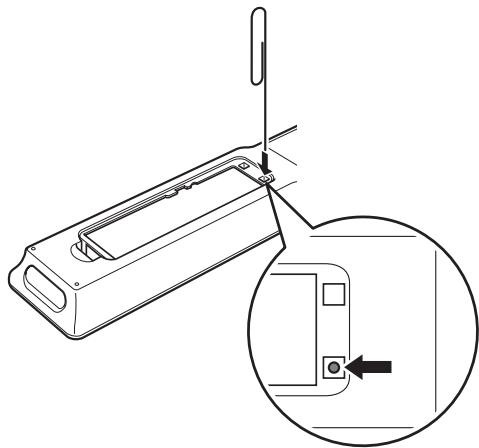
If the RC3001 is not operating properly, use the procedure below to perform a reset (restart). Performing a reset does not erase the settings in the RC3001.
- Remove the battery case cover.
- Use a paper clip or other object to press the reset button in the reset hole as shown in the figure below to reset the RC3001.
natural_image
Technical line drawing of a mechanical device with an inset close-up showing a component detail (no text or symbols)Note:
Perform the reset with the battery pack loaded.
6. PROGRAMMABLE CODES
NUMBER OF PROGRAMMABLE CODES
This remote control has Flash memory 4M bit (512KB) that enables it to program remote control signals include the learned codes for up to 8000 codes.
This number is for Marantz remote control codes.
The actual number of codes may be less than 8000 depending on the type of the programmed remote control signals.
PROGRAMMABLE CODES
This remote control may be unable to learn the codes for some AV equipment due to the code types, system, or other differences.
RC3001
LCD Resolution
......“11x81pixel x6 line
9x81pixel x1line"
Backlight ...... EL back light
Transmission IR or RF
Learning...... Capability: MAX 1000code
Operating/ learning IR frequency range .....Up to 455kHz
RF carrier frequency 433.92MHz
Rechargeable battery pack NiMH Battery Pack 700 mAh
Interface .. USB 2.0 connection with USB bus power supply
Memory Size....4M bit (512kB)
Dimensions (W x H x L) ...... 54 x 228 x 25 mm (2-3/16 x 9 x 1ins.)
Unit Weight (With Batteries) 210g (0.5lbs)
natural_image
Simple line drawing of a three-legged container or tray (no text or symbols)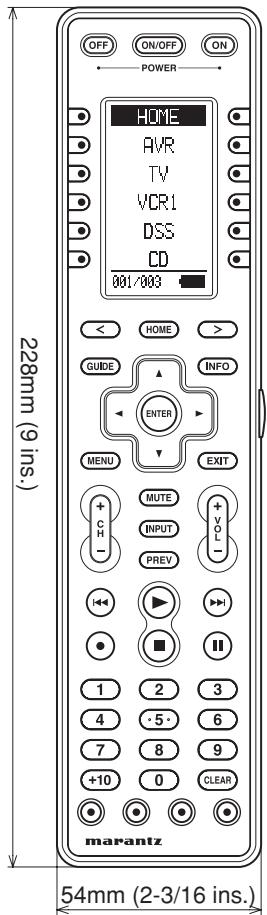

natural_image
Pure technical line drawing of a mechanical component with no text or symbols
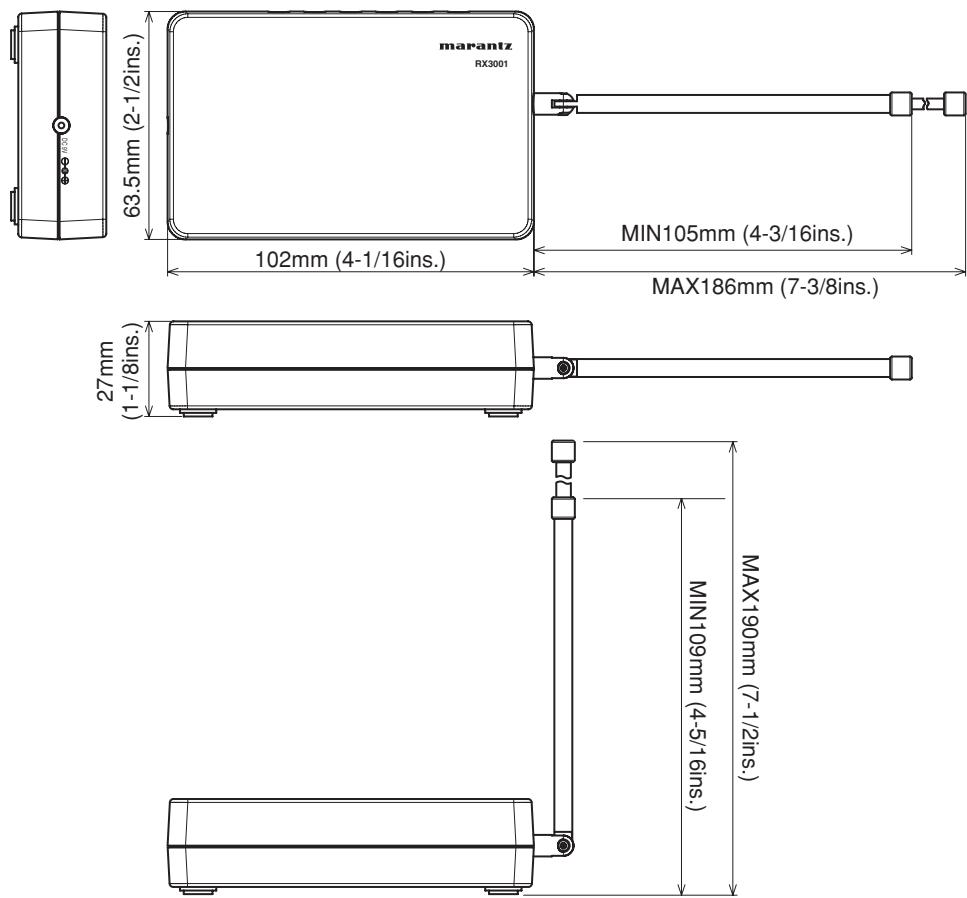
RX3001
RF carrier frequency 433.92MHz
Operating/ learning IR frequency range .....Up to 100kHz
IR emitter output ......x6
Dimensions (W x H x L) ... 102 x 63.5 x 27 mm (4-1/16 x 2-1/2 x 1-1/8 ins.)
Unit Weight 90g (0.2lbs)
AC Adapter
Power Supply...... 100 V-240 V AC / 50-60 Hz
Power Output.....DC9V 800mA
OTHERS
The section describes the care and maintenance tasks that must be performed to optimize the operation of your Marantz component.
CLEANING OF EQUIPMENT EXTERNAL SURFACES
The exterior finish of your unit will last indefinitely with proper care and cleaning, Never use scouring pads, steel wool, scourging powders or harsh chemical agents (e.g., lye solution), alcohol, thinner, benzine, insecticide or other volatile substances as these will mar the finish of the equipment. Likewise, never use cloths containing chemical substances. If the equipment get dirty, wipe the external surfaces with a soft, lint-free cloth.
If the equipment becomes heavily soiled:
- dilute some washing up liquid in water, in a ratio of one part detergent to six parts water.
- dip a soft, lint free in the solution and wring the it is damp.
- wipe the equipment with the damp cloth.
- dry the equipment by wiping it with a dry cloth.

REPAIRS
Only the most competent and qualified service technicians should be allowed to service the factory-trained warranty station personnel have the knowledge and special facilities needed for repair and calibration of this precision equipment. After the warranty period has expired, repairs will be performed for a charge if the equipment can be returned to normal operation.
In the event of difficulty, refer to your dealer or write directly to the nearest location to you that is listed on the Marantz Authorized Service Station list. If writing, please include the model and serial number of the equipment together with a full description of what you think is abnormal about the equipment's behaviour.
www.marantz.com
You can find your nearest authorized distributor or dealer on our website.
marantz® is a registered trademark.
- For Europe
- ENGLISH
- WARRANTY
- RETAIN YOUR PURCHASE RECEIPT
- IMPORTANT
- FOR U.K. ONLY
- FRANÇAIS
- GARANTIE
- AVERTISSEMENTS
- CHECKING THE ACCESSORIES
- FEATURES
- RC3001 : Remote controller
- RX3001 : RF Extender
- TABLE OF CONTENTS
- BEFORE USE....2
- NAMES AND FUNCTIONS...... 4
- INSTALLATION 7
- SETUP 12
- BASIC OPERATION.... 14
- OTHER OPERATION 15
- BEFORE USE
- LOAD THE RECHARGEABLE BATTERY PACK INTO THE REMOTE CONTROLLER
- Remove the battery case cover.
- Insert the rechargeable battery cable connector into the socket of the remote controller.
- Pull the cable of the rechargeable battery pack around so that it does not get caught in the case as shown in the figure below, then load the rechargeable battery pack into the battery case.
- Attach the battery case cover.
- CAUTION ON BATTERY
- REPLACING THE BATTERIES
- Warning:
- CHARGING THE BATTERY PACK
- Notes:
- REMOTE CONTROLLER
- ① POWER ON and OFF buttons
- ② SOURCE ON/OFF button
- ③ LCD Display
- ④ Programable soft buttons
- ⑤ Page Scroll buttons
- ⑥ Home button
- ⑦ Light button
- ⑧ Cursor, ENTER buttons
- ⑨ Programmable Hard buttons
- ⑩ USB port
- ⑪ Charging terminal
- REMOTE CONTROLLER LCD
- Ⓐ Mode display area
- Home:
- Device Name:
- ⑧ Command display area
- © Battery indicator
- D Sub info. Area
- Normal operation:
- When sending IR command:
- Operation when not sending an IR command (such as jump operation):
- Note:
- MOUNTING THE RX3001 TO A WALL
- MOUNTING LOCATION PRECAUTIONS
- MOUNTING PROCEDURE PRECAUTIONS
- MOUNTING PROCEDURE
- USING THE REMOTE CONTROLLER WITH INFRARED RAYS
- Precautions:
- USING THE REMOTE CONTROLLER WITH RADIO FREQUENCY
- Precaution:
- CHANGING THE IR / RF SETTINGS
- CONNECTING TO MARANTZ EQUIPMENT
- CONNECTING TO NON-MARANTZ EQUIPMENT
- CONNECTING TO AN AC ADAPTER
- SETTING THE IR OUTPUT LEVEL
- SETTING THE CHANNEL
- SETTING THE GROUP ID SELECTOR
- BASIC OPERATION
- RC3001 BUTTON SETTINGS
- Example:
- SLEEP TIMER
- OTHER OPERATION
- MAIN MENU
- ENTERING THE MAIN MENU
- LEARNING FUNCTION
- TIMER
- CHECKING THE SETTINGS
- OPERATION SETTINGS
- SYS.SETUP
- CLOCK (CLOCK SETTING)
- BACKLIGHT(BACKLIGHTILLUMINATION TIME SETTING)
- LCD (LCD SETTING)
- LCD TIMER (LCD timer setting)
- CONTRAST
- (LCD CONTRAST ADJUSTMENT)
- BEEP (BEEP SOUND SETTING)
- MEM CLEAR (INITIALIZATION SETTING)
- STATUS INDICATOR
- CHECKING THE STATUS
- RESET
- PROGRAMMABLE CODES
- NUMBER OF PROGRAMMABLE CODES
- PROGRAMMABLE CODES
- RC3001
- RX3001
- OTHERS
- CLEANING OF EQUIPMENT EXTERNAL SURFACES
- REPAIRS
Brand : MARANTZ
Model : RC3001
Category : Remote control