
IMPRESSA E50 - Coffee machine JURA - Free user manual and instructions
Find the device manual for free IMPRESSA E50 JURA in PDF.
| Product type | Automatic coffee machine |
| Brand | JURA |
| Model | IMPRESSA E50 |
| Dimensions (W x H x D) | 28 x 34.5 x 41.5 cm |
| Weight | 8.3 kg |
| Power supply | 230 V AC, 1350 W, 10 A |
| Water tank capacity | 1.9 liters |
| Bean container | Integrated, lid |
| Brewing system | P.B.A.S. (Pre Brew Aroma System) |
| Coffee functions | Espresso, normal coffee, strong, extra-strong |
| Preparation of two cups | Yes, simultaneously |
| Grinding | Adjustable integrated grinder (fine/coarse) |
| Ground coffee | Possible to use via separate funnel |
| Adjustable water volume | Variable, rotary selector |
| Steam function | Yes, for heating and frothing milk |
| Hot water function | Yes |
| Automatic shut-off | Adjustable (2h or 5h, or disabled) |
| Maintenance | Integrated rinsing, cleaning, and descaling programs |
| Water filter | Compatible with Claris cartridge (optional) |
| Safety | Automatic shut-off, warning lights, splash protection |
| Spare parts | Available from JURA after-sales service |
| Repairability | Repairs by JURA authorized center only |
| General information | Domestic use, manual in multiple languages |
Frequently Asked Questions - IMPRESSA E50 JURA
User questions about IMPRESSA E50 JURA
0 question about this device. Answer the ones you know or ask your own.
Ask a new question about this device
Download the instructions for your Coffee machine in PDF format for free! Find your manual IMPRESSA E50 - JURA and take your electronic device back in hand. On this page are published all the documents necessary for the use of your device. IMPRESSA E50 by JURA.
USER MANUAL IMPRESSA E50 JURA
Instructions for use
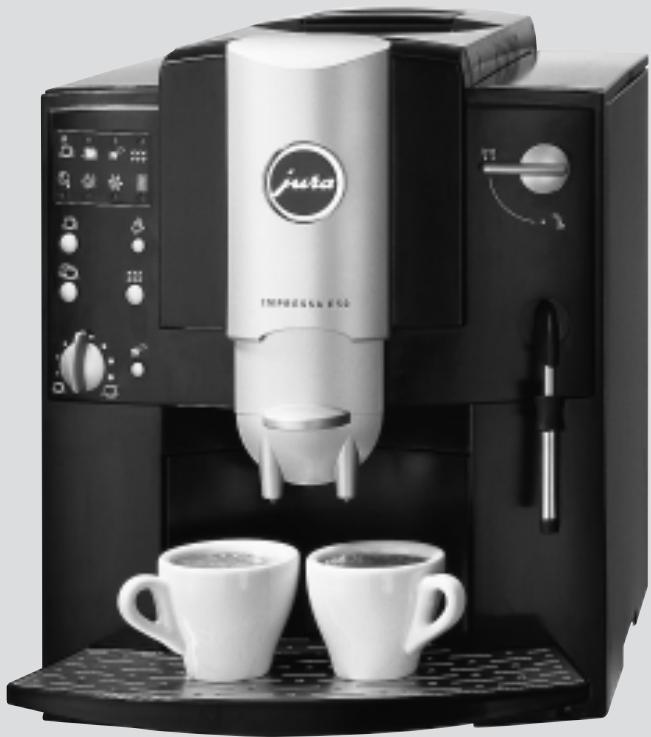
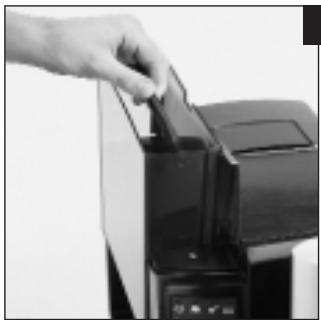
Fig. 1
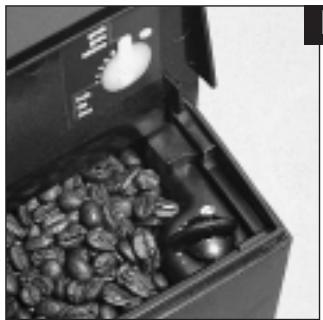
Fig. 2

Fig. 3
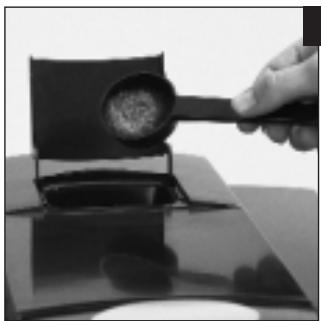
Fig. 4
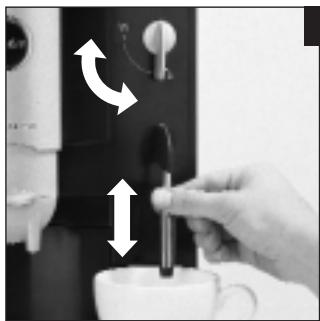
Fig. 5
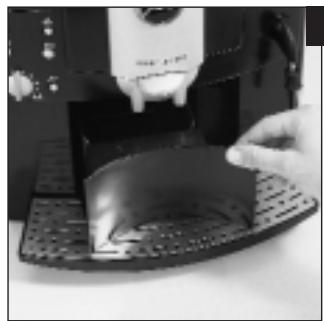
Fig. 6
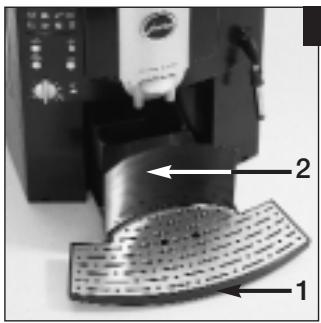
Fig. 7
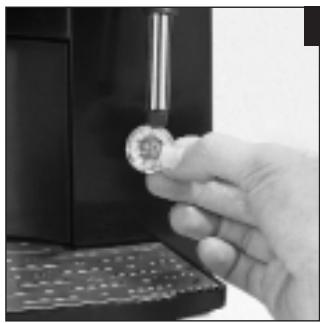
Fig. 8
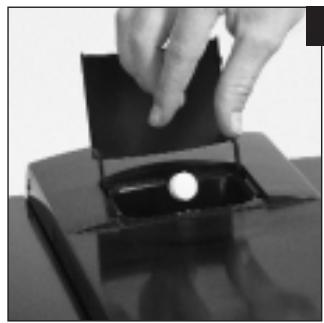
Fig. 9
Instructions for use Jura Impressa E50/E55
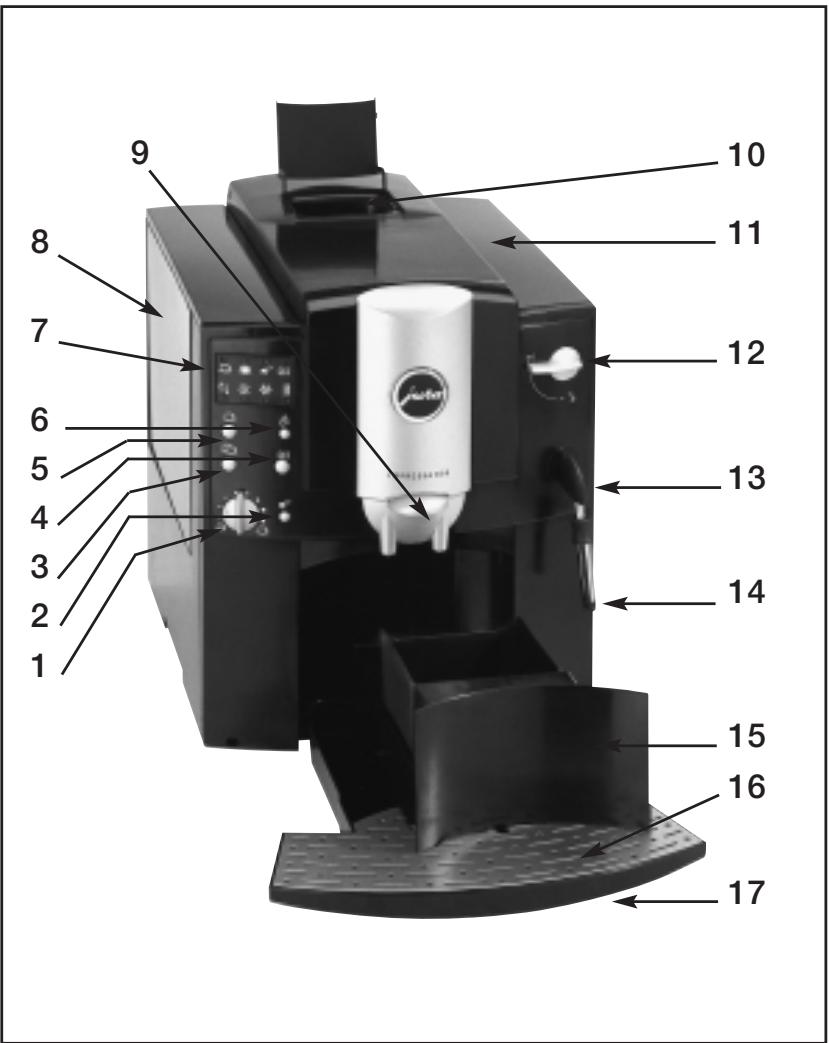
- Water volume selector switch
- Selector button for pre-ground coffee powder
- Coffee button 2 cups
- Rinsing button
- Coffee button 1 cup
- ON/OFF switch
- Display with warning lamps
- Water tank with carrying handle
- Height-adjustable coffee-spout
- Filler funnel for pre-ground coffee
- Cover for bean container
- Selector switch for coffee or hot-water/steam
- Pivoting nozzle for hot-water/steam
- Frothing nozzle
- Container for coffee grounds
- Drip tray cover
- Drip tray
Contents
Jura Impressa E50/E55
1.Description page 6
1.1 Meaning of symbols in the display.. page 6
2. Safety instructions.. page 6
2.1Warnings . page 6
2.2 Safety precautions.. page 7
3. Check before use.. page 7
3.1 Checking mains voltage.. page 7
3.2 Checking fuse.. page 7
3.3 Filling water tank.. page 7
3.4 Adding coffee beans page 7
3.5 Adjusting grinder page 7
3.6 Adjusting for water hardness.. page 8
3.7 Adjustable automatic close-down page 9
4.Preparing machine.. page 9
4.1 Filling the system with water page 9
5. Rinsing the machine.. page 9
6. Adjusting water volume.. page 9
7. Drawing off espresso/normal coffee . page 10
7.1 Drawing off espresso/strong coffee....page 10
7.2 Drawing off espresso/extra-strong coffee....page 10
7.3 Using pre-ground powder coffee . page 10
8. Using steam.. page 10
8.1 Resetting to stand-by status.. page 11
- Drawing off hot-water page 11
- Switching off machine.. page 11
- Care and maintenance.. page 11
11.1 Fill water page 11
11.2 Empty ground container.. page 11
11.3 Drip tray is missing.. page 11
11.4 Clean machine page 11
11.5 Machine furred page 12
11.6 Use of Claris filter cartridges . page 12
11.7 General cleaning instructions.. page 12
11.8 Regular servicing.. page 12
11.9 Empty system page 12
- Cleaning page 12
13.Decalcifying. page 13 - Disposal page 14
- Tips of a perfect coffee page 14
- Messages.. page 15
17.Problems page 17 - Legal information page 17
- Technical specifications.. page 17
Important information for the user
Thank you for choosing this Jura product.
Please study these instructions carefully before using your new machine and keep them in a safe place for easy reference in the future.
Should you require further information or should particular problems occur that are not dealt with in these operating instructions in sufficient detail for you, then please ask you local dealer for the information you require or contact us directly.
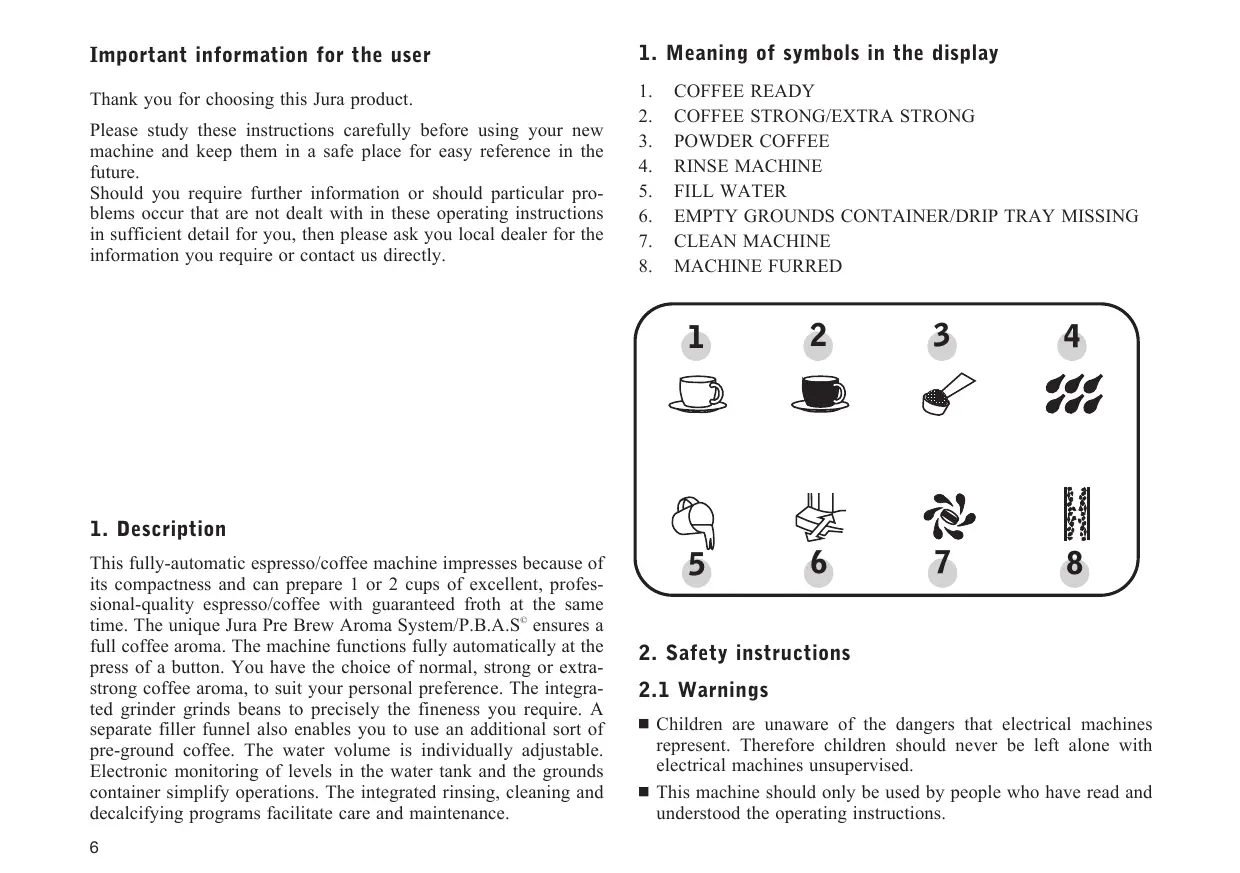
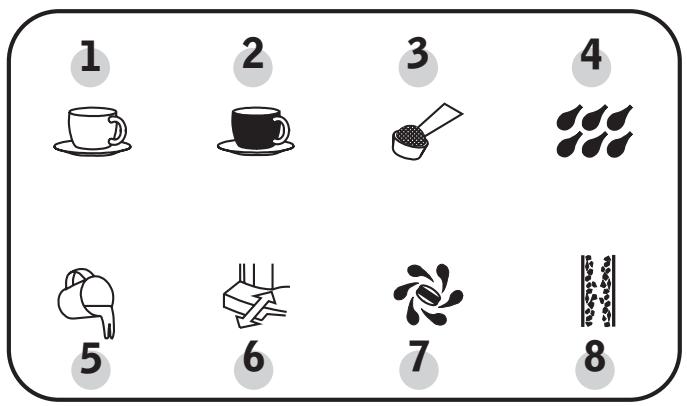
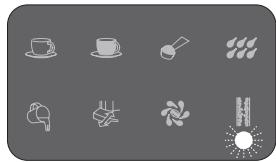
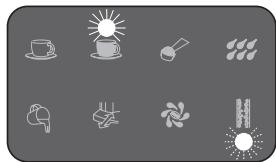
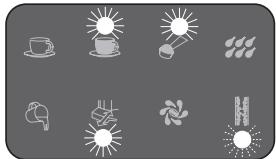
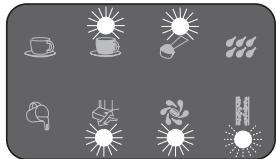
1. Meaning of symbols in the display
- COFFEE READY
- COFFEE STRONG/EXTRA STRONG
- POWDER COFFEE
- RINSE MACHINE
- FILL WATER
- EMPTY GROUNDSC CONTAINER/DRIP TRAY MISSING
- CLEAN MACHINE
- MACHINE Furred
1.Description
This fully-automatic espresso/coffee machine impresses because of its compactness and can prepare 1 or 2 cups of excellent, professional-quality espresso/coffee with guaranteed froth at the same time. The unique Jura Pre Brew Aroma System/P.B.A.S ensures a full coffee aroma. The machine functions fully automatically at the press of a button. You have the choice of normal, strong or extra-strong coffee aroma, to suit your personal preference. The integrated grinder grinds beans to precisely the fineness you require. A separate filler funnel also enables you to use an additional sort of pre-ground coffee. The water volume is individually adjustable. Electronic monitoring of levels in the water tank and the grounds container simplify operations. The integrated rinsing, cleaning and decalcifying programs facilitate care and maintenance.
2. Safety instructions
2.1Warnings
Children are unaware of the dangers that electrical machines represent. Therefore children should never be left alone with electrical machines unsupervised.
This machine should only be used by people who have read and understood the operating instructions.
- Never use a faulty machine or one with a damaged power cable.
- Never immerse the machine in water.
2.2 Safety precautions
- Never expose the machine to the effects of rain, snow or frost and never operate it with wet hands.
- Place your espresso/coffee machine on a solid level surface. Never leave it on a surface that is warm or hot (hob etc.). Choose a location that is inaccessible for children or pets.
- Remove plug from power socket if an absence for a longer period of time (holidays etc.) is planned.
Always remove plug from power socket before cleaning. - When removing plug from power socket, never tug on the cord or on the machine itself.
- Never repair or open the machine yourself. All repairs should be performed only by authorised service centres using original Jura spare parts and accessories.
- The machine is connected to the mains power socket via an electric cable. Ensure that no one trips over this cable and pulls down the machine. Keep children and animals away.
- Never put the machine or even parts of it in the dishwasher.
To prevent overheating put the machine in an airy place.
If you are using an acid-based descaling agent, it is important to avoid any splashed or drips on sensitive kitchen surfaces, particularly those in natural stone or wood. If they do occur, they should be removed immediately.
3. Check before use
3.1 Checking mains voltage
The machine is set for the correct voltage before leaving our factory. Ensure that your mains voltage corresponds to the details quoted on the rating plate attached to the bottom of the machine.
3.2 Checking fuse
The machine is designed for a current of 10 amps. Check that an appropriate fuse is fitted.
3.3 Filling water tank
- Remove water tank and rinse well with cold clean tap water.
- Fill the tank and replace it in the machine. Ensure that the tank clicks correctly into place (Fig. 1).

Note: Use only clean cold water. Never fill the tank with milk, mineral water or any other liquid. You can also top the tank up with water without removing it from the machine. Simply pull up cover and pour water into the tank from above. Put cover back in its original position.
3.4 Adding coffee beans
- Lift up cover of the bean container (11).
Clean out any dirt or alien elements from the bean container. - Fill the grinder container with coffee beans and close the cover.
3.5 Adjusting grinder
You can adjust the grinder to the roast of your coffee. We recommend the following:
for a light roasting a finer adjustment
for a dark roasting a coarser adjustment
- Open the cover of the bean container (11).
-
To adjust grinding turn selector switch (Fig. 2) to the wanted position.
-
You have the following possibilities to adjust the grade of grinding the smaller the dots, the finer the grinding the bigger the dots, the coarser the grinding
Important: The grinding grade should only be adjusted while the grinder is working.
3.6 Adjusting for water hardness
The water is heated inside the machine. With use, this leads to calcium deposits (furring) forming on the machine. This is automatically indicated in the display. For this reason, it is necessary to adjust the machine to the hardness of your local water before you use it for the first time. Use the enclosed test-sticks for this purpose.

Note: 1^ water hardness on the German scale represents 1.79^ on the French scale.
The machine has got 5 hardness settings to choose from. The chosen grade is shown on the display.
$$ \begin{array}{l} \text {L e g e n d :} \quad \text {f l a s h e s} \ \bullet = \text {l i g h t s} \ \end{array} $$
Level 0 = Setting for Claris filter cartridges Display
The display for automatic decalcifying is switched off.
Level 1
German water hardness 1^ - 7^ French water hardness 1.79^ - 12.53^

Level 2
German water hardness 8^ - 15^ French water hardness 14.32^ - 26.85^
Level 3
German water hardness 16^ - 23^ French water hardness 28.64^ - 41.14^
Level 4
German water hardness 24^ - 30^ French water hardness 42.96^ - 53.7^
The machine is adjusted to Level 3 before it leaves the factory. You can alter this setting by simply following the instructions below:
Pull the mains lead with its plug out from the cable box at the rear of the machine.
Put the mains plug into the wall socket.
Leave the machine switched off.
Press the button for about 3 seconds. Now warning lamp (Level 3) flashes.
- Choose the required setting by pressing button and press button 业 to store in memory. The warning lamps go out.

Note: It is only necessary to adjust the water hardness before the machine is used for the first time or when a different quality of water is used.
If no water hardness level is changed within 30 seconds, the display goes out and the last value programmed remains unchanged.
3.7 Adjustable automatic close-down
You can adjust the automatic close-down of 2 hours set by Jura to your own requirements. The machine provides 3 different levels:
1st Level
Warning lamp flashes.
The automatic close-down is not activated.
2nd Level
Warning lamp : : flashes, warning lamps , light up.
Automatic close-down is set to 2 hours.
3rd Level
Warning lamp flashes, warning lamps light up.

Automatic close-down is set to 5 hours.
To set or alter the automatic close-down follow the instructions below:
Put the mains plug into the wall socket.
Leave the machine switched off.
Press button for about 3 seconds and choose the required setting by pressing button.
Push button to store level in memory

Note: If no change to the setting level is made within 30 seconds, the warning lamps go out and the last level stored remains effective.
4. Preparing machine
4.1 Filling the system with water
Press button to switch on the machine.
Warning , , , lamps flash.
Place an empty cup under the pivoting nozzle (13).
- Turn selector switch for hot-water/steam (12) to position 3. Now the machine gives off water. Warning lamps 4, flash. The water flow is stopped automatically.
Turn back selector switch for hot-water/steam (12) to position
5. Rinsing the machine
If warning lamp flashes, the machine needs rinsing.
Place an empty cup under the coffee-spout.
Press button. The rinsing is stopped automatically.

Note: If the machine has been switched off and has already cooled down it will be necessary to carry out this rinsing function when the machine is switched on again. After switching off the machine, the rinsing sets off automatically.
6. Adjusting water volume
Water volume is infinitely adjustable by means of the selector switch (1). The small cup means a small volume of water for espresso, the big cup means a larger volume of water for coffee. ll cup means a small volume of water for espresso, the big cup means a larger volume of water for coffee.

Tip: You can also change the water volume while coffee is being drawn off. Simply turn the selector switch (1) to give more or less water.

Note: If you press button the machine automatically doubles the amount of water and divides it between two cups.
7. Drawing off espresso/normal coffee
Switch on the machine by pressing button. The machine is ready as soon as the warning lamp lights up.
- Place 1 or 2 cups under the coffee-spout and press the appropriate button. The pre-brew function (P.B.A.S) moistens the coffee powder, briefly interrupts the flow and then the real brewing process begins.

Note: You can interrupt the flow of coffee at any time by simply pressing any one of the coffee buttons.

Tip: Adjust the coffee-spout height to the size of your cups to obtain a perfect head of froth (Fig. 3).
7.1 Drawing off espresso/strong coffee
- Place 1 cup under coffee-spout (9) and press the required button until the warning lamp lights up. Warning lamp flashes.

Note: You can only draw off 1 cup of strong coffee at a time.
7.2 Drawing off espresso/extra-strong coffee
Place 1 cup under coffee-spout (9).
Press the required button until warning lamps, , flash.

Note: You can only draw off 1 cup of extra-strong coffee at a time.
7.3 Using pre-ground powder coffee
Press button. Warning lamps 念 and light up.
■ Now put 1 or 2 level measuring spoons of pre-ground coffee (Fig. 4) into the powder funnel (10).
- Place 1 or 2 cups under coffee-spout and press the coffee button required.

Important: Never use soluble instant coffee or quick coffee. Only use coffee powder from freshly ground beans or pre-ground vacuum-packed coffee. Never fill the funnel with more than 1 or 2 portions at a time. The powder funnel is not intended as a storage container.

Note: If button is pressed by mistake, this can be corrected by pressing button . The machine rinses.

Tip: We recommend a regular cleaning of the funnel with a bottle-brush after drawing off powder coffee.
8. Using steam
Steam can be used for heating up liquids as well as for frothing up milk for cappuccinos. To heat up liquids remember to push the frothing nozzle (14) up. For frothing up liquids push the nozzle down (Fig. 5).
Put a cup under the pivoting nozzle (13).
- Immerse the frothing nozzle (14) into the milk you want to froth or into the liquid you want to heat up. Turn selector switch for coffee or hot-water/steam (12) to position (Fig. 5).
To stop steam-function turn selector switch for coffee or hot-water/steam (12) back to position.
Warning lamps, flash.
If you would like to draw off coffee right after drawing off steam, proceed as described in chapter 8.1.

Note: The max. drawing off time for steam is about 8 minutes. Due to the start frothing. This water should be drawn off before drawing off steam. However the perfect result (e.g. of frothing milk) is not influenced.
Important: When steam is first drawn off, there is a possibility of spattering. The pivoting nozzle becomes hot. Avoid direct contact with the skin.
8.1 Resetting to stand-by status
Place a container under the pivoting nozzle (13).
Turn selector switch for hot-water/steam (12) to position
Push button and draw off water until water-flow is automatically stopped. Warning lamps, flash.
- Then turn back selector switch for hot-water/steam (12) to position.

Tip: Whenever you have finished drawing off steam clean the pivoting nozzle with a damp cloth.
9. Drawing off hot-water
- Place a cup under the pivoting nozzle (13) and turn selector switch for hot-water/steam (12) to the symbol
Press button. The machine will now deliver hot-water.
To stop this process turn back selector switch for hot-water/steam (12) to the sympol

Important: When hot-water and steam are first drawn off, there is a possibility of spattering. The pivoting nozzle becomes hot. Avoid direct contact with the skin.
10. Switching off machine
When the machine is switched off, the rinsing program is automatically run again. Place an empty cup under the coffee-spout and press button. When the rinsing water has run into the cup, the machine powers down. Discard the water.
11. Care and maintenance
11.1 Fill water
When warning lamp lights up no more coffee can be drawn off. Top up water as described in chapter 3.3.
11.2 Empty grounds container
Coffee grounds are collected in the grounds container. When warning lamp lights up, all coffee buttons are blocked and you must empty the grounds container.
Push up coffee-spout (9).
Remove drip tray. Do this carefully as there is water in it.
- Remove and clean drip tray (Fig. 6) and grounds container. First replace grounds container and then drip tray (Fig. 7).

Important: Whenever grounds container is emptied, empty drip tray too.
11.3 Drip tray is missing
If the drip tray is not replaced correctly, warning lamp flashes.

Note: When the drip tray is outside the machine you can take the opportunity to clean the inside of the machine. Wipe off any of coffee powder with a damp cloth. Then replace clean drip tray.
11.4 Clean machine
After coffee etc. has been drawn off 200 times or 160 rinse programs have been run, the machine must be cleaned. Warning lamp will remind you. You can still draw off coffee and hot-water/steam. However we recommend that you clean the machine (as described in chapter 12) within the next few days. Warning lamp does not go out until the complete cleaning process has been carried out.
11.5 Machine furred
Your machine will become furred in the course of normal use. The amount of furring depends on the hardness of your water. The machine registers when descalcifying becomes necessary and signals this via warning lamp . You can still draw off coffee and hot-water/steam. However we recommend that you decalcify the machine (as described in chapter 13) within the next few days. Warning lamp does not go out until the complete decalcifying process has been carried out.
11.6 Use of Claris filter cartridges
At the correct use of Claris filter cartridges, decalcifying of the machine becomes unnecessary. For further information, please read the instructions for use attached to the water tank.

Note: Furring display must be switched off (as described in chapter 3.6) before using Claris filter cartridges.
11.7 General cleaning instructions
- Never use sharp or abrasive articles or corrosive chemicals to clean your machine.
■ Wipe down the casing inside and out using a soft damp cloth.
Clean the pivoting hot-water/steam nozzle every time it is used.
After warming milk, draw off a little hot-water to clean the pivoting nozzle inside.
■ You can take off the pivoting nozzle for a thorough cleaning (Fig. 8). - The water tank should be rinsed out and filled with clean water daily.

Note: If you notice any furring in the water tank, this can be descalcified separately with a customary decalcifying product. Remove the tank from the machine in order to do this.
11.8 Regular servicing
Regular Jura services ensure your machine's reliability and longer life. Keep the original packaging to protect the machine when it is transported.
11.9 Empty system

Important: This process is necessary to protect the machine from frost damages while being transported.
Press button to switch off the machine.
Place a container under the pivoting nozzle (13)
Turn selector switch for hot-water/steam (12) to position
Press button to switch on the machine. Warning lamps, flash.
Press button until only warning lamp flashes. Steam comes out after a short time.
Draw off steam until it stops automatically.
Turn selector button for hot-water/steam (12) back to position
12. Cleaning
The machine has an integrated cleaning program.

Note: Whenever the machine needs cleaning, warning lamp lights up. You can still draw off coffee and hot-water/steam and run the cleaning program later.
Only use Jura cleaning tablets. These are available from your Jura dealer.

Important: It is essential not to interrupt the process once it has been started.
Switch on machine by pressing button.
Push button for about 3 seconds. Warning lamps (if necessary) light up.
Fill water tank.
- Empty drip tray and grounds container and replace them. Warning lamps (if necessary) go out.
Place a container under the coffee-spout (9).
Put a Jura cleaning tablet (Fig. 9) into the powder funnel (10).
Press selector button. The warning lamp goes out. Warning lamp 念 flashes.
The flashing of warning lamp indicates that the cleaning process is activated.
If warning lamp lights up, empty drip tray (if necessary), wait about 10 seconds before replacing it. Warning lamp goes out.
Replace the container under the coffee-spout (9) and press button
The cleaning process is continued.
■ If warning lamp lights up again, empty drip tray (if necessary), wait about 10 seconds before replacing it. Warning lamp goes out.
- Replace the container under the coffee-spout (9) and press button
The cleaning process is continued. At the end of it, warning lamp lights up.
- Empty drip tray and grounds container and replace them. Warning lamp : : lights up.
- Replace container under the coffee spout (9) and press button . The machine rinses and warning lamp lights up.

Tip: Clean powder funnel with a bottle-brush.
13. Decalcifying
Your machine has an integrated decalcifying program. If a Claris filter cartridge is used there is no need for decalcifying your machine. Please use Jura decalcifying tablets only. These are available from your Jura dealer

Note: If the machine needs decalcifying warning lamp H lights up. You can still draw off coffee and hot-water/steam and run the decalcifying program later.
Important: Run the decalcifying program only after the machine has been switched off for at least 2 hours and has cooled down completely. The decalcifying program is started with the machine switched off. The running decalcifying program must not be interrupted.
- Switch off machine by pressing button ② and let the machine cool down for 2 hours.
Then remove water tank.
Press button for about 3 seconds. Warning lamps, light up. - Pour 0,5 litres of water into a container and completely dissolve the contents of a blister pack (2 tablets). Then fill the mixture into the water tank.
- Empty drip tray and replace it. Warning lamps , , , flash and warning lamp lights up.
- Place a sufficiently big container under the pivoting nozzle (13).
Turn selector switch for hot-water/steam (12) to position
The flashing of warning lamp indicates that the decalcifying program is activated.
If warning lamp lights up, empty drip tray (if necessary). Warning lamps flash and warning lamp lights up.
Turn selector switch for hot-water/steam (12) back to position
The decalcifying program is continued and the decalcifying solution is channelled inside the machine to the drip tray.
Warning lamp flashes and warning lamps, light up.
Important: Fill water tank with fresh water and replace it.
- Empty drip tray (if necessary) and replace it. Warning lamps, flash and warning lamp lights up.
Put a sufficiently big container under the pivoting nozzle (13). Turn selector switch for hot-water/steam (12) to position Warning lamps flash.
The decalcifying program is continued.
Warning lamp flashes and warning lamps light up.
- Empty drip tray (if necessary) and replace it. Warning lamps , , , flash and warning lamp lights up.
- Turn selector switch for hot-water/steam (12) back to position 🇪. Warning lamps 🇪, 🇭 flash.
The decalcifying program is continued and the decalcifying solution is channelled inside the machine to the drip tray.
Warning lamp flashes, warning lamps light up.
Empty drip tray and replace it.
- Then press button. Your machine rinses and is ready to draw off coffee.
14. Disposal
For correct disposal, you should return your coffee machine to your dealer, Jura service centre or Jura Elektroapparate AG.
15. Tips for a perfect coffee
Height adjustable coffee-spout
You can adjust the height of the coffee-spout to your cup sizes.
Grinding
Please see chapter 3.5.
Pre-warm cups
You should warm cups in advance with hot water or steam. The smaller the quantity of coffee, the more important warming the cups is.
Sugar an cream
Warmth is lost by stirring the contents of the cup. Adding milk or cream from the refrigerator considerably lowers the temperature of the coffee.
16. Messages
| Display | Cause | Action |
| System empty | Fill the system (see chapter 4.1) | |
| System too hot after drawing off steam | Re-set to coffee ready | |
| Selector switch in wrong position | Re-set to correct position | |
| General troubles | 1. - Switch off - Disconnect from mains power - Connect machine to mains power - Switch on machine 2. Have the machine checked at a Jura service centre | |
| Machine needs rinsing | Rinsing the machine | |
| Water tank empty | Fill water tank | |
| Float faulty | Rinse out tank, descalcify tank if necessary | |
| Grounds container full | Empty grounds | |
| Drawer replaced too early | Wait at least 10 seconds and replace drawer | |
| Drip tray not inserted properly or missing | Replace correctly | |
| Cleaning necessary | Run cleaning program | |
| Decalcifying necessary | Run decalcifying program |
17. Problems
| Problem | Cause | Action |
| Coffee flow is stopped after pre-brewing | - Beans container is empty | - Fill in beans |
| - Not enough coffee powder | - Measure powder correctly | |
| Grinder is extremely noisy | - Alien element in grinder | - Drawing off powder coffee is still possible |
| - Have the machine checked at a Jura service centre | ||
| Not enough froth | - Unsuitable milk-type | - Use full cream milk |
| - Frothing nozzle blocked | - Clean frothing nozzle | |
| - Frothing nozzle in wrong | - Drawing off steam (see chapter 8) |
If none of the remedies listed above help, please contact your dealer or get in touch with Jura Elektroapparate AG.
18. Legal information
These operating instructions contain all the information necessary for the correct use, operation and maintenance of your espresso/ coffee machine.
Understanding and complying with the directions contained in these operating instructions are essential to ensure that the machine is utilised without risk and to ensure safety during operation and maintenance.
These operating instructions cannot cover all the possible ways in which this machine may be used. This machine has been designed for private use in households.
We would further point out that the contents of these operating instructions in no way constitute a part of, or alter, any previous or existing contract, agreement or legal relationship. All obligations on the part of Jura Elektroapparate AG result solely from the relevant sales agreement which also contains full details of the only warranty terms valid in respect of this machine. The contractual terms of this warranty are neither extended nor limited in any form by the information in these operating instructions.
These operating instructions contain information that is protected by copyright. The photocopying or translation into any other language of these instructions without prior written authorisation from Jura Elektroapparate AG is strictly prohibited.
19. Technical specifications
Voltage: 230 V AC
Power consumption: 1350 W
Fuse: 10 A
Volume of water tank: 1,9 litre
Weight: 8,3 kg
Dimensions (WxHxD): 28 × 34,5 × 41,5 ~cm
Safety standards:

- Instructions for use Jura Impressa E50/E55
- Contents
- Jura Impressa E50/E55
- Important information for the user
- Meaning of symbols in the display
- 1.Description
- Safety instructions
- 2.1Warnings
- Safety precautions
- Check before use
- Checking mains voltage
- Checking fuse
- Filling water tank
- Adding coffee beans
- Adjusting grinder
- Adjusting for water hardness
- Level 0 = Setting for Claris filter cartridges Display
- Level 1
- Level 2
- Level 3
- Level 4
- Adjustable automatic close-down
- 1st Level
- 2nd Level
- 3rd Level
- Preparing machine
- Filling the system with water
- Rinsing the machine
- Adjusting water volume
- Drawing off espresso/normal coffee
- Drawing off espresso/strong coffee
- Drawing off espresso/extra-strong coffee
- Using pre-ground powder coffee
- Using steam
- Resetting to stand-by status
- Drawing off hot-water
- Switching off machine
- Care and maintenance
- Fill water
- Empty grounds container
- Drip tray is missing
- Clean machine
- Machine furred
- Use of Claris filter cartridges
- General cleaning instructions
- Regular servicing
- Empty system
- Cleaning
- Decalcifying
- Disposal
- Tips for a perfect coffee
- Grinding
- Pre-warm cups
- Sugar an cream
- Messages
- Problems
- Legal information
- Technical specifications
Brand : JURA
Model : IMPRESSA E50
Category : Coffee machine