
GS60GVSX - Dishwasher AEG - Free user manual and instructions
Find the device manual for free GS60GVSX AEG in PDF.


| Product type | Fully integrated dishwasher |
| Place setting capacity | 13 standard place settings |
| Width | 60 cm |
| Height | 82 cm |
| Depth | 55 cm |
| Weight | Approximately 45 kg |
| Power supply | 220-240 V, 50 Hz |
| Noise level | 44 dB(A) re 1 pW |
| Energy efficiency class | A++ (EU energy label) |
| Drying performance | AutoOpen drying system |
| Number of programs | 8 wash programs |
| Main programs | Eco, Intensive, Normal, Quick, Glass, Silent, Auto, Soak |
| Display type | Full LED display with time remaining |
| Adjustable racks | Height-adjustable upper basket, foldable tines |
| Water consumption per cycle | 9.5 liters (Eco program) |
| Annual energy consumption | 266 kWh per 280 cycles |
| Electrical rating | 10 A fuse |
| Water connection | Cold water only, max 60 °C |
| Cleaning maintenance | Self-cleaning filter system, removable spray arms |
| Safety systems | Child lock, overflow protection, anti-flood device |
| Spare parts availability | Repairability rating 7.2/10, spare parts available for 10 years |
Frequently Asked Questions - GS60GVSX AEG
User questions about GS60GVSX AEG
0 question about this device. Answer the ones you know or ask your own.
Ask a new question about this device
Download the instructions for your Dishwasher in PDF format for free! Find your manual GS60GVSX - AEG and take your electronic device back in hand. On this page are published all the documents necessary for the use of your device. GS60GVSX by AEG.
USER MANUAL GS60GVSX AEG


Welcome to AEG! Thank you for choosing our appliance.

Get usage advice, brochures, troubleshooting, service and repair information: www.aeg.com/support
Subject to change without notice.
CONTENTS
- SAFETY INFORMATION......3
- SAFETY INSTRUCTIONS.... 5
- PRODUCT DESCRIPTION .... 7
- CONTROL PANEL....7
- PROGRAMMES AND OPTIONS....8
- SETTINGS....9
- BEFORE FIRST USE....11
- LOADING THE DISHWASHER....13
- DAILY USE....17
- HINTS AND TIPS.... 18
- CARE AND CLEANING.... 19
- TROUBLESHOOTING 22
- TECHNICAL DATA.... 25
- GUARANTEE 25
- ENVIRONMENTAL CONCERNS......26
1. ⚠ SAFETY INFORMATION
Before the installation and use of the appliance read the supplied instructions carefully. The manufacturer is not responsible for any injuries or damage that result from incorrect installation or usage. Always keep the instructions in a safe and accessible location for future reference.
1.1 Children and vulnerable people safety
- This appliance can be used by children aged from 8 years and above and persons with reduced physical, sensory or mental capabilities or lack of experience and knowledge if they have been given supervision or instruction concerning the use of the appliance in a safe way and understand the hazards involved. Children of less than 8 years of age and persons with very extensive and complex disabilities shall
be kept away from the appliance unless continuously supervised.
- Children should be supervised to ensure that they do not play with the appliance.
- Keep detergents away from children.
- Keep children and pets away from the appliance when the door is open.
- Children shall not carry out cleaning and user maintenance of the appliance without supervision.
1.2 General Safety
- This appliance is for cleaning household-type dishes and tableware only.
- This appliance is designed for single household domestic use in an indoor environment.
- This appliance may be used in offices, hotel guest rooms, bed & breakfast guest rooms, farm guest houses and other similar accommodation where such use does not exceed (average) domestic usage levels.
- Do not change the specification of this appliance.
- The operating water pressure (minimum and maximum) must be between 0.05 (0.5) / 1 (10) MPa (bar).
- Follow the maximum number of 15 place settings.
- The appliance door should not be left in an open position to avoid the tripping hazard.
- If the supply cord is damaged, it must be replaced by the manufacturer, its Authorised Service Centre or similarly qualified persons in order to avoid a hazard.
- WARNING: Knives and other utensils with sharp points must be loaded in the basket with their points down or placed in a horizontal position.
- Before any maintenance operation, deactivate the appliance and disconnect the mains plug from the socket.
-
Do not use high pressure water sprays and/or steam to clean the appliance.
-
If the appliance has ventilation openings in the base, they must not be covered e.g. by a carpet.
- The appliance is to be connected to the water mains using the new supplied hose-sets. Old hose sets must not be reused.
2. SAFETY INSTRUCTIONS
2.1 Installation

WARNING!
Only a qualified person must install this appliance.
- Remove all the packaging.
- Do not install or use a damaged appliance.
- Follow the supplied installation instructions.
- Be careful when moving the appliance, as it is heavy. Use safety gloves and enclosed footwear.
- Do not install or use the appliance in temperatures below 0°C.
• Install the appliance in a safe and suitable place that meets installation requirements. - Do not use the appliance before installing it in the built-in structure due to safety manner.
- If the furniture panel is not installed, the door may close unexpectedly. Open the appliance door carefully to avoid the risk of injury. After installation, make sure the plastic covers are locked in position. Damage or removal of the plastic covers on the sides of the door may impact the functionality of the appliance and may cause an injury. If the plastic cover is damaged, contact the Authorized Service Centre for replacement.
2.2 Electrical connection

WARNING!
Risk of fire and electric shock.
- WARNING: This appliance is designed to be installed / connected to a grounding connection in the building.
- Ensure the rating plate parameters are compatible with the mains power supply.
• Always use a correctly installed shockproof socket. - Do not use multi-plug adapters and extension cables.
- Do not use other types of adapters that are not certified for this purpose.
- Prevent damage to the mains plug and mains cable. If a replacement is required, contact our Authorized Service Centre.
- Connect the mains plug to the socket only at the end of installation, and ensure access to the mains plug.
- Do not disconnect the appliance by pulling on the mains cable. Always pull on the mains plug.
2.3 Water connection

WARNING!
Risk of electric shock.
- Do not cause damage to the water hoses.
- Before connecting to new pipes, pipes unused for a long time, after repairs or installation of new devices (e.g. water meters), let the water run until it is clear.
- Check for water leaks during and after the first use.
- If the water inlet hose is damaged, immediately close the water tap and disconnect the mains plug from the mains socket. Contact the Authorised Service Centre to replace the water inlet hose.
- Electrical power loss deactivates the water protection system, increasing the risk of flooding.
- The water inlet hose has a safety valve and a sheath with an inner mains cable.
2.4 Use
- Keep flammable products or items wet with flammable products away from the appliance.
- Dishwasher detergents are dangerous. Follow the safety instructions on the detergent packaging.
- Do not drink or play with the water in the appliance.
- Wait until the program ends to remove dishes, as detergent may remain on dishes.
- Do not store items or apply pressure on the open door of the appliance.
- The appliance can release hot steam if you open the door while a programme operates.
2.5 Internal lighting

WARNING!
Risk of injury.
- This appliance has an internal lamp that turns on when you open the door or switch the appliance on while the door is open. The lamp turns off when you close the door, switch the appliance off, or automatically after some time.
• To replace the internal lighting, contact the Authorised Service Centre.
2.6 Service
• To repair the appliance contact the Authorised Service Centre. Use original spare parts only.
- Self-repair or non-professional repair can be unsafe and may void the guarantee.
- The following spare parts are available for at least 7 years after the model has been discontinued: motor, circulation and drain
pump, heaters and heating elements, including heat pumps, piping and related equipment including hoses, valves, filters and aquastops, structural and interior parts related to door assemblies, printed circuit boards, electronic displays, pressure switches, thermostats and sensors, software and firmware including reset software. The following spare parts are available for at least 10 years after the model has been discontinued: door hinge and seals, other seals, spray arms, drain filters, interior racks and plastic peripherals such as baskets and lids. The duration may be longer in your country. For further information, please visit our website.
- Some spare parts are only available for professional repairers and may not be relevant for the model.
- Concerning the lamp(s) inside this product and spare part lamps sold separately: These lamps are intended to withstand extreme physical conditions in household appliances, such as temperature, vibration, humidity, or are intended to signal information about the operational status of the appliance. They are not intended to be used in other applications and are not suitable for household room illumination.
2.7 Disposal

WARNING!
Risk of injury or suffocation.
- Disconnect the appliance from the mains supply.
- Cut off the mains cable and discard it.
- Remove the door catch to prevent children and pets to get closed in the appliance.
3. PRODUCT DESCRIPTION

1 Ceiling spray arm
2 Basket height adjusters
3 Upper spray arm
4 Lower spray arm
5 Filters
6 Rating plate
7 Salt container
8 Rinse aid dispenser
9 Detergent dispenser
10 Lower basket
11 Upper basket
12 Cutlery drawer
3.1 TimeOnFloor
The function displays the following information on the floor below the appliance door:
- The remaining time once the programme begins.
- 0:00 and CLEAN when the programme is completed.
- DELAY and the countdown when the delayed start begins.
- An error code when the appliance malfunctions.

When AirDry function opens the door, TimeOnFloor function is off. To check the remaining time of the running programme, check the control panel display.
4. CONTROL PANEL
![graph LR 1["Reset 3s"] --> 2["Delay"] 2 --> 3["Block with '3'"] 3 --> 4["My Time"] 4 --> 5["Quick hold 3s"] 4 --> 6["ECO"] 6 --> 7["AUTO hold 3s"] 7 --> 8["Zone Clean"] 8 --> 9["Glass Care"] 9 --> 10["Extra Silent"]](/content/2026/08/1631200/images/2f24439fe7d1a3876d433f5c4d467e10b234f567b3b97b078484c9f708f86205.jpg)
1 On/Off button / Reset button
2 Delay start button
3 Display
4 My Time programme selection bar
5 AUTO programme button / MachineCare programme button
6 Programme option buttons
4.1 Indicators on the display

Energy metre indicates the level of energy efficiency of the selected programme and option. The more segments are on, the lower the consumption is. It is off with Quick, Rinse&Hold, and MachineCare programmes.
ECO It is on when you select ECO programme. Refer to "Programmes and options" chapter.
| It is on when the rinse aid dispenser needs refilling. Refer to "Before first use" chapter. | |
| It is on when the salt container needs refilling. Refer to "Before first use" chapter. | |
| It is on when you select a programme with the drying phase. Refer to "Programmes and options" chapter. | |
| It is on when you select a programme without the drying phase. Refer to "Programmes and options" chapter. | |
| It is on when you select Rinse&Hold programme. Refer to "Programmes and options" chapter. | |
| It is on when you need to run MachineCare programme and when you start it. Refer to "Care and cleaning" chapter. |
5. PROGRAMMES AND OPTIONS
5.1 Dishwashing programmes
![graph TD A["Quick"] --> B["A"] C["ECO"] --> D["B"] E["My Time"] --> F["C"]](/content/2026/08/1631200/images/c0745e03cacd4e6488d9a9b21bea394575e83e2b01cde61ce25c4c5d97b704fd.jpg)
Quick
For crockery and cutlery with fresh soil. Phases: dishwashing at 60° C, rinse at 50° C, AirDry. The programme does not include the drying phase or the release of rinse aid. Leave the items in the dishwasher with the door open to allow air drying.
A. 1 h 00 m
For crockery and cutlery with fresh, lightly dried-on soil. Phases: dishwashing at 65° C, intermediate rinse, final rinse at 55° C, drying, AirDry.
B. 1 h 30 m
For crockery, cutlery, pots, and pans with normal, lightly dried-on soil. Phases: dishwashing at 65°C, intermediate rinse, final rinse at 60°C, drying, AirDry.
C. 2 h 00 m
For crockery, cutlery, pots, and pans with normal, dried-on soil. Phases: dishwashing at 65°C, intermediate rinse, final rinse at 55°C, drying, AirDry.
ECO
This programme offers the most efficient use of water and energy consumption for crockery, cutlery, pots, and pans with normal soil. Phases: prewash, dishwashing at 50°C, intermediate rinse, final rinse at 40°C, drying, AirDry. This is the standard programme for test institutes. This programme is used to assess compliance with the Ecodesign Commission Regulation (EU) 2019/2022.
AUTO
For crockery, cutlery, pots, and pans with all degrees of soil. Phases: prewash, dishwashing at 55°C, intermediate rinse, final rinse at 55-60°C, drying, AirDry, This smart cycle senses the load size and soil level. It automatically adjusts the dishwashing temperature, duration, and water quantity for optimal cleaning and drying results.
5.2 Programme options
ZoneClean
The option creates two cleaning zones. The lower basket applies maximum water pressure to deep clean pots and pans. The upper basket uses gentle pressure to clean
delicate items. The option does not impact water and energy consumption. Applicable to Quick, 1h00m, 1h30m, 2h00m programmes.
GlassCare
The option protects delicate items, especially glassware, by preventing rapid temperature changes. The option limits the dishwashing temperature to 45° C to ensure gentle yet effective cleaning. Applicable to Quick, 1h00m, 1h30m, 2h00m programmes.
ExtraSilent
The option reduces the speed of the wash pump to minimize the noise generated by the appliance. The dishwashing duration is extended to maintain cleaning effectiveness. Applicable to 1h30m, 2h00m, ECO programmes.
5.3 Special programmes

Rinse&Hold
The programme refreshes dishes that will be washed later. Do not use detergent with this programme. Refer to "Daily use" chapter.

MachineCare
The programme cleans the appliance interior at 65° C, effectively removing limescale and grease buildup to maintain long-lasting performance. Refer to "Care and cleaning" chapter.
5.4 Consumption values
A - programme, B - water (l), C - energy (kWh), D - duration (min).
A B C D
| Quick 8.5 0.475 30 |
| Rinse&Hold 4.0 0.150 15 |
| 1h00m 10.5 1.000 60 |
| 1h30m 10.5 1.000 90 |
| 2h00m 10.5 0.900 120 |
| ECO 8.4 0.550 270 |
| AUTO 12.5 1.000 180 |
| MachineCare 10.0 0.575 60 |
The pressure and the temperature of the water, the variations of the mains supply, the options, the quantity of dishes and the degree of soil can change the values.
The values for programmes other than ECO are indicative only.
5.5 Information for comparative tests
To receive the necessary information for conducting performance tests (e.g. according to: EN60436), send an email to:
info.test@dishwasher-production.com
In your request, include the product number code (PNC) from the rating plate.
For any other questions regarding your dishwasher, refer to the service book provided with your appliance.
6. SETTINGS
6.1 Settings overview
Names in brackets correspond to how the dishwasher displays the settings in setting mode.
Water hardness (HAr)
Set the water softener level (1–10) based on the water hardness. Default: 5. 1)
Rinse aid level (rA)
Adjust the rinse aid level (0–8). Default: 8. 1)
End sound (ES)
Select On to activate or Off to deactivate the acoustic signal for the end of a programme. Default: Off.
Auto door open (Ado)
Select On to activate or Off to deactivate AirDry function. Default: On. 1)
Key tones (to)
Select On to activate or Off to deactivate the button sound when pressed. Default: On.
Push2Open (P2o)
Select On to activate or Off to deactivate opening the door with a push. Default: On.
TimeOnFloor (toF)
Select On to activate or Off to deactivate TimeOnFloor function. Default: On.
Hour usage (Hu)
Check the total hours of dishwasher usage. The counter stops at 65535.
PNC number (Pnc)
Check the PNC number of your appliance. Provide the number when you contact an Authorised Service Centre.
Reset settings (rS)
Select Yes to reset the appliance to factory settings. The setting does not reset the hour usage. Select No to exit.
6.2 Setting mode
How to enter setting mode
You can enter setting mode before starting a programme. You cannot enter setting mode while the programme is running.
Press and hold simultaneously ECO and AUTO for about 3 seconds.
The display shows the first setting: HAr.
How to navigate in setting mode
Use My Time selection bar to navigate in setting mode.
![graph TD A["Quick"] --> B["A"] A --> C["B"] A --> D["C"] E["My Time"] --> F["ECO"] G["hold 3s"] --> H["A"] G --> I["B"] G --> J["C"]](/content/2026/08/1631200/images/3dcfb3296e9872bbd96df24533b6d4127579f6647f50325a3a5ee39672d56c1e.jpg)
A. Previous button
B. OK button
C. Next button
Use Previous and Next to switch between the settings and to change their value. Use OK to enter the setting and to confirm changing its value.
How to change a setting
Make sure the appliance is in setting mode.
-
Press Previous or Next to select a setting. The display shows the setting name.
-
Press OK to enter the setting. The current setting value flashes.
-
Press Previous or Next to change the value.
-
Press OK to confirm the setting.
The setting is saved. The appliance returns to the settings list.
- To exit setting mode, press and hold simultaneously ECO and AUTO for about 3 seconds.
The appliance returns to the programme selection.
The saved settings remain valid until you change them again.
i
The appliance exits setting mode if no button is pressed for 10 seconds.
6.3 Water softener
The water softener removes minerals from the water supply, which would have a negative effect on the washing results and on the appliance.
The higher the content of these minerals, the harder your water is. Water hardness is measured in equivalent scales.
The water softener level should be adjusted according to the water hardness of your water supply. The adjustment is necessary regardless of the detergent type used to ensure good dishwashing results and to keep the salt indicator active. Your local water authority can advise you on the water hardness in your area.
i
Multi-tabs with a softening agent have limited effectiveness in softening water. Refer to the product packaging.
Water hardness
| °dH °fH mmol | /1 | mg/l (ppm) | °Clar k | L1) | |
| 47 | 84 | 8.4 | 835 | 58 | 10 |
| -50 | -90 | -9.0 | -904 | -63 | |
| 43 | 76 | 7.6 | 755 | 53 | 9 |
| -46 | -83 | -8.3 | -834 | -57 | |
| 37 | 65 | 6.5 | 645 | 46 | 8 |
| -42 | -75 | -7.5 | -754 | -52 | |
| 29 | 51 | 5.1 | 505 | 36 | 7 |
| -36 | -64 | -6.4 | -644 | -45 | |
| 23 | 40 | 4.0 | 395 | 28 | 6 |
| -28 | -50 | -5.0 | -504 | -35 | |
| 19 | 33 | 3.3 | 325 | 23 | 5 |
| -22 | -39 | -3.9 | -394 | -27 | |
| 15 | 26 | 2.6 | 255 | 18 | 4 |
| -18 | -32 | -3.2 | -324 | -22 | |
| 11 | 19 | 1.9 | 185 | 13 | 3 |
| -14 | -25 | -2.5 | -254 | -17 | |
| 4 | 7 | 0.7 | 70 | 5 | 2 |
| -10 | -18 | -1.8 | -184 | -12 | |
| <4 <7 <0.7 <70 < 5 1 | |||||
1) Water softener level
The water softener undergoes an automatic regeneration process. 2)
6.4 Rinse aid level
Rinse aid improves the drying results. It is automatically released during the hot rinse phase. You can set the released quantity of rinse aid.
When the rinse aid dispenser is empty, indicator is on, notifying to refill the rinse aid. If the drying results are satisfactory while using multi-tablets only, you can deactivate the dispenser and the indicator. However, for the best drying performance, always use rinse aid and keep the rinse aid indicator active.
To deactivate the rinse aid dispenser and indicator, set the level of rinse aid to 0.
6.5 AirDry
AirDry improves the drying results with low energy use. The appliance door opens automatically during the drying phase and remains ajar. Deactivating the function may reduce the drying performance.
AirDry is automatically activated with all programmes except 🌿
When the door opens, the display shows the remaining time of the running programme.
The duration of the drying phase and the door opening time vary depending on the selected programme and option.
CAUTION!
Do not try to close the appliance door within 2 minutes after automatic opening. This can cause damage to the appliance.
7. BEFORE FIRST USE
- Press and hold the on/off button until the appliance activates.
- Adjust the water softener level to the water hardness.
- Fill the salt container.
-
Fill the rinse aid dispenser.
-
Fill the detergent dispenser.
- Open the water tap.
- Start Quick programme to remove any residues from the manufacturing process. Do not put dishes in the baskets.
After starting the programme, the appliance recharges the resin in the water softener for up to 5 minutes. The washing phase starts only after this procedure is completed. The procedure is repeated periodically.
7.1 The salt container

CAUTION!
Use only regeneration salt for dishwashers. Do not use kitchen salt.
The salt is used to recharge the resin in the water softener and to assure good washing results in daily use.
How to fill the salt container
- Turn the cap of the salt container counterclockwise and remove it.
- Pour 1 l of water in the salt container (only if filling it for the first time).
- Using the supplied funnel, fill the salt container with 1 kg of dishwasher salt.

-
Carefully shake the funnel by its handle to get the last granules inside.
-
Remove the salt around the opening of the salt container.

- Turn the cap clockwise to close the salt container.

IMPORTANT
Water and salt can come out of the salt container when you fill it. To prevent corrosion, fill the salt container and then immediately start a complete dishwashing cycle with detergent.
7.2 How to fill the rinse aid dispenser


CAUTION!
The compartment (C) is for rinse aid only. Do not fill it with detergent.

CAUTION!
Only use rinse aid intended for dishwashers.
- Press the release element (A) to open the lid (B).
- Pour the rinse aid in the dispenser (C) until the liquid reaches the "FILL" marking.
- Remove the spilled rinse aid with an absorbent cloth to prevent excessive foam formation.
- Close the lid. Make sure that the lid locks into position.
7.3 How to fill the detergent dispenser


CAUTION!
Only use detergent intended for dishwashers.
- Press the release button (B) to open the lid (C).
-
Put the detergent in the compartment (A). Do not exceed the "40 max" marking. You can use detergent in tablets, powder or gel.
-
If the programme includes a prewash phase, put up to 5 g of detergent on the inner part of the dishwasher door.
-
Close the lid. Make sure that the lid locks into position.
For information about the detergent dosage, refer to the manufacturer's instructions on the packaging of the product. Usually, 20 - 25 ml of gel detergent or up to 18 g of powder detergent is adequate for washing a load with normal soil.
8. LOADING THE DISHWASHER
- For best cleaning results, arrange items in the baskets as instructed in the user manual.
- Load the dishwasher to its full capacity to save water and energy.
- Do not overload the baskets to ensure the dishwasher operates efficiently.
- Make sure that items in the baskets do not touch or cover each other. Only then can the water completely reach and wash the dishes.
- Use the appliance to wash dishwasher-safe items only.
- Do not wash the following materials in the dishwasher: wood, horn, pewter, copper, aluminium, delicate ornamented porcelain and unprotected carbon steel. This can cause them to crack, warp, discolour, pit or rust.
- Do not wash in the appliance items that can absorb water (sponges, household cloths).
- Put hollow items (cups, glasses and pans) with the opening facing downwards to allows water to drain out.
• Make sure that glass items do not touch each other.
- Put light items in the upper basket. Make sure that the items do not move freely.
- Put cutlery and small items in the cutlery drawer.
• Make sure that the spray arms can move freely before you start a programme. - Adjust the height of the upper basket to fit large dishes.
8.1 How to adjust the height of the upper basket


CAUTION!
Do not lift or lower the basket on one side only.
How to lift the upper basket
- Pull out the basket until it stops.
- Lift the basket on both sides until the mechanism locks into place and the basket is stable.
Make sure the basket remains level after adjustment.
How to lower the upper basket
- Pull out the basket until it stops.
- Slightly lift the basket on both sides, then push it down and allow to drop down.
8.2 Dishwasher basket features
Included accessories may vary depending on your dishwasher model.
Lower basket
The number of foldable tines may vary depending on your dishwasher model. Folding the front tines reveals shorter tines for supporting bowls.

The basket includes holders with anti-slip rubber grips for stemware and beer glasses.

Fold the holders and release the oven tray supports.

Upper basket
The number of foldable tines may vary depending on your dishwasher model. The shelves for holding cups can be folded down to make space for tall dishes.

The cup shelves have soft grips to hold glassware, while rubber spikes ensure stability.

Cutlery drawer
Use the drawer for cutlery and small items. The drawer includes foldable knife holders.

How to remove accessories
Cup shelves and rubber spikes can be temporarily removed to accommodate cumbersome items.

Holders can be removed if more space is needed in the lower basket.

Knife holders can be temporarily removed if needed.

Maximum dish heights (mm)


8.3 Dishwasher loading examples Lower basket

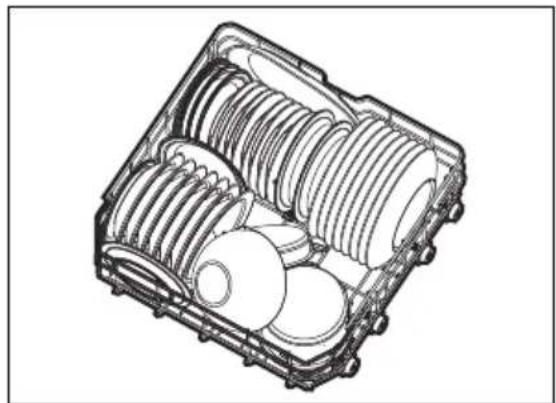
Upper basket


Cutlery drawer

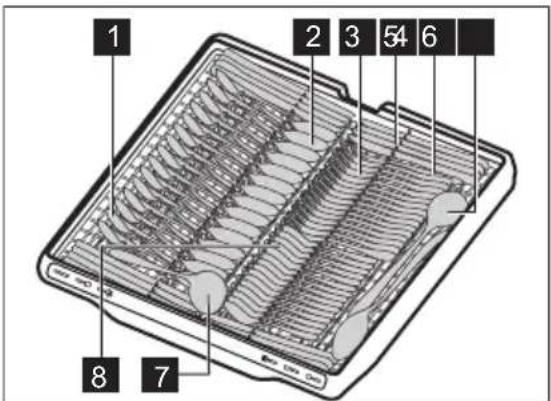
1 Tea spoon (15 pieces)
2 Soup spoon (15 pieces)
3 Fork (15 pieces)
4 Knife (15 pieces)
5 Serving fork (1 piece)
6 Serving spoon (2 pieces)
7 Gravy ladle (1 piece)
8 Dessert spoon (15 pieces)
9. DAILY USE
- Open the water tap.
- Press and hold the on/off button until the appliance activates.
- Fill the salt container if indicator is on.
- Fill the rinse aid dispenser if indicator is on.
- Load the baskets.
- Fill the detergent dispenser.
- Select and start a programme.
- Close the water tap when the programme is completed.
9.1 How to start a programme from My Time selection bar
- Slide your finger across My Time selection bar to choose a programme.
The light related to the programme is on.
-
Activate a programme option if desired.
-
Close the appliance door to start the programme.
9.2 How to start Rinse&Hold programme
- Press and hold Quick for about 3 seconds.
indicator is on.
- Close the appliance door to start the programme.
9.3 How to start AUTO programme
- Press AUTO.
The light related to the button is on. The display shows the longest possible programme duration.
- Close the appliance door to start the programme.
Sensors operate several times during the cycle and the initial programme duration can decrease.
9.4 How to activate a programme option
Only one option can be activated at a time. Activate the option before starting a programme. You cannot activate or deactivate the option while a programme is running.
- Select a programme from My Time selection bar.
- Press the option button.
The light related to the button is on. If the option is not applicable, the light related to the button flashes and a tone sounds.
i
Activating an option often increases water consumption, energy consumption, and programme duration.
9.5 How to delay the start of a programme
- Select a programme.
- Press Delay repeatedly until the display shows the desired delay time (from 1 to 24 hours).
The light related to the button is on. - Close the appliance door to start the countdown.
During the countdown, you cannot change the delay time, programme, or option.
When the countdown is completed, the programme starts.
9.6 How to cancel the delayed start of a programme
Press and hold Ⓛ for about 3 seconds.
The appliance returns to the programme selection.
Select a programme again.
9.7 How to cancel a running programme
Press and hold for about 3 seconds. The appliance returns to the programme selection.
i
Make sure that there is detergent in the detergent dispenser before you start a new programme.
9.8 Opening the door while the appliance operates
Opening the door while a programme is running pauses the dishwashing cycle. The display shows the remaining time of the programme. After closing the door, the dishwashing cycle resumes from the point of interruption.
If you open the door during the delayed start countdown, the countdown is paused. The display shows the current countdown status. After closing the door, the countdown resumes.
i
Opening the door while the appliance operates may affect the energy consumption and programme duration.
9.9 End of the programme
When the programme is completed, the dishwasher automatically deactivates.
All buttons are inactive except for the on/off button.
9.10 Automatic switch-off
The function saves energy by switching the appliance off when it is not operating. The function comes into operation automatically:
- When the programme is completed.
• After 10 minutes if no programme was started and no button was pressed.
10. HINTS AND TIPS
10.1 General
Follow the hints to ensure optimal cleaning and drying results in daily use, and to protect the environment.
- Washing dishes in the dishwasher, as instructed in the user manual, usually consumes less water and energy than washing dishes by hand.
- Do not pre-rinse dishes by hand. It increases the water and energy consumption. When needed, select a programme with a prewash phase.
- Remove larger residues of food from the dishes, and empty cups and glasses before putting them inside the appliance.
- Select a programme according to the type of load and the degree of soil.
- To prevent limescale buildup inside the appliance:
- Refill the salt container whenever necessary.
– Use the recommended dosage of the detergent and rinse aid. - Make sure that the current level of the water softener agrees with the hardness of the water supply.
– Follow the instructions in "Care and cleaning" chapter.
10.2 Using salt, rinse aid and detergent
- Only use salt, rinse aid and detergent designed for dishwasher. Other products can cause damage to the appliance.
- In areas with hard and very hard water, we recommend to use basic dishwasher detergent (powder, gel, tablets containing no additional agents), rinse aid and salt separately for optimal cleaning and drying results.
- Multi-tabs may not fully dissolve during short programmes, which can lead to detergent residues on the dishes. Refer to the product packaging. Use tablets with longer programmes.
- Always use the correct quantity of detergent. Insufficient dosage of detergent can result in poor cleaning results and hard-water filming or spotting on the items. Using too much detergent with soft or softened water results in detergent residues on the dishes. Refer to the instructions on the detergent packaging.
- Always use the correct quantity of rinse aid. Insufficient dosage of rinse aid decreases the drying results. Using too much rinse aid results in bluish layers on
the items. To adjust the rinse aid level, refer to "Settings" chapter.
- Make sure that the water softener level is correct. If the level is set too high, the water becomes overly soft, which can cause glass corrosion. To adjust the water softener level, refer to "Settings" chapter.
10.3 What to do if you want to stop using multi-tablets
Before you start using separately detergent, salt and rinse aid, complete the following steps:
- Set the highest level of the water softener.
- Make sure that the salt and rinse aid containers are full.
- Start Quick programme. Do not add detergent and do not put dishes in the baskets.
- When the programme is completed, adjust the water softener according to the water hardness in your area.
- Adjust the released quantity of rinse aid.
10.4 Before starting a programme
Before you start the selected programme, make sure that:
- The filters are clean and correctly installed.
- The cap of the salt container is tight.
- The spray arms are not clogged.
• There is enough salt and rinse aid. - The arrangement of the items in the baskets is correct.
- The programme is suitable to the type of load and the degree of soil.
- The correct quantity of detergent is used.
10.5 Unloading the baskets
- Let the tableware cool down before you remove it from the appliance. Hot items can be easily damaged.
- First remove items from the lower basket, then from the upper basket.
i
After the programme is completed, water can still remain on the inside surfaces of the appliance.
11. CARE AND CLEANING

IMPORTANT
Before any maintenance other than running programme, deactivate the appliance and disconnect the mains plug from the main socket.
Dirty filters and clogged spray arms negatively affect the washing results.
The filters are self-cleaning and do not require cleaning after each use. Clean the filters once a week. Clean the spray arms every two months, or sooner if you notice food residues on dishes after the programme is complete. The frequency of cleaning might vary depending on how often the appliance is used.
11.1 How to start MachineCare programme
Before starting the programme, clean the filters and spray arms as instructed later in this chapter.
-
Use a descaler or a cleaning product designed specifically for dishwashers. Follow the instructions on the packaging. Do not put dishes in the baskets.
-
Press and hold AUTO for about 3 seconds.
indicator is on.
- Close the appliance door to start the programme.
When the programme is completed, indicator is off.
11.2 Removal of foreign objects
Check the filters and the sump after each use of the dishwasher. Foreign objects (e.g. pieces of glass, plastic, bones or toothpicks, etc) decrease the cleaning performance and can cause damage to the drain pump.

CAUTION!
If unable to remove the foreign objects, contact an Authorised Service Centre.
- Disassemble the filters system as instructed in this chapter.
- Remove any foreign objects manually.
- Reassemble the filters as instructed in this chapter.
11.3 Cleaning the filters
The filter system is made of 3 parts.

- Turn the drain filter (C) counterclockwise and lift it. Remove the flat filter (A).

- Push the two buttons on the drain filter (C) and remove it from the fine filter (B).

- Wash the filters.
- Make sure that there are no residues of food or soil in or around the edge of the sump.
- Install the flat filter (A) back in place.
- Push the drain filter (C) into the fine filter (B).
- Insert the fine filter (B) in the flat filter (A). Turn the drain filter (C) clockwise until it locks.

CAUTION!
An incorrect position of the filters can cause bad washing results and damage to the appliance.
11.4 Internal cleaning
- Clean the appliance interior with a soft damp cloth.
- Do not use abrasive products, abrasive cleaning pads, sharp tools, strong chemicals, scourer or solvents.
- Wipe clean the door, including the rubber gasket, once a week.
- To maintain the performance of your appliance, use a cleaning product designed specifically for dishwashers at least once every two months. Carefully follow the instructions on the packaging of the product.
- For optimal cleaning results, start the programme
11.5 Cleaning the lower spray arm

- Turn the tightening nut (A) counterclockwise and pull the spray arm (B) upwards.
- Wash the spray arm under running water. Use a thin pointed tool, e.g. a toothpick, to remove soil particles from the holes.
Run water through the holes to flush out any remaining debris.
- Press the spray arm downwards and turn the tightening nut clockwise.
11.6 Cleaning the upper spray arm
-
Pull out the upper basket.
-
To detach the spray arm from the basket, turn the tightening nut (A) clockwise.

-
Wash the spray arm under running water. Use a thin pointed tool, e.g. a toothpick, to remove soil particles from the holes. Run water through the holes to flush out any remaining debris.
-
To install the spray arm back, turn the tightening nut counterclockwise until you hear a click.
11.7 Cleaning the ceiling spray arm
The ceiling spray arm is placed on the ceiling of the appliance. The spray arm (C) is installed in the delivery tube (A) with the mounting element (B).

- Release the stoppers on the sides of the sliding rails of the cutlery drawer and pull the drawer out.

-
Move the upper basket to the lowest level to reach the spray arm more easily.
-
Turn the mounting element (B) counterclockwise and pull the spray arm (C) downwards.
-
Wash the spray arm under running water. Use a thin pointed tool, e.g. a toothpick, to remove soil particles from the holes. Run water through the holes to flush out any remaining debris.
-
Insert the mounting element (B) in the spray arm (C) and fix it in the delivery tube (A) by turning it clockwise. Make sure that the mounting element locks into place.
-
Install the cutlery drawer on the sliding rails and block the stoppers.
11.8 Cleaning the inlet hose filter
-
Close the water tap.
-
Turn the fastener (A) clockwise. Disconnect the hose.

- Clean the filter of the inlet hose.

11.9 External cleaning
- Clean the appliance with a moist soft cloth.
- Only use neutral detergents.
- Do not use abrasive products, abrasive cleaning pads or solvents.
12. TROUBLESHOOTING
The majority of problems that may occur can be solved without the need to contact an Authorised Service Centre. Refer to the table for information on possible problems.
With some problems, the display shows an error code.
Once you have checked the appliance, deactivate and then activate it. If the problem persists, contact an Authorised Service Centre.

IMPORTANT
Close the water tap, unplug the appliance, and do not use it until the problem is fixed.
You cannot activate the appliance.
• Make sure that the mains plug is connected to the mains socket.
- Make sure that there is no damaged fuse in the fuse box.
The appliance door does not open when pushed.
- Push2Open function is disabled during a power outage or when the appliance is unplugged. Refer to "How to open the door manually" section later in this chapter.
The programme does not start.
- Make sure that the appliance door is closed.
- If the delayed start is set, cancel the countdown or wait for the end of the countdown.
- The appliance recharges the resin inside the water softener. The duration of the procedure is approximately 5 minutes.
or error codes. The appliance does not fill with water.
- Make sure that the water tap is open.
- Make sure that the pressure of the water supply is between 0.05 (0.5) / 1 (10) MPa
(bar). For this information, contact your local water authority.
- Make sure that the water tap is not clogged.
- Make sure that the filter in the inlet hose is not clogged. Clean the filter if necessary. Refer to "Care and cleaning" chapter.
- Make sure that the inlet hose has no kinks or bends.
20 error code. The appliance does not drain the water.
- Make sure that the sink spigot is not clogged.
- Make sure that the interior filter system is not clogged.
- Make sure that the drain hose has no kinks or bends.
23 error code. Malfunction of the drain pump.
- The drain pump cover is loose or missing. Inspect the cover. For the location of the cover, refer to the instructions on how to clean the drain pump, provided later in this chapter.
24 error code. Malfunction of the drain pump.
- The drain pump is blocked by a foreign object. Refer to "How to clean the drain pump" section later in this chapter.
28 error code. Malfunction of the drain pump.
- Close the water tap and contact an Authorised Service Centre.
30 error code. The anti-flood device is on.
- Close the water tap.
- Make sure that the appliance is correctly installed.
- Make sure the baskets are loaded as instructed in the user manual.
.51-58 error codes. Malfunction of the wash pump.
- Switch the appliance off and on.
61 or 68 error code. The temperature of the water inside the appliance is too high or malfunction of the temperature sensor occurred.
- Make sure that the temperature of the inlet water does not exceed 60°C.
- Switch the appliance off and on.
,97,98 - errorcodes.
Technical malfunction of the appliance.
- Switch the appliance off and on.
F 1 error code. The level of water inside the appliance is too high.
- Switch the appliance off and on.
• Make sure that the filters are clean. - Make sure that the outlet hose is installed at the right height above the floor. Refer to the installation instruction.
The appliance stops and starts more times during operation.
- It is normal. It provides optimal cleaning results and energy savings.
The programme lasts too long.
- If the delayed start is set, cancel the countdown or wait for the end of the countdown.
- Activating programme options increases the programme duration.
The displayed programme duration is different than the duration in the consumption values table.
- The programme duration can change due to the pressure and temperature of the water, variations in the mains supply, selected options, quantity of dishes, and degree of soil.
The remaining time in the display increases and skips nearly to the end of the programme duration.
- This is not a defect. The appliance is working correctly.
Small leak from the appliance door.
- The appliance is not levelled. Loosen or tighten the adjustable feet (if applicable).
The appliance door is difficult to close.
- The appliance is not levelled. Loosen or tighten the adjustable feet (if applicable).
- Parts of the tableware are protruding from the baskets.
The appliance door opens during the wash cycle.
- AirDry function is activated to enhance drying results while saving energy. To deactivate the function, refer to "Settings" chapter.
Rattling or knocking sounds from the inside of the appliance.
- The tableware is not properly arranged in the baskets. Refer to "Loading the dishwasher" chapter.
• Make sure that the spray arms can rotate freely.
The appliance trips the circuit breaker.
- The amperage is insufficient to supply simultaneously all the appliances in use. Check the socket amperage and the capacity of the metre or turn off one of the appliances in use.
- Internal electrical fault of the appliance. Contact an Authorised Service Centre.
The appliance is switched on but does not operate. The display shows PF..
• Power supply is out of the operating range. The dishwashing cycle is temporarily interrupted and resumes automatically once the power is restored.
The appliance switches off during operation.
- Complete power outage. The dishwashing cycle is temporarily interrupted and resumes automatically once the power is restored.
12.1 How to open the door manually
The appliance includes a tool for manual door opening. The tool is also available as a spare part.
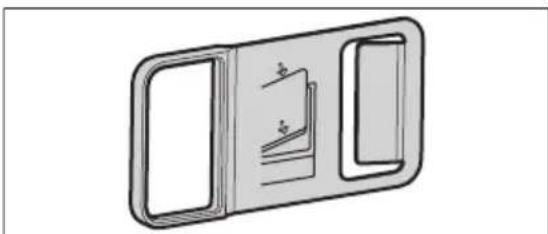
Insert the tool into the gap next to the door, then pull to open.

12.2 How to clean the drain pump

CAUTION!
Be careful when cleaning, as the drain pump may contain sharp debris, such as glass.
- Deactivate the appliance and disconnect the mains plug from the main socket.
- Remove the filter system.
- Remove any residual water with a sponge.
- Pull the plastic cover with your finger.

- Carefully remove any foreign objects.
- Insert the plastic cover back in place. Make sure it is not loose.
- Install the filter system and plug the appliance.
12.3 Dishwashing and drying results are not satisfactory
Poor dishwashing results.
• Refer to "Hints and tips" chapter.
- Use a more intensive washing programme.
- Clean spray arm jets and filters. Refer to "Care and cleaning" chapter.
- The quality of the detergent can be the cause. Try a different detergent.
Poor drying results.
• Refer to "Hints and tips" chapter.
- Tableware was left for too long inside the closed appliance. Activate AirDry function to set the automatic opening of the door and to improve the drying performance. Refer to "Settings" chapter.
- Unload the dishwasher only when the programme is completed and the display shows 0:00.
- There is no rinse aid or the dosage is not sufficient. Fill the rinse aid dispenser or set the dosage to a higher level (if applicable). To adjust the level, refer to "Settings" chapter.
• The quality of the rinse aid can be the cause. Try using a different rinse aid.
• Always use rinse aid, even with multi-tablets. - Plastic items may need to be towel dried.
- Quick programme does not have the drying phase. Select a different programme.
• Water drops from the upper basket fell on the lower basket. First unload the lower basket, and then the upper basket.
Whitish streaks on glasses and dishes.
- The quantity of detergent is too high. Reduce the quantity.
Bluish layers on glasses and dishes.
- The released quantity of rinse aid is too high. Adjust the dosage to a lower level.
Stains and dry water drops on glasses and dishes.
- The released quantity of rinse aid is not sufficient. Adjust the dosage to a higher level. Refer to "Settings" chapter.
- The quality of the rinse aid can be the cause. Try a different rinse aid.
• Refer to "Loading the dishwasher" chapter.
The interior of the appliance is wet.
- This is not a defect of the appliance. Humidity condensates on the appliance walls.
Unusual foam during washing.
- Use the detergent designed specifically for dishwashers.
- Use a detergent from a different manufacturer.
- Do not pre-rinse dishes under running water.
Traces of rust on cutlery.
- There is too much salt in the water used for washing. After filling the salt container, always remove the spilled salt.
- Rusting items and stainless steel cutlery were placed together. Do not place these items close together.
Residues of detergent in the dispenser at the end of the programme.
• Water cannot wash away the detergent from the dispenser. Make sure that the spray arms are not blocked or clogged.
- Make sure that items in the baskets do not impede the lid of the detergent dispenser from opening.
Odours inside the appliance.
• Refer to "Care and cleaning" chapter.
- Regularly use a programme with a dishwashing temperature of 65°C .
Limescale deposits on the tableware, on the tub and on the inside of the door.
- Your tap water is hard. Use salt and set regeneration of the water softener even when multi-functional tablets are used. Refer to the water softener section in "Settings" chapter.
-
The level of salt is low. If the salt indicator is on, fill the salt container.
-
The cap of the salt container is loose. Inspect the cap.
一 - Start programme with a descaler or a cleaning product designed for dishwashers.
- If limescale deposits persist, clean the appliance with the suitable detergents.
- Try a different detergent.
- Contact the detergent manufacturer.
Dull, discoloured or chipped tableware.
- Make sure that only dishwasher-safe items are washed in the appliance.
- Load and unload the basket carefully. Refer to "Loading the dishwasher" chapter.
- Place delicate items in the upper basket.
- Activate GlassCare option to ensure special care for glassware and delicate items.
Refer to "Before first use", "Loading the dishwasher", "Daily use", or "Hints and tips" chapters for other possible causes.
13. TECHNICAL DATA
| Dimensions Width / height / depth (mm) 596 / 865 - 945 / 550 | ||
| Electrical connection1) | Voltage (V) 200 - 240 | |
| Frequency (Hz) 50 - 60 | ||
| Water supply pressure Min. / max. MPa (bar) 0.05 (0.5) / 1 (10) | ||
| Water supply | Cold water or hot water (°C)2) | min. 5 - max. 60 |
| Capacity Place settings 15 | ||
1) Refer to the rating plate for other values.
2) If the hot water comes from alternative source of energy (e.g. solar panels), use the hot water supply to decrease energy consumption.
14. CH GUARANTEE
Customer Service Centres
| Point of Service | ||
| Industriestrasse 105506 Mägenwil | Le Trési 61028 Préverenges | Via Violino 116928 Manno |
Point of Service
Morgenstrasse 131 3018 Bern
Langgasse 10 9008 St. Gallen
Am Mattenhof 4a/b 6010 Kriens
Warranty For each product we provide a two-year guarantee from the date of purchase or delivery to the consumer (with a guarantee certificate, invoice or sales receipt serving as
proof). The guarantee covers the costs of materials, labour and travel. The guarantee will lapse if the operating instructions and conditions of use are not adhered to, if the product is incorrectly installed, or in the event of damage caused by external influences, force majeure, intervention by third parties or the use of non-genuine components.
15. ENVIRONMENTAL CONCERNS
Recycle materials with the symbol .Put the packaging in relevant containers to recycle it. Help protect the environment and human health by recycling waste of electrical and electronic appliances. Do not dispose of appliances marked with the symbol with the household waste. Return the product to your local recycling facility or contact your municipal office.

For Switzerland:
Where should you take your old equipment?
Anywhere that sells new equipment or hand it in to official SENS collection points or official SENS recycling firms. The list of official SENS collection points can be found at www.erecycling.ch

VORSICHT!
Oberer Korb
Besteckschublade

Upper basket


Cutlery drawer



- WELCOME TO AEG! THANK YOU FOR CHOOSING OUR APPLIANCE
- CONTENTS
- ⚠ SAFETY INFORMATION
- 1.1 CHILDREN AND VULNERABLE PEOPLE SAFETY
- 1.2 GENERAL SAFETY
- SAFETY INSTRUCTIONS
- 2.1 INSTALLATION
- WARNING
- 2.2 ELECTRICAL CONNECTION
- 2.3 WATER CONNECTION
- 2.4 USE
- 2.5 INTERNAL LIGHTING
- 2.6 SERVICE
- 2.7 DISPOSAL
- PRODUCT DESCRIPTION
- 3.1 TIMEONFLOOR
- CONTROL PANEL
- 4.1 INDICATORS ON THE DISPLAY
- PROGRAMMES AND OPTIONS
- 5.1 DISHWASHING PROGRAMMES
- QUICK
- 1 H 00 M
- 1 H 30 M
- 2 H 00 M
- ECO
- AUTO
- 5.2 PROGRAMME OPTIONS
- ZONECLEAN
- GLASSCARE
- EXTRASILENT
- 5.3 SPECIAL PROGRAMMES
- RINSE&HOLD
- MACHINECARE
- 5.4 CONSUMPTION VALUES
- 5.5 INFORMATION FOR COMPARATIVE TESTS
- INFO.TEST@DISHWASHER-PRODUCTION.COM
- SETTINGS
- 6.1 SETTINGS OVERVIEW
- WATER HARDNESS (HAR)
- RINSE AID LEVEL (RA)
- END SOUND (ES)
- AUTO DOOR OPEN (ADO)
- KEY TONES (TO)
- PUSH2OPEN (P2O)
- TIMEONFLOOR (TOF)
- HOUR USAGE (HU)
- PNC NUMBER (PNC)
- RESET SETTINGS (RS)
- 6.2 SETTING MODE
- 6.3 WATER SOFTENER
- 6.4 RINSE AID LEVEL
- 6.5 AIRDRY
- CAUTION
- BEFORE FIRST USE
- 7.1 THE SALT CONTAINER
- HOW TO FILL THE SALT CONTAINER
- IMPORTANT
- 7.2 HOW TO FILL THE RINSE AID DISPENSER
- 7.3 HOW TO FILL THE DETERGENT DISPENSER
- LOADING THE DISHWASHER
- 8.1 HOW TO ADJUST THE HEIGHT OF THE UPPER BASKET
- 8.2 DISHWASHER BASKET FEATURES
- LOWER BASKET
- UPPER BASKET
- CUTLERY DRAWER
- HOW TO REMOVE ACCESSORIES
- 8.3 DISHWASHER LOADING EXAMPLES LOWER BASKET
- DAILY USE
- 9.1 HOW TO START A PROGRAMME FROM MY TIME SELECTION BAR
- 9.2 HOW TO START RINSE&HOLD PROGRAMME
- 9.3 HOW TO START AUTO PROGRAMME
- 9.4 HOW TO ACTIVATE A PROGRAMME OPTION
- 9.5 HOW TO DELAY THE START OF A PROGRAMME
- 9.6 HOW TO CANCEL THE DELAYED START OF A PROGRAMME
- 9.7 HOW TO CANCEL A RUNNING PROGRAMME
- 9.8 OPENING THE DOOR WHILE THE APPLIANCE OPERATES
- 9.9 END OF THE PROGRAMME
- 9.10 AUTOMATIC SWITCH-OFF
- HINTS AND TIPS
- 10.1 GENERAL
- 10.2 USING SALT, RINSE AID AND DETERGENT
- 10.3 WHAT TO DO IF YOU WANT TO STOP USING MULTI-TABLETS
- 10.4 BEFORE STARTING A PROGRAMME
- 10.5 UNLOADING THE BASKETS
- CARE AND CLEANING
- 11.1 HOW TO START MACHINECARE PROGRAMME
- 11.2 REMOVAL OF FOREIGN OBJECTS
- 11.3 CLEANING THE FILTERS
- 11.4 INTERNAL CLEANING
- 11.5 CLEANING THE LOWER SPRAY ARM
- 11.6 CLEANING THE UPPER SPRAY ARM
- 11.7 CLEANING THE CEILING SPRAY ARM
- 11.8 CLEANING THE INLET HOSE FILTER
- 11.9 EXTERNAL CLEANING
- TROUBLESHOOTING
- YOU CANNOT ACTIVATE THE APPLIANCE
- THE APPLIANCE DOOR DOES NOT OPEN WHEN PUSHED
- THE PROGRAMME DOES NOT START
- OR ERROR CODES. THE APPLIANCE DOES NOT FILL WITH WATER
- 20 ERROR CODE. THE APPLIANCE DOES NOT DRAIN THE WATER
- 23 ERROR CODE. MALFUNCTION OF THE DRAIN PUMP
- 24 ERROR CODE. MALFUNCTION OF THE DRAIN PUMP
- 28 ERROR CODE. MALFUNCTION OF THE DRAIN PUMP
- 30 ERROR CODE. THE ANTI-FLOOD DEVICE IS ON
- 12.2 HOW TO CLEAN THE DRAIN PUMP
- 12.3 DISHWASHING AND DRYING RESULTS ARE NOT SATISFACTORY
- POOR DISHWASHING RESULTS
- POOR DRYING RESULTS
- WHITISH STREAKS ON GLASSES AND DISHES
- BLUISH LAYERS ON GLASSES AND DISHES
- STAINS AND DRY WATER DROPS ON GLASSES AND DISHES
- THE INTERIOR OF THE APPLIANCE IS WET
- UNUSUAL FOAM DURING WASHING
- TRACES OF RUST ON CUTLERY
- RESIDUES OF DETERGENT IN THE DISPENSER AT THE END OF THE PROGRAMME
- ODOURS INSIDE THE APPLIANCE
- LIMESCALE DEPOSITS ON THE TABLEWARE, ON THE TUB AND ON THE INSIDE OF THE DOOR
- DULL, DISCOLOURED OR CHIPPED TABLEWARE
- TECHNICAL DATA
- CH GUARANTEE
- POINT OF SERVICE
- ENVIRONMENTAL CONCERNS
- FOR SWITZERLAND
- VORSICHT
- OBERER KORB
- BESTECKSCHUBLADE
Brand : AEG
Model : GS60GVSX
Category : Dishwasher