
4LVF-439ADX - Dishwasher FAGOR - Free user manual and instructions
Find the device manual for free 4LVF-439ADX FAGOR in PDF.


| Product type | Fully integrated dishwasher |
| Brand | Fagor |
| Model | 4LVF-439ADX |
| Energy class | A++ |
| Place settings | 13 |
| Noise level | 44 dB |
| Width | 60 cm |
| Height | 85 cm |
| Depth | 60 cm |
| Water consumption per cycle | 9.5 L |
| Energy consumption per cycle | 0.93 kWh |
| Number of programs | 6 |
| Delay start | Yes, up to 24 hours |
| Child lock | Yes |
| Water leakage protection | Total flood protection |
| Tub material | Stainless steel |
| Adjustable upper basket | Yes |
| Cutlery tray | Yes, third level |
| Display | Digital LED |
| Repairability index | 9.2 / 10 |
| Spare parts availability | 10 years |
Frequently Asked Questions - 4LVF-439ADX FAGOR
User questions about 4LVF-439ADX FAGOR
0 question about this device. Answer the ones you know or ask your own.
Ask a new question about this device
Download the instructions for your Dishwasher in PDF format for free! Find your manual 4LVF-439ADX - FAGOR and take your electronic device back in hand. On this page are published all the documents necessary for the use of your device. 4LVF-439ADX by FAGOR.
USER MANUAL 4LVF-439ADX FAGOR
CONOCE SU APARATO....16
ECOLOGY IN PRACTICE....76
UNPACKING....77
DISPOSAL OF OLD APPLIANCE....77
BASICINFORMATION....78
MANUFACTURER'S DECLARATION....78
SAFETY INSTRUCTIONS FOR USE 79
FEATURES AND COMPONENTS....88
PREPARE THE APPLIANCE FOR OPERATION....91
LOAD DISHES INTO DISHWASHER....96
TURN ON THE APPLIANCE AND SELECT PROGRAMME....101
CLEANING AND MAINTENANCE....103
ERROR CODES AND TROUBLESHOOTING....106
ECOLOGÍA EN PRÁCTICA
CONOCE SU APARATO
Brazo rocia- dor superior

Cesta inferior
Cesta superior

NOTA:
2
3
4

2


3
2

3


CONHEÇA O SEU APARELHO
- Remova a tampa do dispensador levantando a alça.

2
3
- Estenda o cesto superior.
- Remova o cesto superior.
3

4

2

Dobrando as prateleiras de chávenas
Cesto de baixo

- Copos
- Porta-copos
- Óculos
- Copos
- Uma panela pequena
- Panela do forno
- Pratos de sobremesa
- Pratos de jantar
- Pratos de sopa
- Placa oval
- Pratos de sobremesa de melamina
- Tigelas de melamina
- Tigela de vidro

3
4
2

3

For many years, Fagor has consistently pursued pro-ecological policy.
Concern for the environment is as important for us as the use of modern technology.
The development of technology has enabled our factories to become more environmentally friendly – we use less and less water, electricity and less waste water and solid waste is generated in the production.
A lot of attention is paid to materials used in production. We strive to use only those that do not contain harmful substances and make recycling and safe disposal possible after use.
UNPACKING

During transportation, protective packaging was used to protect the appliance against any damage. After unpacking, please dispose of all elements of packaging in a way that will not cause damage to the environment.
All materials used for packaging the appliance are environmentally friendly; they are 100% recyclable and are marked with the appropriate symbol.
Important! Packaging materials (bags, polyethylene, polystyrene, etc.) should be kept away from children during unpacking.
DISPOSAL OF OLD APPLIANCE

In accordance with European Directive 2012/19/EU and local legislation regarding used electrical and electronic goods, this appliance is marked with the symbol of the crossed-out waste container. This marking indicates that the appliance must not be disposed of together with other household waste after it has been used.
The user is obliged to hand it over to waste collection centre collecting used electrical and electronic goods. The collectors, including local collection points, shops and local authority departments provide recycling schemes.
Proper handling of used electrical and electronic goods helps avoid environmental and health hazards resulting from the presence of dangerous components and the inappropriate storage and processing of such goods.
BASIC INFORMATION
Carefully read the operating instructions before plugging dishwasher to a power outlet and using the appliance. Operating instruction include tips that will help you avoid the risk of injury and damage to the appliance. Keep dishwasher documentation in a safe place for possible future use.
These operating instructions have been prepared for a range of appliances and some features described herein may not apply to your appliance.
MANUFACTURER'S DECLARATION
Manufacturer's Declaration
The manufacturer hereby declares that this product meets the requirements of the following European directives:
• Low Voltage Directive 2014/35/EU
• Electromagnetic Compatibility (EMC) Directive 2014/30/EU
• ErP Directive 2009/125/EC
• Directive RoHS 2011/65/EU
and has thus been marked with the symbol and been issued with a declaration of compliance made available to market regulators.
SAFETY INSTRUCTIONS FOR USE
| Before you install the appliance | Check the appliance for transport damage. Never install or use a damaged appliance. If in doubt, contact your seller. |
| Before first use See inst | tallation notes (below). |
| Refer the grounding system installation to a qualified electrician. | |
| The manufacturer shall not be liable for any damage arising from the use of a non-grounded appliance. | |
| Before using the appliance, verify that the data given on the rating plate matches that of local power outlets. | |
| Do not plug in the appliance before and during installation. | |
| Always use the original plug that came with the appliance. | |
| Do not use an extension cord to connect the appliance to the wall outlet. Extension cords are not sufficiently safe (e.g. they may overheat). | |
| Make sure the plug is easily accessible after installing the appliance. | |
| Before first use This appliance can be used by children aged 8 years and older or persons with physical, mental or sensory handicaps, or those who are inexperienced or unfamiliar with the appliance, provided they are supervised or have been instructed how to safely use the appliance and are familiar with the associated risks. Ensure that children do not play with the appliance. Children should not be allowed to clean or maintain the appliance. | |
| Child safety Do not allow children to play with the appliance. | |
| Child safety Dishwasher w | water is not suitable for drinking. Danger of injury from the caustic chemicals. |
| When you open the door during a programme, be careful as water temperature is high. | |
| To avoid injury always place long and sharp/pointed items (e.g. forks, knives) in the cutlery basket, pointing down, or flat on the top basket. | |
| Daily maintenance Use the | the appliance for household dishwashing only. |
| Do not use solvents in the applian-ce as there is a risk of explosion. | |
| Do not sit or stand on the open door and do not place any objects on it. The device may overturn. | |
| Do not open the door when the appliance is operating. Hot water or steam can be released. | |
| Do not leave the door open, because they it can pose a hazard. | |
| Loading the dishwasher to the ca-pacity indicated by the manufac-turer will save energy and water. | |
| It is not recommended to pre-rin-se the tableware, as this leads to an increase in water and energy consumption. | |
| Dishes and utensils that are not suitable for dishwashers. | Ashtrays, candles, cleaning pastes, paints, chemicals, ferro-alloys; |
| Forks, spoons and knives with a handle made of wood, ivory or Nacre, glued items, items contaminated with abrasive powders, acid or base | |
| Plastic dishes that are not resistant to high temperature, containers made of copper or tin; | |
| Aluminium and silver items (may be stained or loose lustre) | |
| Some delicate types of glass, porcelain with decorative prints, as prints may fade even after the first wash; some crystal dishes as they may lose their transparency, glued silverware sensitive to high temperatures, lead crystal glass, chopping boards, items made with synthetic fibres; | |
| Absorbent objects such as a sponge or kitchen cloths are not suitable for the dishwasher. | |
| Before buying dishes in the future make sure they are dishwasher safe. | |
| RECYCLING Packaging and some parts of the appliance are made of materials suitable for recycling. They are marked with the recycling symbol and information about the type of material. | |
| Before using the appliance remove all packaging and dispose of it in accordance with the regulations. | |
| Warning!The packaging can be dangerous for children.Recyclable materials can be taken to local waste collection. Additional information can be obtained from local authorities and at waste disposal points. | |
| SCRAPPING OF AN OLD APPLIANCE | The materials used in making of this appliance can be reused, as indicated. By reusing or recycling the materials or parts, you will be playing an important part in protecting our environment. |
| Information about the relevant disposal points for worn-out electrical goods is available from your local authorities. | |
| Thank you for your contribution to environmental protection. | |
| To avoid risks, prevent the appliance pending transport from being used. | |
| Disconnect the plug and cut the power cord. Also damage the door lock. |
INSTALL THE APPLIANCE
PLACE YOUR APPLIANCE
When choosing the place of installation, make sure you will be able to easily load and remove dishes and utensils from the dishwasher.
Do not place the appliance in a room where the temperature can fall below 0° C.
Before installing unpack the appliance following the instructions on the packaging.
- When you move the appliance do not handle it by the door or control panel.
Leave some room on all sides to have convenient access to the dishwasher when cleaning.
■ Make sure that when you set the dishwasher you do not crush the water supply and drain hose. Also, make sure that the appliance is not places on the power cord.
Level the appliance using the adjustable legs. Proper level ensures trouble-free opening and closing the dishwasher doors.
If the dishwasher door will not close properly, check that the appliance stands firmly on the floor, if not, adjust using the adjustable legs.
WATER SUPPLY CONNECTION
Make sure that domestic water supply system is suitable for the dishwasher. It is recommended to install a filter in the water supply line to avoid damage to the appliance due to impurities (such as sand, clay, rust, etc.) that occasionally occur in water. This will also prevent accumulation of sediment after dishwashing.
WATER SUPPLY HOSE

Do not use the water supply hose from the old dishwasher. Use the new water supply hose provided with the appliance. Before connecting, rinse the hose with water. Connect the water supply hose directly to the water feed valve. The domestic water system pressure should be at least 0.04 MPa and up to 1 MPa. If the water pressure exceeds 1 MPa, install pressure reducing valve.
When the connection is ready, open the valve completely and check for leaks. For safety reasons, close the water supply tap after every wash.

NOTE: Aquastop water supply is used in some dishwasher models. Dangerous voltage could occur with Aquastop. Do not cut the Aquastop water supply. Do not allow it to bend or twist


Note: For safety reasons, close the water tap after every wash
THE DRAIN HOSE
The drain hose can be connected directly to a water drain or kitchen sink stub pipe. You can also drain the water directly into the sink using the special bracket (if available), placing the drain hose outlet on the kitchen sink edge. The drain hose connection should be made at least 50 cm and up to 110 cm from the floor.


If the drain hose is longer than 4 m, dishes may not be washed properly. The manufacturer will not be held responsible.
ELECTRICAL CONNECTION
Grounded plug must be connected to a grounded power outlet with a proper voltage. If there is no grounding, refer this to a qualified electrician. If you operate the appliance without proper grounding, the manufacturer does not assume any liability for the possible resulting damage.

Domestic electrical system must be protected with a 10-16A fuse. The appliance must be supplied with 220-240 V AC. If the supply voltage is 110 V, use 3000W, 110/220 V set-up transformer to connect the appliance. Do not connect the appliance during installation.

Always use the plug provided with the appliance. When you operate the appliance at lower voltage the dishwashing efficiency will deteriorate and may damage the appliance.
The power cord may only be replaced by authorized service or a qualified electrician. Failure to comply with these rules may lead to an accident.
For safety reasons, you should always unplug the appliance after you have finished using it.
In order not to avoid electric shock, do not remove the plug from the wall outlet with wet hands.
When you unplug the appliance from the wall outlet, always pull the plug. Never pull the power cord.

FEATURES AND COMPONENTS
DESCRIPTION OF THE APPLIANCE
The features and components of the appliance (fig. 1):


Cutlery rack

Top spray arm

Bottom basket
Upper basket

NOTE:
Figures are for illustrative purposes only Individual models may vary.

| 1. Power Press this button to turn on your dishwasher, the screen lights up. | |
| 2. Program | Press this or button to select the appropriate washing program, the program indicator will be lit. |
| 3. Favorite This button can save 4 features with Program, Function, Auto open and Alt.Select the combination you mostly use, and then press the Favorite button for 3 seconds. The corresponding indicator will flash for 5 seconds by 1 HZ frequency. After successful setting, the indicator will turn off. When next time to use the dishwasher, you can quickly select the combination of settings by pressing Favorite button. | |
| 4. Delay Press this button to set the delayed hours for washing. You can delay the start of washing up to 1-24 hours. | |
| 5. Alt Press the button to select either upper basket or lower basket loaded, and the corresponding indicator will light up. | |
| 6. Function Press the button to select a function, corresponding indicator will be lit. | |
| 7. Auto open The dishwasher door opens automatically at the end of the program, which improves the drying results (Available for Eco; 58 Mins; Glass; Hygiene; Intensive; Auto; Silent). | |
| 8. Start/Pause To start the selected washing program or pause it when the 8 dishwasher is working. | |
| 9. Child lock This option allows you to lock the buttons on the control panel, so children cannot accidentally start the dishwasher by pressing the buttons on the pan-el. Only the Power button remains active. To lock or unlock the buttons on the control panel, press Function and Alt button Simultaneously. | |
| 10. Program indicator | Eco ECOThis is standard program, it is suitable to clean normally soiled tableware and it is the most efficient program in terms of its combined energy and water consumption for that type of tableware.58 mins 58For lightly soiled crockery and glass.Rapid A shorter wash for lightly soiled loads that do not need drying. |

NOTE:
Figures are for illustrative purposes only Individual models may vary.

NOTA:
*on selected models: When you open the dishwasher door, the interior light will turn on automatically. The appliance interior is well lit.
| 10. Program indicator | GlassFor lightly soiled crockery and glass.HygieneWith the sanitize option selected, the water temperature is increased to 72°C for high temperature sanitization.Self-CleaningThis program provides an effective cleaning of the dishwasher itself.IntensiveFor heaviest soiled crockery, and normally soiled pots, pans, dishes etc. With dried-on food.AutoAutoFor lightly, normally or heavily soiled crockery with or without dried-on food.SoakTo rinse dishes that you plan to wash later that day.SilentLower noise and normally energy consumption, used for washing in evening. |
| 11. Warning indicator | Rinse aidThe indicator shows a low level of special rinse aid in the dispenser. Add special salt.Special saltThe indicator shows a low level of special salt in the dispenser. Add special salt.Water FaucetIf the indicator is lit, it means the water faucet closed.Remind of Self-CleaningIf the indicator is lit, it means the dishwasher needs to clean itself after 20 cycles, the indicator will flash for 5 seconds, this will last 3 cycles, When the user chooses to finish running the Self Clean program or the number of washing runs reaches 23 times, the dishwasher starts counting the number of program runs again.To show the remaining program time and delay time, error codes, when you chose program,the screen alt show program time.To show the degree of water consumption.To show the degree of energy consumption.Remind of Add dish[0x66]At the beginning of washing before reaching the mainwash temperature, it will lit, which means it is still OK to open the door and add more dishware if you need during this period. |
| 11. Warning indicator | UpperWhen you select Upper, only the upper rack nozzle is activated. The lower nozzle will not operate.LowerWhen you select Lower, only the lower rack nozzle is activated. The upper nozzle will not operate. |
| 12. Function indicator | Extra DryingFor better drying result.(Available for Eco; 58 Mins; Glass; Hygiene; Intensive; Silent.).ExpressReduce the program time. (Available for Eco;58 Mins; Glass; Hygiene; Intensive; Silent.).Steam washFor better washing performance and more hygienic washing. (Available for Eco;58 Mins; Glass; Hygiene; Intensive; Silent.).Strong WashTo wash very dirty, hard to clean dishes. (Available for Eco;58 Mins; Glass; Hygiene; Intensive; Silent.). |
PREPARE THE APPLIANCE FOR OPERATION
1
Before first use
Before using the appliance, verify that the data given on the rating plate matches that of local power outlets.
■ Remove all packing materials from inside of the appliance.
■ Prepare special salt (water softener).
Pour water into the special salt dispenser and then add about 1.5 kg of special salt (dishwasher salt).
■ Pour rinse aid into the dispenser.
2
The importance of water descaling
A dishwasher requires soft water (with low calcium content) to operate efficiently. Otherwise, white residue main remain on the dishes and inside the appliance. This has a negative impact on the quality of dishwashing, rinsing and drying. When the water flows through the softener, ions responsible for the water hardness are removed, and the water becomes soft, for best dishwashing results. Depending on the degree of water hardness, the ions responsible for water hardness accumulate quickly inside the water softener. Therefore, the water softener must be regenerated to operate with the same efficiency during the next wash. This is why special salt is used in the dishwasher.
3
Add special salt
Only use special salt intended for dishwashers.
Any other type of salt that is not intended for use in a dishwasher, especially regular kitchen salt, will damage the water softener. In the event of damage caused by the use of the wrong salt, the manufacturer's warranty is void and we will not be liable for damage.
Fill with special salt before running the washing programme.
This will prevent spilled special salt or salty water from remaining on the bottom of the device, which may cause corrosion.
![graph LR A["Hand holding a cup with a lid"] --> B["Salt being added to a container"] B --> C["Add salt into a pot with a flame inside the container"] C --> D["Hearts from adding and pouring the salt into a container"]](/content/2026/08/1627920/images/0fe858fa64a100603d58e3d5521dd73ca83c646d7adc8a0e35abff3bf2b52c60.jpg)
- Remove the lower basket from the appliance and unscrew the special salt dispenser cap.
- Place the end of the funnel (included) in the hole and pour about 1.5 kg of salt.
- Pour water into the dispenser until full. It is normal that a small amount of water spills out of the special salt dispenser.
- After you fill the dispenser, screw the cap on.
- When you fil the dispenser with special salt, the add salt indicator goes out.
- Start the washing programme immediately after filling the dispenser with special salt (the quick wash is recommended). Otherwise, salty water can damage the filters, the pump or other important appliance components This is not covered by the warranty.
NOTE:

Fill the special salt dispenser when the special salt indicator on the control panel lights up. Depending on the rate of salt dissolution, the special salt indicator may still be on even after filling the dispenser.
If there is no special salt indicator on the control panel (on some models), you can estimate when to top up the dispenser based on the number of wash cycles performed.
If some special salt spills, run the soaking programme or a quick wash programme.

4
Fill the detergent dispenser
Open the detergent dispenser flap by pressing the detergent dispenser tab to release the lock as shown in the figure. The detergent dispenser features volume marking. Using these markings (lines) you can measure the correct amount of detergent. The dispenser can accommodate a maximum of 30g of detergent.
Open the pack with dishwasher detergent and in the case of heavily soiled dishes pour 25 cm 3 det Close the flap by sliding it to the left
and then pressing it down. ergent into the main wash compartment (A) or 15 cm3 for less soiled dishes (B). If the dishes remained unwashed for an extended period of time or if food has dried, pour 5 cm3 detergent into the pre-wash compartment and start the dishwasher. Depending on the amount of soil and the water hardness you may need to add more detergent.

Please choose an open way according to the actual situation.
- Open the cap by sliding the release catch.
- Open the cap by pressing down the release catch.

2 Add detergent into the larger cavity (A) for the main wash cycle. For better cleaning result, especially if you have very dirt items, pour a small amount of detergent onto the door. The additional detergent will activate during the pre-wash phase.

3 Close the flap by sliding it to the front and then pressing it down.

Please note that the setting may be different depending on the water contamination. Follow the manufacturer's instructions on the detergent packaging.
5
Multi-component (multitab) detergents (eg. 2-in-1, 3-in-1, etc.)
There are three types of detergents:
- Containing phosphates and chlorine,
- Containing phosphates and no chlorine,
- Containing no phosphates and no chlorine.
The latest tablets are generally phosphate-free. Since phosphates have water softening properties, we recommend adding salt to the container even if the water hardness is only 6° dH. If you use phosphate-free detergent where water is hard, white residue may be visible on the dishes.
You can prevent this by increasing the amount of detergent. Chlorine-free detergents have less bleaching effect. Stains may not be entirely removed. Select the programme with a higher wash temperature.
Generally, using multi-component detergents suitable results are obtained only under certain conditions. Such detergents contain rinse aid and/or special salt in a specific amount. It is recommended to use special salt when using multi-component tablets.
6
What you should pay attention to when using these tablets.
■ Always check the type of detergent used and whether it is a multi-component product.
■ Make sure that the detergent used is appropriate for tap water hardness.
■ Follow the instructions on the product packaging.
If the detergent is in the form of tablets, never place it the cutlery basket. Always place the tablet in the detergent dispenser compartment.
The use of these detergents yields good results only in certain applications. Using this type of detergent you should contact the manufacturer for information about proper use.
If you use the detergent properly and dishwasher settings are correct you can save on salt
■ and/or rinse aid.
If dishwashing results while using 2-in-1 or 3-in-1 detergents are not satisfactory (traces of
■ lime scale on the dishes), please contact the detergent manufacturer.
The warranty does not cover complaints due to the use of multi-component detergents.

Recommended use: For best results using multi-component cleaning agents, add special salt and rinse aid in the dishwasher and set the water hardness and amount of rinse aid to the lowest setting.
The solubility of the detergent tablets made by different manufacturers can vary with regard to temperature and time. It is therefore not recommended to use detergent tablets in quick programmes. It is recommended to use powder detergents in quick programmes.

Always store detergents in a dry, cool place, out of reach of children. Add detergent to the dispenser immediately before using the appliance.
Warning: If encounter another problem when using a multi-component detergent, please contact the detergent manufacturer.
Stop using multi-component detergents
■ Add special salt and rinse aid to dispensers.
- Set the water hardness to the highest level (6) and run an empty dishwasher.
■ Adjust the water hardness.
■ Adjust rinse aid setting.
Add rinse aid to the dispenser and adjust setting
Use rinse aid to prevent the formation of white water drops, lime scale spots, white streaks that may occur on the dishes, as well as to improve the drying process. Contrary to popular belief, it not only serves to obtain a shiny dishes, but also to facilitate drying. For this reason, make sure there is always sufficient amount of rinse aid in the dispenser.
If the rinse aid indicator on the control panel lights up, add rinse aid to the dispenser. To add rinse aid remove the dispenser lid by unscrewing it.
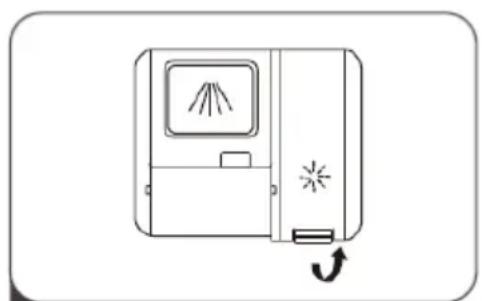
1 Remove the rinse reservoir cap by lifting up the handle

2 Pour the rinse aid into the dispenser, being careful not to overfill.

3 Close the cap after all.
Adjust the rinse aid dispenser
To achieve better drying results you can adjust how much rinse aid is used.
Follow these steps.
- Close the door. Switch on the appliance.
- Within 60 seconds of step 1, press and hold down the Programme button for at least 5 seconds. Press the Delay button to enter the settings. The rinse aid indicator blinks once per second.
- Press the Programme button repeatedly to select the desired setting suitable for to your local requirements. The following settings are available: d3->d4->d5->d6->d1->d2->d3. The higher the number, the more rinse aid is dispensed.
- Press the on/off button to save the setting.
| Selector position Amount of rinse aid (mL) | |
| d1 1.2 | |
| d2 2.4 | |
| d3 3.6 | |
| d4 4.8 | |
| d5 6.0 | |
| d6 7.2 | |
Warning: Use only rinse aid designed for domestic dishwashers. Wipe up spilled rinse aid with a cloth as it will cause the formation of large amounts of foam, and thus will reduce the dishwashing effectiveness.
Water hardness table
| Water hardness | German degrees [dH] | French degrees [dF] | British degrees [dE] | Water hardness level indicator | Regeneration occurs every X program sequence 1) | Special salt consumption [g/cycle] |
| 10~5 | 0~90~6 | H1 | No regeneration 0 | |||
| 26-11 | 10-207-14 | H2109 | ||||
| 312-17 | 21-3015 | -21 | H3 | 5 | 12 | |
| 418-22 | 31-4022 | -28 | H4 | 3 | 20 | |
| 523-34 | 41-6029 | -42 H5230 | ||||
| 635-55 | 61-9843 | -69 H6160 |
If the water hardness is higher than the maximum values given in the table above, or if you use water from a deep well, it is recommended to use filters and water treatment equipment.
NOTE: The factory settings are for the water hardness level 3.
- Close the door, Switch on the appliance;
- Press the Program button for more than 5 seconds to start the water softener set model within 60 seconds after the appliance was switched on;
- Press the Program button to select the proper set according to your local environment, the sets will change in the following sequence: H3->H4->H5->H6->H1->H2->H3.
- Press the Power button to end the set up model.
The use of detergents
Use a detergent for domestic dishwashers. On the market you can find detergent intended for dishwashers in the form of powder, gel and tablets. The detergent must be placed in the dispenser before starting the dishwasher. Store detergent in a cool and dry place, out of reach of children. Do not overfill the detergent dispenser, otherwise the detergent may not dissolve completely and leave streaks on the dishes. If you need more information on the detergent used, please contact the manufacturer directly.
LOAD DISHES INTO DISHWASHER
1
Upper basket
The upper basket is designed for washing delicate dishes such as glasses, cups, plates, etc.
Dishes that are placed in the upper basket should be less soiled than dishes in the lower basket.
You can place long forks, knives and spoons horizontally on shelves so as not to obstruct the spray arms..

2
Fold the mugs and cups shelves
Fold the shelves to increase the capacity of the upper basket. You can place the glasses and mugs on the shelves. Raise the cup shelf to make more space in the basket for taller items. You can then lean the taller glasses against the shelf. It can also be removed if it is not needed.

3
Fold the dishwasher basket spikes
The spikes are used to hold the plates. They can be folded, making more room for large dishes.

4
Tips for using the dishwasher basket:
Adjust the upper basket
Type 1:
The height of the upper basket can be easily adjusted to accommodate tall pots and pans in the upper or lower basket.
To adjust the height of the upper basket:

2

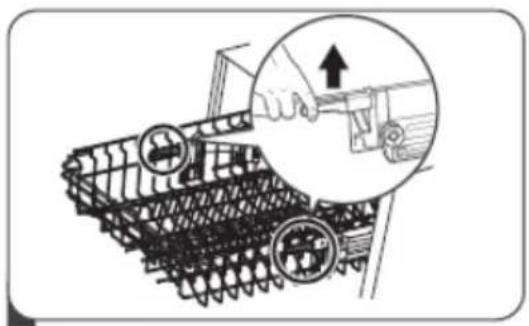
- Extend the upper basket.
- Remove the upper basket.

4

- Mount the basket on the upper or lower rollers.
- Insert the upper basket.
Type 2:

2

- To raise the basket to the upper position, raise it until it is at the same height on both sides. Make sure it is securely attached to the rails.
- To lower the basket, push down and release the handles.
5
Lower basket
Put plates, bowls, pots, etc. in the lower basket. Make sure that dishes in the lower basket do not block the spray arm and it can rotate freely. Place large pans and heavily soiled items such as pots, pans, lids, dishes, etc. in the lower basket. Place dishes upside down, so that water does not collect inside.

Place the dishes in such a way that they do not block the spray arm.

Folding back the cup shelves
To make room for taller items in the upper basket, raise the cup rack upwards. You can then lean the tall glasses against it. You can also remove it when it is not required for use.

Win-Wine Glass Racks
You can load cups or glasses onto the glass support. This is also very convenient for washing wine glasses. Hang your wine glasses onto the pegs of the glass support. Please adjust according to the size of the glasses.

Two middle glasses can be placed when the win-wine glass rack is put down.

Four small glasses can be placed when the win-wine glass rack is folded.
6
The standard load and test results
Capacity:
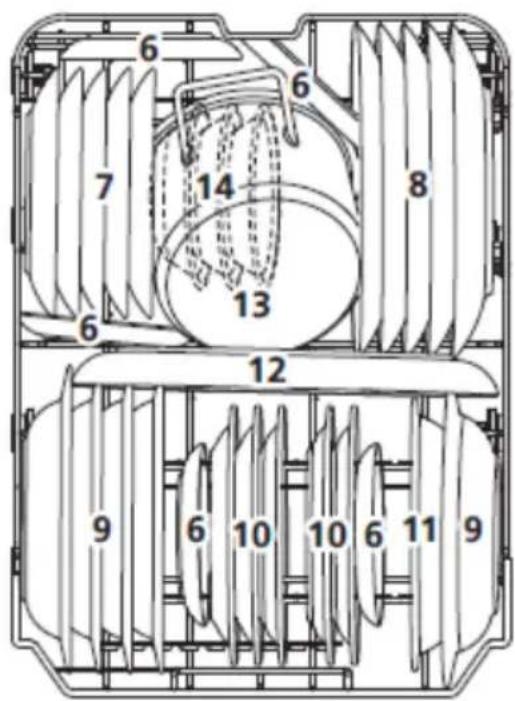
The upper and lower basket: 10 place settings. Set the upper basket to the upper position. Place the cups on the shelves.
Detergent/rinse aid
4+18g, in accordance with the EN 60436 international standards/rinse aid dose: max
Test programme
Eco, in accordance with the EN 60436 international standard
Upper basket

-
Cups
-
Saucers
-
Glasses
-
Mugs
-
Dessert bowls
-
Glass bowl
-
Dessert plates
-
Dinner plates
-
Soup plates
-
Melamine dessert plates
-
Melamine bowl
-
Oval plate
-
A small pot
Lower basket
Tests specification according to EN 60436
Capacity — 10 standard place settings
Upper basket setting — lower position
Programme — ECO
Rinse dose setting — max
Water hardness setting — H3
Cutlery basket
Place knives and forks separately from each other, and make sure they do not touch as this may cause poor washing results.
For best washing results place knives and forks in the cutlery basket, and make sure: they do not touch and place objects in the middle.

| Item Cutlery |
| 1 Soup spoons |
| 2 Forks |
| 3 Knives |
| 4 Tea spoons |
| 5 Dessert spoons |
| 6 Serving spoons |
| 7 Forks for serving |
| 8 Spoons for sauces |

TURN ON THE APPLIANCE AND SELECT PROGRAMME
1
Turn on the appliance
- Slide out the upper and lower the basket, place the dishes inside and slide baskets back in the dishwasher.
It is recommended to first load the lower basket and then the upper basket. - Pour detergent.
- Insert the plug into the wall outlet. Information on the power supply can be found on the last page in the chapter "Product fiche." Make sure that the water supply is turned on and set to the maximum pressure.
- Close the door, press the Power button.
- Choose a program, the response light will turn on and then press the Start/Pause button. Finally the dishwasher will start its cycle.
2
Change programme
You can change the programme only if it runs for a short time. Otherwise the detergent is already dissolved in water and the water could be pumped out. In this case, refill the dispenser with detergent and start the washing program from the beginning. To reset your dishwasher, please follow the instructions below:
- Press the Start/Pause to stop the machine, then press the program button for more than 3 seconds, the selected program will be cancel.
- After the selected program be canceled, you can chose the desired program.
- Press the Start/Pause button, the dishwasher will start.
3
Add dishes during the programme:
You can add extra dishes at any time before detergent is released. In this case, follow the instructions below:
- Press the Start/Pause button to pause the washing.
- Wait 5 seconds then open the door.
- Add the forgotten dishes.
- Close the door.
- Press the Start/Pause button, the dishwasher will continued to run after 10 seconds.

WARNING!
Be careful when opening the door during the dishwashing programme as hot steam can be released and cause scalding.
4
The dishwashing programme completes
Press on/off button to turn off the appliance. Close water supply tap and open the dishwasher door. Wait a few minutes before unloading the dishwasher. Allow dishes to cool. Hot dishes are more susceptible to breakage. Also the dishes will dry.
Turn off the dishwasher
The programme is completed only when the programme indicator is on, but not flashing.
- Press on/off button to turn off the appliance.
- Close water supply tap!
Open the door carefully.
Hot dishes are more susceptible to breakage. Before unloading the dishwasher leave the dishes to cool for about 15 minutes.
Open the dishwasher door, leave it ajar and wait a few minutes before removing the dishes.
This will allow the dishes to cool and dry.
Unload the dishwasher
It is normal that the dishwasher interior is wet.
First remove dishes from the lower basket and then from the upper basket. This will prevent water dripping from the upper basket on the dishes in the lower basket.


OpenDry. Automatic door opening.
At the end of the programme, the dishwasher door opens automatically, improving the drying results while using less energy. Press and hold ALT and Delay Start buttons simultaneously for approximately 2 seconds and the corresponding indicator will light up. To disable this function, press hold the same buttons again for about 2 seconds.
If the automatic door opening function is used, do not obstruct the door. This may interfere with the operation of the door lock.
This function does not apply to the Quick Wash and the Soak programme.
CLEANING AND MAINTENANCE
1
Clean external surfaces
Door and door seal
To remove food residue, clean the door gasket regularly with a soft, moist cloth. When loading dishes into the dishwasher, food and drink residue may deposit on the sides of the dishwasher door. These surfaces are outside the dishwasher compartment and the water from the spray arms does not reach them. Remove any residue before closing the door.
Control Panel
Wipe the control panel ONLY with a soft, damp cloth.

WARNING
Do NOT use any spray cleaner to prevent water ingress into the door lock and electrical components.
Do not use any abrasive detergents or sharp cleaners on external surfaces. Some paper towels may also leave scratches or marks on the surface.
2
Clean internal surfaces Filter system
The filter system at the bottom of the dishwasher compartment stops coarse residue during wash cycle. This residue can cause clogging of the filters. Regularly check the condition of the filters and rinse them under running water, if necessary. Clean the filters as follows.

NOTE:
Figures are for illustrative purposes only Filter systems and spray arms may vary in individual models.

- Hold the strainer and turn it counter clockwise to unscrew. Lift the filter up and remove it from the dishwasher.
- The fine filter can be removed from the bottom of the filter assembly. The strainer can be disengaged from the main filter by gently squeezing the edges and pulling.


4
- Larger residues can be rinsed under running water. Clean the filter completely with a soft, clean brush.
- Install the filters in reverse order, place the filter insert and turn clockwise as indicated by the arrow.

WARNING
Do not overtighten the filters. Carefully replace the filters and install in place. Otherwise, contaminants can enter the dishwasher's systems and cause clogging.
NEVER use the dishwasher without the filter assembly. Incorrect filter replacement can reduce the appliance effectiveness and cause damage to the dishes and cutlery.
3
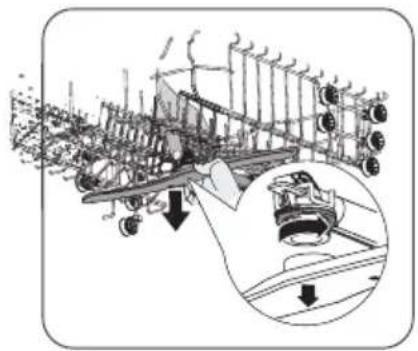
Spray arms
Clean the spray arms regularly. Hard water and detergents can clog the nozzles and the spray arm slide rings.
Clean spray arms:
1
2

3

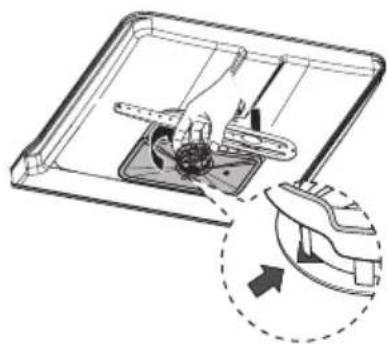
- To remove the upper spray arm, hold the nut in place and turn the arm counter clockwise.
- To remove the lower spray arm, pull the arm up.
- Clean the spray arms with a soft brush in warm soapy water. Rinse the arms and install in the appliance.
4
Clean the dishwasher
Frost protection
In winter, the dishwasher must be protected against freezing temperature. After each wash:
- Disconnect the dishwasher from power.
- Turn off the water supply and disconnect the water inlet hose from the water valve.
- Drain the water from the inlet hose and the water valve. (Collect the water in a bowl)
- Reconnect the water inlet hose to the water valve.
- Remove the filter and use a sponge to collect the water from the bottom of the dishwasher.
After each wash
After each wash, close the water supply to the appliance and leave the door slightly ajar, so that moisture and odours are not trapped inside.
Unplug the appliance
Unplug the appliance from the wall outlet before any cleaning and maintenance.
Do not use solvents or abrasive detergents.
Do not use solvents or abrasive detergents to clean the outer parts and the rubber seals of the dishwasher. Use only cloths and warm soapy water.
To remove stains from the inside use a cloth dampened with water and a little vinegar or cleaning detergent intended specifically for dishwashers.
If the dishwasher is not used for a long time
It is recommended to run the washing programme with an empty dishwasher, then unplug the appliance from power, close the water supply and leave the door slightly ajar. This protects the gaskets and prevents the formation of unpleasant odours in the appliance.
Move the appliance
If the appliance needs to be moved, try to keep it in an upright position. If absolutely unavoidable, you can rest the appliance on the back wall.
ERROR CODES AND TROUBLESHOOTING
In the event of a fault, the dishwasher displays error codes that identify the problem:
| ERROR CODE | DESCRIPTION OF THE FAULT | ACTION |
| E1 Long water filling time. | Tap is closed, water intake is clogged, or water pressure is too low | |
| E3 | The required temperature has not been reached. | Malfunction of heating element. |
| E4 Overflow Some dishwasher element leaks. | ||
| E8 | Failure of orientation of distributary valve. | Open circuit or break of distributary valve. |
| Ec Washing control system fail. PCB ou motor falham. | ||
| Ed | Communication failure between main and display PCB. | Open circuit or damage to communication connections. |
WARNING!
If overflow occurs, turn off the main water valve before calling for service.
If there is water in the bottom tray due to overflow or a small leak, empty the water before starting the dishwasher.
| Problem Possible cause | Solution | |
| The dishwasher will not start | The dishwasher will not start | The dishwasher door is open — close the door. |
| The appliance is not connected to the mains power The Delay start function is selected | Close the door carefully, make sure it is closed fully | |
| Child Lock is enabled (selected models) | Turn off the Child Lock | |
| The dishwasher beeps at the end of the wash cycle | It indicates the end of the wash programme and emits a beep | |
| The rinse aid indicator is on | The LED display shows "Lsb" | Add rinse aid |
| The wash cycle takes too long | The dishwasher is connected to hot water | Check the dishwasher, make sure it is properly connected to hot water |
| The duration of the wash programme varies depending on how soiled the dishes are | When heavy soil is detected, auto and normal programmes, automatically extend the wash cycle duration | |
| The disinfection option has been selected | When you select the disinfection option, the wash cycle time will be extended to reach the disinfection temperature | |
| The dishes are not clean enough | The water pressure is temporarily low | Use a dishwasher when the pressure is normal |
| The temperature of the inlet water is low | Ensure that the dishwasher is connected to hot water. Try not to use the dishwasher if hot water is used elsewhere in the household | |
| The dishes are arranged too close together. The detergent is used incorrectly | Rearrange the dishes in accordance with the instructions. Use the amount of detergent suitable for the water hardness and the selected wash programme. Use a new/different detergent | |
| The selected wash programme is not suitable for the level of soil on the dishes | Select a different, more intensive/longer wash programme | |
| The spray arm rotation is blocked | Make sure that the spray arm rotates freely | |
| The dishwasher will not start | The dishwasher will not start | Close the door carefully, make sure it is closed fully |
| The appliance is not connected to the mains power The Delay start function is selected | Check the connection to the power supply | |
| To change the setting, refer to the Start Delay section in the operating instructions | ||
| Child Lock is enabled (selected models) | Deactivate the Child Lock function, refer to the Child Lock section in the operating instructions. | |
| The dishes are not dry enough | The detergent dispenser is empty | Fill the rinse aid dispenser or increase the dispensed amount |
| Dishes placed incorrectly in the dishwasher | Rearrange the dishes in accordance with the instructions. | |
| The selected programme dose not include the drying stage | Select the wash program that includes drying | |
| Stains and deposits on dishes | Water too hard In the case | of very hard water, a water softener should be installed |
| Dishes placed incorrectly in the dishwasher | Rearrange the dishes in accordance with the instructions. | |
| An old rinse aid was used | Use new rinse aid | |
| Rinse aid dispenser is empty | Add rinse aid to the dispenser | |
| Too much detergent Use less detergent if water is soft | ||
| The temperature of water supplied to the dishwasher exceeds 70°C | Reduce the temperature of the water supply | |
| The detergent was not fully released from the dispenser | The detergent may be too old | Use a new/different detergent |
| The spray arm rotation is blocked | Rearrange the dishes making sure that the spray arm rotation is not restricted | |
| The detergent dispenser will not close | The lid of the detergent dispenser is malfunctioning | Add detergent and rinse aid according to the instructions |
| The water was not drained from the dishwasher | The previous programme was not completed or was interrupted | For information on how to select a suitable wash programme, please refer to the operating instructions |
| Food residue or glass shards clogged the pump. | Remove foreign body. | |

| Height [mm] [H] 845 mm | |
| Width [mm] [W] 448 mm | |
| Depth [mm] [D1] 600 mm (with the door closed) | |
| Depth [mm] [D2] 1175 mm (with the door opened 90°) | |
For more information about the product, please refer to the EU EPREL Product Database at https://eprel.ec.europa.eu. For more information, please use your mobile device to scan the QR code on the energy label or enter the product model listed on the energy label in the EPREL search engine https://eprel.ec.europa.eu/
WARRANTY AND AFTER SALES SERVICE
Warranty
Warranty service as stated on the warranty card. The manufacturer shall not be held liable for any damage caused by improper use of the product.
Service
- The manufacturer recommends that all repairs and adjustments be carried out by the Factory Service Technician or the Manufacturer's Authorized Service Point. For safety reasons, repairs should be referred to professionals.
- Repairs carried out by unqualified persons may seriously endanger the appliance user.
- Pursuant to Commission Regulation (EU) 2019/2022, the minimum availability period for spare parts necessary to repair the appliance is 7 or 10 years depending on the type and purpose of the spare part.
- The list of spare parts and the ordering procedure are available on the websites of the manufacturer, importer or an authorized representative.
- The minimum warranty period for the appliance offered by 'the manufacturer, importer or authorized representative is given in the warranty card.
- The warranty shall be void if you make any independent adaptations or alterations, tamper with seals or other appliance safety devices or its parts or interfere with the appliance contrary to operating instructions.
In the event of appliance malfunction, request assistance or repair.
If your appliance needs repair, please contact the service centre. Please see warranty card for address and contact details of our service centre. Before contacting us, please have ready the appliance serial number, which can be found on the identification sticker: For your convenience, please write it down below:
FAGOR
ELECTRODOMÉSTICO

- ECOLOGÍA EN PRÁCTICA
- CONOCE SU APARATO
- NOTA
- CONHEÇA O SEU APARELHO
- UNPACKING
- DISPOSAL OF OLD APPLIANCE
- BASIC INFORMATION
- MANUFACTURER'S DECLARATION
- SAFETY INSTRUCTIONS FOR USE
- INSTALL THE APPLIANCE
- PLACE YOUR APPLIANCE
- WATER SUPPLY CONNECTION
- WATER SUPPLY HOSE
- THE DRAIN HOSE
- ELECTRICAL CONNECTION
- FEATURES AND COMPONENTS
- DESCRIPTION OF THE APPLIANCE
- NOTE
- PREPARE THE APPLIANCE FOR OPERATION
- BEFORE FIRST USE
- THE IMPORTANCE OF WATER DESCALING
- ADD SPECIAL SALT
- ONLY USE SPECIAL SALT INTENDED FOR DISHWASHERS
- FILL WITH SPECIAL SALT BEFORE RUNNING THE WASHING PROGRAMME
- FILL THE DETERGENT DISPENSER
- MULTI-COMPONENT (MULTITAB) DETERGENTS (EG. 2-IN-1, 3-IN-1, ETC.)
- ADD RINSE AID TO THE DISPENSER AND ADJUST SETTING
- ADJUST THE RINSE AID DISPENSER
- THE USE OF DETERGENTS
- LOAD DISHES INTO DISHWASHER
- UPPER BASKET
- FOLD THE MUGS AND CUPS SHELVES
- FOLD THE DISHWASHER BASKET SPIKES
- TIPS FOR USING THE DISHWASHER BASKET
- ADJUST THE UPPER BASKET
- TYPE
- THE STANDARD LOAD AND TEST RESULTS
- CAPACITY
- DETERGENT/RINSE AID
- TEST PROGRAMME
- TESTS SPECIFICATION ACCORDING TO EN
- CUTLERY BASKET
- TURN ON THE APPLIANCE AND SELECT PROGRAMME
- TURN ON THE APPLIANCE
- CHANGE PROGRAMME
- ADD DISHES DURING THE PROGRAMME
- WARNING
- THE DISHWASHING PROGRAMME COMPLETES
- CLEANING AND MAINTENANCE
- DOOR AND DOOR SEAL
- CONTROL PANEL
- CLEAN INTERNAL SURFACES FILTER SYSTEM
- SPRAY ARMS
- CLEAN THE DISHWASHER
- FROST PROTECTION
- AFTER EACH WASH
- UNPLUG THE APPLIANCE
- MOVE THE APPLIANCE
- ERROR CODES AND TROUBLESHOOTING
- WARRANTY AND AFTER SALES SERVICE
- WARRANTY
- SERVICE
- IN THE EVENT OF APPLIANCE MALFUNCTION, REQUEST ASSISTANCE OR REPAIR
Brand : FAGOR
Model : 4LVF-439ADX
Category : Dishwasher