
LWX7E8611S - Washing machine AEG - Free user manual and instructions
Find the device manual for free LWX7E8611S AEG in PDF.


| Product Type | Freestanding washing machine |
| Brand | AEG |
| Model Number | LWX7E8611S |
| Loading Type | Front loading |
| Capacity | 7 kg |
| Maximum Spin Speed | 1600 rpm |
| Energy Efficiency Class | A+++ |
| Voltage | 220-240 V |
| Frequency | 50 Hz |
| Power Consumption | 2200 W |
| Water Consumption per Cycle | 49 L |
| Dimensions (W x H x D) | 60 cm x 85 cm x 60 cm |
| Weight | 68 kg |
| Noise Level (Wash/Spin) | 54 dB / 74 dB |
| Monitor Display | LED digital display |
| Control Interface | Electronic dial with Touch buttons |
| Inverter Motor | Brushless and energy efficient |
| Number of Programmes | 15 including Cotton, Synthetics, Delicates, Wool, Steam & Quick |
| Special Features | ProSense, SteamCare, Allergy Unlock, Time Manager |
| Delay Start | Up to 24 hours |
| Child Lock | Yes |
| Anti-Flood Protection | Yes |
| Spare Parts Availability | 7 years after the last production date |
Frequently Asked Questions - LWX7E8611S AEG
User questions about LWX7E8611S AEG
0 question about this device. Answer the ones you know or ask your own.
Ask a new question about this device
Download the instructions for your Washing machine in PDF format for free! Find your manual LWX7E8611S - AEG and take your electronic device back in hand. On this page are published all the documents necessary for the use of your device. LWX7E8611S by AEG.
USER MANUAL LWX7E8611S AEG
CONTENTS
- SAFETY INFORMATION......3
- SAFETY INSTRUCTIONS....5
- INSTALLATION....6
- PRODUCT DESCRIPTION....11
- CONTROL PANEL....12
- DIAL AND BUTTONS....14
- PROGRAMMES....16
- BEFORE FIRST USE....21
- SETTINGS....22
- DAILY USE - WASHING ONLY....22
- DAILY USE - WASHING & DRYING....27
- DAILY USE - DRYING ONLY....29
- FLUFF IN THE FABRICS....30
- HINTS AND TIPS.... 30
- CARE AND CLEANING.... 32
- TROUBLESHOOTING....36
- CONSUMPTION VALUES......40
- TECHNICAL DATA....41
- ACCESSORIES....42
FOR PERFECT RESULTS
Thank you for choosing this AEG product. We have created it to give you impeccable performance for many years, with innovative technologies that help make life simpler – features you might not find on ordinary appliances. Please spend a few minutes reading to get the very best from it.
Visit our website to:

Get usage advice, brochures, trouble shooter, service and repair information: www.aeg.com/support

Register your product for better service:
www.registeraeg.com

Buy Accessories, Consumables and Original spare parts for your appliance:
www.aeg.com/shop
CUSTOMER CARE AND SERVICE
Always use original spare parts.
When contacting our Authorised Service Centre, ensure that you have the following data available: Model, PNC, Serial Number.
The information can be found on the rating plate.
⚠ Warning / Caution-Safety information
i General information and tips
Environmental information
Subject to change without notice.
1. ⚠SAFETY INFORMATION
Before the installation and use of the appliance, carefully read the supplied instructions. The manufacturer is not responsible for any injuries or damage that are the result of incorrect installation or usage. Always keep the instructions in a safe and accessible location for future reference.
1.1 Children and vulnerable people safety- Gulf Market

WARNING!
Risk of suffocation, injury or permanent disability.
- This appliance is not intended for use by persons (including children) with reduced physical, sensory or mental capabilities, or lack of experience and knowledge, unless they have been given supervision or instruction concerning use of the appliance by a person responsible for their safety.
• Children should be supervised to ensure that they do not play with the appliance. - Keep all packaging away from children and dispose of it appropriately.
- Keep detergents away from children.
- Keep children and pets away from the appliance when the door is open.
- If the appliance has a child safety device, it should be activated.
• Children shall not carry out cleaning and user maintenance of the appliance without supervision.
1.2 General Safety
- Do not change the specification of this appliance.
-
The appliance shall be installed as a freestanding product or below the kitchen worktop if space margins permit.
-
Do not install the appliance behind a lockable door, a sliding door or a door with a hinge on the opposite side, that would prevent the appliance door from being fully open.
- Connect the mains plug to the mains socket only at the end of the installation process. Make sure that the mains plug is accessible after installation.
- The ventilation opening in the base must not be covered by a carpet, mat, or any floor covering.
- Ensure good air ventilation in the room where the appliance is installed to avoid the backflow of unwanted gases into the room from appliances burning gas or other fuels, including open fires.
- Exhaust air must not be discharged into a flue which is used for exhausting fumes from any appliances burning gas or other fuels.
- The operating water pressure at the water entry point from the outlet connection must be between 0.5 bar (0.05 MPa) and 8 bar (0.8 MPa).
- Do not exceed the maximum load of 8 kg (refer to the "Programme chart" chapter).
- The appliance must be connected to the water mains using the new supplied hose sets, or other new hose sets supplied by the Authorised Service Centre.
- Old hose sets must not be reused.
- If the mains power supply cable is damaged, it must be replaced by the manufacturer, its Authorised Service Centre or similarly qualified persons to avoid an electrical hazard.
- Wipe away lint or packaging debris that has accumulated around the appliance.
- Items that have been soiled with substances such as vegetable or mineral oil, acetone, alcohol, petrol, kerosene, spot removers, turpentine, waxes and wax removers should be washed separately with an extra amount of detergent before being dried in the washer dryer.
- Do not use the appliance if items have been soiled with industrial chemicals.
- Do not dry unwashed items in the wash dryer.
- Items such as foam rubber (latex foam), shower caps, waterproof textiles, and rubber backed articles and clothes, or pillows fitted with foam rubber pads should not be dried in the washer dryer.
- Fabric softeners, or similar products, should only be used as specified by the product manufacturer's instructions.
- Remove all objects from items that could be a source of fire ignition such as lighters or matches.
- Never stop the washer dryer before the end of the drying cycle unless all items are quickly removed and separated so that residual heat can dissipate.
- The final part of the washer dryer cycle takes place without heat (cool down cycle) to ensure that items reach a temperature that will not cause damage to them.
- Do not use high pressure water sprays and/or steam to clean the appliance.
- Clean the appliance with a moist cloth. Use only neutral detergents. Do not use abrasive products, abrasive cleaning pads, solvents or metal objects.
- Before any maintenance operation, deactivate the appliance and disconnect the mains plug from the socket.
2. SAFETY INSTRUCTIONS
2.1 Installation

The installation must comply with relevant national regulations.
- Follow the installation instructions supplied with the appliance.
- Do not install or use the appliance where the temperature can be less than 0°C or where it is exposed to the weather.
• Always keep the appliance vertical when it is being moved.
- Make sure that there is air circulation between the appliance and the floor.
- Remove all the packaging and the transit bolts.
- The floor area on which the appliance is to be installed must be flat, stable, heat resistant and clean.
- Keep the transit bolts in a safe place. If the appliance is to be moved in the future they must be reattached to lock
the drum to prevent an internal damage.
• Always take care when moving the appliance as it is heavy. Always use safety gloves and enclosed footwear.
- Do not install or use a damaged appliance.
- Do not install the appliance where the appliance door cannot be fully opened.
- Adjust the feet to have the necessary space between the appliance and the flooring.
- When the appliance is in its permanent position, check if it is levelled correctly with the aid of a spirit level. If it is not, adjust the feet accordingly.
2.2 Electrical Connection

WARNING!
Risk of fire and electric shock.
• The appliance must be earthed.
- Always use a correctly installed shockproof socket.
- Do not use multi-plug adapters and extension cables.
- Do not pull the mains cable to disconnect the appliance. Always pull the mains plug.
- Do not touch the mains cable or the mains plug with wet hands.
2.3 Water Connection
- Do not cause damage to the water hoses.
- Before connection to new pipes, pipes not used for a long time, where repair work has been carried out or new devices fitted (water meters, etc.), let the water flow until it is clean and clear.
- Ensure that there are no visible water leaks during and after the first use of the appliance.
3. INSTALLATION

WARNING!
Refer to Safety chapters.
2.4 Use

WARNING!
Risk of injury, electric shock, fire, burns or damage to the appliance.
- Do not put flammable products or items that are wet with flammable products in, near or on the appliance.
- Do not touch the glass door while a programme operates. The glass can get hot.
- Do not dry damaged (torn, frayed) items that contain padding or fillings.
- If laundry has been washed with a stain remover, carry out an additional rinse cycle before starting a drying cycle.
- Make sure that all metal objects are removed from the laundry.
- Dry only fabrics that are suitable to dry in the appliance. Follow the cleaning instruction on the item label.
- Do not sit or stand on the open door of the appliance.
- Do not dry dripping wet clothes in the appliance.
- Do not let hot items to touch the plastic parts of the appliance.
- Remove a detergent ball (if used) before starting a drying programme.
- Do not use a detergent ball if setting a non-stop programme.
2.5 Disposal
- Disconnect the appliance from the mains electrical and water supplies.
- Cut off the mains electrical cable close to the appliance and dispose of it.
- Remove the door catch to prevent children or pets from becoming trapped in the drum.
- Dispose of the appliance in accordance with local requirements for the disposal of Waste Electrical and Electronic Equipment (WEEE).
3.1 Unpacking

WARNING!
Remove all the packaging and the transit bolts before installing the appliance.

WARNING!
Use the gloves.
- Remove the external film. If necessary, use a cutter.
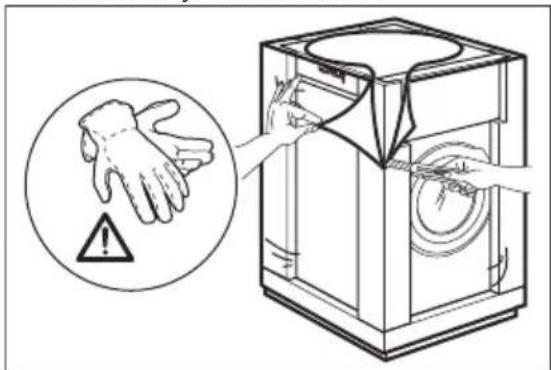
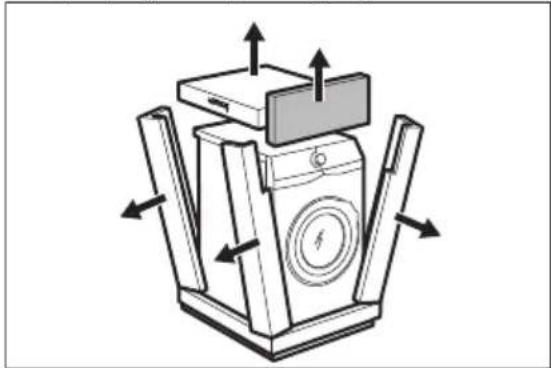
- Remove the cardboard top and the polystyrene packaging materials.
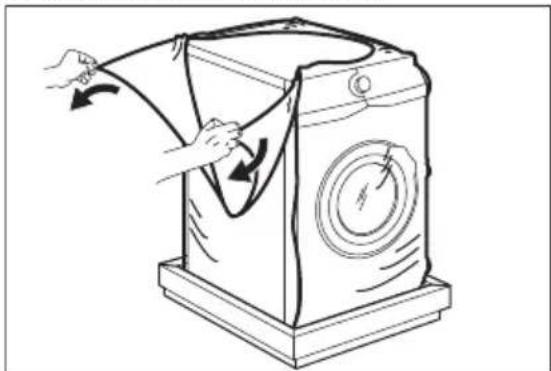
- Remove the internal film.
- Open the door and remove the polystyrene piece from the door seal and all the items from the drum.
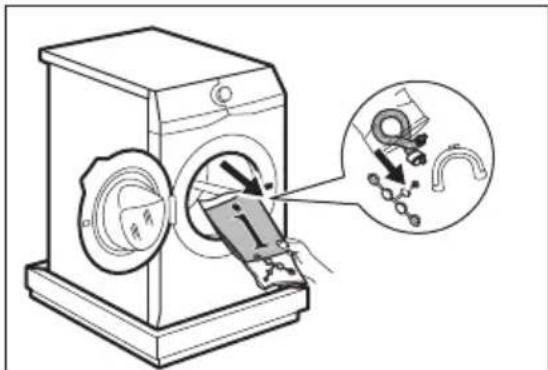
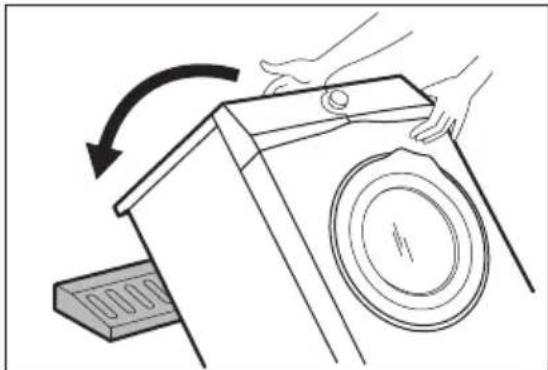
- Carefully put the appliance down on its rear side.
- Put the front polystyrene packaging element on the floor under the appliance.
Make sure not to damage the hoses.
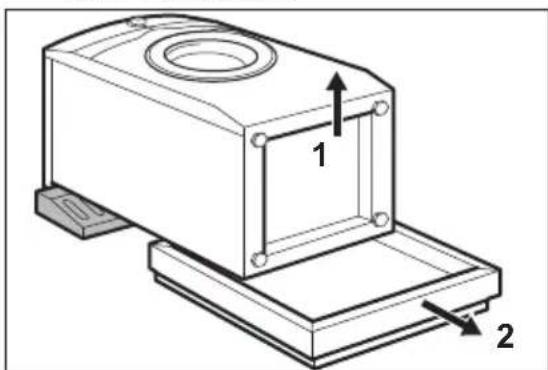
- Remove the polystyrene protection from the bottom.
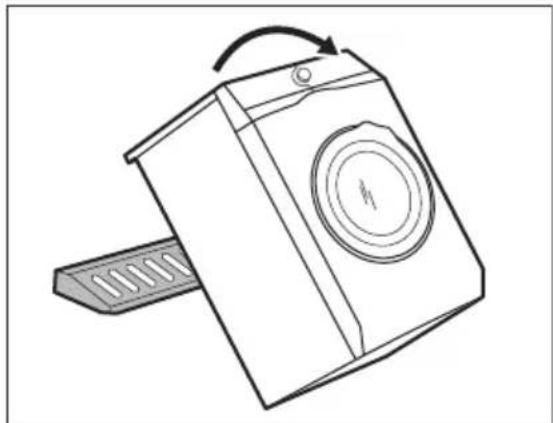
- Pull up the appliance in vertical position.
- Remove the power supply cable and the drain hose from the hose holders.

It is possible to see water flowing from the drain hose. This is due to the testing with water of the appliance in factory.
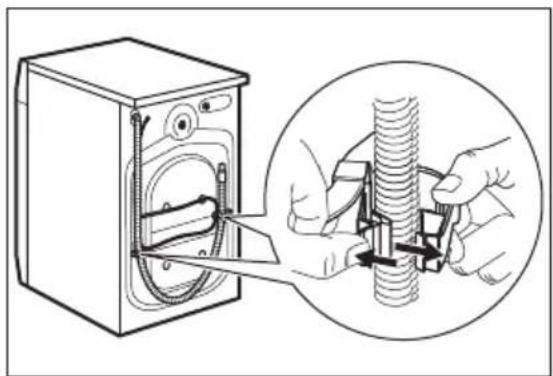
- Remove the three bolts by using the spanner supplied with the appliance.
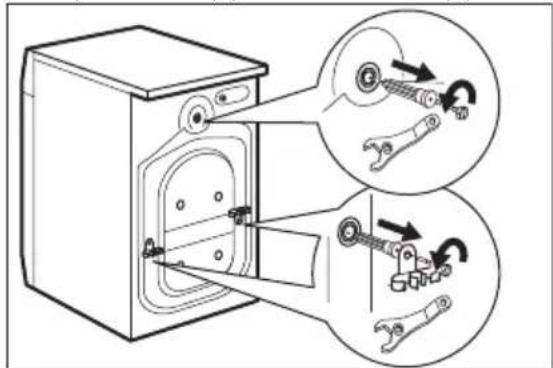
- Pull out the plastic spacers.
- Put the plastic caps, that you find in the user manual bag, in the holes.
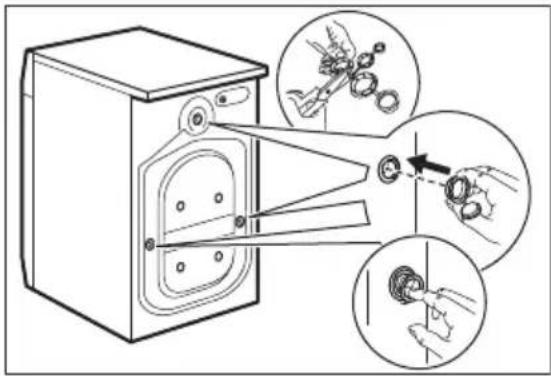

We recommend that you keep the packaging and the transit bolts for any movement of the appliance.
3.2 Positioning and levelling
- Install the appliance on a flat hard floor.

Make sure that carpets do not stop the air circulation below the appliance. Make sure that the appliance does not touch the wall or other units.
- Loosen or tighten the feet to adjust the level.

WARNING!
Do not put cardboard, wood or equivalent materials below the appliance feet to adjust the level.
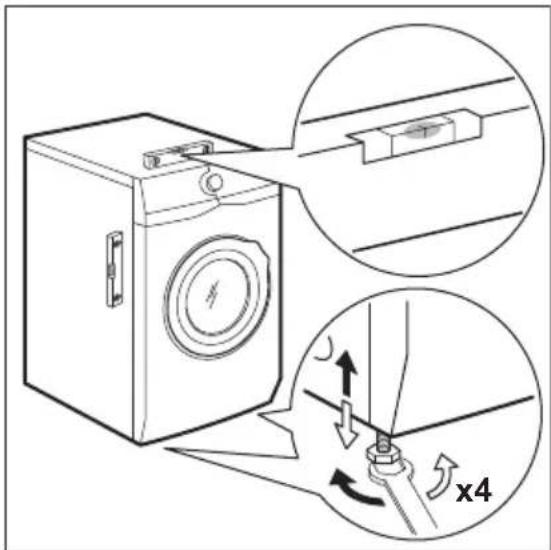
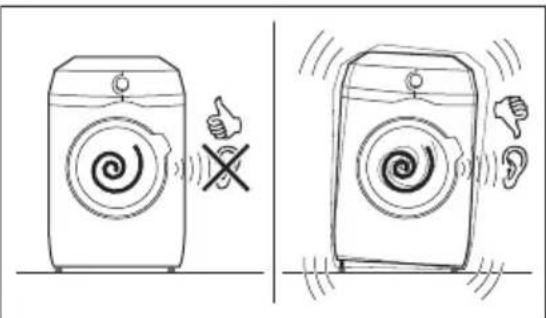
The appliance must be level and stable.
A correct adjustment of the appliance level prevents the vibration, noise and the movement of the appliance when in operation.
When the machine is installed on a plinth or if a washer dryer is stacked on the washing machine, use the accessories described in chapter 'Accessories'. Read carefully the instructions supplied with the appliance and with the accessory.
3.3 The inlet hose
- Connect the water inlet hose to the back of the appliance.
- Position it toward left or right depending on the position of the water tap.
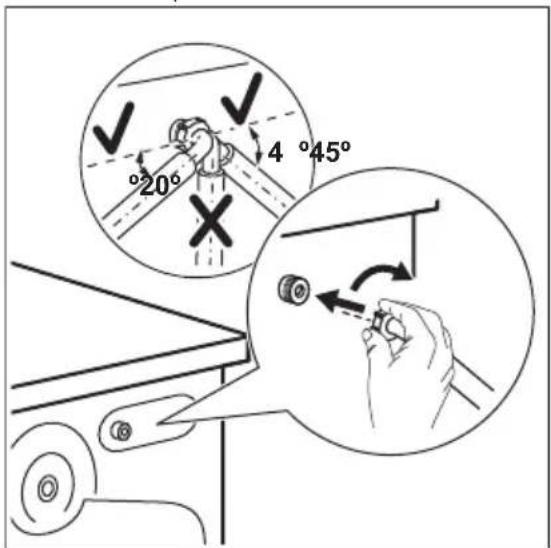
Make sure that the inlet hose is not in vertical position.
- If necessary, loose the ring nut to set it in the correct position.
- Connect the water inlet hose to the cold water tap with 3/4" thread.
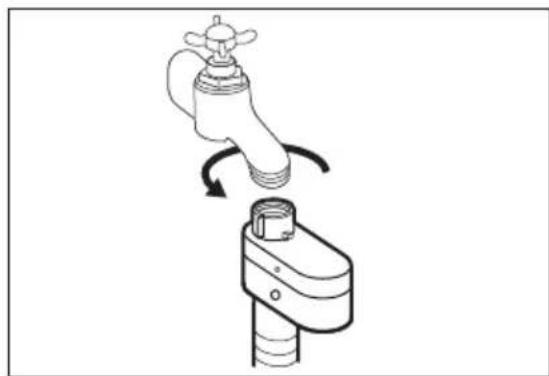
CAUTION!
Make sure that there are no
leaks from the couplings.
Do not use an extension hose if the inlet hose is too short. Contact the service centre for the replacement of the inlet hose.
3.4 Water-stop device
The inlet hose has a water stop device. This device prevents water leaks in the hose because of its natural ageing.
The red sector in the window «A» shows this fault.
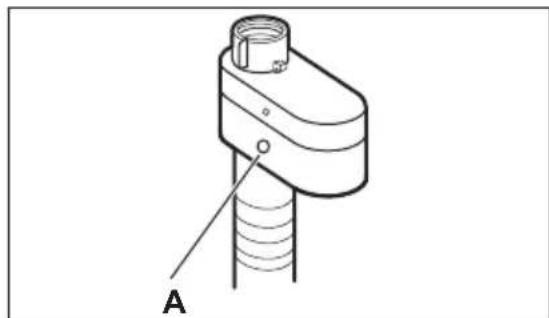
If this occurs, close the water tap and contact the authorized service centre to replace the hose.
3.5 Water drainage
The drain hose should be positioned at a height of not less than 60 cm and not more than 100 cm from the floor.
You can extend the drain hose to maximum 400 cm. Contact the authorized service centre for the other drain hose and the extension.
It is possible to connect the drain hose in different ways:
- Make a U shape with the drain hose and put it around the plastic hose guide.
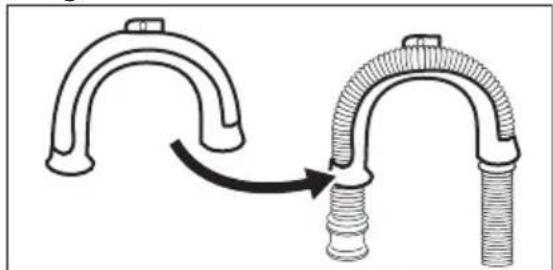
- On the edge of a sink - Fasten the guide to the water tap or to the wall.

Make sure that the plastic guide cannot move when the appliance drains.
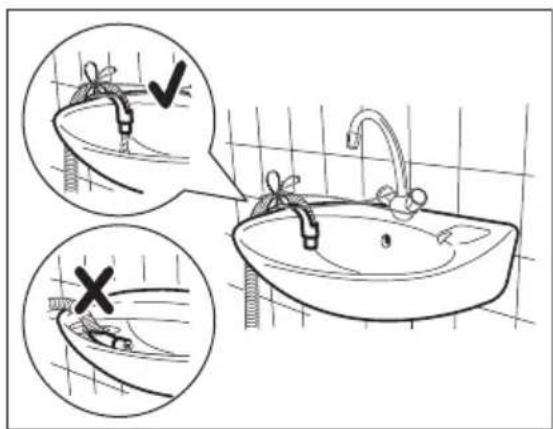

Make sure that the drain hose end is not immersed in the water. There may be a return of dirty water into the appliance.
- To a stand pipe with vent-hole - Insert the drain hose directly into a drain pipe. Refer to the illustration.
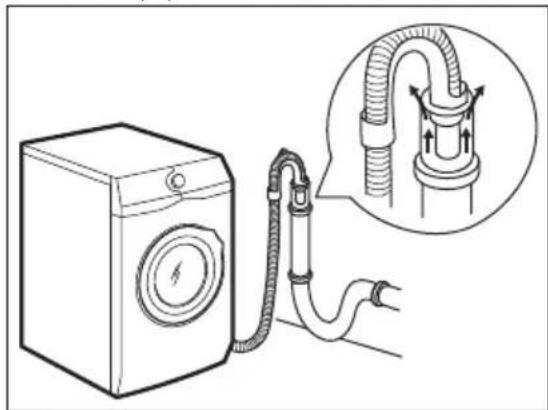

The end of the drain hose must always be ventilated, i.e. the inner diameter of the drain pipe (min. 38 mm - min. 1.5") must be larger than the external diameter of the drain hose.
- If the end of the drain hose looks like this (see the picture), you can push it directly into the stand pipe.
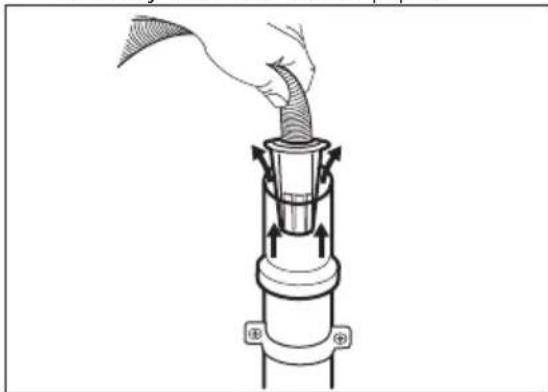
- Without the plastic hose guide, to a sink spigot - Put the drain hose in the spigot and tighten it with a clamp. Refer to the illustration.
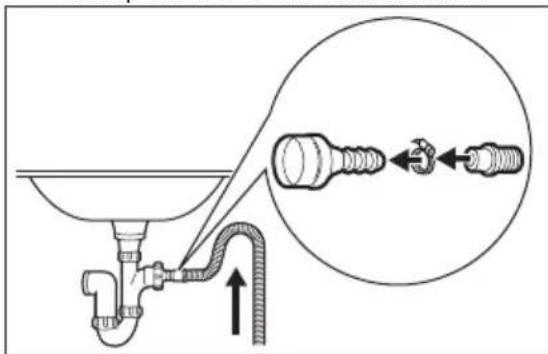

Make sure that the drain hose makes a loop to prevent particles going into the appliance from the sink.
- Position the hose directly to a built-in drain pipe in the room wall and tighten it with a clamp.
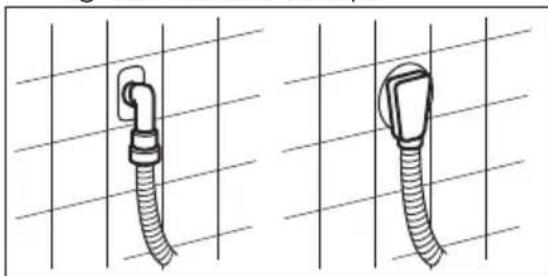
4. PRODUCT DESCRIPTION
4.1 Appliance overview
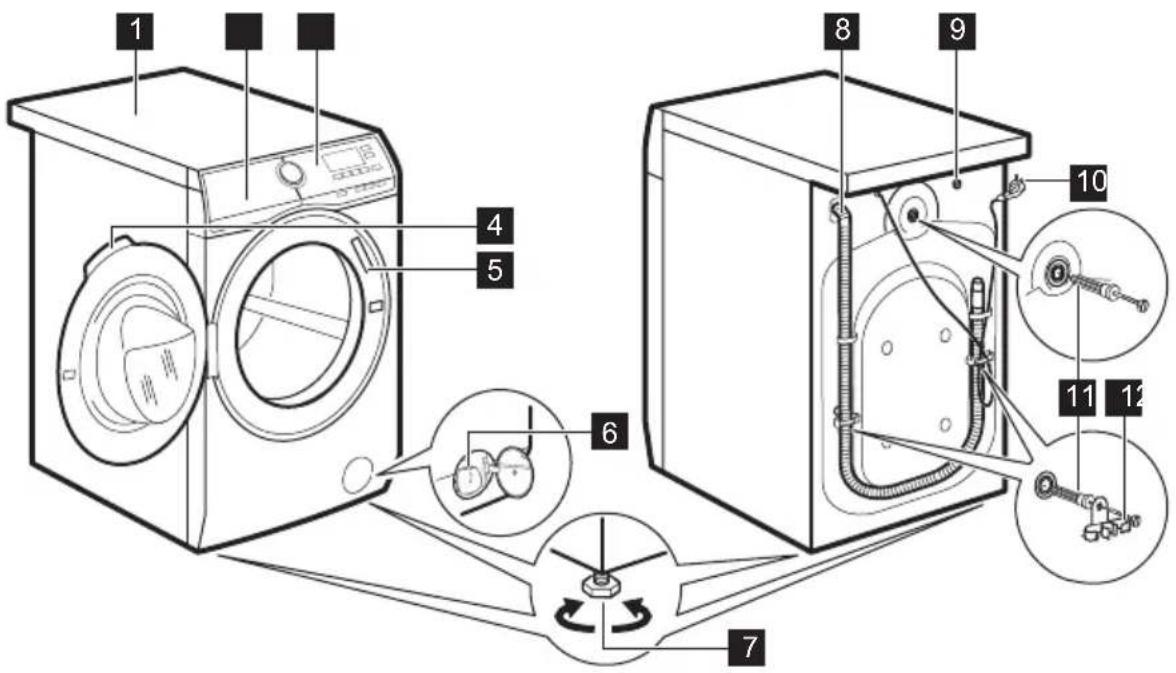
1 Worktop
2 Detergent dispenser
3 Control panel
4 Door handle
5 Rating plate
6 Drain pump filter
7 Feet for levelling the appliance
8 Drain hose
9 Inlet hose connection
10 Mains cable
11 Transit bolts
12 Hose support
5. CONTROL PANEL
5.1 Control panel description
Programme
Cottons
Cottons Eco
Synthetics
Delicates
Wool/Handwash
Outdoor
Anti-Allergy
NonStop 60min
Steam
Rinse
Time Drying
Auto Drying
Drain
Spin
Temp.
Stains
Prewash
Stains/Prewash
Wash
Dry
Mode
Quick Wash Delay Start
Start' Pause
Programme dial
Display
Drying time touch button (Time Drying)
Drying level touch button (Auto Drying)
Washing and drying mode touch button (Mode)
- Wash
- Dry
Start and pause touch button (Start/Pause)
Anti-stain and prewash touch button (Stains/Prewash)
- Stains
- Prewash
Delay Start touch button (Delay Start)
Time Saving touch button (Quick Wash)
Spin reduction touch button (Spin)
- Drain
- Spin
Temperature touch button (Temp.)
On/Off push button (On/Off)
5.2 Display
 | Maximum load indicator. The kg on flashes during laundry load estimation (refer to "PROSENSE load detection" paragraph). |
 | Maximum laundry indicator. It flashes when the laundry load exceeds the maximum declared load of the selected programme. If you run a programme when the drum is overloaded, also flashes at the end of the programme. |
 | Drying time indicator. |
 | Door locked indicator. |
| [CGH6] | The digital indicator can show:Programme duration (e.g., washing and/or drying phase).Delay time (e.g., 2hCycle end ( )Warning code (e.g. )E20 |
 | Washing phase indicator: it flashes during prewash and wash phase. |
 | Rinsing phase indicator. It flashes during rinse phase. |
 | The permanent Extra Rinse option:-the additional rinse.-two additional rinses. |
 | Spin and drain phase indicator. It flashes during spin and drain phase. |
 | Steam phase indicator. |
| [26KH] | Drying phase indicator. |
 | Child safety lock indicator. |
 | Temperature indicator. The indicator appears when a cold wash is set. |
 | Spin speed indicator. |
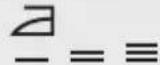 | Iron drying indicator. |
 | Cupboard drying indicator. |
 | Extra drying indicator. |
6. DIAL AND BUTTONS
6.1 On/Off
Pressing this button for a few seconds allows to activate or deactivate the appliance. Two different tunes sound while switching the appliance on or off.
As the Stand-by function automatically deactivates the appliance to decrease the energy consumption in a few cases, you may need to activate the appliance again.
For more details, refer to Stand-by paragraph in Daily Use chapter.
6.2 Introduction

The options/functions are not selectable with all washing programmes. Check the compatibility between options/functions and washing programmes in the "Programme Chart". An option/function can exclude another one, in this case the appliance doesn't allow you to set the incompatible options/functions together. Make sure the screen and touch buttons are always clean and dry.
6.3 Temp.
When you select a washing programme, the appliance automatically proposes a default temperature.
Touch this button repeatedly until the desired temperature value appears on the display.
When the display shows the indicators
* and, the appliance does not heat the water.
6.4 Spin
When you set a programme, the appliance automatically sets the maximum spin speed allowed.
Touch repeatedly this button to:
- Decrease the spin speed.

The display shows only the spin speeds available for the set programme.
- Set the drain-only option (Skipping the wash, rinse and spin phases): Drain.
The appliance performs the only draining phase of the selected washing programme.
The display shows the indicator -- (cold), and the indicator -(no spin) and the indicator ©.
- Set the spin-only option (Skipping the wash and rinse phases) : Spin.

Before setting this option, select a suitable washing programme for the garments. The appliance will perform the most fitting spin cycle for your garments care (e.g. For synthetics items, first select the Synthetics washing programme and then the Spin option).
The appliance performs only the spinning phase of the selected washing programme.
The display shows the indicator - - (cold), the phase indicator and the spin speed.
6.5 Stains/Prewash
Press this button repeatedly to activate one of the two options.
The relevant indicator goes on in the display.
- Stains

Select this option to add an anti-stain phase to a programme in order to treat heavily soiled or stained laundry with stain remover.
Pour the stain remover into
compartment 🐎. The stain remover will be added in the appropriate phase of the washing programme.

This option is not available with a temperature lower than 40 °C.
- Prewash

Use this option to add a pre-wash phase at 30\ °C before the washing phase.
This option is recommended for heavily soiled laundry, especially if containing sand, dust, mud and other solid particles.

The options can increase the programme duration.
6.6 Delay Start
With this option you can delay the start of a programme in a more convenient time.
Tap on the button repeatedly to set the required delay. The time increases by steps of 30 minutes up to 90' and from 2 hours up to 20 h.
After starting the cycle by the means of the Start/Pause button, the display shows the selected delay time and the appliance begins the countdown.
6.7 Quick Wash
With this option you can decrease the programme duration.
- If your laundry is normally or lightly soiled, it may be advisable to shorten the washing programme. Touch this button once to decrease the duration.
- In case of smaller load, touch this button twice to set an extra quick programme.
On the display the programme duration is adjusted accordingly.
When this button is set, the led above the button is on.

This option can also be used to shorten the Steam programme duration.
6.8 Time Drying
Touch this button to set the time that suits the fabrics you have to dry (refer to "Timed drying" table). The display shows the set value.
Each time you touch this button the time value increases by 5 minutes.

You cannot set all time values for different types of fabrics.
6.9 Auto Drying
Touch this button to set one of 3 automatic dryness levels proposed by the appliance.
On the display the relevant dryness indicator goes on:
• Iron dry: laundry to be ironed.
- 田 Cupboard dry: laundry to be put in store.
- Extra-dry: laundry to be fully dried.

You can not set all automatic levels for each type of fabrics.
6.10 Mode
Thanks to this button, a cycle can perform:
- Only washing : Wash indicator is on.
- Washing and drying : Wash and Dry indicators are on.
- Only drying : Dry indicator is on.
6.11 Start/Pause
Touch the Start/Pause button to start, pause the appliance or interrupt a running programme.
7. PROGRAMMES
7.1 Programme Chart
| Programme Programme description | |
| Washing programmes | |
| Cottons | White cotton and coloured cotton. Normally, heavily and lightly soiled items. |
| Cottons Eco | White cotton and fast-coloured cotton. Normally soiled items. The energy consumption decreases and the time of the washing programme is extended, ensuring good washing results.This programme at 60 °C with a load of 8 kg is the reference programme for energy label, in compliance with UAE. S 5010 2:2019. |
| Synthetics | Synthetic items or mixed fabric items. Normally soiled items. |
| Delicates | Delicate fabrics such as acrylics, viscose and mixed fabrics requiring gentler washing. Normally and lightly soiled items. |
 Wool/Handwash Wool/Handwash | Machine washable wool, hand washable wool and other fabrics with «hand washing» care symbol1). |
| [22XT] Outdoor | [7WG] Do not use fabric softener and make sure that there is no softener residue in the detergent dispenser.Outdoor clothing, technical, sport fabrics, waterproof and breathable jackets, shell jackets with a removable fleece or inner insulation. By performing a combined wash and dry pro-gramme, the drying phase also acts as water-repellent restorer. Make sure that the gar-ment care label permits tumble drying. By performing a combined wash and dry pro-gramme, the drying phase also acts as water-repellent restorer. Make sure that the gar-ment care label permits tumble drying. |
| Anti-Allergy | White cotton items. This programme removes micro-organisms thanks to a washing phase with the temperature maintained above 60°C for several minutes. This helps remove germs, bacteria, micro-organism and particles. An additional rinsing phase ensures a proper removal of detergent residues and pollens/allergenic items. In this way the wash is more effective. |
| Wash&Dry programme | |
| Programme Programme description | |||
| NonStop 60min | Complete programme composed of a washing phase and of a drying phase for a small load of mixed fabrics (cotton and synthetic items).Also, the indicator Appears on the display. | ||
| Steam programme | |||
| Steam | Steam programmes2) Steam can be used for dried, washed or worn once laundry. These programmes can reduce creases and odours and make your laundry softer.Do not use any detergent. If necessary, remove stains by washing or using localized stain removal.Steam programmes do not perform any hygienic cycle.Do not set a Steam programme with these types of items:Items to be washed at a temperature lower than 40°C.Items where it is not specified on the care label as being suitable for tumble drying.Items with label "Dry clean only". | ||
| Additional programmes | |||
| Rinse | To rinse and spin the laundry. All fabrics, except woollens and very delicate fabrics. Reduce the spin speed accordingly to the type of laundry. | ||
| 1) During this cycle the drum rotates slowly to ensure a gentle wash. It can seem that the drum doesn't rotate or doesn't rotate properly, but this is normal for this programme.2) If you set a Steam programme with dried laundry, at the end of the cycle the laundry could be humid. It is better to expose the items to the fresh air for about 10 minutes to let the humidity dry. When the programme is completed, quickly remove the laundry from the drum. After a steam cycle, items may be ironed however with less effort. | |||
| Programme temperature, maximum spin speed and maximum load | |||
| Programme Default temperatureTemperature range | Reference spin speedSpin speed range | Maximum load | |
| Washing programmes | |||
| Cottons | 40 °C95 °C - Cold | 1600 rpm1600 rpm - 400 rpm | 8 kg |
| Programme Default temperature | Temperature range | Reference spin speed Spin speed range | Maximum load |
| Cottons Eco | 60 °C | 1600 rpm | 8 kg |
| 60°C - 40 °C | 1600 rpm - 400 rpm | ||
| Synthetics | 40 °C | 1200 rpm | 4 kg |
| 60 °C - Cold | 1200 rpm - 400 rpm | ||
| Delicates | 40 °C | 1200 rpm | 4 kg |
| 40 °C - Cold | 1200 rpm - 400 rpm | ||
| Wool/Handwash | 40 °C | 1200 rpm | 1.5 kg |
| 40 °C - Cold | 1200 rpm - 400 rpm | ||
| Outdoor | 30 °C | 1200 rpm | 2 kg |
| 40 °C - Cold | 1200 rpm - 400 rpm | ||
| Anti-Allergy | 60 °C | 1600 rpm | 8 kg |
| 1600 rpm - 400 rpm | |||
| NonStop 60min | 30 °C | 1200 rpm | 1 kg |
| 40 °C - 30 °C | 1200 rpm - 1000 rpm | ||
| Steam | 1.5 kg | ||
| Rinse | 1600 rpm | 8 kg | |
| 1600 rpm - 400 rpm | |||
Programme options compatibility
| Programme | Cottons | Cottons Eco | Synthetics | Delicates | Wool/Handwash | Outdoor | Anti-Allergy | NonStop 60min | Steam | Rinse |
| Options | ||||||||||
| Spin | ■ | ■ | ■ | ■ | ■ | ■ | ||||
| Drain | ■ | ■ | ■ | ■ | ■ | ■ | ||||
| Options | ||||||||||
| Spin1) | ■ | ■ | ■ | ■ | ■ | ■ | ||||
| Extra Rinse | ■ | ■ | ■ | ■ | ■ | ■ | ||||
| Prewash | ■ | ■ | ■ | ■ | ||||||
| Stains2) | ■ | ■ | ■ | ■ | ||||||
| Delay Start | ■ | ■ | ■ | ■ | ■ | ■ | ■ | ■ | ||
| Quick Wash3) | ■ | ■ | ■ | ■ | ||||||
| Time Drying | ■ | ■ | ■ | ■ | ■ | ■ | ||||
| Auto Drying | ■ | ■4) | ■ |
1) Before setting this option, select a suitable washing programme for the garments. The appliance will perform the most fitting spin cycle for your garments care (e.g. For synthetics items, first select the Synthetics washing programme and then the Spin option).
2) This option is not available with temperature lower than 40\ °C .
3) If you set the shortest duration, we recommend that you decrease the load size. It is possible to fully load the appliance, however the washing results can be less satisfactory.
4) Iron Dry is not available with this programme.
7.2 Woolmark Apparel Care - Blue
- The wool wash cycle of this machine has been approved by The Woolmark Company for the washing of wool garments labelled as "hand wash" provided that the products are
washed according to the instructions on the garment label and those issued by the manufacturer of this washing machine. M1230
- The wool drying cycle of this machine has been tested and approved by The Woolmark Company. The cycle is suitable to dry wool garments which are labelled "hand wash" provided that the garments are washed in a Woolmark endorsed hand washing cycle and dried according to the instructions issued by the manufacturer. M1224
In UK, Eire, Hong Kong and India the Woolmark symbol is a certification trademark.
7.3 Automatic drying
| Dryness Level Type of fabric Load | ||
| Extra DryFor towelling materials | Cottons and Linen(bathrobes, bath towels, etc) | up to 6 kg |
| Cupboard DryFor items to be stored | Cottons and Linen(bathrobes, bath towels, etc) | up to 6 kg |
| Synthetics and mixed fabrics(jumpers, blouses, underwear, household and bed linen) | up to 4 kg | |
| Delicate fabrics(acrylics, viscose and delicate mixed fabrics) | up to 2 kg | |
| Wool items(woollen jumpers) | up to 1 kg | |
| Outdoor sporting garments(Outdoor clothing, technical, sport fabrics, waterproof and breathable jackets, shell jackets) | up to 2 kg | |
| Iron DrySuitable for ironing | Cottons and Linen(sheets, tablecloths, shirts, etc) | up to 6 kg |
7.4 Timed drying
| Dryness Level Type of fabric Load | (kg) | Spin speed (rpm) | Suggested duration (mins) | |
| Extra Dry For towelling materials | Cottons and Linen (bathrobes, bath towels, etc) | 6 1600 245 - 265 | ||
| 4 1600 165 - 185 | ||||
| 2 1600 125 - 135 | ||||
| Cupboard Dry For items to be stored | Cottons and Linen (bathrobes, bath towels, etc) | 6 1600 235 - 255 | ||
| 4 1600 155 - 175 | ||||
| 2 1600 115 - 125 | ||||
| Synthetics and mixed fabrics (jumpers, blouses, underwear, house- hold and bed linen) | 4 1200 135 - 145 | |||
| 1 1200 40 - 50 | ||||
| Delicates (acrylics, viscose and delicate mixed fabrics) | 2 1200 150 | |||
| Wool (woollen jumpers) | 1 1200 110 - 130 | |||
| Outdoor sporting garments (Outdoor clothing, technical, sport fab- rics, waterproof and breathable jackets, shell jackets) | 2 1200 160 | |||
| Iron Dry Suitable for ironing | Cottons and Linen (sheets, tablecloths, shirts, etc) | 6 1600 170 - 190 | ||
| 4 1600 105 - 125 | ||||
| 2 1600 75 - 85 | ||||
8. BEFORE FIRST USE

During installation or before first use you may observe some water in the appliance. This is a residual water left in the appliance after a full functional test in the factory to ensure the appliance is delivered to customers in perfect working order and is no cause for concern.
-
Make sure that all transit bolts have been removed from the appliance.
-
Make sure that the electrical power is available and the water tap is open.
- Pour 2 litres of water into the detergent compartment marked by
This action activates the drain system.
- Pour a small quantity of detergent into the compartment marked by
- Set and start a programme for cotton at the highest temperature without any laundry in the drum.
This removes all possible dirt from the drum and the tub.
9. SETTINGS
9.1 Child Lock
With this option you can prevent that the children play with the control panel.
- To activate/deactivate this option, touch the Spin and the Stains/Prewash buttons simultaneously until the indicator comes on/goes off on the display.
You can activate this option:
• After you touch the Start/Pause button: all the buttons and the programme dial are deactivated (except On/Off button).
- Before you touch the Start/Pause button: the appliance cannot start.
The appliance keeps the selection of this option after you switch it off.
9.2 Acoustic signals
This appliance is provided with different acoustic signals, that operate when:
- You activate the appliance (special short tune).
- You deactivate the appliance (special short tune).
- You touch the buttons (click sound).
- You make a wrong selection (3 short sounds).
- The programme is completed (sequence of sounds for about 2 minutes).
- The appliance has a malfunction (sequence of short sounds for about 5 minutes).
To deactivate/activate the acoustic signals when the programme is completed, touch the Stains/Prewash and the Delay Start buttons simultaneously for about 6 seconds.

If you deactivate the acoustic signals, they continue operate when the appliance has a malfunction.
9.3 Permanent Extra Rinse

With this option you can permanently have one or two extra rinses when you set a new programme.
- Simultaneously touch the Temp. button and the Spin button once to add one extra rinse. 📋 appears on the display.
- Simultaneously touch the Temp. button and the Spin button twice to add two extra rinses. 📋 appears on the display.
- Simultaneously touch the Temp. button and the Spin button three times to remove extra rinses. The display only shows 📁
10. DAILY USE - WASHING ONLY

WARNING!
Refer to Safety chapters.
10.1 Activating the appliance
- Connect the mains plug to the mains socket.
- Open the water tap.
- Press the On/Off button for a few seconds to activate the appliance. The indicator of the Start/Pause button starts flashing.
The programme dial is automatically set on Cotton programme and only the
indicator Wash is on above the Mode button.
The display shows the maximum load, the default temperature, the maximum spin speed, the indicators of the phases making up the programme and the cycle duration.
10.2 Loading the laundry
- Open the appliance door.
- Shake the items before you put them in the appliance.
- Put the laundry in the drum, one item at a time.
Make sure not to put too much laundry in the drum.
- Close the door firmly.
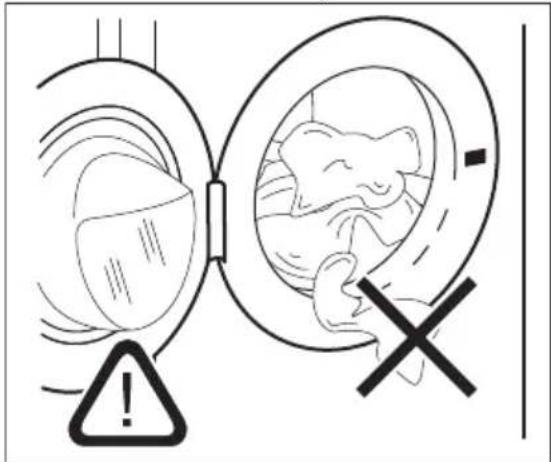

CAUTION!
Make sure that no laundry stays between the seal and the door. There is a risk of water leakage or damage to the laundry.
10.3 Filling the detergent and additives
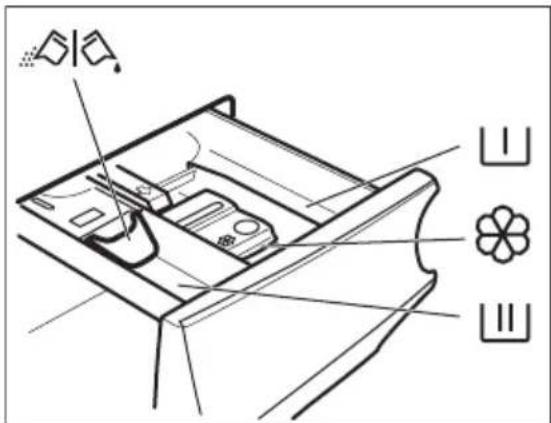
山
Compartment for prewash phase, soak programme or stain remover.
|||
Compartment for washing phase.
[NO TEXT]
Compartment for liquid additives (fabric conditioner, starch).
MAX
Maximum level for quantity of liquid additives.
◇|◇
Flap for powder or liquid detergent.
i
Always follow the instructions that you find on the packaging of the detergent products, but we recommend that you do not exceed the maximum indicated level (MAX) is quantity will however guarantee the best washing results.
i
After a washing cycle, if necessary, remove any detergent residue from the detergent dispenser.
10.4 Check the position of the flap
-
Pull out the detergent dispenser until it stops.
-
Press the lever down to remove the dispenser.
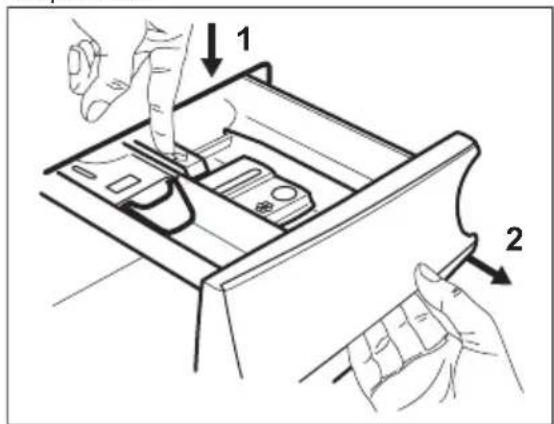
- To use powder detergent, turn the flap up.
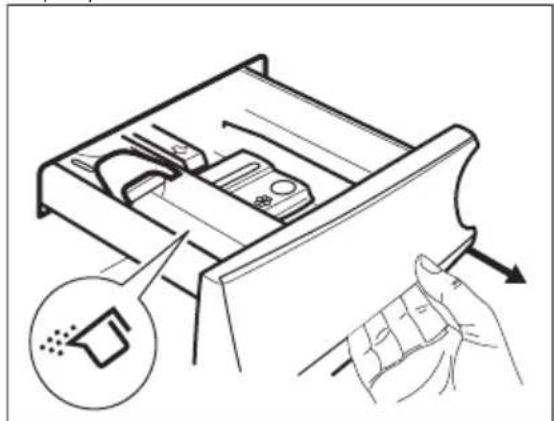
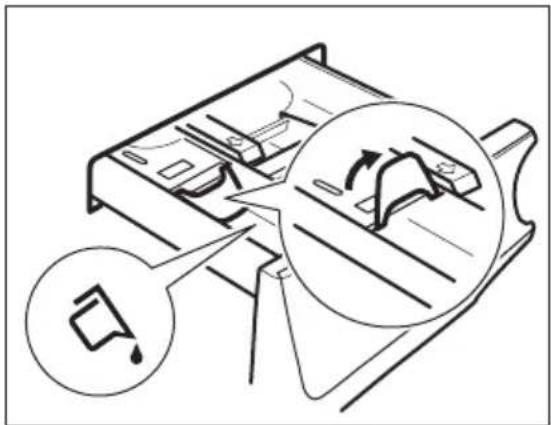
- To use liquid detergent, turn the flap down.
i
With the flap in the position DOWN:
• Do not use gelatinous or thick liquid detergents.
- Do not put more liquid detergent than the limit shown on the flap.
- Do not set the prewash phase.
- Do not set the delay start function.
- Measure out the detergent and the fabric conditioner.
- Carefully close the detergent dispenser.
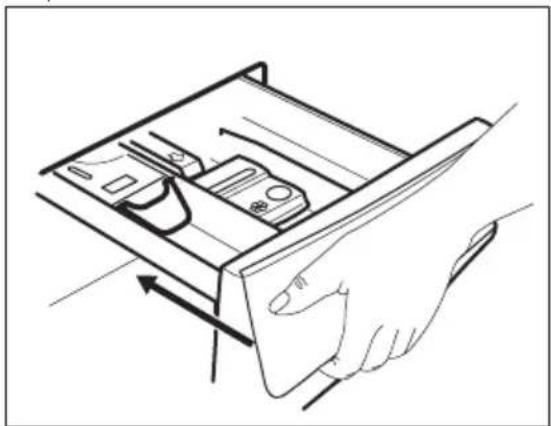
Make sure that the flap does not cause a blockage when you close the drawer.
10.5 Setting a programme
- Turn the programme dial to select the desired washing programme. The related programme indicator comes on.
The indicator of the Start/Pause button flashes.
The display shows the maximum declared load for the programme, the default temperature, the maximum spin speed, the washing phase indicators (when available) and an indicative programme duration.
- To change the temperature and/or the spin speed, touch the related buttons.
- If desired, set one or more options by touching the related buttons. The related indicators come on in the display and the given information changes accordingly.
i
To perform washing only, make sure that only the Wash indicator is on above the Mode button.
i
In case a selection is not possible, no indicator comes on and an acoustic signal sounds.
10.6 Starting a programme
Touch the Start/Pause button to start the programme.
The related indicator stops flashing and stays on.
In the display, the indicator of the operating phase starts flashing and the maximum load indicator goes off.
The programme starts, the door is locked. The display shows the indicator
[NO TEXT]
i
The drain pump can operate shortly before the appliance fills water.
10.7 Starting a programme with the delay start
- Touch the Delay Start button repeatedly until the display shows the desired delay time. The indicator Delay Start goes on.
- Touch the Start/Pause button.
The appliance starts the countdown of the delay start.
When the countdown is completed, the programme starts.

The PROSENSE estimation starts at the end of the countdown.
Cancelling the delay start after the countdown has started
To cancel the delay start:
- Touch the Start/Pause button to pause the appliance. The related indicator flashes.
- Touch the Delay Start button repeatedly until the display shows ☐
- Touch the Start/Pause button again to start the programme immediately.
Changing the delay start after the countdown has started
To change the delay start:
- Touch the Start/Pause button to pause the appliance. The related indicator flashes.
- Touch the Delay Start button repeatedly until the display shows the desired delay time.
- Touch the Start/Pause button again to start the new countdown.
10.8 The ProSense load detection

The programme duration in the display is referred to a medium/high load.
After touching the Start/Pause button, the maximum declared load indicator goes off, the indicator flashes, the ProSense starts the laundry load detection:
- The appliance detects the load in the first 30 seconds: the indicator and the time dots: flash, the drum rotates shortly.
- At the end of the load detection, the indicator kg goes off and the time dots: stop flashing. The programme duration will be adjusted accordingly and could increase or decrease. After further 30 seconds, the water filling starts.
At the end of the load detection, in case of drum overload, the indicator MAX is flashing in the display:
In this case, for 30 seconds, it is possible to pause the appliance and remove the exceeding garments.
Once removed the exceeding garments, touch the Start/Pause button to start the programme again. The ProSense phase can be repeated up to three times (see point 1).
Important! If the laundry amount will not be reduced, the washing programme starts anyway, despite the overload. In this case, it will be not possible to guarantee the best washing results.

About 20 minutes after the programme start, the programme duration could be adjusted again depending on the capacity of water absorption of the fabrics.

The ProSense detection is carried out with complete washing programmes only (no skipping phase selected).
10.9 Programme phase indicators
When the programme starts the indicator of the running phase flashes and the other phase indicators are steady on.
E.g. the washing or pre wash phase is
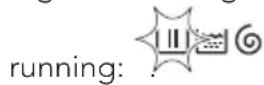
When the phase ends the relevant indicator stops flashing and is steady on. The next phase indicator starts flashing.
E.g. the rinse phase is running:

If you select the Steam programme the steam phase indicator 🤒 comes on.
10.10 Interrupting a programme and changing the options
When the programme is running, you can change only some options:
- Touch the button Start/Pause. The related indicator flashes.
- Change the options. The given information in the display changes accordingly.
- Touch the button Start/Pause again. The washing programme continues.
10.11 Cancelling a running programme
- Press the button On/Off to cancel the programme and to deactivate the appliance.
- Press the button On/Off again to activate the appliance.
Now, you can set a new washing programme.

If the ProSense phase is already carried out and the water filling is already started, the new programme starts without repeating the ProSense phase. The water and the detergent are not drained out in order to avoid waste. The display shows the maximum duration of the programme, updating it about 20 minutes after the starting of the new programme.
10.12 Opening the door - Adding garments
While a programme or the delay start operates, the appliance door is locked.

If the temperature and level of the water in the drum are too high and/or the drum still rotates you cannot open the door.
-
Touch the button Start/Pause. In the display the related door lock indicator goes off.
-
Open the appliance door. If necessary, add or remove the items.
- Close the door and touch the button Start/Pause.
The programme or the delay start continues. - The door can be opened when the programme is complete, or set Spin Drain programme/option and then press Start/Pause button.
10.13 End of the programme
When the programme has finished, the appliance stops automatically. The acoustic signals operate (if they are active).
In the display all washing phase indicators become steady and the time area shows ☐
The indicator of the Start/Pause button goes off.
The door unlocks and the indicator goes off.
MAX flashes at the end of the programme in case of overloaded drum.
- Press the On/Off button to deactivate the appliance.
After five minutes from the end of the programme, the energy saving function automatically deactivates the appliance.

When you activate the appliance again, the display show the end of the last selected programme. Turn the programme dial to set a new cycle.
- Remove the laundry from the appliance.
- Make sure that the drum is empty.
- Keep the door and the detergent dispenser slightly ajar to prevent mildew and odours.
- Close the water tap.
10.14 Draining water out after end of cycle
If you have chosen a programme or an option that does not empty out the
water of the last rinse, the programme is completed, but:
- The display shows the door locked indicator
- The drum still turns at regular intervals to prevent the creases in the laundry.
• The door stays locked. -
You must drain the water to open the door:
-
If necessary, touch the Spin button to decrease the spin speed proposed by the appliance.
- Press Start/Pause to continue the cycle
- When the programme is completed and the door locked indicator →0 goes off, you can open the door.
- Press the On/Off button a few seconds to deactivate the appliance.

In any case, the appliance empties the water out automatically after approximately 18 hours.
10.15 Stand-by option
The Stand-by function automatically deactivates the appliance to decrease the energy consumption when:
- You do not use the appliance for 5 minutes before you touch the Start/Pause button.
Press the button On/Off to activate the appliance again.
• After 5 minutes from the end of the washing programme Press the On/Off button to activate the appliance again.
The display shows the end of the last set programme.
Turn the programme dial to set a new cycle.

If you set a programme or an option that ends with water in the drum, the Stand-by function doesn't deactivate the appliance to remind you to drain the water.
11. DAILY USE - WASHING & DRYING

WARNING!
Refer to Safety chapters.

This appliance is an automatic washer dryer.
11.1 Complete wash&dry programmes
Automatic Non-Stop programme
The appliance is equipped with the NonStop 60min programme, an automatic wash&dry programme where it is not necessary to set the Dry mode.
To run this programme:
-
After loading laundry and detergent, press the On/Off button for some seconds to activate the appliance.
-
Set the NonStop 60min programme by means of the programme dial.
The indicator 📊 appears on the display
- Touch the Start/Pause button to start the programme.
Non-automatic wash&dry programmes
In some washing programmes, you can combine Wash and Dry mode for running a complete wash&dry programme.
Proceed as follows:
-
Press the On/Off button for some seconds to activate the appliance.
-
Load the laundry one item at a time.
-
Put the detergent and the additives in the appropriate compartment.
-
Turn the programme dial to the washing programme. The display shows the default temperature and spin. If necessary, change them according to your laundry. The display also shows the maximum recommended load for washing phase.
-
Set the desired options, if there are available.
-
Touch the Mode button once to activate also the drying function. The Wash and Dry indicators come on.
The indicators and _ = ≡ appear on the display. The display also shows the maximum recommended load for a washing and drying programme (e.g. 6 kg for cottons).
- Now, you can choose an automatic drying level or a specific timed drying.
11.2 Washing and Drying - Automatic levels
- Tap on the Auto Drying button repeatedly until the display shows the required dryness level. The indicators in the display illuminate accordingly:
a. 2 = Iron dry: for cotton items;
b. Cupboard dry: for cotton and synthetic items;
c. - = Extra dry: for cotton items.
The time value on the display is the duration of both cycles washing and drying, calculated on a default load size.
i
To have a good drying by using less energy and in a shorter time, the appliance does not let you set a too low spin speed for the items to be washed and dried.
- Touch button Start/Pause to start the programme. The PROSENSE estimation starts.
In the display the door locked —0 indicator goes on, the indicator of the running phase starts flashing. The display also shows the remaining programme time.
11.3 Washing and Timed Drying
- Tap on the button Time Drying repeatedly to set the desired time
value (see the "Timed drying" table the "Programmes" chapter). The drying level indicator goes off and the indicator comes on.
Each time you tap on this button the time value increases by 5 minutes. The display shows the set new time value.
- Touch the Start/Pause to start the programme. The PROSENSE estimation starts.
In the display the door locked indicator comes on and the indicator of the running phase starts flashing. The display also shows the remaining programme time.
11.4 At the end of the drying programme
• The appliance stops automatically.
- The acoustic signals operate (if they are active).
- In the display comes on.
- The indicator of button Start/Pause goes off. The door locked → goes off
- Press the button On/Off for some seconds to deactivate the appliance.
i
After some minutes from the end of the programme, the energy saving function deactivates the appliance automatically.
- Remove the laundry from the appliance.
- Make sure that the drum is empty.
i
After drying phase, clean the drum, the seal and the inside of the door with a wet cloth.
12. DAILY USE - DRYING ONLY

WARNING!
Refer to Safety chapters.

This appliance is an automatic washer dryer.
12.1 Preparation to drying
- Press the On/Off button for some seconds to activate the appliance.

With a drying-only programme the display does not show the maximum load and the PROSENSE estimation is deactivated.
- Load the laundry one item at a time.
- Turn the programme dial to the programme suitable for the items to dry.
- Tap on the Mode button twice to exclude washing and perform drying only. The Dry indicator is on. The
indicators and appear on the display.

When drying a big amount of laundry, to have good drying performances, make sure that the laundry itself is not rolled up and that is uniformly distributed in the drum.
12.2 Drying - Automatic levels
- Tap on the Auto Drying button repeatedly until the display shows the required dryness level. The indicators in the display illuminate accordingly:
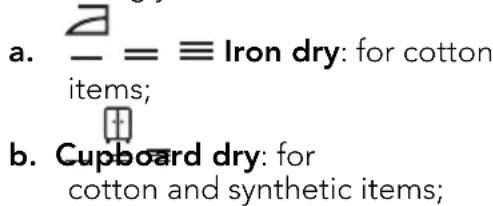
c. Extra dry: for cotton items.
The display shows the drying programme duration.

To have a good drying by using less energy and in a shorter time, the appliance does not let you set a too low spin speed for the items to be washed and dried.
- Touch button Start/Pause to start the programme.
In the display the door locked —— indicator goes on, the indicator of the running phase starts flashing.
The display also shows the remaining programme time.
12.3 Timed Drying
- Tap on the button Time Drying repeatedly to set the desired time value (see the "Timed drying" table the "Programmes" chapter). The drying level indicator goes off and the indicator comes on.
Each time you tap on this button the time value increases by 5 minutes. The display shows the set new time value.
- Touch the Start/Pause to start the programme.
In the display the door locked indicator comes on and the indicator of the running phase starts flashing.
The display also shows the remaining programme time.
12.4 At the end of the drying programme
• The appliance stops automatically.
- The acoustic signals operate (if they are active).
- In the display comes on.
- The indicator of button Start/Pause goes off. The door locked → goes off
- Press the button On/Off for some seconds to deactivate the appliance.

After some minutes from the end of the programme, the energy saving function deactivates the appliance automatically.
- Remove the laundry from the appliance.
- Make sure that the drum is empty.
13. FLUFF IN THE FABRICS
During the washing and/or drying phase, some types of fabric, (sponge, wool, sweatshirt) could release fluff.
The released fluff could stick to the fabrics during the next cycle.
This inconvenient increases with technical fabrics.
To prevent the fluff in your laundry, we recommend that you:
- To do not wash dark fabrics after you washed and dried light coloured fabrics (hand towel, wool, sweatshirt) and the contrary.
- To dry this type of fabrics at open air when they are washed the first time.
- To clean the drain filter.
• After the drying phase, clean the empty drum, the gasket and the door with a wet cloth.
14. HINTS AND TIPS

WARNING!
Refer to Safety chapters.
14.1 The laundry load
- Divide the laundry into: white, coloured, synthetics, delicates and wool.
- Follow the washing instructions on the laundry care labels.
- Do not wash white and coloured items together.
- Some coloured items can discolour with the first wash. We recommend that you wash them separately for the first couple of times.
- Button up pillowcases, close zippers, hooks and poppers. Tie up belts.
• Empty pockets and unfold. - Turn multilayered fabrics, wool and items with printed illustrations inside out.
- Pre-treat tough stains.

After drying phase, clean the drum, the seal and the inside of the door with a wet cloth.
To remove the fluff inside the drum, set a special programme:
- Empty the drum.
- Clean the drum, the gasket and the door with a wet cloth.
- Set the rinse programme.
- Simultaneously press the Spin and the Quick Wash buttons until the display shows CLE to activate the cleaning function.
- Touch the Start/Pause button to start the programme.

If the appliance is frequently used, carry out the CLE programme regularly.
- Wash heavy soil stains with a special detergent.
- Be careful with curtains. Remove the hooks and put the curtains in a washing bag or pillowcase.
- Do not wash laundry without hems or with cuts.
- Use a washing bag to wash small and/or delicate items (e.g. underwired bras, belts, tights, etc.).
- A very small load can cause balance problems with the spin phase leading to excessive vibration. If this occurs:
a. interrupt the programme and open the door (refer to "Daily Use" chapter);
b. manually redistribute the load so that the items are spaced evenly around the tub;
c. press the Start/Pause button. The spin phase continues.
14.2 Stubborn stains
For some stains, water and detergent is not sufficient.
We recommend that you pre-treat these stains before you put the items in the appliance.
Special stain removers are available. Use the special stain remover that is applicable to the type of stain and fabric.
14.3 Detergents and other treatments
- Only use detergents and other treatments specially made for washing machines:
- powder detergents for all types of fabric, excluding delicate. Prefer powder detergents containing bleach for whites and laundry sanitization - liquid detergents, preferably for low temperature wash programmes (60 °C max) for all types of fabric, or special ones for woollens only.
- Do not mix different types of detergents.
- To help the environment, do not use more than the recommended quantity of detergent.
- Follow the instructions that you find on packaging of the detergents or other treatments without exceeding the indicated maximum level (i). MAX
- Use the recommended detergents for the type and colour of the fabric, the programme temperature and the level of soil.
14.4 Ecological hints
- Set a programme without the prewash phase to wash laundry with normal soil.
• Always start a washing programme with the maximum load of laundry allowed. - If you pre-treat the stains or use a stain remover, set a programme with a low temperature.
- To use the correct quantity of detergent, check the water hardness
of your domestic system. Refer to "Water hardness".
14.5 Water hardness
If the water hardness in your area is high or moderate, we recommend that you use a water softener for washing machines. In areas where the water hardness is soft it is not necessary to use a water softener.
To find out the water hardness in your area, contact your local water authority.
Use the correct quantity of water softener. Follow the instructions that you find on the packaging of the product.
14.6 Prepare the drying cycle
- Open the water tap.
- Check if the drain hose is connected properly. Refer to installation chapter for more information.
- For the maximum laundry load of the drying programmes, refer to the drying programmes table.
14.7 Items not suitable for drying
Do not set a drying programme for this laundry:
- Synthetic curtains.
- Pieces of clothing with metal inserts.
- Nylon stockings.
- Quilts.
- Bed covers.
- Duvets.
- Anoraks.
- Sleeping bags.
- Fabrics with residue of hair sprays, nail solvents or similar.
• Garments with foam-rubber or materials similar to foam-rubber.
14.8 Garment labels
When you dry the laundry, obey the indications on the labels of the manufacturers:
• =The item can be tumble dried
- 📄 = The drying cycle is at high temperature
• =The drying cycle is at reduced temperature
- =The item can not be tumble dried.
14.9 Drying cycle duration
The drying time can change depending on:
- speed of the last spin
- dryness level
- type of laundry
- weight of the load
14.10 Additional drying
If, at the end of the drying programme, the laundry is still damp, set a short drying cycle again.

WARNING!
To avoid creasing and shrinkage do not overdry the laundry.
15. CARE AND CLEANING

WARNING!
Refer to Safety chapters.
15.1 External cleaning
Clean the appliance with mild soap and warm water only. Fully dry all the surfaces.

CAUTION!
Do not use alcohol, solvents or chemical products.

CAUTION!
Do not clean the metal surfaces with chlorine-based detergent.
15.2 Descaling

If the water hardness in your area is high or moderate, we recommend that you use a water descaling product for washing machines.
Regularly examine the drum to check for limescale.
14.11 General Tips
Refer to the «Drying programmes» table to find the average drying times. Experience will help you to dry the laundry better. Take note of the duration of the cycles done before.
To avoid the static charge at the end of the drying cycle:
- Use fabric conditioner in the washing cycle.
- Use special fabric conditioner for tumble dryers.
When the drying programme is completed remove the laundry promptly.
The regular detergents already contain water softening agents, but we recommend to run a cycle with empty drum and a descaling product occasionally.

Always follow the instructions that you find on the packaging of the product.
15.3 Maintenance wash
The repeated and prolonged use of low temperature programmes can cause detergent deposits, fluff residues, bacterial growth inside the drum and the tub. This could generate bad odours and mildew.
To eliminate these deposits and hygienize the inner part of the appliance, run a maintenance wash regularly (at least once a month):
- Remove all laundry from the drum.
- Run a cotton programme with the highest temperature with a small quantity of powder detergent.
15.4 Door seal
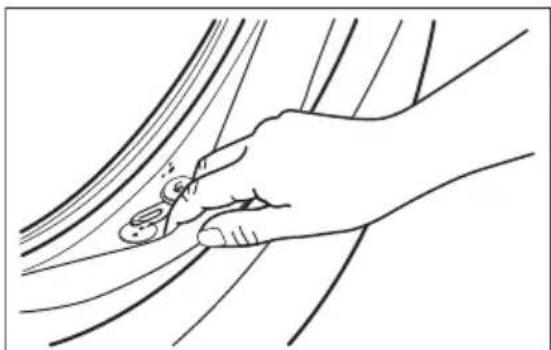
Regularly examine the seal and remove all objects from the inner part.
15.5 Cleaning the drum
Regularly examine the drum to prevent rust forming.
For a complete cleaning:
- Clean the drum with special products for stainless steel.

Always follow the instructions that you find on the packaging of the product.
- Run a short cotton programme at high temperature with empty drum and with a small quantity of powder detergent, in order to rinse out any residues left.
15.6 Cleaning the detergent dispenser
To prevent possible deposits of dried detergent or clotted fabric softener and/or formation of mould in the detergent dispenser drawer, once in a while carry out the following cleaning procedure:
- Open the drawer. Press the catch downwards as indicated in the picture and pull it out.
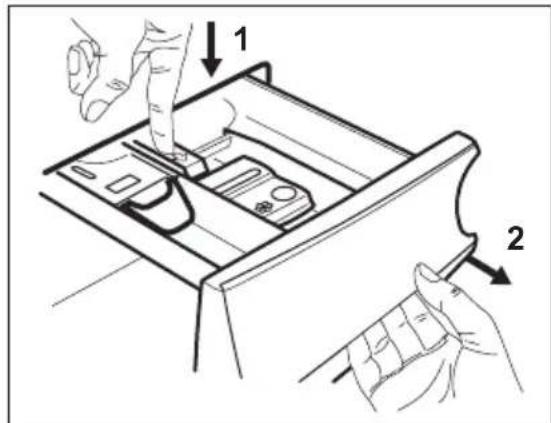
- Remove the top part of the additive compartment to aid cleaning and flush it out under running warm water, to remove any traces of accumulated detergent. After cleaning, replace the top part in its position.
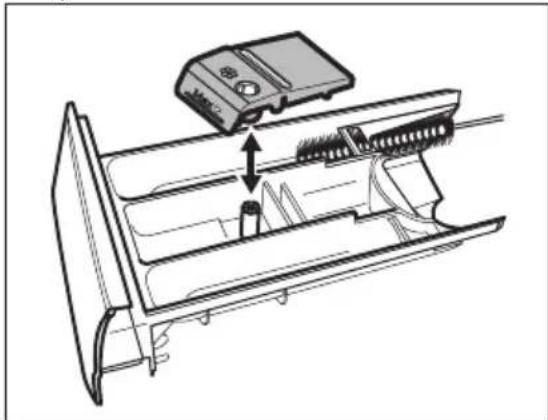
- Make sure that all detergent residue is removed from the upper and lower part of the recess. Use a small brush to clean the recess.
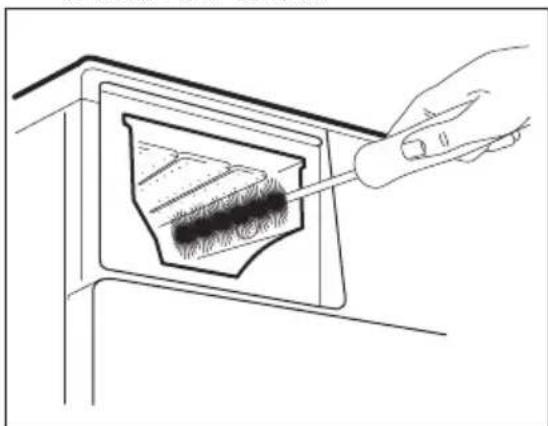
- Insert the detergent drawer into the guide rails and close it. Run the rinsing programme without any clothes in the drum.
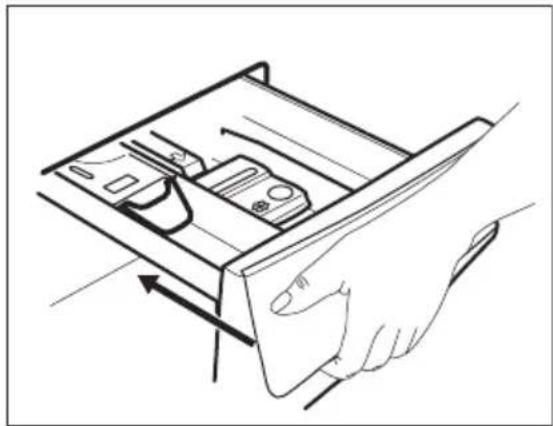
15.7 Cleaning the drain pump

WARNING!
Disconnect the mains plug from the mains socket.

Regularly check the drain pump filter and make sure that it is clean.
Clean the drain pump if:
- The appliance does not drain the water.
• The drum does not turn.
- The appliance makes an unusual noise because of the blockage of the drain pump.
- The display shows the alarm code E20.

WARNING!
- Do not remove the filter while the appliance operates.
- Do not clean the pump if the water in the appliance is hot. Wait until the water cools down
Proceed as follows to clean the pump:
- Open the pump cover.
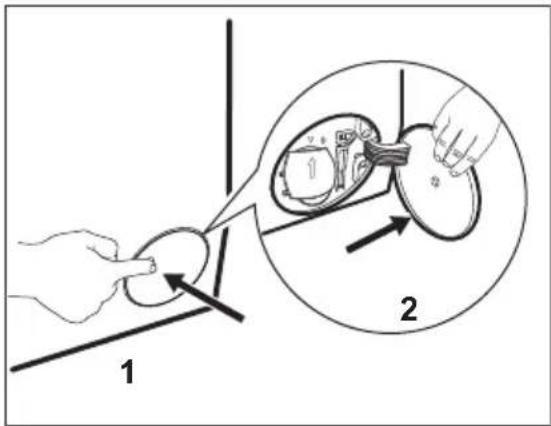
-
Place a suitable bowl below the drain pump access to collect the water that flows out.
-
Open the chute downwards. Always keep a rag nearby to dry up any water spillages when removing the filter.
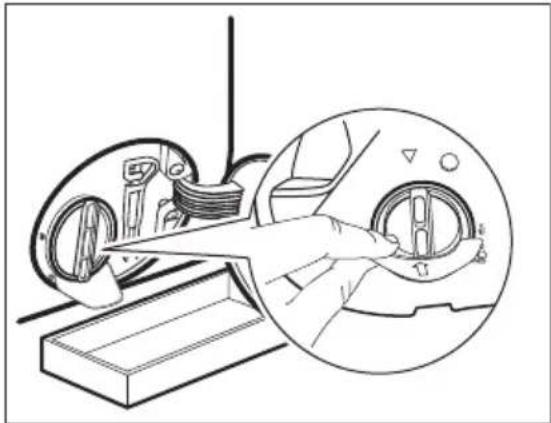
- Turn the filter 180 degrees in anti-clockwise direction to open it, without removing. Let the water flow out.
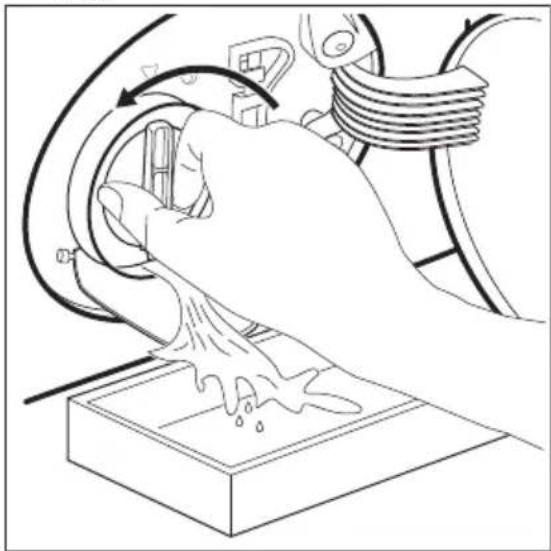
-
When the bowl is full of water, turn the filter back and empty the container.
-
Repeat the steps 4 and 5 until the water stops to flow out.
- Turn the filter anti-clockwise to remove it.
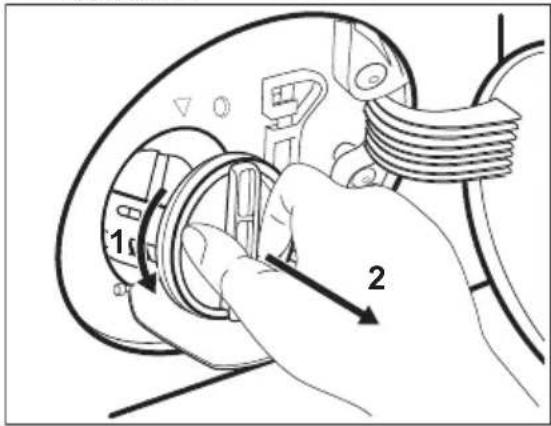
- If it is necessary, remove fluff and objects from the filter recess.
- Make sure that the impeller of the pump can rotate. If it does not rotate, contact the Authorised Service Centre.
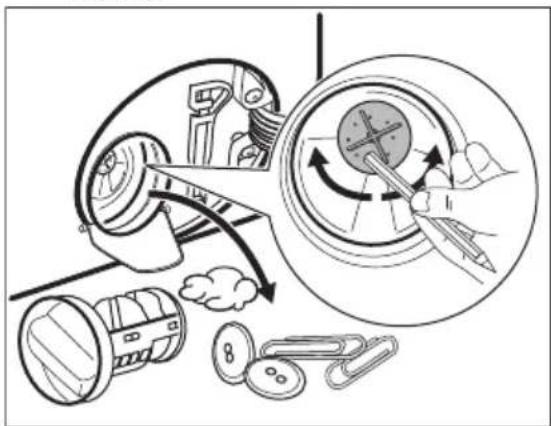
- Clean the filter under the water tap.
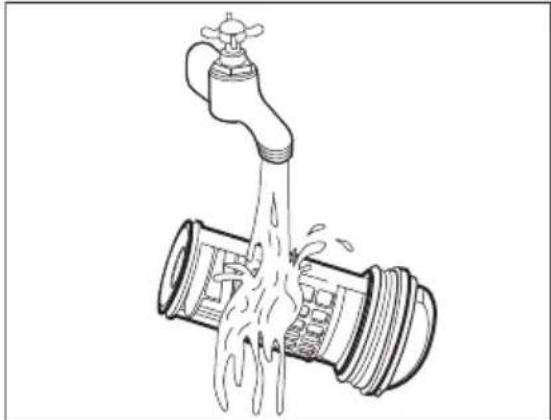
- Put the filter back into the special guides by turning it clockwise. Make sure that you tighten the filter correctly to prevent leakages.
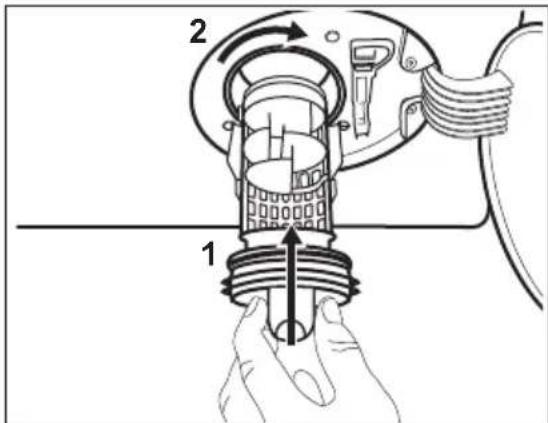
- Close the pump cover.
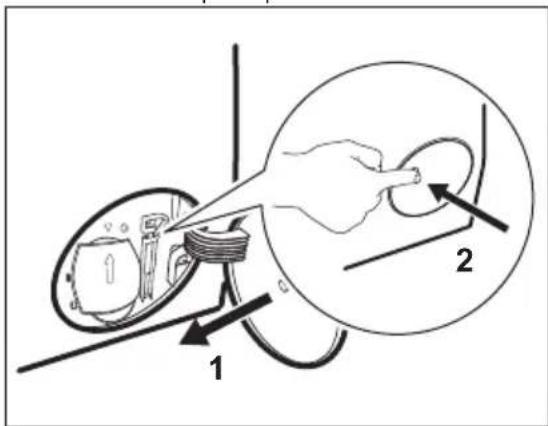
When you drain the water with the emergency drain procedure, you must activate the drain system again:
a. Put 2 litres of water in the main wash compartment of the detergent dispenser.
b. Start the programme to drain the water.
15.8 Cleaning the inlet hose and the valve filter
It is recommended to clean both the filters of the inlet hose and valve occasionally to remove any deposit, collected over the time:
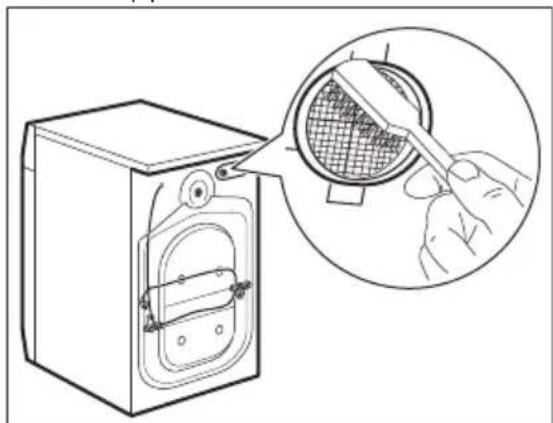
- Remove the inlet hose from the tap and clean the filter.
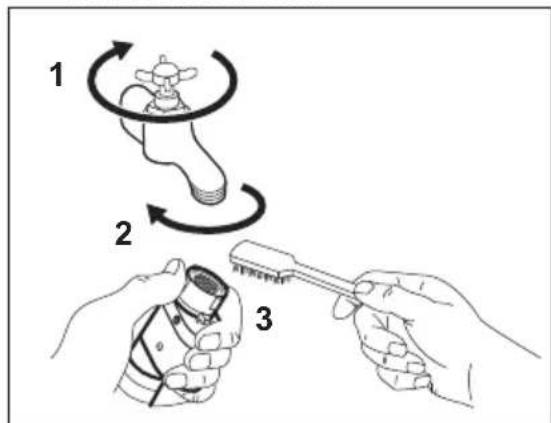
- Remove the inlet hose from the appliance by loosening the ring nut.
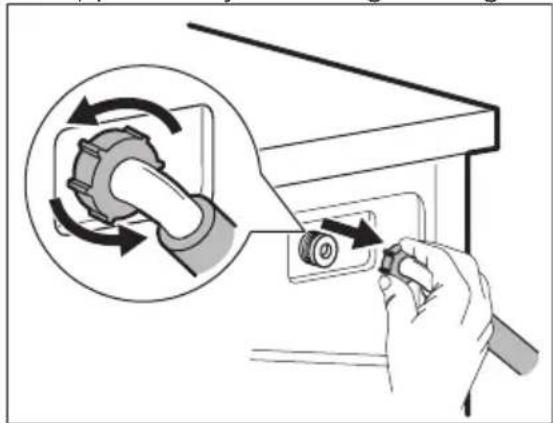
- Clean the valve filter on the back of the appliance with a toothbrush.
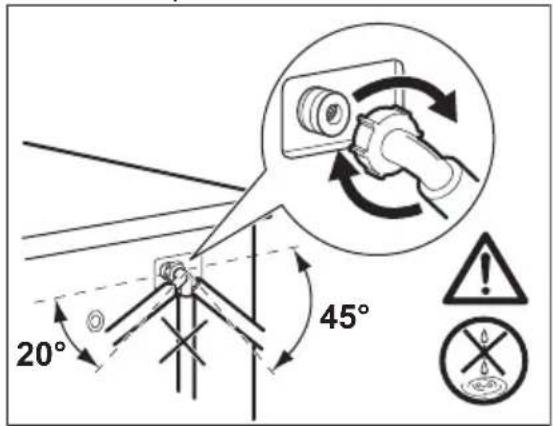
- When you reconnect the hose to the back of the appliance, turn it left or right (not in vertical position) depending on the position of your water tap.
16. TROUBLESHOOTING

WARNING!
Refer to Safety chapters.
15.9 Emergency drain
If the appliance cannot drain the water, carry out the same procedure, described in 'Cleaning the drain pump' paragraph. If necessary, clean the pump.
When you drain the water with the emergency drain procedure, you must activate the drain system again:
-
Put 2 litres of water in the main wash compartment of the detergent dispenser.
-
Start the programme to drain the water.
15.10 Frost precautions
If the appliance is installed in an area where the temperature can reach the values around 0° C or drop below, remove the remaining water from the inlet hose and the drain pump.
-
Disconnect the mains plug from the mains socket.
-
Close the water tap.
-
Put the two ends of the inlet hose in a container and let the water flow out of the hose.
-
Empty the drain pump. Refer to the emergency drain procedure.
-
When the drain pump is empty, install the inlet hose again.

WARNING!
Make sure that the temperature is higher than 0 °C before you use the appliance again. The manufacturer is not responsible for damages caused by low temperatures.
16.1 Introduction
The appliance does not start or it stops during operation.
First try to find a solution to the problem (refer to the table). If the problem
persists, contact the Authorised Service Centre.
In case of major problems, the acoustic signals operate, the display shows an alarm code and the Start/Pause button may flash continuously:
- The appliance does not fill with water properly.
Start the appliance again by pressing Start/Pause button. After 5 seconds the door will be unlocked.
• E20 - The appliance does not drain the water. - The appliance door is open or not closed correctly. Please check the door!

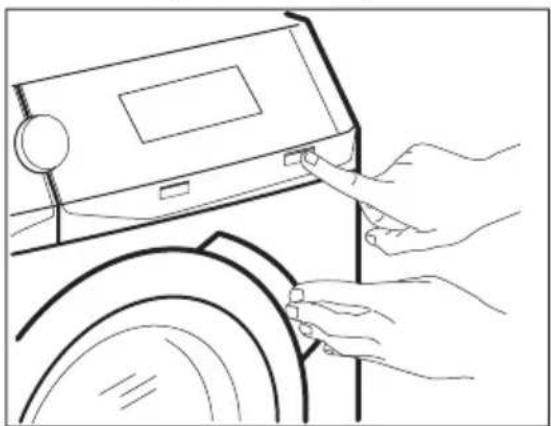
If the appliance is overloaded, remove some items from the drum and/or keep pressed the door while touching the Start/Pause button until the indicator
- stops flashing (see the picture below).
16.2 Possible failures
- The mains supply is unstable. Wait until the mains supply is stable.
- No communication between electronic elements of the appliance. Switch it off and switch on again. The programme was not finished properly or the appliance stopped too early. If the alarm code appears again, contact the Authorised Service Centre.
- EFO - The anti-flood device is on. Disconnect the appliance and close the water tap. Contact the Authorised Service Centre.

WARNING!
Deactivate the appliance before carrying out any check.
Problem Possible solution
The programme does not start.
- Make sure that the mains plug is connected to the mains socket.
- Make sure that the appliance door is closed.
- Make sure that there is no damaged fuse in the fuse box.
- Make sure that the Start/Pause has been touched.
- If the delay start is set, cancel the setting or wait for the end of countdown.
- Deactivate the Child Lock function if it is on.
| Problem Possible solution | |
| The appliance does not fill with water properly. | Make sure that the water tap is open.Make sure that the pressure of the water supply is not too low. For this information, contact your local water authority.Make sure that the water tap is not clogged.Make sure that the inlet hose has no kinks, damages or bends.Make sure that the connection of the water inlet hose is correct.Make sure that the filter of the inlet hose and the filter of the valve are not clogged. Refer to 'Care and cleaning'. |
| The appliance fills with water and drains immediately | Make sure that the drain hose is in the correct position. The hose may be positioned too low. Refer to "Installation instruction". |
| The appliance does not drain the water. | Make sure that the sink spigot is not clogged.Make sure that the drain hose has no kinks or bends.Make sure that the drain filter is not clogged. Clean the filter, if necessary. Refer to "Care and cleaning".Make sure that the connection of the drain hose is correct.Set the drain programme if you set a programme without drain phase.Set the drain programme if you set an option which ends with water in the tub. |
| The spin phase does not operate or the washing cycle lasts longer than usual. | Set the spin programme.Make sure that the drain filter is not clogged. Clean the filter, if necessary. Refer to "Care and cleaning".Adjust manually the items in the tub and start the spin phase again. This problem may be caused by balance problems. |
| There is water on the floor. | Make sure that the couplings of the water hoses are tight and there is not water leakages.Make sure that the water inlet hose and the drain hose have no damages.Make sure you use the correct detergent and the correct quantity of it. |
| You cannot open the appliance door. | Make sure that a washing programme that ends with water in tub, has been selected.Make sure that the washing programme is finished.Set the drain or the spin programme if there is water in the drum.Make sure that the appliance receives electrical power.This problem may be caused by a failure of the appliance. Contact the Authorised Service Centre.If you need to open the door, please read carefully "Emergency door opening". |
| The appliance makes an unusual noise and vibrates. | Make sure the levelling of the appliance is correct. Refer to "Installation instruction".Make sure that the packaging and/or the transit bolts are removed. Refer to "Installation instruction".Add more laundry in the drum. The load may be too small. |
| The programme duration increases or decreases during programme execution. | The ProSense function is able to adjust the programme duration according to the type and the laundry load size. Refer to "The ProSense load detection" in "Daily Use" chapter. |
| The washing results are not satisfactory. | Increase the detergent quantity or use a different detergent.Use special products to remove the stubborn stains before you wash the laundry.Make sure that you set the correct temperature.Decrease the laundry load. |
| Too much foam in the drum during the washing cycle. | Reduce the quantity of detergent. |
| After the washing cycle, there are some detergent residues in the dispenser drawer. | Make sure that the flap is in the correct position (UP for powder detergent - DOWN for liquid detergent).Make sure you have used the detergent dispenser according the indications given in this user manual. |
| The appliance does not dry or does not dry correctly. | Turn the water tap on.Make sure the drain filter is not clogged.Reduce the laundry load.Make sure you have set the correct cycle. if necessary, set again a short drying time. |
| The laundry is full of different colours fluff. | The fabrics washed in the previous cycle released fluff of a different colour:The drying phase helps to eliminate some fluff.Clean the clothes with a fluff remover.In case of an excessive amount of fluff in the drum run the special programme to clean it (refer to "Fluff in the fabrics" for more details). |
After the check, activate the appliance. The programme continues from the point of interruption.
If the problem occurs again, contact the Authorised Service Centre.
If the display shows other alarm codes. Deactivate and activate the appliance. If the problem continues, contact the Authorised Service Centre.
16.3 Emergency door opening
In case of power failure or functioning failure the appliance door remains locked. The washing programme
continues when the power is restored. If the door remains locked in case of failure, it is possible to open it using the emergency unlock function.
Before opening the door:

CAUTION!
Risk of burns! Make sure that the water temperature is not too high and the laundry is not hot. If necessary, wait until they cool down.

CAUTION!
Risk of injury! Make sure that the drum is not rotating. If necessary, wait until the drum stops rotating.

Make sure that the water level inside the drum is not too high. If necessary, proceed with an emergency drain (refer to «Emergency drain» in «Care and cleaning» chapter).
To open the door, proceed as follows:
-
Press the On/Off button to switch the appliance off.
-
Disconnect the mains plug from the mains socket.
- Open the filter flap.
- Pull the emergency unlock trigger downward once. Pull it downward once again, keep it tensed and, in the meanwhile, open the appliance door.
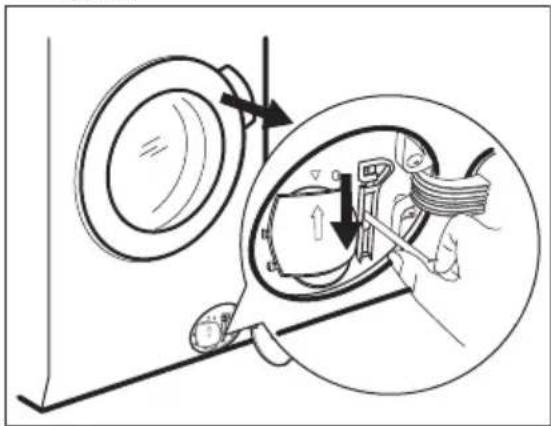
- Take out the laundry and then close the appliance door.
- Close the filter flap.
17. CONSUMPTION VALUES

Stated values are obtained in laboratory conditions with relevant standards. Different causes can change the data: the quantity and type of laundry and ambient temperature. Water pressure, the supply voltage and the temperature of inlet water may also affect the washing programme duration.

Technical specifications may be changed without prior notice to improve the quality of product.

During the washing programme, the ProSense technology can vary the wash duration and the consumption values. For further details see 'The ProSense load detection' paragraph in 'Daily Use' chapter.
| Programmes Load(kg) | Energy consumption (kWh) | Water consumption (litre) | Approximate programme duration (minutes) |
| Cottons 60°C 8 1.65 80 200 | |||
| Cottons Eco60 °CCottons energy saving pro-gramme1) | 8 0.90 60 250 | ||
| Cottons 40°C 8 1.25 80 200 | |||
| Synthetics 40°C 4 0.78 55 130 | |||
| Delicates 40°C 4 0.60 63 91 | |||
| Wool/Handwash 30°C 1.5 0.35 57 60 |
1) This programme at 60 °C with a load of 8 kg is the reference programme for energy label, in compliance with UAE. S 5010 2:2019.
18. TECHNICAL DATA
| Dimension Width/ Height/ Depth/ Total depth | 600 mm/ 850 mm/ 630 mm/ 660 mm | |
| Electrical connection Voltage | 220-240 V | |
| Overall power | 2200 W | |
| Fuse | 13 A | |
| Frequency | 50 Hz | |
| Level of protection against ingress of solid particles and moisture ensured by the protective cover, except where the low voltage equipment has no protection against moisture | IPX4 | |
| Water supply 1) | Cold water | |
| Water supply pressure Minimum Maximum | 0.5 bar (0.05 MPa)8 bar (0.8 MPa) | |
| Maximum wash load | Cotton | 8 kg |
| Maximum dry load | CottonSynthetics | 6 kg4 kg |
| Spin Speed | Maximum spin speed | 1550 rpm |
1) Connect the water inlet hose to a water tap with a 3/4" thread.
19. ACCESSORIES
19.1 Available in www.aeg.com/shop or from authorised dealer

Only appropriate accessories approved by AEG ensure the safety standards of the appliance. If unapproved parts are used, any claims will be invalidated.
19.2 Fixing plate kit
If you install the appliance on a plinth, secure the appliance with the fixing plates.
Read carefully the instructions supplied with the accessory.
19.3 Pedestal with the drawer
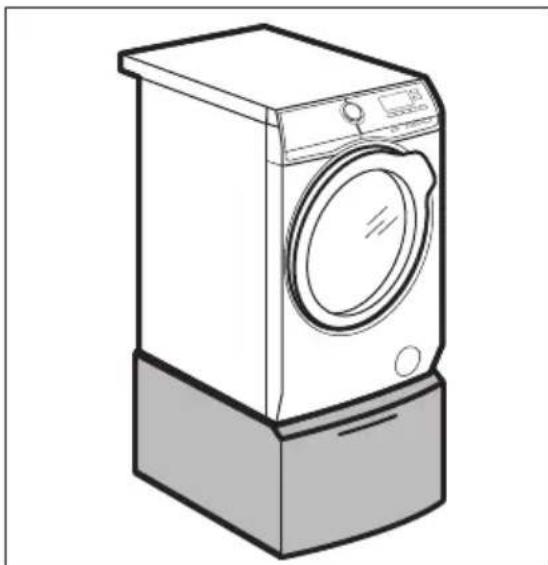
To raise your appliance and make loading and unloading laundry easier.
The drawer can be used for laundry storage e.g.: towels, cleaning products and more.
Read carefully the instructions supplied with the accessory.
20. ENVIRONMENTAL CONCERNS
Recycle materials with the symbol Put the packaging in relevant containers to recycle it. Help protect the environment and human health by recycling waste of electrical and electronic appliances. Do not dispose of
appliances marked with the symbol ✗ with the household waste. Return the product to your local recycling facility or contact your municipal office.
CE
- CONTENTS
- FOR PERFECT RESULTS
- CUSTOMER CARE AND SERVICE
- ⚠SAFETY INFORMATION
- CHILDREN AND VULNERABLE PEOPLE SAFETY- GULF MARKET
- WARNING
- GENERAL SAFETY
- SAFETY INSTRUCTIONS
- INSTALLATION
- ELECTRICAL CONNECTION
- WATER CONNECTION
- USE
- DISPOSAL
- UNPACKING
- POSITIONING AND LEVELLING
- THE INLET HOSE
- WATER-STOP DEVICE
- WATER DRAINAGE
- PRODUCT DESCRIPTION
- APPLIANCE OVERVIEW
- CONTROL PANEL
- CONTROL PANEL DESCRIPTION
- DISPLAY
- DIAL AND BUTTONS
- ON/OFF
- INTRODUCTION
- TEMP
- SPIN
- STAINS/PREWASH
- STAINS
- PREWASH
- DELAY START
- QUICK WASH
- TIME DRYING
- AUTO DRYING
- MODE
- START/PAUSE
- PROGRAMMES
- WOOLMARK APPAREL CARE - BLUE
- AUTOMATIC DRYING
- BEFORE FIRST USE
- SETTINGS
- CHILD LOCK
- ACOUSTIC SIGNALS
- PERMANENT EXTRA RINSE
- DAILY USE - WASHING ONLY
- ACTIVATING THE APPLIANCE
- LOADING THE LAUNDRY
- CAUTION
- FILLING THE DETERGENT AND ADDITIVES
- CHECK THE POSITION OF THE FLAP
- I
- WITH THE FLAP IN THE POSITION DOWN
- SETTING A PROGRAMME
- STARTING A PROGRAMME
- [NO TEXT]
- STARTING A PROGRAMME WITH THE DELAY START
- CANCELLING THE DELAY START AFTER THE COUNTDOWN HAS STARTED
- CHANGING THE DELAY START AFTER THE COUNTDOWN HAS STARTED
- THE PROSENSE LOAD DETECTION
- PROGRAMME PHASE INDICATORS
- INTERRUPTING A PROGRAMME AND CHANGING THE OPTIONS
- CANCELLING A RUNNING PROGRAMME
- OPENING THE DOOR - ADDING GARMENTS
- END OF THE PROGRAMME
- DRAINING WATER OUT AFTER END OF CYCLE
- STAND-BY OPTION
- DAILY USE - WASHING & DRYING
- COMPLETE WASH&DRY PROGRAMMES
- AUTOMATIC NON-STOP PROGRAMME
- NON-AUTOMATIC WASH&DRY PROGRAMMES
- WASHING AND DRYING - AUTOMATIC LEVELS
- WASHING AND TIMED DRYING
- AT THE END OF THE DRYING PROGRAMME
- DAILY USE - DRYING ONLY
- PREPARATION TO DRYING
- DRYING - AUTOMATIC LEVELS
- TIMED DRYING
- FLUFF IN THE FABRICS
- HINTS AND TIPS
- THE LAUNDRY LOAD
- TO REMOVE THE FLUFF INSIDE THE DRUM, SET A SPECIAL PROGRAMME
- STUBBORN STAINS
- DETERGENTS AND OTHER TREATMENTS
- ECOLOGICAL HINTS
- WATER HARDNESS
- PREPARE THE DRYING CYCLE
- ITEMS NOT SUITABLE FOR DRYING
- DO NOT SET A DRYING PROGRAMME FOR THIS LAUNDRY
- GARMENT LABELS
- DRYING CYCLE DURATION
- ADDITIONAL DRYING
- CARE AND CLEANING
- EXTERNAL CLEANING
- DESCALING
- GENERAL TIPS
- MAINTENANCE WASH
- DOOR SEAL
- CLEANING THE DRUM
- CLEANING THE DETERGENT DISPENSER
- CLEANING THE DRAIN PUMP
- PROCEED AS FOLLOWS TO CLEAN THE PUMP
- CLEANING THE INLET HOSE AND THE VALVE FILTER
- TROUBLESHOOTING
- EMERGENCY DRAIN
- FROST PRECAUTIONS
- POSSIBLE FAILURES
- PROBLEM POSSIBLE SOLUTION
- EMERGENCY DOOR OPENING
- CONSUMPTION VALUES
- TECHNICAL DATA
- ACCESSORIES
- AVAILABLE IN WWW.AEG.COM/SHOP OR FROM AUTHORISED DEALER
- FIXING PLATE KIT
- PEDESTAL WITH THE DRAWER
- ENVIRONMENTAL CONCERNS
Brand : AEG
Model : LWX7E8611S
Category : Washing machine