
ZCM561MW1 - Uncategorized ZANUSSI - Free user manual and instructions
Find the device manual for free ZCM561MW1 ZANUSSI in PDF.
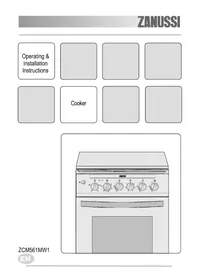


| Brand | Zanussi |
| Model | ZCM561MW1 |
| Product Type | Built-in microwave oven with grill |
| Installation | Built-in |
| Color | White |
| Microwave Power | 900 W |
| Grill Power | 1000 W |
| Total Connected Load | 2300 W |
| Power Supply | 230 V ~ 50 Hz |
| Dimensions (H x W x D) | 455 x 595 x 548 mm |
| Cabinet Cut-out Dimensions (H x W x D) | 450 x 560 x 550 mm |
| Oven Capacity | 39 L |
| Turntable Diameter | 314 mm |
| Display | LED display with clock |
| Controls | Touch controls and rotary knob |
| Cooking Functions | Microwave, grill, combination cooking, defrost, auto menus |
| Auto Programmes | 8 auto programmes |
| Child Lock | Yes |
| Door Type | Drop-down door with glass window |
| Interior Light | Yes |
| Cleaning & Maintenance | Wipe with soft damp cloth and mild detergent |
| Safety Features | Safety interlock system and overheat protection |
| Spare Parts & Repairability | Turntable, roller ring, door parts and bulbs replaceable via service center |
| General Information | Household use only; manual available in EN and HR |
Frequently Asked Questions - ZCM561MW1 ZANUSSI
User questions about ZCM561MW1 ZANUSSI
0 question about this device. Answer the ones you know or ask your own.
Ask a new question about this device
Download the instructions for your Uncategorized in PDF format for free! Find your manual ZCM561MW1 - ZANUSSI and take your electronic device back in hand. On this page are published all the documents necessary for the use of your device. ZCM561MW1 by ZANUSSI.
USER MANUAL ZCM561MW1 ZANUSSI
Operating & Installation Instructions
Cooker
ZCM561MW1

Contents
| Safety Information | 2 | Cleaning and care | 12 |
| Description of the appliance | 4 | Something not working | 14 |
| Use of the appliance | 4 | Technical data | 15 |
| Operating instruction | 5 | Installation | 16 |
| Accessories delivered with the appliance | 11 | Environmental Information | 20 |
How to read the instruction book?
The symbols below will guide you when reading the instruction book

Safety instructions
Description of operations step by step
Advice and recommendation
Information environment protection
Important safety information
It is most important that this instruction book should be retained with the appliance for future reference. Should the appliance be sold or transferred, always ensure that the book is left with the appliance in order that the new owner can get to know the functions of the appliance and the relevant warnings. These warnings are provided in the interest of safety. You MUST read them carefully before installing or using the appliance.
Installation
- Qualified personnel, according to the manufacturer's instructions, must install this cooker.
• This cooker is heavy. Take care when moving it. - Remove all packaging before using the cooker.
- The adjustment conditions for this appliance are stated on the label.
- This appliance is not connected to a combustion products evacuation device. It shall be installed and connected in accordance with current installation regulations. Particular attention shall be given to the relevant requirements regarding ventilation.
- This cooker is designed to be connected to a 230V, 50Hz electrical supply.
- Ensure that the gas and electrical supply complies with the type stated on the rating plate, located near the gas supply pipe.
- Do not attempt to modify the cooker in any way.
Child Safety
- This cooker is designed to be operated by adults. Do not allow children to play near or with the cooker.
- Children can also injure themselves by pulling pans or pots off the cooker.
- During use the appliance becomes hot. Care should be taken to avoid touching heating elements inside the oven.
- This appliance is not intended for use by persons (including children) with reduced physical, sensory or mental capabilities, or lack of experience and knowledge, unless they have been given supervision or instruction concerning use of the appliance by a person responsible for their safety.
During use
- This cooker is intended for domestic cooking only. It is not designed for commercial or industrial purposes or for heating the room.
- When in use a gas cooker will produce heat and moisture in the room in which it has been installed. Ensure there is a continuous air supply, by keeping air vents in good condition or installing a cooker hood with a venting hose.
- When using the cooker for a long period time, opening a window or increasing the extractor speed should improve the ventilation.
- The cooker gets hot when it is in use and retains their heat for a long period after use. Children should be kept away until it has cooled.
- Do not use this cooker if it is in contact with water. Do not operate the cooker with wet hands.
- When using other electrical appliances, ensure the cable does not come into contact with the hot surfaces of the cooker.
- Never leave the cooker unattended when cooking with oil and fats.
- Unstable or misshapen pans should not be used on the hob burners as unstable pans can cause an accident by tipping or spillage.
- The grill pan will become hot during use, always use oven gloves when removing or replacing a hot grill pan.
- During use the appliance becomes hot. Care should be taken to avoid touching heating elements inside the oven.
- The oven must be switched off before removing the guard and after cleaning the guard must be replaced in accordance with the manufacturer's instructions.
- Ensure the control knobs are in the 'OFF' position when not in use.
- This cooker should be kept clean at all times. A build-up of fats or foodstuffs could result in a fire.
- Only clean this oven in accordance with the instructions.
- Never use plastic dishes in the oven or on the hob burners. Never line any part of the oven with aluminium foil.
- Always ensure that the oven vent, which is located at the centre back of the hob, is left unobstructed to ensure ventilation of the oven cavity.
- Perishable food, plastic items and aerosols may be affected by heat and should not be stored above the cooker.
- Never pule the appliance by the oven handle.
- On the open oven door never put:
- heavy things,
- ensure that children do not climb up or sit on it.
- Prolonged intensive use of the appliance may call for additional ventilation, for example opening of a window, or more effective ventilation, for example increasing the level of mechanical ventilation where present.
- The appliance is fitted with a lid: this is designed as a dust cover when closed, and as a splash back when open. Do not use for any other purpose.
- Always remove any spillage from the surface of the lid before opening, and the appliance should be allowed to cool before closing the lid.
- After using the cooker, the lid MUST NOT be closed until the hob and oven are completely cold.
Service
- This cooker should only be repaired or serviced by an authorised Service Engineer and only genuine approved spare parts should be used.
- We decline our responsibility for possible damages resulting from bad use and non-observing of safety rules in force.
- Do observe strictly the cleaning and maintenance instructions.
Instructions for the user
Description of the appliance
Control panel

1 Ignition switch
2 Oven function knob
3 Hob plates/ oven pilot light
4 Oven thermostat pilot light
5 Oven thermostat knob
6 Front left burner control knob
7 Back left hotplate control knob
8 Back right burner control knob
9 Front right burner control knob
Hob

1 Solid hot plate - 1000W/145 mm
2 Semi Rapid burner - 2000W
3 Rapid burner - 2600W
4 Auxiliary burner - 1000W
Use of appliance
Before the First Use of the Oven
Before the first use ensure that the room is well ventilated: V.M.C. (Mechanic ventilation) or opened window.
Remove all packaging, both inside and outside the oven, before using the oven.
Before first use, the oven should be heated without food. During this time, an unpleasant odour may be emitted. This is quite normal.
- Remove the oven accessories.
-
Remove any adhesive labels or protective films, if there are any.
-
Heat the oven the corresponding knob on position "250" for about 45 min.
This procedure should be repeated with the grill function for approximately 5-10 minutes.
Clean the accessories with a soft detergent. Rinse and dry carefully.
Rating Plate
The model number of your cooker can be found on the rating plate on the lower front frame of the cooker upon opening the door.
The cooker must be protected by a suitably rated fuse or circuit breaker. The rating of the cooker is given on the rating plate.
About condensation and steam
When food is heated it produces steam in the same way as a boiling kettle. The oven vents allow some of this steam to escape.
However, always stand back from the oven when opening the oven door to allow any build up of steam or heat to release.
If the steam comes into contact with a cool surface on the outside of the oven, e.g. a trim, it will condense and produce water droplets. This is quite normal and is not a fault with the oven.
To prevent discolouration, regularly wipe away condensation and also soilage from surfaces.
Cookware
Use any ovenproof cookware, which will withstand temperatures of 250° C.
Oven dishes, etc. should not be placed directly on the oven base.

During cooking in the oven the oven door is take care that children do not play near it
Functions of the oven
| 0 Off | |
| Conventional cooking | Use the top and bottom element; this function will enable you to use your favorite recipes without having to adapt the temperatures. It is necessary to pre-heat the oven in this instance. |
| Bottom oven element | Enables you to finish off dishes on the bottom only. |
| Upper and lower oven elements – Fan | Heat is transmitted to food by means of pre-heated air throughout a fan located on the back wall of the oven. |
| Grill | The oven door must be closed when grilling. Attention: use the grill function at max. 210°C. |
| Defrost | This is NOT a cooking position. This position is intended to assist in thawing of frozen foods. |

Hob plates pilot light
This light will illuminate when the hotplate knob is turned on and remains lit while these is in use.
Oven thermostat pilot light
This light will illuminate when a temperature is selected and remain lit until the selected temperature has been reached. It then cycles on and off to indicate that the temperature is being maintained.
Oven light
It's lighted once the oven control knob is turned on and lights during the oven functioning
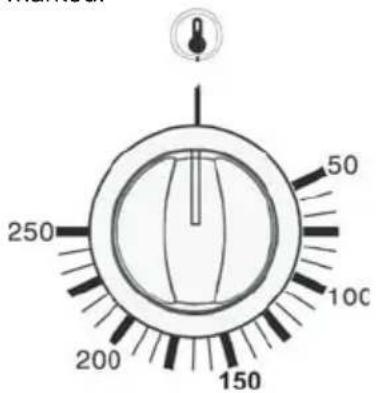
Thermostat Control Knob
By turning the oven control knob clockwise, you select the cooking temperature.
The temperatures shown here are on the actual control knob.
Temperature selection starts at 50° C and will reach approximately 250° C at the centre of the oven.
The thermostat controlling the temperature is variable so it is possible to select temperatures between those marked.
Cooking in the oven

During use the appliance becomes hot.
Care should be taken to avoid touching heating elements inside the oven.
Conventional cooking (Traditional)
Conventional cooking is made by natural convection of the heated air.
It is necessary to preheat the oven.
How to proceed?
For small cakes, pastry, beaten mixture cakes in moulds.
- Preheat the oven, the oven function knob on
position :
- about 8 min. for position 50°C to 150°C;
- about 15 min for position 175°C to 250°C;
- Insert the meal. Turn the oven thermostat knob on to the required temperature.

Hints and Tips
There should always be at least 2.5cm between the top of the food and the element. This gives the best cooking results and allows room for rise in yeast mixtures, Yorkshire puddings, etc. When cooking cakes, pastry, scones, bread, etc., place the tins or baking trays centrally below element.
Ensure that food is placed centrally on the shelf and there is sufficient room around the baking tray/dish to allow for maximum circulation.
Stand dishes on suitably sized baking trays to prevent spillage onto the oven base and to help reduce cleaning.
Enamelware, dark, or heavy utensils increase base browning. Shiny aluminium or polished steel trays reflect the heat away and give less base browning.
DO NOT place dishes directly onto the oven base as it becomes very hot and damage may occur.
DO NOT use the grill pan or meat tin as a baking tray as this will increase base browning of the food.
For economy leave the door open for the shortest possible time, particularly when placing food into a preheated oven.
Bottom oven element
The heat comes only from the bottom of the oven. This position of the oven function knob is recommended for finishing cooked dishes.
How to proceed?
- Preheat the oven, the oven function knob on
position ○ for about 10 minutes with the oven thermostat knob on maximum position.
- Insert the meal. Turn the oven thermostat knob on the desire temperature.
Grilling


When grilling, the accessible parts of the nce are hot and the appliance should not be attended. Take care that children do not ear it.

All grilling must be carried out with the floor closed. Attention: use the grill function maximum 210°C.

To switch on the grill, turn the oven function knob to
position 🌐 and then turn the oven thermostat knob to 210°C temperature.
Most foods should be placed on the grid in the grill pan to allow maximum circulation of air to lift the food out of the fats and juices. Food such as fish, liver and kidneys may be placed directly on the grill pan, if preferred.
Adjust the grid and grill pan runner position to allow for different thicknesses of food.
Food should be thoroughly dried before grilling to minimise splashing. Brush lean meats and fish lightly with a little oil or melted butter to keep them moist during cooking.
Accompaniments such as tomatoes and mushrooms may be placed underneath the grid when grilling meats.
When toasting bread, we suggest that the top runner position is used with the grid in its 'high' position. Preheat the grill for a few minutes before sealing steaks or toasting. Adjust the shelf as necessary, during cooking.
The food should be turned over during cooking, as required.
NOTE: for safety in use, the thermostat controls the grill element. During cooking, the grill cycles on and off to prevent overheating.
Cooking time depends on the thickness of the meat and not on its weight.

Caution: Accessible parts may be hot the grill is in use. Young children should be way.
Upper and lower oven elements – Fan

Heat is transmitted to food by means of pre-heated air throughout a fan located on the back wall of the oven. In this way heat can rapidly reach every part of the oven and cook simultaneously many dishes placed on several shelves. Thanks to the elimination of dampness and the consequently drier air, this kind of cooking prevents any flavour transference.
However the oven can also be used for cooking on one shelf only. In this case use the lower shelves to better control cooking. Moreover, this oven is particularly suitable for a rapid thawing, sterilizing suitable preserves and homemade fruit in syrup, and for drying mushrooms and fruit.
- Turn the oven function knob to the position

- Turn the oven thermostat knob to the selected temperature.
Defrost

The defrosting function allows you to defrost frozen foods. The oven fan operates without heat and circulates the air, at room temperature, inside the oven.
This increases the rate at which defrosting takes place.
This function is particularly suitable for delicate food that could be damaged by heat, e.g. cream filled gateaux, iced cakes, pastries, bread and other yeast products.
- Turn the oven function knob to position ⚴, to start the motor fan that will permit a quick thawing by blowing cold air throughout the oven.
- With the oven function knob in this position turn the oven thermostat knob up to the position «0».

Hints and tips
- Cover food with a lid, aluminium foil or plastic film to prevent drying out during defrosting.
- Place the food to be defrosted in a single layer where possible and turn it over half way through the defrosting process.
- DO NOT leave food at room temperature once it is defrosted. Cook raw food immediately or store cooked food in the fridge.
- Take care to follow the basic rules for hygiene when handling fresh, frozen, raw and cooked foods.
Cooking chart
| Food | Shelf position from the bottom | Preheating min | Temperature °C | Temperature °C | Duration min. |
| Pastry stripes | 2 8-10 | 160-170 ---- 15-20 | |||
| 1+2 | 8-10 | ---- | 150-160 | 15-20 | |
| Small cakes | 2 10-12 | 160-170 | ---- 20-25 | ||
| 1+2 10-12 ---- 155-165 | 20-25 | ||||
| Christmas cake | 2 15-20 | 250°160-170 | ---- 45+10 | ** | |
| 2 ---- ---- 150-160 | 45+10 | ** | |||
| Crumble cake | 2 15-20 | 180-190 | ---- 30-35 | ||
| 2 ---- ---- 170-180 | 35-45 | ||||
| Meringue | 2 ---- 130-140 | ---- 40-50 | |||
| 1+2 ---- ---- 120-130 | 45-55 | ||||
| Yeast buns | 2 10-15 | 210-220 | ---- 10-15 | ||
| 1+2 10-13 ---- 200-210 | 10-15 | ||||
| Flat cake | 2 10-12 | 170-180 | ---- 30-35 | ||
| 1+2 | 8-10 | ---- | 160-170 | 30-40 | |
| Fatless sponge cake | 2 10-12 | 160-170 | ---- 25-30 | ||
| 2 8-10 | ---- 150-160 | 30-35 | |||
| Cheese cake | 2 ---- 170-180 | ---- 55-75 | |||
| 2 ---- ---- 150-160 | 55-75 | ||||
| Swiss roll | 2 10-13 | 170-180 | ---- 15-20 | ||
| 2 10-13 ---- 160-170 | 10-20 | ||||
| Petit Choux | 2 10-15 | 190-200 | ---- 10-20 | ||
| 2 10-13 ---- 190-200 | 10-20 | ||||
| Yeast cake with apples | 2 ---- 180-190 | ---- 40-50 | |||
| 2 ---- ---- 160-170 | 40-50 | ||||
| Apple pie | 2+2 12-15 | 175-185 | ---- 60-65 | ||
| 1+2 ---- ---- 165-175 | 50-55 | ||||
| Drip pan cake | 2 ---- 170-180 | ---- 45-50 | |||
| 1+2 ---- ---- 160-170 | 45-50 | ||||
| sponge cake | 2 ---- 160-170 | ---- 30-40 | Traditional Romanian | ||
| 2 ---- ---- 150-160 | 30-40 | ||||
| Romanian sponge cake | 2 10-13 | 160-170 | ---- 40-50 | ||
| 2 10-13 ---- 150-160 | 40-50 | ||||
| Peasant bread | 2 15-20 | 250°190-200 | ---- 50-60 | ||
| Quiche Lorraine | 2 15-20 | 220-230 | ---- 20-30 | ||
| 1 10-15 ---- 200-210 | 20-30 | ||||
| Pizza | 2 ---- 210-220 | ---- 30-35 | |||
| 1 ---- ---- 210-220 | 30-35 |
* - preheating time
** - maintaining time in the oven after switching off of the oven function control knob
Roasting chart
| Food | Shelf position from the bottom | Temperature °C | Temperature °C | Duration min. |
| Chicken entire | 2 190-200 ---- 60-70 | |||
| 2 ---- 160-170 45-50 | ||||
| Pork roast | 2 | 190-200 | ---- 90-100 | |
| 2 ---- 160-170 80-90 |
Grilling chart
| Food | Shelf position from the bottom | Preheating min | Temperature °C | Duration min. |
| Toast 2 6 230 4-5 | ||||
| Hochsteaks 2 10 200 20+20 | ||||
| Half chicken 2 ---- | 230 | 25+20 | ||
| Pork roast cutlet | 2 | ---- | 230 | 30+25 |
Using the Hob
The Hob Burners
The symbol on the knob corresponds to a symbol on the control panel (See description of appliance).
Each burner has a safety device. In case the flame dies out the safety device stops the gas supply.


Use the maximum level for boiling and the minimum for simmering.
Always choose positions between the minimum and maximum, never between maximum and off.

Warning: do not use cooking vessels then the overlap its edges on the hotplate.

Ignition of the burners
- Push the knob and turn it left to the symbol "big flame".
- At the same time, push the electronic ignition knob. Keep it pushed until the gas ignites (1 spark / second).

Or by power cut
- Push the corresponding knob in completely and turn it left to the symbol "big flame" and ignite with a match.
- Release the knob after 10 seconds and watch that the burner has ignited (until the safety valve automatically keeps the burner lit).
- Upon ignition, adjust the flame as required. If for any reason the flame should extinguish turn off the relevant control knob, leave for at least one minute and then re-ignite.
If after a few attempts the burner does not ignite, check that the burner ring and its cap are correctly positioned.

Extinguishing of burners
To switch on a hotplate, turn the relevant control knob to the required heat setting.
The control knob is numbered 0 - 6

| 0 | Off |
| 1 | Minimum |
| 6 | Maximum |
Normal Hotplates
We recommend the plates are switched to maximum (6) for a short while to boost the plate, and then adjusted to the required setting.

It is important to note that the hotplate may like and produce a slightly unpleasant odour used for the first time. This is quite normal will disappear after some time.

Do not put anything on the hob that is liable to melt. Always remove any spillage from the surface of the lid before opening, and the appliance should be allowed to cool before closing the lid. After using the cooker, the lid MUST NOT be closed until the hob and oven are completely cold.
Suggestions for the correct setting of the plates are given in the following table:
| OFF 0 | |
| Very Gentle 1 | To keep food warmTo melt butter and chocolate |
| Gentle 2 | To prepare cream-sauces, stews and milk puddings or to fry eggs |
| Slow 3 | Dried vegetables, frozen food, fruit, boiling water or milk |
| Medium 4 | Boiled potatoes, fresh vegetables, pâtés, soups, broths, pancakes or fish |
| High 5 | Larger stews, meat roll, fish, omelettes, steaks |
| Fast 6 | Steaks, escalopes and frying |
Selecting the Correct burner
Above every knob there is a symbol for the corresponding burner.
For good cooking results, always choose pans, which correctly fit to the diameter of the burner used (see figs). Choose thick, flat bottom pots.
We recommend the flame is lowered as soon as the liquid starts boiling.
For a correct ignition always keep the burner ring and the spark plugs clean.

The following diameter pans can be used:
| Burner | Power (kW) | Diameter (mm) | |
| Min. Max. | |||
| Rapid 2,60 | 165 260 | ||
| Semi-Rapid | 2.00 140 240 | ||
| Auxiliary 1,00 | 120 160 | ||

Hints and tips
Saucepans for use on solid hotplates should have several characteristics:
• They should be fairly heavy duty.
- They should fit the heat area exactly, or be slightly larger for efficient use, NEVER smaller.
- They should have a flat base to ensure good contact with the hotplate. This is particularity important when using pans for high temperature frying pressure cooking.
As soon as liquid starts boiling, turn the hotplate control knob so that it will barely keep the liquid simmering.
You can switch off the hotplate a short while before you finish cooking, and the final stage will be completed using the accumulated heat.

Ensure pans are large enough to avoid
liquids being split into the plates. Never leave the plates on without a pan on them or with an empty pan on them.

Take care never to lean or reach over a hot ic plate. Always point pan handles inward or the work surface next to the hob to avoid entally knocking over a pan as you pass by.

Take care when frying food in hot oil or fat, overheated splashes could easily ignite.

If the control knobs become difficult to please contact your local Service Force.

Accessories delivered with the appliance
The following accessories are supplied with your appliance.
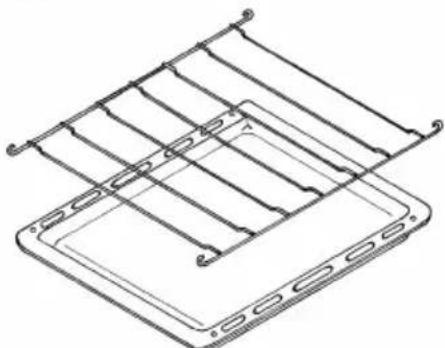
- Shelf for placing dishes on.
The dish should be put in the middle of the shelf to balance the weight. - A roasting tray with roasting grid on it.
It is used to collect juice when cooking in it, place it on the shelf 2.
If you do not use the roasting tray, remove it from the oven.
In addition to the accessories supplied we recommend you only use heatproof dishes/pans (according to the manufacturer's instructions).
Storage compartment
The storage compartment is located underneath the oven cavity.

During cooking the storage compartment become hot if the oven is in use for a long l of time. Flammable materials such as oven s, tea towels, plastic aprons etc. should not be red in the drawer.
Oven accessories such as baking sheets, will also become hot, therefore care should be taken when removing these items from the compartment whilst the oven is in use or still hot.
Advice for use
Oven cooking
- Turn off your oven 5 minutes before the foreseen cooking time you will save power, the accumulated heat will allow to end cooking;
- The thickness, the conductivity and the color of pot influences the culinary results;
- When cooking, certain dishes increase in volume, choose the pot so that above the raw mixture remain enough place;
- For preventing fat dripping when roasting use tall rim pans proportional to the piece to be roasted;
- Prick the skin of poultry and the sausage with a fork before cooking to avoid its blowing up;
- Between the dish and the oven grid could be put an aluminium foil but not covering all the grid;
- Use glass heat resisting pans for crispy and soufflés;
- Add some fat before finishing the cooking.

Never line any part of the oven with aluminium foil. It would result in an accumulation of heat which might damage the cooking results and also damage the enamel. The cover has to be opened when using the oven.
Cleaning and care

The oven should be kept clean at all times. A build-up of fats or other foodstuffs could result in a fire, especially in the grill pan.

Before cleaning, ensure all control knobs are in the OFF position, and the appliance has cooled completely.

Before any maintenance or cleaning can be carried out, you must DISCONNECT the cooker from the electricity supply.
Cleaning materials
Before using any cleaning materials on your oven, check that they are suitable and that the manufacturer recommends their use.

Cleaners that contain bleach should NOT be used as they may dull the surface finishes.
Influence of the pots on oven cooking results
You have to know that:
- The aluminium, the terracotta pots diminish the browning bellow and maintain the humidity of the meals. We advice to use it for pastry, roast meat.
- The enamelled cast iron, the tinned pots, the glass and the heat-proof porcelain, the pots with non-sticky interior and colored exterior, increase the browning bellow and dries the meals. We suggest to use them for pies and all other crispy cooking that has to be colored bellow and above.
Cooking on the hob
Choose always the right pot, proportional to the burner used.
In case you use a large bottom pot, put it slight backwards on the plate, so that its bottom should not outrun the front of the enameled hob, thus avoiding flame exceeding and overheating of front panel.

Before covering make sure the hob is 1, otherwise the cover could be damaged.
Do not use a steam cleaner for cleaner the oven and hobs. Harsh abrasives should also be avoided.
External cleaning
Regularly wipe over the control panel, oven door and door seal using a soft cloth well wrung out in warm water to which a little washing up liquid has been added.
In the case of stainless steel parts, you may use commercially available stainless steel cleaners with care. These also provide a protective film against finger marks.

To prevent damaging or weakening the glass panels avoid the use of the following:
• Household detergent and bleaches
- Impregnated pads unsuitable for non stick saucepans
- Brillo/Ajax pads or steel wool pads
• Chemical oven pads or aerosols - Rust removers
- Bath/Sink stain removers
Oven Cavity
The enamelled oven cavity is best cleaned whilst the oven is still warm.
Wipe the oven over with a soft cloth soaked in warm soapy water after each use. From time to time it will be necessary to do a more thorough cleaning, using a proprietary oven cleaner.
Hob
After every use wipe with a soft cloth well wrung out in warm water to which a little washing up liquid has been added, avoiding any leakage through the holes of the hob. Rinse and dry with a soft cloth.
To remove more stubborn stains, wet and leave to dissolve, do not scratch and avoid the use of abrasive or caustic products that could damage the enamel.
Burners
The burner caps and crowns can be removed for cleaning.
Wash the burners caps and crowns using hot soapy water, and remove marks with a mild paste cleaner. A well-moistened soap impregnated steel wool pad can be used with caution, if the marks are particularly difficult to remove.
After cleaning, be sure to wipe dry with a soft cloth.
Oven door
Removing oven door from its hinges
To make it easier to clean the oven, the oven door can be removed.

- Open the oven door into the horizontal position. Then lift up the clips on the two door hinges as far as they will go (a).

- Slowly close the door again as far as the stop and lift the door until the hinges come out (b).
Replacing the oven door on its hinges
When putting the door back on its hinges, reverse the procedure for removing the door from its hinges.

1 Re-insert the door's hinges into the slots (c). When you do this, make sure the hinges engage properly and evenly.

- Then slowly lower the door downwards. When you do this, make sure the corners of the door do not touch the bottom of the frame (if this happens, lift the door up again and realign the hinges).
Finally fold the clips back down towards the oven (d). So that the door closes properly, press down on the clips with something (e.g. a screwdriver) (e).
Important: Never leave the door hinge levers standing up. Otherwise the spring action can lead to injury.

DO NOT clean the oven door while the panels are warm. If this precaution is notived the glass panel may shatter. If the door panel becomes chipped or has deepches, the glass will be weakened and must be led to prevent the possibility of the panel ring.
Contact your local Service Centre who will be pleased to advise further.
The Hotplates
Spills onto the actual plate should be removed using warm water and a soft brush, nylon or plastic scourer. To keep the plates looking as new, hotplate conditioner can be purchased from most hardware stores, e.g. "4 Hob" by Homecare Products (follow the manufacturer's instruction for use). Alternatively, wipe the plates with a drop of olive oil on a kitchen towel to avoid rust. It is important to note that the plate will smoke a little and produce a slightly unpleasant odour when next used.
Drying
Important: After cleaning, dry the hotplates thoroughly by switching on to a low-medium setting for a few minutes.
Restoring
To maintain the appearance of your sealed hotplates apply a little salt-free vegetable oil or restorative agent periodically.
To apply vegetable oil: first heat the hotplate on a medium setting for 30 seconds then turn off. Pour a very small amount of salt-free oil onto a dry cloth or kitchen paper. Apply a thin coat of oil to the hotplate surface and wipe off any excess. Heat the hotplate on a medium setting for 1 minute.
Stainless steel parts: the stainless steel spill rings may become straw coloured with use. Use a proprietary stainless steel cleaner to remove this straw discolouration.
This also applies to the area around the hotplates on stainless steel hobs.
Something not working
If the appliance is not working correctly, please carry out the following checks, before contacting your local Service Force Centre.
IMPORTANT: If you call out an engineer to a fault listed below, or to repair a fault caused by incorrect use or installation, a charge will be made even if the appliance is under guarantee
Oven bulb replacement
⚠ Ensure that the appliance is switched off and disconnected from the electricity supply before replacing the bulb to avoid possibility of an electric shock.
If the oven bulb needs replacing, it must comply with the following specifications:
| Wattage 15W | |
| Voltage 230/240V(50Hz) | |
| Temperatures 300°C | |
| Thread Type E14 |

To replace the faulty bulb.
- Turn the glass cover anticlockwise and remove.
- Remove the faulty bulb and replace with a new one.
- Refit the glass cover.
- Reconnect the appliance to the electricity supply.

| Symptoms Solutions | |
| No burner ignition Check that: | gas supply is completely openthe position of gas pipe is rightthe burner is not wetthe burner cap and ring burner have been replaced correctly after cleaningthe control knob has been pressed for 10 seconds upon ignition |
| Cooking results are not satisfactory | Check that:the thermostat is placed correctly;the cooking time is adapted;the grill is placed correctly in the oven. |
| The oven smokes | Check that:the oven does not need cleaning;the meal does not overflow;there is no excessive fat / juice projection on the oven sides. |
| The hot plate and the oven do not work Check that: | the appliance is not unplugged;there is no power break.check the fuses. |
| If after these checks, the appliance still does not work, contact your local Service Force Centre. When you contact the Service Centre, they will need the following information:Your name, address and post code.Your telephone number | 3. Clear and concise details of the fault4. The model and serial number of the appliance (found on the rating plate)5. The purchase date |
Instructions for the installer
Technical data
Free standing Class 1
| ZCM561MW | |||
| Hob Lid | Sheet steel, painted | ||
| Pan support | Enamelled | ||
| Front right burner | Rapid burner | 2600 W | |
| Back right burner | Auxiliary burner | 1000 W | |
| Front left burner | Semi Rapid burner | 2000 W | |
| Back left element | Solid hotplate | 1500 W | |
| Ignition | 0,6W | ||
| Total electrical hob rating 1500,6 W | |||
| Oven Oven element | electric | ||
| -Bottom element | 900W | ||
| -Top element | 850W | ||
| Grill element | 1800W | ||
| Convection fan | 35W | ||
| Lamp power | 15W tip E14 | ||
| Cleaning | manual | ||
| Total oven rating 1815 W | |||
| Supply Rated voltage | 230 V | ||
| Rated frequency | 50 Hz | ||
| Accesories Oven shelf | |||
| Baking tray | Enamelled | ||
| Total cooker rating 3315,6 W | |||
| Dimensions Height | 875 mm | ||
| Width | 500 mm | ||
| Depth | 600 mm | ||

Safety advice
- Before installation ensures that the local distribution conditions (gas type and pressure) and the pre-setting of the appliance are consistent.
- This appliance must be installed only in a room with good ventilation.
- This appliance must not connect to flu. It has to be installed and connected in accordance with the rules in force. Special attention should be paid to the applicable disposal concerning ventilation.
- The adjacent furniture panels have to be heat proof or protected by such material.
- The adjusting conditions of this appliance are mentioned on the rating plate.
Connection to gas supply.
Check that the gas flow and the diameter of the supply pipe is sufficient to supply all the appliances of the installation.
- Check that all connections are tight.
- Install an accessible and visible gas tap to isolate the appliance.;

The manufacturing company declines any insibility for possible damages resulting in an installation, which doesn't comply with sales in force.
Electrical connection

Any electrical work required to install this or should be carried out by a qualifiedician or competent person, in accordance with current regulations.

This cooker must be earthed.
This cooker is designed to be connected to a 230V 50Hz AC electrical supply.
Before switching on, make sure the electricity supply voltage is the same as that indicated on the rating plate.
Before connecting check that:
The plug used for connection is easily accessible when the appliance is installed.
Installation
Positioning
The cooker has been registered as a "Class Y" appliance according to Fire Rick Regulations. Any adjacent cabinets or walls must not exceed the cooker's height.
The cooker may be located in a kitchen, a kitchen/diner or bed sitting room, but not in a bathroom or shower room.
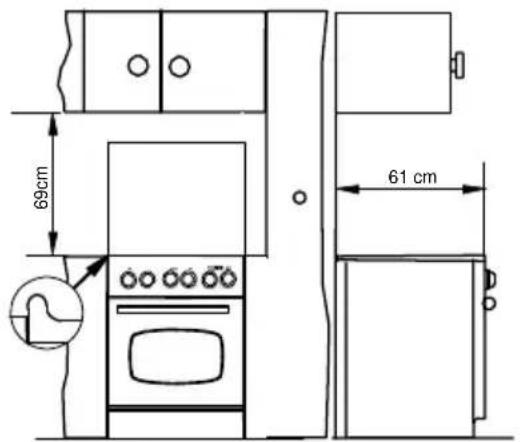
The minimum distance combustible material can be fitted above the cooker in line with the edges of the cooker is 69 cm (see fig.)

The cooker should be placed only on the but not on the base.
Gas connection
Your cooker is delivered adjusted for the kind of gas stated on the rating plate.
It might be necessary to pass to another kind of gas, different to the one it is preset to. Under these circumstances follow the instructions bellow.

For best efficiency, lowest consumption longer length of life of your cooker, the old gas pressure has to respect the values in table no.1
If the appliance is supplied with Butane or Propane gas check that from the pressure regulator, the pressure for Butane is 28-30 mbar and for Propane 28-30 (or 37) mbar.
Connection using a rigid pipe or a flexible pipe (class 1).
1. For network gas:
Flexible, nonmetal pipe
- Use a flexible rubber pipe non longer than 1,5 m and inner diameter of 15 mm mounted with its holder
Make sure it is well inserted and fix it by means of a collar (see figure)

Flexible pipe
- Flexible pipe (mechanic connection) max length 1.5 m;
- We advice to use a flexible pipe, according to the national rule in force, not shorter than 1 m, depending on the position of the tap (see figure);
- Connect one end of the pipe to the blocking tap, than, before placing the appliance between the furniture, connect the other end to the pipe extension, inserting a gasket.
- Place the cooker checking that the loop made by the flexible pipe develops in the sanitary empty of the furniture.

Rigid pipe
- Rigid pipe with screw nut.
2. For cylinder butane propane gas:
- We advise you to use flexible pipe according to the national rule in force of minimum 1 m; this length is chosen depending on the position of the connection to the gas supply;
- For the old butane installations you can use a flexible rubber pipe of max 1,5 m and 6 mm diameter, mounted with the special butane holder (see figure);
• Fix it well by means of a collar for each end.
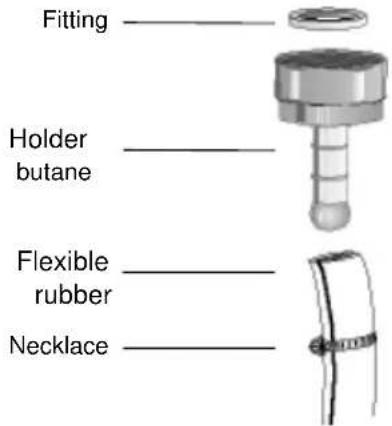
The appliance can be connected to the gas supply on the right by one print of connection. The end of the distributing pipe is threaded.
It is necessary to route the connecting hose (flexible) at the back of the appliance as shown in the diagram. Ensure that the rubber hose is not in contact with any part of the hatched area shown in the diagram. The hose has to be fixed in the support by means of the clamp supplied. The hose should not have narrow curves or throttlings. Check tightness with soapy water.

Change of gas
Your cooker is foreseen to work with natural gas, propane or butane. It is not foreseen for butane or propane air.
For changing the gas type it is necessary to:
- replace the nozzles (hob);
- adjust the minimum level;
- check the gas connection.

Stick the label delivered with the appliance are nozzles, corresponding to the type of gas (ed).
Specification nozzles
Table no. 1
Cat : II 2H 3B/P
| Burner | Nom. power (kW) | Reduced power (kW) | Gas type | Pressure (mbar) | By-pass (mm) | Nozzle diameter (mm)) | Cons. | |
| g/h | ||||||||
| Rapid | 2,60 | 0,75 | Natural gas | G20 | 20 | 1,13 | - | |
| 2,50 | 0,72 | Butan | G30 | 30 | 0,42 | 0,77 | 181,78 | |
| 2,20 | 0,63 | Propan | G31 | 30 | 0,77 | 157,11 | ||
| Semi-Rapid | 1,90 | 0,45 | Natural gas | G20 | 20 | 0,96 | - | |
| 2,00 | 0,43 | Butan | G30 | 30 | 0,32 | 0,71 | 145,43 | |
| 1,70 | 0,38 | Propan | G31 | 30 | 0,71 | 121,40 | ||
| Auxiliary | 1,00 | 0,35 | Natural gas | G20 | 20 | 0,70 | - | |
| 1,00 | 0,35 | Butan | G30 | 30 | 0,30 | 0,50 | 72,71 | |
| 0,85 | 0,31 | Propan | G31 | 30 | 0,50 | 60,70 | ||
Replacement of the nozzles

Before any modifications or adapt the to a different kind of gas, you must CONNECT the cooker from the electricity and ensure that all control knobs are in FF position, and the appliance has cooled letely.
Every appliance has spare nozzles for every gas. The hole of each nozzle is marked on the nozzle, in microns.

For changing the nozzles:
- Remove the pan support;
- Remove the burners;
- Using a socket spanner 7, unscrew the nozzles (see figure) and replace them with those required for the type of gas in use (see table no. 2).
Put in place the burners and the pan supports.
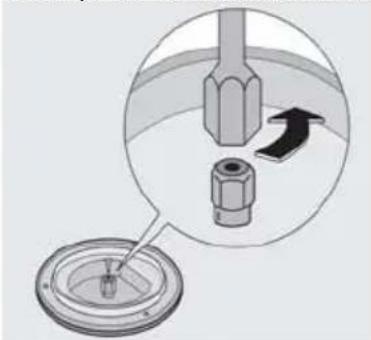
Adjustment of minimum level of plate burners.
When changing the gas type, watch that the minimum level be correct. A regular flame at minimum level is about 4 mm; check that, turning quickly the knob from the maximum to the minimum position, the burner doesn't go out.
Adjustment of minimum level for the hob burners
The burner is correctly adjusted when the flame is stable silent and goes out without any noise. When changing the type of gas check that the minimum level is correct. The air admission is correct when the flame is about 4 mm in length.
The top burners do not need adjustment of primary air.
Check that, turning the knob quickly from the maximum position to the minimum one, the flame does not go out.

no air

correct
adjustment

excess of air

Flame adjustment
To adjust the minimum level:
- Light the burner
- Turn the knob to minimum level;
- Remove the knob;
- Unscrew or screw the by-pass screw (see figure) until a regular small flame is reached.
For LPG screw completely the by-pass screw.
Reassemble the parts following the same procedure in reverse.
Check that, when turning the knob quickly from the maximum position to the minimum one, the flame does not go out.

Electrical connection
⚠️ Any electrical work required to install this hob should be carried out by a qualified electrician or competent person, in accordance with the current regulations.

THIS COOKER MUST BE EARTHED.

The manufacturer declines any liability of these safety measures not be observed.
Before switching on, make sure the electricity supply voltage is the same as that indicated on the rating plate.
Note:
In case of a direct connection to the mains you have to interpose an omnipolar switch a minimum opening between contacts of 3 mm.
The switch should be sited within 2 m of the hob and be easily accessible upon completion of the installation.
The yellow-green grounding cable has not to be interrupted by the switch.
Ensure that the supply cord is not in contact with any part of the hatched area shown in the diagram (see figure).
NOTE: The earth wire should be about 4 cm longer than the live and neutral wires.
To use cable type H05 RR-F with the section indicated in the table no.1.
Environmental Information
All materials marked by the symbol are recycling. Store them in places especially foreseen for this purpose (inform yourself at the services of your area) for recovery and recycling. In case of functioning anomalies it is the after sales service of your dealer the first to intervene. In case of moving to another place, closing of the shop, contact the nearest Consumers Service (Authorised Services Centre) who will give you the address of an after sales service.
The symbol

on the product or on its
packaging indicates that this product may not be
Before connecting check that:
- fuse and household electric installation can bear the charge of the appliance (see rating plate);
How to proceed?
- Unscrew and remove the protective cover at the back of the appliance;
- Connect the power cord to the terminal of the cooker according to the table no.2;
• Fix by means of cable clamp; - Make sure that the connection to the terminal is matching the network power;
- Remount and screw the protective cover at the back of the appliance.
Table no.2
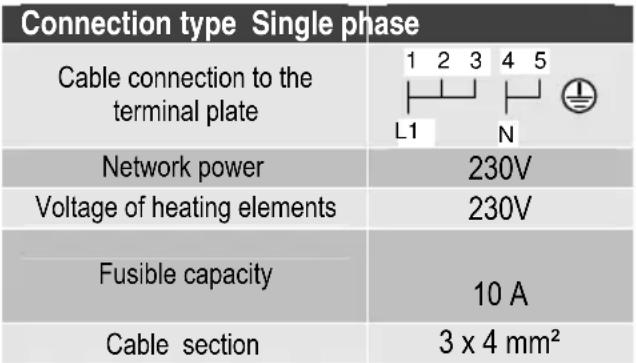 |
treated as household waste. Instead it shall be handed over to the applicable collection point for the recycling of electrical and electronic equipment. By ensuring this product is disposed of correctly, you will help prevent potential negative consequences for the environment and human health, which could otherwise be caused by inappropriate waste handling of this product.
For more detailed information about recycling of this product, please contact your local city office, your household waste disposal service or the shop where you purchased the product.
ZANUSSI

www.electrolux.com
- CONTENTS
- HOW TO READ THE INSTRUCTION BOOK
- IMPORTANT SAFETY INFORMATION
- INSTALLATION
- CHILD SAFETY
- DURING USE
- SERVICE
- INSTRUCTIONS FOR THE USER
- DESCRIPTION OF THE APPLIANCE
- USE OF APPLIANCE
- BEFORE THE FIRST USE OF THE OVEN
- RATING PLATE
- ABOUT CONDENSATION AND STEAM
- COOKWARE
- HOB PLATES PILOT LIGHT
- OVEN THERMOSTAT PILOT LIGHT
- OVEN LIGHT
- THERMOSTAT CONTROL KNOB
- COOKING IN THE OVEN
- CONVENTIONAL COOKING (TRADITIONAL)
- HOW TO PROCEED
- HINTS AND TIPS
- BOTTOM OVEN ELEMENT
- GRILLING
- UPPER AND LOWER OVEN ELEMENTS – FAN
- DEFROST
- USING THE HOB
- THE HOB BURNERS
- OR BY POWER CUT
- EXTINGUISHING OF BURNERS
- NORMAL HOTPLATES
- SELECTING THE CORRECT BURNER
- ACCESSORIES DELIVERED WITH THE APPLIANCE
- STORAGE COMPARTMENT
- ADVICE FOR USE
- OVEN COOKING
- CLEANING AND CARE
- CLEANING MATERIALS
- INFLUENCE OF THE POTS ON OVEN COOKING RESULTS
- YOU HAVE TO KNOW THAT
- COOKING ON THE HOB
- DO NOT USE A STEAM CLEANER FOR CLEANER THE OVEN AND HOBS. HARSH ABRASIVES SHOULD ALSO BE AVOIDED
- EXTERNAL CLEANING
- OVEN CAVITY
- HOB
- BURNERS
- OVEN DOOR
- REMOVING OVEN DOOR FROM ITS HINGES
- REPLACING THE OVEN DOOR ON ITS HINGES
- THE HOTPLATES
- DRYING
- RESTORING
- SOMETHING NOT WORKING
- OVEN BULB REPLACEMENT
- TO REPLACE THE FAULTY BULB
- INSTRUCTIONS FOR THE INSTALLER
- TECHNICAL DATA
- SAFETY ADVICE
- CONNECTION TO GAS SUPPLY
- ELECTRICAL CONNECTION
- BEFORE CONNECTING CHECK THAT
- POSITIONING
- GAS CONNECTION
- FOR NETWORK GAS
- FLEXIBLE, NONMETAL PIPE
- FLEXIBLE PIPE
- RIGID PIPE
- FOR CYLINDER BUTANE PROPANE GAS
- CHANGE OF GAS
- REPLACEMENT OF THE NOZZLES
- FOR CHANGING THE NOZZLES
- ADJUSTMENT OF MINIMUM LEVEL OF PLATE BURNERS
- ADJUSTMENT OF MINIMUM LEVEL FOR THE HOB BURNERS
- FLAME ADJUSTMENT
- NOTE
- NOTE: THE EARTH WIRE SHOULD BE ABOUT 4 CM LONGER THAN THE LIVE AND NEUTRAL WIRES
- ENVIRONMENTAL INFORMATION
- ZANUSSI
Brand : ZANUSSI
Model : ZCM561MW1
Category : Uncategorized