
NA10 - Scanner CANON - Free user manual and instructions
Find the device manual for free NA10 CANON in PDF.


| Product Type | Network Adapter for Canon imageFORMULA DR series scanners |
| Brand | Canon |
| Model | NA10 |
| Scanner Connection Interface | USB 2.0 Hi-Speed (Type A) |
| Network Interface | IEEE802.3 10Base-T / 100Base-TX / 1000Base-T |
| Supported Scanners | DR-C230, DR-C240, DR-M140, DR-M160II, DR-M260, DR-M1060 |
| Dimensions (W x D x H) | 116 mm x 93.6 mm x 28.8 mm (4.57" x 3.69" x 1.13") without cord cover |
| Weight | Approx. 179 g (0.40 lb) (main body only) |
| Power Supply | AC adapter supplied with the scanner |
| Power Consumption | Max. 5.6 W during operation; 4.2 W standby; 0.1 W or less when off |
| Operating Temperature | 10 to 35 °C (50 to 95 °F) |
| Operating Humidity | 20 to 85% RH |
| Smart Device Control | CaptureOnTouch Job Tool for iOS and Android |
| Computer Control | CaptureOnTouch Job Tool for Windows |
| Web Configuration | Built-in web menu for network, mDNS, password, and maintenance settings |
| IP Address Assignment | DHCP enabled by default; static IP configuration via web menu |
| Security | Administrator password protection for web menu settings |
| LED Indicators | Power, DHCP, Connection, and Status lamps |
| Reset Function | Reset button restores initial values or factory defaults |
| Firmware Update | Supported via web menu Maintenance Setting page |
| Included Accessories | Cord cover, stand, USB cable, power relay cable |
| Safety Compliance | FCC Class B, ICES-003, and WEEE compliant |
Frequently Asked Questions - NA10 CANON
User questions about NA10 CANON
0 question about this device. Answer the ones you know or ask your own.
Ask a new question about this device
Download the instructions for your Scanner in PDF format for free! Find your manual NA10 - CANON and take your electronic device back in hand. On this page are published all the documents necessary for the use of your device. NA10 by CANON.
USER MANUAL NA10 CANON
This manual describes the setup and operating procedures for the NA10 Network Adapter for the Canon imageFORMULA DR series. To use this device, read this manual together with the instructions for the scanner to be connected.
Procedures and Example Screens
This manual describes operations using Windows 7 as examples.
Table of Contents
About This Device ....4
Setup....5
Connecting to the Wired Network ....7
Scanning with the CaptureOnTouch Job Tool
from a Smart Device 9
Scanning from a Computer with
the CaptureOnTouch Job Tool ....16
Using the Web Menu ....21
Troubleshooting 27
Specifications ....28
Trademarks
●Canon and the Canon logo are registered trademarks of Canon Inc. in the United States and may also be trademarks or registered trademarks in other countries.
●imageFORMULA is a trademark of CANON ELECTRONICS INC.
● Microsoft and Windows are registered trademarks of Microsoft Corporation in the United States and other countries.
Copyright
Copyright 2018 by CANON ELECTRONICS INC. All rights reserved. No part of this publication may be reproduced or transmitted in any form or by any means, electronic or mechanical, including photocopying and recording, or by any information storage or retrieval system without the prior written permission of CANON ELECTRONICS INC.
Disclaimers
The information in this document is subject to change without notice.
CANON ELECTRONICS INC. MAKES NO WARRANTY OF ANY KIND WITH REGARD TO THIS MATERIAL, EITHER EXPRESS OR IMPLIED, EXPECT AS PROVIDED HEREIN, INCLUDING WITHOUT LIMITATION, THEREOF, WARRANTIES AS TO MARKETABILITY, MERCHANTABILITY, FITNESS FOR A PARTICULAR PURPOSE OF USE OR NON-INFRINGEMENT. CANON ELECTRONICS INC. SHALL NOT BE LIABLE FOR ANY DIRECT, INCIDENTAL, OR CONSEQUENTIAL DAMAGES OF ANY NATURE, OR LOSSES OR EXPENSES RESULTING FROM THE USE OF THIS MATERIAL.
CANON ELECTRONICS INC. IS NOT LIABLE FOR THE STORAGE AND HANDLING OF DOCUMENTS SCANNED WITH THIS PRODUCT, OR THE STORAGE AND HANDLING OF RESULTING SCANNED IMAGE DATA.
IF YOU INTEND TO DISCARD THE ORIGINALS OF SCANNED DOCUMENTS, YOU THE CUSTOMER ARE RESPONSIBLE FOR INSPECTING THE SCANNED IMAGES AND VERIFYING THAT DATA IS INTACT.
THE MAXIMUM LIABILITY OF CANON ELECTRONICS INC. UNDER THIS WARRANTY IS LIMITED TO THE PURCHASE PRICE OF THE PRODUCT COVERED BY THE WARRANTY.
FCC REGULATIONS (For North America)
Network Adapter, Model 6830030, 6830050
This device complies with Part 15 of FCC Rules and Industry Canada licence-exempt RSS standard(s). Operation is subject to the following two conditions: (1) this device may not cause interference, and (2) this device must accept any interference, including interference that may cause undesired operation of this device.
This equipment complies with FCC/IC radiation exposure limits set forth for an uncontrolled environment and meets the FCC radio frequency (RF) Exposure Guidelines in Supplement C to OET65 and RSS-102 of the IC radio frequency (RF) Exposure rules. This equipment has very low levels of RF energy that it deemed to comply without maximum permissive exposure evaluation (MPE). But it is desirable that it should be installed and operated keeping the radiator at least 20cm or more away from person's body (excluding extremities: hands, wrists, feet and ankles).
Changes or modifications not expressly approved by the party responsible for compliance could void the user's authority to operate the equipment.
Note: This equipment has been tested and found to comply with the limits for a Class B digital device, pursuant to Part 15 of the FCC Rules. These limits are designed to provide reasonable protection against harmful interference in a residential installation. This equipment generates, uses, and can radiate radio frequency energy and, if not installed and used in accordance with the instructions, may cause harmful interference to radio communications. However, there is no guarantee that interference will not occur in a particular installation. If this equipment does cause harmful interference to radio or television reception, which can be determined by turning the equipment OFF and ON, the user is encouraged to try to correct the interference by one or more of the following measures:
- Reorient or relocate the receiving antenna.
- Increase the separation between the equipment and receiver.
- Connect the equipment into an outlet on a circuit different from that to which the receiver is connected.
- Consult the dealer or an experienced radio/TV technician for help. Use of shielded cable is required to comply with Class B limits in Subpart B of Part 15 of FCC Rules.
Do not make any changes or modifications to the equipment unless otherwise specified in the manual. If such changes or modifications should be made, you could be required to stop operation of the equipment.
Canon U.S.A. Inc.
One Canon Park, Melville, NY 11747, U.S.A.
Tel. No. 1-800-OK-CANON (1-800-652-2666)
This transmitter must not be co-located or operated in conjunction with any other antenna or transmitter.

AVERTISSEMENT
This digital apparatus does not exceed the Class B limits for radio noise emissions from digital apparatus as set out in the interferencecausing equipment standard entitled "Digital Apparatus", ICES-003 of the Industry Canada.
RÈGLEMENT SUR LE BROUILLAGE RADIOÉLECTRIQUE (For 120 V models)
The following names may be provided for the safety regulations in each sales region of the Network Adapter.
NA10: Model 6830030, 6830050
European Union (and EEA) only.

This symbol indicates that this product is not to be disposed of with your household waste, according to the WEEE Directive (2002/96/EC) and your national law. This product should be handed over to a designated collection point, e.g., on an authorized
one-for-one basis when you buy a new similar product or to an authorized collection site for recycling waste electrical and electronic equipment (EEE). Improper handling of this type of waste could have a possible negative impact on the environment and human health due to potentially hazardous substances that are generally associated with EEE. At the same time, your cooperation in the correct disposal of this product will contribute to the effective usage of natural resources. For more information about where you can drop off your waste equipment for recycling, please contact your local city office, waste authority, approved WEEE scheme or your household waste disposal service. For more information regarding return and recycling of WEEE products, please visit www.canon-europe.com/environment. (EEA: Norway, Iceland and Liechtenstein)
About This Device
This device allows you to connect LAN-compatible computers to a scanner via a network. By connecting a scanner to the device with a USB cable, you can perform scanning operations from a computer via the network.
Names of Parts

1 Power button
Turns on this device. The power lamp lights blue when the device turns on.
When the device's power is on, press and hold this button to turn it (and the power lamp) off.

Hint
When a scanner is connected, the device's power will be linked to the scanner and will turn on/off when the scanner turns on/off.
②Reset button
Hold this button while turning the device on, and keep holding until it starts up, to return the device to its factory default state.
Holding the button while the device is turned on resets only the device's settings to their initial values.
3DHCP On/Off button
Determines whether the device's IP address is obtained automatically via DHCP or whether a static address is used. When DHCP is enabled, holding this button while turning on the device turns off the DHCP lamp and disables DHCP.
When DHCP is disabled, holding this button while turning on the device lights the DHCP lamp and enables DHCP.
Depending on the connection environment, it may take up to 2 minutes for the device to start up. Be sure to hold the button until startup is complete.
4USB connector
Connect this device to the scanner using the USB cable.
5 Power output connector
Use the supplied power relay cable to connect this to the scanner's power connector.
6 LAN port
Connect a network cable that supports RJ-45 (10Base-T, 100Base-TX, 1000Base-T) here.
7 Power input connector
Connect the AC adapter supplied with the scanner here.
8Lamps
The following lamps indicate the device state.
| Lamps Meaning | |||
| 1 | Power Lamp) | Lit(blue) | Power on |
| Unlit Power off | |||
| 2 | DHCP | Lit(green) | DHCP ON |
| Unlit DHCP OFF | |||
| 3 | Connection | Lit(green) | LAN connection established |
| Lit(red) | Initializing setup | ||
| Unlit LAN stopping | |||
| 4 | S t a t u | Lit(green) | Network connection stable |
Setup
(1) Installing the Scanner Driver
To use the device, the driver of the scanner to be used in conjunction with the device must be updated to its latest version.
The scanner driver is available on the downloads page of the Canon website. For details on acquiring and installing the driver, visit the
Canon support website.
http://www.canon-elec.co.jp/products/ims/softwareDownload/index.html
Supported scanners
This unit supports the following scanners.
| Scanner Driver version | |
| DR-C230 1.0.1 | 1705.08001 SP2 |
| DR-C240 1.1.1 | 1508.3001 SP4 |
| DR-M140 1.2.1 | 1407.1001 SP7 |
| DR-M160II 1.2.1 | 11402.06001 SP7 |
| DR-M260 1.0.1 | 1705.30001 SP4 |
| DR-M1060 1.0.1 | 11402.20001 SP6 |
An update is required for scanner driver versions indicated above and earlier. For details on how to acquire the latest scanner driver and the latest information on supported models, visit the Canon support website.
(2) Connecting to the Scanner
①Connect the supplied USB cable to the USB ports on the device and the scanner.
When connecting the device to a scanner that supports USB 3.0/3.1, use the USB cable supplied with the scanner.
②Connect the supplied power relay cable to the power output connector on the device and the power connector on the scanner.
③Plug the network cable's connector (RJ-45) into the LAN port.
④Connect the AC adapter supplied with the scanner to the device, and connect the power plug to a power outlet.

CAUTION
Connect and disconnect the AC adapter or power relay cables by holding their plugs. Connecting and disconnecting by the cable may result in damage to the cable.
Cord Cover and Stand
You can attach the supplied cord cover to protect the connected cable's connector.

You can attach the stand to set the device upright. In addition, placing the scanner on the stand will stabilize the device.


CAUTION
- When connecting the device to a scanner equipped with a fan, maintain a space of at least 10 mm between the device and the scanner so as not to obstruct the vents. If you attached the device to the stand and are placing the scanner on the stand, be sure to position the device so that it does not obstruct the scanner's vents.
- When the stand is attached to the device, attach the cord cover as well to prevent disconnection of the stand.
Connecting to the Wired Network
Under factory default conditions, the device will acquire its IP address automatically from a DCHP server. If the network to which the device will connect includes a DHCP server, the device will be usable simply by connecting to that network.
You can check whether the device is connected to the network properly and ready for use by performing the following and starting the Driver Setting Tool.

Hint
This section describes operations for when the DR-M160II is being used. When using a different model, replace any instance of the model name with that of the model you are using.
1 Click [All Programs] — [Canon ] — [Driver Setting Tool] in the start menu.
Driver Setting Tool starts.

2 Click the [NetworkMonitor] tab.

3 Check that the scanner appears in the list.
4 Select the scanner in your application.

Specifying a Static IP Address for the Device
Perform the following when specification of a static IP address for the device is necessary, such as when the network does not include a DHCP server.
1 Turn on the device while holding the DHCP On/Off button. The power lamp will light. (The other lamps will also light momentarily and then turn off.) Hold the DHCP On/Off button until the Connection lamp lights.
CAUTION
If the Connection lamp does not light even after holding the power button for 3 minutes or more, check the network cable connection.
2 Temporarily change the network address of the computer to which the device will be connected to "192.168.0.100". Connect this device to your computer by peer-to-peer connection, and set a static IP address.
3 Start the web browser, and access the "http://192.168.0.10/" URL.
The device's web page opens, and the login screen is displayed.
4 Specify the IP address for the device in the [Network Setting] screen of the web menu.
For details, see "Using the Web Menu" (p. 21).
Scanning with the CaptureOnTouch Job Tool from a Smart Device
The CaptureOnTouch Job Tool is an application for smart devices (such as smart phones and tablet devices) for controlling scan operations via this device (NA10).

The CaptureOnTouch Job Tool for smart devices provides the following scanning methods.
Job Scanning from the App
Tap a job icon in the CaptureOnTouch Job Tool to scan according to registered scan job settings.
Scanning with Scanner Start Button
You can copy a job registered in the CaptureOnTouch Job Tool to the scanner, then run that job by pressing the scanner's start button.
Job Scanning from a PC
When there is one or more computer on the same network, you can use the CaptureOnTouch Job Tool to select and execute jobs registered by CaptureOnTouch on each computer.

CAUTION
CaptureOnTouch Job Tool compatibility requires CaptureOnTouch version 4.2 or later.
Preparation Before Scanning
Install the CaptureOnTouch Job Tool on your smart device, connect the NA10 to a computer, and connect your smart device to the network.
1 Install the CaptureOnTouch Job Tool application on your smart device.
- For iOS devices, download the CaptureOnTouch Job Tool from the App Store and install it.
- For Android devices, download the CaptureOnTouch Job Tool from Google Play and install it.
2 Connect the NA10 to a wired network.
For details, see "Connecting to the Wired Network" (p. 7).
3 Connect your smart device to the same network as this device and the computer.
Granting Access Permission
When saving scanned data in a specific location, a screen asking for permission to access the smart device is displayed. You can save scanned data if you grant access permission. If you do not grant access permission, you cannot save the scanned data. You can change granting/denial of access permission by the following procedure.
CAUTION
The operating procedure may differ depending on OS version and terminal type.
Android devices
1 Tap [Settings]. The [Settings] screen appears.
2 Tap [Apps]. The [Apps] screen appears.
3 Tap [COTJT]. The [App info] screen appears.
4 Tap [Permissions].
iOS devices
1 Tap [Settings]. The [Settings] screen appears.
2 Tap [COTJT]. The access permission setting screen is displayed.
3 Tap [Photos], and select [Add Photos Only] or [Never].
Job Scanning from the App
You can register a job in the CaptureOnTouch Job Tool and execute scanning according to the job's scan settings. Scanned data is saved in a shared folder on the specified computer or smart device.
1 Start the CaptureOnTouch Job Tool.
The [Scan from app job] screen appears.

You can change the screen displayed at startup by tapping [☐ and selecting [Initial screen setting].
2 Select the scanner.
![①Tap [ ] Scan from app job Scanner • Tap to select a scanner](/content/2026/08/1624937/images/ad1cb3ee62bb7be3640340d59b5b9a077780a454e98b76830b80b947028e7013.jpg)
②Select the scanner on the [Select Scanner] screen.

3
Register the job.
①Tap [Add new].

②On the [Add] screen, set the [Job name] and [Scan setting], then tap [SAVE].


CAUTION
- In [Transmission settings] under [Scan setting], select either [Shared Folder] or [In (name of smart device)] as the destination for the scanned data. When [Shared Folder] is selected, be sure to specify the shared folder in which the scanned data is to be saved.
- To scan A3-size documents on the DR-M1060, set [Page Size] to [Detect Page Size].

Hint
You can register multiple jobs. Up to 99 jobs can be registered.
4
Tap the registered job's icon.
Scanning is executed and the scanned data is saved in the shared folder of the specified computer.

5
Tap [ ] to save the scanned data in the smart device.
Scanned data is saved in the smart device.

![CANON NA10 - Tap [ ] to save the scanned data in the smart device. - 2](/content/2026/08/1624937/images/d59b403b61ccba30d729b2e8fde288c337983074360fab48b2c0d2e755f6da8e.jpg)
Hint
By clicking [■] you can send scanned data as an e-mail attachment or save it to another app.
Editing job settings
You can edit the settings of registered jobs.
1 Press and hold the icon of the job you want to edit. [ ] appears to indicate the job is editable.


Hint
To cancel editing, tap the job icon again or tap [ ][Deselect].
2 Tap [V] The [Edit] screen appears.
3 Change the settings in [Job name] and [Scan setting], and tap [SAVE].
The settings are saved.

Deleting jobs
You can delete registered jobs.
1 Press and hold the icon of a job you want to delete. [ ] appears to indicate it is ready to be deleted.


Hint
- To cancel the selected state, tap the selected job icon.
- By tapping [H- [Select all] or [Deselect], you can select all jobs or cancel the selected state.
2
Tap [ ]
A confirmation message appears.
3
Tap [OK].
The selected job(s) is deleted.
Scanning with Scanner Start Button
You can copy a job registered in the CaptureOnTouch Job Tool to the scanner, then scan according to those scan job settings by pressing the scanner's start button.
In this scanning method, since the NA10 controls the scanner, the smart device is not needed to execute scanning.
1
Start the CaptureOnTouch Job Tool.
The [Scan from app job] screen appears.

Hint
You can change the screen displayed at startup by tapping [☐] and selecting [Initial screen setting].
2
Select the scanner.
①Tap [ ]

②Select the scanner on the [Select Scanner] screen.

3
Tap [or tap [ ] [Copy job registration settings].

4
Enter the administrator password.
Enter the same password as for the Web menu. For details, see "Displaying the Web Menu of This Device" (p. 21).
5
Tap [OK].
All registered jobs are registered in the scanner at once.
![CANON NA10 - Tap [OK]. - 1](/content/2026/08/1624937/images/308ec8d7ea2a12516749667f20493e0c71b392c7242802dfe5f23f0e30ad5ec3.jpg)
CAUTION
The number of jobs that can be copied depends on the scanner.
6
Select the job number on the scanner and press the start button.
Scanning executes according to the scan settings of the selected job number.
During scanning, the power light of the device blinks blue. It lights steadily blue when scanning and data transmission are completed.

CAUTION
- If the scanner does not detect the document (there is no document in the feeder) when scanning starts, the Connection lamp lights orange.
- If data cannot be sent, such as because of an invalid destination, a transmission error occurs and the Connection lamp lights red.
- If you copy jobs registered in the CaptureOnTouch Job Tool to the scanner, you cannot use the favorite settings assigned by CaptureOnTouch to the job buttons on the scanner itself. If you want to use CaptureOnTouch favorite settings, first delete from the scanner all jobs copied from the CaptureOnTouch Job Tool.
To Delete Jobs Copied to the Scanner
Jobs copied to the scanner can be deleted.
1 Delete the job(s) from the CaptureOnTouch Job Tool. For details, see "Deleting jobs" (p. 12).

Hint
To delete all jobs copied to the scanner, delete all jobs from the CaptureOnTouch Job Tool.
2 Select the scanner.
①Tap []

②Select the scanner on the [Select Scanner] screen.

3 Tap [or tap [ ] [Copy job registration settings].

4 Enter the administrator password.
Enter the same password as for the Web menu. For details, see "Displaying the Web Menu of This Device" (p. 21).
5 Tap [OK].
Jobs deleted from the CaptureOnTouch Job Tool are deleted from the scanner.
Job Scanning from a PC
When there is one or more computer on the same network, you can use the CaptureOnTouch Job Tool to select and execute jobs registered by CaptureOnTouch on each computer.
CAUTION
Scanning cannot be executed with this operation if a job registered in CaptureOnTouch Job Tool has been copied to the scanner. All jobs from the CaptureOnTouch Job Tool registered in the scanner must first be deleted. For details, see "To Delete Jobs Copied to the Scanner" (p. 14).
1 Start the CaptureOnTouch Job Tool. The [Scan from app job] screen appears.
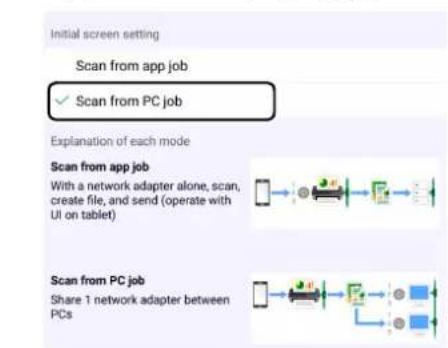
2 Tap [Scan from PC job] in [+] - [Initial screen setting].
3 Select the scanner.
①Tap [ ]

②Select the scanner on the [Select Scanner] screen.

4 Select a computer.
①Tap [ ].

②On the [Select computer] screen, select a computer.

CAUTION
Start CaptureOnTouch on the computer.
The computer cannot be selected unless CaptureOnTouch is running.
5 Tap the job number to execute, and tap [Scan].
Scanning executes according to the scan settings of the selected job number.

Hint
- Using the CaptureOnTouch favorite on the computer selected in the above figure, the job is registered as shown below.

- Only the favorites that are registered to the scanner's job buttons using CaptureOnTouch can be operated from CaptureOnTouch Job Tool.
Scanning from a Computer with the CaptureOnTouch Job Tool
CaptureOnTouch Job Tool for Windows is an application to control scanning via the NA10 by computer operation.

The CaptureOnTouch Job Tool for Windows provides the following scanning methods.
Job Scanning with the App
Select a job icon in the CaptureOnTouch Job Tool and click [Scan] to scan according to the scan settings of the registered job.
Scanning with Scanner Start Button
By copying a job registered in the CaptureOnTouch Job Tool to the scanner, you can then execute the job by pressing the scanner's start button.

CAUTION
The CaptureOnTouch Job Tool for Windows requires that .NET Framework 4.5.2 or higher be installed.
Preparation Before Scanning
Install the CaptureOnTouch Job Tool on the computer, and connect it and the NA10 to the network.
1 Install the CaptureOnTouch Job Tool application on the computer.
2 Connect the NA10 to a wired network.
For details, see "Connecting to the Wired Network" (p. 7).
Job Scanning with the App
You can register a job in the CaptureOnTouch Job Tool and execute scanning according to the job's scan settings. Scanned data is saved in a shared folder on the specified computer.
1 Start the CaptureOnTouch Job Tool. The [Scan from app job] screen appears.
2 Select the scanner.
①Click [ ]

②Select the scanner on the [Select Scanner] screen.

3 Register the job.
①Click [Add].

②On the Add screen, set the [Job name] and [Scan setting], then click [Save].

CAUTION
- In [Transmission settings] under [Scan setting], be sure to specify the shared folder in which to save the scanned data.
- To scan A3-size documents on the DR-M1060, set [Page Size] to [Detect Page Size].
Hint
You can register multiple jobs. Up to 99 jobs can be registered.
4 Click the registered job's icon, then click [Scan].
Scanning is executed and the scanned data is saved in the shared folder of the specified computer.

Editing job settings
You can edit the settings of registered jobs.
1 Click the icon of the job you want to edit.

2 Click [ ].
The [Edit] screen appears.
3 Change the settings in [Job name] and [Scan setting], and click [Save].
The settings are saved.

Deleting jobs
You can delete registered jobs.
1 Click the icon of the job you want to delete.

2 Click [ ].
The selected job(s) is deleted.
Deleting all jobs
You can delete all registered jobs at once.
1 Click [Delete All].
A confirmation message appears.
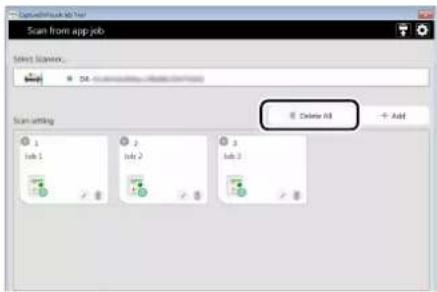
2 Click [OK].
All jobs are deleted.
Scanning with Scanner Start Button
You can copy a job registered in the CaptureOnTouch Job Tool to the scanner, then scan according to those scan job settings by pressing the scanner's start button.
In this scanning method, since the NA10 controls the scanner, the computer is not needed to execute scanning.
1 Start the CaptureOnTouch Job Tool. The [Scan from app job] screen appears.
2 Select the scanner.
①Click [ ]
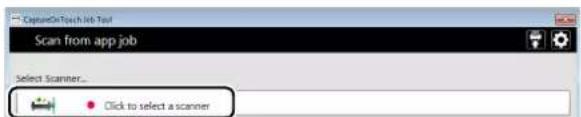
②Select the scanner on the [Select Scanner] screen.

3 Click [or click [Copy job registration settings].

4 Enter the administrator password. Enter the same password as for the Web menu. For details, see "Displaying the Web Menu of This Device" (p. 21).
5 Tap [OK]. All registered jobs are registered in the scanner at once.
CAUTION
The number of jobs that can be copied depends on the scanner.
6 Select the job number on the scanner and press the start button.
Scanning executes according to the scan settings of the selected job number.
During scanning, the power light of the device blinks blue. It lights steadily blue when scanning and data transmission are completed.
CAUTION
- If the scanner does not detect the document (there is no document in the feeder) when scanning starts, the Connection lamp lights orange.
- If data cannot be sent, such as because of an invalid destination, a transmission error occurs and the Connection lamp lights red.
- If you copy a job registered in the CaptureOnTouch Job Tool to the scanner, you cannot use the favorite settings assigned to the job buttons on the scanner with CaptureOnTouch. To use the CaptureOnTouch favorite settings, first delete any jobs copied to the scanner with the CaptureOnTouch Job Tool.
To Delete Jobs Copied to the Scanner
Jobs copied to the scanner can be deleted.
1 Delete the job(s) from the CaptureOnTouch Job Tool.
For details, see "Deleting jobs" (p. 12), "Deleting all jobs" (p. 18).

To delete all jobs copied to the scanner, delete all jobs from the CaptureOnTouch Job Tool.
2 Select the scanner.
①Click [ ]

②Select the scanner on the [Select Scanner] screen.

3 Click [播放] or click [播放] [Copy job registration settings].

4 Enter the administrator password. Enter the same password as for the Web menu. For details, see "Displaying the Web Menu of This Device" (p. 21).
5 Click [OK]. Jobs deleted from the CaptureOnTouch Job Tool are deleted from the scanner.
Displaying the Web Menu of This Device
Since this device has the HTTP protocol, advanced settings can be configured or changed via a web browser.
IMPORTANT
• We recommend the following web browsers:
| Windows Microsoft Internet Explorer 11 or higher |
| Microsoft Edge 38 or higher |
| Firefox 3.0.0 or higher |
| Chrome 11.0 or higher |
- In the following instructions, Internet Explorer 11 and Windows 7 are used as example. Display may vary depending on the web browser.
Hint
- The web configuration page complies with HTTP 1.0 (RFC1945) / HTML 3.0.
- The operating status of the connected scanner is automatically refreshed every 30 sec.
Displaying the Web Menu of This Device

This section describes operations for when the DR-M160II is being used. When using a different model, replace any instance of the model name with that of the model you are using.
1 Click [All Programs] — [Canon ] — [Driver Setting Tool] in the start menu.
Driver Setting Tool starts.

2 Click the [NetworkMonitor] tab.

3 Select the scanner from the list, and click [Property]. The device's web page opens, and the login screen is displayed.

4 Select a display language for the web page in the [Language] list box.
5 Enter the administrator password in [Password]. When opening the web menu for the first time, you will proceed to the next step without password entry, as an administrator password is not configured under the device's factory default settings. If you changed the administrator password previously via the web menu, enter that new password.
CAUTION
To ensure security, we recommend changing the administrator password from its factory default setting. You can change the password on the [Password Setting] screen of the web menu (p. 25).
6 Click [Login]. The [Device information] screen appears.

Specifying the Device's IP Address to Display the Web Menu
Enter the device's IP address in the address bar of the web browser, and press the Enter key.
Example: Enter 192.168.0.10 (displayed as "http://192.168.0.10/")
The device's web page opens, and the login screen is displayed.
The [Device information] screen appears immediately after you log into the web menu, allowing you to view the current settings.

Pages of the Web Menu
When you click the items on the left menu, the following pages are displayed.
Scanner Name Displays the scanner name. Setting
Network Setting Configures the network settings.
mDNS Setting Configures the mDNS settings.
Password Setting Configures the administrator password used to log into the web menu.
Maintenance Setting Restores the factory default settings and updates the firmware.

To return to the [Device information] screen from one of its setting screens, click the model name of the device that appears at the top of the left menu.
Web Menu Settings
This section describes the setting items on each of the pages of the web menu.
Scanner Name Setting
If you click [Scanner Name Setting] on the left menu, the page below is displayed.

| Item Description | |
| Scanner Name | Displays the device name of the connected scanner. |
Network Setting
If you click [Network Setting] on the left menu, the page below is displayed.

| Item Description | Default Value | |
| DHCP | Enable ([ON]) / disable ([OFF]) the DHCP protocol.To assign an IP address using DHCP, the DHCP server must be running in your subnetwork. | ON |
| IP Address | Set the IP address of the device.If DHCP is enabled, the IP address obtained from it will be applied.The value must be four decimal numbers separated by dots and expressed in the [xxx.xxx.xxx.xxx] format. | 192.168.0.10 |
| Subnet Mask | Set the subnet mask of the device.If DHCP is enabled, the subnet mask obtained from it will be applied.The value must be four decimal numbers separated by dots and expressed in the [xxx.xxx.xxx.xxx] format. | 255.255.255.0 |
| Default Gateway | Set the gateway IP address of the device.If DHCP is enabled, the default gateway obtained from it will be applied.The value must be four decimal numbers separated by dots and expressed in the [xxx.xxx.xxx.xxx] format.Also, the gateway needs to be running in the same subnetwork as the device. | 192.168.0.1 |
mDNS Setting
If you click [mDNS Setting] on the left menu, the page below is displayed.

| Item Description | Default Value | |
| mDNS | Enable/disable multicast DNS.This setting allows scanning applications to search for and automatically connect to this device and its connected scanner.Enable the setting under normal circumstances.When the setting is disabled, you must manually specify the scanner using the device's IP address to scan from a scanning application. | ON |
Password Setting
If you click [Password Setting] on the left menu, the page below is displayed.

| Item Description | Default Value | |
| Current Password | Enter the current password. None | |
| New Password | Set the administrator password (up to 32 characters).This password is used for authentication when configuring settings in a web browser. | None |
| New Password (Confirmation) | Used to confirm the password. None |
Maintenance Setting
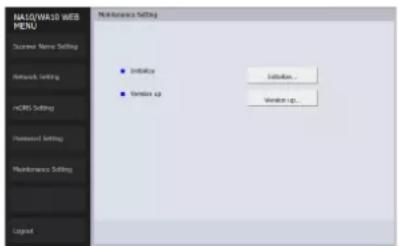
If you click [Maintenance Setting] on the left menu, the page below is displayed.
In this page, you can restore the device's factory default settings and update the firmware.
| Item Description | |
| Initialize | Restore the device's factory default settings. If you click [Initialize] and then [Yes] in the screen that appears, the device's factory default settings are restored, and the device restarts. |
| Version up | Update the device's firmware. Click [Version up], and then specify the firmware file in the screen that appears. |
Visit the Canon support page for instructions on out to obtain the firmware.
http://www.canon-elec.co.jp/products/ims/softwareDownload/index.html
Software License
The device includes software that is licensed under GNU GENERAL PUBLIC LICENSE (GPL), GNU LESSER GENERAL PUBLIC LICENSE (LGPL), or proprietary licenses. You can view the original text of a software license via the device's web menu.
1 Follow the steps in "Displaying the Web Menu of This Device" (p. 21), and display the [Device information] screen.
2 Click [▼] to display the next page of the [Device information] screen.
3 Click [Download] for [Third party license].

Troubleshooting
Problem 1 Scanning is not possible.
Solutions • Confirm that the scanner and the device are turned on.
- Confirm that the scanner is compatible with the device.
- Confirm that the device and scanner are connected via USB cable.
- Confirm that the network cable is connected properly.
- Confirm that the IP address is configured properly.
Problem 2 I cannot get a working connection.
Solutions • If a DHCP server does not exist on the network, you need to use a static IP address. For details, see "Specifying a Static IP Address for the Device" (p. 8).
- You cannot connect if the connected segment is different. Please set it to the same segment as your computer. For details, please contact your network administrator.
- Connection may not be possible due to security software settings. For details, please contact your network administrator.
- You cannot connect if the same device exists on multiple networks and you specify a device with a different IP address. Please double check the IP address of the device to be used.
- Confirm that the version of the installed scanner driver is compatible with this device
Problem 3 Automatic connection to the network is not possible.
Solutions If your network environment supports DHCP, consult your network administrator. If your network environment does not support DHCP, configure the IP address manually.
Problem 4 The network disconnects during use.
Solutions • Check the condition of the cable connection.
- Check the status of network traffic. When a heavy load is placed on the network, processing takes time and timeouts may occur. Wait for awhile and then reconnect. If the situation does not improve, please contact your network administrator.
Problem 5 The scanner automatically turns itself off, making the connection unavailable.
Solution When the scanner has its Auto Power Off function enabled, it automatically turns itself off after a certain period of inactivity, regardless of the connection. Turn the scanner back on, and as necessary, disable the Auto Power Off function as described in the scanner's manual.
Problem 6 I want to reset the device's settings to their initial values.
Solutions Press and hold the Reset button while the device is turned on to reset the device's settings to their initial values. During initialization, the Connection lamp lights red. When the Connection lamp lights green, initialization is finished. Holding the Reset button while turning on the device, and continuing to hold it until the Connection lamp on this device lights red, resets it to the factory default state.
Specifications
Main Unit
Type Network Adapter
Scanner connection interface
USB 2.0 Hi-Speed (Type A)
Network interface
IEEE802.3 10Base-T/100Base-TX/1000Base-T
Dimensions 116 mm x 93.6 mm x 28.8 mm
(4.57" x 3.69" x 1.13")
(W x D x H; without cord cover)
Mass Approx. 179 g (0.4 lb) (main body only)
Power supply AC adapter (use the adapter supplied with the scanner)
Power consumption Max. during operation: 5.6 W;
During standby: 4.2 W;
During power off: 0.1 W or less
Operating environment Temperature: 10 to 35 degrees C
(50 to 95 degrees F)
Humidity: 20 to 85% (RH)
* Varies according to environmental conditions.
Safety-related markings on the machine
[English] Switch (On)
[English] Switch (Off)
Power off (no standby current)
Power on/off (standby current on)
[English] Switch (Push-On/Push-Off)
Power on/off (no standby current)
[English] Heat hazard
[English] Class II equipment
Indicates this is Class II equipment
[English] DC symbol Indicates direct current
[English] DC polarity Indicates the power plug polarity
[English] Electrostatic precaution Avoid applying static electricity to the machine
CANON INDIA PVT. LTD
7TH FLOOR, TOWER B DLF CYBER TERRACES DLF PHASE III GURGAON-122002 HARYANA, INDIA
PUB. 6T3-0017-E1.40 © CANON ELECTRONICS INC. 2018
- PROCEDURES AND EXAMPLE SCREENS
- TABLE OF CONTENTS
- TRADEMARKS
- COPYRIGHT
- DISCLAIMERS
- FCC REGULATIONS (FOR NORTH AMERICA)
- AVERTISSEMENT
- RÈGLEMENT SUR LE BROUILLAGE RADIOÉLECTRIQUE (FOR 120 V MODELS)
- EUROPEAN UNION (AND EEA) ONLY
- ABOUT THIS DEVICE
- POWER BUTTON
- HINT
- ②RESET BUTTON
- DHCP ON/OFF BUTTON
- USB CONNECTOR
- POWER OUTPUT CONNECTOR
- LAN PORT
- POWER INPUT CONNECTOR
- LAMPS
- SETUP
- INSTALLING THE SCANNER DRIVER
- SUPPORTED SCANNERS
- CONNECTING TO THE SCANNER
- CAUTION
- CORD COVER AND STAND
- CONNECTING TO THE WIRED NETWORK
- CLICK [ALL PROGRAMS] — [CANON ] — [DRIVER SETTING TOOL] IN THE START MENU
- CLICK THE [NETWORKMONITOR] TAB
- CHECK THAT THE SCANNER APPEARS IN THE LIST
- SELECT THE SCANNER IN YOUR APPLICATION
- SPECIFYING A STATIC IP ADDRESS FOR THE DEVICE
- SCANNING WITH THE CAPTUREONTOUCH JOB TOOL FROM A SMART DEVICE
- JOB SCANNING FROM THE APP
- SCANNING WITH SCANNER START BUTTON
- JOB SCANNING FROM A PC
- PREPARATION BEFORE SCANNING
- GRANTING ACCESS PERMISSION
- ANDROID DEVICES
- IOS DEVICES
- START THE CAPTUREONTOUCH JOB TOOL
- SELECT THE SCANNER
- REGISTER THE JOB
- TAP THE REGISTERED JOB'S ICON
- TAP [ ] TO SAVE THE SCANNED DATA IN THE SMART DEVICE
- EDITING JOB SETTINGS
- DELETING JOBS
- TAP [ ]
- TAP [OK]
- TAP [OR TAP [ ] [COPY JOB REGISTRATION SETTINGS]
- ENTER THE ADMINISTRATOR PASSWORD
- SELECT THE JOB NUMBER ON THE SCANNER AND PRESS THE START BUTTON
- TO DELETE JOBS COPIED TO THE SCANNER
- SELECT A COMPUTER
- TAP THE JOB NUMBER TO EXECUTE, AND TAP [SCAN]
- SCANNING FROM A COMPUTER WITH THE CAPTUREONTOUCH JOB TOOL
- JOB SCANNING WITH THE APP
- CLICK THE REGISTERED JOB'S ICON, THEN CLICK [SCAN]
- CLICK THE ICON OF THE JOB YOU WANT TO EDIT
- CLICK [ ]
- CHANGE THE SETTINGS IN [JOB NAME] AND [SCAN SETTING], AND CLICK [SAVE]
- CLICK THE ICON OF THE JOB YOU WANT TO DELETE
- DELETING ALL JOBS
- CLICK [DELETE ALL]
- CLICK [OK]
- CLICK [播放] OR CLICK [播放] [COPY JOB REGISTRATION SETTINGS]
- ENTER THE ADMINISTRATOR PASSWORD. ENTER THE SAME PASSWORD AS FOR THE WEB MENU. FOR DETAILS, SEE "DISPLAYING THE WEB MENU OF THIS DEVICE" (P. 21)
- CLICK [OK]. JOBS DELETED FROM THE CAPTUREONTOUCH JOB TOOL ARE DELETED FROM THE SCANNER
- DISPLAYING THE WEB MENU OF THIS DEVICE
- IMPORTANT
- SPECIFYING THE DEVICE'S IP ADDRESS TO DISPLAY THE WEB MENU
- PAGES OF THE WEB MENU
- WEB MENU SETTINGS
- SCANNER NAME SETTING
- NETWORK SETTING
- MDNS SETTING
- PASSWORD SETTING
- MAINTENANCE SETTING
- SOFTWARE LICENSE
- TROUBLESHOOTING
- PROBLEM 1 SCANNING IS NOT POSSIBLE
- PROBLEM 2 I CANNOT GET A WORKING CONNECTION
- PROBLEM 3 AUTOMATIC CONNECTION TO THE NETWORK IS NOT POSSIBLE
- PROBLEM 4 THE NETWORK DISCONNECTS DURING USE
- PROBLEM 5 THE SCANNER AUTOMATICALLY TURNS ITSELF OFF, MAKING THE CONNECTION UNAVAILABLE
- PROBLEM 6 I WANT TO RESET THE DEVICE'S SETTINGS TO THEIR INITIAL VALUES
- SPECIFICATIONS
- MAIN UNIT
Brand : CANON
Model : NA10
Category : Scanner