
SK3D - Soundbar LG - Free user manual and instructions
Find the device manual for free SK3D LG in PDF.


| Product Type | Soundbar |
| Brand | LG |
| Model | SK3D |
| Speaker Configuration | 2.1 channels (soundbar + wireless subwoofer) |
| Total Output Power | 300W RMS |
| Wireless Subwoofer | Yes, 100W RMS |
| Connectivity | Bluetooth, HDMI ARC, USB, Optical |
| Bluetooth Version | 4.0 |
| Audio Formats | MP3, WAV, AAC |
| Sound Modes | Standard, Cinema, Bass Boost, News |
| Dimensions (W x H x D) | 900 x 60 x 85 mm |
| Soundbar Weight | 2.5 kg |
| Subwoofer Weight | 4.5 kg |
| Power Supply | AC 100-240V, 50/60Hz |
| Power Consumption | 30W (standby: 0.5W) |
| Wall Mountable | Yes (brackets not included) |
| Remote Control | Included |
| Cleaning and Maintenance | Wipe with a soft, dry cloth |
| Safety Instructions | Read the user manual before installation |
| Spare Parts and Repairability | Contact LG customer service |
Frequently Asked Questions - SK3D LG
User questions about SK3D LG
0 question about this device. Answer the ones you know or ask your own.
Ask a new question about this device
Download the instructions for your Soundbar in PDF format for free! Find your manual SK3D - LG and take your electronic device back in hand. On this page are published all the documents necessary for the use of your device. SK3D by LG.
USER MANUAL SK3D LG
Please read this manual carefully before operating your set and retain it for future reference.
MODEL
SK3D (SK3D, SPH4B-W)
Safety Information

CAUTION
RISK OF ELECTRIC SHOCK DO NOT OPEN

CAUTION: TO REDUCE THE RISK OF ELECTRIC SHOCK DO NOT REMOVE COVER (OR BACK) NO USER-SERVICEABLE PARTS INSIDE REFER SERVICING TO QUALIFIED SERVICE PERSONNEL.

This lightning flash with arrowhead symbol within an equilateral triangle is intended to alert the user to the presence of uninsulated dangerous voltage within the product's enclosure that may be of sufficient magnitude to constitute a risk of electric shock to persons.

The exclamation point within an equilateral triangle is intended to alert the user to the presence of important operating and maintenance (servicing) instructions in the literature accompanying the product.
WARNING: TO PREVENT FIRE OR ELECTRIC SHOCK HAZARD, DO NOT EXPOSE THIS PRODUCT TO RAIN OR MOISTURE.
CAUTION: The device shall not be exposed to water (dripping or splashing) and no objects filled with liquids, such as vases, shall be placed on the device.
WARNING: Do not install this equipment in a confined space such as a book case or similar unit.
CAUTION: Do not use high voltage products around this product. (ex. Electrical swatter) This product may malfunction due to electrical shock.
CAUTION: No naked flame sources, such as lighted candles, should be placed on the device.
CAUTION: Do not block any ventilation openings. Install in accordance with the manufacturer's instructions.
Slots and openings in the cabinet are provided for ventilation and to ensure reliable operation of the product and to protect it from over heating. The openings shall never be blocked by placing the product on a bed, sofa, rug or other similar surface. This product shall not be placed in a built-in installation such as a bookcase or rack unless proper ventilation is provided or the manufacturer's instruction has been adhered to.
CAUTION concerning the Power Cord
The Power Plug is the disconnecting device. In case of an emergency, the Power Plug must remain readily accessible.
Check the specification page of this owner's manual to be certain of the current requirements.
Do not overload wall outlets. Overloaded wall outlets, loose or damaged wall outlets, extension cords, frayed power cords, or damaged or cracked wire insulation are dangerous. Any of these conditions could result in electric shock or fire. Periodically examine the cord of your device, and if its appearance indicates damage or deterioration, unplug it, discontinue use of the device, and have the cord replaced with an exact replacement part by an authorized service center. Protect the power cord from physical or mechanical abuse, such as being twisted, kinked, pinched, closed in a door, or walked upon. Pay particular attention to plugs, wall outlets, and the point where the cord exits the device.
NOTICE: For safety marking information including product identification and power supply ratings, please refer to the main label on the bottom or the other surface of the product.
This device is equipped with a portable battery or accumulator.
How to Safely remove the batteries or the battery pack from the equipment:
To Remove the old batteries or battery pack, follow the assembly steps in reverse order. To prevent contamination of the environment and bring on possible threat to human and/or animal health, the old batteries or the battery pack must be put in an appropriate container at designated collection points. Do not dispose of batteries or battery pack together with other waste. It is recommended that you use local, free reimbursement systems batteries or battery packs, (may not be available in your area). The batteries or the battery pack should not be exposed to excessive heat such as sunshine, fire or the like.
CAUTION: No naked flame sources, such as lighted candles, should be placed on the apparatus.
Symbols
| ~ | Refers to alternating current (AC). |
| --- | Refers to direct current (DC). |
| ☐ | Refers to class II equipment. |
| ◎ | Refers to stand-by. |
| I | Refers to “ON” (power). |
| ⚡ | Refers to dangerous voltage. |
Table of Contents
1 Getting Started
2 Safety Information
6 Unique features
6 - Auto power down
6 - Portable In
6 Introduction
6 - Symbols used in this manual
6 Accessories
7 Remote control
8 Front panel
8 Rear panel
9 Installing the sound bar
10 Mounting the main unit on a wall
2 Connecting
12 Wireless subwoofer connection
13 Connecting to your TV
13 - Using an OPTICAL cable
14 Optional equipment connection
14 - OPTICAL IN connection
14 - PORT. IN connection
3 Operating
15 Operations
15 - Night mode
15 - Turn off the sound temporarily
15 - Using your TV remote control
16 - AUTO POWER On/Off
16 - Auto function change
17 Using BLUETOOTH® technology
17 - Listening to music stored on the BLUETOOTH devices
18 Sound adjustment
18 - Setting the surround mode
18 - Adjust the woofer level settings
4 Troubleshooting
19 Troubleshooting
20 NOTES to use wireless
5 Appendix
21 Trademarks and licenses
22 Specifications
23 Maintenance
23 - Handling the unit
Unique features
Auto power down
This unit supports turning off by itself for energy consumption saving.
Portable In
Listen to music from your portable device. (MP3 player, Notebook, Smart phone, etc.)
Introduction
Symbols used in this manual

Note
Indicates special notes and operating features.
Caution
Indicates cautions for preventing possible damages from abuse.
Accessories
Please check and identify the supplied accessories.


Remote control (1) Batteries (2)


Wall Bracket Install guide (1)
Wall bracket (1)

Optical cable (1)
Remote control

Replacement of battery

Remove the battery cover on the rear of the Remote Control, and insert the (size AAA) battery with + and -natched correctly.
1
(Power): Switches the unit ON or OFF
F: Selects the function and the input source.
ASC (a): Analyzes the property of input sound and provides the sound optimized for the content in real time.
BASS BLAST : Selects reinforced bass sound.
CINEMA : Selects cinematic surround sound.
VOL +/—: Adjusts speaker volume.
(Mute): Mutes the sound.
2
◀◀/▶◀ (Skip): Skips Fast backward or Forward.
▶II (Play/Pause): Starts playback. / Pauses playback.
NIGHT ON/OFF :
- Turns on or off Night mode.
- Controls this unit using TV remote. (Refer to the page 16)
WOOFER LEVEL +/—: Adjusts sound level of subwoofer.
AUTO POWER ON/OFF: Turns on or off AUTO POWER function. (Refer to the page 16.)
Front panel

1 ⏻/I (Standby/On)
2 F (Function) Selects the function and input source.
3 -/+ (Volume) Adjusts volume level.
4 Standby LED
It lights up in red on standby mode.
5 Remote sensor
6 Function LED
Note
- You can check current function through the LED.

- This unit turns off LED If there is no key input for 20 seconds. To display LED, press any button.
- Standby LED quickly blinks when you press any button, and slowly blinks in Mute or Minimum volume status.
- Bluetooth LED blinks when you select Bluetooth function. If you connect a Bluetooth device, the LED will turn on.
7 Speakers
Rear panel

1 PORT.IN:Portable input
2 OPTICAL IN: Optical input
Installing the sound bar
You can hear the sound by connecting the unit to another device: TV, Blu-ray disc player, DVD player, etc. Place the unit in front of the TV and connect it to the device you want. (Refer to pages 13 - 14.)

Caution
- For best performance of wireless connection such as Bluetooth or wireless subwoofer, do not install the unit on Metallic furniture because wireless connection communicates through a module positioned on the bottom of the unit.
- Be careful not to make scratches on the surface of the Unit or Sub-Woofer when installing or moving them.
Mounting the main unit on a wall
You can mount the main unit on a wall.

Caution
Because it is difficult to make a connection after installing this unit, you should connect the cables before installation.
Prepare screws and brackets.

- Match the TV's BOTTOM EDGE of Wall Bracket Install guide with the bottom of TV and attach to the position.
![graph TD A["TV"] --> B["TV Center"] B --> C["LG"] C --> D["TV Bottom Line"] D --> E["TV Bottom Line"] style A fill:#f9f,stroke:#333 style B fill:#ccf,stroke:#333 style C fill:#cfc,stroke:#333 style D fill:#fcc,stroke:#333 style E fill:#ffc,stroke:#333](/content/2026/08/1624566/images/7dba5631d2b417c02fe1f43a0c67ad45732eb8d20363c8439cfe6d767e556f88.jpg)
- When you mount it on a wall (concrete), use the wall plugs (Not supplied). You will need to drill some holes. A guide sheet (Wall Bracket Install guide) is supplied showing you where to drill. Use the sheet to check the points where you should drill.

Note
Screws and Wall Plugs are not supplied for mounting the unit. We recommend the Hilti (HUD-1 6 x 30) for the mounting. Please purchase it locally.
- Remove the Wall bracket install guide.
- Fix it with screws (not supplied) as shown in the illustration below.

- Hang the main unit onto the bracket as shown below.

Caution
- Do not install this unit upside down. It can damage the parts of this unit or be the cause of personal injury.
- Do not hang onto the installed unit and avoid any impact to the unit.
- Secure the unit firmly to the wall so that it does not fall off. If the unit falls off, it may result in an injury or damage to the product.
- When the unit is installed on a wall, please make sure that a child does not pull any of connecting cables, as it may cause it to fall.
Note
Detach the unit from the bracket as shown below.

Wireless subwoofer connection
LED indicator of wireless subwoofer
| LED Color Status | |
| Yellow green (Blink) | Attempting to make connection. |
| Yellow green | The connection is completed. |
| Red/ Yellow green (Blink alternately) | The wireless subwoofer connection is initialized. |
| Off (No display) | The power cord of wireless subwoofer is disconnected. |
Setting up the wireless subwoofer for the first time
- Connect the power cord of the wireless subwoofer to the outlet.
- Turn on the main unit: The main unit and wireless subwoofer will be automatically connected.
Manually pairing wireless subwoofer
When your connection is not completed, you can see the red LED or the blinking of yellow-green LED on the wireless subwoofer and the subwoofer does not make sound. To solve the problem, follow the below steps.
-
Adjust volume level of the main unit to minimum by pressing VOL — button repeatedly until standby LED on the main unit blinks slowly.
-
Press and hold 📄 (Mute) on the remote control for about 3 seconds.
- The standby LED on the main unit blinks quickly.
- If the LED of the wireless subwoofer already blinks in yellow-green continually, you can skip this step.
Press and hold PAIRING on the back of the wireless subwoofer for more than 5 seconds.
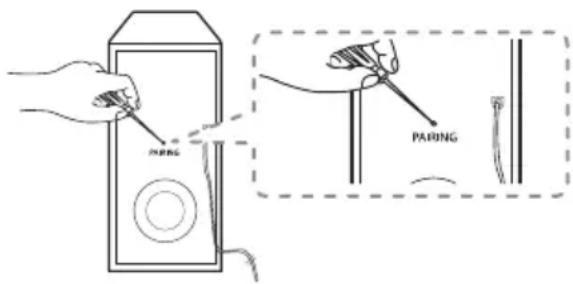
- The LED of the wireless subwoofer lights up alternately in red and yellow-green.
- Disconnect the power cord of the main unit and the wireless subwoofer.
- Connect them again after the LED of the main unit and the wireless subwoofer is fully turned off.
The main unit and the wireless subwoofer will be paired automatically when you turn on the main unit.
- When the connection is completed, you can see the yellow-green LED on the subwoofer.
Note
- It takes a few seconds (and may take longer) for the main unit and the subwoofer to communicate with each other and make sounds. - The closer the main unit and the subwoofer, the better sound quality. It is recommended to install the main unit and the subwoofer as close as possible and avoid the cases below.
- There is a obstacle between the main unit and the subwoofer.
- There is a device using same frequency with this wireless connection such as a medical equipment, a microwave or a wireless LAN device.
Connecting to your TV
Using an OPTICAL cable
- Connect the OPTICAL IN jack on the back of the unit to OPTICAL OUT jack on the TV using an OPTICAL cable.
![graph TD A["PORTIN"] --> B["OPTICAL IN"] B --> C["Optical cable"] D["OptICAL OUT"] --> E["Optical cable"] style A fill:#f9f,stroke:#333 style D fill:#ccf,stroke:#333 style B fill:#cfc,stroke:#333 style C fill:#fcc,stroke:#333 style E fill:#cff,stroke:#333](/content/2026/08/1624566/images/6ba3a8f916ab917187466d786801f634b3910b1a1736fc0a6d7431c74b06d0cf.jpg)
- Set the input source to OPTICAL Press F button repeatedly until the function is selected.
Note
- Before connecting the optical cable, be sure to remove the protection plug cover if your cable has the cover.
- You can enjoy the TV audio through the speakers of this unit. In the case of some TV models, you must select the external speaker option from the TV menu. (For details, reference your TV user manual.)
- Set up the sound output of TV to listen to the sound through this unit: TV setting menu → [Sound] → [TV Sound output] → [External speaker (Optical)]
- Details of TV setting menu vary depending on the manufacturers or models of your TV...
Optional equipment connection
OPTICAL IN connection
Connect an optical output jack of external devices to the OPTICAL IN jack.

- Connect the OPTICAL IN jack on the back of the unit to optical out jack of your TV (or digital device etc.)
- Select the input source to OPTICAL by pressing F button repeatedly until the function is selected.
- Listen to sound.
- Press F to exit from OPTICAL.

Note
Before connecting the optical cable, be sure to remove the protection plug cover if your cable has the cover.
PORT. IN connection
![graph TD A["PORT.IN"] --> B["MP3 player, etc..."] B --> C["Portable cable"] C --> D["MP3 player"] D --> E["手机"] D --> F["笔记本电脑"] D --> G["电脑"] A --> H["OPTICAL"] H --> I["Port.IN"]](/content/2026/08/1624566/images/d056d3dccf2cb100c00f678b4a91aed32e09c5561ce35885d5c5197dbd2fe743.jpg)
Listening to music from your portable player
The unit can be used to play the music from many types of portable players or external devices.
- Connect the portable player to the PORTABLE IN connector of the unit by using 3.5 mm stereo cable.
- Turn the power on by pressing ⏻ (Power).
- Select the PORTABLE function by pressing F button repeatedly until the function is selected.
- Turn on the portable player or external device and start playing it.
Operations
Night mode
This function is useful when you want to watch movies at low volume late at night. Set Night mode to On to reduce the sound intensity and improve fineness and softness.
Press NIGHT ON/OFF button to turn on or off night mode.
Turn off the sound temporarily
Press 📄Mute) to mute your unit.
To cancel it, press ✗ (Mute) again on the remote control or change the volume level.
Using your TV remote control
You can control some functions of this unit by your TV remote control even by other company's product. Controllable functions are volume up/down and mute.
Press and hold NIGHT ON on the remote control for about 3 seconds.
To turn off this function, press and hold NIGHT OFF about 3 seconds.
Note
• Supported TV brands
LG Panasonic Philips Samsung
Sharp Sony Toshiba Vizio
- Make sure that the sound output of your TV is set to [External speaker].
- Depending on the remote control, this function may not work well.
- This function does not operate on LG TV's magic remote control.
Auto power down
This unit will turn itself off to save electric consumption in the case main unit is not connected to external device and is not used for 15 minutes.
It will also shut itself off after six hours when the Main unit has been connected to other device using analog input. (Ex : Portable, etc..)
AUTO POWER On/Off
This unit automatically turns on by an input source: Optical or Bluetooth.
When you turn on your TV or an external device connected to this unit, this unit recognizes the input signal and selects the suitable function. You can hear the sound from your device.
If you try to connect your Bluetooth device, this unit turns on and is ready to pair. Connect your Bluetooth device and play your music.
This function turns on or off when you press AUTO POWER ON/OFF.
Note
- After the unit is turned on by AUTO POWER function, it will be automatically turned off if there is no signal for a certain period of time from the external device.
- If you turned off the unit directly, it cannot be turned on automatically by AUTO POWER function. However the unit can be turned on by AUTO POWER function when optical signal comes in after 5 seconds of no signal.
- Depending on the connected device, this function may not operate.
- If you disconnect Bluetooth connection by this unit, some Bluetooth devices try to connect to the unit continually. Therefore it is recommended to disconnect the connection before turning off the unit.
- When you turn on this unit for the first time, Auto Power function status is turned on.
Auto function change
This unit recognizes input signals such as optical and Bluetooth. And then changes suitable function automatically.
When optical signal comes in
When you turn on the external device connected to this unit by an optical cable, this unit changes the function to optical. You can hear the sound from your device.
When you try to connect BLUETOOTH device
When you try to connect your Bluetooth device to this unit, the Bluetooth function is selected. Play your music on the Bluetooth device.
Note
To change to optical function, it needs 5 seconds of no signal.
Using BLUETOOTH® technology
About BLUETOOTH
Bluetooth is wireless communication technology for short range connection.
The sound may be interrupted when the connection has interference from other electronic waves or you connect the Bluetooth in other rooms.
Connecting individual devices under Bluetooth wireless technology does not incur any charges. A mobile phone with Bluetooth wireless technology can be operated via the Cascade if the connection was made via Bluetooth wireless technology.
• Available Devices : Mobile phone, MP3, Laptop, PDA etc.
- Codec: SBC
BLUETOOTH Profiles
In order to use Bluetooth wireless technology, devices must be able to interpret certain profiles. This unit is compatible with following profile.
A2DP (Advanced Audio Distribution Profile)
Listening to music stored on the BLUETOOTH devices
Pairing your unit and BLUETOOTH device
Before you start the pairing procedure, make sure the Bluetooth feature is turned on in to your Bluetooth device. Refer to your Bluetooth device's user guide. Once a pairing operation is performed, it does not need to be performed again.
- Turn on the unit.
- Operate the Bluetooth device and perform the pairing operation. When searching for this unit with the Bluetooth device, a list of the devices found may appear in the Bluetooth device display depending on the type of Bluetooth device. Your unit appears as "LG SK3D (XX)".
Note
- XX means the last two digits of Bluetooth address. For example, if your unit has a Bluetooth address such as 9C:02:98:4A:F7:08 you will see "LG SK3D (08)" on your Bluetooth device.
-
Depending on the Bluetooth device type, some device have a different pairing way. Enter the PIN code (0000) as needed.
-
When this unit is successfully connected with your Bluetooth device, BLUETOOTH (✗) LED will turn on.
-
Listen to music. To play a music stored on your Bluetooth device, refer to your Bluetooth device's user guide.

Note
- When using Bluetooth technology, you have to make a connection between the unit and the Bluetooth device as close as possible and keep the distance.
However it may not work well in the case below :
- There is a obstacle between the unit and the bluetooth device.
- There is a device using same frequency with Bluetooth technology such as a medical equipment, a microwave or a wireless LAN device.
- You should connect your Bluetooth device to this unit again when you restart it.
- The sound may be interrupted when the connection has interference from other electronic waves.
- You may not control the Bluetooth device with this unit.
- Pairing is limited to one Bluetooth device per unit and multi-pairing is not supported.
- Depending on the type of the device, you may not be able to use the Bluetooth function.
- You can enjoy Bluetooth function using Smart phone, MP3 player, Notebook, etc..
- The more distance between the unit and the Bluetooth device, the lower the sound quality becomes.
- Bluetooth connection will be disconnected when the unit is turned off or the bluetooth device gets far from the unit.
- When Bluetooth connection is disconnected, connect the bluetooth device to the unit again.
- When this unit is not connected with Bluetooth device, Bluetooth LED will blink.
- You can control a Bluetooth device using ◀◀◀/▶▶▶I (Skip) and ▶▶▶ (Play/Pause) buttons on the remote control.
Sound adjustment
Setting the surround mode
This system has a number of pre-set surround sound fields. You can select a desired sound mode by using each sound mode button.
| Sound effect Description | |
| ASC(Adaptive Sound Control) | Analyzes the property of input sound and provides the sound optimized for the content in real time. |
| BASS BLAST | Reinforces the bass and powerful sound. |
| CINEMA | You can enjoy more immersive and cinematic surround sound. |

Note
- In some of the sound effect modes, some speakers may have no sound or low sound. It depends on the mode of sound and the source of the audio, it is not a defect.
- You may need to reset the sound effect mode, after switching the input, sometimes even after the sound file changed.
Adjust the woofer level settings
You can adjust the sound level of woofer by pressing WOOFER LEVEL +/— button.

Note
When the subwoofer level reaches maximum or minimum, standby LED (Red) on the main unit turns on for 2 seconds.
Troubleshooting
| PROBLEM CAUSE & CORRECTION | |
| The unit does not work properly. | Turn off the power of this unit and the connected external device (TV, Woofer, DVD-player, Amplifier, etc.) and turn it on again.Disconnect the power cord of this unit and the connected external device (TV, Woofer, DVD-player, Amplifier, etc.) and then try connecting again.Previous setting may not be saved when device power is shut off. |
| No Power | The power cord is unplugged.Plug in the power cord.Check the condition by operating other electronic devices. |
| No sound | Incorrect input source is selected.Check the input source and select the correct input source.The mute function is activated.Press 📋 (Mute) or adjust the volume level to cancel the mute function.When you are using connection with a external device (set top box, Bluetooth device etc.), adjust volume level of the device. |
| No woofer sound | The power cord of the woofer is not connected.Plug the power cord into the wall outlet securely.Pairing between the unit and woofer gets disconnected.Connect the unit and woofer. (Refer to the page 12.) |
| The remote control does not work properly. | The remote control is too far from the unit.Operate the remote control within about 7 m, (23 ft.).There is an obstacle in the path of the remote control and the unit.Remove the obstacle.The batteries in the remote control is exhausted.Replace the batteries with new one. |
| The AUTO POWER function does not work. | Check connection of the external device such as TV, DVD/Blu-Ray player orBluetoothdevice.Depending on the connected device, this function may not operate. |
| When you feel the output sound of the unit is low. | Check the details below and adjust the unit according to them.Switch [ON] state of DRC function to [OFF] by using remote controller.With the sound bar connected with TV, change the AUDIO DIGITAL OUT setting on TV Setup Menu from [PCM] to [AUTO] or [BITSTREAM].With the sound bar connected with Player, change the AUDIO DIGITAL OUT setting on Player Setup Menu from [PCM] to [PRIMARY PASS-THROUGH] or [BITSTREAM].Make sure Night Mode is not On. Turn [OFF] Night Mode. |
NOTES to use wireless
| PROBLEM CAUSE & CORRECTION | |
| This device may have wireless interference. | · Wireless may not operate normally in weak signal area.· Please install the device close enough to wireless subwoofer.· Do not install the device on metal furniture for optimum performance. |
| Bluetooth device may malfunction or make noise in the following cases. | · When any part of your body contacts the transceiver of the Bluetooth device or sound bar.· When there is an obstacle or wall or the device is installed in a secluded spot.· When there is a device (a wireless LAN, a medical equipment or a microwave) using the same frequency, make the distance between the products as far away as possible from each other.· When connecting the device to a Bluetooth device, make the distance between the products as close as possible.· hen the device gets too far from the Bluetooth device, the connection is disconnected and also may cause the device malfunction. |
Trademarks and licenses
All other trademarks are trademarks of their respective owners.
DOLBY AUDIO™
Manufactured under license from Dolby Laboratories. Dolby, Dolby Audio, and the double-D symbol are trademarks of Dolby Laboratories.

dts®
Digital Surround
For DTS patents, see http://patents.dts.com. Manufactured under license from DTS Licensing Limited. DTS, the Symbol, & DTS and the Symbol together are registered trademarks, and DTS Digital Surround is a trademark of DTS, Inc. © DTS, Inc. All Rights Reserved.

Bluetooth®
Bluetooth wireless technology is a system which allows radio contact between electronic.
Connecting individual devices under Bluetooth wireless technology does not incur any charges. A mobile phone with Bluetooth wireless technology can be operated via the Cascade if the connection was made via Bluetooth wireless technology.
The Bluetooth word mark and logos are owned by the Bluetooth SIG, Inc. and any use of such marks by LG Electronics is under license.
Other trademarks and trade names are those of their respective owners.
Specifications
| General | |
| Power requirements Refer to the main label. | |
| Power consumption Refer to the main label. | |
| Dimensions (W x H x D) Approx. 950 mm x 71 mm x 47 mm (37.4 inch x 2.8 inch x 1.9 inch) | |
| Net Weight Approx. 2.47 kg (5.4 lb) | |
| Operating temperature 41 °F to 95 °F (5 °C to 35 °C) | |
| Operating humidity 5 % to 90 % | |
| Inputs | |
| Digital audio in (OPTICAL IN) 3 V (p-p), Optical jack x 1 | |
| Portable in (PORT. IN) 0.32 Vrms (3.5 mm stereo jack) x 1 | |
| Available Digital Input Audio Sampling Frequency | 32 kHz, 44.1 kHz, 48 kHz, 88.2 kHz, 96 kHz |
| Available Digital Input Audio format | Dolby Digital, DTS Digital Surround, PCM |
| Amplifier (RMS Output power) | |
| Total 300 W | |
| Front 50 W +50 W (4 | Ω at 1 kHz, 10% THD) |
| Subwoofer 200 W (3 | Ω at 80 Hz, 10% THD) |
| Wireless subwoofer | |
| Power requirements Refer to the main label on the wireless subwoofer. | |
| Power consumption Refer to the main label on the wireless subwoofer. | |
| Type 1 Way 1 Speaker | |
| Impedance | 3Ω |
| Rated Input Power | 200 W |
| Max. Input Power | 400 W |
| Dimensions (W x H x D) | Approx. 171 mm x 390 mm x 261mm(6.7 inch x 15.3 inch x 10.2 inch) |
| Net Weight Approx. 5.6 kg (12.3 lbs) | |
- Designs and specifications are subject to change without prior notice.
Maintenance
Handling the unit
When shipping the unit
Please save the original shipping carton and packing materials. If you need to ship the unit, for maximum protection, re-pack the unit as it was originally packed at the factory.
Keeping the exterior surfaces clean
- Do not use volatile liquids such as insecticide spray near the unit.
- Wiping with strong pressure may damage the surface.
- Do not leave rubber or plastic products in contact with the unit for a long period of time.
Cleaning the unit
To clean the player, use a soft, dry cloth. If the surfaces are extremely dirty, use a soft cloth lightly moistened with a mild detergent solution. Do not use strong solvents such as alcohol, benzine, or thinner, as these might damage the surface of the unit.

LG
Life's Good
LG Customer Information Center
Register your product Online!
www.lg.com
- SAFETY INFORMATION
- CAUTION
- RISK OF ELECTRIC SHOCK DO NOT OPEN
- CAUTION CONCERNING THE POWER CORD
- HOW TO SAFELY REMOVE THE BATTERIES OR THE BATTERY PACK FROM THE EQUIPMENT
- TABLE OF CONTENTS
- GETTING STARTED
- CONNECTING
- OPERATING
- TROUBLESHOOTING
- APPENDIX
- UNIQUE FEATURES
- AUTO POWER DOWN
- PORTABLE IN
- INTRODUCTION
- SYMBOLS USED IN THIS MANUAL
- ACCESSORIES
- REMOTE CONTROL
- NIGHT ON/OFF
- FRONT PANEL
- NOTE
- REAR PANEL
- INSTALLING THE SOUND BAR
- MOUNTING THE MAIN UNIT ON A WALL
- WIRELESS SUBWOOFER CONNECTION
- SETTING UP THE WIRELESS SUBWOOFER FOR THE FIRST TIME
- MANUALLY PAIRING WIRELESS SUBWOOFER
- CONNECTING TO YOUR TV
- USING AN OPTICAL CABLE
- OPTIONAL EQUIPMENT CONNECTION
- OPTICAL IN CONNECTION
- LISTENING TO MUSIC FROM YOUR PORTABLE PLAYER
- OPERATIONS
- NIGHT MODE
- TURN OFF THE SOUND TEMPORARILY
- USING YOUR TV REMOTE CONTROL
- AUTO POWER ON/OFF
- AUTO FUNCTION CHANGE
- WHEN OPTICAL SIGNAL COMES IN
- WHEN YOU TRY TO CONNECT BLUETOOTH DEVICE
- USING BLUETOOTH® TECHNOLOGY
- ABOUT BLUETOOTH
- BLUETOOTH PROFILES
- LISTENING TO MUSIC STORED ON THE BLUETOOTH DEVICES
- PAIRING YOUR UNIT AND BLUETOOTH DEVICE
- SOUND ADJUSTMENT
- SETTING THE SURROUND MODE
- ADJUST THE WOOFER LEVEL SETTINGS
- NOTES TO USE WIRELESS
- TRADEMARKS AND LICENSES
- DOLBY AUDIO™
- DTS®
- DIGITAL SURROUND
- BLUETOOTH®
- MAINTENANCE
- HANDLING THE UNIT
- WHEN SHIPPING THE UNIT
- KEEPING THE EXTERIOR SURFACES CLEAN
- CLEANING THE UNIT
Brand : LG
Model : SK3D
Category : Soundbar