USER MANUAL Rapid Power ECW1PAV1 VAX
OUT CLEANS THE LEADING RENTAL
LET'S GET STARTED.


Basic safety precautions
This carpet washer is intended for household use only and NOT for commercial or industrial use.
- Only use the carpet washer indoors and keep the area you're cleaning well lit.
- Keep fingers, hair and loose clothing away from moving parts and openings whilst using the carpet washer.
- This appliance can be used by children aged from 8 years and above and persons with reduced physical, sensory or mental

Don'ts
- Don't leave the carpet washer plugged in when unattended.
- Don't use this carpet washer if it has been dropped, damaged or left outdoors.
- Don't run over the power cord or use carpet washer if the power cord or plug is damaged.
- Don't use the carpet washer to pick up any flammable or combustible materials (lighter fluid, petrol, kerosene etc.) or use the carpet washer in an area with explosive vapours or liquid.
- Don't handle the plug or use the carpet washer with wet hands.
- Don't pull or carry this carpet washer by the power cord.

Do's
- Check with the manufacturer of your flooring prior to using the carpet washer.
- The clean water tank should be filled with warm water (max 40°C) only. Filling the clean water tank with hot or boiling water will damage the machine and invalidate the guarantee.
- Always vacuum your flooring thoroughly before using the carpet washer.
- Always check tools and accessories are free from damage, dirt and debris before using.
- Always unplug the carpet washer before carrying out any maintenance and before connecting or disconnecting the hose/accessories.
- Turn off all controls on the carpet washer before disconnecting or connecting the power cord, after use always wrap the power cord around the cord clips provided.
• Always replace the fuse in the plug with a British 13amp fuse.
capabilities or lack of experience and knowledge if they have been given supervision or instruction concerning use of the appliance in a safe way and understand the hazards involved. Children shall not play with the appliance. Cleaning and user maintenance shall not be made by children without supervision.
- Before using the carpet washer test your carpets/rugs/upholstery for colourfastness and pile distortion.
- Only Vax recommended tools and solution should be used with this carpet washer. Using other solutions may invalidate the guarantee.
- Don't use the carpet washer to pick up hot coals, cigarette butts, matches or smoking hot burning items or use in an area where there may be harmful fluids (chlorine, bleach, and ammonia drain cleaner).
- Don't use the power cord as a handle, pull the power cord around corners, sharp edges or close a door over the power cord.
- Don't unplug carpet washer by pulling on the power cord.
- Don't carry the carpet washer while it's switched on.
- Don't attempt to remove blockages with sharp objects as this may cause damage to the carpet washer.
- Don't use the carpet washer with incorrect voltage as this may result in damage or injury to the user. The correct voltage is listed on the ratings label.
• Always protect the power cable from heated surfaces or near open flames.
• Always keep the power cord away from the brushes whilst using the carpet washer.
- Use only CE approved 13amp extension cords, non-approved extension cords may overheat. Care should be taken to arrange the extension cord as it can be a trip hazard
• Take extra care when cleaning on the stairs.
• Always use the carpet washer with all water/solution tanks and filters in place.
- Keep all openings clear and free from debris as this may affect the airflow /suction.
• Always use the carpet washer in an upright position. To prevent motor damage from dirty water, never hold the carpet washer upside down or on its side.
- Store the carpet washer in a cool, dry area. Before storing the carpet washer please ensure all water/solutions tanks and filters are thoroughly clean and dry.
- PLEASE KEEP INSTRUCTIONS FOR FURTHER USE AND USE ONLY AS INSTRUCTED IN THIS GUIDE.
Thank you for buying the Rapid Power.
Taking care of your carpets
The Rapid Power is designed to make washing carpets regularly, as effective and efficient as possible and this user guide will help you get the most out of your machine.
Maintaining your carpets will ensure they keep their appearance for longer and smell fresh and clean. You've chosen carpets for your home for a reason and Vax will help you take good care of them.
Taking care of your Rapid Power
Also inside this guide are instructions on maintaining your new machine, so that it's always ready when you are to tackle your carpets.
We're here if you need us
Instead of taking me back to the shop, simply visit our online support:
vax.co.uk/support
vax™
Still need to get in touch?
Our UK based Customer Care Team are here to support you.
For help with assembly, operational or performance problems, or buying and fitting new accessories, you can find all our contact details at vax.co.uk/contact
This user guide can be found online at: vax.co.uk/support
Contents

Let's talk safety

Getting to know your machine

Getting started

Using your machine

Taking care of your machine

Let's talk technical

What to do if it goes wrong

Getting in touch

Accessories

Notes
Included with your machine

Wash tool

Accessory bag

2x 250ml Ultra+ solution

2.5m Hose

4.6m Hose
SpinScrub tool


Hard floor tool
Pre-treatment wand

250ml
Pre-treatment solution
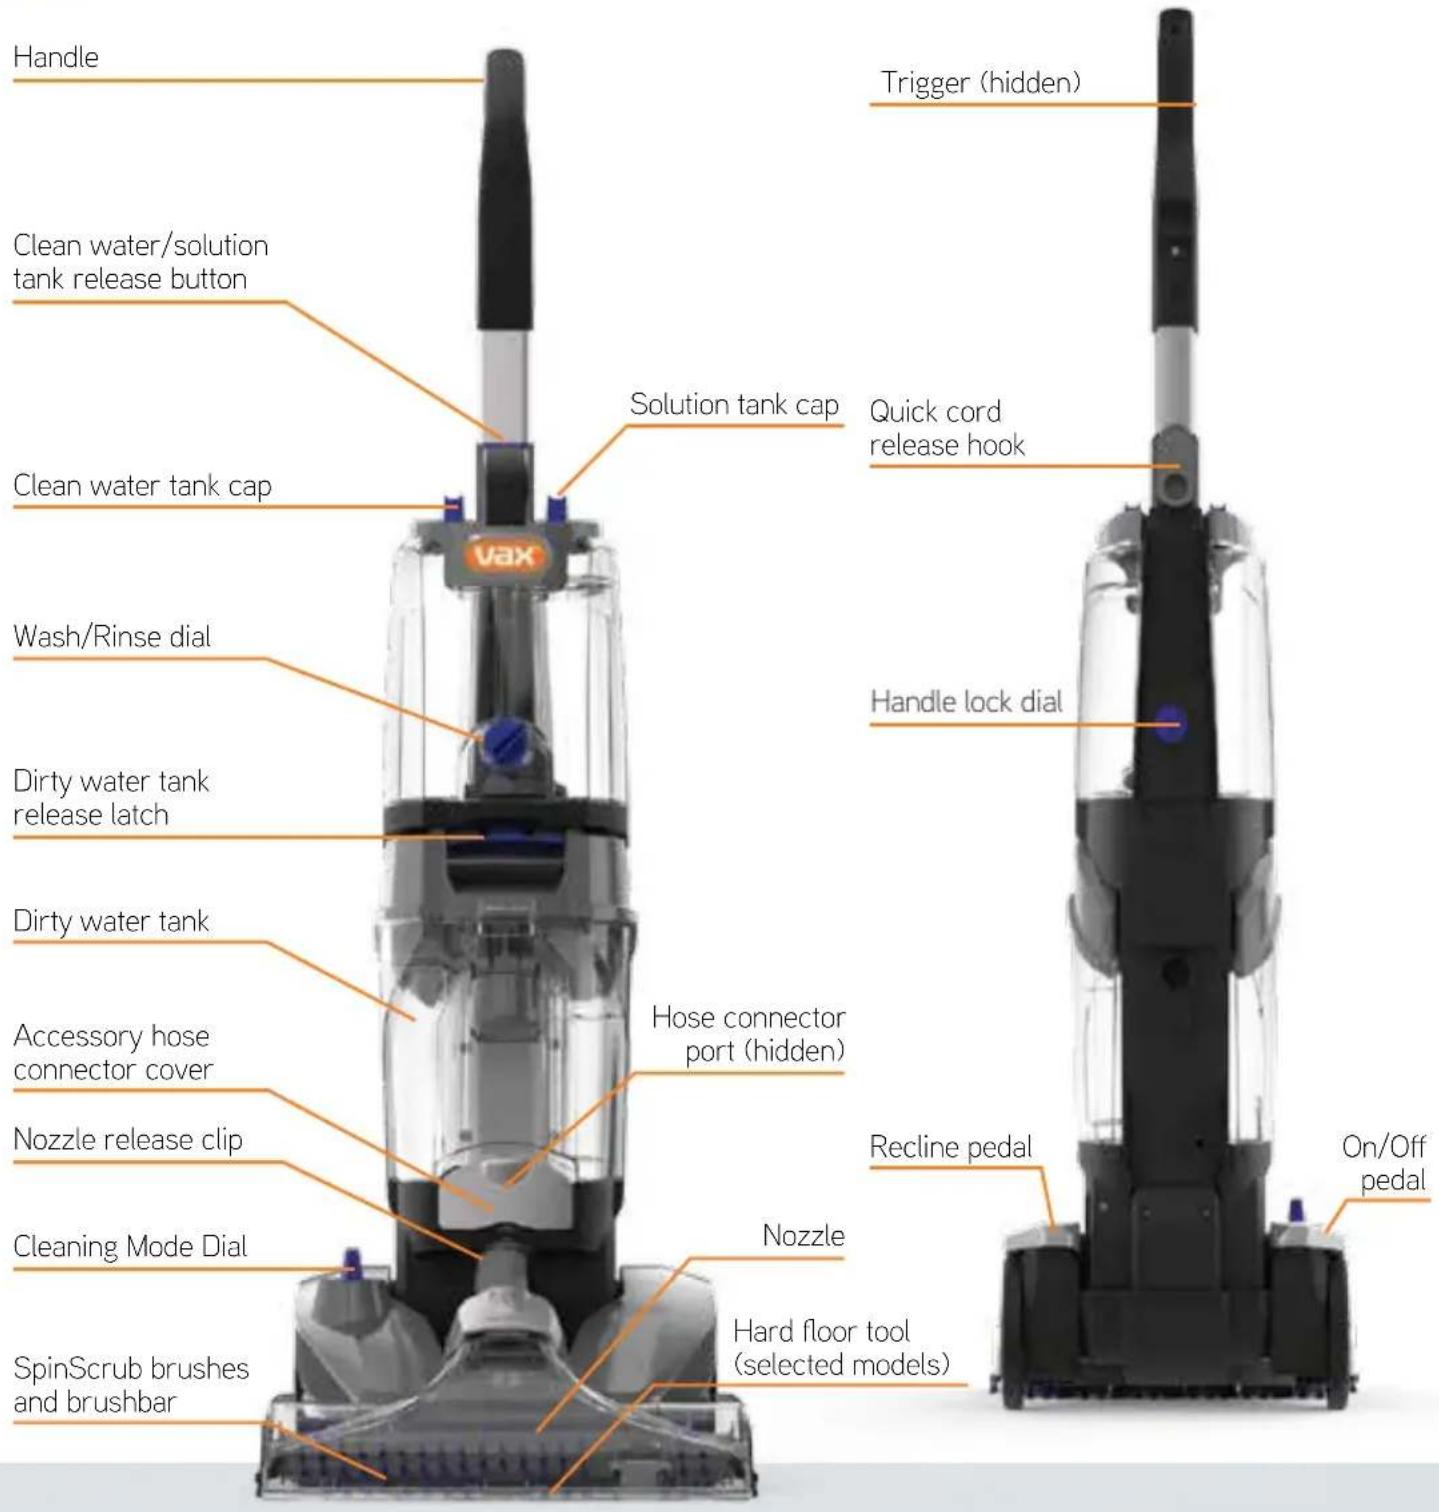
Getting to know your machine
Technical Specification
Name Rapid Power Advance
Code ECJ1PAV1
Part number 1-1-139002
Voltage 220-240V\~50Hz
Wattage 1200W
Cord length 8m
Weight 8.7kg
Name Rapid Power Deluxe
Code ECW1PAV1
Part number 1-1-139003
Voltage 220-240V\~50Hz
Wattage 1200W
Cord length 8m
Weight 8.7kg
Accessories & Consumables
Wash tool
1-9-127821-00
SpinScrub tool
1-9-133245-00
PLEASE READ 'LET'S TALK SAFETY' AT THE BEGINNING BEFORE USE
IMPORTANT: Flooring should be dry vacuumed thoroughly before washing.
Test for colourfastness – Wet a white absorbent cloth with the solution. In a small hidden area of your carpet/rugs/upholstery gently rub with the dampened cloth. Wait ten minutes and check for colour removal or bleed with a white paper towel or cloth. If your carpet has more than one colour, check all colours.
Test your carpet/rugs/upholstery – Run the carpet washer over a small hidden area. If no pile distortion occurs continue cleaning. When cleaning an entire room, move furniture out of the area to be cleaned. If the furniture cannot be moved, place aluminium foil or wax paper under the legs. This will prevent wood finishes from staining your carpet. Pin up furniture skirts and curtains.
When using the carpet washer, basic safety precautions should always be observed and don't over saturate your carpets.
Only use Vax carpet solution. Using other solutions may cause excess foaming and will invalidate your guarantee. The clean water tank should only be filled with warm water (max 40°C). Filling the clean water tank with hot/boiling water will damage your machine and invalidate the guarantee.
This is a powerful carpet washer. Before plugging in make sure all controls are turned off. Hold carpet washer firmly when starting and during use.
Assembling your carpet washer

Stand the base of the carpet washer on the floor in the upright position. Line up the handle with the main body and push into place.

Turn handle lock dial clockwise to lock into position.

Assemble the tanks by tilting and lining up the front of the tank with the washer and pushing the tank back until it clicks into place.
CAUTION: Always unplug the carpet washer before performing any maintenance/troubleshooting checks.
IMPORTANT: Your dirty water tank is fitted with a float. When the dirty water tank is full, or the floorhead is not in contact with the carpet, the float will shut off the suction on the carpet washer. You will be able to hear if this has happened as the motor noise on the machine will increase. Once the float is activated, empty the dirty water tank if full. If the dirty water tank is not full then turn off your machine at the power switch and wait for the float to settle.
NOTE: Carpets should be dry vacuumed thoroughly before washing. For heavily soiled areas, it may be necessary to repeat the cleaning process. Make criss-crossing strokes across the original pattern and overlap with each pass.
Filling the water/solution tank and cleaning modes
Quick Clean Mode: Best for a quick, surface clean because carpets dry in less than 1 hour.
Deep Clean Mode: Best overall results for a thorough, deep clean.

Press clean water /solution tank release button, and pull and lift to remove tank.

Twist solution tank cap anti-clockwise and remove.

Pour required amount of carpet cleaning solution into tank. Tighten cap before returning tank to unit.

Fill the clean water tank with warm water (max 40°C). Fill to max fill line for a Deep Clean, and fill to the Quick Clean fill line for a quick surface clean.

Tilt and line up the front of the tank with the washer, and push the tank back until it clicks into place.

Turn wash/rinse dial to 'wash'. The SpinScrub brushes and brushbar deep clean your carpets with water and solution, removing dirt and stains.

Plug into mains and press the On/Off button to switch on.

Choose the cleaning mode by turning the dial on the base.
Quick Clean Mode: Best for a quick, surface clean with carpets drying in less than 1 hour.
Deep Clean Mode: Best overall results for a thorough, deep clean.
This machine has an auto mix tank so any solution not used can be poured back into the bottle.


Press the recline pedal and pull the handle backwards.

Squeeze the trigger to release solution and water mix.

For best results apply water/solution on the forward stroke and release the trigger to pick up water/solution on the backward stroke. For a dryer finish, follow with an additional dry stoke with no trigger pressed.

Turn wash/rinse dial to 'rinse'. Only water is released to remove solution residue.
For best cleaning results use slow straight parallel strokes. Intermittent dry forward strokes will increase water pick up.
The 'rinse' mode will also work when using the hose.

CAUTION: Test for colourfastness – Wet a white absorbent cloth with the solution. In a small hidden area of your carpet/rugs/upholstery gently rub with the dampened cloth. Wait ten minutes and check for colour removal or bleed with a white paper towel or cloth. If your carpet has more than one colour, check all colours.
NOTE: The carpet washer should be in the upright position when using the hose and tools; de-activating the SpinScrub brushes and brushbar.

Pour required amount of carpet cleaning solution into the solution tank.

Fill the clean water tank with warm water (max 40°C).

Turn wash/rinse dial to 'wash'.

Pull down accessory hose connector cover.

Push hose end and hose solution connector into connection port until it clicks into place.

Slide selected tool over tab at end of hose until it clicks into place.

Plug into mains and press the On/Off button to switch on.

Press trigger on hose to release solution/water.

Squeeze trigger on the forward stroke, release trigger on backward stroke to recover solution/water. For a dryer finish, follow with an additional dry stoke with no trigger pressed.
Use the carpet washer or hose to pick up spills before washing and cleaning the area.
Pre-treatment Wand (selected models only)

Pour required amount of pre-treatment solution into the solution tank.

Fill the clean water tank with warm water (max 40°C).

Turn wash/rinse dial to 'wash'.

Pull down accessory hose connector cover.

Push wand connector into solution tube port.

Plug into mains,
press the On/Off
button to switch on.

Press and hold trigger on pre-treatment wand, spraying evenly over stubborn stains.

Leave the solution for 10-15 minutes before washing carpet.
CAUTION: To prevent damage to wood floors and other hard floors, follow the flooring manufacturer's cleaning recommendations. Inspect floor surface for worn finish, bare wood or separated joints. If it's not recommended to use the carpet washer on floors if any of these conditions exist.
Washing hard floors (selected models only)
IMPORTANT: Before attaching the hard floor squeegee onto carpet washer, remove tanks or make sure tanks are empty before lying the carpet washer on its back.

Lie carpet washer on its back, line up squeegee with nozzle.

Hook front of squeegee onto edge of nozzle.

Push squeegee under nozzle until it clicks into place.
CAUTION: Always unplug the carpet washer before performing any maintenance/troubleshooting checks.
Emptying the dirty water tank

Press dirty water tank release latch, pull to remove dirty water tank.

Pull and lift dirty water tank clip to release lid. Lift to remove dirty water tank lid.

Empty dirty water over the sink. Rinse dirty water tank and lid under water to remove dirt/debris.

Clean the filter screen located at the back of the dirty water tank.

To re-fit, tilt dirty water tank and line up onto carpet washer. Push back until it clicks into place.

IMPORTANT
Empty and rinse out clean and dirty water tanks and leave to air dry before replacing. Do not leave solution stored in the tanks between uses.
Taking care of your machine
Removing and cleaning the nozzle

Remove both tanks and tilt carpet washer back.

Lift nozzle release
clip and pull forward,
separating tabs on nozzle
and carpet washer.

Rinse nozzle under water to remove dirt/debris.

Replace nozzle by lining up tabs on nozzle with tabs underneath front of carpet washer. Push nozzle down until it clicks into place.
Removing blockages from the brushbar and SpinScrub brushes

Using a pair of scissors remove any threads or hair caught around the brushbar.

Using a crosshead screwdriver remove the bottom screws from each of the rug guards (metal pins) so the bottom of the pin is released. Unclip the top of each pin to release.

Firmly pull the sides of the SpinScrub cover to remove.

Line up spindle and tabs on side of spin scrub cover into carpet washer, push firmly until it clicks into place.
CAUTION: Always unplug the carpet washer before performing any maintenance/troubleshooting checks.
Changing the brushbar

Lie carpet washer on its back exposing SpinScrub brushes and brushbar.

Using a crosshead screwdriver, remove the bottom screws from each of the rug guards (metal pins), so the bottom of the pin is released. Unclip the top of each to release.

Firmly pull the sides of SpinScrub cover and remove SpinScrub brushes.

Use a crosshead screwdriver, undo 2 screws and remove belt guard.

Undo the four screws on the side brushes.

Pull and slide the left side brushes and remove side cap from brushbar.

Pull and slide the right side brushes together with brushbar. Remove side cap from brushbar and unloop brushbar from belt.

Loop replacement brushbar through the belt and onto belt grip.
CAUTION: Always unplug the carpet washer before performing any maintenance/troubleshooting checks.
Changing the brushbar (continued)

Line up the 'right' side brushes with base and slide into place. Attach brushbar to side brushes.
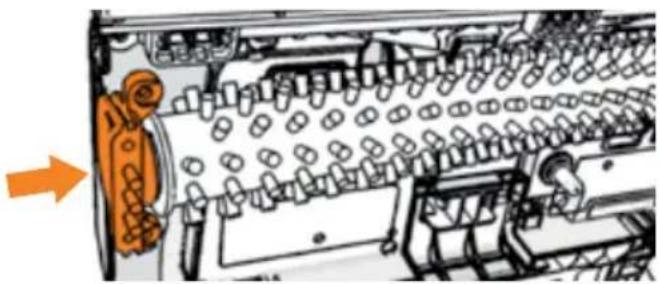
Attach the other side of the brushbar to side brushes. Slide onto side of base and into place.

Refit belt guard and tighten x2 screws. Refit and tighten screws x2 on either side of the side brushes. There are 6 screws in total.

Refit SpinScrub brushes and rug guard. Refit rug guard pins and tighten screws.
CAUTION: To reduce the risk of personal injury, unplug the carpet washer before performing maintenance/troubleshooting checks.
SolutionProblem
Is there an accessory missing?
- Check the contents panel on the box to make sure the part is definitely included in your unit.
Why won't the carpet washer turn on?
• The plug may not be fully pushed into the electrical socket.
- Check the fuse in the plug if this needs replacing, always replace with a British 13amp fuse.
Why won't the solution/clean water dispense?
- Make sure the clean water tank is fitted securely. Go to 'Using your machine'.
- Wash/Rinse dial has been set to 'Rinse'. Set dial to 'Wash' to dispense solution.
- The clean water tank valve may be stuck. Hold the clean water tank over the sink and press the valve underneath to release.
- Squeeze the trigger on the handle to release solution and water mix.
- Water/solution tank is empty. Go to 'Using your machine' for how to refill.
Why won't the carpet washer pick up?
- The float in the dirty water tank may have been activated. Empty the dirty water tank and wait for the float to settle before re-starting your carpet washer.
- The accessory hose connector cover has not been correctly closed. Correctly close cover.
- Check the SpinScrub brushes and brushbar for blockages and clear.
- The dirty water tank may not be fitted correctly. Re-fit making sure the lid is pushed down securely. Go to 'Taking care of your machine'.
- Check the nozzle for blockages and clear. Go to 'Taking care of your machine'.
- Check the nozzle is correctly fitted. Go to 'Taking care of your machine'.
- Check the filter screen located in the dirty water tank for dirt and debris. Go to 'Emptying the dirty water tank'.
Why won't the brushes spin?
- The brushes will only spin when the carpet washer is reclined.
- Check the SpinScrub brushes and brushbar for blockages and clear.
- Check for damage to the brushbar and the spindle on the back of the SpinScrub brush.
It's quick and easy to
register for your FREE
6 year guarantee †
Online at: vax.co.uk/registration
Please retain your original receipt for proof of purchase.
we're here if you need us
vax.co.uk/support
Don't forget your accessories!
Order at: www.vax.co.uk/spares-and-solutions
Ultra+ carpet cleaning solution (1.5l)
1-9-132706-00
Ultra+ Carpet Cleaning Solution tackles stubborn spots and stains and removes unpleasant odours too. It's specially formulated to leave no sticky residue, so your carpets stay fresher for longer.

Ultra+ Pet carpet cleaning solution (1.5l)
1-9-132707-00
Ultra+ Pet Carpet Cleaning Solution tackles stubborn spots and stains and removes unpleasant pet odours too. It's specially formulated to leave no sticky residue, so your carpets stay fresher for longer.

Ultra+ Refresh & Revitalise (1.5l)
1-9-133260-00
Ultra+ Refresh and Revitalise tackles stubborn spots and stains. It's Oxy-Lift Action Technology brings your carpets back to life and restores carpet pile. Formulated to leave no sticky residue, so your carpets stay fresher for longer. Safe to use on wool carpets - Woolsafe approved.

Ultra+ Allergen tackles stubborn spots and stains, but also removes deep down dirt and allergens in your carpet. Formulated to leave no sticky residue, so your carpets stay fresher for longer. Ultra+ Allergen carpet cleaning solution is approved by the British Allergy Foundation.

Ultra+ Sanitise (1.5l)
1-9-133261-00
Ultra+ Sanitise tackles stubborn spots and stains and removes embedded dust and dirt from carpet pile. Ultra+ Sanitise is formulated to leave no sticky residue, so your carpets stay fresher for longer.

GET IN TOUCH
info@vax.co.uk vax.co.uk
EU Statement of Compliance: Manufacturer/EU importer: Vax Limited, hereby on our own responsibility, declare that the ECJ1PAV1 and ECW1PAV1 are manufactured in compliance with the following Directives: Safety: 2014/35/EU Low Voltage Directive. EMC: 2014/30/EU Electromagnetic Compatibility Directive.
Waste electrical products should not be disposed of with household waste. Please recycle where facilities exist. Check with your Local Authority or retailer for recycling advice.
© 2017 Vax Limited. All rights reserved. The VAX trade mark and Vax lozenge is the property of Techtronic Floor Care Technology Ltd and is registered in the EU and may be pending or registered in other countries.