Forceclima 7500 Soundless Connected - Air Conditioning CECOTEC - Free user manual and instructions
Find the device manual for free Forceclima 7500 Soundless Connected CECOTEC in PDF.


User questions about Forceclima 7500 Soundless Connected CECOTEC
0 question about this device. Answer the ones you know or ask your own.
Ask a new question about this device
Download the instructions for your Air Conditioning in PDF format for free! Find your manual Forceclima 7500 Soundless Connected - CECOTEC and take your electronic device back in hand. On this page are published all the documents necessary for the use of your device. Forceclima 7500 Soundless Connected by CECOTEC.
USER MANUAL Forceclima 7500 Soundless Connected CECOTEC
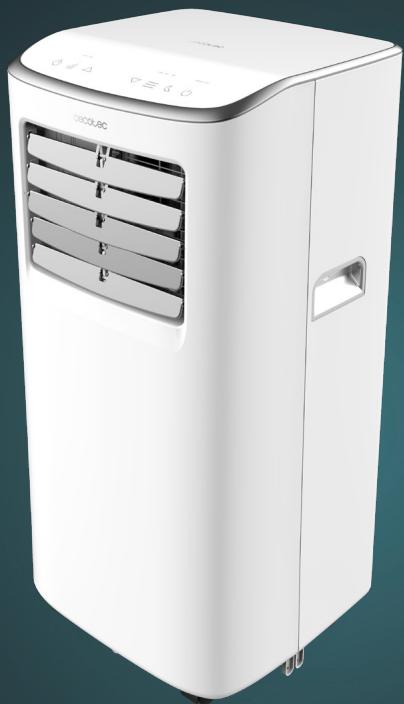
FORCECLIMA 7500 CONNECTED
Aire acondicionado portátil de 7000 BTU y control por wifi / 7000 BTU portable air conditioner with Wi-Fi control
ES · Este producto no es adecuado para calefacción primaria. Este producto está indicado únicamente en lugares abrigados o para una utilización puntual. EN · This product is not suitable for primary heating purposes. This product is only suitable for well insulated spaces or occasional use. FR · Ce produit ne convient pas pour une utilisation en tant que chauffage primaire. Cet appareil a été conçu seulement pour être utilisé dans des espaces intérieurs ou pour une utilisation momentanée. DE · Dieses Produkt ist nicht für als Hauptheizgerät geeignet. Dieses Produkt ist nur für geschützten Orten oder zur gelegentlichen Verwendung geeignet. IT · Questo prodotto non è adatto a riscaldamento primario. Questo prodotto è indicato solamente per luoghi caldi o per uso sporadico. PT · Este produto não é adequado para ser usado como aquecimento primário. Destina-se a uma utilização ocasional e apenas em locais cobertos. NL · Dit product is niet geschikt voor primaire verwarming. Dit product is alleen geschikt voor gebruik op beschatte plaatsen of voor incidenteel gebruik. PL · Ten produkt nie nadaje się do pierwotnego ogrzewania. Ten produkt jest wskazany tylko do miejsc ostonietych lub do okazjonalnego użytku. CZ · Tento produkt není vhodný pro primární vytápění. Tento výrobek je určen pouze na topení na chráněných místech nebo pro příležitostné použití. TR · Bu ürün birincil ıstıma için uygun değildir. Bu ürün sadece korunaklı alanlarda veya ara sıra kullanım için uygundur. CAT · Aquest producte no és adequat per a calefacció primária. Aquest producte està indicat únicament a llocs abrigats o per a una utilizació puntual. GR · Autó to προϊόν δεν είναι κατάλληλο για κύρια θέρμανση. Autó to προϊόν είναι κατάλληλο μόνο για χρήση σε προστατευμένες περιοχές ή για περιστασιακή χρήση. HU · Ez a termék nem alkalmas elsődleges fűtésre. Ez a termék csak védett helyen vagy alkalmi használatra alkalmas. AR · يضيرطًا مادخستس اللاب واقيمحنا نشامل طلف قب SETNJIADA ئيولوالا قييunitsbel بسرانم رويج عنعتنلا ا Honda
Manual de instrucciones Instruction manual Manuel d'instructions Bedienungsanleitung Manuale di istruzioni Manual de instruções Instructiehandleiding Instrukcja obstugi Návod k použití Kullanma kilavuzu Használati utasítás Manual d'instruccions Oðnýics χρήσης دَلْبِّ الْتَعْلِيمَات
Safety instructions 9
-
Parts and components 78
-
Before use 79
-
Appliance installation 79
-
Operation 80
-
Wi-Fi connectivity and mobile App 83
-
Cleaning and maintenance 84
-
Troubleshooting 85
-
Recycling of electrical
and electronic equipment 92
-
Copyright 92
-
EU Declaration of Conformity 92
SOMMAIRE
EN · The coding in this manual is generic and applies to all code variants of the appliance.
Read the following instructions carefully before using the appliance. Keep this instruction manual for future reference or new users.
- This appliance is intended for domestic use only and is not suitable for use in commercial establishments such as bars, restaurants, farms, hotels, motels, and offices.
- This appliance can be used by children aged 8 years and above and people with reduced physical, sensory, or mental capabilities or lack of experience and knowledge if they have been given supervision or instruction concerning the use of the appliance in a safe way and understand the hazards involved. Children must not play with the appliance. Cleaning and user maintenance must not be carried out by children without supervision.
- The appliance must be powered at a low safety voltage as stated on the marking.
- If the power cord is damaged, it must be replaced by Cecotec's Official Technical Support Service or similar qualified personnel to avoid risks.
- The installation of pipelines should be kept to a minimum.
- Piping must be protected from physical damage and must not be installed in a space without ventilation.
-
Compliance with national gas regulations must be observed.
-
Mechanical connections shall be accessible for maintenance purposes.
- The minimum room floor area for the room in which the appliance can be placed is 7 m2 .
- WARNING: keep the ventilation openings clear from obstructions.
- NOTE: servicing should be performed only as recommended by the manufacturer.
- The appliance shall be installed in accordance with national electrical installation regulations
- WARNING: the appliance must be stored in a well-ventilated area where the room size corresponds to the room area as specified for operation.
- WARNING: the appliance must be stored in a room without continuously operating open flames (e.g. an operating gas appliance) or sources of ignition (e.g. an operating electric heater).
- The appliance must be stored in such a way as to prevent mechanical damage.
- Any person involved in work or intervention on a refrigerant circuit should hold a current valid certificate issued by an industry-accredited assessment authority, authorising their competence to handle refrigerants safely in accordance with an industry-recognised assessment specification.
- Servicing should only be carried out as recommended by the equipment manufacturer. Maintenance and repairs requiring the assistance of other qualified personnel must be carried out under the supervision of the person competent in the use of flammable refrigerants.
-
Service personnel must be instructed to perform the following when servicing an appliance using a flammable refrigerant.
-
Make sure that the mains voltage matches the voltage stated on the rating label of the appliance and that the wall outlet is earthed.
- Do not immerse the cord, plug, or any other non-removable part of the appliance in water or any other liquid. Do not expose electrical connections to water. Make sure your hands are completely dry before handling the plug or switching on the appliance.
- Do not carry or pull the appliance from the power cable. Do not use the cord as a handle. Do not push the cable against corners or sharp edges. Do not crush the power cable with the full weight of the appliance. Keep the cable away from hot surfaces.
- Do not operate the appliance if its cable, plug, or body show visible damage, do not operate properly, or have been dropped.
- Do not use the appliance in confined spaces with explosive or flammable vapours.
- Keep the portable air conditioner away from heat sources.
- Do not try to repair the appliance by yourself. Contact Cecotec's Official Technical Support Service.
- Do not install and use the portable air conditioner in the bathroom or other humid environments.
- The portable air conditioner is designed for indoor use only and is not compatible with other uses.
Instructions on batteries
- Battery ingestion can cause burns, soft-tissue perforation, and death. It can cause severe burns within two hours of the ingestion.
-
In case of battery ingestion, please seek medical attention immediately.
-
Do not allow children to replace batteries without adult supervision.
- Do not disassemble, open, or damage the batteries.
- Keep the batteries out of the reach of children. Pay particular attention to small batteries. In case of battery ingestion, please seek medical attention immediately.
- Do not expose batteries to heat or fire. Avoid storage in direct sunlight.
- Do not short-circuit an element or a battery. Do not store batteries in an untidy manner, in a box, or drawer where they can short-circuit each other or be short-circuited by other metal objects.
- Do not subject batteries to mechanical shock.
- Both batteries and cells can leak under extreme conditions. In the event of a battery leak, keep your skin and eyes away from the liquid. If the liquid comes into contact with skin, wash immediately with soap and water. If the liquid gets into the eyes, rinse them immediately with clean water for at least 10 minutes and seek medical attention. Wear gloves to handle the battery and dispose of it immediately in accordance with local regulations.
- Pay attention to the positive (+) and negative (-) marks on the batteries and the remote-control compartment to ensure they are inserted correctly.
- Do not use any batteries that are not designed for use with the appliance.
- Do not use the remote control if powered with batteries that differ in capacity, size, or type.
- Children should be allowed to handle the batteries only under adult supervision.
- Always buy recommended batteries.
-
Keep the batteries clean and dry. Wipe the battery terminals with a clean, dry cloth if they become dirty.
-
Keep the original instruction manual for future reference.
- Use the batteries only for their intended purpose.
- Whenever possible, remove the batteries when not in use.
INSTRUCTIONS DE SÉCURITÉ
- Top lid
- Handle
- Rear housing
- Wheels
- Control panel
- Air outlet/louvers
- Front housing
Fig. 2
- Filter
- Continuous-drainage hole
- Air outlet
- Drainage hole
Fig. 3
- Air outlet pipe
- Window sealing plate
Fig. 4
Control panel
- Power on/off touch icon
- Sleep mode touch icon
- Modes touch icon
- Increase touch icon
- Decrease touch icon
- Speed/Wi-Fi touch icon
- Timer icon
- Oscillation icon
- Display
- Full-tank indicator light
Fig. 5
Remote control
- Power button
- Timer button
- Modes button
- Increase button
-
Decrease button
-
Oscillation button
- Speed/Wi-Fi button
- Sleep mode button
NOTE:
The graphics in this manual are schematic representations and may not exactly match the product.
2. BEFORE USE
- This appliance comes in a packaging designed to protect it during transport. Take the appliance out of its box and remove all packaging materials. You can keep the original box and other packaging materials in a safe place to prevent damage to the appliance if you need to transport it in the future. If you wish to dispose of the original packaging, make sure all items are recycled properly.
- Check that all parts and components are included and in good condition. If any of them are missing or damaged, please contact Cecotec's Official Technical Support Service immediately.
Box content
- Portable air conditioner
- Window kit
- Remote control
- AAA batteries (x3)
- Instruction manual
- Do not remove the product's serial number in order to keep proper traceability if technical assistance is required.
3. APPLIANCE INSTALLATION
NOTE:
- Leave a minimum of 50 cm distance to walls and other objects. Fig. 6.
- Do not install and use the air conditioning in the bathroom or other humid environments.
- Before using the portable air conditioner, keep it upright for at least two hours. When moving the appliance from one place to another, always keep it in an upright position and leave it on a flat surface.
- The air outlet pipe should be 28-150 cm long, this length is based on the specifications of the air conditioner. Do not use extendible pipes or replace the pipe with a different
ENGLISH
one, as this may cause the product to malfunction. The exhaust hose must be clear of obstructions; otherwise it may cause overheating.
Installing of the air outlet pipe. Fig. 7
- Stretch the air outlet pipe.
- Insert the pipe into the air outlet.
- Turn the end counterclockwise to fix it to the air conditioner body.
NOTE:
- The flat end of the exhaust hose joints must be snapped into place.
- The air outlet pipe must not be twisted or bent more than 45° . Keep the air outlet pipe free of obstructions.
Installing the window sealing plate
You can install the window sealing plate either vertically (Fig. 8) or horizontally (Fig. 9). Adjust the size of the opening so that the sealing plate remains fixed in it.
- The following checks must be applied to installations using flammable refrigerants:
- The load size is in accordance with the size of the room where refrigerant-containing parts are installed.
- Ventilation machinery and outlets can be properly operated and are unobstructed.
- If an indirect cooling circuit is used, the secondary circuit must be checked for refrigerant presence.
- Equipment marking remains visible and legible. Illegible markings and symbols should be corrected.
- The components or refrigerant piping are installed in a position where they are not susceptible to exposure to any substance that may corrode the refrigerant-containing components, unless the components are made of materials that are inherently resistant to corrosion or are properly protected against it.
4. OPERATION
The following functions can be activated from the control panel or from the remote control.
On/Off
When the appliance is switched on, it will beep and enter Standby mode. Touch the power icon to turn the appliance on and off.
Mode
Press the mode icon to switch between cooling mode, fan mode, and dehumidification mode.
Sleep mode
In cooling mode, press the increase and decrease icons to activate the Sleep mode. The device will operate saving energy and silently.
Increase and decrease
Use these icons to increase or decrease temperature and time.
Temperature cannot be increased or decreased in fan mode or dehumidification mode.
Fan speed/Wi-Fi
In cooling mode, press the corresponding icon to select a high or low wind-speed setting. This option is not available under the dehumidification mode.
NOTE:
Under certain conditions (defrost), it may not operate at the selected speed.
To connect the air conditioner to Wi-Fi, follow the steps detailed in section «5. Wi-Fi connection and mobile App».
Notes:
- This function can only be activated from the control panel.
- Once Wi-Fi is activated, the power light will flash after pressing and holding the speed button for 5 seconds.
Timer
Press this icon to set the timer. When the timer symbol blinks, use the increase and decrease icons to select the desired operating time.
The timer can be set from 1 to 24 hours, and the digits increase and decrease by 1 hour.
Oscillation
Press this touch icon to activate air oscillation.
Drainage instructions
When the air conditioner stops operating because the water tank is full, turn it off and unplug it from the power supply. The full-tank indicator light (FULL) will start flashing and the appliance will not operate until the water inside the tank is drained.
Manual drainage
Fig. 10
- Place a container below the water outlet behind the body.
- Unscrew the drain cap and unplug the water plug. The water will automatically flow into a container.
ENGLISH
NOTE:
- Move the device carefully, so as not to spill the water in the water tank at the bottom of the body.
- Keep the drain cap and the water plug properly.
- During drainage, the body can be tilted slightly backwards.
- If the water container cannot hold all the water, before the water container is full, stuff the water outlet with the water plug as soon as possible to prevent water from flowing to the floor or the carpet.
- When the water is discharged, re-tighten the water plug and tighten the drain cap.
- Restart the appliance after the plug and cap are installed, otherwise condensed water of the appliance will flow to the floor or the carpet.
Continuous drainage
Fig. 11
- Unscrew the drain cap and unplug the water plug.
- Set the drainage pipe into the water outlet.
- Connect the drainage hose to a bucket or big container.
Protection features
Frost protection function
In cool and dehumidification modes, if the temperature of the evaporator outlet pipe is too low, the appliance will automatically enter protection mode to prevent damage to the evaporator. The appliance will restart when the temperature is restored to normal values.
Condensate water flooding protection function
When the water level exceeds the maximum level allowed by the safety buoy, the appliance will switch off and activate the FULL indicator light on the control panel. To restart the device, the water inside the device will need to be drained through the bottom drain plug (shown in detail in the drainage instructions section). Once the water has been drained, the device will restart.
Automatic defrost
This air conditioner has an automatic defrost function.
Compressor protection function
To increase the service life of the compressor, it has a 3-minute delay booting protection function after the compressor is turned off.
5. WI-FI CONNECTIVITY AND MOBILE APP
In order to link your product with our App, please follow the steps below.
- Download Cecotec's app from Google Play or App Store.
- If this is the first time you are using the app you will need to register your account, otherwise log in.
- Once you have entered the App, press "+" on the top right-hand corner and tap "ForceClima".
-
Turn on your device, you must make sure that you do not have any mode selected by pressing the power button, the air conditioner will go into standby mode. Then press the button for about 5 seconds, the Wi-Fi indicator will start blinking. If the indicator flashes slowly, this operation must be repeated.
-
Enter your Wi-Fi password and press confirm. Remember the Wi-Fi network must be 2.4 GHz.
-
Then, pairing will start automatically.
If automatic pairing fails, turn on your device and ensure no mode is selected by pressing the power button. The air conditioner will enter standby mode. Then, press and hold the button for approximately 5 seconds until the Wi-Fi indicator starts flashing. And follow the steps below:
- Once you have entered the App, press "+" on the top right-hand corner and tap "ForceClima".
- A window will open to confirm that the Wi-Fi icon is flashing. If so, tap on «Confirm indicator slowly blink».
- Next, a window will open asking for the Wi-Fi user name and password (remember your Wi-Fi network must be of 2.4 GHz). Once you have entered your password and user name, tap on «Next».
- On the next screen, you will have to select the pairing mode. Tap on «AP Mode» and a mode-selection menu will open.
- Select AP mode. Next, confirm the appliance light is flashing (tap on «Confirm indicator slowly blink») and tap on «Next».
- Another screen will open, telling you to connect to the appliance Wi-Fi appearing as «SmartLife-XXXX». Tap «Go to connect» and the application will open your mobile-device Wi-Fi network menu. Connect to the previously mentioned network and wait for both devices to connect.
- Once connected, return to the App and pairing will begin.
- Wait for it to finish and you will be able to use your device via the App.
ENGLISH
6. CLEANING AND MAINTENANCE
- Turn off and unplug the device from the power supply before cleaning or repairing it.
- Use a soft, dry (or slightly damp) cloth with some neutral cleaning agent to clean the product's outside and prevent the accumulation of dust and dirt.
- If the product is not going to be used for a long time, store it in a safe and well-ventilated place.
- Do not use detergent, scouring pads, chemically-treated cloths, petrol, benzene, alcohol, thinner, or other solvents, as these can scratch and damage the tank and cause water leakage.
- Do not immerse the appliance in water or other liquids.
Cleaning the filter
Fig. 12
- If the filter is clogged with dust, the effectiveness of the air conditioning will be reduced. Make sure to clean the filter once every two weeks.
- Cleaning the upper filter frame
- Unscrew the screw attached to the filter at the rear with a screwdriver and remove the filter.
- Put the filter screen in hot water with neutral detergent (about 40 °C / 104 °C) and dry it in the shade after rinsing clean. Make sure it is completely dry before reattaching it.
Replacing batteries
- The remote control is powered by two AAA batteries. If the remote control does not respond, replace the batteries as follows:
- Put the remote control face down and slide the tab outwards.
- Remove the batteries.
- Insert the batteries paying attention to polarity.
Storage
- Store the device in well ventilated areas.
- Unscrew the drain cap, unplug the water plug, and discharge the water in the water tank into other water containers or directly tilt the body to discharge the water into other containers.
- Turn on the appliance, adjust it to low-wind ventilation mode, and maintain this state until the drainage pipe becomes dry. This way, you will keep the inside of the body in a dry state and prevent it from mildewing.
- Turn off the appliance, unplug the power plug, and wrap the power cord around the wrapping post. Install the water plug and the drain cap.
- Remove the exhaust hose and keep it properly.
-
Cover the air conditioning with a plastic bag. Put the air conditioning in a dry place, keep it out of the reach of children, and take dust control measures.
-
Remove batteries of the remote control and keep them properly.
- Ensure that the body is placed in a dry place and keep all machine components properly.
Maintenance
Any person who is involved with working on or breaking into a refrigerant circuit should hold a current valid certificate from an industry-accredited assessment authority, which authorises their competence to handle refrigerants safely in accordance with an industry recognised assessment specification.
7. TROUBLESHOOTING
| Problem | Possible causes | Possible solutions |
| The air conditioning does not work. | There is no electricity. | Turn it on after connecting it to a socket with electricity. |
| The full-tank indicator will flash. | Discharge the water inside. | |
| The room temperature is too low or too high. | It is recommended using the appliance in at the temperature of 7-35 °C. | |
| In cooling mode, the room temperature is lower than the set temperature; in heating mode, the room temperature is higher than the set temperature. | Change the set temperature. | |
| In dehumidification mode, the room temperature is very low. | The appliance is in a room with a temperature below 17°C. | |
| The cooling effect is not good. | There is direct sunlight. | Pull the curtain. |
| Doors or windows are open; there are a lot of people; or in cooling mode, there are other sources of heat. | Close doors and windows. | |
| The filter screen is dirty. | Clean or replace the filter. | |
| The air inlet or outlet is blocked. | Clear obstructions. |
ENGLISH
| The appliance makes a lot of noise. | The air conditioning is not placed on a flat surface. | Put the air conditioning on a flat and hard place (to reduce noise). |
| The compressor does not work. | There is frost. | Wait for 3 minutes until the temperature is lowered, and then restart the appliance. |
| Protection against overheating system is activated. | ||
| The remote control does not work. | There is too much distance between the machine and the remote control. | Let the remote control get close to the air conditioning, and make sure that the remote control directly faces to the direction of the remote control receiver. |
| The remote control is not aligned with the direction of the remote control receiver. | ||
| Batteries are dead. | Replace batteries. | |
| Displays ‘E1’. | The room temperature sensor is abnormal. | Contact Cecotec's Official Technical Support Service. |
| The display shows “E2”. | The pipe temperature sensor is abnormal. | Contact Cecotec's Official Technical Support Service. |
1. Service information
1.1 Area verification
Before starting work on systems containing flammable refrigerants, safety checks are necessary to ensure that the risk of ignition is minimised. Before repairing the cooling system, the following precautions must be observed:
1.2. Work procedure
The work must be carried out in accordance with a controlled procedure to minimise the risk of a flammable vapour or gas being present while the work is being carried out.
1.3. General workspace
All maintenance personnel and others working in the area should be briefed on the nature of the work to be carried out. Work in confined spaces must be avoided. The area around the workspace should be divided into sections. Ensure that conditions within the workspace are safe by keeping flammable material under control.
1.4. Refrigerant verification
The area should be checked with an appropriate refrigerant detector before and during work to ensure that the technician is warned of potentially flammable atmospheres. Ensure that the leak-detection equipment used is suitable for use with flammable refrigerants, i.e. non-sparking, adequately sealed, or intrinsically safe.
1.5. Presence of fire extinguishers
If any high-temperature work is to be carried out on the refrigeration equipment or any associated parts, suitable extinguishing equipment must be available. Always have a dry-powder or CO2 fire extinguisher nearby the load area.
1.6. Absence of ignition sources
No person carrying out work related to a refrigeration system involving the exposure of piping containing or having contained flammable refrigerant should use any source of ignition in such a manner as to create a risk of fire or explosion. All possible sources of ignition, including cigarette smoking, should be kept far enough away from the installation, repair, pick-up, and disposal site, where flammable refrigerant can be released into the surrounding space. Before work starts, the area around the equipment must be thoroughly examined to ensure that no danger or risk of ignition is present. “No Smoking” signs must be displayed.
1.7. Ventilation
Ensure that the area is outdoors or adequately ventilated before intervening in the system or carrying out any work at high temperature. Proper ventilation must be kept at all times during work. Ventilation should safely disperse any refrigerant released and preferably expel it externally to the atmosphere.
1.8. Verification of refrigeration equipment
When electrical components are replaced, they must be fit for purpose and to the correct specification. The manufacturer's maintenance and service guidelines must be followed at all times. In case of doubt, refer to the manufacturer's technical department for assistance. The following checks must be applied to installations using flammable refrigerants:
- The load size is in accordance with the size of the room where refrigerant-containing parts are installed.
- Ventilation machinery and outlets can be properly operated and are unobstructed.
- If an indirect cooling circuit is used, the secondary circuit must be checked for refrigerant presence.
- Equipment marking remains visible and legible. Illegible markings and symbols should be corrected.
- The components or refrigerant piping are installed in a position where they are not susceptible to exposure to any substance that may corrode the refrigerant-containing components, unless the components are made of materials that are inherently resistant to corrosion or are properly protected against it.
ENGLISH
1.9. Verification of electrical devices
Repair and maintenance of electrical components should include initial safety checks and component-inspection procedures. If there is a fault that may compromise safety, then no power supply should be connected to the circuit until the fault is satisfactorily dealt with. If the fault cannot be corrected immediately, but continued operation is necessary, a suitable temporary solution must be used. This should be reported to the owner of the equipment so as to inform all parties.
During initial safety checks, make sure
- that capacitors are unloaded—this must be done in a safe manner to avoid sparks;
- that no live wiring or electrical components are exposed while loading, recovering, or purging the system;
- that there is continuity in the earth connection.
2. Repair of sealed components
- During the repair of sealed components, all power supplies should be disconnected from the equipment being worked on prior to any removal of sealed covers, etc. If it is absolutely necessary to have a power supply to the equipment during service, then a permanently operating form of leak detection should be placed at the most critical point to warn of a potentially hazardous situation.
- Particular attention must be paid to the following to ensure that, when working on electrical components, the housing is not altered in such a way as to affect safety. This must include damage to cords, an excessive number of connections, terminals not conforming to the initial specification, damage to seals, incorrect fitting of the stuffing box, etc.
- Ensure that the instrumentation is securely mounted.
- Ensure that seals or sealing materials have not degraded until no longer being useful to preventing the penetration of flammable atmospheres. Spare parts must be in accordance with the manufacturer's specifications.
NOTE: the use of silicone sealant may inhibit the effectiveness of some types of leak-detection equipment. Intrinsically safe components do not have to be isolated before work.
3. Repair of intrinsically safe components
- Do not apply any permanent inductive or capacitive load to the circuit without ensuring that it will not exceed the permissible voltage and current rating for the equipment in use.
- Intrinsically safe components are the only type of components that can be worked on in a flammable atmosphere. The test instrumentation must have the correct assigned features.
- Replace components only with parts specified by the manufacturer. Other parts can ignite the refrigerant in the atmosphere from a leak.
4. Wiring
Verify that the wiring is not subject to wear, corrosion, excessive pressure, vibration, sharp edges, or any other environmental effects. The verification should also take into account the effects of ageing or continuous vibration from sources such as compressors or fans.
5. Detection of flammable refrigerants
Under no circumstances should potential ignition sources be used in the search for or detection of refrigerant leaks. Do not use a halide lamp or any other detector using a naked flame.
6. Leak-detection methods
- The following leak-detection methods are considered acceptable for systems containing flammable refrigerants.
- Electronic leak detectors should be used to detect flammable refrigerants, but the sensitivity may not be adequate, or may need recalibration (the detection equipment should be calibrated in a refrigerant-free area). Ensure that the detector is not a potential ignition source and that it is suitable for the refrigerant used. The leak-detection equipment must be set to a percentage of the lower flammability limit of the refrigerant and calibrated for the refrigerant used with the appropriate percentage of gas (maximum 25%) confirmed.
- Leak-detection fluids are suitable for use with most refrigerants, but the use of detergents containing chlorine must be avoided, as chlorine can react with the refrigerant and corrode copper pipes.
- If a leak is suspected, all naked flames must be eliminated/extinguished.
- If a refrigerant leak is found and requires brazing, all refrigerant must be recovered from the system, or isolated (by means of shut-off valves) in a part of the system far away from the leak. Oxygen-free nitrogen must then be purged through the system both before and during the brazing process.
7. Removal and evacuation
When intervening in the cooling circuit for repairs or any other purpose, conventional procedures must be followed. However, it is important that best practices are followed, as flammability is a matter to be taken seriously. The following procedure is to be followed:
- Remove the refrigerant.
- Purge the circuit with inert gas.
- Evacuate.
- Purge again with inert gas.
- Open the circuit by cutting or brazing.
- The refrigerant charge must be recovered from the correct recovery cylinders. The system must be flushed with oxygen-free nitrogen to render the unit safe. This process may need to be repeated several times. Oxygen or compressed air must not be used for the task.
ENGLISH
- Cleanliness must be achieved by breaking the vacuum in the system with oxygen-free nitrogen and continuing to fill until working pressure is reached, then venting to atmosphere, and finally pushing to a vacuum. This process must be repeated until there is no refrigerant left in the system. When using the oxygen-free nitrogen end-charge, the system must be vented to atmospheric pressure to allow for work. This operation is absolutely vital if brazing operations are to take place on pipes.
- Ensure that the vacuum pump outlet is not near any source of ignition and that ventilation is available.
8. Loading procedure
In addition to conventional loading procedures, the following requirements must be followed.
- Ensure that no contamination of different refrigerants occurs when using the loading equipment. Hoses or lines should be kept as short as possible to minimise the amount of refrigerant contained in them.
- Cylinders must be kept in an upright position.
- Ensure that the refrigeration system is grounded before loading the system with refrigerant.
- Tag the system when charging is complete (if not already).
- Extreme care must be taken to avoid overfilling the cooling system.
Before reloading, the system must be pressure-tested with oxygen-free nitrogen. The system shall be leak-tested upon completion of loading, but prior to commissioning. A subsequent leakage test must be carried out before leaving the site.
9. Commissioning
Before performing this procedure, it is essential that the technician is thoroughly familiar with the equipment and all its details. It is recommended good practice that all refrigerants are safely recovered. Before the task is carried out, a sample of oil and refrigerant should be taken in case an analysis is required before the recovered refrigerant is reused. It is essential for there to be power before starting with the task.
A. It is important to get familiar with the equipment and its operation.
B. Electrically isolate the system.
C. Before attempting the procedure, ensure that
- the mechanical-handling equipment is available, if required, for the handling of refrigerant cylinders;
- all personal protective equipment is available and correctly used;
- the recovery process is supervised at all times by a competent person;
- cylinders and recovery equipment conform to appropriate standards.
D. Pump the cooling system, if possible.
E. If vacuum is not possible, make a manifold so that refrigerant can be removed from various parts of the system.
F. Ensure that the cylinder is positioned on the scale before recovery takes place.
G. Switch on the recovery machine and operate it according to the manufacturer's instructions.
H. Do not overfill cylinders (no more than 80% of the liquid charge by volume).
I. Do not exceed the maximum working pressure of the cylinder, even temporarily.
J. When the cylinders have been correctly filled and the process is complete, ensure that the cylinders and equipment are promptly removed from the site and that all equipment isolation valves are closed.
K. Recovered refrigerant must not be charged to another refrigeration system, unless cleaned and checked.
10. Labelling
The equipment must be labelled stating that it has been taken out of service and drained of refrigerant. The labelling must be dated and signed. Ensure that there are labels on the equipment stating that the equipment contains flammable refrigerant.
11. Recovery
- When refrigerant is removed from a system, either for service or decommissioning, it is recommended good practice that all refrigerants are removed safely.
- When transferring refrigerant to cylinders, ensure that only suitable refrigerant-recovery cylinders are used. Ensure that the correct number of cylinders is available to support the total load of the system. All cylinders to be used are designated for the refrigerant recovered and labelled for that refrigerant (i.e. special refrigerant-recovery cylinders).
Cylinders must be completed with pressure-relief valves and associated shut-off valves in good working order. Empty recovery cylinders are evacuated and, if possible, cooled before recovery takes place. - Recovery equipment must be in good working order with a set of instructions concerning the equipment at hand and must be suitable for the recovery of flammable refrigerants. In addition, a set of calibrated weighing scales must be available and in good working order. Hoses must be complete with disconnect couplings free of leakage and in good running order. Before using the recovery machine, check that it is in good running order, properly maintained, and that all associated electrical components are sealed to prevent ignition in the event of refrigerant release. Consult the manufacturer in case of doubt.
- The flammable refrigerant must be returned to the refrigerant supplier in the correct recovery cylinder, and the applicable waste transfer note must be provided. Do not mix refrigerants in recovery units and especially not in cylinders.
- If compressors and compressor oils are to be removed, ensure that they have been drained to an acceptable level so that no flammable refrigerant remains within the lubricant. The evacuation process must be carried out before returning the compressor to the suppliers. Only electrical heating of the compressor body should be used to accelerate this process. When oil is drained from a system, it must be done in a safe manner.
ENGLISH
8. RECYCLING OF ELECTRICAL AND ELECTRONIC EQUIPMENT
This symbol indicates that, according to the applicable regulations, the product and/or batteries must be disposed of separately from household waste. When this product reaches the end of its shelf life, you should dispose of the batteries/accumulators and take them to a collection point designated by the local authorities.
For detailed information on how to properly dispose of electrical and electronic equipment and/or the corresponding batteries, consumers should contact their local authorities. Compliance with the above guidelines will help to protect the environment.
Information regarding national packaging recycling systems and their marking can be found on our website.
9. COPYRIGHT
The intellectual property rights over the texts in this manual belong to CECOTEC INNOVACIONES, S.L. All rights reserved. The content of this publication may not, either in part or in its entirety, be reproduced, stored in a retrieval system, transmitted or distributed by any means (electronic, mechanical, photocopying, recording or similar) without prior authorisation from CECOTEC INNOVACIONES, S.L.
10. EU DECLARATION OF CONFORMITY

Cecotec Innovaciones hereby declares that this air conditioner, model 08172 ForceClima 7500 Connected is in conformity with the Radio Equipment Directive 2014/53/EU.
The full text of the EU Declaration of Conformity can be found on the following website: https://cecotec.es/es/information/declaration-of-conformity
1. PIÈCES ET COMPOSANTS
Image 1
3. INSTALLATION DU PRODUIT
AVERTISSEMENTS :
5. CONNETTIVITÀ WI-FI E APP
7. PROBLEEMOPLOSSING
3. INSTALACE PRODUKTU
OZNÁMENÍ:
adrese: https://cecotec.es/es/information/declaration-of-conformity
TÜRKÇE
1. PARÇALAR VE BILEŞENLER
Şekil 1
Fig./Img./Abb./Afb./Rys.1

Fig./Img./Abb./Afb./Rys. 2

Fig./Img./Abb./Afb./Rys. 3

Fig./Img./Abb./Afb./Rys. 4

Fig./Img./Abb./Afb./Rys. 5
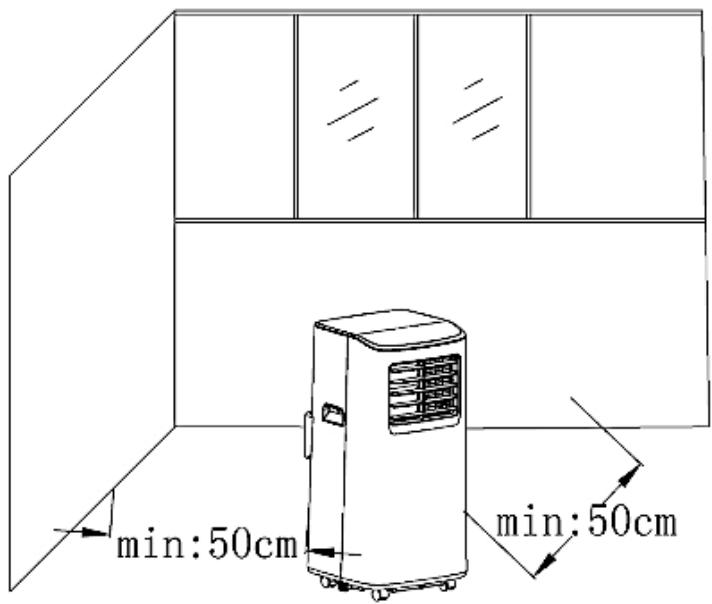
Fig./Img./Abb./Afb./Rys. 6

Fig./Img./Abb./Afb./Rys. 7
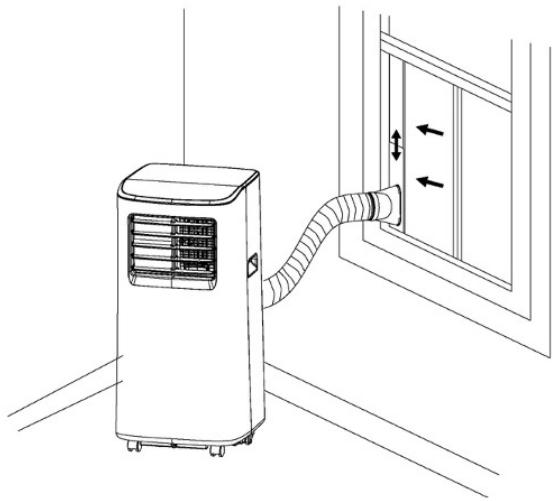
Fig./Img./Abb./Afb./Rys. 8

Fig./Img./Abb./Afb./Rys. 9

Fig./Img./Abb./Afb./Rys. 10

Fig./Img./Abb./Afb./ Rys. 11

Fig./Img./Abb./Afb./Rys. 12
www.cecotec.es
- SOMMAIRE
- INSTRUCTIONS ON BATTERIES
- INSTRUCTIONS DE SÉCURITÉ
- FIG. 2
- FIG. 3
- FIG. 4
- CONTROL PANEL
- FIG. 5
- REMOTE CONTROL
- NOTE
- BEFORE USE
- BOX CONTENT
- APPLIANCE INSTALLATION
- ENGLISH
- INSTALLING OF THE AIR OUTLET PIPE. FIG. 7
- INSTALLING THE WINDOW SEALING PLATE
- OPERATION
- ON/OFF
- MODE
- SLEEP MODE
- INCREASE AND DECREASE
- FAN SPEED/WI-FI
- TIMER
- OSCILLATION
- DRAINAGE INSTRUCTIONS
- MANUAL DRAINAGE
- CONTINUOUS DRAINAGE
- FIG. 11
- PROTECTION FEATURES
- FROST PROTECTION FUNCTION
- CONDENSATE WATER FLOODING PROTECTION FUNCTION
- AUTOMATIC DEFROST
- COMPRESSOR PROTECTION FUNCTION
- WI-FI CONNECTIVITY AND MOBILE APP
- CLEANING AND MAINTENANCE
- CLEANING THE FILTER
- FIG. 12
- REPLACING BATTERIES
- STORAGE
- MAINTENANCE
- TROUBLESHOOTING
- SERVICE INFORMATION
- 1.1 AREA VERIFICATION
- WORK PROCEDURE
- GENERAL WORKSPACE
- REFRIGERANT VERIFICATION
- PRESENCE OF FIRE EXTINGUISHERS
- ABSENCE OF IGNITION SOURCES
- VENTILATION
- VERIFICATION OF REFRIGERATION EQUIPMENT
- VERIFICATION OF ELECTRICAL DEVICES
- REPAIR OF SEALED COMPONENTS
- REPAIR OF INTRINSICALLY SAFE COMPONENTS
- WIRING
- DETECTION OF FLAMMABLE REFRIGERANTS
- LEAK-DETECTION METHODS
- REMOVAL AND EVACUATION
- LOADING PROCEDURE
- COMMISSIONING
- LABELLING
- RECOVERY
- RECYCLING OF ELECTRICAL AND ELECTRONIC EQUIPMENT
- COPYRIGHT
- EU DECLARATION OF CONFORMITY
- PIÈCES ET COMPOSANTS
- IMAGE 1
- INSTALLATION DU PRODUIT
- AVERTISSEMENTS
- CONNETTIVITÀ WI-FI E APP
- PROBLEEMOPLOSSING
- INSTALACE PRODUKTU
- OZNÁMENÍ
- TÜRKÇE
- PARÇALAR VE BILEŞENLER
- ŞEKIL 1
Brand : CECOTEC
Model : Forceclima 7500 Soundless Connected
Category : Air Conditioning