
VR-FB383-3H0B - Refrigerator VESTFROST - Free user manual and instructions
Find the device manual for free VR-FB383-3H0B VESTFROST in PDF.
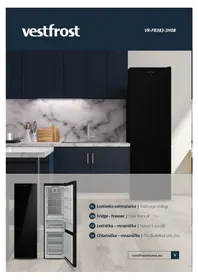


| Brand | VESTFROST |
| Model | VR-FB383-3H0B |
| Product type | Freestanding refrigerator-freezer |
| Total volume | 383 litres |
| Refrigerator volume | Approximately 250 litres |
| Freezer volume | Approximately 133 litres |
| Dimensions | 1860 × 600 × 650 mm |
| Weight | 75 kg |
| Power supply | 220-240 V, 50 Hz |
| Climate class | SN-T |
| Annual energy consumption | Approximately 280 kWh/year |
| Noise level | Around 40 dB(A) |
| Refrigerant | R600a (iso-butane) |
| Temperature control | Adjustable thermostat |
| Defrosting | Automatic in fridge, manual in freezer |
| Shelves | Adjustable glass shelves |
| Door storage | Multiple door balconies |
| Lighting | Internal LED lighting |
| Care and cleaning | Wipe with a soft damp cloth and mild detergent; clean condenser coils regularly |
| Spare parts availability | Contact authorised service centres or Vestfrost spare parts partners |
Frequently Asked Questions - VR-FB383-3H0B VESTFROST
User questions about VR-FB383-3H0B VESTFROST
0 question about this device. Answer the ones you know or ask your own.
Ask a new question about this device
Download the instructions for your Refrigerator in PDF format for free! Find your manual VR-FB383-3H0B - VESTFROST and take your electronic device back in hand. On this page are published all the documents necessary for the use of your device. VR-FB383-3H0B by VESTFROST.
USER MANUAL VR-FB383-3H0B VESTFROST


Rys. 1 Rys. 2

Rys. 1 Rys. 2
![graph LR A["LED Light"] --> B["Worker Icon"] B --> C["Sun Light"]](/content/2026/08/1617088/images/68cf3071272c0611eeb053df51b1a327059406402e68f654e0780b9e79098606.jpg)
Thank you for choosing this product.
This user manual contains important information on safety and instructions intended to assist you in the operation and maintenance of your appliance.
Please take the time to read this user manual before using your appliance and keep this book for future reference.
| Icon Type Meaning | |
| ! | WARNING Serious injury or death risk |
| RISK OF ELECTRIC SHOCK Dangerous voltage risk | |
| FIRE Warning; Risk of fire / flammable materials | |
| CAUTION Injury or property damage risk | |
| IMPORTANT Operating the system correctly | |
CONTENTS
1. SAFETY INSTRUCTIONS 40
1.1 General Safety Warnings 40
1.2 Installation warnings 42
1.3 During Usage 43
2. DESCRIPTION OF THE APPLIANCE 45
2.1 Dimensions 46
3. USING THE APPLIANCE 47
3.1 Information about New Generation Cooling Technology 47
3.2 Display and Control Panel 47
3.3 Operating your Fridge Freezer 48
3.3.1 Super Freeze Mode 48
3.3.2 Super Cool Mode 48
3.3.3 Economy Mode 49
3.3.4 Holiday Mode 50
3.3.5 Drink Cool Mode 50
3.3.6 Screen Saver Mode 51
3.3.7 The Child Lock Function 51
3.3.8 No Light mode 51
3.3.9 Mute Mode 52
3.4 Temperature Settings 52
3.4.1 Freezer Temperature Settings 52
3.4.2 Cooler Temperature Settings 52
3.4.3 Door Open Alarm Function 53
3.5 Temperature Settings Warnings 53
3.6 Accessories 54
3.6.1 Ice Tray (In some models) 54
3.6.2 The Freezer Box 55
3.6.3 The Chill Drawer (In some models) 55
3.6.4 The Fresh Dial (In some models) 56
3.6.5 Adjustable Door Shelf (In some models) 56
3.6.6 Adjustable Glass Shelf (In some models) 57
3.6.7 Natural Ion Tech (In some models) 57
3.6.8 Ultrafresh (If available) 57
3.6.9 Disinfection Module 58
4. FOOD STORAGE 58
4.1 Refrigerator Compartment 58
4.2 Freezer Compartment 58
5. CLEANING AND MAINTENANCE 64
5.1 Defrosting 64
6. SHIPMENT AND REPOSITIONING 65
6.1 Transportation and Changing Positioning 65
6.2 Repositioning the Door 65
7. BEFORE CALLING AFTER-SALES SERVICE 66
8. TIPS FOR SAVING ENERGY 69
9. TECHNICAL DATA 69
10. INFORMATION FOR TEST INSTITUTES 70
11. CUSTOMER CARE AND SERVICE 70
1. SAFETY INSTRUCTIONS
1.1 General Safety Warnings
Read this user manual carefully.
WARNING: Keep ventilation openings, in the appliance enclosure or in the built-in structure, clear of obstruction.
WARNING: Do not use mechanical devices or other means to accelerate the defrosting process, other than those recommended by the manufacturer.
WARNING: Do not use electrical appliances inside the food storage compartments of the appliance, unless they are of the type recommended by the manufacturer.
WARNING: Do not damage the refrigerant circuit.
WARNING: When positioning the appliance, ensure the supply cord is not trapped or damaged.
WARNING: Do not locate multiple portable socketoutlets or portable power supplies at the rear of the appliance.
WARNING: In order to avoid any hazards resulting from the instability of the appliance, it must be fixed in accordance with the instructions.
If your appliance uses R600a as a refrigerant (this information will be provided on the label of the cooler) you should take care during transportation and installation to prevent the cooler elements from being damaged. R600a is an environmentally friendly and natural gas, but it is explosive. In the event of a leak due to damage of the cooler elements, move your fridge away from open flames or heat sources and ventilate the room where the appliance is located for a few minutes.
- While carrying and positioning the fridge, do not damage the cooler gas circuit.
-
Do not store explosive substances such as aerosol cans with a flammable propellant in this appliance.
• This appliance is intended to be used in household and domestic applications such as: -
staff kitchen areas in shops, offices and other working environments.
– farm houses and by clients in hotels, motels and other residential type environments. - bed and breakfast type environments;
- catering and similar non-retail applications.
- If the socket does not match the refrigerator plug, it must be replaced by the manufacturer, a service agent or similarly qualified persons in order to avoid a hazard.
- A specially grounded plug has been connected to the power cable of your refrigerator. This plug should be used with a specially grounded socket of 16 amperes. If there is no such socket in your house, please have one installed by an authorised electrician.
- This appliance can be used by children aged from 8 years and above and persons with reduced physical, sensory or mental capabilities or lack of experience and knowledge if they have been given supervision or instruction concerning use of the appliance in a safe way and understand the hazards involved. Children shall not play with the appliance. Cleaning and user maintenance shall not be made by children without supervision.
- Children aged from 3 to 8 years are allowed to load and unload refrigerating appliances. Children are not expected to perform cleaning or user maintenance of the appliance, very young children (0-3 years old) are not expected to use appliances, young children (3-8 years old) are not expected to use appliances safely unless continuous supervision is given, older children (8-14 years old) and vulnerable people can use appliances safely after they have been given appropriate supervision or instruction concerning use of the appliance. Very vulnerable people are not expected to use appliances safely unless continuous supervision is given.
- If the supply cord is damaged, it must be replaced by the manufacturer, an authorised service agent or similar qualified persons, in order to avoid a hazard.
- This appliance is not intended for use at altitudes exceeding 2000 m.
To avoid contamination of food, please respect the following instructions:
- Opening the door for long periods can cause a significant increase of the temperature in the compartments of the appliance.
- Clean regularly surfaces that can come in contact with food and accessible drainage systems
- Store raw meat and fish in suitable containers in the refrigerator, so that it is not in contact with or drip onto other food.
- Two-star frozen-food compartments are suitable for storing pre-frozen food, storing or making ice cream and making ice cubes.
• One-, two- and three-star compartments are not suitable for the freezing of fresh food. - If the refrigerating appliance is left empty for long periods, switch off, defrost, clean, dry, and leave the door open to prevent mould developing within the appliance.
1.2 Installation warnings
Before using your fridge freezer for the first time, please pay attention to the following points:
- The operating voltage for your fridge freezer is 220-240 V at 50Hz.
- The plug must be accessible after installation.
- Your fridge freezer may have an odour when it is operated for the first time. This is normal and the odour will fade when your fridge freezer starts to cool.
- Before connecting your fridge freezer, ensure that the information on the data plate (voltage and connected load) matches that of the mains electricity supply. If in doubt, consult a qualified electrician.
- Insert the plug into a socket with an efficient ground connection. If the socket has no ground contact or the plug does not match, we recommend you consult a qualified electrician for assistance.
- The appliance must be connected with a properly installed fused socket. The power supply (AC) and voltage at the operating point must match with the details on the name plate of the appliance (the name plate is located on the inside left of the appliance).
- We do not accept responsibility for any damages that occur due to ungrounded usage.
- Place your fridge freezer where it will not be exposed to direct sunlight.
- Your fridge freezer must never be used outdoors or exposed to rain.
- Your appliance must be at least 50 cm away from stoves, gas ovens and heater cores, and at least 5 cm away from electrical ovens.
- If your fridge freezer is placed next to a deep freezer, there must be at least 2 cm between them to prevent humidity forming on the outer surface.
- Do not cover the body or top of fridge freezer with lace. This will affect the performance of your fridge freezer.
- Clearance of at least 150 mm is required at the top of your appliance. Do not place anything on top of your appliance.
- Do not place heavy items on the appliance.
- Clean the appliance thoroughly before use (see Cleaning and Maintenance).
- Before using your fridge freezer, wipe all parts with a solution of warm water and a teaspoon of sodium bicarbonate. Then, rinse with clean water and dry. Return all parts to the fridge freezer after cleaning.
- Use the adjustable front legs to make sure your appliance is level and stable. You can adjust the legs by turning them in either direction. This must be done before placing food in the appliance.
• Install the plastic distance guide(s) on the condenser (black vanes at the rear of the appliance) by turning it 90° (as shown in the figure) to prevent the condenser from touching the wall.
- The distance between the appliance and back wall must be a maximum of 75 mm..

1.3 During Usage
- Do not connect your fridge freezer to the mains electricity supply using an extension lead.
- Do not use damaged, torn or old plugs.
- Do not pull, bend or damage the cord.
- Do not use plug adapter.
- This appliance is designed for use by adults. Do not allow children to play with the appliance or hang off the door.
- Never touch the power cord/plug with wet hands. This may cause a short circuit or electric shock.
- Do not place glass bottles or cans in the ice-making compartment as they will burst when the contents freeze.
- Do not place explosive or flammable material in your fridge. Place drinks with high alcohol content vertically in the fridge compartment and make sure their tops are tightly closed.
- When removing ice from the ice-making compartment, do not touch it. Ice may cause frost burns and/or cuts.
- Do not touch frozen goods with wet hands. Do not eat ice-cream or ice cubes immediately after they are removed from the ice-making compartment.
- Do not re-freeze thawed frozen food. This may cause health issues such as food poisoning..
Old and Out-of-order Fridges
- If your old fridge or freezer has a lock, break or remove the lock before discarding it, because children may get trapped inside it and may cause an accident.
- Old fridges and freezers contain isolation material and refrigerant with CFC. Therefore, take care not to harm environment when you are discarding your old fridges.
CE Declaration of conformity

We declare that our products meet the applicable European Directives, Decisions and Regulations and the requirements listed in the standards referenced.
Disposal of your old appliance

The symbol on the product or on its packaging indicates that this product may not be treated as household waste. Instead it shall be handed over to the applicable collection point for the recycling of electrical and electronic equipment. By ensuring this product is disposed of correctly, you will help prevent potential negative consequences for the environment and human health, which could otherwise be caused by inappropriate waste handling of this product. For more detailed information about recycling of this product, please contact your local city office, your household waste disposal service or the shop where you purchased the product.
Packaging and the Environment

Packaging materials protect your machine from damage that may occur during transportation. The packaging materials are environmentally friendly as they are recyclable. The use of recycled material reduces raw material consumption and therefore decreases waste production.
Notes
- Please read the instruction manual carefully before installing and using your appliance. We are not responsible for the damage occurred due to misuse.
- Follow all instructions on your appliance and instruction manual, and keep this manual in a safe place to resolve the problems that may occur in the future.
- This appliance is produced to be used in homes and it can only be used in domestic environments and for the specified purposes. It is not suitable for commercial or common use. Such use will cause the guarantee of the appliance to be cancelled and our company will not be responsible for any losses incurred.
- This appliance is produced to be used in houses and it is only suitable for cooling / storing foods. It is not suitable for commercial or common use and/or for storing substances except for food. Our company is not responsible for any losses incurred by inappropriate usage of the appliance.
General notes:
Fresh Food Compartment (Fridge):
Most efficient use of energy is ensured in the configuration with the drawers in the bottom part of the appliance, and shelves evenly distributed, position of door bins does not affect energy consumption.
Freezer Compartment (Freezer):
Most Efficient use of energy is ensured in the configuration with the drawers and bins are on stock position.
2. DESCRIPTION OF THE APPLIANCE

This presentation is only for information about the parts of the appliance. Parts may vary according to the appliance model.


A. Refrigerator compartment
B. Freezer compartment
- Wine rack*
- Refrigerator shelves
- Ioniser*
- Chiller*
- Crisper cover
- Crisper
-
Freezer upper basket
-
Freezer middle basket
- Freezer bottom basket
- Levelling feet
- Freezer glass shelves*
- Bottle shelf
- Adjustable door shelf* / door shelf
- Door shelf
- Egg holder
- Ice box tray
2.1 Dimensions


| Overall dimensions1(mm) | |
| H12010,0 | |
| W1 595,0 | |
| D1 660,0 | |
| Space required in use2(mm) | |
| H22160,0 | |
| W2 695,0 | |
| D2 700,0 | |
| Overall space required in use3 (mm) | |
| W3 | 873,0 |
| D3 | 1228,0 |
1 the height, width and depth of the appliance without the handle.
2 the height, width and depth of the appliance including the handle, plus the space necessary for free circulation of the cooling air.
3 the height, width and depth of the appliance including the handle, plus the space necessary for free circulation of the cooling air, plus the space necessary to allow door opening to the minimum angle permitting removal of all internal equipment.
3. USING THE APPLIANCE
3.1 Information about New Generation Cooling Technology
Fridges with new-generation cooling technology have a different operating system to static fridges. Other (static) fridges may experience a build up of ice in the freezer compartment due to door openings and humidity in the food. In such fridges, regular defrosting is required; the fridge must be switched off, the frozen food moved to a suitable container and the ice which has formed in the freezer compartment removed.
In fridges with new-generation cooling technology, a fan blows dry cold air evenly throughout the fridge and freezer compartments. The cold air cools your food evenly and uniformly, preventing humidity and ice build-up.
In the refrigerator compartment, air blown by the fan, located at the top of the refrigerator compartment, is cooled while passing through the gap behind the air duct. At the same time, the air is blown out through the holes in the air duct, evenly spreading cool air throughout the refrigerator compartment. There is no air passage between the freezer and refrigerator compartments, therefore preventing the mixing of odours.
As a result, your fridge, with newgeneration cooling technology, provides you with ease of use as well as a huge volume and aesthetic appearance.
3.2 Display and Control Panel

Using the Control Panel
- Freezer Set Button
- Mode Button
- Refrigerator Button
- D.cool & Mute Button
- Freezer Set Value Screen
6a/6b. Super Freeze Symbol - Cooler Set Value Screen
8a/8b. Super Cool Symbol -
Holiday Mode Symbol
-
Economy Mode Symbol
- Child Lock Symbol
- Low Voltage Symbol
- Alarm (SR) Symbol
- Sound Off Symbol
- Drink Cool Value Screen (Active Symbol May Change According to Language(Min-Dk.))
3.3 Operating your Fridge Freezer
Lighting (If available)
When the product is plugged in for the first time, the interior lights may turn on 1 minute late due to opening tests.
3.3.1 Super Freeze Mode
Purpose
• To freeze a large quantity of food that cannot fit on the fast freeze shelf.
• To freeze prepared foods.
• To freeze food more quickly.
• To store fresh food and vegetables
How to Use?
- Press freezer set button until SF letters will be seen on the screen. Buzzer will sound beep beep. Mode will be set.
- Freezer temperature segment will show "SF".

During This Mode:
- Temperature of cooler and super cool mode may be adjusted. In this case super freeze mode continues.
• Economy and holiday mode can not be selected. - Super freeze mode can be cancelled by the same operation of selecting.
Notes:
- Maximum amount of fresh food (in kilograms) to be frozen within 24 hours is shown on the appliance label.
- For optimal appliance performance in maximum freezer capacity, set the appliance to active super freeze mode 24 hours before you put the fresh food into the freezer.
- Super freeze mode will automatically cancel after 24 hours, depending on the environmental temperature or when the freezer sensor reaches a sufficiently low temperature.
3.3.2 Super Cool Mode
Purpose
• To cool prepared food.
• To cool and store a large quantity of food in the refrigerator compartment.
• To cool drinks more quickly.
How to Use?
- Press cooler set button until SC letters will be seen on the screen. Buzzer will sound beep beep.
Mode will be set.
- Cooler temperature segment will show "SC".
During This Mode:
- Temperature of freezer and super freeze mode may be adjusted. In this case super cool mode continues.
- Economy and holiday mode can not be selected.
- Super cool mode can be cancelled by the same operation of selecting.

3.3.3 Economy Mode
Purpose
If you want to use set temperature values, defined by the control circuit. Both compartments will work in the normal manner with the set values
How to Use?
- Push MODE button till a circle appears around economy symbol.
- If no pressed any button for 1 sec. Mode will be set. Circle will blink 3 times. When mode is set, buzzer will sound beep beep.
- Freezer and refrigerator temperature segments will show "E".
- Circle of economy symbol and "e" will light till mode finishes.

During This Mode:
- Freezer may be adjusted. When economy mode will be cancelled, the selected setting values will proceed.
- Cooler may be adjusted. When economy mode will be cancelled, the selected setting values will proceed.
- Super cool and super freeze modes can be selected. Economy mode is automatically cancelled and the selected mode is activated.
- Holiday mode can be selected after cancelling the economy mode. Then the selected mode is activated.

To cancel, you will just need to press on mode button.
3.3.4 Holiday Mode
Purpose
If you are planning to leave the appliance for a long period of time, you can activate this function. Only the freezer compartment will remain active.
How to Use?
- Push MODE button till a circle appears around plane symbol.
- If no pressed any button for 1 sec. Mode will be set. Circle will blink 3 times. When mode is set, buzzer will sound beep beep.
- Freezer temperature segment will show "H".
- Circle of plane symbol and H will light till mode finishes.
During This Mode:
- Freezer may be adjusted. When holiday mode will be cancelled, the selected setting values will proceed.
- Cooler may be adjusted. When holiday mode will be cancelled, the selected setting values will proceed.
- Super cool and super freeze modes can be selected. Holiday mode is automatically cancelled and the selected mode is activated.
- Economy mode can be selected after cancelling the holiday mode. Then the selected mode is activated.
• To cancel, you will just need to press on mode button.
3.3.5 Drink Cool Mode
Purpose
This mode is used to cool drinks within an adjustable time.
How to Use?
Drink cool button should be pressed to activate beverage cooling mode. Each press will increment the time for 5 minutes up to 30 minutes, and then it returns to zero. You can view the time zone you want to set on "Drink cool alarm counter" section. Drink cool mode only lets the refrigerator release an audible alert after a specific period.

You must adjust the time according to the temperature of the bottles before you put them in. For example, you can set the time as "5 minutes" in the beginning. After this time, if the cooling is insufficient, you might set another 5 or 10 minutes. While using this mode, you must check the temperature of the bottles regularly. When the bottles are cool enough, you must take them out of the appliance. In the event that you leave the bottles in when the drink cool mode is on, they might explode.

oportant: It should not be confused with coolingchłodzeniem.
3.3.6 Screen Saver Mode
Purpose
This mode saves energy by switching all control panel lights off for as long as the control panel remains inactive
How to Use?
- This mode will be activated when you press on mode button for 5 seconds.
- If pressed on no button in 5 seconds when he mode is active, lights of the control panel will go off.
- If you press any button when lights of control panel are off, the current settings will appear on the screen, and then you can make it adjustment as you want. If you neither cancel screen saver mode nor press on any button in 5 seconds, the control panel will go off again.
- To cancel screen saver mode press on mode button for 5 seconds again.
Notes:
- When screen saver mode is active you can also activate child lock.
- If you do not press any button for 5 seconds after activating child lock, the lights of the control panel will go off. Then, you can view the previous settings and that child lock symbol is active when you pres any button, and you can cancel child lock as is described in the instruction of that mode.
3.3.7 The Child Lock Function
Purpose
Child lock can be activated to prevent any accidental or unintentional changes being made to the appliance settings
Activating Child Lock
Press on Freezer and Cooler buttons simultaneously for 5 seconds

Cancelling Child Lock
Press on Freezer and Cooler buttons simultaneously for 5 seconds

Child lock will automatically cancel if a power failure occurs.
3.3.8 No Light mode
How to Use?
- If you want to cancel lights of cooler, you can select this mode.
- While pushing on Freezer, Cooler, Mode and D.Cool/Mute Button together for 3 seconds. The mode will be selected in this way. From now on, the lights will not come on when the function is not cancelled by the same way.
- If you want to cancel this mode, repeat the same process or the mode will automatically cancel itself after 24 hours.
3.3.9 Mute Mode
This mode can be activated when you press and hold mute bottom for 3 seconds. When this mode is activated all button sounds and sound alarms will be off. This mode can be cancelled when you press and hold mute button for 3 seconds.

3.4 Temperature Settings
3.4.1 Freezer Temperature Settings
• The temperature for the freezer will initially display -18 °C.
- Press the freezer SET button.
- When you first push this button, the last set value will blink on screen.
• Each time the button is pressed, the temperature will decrease by 2 degrees (-16 °C, -18 °C, -20 °C, -22 °C, -24 °C, SF).
- When you press the freezer set button until superfreeze symbol appears on the freezer setting indicator, and if you do not press any button in 1 seconds super freeze will flash.
- If you continue to press, it will restart from -16°C .
- The temperature value selected before holiday mode, super freeze mode, super cool mode or economy mode is activated will remain the same when the mode is over or cancelled. The appliance continues to operate with this temperature value.
3.4.2 Cooler Temperature Settings
- Press cooler button once.
- When you first push this button, the last value appears on the setting indicator of the cooler.
- Whenever you press on this button, lower temperature will be set. (+8 °C, +6 °C, +5 °C, +4 °C, +2 °C, SC)
- When you press the cooler set button until supercool symbol appears on the cooler setting indicator, and if you do not press any button in 1 seconds super cool will flash.
- If you continue to press, it will restart from +8 °C.
- The temperature value selected before holiday mode, super freeze mode, super cool mode or economy mode is activated will remain the same when the mode is over or cancelled. The appliance continues to operate with this temperature value.

Recommended Settings for the Freezer and Cooler Compartment Temperature
| Freezer Compartment Cooler Compartment Remarks | ||
| -18°C 4 | °C For regular use and best performance. | |
| -20°C, -22°C or -24°C | 4°C | Recommended when environmental temperature exceeds 30 °C. |
| SF4 | °C | Must be used when you wish to freeze food in a short period of time. |
| -18°C, -20°C, -22°C or -24°C | 3°C | These temperature settings must be used when the environmental temperature is high or if you think the refrigerator compartment is not cool enough because the door is being opened frequently. |
| -18°C, -20°C, -22°C or -24°C | SC | Must be used when the refrigerator compartment is overloaded with food or when food needs to be cooled quickly. |
3.4.3 Door Open Alarm Function
If fridge door is opened more than 2 minutes, appliance sounds 'beep beep'.
3.5 Temperature Settings Warnings
- Your appliance is designed to operate in the ambient temperature ranges stated in the standards, according to the climate class stated in the information label. It is not recommended that your fridge is operated in the environments which are outside of the stated temperature ranges. This will reduce the cooling efficiency of the appliance.
- Temperature adjustments should be made according to the frequency of door openings, the quantity of food kept inside the appliance and the ambient temperature in the location of your appliance.
- When the appliance is first switched on, allow it to run for 24 hours in order to reach operating temperature. During this time, do not open the door and do not keep a large quantity of food inside.
- A 5 minute delay function is applied to prevent damage to the compressor of your appliance when connecting or disconnecting to mains, or when an energy breakdown occurs. Your appliance will begin to operate normally after 5 minutes.
Climate class and meaning:
T (tropical): This refrigerating appliance is intended to be used at ambient temperatures ranging from 16 °C to 43 °C.
ST (subtropical): This refrigerating appliance is intended to be used at ambient temperatures ranging from 16 °C to 38 °C.
N (temperate): This refrigerating appliance is intended to be used at ambient temperatures ranging from 16 °C to 32 °C.
SN (extended temperate):
This refrigerating appliance is intended to be used at ambient temperatures ranging from 10\ °C to 32\ °C .
Important installation instructions
This appliance is designed to work in difficult climate conditions and is powered with 'Freezer Shield' technology which ensures that the frozen food in the freezer will not defrost even if the ambient temperature falls as low as -15 °C. So you may then install your appliance in an unheated room without having to worry about frozen food in the freezer being spoilt. When the ambient temperature returns to normal, you may continue using the appliance as usual.
3.6 Accessories
Visual and text descriptions in the accessories section may vary according to the model of your appliance.
3.6.1 Ice Tray (In some models)
- Fill the ice tray with water and place in the freezer compartment.
• After the water has completely frozen, you can twist the tray as shown below to remove the ice cubes.

3.6.2 The Freezer Box
The freezer box allows food to be accessed more easily.
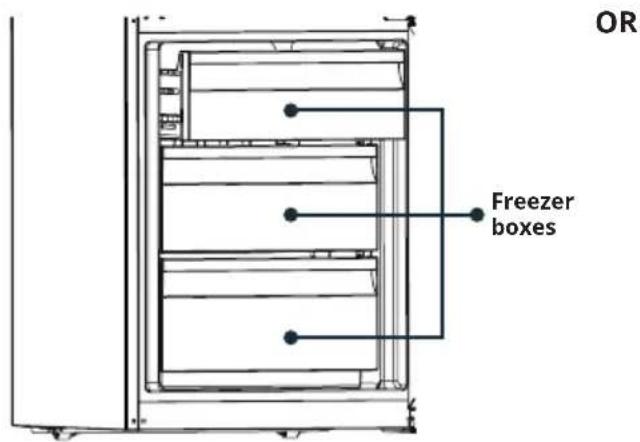

The images are representative
Removing the freezer box:
• Pull the box out as far as possible
• Pull the front of the box up and out

Carry out the opposite of this operation when refitting the sliding compartment.

Always keep hold of the handle of the box while removing it.
3.6.3 The Chill Drawer (In some models)
Keeping food in the chill drawer, instead of the freezer or refrigerator compartments, allows food to retain freshness and flavour for longer, while preserving its fresh appearance. When the chill drawer tray becomes dirty, remove it and wash with water. (Water freezes at 0° C, but food containing salt or sugar freezes at temperatures lower than this). The chill drawer is usually used for storing foods such as raw fish, lightly pickled food, rice, and so on.

The images are representative

not put food you want to freeze or ice trays (to make ice) in the chill drawer.
3.6.4 The Fresh Dial (In some models)
If the crisper is full, the fresh dial located in front of the crisper should be opened. This allows the air in the crisper and the humidity rate to be controlled, to increase the life of food within. The dial, located behind the shelf, must be opened if any condensation is seen on the glass shelf.

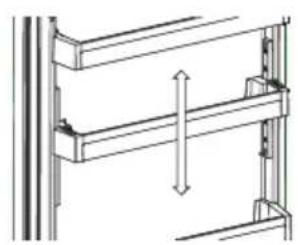
3.6.5 Adjustable Door Shelf (In some models)
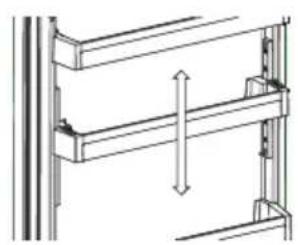
Six different height adjustments can be made to provide storage areas that you need by adjustable door shelf. To change the position of adjustable door shelf; Hold the bottom of the shelf and pull the buttons on the side of the door shelf direction of arrow. (Fig.1)
Position door shelf the height you need by moving up and down. After you get the position that you want the door shelf, release the buttons on the side of the door shelf (Fig.2) Before releasing the door shelf, move up down and make sure the door shelf is fixed.


Fig. 1 Fig. 2

Note: Before moving door shelf is loaded, you must hold the shelf by supporting the bottom.
Otherwise, door shelf could fall off the rails due to the weight. So damage may occur on the door shelf or rails.
3.6.6 Adjustable Glass Shelf (In some models)
Adjustable glass shelf mechanism provides higher storage spaces with a simple movement. To cover the glass shelf, push it.
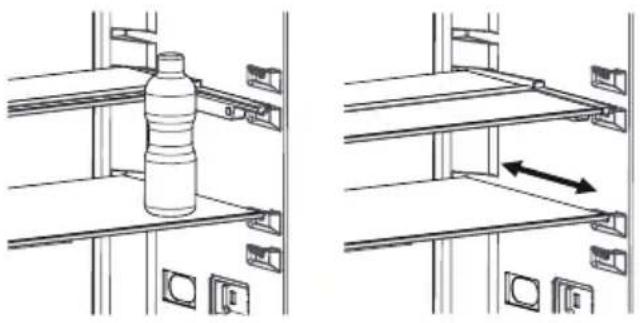
Fig. 1 Fig. 2
You can load your food as you want in the resulting extra space. To bring the shelf in its original position, pull it toward you.
3.6.7 Natural Ion Tech (In some models)
Natural Ion Tech spreads negative ions which neutralize particles of unpleasant smell and dust in the air.
By removing these particles from the air in the refrigerator, Natural Ion Tech improves air quality and eliminates odours.
- This feature is optional. It may not exist on your product.
• The location of your ioniser device may vary from product to product.

3.6.8 Ultrafresh (If available)
Ultrafresh technology helps to remove ethylene gas (a volatile organic compound released naturally from fresh foods) and unpleasant odors from the crisper.
In this way, food stays fresh for a longer time.
- Ultrafresh must be cleaned once in a year. The filter should be waited for 2 hours at 65°C in a oven.
- To clean the filter, please remove the back cover of the filter box by pulling it in the direction of the arrow.
• The filter should not be washed with water or any detergent.


The images are representative
3.6.9 Disinfection Module
Disinfection module, effectively reduces volatile organic compounds formed by the spoilage of food in the refrigerator. Module, reduces bacteria and viruses on the filter surface. The quality of the air in the refrigerator improves and always kept clean. Disinfection module, consists of a fan that directs the air, a filter that cleans the air, and UVC LED.

4. FOOD STORAGE
4.1 Refrigerator Compartment
For normal operating conditions, set the temperature of the cooler compartment to +4 or +6°C.
• To reduce humidity and avoid the consequent formation of frost, always store liquids in sealed containers in the refrigerator. Frost tends to concentrate in the coldest parts of the evaporating liquid and, in time, your appliance will require more frequent defrosting.
- Cooked dishes must remain covered when they are kept in the fridge. Do not place warm foods in fridge. Place them when they are cool, otherwise the temperature/humidity inside the fridge will increases, reducing the fridge's efficiency.
- Make sure no items are in direct contact with the rear wall of the appliance as frost will develop and packaging will stick to it. Do not open the refrigerator door frequently.
• We recommend that meat and clean fish are loosely wrapped and stored on the glass shelf just above the vegetable bin where the air is cooler, as this provides the best storage conditions.
- Store loose fruit and vegetable items in the crisper containers.
- Storing fruit and vegetables separately helps prevent ethylene-sensitive vegetables (green leaves, broccoli, carrot, etc.) being affected by ethylenereleaser fruits (banana, peach, apricot, fig etc.).
- Do not put wet vegetables into the refrigerator.
- Storage time for all food products depends on the initial quality of the food and an uninterrupted refrigeration cycle before refrigerator storage.
• Water leaking from meat may contaminate other products in the refrigerator. You should package meat products and clean any leakages on the shelves.
- Do not put food in front of the air flow passage.
- Consume packaged foods before the recommended expiry date.
- Do not allow food to come into contact with the temperature sensor, which is located in the refrigerator compartment, in order to keep the refrigerator compartment at optimum temperature.
- For normal working conditions, it will be sufficient to adjust the temperature setting of your refrigerator to +4 °C.
- The temperature of the fridge compartment should be in the range of 0-8 °C, fresh foods below 0 °C are iced and rotted, bacterial load increases above 8 °C, and spoils.
- Do not put hot food in the refrigerator immediately, wait for the temperature to pass outside. Hot foods increase the degree of your refrigerator and cause food poisoning and unnecessary spoiling of the food.
- Meat, fish, etc. should be store in the chiller compartment of the food, and the vegetable compartment is preferred for vegetables. (if available)
• To prevent cross contamination, meat products and fruit vegetables are not stored together. - Foods should be placed in the refrigerator in closed containers or covered to prevent moisture and odors.
The table below is a quick guide to show you the most efficient way to store the major food groups in your refrigerator compartment.
| Food | Maximum storage time | How and where to store |
| Vegetables and fruits 1 week Vegetable bin | ||
| Meat and fish 2 - 3 days | Wrap in plastic foil, bags, or in a meat container and store on the glass shelf | |
| Fresh cheese 3 - 4 days On the designated door shelf | ||
| Butter and margarine 1 week On the designated door shelf | ||
| Bottled products e.g. milk and yoghurt | Until the expiry date recommended by the producer | On the designated door shelf |
| Eggs 1 month On the designated egg shelf | ||
| Cooked food 2 days All shelves | ||

NOTE: Potatoes, onions and garlic should not be stored in the refrigerator.
4.2 Freezer Compartment
For normal operating conditions, set the temperature of the freezer compartment to -18 or -20°C.
- The freezer is used for storing frozen food, freezing fresh food, and making ice cubes.
- Food in liquid form should be frozen in plastic cups and other food should be frozen in plastic folios or bags. For freezing fresh food; wrap and seal fresh food properly, that is the packaging should be air tight and shouldn't leak. Special freezer bags, aluminum foil polythene bags and plastic containers are ideal.
- Do not store fresh food next to frozen food as it can thaw the frozen food.
- Before freezing fresh food, divide it into portions that can be consumed in one sitting.
- Consume thawed frozen food within a short period of time after defrosting
- Always follow the manufacturer's instructions on food packaging when storing frozen food. If no information is provided food, should not be stored for more than 3 months from the date of purchase.
- When purchasing frozen food, make sure that it has been stored under appropriate conditions and that the packaging is not damaged.
- Frozen food should be transported in appropriate containers and placed in the freezer as soon as possible.
- Do not purchase frozen food if the packaging shows signs of humidity and abnormal swelling. It is probable that it has been stored at an unsuitable temperature and that the contents have deteriorated.
- The storage life of frozen food depends on the room temperature, the thermostat setting, how often the door is opened, the type of food, and the length of time required to transport the product from the shop to your home. Always follow the instructions printed on the packaging and never exceed the maximum storage life indicated.
- If the freezer door has been left open for a long time or not closed properly, frost will form and can prevent efficient air circulation. To resolve this, unplug the freezer and wait for it to defrost. Clean the freezer once it has fully defrosted.
- The freezer volume stated on the label is the volume without baskets, covers, and so on.
- Do not refreeze thawed food. It may pose a danger to your health and cause problems such as food poisoning.

NOTE: If you attempt to open the freezer door immediately after closing it, you will find that it
will not open easily. This is normal. Once equilibrium has been reached, the door will open easily.

The table below is a quick guide to show you the most efficient way to store the major food ps in your freezer compartment.
| Meat and fish Preparation | Maximum storage time (months) | |
| Steak Wrap in foil 6-8 | ||
| Lamb meat Wrap in foil 6-8 | ||
| Veal roast Wrap in foil 6-8 | ||
| Veal cubes In small pieces 6-8 | ||
| Lamb cubes In pieces 4-8 | ||
| Minced meat In packaging without using spices 1-3 | ||
| Giblets (pieces) In pieces 1-3 | ||
| Bologna sausage/salami | Should be kept packaged even if it has a membrane | |
| Chicken and turkey Wrap in foil 4-6 | ||
| Goose and duck Wrap in foil 4-6 | ||
| Deer, rabbit, wild boar | In 2.5 kg portions or as fillets | 6-8 |
| Freshwater fish (Salmon, Carp, Crane, Catfish) | After cleaning the bowels and scales of the fish, wash and dry it. If necessary, remove the tail and head. | 2 |
| Lean fish (Bass, Turbot, Flounder) | 4 | |
| Fatty fishes (Tuna, Mackerel, Bluefish, Anchovy) | 2-4 | |
| Shellfish | Clean and in a bag | 4-6 |
| Caviar | In its packaging, or in an aluminium or plastic container | 2-3 |
| Snails | In salty water, or in an aluminium or plastic container | 3 |

NOTE: MThawed frozen meat should be cooked as fresh meat. If the meat is not cooked after posting, it must not be re-frozen.
| Vegetables and Fruits Preparation | Maximum storage time (months) | |
| String beans and beans | Wash, cut into small pieces and boil in water | 10-13 |
| Beans Hull, wash and boil in water 12 | ||
| Cabbage Clean and boil in water 6-8 | ||
| Carrot Clean, cut into slices and boil in water 12 | ||
| Pepper | Cut the stem, cut into two pieces, remove the core and boil in water | 8-10 |
| Spinach Wash and boil in water 6-9 | ||
| Cauliflower | Remove the leaves, cut the heart into pieces and leave it in water with a little lemon juice for a while | 10-12 |
| Eggplant Cut into pieces of 2cm after washing 10-12 | ||
| Corn Clean and pack with its stem or as sweet corn 12 | ||
| Apple and pear Peel and slice 8-10 | ||
| Apricot and Peach | Cut into two pieces and remove the stone | 4-6 |
| Strawberry and Blackberry | Wash and hull | 8-12 |
| Cooked fruits | Add 10 % of sugar to the container | 12 |
| Plum, cherry, sourberry | Wash and hull the stems | 8-12 |
| Maximum storage time (months) | Thawing time at room temperature (hours) | Thawing time in oven (minutes) | |
| Bread 4-62-34-5 (220-225°C) | |||
| Biscuits 3-61-1,55-8 (190-200°C) | |||
| Pastry 1-32-35-10 (200-225°C) | |||
| Pie 1-1,53-45-8 (190-200°C) | |||
| Phyllo dough 2-31-1,55-8 (190-200°C) | |||
| Pizza 2-32-415-20 (200°C) |
| Dairy products Preparation | Maximum storage time (months) | Storage conditions | |
| Packet (Homogenized) Milk | In its own packet 2–3Pure Milk – in its own packet | ||
| Cheese - excluding white cheese | In slices 6–8 | Original packaging may be used for short-term storage.Keep wrapped in foil for longer periods. | |
| Butter, margarine In its packaging | 6 | ||
5. CLEANING AND MAINTENANCE
Disconnect the unit from the power supply before cleaning.
Do not wash your appliance by pouring water on it.
⚠️ DDo not use abrasive products, detergents or soaps for cleaning the appliance. After washing, rinse with clean water and dry carefully. When you have finished cleaning, reconnect the plug to the mains supply with dry hands.
• Make sure that no water enters the lamp housing and other electrical components.
- The appliance should be cleaned regularly using a solution of bicarbonate of soda and lukewarm water.
- Clean the accessories separately by hand with soap and water. Do not wash accessories in a dish washer.
- Clean the condenser with a brush at least twice a year. This will help you to save on energy costs and increase productivity.
The power supply must be disconnected during cleaning.
Cleaning Door Glasses
Water based products which are not abrasive should be used in cleaning glasses.
5.1 Defrosting
- Your appliance performs automatic defrosting. The water formed as a result of defrosting passes through the water collection spout, flows into the water tray behind your appliance and evaporates there.
- Make sure you have disconnected the plug of your appliance before cleaning the water tray.
- Remove the water tray from its position by removing the screws (if it has screws). Clean it with soapy water at specific time intervals. This will prevent odours from forming.

Replacing LED Lighting
To replace any of the LEDs, please contact the nearest Authorised Service Centre.

NOTE: The numbers and location of the LED strips may change according to the model.
![graph LR A["LED"] --> B["Worker Icon"] C["Sun"] --> D["Arrow"] style A fill:#fff,stroke:#000 style B fill:#fff,stroke:#000 style C fill:#fff,stroke:#000 style D fill:#fff,stroke:#000](/content/2026/08/1617088/images/faf4e82fe4d084e8e3334534920f81dc3fff9bf8c3b963614c9810cee88f77b2.jpg)
If product equipped with LED lamp
This product contains a light source of energy efficiency class
If product equipped with LED Strip(s) or LED card(s)
This product contains a light source of energy efficiency class
6. SHIPMENT AND REPOSITIONING
6.1 Transportation and Changing Positioning
- The original packaging and foam may be kept for re-transportation (optional).
- Fasten your appliance with thick packaging, bands or strong cords and follow the instructions for transportation on the packaging.
- Remove all movable parts or fix them into the appliance against shocks using bands when re-positioning or transporting.

Always carry your appliance in the upright position.

Important Note: Pay attention to glass surface when ransporting.
6.2 Repositioning the Door
- It is not possible to change the opening direction of your appliance door if door handles are installed on the front surface of the appliance door.
- It is possible to change the opening direction of the door on models with handle on the side of the door or without handles.
- If the door-opening direction of your appliance can be changed, contact the nearest Authorised Service Centre to change the opening direction.
7. BEFORE CALLING AFTER-SALES SERVICE
Errors
Your appliance will warn you if the temperatures for the cooler and freezer are at improper levels or if a problem occurs with the appliance. Warning codes are displayed in the freezer and cooler indicators.
| ERROR TYPE MEANING WHY ERROR TYPE MEANING WHY WHAT TO DO | |||
| SR„Failure” Warning | There is/are some part(s) out of order or there is a failure in the cooling process. | Call a service agent for assistance as soon as possible. | |
| LF | Freezer compartment is not cold enough | This warning especially appears if there has been a power failure for a long period or when the refrigerator is operated for the first time. | 1. Use food within a short time period.Do not freeze foods that has thawed.2. Set the freezer temperature to colder values or set the Super Freeze until he compartment gets to normal temperature.3. Do not put fresh food in the appliance until the fault has cleared. |
| LC | Refrigerator compartment is not cold enough | This warning especially appears if there has been a power failure for a long period or when the refrigerator is operated for the first time. Ideal temperature for the refrigerator compartment is +4 oC. If you see this warning, your foods are at risk of spoiling. | 4. Set the refrigerator temperature to colder values or set the Super Cooling mode until the compartment reaches normal temperature.5. Open the door as little as possible until the fault clears. |
| LF i LC | “Not cold enough” Warning | This is a combination of the LF and LC error types. | You will see this failure when first starting the appliance. It will clear after the compartments reach normal temperature. |
| HC | Refrigerator compartment too cold | The food will start to freeze because the temperature is too cold. | 1. Check if the Super Cooling mode is switched on.2. Decrease the refrigeratortemperature values. |
| LOPO “Low voltage” Warning | This is seen when the power supply becomes lower than 170 V. | This not a failure. This prevents any damage to the compressor. This warning will clear after the voltage reaches the required level. | |
If you are experiencing a problem with your appliance, please check the following before contacting the after-sales service.
Your appliance is not operating
Check if:
- There is power
- The plug is correctly placed in the socket
• The plug fuse or the mains fuse has blown - The socket is defective. To check this, plug another working appliance into the same socket.
The appliance performs poorly
Check if:
• The appliance is overloaded
• The appliance door is closed properly
• There is any dust on the condenser
- There is enough space near the rear and side walls.
Your appliance is operating noisily
Cracking noise occurs:
• During automatic defrosting
- When the appliance is cooled or warmed (due to expansion of appliance material).
Short cracking noise occurs: When the thermostat switches the compressor on/off.
Motor noise: Indicates the compressor is operating normally. The compressor may cause more noise for a short time when it is first activated.
Bubbling noise and splash occurs: Due to the flow of the refrigerant in the tubes of the system.
Water flowing noise occurs: Due to water flowing to the evaporation container. This noise is normal during defrosting.
Air blowing noise occurs: In some models during normal operation of the system due to the circulation of air.
The edges of the appliance in contact with the door joint are warm
Especially during summer (warm seasons), the surfaces in contact with the door joint may become warmer during the operation of the compressor, this is normal.
There is a build-up of humidity inside the appliance
Check if:
- All food is packed properly. Containers must be dry before being placed in the appliance.
- The appliance door is opened frequently. Humidity of the room enters the appliance when the doors are opened. Humidity increases faster when the doors are opened more frequently, especially if the humidity of the room is high.
The door does not open or close properly
Check if:
- There is food or packaging preventing the door from closing
• The door joints are broken or torn - Your appliance is on a level surface.
Recommendations
- If the appliance is switched off or unplugged, wait at least 5 minutes before plugging the appliance in or restarting it in order to prevent damage to the compressor.
- If you will not use your appliance for a long time (e.g. in summer holidays) unplug it. Clean your appliance according to chapter cleaning and leave the door open to prevent humidity and smell.
- If a problem persists after you have followed all the above instructions, please consult the nearest authorised service centre.
- The appliance you have purchased is designed for domestic use only. It is not suitable for commercial or common use. If the consumer uses the appliance in a way that does not comply with this, we emphasise that the manufacturer and the dealer will not be responsible for any repair and failure within the guarantee period.
8. TIPS FOR SAVING ENERGY
- Install the appliance in a cool, wellventilated room, but not in direct sunlight and not near a heat source (such as a radiator or oven) otherwise an insulating plate should be used.
- Allow warm food and drinks to cool before placing them inside the appliance.
- Place thawing food in the refrigerator compartment if available. The low temperature of the frozen food will help cool the refrigerator compartment while the food is thawing. This will save energy. Frozen food left to thaw outside of the appliance will result in a waste of energy.
- Drinks or other liquids should be covered when inside the appliance. If left uncovered, the humidity inside the appliance will increase, therefore the appliance uses more energy. Keeping drinks and other liquids covered helps preserve their smell and taste.
- Avoid keeping the doors open for long periods and opening the doors too frequently as warm air will enter the appliance and cause the compressor to switch on unnecessarily often.
- Keep the covers of the different temperature compartments (such as the crisper and chiller if available) closed.
- The door gasket must be clean and pliable. In case of wear, replace the gasket.
9. TECHNICAL DATA
The technical information is situated in the rating plate on the internal side of the appliance and on the energy label. The QR code on the energy label supplied with the appliance provides a web link to the information related to the performance of the appliance in the EU EPREL database.
Keep the energy label for reference together with the user manual and all other documents provided with this appliance. It is also possible to find the same information in EPREL using the link https://eprel.ec.europa.eu and the model name and product number that you find on the rating plate, the appliance.
See the link www.theenergylabel.eu for detailed information about the energy label.
10. INFORMATION FOR TEST INSTITUTES
Appliance for any EcoDesign verification shall be compliant with EN 62552. Ventilation requirements, recess dimensions and minimum rear clearances shall be as stated in this User Manual at Chapter 2. Please contact the manufacturer for any other further information, including loading plans.
11. CUSTOMER CARE AND SERVICE
Always use original spare parts. When contacting our Authorised Service Centre, ensure that you have the following data available: Model, Serial Number and Service Index.
The information can be found on the rating plate. You can find the rating label inside the fridge zone on the left lower side. The original spare parts for some specific components are available for a minimum of 7 or 10 years, based on the type of component, from the placing on the market of the last unit of the model.
Notatki
1.3 Během provozu


3.3.4 Režim Holiday
Účel
3.6.2 Mraznička - box
Obr. 1 Obr. 2

Obr. 1 Obr. 2
![graph LR A["LED"] --> B["Worker Icon"] B --> C["Sun icon"]](/content/2026/08/1617088/images/feca9c2a2f19396b94500c5a540752384edfc14fe38b02447faf621ada2f381e.jpg)

A. Priečinok chladničky
B. Priečinok mrazničky
- Regál na víno*
- Police chladničky
- Ionizátor*
- Chladiaci priečinok*
- Kryt priestoru na ovocie a zeleninu
- Priečinok na ovocie a zeleninu (crisper)
-
Horný košík mrazničky
-
Prostredný košík mrazničky
- Spodný košík mrazničky
- Vyrovnávacia nožička
- Sklené poličky mrazničky*
- Polica na fl'aše
- Nastavitelná polička na dverách*/polička na dverách
- Polička na dverách
- Držiak na vajíčka
- Zásobník na lad
2.1 Rozmery

3.6.2 Mraznička - box
Obr. 1 Obr. 2

Obr. 1 Obr. 2
- THANK YOU FOR CHOOSING THIS PRODUCT
- CONTENTS
- SAFETY INSTRUCTIONS
- DESCRIPTION OF THE APPLIANCE
- USING THE APPLIANCE
- FOOD STORAGE
- CLEANING AND MAINTENANCE
- SHIPMENT AND REPOSITIONING
- BEFORE CALLING AFTER-SALES SERVICE
- TIPS FOR SAVING ENERGY
- TECHNICAL DATA
- INFORMATION FOR TEST INSTITUTES
- CUSTOMER CARE AND SERVICE
- GENERAL SAFETY WARNINGS
- READ THIS USER MANUAL CAREFULLY
- TO AVOID CONTAMINATION OF FOOD, PLEASE RESPECT THE FOLLOWING INSTRUCTIONS
- INSTALLATION WARNINGS
- DURING USAGE
- OLD AND OUT-OF-ORDER FRIDGES
- CE DECLARATION OF CONFORMITY
- DISPOSAL OF YOUR OLD APPLIANCE
- PACKAGING AND THE ENVIRONMENT
- NOTES
- GENERAL NOTES
- FRESH FOOD COMPARTMENT (FRIDGE)
- FREEZER COMPARTMENT (FREEZER)
- DIMENSIONS
- INFORMATION ABOUT NEW GENERATION COOLING TECHNOLOGY
- DISPLAY AND CONTROL PANEL
- USING THE CONTROL PANEL
- OPERATING YOUR FRIDGE FREEZER
- LIGHTING (IF AVAILABLE)
- SUPER FREEZE MODE
- PURPOSE
- HOW TO USE
- DURING THIS MODE
- SUPER COOL MODE
- ECONOMY MODE
- HOLIDAY MODE
- DRINK COOL MODE
- SCREEN SAVER MODE
- THE CHILD LOCK FUNCTION
- ACTIVATING CHILD LOCK
- CANCELLING CHILD LOCK
- NO LIGHT MODE
- MUTE MODE
- TEMPERATURE SETTINGS
- FREEZER TEMPERATURE SETTINGS
- COOLER TEMPERATURE SETTINGS
- DOOR OPEN ALARM FUNCTION
- TEMPERATURE SETTINGS WARNINGS
- CLIMATE CLASS AND MEANING
- SN (EXTENDED TEMPERATE)
- IMPORTANT INSTALLATION INSTRUCTIONS
- ACCESSORIES
- VISUAL AND TEXT DESCRIPTIONS IN THE ACCESSORIES SECTION MAY VARY ACCORDING TO THE MODEL OF YOUR APPLIANCE
- ICE TRAY (IN SOME MODELS)
- THE FREEZER BOX
- REMOVING THE FREEZER BOX
- THE CHILL DRAWER (IN SOME MODELS)
- THE FRESH DIAL (IN SOME MODELS)
- ADJUSTABLE DOOR SHELF (IN SOME MODELS)
- ADJUSTABLE GLASS SHELF (IN SOME MODELS)
- NATURAL ION TECH (IN SOME MODELS)
- ULTRAFRESH (IF AVAILABLE)
- DISINFECTION MODULE
- REFRIGERATOR COMPARTMENT
- FREEZER COMPARTMENT
- CLEANING DOOR GLASSES
- DEFROSTING
- REPLACING LED LIGHTING
- IF PRODUCT EQUIPPED WITH LED LAMP
- IF PRODUCT EQUIPPED WITH LED STRIP(S) OR LED CARD(S)
- TRANSPORTATION AND CHANGING POSITIONING
- REPOSITIONING THE DOOR
- ERRORS
- YOUR APPLIANCE IS NOT OPERATING
- CHECK IF
- THE APPLIANCE PERFORMS POORLY
- YOUR APPLIANCE IS OPERATING NOISILY
- CRACKING NOISE OCCURS
- THE EDGES OF THE APPLIANCE IN CONTACT WITH THE DOOR JOINT ARE WARM
- THERE IS A BUILD-UP OF HUMIDITY INSIDE THE APPLIANCE
- THE DOOR DOES NOT OPEN OR CLOSE PROPERLY
- RECOMMENDATIONS
- NOTATKI
- BĚHEM PROVOZU
- REŽIM HOLIDAY
- ÚČEL
- MRAZNIČKA - BOX
Brand : VESTFROST
Model : VR-FB383-3H0B
Category : Refrigerator