
SNC-EM600 - Uncategorized SONY - Free user manual and instructions
Find the device manual for free SNC-EM600 SONY in PDF.


| Brand | Sony |
| Model | SNC-EM600 |
| Product Type | Network Security Camera |
| Image Sensor | 1/2.8-inch Exmor CMOS sensor |
| Effective Pixels | Approx. 2.1 Megapixels (1920 x 1080) |
| Lens | Auto-focus 3.1x optical zoom (3.1-9.6 mm) |
| Minimum Illumination | 0.02 lx (color, F1.2) |
| Infrared Range | Up to 30 m with built-in IR LED |
| Video Compression | H.264, MPEG-4, JPEG |
| Max Resolution | 1920 x 1080 at 60 fps |
| Network Interface | 10BASE-T / 100BASE-TX (RJ-45) |
| Protection Features | Built-in IR cut filter, privacy masking |
| Power Supply | PoE (IEEE 802.3af) or 12V DC |
| Power Consumption | Max 12 W (including IR LED) |
| Operating Temperature | -10°C to +50°C |
| Dimensions (W x H x D) | 127 mm x 127 mm x 67 mm |
| Weight | Approx. 700 g |
| Maintenance and Cleaning | Wipe the lens with a soft cloth and ensure the ventilation openings are not blocked |
| Safety | Use the supplied power adapter or PoE; avoid exposing the camera to rain or moisture |
| Spare Parts and Repairability | Contact Sony service center for genuine replacement parts and professional repair |
| General Information | ONVIF compliant, supports day/night function and intelligent motion detection |
Frequently Asked Questions - SNC-EM600 SONY
User questions about SNC-EM600 SONY
0 question about this device. Answer the ones you know or ask your own.
Ask a new question about this device
Download the instructions for your Uncategorized in PDF format for free! Find your manual SNC-EM600 - SONY and take your electronic device back in hand. On this page are published all the documents necessary for the use of your device. SNC-EM600 by SONY.
USER MANUAL SNC-EM600 SONY
[Important notice] To the customers those who use SSL client authentication
Please follow the steps below when using SSL client authentication.
■ If you enable SSL client authentication for the first time after updating camera firmware to V3.0, please follow [Step-1] and [Step-2] in order.
■ If you already enabled SSL client authentication with camera firmware version earlier than V3.0, please make sure to follow [Step-2] BEFORE updating camera firmware to v3.0.
【Step-1】
Configure SSL client authentication
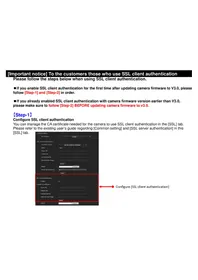
You can manage the CA certificate needed for the camera to use SSL client authentication in the [SSL] tab. Please refer to the existing user's guide regarding [Common setting] and [SSL server authentication] in this [SSL] tab. Common setting

Note
- When using the client authentication, the personal certificate must be successfully installed on the PC being used. If it's not installed, do NOT configure this tab or you may not be able to connect to the camera. For more detail, please refer to the [Step-2] Import personal certificate.
-
The setting of SSL client authentication is available only when SSL server authentication certificates are uploaded.
-
Open [SSL] tab from the [Security] under [Setting] for administrator.
- Click [Browse...] button for [Trusted CA certificate 1] and select the CA certificate to be imported to the camera.
- Click [OK] button in the pop-up dialog, and the selected file will be imported to the camera. Up to 4 CA certificates can be imported to one camera. Supported file type of certificate is PEM.
- Check the checkbox to enable SSL client authentication and click [OK] button.
Note
Importing process will be invalid if the selected file is not a CA certificate.
To display the information of the CA certificate
When the CA certificate has been successfully stored in the camera, its information appears on [Issuer DN], [Subject DN], [Available period], and [Extended Key Usage] for your reference.
To delete the CA certificate
Click [Delete] to delete the selected CA certificate from the camera.
Tip
When enabling the client certificate, the following steps in order are recommended.
- Import the necessary CA certificates.
- Check the [Enable] checkbox for SSL client authentication and click [OK].
Note
Once you check the [Enable] checkbox for SSL client authentication and click [OK], the camera will immediately enable the client authentication.
Therefore make sure that the personal certificate on your PC is successfully installed before you enable SSL client authentication.
For more detail, please refer to the [Step-2] Import personal certificate.
【Step-2】
Import personal certificate
Please follow the steps below to import the personal certificate when using SSL client authentication.
- Double click the stored personal certificate on your PC.
- [Certificate Import Wizard] will pop-up.
- Check the [Mark this key as exportable] checkbox in the middle.
- Follow the instruction to complete the import.


Brand : SONY
Model : SNC-EM600
Category : Uncategorized