
MAG 322UP QD-OLED E16 - Monitor MSI - Free user manual and instructions
Find the device manual for free MAG 322UP QD-OLED E16 MSI in PDF.


| Product Type | QD-OLED Gaming Monitor |
| Brand | MSI |
| Model | MAG 322UP QD-OLED E16 |
| Screen Size | 31.5 inches diagonal |
| Panel Type | QD-OLED |
| Resolution | 3840 x 2160 (4K UHD) |
| Refresh Rate | 165 Hz |
| Response Time | 0.03 ms (GtG) |
| Brightness | 400 cd/m² typical; 1000 cd/m² peak HDR |
| Contrast Ratio | 1,500,000:1 |
| Viewing Angles | 178° horizontal / 178° vertical |
| Aspect Ratio | 16:9 |
| Color Gamut | 99% DCI-P3, 97% Adobe RGB, 100% sRGB |
| Connectivity | HDMI 2.1 x2, DisplayPort 1.4 x1, USB-C x1 (DP Alt Mode, 90 W PD), USB 3.2 Type-A x2, headphone out |
| VESA Mounting | 100 x 100 mm |
| Ergonomic Adjustments | Height 0–110 mm, tilt -5° to 20°, swivel -30° to 30°, pivot 90° |
| Power Consumption | 48 W typical, standby < 0.5 W |
| Dimensions (with stand) | 718 x 580 x 248 mm |
| Weight (with stand) | 7.2 kg |
| Safety Features | Anti-flicker, low blue light, burn-in protection technologies |
| Cleaning Instructions | Use a dry microfiber cloth; do not spray liquids directly on the panel |
| Repairability | Removable stand and back cover; standard connectors and power supply for easy service |
Frequently Asked Questions - MAG 322UP QD-OLED E16 MSI
User questions about MAG 322UP QD-OLED E16 MSI
0 question about this device. Answer the ones you know or ask your own.
Ask a new question about this device
Download the instructions for your Monitor in PDF format for free! Find your manual MAG 322UP QD-OLED E16 - MSI and take your electronic device back in hand. On this page are published all the documents necessary for the use of your device. MAG 322UP QD-OLED E16 by MSI.
USER MANUAL MAG 322UP QD-OLED E16 MSI
MAG Series
OLED Monitor
MAG 322UP QD-OLED E16 (3DD2)
User Guide
Contents
Getting Started .... 3
Package Contents 3
Installing the Monitor Stand....4
Adjusting the Monitor 5
Monitor Overview 6
Connecting the Monitor to PC 9
OSD Setup....10
Navi Key....10
Hot Key 10
OSD Menus ....11
G.I....12
Gaming....13
Professional 15
Image.... 15
Input Source.... 16
PIP/PBP....17
Navi Key....18
Settings.... 18
MSI OLED Care....20
Specifications....22
Preset Display Modes ....24
Troubleshooting....26
Safety Instructions....27
TÜV Rheinland Certification ....29
Regulatory Notices....30
Revision
V1.0, 2025/05
Getting Started
This chapter provides you with the information on hardware setup procedures. While connecting devices, be careful in holding the devices and use a grounded wrist strap to avoid static electricity.
Package Contents
| Monitor MAG 322UP QD-OLED E16 | |
| Documentation | Quick Start Guide |
| Accessories | Stand |
| Stand Base with Screw(s) | |
| Screw(s) for Wall Mount Bracket(s) | |
| Power Cord | |
| Cable | DisplayPort Cable |

- Contact your place of purchase or local distributor if any of the items is damaged or missing.
- Package contents may vary by country and model.
- The included power cord is exclusively for this monitor and should not be used with other products.
Installing the Monitor Stand
- Leave the monitor in its protective packaging. Align the stand to the monitor groove.
- Push the stand towards the monitor groove until it locks in place.
- Connect the base to the stand and tighten the base screw to secure the base.
- Make sure the stand assembly is properly installed before setting the monitor upright.

Important
- Place the monitor on a soft, protected surface to avoid scratching the display panel.
• Do not use any sharp objects on the panel. - The groove for installing the stand bracket can also be used for wall mount. Please contact your dealer for proper wall mount kit.
Adjusting the Monitor
This monitor is designed to maximize your viewing comfort with its adjustment capabilities.

- Avoid touching the display panel when adjusting the monitor.
- Please slightly tilt the monitor backwards before pivoting it.

Monitor Overview
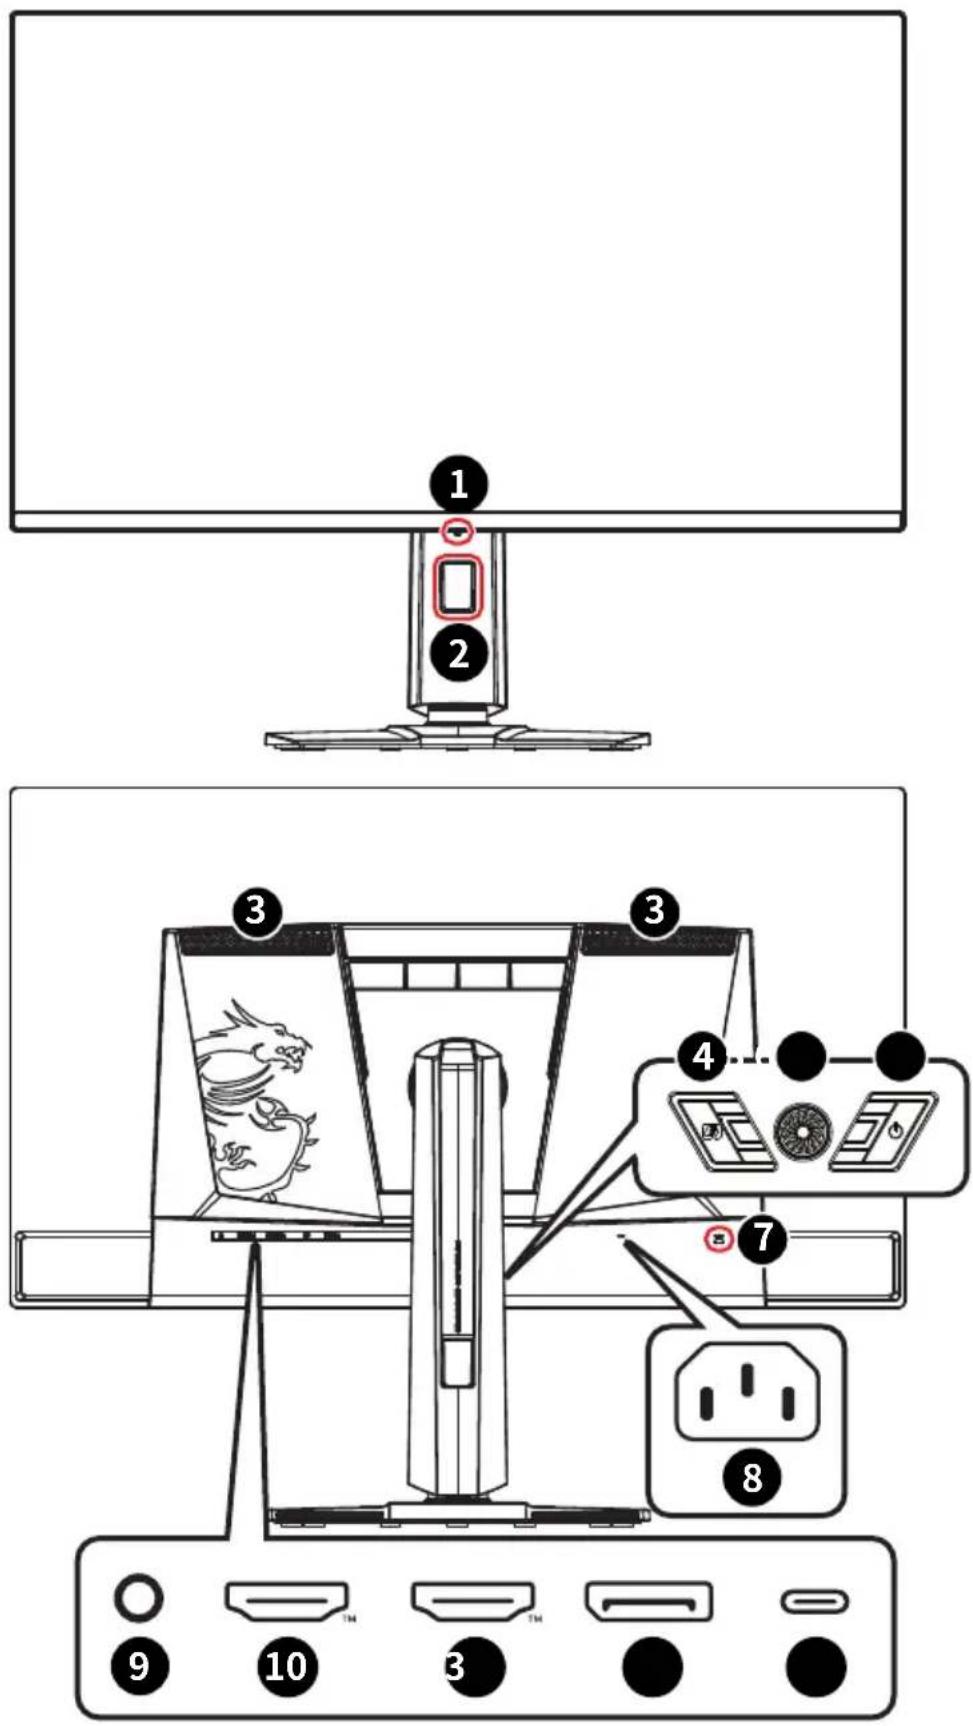
| 1 | Power LEDLit in white after the monitor is turned on. If no signal input, the LED will turn into orange. Lit in orange when the monitor is in Stand-by mode. |
| 2 | Cable Routing Hole |
| 3 | VentilatorThe ventilator on the enclosure is used for air convection and to prevent the equipment from overheating. Do not cover the ventilator. Please remove the protective film. |
| 4 | G KeyTo activate the OSD Application. |
| 5 | Navi Key |
| 6 | Power Button |
| 7 | Kensington Lock |
| 8 | Power Jack |
| 9 | Headphone Jack |
| 10 | DisplayPortSupports 3840x2160@165Hz as specified in DisplayPort 1.4a. |
| 11 | HDMI TM Connector HDMITM HIGH-DEFINION MULTIMED INTERFACESupports HDMI TM CEC, 3840x2160@165Hz as specified in HDMI TM 2.1. To ensure optimal performance and compatibility, please use only HDMI TM cables certified with the official HDMI TM logo when connecting this monitor. For more information, please visithttps://www.hdmi.org/resource/cables. To ensure optimal performance and compatibility, please use only HDMI TM cables certified with the official HDMI TM logo when connecting this monitor. For more information, please visithttps://www.hdmi.org/resource/cables. |
| 12 | HDMI TM Connector HDMITM HIGH-DEFINION MULTIMED INTERFACESupports 3840x2160@165Hz as specified in HDMI TM 2.1. To ensure optimal performance and compatibility, please use only HDMI TM cables certified with the official HDMI TM logo when connecting this monitor. For more information, please visithttps://www.hdmi.org/resource/cables. To ensure optimal performance and compatibility, please use only HDMI TM cables certified with the official HDMI TM logo when connecting this monitor. For more information, please visithttps://www.hdmi.org/resource/cables. |

USB Type-C Port
This port supports DisplayPort Alternate (DP Alt) Mode and up to 5V/3A (15W) power delivery.

Your USB-C signal source and cable must support DisplayPort Alternate Mode to enable video output to the monitor.
Connecting the Monitor to PC
- Turn off your computer.
- Connect the video cable from the monitor to your computer.
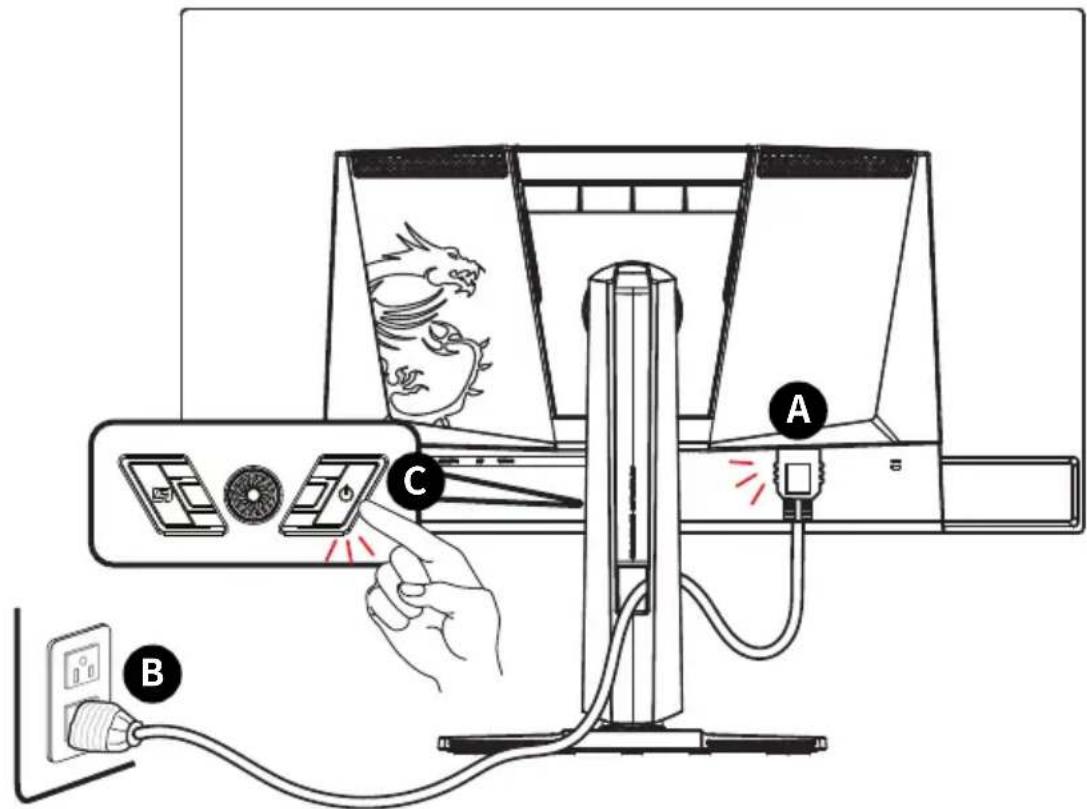
- Connect the power cord to the monitor power jack. (Figure A)
- Plug the power cord into the electrical outlet. (Figure B)
- Turn on the monitor. (Figure C)
- Power on the computer and the monitor will auto detect the signal source.

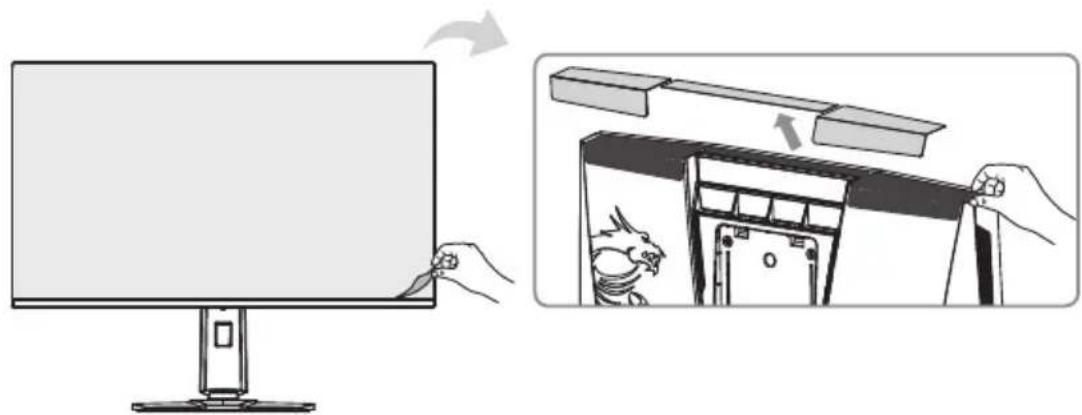
Please remove the protective films from the display panel and ventilation ports before use to optimize performance and prevent overheating.
OSD Setup
This chapter provides you with essential information on OSD Setup.

All information is subject to change without prior notice.
Navi Key
The monitor comes with a Navi Key, a multi-directional control that helps navigate the On-Screen Display (OSD) menu.
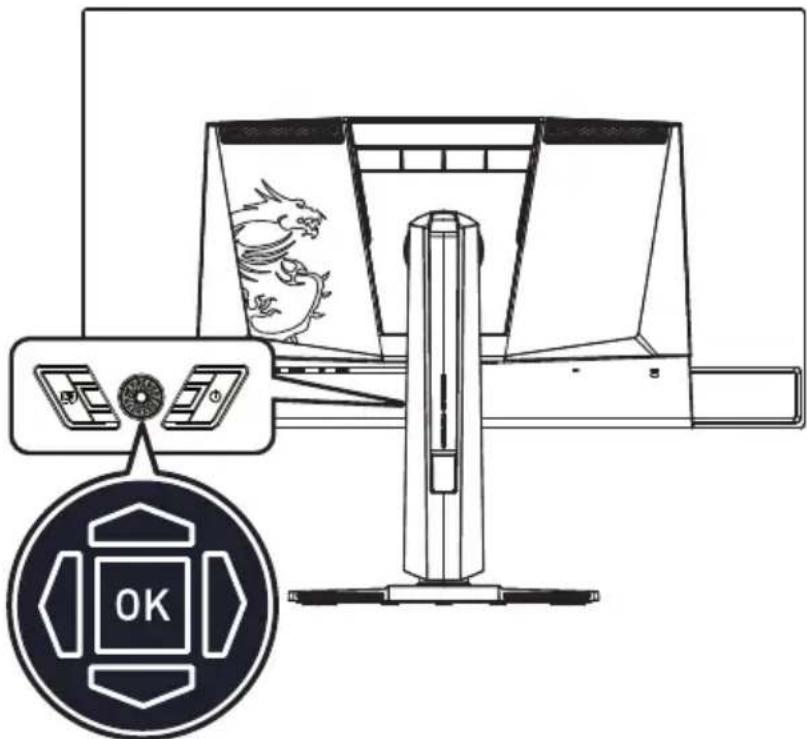
Up/Down/Left/Right:
- selecting function menus and items
• adjusting function values - entering into/exiting from function menus
Press (OK):
- launching the On-Screen Display (OSD)
- entering submenus
• confirming a selection or setting
Hot Key
- Users may enter into preset function menus by moving the Navi Key up, down, left or right when the OSD menu is inactive.
- Users may customize their own Hot Keys to enter into different function menus.
OSD Menus


ortant
The following settings will be grayed out when HDR signals are received:
- Night Vision
- Low Blue Light
- Brightness
- Contrast
• Color Temperature
• AI Vision
- Optix Scope
- PIP/PBP
• sRGB, Adobe RGB, Display P3
G.I.
| 1st Level Menu 2nd/3rd Level Menu Description | ||||
| Smart Crosshair Icon None | Through AI algorithm, this function enhances the visibility of in-game crosshair.Users can select the color and position of the crosshair. | |||
 | ||||
| Color White | ||||
| Red | ||||
| Auto | ||||
| Position | ||||
| Reset | ||||
| Optix Scope Scope Size | Small | The center point will zoom in when Optix Scope is enabled.Smart Crosshair and Optix Scope can be enabled at the same time.Activating Optix Scope will affect: | ||
| Medium | ||||
| Large | ||||
| Scope Ratio | x1.5 | |||
| x2 | ||||
| x3 | ||||
| OFF | » Screen Size 1:1/27"/24.5" | Set to Auto | ||
| ON | ||||
| Affected Function Function Status | |
| » Adaptive-Sync» PIP/PBP | Set to OFF |
| » Screen Size 1:1/27"/ 24.5" | Set to Auto |
Gaming
| 1st Level Menu 2nd/3rd Level Menu Description | ||||
| Game Mode Premium Color | ·Use Up or Down Button to select and preview mode effects.·Press the OK Button to confirm and apply your mode type. | |||
| Alarm Clock Location Left Top | After setting the time, press the OK Button to activate the timer.Users have to manually restore their preset Alarm Clock after any AC power loss and reconnection. | |||
| OFF | ||||
| 15:00 00:01 ~ | 99:59 | |||
| 30:00 | ||||
| 45:00 | ||||
| 60:00 | ||||
| Adaptive-Sync OFF | Adaptive-Sync prevents screen tearing.Activating Adaptive-Sync will affect: | |||
| ON | Affected Function Function Status | |||
| » Screen Size 1:1/27"/24.5" | Set to Auto | |||
| » MPRT» PIP/PBP» Optix Scope | Set to OFF | |||
| DSC OFF | Users can toggle DSC (Display Stream Compression) on/off.For more DSC timing information, please check Preset Display Modes for DSC On/Off timing tables.Activating DSC will affect: | |||
| ON | ||||
| Affected Function Function Status | ||||
| » Screen Size 1:1/27"/24.5"/16:10» PIP/PBP | Unable to select | |||
Professional
| 1st Level Menu 2nd Level Menu Description | ||
| Pro Mode Eco | Use Up or Down Button to select and preview mode effects.Press the OK Button to confirm and apply your mode type.The default setting “Eco” mode meets the requirements of TUV Rheinland’s “Low Blue Light” standard.Activating sRGB, Adobe RGB, and Display P3 will affect: | |
| User | ||
| Anti-Blue | ||
| Movie | ||
| Office | ||
| sRGB | Affected Function Function Status | |
| Adobe RGB | » Color Temperature» Low Blue Light» ContrastUnable to select | |
| Display P3 | ||
| Low Blue Light OFF | Low Blue Light protects your eyes against blue light. When enabled, Low Blue Light adjusts the screen color temperature to a more yellow glow.When Pro Mode is set to Anti-Blue, it is mandatory to enable Low Blue Light.This monitor is a Low Blue Light monitor which will decrease the blue light emitted without adjusting the OSD settings. | |
| ON | ||
| Image Enhancement OFF | Image Enhancement enhances image edges to improve their acutance. | |
| Weak | ||
| Medium | ||
| Strong | ||
| Strongest | ||
Image
| 1st Level Menu 2nd/3rd Level Menu Description | |||
| Brightness 0-100 | Properly adjust Brightness according to the surrounding lighting. | ||
| Contrast 0-100 | Properly adjust Contrast to relax your eyes. | ||
| Sharpness 0-5 | Sharpness improves clarity and details of images. | ||
| Color Temperature Cool | Use Up or Down Button to select and preview mode effects.Press the OK Button to confirm and apply your mode type.Users can adjust Color Temperature in Customization mode. | ||
| Normal | |||
| Warm | |||
| Customization R | (0-100) | ||
| G (0-100) | |||
| B (0-100) | |||
| Screen Size Auto | ·Users can adjust Screen Size in any mode, any resolution and any screen refresh rate.·Activating Screen Size 1:1/27"/24.5" will affect: | ||
| 4:3 | |||
| 16:9 | |||
| 16:10 | |||
| 1:1 | |||
| 24.5" | |||
| 27" | |||
| Affected Function Function Status | |||
| » Adaptive-Sync» PIP/PBP» Optix Scope | Set to OFF | ||
 Screen Size 1:1 refers to displaying content at its original resolution. This option is disabled when the monitor is set to its native resolution. Screen Size 1:1 refers to displaying content at its original resolution. This option is disabled when the monitor is set to its native resolution. | |||
| DisplayHDR True Black | 400 | ·The DisplayHDR function enhances visuals with customizable settings for optimized brightness and contrast. | |
| Peak 1000 nits | |||
| EOTF Boost | |||
Input Source
| 1st Level Menu 2nd Level Menu Description | ||
| HDMI TM 1 | Users can adjust Input Source in any mode. | |
| HDMI TM 2 | ||
| DP | ||
| Type C | ||
| Auto Scan OFF | Users can use the Navi Key to select Input Source at below status:While “Auto Scan” is set to “OFF” with the monitor power saving mode;While “No Signal” message box is shown on the monitor. | |
| ON | ||
| 1st Level Menu 2nd/3rd Level Menu Description | ||||
| OFF | PIP (Picture in Picture) allows users to simultaneously display multiple video sources on one screen. One program is displayed on the full screen at the same time as one or more other programs are displayed in inset windows.PBP (Picture by Picture) is a similar feature that displays two input sources side-by-side on the screen.Display Switch allows users to switch between primary and secondary input sources.If there is only one signal input, the Display Switch and Audio Switch will be grayed out.Users can adjust the ratio of window division by switching Mode 1/2/ Customize.Activating PIP/PBP will affect: | |||
| PIP Source HDMITM 1 | ||||
| HDMITM 2 | ||||
| DP | ||||
| Type C | ||||
| PIP Size Small | ||||
| Location Left | Top | |||
| Right Top | ||||
| Left Bottom | ||||
| Right Bottom | ||||
| Customize | ||||
| Display Switch | ||||
| Audio Switch | ||||
| PBP Mode 1 | ||||
| Mode 2 | ||||
| Customize | ||||
| Source 1 HDMITM 1 | ||||
| Source 2 HDMITM 1 | ||||
| Display Switch | ||||
| Audio Switch | ||||
Navi Key
| 1st Level Menu 2nd Level Menu Description | ||
| UpDownLeftRightG Key | OFF | All Navi Key items can be adjusted via OSD Menus. |
| Brightness | ||
| Game Mode | ||
| Smart Crosshair | ||
| Alarm Clock | ||
| Input Source | ||
| PIP/PBP Mode | ||
| Refresh Rate | ||
| Info. On Screen | ||
| Night Vision | ||
| Optix Scope | ||
Settings
| 1st Level Menu 2nd Level Menu Description | ||
| Language 繁體中文 | ·Users have to press the OK Button to confirm and apply the Language setting.·Language is an independent setting. Users' own language setting will override the factory default. When users set Reset to Yes, Language will not be changed. | |
| English | ||
| Français | ||
| Deutsch | ||
| Italiano | ||
| Español | ||
| 한국어 | ||
| 日本語 | ||
| Русский | ||
| Português | ||
| 简体中文 | ||
| Bahasa Indonesia | ||
| Türkçe | ||
| (More languages coming soon) | ||
| Transparency 0~5 | ·Users can adjust Transparency in any mode. | |
| OSD Time Out 5~30s | ·Users can adjust OSD Time Out in any mode. | |
| 1st Level Menu 2nd Level Menu Description | ||
| Power Button OFF | When set to OFF, users can press the power button to turn off the monitor. | |
| Standby | When set to Standby, users can press the power button to turn off the panel and backlight. | |
| Info. On Screen OFF | The information of the monitor status will be shown on the right side of the screen. | |
| ON | ||
| HDMI TM CEC OFF | HDMI TM CEC (Consumer Electronics Control) supports Sony PlayStation , Nintendo Switch TM , Xbox Series X|S consoles and various audio-visual devices that are CEC-capable.If HDMI TM CEC is set to ON:The monitor will automatically power on when the CEC device is turned on.The CEC device will enter power saving mode when the monitor is turned off.When Sony PlayStation , Nintendo Switch TM , or Xbox Series X|S console is connected, Game Mode and Pro Mode will be automatically set to default modes and can be adjusted to users' preferred modes later. | |
| ON | ||
| Type C PD Charge OFF | This function enables users to charge their devices through a USB Type-C connector. | |
| ON | ||
| Power LED OFF | Users can toggle the Power LED on/off.During the Panel Protect process, the power LED indicator will blink orange until the process is complete. | |
| ON | ||
| Reset YES | Users can Reset and restore settings to original OSD Default in any mode. | |
| NO | ||
MSI OLED Care
| 1st Level Menu 2nd/3rd Level Menu Description | ||||
| Pixel Shift Slow | Pixel Shift moves the pixels of your screen at regular intervals to reduce the possibility of screen burn-in or image retention. | |||
| Normal | ||||
| Fast | ||||
| Panel Protect | To maintain panel image quality, panel protect function will automatically activate when monitor using over 4 hours.This protect function may take several minutes to complete.The power indicator will blink orange color until process done.During process executing, please do not unplug the power cord from monitor.During process executing, press power button again to cancel this function. | |||
| Protect Notice Auto | When set to Auto, Protect Notice will pop up when the panel exceeds 4 hours of cumulative usage.When set to Usage 16 hrs, Protect Notice will pop up when the panel exceeds 16 hours of cumulative usage.When Panel Protect is interrupted, Protect Notice will pop up upon next power-up. | |||
| Usage 16 hrs | ||||
| Static Screen Detection | OFF | If Static Screen Detection is set to ON:When detecting static visuals over long periods of time, the monitor reduces brightness to prevent screen burn-in.Once detecting moving visuals, the monitor restores its previous brightness setting. | ||
| ON | ||||
| Starting in 50 Sec | Starting in detects the time a static image remains on the screen. | |||
| 100 Sec | ||||
| Time required 120 Sec | Time required specifies the time for brightness reduction after detecting a static image for 50/100 seconds.The brightness reduction level depends on the setting of Reducing Level. | |||
| 240 Sec | ||||
| Reducing Level 1-7 | Users can select a level for brightness reduction.Reducing effect depends on Brightness/DisplayHDR setting. | |||
| Multi Logo Detection OFF | FF | This function helps prevent image sticking phenomenon. When set to ON, brightness reduction of multi logo areas will kick in if logos are detected. | ||
| ON | ||||
| Reducing Level 1-4 | Users can select a level for brightness reduction.Reducing effect depends on Brightness/DisplayHDR setting. | |||
| Taskbar Detection OFF | This function helps prevent image sticking phenomenon. When set to ON, brightness reduction of taskbar areas will kick in if taskbars are detected. | |||
| ON | ||||
| Reducing Level 1-4 | Users can select a level for brightness reduction.Reducing effect depends on Brightness/DisplayHDR setting. | |||
| Boundary Detection OFF | OFF | This function helps prevent image sticking phenomenon. When set to ON, brightness reduction of boundary areas will kick in if boundaries, such as letters, pillars and vertical lines, are detected. | ||
| ON | ||||
| Reducing Level 1-4 | Users can select a level for brightness reduction.Reducing effect depends on Brightness/DisplayHDR setting. | |||
| Auto DIM Control OFF | This function prevents image sticking by gradually dimming the screen. When set to ON, it automatically reduces full-screen brightness when detecting static images. | |||
| ON | ||||
| Starting Speed Slow | Starting Speed defines how quickly Auto DIM Control detects a static image. | |||
| Reducing Speed Slow | Users can specify the speed for brightness reduction. | |||
| Reducing Level 1-6 | Users can select a level for brightness reduction.Reducing effect depends on Brightness/DisplayHDR setting. | |||
| OLED Panel Info. | This field shows the information of MSI OLED Care. | |||
Specifications*
| Monitor MAG 322UP QD-OLED E16 | ||
| Size | 31.5 inch | |
| Curvature | Flat | |
| Panel Type | QD-OLED | |
| Resolution | 3840 x 2160 (UHD) | |
| Aspect Ratio | 16:9 | |
| Brightness | Typical SDR: 250 nitsPeak HDR: 1000 nits | |
| Contrast Ratio | 1500000 : 1 | |
| Refresh Rate | 165Hz | |
| Response Time | 0.03ms (GTG) | |
| I/O | 2 x HDMITM Connector1 x DisplayPort1 x USB Type-C Port1 x Headphone Jack | |
| View Angles | 178°(H), 178°(V) | |
| DCI-P3** / sRGB | 99%/ 138% | |
| Surface Treatment | Anti-Reflection | |
| Display Colors | 1.07B, 10 bits | |
| Monitor Power Options | 100-240V~, 50/60Hz, 1.8A | |
| Power Consumption(Typical) | Power On < 160WStandby < 0.5WPower Off < 0.3W | |
| Adjustment (Height) | 0 ~ 110mm | |
| Adjustment (Tilt) | -5° ~ 15° | |
| Adjustment (Swivel) | -30° ~ 30° | |
| Adjustment (Pivot) | -10° ~ 10° | |
| Kensington Lock | Yes | |
| VESA Mounting | Plate Type: 100 x 100 mmScrew Type: M4 x 10 mmThread Diameter: 4 mmThread Pitch: 0.7 mmThread Length: 10 mm | |
| Dimension (W x H x D) | 719.1 x 593.9 x 241.9 mm | |
| Weight Net | 7.7 kg | |
| Gross | 12.34 kg | |
| Operating Environment | Temperature: 0°C to 40°CHumidity: 20% to 90%, non-condensingAltitude: 0 ~ 5000m | |
| Storage Environment | Temperature: -20°C to 60°CHumidity: 10% to 90%, non-condensing | |
* Some technical specifications of the device may be subject to change by the manufacturer. Please verify the specifications with the seller or the manufacturer's representative.
** Based on CIE1976 test standards.
Preset Display Modes

• All information is subject to change without prior notice.
- HDMI™ VRR (Variable Refresh Rate) synchronizes with Adaptive-Sync (ON/OFF). For VRR ON/OFF status, please check Adaptive-Sync.
- To activate DSC-specific timing and frequency, ensure your graphics card supports DSC (Display Stream Compression).
Standard Mode (DSC On)
| Standard Resolution HDMITM DP USB-C | |||||
| QHD 2560x1440 @60Hz V V | V | ||||
| @120Hz V V V | |||||
| UHD 3840x2160 @60Hz V V | V | ||||
| @120Hz V V | |||||
| @165Hz V V V | |||||
| Video Timing Resolution 720P V V V | |||||
| HDMITM VRR V | |||||
Standard Mode (DSC Off)
| Standard Resolution HDMITM DP USB-C | |||||
| QHD 2560x1440 @60Hz V V | V | ||||
| @120Hz V V V | |||||
| UHD 3840x2160 @60Hz V V | V | ||||
| @120Hz V V | |||||
| Video Timing Resolution 720P V V V | |||||
| HDMITM VRR V | |||||
PIP Mode (Not Support HDR)
| Standard Resolution HDMITM DP USB-C | |||||
| QHD 2560x1440 @60Hz V V V | |||||
| @120Hz V V V | |||||
| UHD 3840x2160 @60Hz V V V | |||||
| @120Hz V V V | |||||
| Video Timing Resolution 720P V V V | |||||
PBP Mode 1 (Not Support HDR)
| Standard Resolution HDMITM DP USB-C | |||||
| Video Timing Resolution 720P V V V | |||||
| Used for PBP Full Screen 9 | 60x2160 @60Hz V V V | ||||
| 2880x2160 @60Hz V V V | |||||
PBP Mode 2/Customize (Not Support HDR)
| Standard Resolution HDMITM DP USB-C | |||||
| Video Timing Resolution 720P V V V | |||||
| Used for PBP Full Screen 1920x2160 @60Hz V V V | |||||
Screen Size 16:10 (Not Support HDR)
| Standard Resolution HDMITM DP USB-C | |||||
| QHD+ 2560x1600 @60Hz V | V V | ||||
| @120Hz V | V V | ||||
Troubleshooting
The power LED is off.
- Press the monitor power button again.
- Check if the monitor power cable is properly connected.
No image.
- Check if the computer graphics card is properly installed.
- Check if the computer and monitor are connected to electrical outlets and are turned on.
- Check if the monitor signal cable is properly connected.
- The computer may be in Standby mode. Press any key to activate the monitor.
The screen image is not properly sized or centered.
- Refer to Preset Display Modes to set the computer to a setting suitable for the monitor to display.
No Plug & Play.
- Check if the monitor power cable is properly connected.
- Check if the monitor signal cable is properly connected.
- Check if the computer and graphics card are Plug & Play compatible.
The icons, font or screen are fuzzy, blurry or have color problems.
- Avoid using any video extension cables.
- Adjust brightness and contrast.
- Adjust RGB color or tune color temperature.
- Check if the monitor signal cable is properly connected.
- Check for bent pins on the signal cable connector.
The monitor starts flickering or shows waves.
- Change the refresh rate to match the capabilities of your monitor.
- Update your graphics card drivers.
- Keep the monitor away from electrical devices that may cause electromagnetic interference (EMI).
Safety Instructions
- Read the safety instructions carefully and thoroughly.
- All cautions and warnings on the device or User Guide should be noted.
• Refer servicing to qualified personnel only.
Power
- Make sure that the power voltage is within its safety range and has been adjusted properly to the value of 100\~240V before connecting the device to the power outlet.
- If the power cord comes with a 3-pin plug, do not disable the protective earth pin from the plug. The device must be connected to an earthed mains socket-outlet.
- Please confirm the power distribution system in the installation site shall provide the circuit breaker rated 120/240V, 20A (maximum).
- Always disconnect the power cord or switch the wall socket off if the device would be left unused for a certain time to achieve zero energy consumption.
- Place the power cord in a way that people are unlikely to step on it. Do not place anything on the power cord.
- If this device comes with an adapter, use only the MSI provided AC adapter approved for use with this device.
Environment
- To reduce the possibility of heat-related injuries or of overheating the device, do not place the device on a soft, unsteady surface or obstruct its air ventilators.
- Use this device only on a hard, flat and steady surface.
- To prevent the device from tipping over, secure the device to a desk, wall or fixed object with an anti-tip fastener that helps to properly support the device and keep it safe in place.
- To prevent fire or shock hazard, keep this device away from humidity and high temperature.
- Do not leave the device in an unconditioned environment with a storage temperature above 60° C or below -20° C, which may damage the device.
- The maximum operating temperature is around 40°C.
- When cleaning the device, be sure to remove the power plug. Use a piece of soft cloth rather than industrial chemical to clean the device. Never pour any liquid into the opening; that could damage the device or cause electric shock.
• Always keep strong magnetic or electrical objects away from the device.
- If any of the following situations arises, get the device checked by service personnel:
• The power cord or plug is damaged.
• Liquid has penetrated into the device.
- The device has been exposed to moisture.
- The device does not work well or you can not get it working according to the User Guide.
- The device has dropped and damaged.
- The device has obvious sign of breakage.
TÜV Rheinland Certification
TÜV Rheinland Low Blue Light Certification
Blue light has been shown to cause eye fatigue and discomfort. MSI now offers monitors with TÜV Rheinland Low Blue Light certification to ensure users' eye comfort and well-being. Please follow the instructions below to reduce the symptoms from extended exposure to the screen and blue light.
Low Blue Light (Hardware Solution)
www.tuv.com
- Place the screen 20 – 28 inches (50 – 70 cm) away from your eyes and a little below eye level.
- Consciously blinking the eyes every now and then will help to reduce eye strain after extended screen time.
• Take breaks for 20 minutes every 2 hours.
- Look away from the screen and gaze at a distant object for at least 20 seconds during breaks.
• Make stretches to relieve body fatigue or pain during breaks.
TÜV Rheinland Flicker Free Certification
- TÜV Rheinland has tested this product to ascertain whether the display produces visible and invisible flicker for the human eye and therefore strains the eyes of users.
- TÜV Rheinland has defined a catalogue of tests, which sets out minimum standards at various frequency ranges. The test catalogue is based on

Flicker Free
www.tuv.com
internationally applicable standards or standards common within the industry and exceeds these requirements.
- The product has been tested in the laboratory according to these criteria.
- The keyword “Flicker Free” confirms that the device has no visible and invisible flicker defined in this standard within the range of 0 - 3000 Hz under various brightness settings.
- The display will not support Flicker Free when Anti Motion Blur/MPRT is enabled. (The availability of Anti Motion Blur/MPRT varies by products.)
Regulatory Notices
CE Conformity
This product has been tested and found to comply with the harmonized standards for Information Technology Equipment published under Directives of Official Journal of the European Union.

FCC-B Radio Frequency Interference Statement
This equipment has been tested and found to comply with the limits for a Class B digital device, pursuant to Part 15 of the FCC Rules. These limits are designed to provide reasonable protection against harmful interference in a residential installation. This equipment generates, uses and can radiate radio frequency energy and, if not installed and used in accordance with the instruction manual, may cause harmful interference to radio communications. However, there is no guarantee that interference will not occur in a particular installation. If this equipment does cause harmful interference to radio or television reception, which can be determined by turning the equipment off and on, the user is encouraged to try to correct the interference by one or more of the measures listed below:

- Reorient or relocate the receiving antenna.
- Increase the separation between the equipment and receiver.
- Connect the equipment into an outlet on a circuit different from that to which the receiver is connected.
- Consult the dealer or an experienced radio/television technician for help.
Notice 1
The changes or modifications not expressly approved by the party responsible for compliance could void the user's authority to operate the equipment.
Notice 2
Shielded interface cables and AC power cord, if any, must be used in order to comply with the emission limits.
This device complies with Part 15 of the FCC Rules. Operation is subject to the following two conditions:
- This device may not cause harmful interference, and
- This device must accept any interference received, including interference that may cause undesired operation.
MSI Computer Corp.
901 Canada Court, City of Industry, CA 91748, USA
(626) 913-0828
www.msi.com
WEEE Statement
Under the European Union (“EU”) Directive on Waste Electrical and Electronic Equipment, Directive 2012/19/EU, products of “electrical and electronic equipment” cannot be discarded as municipal waste anymore and manufacturers of covered electronic equipment will be obligated to take back such products at the end of their useful life.

Chemical Substances Information
In compliance with chemical substances regulations, such as the EU REACH Regulation (Regulation EC No. 1907/2006 of the European Parliament and the Council), MSI provides the information of chemical substances in products at: https://csr.msi.com/global/index
RoHS Statement
Japan JIS C 0950 Material Declaration
A Japanese regulatory requirement, defined by specification JIS C 0950, mandates that manufacturers provide material declarations for certain categories of electronic products offered for sale after July 1, 2006. https://csr.msi.com/global/Japan-JIS-C-0950-Material-Declarations
India RoHS
This product complies with the “India E-waste (Management and Handling) Rule 2016” and prohibits use of lead, mercury, hexavalent chromium, polybrominated biphenyls or polybrominated diphenyl ethers in concentrations exceeding 0.1 weight % and 0.01 weight % for cadmium, except for the exemptions set in Schedule 2 of the Rule.
Turkey EEE Regulation
Conforms to the EEE Regulations of the Republic Of Turkey
Ukraine Restriction of Hazardous Substances
The equipment complies with requirements of the Technical Regulation, approved by the Resolution of Cabinet of Ministry of Ukraine as of 10 March 2017, № 139, in terms of restrictions for the use of certain dangerous substances in electrical and electronic equipment.
Vietnam RoHS
As from December 1, 2012, all products manufactured by MSI comply with Circular 30/2011/TT-BCT temporarily regulating the permitted limits for a number of hazardous substances in electronic and electric products.
Green Product Features
- Reduced energy consumption during use and stand-by
- Limited use of substances harmful to the environment and health
- Easily dismantled and recycled
- Reduced use of natural resources by encouraging recycling
• Extended product lifetime through easy upgrades - Reduced solid waste production through take-back policy
Environmental Policy
- The product has been designed to enable proper reuse of parts and recycling and should not be thrown away at its end of life.
- Users should contact the local authorized point of collection for recycling and disposing of their end-of-life products.
- Visit the MSI website and locate a nearby distributor for further recycling information.
- Users may also reach us at gpcontdev@msi.com for information regarding proper disposal, take-back, recycling, and disassembly of MSI products.
- Please visit https://us.msi.com/page/recycling for information regarding the recycling of your product in the US.

Warning!
Overuse of screens is likely to affect eyesight.
Recommendations:
- Take a 10-minute break for every 30 minutes of screen time.
- Children under 2 years of age should have no screen time. For children aged 2 years and over, screen time should be limited to less than one hour per day.
Copyright and Trademarks Notice
msi
MSI
微星
微星科技 MICRO-STAR INTERNATIONAL

Copyright © Micro-Star Int’ I Co., Ltd. All rights reserved. The MSI logo used is a registered trademark of Micro-Star Int’ I Co., Ltd. All other marks and names mentioned may be trademarks of their respective owners. No warranty as to accuracy or completeness is expressed or implied. MSI reserves the right to make changes to this document without prior notice.
The terms HDMI™, HDMI™ High-Definition Multimedia Interface, HDMI™ Trade dress and the HDMI™ Logos are trademarks or registered trademarks of HDMI™ Licensing Administrator, Inc.
Technical Support
If a problem arises with your product and no solution can be obtained from the user's manual, please contact your place of purchase or local distributor. Alternatively, please visit https://www.msi.com/support/ for further guidance.
- MAG SERIES
- OLED MONITOR
- CONTENTS
- GETTING STARTED
- OSD SETUP
- OSD MENUS
- SPECIFICATIONS
- PRESET DISPLAY MODES
- TROUBLESHOOTING
- SAFETY INSTRUCTIONS
- TÜV RHEINLAND CERTIFICATION
- REGULATORY NOTICES
- REVISION
- INSTALLING THE MONITOR STAND
- IMPORTANT
- ADJUSTING THE MONITOR
- USB TYPE-C PORT
- CONNECTING THE MONITOR TO PC
- NAVI KEY
- UP/DOWN/LEFT/RIGHT
- PRESS (OK)
- HOT KEY
- ORTANT
- G.I
- GAMING
- PROFESSIONAL
- IMAGE
- SETTINGS
- MSI OLED CARE
- THE POWER LED IS OFF
- NO IMAGE
- THE SCREEN IMAGE IS NOT PROPERLY SIZED OR CENTERED
- NO PLUG & PLAY
- THE ICONS, FONT OR SCREEN ARE FUZZY, BLURRY OR HAVE COLOR PROBLEMS
- THE MONITOR STARTS FLICKERING OR SHOWS WAVES
- POWER
- ENVIRONMENT
- TÜV RHEINLAND LOW BLUE LIGHT CERTIFICATION
- TÜV RHEINLAND FLICKER FREE CERTIFICATION
- CE CONFORMITY
- FCC-B RADIO FREQUENCY INTERFERENCE STATEMENT
- NOTICE
- MSI COMPUTER CORP
- WEEE STATEMENT
- CHEMICAL SUBSTANCES INFORMATION
- ROHS STATEMENT
- JAPAN JIS C 0950 MATERIAL DECLARATION
- INDIA ROHS
- TURKEY EEE REGULATION
- UKRAINE RESTRICTION OF HAZARDOUS SUBSTANCES
- VIETNAM ROHS
- GREEN PRODUCT FEATURES
- ENVIRONMENTAL POLICY
- WARNING
- RECOMMENDATIONS
- COPYRIGHT AND TRADEMARKS NOTICE
- TECHNICAL SUPPORT
Brand : MSI
Model : MAG 322UP QD-OLED E16
Category : Monitor