
DWA-F03D - Uncategorized SONY - Free user manual and instructions
Find the device manual for free DWA-F03D SONY in PDF.


| Product Type | Digital Wireless Adapter |
| Brand | Sony |
| Model | DWA-F03D |
| Compatibility | Professional cameras and audio recorders with XLR input |
| Transmission Type | Digital wireless audio transmission |
| Frequency Band | 2.4 GHz ISM band |
| Transmission Range | Approx. 100 m (line of sight) |
| Audio Input | XLR-3-11C (phantom power supported) |
| Audio Output | XLR-3-11C (balanced) |
| Sampling Frequency | 24-bit / 48 kHz |
| Latency | Approx. 0.5 ms |
| Power Source | AA batteries (x2) or external DC 5 V |
| Battery Life | Up to 6 hours (with alkaline batteries) |
| Weight | Approx. 320 g (without batteries) |
| Dimensions (W × H × D) | 70 × 150 × 40 mm |
| Operating Temperature | 0 °C to 40 °C |
| Mounting | Hot shoe / tripod socket |
| Included Accessories | Transmitter unit, receiver unit, windjammer, carrying case |
| Distinctive Features | Low latency, stable connection, high-quality audio |
| Security | Avoid extreme heat or moisture; use certified chargers |
| Spare Parts and Repairability | Sony authorized service centers offer original parts |
| Maintenance | Keep contacts clean and store in a dry place |
Frequently Asked Questions - DWA-F03D SONY
User questions about DWA-F03D SONY
0 question about this device. Answer the ones you know or ask your own.
Ask a new question about this device
Download the instructions for your Uncategorized in PDF format for free! Find your manual DWA-F03D - SONY and take your electronic device back in hand. On this page are published all the documents necessary for the use of your device. DWA-F03D by SONY.
USER MANUAL DWA-F03D SONY
Digital Wireless Adapter
Operating Instructions
DWA-F03D
DWX
DIGITAL WIRELESS
Table of Contents
Overview ....3
Name and Function of Parts ....3
Top 3
Bottom....4
Attachment and Connection.... 4
Attaching the Receiver....4
Block Diagram 6
Troubleshooting....7
Important Notes on Operation 8
Use and Storage 8
Cleaning....8
Specifications 8
Overview
The DWA-F03D is an adapter that attaches to an optional DWR-S03D Digital Wireless Receiver that allows the DWR-S03D to be used as a portable wireless receiver.
High quality and reliable audio transmission
Outputs the high-quality audio of the DWX series as two analog channels.
The outputs use high-reliability connectors to provide stable audio transmission.
Dual power supplies
Two types of external power supply (DC IN connector and USB connector) are supported, which can be freely selected depending on the user's workflow.
Compact, lightweight design
The total mass when combined with the DWR-S03D is just 245 g (8.64 oz), making it ideal for mixer bag audio recording for live broadcast coverage and production sites.
Name and Function of Parts
Top

① OUTPUT1 connector (4-pin)
Outputs balanced audio signal.
When attached to the DWR-S03D, it outputs the TUNER1 audio.

1:NC
2:Hot
3:Cold
4:GND
② UB Type-C® connector
Connect to a mobile battery pack to supply power to the unit.
Note
The input voltage rating is 5 V. If the voltage exceeds 5 V, it may cause a failure.
USB Type-C® and USB-C® are registered trademarks of USB Implementers Forum.
③ USB cable clamp M2 screw hole
The M2 screw hole is used to prevent removal of the USB cable.
It supports a USB single screw (center) lock type cable.
④ DCN connector (4-pin)
Connect to a portable battery to supply power to the unit. This connector accepts a voltage between 10 V DC and 17 V DC.
Note
Depending on the portable battery used, the unit may turn off and then restart when the power is switched.

1:GND
2:NC
3:NC
4:+12V
When power is connected to the USB connector and DC IN connector at the same time, the DC IN connector takes precedence. If the voltage on the DC IN connector falls below 9.6 V, the power source switches to the USB connector.
⑤ OUTPUT2 connector (4-pin)
Outputs balanced audio signal.
When attached to the DWR-S03D, it outputs the TUNER2 audio.
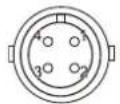
1:NC 2:Hot 3:Cold 4:GND
⑥ fot interface connector
When attached to the DWR-S03D, the power, audio signals, and control signals are passed between the devices.
⑦ Wireless receiver slot
Attach to the optional DWR-S03D.
For details on how to attach, see "Attaching the Receiver" (page 4).
Bottom

① Connection screw holes
Two units can be attached together using four M2 screws (recommended thread depth of 3 mm) and mounting parts. Use these screw holes to attach the units.
② Wireless receiver attachment M2 screws
Use to secure the attached wireless receiver to the unit.
Attachment and Connection
Attaching the Receiver
Insert the DWR-S03D into the wireless receiver slot of the unit.
1 Attach the unit and DWR-S03D as shown in the following diagram.

2 Fasten the two M2 mounting screws of the wireless receiver using a screwdriver.
Use a Phillips #1 screwdriver.
Notes
- Check that the two screws are tightened securely (recommended tightening torque: 0.25 N·m). If the screws are loose, any vibration or impact may cause a malfunction.
- After attaching the unit and DWR-S03D, refrain from attaching/detaching them except in the event of a malfunction or maintenance, as they are not intended to be attached and detached frequently.
- Check that there are no foreign objects in the wireless receiver slot before connecting. Foreign objects may cause damage, failure, or a malfunction.
- Do not touch the connector directly with your hands. Applying strong force to the connector may cause a poor connection or damage.
Connecting power
Connect a portable battery to the DC IN connector and/or a mobile battery pack to the USB connector of the unit using the appropriate cables.
Power supply cables are sold separately.
Connecting the audio cables
Connect the OUTPUT1 or OUTPUT2 connector of the unit to the AUDIO IN connector of a mixer recorder using the supplied audio cable.
Note
To prevent foreign objects from entering the DC IN connector or USB connector, use caps on the unused connectors.
Block Diagram
![graph TD A["OUTPUT1"] --> B["Board-to-board connector (30-pin)"] C["OUTPUT2"] --> B D["DC IN"] --> E["DC/DC converter"] F["USB"] --> E B --> E E --> G["Output"]](/content/2026/08/1607463/images/daa39a7b91301552df2e316614cb7418c549635fbb238459b2de2c551795182a.jpg)
Troubleshooting
Check the following items before submitting the unit for repairs. If the problem persists, consult your Sony dealer.
| Symptom Cause Remedy | ||
| The DWR-S03D does not turn on. The DWR-S03D is not correctly attached to the unit. | Attach it until it is firmly inserted, and then secure in position using the adapter mounting screws. | |
| No audio is output from the OUTPUT2 connector. | The tuner 2 of the DWR-S03D is not turned on. | Turn on tuner 2 so that tuner 2 audio is output from the OUTPUT2 connector. |
| Cannot update the DWR-S03D using USB connection. | The DWR-S03D cannot be updated using the USB connector of the unit. | Use the USB connector on the side of the DWR-S03D. |
Note
The unit does not support the ANALOG OUTPUT1 function of the DWR-S03D.
Important Notes on Operation
Use and Storage
- The unit must be used within a temperature range of 0°C to 50°C (32°F to 122°F).
- When using the DWR-S03D in a mixer bag, for example, heat may accumulate and the surface of the DWR-S03D may become hot. Exercise caution when touching the unit.
- Operating the unit near electrical equipment (motors, transformers, or dimmers) may cause it to be affected by electromagnetic induction. Keep the unit as far from such equipment as possible.
Cleaning
- If the adapter is used in a very humid or dusty place or in a place subject to an active gas, clean its surface as well as the connectors with a dry, soft cloth soon after use. Lengthy use of the unit in such places or not cleaning it after its use in such places may shorten its life.
- Clean the surface and the connectors of the unit with a dry, soft cloth. Never use thinner, benzene, alcohol or any other chemicals, since these may damage the finish.
Specifications
Audio section
* Values may vary depending on the analog output standard of the DWR-S03D.
Output connectors
SMC9-4S (female) (OUTPUT1/OUTPUT2)
Analog output impedance
150 ohms or lower
Reference output level
Analog output: -40 dBu
(0 dBu = 0.775 Vrms at 1 kHz output)
Dynamic range 106 dB or higher (A-weighted)
Audio signal delay time
Analog output mode:
MODE1: 2.1 ms
MODE2: 1.7 ms
MODE3: 3.0 ms
MODE4: 1.7 ms
General
Input voltage
DC IN: DC 10 V to 17 V
USB: DC 5 V
Note
If the voltage exceeds the specified rating, it may cause a failure.
Operating temperature
0 °C to 50 °C (32 °F to 122 °F)
Note
When used in locations with an ambient temperature of 45\ °C ( 113\ °F ) or higher, make sure the unit does not come into direct contact with your skin, as it may cause burns due to high temperature.
Storage temperature
-20°C to +60°C (-4°F to +140°F)
Dimensions (unit: mm (inches))


Mass Approx. 110 g (3.9 oz)
Supplied accessories
Audio cables (2)
Before Using This Unit (1)
Warranty booklet (1)
Design and specifications are subject to change without notice.

- DIGITAL WIRELESS ADAPTER
- TABLE OF CONTENTS
- OVERVIEW
- HIGH QUALITY AND RELIABLE AUDIO TRANSMISSION
- DUAL POWER SUPPLIES
- COMPACT, LIGHTWEIGHT DESIGN
- NAME AND FUNCTION OF PARTS
- ① OUTPUT1 CONNECTOR (4-PIN)
- ② UB TYPE-C® CONNECTOR
- NOTE
- ③ USB CABLE CLAMP M2 SCREW HOLE
- ④ DCN CONNECTOR (4-PIN)
- BOTTOM
- ATTACHMENT AND CONNECTION
- ATTACHING THE RECEIVER
- NOTES
- CONNECTING POWER
- CONNECTING THE AUDIO CABLES
- BLOCK DIAGRAM
- TROUBLESHOOTING
- IMPORTANT NOTES ON OPERATION
- USE AND STORAGE
- CLEANING
- SPECIFICATIONS
- AUDIO SECTION
- GENERAL
Brand : SONY
Model : DWA-F03D
Category : Uncategorized