
D80-15F6 - Kettle MIDEA - Free user manual and instructions
Find the device manual for free D80-15F6 MIDEA in PDF.


| Product Type | Electric Kettle |
| Brand | Midea |
| Model | D80-15F6 |
| Capacity | 1.5 liters |
| Power Rating | 1500 W |
| Voltage | 220-240 V ~ 50/60 Hz |
| Cordless Operation | Yes, with 360° rotating base |
| Housing Material | Food-grade stainless steel |
| Heating Element | Concealed stainless steel |
| Boil-Dry Protection | Yes, automatic switch-off |
| Auto Shut-Off | Yes, when water reaches boiling point |
| Water Level Indicator | Clear window with measurement markings |
| Removable Filter | Yes, for easy descaling |
| Lid Opening | Wide push-button lid |
| Handle | Ergonomic, cool-touch handle |
| Base | Separate base with cord storage |
| Dimensions | Approx. 22 x 18 x 24 cm |
| Weight | Approx. 1.2 kg |
| Power Cord Length | About 0.8 m |
| Safety Features | Overheat protection and boil-dry safety |
| Cleaning & Maintenance | Wipe with damp cloth; descale regularly |
| Spare Parts Availability | Available via Midea service partners |
Frequently Asked Questions - D80-15F6 MIDEA
User questions about D80-15F6 MIDEA
0 question about this device. Answer the ones you know or ask your own.
Ask a new question about this device
Download the instructions for your Kettle in PDF format for free! Find your manual D80-15F6 - MIDEA and take your electronic device back in hand. On this page are published all the documents necessary for the use of your device. D80-15F6 by MIDEA.
USER MANUAL D80-15F6 MIDEA
Storage Electric Water Heater
FASHION SERIES
USER MANUAL
D30-15F6
D50-15F6
D80-15F6
D100-15F6
EN English
IT Italian
PL Polish
LANGUAGES
THANK YOU LETTER
Thank you for choosing Midea! Before using your new Midea product, please read this manual thoroughly to ensure that you know how to operate the features and functions that your new appliance offers in a safe way.
EN
CONTENTS
THANK YOU LETTER 01
SAFETY INSTRUCTIONS 02
SPECIFICATIONS 04
PRODUCT OVERVIEW 05
QUICK START GUIDE 07
PRODUCT INSTALLATION 08
OPERATION INSTRUCTIONS 10
CLEANING AND MAINTENANCE 10
TROUBLESHOOTING 11
TRADEMARKS, COPYRIGHTS AND LEGAL STATEMENT 12
DISPOSAL AND RECYCLING 12
DATA PROTECTION NOTICE 13
SAFETY INSTRUCTIONS
Intended Use
The following safety guidelines are intended to prevent unforeseen risks or damage from unsafe or incorrect operation of the appliance. Please check the packaging and appliance on arrival to make sure everything is intact to ensure safe operation. If you find any damage, please contact the retailer or dealer. Please note modifications or alterations to the appliance are not allowed for your safety concern. Unintended use may cause hazards and loss of warranty claims.
EN
Explanation of Symbols

Warning
The signal word indicates a hazard with a medium level of risk which, if not avoided, may result in death or serious injury.

Attention
The signal word indicates important information (e.g. damage to property), but not danger.

Caution
The signal word indicates a hazard with a low degree of risk which, if not avoided, may result in minor or moderate injury.
Read these operating instructions carefully and attentively before using/commissioning the unit and keep them in the immediate vicinity of the installation site or unit for later use!
Before installing this water heater, check and confirm that the earthing on the supply socket is reliably grounded. Otherwise, the electrical water heater can not be installed and used. Do not use extension boards. Incorrect installation and use of this electrical water heater may result in serious injuries and loss of property.
Special Cautions
- The supply socket must be earthed reliably. The rated current of the socket shall not be lower than 10A. The socket and plug shall be kept dry to prevent electrical leakage. Inspect frequently whether the plugs contact well with the socket. Inspect method is as follows: insert the power supply plug into socket, after using for half an hour, shut down the unit and pull the plug out, and inspect the plug whether it scalds hand. If it scalds (over 50°C ), please change another well-contacted socket to avoid the plug being damaged, fire or other personnel accidents result from bad-contacting.
- The installation height of the supply socket shall not be lower than 1.8m.
- The wall in which the electrical water heater is installed shall be able to bear the load more than two times of the heater filled fully with water without distortion and cracks. Otherwise, other strengthening measures shall be adopted.
- The pressure relief valve attached with the heater must be installed at the cold water inlet of this heater(see Fig.1), and make sure it is not exposed in the foggy. The water may be outflowed from pressure relief valve, so the outflow pipe must open wide in the air; The pressure relief valve need to be checked and cleaned regularly, so as to make sure it will not be blocked.

- When using the heater for the first time(or the first use after maintenance), the heater can not be switched on until it has been filled fully with water. When filling the water, at least one of the outlet valves at the outlet of the heater must be opened to exhaust the air. This valve can be closed after the heater has been filled fully with water.
-
The water heater is not intended for use by persons(including children)with reduced physical, sensory or mental capabilities, or lack of experience and knowledge, unless they have been given supervision or instructions concerning use of the appliance by a person responsible for their safety. Children should be supervised to ensure that they do not play with the heater.
-
During heating, there may be drops of water dripping from the pressure release hole of the multifunction valves. This is a normal phenomenon. If there is a large amount of water leak, please contact customer care center for repair. This pressure release hole shall, under no circumstances, be blocked; otherwise, the heater may be damaged, even resulting in accidents.
- The drainage pipe connected to the pressure release hole must be kept sloping downwards.
- Since the water temperature inside the heater can reach up to 75°C, the hot water must not be exposed to human bodies when it is initially used. Adjust the water temperature to a suitable temperature to avoid scalding.
- Unscrew the thread screw on the multifunction safety valve, and lift the drain handle upwards. (See Fig.1) to drain the water from the inner tank.
- If the flexible power supply cord is damaged, the special supply cord provided by the manufacturer must be selected, and replaced by the professional maintenance personnel.
- If any parts and components of this electrical water heater are damaged please contact customer care center for repair.
- This appliance is not intended for use by persons (including children) with reduced physical, sensory or mental capabilities, or lack of experience and knowledge, unless they have been given supervision or instruction concerning use of the appliance by a person responsible for their safety.
- Children should be supervised to ensure that they do not play with the appliance.
SPECIFICATIONS
| D30-15F6 D50-15F6 D80-15F6 D100-15F6 Product Model | ||||
| Volume(L) | 27 | 47 | 74 | 93 |
| Rated Power(W) | 1500 | 1500 | 1500 | 1500 |
| Rated Voltage(ACV) | 220-240V~ | 220-240V~ | 220-240V~ | 220-240V~ |
| Rated Pressure(MPa) | 0.8 | 0.8 | 0.8 | 0.8 |
| Max Of Water Temperature(°C) | 75 | 75 | 75 | 75 |
| Protection Class | I | I | I | I |
| Water Proof Class | IPX4 | IPX4 | IPX4 | IPX4 |
PRODUCT OVERVIEW
Product
EN

27L 47L 74L 93L
| A | 340 | 450 | 450 | 450 |
| B | 579 | 563 | 754 | 904 |
| C | 66 | 66 | 66 | 66 |
| D | 200 | 200 | 200 | 200 |
(Note: All dimensions are in mm)

EN
Accessories
Safety valve × 1 Wall hanging screw × 2


Plastic expansion pipe × 2

QUICK START GUIDE
Before First Use

CAUTION
Fill the inner tank with water before use.
- Plug in 2. Rotate the thermostat knob

- When the water temperature reaches the adjusted temperature, the heating will be stopped, and the heating indicator will be off. When the water temperature drops to a certain temperature, it will automatically resume heating.
clockwise to adjust the temperature inside the water heater.

- Open the water outlet valve, you can use hot water.
PRODUCT INSTALLATION
Installation Instruction
-
This electrical water heater shall be installed on a solid wall. If the strength of the wall cannot bear the load equal to two times of the total weight of the heater filled fully with water, it is then necessary to install a special support. In case of hollow bricks wall, ensure to fill it with cement concrete completely.
-
After selecting a proper location, determine the positions of the two install holes used for expansion bolts with hook (determined according to the specification of the product you select). Make two holes in the wall with the corresponding depth by using a chopping bit with the size matching the expansion bolts attached with the machine, insert the screws, make the hook upwards, tighten the nuts to fix firmly, and then hang the electric water heater on it. (see Fig.2).

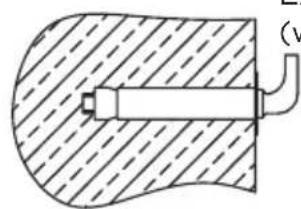
Expansion bolt (with hook)
(Fig.2)
- Install the supply socket in the wall. The requirements for the socket are as follows: 250V/10A, single phase, three electrodes. It is recommended to placed the socket on the right above the heater. The height of the socket to the ground shall not be less than 1.8m (see Fig.3).


(Fig.3)
- If the bathroom is too small, the heater can be installed at another place without sun-scorched and rain-drenched. However, in order to reduce the pipeline heat losses, the installation position of the heater shall be closed to the location shall be as near as possible to the heater.
Pipelines Connection
- The dimension of each pipe part is G1/2"; The massive pressure of inlet should use Pa as the unit; The minimum pressure of inlet should use Pa as the unit.
-
Connection of pressure relief valve with the heater on the inlet of the water heater.
-
In order to avoid leakage when connecting the pipelines, the rubber seal gaskets provided with the heater must be added at the end of the threads to ensure leak proof joints (see Fig.4).

- If the users want to realize a multi-way supply system, refer to the method shown in fig.5 for connection of the pipelines.


Note
Please be sure to use the accessories provided by our company to install this electric water heater. This electric water heater can not be hung on the support until it has been confirmed to be firm and reliable. Otherwise, the electric water heater may drop off from the wall, resulting in damage of the heater, even serious accidents of injury. When determining the locations of the bolt holes, it shall be ensured that there is a clearance not less than 0.2m on the right side of the electric heater, to convenient the maintenance of the heater, if necessary.
OPERATION INSTRUCTIONS
Methods of using
- First, open any one of the outlet valves at the outlet of the water heater, then, open the inlet valve. The water heater gets filled with water. When water flows out of the outlet pipe it implies that the heater has been filled fully with water, and the outlet valve can be closed.

Note
During normal operation, the inlet valve shall be always kept open.
- Insert the supply plug into the supply socket, the two indicator lights will light up this time.
- The thermostat will automatically control the temperature. When the water temperature inside the heater has reached the set temperature, it will switch off automatically, when the water temperature falls below the set point the heater will be turned on automatically to restore the heating.
CLEANING AND MAINTENANCE

Warning
Do cut off power supply before maintenance, to avoid danger like electric shock.
- Check the power plug and outlet as often as possible. Secure electrical contact and also proper grounding must be provided. The plug and outlet must not heat excessively.
- If the heater is not used for a long time, especially in regions with low air temperature(below 0°C), it is necessary to drain water from the heater to prevent damage of the water heater, due to water freezing in the internal tank.(Refer Cautions in this manual for the method to drain away the water from the inner container).
- To ensure long reliable water heater operation, it is recommended to regularly clean the internal tank and remove deposits on the electric heating element of the water heater, as well as check condition (fully decomposed or not) of the magnesium anode and, if necessary, replace it with a new one in case of full decomposition. Tank cleaning frequency depends on hardness of water located in this territory. Cleaning must be performed by special maintenance services. You can ask the seller for address of the nearest service center.
-
The water heater is equipped with a thermal switch, which cuts off power supply of the heating element upon water overheating or its absence in the water heater. If the water heater is connected to the mains, but water is not heated and the indicator doesn't light up, then the thermal switch was switched off or not switched on. To reset the water heater to the operating condition, it is necessary to:
-
De-energize the water heater, remove the plate of the side/lower cover.
-
Press the button, located at the center of the thermal switch, see Fig.6;
-
If the button is not pressed and there is no clicking, then you should wait until the thermal switch cools down to the initial temperature.
Manual reset button

(Fig.6)
EN

Warning
Non-professionals are not allowed to disassemble the thermal switch to reset. Please contact professionals to maintain. Otherwise our company will not take responsibility if any quality accident happens because of this.
TROUBLESHOOTING
| Reasons TreatmentFailures | ||
| The heating indicator light is off. | Failures of the temperature controller. | Contact with the professional personnel for repair. |
| No water coming out of the hot water outlet. | 1. 1The running water supply is cut off. | Wait for restoration of running water supply. |
| 2. The hydraulic pressure is too low. | 2. Use the heater again when the hydraulic pressure is increased. | |
| 3. The inlet valve of running water is not open. | 3. Open the inlet valve of running water. | |
| The water temperature is too high. | Failures of the temperature control system. | Contact with the professional personnel for repair. |
| Water leak. | Seal problem of the joint of each pipe. | Seal up the joints. |

Note
Parts illustrated in this use and care manual are indicative only, parts provided with the product may differ with illustrations. This product is intended for household use only. Specifications are subject to change without notice.
TRADEMARKS, COPYRIGHTS AND LEGAL STATEMENT
Midea logo, word marks, trade name, trade dress and all versions thereof are valuable assets of Midea Group and/or its affiliates (“Midea”), to which Midea owns trademarks, copyrights and other intellectual property rights, and all goodwill derived from using any part of an Midea trademark. Use of Midea trademark for commercial purposes without the prior written consent of Midea may constitute trademark infringement or unfair competition in violation of relevant laws.
This manual is created by Midea and Midea reserves all copyrights thereof. No entity or individual may use, duplicate, modify, distribute in whole or in part this manual, or bundle or sell with other products without the prior written consent of Midea.
All the described functions and instructions were up to date at the time of printing this manual. However, the actual product may vary due to improved functions and designs.
DISPOSAL AND RECYCLING
Important instructions for environment
Compliance with the WEEE Directive and Disposing of the Waster Product: This product complies with EU WEEE Directive (2012/19/EU). This product bears a classification symbol for waster electrical and electronic equipment (WEEE).
This symbol indicates that this product shall not be disposed with other household wastes at the end of its service life. Used device must be returned to official collection point for recycling of electrical electronic devices. To find these collection systems please contact to your local authorities or retailer where the product was purchased. Each household performs important role in recovering and recycling of old appliance. Appropriate disposal of used appliance helps prevent potential negative consequences for the environment and human health.

Compliance with RoHS Directive
The product you have purchased complies with EU RoHS Directive (2011/65/EU). It does not contain harmful and prohibited materials specified in the Directive.
Package information
EN
Packaging materials of the product are manufactured from recyclable materials in accordance with our National Environment Regulations. Do not dispose of the packaging materials together with the domestic or other wastes. Take them to the packaging material collection points designated by the local authorities.

DATA PROTECTION NOTICE
For the provision of the services agreed with the customer,
we agree to comply without restriction with all stipulations of applicable data protection law, in line with agreed countries within which services to the customer will be delivered, as well as, where applicable, the EU General Data Protection Regulation (GDPR).
Generally, our data processing is to fulfil our obligation under contract with you and for product safety reasons, to safeguard your rights in connection with warranty and product registration questions. In some cases, but only if appropriate data protection is ensured, personal data might be transferred to recipients located outside of the European Economic Area.
Further information are provided on request. You can contact our Data Protection Officer via MideaDPO@midea.com. To exercise your rights such as right to object your personal date being processed for direct marketing purposes, please contact us via MideaDPO@midea.com. To find further information, please follow the QR Code.

make yourself at home


GUIDA RAPIDA


(Fig.3)
(Fig.6)
IT

Avvertenza
make yourself at home

UTYLIZACJA I RECYKLING 12
INFORMACJA O OCHRONIE DANYCH....13
INSTRUKCJE DOTYCZĄCE BEZPIECZEŃSTWA

(Rys. 6)
PL

Ostrzeżenie
UTYLIZACJA I RECYKLING
INFORMACJA O OCHRONIE DANYCH
by email: midea@fidelia-service.sk

make yourself at home
- USER MANUAL
- THANK YOU LETTER
- CONTENTS
- SAFETY INSTRUCTIONS
- INTENDED USE
- EXPLANATION OF SYMBOLS
- WARNING
- ATTENTION
- CAUTION
- SPECIAL CAUTIONS
- PRODUCT OVERVIEW
- PRODUCT
- ACCESSORIES
- QUICK START GUIDE
- BEFORE FIRST USE
- PRODUCT INSTALLATION
- INSTALLATION INSTRUCTION
- PIPELINES CONNECTION
- NOTE
- OPERATION INSTRUCTIONS
- METHODS OF USING
- CLEANING AND MAINTENANCE
- TROUBLESHOOTING
- TRADEMARKS, COPYRIGHTS AND LEGAL STATEMENT
- DISPOSAL AND RECYCLING
- IMPORTANT INSTRUCTIONS FOR ENVIRONMENT
- COMPLIANCE WITH ROHS DIRECTIVE
- PACKAGE INFORMATION
- EN
- DATA PROTECTION NOTICE
- GUIDA RAPIDA
- AVVERTENZA
- INSTRUKCJE DOTYCZĄCE BEZPIECZEŃSTWA
- OSTRZEŻENIE
- UTYLIZACJA I RECYKLING
- INFORMACJA O OCHRONIE DANYCH
Brand : MIDEA
Model : D80-15F6
Category : Kettle