
Ensemble HD 720 - Projector EPSON - Free user manual and instructions
Find the device manual for free Ensemble HD 720 EPSON in PDF.
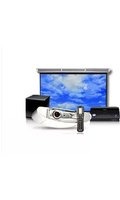


| Type of product | Video projector |
| Brand | Epson |
| Model | Ensemble HD 720 |
| Display technology | 3LCD |
| Native resolution | 1280 x 720 pixels (HD Ready) |
| Brightness | 2500 lumens |
| Contrast ratio | 10000:1 |
| Aspect ratio | 16:9 |
| Lamp type | UHE 200 W |
| Lamp life | Up to 5000 hours (Eco mode) |
| Throw range | 0.89 m to 10.51 m (for 30-300 inch diagonal) |
| Zoom | Manual, 1.2x |
| Focus | Manual |
| Keystone correction | Vertical, +/- 30 degrees |
| Audio output | 5 W built-in speaker |
| Video inputs | HDMI x2, VGA x1, RCA composite x1 |
| USB port | Yes (Type A) |
| Noise level | 28 dB (Eco mode) |
| Power consumption | 280 W (max) |
| Power supply | AC 100-240 V, 50/60 Hz |
| Dimensions (W x D x H) | 328 x 240 x 98 mm |
| Weight | 2.9 kg |
| Cleaning | Air filter cleaning recommended every 300 hours |
| Security | Kensington lock slot |
| Parts and repairability | User-replaceable lamp and air filter |
| Documentation | Free PDF manual available (132 pages) |
Frequently Asked Questions - Ensemble HD 720 EPSON
User questions about Ensemble HD 720 EPSON
0 question about this device. Answer the ones you know or ask your own.
Ask a new question about this device
Download the instructions for your Projector in PDF format for free! Find your manual Ensemble HD 720 - EPSON and take your electronic device back in hand. On this page are published all the documents necessary for the use of your device. Ensemble HD 720 by EPSON.
USER MANUAL Ensemble HD 720 EPSON
All rights reserved. No part of this publication may be reproduced, stored in a retrieval system, or transmitted in any form or by any means, electronic, mechanical, photocopying, recording, or otherwise, without the prior written permission of Seiko Epson Corporation.
The information contained herein is designed only for use with this Epson product. Epson is not responsible for any use of this information as applied to other equipment.
Neither Seiko Epson Corporation nor its affiliates shall be liable to the purchaser of this product or third parties for damages, losses, costs, or expenses incurred by purchaser or third parties as a result of: accident, misuse, or abuse of this product or unauthorized modifications, repairs, or alterations to this product, or (excluding the U.S.) failure to strictly comply with Seiko Epson Corporation's operating and maintenance instructions.
Legal Notice
This product incorporates copyright protection technology that is protected by U.S. patents and other intellectual property rights. Use of this copyright protection technology must be authorized by Macrovision, and is intended for home and other limited viewing uses only, unless otherwise authorized by Macrovision. Reverse engineering or disassembly is prohibited.
Trademarks
Epson is a registered trademark and Epson Exceed Your Vision is a logomark of Seiko Epson Corporation.
PowerLite and PrivateLine are registered trademarks, Ensemble HD is a trademark, and Epson Connection is a service mark of Epson America, Inc.
The DVD Video logo DVD/v188 trademark of DVD Format/Logo Licensing Corporation.
Manufactured under license from Dolby Laboratories. “Dolby”, “Pro Logic”, and the double-D symbol are trademarks of Dolby Laboratories.
“DTS” and “DTS Digital Surround” are registered trademarks of Digital Theater Systems, Inc.
General Notice: Other product names used herein are for identification purposes only and may be trademarks of their respective owners. Epson disclaims any and all rights in those marks.
This information is subject to change without notice.
Important Safety Instructions
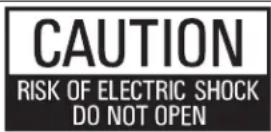

CAUTION: To reduce the risk of electric shock, do not remove the cover (or back). No user serviceable parts inside. Refer servicing to qualified personnel.
WARNING: To reduce the risk of fire or electric shock, do not expose this apparatus to rain or moisture.
The lightning flash with arrowhead, within an equilateral triangle, is intended to alert the user to the presence of uninsulated “dangerous voltage” within the product’s enclosure that may be of sufficient magnitude to constitute a risk of electrical shock to persons.

The exclamation point within an equilateral triangle is intended to alert the user to the presence of important operating maintenance (servicing) instructions in the literature accompanying the appliance.
- Read these instructions.
- Keep these instructions.
- Heed all warnings.
- Follow all instructions.
- Do not use this apparatus near water.
- Clean only with dry cloth.
- Do not block any ventilation openings. Install in accordance with the manufacturer's instructions.
- Do not install near any heat sources such as radiators, heat registers, stoves, or other apparatus (including amplifiers) that produce heat.
- Do not defeat the safety purpose of the polarized or grounding-type plug. A polarized plug has two blades with one wider than the other. A grounding type plug has two blades and a third grounding prong. The wide blade or the third prong is provided for your safety. If the provided plug does not fit into your outlet, consult an electrician for replacement of the obsolete outlet.
- Protect the power cord from being walked on or pinched particularly at plugs, convenience receptacles, and the point where they exit from the apparatus.
- Only use attachments/accessories specified by the manufacturer.
- Unplug this apparatus during lightning storms or when unused for long periods of time.
- Refer all servicing to qualified service personnel. Servicing is required when the apparatus has been damaged in any way, such as when the power-supply cord or plug is damaged, liquid has been spilled or objects have fallen into the apparatus, the apparatus has been exposed to rain or moisture, does not operate normally, or has been dropped.
Additional Safety Instructions
- Do not place the components of this system near sources of heat or in direct sunlight.
- Make sure nothing blocks the ventilation openings on any of the components. Allow for sufficient heat dispersion when components are installed on a rack. Do not block or cover the heatsink on the back of the subwoofer.
- Where the mains plug is used as the disconnect device, the disconnect device shall remain readily operable.
- When unplugging the power cord of any system component, handle it carefully. Hold the plug when unplugging the cord.
- This product should be operated only from the type of power source indicated on the marking label. If you are not sure of the type of power supplied in your home, consult your product dealer or local power company.
- Do not overload wall outlets, extension cords, or integral convenience receptacles as this can result in a risk of fire or electric shock.
- Keep the system components free from moisture, water, and dust.
- Do not let insecticides, benzene, or thinner come in contact with any components of the system.
- Never push objects of any kind through openings in the system components as they may touch dangerous voltage points or short-out parts that could result in a fire or electric shock. Never spill liquid of any kind on the product.
- Except as specifically explained in these instructions, do not attempt to service this product yourself. Refer all servicing to qualified service personnel.
- Never disassemble or modify the product in any way. Dangerous electrical voltages inside the components can severely injure you.
- When replacement parts are required, be sure the service technician has used replacement parts specified by the manufacturer or have the same characteristics as the original part. Unauthorized substitutions may result in fire, electric shock, or other hazards.
- When closing the screen, be careful not to pinch your fingers where the screen closes against the case.
- Do not touch the white part of the screen with your hands. Oil from your skin could damage it.
- Never look into the projector lens when the lamp is turned on. The bright light can damage your eyes. Never let children look into the lens when it is on.
- Don't use the projector outside of the required temperature range of 41 to 95°F (5 to 35°C ). Doing so may cause an unstable display and could lead to projector damage.
- The lamp(s) in this product contain mercury. Please consult your state and local regulations regarding disposal or recycling. Do not put in the trash.
- Allow the projector lamp to cool for one hour before replacing it.
Contents
Introduction
Getting Started
Using the Remote Control....12
Turning On the System 13
Turning On Selected Components....14
Controlling the Screen....15
Controlling the DVD Player and Other Equipment 15
Controlling Playback 15
Selecting Channels on an HD Tuner, Cable Box, or Satellite Receiver....16
Using the Buttons on the AV Controller 16
Adjusting the Volume 17
Watching Movies
Inserting a Disc 19
Playing a DVD....20
Using Basic Playback Functions 20
Using Other Playback Features....22
Listening to Music
Playing a CD 23
Using Basic Playback Functions 24
Using Other Playback Features....25
Playing Audio Files....26
Using Basic Playback Functions 27
Listening to an MP3 Player 28
Listening to a Tape Deck....29
Listening to AM/FM Radio 29
Tuning to the Desired Station 29
Using Radio Station Presets 30
Connecting and Using Other Components
Connecting Video Equipment 32
Connecting the Audio Cable for the Video Source....33
Linking Audio and Video Sources 34
Connecting Audio Equipment 36
Setting Up the Remote Control 36
Entering the Setup Code for Your Component 37
Customizing the Remote Control Menu 39
Using the Remote Control to Operate Your Equipment 39
Adjusting the Sound, Picture, and Other Settings
Using the On-screen Menu System 41
Adjusting the Picture 42
Adjusting the Color Mode 42
Adjusting the Aspect Ratio 43
Adjusting the Picture Quality....45
Adjusting the Sound. 46
Using Test Tones to Adjust the Sound....47
Changing the Surround Sound Format 47
Using Midnight Mode 48
Using Other Features....49
Choosing the Language 49
Using Parental Controls 50
Restoring Factory Defaults....51
Cleaning and Maintenance
Cleaning. 53
Cleaning the Screen 53
Cleaning the Projector Lens 53
Cleaning System Components 54
Adjusting the Screen Length. 54
Manual Screen Adjustment 55
Adjusting the Image Position and Focus. 56
Repositioning the Image....56
Focusing and Resizing the Image 57
Checking the Projector Lamp....58
Checking the Info Menu 58
Checking the Warning Light 58
Replacing Remote Control Batteries. 59
Solving Problems
Basic Operation Problems 61
Picture Problems 62
Sound Problems....64
Problems Using the Screen....65
Problems Using the Remote Control 66
Problems Using the DVD Player 67
Problems Using the Radio 67
Problems Using an External Component 68
Where To Get Help....69
Internet Support....69
Speak to a Support Representative 69
Purchase Supplies and Accessories 69
Using Advanced Remote Control Features
Adjusting the LCD Screen 71
Adjusting the Contrast 72
Learning Commands from Another Remote Control....72
Cloning Your Remote Control....74
Advanced Remote Control Setup....75
Editing Device Names and Commands 75
Setting Up Macros 77
Adding or Hiding Pages 78
Erasing Learned Buttons and Macros 79
Using Remote Control Punch-Through....80
Using an RF Base Station....81
Setting Up an Addressable Base Station 81
Restoring Remote Control Factory Defaults....83
Remote Control Codes
Using the Code Tables....85
Recalling Programmed Codes....86
Code Tables....87
Specifications
Playable Disc Types 119
Screen Specifications 120
General. 120
Built-in Speaker System 120
Remote Control Specifications....120
Powered Subwoofer Specifications 121
Bass Driver....121
Amplifier 121
Physical 121
Surround Speaker Specifications....121
AV Controller Specifications 122
Notices
Responsible Use of Copyrighted Materials 123
FCC Compliance Statement 123
Declaration of Conformity....124
Epson America, Inc. Limited Warranty 124
Index
Introduction
The Ensemble HD ™ home cinema system by Epson ® is designed to transform your living room into a state-of-the-art home cinema. Its wide-format (16:9) projection screen, 5.1-channel surround sound system, and high-definition video projector deliver unrivaled, high-performance picture and sound.
Your home cinema system's ease-of-use and versatility let you:
- Watch movies using the built-in DVD player (see page 19)
- Listen to music in various formats—by playing CDs, connecting an MP3 player, or using the built-in AM/FM radio (see page 23)
- Connect external components such as a cable box, satellite receiver, gaming console, or high-definition DVD player like Blu-ray ™ or HD DVD ® (see page 31)
- Use the included universal remote control to operate not just the Ensemble HD system, but any components you connect to it
See “Getting Started” in the next section for basic instructions on using your system.
Getting Started
The universal remote control included with your Ensemble HD system puts complete control over your home theater in the palm of your hand. With one touch, you can lower the screen, turn on the projector, and get ready to watch a movie. If you've connected additional components to your home theater, such as a cable box or satellite receiver, you can use the remote control to operate them too.
See these sections:
- "Using the Remote Control" on page 12
- "Turning On the System" on page 13
- "Controlling the Screen" on page 15
- “Controlling the DVD Player and Other Equipment” on page 15
- "Adjusting the Volume" on page 17
Using the Remote Control
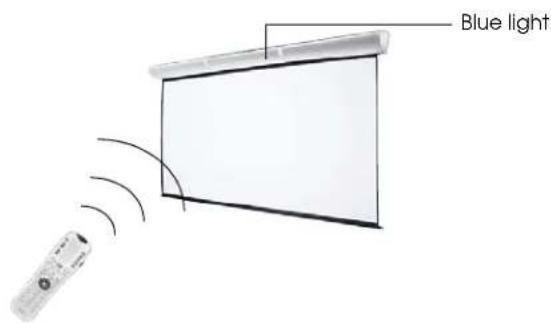
Aim the remote control at the screen and press any button. An 📞on appears on the remote control's LCD screen to indicate that a command is being transmitted. At the same time, the blue light at the top of the projection screen flashes, indicating that the system is receiving a command.
Note
The blue light remains on when the screen is raised and turns off when the screen is lowered.
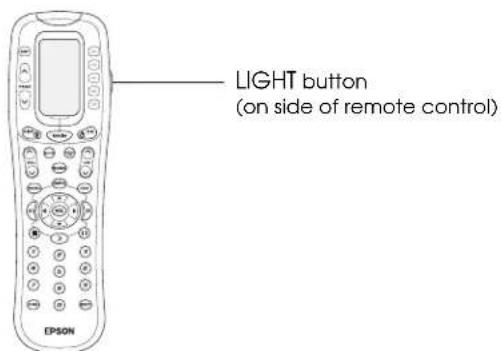
If you're using the remote control in a darkened room, press the LIGHT button on the side of the remote control. The keys and display screen on the remote control light up so you can make a selection. The light shuts off by itself after 10 seconds, or you can turn it off by pressing the LIGHT button a second time.
Note
If you need to increase the amount of time the remote control lights up or change the contrast of its screen, see page 71.
Turning On the System
When you're ready to watch a movie, you can lower the screen, turn on the projector, and turn on the AV controller (with its built-in DVD player) with the touch of a button.
1 Make sure the MAIN menu is displayed on the remote control. If necessary, press the MAIN button.
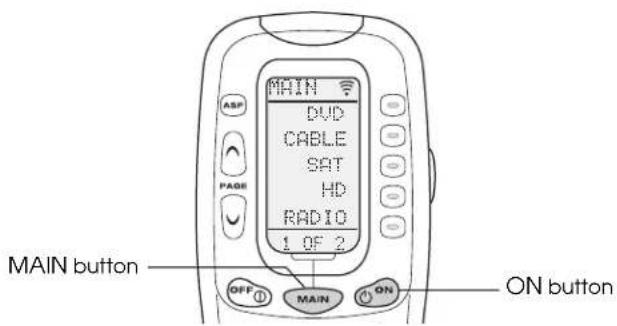
2 Point the remote control at the screen and press the ON button to turn on the system. The screen comes down and the projector and AV controller turn on.
Note
Make sure the remote control remains pointed at the screen until the system has turned on. (You see the 📋 icon flash on the remote control screen while it's turning on the system.) If the system does not turn on, see "Basic Operation Problems" on page 61.
The projector lamp takes up to 30 seconds to achieve full brightness.
3 When you're done using the system, make sure the MAIN menu is displayed on the remote control and press the OFF button. The projector and AV controller turn off, and the screen raises up automatically.
Note
If you install additional components, such as a cable box or satellite receiver, you can set up the remote control to turn them on with one button, too. See "Setting Up Macros" on page 77.
Turning On Selected Components
You can turn on and operate any component in the system without using any of the others. For example, if you want to listen to your home theater's built-in radio, you can turn on the radio by itself without lowering the screen.
1 Make sure the MAIN menu is displayed on the remote control. If necessary, press the MAIN button.
You see a list of components displayed on the remote control:
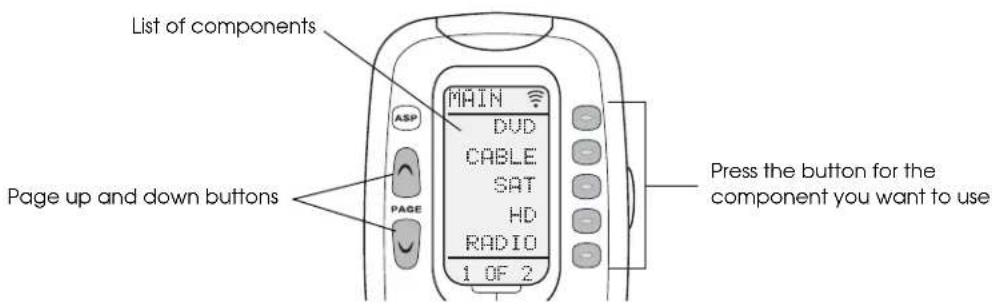
2 If you don't see the component you want to use, it may be listed on the next page. Press the PAGE or (page up or down) button to access additional components.
3 Press the button to the right of the component you want to use, such as DVD or RADIO. The top of the screen changes from MAIN to the name of the component you select, and the menu options change to the ones for that component.
Note
Some of the options in the MAIN menu, such as CABLE or SAT, are for components that don't come with the Ensemble HD system, such as a cable box or satellite receiver. If you install components like these, you can use the remote control to operate them just like the rest of your system. See "Connecting and Using Other Components" on page 31 for more information.
4 Once you've opened the menu for the selected component, press the ON button to turn it on or the OFF button to turn it off. (If you select DVD or RADIO, the AV controller turns on automatically.)
5 Follow the instructions elsewhere in this guide to operate the selected component:
- If you selected RADIO, you can listen to AM/FM radio through your home theater (see page 23).
- I f y o DVD, you can you can play at DVD (see page 19), listen to a CD (see page 23), or listen to a disc with MP3 audio files (page 26).
• To use other components you may have added to your system, see page 39.
Controlling the Screen
The screen is lowered automatically when you turn on the system as described on page 13. If necessary, you can also operate the screen manually as described below.
Note
To change how far the screen comes down when you lower it, see "Adjusting the Screen Length" on page 54.
1 Make sure the MAIN menu is displayed on the remote control. If necessary, press the MAIN button.
2 Press the PAGE button to display additional components.
3 Press the button to the right of PROJ to select the projector menu.
4 Press S-DWN to lower the screen. It comes down and automatically stops at the pre-set position.
5 Press S-UP to raise the screen when you're done using it.
Controlling the DVD Player and Other Equipment
The universal remote control has all the buttons you need to control the Ensemble HD home theater, along with any additional components you may add to it. Here's an overview of the main buttons you'll use to control the built-in DVD player and radio, as well as any optional components like a cable box or satellite receiver.
Note
You can also use the buttons on the AV controller for many of the same functions that you would normally access using the remote control. See "Using the Buttons on the AV Controller" on page 16.
Controlling Playback
Use the buttons shown below to control playback when watching a movie or listening to music:
![graph TD A["Stop"] --> B["Menu"] B --> C["INFO"] C --> D["ESC"] D --> E["SEL"] E --> F["<<"] F --> G["Slow"] G --> H["Play"] H --> I["Fast-forward/skip forward"] I --> J["Fast-rewind/skip backward"] K["Pause"] --> L["Next Step"] M["Next Step"] --> N["Next Step"]](/content/2026/08/1581156/images/76b685ce46dba07a7920f9148e6c05429434e41876f97a99a142d0afc1f27f6e.jpg)
Note
The buttons highlighted at right are for accessing the on-screen menu system and selecting menu options, not for controlling playback. See "Using the On-screen Menu System" on page 41.
![graph TD A["SEL"] --> B["MENU"] A --> C["INFO"] A --> D["ESC"] B --> E["<<"] C --> F["<<"] D --> G["<<"]](/content/2026/08/1581156/images/0c59769bac1f406c6ad37188a31adfc0de42dc73e767e92dd06244e3c67e3fe5.jpg)
Selecting Channels on an HD Tuner, Cable Box, or Satellite Receiver
You can use the numeric keypad to select pretuned radio stations or the tracks on a CD. If you've connected an HD tuner or other equipment to receive programmed content, use the numeric keypad to enter channels. The method of entering the digits varies, depending on the type of equipment you're using—for example, you might have to press 0 to enter a single-digit number, such as 01. In some case, you may need to press the ENT (Enter) or SEL (Select) button to enter the digits.
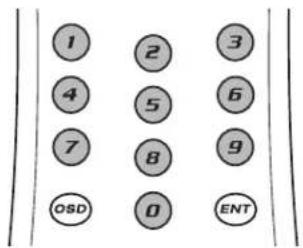
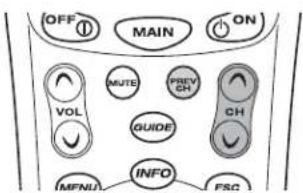
You can also use CH ∧ and ∨ (channel up and down) to change channels.
To return to the previously selected channel, press the PREV CH button.
Using the Buttons on the AV Controller
You can use the buttons on the AV controller to control most basic functions.
Note
All these functions are accessible via the remote control.
- ON/STANDBY lets you turn on the AV controller. The controller is on when the light surrounding the button is blue, and is off (standby) when the light is orange.
- SOURCE lets you switch between the Ensemble HD system's DVD player and radio, or select other equipment you've connected to the system. Each time you press the button, the AV controller cycles through these functions or sources:
DVD player → FM radio → AM radio → Audio 1 port → Audio 2 port → Composite video (CVBS) → S-video → Component video → HDMI 1 → HDMI 2
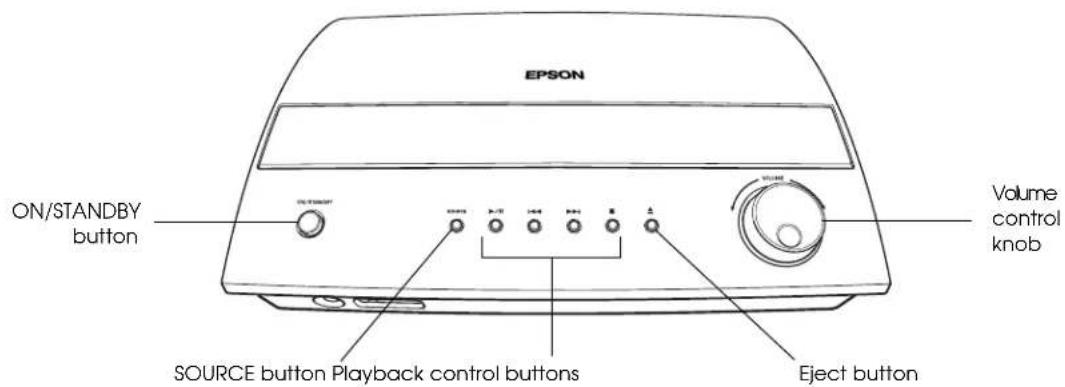
• The playback control buttons let you control playback when watching a DVD or listening to a CD. In addition, the button should select preset radio stations while listening to AM or FM radio.
• The eject button opens and closes the DVD/CD tray.
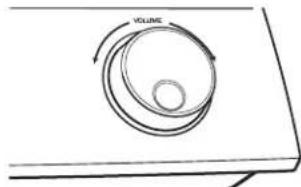
• The volume control knob lets you adjust the sound volume.
Adjusting the Volume
The Ensemble HD system gives you various ways to control the volume:
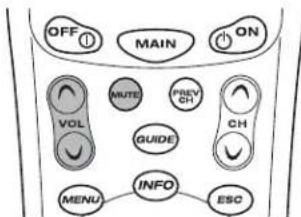
- VOL and (volume up and down) lets you change the volume from -74 to +10 dB.
- MUTE temporarily turns off the sound. Press the button again to restore audio.
- Midnight Mode adjusts the sound for late-night viewing when you want to avoid disturbing others. Volume is reduced at the bass end with volume highs and lows being compressed to a narrower range. See page 48 for details.
Note
You can also adjust the volume using the volume control knob on the AV controller.
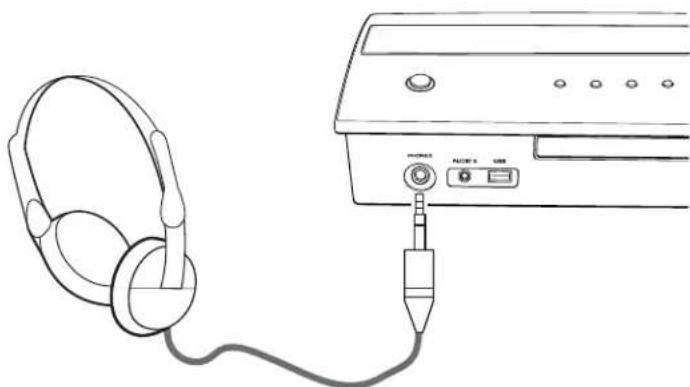
To use headphones with your home theater, plug them into the PHONES jack on the front of the AV controller. The jack accepts 1/4-inch stereo headphones. When you plug in the headphones, the sound is automatically muted from the Ensemble HD speakers.
Watching Movies
Follow the steps in this chapter when you're ready to watch a movie on DVD. See these sections:
- "Inserting a Disc" below
• "Playing a DVD" on page 20
Note
If you watch movies under different lighting conditions (for example, in the daytime and at night), you may want to change the Color Mode when you begin watching a movie (see "Adjusting the Color Mode" on page 42).
Depending on the aspect ratio your movie was filmed in, you may also want to select a different Aspect setting (see "Adjusting the Aspect Ratio" on page 43).
Inserting a Disc
The DVD player, built into the Ensemble HD system, accepts both DVD and DVD-R discs. For more information on compatible formats, see “Playable Disc Types” on page 119.
1 Make sure the Ensemble HD system is turned on (see "Turning On the System" on page 13).
2 Open the DVD/CD tray by pressing the ▲ eject button on the AV controller. (Or select EJECT from the DVD menu on the remote control.)
Note
Make sure you don't have a USB flash drive inserted, or you won't be able to operate the DVD player, or insert or eject a DVD. Remove the flash drive prior to inserting the disc.
3 Place the disc in the tray, playable side down.
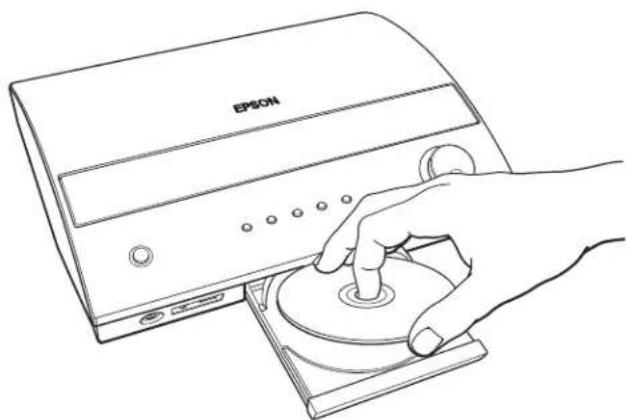
4 Close the DVD/CD tray by pressing the ▲ eject button on the AV controller. (Or select EJECT from the DVD menu on the remote control.)
When you're done playing the disc, open the DVD/CD tray as described above and remove the disc.
Playing a DVD
Once the disc is inserted, follow these steps to begin playing the movie:
1 If the DVD player was the last function you used, the DVD begins playing automatically.
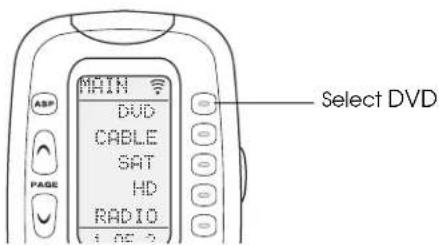
If you previously used a different function (such as CABLE or SAT), select the DVD option on the remote control:
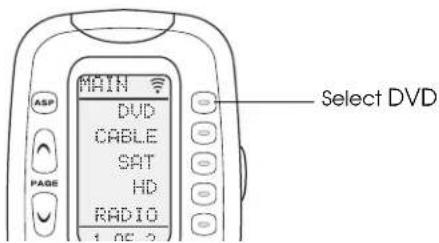
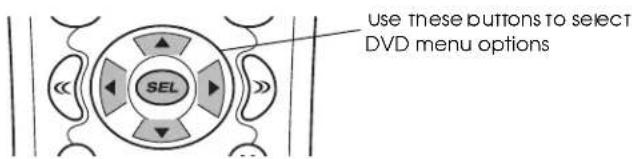
2 When the DVD begins playing, you may see a menu screen that lets you select its contents and other options. (This menu varies from disc to disc.) Use the arrow buttons (◀▶▲▼) to highlight the option you want, then press the SEL (Select) button. For example, to play a movie, highlight the "Play movie" option, then press SEL.
3 If you need to return to the DVD's main menu screen while watching the movie, press the MENU or GUIDE button. You can also select MENU from the DVD menu on the remote control.
Note
To avoid losing your place while watching a movie, don't switch sources. If you select a different source (such as CABLE or SAT), the DVD will stop playing. It will start over from the beginning when you return to the DVD function.
Using Basic Playback Functions
While you're watching a movie, you can use the following buttons to control playback:
![graph TD A["Time elapsed/time remaining"] --> B["Menu"] B --> C["INFO"] C --> D["ESC"] D --> E["SEL"] E --> F["<<"] F --> G["Slow"] G --> H["Pause/step"] H --> I["Play"] I --> J["Stop"]](/content/2026/08/1581156/images/08fbb443167bb037941eb10d2c838db85ed071160c0e894bf6d3966fd593790c.jpg)
- Press the II pause button to stop the movie temporarily. The image freezes on the screen. While the movie is paused, pressing the II pause button again puts the player in step mode. Each time you press the II pause button, the movie advances one frame at a time. To return to normal playback, press the > play button.
- Press the ■ stop button to stop projection of the movie temporarily. The DVD player remembers the point in the movie where you stopped. Press the >play button to resume playback from that point.
Note
If you press the ■ stop button twice, playback will start over from the beginning of the movie.
- Press the play button to resume playback if you've paused or stopped the movie.
- Press the fast-rewind or fast-forward button to skip backward or forward to a different chapter in the movie. DVDs are usually structured with each movie or special feature having its own title, and with each title broken into chapters:

As you skip through chapters, the title and chapter information display at the top of the screen.
- Press and hold the fast-rewind or fast-forward button to move quickly through a scene. Each time you press and hold the button, the speed doubles and then finally returns to normal speed:
2 × → 4 × → 8 × → 1 6 × → normal speed
- P r dNFO button to display title and chapter information on the screen. The on-screen display tells you the time elapsed and time remaining at your current location on the disc. Each time you press the INFO button, you see the following information displayed:
Title time elapsed → Title time remaining → Chapter time elapsed → Chapter time remaining → Display off
Note
If you press a button for a function that cannot be performed at a given time (for example, if you press the > play button while the movie is already playing), you see the symbol on the screen.
Using Other Playback Features
You can use the DVD menu on the remote control to access several other features while watching movies.
Note
Some functions in the remote control's DVD menu are used only for playing CDs. These include the Shuffle, Memory, and Clear functions.
- If your DVD has separate audio tracks in different languages, you can change the language by selecting AUDIO from the DVD menu. Each time you press AUDIO, the language changes and you see an on-screen display like the following:
Audio 5/5:Dolby D 2CH ENGLISH
Note
If you usually watch DVDs with a language other than English selected, you can set that language to be used automatically whenever you play a DVD. See "Choosing the Language" on page 49.
- Some DVDs include scenes that have been shot from different camera angles. They have a symbol like this to indicate the number of available angles: 2. When you encounter a scene with multiple angles, a camera icon is displayed on the screen. Select ANGLE in the DVD menu to change angles. To stop displaying the camera icon, press the INFO button repeatedly until it clears the icon from the screen.
- To repeat the current chapter of a movie that you're watching, select RPEAT from the DVD menu. To repeat the entire title (such as the movie itself or a special feature), press RPEAT again. Press RPEAT a third time to cancel the repeat function.
To repeat just part of a scene that you're watching, press A<>B at the beginning of the part you want to repeat, then press A<>B a second time to mark the end of the section. Press A<>B a third time to cancel the repeat function.
- To move slowly through a scene, select SLOW from the DVD menu. Each time you press SLOW, the speed is reduced by one-half. You can select from 1/2, 1/4, and 1/8 speed. To return to normal playback, press the play button.
- If your DVD has subtitles, you can change the subtitle language by selecting SUB-T from the DVD menu. Each time you press SUB-T, the language changes and you see an on-screen display like the following:
Subtitle 03/03:FRENCH
Note
If you usually watch DVDs with subtitles, you can have the subtitle language you prefer turned on automatically whenever you play a DVD. See "Choosing the Language" on page 49.
Listening to Music
Follow these steps when you want to listen to music with your Epson Ensemble HD system. See these sections:
- "Playing a CD" below
- "Playing Audio Files" on page 26
• "Listening to an MP3 Player" on page 28
• "Listening to a Tape Deck" on page 29
• "Listening to AM/FM Radio" on page 29
Note
When listening to music, you may wish to change the surround sound format to STEREO. See "Changing the Surround Sound Format" on page 47.
Playing a CD
The DVD player built into the Ensemble HD system can play music CDs as well as movies. The player accepts both commercial CDs and home-recorded CD-R and CD-RW discs. For more information on compatible formats, see “Playable Disc Types” on page 119.
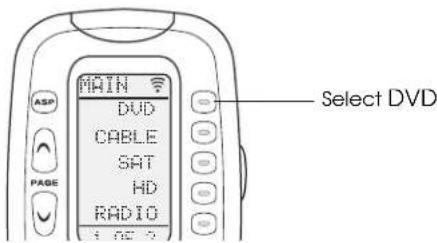
1 Select the DVD option on the remote control to activate the DVD player:
Note
For most CD playing functions, it is not necessary to lower the screen or turn on the projector.
2 Insert the CD just as you'd insert a DVD. See "Inserting a Disc" on page 19.
After a moment, you see the number of tracks and total playing time on the AV controller.
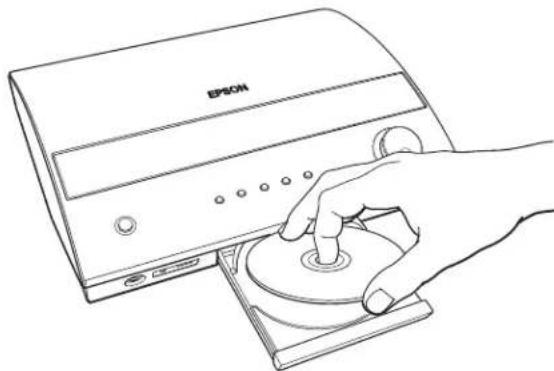
3 To begin playing the CD, press the play button.
![graph TD A["Menu"] --> B["INFO"] B --> C["ESC"] C --> D["SEL"] D --> E["<<"] D --> F[">>"] D --> G["■"] D --> H["II"] D --> I[">"] J["Play button"] --> K["End"]](/content/2026/08/1581156/images/319063d368023a6d893cb4fa25f83533e631e8cf5230b7db1778da168d3dc844.jpg)
Note
To avoid interrupting CD playback, don't switch sources. If you select a different source (such as CABLE or SAT), the CD will stop playing. It will start over from the beginning when you resume playback.
Using Basic Playback Functions
While you're listening to a CD, you can use the following buttons and the numeric keypad to control playback:
![graph TD A["Stop"] --> B["Play"] B --> C["Menu"] C --> D["INFO"] D --> E["ESC"] E --> F["SEL"] F --> G["Slow Backward"] G --> H["Fast-forward/skip forward"] H --> I["Slow Backward"] I --> J["Slow Backward"] J --> K["Slow Backward"] K --> L["Slow Backward"] L --> M["Slow Backward"] M --> N["Slow Back…](/content/2026/08/1581156/images/6dad84a169a6e76835698d30f253b0f2e51d2b8964b461fa2e64951513a7e7b8.jpg)
• To play a specific track on the CD, use the numeric keypad on the remote control. For example, to select track 3, just press the 3 button. To select track 21, press 2 followed by 1. After pressing the buttons, wait a moment for the selection to be transmitted, or press SEL (Select) to transmit your selection right away.
You can also skip between tracks by using the fast-rewind or fast-forward button. To advance to the next track, momentarily press and release the button without holding it. To go to the previous track, press the button twice (the first time returns you to the beginning of the current track).
- The current track and elapsed time are indicated on the AV controller screen.
If the projector is on, you can also display the track and time information on the projection screen by pressing the INFO button. Each additional time you press the INFO button, the displayed information changes (both on the AV controller and on the projection screen) as follows:
Track time elapsed → Track time remaining → Total time elapsed → Total time remaining → Display off
- Press and hold the fast-rewind or fast-forward button to move quickly through a track. Each time you press and hold the button, the speed changes as follows:
2 × → 4 × → 6 × → 8 × → 2 ×
To return to normal playback, press the > play button.
- Press the || pause button to stop the music temporarily. To resume playback, press > play or || pause.
- Press the stop button when you're done listening to the CD.
Using Other Playback Features
You can use the DVD menu on the remote control to access several other features while listening to a CD.
Note
Most functions in the remote control's DVD menu are used only for playing DVDs. Only the ones listed below can be used when playing CDs.
- To repeat the current track of a CD that you're listening to, select RPEAT from the DVD menu. To repeat the entire CD (or a programmed playlist), press RPEAT again. Press RPEAT a third time to cancel the repeat function. Each time you select this option, the display changes as follows:
Repeat one → Repeat all → Repeat off
To repeat just part of a track, press A<>B at the beginning of the part you want to repeat, then press A<>B a second time to mark the end of the section. Press A<>B a third time to cancel the repeat function.
- To play all the tracks on your CD in a random order, press the stop button if the CD is currently playing. Select SHUFF (Shuffle) from the DVD menu, then press the > play button. After all the tracks finish playing, the DVD player stops and the shuffle function is cancelled. To cancel shuffle mode while random playback is in progress, press the stop button, then press SHUFF.
- You can play up to 21 tracks in any desired order by creating a playlist. To create a playlist, you need to lower the screen and turn on the projector. Also, press the stop button if the CD is currently playing. Once the projector is turned on, select MEMO (Memory) from the DVD menu on the remote control. You see this screen:
![Select desired track number Total tracks on disc [15] 01 PROGRAM LISTTRACK ADD 05 DELETE 11 PLAY 13 CLEAR Playlist](/content/2026/08/1581156/images/ecd7e47146ebd7797803434db22f0cb667c38414daff97de38548ea9fbc4384e.jpg)
Select the desired track number on the left, using the ▲ or ▼ button on the remote control. Then highlight ADD, using the ▶ button, and press SEL (Select). The track number is added to the list on the right. Repeat for any additional tracks you want to add.
To insert a track at an earlier point in the list, highlight the track in the playlist prior to the point where you want to insert the new track. Then select the desired track number on the left and select INSERT. Use DELETE to erase a track, or CLEAR to erase the whole list.
Once you've finished creating your playlist, highlight PLAY and press SEL (Select) to start playback. The playlist is retained until you remove the CD or turn off the player. To resume normal playback without the playlist, press the stop button, then press play.
Playing Audio Files
You can use the AV controller to play MP3 and WMA audio files stored on a USB flash drive, or on a data CD or DVD.
Note
If you burn your MP3 and WMA files to an audio CD instead of a data CD, play the disc as described in "Playing a CD" on page 23.
You can also display JPG images (stored on a flash drive, data CD, or DVD) by following the instructions below. When you press the play button, your photos display as a slideshow.
1 Make sure the Ensemble HD system is turned on (see "Turning On the System" on page 13). You'll need the projector turned on in order to select files on the screen.
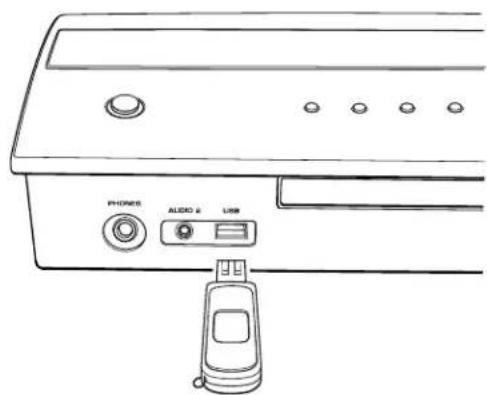
2 Insert your USB flash drive into the USB slot on the front of the AV controller. (If the files are stored on a CD or DVD, insert the disc as described in "Inserting a Disc" on page 19.)
3 Select the DVD option on the remote control. (This tells the AV controller to check for an inserted disc or flash drive.)
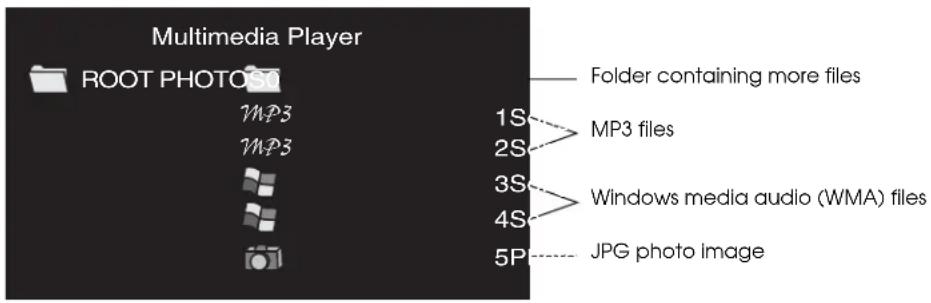
After a moment, you see the contents of the flash drive or CD/DVD displayed on the screen:
Caution
Do not remove the flash drive while its data access light is flashing, or you could lose data on the drive. Always stop playback by pressing the stop button before removing the drive.
4 Do one of the following:
- Press the play button to play all files from the beginning.
- Use the ▲ or ▼ button to highlight the file you'd like to start with. (If a file is already playing, press the ■ stop button first.) Then press the play button. All files are played from the selected file to the last one on the drive.
- If your flash drive contains folders, use the ▲ or ▼ button to highlight the desired folder, then press SEL (Select) to view its contents. Highlight the file you'd like to start with, then press the > play button. Only files in the folder are played.
When you're done listening to music on the flash drive, make sure its data access light is not flashing. (If necessary, press the stop button.) Then pull the drive straight out of the slot.
Using Basic Playback Functions
While you're listening to audio files, you can use the following buttons and the numeric keypad to control playback:
![graph TD A["Menu"] --> B["SEL"] C["INFO"] --> B D["ESC"] --> B E["Slow"] --> F["Play/resume"] G["Stop"] --> H["Slow/Slow backward"] I["Time elapsed/time remaining"] --> J["Fast-forward/skip forward"] K["Pause"] --> L["Slow/Slow backward"]](/content/2026/08/1581156/images/050a48282929a04732d8384c5371c678a466dad43bf81d23dbdaa6c5e1be63c1.jpg)
- To play a specific file, use the numeric keypad on the remote control. For example, to select file 3, just press the 3 button. To select file 21, press 2 followed by 1. After pressing the buttons, wait a moment for the selection to be transmitted, or press SEL (Select) to transmit your selection right away.
You can also skip between tracks by using the fast-rewind or fast-forward button. To advance to the next track (or go to the previous one), momentarily press and release the button without holding it.
- The current file and elapsed time are indicated on the AV controller screen. You can also display the file and time information on the projection screen by pressing the INFO button. Each time you press the INFO button, the displayed information changes (both on the AV controller and on the projection screen) as follows:
Time elapsed → Time remaining → Display off
- Press and hold the fast-rewind or fast-forward button to move quickly through a file. Each time you press and hold the button, the speed increases:
2×→4×→6×→8×→ normal speed
To return to normal playback, press the > play button.
- Press the pause button to stop the music temporarily. To resume playback, press the play button.
- Press the stop button when you're done listening.
Note
You can also use the repeat function to repeat one or more files. Select RPEAT from the DVD menu on the remote control. Each time you press RPEAT, you switch between various repeat options.
Listening to an MP3 Player
You can connect a personal MP3 player, such as an iPod, to the AUDIO 2 port on the front of the AV controller. You'll need a 1/8-inch stereo mini audio cable, which you can purchase from an electronics retailer.
1 Connect one end of a stereo mini audio cable to the AUDIO 2 port, shown below. Connect the other end to the headphone jack on your MP3 player.
Note
Do not connect your MP3 player to the AV controller with a USB cable.
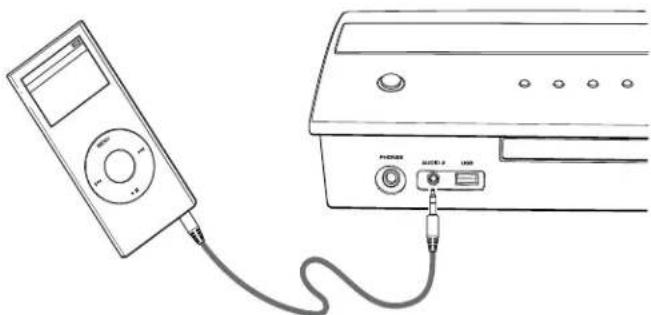
2 Select the AUDIO option on the remote control, then select AUD2. This switches the audio input to your MP3 player.
3 Use the controls on your MP3 player to begin playing music.
Listening to a Tape Deck
Make sure your tape deck (or other audio source) is connected to the AUDIO 1 port on the back of the AV controller, as described in “Connecting Audio Equipment” on page 36.
1 Select the AUDIO option on the remote control, then select AUD1. This switches the audio input to your tape deck.
2 Use the controls on your tape deck to begin playing music.
Listening to AM/FM Radio
You can use the AV controller to receive AM or FM radio broadcasts. First make sure an antenna is connected, as described in the Installation Guide.
Tuning to the Desired Station
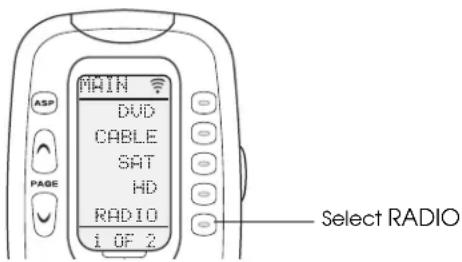
1 Select the RADIO option on the remote control to activate the radio:
Note
To use the radio, it is not necessary to lower the screen or turn on the projector.
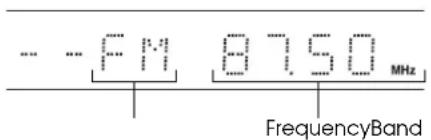
2 Select the BAND option on the remote control to switch between AM and FM. The display on the AV controller shows the current station:
3 Select TUNE+ or TUNE- to change the frequency:
- Press the button momentarily and then release it to change the frequency manually.
- Or press and hold the button to find the next available station automatically. The tuner searches until a station of sufficient strength has been found, and the word “TUNED” appears on the display. Weak stations are skipped during the auto-tuning process.
Using Radio Station Presets
You can save up to 40 preset stations. Follow these steps to save a station:
1 Tune in the desired station, as described in the previous section.
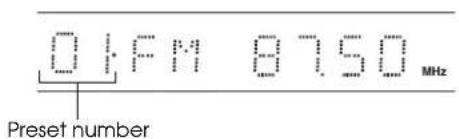
2 Select the SAVE option in the RADIO menu on the remote control. The preset number flashes on the display:
3 Select the desired preset number (1 through 40):
- Use the numeric keypad to enter the number—for example, to select preset 3, press 0 followed by 3. To select preset 21, press 2 followed by 1.
- Or use the or button to select the desired number, then press SAVE again.
Note
A preset station is erased from the memory when you store another station in its place.
Once your stations are preset, use either the numeric keypad on the remote control, or the <and buttons, to quickly access your favorite stations. You can also use the ◀◀ and ▶▶1 buttons on the AV controller.
Connecting and Using Other Components
To extend the capabilities of your Ensemble HD system, you can add on a variety of audio and video components. You can connect up to a total of five external video devices to the Ensemble HD system, such as a cable box or satellite receiver. You can also connect an external audio device, such as a CD player or tape deck. If you want to connect your own amplifier or sound system, a two-channel (stereo) analog audio output port is provided.
See these sections:
- "Connecting Video Equipment" on page 32
- "Connecting Audio Equipment" on page 36
- "Setting Up the Remote Control" on page 36
- "Using the Remote Control to Operate Your Equipment" on page 39
Note
To temporarily connect a personal MP3 player, such as an iPod, use the Audio 2 port located on the front of the AV controller. See page 28.
If desired, you can connect an IR blaster to the IR OUT port to relay signals to your components (such as a cable box or satellite receiver), or use an RF base station. See "Using an RF Base Station" on page 81.
Connecting Video Equipment
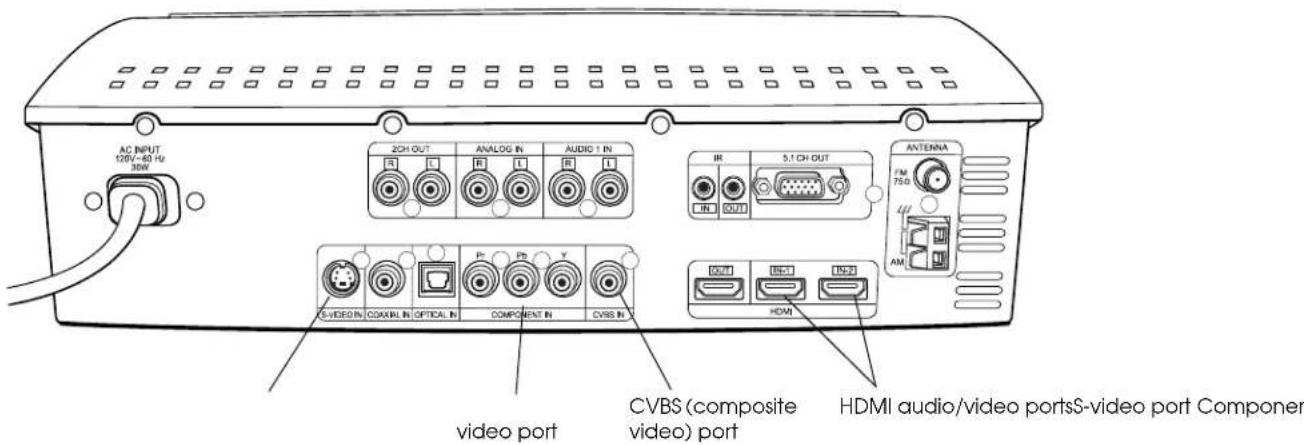
You can connect up to five pieces of video equipment at the same time, using any of the commercially available cables shown below:
Port Cable
HDMI 1 or 2 HDMI cable


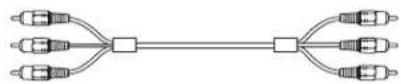
Component Component video cable
Pr Pb Y


Note
When connecting the cable, match the colors of its connectors to the colors of the ports where you're plugging them in.
S-Video S-video cable


CVBS (composite video) Composite video cable (RCA cable)


Check your video device for the type of output port(s) it has available. For best picture quality, use the HDMI (High-Definition Multimedia Interface) port. If your equipment doesn't support HDMI, use one of the following ports (highest quality listed first): component video, S-video, or composite video (yellow RCA-style connector).
Connect the cable from your video component to any available port on the back of the AV controller, as shown below:
Caution
Avoid connecting or disconnecting any components with your equipment turned on.
Connecting the Audio Cable for the Video Source
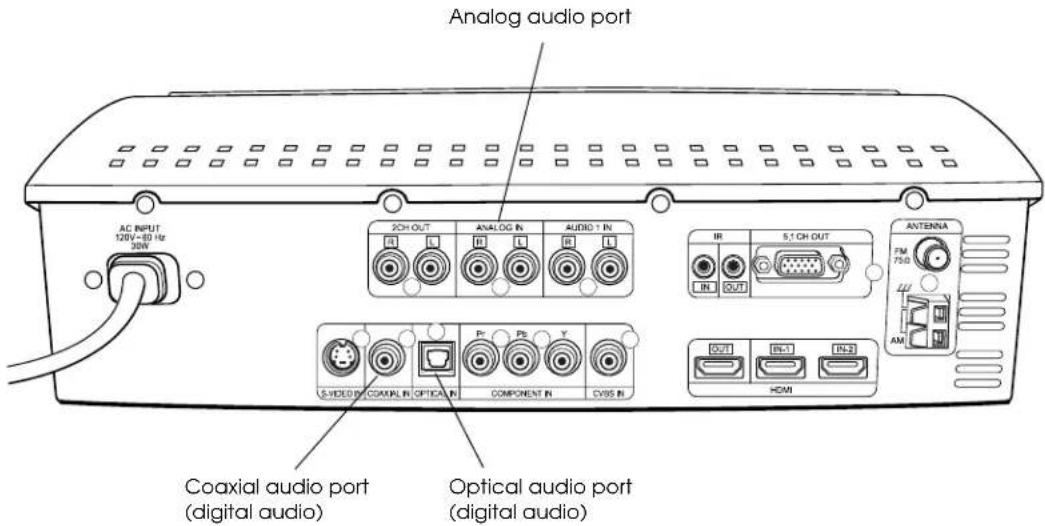
Once you've connected the video cable, you may need to connect an audio cable in order to combine the picture with sound. If you've connected your device using an HDMI cable, the audio signal is already carried by the cable, so you don't have to connect an additional cable. (Make sure HDMI audio is enabled in your component's setup menu.) Otherwise, you'll need to connect an audio cable to one of the ports listed below:
If you've connected to this video port... ...connect an audio cable to one of these ports
| HDMI 1 or 2 Coaxial* | |
| Optical* | |
| Component Coaxial | |
| OpticalAnalog | |
| S-Video Coaxial | |
| OpticalAnalog | |
| CVBS (Composite video) Coaxial | |
| OpticalAnalog | |
* Connection not required if your video device supports HDMI audio.
Check your video device for the type of audio output port(s) it has available. For best sound quality, use either the coaxial or optical digital audio port. If your equipment doesn't have digital audio, use an analog stereo output port instead. Connect the audio cable to one of the ports shown below:
Linking Audio and Video Sources
Once you've connected the audio and video cables, you need to tell the Ensemble HD system which audio and video ports to use together. That way, when you select a device with the remote control (VCR, cable, satellite, etc.), the matching audio and video sources will be automatically used. You link the audio and video sources together using the Source Assign screen.
Note
The label you assign to a device (e.g. "CABLE") is what you see on the projection screen when you're selecting sources. It doesn't affect the device names shown on the remote control's LCD screen.
1 Make sure the MAIN menu is displayed on the remote control. If necessary, press the MAIN button.
2 Point the remote control at the screen and press the MENU button.
You see the Ensemble HD menu screen:
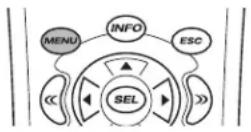
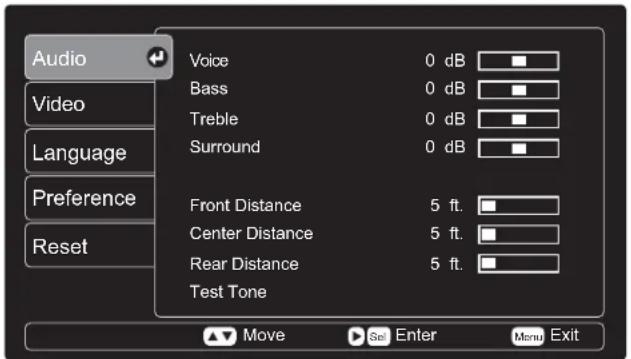
3 Use the ▼ button to highlight Video, then press the SEL (Select) button.
4 Use the ▼ button to highlight Source Assign, then press the SEL (Select) button.
You see the screen shown below. The video port to which you've connected your video equipment is listed in the left-hand column:
![[Source Assign] Video Input Label Audio Input HDMI1 Cable HDMI1 HDMI2 Sat HDMI2 Component HD Coax S-Video DVR Optical Composite Video Analog ESC Return ▲ Move ▶ Adjust Menu Exit](/content/2026/08/1581156/images/72001b9137b72f9ec3ffae8525dd76f72da6647e7353ea656474b24672032c12.jpg)
5 In the left-hand column (under Video Input), locate the name of the port to which you've connected the video cable for your equipment.
6 In the middle column of the same row (under Label), select the type of device you've connected. If you've connected a device not listed below, select an unused name such as AUX. You can select from these labels:
| Label (device name) Description |
| CABLE Cable box |
| SAT Satellite receiver |
| HD High-definition DVD player, such as Blu-ray or HD DVD |
| DVR Digital video recorder (for example, TiVo) |
| AUX Video game console |
| VIDEO Video cassette recorder |
Note
You can't select the same label for different inputs. If the label you want is currently selected on another unused input, change the label on the unused input to free up that label.
7 In the right-hand column of the same row (under Audio Input), select the name of the port to which you've connected the audio cable.
For example: If you connected a cable box to the HDMI1 port and the cable box supports HDMI audio, select HDMI1 in the Audio Input column. Or if you connected to the S-Video port, select Coax, Optical, or Analog in the Audio Input column, depending on the port to which you connected the audio cable.
Note
Make sure you don't select the same audio input for different video inputs.
8 When you're done changing the settings, press the MENU button to exit the menu system.
Note
When you're viewing a particular source, you can press the OSD (On-Screen Display) button to display information about the source.
Connecting Audio Equipment
You can connect an external audio device, such as a CD player or tape deck, to the Ensemble HD system. Use an RCA-style stereo cable and connect your equipment's audio output port to the AUDIO 1 port on the back of the AV controller, as shown below:
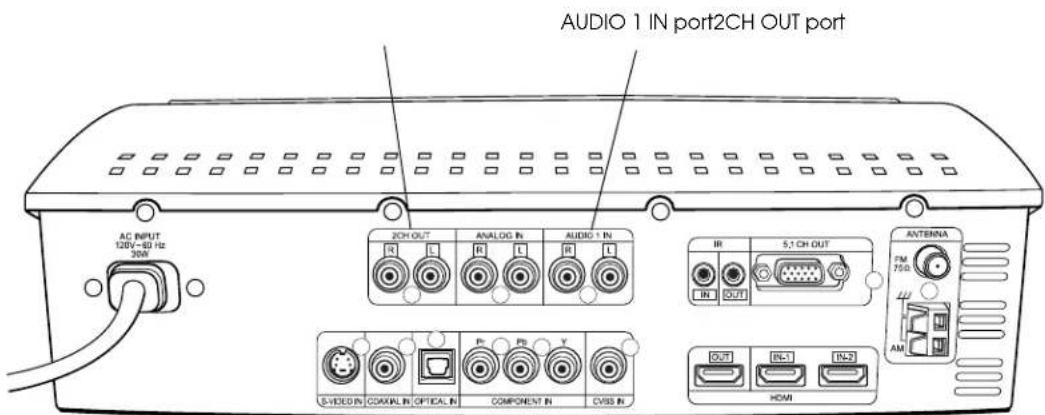
To record from the AV controller to your tape deck, connect the audio input port on your tape deck to the 2CH OUT port, shown above. If you're not using a tape deck, you can use this port to connect the Ensemble HD system to an external amplifier or other home audio system.
Note
The 2CH OUT port is intended for use as a pass-through port. You cannot use the Ensemble HD system to control the volume of the audio signal transmitted through this port.
Setting Up the Remote Control
After connecting a new component, you can continue to use its original remote control. However, it may be more convenient to set up the Ensemble HD remote control to work with it. That way, you only need to use one remote control.
You enable the Ensemble HD remote control to recognize the new component by entering a setup code as described on page 37. This creates the appropriate commands for your device in one of the remote control menus listed below:
| Component Remote control menu name |
| Cable box CABLE |
| Satellite receiver SAT |
| High-definition DVD player HD |
| Digital video recorder (for example, TiVo) DVR |
| Video game console AUX |
| Video cassette recorder VIDEO |
Note
The menus for the listed components remain blank until you enter the setup code for the component. The remote control also has several other menus (DVD, RADIO, AUDIO, and PROJ). These are used to operate the built-in components of the Ensemble HD system.
If you have a type of component not listed above, first enter its setup code as described in the next section. Then see "Customizing the Remote Control Menu" on page 39 for additional instructions.
Entering the Setup Code for Your Component
You enable the remote control to recognize the new component by entering a setup code from the tables starting on page 85. You may have to try out several codes before finding the right one for your component. Once the correct code is entered, the remote control will automatically create the appropriate commands in the menu for the new device.
If you can't find the correct code, you can “teach” the remote control how to operate your new component one function at a time, but this may take much longer (see page 72).
1 Turn on the component you want to set up. Each time you enter a code, the remote control will try to turn off your component by sending a power-off command. You will know that you have entered the correct code when the component turns off.
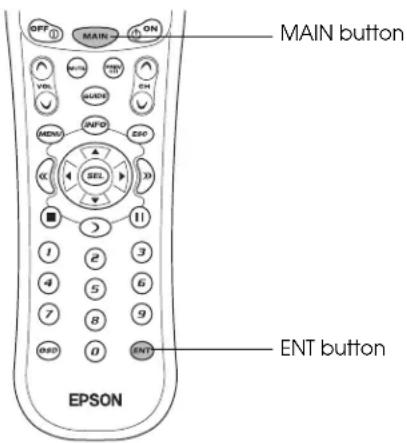
2 Press and hold both the MAIN and ENT (Enter) buttons for approximately three seconds to enter the SETUP menu.
Note
You have 30 seconds to perform a step while you are in the SETUP menu. If you don't press a button, the remote control returns to the MAIN menu.
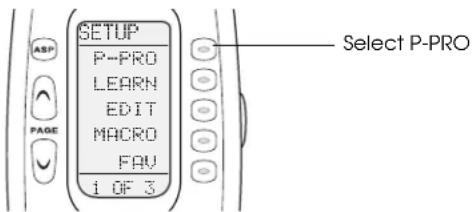
3 Select the P-PRO (Pre-Programmed) option on the LCD screen.
4 Choose the name of the remote control menu that will operate the device. It's important to choose the one whose name matches the device label you selected in the Source Assign screen on page 35. If you don't see your device on the screen, press the PAGE or (page up or down) button to view more options. Use the ▲ or ▼ button to highlight the desired option so it flashes, then press the SEL (Select) button.
Note
Some of the device names (DVD, RADIO, AUDIO, and PROJ) are already used by the Ensemble HD system, and you cannot select them.
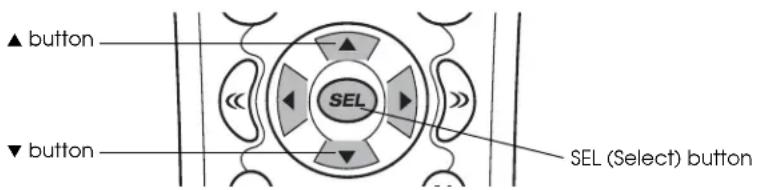
5 Use the ▲ or ▼ button to select the type of device you've connected, then press the SEL (Select) button. (The names in this step correspond to the categories of devices found in the code tables on page 36).
6 Point the remote control at the component, then enter the first three-digit code number from the code tables starting on page 87. The code numbers are listed by categories of devices, then by brand. After you enter a three-digit code, look at the component to see if it has turned off. (You do not have to press SEL or ENT to enter the code.)
Continue to enter code numbers until the component turns off.
Note
If the component fails to turn off after you have entered all the code numbers listed for your brand, you can scan through the other brands in the table using the UP and DOWN options on the LCD screen (there is a chance that your component was actually manufactured by another brand). However, most of the code tables are large, so it is usually faster to use the learning method described on page 72.
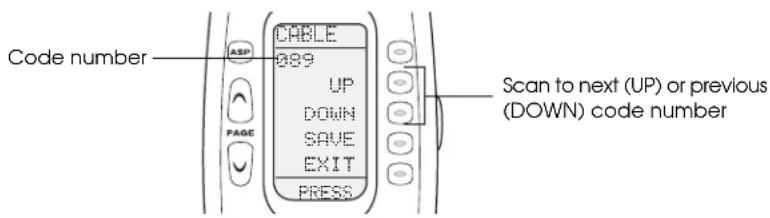
7 When the component turns off, save the code number you entered by selecting the SAVE option on the LCD screen.
8 Press the MAIN button twice to exit the SETUP menu.
9 Test the Ensemble HD remote control to make sure it has all the functions you need for your component. When you select your component's menu, you should see all the functions needed to operate it. If any commands are missing, you can copy them from the component's original remote control (see page 72).
Note
Refer to the manual that came with your component for instructions on using the commands to operate it.
Customizing the Remote Control Menu
For most components that can be connected to the Ensemble HD system, a full set of functions is already programmed into the remote control. These functions work with all the components listed in the tables starting on page 85. If you've connected a different type of component or want to customize the menu for your device, follow the steps below.
Note
There are 10 devices listed in the remote control's MAIN menu. You cannot add new ones, but you can modify an existing one to customize it for your new component.
1 First enter the code for you component, as described on page 37. If you successfully enter the correct code, the remote control will automatically create the appropriate commands in the menu for the new device.
2 If desired, change the menu name for the new device on the remote control. For example, you might want to change AUX to HDTV. To change the device name, see “Editing Device Names and Commands” on page 75.
Note
If you change the device name on the remote control, it will not match the name shown on the projection screen when you select your component for viewing.
3 If necessary, delete any functions currently displayed in the menu that you don't need. See "Editing Device Names and Commands" on page 75.
4 If any functions are missing, copy them from component's original remote control. See “Learning Commands from Another Remote Control” on page 72.
Using the Remote Control to Operate Your Equipment
When you're ready to use your new component, follow these steps to turn it on:
1 Make sure the Ensemble HD system is ready for use. If necessary, press the MAIN button on the remote control, then press the ON button to turn on the system. The screen comes down, and the projector and AV controller turn on.
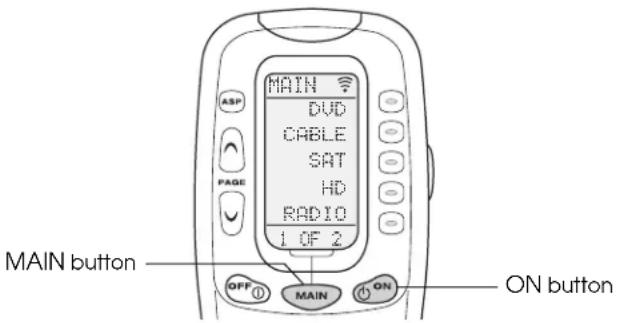
2 Select the component you want to operate on the remote control's LCD screen (for example, CABLE or SAT).
Your component turns on and the AV controller switches to that component as its source.
Note
When the menu is displayed for a component (not the MAIN menu), the ON and OFF buttons operate that component. When the MAIN menu is displayed, the ON and OFF buttons control the Ensemble HD system.
Refer to the manual that came with your component for instructions on using the commands to operate it.
3 When you're done using your component, make sure its menu screen is displayed on the remote control and press the OFF button.
4 To turn off the Ensemble HD system, press the MAIN button to return to the MAIN menu. Then press the OFF button to turn off the projector and AV controller, and to raise the screen.
Adjusting the Sound, Picture, and Other Settings
You can use the menu system described in this chapter to adjust the sound, picture, and other settings. See these sections:
- "Using the On-screen Menu System" below
- "Adjusting the Picture" on page 42
- "Adjusting the Sound" on page 46
- "Using Other Features" on page 49
- "Restoring Factory Defaults" on page 51
Using the On-screen Menu System
Follow these guidelines when using the on-screen menu system.
1 Make sure the MAIN menu is displayed on the remote control.
Note
The MAIN menu must be displayed, or you won't be able to open the Ensemble HD menu by pressing the MENU button. If another component's page is displayed instead, its menu screen will open when you press the MENU button.
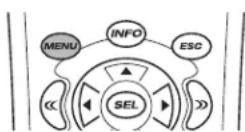
2 Point the remote control at the screen and press the MENU button. You see the Ensemble HD menu, as shown below.
Note
When you open the menu, it displays the last screen you used.
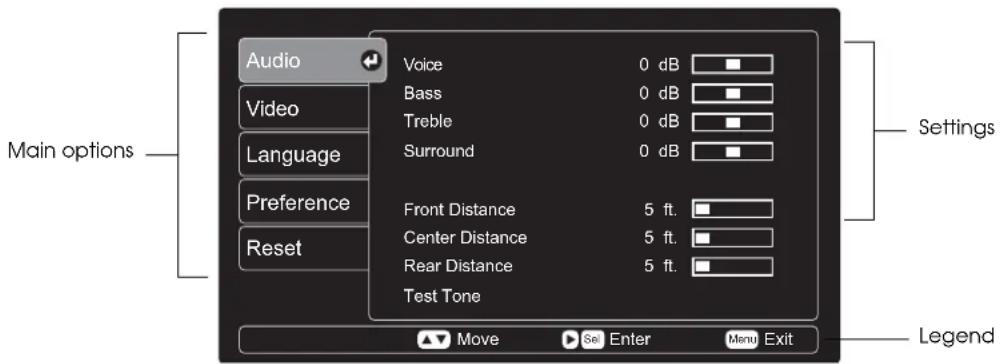
3 Use the ▲ or ▼ button to highlight the menu you want to use (such as Audio or Video). Then press the SEL (Select) button to open it.
4 Use the ▲ or ▼ button to highlight the setting you want to adjust.
5 After highlighting the setting you want to adjust, check the legend at the bottom of the screen. It tells you which buttons let you adjust the setting.
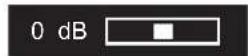
For example, if you see a slider bar like this, use the ◀ and ▶ buttons to change the setting.
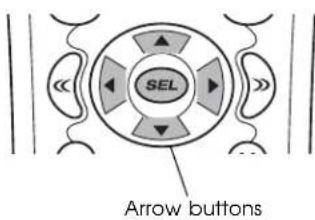
6 Press the ESC (Escape) button to return to the previous menu level, or press the MENU button to exit the menu system.
Adjusting the Picture
Adjusting the Color Mode
You can change the projector's Color Mode to automatically adjust brightness, contrast, and color, letting you quickly optimize the image for different lighting conditions. For example, you might select Living Room for watching movies in the daytime with the curtains closed, and Theatre for watching movies at night.
1 Make sure the MAIN menu is displayed on the remote control. If necessary, press the MAIN button.
2 Press the PAGE button to display the second page of components.
3 Select the PROJ option on the LCD screen to open the Projector menu.
4 Select COL-M (Color Mode). You see a screen like this:
![[Color Mode] Dynamic Living Room Natural Theatre Theatre Black 1 Theatre Black 2](/content/2026/08/1581156/images/46b12481c67755d114b41a017b515ee26f2da04f6a1e50e9672b02499d9b637d.jpg)
Screen shown for the PowerLite Home Cinema 1080
5 Press the COL-M button repeatedly to change modes. (With the PowerLite Home Cinema 720, use the ▲ or ▼ button to highlight the setting you want to use.)
| Color Mode Description |
| Dynamic For projecting the brightest picture available |
| Living Room For watching movies during the day |
| Natural For projecting the most natural, accurate colors |
| Theatre For viewing movies in a dark room |
| Color Mode Description | |
| Theatre Black 1 | For images close to those produced by professionally used broadcast monitors |
| Theatre Black 2 For black-and-white movies or those with dark scenes | |
| sRGB For projecting computer images that conform to the sRGB color standard(PowerLite Home Cinema 720 only) | |
6 Press the SEL (Select) button to apply the setting.
Adjusting the Aspect Ratio
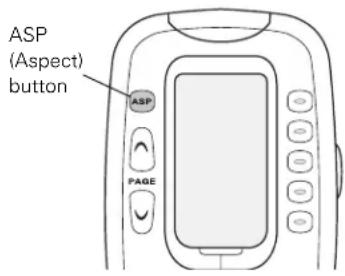
Some picture sources, such as standard-definition TV broadcasts, are not formatted for high-definition video. To fit such images optimally onto the screen, you can change their shape (or aspect ratio) by pressing the ASP (Aspect) button on the remote control. Press the ASP button repeatedly to move through the settings. The setting you choose depends on how the original picture source is formatted.
Note
No matter which aspect ratio setting you choose, the original image is automatically "upscaled" (resized) to fit on your Ensemble HD screen.
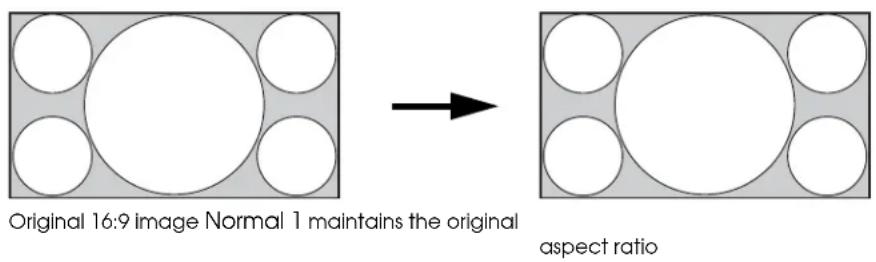
- Normal 1 (default setting) for widescreen content, such as HD television broadcasts, presented in the 16:9 HDTV aspect ratio.
Note
Movies released in a theatrical widescreen format (such as 1.85:1 or 2.35:1) will display with black bars at the top and bottom. That's because high-definition TVs and home entertainment systems use the slightly narrower 16:9 (1.78:1) aspect ratio.
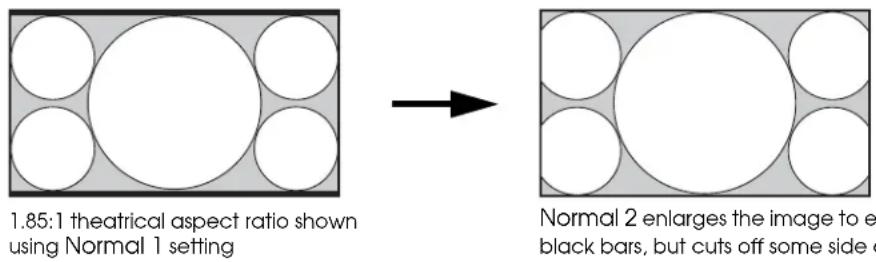
- Normal 2 for use with DVDs that present movies in their original 1.85:1 aspect ratio. Eliminates narrow black bars at the top and bottom so the image fills the whole screen. Can also be used to improve the appearance of widescreen TV broadcasts that contain “noise” in the overscanned area.
• 4:3 for standard-definition TV broadcasts, video games, and other 4:3 content.
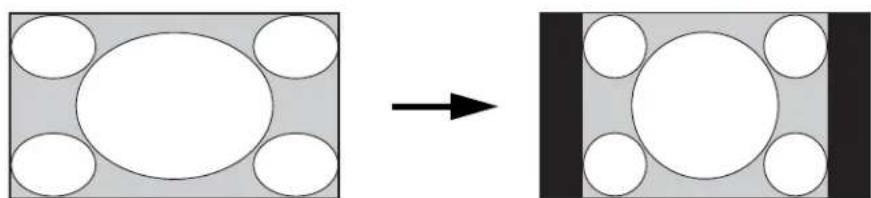
4:3 image shown using Normal 1 setting
4:3 adds side bars to display the image in its original aspect ratio
- Wide for standard-definition TV broadcasts, video games, and other 4:3 content.
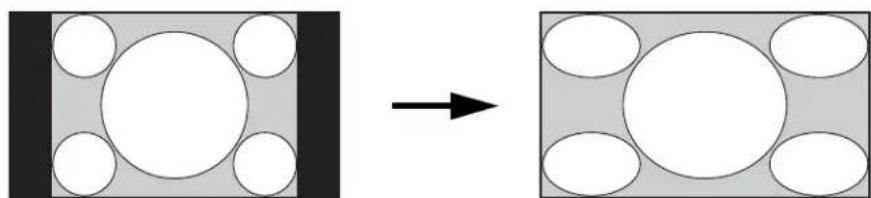
4:3 Image shown using 4:3 setting
Wide keeps the center of the image close to its original proportions, while stretching the image more at the sides to fill the screen
- Zoom 1 for use with DVDs that present movies in their original 2.35:1 aspect ratio.
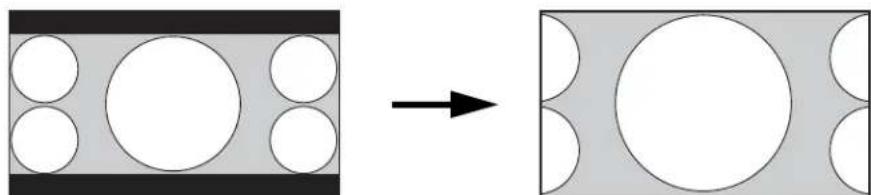
2.35:1 theatrical aspect ratio shown using Normal 1 setting
Zoom 1 enlarges the image to eliminate the black bars, but cuts off some side content
- Zoom 2 for standard-definition (4:3) content that has been “letterboxed” to present movies in their original aspect ratio.
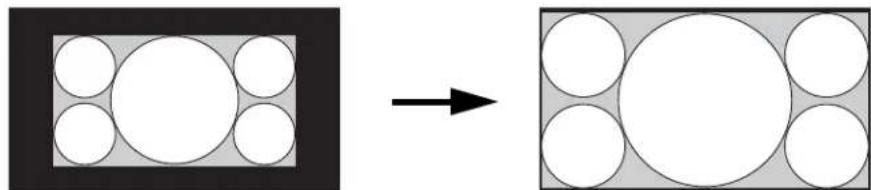
Letterboxed 1.85:1 movie image shown using 4:3 setting
Zoom 2 enlarges the image to eliminate the black bars on the sides, but narrow bars remain at the top and bottom
Note
When you're viewing a particular source, you can press the OSD (On-Screen Display) button to display the selected aspect ratio.
Adjusting the Picture Quality
The settings described below control how the image is processed by the Ensemble HD system's AV controller. Before changing any of these settings, first be sure to select the best Color Mode as described on page 42.
Note
These settings adjust the picture quality for all sources, not for each source independently.
To access the Video menu, make sure the MAIN menu is displayed on the remote control, press the MENU button, then select Video. You see this screen:
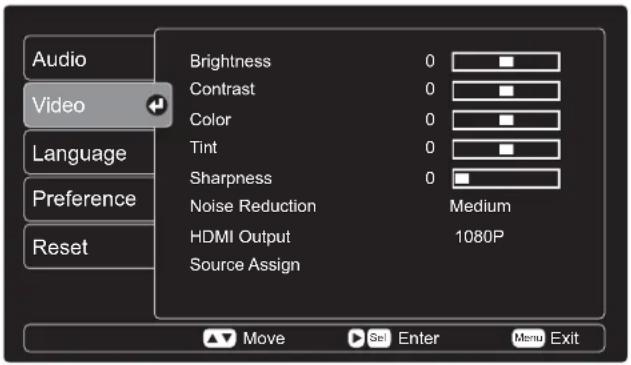
You can adjust the following settings:
- Brightness
Adjusts the brightness so it's suitable for your viewing conditions.
- Contrast Adjusts the contrast between the light and dark parts of the image.
• Color Adjusts the color intensity of the image.
- Tint Shifts the color balance between magenta and green.
- Sharpness Use this function to make lines and edges appear more distinct.
- Noise Reduction This function softens the image and reduces noise. Use only if you are receiving a weak signal.
- HDMI Output Sets the output signal to either 720P (for the PowerLite Home Cinema 720) or 1080P (for the PowerLite Home Cinema 1080). Automatically defaults to the projector's resolution.
- Source Assign Lets you combine audio and video sources connected to the AV controller through different ports. See "Linking Audio and Video Sources" on page 34 for details.
Adjusting the Sound
To access the Audio menu, make sure the MAIN menu is displayed on the remote control, press the Menu button, then select Audio. You see this screen:
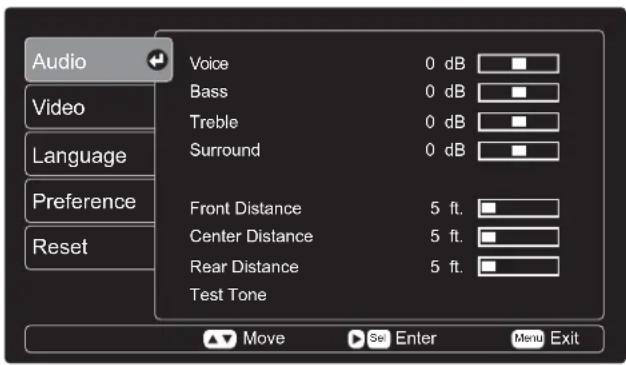
You can adjust the following settings:
- Voice
Lets you adjust the volume of the center channel, which is mainly used for actors' voices in movies.
- Bass
Lets you adjust the volume at the lower end of the sound spectrum. This setting adjusts the bass sound from the left and right front channels and the subwoofer.
- Treble
Lets you adjust the volume at the higher end of the sound spectrum.
- Surround
Lets you adjust the volume from the rear (surround) speakers.
- Front Distance
Adjusts the sound delay from the left and right front speakers. Measure and enter the distance from your main seating location to the left and right speakers on the screen.
- Center Distance
Adjusts the sound delay from the front center speakers. Measure and enter the distance from your main viewing location to the speakers in the middle of the screen.
- Rear Distance
Adjusts the sound delay from the rear (surround) speakers. Measure and enter the distance from your main seating location to the rear speakers.
- Test Tone
Lets you check and adjust the sound level for each speaker. See the next section for details.
Note
You can also adjust the Voice, Bass, Treble, and Surround settings by selecting the AUDIO menu on the remote control, and then selecting TONE. Press TONE repeatedly to select each setting.
Using Test Tones to Adjust the Sound
Use the test tones to adjust the volume for each speaker independently or to verify that each speaker is working properly. Use a sound-level meter to ensure that the tone emitted from each speaker is 75 dB. If you're not using a meter, make sure all the speakers sound consistent in volume.
1 Make sure the MAIN menu is displayed on the remote control, press the MENU button, select Audio, then select Test Tone. You see this screen:
![[Test Tone] Left Speaker 0 dB Center Speaker 0 dB Right Speaker 0 dB Rear Right Speaker 0 dB Rear Left Speaker 0 dB Subwoofer Speaker 0 dB ESC Return ▲ Move ▶ Adjust Menu Exit](/content/2026/08/1581156/images/75c452fa16beda1afd170e3fedc9eb2d2673f9213ecd0c130a6583af2a153017.jpg)
The speakers automatically begin emitting tones, one by one.
2 Use a sound-level meter to measure the volume from the usual seating area. Set the meter for C weight and slow response.
Use the ▲ or ▼ button to move the test tone to a different speaker. Press the ▲ button as needed to keep the test tone from advancing to the next speaker.
3 Use the ◀ or ▶ button to change the speaker's output. Make sure all the speakers output sound at 75 dB.
4 When you're done adjusting the settings, press the MENU button to exit the menu system.
Changing the Surround Sound Format
Depending on your audio source, you may be able to select from one or more surround sound formats.
1 Make sure the MAIN menu is displayed on the remote control, then select the AUDIO option.
2 Select the SURR (Surround) option to change the audio format. Each time you press SURR, the format changes to one of the following settings:
- DPLII Movie or DPLII Music (Dolby Pro Logic II) for extracting 5.1-channel sound from recordings made with Dolby Surround technology. If the source is digitally encoded, you see the type of encoding—Dolby Digital or DTS (Digital Theatre Sound)—displayed on the screen.
- STEREO for digital and analog sources recorded in 2-channel stereo, when you don't want to hear it using any surround sound effects.
Note
When you're viewing a particular source, you can press the OSD (On-Screen Display) button to display the current audio format.
Using Midnight Mode
Midnight Mode adjusts the sound for late-night viewing when you want to avoid disturbing others. The volume is reduced at the bass end with volume highs and lows being compressed to a narrower range.
1 To access the Midnight Mode setting, make sure the MAIN menu is displayed on the remote control, press the Menu button, then select Preference. You see this screen:
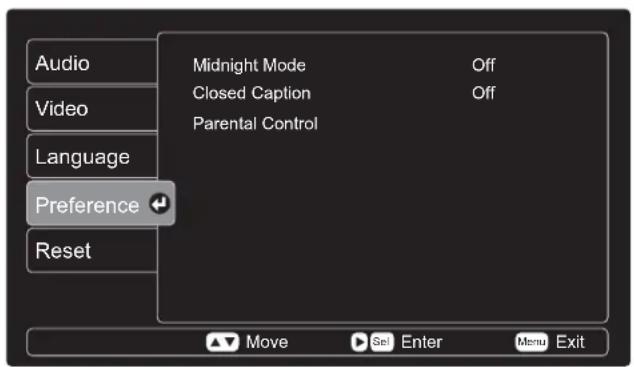
2 Select Midnight Mode, then select Off, Medium, or Full.
Using Other Features
In addition to its audio and video settings, the on-screen menu system lets you select language options, turn on closed captioning, and use parental controls to restrict access to rated DVDs.
Choosing the Language
You can change the language that the on-screen display and various DVD features appear in. For each option, you can choose from English, French, or Spanish.
To access the Language menu, make sure the MAIN menu is displayed on the remote control, press the Menu button, then select Language. You see this screen:
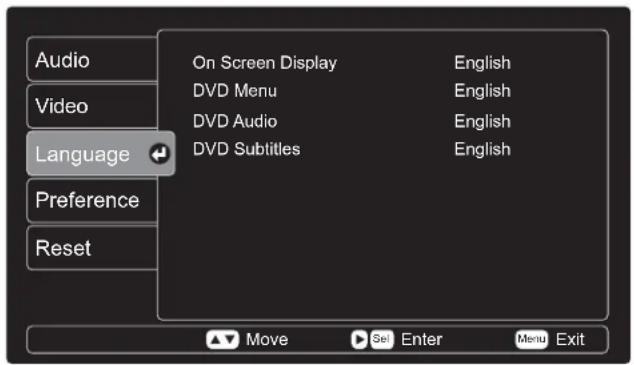
You can adjust the following settings:
- On Screen Display
Lets you change the language for the menu screens discussed and shown in this chapter.
- DVD Menu
Lets you select the default language for the menu you see when you first insert a DVD (the menu that lets you select its contents).
- DVD Audio
Lets you select the default language for the audio portion of your DVDs, when you play a DVD that has separate audio tracks in different languages. DVDs with separate audio tracks have a symbol like this to indicate the number of languages: ④
- DVD Subtitles
Lets you select the default language that subtitles appear in, when you turn on the subtitles option for a DVD that has subtitles. DVDs with subtitles have a symbol like this to indicate the number of subtitled languages: 2
Using Parental Controls
You can control access to rated DVDs to prevent children from viewing unsuitable content. To set up parental controls, you'll need to create a 4-digit numeric password.
Note
The parental controls cannot be used to prevent viewing of unrated DVDs.
To set up parental controls, follow these steps:
1 Make sure the MAIN menu is displayed on the remote control. Press the Menu button, select Preference, then select Parental Control. You see this screen:
![[Parental Control] Enter Password ESC Return 0 - 9 Number Menu Exit](/content/2026/08/1581156/images/9a54fc0701c4351b97305a9d9af116e61abc50c25d921bda9382ef63e0c28ba2.jpg)
2 Select the DVD option on the remote control. (You must be in DVD mode to use the numeric keypad, as required in step 3.)
3 Enter your parental controls password. If this is your first time using the parental controls, enter the default password 1234.
You see this screen:
![[Parental Control] Enter new Password Max. allowable rating None Return to Preference menu ESC Return ▲ Move Sel Enter Menu Exit](/content/2026/08/1581156/images/bf87b3c4a37c59d3a86e29c471723053fb04f847052fcdad911cca49a266e71b.jpg)
4 If this is your first time using the parental controls, select Enter new Password. Use the numeric keypad on the remote control to create a 4-digit numeric password. Confirm the password by re-entering it on the next screen.
Note
Be sure to write down the password and keep it in a safe place. You'll need the password if you want to change the parental control settings in the future.
5 Select Max. allowable rating and select the highest rating you want to allow for viewing.
| Rating Description |
| G General audience |
| PG Parental guidance suggested |
| PG13 Parents strongly cautioned |
| R Restricted – No one under 17 admitted without a parent or adult guardian |
| NC17 No one under 17 admitted |
| None No rating selected |
6 When you're done changing the settings, press the MENU button to exit the menu system.
Restoring Factory Defaults
If you customize the picture and sound but don't find your changes satisfactory, you can restore the system to its original settings. You should use this function only if necessary, because it may restore a number of settings you'd like to keep.
Caution
When you restore the settings, the audio, video, language, and source assign settings are returned to their original state.
1 Make sure the MAIN menu is displayed on the remote control, press the MENU button, then select Reset. You see this screen:
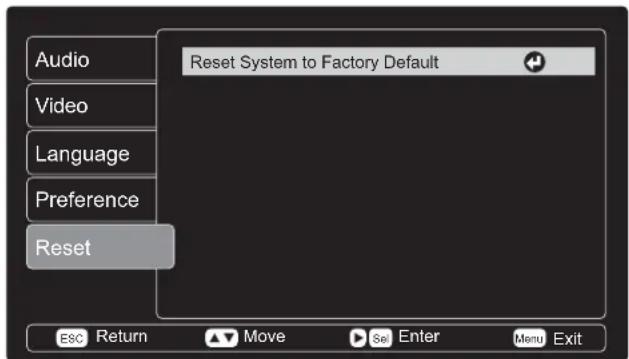
2 Press Sel (Select) to return to the factory default settings, or press the Menu button to cancel.
3 At the confirmation screen, select Yes. The AV controller restores its settings and shuts itself down.
Note
You can also restore the remote control to its original settings. See "Restoring Remote Control Factory Defaults" on page 83.
Cleaning and Maintenance
Follow the instructions in this chapter when your Ensemble HD system needs ordinary cleaning, as described below. Routine maintenance is not required. However, you may need to perform the following basic tasks on occasion:
- “ A d j u s t i n g t h e S c r e e n L e n g t h ” o n
- "Adjusting the Image Position and Focus" on page 56
- "Checking the Projector Lamp" on page 58
- "Replacing Remote Control Batteries" on page 59
Warning
Never open the cover on the projector or other components. Dangerous electrical voltages can injure you severely. Do not try to service this product yourself, except as specifically explained in this User's Guide.
Cleaning
Warning
Before you clean any part of the system, turn the system off and unplug the power cord.
Cleaning the Screen
If the screen gets soiled, clean it using a clean, white, 100% cotton cloth. Dampen the cloth with clean, clear water (do not use detergents). Gently wipe the soiled area in one direction only. Do not use a circular motion. Wipe any moisture from the screen using a dry cotton cloth.
A lint roller or masking tape may be used to remove loose dust or lint.
Cleaning the Projector Lens
Clean the lens if you notice dirt or dust on the surface. To remove dirt or smears, use lens-cleaning tissue. If necessary, moisten a soft cloth with lens cleaner and gently wipe the lens surface.
Caution
Clean the lens gently to avoid changing the focus or misaligning the image with the screen. If this happens, see "Adjusting the Image Position and Focus" on page 56.
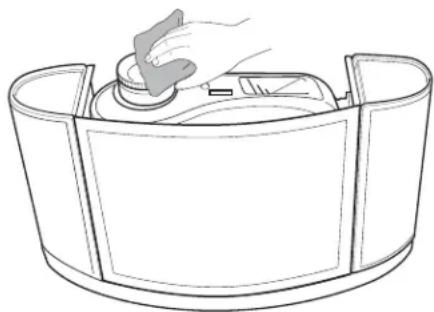
Cleaning System Components
You can clean the outside of the system components to remove dust and fingerprints. Before cleaning, turn off the system and unplug the power cord.
- To remove dirt or dust, wipe the component with a soft, dry, lint-free cloth.
- To remove stubborn dirt or stains, moisten a soft cloth with water and a neutral detergent. Then wipe the component and dry it with a dry cloth.
Caution
Never use wax, alcohol, benzene, thinner, or other chemical detergents. These can damage components.
Adjusting the Screen Length
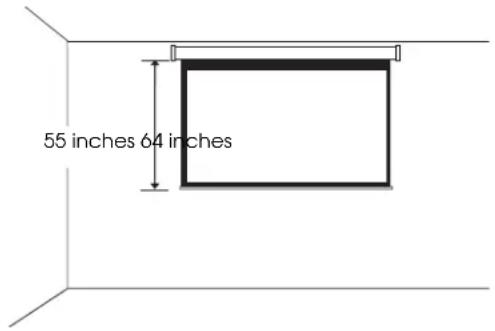
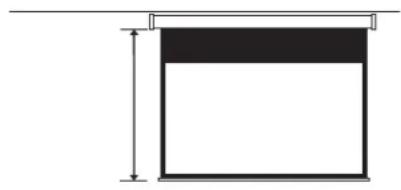
You can adjust how far the screen comes down when you open it. The screen is factory-set to come down 55 inches, but you can set it to come down as far as 64 inches, with a 12-inch black drop at the top.
Note
If you change the position of the screen, you'll have to reposition the image. See page 56 for instructions.
1 Make sure the MAIN menu is displayed on the remote control. If necessary, press the MAIN button.
2 Press the PAGE button to display additional components.
3 Press the button to the right of PROJ to select the projector menu.
4 Use the following commands to raise and lower the screen, and to stop it at the desired position:
• S-UP to raise the screen
• S-DWN to lower the screen
When the screen comes to a stop, press S-DWN again to lower it beyond the current stop-position.
You can bring it down as far as the maximum length set by the adjustment screw described in “Manual Screen Adjustment” on page 55.
• S-STP to stop the screen
5 Once the screen is positioned where you want it, press S-SET to set the screen position.
6 Press S-UP to raise the screen fully.
Note
You must raise the screen all the way for the new position to take effect.
7 Press S-DWN re-open the screen. Verify that it comes down and stops at the desired position.
Manual Screen Adjustment
If you weren't able to adjust the screen length precisely enough using the remote control, you can adjust it using the 4-mm Allen wrench that came with your system. This adjustment sets the maximum length that the screen can come down.
Caution
Do not allow the screen to descend more than 64 inches (with a black drop of more than 12 inches), or the fabric could separate from the roller.
1 After adjusting the screen length as described in the previous section, press S-DWN on the remote control to lower the screen fully.
2 Locate the lower-limit adjustment screw on the left side of the screen roller, inside the screen casing.
Caution
Do not turn the upper-limit adjustment screw, located to the rear of the lower-limit adjustment screw.
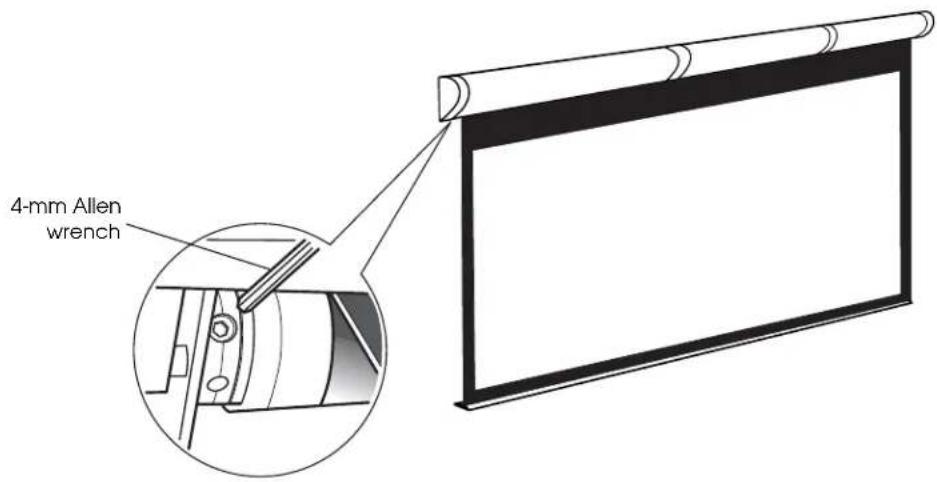
3 Use a 4-mm Allen wrench to rotate the adjustment screw:
To raise the screen: Turn the screw clockwise.
To lower the screen: Turn the screw counterclockwise.
Each turn changes the screen's stop-position by two-thirds of an inch. However, since the screen doesn't move as you adjust it, you'll need to estimate how far to turn the screw. After turning the screw the estimated number of turns, remove the Allen wrench and press S-UP on the remote control to raise the screen fully. Then press S-DWN to re-open the screen. Verify that it comes down and stops at the desired position.
Adjusting the Image Position and Focus
If you adjusted how far the screen comes down (see page 54), you'll need to reposition the image on the screen as described below. You may also need to reposition or refocus the image if you cleaned the lens and accidentally changed it from its original position.
Repositioning the Image
1 Remove the cover on the bottom of the projector enclosure to access the lens shift dials on the projector. Slide the cover straight forward, then remove it. (The cover is held in place with clips, which may be tight.)
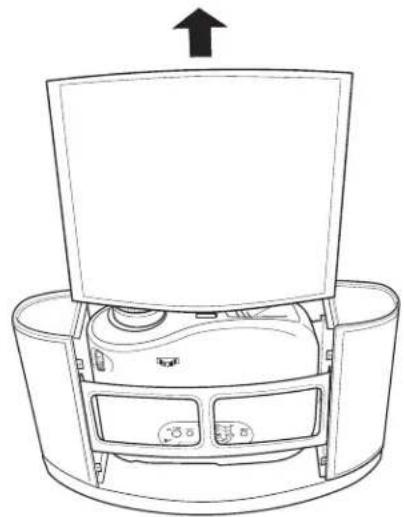
2 If desired, you can display a test pattern to help adjust the image position. You'll need to use the remote control that came with the projector (not the Ensemble HD remote). Press the Pattern button on the remote control to display the pattern. Press the Pattern button again to turn it off.
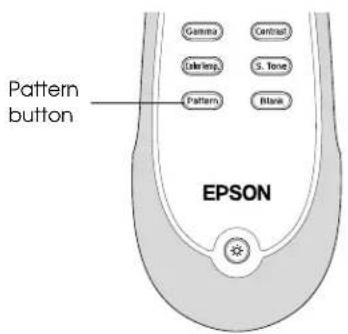
3 Use the horizontal lens shift dial to move the image left or right. Use the vertical lens shift dial to move the image up or down.
Note
Do not try to move the lens by hand, or you may damage the projector. Always use the lens shift dials to change the image position. If a lens shift dial becomes hard to turn, you cannot adjust the position any further.
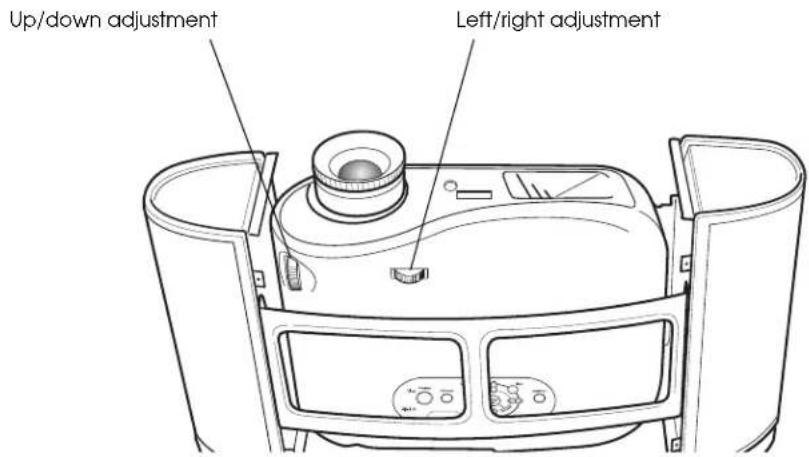
4 When you're done adjusting the image position, replace the cover on the bottom of the projector enclosure.
Focusing and Resizing the Image
Use the focus ring to sharpen the image, or the zoom ring to resize it.
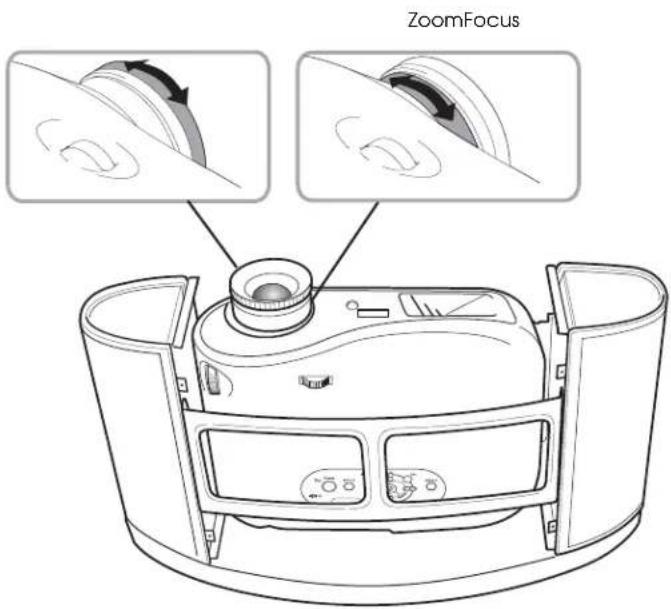
Checking the Projector Lamp
The projector lamp lasts for up to 3000 hours. You can use the Info menu to check how long it's been in use (see below). It's time to replace the lamp when:
- The projected image gets darker or starts to deteriorate.
- The message Replace the lamp appears on the screen when you start projecting.
- The projector's warning light flashes red at half-second intervals (see below for details).
Note
Lamp life results will vary depending on mode selected, environmental conditions, and usage. Turn off this product when not in use to prolong the life of the projector.
Checking the Info Menu
If you have access to the remote control that came with the projector (not the Ensemble HD remote), you can use it to check the projector's Info menu to find out how long the lamp has been in use. If you don't have the remote control, you'll need to remove the cover on the bottom of the projector enclosure (see page 56) and then use the buttons on the projector's control panel to display the Info menu.
1 Press the Menu button on the projector's remote control or on its control panel.
2 Use the menu navigation buttons to open the Info menu.
3 Check the Lamp Hours to determine how long the lamp has been in use.
Note
The Lamp Hours shows 0H until you've used the lamp for at least 10 hours.
Checking the Warning Light
If you suspect that the lamp needs to be replaced, check the warning light on the projector's control panel.
1 Remove the cover on the bottom of the projector enclosure (see page 56).
2 Check the warning light, pictured below.
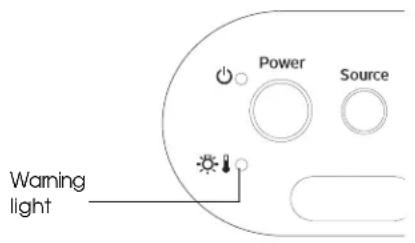
If the warning light is flashing red at half-second intervals, the lamp needs to be replaced. Contact your dealer or a qualified servicer, or contact Epson for help (see page 69).
Replacing Remote Control Batteries
If the Ensemble HD remote control isn't working correctly, check the following:
- Aim the remote control at the top of the screen and try operating the screen. If the remote control works only when you aim it at the top of the screen but not elsewhere in the room, you may need to replace the batteries.
- P r dLIGHT button oh the side of the remote control and verify its screen and buttons light up. (You need to be in a darkened room to see this.) If they don't light up, replace the batteries.
- Check for a LOW BATTERY message at the bottom of the remote control's LCD screen.
Follow the steps below to replace the batteries in the remote control.
Note
All user-made settings are stored in non-volatile memory and are preserved when the batteries are taken out.
1 Remove the battery compartment cover on the back of the remote control.
2 Insert 4 AAA batteries as shown below.
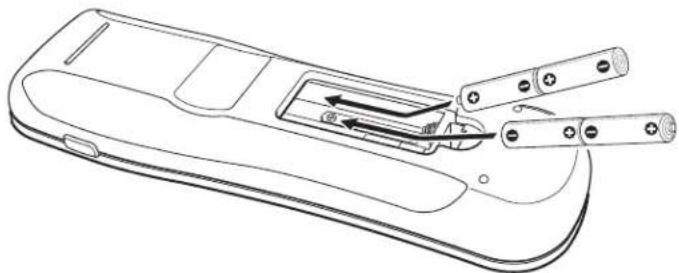
3 Replace the cover.
Solving Problems
If you're having a problem with the Ensemble HD system, check for a solution in one of these sections:
- "Basic Operation Problems" below
- “Picture Problems” on page 62
- "Sound Problems" on page 64
- "Problems Using the Screen" on page 65
- "Problems Using the Remote Control" on page 66
- "Problems Using the DVD Player" on page 67
- "Problems Using the Radio" on page 67
- “Problems Using an External Component” on page 68
If you cannot solve the problem on your own, contact Epson for help (see page 69).
Basic Operation Problems
| Problem Solution | |
| The system doesn’t turn on. | Make sure the MAIN menu is displayed on the remote control, then press the ON button to turn the system on or the OFF button to turn the system off.The remote control’s batteries may need to be replaced. See page 59.Check the blue light at the top of the screen. When the screen is raised, the light remains on. This indicates that the system is receiving power. If the light is not on, make sure your electrical outlet is working and isn’t controlled by a wall switch or timer.Check that the power cords on the back of the subwoofer are connected securely.Check the power switches on the back of the subwoofer. Make sure the PWR ON MODE switch is in the AUTO position and the MASTER POWER switch is turned on. |
| The projector doesn’t turn on. | Press the MAIN button on the remote control, then press the ON button. Keep the remote control pointed at the screen for several seconds after you press the button to ensure that the projector turns on.Try to turn on the projector by itself. Open the PROJ menu on the remote control, then press the ON button.The lamp may need to be replaced. See “Checking the Projector Lamp” on page 58. |
Problem Solution
| The AV controller doesn’t turn on. | Make sure the AV controller is receiving power. When it’s in standby mode, the light around the ON/STANDBY button is orange. If the light is off, the unit is not receiving power. Check the power cord to make sure it’s securely connected to the subwoofer or a working electrical outlet.Press the ON/STANDBY button to turn on the AV controller. The light around the button turns blue when the unit is on.Try to turn on the AV controller using the remote control. Make sure the MAIN menu is displayed on the remote control (if necessary, press the MAIN button). Then either press the ON button, or select the DVD or RADIO option. If the AV controller does not turn on, replace the remote control’s batteries (see page 59).Make sure the control cable is connected to the IR IN port on the back of the AVcontroller. |
| The screen can’t be raised or lowered. | See “Problems Using the Screen” on page 65. |
| There is no sound. See “Sound Problems” on page 64. | |
Picture Problems
| Problem Solution | |
| You don't see a picture. | Make sure the projector is turned on. Press the MAIN button on the remote control, then press the ON button. Keep the remote control pointed at the screen for several seconds after you press the button to ensure that the projector turns on.If you're sourcing video from an external component, make sure that component is turned on.The lamp may need to be replaced. See "Checking the Projector Lamp" on page 58.Make sure the video cable is connected to the HDMI OUT port on the back of the AV controller.If you've connected an external component, check for loose or disconnected cables on the back of the component and the AV controller.If you've connected an external component, check the Source Assign screen.Make sure the correct label is assigned to the video port to which the component is connected (see page 34). |
| You see light or dark pixels on the screen. | The projector's display is more than 99.99% accurate. However, some individual pixels (dots) may appear light or dark due to the inherent limitations of LCD manufacturing technology. |
| You notice smudges or dirt in the image. | You may need to clean the screen (see page 53) or the projector lens (see page 53). |
| The image sometimes gets scrambled or broken up. | Use a soft, lint-free cloth to clean the disk. Wipe gently in a straight line from the center of the disc toward the outside. If necessary, moisten the cloth with water, mild detergent, or rubbing alcohol. Avoid using abrasives, solvents, or other cleansers. |
| You see scrolling horizontal bars in the picture ("hum bars") when watching satellite or cable TV, or you hear a buzzing sound. | Connect a ground loop isolator to the satellite or CATV cable close to where it connects to your equipment. You can purchase this module from electronics retailers. The module filters out interference caused by your cable or satellite system's outdoor ground connection. Or you can use a coaxial surge protector.WARNING:Never disconnect the cable's ground connection or disable the grounding pins on your power cords. These exist for the protection of both you and your equipment. |
| The image is too soft or out of focus. | If you cleaned the lens, you may have accidentally changed the position of the focus ring. See "Adjusting the Image Position and Focus" on page 56.Adjust the sharpness of the image using the Sharpness settings (see "Adjusting the Picture" on page 42). Be careful not to over-adjust the sharpness, or you may get banding in some images. |
| The image isn't positioned correctly on the screen. | If the image isn't at the right height, you may need to adjust how far the screen comes down. See "Adjusting the Screen Length" on page 54.If you cleaned the lens, you may have accidentally changed the lens position or the position of the zoom ring. See "Adjusting the Image Position and Focus" on page 56. |
| The image is cut off, squeezed in one direction, or stretched out. | Press the ASP (Aspect) button on the remote control to select a different aspect ratio setting. See "Adjusting the Aspect Ratio" on page 43.If you've connected a second DVD player as an external component, make sure it's set to output a widescreen 16:9 image. |
| There are black bars at the top and bottom of the image. | Press the ASP (Aspect) button on the remote control to select a different aspect ratio setting. See "Adjusting the Aspect Ratio" on page 43.If you're watching a movie released in a theatrical widescreen format (such as 1.85:1 or 2.35:1), you must display it with black bars at the top and bottom if you want to see the whole image. That's because high-definition TVs and home entertainment systems use the slightly narrower 16:9 (1.78:1) aspect ratio. |
| The image is too dark. | Make sure you've selected the best Color Mode for your viewing environment. See "Adjusting the Color Mode" on page 42.After setting the Color Mode, you may need to fine-tune the brightness and contrast. See "Adjusting the Picture Quality" on page 45.If the projector lamp is old, you may need to replace it. See "Checking the Projector Lamp" on page 58. |
| The colors don't look right. | Make sure you've selected the best Color Mode for your viewing environment. See "Adjusting the Color Mode" on page 42.After setting the Color Mode, you may need to fine-tune the color settings. See "Adjusting the Picture Quality" on page 45.If you've changed several settings and the picture still doesn't look right, you can return all the settings to their original state. However, this option should be used only if necessary. See "Restoring Factory Defaults" on page 51. |
Sound Problems
| Problem Solution | |
| There is no sound. | Check the power switches on the back of the subwoofer. Make sure the PWR ON MODE switch is in the AUTO position and the MASTER POWER switch is turned on. Press the MUTE button on the remote control to make sure the sound wasn't muted or turned off.Unplug any headphones that may be plugged into the AV controller.Try increasing the volume. Depending on your audio source, it's possible that no sound may be heard at the low end of the +dB range.If you've connected an external audio device such as an MP3 player, make sure its volume control is adjusted to allow sound output.If you've connected an external audio device such as an MP3 player or tape deck, be sure to select the correct audio port: Select the AUDIO option on the remote control, then select either AUD1 (for the Audio 1 port in back of the AV controller) or AUD2 (for the Audio 2 port in front).If you've connected an external component, check the Source Assign screen.Make sure the selected Audio Input matches the port to which the audio is connected (see page 34).If you've connected an external video component using an HDMI cable, make sure HDMI audio is enabled in the component's setup menu. If your component doesn't support HDMI audio, you may need to connect a coaxial or optical cable to carry the audio signal (see page 33).Check for loose or disconnected cables on the back of the subwoofer and AVcontroller. |
| The high and low parts of the sound spectrum seem weak. | Make sure Midnight Mode isn't turned on. See "Using Midnight Mode" on page 48. |
| Bass tones aren't loud enough. | Use the Bass setting to increase the bass. See "Adjusting the Sound" on page 46.Use the Test Tones function to increase the output of the subwoofer. See "Using Test Tones to Adjust the Sound" on page 47.If you rearranged your room or moved your subwoofer to a different location, try switching the PHASE control on the back of the subwoofer. |
Problems Using the Screen
Blue light (remote control sensor)
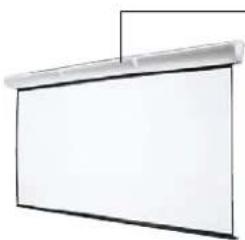
| Problem Solution | |
| You cannot lower the screen. | Check for a blue light at the top of the screen. The light indicates that the screen is receiving power. If the light is off, make sure the power cords on the back of the subwoofer are connected securely.Select the PROJ (Projector) option on the remote control, then select S-DWN to lower the screen.The screen may be stuck in the closed position. Grasp the weighted bar that hangs from the bottom of the screen and pull it slightly to free it. Then try opening the screen again with the remote control.The screen motor may have overheated if you repeatedly raised and lowered the screen. Let the motor cool for 5 to 10 minutes, then try operating the screen again. Check for problems with the remote control (see page 66). |
| You cannot raise the screen. | Check that the blue light at the top of the screen flashes when you make a selection with the remote control. The light indicates that the screen is receiving power. If the light does not flash, make sure the power cords on the back of the subwoofer are connected securely.Select the PROJ (Projector) option on the remote control, then select S-UP to raise the screen.The screen motor may have overheated if you repeatedly raised and lowered the screen. Let the motor cool for 5 to 10 minutes, then try operating the screen again. Check for problems with the remote control (see page 66). |
| The screen comes down too far, or not far enough. | The screen can be adjusted so it comes down anywhere from 55 to 64 inches. If the setting was inadvertently changed, see “Controlling the Screen” on page 15 to reset it. |
| The image isn’t positioned correctly on the screen. | You may need to adjust how far the screen comes down. See “Adjusting the Screen Length” on page 54.If you cleaned the lens, you may have accidentally changed the lens position or the position of the zoom ring. See “Adjusting the Image Position and Focus” on page 56. |
Problems Using the Remote Control
| Problem Solution | |
| The system doesn’t respond to the remote control. | Make sure you’re within about 20 feet of the screen. Point the remote control toward the sensor at the top of the screen.You may need to replace the remote control’s batteries (see page 59). If you suspect they are weak, press the LIGHT button on the side of the remote control and verify its screen and buttons light up. (You need to be in a darkened room to see this.) If they don’t light up, replace the batteries.Turn off any fluorescent lights. Make sure the screen is not in direct sunlight.Turn off nearby equipment that emits infrared energy, such as a radiant room heater.If you changed any of the remote control’s RF settings (see page 81), make sure you didn’t disable the remote control’s IR LED. |
| The ON and OFF buttons don’t operate the system. | Press the MAIN button first, then press either ON or OFF. Keep the remote control pointed at the screen for several seconds after you press the button to ensure that all the components in the system turn on or off. |
| When the numeric keypad is used, there is a delay before your selection is transmitted. | After entering digits with the keypad, press the SEL (Select) button to transmit your selection right away. If you don’t press SEL, the selection will be transmitted after a brief delay. |
| The ENT (Enter) button doesn’t work with the numeric keypad. | The ENT (Enter) button is meant for use with other components that may require it, such as cable box. Use the SEL (Select) button with the numeric keypad when operating the Ensemble HD system. |
| You want to return to the main menu of the DVD you’re watching to select its contents. | Press the MENU or GUIDE button to display the main menu of a DVD.(The MENU button displays the Ensemble HD setup menu if the MAIN menu is displayed on the remote control. If a different menu is displayed, such as CABLE or SAT, it displays the menu system for that component.) |
| You want to view information about the selected audio or video source. | Press the OSD (On-Screen Display) button on the remote control. |
| You want to view chapter information for the DVD you’re watching, or check the amount of time remaining. | Press the INFO button on the remote control. |
| You tried using advanced remote control setup features, and now the remote control doesn’t work correctly. | You can restore the remote control’s original settings. See “Restoring Remote Control Factory Defaults” on page 83. |
| The remote control has been lost or damaged. | Contact Epson for help (see page 69). |
Problems Using the DVD Player
Problem Solution
| The DVD/CD tray doesn’t open or close. | Make sure a flash drive isn’t inserted into the USB slot. The flash drive takes precedence over the operation of the DVD player. When a flash drive is inserted, the DVD player cannot be used and a disc cannot be inserted or ejected. |
| You want to view chapter information for the DVD you’re watching, or check the amount of time remaining. | Press the INFO button on the remote control. |
| The display shows the amount of time remaining instead of the elapsed time for a DVD chapter, CD track, or MP3 audio file. | Press the INFO button on the remote control to select the desired display format, or to turn off the on-screen display. |
| You want to return to the main menu of the DVD you’re watching to select its contents. | Press the MENU or GUIDE button to display the main menu of a DVD. (The MENU button displays the Ensemble HD setup menu if the MAIN menu is displayed on the remote control. If a different menu is displayed, such as CABLE or SAT, it displays the menu system for that component.) |
Problems Using the Radio
Problem Solution
| You get poor radio reception. | The antennas included with the AV controller are sufficient to receive strong, local stations. To receive weaker stations, connect an antenna designed for stronger reception, such an outdoor antenna. See your antenna’s manual or the Ensemble HD Installation Guide to make connections for proper grounding protection. |
| You installed an outdoor antenna and properly grounded it, but you get audio hum or buzz as a result. | Connect a ground loop isolator to the coaxial antenna cable close to where it connects to the AV controller. You can purchase this module from electronics retailers. The module filters out interference caused by the outdoor ground connection. Or you can use a coaxial surge protector.WARNING:Never disconnect the antenna’s ground connection or disable the grounding pins on your power cords. These exist for the projection of both you and your equipment. |
Problems Using an External Component
| Problem Solution | |
| You've connected a new component, but can't operate it with the remote control. | You have to enter the setup code for your new component. See "Setting Up the Remote Control" on page 36. |
| You've connected a DVD player and the image is elongated or has prominent black bars at the top and bottom. | Make sure the DVD player's monitor type setting (or similarly named function) is set to output a widescreen 16:9 image. |
| You've connected a new component, but you're not getting audio and/or video when you select the device with the remote control. | You need to match up the device name with the ports to which you've connected the audio and video. See "Linking Audio and Video Sources" on page 34. |
| You've connected a type of device not included in the remote control's menu system, such as an HDTV tuner or DVD recorder. | See "Customizing the Remote Control Menu" on page 39. |
| You want to add a new device to the 10 devices already included in the remote control's menu system. | The remote control supports up to 10 devices, which are already programmed into it. Therefore, you cannot add a new device, but you can modify an existing one to customize it for your new component. See "Customizing the Remote Control Menu" on page 39. |
| You've changed the name of a device listed on the remote control, but now when you select it, the name shown on the projection screen doesn't match the name shown on the remote control. | You can change the device name on the remote control, but it will no longer match the name shown on the projection screen when you select the device for viewing. |
Where To Get Help
Internet Support
Visit Epson's support website at epson.com/support and select your product for solutions to common problems. You can download documentation, get FAQs and troubleshooting advice, or e-mail Epson with your questions.
Speak to a Support Representative
To use the Epson PrivateLine® Support service, call (800) 637-7661 and enter the PIN on the Epson PrivateLine Support card that came with your projector. This is the fastest way of speaking to a live representative, and it's free. This service is available 6 AM to 6 PM, Pacific Time, Monday through Friday, for the duration of your warranty period.
You may also speak with a projector support specialist by dialing (562) 276-4394, 6 AM to 6 PM, Pacific Time, Monday through Friday.
Days and hours of support are subject to change without notice. Toll or long distance charges may apply.
Before you call Epson for support, please have the following information ready:
- Product name (Ensemble HD home cinema system)
- Product serial number (located on the back of the weighted bar at the bottom of the screen, on the right side of the screen as viewed from the front)
- Proof of purchase (such as a store receipt) and date of purchase
• Description of the problem
Purchase Supplies and Accessories
You can purchase genuine Epson supplies and accessories from an Epson authorized reseller. To find the nearest reseller, call 800-GO-EPSON (800-463-7766). Or you can purchase online at www.EnsembleHD.com (U.S. sales only).
Using Advanced Remote Control Features
The features described in this chapter let you customize the behavior of the remote control. In most cases, you won't have to perform any of these customizations—for example, if you want to set up the remote control to work with a new component, you only have to enter its setup code as described on page 37. This chapter is mainly for users who want to take full advantage of their remote control's advanced settings.
See these sections:
- “Adjusting the LCD Screen” (below)
- "Learning Commands from Another Remote Control" on page 72
- "Advanced Remote Control Setup" on page 75
- "Using an RF Base Station" on page 81
- “Restoring Remote Control Factory Defaults” on page 83
Adjusting the LCD Screen
You can adjust the amount of time the LCD screen's backlight stays on when you press the LIGHT button on the side of the remote control. You can also adjust the screen's contrast (see page 72).
1 Enter Setup mode by pressing and holding both the MAIN and ENT buttons for three seconds. The top of the screen displays SETUP.
2 Press the PAGE (page down) button to view more options.
3 Select the LIGHT option.
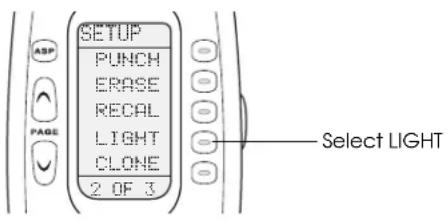
4 Do one of the following:
- Enter the amount of time you would like the light to stay on using the numbered keypad (0-99 seconds).
- If you'd rather not have the backlight come on at all (this extends battery life), select the ON option: ON changes to OFF.
5 Select the SAVE option to save your settings.
6 Press the MAIN button to return to normal operation.
Adjusting the Contrast
You can make the text on the remote control's LCD screen appear darker or lighter by adjusting the contrast.
- To darken the text, press and hold both the MAIN and ▲ buttons at the same time.
- To lighten the text, press and hold both the MAIN and ▼ buttons at the same time.
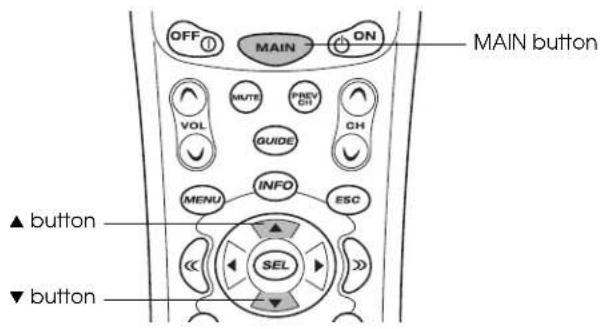
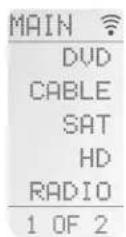
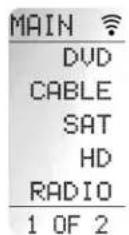
Contrast set low Contrast set high
Learning Commands from Another Remote Control
The Ensemble HD remote control can learn commands from another remote control, one button at a time. You may need to use this procedure if you weren't successful in programming the remote control with a three-digit device code as described on page 37.
Note
If you have two Ensemble HD remote controls and have customized one of them, you can copy your changes from one to the other. See "Cloning Your Remote Control" on page 74.
1 First choose names for any new commands, and add them to the appropriate menu for your device on the Ensemble HD remote control (see "Editing Device Names and Commands" on page 75).
2 Line-up the remote controls, head to head, one or two inches apart.

3 On the Ensemble HD remote control, press and hold both the MAIN and ENT buttons for approximately three seconds. The top of the screen displays SETUP.
Note
You have 30 seconds to complete each step. After that, the remote control returns to normal operation.
4 Select the LEARN option.
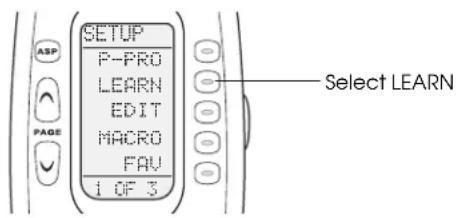
The top of the screen changes to LEARN and the screen lists several devices.
5 Select the device you would like to teach a command to by pressing the button to its right. If you don't see the device you want, press the PAGE for (page up or down) button to view more options.
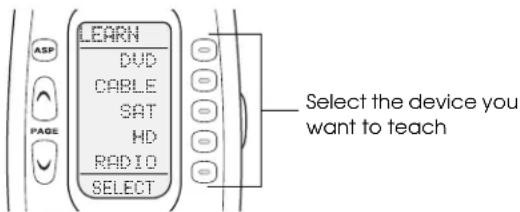
6 On the Ensemble HD remote control, press any button you want to teach a command to. It can be either a physical button on the remote control or a command displayed on the menu screen.
Note
If you don't see a command on the screen for the function you want to teach, press the PAGE ▲ or ∨ button to display more options. You can also add or edit text for a new command (see "Editing Device Names and Commands" on page 75). The only buttons you can't teach are the PAGE, MAIN, and ASP buttons.
Once you press a button, the top of the screen changes from LEARN to READY:
7 Press and hold the button for the corresponding function on your old remote control until the screen changes to either GOOD or FAILD (failed).

If GOOD appears at the top of the screen, you were successful. Continue by pressing the next button you want to teach. Repeat steps 6 and 7 until you have programmed all the buttons you want.
If FAILD appears, try to teach the same button again by repeating steps 6 and 7. If you continue having difficulties, try the following:
- Move to another room. Plasma TVs, sunlight, and halogen or quartz lighting can interfere with the learning process.
- Although the old remote control seems to work fine, its batteries may be old. Use fresh batteries.
- Vary the distance between the remote controls gradually. Try 1/4 inch, 1 inch, 2 inches, and so on, up to 4 feet.
• Repeatedly press the button on the old remote control instead of pressing and holding it during the learning process.
8 Once you've finished, press the MAIN button to return to normal operation.
Cloning Your Remote Control
If you have two Ensemble HD remote controls and have customized one of them, you can copy your changes from one to the other.
1 On each remote control, press and hold both the MAIN and ENT buttons for approximately three seconds. The top of the screen displays SETUP.
Note
You have 30 seconds to complete each step. After that, the remote control returns to normal operation.
2 Select the CLONE option.
3 Line up the remote controls, head to head, one or two inches apart.

4 On the remote control you want to modify, select RECV (Receive). On the remote control whose settings you want to keep, select SEND.
5 Select START on each remote control to begin cloning.
Note
Cloning can take several minutes to complete. You see GOOD displayed when the process is finished.
6 Once cloning is finished, press the MAIN button to return to normal operation.
Advanced Remote Control Setup
You can change the behavior of your remote control by editing device names (menu screen titles), editing command names, creating macros, adding or hiding menu pages, and setting up “punch through” commands (rarely used). See these sections:
- "Editing Device Names and Commands" below
- "Setting Up Macros" on page 77
- "Adding or Hiding Pages" on page 78
- “Erasing Learned Buttons and Macros” on page 79
- "Using Remote Control Punch-Through" on page 80
Editing Device Names and Commands
Each type of device (DVD, CABLE, etc.) has its own menu with commands listed on multiple pages. You can customize the name of the device (which is also the name of the menu) or any command listed in the menu. If you are adding a new command from another remote control (see page 72) or creating a macro (see page 77), you'll first need to add the command name to a blank space in the menu, as described below. If there isn't a space already, you'll need to add a blank page (see "Adding or Hiding Pages" on page 78).
1 Press and hold both the MAIN and ENT buttons for approximately three seconds. The top of the screen displays SETUP.
Note
You have 30 seconds to complete each step. After that, the remote control returns to normal operation.
2 Select the EDIT option.
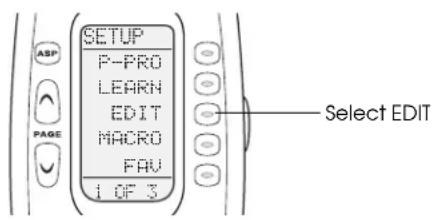
The top of the screen changes to EDIT:
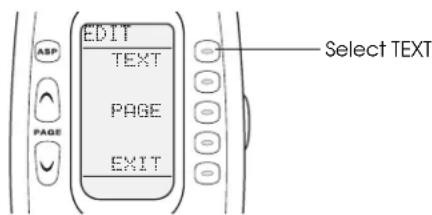
3 Select the TEXT option.
Note
The PAGE option is for hiding or adding pages. See "Adding or Hiding Pages" on page 78.
The top of screen displays EDIT, as shown at right, and you see a list of devices (DVD, CABLE, SAT, etc.).
4 Do one of the following:
- To edit an existing command, select the device that has the command in its menu that you want to edit, then select the command. If necessary, press the PAGE button to display the second page of devices.
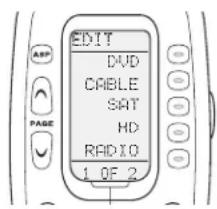
Note
If you can't open a device menu, continue pressing PAGE ∨ until the top of the screen displays EDIT and you see the device name you want.
- To add a command to a blank row, first select the device that has the blank row in its menu that you want to edit, as described above. Then press the PAGE button until the last page of commands is displayed with the blank row where you want to add text. Press the button to the right of that row.
Note
If there are no blank rows, you can add a new blank page as described in "Adding or Hiding Pages" on page 78.
- To edit a device name, press the PAGE ∨ button until the top of the screen displays MAIN and you see the page that has the name of the device you want to edit, then select the device.
The cursor flashes at the first character point in the line of text:
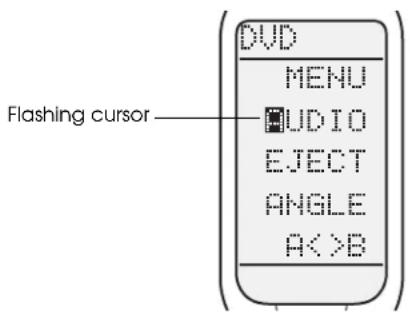
5 Use the ◀ or ▶ button to change the cursor position.
To delete a character, press ▼. To delete all characters, press ▲.
Use the numeric keypad to enter characters in the same way as you send text-messages with many cell phones. Each time you press a button, it selects a different character represented by that button, as shown below:
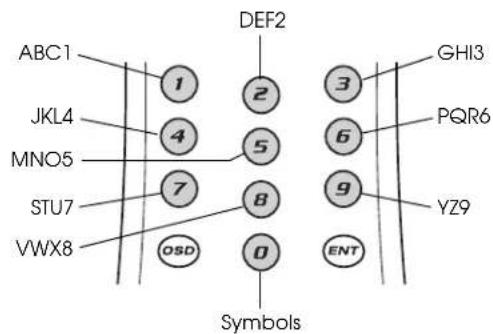
6 When you have finished editing the line of text, press the button to its right. You see SAVED displayed at the bottom of the screen.
7 To edit any other commands for the same device, select the command and repeat steps 5 and 6.
8 When you've finished making edits, press the MAIN button several times to return to normal operation.
Setting Up Macros
A macro lets you perform several operations in sequence automatically. For example, when you press the ON button to turn on the Ensemble HD system, the remote control turns on the projector, turns on the AV controller, and lowers the screen—all with one press of a button.
If you find there are other operations you sometimes perform together—for example, turning on your cable box and DVR—you can create a macro to perform the operations automatically. You store the macro by saving it as a menu option for a particular device (for example, you could create a macro called SYS ON in the DVR menu).
Note
You cannot use any of the physical buttons on the remote control to store a macro.
1 Choose a name for the new macro and add it to the desired menu (see "Editing Device Names and Commands" on page 75).
2 Press and hold both the MAIN and ENT buttons for approximately three seconds. The top of the screen displays SETUP.
Note
You have 30 seconds to complete each step. After that, the remote control returns to normal operation.
3 Select the MACRO option.
4 Navigate through the menu pages to the newly created menu item you want to turn into a macro, and press the button to its right.
The bottom of the screen flashes Step 0.
5 Press the sequence of buttons for all the steps you want the macro to perform. Each time you press a button, the bottom of the screen flashes Step 1, Step 2, etc. Your macro can hold up to 190 steps.
Note
You can program delays into the macro by pressing the || pause button. Each time you press the || pause button, it adds a one-half second delay.
6 When you're done entering all the steps of the macro, press the LIGHT button on the side of the remote control.
You see this screen:
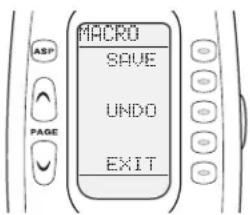
7 Select one of the following:
• SAVE to save the macro
- UNDO to erase the last step of the macro and continue programming it
- EXIT to erase the whole macro and return to step 4 on page 77
8 When you've finished, press the MAIN button several times to return to normal operation.
Adding or Hiding Pages
Each device menu (DVD, CABLE, etc.) has eight pages or screens. The commands that are visible in each menu occupy only a few of the pages, with the remaining pages being hidden. If necessary, you can add new pages (to make them visible), or hide existing ones. You may also need to add a page in order to create space for a new command or macro.
1 Press and hold both the MAIN and ENT buttons for approximately three seconds. The top of the screen displays SETUP.
Note
You have 30 seconds to complete each step. After that, the remote control returns to normal operation.
2 Select the EDIT option.
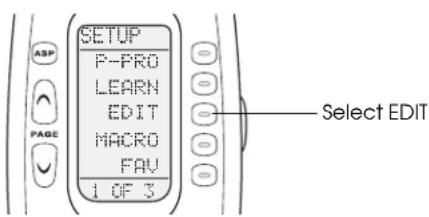
The top of the screen changes to EDIT:
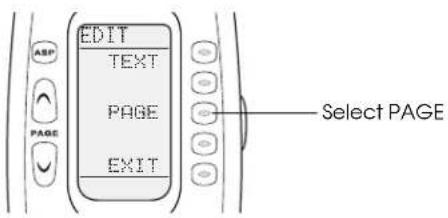
3 Select the PAGE option.
Note
The TEXT option is for editing device names and commands. See "Editing Device Names and Commands" on page 75.
The top of screen displays PAGE, as shown at right, and you see a list of devices (DVD, CABLE, SAT, etc.).
4 Navigate to the page you want to add or hide.
If a page is already visible, it says HIDE? at the top of the screen. If a page is currently hidden, it says ADD?.
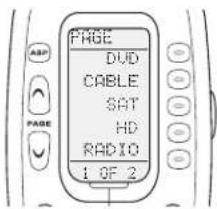
5 Press the LIGHT button on the side of the remote control to add or hide the page.
Repeat steps 4 and 5 to add or hide additional pages.
6 When you've finished, press the MAIN button several times to return to normal operation.
Erasing Learned Buttons and Macros
You can erase any commands that were learned from another remote control or any macros you created.
Note
This operation does not erase the text used for commands or macros, just the functions that they perform. If you want to delete the text itself, see "Editing Device Names and Commands" on page 75.
1 Press and hold both the MAIN and ENT buttons for approximately three seconds. The top of the screen displays SETUP.
Note
You have 30 seconds to complete each step. After that, the remote control returns to normal operation.
2 Select the ERASE option.
You see this screen:
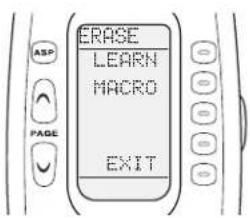
3 Select one of the following:
• LEARN to erase commands that were learned from another remote control
• MACRO to erase macros you created
4 At the next screen, select one of the following:
- ALL to erase all learned commands or macros. When you select this option, you see SURE? displayed on the screen. Select SURE? to erase the settings, or select EXIT to cancel.
- DEVIC to erase all commands or macros for a specific device. When you select this option, you see a list of devices (DVD, CABLE, SAT, etc.). Select the device whose settings you want to erase. You see ERASED! displayed at the bottom of the screen.
Caution
Be careful to select the correct device. If you select the wrong one, you won't have the option to cancel.
- KEY to erase a single command or macro. When you select this option, you see a list of devices (DVD, CABLE, SAT, etc.). Select the device that has the command or macro in its menu that you want to erase, then select the command or macro. You see ERASED! displayed at the bottom of the screen.
Caution
Be careful to select the correct command or macro. If you select the wrong one, you won't have the option to cancel.
5 Press the MAIN button several times to return to normal operation.
Using Remote Control Punch-Through
The Ensemble HD remote control is pre-programmed to let you operate various devices, each from its own menu. For example, if you've connected a high-definition DVD player, you can operate it from the HD menu; or you can operate a satellite receiver from the SAT menu. However, you may want to be able to operate your high-definition DVD player from the MAIN menu so you can also access the Ensemble HD setup menu, and adjust the picture or sound at the same time, for example. To do this, you create a “punch through.” This lets you use the remote control to operate certain functions of one device, while you have the menu screen open for another device. (You can punch commands through any menu, not just the MAIN menu.)
Note
The volume control is automatically punched through to your home theater system from every device.
Follow these steps to set up a punch-through:
1 Enter Setup mode by pressing and holding both the the screen displays SETUP.
MAIN and ENT buttons for three seconds. The top of
Note
You have 30 seconds to complete each step. After that, the remote control returns to normal operation.
2 Select the PUNCH option. (You may have to press PAGE ∧ or ∨ to see it.)
3 Select the button group that contains the type of function you want to punch through:
- CH: Channel up/down and number buttons (0–9 and Enter)
• PLAY: Play, pause, stop, rewind, and fast-forward
• VOD (Video On Demand): Guide, Menu, Info, ESC, arrow buttons (▲▼◀▶), and Select
• POWER: Power on and off
The bottom of the screen displays PUNCH TO.
4 Select the menu from which you want to be able to operate the device that's not normally controlled by that menu, or press the OFF button to select the MAIN menu. For example, to operate your satellite receiver from the MAIN menu, press the OFF button.
The bottom of the screen displays PUNCH FROM.
5 Select the device that you want to be able to operate—for example, SAT for a satellite receiver.
The bottom of the screen displays SAVED.
6 Repeat steps 3 through 5 to set up additional punch-throughs, or press the MAIN button twice to return to normal operation.
Using an RF Base Station
You can use the Ensemble HD remote control to operate components such as a cable box or satellite receiver, even if they're hidden inside a cabinet. You can do this by using an optional RF base station (radio-frequency receiver) to relay the remote control's commands. An RF base station lets you send commands to components that are not located near the AV controller, or are located inside a closed space such as a cabinet. The base station receives RF commands from the remote control and relays them to each of your components, wherever they're located. (This is possible because the Ensemble HD remote control emits both IR and RF signals.)
Note
The AV controller included with your system can be used in a closed space even without a base station. That's because the sensor that receives commands for it is located at the top of the screen.
The Ensemble HD remote control is compatible with RF base stations made by Universal Remote Control (www.UniversalRemote.com). Both addressable and non-addressable versions are available. Addressable ones let you avoid interference from other RF remote controls being used nearby. See the next section for instructions on setting up an addressable base station. (If you have a non-addressable base station, you probably won't need to change any of the RF settings.)
Setting Up an Addressable Base Station
If you have an addressable base station, there are several RF settings you may need to adjust on the remote control. At a minimum, you should set the ID # to match the one assigned to your base station.
1 Press and hold both the MAIN and ENT buttons for approximately three seconds. The top of the screen displays SETUP.
Note
You have 30 seconds to complete each step. After that, the remote control returns to normal operation.
2 Select the RF option. You see this screen:
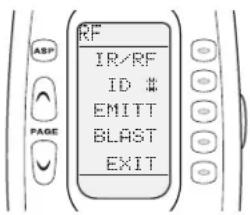
3 Select the setting you want to adjust:
- IR/RF to cause the remote control to emit IR signals only, RF signals only, or IR and RF signals at the same time. If a component receives IR signals directly from the remote control and from the base station at the same time, the signals may interfere with each other, so you should set the remote control to use only RF signals with that component. (You can select the component in step 4.)
- ID # to select the receiver ID # of your addressable base station. Select an address other than 0 (zero) to prevent interference from other RF remote controls in the vicinity.
- EMITT to route commands through specific emitters plugged into the base station. (The ID # must be set to a non-zero address to select this option.)
- BLAST to turn the base station's IR blaster on or off. You may want to turn it off if the blaster's high-power LED saturates or overpowers the sensors of some AV components. (The ID # must be set to a non-zero address to select this option.)
4 On the next screen, select whether you want the setting to apply to the menu options for all 10 devices listed on the MAIN menu of the remote control (select ALL) or just the ones for a specific device (select DEVIC).
If you select DEVIC (Device), the next screen lets you select the device you want the setting to apply to. Select from DVD, CABLE, SAT, etc. (Use the PAGE ∧ or ∨ button to display all the devices.)
5 On the next screen, finish adjusting the selected setting:
- For the IR/RF setting, select IR&RF, IR, or RF.
- For the ID # setting, select UP or DOWN to change the ID #.
- For the EMITT setting, select ALL to route the signal through all the emitters. Or select UP or DOWN to change the Line Output number (this refers to the jack where you plugged in the emitter for a specific component).
- For the BLAST setting, select ON or OFF.
6 Select SAVE to save your setting.
7 Select EXIT to return to the SETUP menu, or press the MAIN button twice to return to normal operation.
Restoring Remote Control Factory Defaults
If you customize the remote control and find that it no longer works correctly, you can restore it to its original settings.
Caution
This procedure erases all commands and macros you taught the remote control, and any other customized changes you may have made.
1 To restore the remote control, press and hold the MAIN and ■ stop buttons for about 10 seconds. During this time, you see WARNING flash at the bottom of the screen.
2 When you see the RESET screen shown below, release the buttons.
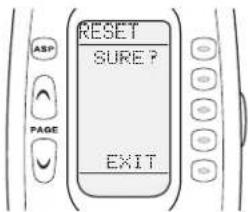
3 Select SURE? to erase all customized settings, or select EXIT to cancel.
After you restore the remote control, it re-initializes and you see the MAIN menu after several seconds.
Remote Control Codes
The program codes provided in this chapter let you set up your remote control to work with devices made by other companies. See “Connecting and Using Other Components” on page 31 for instructions on using such devices with your system.
If you need to recall the code number you selected for a device, see “Recalling Programmed Codes” on page 86.
Using the Code Tables
The code tables in this chapter (starting on page 87) let you quickly program your remote control to work with different brands of equipment you may own. See “Setting Up the Remote Control” on page 36 for instructions.
The codes are divided into categories (TV, cable, DVD, etc.). Each category may include different types of components. For example, the DVD category includes TV/DVD combo units. In each section, the code numbers are listed by brand (Sony, Panasonic, etc.). Some brands have more than one code for you to try.
| Type of device Included devices See this page... | ||
| TV TVs, plasma screens, projectors, and monitors page 87 | ||
| Cable Cable TV descramblers and tunersWebTVs | page 93 | |
| DVD DVD players | TV/DVD combosTV/DVD/VCR combosDVD/VCR combosDVD recordersLaser disc players | page 96 |
| VCR VCRs | TV/VCR combos | page 99 |
| Audio Amps, preamps, A/V receiversXM radios and tuners | page 102 | |
| Satellite Satellite receivers | page 108 | |
| CD | CD players and changers | page 111 |
| DVR | Digital video recorders (TiVo, Replay, etc.) | page 114 |
| Auxiliary | Custom installation productsMedia PC controlsGame systemsIPod controlsTape decksLighting systems | page 114 |
Recalling Programmed Codes
In case you need to recall the code numbers you used to program the remote control, you can display them by following these steps:
1 Enter Setup mode by pressing and holding both the MAIN and ENT buttons for three seconds. The top of the screen displays SETUP.
2 Press the PAGE (page down) button to view more options.
3 Select the RECAL (Recall) option.
The screen alternately displays the device names, followed by their code numbers, as shown below.
Tip
Pay attention to the page numbers at the bottom of the screen. Page 1 codes go with page 1 devices, and page 2 codes with page 2 devices.
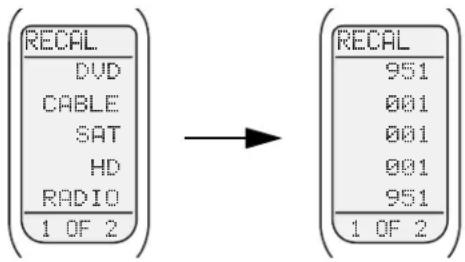
4 Press the MAIN button to return to normal operation.
Code Tables
TV components
| Brand Code number | ||||||||||||||||
| ADMIRAL 072 | 081 | 161 | 160 | |||||||||||||
| ADVENT 247 | 388 | |||||||||||||||
| AKAI 197 | 146 | 248 | 404 | 405 | 458 | 473 | 474 | 475 | ||||||||
| AMARK 112 | 143 | |||||||||||||||
| AMPRO 073 | 167 | 157 | 183 | |||||||||||||
| AMSTRAD 052 | ||||||||||||||||
| ANAM 043 | 054 | 056 | 080 | 112 | 131 | |||||||||||
| AOC 197 | 004 | 112 | 058 | |||||||||||||
| APEX DIGITAL 006 | 310 | |||||||||||||||
| ASTAR 477 | ||||||||||||||||
| AUDIOVOX 076 | 103 | 273 | 388 | 452 | 453 | 454 | 503 | |||||||||
| AVENTURA 401 | ||||||||||||||||
| AVION 441 | ||||||||||||||||
| BARCO 233 | ||||||||||||||||
| BENQ | 423 | 443 | ||||||||||||||
| BLAUPUNKT 088 | ||||||||||||||||
| BOXLIGHT | 266 | |||||||||||||||
| BROKSONIC | 238 | |||||||||||||||
| CAIRN 201 | ||||||||||||||||
| CANDLE | 197 | 002 | 003 | 004 | ||||||||||||
| CAPEHART | 058 | |||||||||||||||
| CETRONIC 043 | ||||||||||||||||
| CITIZEN | 197 | 002 | 003 | 004 | 043 | 101 | 103 | 143 | ||||||||
| CLASSIC | 043 | |||||||||||||||
| CONCERTO | 004 | |||||||||||||||
| CONTEC | 043 | 050 | 051 | |||||||||||||
| CORONADO | 143 | |||||||||||||||
| CRAIG | 043 | 054 | ||||||||||||||
| CROWN | 043 | 143 | ||||||||||||||
| CURTIS MATHES | 197 | 101 | 004 | 143 | ||||||||||||
| CXC | 043 | |||||||||||||||
| DAEWOO | 004 | 016 | 043 | 044 | 076 | 077 | 103 | 114 | 125 | 127 | 143 | 269 | 369 | |||
TV components (continued)
| Brand | Code number | ||||||||||||||||||
| DAYTRON 004 143 | |||||||||||||||||||
| DELL 319 320 321 | |||||||||||||||||||
| DIBOSS 329 | |||||||||||||||||||
| DIGITAL PROJECTION 437 | |||||||||||||||||||
| DREAMVISION 235 312 313 314 343 344 345 | |||||||||||||||||||
| DURABRAND 401 | |||||||||||||||||||
| DWIN 177 257 | |||||||||||||||||||
| DYNASTY 043 | |||||||||||||||||||
| DYNATECH 062 | |||||||||||||||||||
| DYNEX 399 | |||||||||||||||||||
| EIKI 187 | |||||||||||||||||||
| ELECTROGRAPH 470 | |||||||||||||||||||
| ELECTROHOME | 024 | 076 | 143 | 196 | |||||||||||||||
| EMERSON | 197 | 004 | 005 | 028 | 043 | 047 | 048 | 050 | 051 | 076 | 077 | 096 | 143 | 151 | 153 | 154 | 155 | ||
| 401 | |||||||||||||||||||
| EPSON 324 | |||||||||||||||||||
| ESA | 323 | ||||||||||||||||||
| FISHER | 007 | 057 | |||||||||||||||||
| FUJITSU 198 223 219 246 299 346 396 410 | |||||||||||||||||||
| FUNAI | 028 | 043 | 052 | 401 | |||||||||||||||
| FUTURETECH | 043 | ||||||||||||||||||
| GATEWAY 242 268 | |||||||||||||||||||
| GE | 197 | 008 | 009 | 034 | 056 | 073 | 074 | 130 | 144 | 155 | 160 | 161 | 165 | 004 | 091 | 157 | 183 | ||
| GEM | 391 | ||||||||||||||||||
| GOLDSTAR | 004 | 102 | 106 | 112 | 113 | 116 | 119 | 127 | 143 | ||||||||||
| GRUNDIG | 220 | 083 | |||||||||||||||||
| HAIER | 501 | 502 | |||||||||||||||||
| HALL MARK | 004 | ||||||||||||||||||
| HANNSPREE | 381 | ||||||||||||||||||
| HISENSE | 419 | 442 | |||||||||||||||||
| HITACHI | 004 | 009 | 010 | 011 | 012 | 023 | 075 | 143 | 158 | 163 | 166 | 072 | 221 | 250 | 311 | 361 | 380 | ||
| 411 | 460 | ||||||||||||||||||
| HP | 316 | 327 | 378 | 379 | 421 | ||||||||||||||
| HUMAX | 518 | ||||||||||||||||||
TV components (continued)
| Brand | Code number | ||||||||||||||||
| HYUNDAI 337 338 | |||||||||||||||||
| ILO 472 | |||||||||||||||||
| INFINITY 164 | |||||||||||||||||
| INFOCUS 230 | 330 | 331 | 332 | 333 | 252 | 409 | 449 | ||||||||||
| INSIGNIA 350 | 354 | 399 | 400 | 401 | 402 | 403 | 454 | 457 | |||||||||
| JBL 164 | |||||||||||||||||
| JCPENNEY 197 | 004 | 008 | 009 | 024 | 030 | 065 | 101 | 143 | 156 | 160 | |||||||
| JENSEN 013 | |||||||||||||||||
| JVC 034 038 | 070 | 083 | 145 | 199 | 210 | 240 | 241 | 244 | 245 | 317 | 318 | 406 | 420 | 471 | |||
| KEC 043 | |||||||||||||||||
| KENWOOD 197 070 | |||||||||||||||||
| KLEGG 466 | |||||||||||||||||
| KLOSS 002 059 | |||||||||||||||||
| KMC 143 | |||||||||||||||||
| KNOLL SYSTEMS | 230 | 409 | |||||||||||||||
| KONKA 457 | |||||||||||||||||
| KTV | 197 | 043 | 143 | 154 | |||||||||||||
| LG | 243 | 284 | 283 | 286 | 363 | 364 | 365 | 366 | 522 | 523 | |||||||
| LODGENET | 072 | ||||||||||||||||
| LOEWE | 222 | 223 | 224 | 164 | 322 | 422 | |||||||||||
| LOGIK | 072 | ||||||||||||||||
| LUXMAN | 004 | ||||||||||||||||
| LXI | 166 | 007 | 015 | 052 | 081 | 160 | 164 | ||||||||||
| MAGNAVOX | 197 | 003 | 004 | 022 | 059 | 060 | 061 | 063 | 064 | 127 | 160 | 164 | 094 | 226 | 264 390 | ||
| 467 | |||||||||||||||||
| MARANTZ | 197 | 164 | 184 | 397 | 281 | ||||||||||||
| MATSUI | 164 | ||||||||||||||||
| MAXENT | 242 | ||||||||||||||||
| MEMOREX | 007 | 072 | 004 | ||||||||||||||
| METZ | 088 | ||||||||||||||||
| MGA | 197 | 004 | 024 | 028 | 042 | ||||||||||||
| MINERVA 088 | |||||||||||||||||
| MINTEK | 362 | ||||||||||||||||
| MISAKAI | 401 | ||||||||||||||||
TV components (continued)
| Brand | Code number | ||||||||||||||||||||
| MITSUBISHI 004 024 028 040 042 109 124 146 191 225 237 267 300 348 450 519525 | |||||||||||||||||||||
| MTC 197 004 062 101 | |||||||||||||||||||||
| NAD 015 025 | |||||||||||||||||||||
| NEC 132 130 134 197 040 016 024 056 019 236 237 262 272 281 428 448 | |||||||||||||||||||||
| NIKEI 043 | |||||||||||||||||||||
| NORCENT 367 | |||||||||||||||||||||
| NUVISION 351 | |||||||||||||||||||||
| OLEVIA 432 376 394 504 | |||||||||||||||||||||
| ONKING 043 | |||||||||||||||||||||
| ONWA 043 | |||||||||||||||||||||
| OPTOMA 249 265 270 360 | |||||||||||||||||||||
| OPTONICA 019 081 | |||||||||||||||||||||
| ORION 096 | |||||||||||||||||||||
| PANASONIC | 034 | 056 | 080 | 092 | 164 | 208 | 261 | 296 | 295 | 297 | 298 | 359 | 377 | 383 | 429 | 430 | 524 | ||||
| PHILCO | 197 | 003 | 024 | 056 | 059 | 060 | 063 | 064 | 164 | 004 | |||||||||||
| PHILIPS 197 003 004 005 038 059 093 164 127 184 206 259 260 264 274 294 424425 431 | |||||||||||||||||||||
| PHILIPS/MAGNAVOX | 239 | 260 | 294 | ||||||||||||||||||
| PIONEER | 197 | 018 | 023 | 025 | 116 | 135 | 190 | 203 | 204 | 209 | 234 | 237 | 334 | 335 | 336 | 374 | 385 | ||||
| 393 | 397 | 438 | 447 | 459 | 520 | ||||||||||||||||
| PLANAR | 513 | ||||||||||||||||||||
| POLAROID | 352 | 353 | 354 | 355 | 356 | 357 | 358 | 388 | 493 | 494 | 505 | 506 | 507 | 508 | |||||||
| PORTLAND | 077 | 004 | 143 | ||||||||||||||||||
| PROJECTION DESIGN | 417 | 418 | |||||||||||||||||||
| PROSCAN | 144 | 160 | 161 | 165 | 167 | ||||||||||||||||
| PROTON | 004 | 058 | 131 | 143 | 171 | 173 | 193 | 392 | |||||||||||||
| PROTRON 392 398 498 499 500 | |||||||||||||||||||||
| PROVIEW | 493 | ||||||||||||||||||||
| QUASAR | 034 | 056 | 092 | ||||||||||||||||||
| RADIO SHACK | 019 | 043 | 143 | 004 | 127 | ||||||||||||||||
| RCA 160 161 165 065 156 144 197 004 023 024 056 074 152 333 | |||||||||||||||||||||
| REALISTIC | 007 | 019 | 043 | 047 | |||||||||||||||||
| REVOLUTION HD | 466 | ||||||||||||||||||||
| ROCTEC 186 | |||||||||||||||||||||
TV components (continued)
| Brand Code number | ||||||||||||||||||||
| RUNCO 168 | 169 | 178 | 179 | 180 | 181 | 182 | 183 | 073 | 157 | 340 | 341 | 342 | 395 | 414 | 415 | |||||
| 416 | 476 | |||||||||||||||||||
| SAMPO 197 | 058 | 004 | 202 | |||||||||||||||||
| SAMSUNG 004 | 050 | 089 | 101 | 105 | 127 | 143 | 160 | 211 | 228 | 229 | 253 | 254 | 258 | 275 | 309 | |||||
| 375 | 384 | 427 | 434 | 461 | 462 | 463 | 464 | 515 | 516 | 517 | ||||||||||
| SANSUI 399 | ||||||||||||||||||||
| SANYO 166 | 007 | 020 | 053 | 057 | 082 | 187 | 266 | 347 | 509 | 510 | 511 | 512 | ||||||||
| SCEPTRE 276 | ||||||||||||||||||||
| SCOTT 004 | 028 | 043 | 048 | 143 | 497 | |||||||||||||||
| SEARS 015 | 030 | 004 | 007 | 028 | 057 | 143 | 094 | 160 | 082 | 165 | 166 | |||||||||
| SELECO 189 | 200 | 212 | 227 | 205 | ||||||||||||||||
| SHARP 170 | 081 | 019 | 028 | 029 | 014 | 004 | 022 | 143 | 175 | 214 | 251 | 263 | 306 | 307 | 308 | 326 | ||||
| 468 | 496 | |||||||||||||||||||
| SHERWOOD 349 | ||||||||||||||||||||
| SIEMENS 088 | ||||||||||||||||||||
| SIGNATURE | 072 | |||||||||||||||||||
| SIM2 | 205 | 200 | 313 | |||||||||||||||||
| SOLE | 231 | 232 | ||||||||||||||||||
| SONY | 070 | 085 | 139 | 147 | 126 | 185 | 194 | 207 | 213 | 277 | 278 | 279 | 412 | 413 | 444 | 445 | 446 | |||
| 491 | 492 | 521 | ||||||||||||||||||
| SOUNDESIGN | 004 | 028 | 003 | 043 | ||||||||||||||||
| SPECTRICON | 112 | |||||||||||||||||||
| SPECTRONIQ | 499 | 500 | ||||||||||||||||||
| SSS | 004 | 043 | ||||||||||||||||||
| SUPERSCAN | 401 | |||||||||||||||||||
| SUPRE MACY | 002 | |||||||||||||||||||
| SVA | 328 | |||||||||||||||||||
| SYLVANIA | 197 | 003 | 059 | 060 | 063 | 064 | 164 | 044 | 160 | 127 | 052 | 401 | 469 | 514 | ||||||
| SYMPHONIC | 052 | 401 | ||||||||||||||||||
| SYNTAX OLEVIA | 376 | 394 | 432 | 504 | ||||||||||||||||
| TANDY | 081 | |||||||||||||||||||
| TATUNG 056 | 062 | |||||||||||||||||||
| TCL | 426 | |||||||||||||||||||
| TECHNICS | 034 | 080 | ||||||||||||||||||
| TECHWOOD | 004 | |||||||||||||||||||
TV components (continued)
| Brand | Code number | ||||||||||||||||
| TEKNIKA 002 | 003 | 004 | 024 | 028 | 043 | 072 | 101 | 143 | |||||||||
| TELEFUNKEN 037 | 046 | 086 | 087 | ||||||||||||||
| TELERENT 072 | |||||||||||||||||
| TERA 172 | |||||||||||||||||
| THOMPSON 215 | |||||||||||||||||
| TMK 004 | |||||||||||||||||
| TOSHIBA 007 | 015 | 030 | 040 | 062 | 101 | 138 | 216 | 287 | 290 | 291 | 230 | 288 | 289 | 292 | 293 | ||
| 315 | 237 | 325 | 382 | 455 | 456 | 465 | 479 | 480 | |||||||||
| TOTEVISION 143 | |||||||||||||||||
| UNIVERSAL 008 | 009 | ||||||||||||||||
| VIDEO CONCEPTS 146 | |||||||||||||||||
| VIDIKRON 174 | 184 | 188 | 192 | 340 | 342 | 395 | 406 | 414 | 415 | 439 | 440 | ||||||
| VIDTECH 004 | |||||||||||||||||
| VIEWSONIC 271 | 242 | 389 | 390 | 433 | |||||||||||||
| VIORE 472 | |||||||||||||||||
| VITO 478 | |||||||||||||||||
| VIZIO | 386 | 387 | |||||||||||||||
| WARDS | 004 | 008 | 009 | 019 | 028 | 060 | 061 | 063 | 064 | 072 | 074 | 143 | 164 | 034 | |||
| WESTINGHOUSE | 076 | 077 | 280 | 435 | 436 | 495 | |||||||||||
| WINBOOK | 339 | ||||||||||||||||
| YAMAHA 197 | 004 | 370 | 371 | 372 | 373 | 407 | 408 | 451 | |||||||||
| YORK | 004 | ||||||||||||||||
| YUPITERU 043 | |||||||||||||||||
| ZENITH | 072 | 073 | 095 | 103 | 157 | 183 | 217 | 243 | 282 | 283 | 284 | 285 | 286 | 363 | |||
| ZONDA | 112 | ||||||||||||||||
Cable components
| Brand Code numbers | |||||||||||||
| ABC 103 | 003 | 004 | 039 | 042 | 046 | 053 | |||||||
| ADELPHIA 043 | 074 | 110 | 111 | ||||||||||
| ADVANCED NEWHOUSE 043 | |||||||||||||
| ALTRIO 043 | |||||||||||||
| AMERICAST 099 | |||||||||||||
| ANTRONIX 014 | |||||||||||||
| ARCHER 005 | 007 | 014 | |||||||||||
| ARMSTRONG 074 | |||||||||||||
| AT&T BROADBAND 074 | |||||||||||||
| ATLANTIC BROADBAND 043 | 074 | ||||||||||||
| BELL SOUTH | 099 | ||||||||||||
| BLUE RIDGE 043 | 074 | ||||||||||||
| BRESNAN | 074 | ||||||||||||
| BUCKEYE COMM | 074 | ||||||||||||
| CABLEVISION | 108 | 043 | 074 | ||||||||||
| CENTURION | 092 | ||||||||||||
| CENTURY | 007 | ||||||||||||
| CHARTER | 043 | 074 | 110 | 111 | |||||||||
| CITIZEN | 007 | ||||||||||||
| COGECO 074 | |||||||||||||
| COMBANO | 080 | 081 | |||||||||||
| COMCAST | 110 | 043 | 074 | ||||||||||
| COMSAT | 074 | ||||||||||||
| COMTRONICS | 030 | ||||||||||||
| COX DIGITAL CABLE | 043 | 074 | |||||||||||
| DIGICABLE | 101 | ||||||||||||
| EAGLE | 020 | 030 | 040 | ||||||||||
| EASTERN | 057 | 066 | |||||||||||
| ELECTRICORD | 032 | ||||||||||||
| GEMINI | 008 | 054 | |||||||||||
| GE | 072 | ||||||||||||
| GENERAL INSTRUMENT | 103 | 002 | 003 | 004 | 008 | 009 | 010 | 069 | 074 | 104 | |||
Cable components (continued)
| Brand | Code numbers |
| GNC 099 | |
| GOLDEN CHANNEL 030 | |
| HAMLIN 049 050 055 | |
| HITACHI 103 055 | |
| INSIGHT 074 | |
| JERROLD 103 002 003 004 008 009 010 069 074 104 109 110 | |
| M-NET 037 | |
| MAGNAVOX 010 012 064 079 094 | |
| MASSILLON 074 | |
| MEDIA ONE 107 | |
| MEDICOM 074 | |
| MEMOREX 052 | |
| MOTOROLA | 103 002 003 004 008 009 010 069 074 104 109 110 111 112 120 |
| MOVIE TIME | 028 032 |
| MOXI | 111 |
| NCTC | 074 |
| NOVAPLEX | 092 |
| NSC | 015 028 038 071 |
| OAK | 031 037 053 |
| PACE | 043 074 |
| PANASONIC | 044 047 |
| PARAGON | 052 |
| PHILIPS | 006 012 013 020 085 |
| PIONEER | 103 034 051 063 076 105 043 |
| PRUCER 059 | |
| PTS | 011 071 074 |
| PULSAR | 052 |
| QUEST 112 | |
| RCA | 047 |
| RCN | 074 |
| RECOTON | 098 |
| REGAL | 049 050 |
| REGENCY | 057 |
| RODGERS 043 | |
| SAMSUNG 030 123 | |
| SCIENTIFIC ATLANTA 003 011 041 042 043 045 046 123 | |
| SEREN 043 | |
| SERVICE ELECTRIC 074 | |
| SHAW 074 | |
| SIGECOM 043 | |
| SIGNAL 030 | |
| SIGNATURE 103 | |
| SL MARX 030 | |
| SONY 108 096 | |
| SPRUCER 047 078 | |
| STARCOM 002 004 008 009 | |
| STARGATE 008 030 097 104 | |
| SUSQUEHANNA | 043 074 |
| TADIRAN 030 | |
| TIMELESS 030 | |
| TIME WARNER | 043 074 |
| TOCOM | 039 040 056 |
| TOSHIBA | 052 |
| UNIKA | 007 014 |
| UNITED CABLE | 004 053 |
| UNIVERSAL 005 007 014 032 035 | |
| VIDEOTRON | 043 |
| VIEWSTAR | 012 015 018 086 087 088 089 |
| VERIZON | 121 110 |
| WIDE OPEN WEST | 043 099 |
| ZENITH | 052 060 093 100 |
DVD components
| Brand Code numbers | ||||||||||
| ADCOM 157 | ||||||||||
| AIWA 136 146 | ||||||||||
| ALPINE 098 | ||||||||||
| AKAI 281 | ||||||||||
| APEX DIGITAL 087 111 112 115 116 236 | ||||||||||
| ARCAM 122 | ||||||||||
| AUDIOVOX 284 | ||||||||||
| CALIFORNIA AUDIO 021 124 | ||||||||||
| CAMBRIDGE AUDIO 215 216 | ||||||||||
| CARY AUDIO DESIGN 174 | ||||||||||
| CINEVISION 219 | ||||||||||
| CLASSE 167 | ||||||||||
| COBY | 258 | 260 | ||||||||
| CYBERHOME | 133 | 227 | 271 | 313 | ||||||
| DAEWOO | 132 | |||||||||
| DENON | 007 | 080 | 138 | 173 | 181 | 287 | 288 | 206 | 207 | |
| DURABRAND | 143 | |||||||||
| EMERSON | 143 | |||||||||
| ESA | 143 | |||||||||
| GATEWAY | 175 | |||||||||
| GE | 026 | 027 | ||||||||
| GRADIENTE 021 | ||||||||||
| GRUNDIG | 083 | |||||||||
| GO VIDEO | 137 | 091 | 217 | 218 | 219 | 220 | 221 | 222 | 224 | |
| HARMAN KARDON | 084 | 140 | ||||||||
| HITACHI | 101 | |||||||||
| FUNAI | 143 | 120 | ||||||||
| ILO | 268 | |||||||||
| INSIGNIA | 143 | 292 | 297 | |||||||
| INTEGRA | 142 | 180 | 192 | 280 | ||||||
| JVC | 012 | 168 | 203 | 212 | 257 | 302 | ||||
| KENWOOD | 123 | 151 | 152 | 013 | ||||||
DVD components (continued)
| Brand | Code numbers |
| KISS 179 279 | |
| KLH 135 | |
| KRELL 104 | |
| LECSON 126 | |
| LEXICON 148 305 | |
| LG 303 057 074 | |
| LINN 306 | |
| LITEON 264 265 | |
| MAGNAVOX 096 066 143 282 032 121 | |
| MALATA 267 | |
| MARANTZ 083 105 201 202 315 211 | |
| MCINTOSH 125 | |
| MEMOREX 163 | |
| MERIDIAN | 153 |
| MINTEK | 111 282 |
| MITSUBISHI | 017 121 |
| MYRYAD | 134 102 |
| NAIM | 226 |
| NAD | 088 155 278 121 |
| NAKAMICHI | 103 |
| ONKYO | 076 035 180 274 280 314 |
| OPPO | 266 311 |
| PANASONIC | 285 021 042 138 139 144 150 198 199 205 259 289 113 |
| PARASOUND | 245 |
| PHILIPS 066 095 105 166 176 276 277 032 | |
| PIONEER | 304 023 092 099 107 108 131 162 172 178 213 232 272 283 106 117 121 |
| POLAROID | 233 234 235 236 237 284 295 296 297 |
| PRIMARE 193 194 | |
| PROCEED | 086 |
| PROSCAN | 026 027 |
| RCA 026 027 273 290 307 002 | |
| RJTECH | 269 |
| ROTEL | 204 |
DVD components (continued)
| Brand | Code numbers | |||||||||||||||||||
| SAMSUNG 275 056 070 | 119 | 137 | 159 | 165 | 170 | 200 | 254 | 301 | ||||||||||||
| SANSUI 154 | ||||||||||||||||||||
| SANYO 147 075 | ||||||||||||||||||||
| SENSORY SCIENCE | 217 | 222 | 223 | |||||||||||||||||
| SHARP 094 294 152 013 | ||||||||||||||||||||
| SHERWOOD 245 246 247 | 248 | 249 | 250 | |||||||||||||||||
| SONY 286 033 118 126 | 145 | 160 | 189 | 191 | 238 | 239 | 240 | 241 | 242 | 243 | 251 | 252 | ||||||||
| 253 | 261 | 262 | 263 | 053 | 110 | |||||||||||||||
| SPECTRONIQ 310 | ||||||||||||||||||||
| SUPERSCAN 143 | ||||||||||||||||||||
| SV2000 143 | ||||||||||||||||||||
| SYLVANIA 143 | ||||||||||||||||||||
| SYMPHONIC 143 | ||||||||||||||||||||
| TAG MCLAREN 156 | ||||||||||||||||||||
| TEAC 270 | ||||||||||||||||||||
| THETA DIGITAL | 023 | 032 | ||||||||||||||||||
| THOMPSON | 026 | 027 | ||||||||||||||||||
| THULE | 177 | |||||||||||||||||||
| TOSHIBA | 273 | 035 | 034 | 128 | 141 | 130 | 164 | 183 | 184 | 185 | 186 | 187 | 188 | 214 | 300 | 152 | 106 | |||
| TRUTECH | 293 | |||||||||||||||||||
| VENTURER | 149 | |||||||||||||||||||
| VINC 161 308 | ||||||||||||||||||||
| YAMAHA | 042 | 089 | 066 | 158 | 166 | 195 | 196 | 197 | 043 | 129 | ||||||||||
| ZENITH 057 074 091 182 | ||||||||||||||||||||
VCR components
| Brand Code numbers | |||||||||||||||||
| AIWA 034 161 169 | |||||||||||||||||
| AKAI 016 043 046 124 125 142 146 | |||||||||||||||||
| AMPRO 072 | |||||||||||||||||
| ANAM 031 | |||||||||||||||||
| AUDIO DYNAMICS 012 023 039 043 | |||||||||||||||||
| BROOKSONIC 035 037 129 | |||||||||||||||||
| CANON 028 031 | |||||||||||||||||
| CAPEHART 108 | |||||||||||||||||
| CRAIG 003 040 135 | |||||||||||||||||
| CURTIS MATHES 031 041 | |||||||||||||||||
| DAEWOO 005 007 010 065 108 110 111 112 116 117 119 | |||||||||||||||||
| DAYTRON | 108 | ||||||||||||||||
| DBX | 012 | 023 | 039 | 043 | |||||||||||||
| DYNATECH | 034 | 053 | |||||||||||||||
| ELECTROHOME 059 | |||||||||||||||||
| EMERSON 005 006 017 025 027 029 031 034 035 036 037 046 101 116 129 131 138 | |||||||||||||||||
| 153 | 162 | ||||||||||||||||
| FISHER 003 008 009 010 | |||||||||||||||||
| FUNAI | 034 | ||||||||||||||||
| GE | 031 | 063 | 072 | 107 | 109 | 144 | 147 | ||||||||||
| GO VIDEO | 132 | 136 | 155 | 040 | 115 | ||||||||||||
| GOLDSTAR 012 013 020 101 106 114 123 | |||||||||||||||||
| HARMAN KARDON | 012 | 045 | |||||||||||||||
| HITACHI 004 018 026 034 043 063 137 150 160 013 | |||||||||||||||||
| INSTANTREPLAY | 031 | ||||||||||||||||
| JCL | 031 | ||||||||||||||||
| JCPENNEY | 012 | 013 | 015 | 040 | 066 | 101 | |||||||||||
| JENSEN | 043 | ||||||||||||||||
| JVC | 012 | 031 | 043 | 048 | 050 | 055 | 060 | 130 | 150 | 152 | 166 | 172 173 | |||||
| KENWOOD | 014 | 048 | 034 | 047 | |||||||||||||
| LG | 171 | ||||||||||||||||
| LLOYD 034 | |||||||||||||||||
| LXI | 003 | 009 | 017 | 034 | 106 | ||||||||||||
VCR components (continued)
| Brand | Code numbers |
| MAGIN 040 | |
| MAGNAVOX 031 034 041 067 068 156 164 | |
| MARANTZ 012 031 067 069 156 | |
| MARTA 101 | |
| MATSUI 027 030 | |
| MEI 031 | |
| MEMOREX 003 010 014 031 034 053 072 101 102 134 139 | |
| MGA 045 046 059 | |
| MINOLTA 013 020 | |
| MITSUBISHI 013 020 045 046 051 059 061 142 151 049 168 174 175 | |
| MTC 034 040 | |
| MULTITECH 024 034 | |
| NEC | 012 023 039 043 048 |
| NORDMENDE | 043 |
| OPTONICA | 053 054 |
| ORION | 025 |
| PANASONIC | 066 070 083 133 140 145 157 163 074 167 |
| PENTAX | 013 020 031 063 |
| PHILCO | 031 034 067 |
| PHILIPS | 031 034 054 067 071 101 156 |
| PILOT | 101 |
| PIONEER | 013 021 048 |
| PORTLAND | 108 |
| PULSAR | 072 |
| QUARTZ | 002 014 |
| QUASAR | 066 145 075 |
| RADIO SHACK | 123 |
| RCA 013 020 041 107 109 140 144 145 147 034 040 158 | |
| REALISTIC | 003 008 010 014 031 034 040 053 054 101 |
| RICO 058 | |
| RUNCO | 148 |
| SALORA | 014 |
| SAMSUNG 032 040 066 102 104 107 109 112 113 115 120 122 125 | |
VCR components (continued)
| Brand Code numbers | ||||||||||||||
| SANSUI 022 | 043 | 048 | 135 | |||||||||||
| SANYO 003 | 007 | 010 | 014 | 134 | 102 | |||||||||
| SCOTT 017 | 037 | 112 | 129 | 131 | ||||||||||
| SEARS 003 | 008 | 009 | 010 | 013 | 014 | 081 | 101 | 017 | 073 | 112 | ||||
| SHARP 031 | 054 | 149 | 159 | 165 | ||||||||||
| SHINTOM 024 | ||||||||||||||
| SIGNATURE 034 | ||||||||||||||
| SONY 003 | 031 | 052 | 056 | 057 | 058 | 076 | 077 | 078 | 149 | 154 | ||||
| SOUNDESIGN 034 | ||||||||||||||
| STS 013 | ||||||||||||||
| SYLVANIA 031 | 034 | 059 | 067 | |||||||||||
| SYMPHONIC 034 | ||||||||||||||
| TANDY | 010 | 034 | ||||||||||||
| TATUNG | 039 | 043 | ||||||||||||
| TEAC | 034 | 039 | 043 | |||||||||||
| TECHNICS | 031 | 070 | ||||||||||||
| TEKNIKA | 019 | 031 | 034 | 101 | ||||||||||
| THOMAS | 034 | |||||||||||||
| TMK | 006 | |||||||||||||
| TOSHIBA | 008 | 013 | 042 | 047 | 059 | 079 | 082 | 112 | 131 | 081 | 170 | |||
| TOTEVISION | 040 | 101 | ||||||||||||
| UNITECH | 040 | |||||||||||||
| VECTOR RESEARCH | 012 | |||||||||||||
| VICTOR | 048 | |||||||||||||
| VIDEO CONCEPTS | 012 | 034 | 046 | 141 | ||||||||||
| VIDEOSONIC | 040 | |||||||||||||
| WARDS 003 | 013 | 017 | 024 | 031 | 034 | 040 | 053 | 054 | 131 | |||||
| YAMAHA | 012 | 034 | 039 | 043 | ||||||||||
| ZENITH 034 | 048 | 056 | 058 | 072 | 080 | 101 | 171 | |||||||
Audio components
| Brand Code numbers | |||||||||||||||||
| ADC 007 | |||||||||||||||||
| ADCOM 082 | 092 | 225 | 161 | 269 | 355 | 356 | 366 | ||||||||||
| AIWA 018 | 104 | 170 | 202 | 203 | 213 | 211 | 188 | ||||||||||
| AKAI 138 | 189 | ||||||||||||||||
| AMC 038 | 125 | 126 | 127 | 128 | 258 | 281 | 282 | ||||||||||
| AMEND 054 | |||||||||||||||||
| AMX 196 | |||||||||||||||||
| ANGSTROM 142 | |||||||||||||||||
| ANTEX ELECTRONICS 588 | |||||||||||||||||
| ANTHEM 335 | 336 | 337 | 338 | 339 | |||||||||||||
| ARAGON 157 | 158 | 042 | 043 | 081 | 112 | ||||||||||||
| ARCAM 141 | 325 | 418 | 419 | 504 | 590 | 591 | 592 | 593 | 594 | ||||||||
| ARCAM 504 | 591 | ||||||||||||||||
| ATLANTIC TECHNOLOGY 342 | |||||||||||||||||
| AUDIO ACCESS | 147 | ||||||||||||||||
| AUDIO ALCHEMY | 135 | ||||||||||||||||
| AUDIO CONTROL | 448 | 572 | 623 | ||||||||||||||
| AUDIO DESIGN ASSOCIATES | 194 | 221 | 011 | ||||||||||||||
| AUDIO EASE | 021 | 196 | 207 | ||||||||||||||
| AUDIO FILE | 071 | ||||||||||||||||
| AUDIO MATRIX | 167 | ||||||||||||||||
| AUDIO RESEARCH | 399 | 406 | 423 | 424 | 425 | 426 | |||||||||||
| AUDIO SOURCE | 273 | ||||||||||||||||
| AUDIO TECHNICA | 134 | ||||||||||||||||
| B & K 096 | 097 | 298 | 299 | 300 | 301 | 302 | 303 | 304 | 305 | 306 | 307 | 308 | 309 | 310 | 311 | ||
| 312 | 313 | 314 | 315 | ||||||||||||||
| BOSE 409 | 460 | 548 | 070 | 170 | 224 | 347 | 459 | 532 | |||||||||
| BOSE | 170 | 532 | |||||||||||||||
| BOSTON ACOUSTICS | 447 | ||||||||||||||||
| BRIX | 555 | ||||||||||||||||
| BRYSTON | 023 | 551 | |||||||||||||||
| CAMBRIDGE AUDIO | 522 | 523 | 524 | 525 | 630 | 683 | |||||||||||
| CARVER | 006 | 027 | 028 | 061 | 071 | 201 | 214 | 226 | 180 | 185 | 022 | 029 | 077 | 284 | |||
Audio components (continued)
| Brand | Code numbers | ||||||||||||||||||
| CARY AUDIO DESIGN 443 519 | |||||||||||||||||||
| CASIO 076 | |||||||||||||||||||
| CHIRO 140 | |||||||||||||||||||
| CINEMA SOUND 034 134 | |||||||||||||||||||
| CITATION 148 272 | |||||||||||||||||||
| CLARION 026 | |||||||||||||||||||
| CLASSE 410 411 484 537 538 | |||||||||||||||||||
| COLORADO VNET 539 | |||||||||||||||||||
| COMPAQ 382 | |||||||||||||||||||
| CURTIS MATHES 076 | |||||||||||||||||||
| DELPHI 415 515 | |||||||||||||||||||
| DENON 340 400 422 002 034 109 215 229 230 027 037 234 259 316 330 341 | |||||||||||||||||||
| EAD 099 098 466 467 | |||||||||||||||||||
| EIGER | 149 | ||||||||||||||||||
| ELAN | 468 472 469 470 471 057 290 371 473 474 475 476 477 481 482 483 | ||||||||||||||||||
| 508 509 | |||||||||||||||||||
| ESCIENT | 368 381 393 451 452 453 454 | ||||||||||||||||||
| FANFARE | 352 | ||||||||||||||||||
| FISHER | 047 214 180 182 297 | ||||||||||||||||||
| FLEXTRONICS | 378 | ||||||||||||||||||
| FOSGATE | 062 231 342 | ||||||||||||||||||
| GE | 056 260 | ||||||||||||||||||
| GOLDSTAR | 008 | ||||||||||||||||||
| HAFLER 174 | |||||||||||||||||||
| HALCRO | 596 597 | ||||||||||||||||||
| HARMAN KARDON | 318 231 233 254 153 154 118 121 227 277 317 329 365 | ||||||||||||||||||
| HITACHI | 020 | ||||||||||||||||||
| IMERGE | 371 | ||||||||||||||||||
| INKEL | 197 | ||||||||||||||||||
| INSIGNIA | 589 | ||||||||||||||||||
| INTEGRA | 486 441 570 354 371 438 439 440 442 487 586 | ||||||||||||||||||
| JAMO | 398 | ||||||||||||||||||
| JBL | 263 621 622 | ||||||||||||||||||
Audio components (continued)
| Brand | Code numbers | |||||||||||||||||||
| JCPENNEY 076 216 | ||||||||||||||||||||
| JEFF ROWLAND 206 | ||||||||||||||||||||
| JENSEN 058 | ||||||||||||||||||||
| JVC 279 240 163 191 114 266 291 389 390 | ||||||||||||||||||||
| KEF 530 | ||||||||||||||||||||
| KENWOOD 412 320 026 066 145 146 181 190 197 192 182 199 151 222 180 005 280 319 367 374 413 414 420 517 550 | ||||||||||||||||||||
| KENWOOD 550 | ||||||||||||||||||||
| KINERGETICS 220 140 | ||||||||||||||||||||
| KLH 331 | ||||||||||||||||||||
| KLIPSCH 157 158 042 043 081 112 | ||||||||||||||||||||
| KNOLL 531 | ||||||||||||||||||||
| KOSS 216 573 | ||||||||||||||||||||
| KRELL 376 384 500 624 150 072 321 497 498 499 672 673 674 | ||||||||||||||||||||
| KYOCERA 007 | ||||||||||||||||||||
| LEXICON 357 360 120 235 236 237 324 358 359 361 362 363 364 | ||||||||||||||||||||
| LINN | 124 377 | |||||||||||||||||||
| LUXMAN | 137 139 052 165 115 004 009 | |||||||||||||||||||
| LXI | 076 056 | |||||||||||||||||||
| MAGNAVOX 086 164 152 208 | ||||||||||||||||||||
| MARANTZ | 488 492 385 006 028 031 040 063 185 186 251 265 119 289 326 327 328 371 489 490 491 493 563 | |||||||||||||||||||
| MARK LEVINSON | 322 | |||||||||||||||||||
| MCINTOSH | 238 286 496 | |||||||||||||||||||
| MCS | 076 | |||||||||||||||||||
| MERIDIAN 100 012 013 628 | ||||||||||||||||||||
| MICRO LAB | 394 | |||||||||||||||||||
| MICROMEGA | 119 | |||||||||||||||||||
| MITSUBISHI | 242 243 204 | |||||||||||||||||||
| MONDIAL | 157 158 042 043 081 112 | |||||||||||||||||||
| MOTOROLA | 386 | |||||||||||||||||||
| MUSICAL FIDELITY | 407 408 647 648 | |||||||||||||||||||
| MUSICAL FIDELITY | 408 648 | |||||||||||||||||||
| MYRYAD | 276 293 455 456 457 | |||||||||||||||||||
Audio components (continued)
| Brand | Code numbers | ||||||||||||||||||
| MYRYAD 457 | |||||||||||||||||||
| NAD 186 | 113 | 283 | 478 | 479 | 598 | 603 | 604 | 605 | |||||||||||
| NAD 113 | |||||||||||||||||||
| NAIM 533 | 534 | 535 | |||||||||||||||||
| NAIM 535 | |||||||||||||||||||
| NAKAMICHI | 111 | 244 | 245 | 172 | 183 | 287 | 323 | 450 | 615 | ||||||||||
| NEC 176 | |||||||||||||||||||
| NETSTREAMS | 616 | 617 | 618 | 619 | 620 | ||||||||||||||
| NILES 403 | |||||||||||||||||||
| NIRO 343 | |||||||||||||||||||
| NUVO 404 | 405 | 606 | 607 | 608 | 609 | 610 | |||||||||||||
| NUVO 404 | 405 | 606 | 607 | ||||||||||||||||
| OLIVE 584 | |||||||||||||||||||
| ONKYO 486 | 441 | 017 | 046 | 064 | 107 | 108 | 187 | 079 | 080 | 090 | 179 | 209 | 270 | 275 | 438 | ||||
| 439 | 440 | 442 | 486 | 487 | 536 | 552 | 586 | 629 | |||||||||||
| OPTIMUS 026 | 041 | 138 | |||||||||||||||||
| OUTLAW 342 | |||||||||||||||||||
| PANASONIC | 032 | 195 | 219 | 177 | 292 | 383 | 516 | 626 | 627 | ||||||||||
| PARASOUND | 333 | 334 | 553 | 554 | 129 | 130 | 132 | 261 | 294 | 295 | |||||||||
| PASS LABS | 431 | ||||||||||||||||||
| PHAST 196 | |||||||||||||||||||
| PHILIPS | 249 | 250 | 251 | 063 | 119 | 296 | |||||||||||||
| PIONEER | 480 | 542 | 014 | 033 | 039 | 044 | 045 | 050 | 069 | 159 | 168 | 116 | 035 | 078 | 198 | 397 | |||
| 513 | 518 | 520 | 521 | 543 | 544 | 545 | 546 | 547 | 556 | ||||||||||
| PIONEER | 556 | ||||||||||||||||||
| PLINIUS | 458 | ||||||||||||||||||
| POLKAUDIO | 029 | 514 | |||||||||||||||||
| POLKAUDIO | 514 | ||||||||||||||||||
| PRIMARE | 461 | 462 | 463 | 464 | 465 | ||||||||||||||
| PRIMARE | 465 | ||||||||||||||||||
| PROCEED | 144 | 268 | |||||||||||||||||
| QUAD | 526 | ||||||||||||||||||
| RCA | 010 | 048 | 117 | 156 | 067 | 288 | 549 | ||||||||||||
| REALISTIC | 019 | 056 | 073 | 075 | 095 | ||||||||||||||
Audio components (continued)
| Brand Code numbers | ||||||||||||||||||||
| REQUEST 351 | 511 | 611 | 612 | 613 | ||||||||||||||||
| REVOX 162 | ||||||||||||||||||||
| ROKU 506 | 507 | |||||||||||||||||||
| ROTEL 501 | 502 | 503 | 074 | 083 | 085 | 654 | ||||||||||||||
| RUSSOUND 379 | 391 | 392 | 445 | 446 | 527 | 528 | 529 | |||||||||||||
| RUSSOUND 445 | 446 | |||||||||||||||||||
| SAMSUNG 016 | 571 | 653 | ||||||||||||||||||
| SANSUI 040 | 048 | 110 | 119 | 065 | 228 | |||||||||||||||
| SANYO 047 | 059 | |||||||||||||||||||
| SCOTT 019 | 091 | |||||||||||||||||||
| SEARS 076 | ||||||||||||||||||||
| SHARP 026 | 051 | 094 | 131 | 175 | 181 | 652 | ||||||||||||||
| SHERWOOD 447 | 024 | 038 | 055 | 102 | 103 | 105 | 106 | 051 | 030 | 348 | 370 | 388 | 562 | 675 | ||||||
| SIMAUDIO 449 | ||||||||||||||||||||
| SIRIUS 585 | 555 | |||||||||||||||||||
| SIRIUS 585 | 555 | 550 | ||||||||||||||||||
| SLIM DEVICES 512 | ||||||||||||||||||||
| SONY 372 | 417 | 574 | 369 | 018 | 084 | 093 | 223 | 247 | 248 | 160 | 166 | 015 | 101 | 184 | 218 | 271 | ||||
| 353 | 380 | 395 | 421 | 575 | 576 | 577 | 631 | 640 | 641 | 642 | 632 | 633 | 634 | 635 | 636 | |||||
| 637 | 638 | 639 | ||||||||||||||||||
| SONY | 380 | |||||||||||||||||||
| SOUNDESIGN 036 | ||||||||||||||||||||
| SOUNDMATTERS | 375 | |||||||||||||||||||
| SOUNDSTREAM | 084 | 088 | ||||||||||||||||||
| SSI | 068 | |||||||||||||||||||
| STS | 007 | |||||||||||||||||||
| SUGDEN | 430 | |||||||||||||||||||
| SUMO | 171 | |||||||||||||||||||
| SUNFIRE | 344 | 345 | 346 | 494 | 495 | |||||||||||||||
| TAEKWANG | 138 | |||||||||||||||||||
| TAG MCLAREN | 387 | |||||||||||||||||||
| TASCAM | 625 | |||||||||||||||||||
| TASCAM | 625 | |||||||||||||||||||
| TEAC | 005 | 019 | 049 | 111 | 212 | 217 | ||||||||||||||
Audio components (continued)
| Brand | Code numbers | ||||||||||||||||||
| TECHNICS | 122 | 176 | 193 | 219 | 178 | 177 | 200 | 257 | 262 | ||||||||||
| THETA DIGITAL 136 | |||||||||||||||||||
| THULE 505 | |||||||||||||||||||
| TOSHIBA | 060 | 087 | 198 | 278 | 510 | ||||||||||||||
| TURTLE BEACH 416 | |||||||||||||||||||
| WARDS 180 | |||||||||||||||||||
| XANTECH | 508 | 509 | |||||||||||||||||
| XM SATELLITE RADIO | 415 | 514 | 515 | ||||||||||||||||
| YAMAHA | 427 | 557 | 655 | 643 | 644 | 026 | 253 | 169 | 067 | 123 | 133 | 173 | 205 | 264 | 232 | 089 | 274 | ||
| 285 | 332 | 373 | 428 | 429 | 432 | 433 | 434 | 435 | 436 | 437 | 540 | 541 | 558 | 559 | |||||
| 561 | 565 | 566 | 567 | 578 | 579 | 580 | 581 | 582 | 583 | 599 | 600 | 645 | 646 | 656 | |||||
| 658 | 659 | 660 | 661 | 662 | 663 | 664 | 665 | 666 | 667 | 668 | 669 | 670 | 671 | 676 | |||||
| YBA 485 | |||||||||||||||||||
| ZENITH | 143 | 210 | |||||||||||||||||
| ZON 587 | |||||||||||||||||||
Satellite components
| Brand Code numbers | ||||||||||||||||
| ALPHASTAR 123 | ||||||||||||||||
| AMPLICA 050 | ||||||||||||||||
| ASTON 206 | ||||||||||||||||
| ATLANTA DTH 203 | ||||||||||||||||
| BIRDVIEW 129 113 051 126 | ||||||||||||||||
| BSR 053 | ||||||||||||||||
| CABLEVISION 148 | ||||||||||||||||
| CAPETRONICS 053 | ||||||||||||||||
| CHANNEL MASTER 013 014 015 018 036 055 | ||||||||||||||||
| CHAPARRAL 008 009 012 077 | ||||||||||||||||
| CITOH 054 | ||||||||||||||||
| COOLSAT 211 | ||||||||||||||||
| CURTIS MATHES 050 | ||||||||||||||||
| DISH NETWORK | 122 | 167 | 168 | 184 | 185 | 186 | 187 | 188 | ||||||||
| DIRECTV | 173 | 193 | 220 | 221 | 223 | 224 | 225 | 226 | 227 | 228 | ||||||
| DRAKE | 005 | 006 | 007 | 010 | 011 | 112 | 116 | 141 | 052 | |||||||
| DREAM MULTIMEDIA | 191 | 205 | ||||||||||||||
| DX ANTENNA | 024 | 046 | 056 | 076 | ||||||||||||
| ECHOSTAR | 038 | 040 | 057 | 058 | 093 | 094 | 095 | 096 | 097 | 098 | 099 | 100 | 122 | 167 | 168 | 184 |
| 185 | 186 | 187 | 188 | |||||||||||||
| ELECTROHOME 089 | ||||||||||||||||
| EURO PLUS | 114 | |||||||||||||||
| EUROSAT | 114 | |||||||||||||||
| EXPRESSVU | 122 | |||||||||||||||
| FORCE 176 | ||||||||||||||||
| FORTEC STAR | 177 | 178 | ||||||||||||||
| FUJITSU | 017 | 021 | 022 | 027 | 133 | 134 | ||||||||||
| GE | 151 | 106 | 150 | |||||||||||||
| GENERAL INSTRUMENT | 003 | 004 | 016 | 029 | 031 | 059 | 101 | 148 | ||||||||
| GOI | 122 | |||||||||||||||
| HITACHI | 139 | 140 | ||||||||||||||
| HIRSCHMANN | 202 | |||||||||||||||
| HOME CABLE | 080 | 044 | 029 | |||||||||||||
Satellite components (continued)
| Brand | Code numbers | ||||||||||||
| HOUSTON TRACKER 033 | 037 | 039 | 104 | 057 | 051 | ||||||||
| HTS 122 | |||||||||||||
| HUGHES 068 | 154 | 161 | 162 | 165 | 166 | 220 | 221 | 223 | 224 | 225 | 226 | 227 | 228 |
| HYTEK 053 | |||||||||||||
| HYUNDAI 149 | |||||||||||||
| ICR 023 | |||||||||||||
| JANIEL 060 | 147 | ||||||||||||
| JERROLD 148 | |||||||||||||
| JVC 122 | |||||||||||||
| KATHREIN 108 | |||||||||||||
| KPN 208 | |||||||||||||
| LEGEND 057 | |||||||||||||
| LG 170 | |||||||||||||
| LUXOR 144 | 062 | ||||||||||||
| MACOM | 010 | 059 | 063 | 064 | 065 | ||||||||
| MARANTZ | 152 | 153 | |||||||||||
| MEMOREX | 057 | ||||||||||||
| MICRONIK MULTIMEDIA | 207 | ||||||||||||
| MITSUBISHI | 068 | 154 | |||||||||||
| MOTOROLA | 148 | 171 | |||||||||||
| NEXT LEVEL | 148 | ||||||||||||
| NEXTWAVE | 028 | 124 | 125 | ||||||||||
| NORSAT | 069 | 070 | |||||||||||
| NTL 209 | |||||||||||||
| NV | 195 | 196 | 197 | ||||||||||
| PACE | 143 | ||||||||||||
| PANASONIC | 142 | 060 | 160 | ||||||||||
| PANSAT | 121 | 172 | |||||||||||
| PERSONAL CABLE | 117 | ||||||||||||
| PHILIPS | 071 | 152 | 153 | 068 | 154 | 156 | 201 | ||||||
| PL | 023 | 026 | |||||||||||
| PRESIDENT | 019 | 102 | |||||||||||
| PRIMESTAR | 110 | 030 | |||||||||||
Satellite components (continued)
| Brand | Code numbers |
| PROSAT 072 | |
| PROSCAN 151 106 150 | |
| RADIOSHACK 148 | |
| RCA 151 106 150 | |
| REALISTIC 043 074 | |
| SAB 195 196 197 198 199 200 | |
| SAMSUNG 155 123 163 169 175 179 | |
| SATCRUISER 192 | |
| SATELLITE SERVICE 028 035 047 085 | |
| SKY 164 171 174 204 | |
| SONY 103 104 | |
| STARCAST 041 | |
| STAR CHOICE | 148 |
| SUPERGUIDE | 020 124 125 |
| TEECOM | 023 026 075 087 088 090 107 130 137 |
| TOSHIBA | 002 127 157 158 068 154 |
| TOWN & COUNTRY | 023 026 |
| UNIDEN 016 025 042 043 | 044 045 048 049 078 079 080 086 101 135 136 |
| VIEWSTAR 115 | |
| VOOM | 148 |
| WINEGARD | 128 146 |
| ZENITH | 081 082 083 084 091 120 159 |
CD players
| Brand Code number | |||||||||||||||||
| ADCOM 062 042 | |||||||||||||||||
| AIWA 059 012 065 088 089 105 122 170 187 | |||||||||||||||||
| AKAI 085 195 202 | |||||||||||||||||
| AMC 231 232 | |||||||||||||||||
| AMEND 118 | |||||||||||||||||
| ARCAM 238 275 | |||||||||||||||||
| AUDIO ACCESS 119 147 | |||||||||||||||||
| AUDIO EASE 165 | |||||||||||||||||
| AUDIO TECHNICA 046 | |||||||||||||||||
| BSR 037 057 | |||||||||||||||||
| CALIFORNIA AUDIO 103 008 | |||||||||||||||||
| CAMBRIDGE AUDIO 268 | |||||||||||||||||
| CAPETRONIC | 063 | ||||||||||||||||
| CARRERA | 057 080 | ||||||||||||||||
| CARVER | 185 041 044 050 086 107 130 134 135 138 139 203 204 167 | ||||||||||||||||
| CASIO | 111 182 | ||||||||||||||||
| CARY AUDIO DESIGN | 261 262 289 290 291 292 | ||||||||||||||||
| CLASSE | 267 | ||||||||||||||||
| CLARINETTE | 182 | ||||||||||||||||
| CREEK 159 | |||||||||||||||||
| CROWN | 035 | ||||||||||||||||
| DCS | 294 | ||||||||||||||||
| DENON | 002 123 281 | ||||||||||||||||
| EMERSON | 042 069 102 | ||||||||||||||||
| FISHER 050 185 134 008 | |||||||||||||||||
| FRABA | 111 | ||||||||||||||||
| GENEXXA | 010 069 102 | ||||||||||||||||
| GOLDSTAR | 080 | ||||||||||||||||
| HAITAI | 093 | ||||||||||||||||
| HARMAN KARDON | 018 033 047 208 272 | ||||||||||||||||
| HITACHI | 042 175 | ||||||||||||||||
| INKEL | 130 143 144 | ||||||||||||||||
| Brand | Code number | ||||||||||||||||
| INTEGRA 030 | 273 | ||||||||||||||||
| JCPENNEY 014 | 061 | 092 | 141 | ||||||||||||||
| JENSEN 158 | |||||||||||||||||
| JVC 004 | 022 | 136 | 163 | 213 | 214 | 242 | 243 | 286 | |||||||||
| KENWOOD | 185 | 007 | 023 | 055 | 071 | 072 | 142 | 137 | 254 | ||||||||
| KOSS 061 | |||||||||||||||||
| KRELL 241 | 279 | 285 | |||||||||||||||
| KYOCERA 005 | |||||||||||||||||
| LOTTE 102 | |||||||||||||||||
| LUXMAN 011 | 028 | 070 | 076 | 249 | 252 | ||||||||||||
| LXI 059 | |||||||||||||||||
| MAGNAVOX 044 | 107 | ||||||||||||||||
| MARANTZ 027 | 041 | 044 | 051 | 077 | 107 | 209 | 246 | 274 | 296 | 297 | |||||||
| MCINTOSH 212 | 247 | ||||||||||||||||
| MCS | 014 | 073 | 092 | ||||||||||||||
| MEMOREX | 010 | ||||||||||||||||
| MISSION | 044 | 107 | |||||||||||||||
| MITSUBISHI | 179 | ||||||||||||||||
| MITSUMI | 153 | ||||||||||||||||
| MODULAIRE | 182 | ||||||||||||||||
| MONDIAL | 147 | ||||||||||||||||
| MUSICAL FIDELITY | 258 | 284 | |||||||||||||||
| MYRYAD | 244 | 265 | |||||||||||||||
| NAD | 006 | 005 | 067 | 178 | 293 | ||||||||||||
| NAIM | 271 | ||||||||||||||||
| NAKAMICHI | 217 | 218 | 219 | 095 | |||||||||||||
| NEC | 014 | 062 | |||||||||||||||
| NIKKO | 046 | ||||||||||||||||
| NSM | 044 | 107 | |||||||||||||||
| ONKYO | 030 | 038 | 039 | 168 | 169 | 273 | |||||||||||
| OPTIMUS | 010 | 050 | 057 | 058 | 081 | 082 | 083 | 085 | 093 | ||||||||
| PANASONIC | 103 | 201 | 172 | 008 | 068 | 248 | |||||||||||
| PARASOUND | 233 | 240 | |||||||||||||||
CD players (continued)
| Brand | Code number |
| PHILIPS 041 044 107 246 253 | |
| PIONEER 010 020 025 056 174 175 176 257 263 | |
| PLINIUS 288 | |
| PRIMARE 266 | |
| PROCEED 239 | |
| PROTON 044 107 228 | |
| QUAD 269 | |
| QUASAR 103 008 | |
| RADIO SHACK 182 | |
| RCA 017 042 150 276 | |
| REALISTIC 042 050 051 102 181 182 187 | |
| ROTEL 044 107 161 178 250 | |
| SAE 044 107 | |
| SANSUI 044 069 107 128 171 190 125 | |
| SANYO 050 | |
| SCOTT 069 102 | |
| SHARP 026 031 051 066 | |
| SHERWOOD | 003 019 051 096 112 115 119 166 |
| SIGNATURE | 033 |
| SIMAUDIO | 280 |
| SONY | 048 081 097 126 133 177 225 226 164 229 230 259 260 277 278 |
| SOUNDESIGN | 251 |
| SUGDEN | 264 |
| SUMO | 155 |
| SYLVANIA | 044 107 |
| SYMPHONIC | 052 181 |
| TAEKWANG | 195 085 |
| TANDY | 010 |
| TEAC | 015 034 036 051 052 101 131 140 079 145 |
| TECHNICS 060 103 200 172 184 008 068 | |
| TECHWOOD | 076 |
| THETA DIGITAL | 234 235 270 |
| TOSHIBA | 006 067 091 160 148 |
CD players (continued)
| Brand Code number | |||||||||
| VECTOR RESEARCH 080 | |||||||||
| VICTOR 004 | 022 | 114 | 124 | ||||||
| WARDS 185 | 033 | ||||||||
| YAMAHA 024 | 046 | 054 | 186 | 183 | 245 | 282 | 283 | 287 | |
| YORX 182 | |||||||||
DVR components
| Brand Code numbers | ||||||||||||||
| DIRECTV 117 | 121 | 122 | 123 | 124 | 125 | 126 | 127 | 128 | ||||||
| HUGHES 117 | 121 | 122 | 123 | 124 | 125 | 126 | 127 | 128 | ||||||
| HUMAX 118 | 121 | 122 | 123 | 124 | 125 | 126 | 127 | 128 | ||||||
| PHILIPS 090 | 117 | 121 | 122 | 123 | 124 | 125 | 126 | 127 | 128 | |||||
| PIONEER 117 | 118 | 121 | 122 | 123 | 124 | 125 | 126 | 127 | 128 | |||||
| RCA 109 | ||||||||||||||
| REPLAY TV | 075 | |||||||||||||
| SONY 104 | 105 | 131 | ||||||||||||
| TIVO | 090 | 117 | 118 | 121 | 122 | 123 | 124 | 125 | 126 | 127 | 128 | |||
Auxiliary components
| Brand | Code numbers | ||||
| 3M | 152 | ||||
| ADS TECH | 404 | ||||
| AHANIX | 260 | ||||
| AIWA | 164 | 015 | 071 | 100 | 114 |
| ALGOLITH | 415 | 475 | |||
| APPLE | 401 | 412 | 476 | ||
| ARCHER | 155 | ||||
| AUDIO AUTHORITY | 427 | 428 | |||
| AURORA | 300 | ||||
| AUTON | 191 | 434 | |||
| AURORA MULTIMEDIA | 220 | ||||
| AVERMEDIA | 437 | 460 | |||
Auxiliary components (continued)
| Brand | Code numbers |
| BEDIENUNGSANLEITUNG 221 | |
| BOSE 409 | |
| CALYPSO 491 492 493 494 | |
| CE LABS 298 | |
| CELADON 211 | |
| CRESTRON 213 214 215 216 217 218 | |
| D-BOX 440 | |
| DA LITE 269 | |
| DCS 468 469 470 | |
| DDI 403 | |
| DELL 261 262 263 264 265 266 267 268 | |
| DLINK 435 | |
| DLO 418 | |
| DMX 156 | |
| DRAPER SCREEN | 204 |
| DREAMVISION | 097 |
| DVDO | 299 423 |
| DWIN | 080 253 |
| ELAN 451 452 453 454 455 456 457 458 441 442 443 444 445 446 447 | |
| ELECTROKINETICS | 438 |
| ELITE SCREENS | 431 432 |
| EVERQUEST | 206 |
| EXTRON | 151 433 |
| FARENHEIT 430 | |
| FAROUDJA | 184 254 |
| FOCAL 436 | |
| FUJI | 209 |
| GATEWAY | 261 262 263 264 265 266 267 268 |
| GRIFFIN | 471 |
| HAUPPAUGE | 294 295 |
| HP | 252 261 262 263 264 265 266 267 268 |
| HUNTER DOUGLAS | 219 |
| INTEGRA | 439 |
| IOGEAR 407 | |
| IPORT 419 | |
| JERROLD 153 | |
| JVC 185 416 106 116 239 240 | |
| KALEIDESCAPE 259 459 | |
| KENSINGTON 406 | |
| KENMORE 251 | |
| KENWOOD 185 005 013 023 026 064 145 146 181 190 | |
| KEY DIGITAL 273 274 275 461 462 463 464 465 | |
| KEYSPAN 297 | |
| KLIPSCH 425 | |
| LG 296 | |
| LINKSYS 270 | |
| LUMAGEN 472 | |
| LUTRON | 417 077 158 159 306 308 309 |
| LUXOM | 424 |
| MAKITA | 186 201 |
| MARANTZ | 450 014 027 056 065 087 |
| MICROSOFT 107 252 261 262 263 264 265 266 267 268 408 | |
| MINDPATH 205 | |
| NETGEAR | 477 |
| NILES | 160 187 272 |
| NSM | 161 |
| NTI | 421 |
| ONKYO | 439 002 012 016 017 018 019 115 |
| PIANO DISC | 085 |
| PINNACLE | 405 |
| POLK AUDIO | 162 |
| PRIMARE 402 | |
| RCA | 258 |
| RUNCO | 466 |
| RUSSOUND | 081 |
| SCIENTIFIC ATLANTA | 156 163 |
Auxiliary components (continued)
| Brand | Code numbers | |||||||||||||||
| SHERWOOD 467 | 038 | 004 | 028 | 030 | 033 | 034 | ||||||||||
| SIMA 082 | 429 | |||||||||||||||
| SOLO ELECTRONICS 207 | ||||||||||||||||
| SOMFY 078 | 079 | 411 | ||||||||||||||
| SONANCE 419 | ||||||||||||||||
| SONY 164 | 165 | 166 | 271 | 261 | 262 | 263 | 264 | 265 | 266 | 267 | 268 | 414 | 020 | 022 | ||
| 052 | 084 | 089 | ||||||||||||||
| SPEAKERCRAFT 473 | 474 | |||||||||||||||
| STARCOM 153 | ||||||||||||||||
| TEN TECHNOLOGY 401 | ||||||||||||||||
| TURBOSCAN 167 | ||||||||||||||||
| VELODYNE 203 | 413 | |||||||||||||||
| WURLITZER 410 | ||||||||||||||||
| XANTECH 168 | 169 | 170 | 171 | 172 | 276 | 277 | 278 | 279 | 280 | 281 | 282 | 283 | 284 | 285 | ||
| 286 | 287 | 288 | 289 | 290 | 291 | 292 | 293 | 420 | 426 | 188 | 189 | |||||
Specifications
For projector specifications, see the User's Guide that came with your projector. For all other components, see these sections:
- " playable Disc Types" below
- "Screen Specifications" on page 120
- "Remote Control Specifications" on page 120
- “Powered Subwoofer Specifications” on page 121
- "Surround Speaker Specifications" on page 121
- "AV Controller Specifications" on page 122
playable Disc Types
The Ensemble HD system's DVD player accepts DVDs and compact discs in both 3-inch (8 cm) and 5-inch (12 cm) sizes.
In addition, you can play recordable DVDs (marked DVD-R) and recordable compact discs (CD-R and CD-RW). Discs must be recorded in the standard DVD Video or Compact Disc Digital Audio format, and must be finalized to be playable. Data CDs and DVDs containing MP3 or WMA audio files, or picture files in JPG format, can also be played (ISO 9660 format). You cannot play other types of discs, such as DVD-Audio, SACD, CD-ROM, DVD-RW, DVD-RAM, or DVD-ROM. Depending on the characteristics of your recorder or media, some recordable discs may not play properly.
DVDs must be recorded in the NTSC color system and be encoded for playing in Region 1. Commercial DVDs should be marked with the Region 1 symbol:
Note
Many commercial DVDs incorporate a copy protection system. If you attempt to copy such a disc, the copy will be visually distorted. Please see "Responsible Use of Copyrighted Materials" on page 123.
Screen Specifications
General
Screen Size 100" (254 cm), nominal diagonal
Aspect Ratio 16:9 (HDTV widescreen format)
Image Area (W×H) 87" × 49" (221 × 124.5 cm)
Black Drop Length 12" (30.5 cm)
Screen Material 1.1 high-gain matte white
Motor 110 volt Somfy electric
Installation Wall or ceiling
Screen Casing Dimensions (W×H×D) 100" × 6.0" × 9.5"
(254 × 15.2 × 24.1 cm)
Weight 74 lb (33.6 kg)
Built-in Speaker System
Speakers Left/right: (1) 4.5" (114 mm) midrange + (1) 1" (25 mm) titanium tweeter
Center: (2) 4.5" (114 mm) midrange + (1) 1" (25 mm) titanium tweeter
Frequency Response 100 Hz to 20 kHz ±3dB
Nominal Impedance 8 ohm
Crossover Frequency 3.75 kHz, 3rd order
Sensitivity 89dB
Remote Control Specifications
Type LCD backlit display; programmable
Learning Capability
784 commands
472 macros, up to 190 steps each
IR Range (direct line-of-sight via infrared)
20 ft (6.1 m), depending on lighting conditions
IR Frequency
15 kHz to 100 kHz
RF Range (radio frequency)
50 to 100 ft (15 to 30 m), depending on environment
RF Frequency
418 MHz
Weight 8 oz (230 g), with batteries
Size (L×W×H)
8.5" × 2.4" × 1.0"
(21.6 × 6.1 × 2.5 cm)
Batteries
4 AAA alkaline batteries
Powered Subwoofer Specifications
Bass Driver
Type Ported enclosure, front-firing
Size 10" (254 mm), long throw
Frequency Response 32 to 100 Hz, ±3dB
Amplifier
Type 5.1-channel with built-in equalizer
Peak Output 105dB in 3000 cubic feet
70 W (center channel)
40 W ×4 (front left/front right/left surround/right surround)
Frequency Response 20 Hz to 20 kHz ±2dB
Boundary Controls 5 pre-programmed EQs, manually selectable depending on installed location of screen
Anti-boom Adjustment Manually selectable frequency and gain; smooths room-induced bass peak
Physical
Dimensions (W×H×D) 14.9" × 16.1" × 18.0"
(37.8 × 40.9 × 45.7 cm)
Weight 35 lb (16 kg)
Surround Speaker Specifications
Type 4" (10 cm) coaxial speaker; side/reflective surround
Speaker Mounting Built into projector enclosure; also removable for ceiling installation
Frequency Response 100 Hz to 20 kHz
Dimensions of Projector Enclosure (W×H×D) 26.9" × 6.4" × 12.7"
(68.3 × 16.3 × 32.3 cm)
Weight of Projector Enclosure 15 lb (6.8 kg)
AV Controller Specifications
Built-in AV Capabilities DVD/CD player
AM/FM tuner
USB flash drive
playable Disk Types See page 119
Video Processor Pixelworks chipset
Video Output 1080p/720p, depending on projector
Video Input Ports HDMI (×2)
Component video
S-video
Composite video (CVBS)
Compatible Video Formats NTSC
Audio Input Ports
HDMI
(for use with video sources)
Optical
Coaxial
Analog
Other Audio Ports Audio 1 (analog input for use with tape deck)
2Ch Out (analog output for use with tape deck)
Audio 2 (analog input for use with MP3 player or other portable audio device)
DB15 (5.1 channel output; connects to subwoofer)
Video Output Port HDMI
Size (W×H×D) 13.5 in × 4.0 in × 10.5 in
(34.3 × 10.2 × 26.7 cm)
Weight 7.5 lb (3.4 kg)
Responsible Use of Copyrighted Materials
Epson encourages each user to be responsible and respectful of the copyright laws when using any Epson product. While some countries' laws permit limited copying or reuse of copyrighted material in certain circumstances, those circumstances may not be as broad as some people assume. Contact your legal advisor for any questions regarding copyright law.
Use of this equipment for other than private viewing of programs broadcast on UHF or VHF, or transmitted by cable or satellite companies, for the use of the general public may require authorization from the broadcast/cable/satellite company and/or program owner.
FCC Compliance Statement
For United States Users
This equipment has been tested and found to comply with the limits for a Class B digital device, pursuant to Part 15 of the FCC Rules. These limits are designed to provide reasonable protection against harmful interference in a residential installation. This equipment generates, uses, and can radiate radio frequency energy and, if not installed and used in accordance with the instructions, may cause harmful interference to radio or television reception. However, there is no guarantee that interference will not occur in a particular installation. If this equipment does cause interference to radio and television reception, which can be determined by turning the equipment off and on, the user is encouraged to try to correct the interference by one or more of the following measures:
- Reorient or relocate the receiving antenna.
- Increase the separation between the equipment and receiver.
- Connect the equipment into an outlet on a circuit different from that to which the receiver is connected.
- Consult the dealer or an experienced radio/TV technician for help.
WARNING
The connection of a non-shielded equipment interface cable to this equipment will invalidate the FCC Certification of this device and may cause interference levels which exceed the limits established by the FCC for this equipment. It is the responsibility of the user to obtain and use a shielded equipment interface cable with this device. If this equipment has more than one interface connector, do not leave cables connected to unused interfaces. Changes or modifications not expressly approved by the manufacturer could void the user's authority to operate the equipment.
For Canadian Users
This Class B digital apparatus meets all requirements of the Canadian Interference-Causing Equipment Regulations.
Declaration of Conformity
We: Epson America, Inc.
Located at: MS 3-13
3840 Kilroy Airport Way
Long Beach, CA 90806
Telephone: (562) 290-5254
Declare under sole responsibility that the product identified herein, complies with Part 15 of the FCC rules. Operation is subject to the following two conditions: (1) this device may not cause harmful interference, and (2) this device must accept any interference received, including interference that may cause undesired operation.
Trade Name: Epson
Type of Product: Ensemble HD - Complete Home Cinema System
Model: ELPHC100/ELPHC200
Epson America, Inc. Limited Warranty
Epson Ensemble HD Home Theater System
What Is Covered: Epson America, Inc. (“Epson”) warrants to the original retail purchaser of the Epson Ensemble Home Theater System (which includes the projector, screen, speakers, sub-woofer, AV controller, projector cradle, projector mount, and wiring package) covered by this limited warranty statement that the System, if purchased new and operated only in the United States or Canada, will be free from defects in workmanship and materials for a period of two (2) years from the date of original purchase. This limited warranty applies only to the System and not to the projector lamp, which carries a ninety (90) day warranty from the date of original purchase.
What Epson Will Do to Correct Problems: Should any element of the System or the lamp prove defective during the limited warranty period, please call the Epson Connection SM at (800) 637-7661 + PIN or (562) 276-4394 in the U.S. and (905) 709-3839 in Canada for warranty instructions and return authorization. When you call, please be prepared to provide the service technician with the product model and the product serial number (located on the back of the screen weight bar), along with proof of the date of original purchase. The service technician will provide telephone diagnostics to determine whether your unit needs service, and detailed instructions if it is determined that service is needed. When Epson authorizes an exchange for the defective unit, Epson will ship a replacement product to you, freight prepaid, so long as you use an address in Canada or the U.S. (excluding Puerto Rico and U.S. Possessions). Shipments to other locations will be made freight collect. You are responsible for securely packaging the defective unit and returning it to Epson within ten (10) working days of receipt of the replacement. Epson requires a debit or a credit card number to secure the cost of the replacement product in the event that you fail to return the defective one. When service involves the exchange of a unit or its parts, the items replaced become the property of Epson. The exchanged product or part may be new or refurbished to the Epson standard of quality, and, at Epson's option, the replacement may be another model of like kind and quality. Epson's liability for replacement of the covered product will not exceed the original retail selling price of the covered product. The new items assume the remaining warranty period of the original product. If Epson chooses to replace a defective product or part, a replacement product or part will be shipped to you at no charge, but it is your responsibility to pay any labor costs for installation and removal.
What This Warranty Does Not Cover: This warranty covers only normal use of the product. Twenty-four-hour-per-day or other excessive continual use is not considered normal use. This warranty does not cover consumables (e.g., fuses or filters) other than lamps. This warranty is not transferable. Epson is not responsible for warranty service should the Epson label or logo or the rating label or serial number be removed. Epson is not responsible for warranty service should the product fail to be properly maintained or fail to function properly as a result of misuse, abuse, improper installation, neglect, improper shipping, damage caused by disasters such as fire, flood, and lightning, improper electrical current, software problems, interaction with non-Epson products, or service other than by an Epson Authorized Servicer. If a claimed defect cannot be identified or reproduced in service, you will be held responsible for costs incurred.
THE WARRANTY AND REMEDY PROVIDED ABOVE ARE EXCLUSIVE AND IN LIEU OF ALL OTHER EXPRESS OR IMPLIED WARRANTIES INCLUDING, BUT NOT LIMITED TO, THE IMPLIED WARRANTIES OF MERCHANTABILITY OR FITNESS FOR A PARTICULAR PURPOSE. SOME LAWS DO NOT ALLOW THE EXCLUSION OF IMPLIED WARRANTIES. IF THESE LAWS APPLY, THEN ALL EXPRESS AND IMPLIED WARRANTIES ARE LIMITED TO THE WARRANTY PERIOD IDENTIFIED ABOVE. UNLESS STATED HEREIN, ANY STATEMENTS OR REPRESENTATIONS MADE BY ANY OTHER PERSON OR FIRM ARE VOID. IN THE EVENT THE REMEDIES ABOVE FAIL, EPSON'S ENTIRE LIABILITY SHALL BE LIMITED TO A REFUND OF THE PRICE PAID FOR THE EPSON PRODUCT COVERED BY THIS LIMITED WARRANTY. EXCEPT AS PROVIDED IN THIS WRITTEN WARRANTY, NEITHER EPSON AMERICA, INC. NOR ITS AFFILIATES SHALL BE LIABLE FOR ANY LOSS, INCONVENIENCE, OR DAMAGE, INCLUDING DIRECT, SPECIAL, INCIDENTAL, OR CONSEQUENTIAL DAMAGES, RESULTING FROM THE USE OR INABILITY TO USE THE EPSON PRODUCT, WHETHER RESULTING FROM BREACH OF WARRANTY OR ANY OTHER LEGAL THEORY.
In Canada, warranties include both warranties and conditions.
Some jurisdictions do not allow limitations on how long an implied warranty lasts and some jurisdictions do not allow the exclusion or limitation of incidental or consequential damages, so the above limitations and exclusions may not apply to you. This warranty gives you specific legal rights, and you may also have other rights, which vary from jurisdiction to jurisdiction.
To find the Epson Authorized Reseller nearest you, visit our website at: www.epson.com.
To find the Epson Customer Care Center nearest you, visit epson.com/support.
You can also write to:
Epson America, Inc., P.O. Box 93012, Long Beach, CA 90809-3012.
A
Advanced features, remote control, 71 to 83
Aspect ratio, selecting, 43 to 44
Audio equipment
connecting, 36
controlling, 15 to 17, 39 to 40
linking to video sources, 34 to 35
problems, 64
setting up remote control for, 36 to 39, 85 to 117
Audio files, playing, 26 to 28
Audio menu, 46 to 47
AV controller
audio files, playing, 26 to 28
buttons, 16
CD, playing, see CD player
cleaning, 54
connecting external components, 31 to 36
defaults, resetting, 51
DVD playing, see DVD player
headphone connection, 17
MP3 player, using, 28
radio, playing, 29 to 30
specifications, 122
tape deck, using, 29, 36
turning on, 13
volume, 17, 36
B
Backlight, LCD screen, 71
Bass, 46
Batteries, remote control, 59
Black drop, screen, 54
Brightness, 45
C
CD player
connecting external, 36
controlling CD, 24 to 25
loading CD, 23
Channels, selecting, 16
Cleaning system, 53 to 54
Cloning commands, remote control, 72, 74
Code lists, remote control, 85 to 117
Color intensity, 45
Color Mode, 42 to 43
Command repeaters, using, 81 to 82
Commands, remote control
cloning, 74
editing, 75 to 77
erasing, 79 to 80
learning, 72 to 74
macros, 77 to 80
Component video, 32 to 33
Contrast
image, 45
LCD screen, adjusting, 72
Copyright notice, 123
CVBS (composite video), 32 to 33
D
Defaults, resetting
AV controller, 51
remote control, 83
Device names, editing, 75 to 77
Disc
inserting, 19
specifications, 119
Distance, speakers, 46
DVD player
controlling, 15 to 17
inserting disc, 19
language, selecting, 22, 49
playing movie, 20 to 22
problems, 67
subtitles, selecting, 22
E
Enclosure, projector, 56 to 57
Ensemble HD system
AV controller, see AV controller
cleaning, 53 to 54
problems, 61 to 69
screen, see Screen
turning on, 13 to 14
Epson
PrivateLine Support, 69
Epson technical support, 69
External components
cleaning, 54
connecting, 31 to 36
controlling, 15 to 17, 39 to 40
problems, 68
setting up remote control for, 36 to 39, 85 to 117
turning on, 14
F
FCC statement, 123
Focusing image, 57
H
HDMI, 32 to 33, 45
Headphones, 17
Help, Epson, 69
|
Image
aspect ratio, 43 to 44
colors, 42 to 43
focusing, 57
positioning, 56 to 57
problems, 62 to 63
quality, 45
resizing, 43 to 44, 57
L
Lamp, projector, 58
Language
DVD tracks, 22, 49
menu, 49
subtitles, 22, 49
LCD screen, remote control
backlight, adjusting, 71
contrast, adjusting, 72
using, 12 to 13, 39
Learning commands, remote control, 72 to 74
Lens
cleaning, 53
shift dial, 57
Light
projector, 58
remote control, 12, 59
Linking audio/video sources, 34 to 35
M
Macros, remote control, 77 to 80
Maintenance, 53 to 59
Menus
Audio, 46 to 47
Color Mode, 42 to 43
Language, 49
Parental Controls, 50 to 51
Preference, 48, 50 to 51
Reset, 51
Source Assign, 34
Test Tone, 46 to 47
using system, 41 to 42
video, 45
Midnight Mode, 17, 48
Movies, watching, 19 to 22
MP3 player, 28
Music, playing, 23 to 30
N
Names, editing devide, 75 to 77
Noise Reduction, 45
O
Operation
problems, 61 to 62
OSD button, 35, 47
P
Pages, remote control, 78 to 79
Parental Controls, 50 to 51
Password, 50 to 51
Picture
colors, 42 to 43
positioning, 56 to 57
problems, 62 to 63
quality, 45
Preference menu, 48, 50 to 51
PrivateLine Support, 69
Problems
DVD player, 67
Ensemble HD system, 61 to 69
external component, 68
operation, 61 to 62
picture, 62 to 63
radio, 67
remote control, 66
screen, 65
sound, 64
technical support, 69
Projector
cleaning, 53
enclosure, 56 to 57
lamp, checking, 58
lens shift dial, 57
lights, 58
menus, 58
remote control, 56, 59
Punch-through, remote control, 80 to 81
R
Radio
playing, 29 to 30
problems, 67
Ratings, 51
Recalling codes, remote control, 86
Remote control
advanced features, 71 to 83
aiming, 12
batteries, 59
cloning commands, 72, 74
code lists, 85 to 117
command repeaters, using, 81 to 82
controlling components, 15 to 16, 39 to 40
defaults, resetting, 83
editing commands, 75 to 77
erasing commands, 79 to 80
LCD screen, see LCD screen, remote control
learning commands, 72 to 74
lighting, 12, 59
macros, 77 to 80
pages, adding/hiding, 78 to 79
problems, 66
projector, 56, 59
punch-through feature, 80 to 81
recalling codes, 86
RF base station, using optional, 81 to 82
sensor on screen, 65
setting up for components, 36 to 39, 85 to 117
specifications, 120
volume, controlling, 17
Reset menu, 51
RF base station, using optional, 81 to 82
S
Safety instructions, 3 to 4
Screen
adjusting position, 54 to 55
black drop length, 54
cleaning, 53
controlling, 15
lowering, 13 to 15
problems, 65
raising, 13 to 15
sensor, remote control, 65
specifications, 120
Sensor, remote control, 65
Service, 69
Sharpness, 45
Shift dial, projector lens, 57
Sound, see Audio equipment or Speakers
Source Assign menu, 34, 45
Speakers
distance, 46
problems, 64
specifications, 120 to 121
surround, see Surround speakers
volume, 17
Specifications
AV controller, 122
discs, 119
remote control, 120
screen, 120
subwoofer, 121
surround speakers, 121
Stereo, 47
Subtitles, selecting, 22
Subwoofer
problems, 64
specifications, 121
volume, 17
Support, technical, 69
Surround Sound format, 47
Surround speakers
specifications, 121
volume, 46
S-Video, 32 to 33
T
Tape deck, external, 29, 36
Technical specifications, 119 to 122
Test Tone menu, 46 to 47
Tint, 45
Treble, 46
Troubleshooting, 61 to 69
Turning on system, 13 to 14
V
Video equipment
connecting, 32 to 33
controlling, 15 to 17, 39 to 40
linking to audio sources, 34 to 35
setting up remote control for, 36 to 39, 85 to 117
Video menu, 45
Voice, 46
Volume
controlling, 17, 36, 46
Midnight Mode, 17, 48
testing, 46 to 47
W
Warning light, projector, 58
Z
Zooming, 57
- LEGAL NOTICE
- TRADEMARKS
- IMPORTANT SAFETY INSTRUCTIONS
- ADDITIONAL SAFETY INSTRUCTIONS
- CONTENTS
- INTRODUCTION
- GETTING STARTED
- WATCHING MOVIES
- LISTENING TO MUSIC
- CONNECTING AND USING OTHER COMPONENTS
- ADJUSTING THE SOUND, PICTURE, AND OTHER SETTINGS
- CLEANING AND MAINTENANCE
- SOLVING PROBLEMS
- USING ADVANCED REMOTE CONTROL FEATURES
- REMOTE CONTROL CODES
- SPECIFICATIONS
- NOTICES
- INDEX
- USING THE REMOTE CONTROL
- NOTE
- TURNING ON THE SYSTEM
- TURNING ON SELECTED COMPONENTS
- CONTROLLING THE SCREEN
- CONTROLLING THE DVD PLAYER AND OTHER EQUIPMENT
- CONTROLLING PLAYBACK
- SELECTING CHANNELS ON AN HD TUNER, CABLE BOX, OR SATELLITE RECEIVER
- USING THE BUTTONS ON THE AV CONTROLLER
- ADJUSTING THE VOLUME
- INSERTING A DISC
- PLAYING A DVD
- USING BASIC PLAYBACK FUNCTIONS
- USING OTHER PLAYBACK FEATURES
- AUDIO 5/5:DOLBY D 2CH ENGLISH
- SUBTITLE 03/03:FRENCH
- PLAYING A CD
- PLAYING AUDIO FILES
- CAUTION
- DO ONE OF THE FOLLOWING
- LISTENING TO AN MP3 PLAYER
- LISTENING TO A TAPE DECK
- LISTENING TO AM/FM RADIO
- TUNING TO THE DESIRED STATION
- USING RADIO STATION PRESETS
- CONNECTING VIDEO EQUIPMENT
- PORT CABLE
- CONNECTING THE AUDIO CABLE FOR THE VIDEO SOURCE
- LINKING AUDIO AND VIDEO SOURCES
- CONNECTING AUDIO EQUIPMENT
- SETTING UP THE REMOTE CONTROL
- ENTERING THE SETUP CODE FOR YOUR COMPONENT
- CUSTOMIZING THE REMOTE CONTROL MENU
- USING THE REMOTE CONTROL TO OPERATE YOUR EQUIPMENT
- USING THE ON-SCREEN MENU SYSTEM
- ADJUSTING THE PICTURE
- ADJUSTING THE COLOR MODE
- PRESS THE SEL (SELECT) BUTTON TO APPLY THE SETTING
- ADJUSTING THE ASPECT RATIO
- ADJUSTING THE PICTURE QUALITY
- ADJUSTING THE SOUND
- USING TEST TONES TO ADJUST THE SOUND
- CHANGING THE SURROUND SOUND FORMAT
- USING MIDNIGHT MODE
- USING OTHER FEATURES
- CHOOSING THE LANGUAGE
- USING PARENTAL CONTROLS
- RESTORING FACTORY DEFAULTS
- WARNING
- CLEANING
- CLEANING THE SCREEN
- CLEANING THE PROJECTOR LENS
- CLEANING SYSTEM COMPONENTS
- ADJUSTING THE SCREEN LENGTH
- MANUAL SCREEN ADJUSTMENT
- ADJUSTING THE IMAGE POSITION AND FOCUS
- REPOSITIONING THE IMAGE
- FOCUSING AND RESIZING THE IMAGE
- CHECKING THE PROJECTOR LAMP
- CHECKING THE INFO MENU
- CHECKING THE WARNING LIGHT
- REPLACING REMOTE CONTROL BATTERIES
- PROBLEMS USING THE SCREEN
- PROBLEMS USING THE DVD PLAYER
- PROBLEMS USING THE RADIO
- WHERE TO GET HELP
- INTERNET SUPPORT
- SPEAK TO A SUPPORT REPRESENTATIVE
- PURCHASE SUPPLIES AND ACCESSORIES
- ADJUSTING THE LCD SCREEN
- ADJUSTING THE CONTRAST
- LEARNING COMMANDS FROM ANOTHER REMOTE CONTROL
- CLONING YOUR REMOTE CONTROL
- ADVANCED REMOTE CONTROL SETUP
- EDITING DEVICE NAMES AND COMMANDS
- SETTING UP MACROS
- ADDING OR HIDING PAGES
- ERASING LEARNED BUTTONS AND MACROS
- SELECT ONE OF THE FOLLOWING
- USING REMOTE CONTROL PUNCH-THROUGH
- USING AN RF BASE STATION
- SETTING UP AN ADDRESSABLE BASE STATION
- RESTORING REMOTE CONTROL FACTORY DEFAULTS
- USING THE CODE TABLES
- RECALLING PROGRAMMED CODES
- TIP
- CODE TABLES
- PLAYABLE DISC TYPES
- SCREEN SPECIFICATIONS
- GENERAL
- BUILT-IN SPEAKER SYSTEM
- REMOTE CONTROL SPECIFICATIONS
- POWERED SUBWOOFER SPECIFICATIONS
- BASS DRIVER
- AMPLIFIER
- PHYSICAL
- SURROUND SPEAKER SPECIFICATIONS
- AV CONTROLLER SPECIFICATIONS
- RESPONSIBLE USE OF COPYRIGHTED MATERIALS
- FCC COMPLIANCE STATEMENT
- FOR UNITED STATES USERS
- FOR CANADIAN USERS
- DECLARATION OF CONFORMITY
- EPSON AMERICA, INC. LIMITED WARRANTY
- EPSON ENSEMBLE HD HOME THEATER SYSTEM
- A
- B
- C
- D
- E
- F
- H
- L
- M
- N
- O
- P
- R
- S
- T
- V
- W
- Z
Brand : EPSON
Model : Ensemble HD 720
Category : Projector