
S 5272 KVB - Cooker Cylinda - Free user manual and instructions
Find the device manual for free S 5272 KVB Cylinda in PDF.


| Product Type | Freestanding Cooker |
| Brand | Cylinda |
| Model | S 5272 KVB |
| Dimensions (H x W x D) | 85 cm x 50 cm x 60 cm |
| Weight | Approximately 45 kg |
| Power Source | Electric (230 V, 50 Hz) |
| Number of Cooking Zones | 4 (1 large, 2 medium, 1 small) |
| Oven Type | Multifunction electric oven |
| Oven Capacity | Approximately 65 liters |
| Energy Efficiency Class | A |
| Grill Function | Yes, integrated grill |
| Child Safety Lock | Yes, oven door lock and control lock |
| Control Type | Rotary knobs and touch display |
| Cleaning System | Easy-clean enamel interior |
| Number of Oven Shelves | 2 wire shelves + 1 baking tray |
| Interior Light | Yes, halogen oven light |
| Timer | Yes, digital timer with alarm |
| Door Type | Cool touch, double-glass |
| Warranty | 2 years manufacturer warranty |
| Spare Parts Availability | Available via authorized service centers |
| Manual Language | English, Swedish |
Frequently Asked Questions - S 5272 KVB Cylinda
User questions about S 5272 KVB Cylinda
0 question about this device. Answer the ones you know or ask your own.
Ask a new question about this device
Download the instructions for your Cooker in PDF format for free! Find your manual S 5272 KVB - Cylinda and take your electronic device back in hand. On this page are published all the documents necessary for the use of your device. S 5272 KVB by Cylinda.
USER MANUAL S 5272 KVB Cylinda
Ugnsfalsar


A=104 mm; B=147 mm


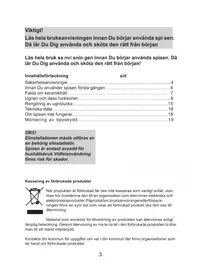
Important!
Read the entire manual carefully before using the appliance for the first time. You will learn how to use the appliance it and look after it properly from the start.
Read the entire manual carefully before using the appliance for the first time. You will learn how to use the appliance it and look after it properly from the start!
Table of contents
page
Safety advice....21
Before using the appliance for the first time ....23
Facts about ceramic hobs ....24
The oven and its functions....25
Cleaning the oven door....32
Technical data....35
Mounting the overturning prevention bracket....36
NOTE
Electrical connection must be made by a properly certified, qualified installer.
The appliance is intended for household use only. Incorrect use carries the risk of injury.
Disposing of used products
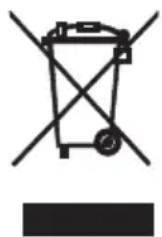
When the product is no longer required, it must not be disposed of as normal waste, but should be handed over to an organisation that recycles electrical and electronic products. There is a symbol on the product, user instructions or packaging that shows that the product should be recycled when it is no longer required.
Materials used to manufacture the product can be recycled as indicated. Recycling the materials used to make the product that you no longer require helps to protect the environment.
Contact your local authority to find out where the recycling organisations are in your area.
Warning: The appliance and its accessible parts become hot during use. Care should be taken to avoid touching heating elements. Children less than 8 years of age shall be kept away unless continuously supervised.
This appliance can be used by children aged from 8 years and above and persons with reduced physical, sensory or mental capabilities or lack of experience and knowledge if they have been given supervision or instruction concerning use of the appliance in a safe way and understand the hazards involved. Children shall not play with the appliance. Cleaning and user maintenance shall not be made by children without supervision.
Warning: Unattended cooking on a hob with fat or oil can be dangerous and may result in fire.
NEVER try to extinguish a fire with water, but switch off the appliance and then cover flame e.g. with a lid or a fire blanket.
Warning: Danger of fire: do not store items on the cooking surfaces.
Warning: If the surface is cracked, switch off the appliance to avoid the possibility of electric shock.
GUIDELINES CONCERNING THE SAFETY OF USE
Note. Electrical connection must be made by a properly certified, qualified installer.
The appliance is intended for household use only. Incorrect use carries the risk of injury.
The oven is very hot while in use and for some time after it has been switched off.
When the oven is in use, some parts will become hot.
Warning: Do not use harsh abrasive cleaners or sharp metal scrapers to clean the oven door glass since they can scratch the surface, which may result in shattering of the glass.
Warning: Ensure that the appliance is switched off before replacing the lamp to avoid the possibility of electric shock.
You should not use steam cleaning devices to clean the appliance.
Installation
Fit the anti-tip device (page 36)
The anti-tip device prevents the appliance from tipping over. For example, a child should not be able to climb on the oven door and tip the appliance over. If there are young children in the house, a hob guard should also be fitted.
NOTE Remember that the anti-tip device is disabled when you pull the appliance forwards, e.g. for cleaning. Supervise children carefully to avoid accidents.
NOTE
Subject to technical alterations.
See the instructions on page 36 for how to fit the anti-tip device.
The appliance must be level.
This is important for frying results as well as baking. Pull out the plate storage drawer to access the screws in the four adjustable feet. Use a spirit level or frying pan filled with water to check.
Further adjustment may be required after some time as the flooring may settle.
Before using the appliance
Clean the appliance using a damp cloth, possibly with some soap or mild washing-up liquid. Rinse and dry thoroughly. After cleaning, heat the oven with top and bottom heater to 250° C for approx. 30 minutes. The smell produced by heating the oven is harmless but still you should ventilate.
Use energy wisely
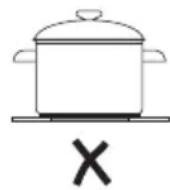
Use pans that are the right size for the cooking zones. It is better to use a slightly larger pan than a pan that does not cover the cooking zone.
Put the lids on saucepans and pots to save energy. It is also recommended that you switch off the cooking zone slightly in advance and let the dish continue to cook using the residual heat.
Facts about ceramic hobs
Zones:
Front left 2300W, 210 mm diameter Back left 1200W, 145 mm diameter Front right 1200W, 145 mm diameter Back right 1800W, 180 mm diameter
Residual heat indicators
The four residual heat indicators are located between the cooking zones and the front of the hob and indicate the respective cooking zone.
These warning indicators light up when the surface is too hot to touch. The indicators light up even when the zones are turned off.
Note: always be careful when the hob has recently been in use, even if the indicator is not lit.
Maintenance
Clean the hob using a damp cloth and some washing-up liquid. Burnt on dirt can be scraped off using a scraper. After cleaning, the hob can be polished using a special product for ceramic hobs, which is available in stores. This gives a fine finish and gives the hob a protective surface.
Do not clean with: steel wool, abrasive scouring powder or anything else that can scratch.

Pots and frying pans
Use pans that are the right size for the cooking zones.
It is better to use a slightly larger pan than a pan that does not cover the cooking zone. Make sure the bottom of the pan is clean and flat. A pan with an uneven bottom can make the contact between the pan and ceramic hob so poor that the overheating protection for the zone is triggered and the cooking time becomes unnecessarily long.
Put the lids on saucepans and pots to save energy. It is also recommended that you turn off the zone slightly in advance and let the dish continue to cook using the remaining heat.
You cannot use pots with plastic handles in the oven.
Warnings
- Do not put anything on the hob when it is hot.
- Do not store heavy or sharp objects which may fall down above the hob. If a crack appears, the power supply to the hob must be cut off by unplugging the appliance or removing the fuses.
- Plastic and sugar or sugary spillages, e.g. jam, juice or toffee, must be removed immediately using a scraper while the hob is warm. If it becomes burnt on, the hob can be seriously damaged.
- Some aluminium pots and pans leave a silvery mark on the hob, this can be removed using detergent and a scraper.
- Do not drag pans with rough bottoms across the hob. This can cause scratches.


The oven and its functions
The symbols on the oven function knob have the following meaning:

Interior lighting
When the knob is turned to this position, the interior oven lighting is lit.

Fan and ring heater on
When this function is activated, the fan on the rear wall of the oven starts.
This provides constant and even air circulation inside the oven.
This heating method has the following benefits:
• The oven heats up faster and there is no need to preheat it
- Two levels can be used at the same time
- Meat dishes lose less fat and juices during heating, which improves the flavour
• The oven does not get as dirty
You must use the temperature settings together with the fan function.
Important! If the fan function is switched on when the temperature knob is set to zero, only the fan is activated. This setting can be used to cool dishes or the oven.

Fan and bottom heating switched on
This knob setting activates both the fan and the bottom heating element. The oven is then heated from the bottom. Suitable e.g. for pizza and pies.
Important! If the temperature knob is set to zero, the cooling setting is used.

Fan and intensive grill on
The grill plus top heat and fan run at the same time. This reduces the grill time and improves the flavour.

Grill on
This setting activates the grill.

Intensive grill (grill plus top heat)
The food is grilled and heated from above at the same time. In this way, the temperature is higher at the top of the oven, making the roasted food darker in colour. A practical setting for grilling thick items

Top heating on
Highest temperature 200°C.

Bottom heating on
Highest temperature 200°C.

Top and bottom heating switched on.
Highest temperature 250° C. If the knob is set to this position, the oven heats up normally.
Temperature knob
The oven temperature is controlled by the temperature knob on the control panel, indicated by the symbol ° C. The oven stops heating up when you turn the knob to zero.
Always follow the advice given in the recipe for the food you are baking/cooking.
Lock

The oven is equipped with a child lock.
● Activate Child Lock. Turn the oven function knob anti-clockwise.
The oven and hob cannot be activated when the function knob is in this position.
- Unlock. Press the function knob and turn it to "0" or another function.
Light indicators
Two light indicators indicate that the oven has been activated – a yellow and a red indicator. When the yellow light indicator lights up, it means the oven operates. When the red light indicator goes out, it means the oven has reached the set temperature. If a recipe for a dish recommends that the dish is placed in a heated oven, do not put it in the oven until the red light indicator has gone out. During baking, the red light indicator will light up and go out intermittently (maintaining the temperature in the oven). The yellow light indicator can also light up when the knob is in the "Oven lighting" position.
Baking
Wait until the oven reaches the right temperature (light indicator turns off) before placing the baking in the oven.
Right baking time
Follow the instructions in the recipe. Be extra careful the first few times you use your new appliance to bake, the appliance may heat somewhat faster than your previous appliance.
Cooking
Follow the advice in the recipe. If it is a dish you have made many times before you should be extra careful the first few times you make it in your new appliance.
Grilling
Follow the advice in the recipe. Place the food on the grill and slide the grill rack into the top position in the oven. Push the roasting pan into the position below to collect any dripping fat.
Do not put aluminium foil on the bottom or walls of the oven.
The heat does not radiate properly, so there is a risk of damaging the enamel in the oven.
Storage drawer for accessories
You can store the roasting pan, baking trays, grill rack and other accessories in the drawer. There is a safety device that stops the drawer being pulled out too far accidentally.
If you want to pull out the drawer completely, e.g. to clean, pull it out until you reach the safety device and then lift up the front and pull it out completely.
You put the drawer back in the reverse order. Make sure it is in the right tracks on the sides.
Baking
● Tables 1 and 1A are recommended for baking.
- The baking parameters are given for 3 different types of heat: conventional heating (top and bottom heating element), fan
Function, top heating element + fan.
Roasting meat
● Table 2 is recommended for roasting meat.
The roasting parameters are given for conventional heating and for fan.
● The recommended parameters for meat, fish and toast are compiled in table 3.
● The recommended parameters for roasting with fan are compiled in table 4.
TABLE 1: Pastries
| Pastries | Top and bottom heating element | Fan assisted heating | Top/bottom heating element | Baking time [min.] | |||
| Oven setting | Temperature [°C] | Oven setting | Temperature [°C] | Oven setting | Temperature [°C] | ||
| Baking in a baking pan | |||||||
| Sponge cake | 2 | 170-180 | 2 | 150-170 | 2 | 150-170 | 60-80 |
| Sponge cake | 2 | 160-180 | 2 | 150-170 | 2 | 150-170 | 65-80 |
| Flan case | 2-3 | 170-180 | 2-3 | 160-170 | 2-3 | 160-170 | 20-30 |
| Soft sponge | 2 | 170-180 | 30-40 | ||||
| Shortcrust pastry flat with fruit | 2-3 | 160-180 | 2-3 | 160-180 | 60-70 | ||
| Cheesecake (on shortcrust pastry base) | 2 | 140-150 | 2 | 140-160 | 60-90 | ||
| Yeast cake | 2 | 160-180 | 2 | 150-170 | 2 | 150-170 | 40-60 |
| Bread (e.g. granary) | 2 | 210-220 | 2 | 180-200 | 2 | 180-200 | 50-60 |
| Baking on baking trays | |||||||
| Shortcrust pastry flat with fruit | 3 | 170-180 | 3 | 160-170 | 3 | 160-170 | 35-60 |
| Fruitcake (yeast or baking powder) | 3 | 160-170 | 3 | 160-170 | 30-50 | ||
| Hundreds and thousands cake | 3 | 160-170 | 3 | 150-170 | 3 | 150-160 | 30-40 |
| Jelly roll | 2 | 180-200 | 10-15 | ||||
| Pizza (thin base) | 3 | 220-240 | 3 | 200-220 | 10-15 | ||
| Pizza (thick base) | 2 | 190-210 | 3 | 180-200 | 30-50 | ||
| Small pastries/cakes | |||||||
| Small pastries/cakes | 3 | 170-180 | 3 | 150-160 | 3 | 150-160 | 10-25 |
| 2 | -plates | -- | 1+3 | 140-150 | -- | -- | 25-35 |
| Puff pastry | 3 | 180-190 | 3 | 170-190 | 3 | 170-180 | 18-25 |
| Meringue | 3 | 90-110 | 2 | 90-110 | 80-90 | ||
| Profiteroles | 2 | 170-190 | 2 | 170-190 | 35-45 | ||
Buns
75 g yeast
150 g margarine
500 ml milk (whole milk)
1/2 teaspoon salt
135 g sugar
Cardamom
900 g flour
Crumble the yeast and mix it with some of the milk. Melt the margarine and pour in the rest of the milk. Mix all the ingredients until you have a smooth dough.
Let the dough rise for 15 min in the bowl. Shape it into small balls and put them in moulds. Let them rise for 30–40 min on the tray. Glaze with beaten egg and sprinkle with granulated sugar.
Bake at 160-180°C top and bottom heating elements for 30-40 min, or 150-170°C fan for 30-40 min.
Muffins
approx. 20 pcs.
1 juicy sponge cake or 1 rich sponge cake with grated lemon rind 60–90 g raisins or currants
Oven temperature:
top and bottom heating elements 180-190°C
or fan 160-170°C
Baking time 10-20 min
Switch on the oven. Make the cake mixture according to one of the suggestions, adding grated lemon rind in both cases. Mix in raisins of currants.
Put muffin cases/paper cases on a tray.
Put the mixture in the cases, e.g. using a spoon.
Bake in the centre of the oven for 10-20 min.
Swiss roll
3 eggs
135 g sugar
120 g flour
1 teaspoon baking po- wder
1 tablespoon water
Filling:
280 g stewed fruit or jam or 1 portion of chocolate butter icing
Baking time 10-15 min
Makes 20-24 slices. Oven temperature, top and bottom heating elements 180-200°C
Easy to mix, quick to cook and roll up. Can be filled with e.g. slightly sweetened stewed apple, raspberry jam or chocolate butter icing. Switch on the oven in good time. Cover a tray with greaseproof paper or baking paper. Beat the egg and the sugar. Mix the flour and backing powder and stir it in carefully, together with the water. Spread out the dough on the paper in an even layer. Bake in the centre of the oven, 10-15 min with the top and bottom heating elements at 180-200°C. Sprinkle some sugar on the cake and tip it onto a piece of greaseproof paper. Brush with some cold water and remove the paper the cake was baked on. Spread on a thin layer of stewed fruit or jam and roll up. Or let the cake cool under a damp piece of greaseproof paper, spread with chocolate butter icing and roll it up.
TIPS: Cut the Swiss roll into approx. 3 cm slices, top with whipped cream and fruit or berries and serve for dessert.
TABLE 1A: Pastries
| Pastries | Top and bottom heating element | Fan assisted heating | Baking time min. | ||
| Oven setting | Temperature [°C] | Oven setting | Temperature [°C] | ||
| Buns | 3 | 160-180 | 3 | 150-170 | 30-40 |
| Muffins | 3 | 180-190 | 3 | 160-170 | 10-20 |
| Jelly roll | 3 | 180-200 | - | - | 10-15 |
TABLE 2: Roasting meat
| Meat dish | Oven setting from below | Temperature °C | Roasting time* min. | ||
| Fan assisted heating | Conventional oven | Fan assisted heating | Conventional oven | ||
| Beef | approx. 1 cm: 12-15 | ||||
| Roast beef or fillet | 3 | 250 | |||
| preheated oven | 3 | 250 | 15-25 | ||
| pink (medium) | 3 | 250 | |||
| preheated oven | 3 | 210-230 | 25-30 | ||
| well done | 3 | 210-230 | |||
| Roast | 2 | 2 | 160-180 | 200-220 | 120-140 |
| Pork | |||||
| Roast | 2 | 2 | 160-180 | 200-210 | 90-140 |
| Ham | 2 | 2 | 160-180 | 200-210 | 60-90 |
| Fillet | 3 | 210-230 | 25-30 | ||
| Veal | 2 | 2 | 160-170 | 200-210 | 90-120 |
| Lamb | 2 | 2 | 160-180 | 200-220 | 100-120 |
| Venison | 2 | 2 | 175-180 | 200-220 | 100-120 |
| Poultry | |||||
| Chicken | 2 | 2 | 170-180 | 220-250 | 50-80 |
| Goose (approx. 2 kg) | 2 | 2 | 160-180 | 190-200 | 150-180 |
| Fish | 2 | 2 | 175-180 | 210-220 | 40-55 |
*Recommendations in table 2 apply to a 1 kg meat portion.
Roasting large cuts of meat is preferable, but the cooking time for each additional 1kg is 30–40 min extra. Turn the cut of meat halfway through the cooking time.
Important: only use ovenproof dishes.
TABLE 3: Grill
| Dish | Oven setting from the bottom | Temperature [°C] | Cooking time [min.] | |
| One side The | other side | |||
| Pork chop | 4 | 250 | 8-10 | 6-8 |
| Minced pork | 3 | 250 | 10-12 | 6-8 |
| Kebab | 4 | 250 | 7-8 | 6-7 |
| Sausages | 4 | 250 | 8-10 | 6-8 |
| Roast beef (approx. 1kg) | 3 | 250 | 12-15 | 10-12 |
| Veal chop | 4 | 250 | 8-10 | 6-8 |
| Roast veal | 4 | 250 | 6-8 | 5-6 |
| Lamb chop | 4 | 250 | 8-10 | 6-8 |
| Half chicken (approx. 500 g) | 3 | 250 | 25-30 | 20-25 |
| Fillet of fish | 4 | 250 | 6-7 | 5-6 |
| Trout (approx. 200 – 250g) | 3 | 250 | 5-8 | 5-7 |
| Toast | 4 | 250 | 2-3 | 2-3 |
TABLE 4: Fan + grill
| Dish | Weight [kg] | Oven setting from below | Temperature [°C] | Roasting time [min.] |
| Roast pork | 1.0 | 2 | 170-190 | 80-100 |
| 1.5 | 2 | 170-190 | 100-120 | |
| 2.0 | 2 | 170-190 | 120-140 | |
| Lamb | 2.0 | 2 | 170-190 | 90-110 |
| Roast beef | 1.0 | 2 | 200-220 | 30-40 |
| Chicken | 1.0 | 2 | 180-200 | 50-60 |
| Duck | 2.0 | 1-2 | 170-190 | 85-90 |
| Goose | 3.0 | 1 | 140-160 | 110-130 |
| Turkey | 2.0 | 2 | 180-200 | 110-130 |
| 3.0 | 1-2 | 160-180 | 150-180 |
During roasting, baste the meat with gravy or warm salty water several times.
Cleaning the oven door
Correct and regular oven cleaning and maintenance prolongs its service life.
Regular maintenance
The user must ensure the following:
- Keep the oven and its surroundings clean.
Important! Make sure the oven is turned off and all knobs are turned to "0". Cleaning must not start until the oven is cold.
Replacing the lamp in the oven
Turn off at the main switch or remove the fuses as the power supply to the oven must be cut off before the lamp is replaced. Remove the broken bulb and replace it with a new (25 W oven bulb).

Oven fittings
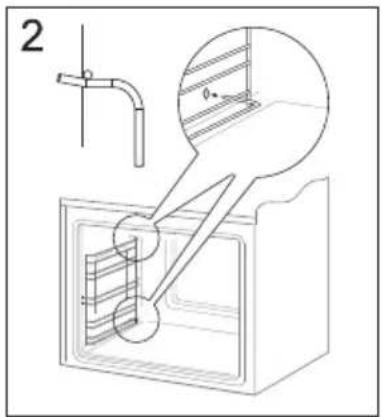
The oven is equipped with removable side rails. To remove them for cleaning, pull the handle at the front and then pull out the rail and remove it from the rear fixture. After cleaning the rails, put them in the openings in the oven and push down the fixture.

Steam cleaning Steam Clean
Place a bowl containing 0.25 litres water at the bottom of the oven and close the oven door. Set the oven to 50°C and turn the function knob to "bottom heating" ☐ Heat the oven for approx. 30 min. Then open the oven door, dry the oven using a cloth or sponge and then clean the oven using warm water with washing-up liquid.
Remove the oven door
To access the interior of the oven for cleaning, you can remove the oven door. To do this, open the door and pull up the safety device found in the hinge (Fig. A). Then push the door slightly, lift it up and pull it out. To fit the door of the oven, do this in the reverse order. When replacing the door, make sure the cut-out part of the hinge is placed correctly on the hinge's grip. After replacing the door, you must pull down the safety device. If you do not pull it down, the hinges may be damaged when you try to close the door.

Pulling up safety devices for the hinge
Remove the inner panel
- Use an ordinary screwdriver to remove the upper door slat from the door and carefully loosen the sides (Fig. B).
- Carefully remove the door slat (fig. B, C)
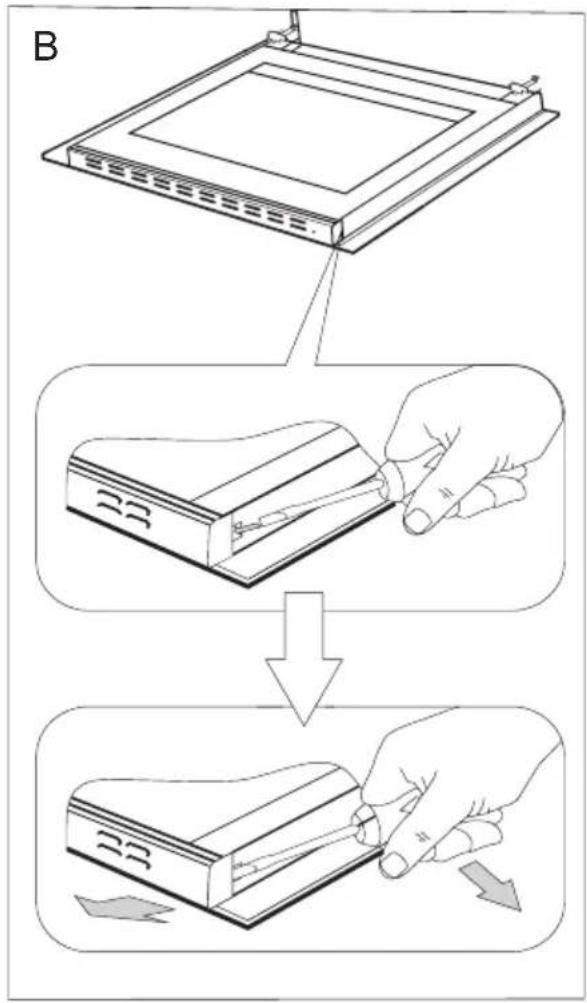
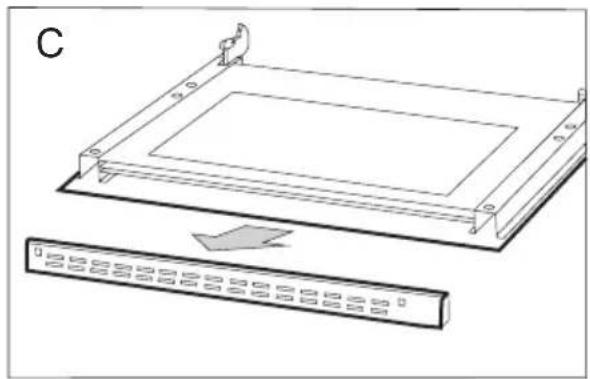
- You can then remove the glass panel (Fig. D). After cleaning, repeat the procedure in the reverse order.
Important! Do not force the upper slat in on both sides of the door at the same time. In order to correctly fit the top door slat, first put the left end of the slat on the door and then press the right end in until you hear a "click". Then press the left end in until you hear a "click".

Child safety lock
Oven door features a child safety lock device that prevents children from opening of the door. The appliance is supplied by the manufacturer with the door safety lock device engaged. The child safety lock device can be operated as shown below.
- Engage child safety lock function — turn anticlockwise until you hear a click.


- Release the child safety lock temporarily — turn clockwise until you feel resistance, the lock is released temporarily and you can open the door. The child safety lock is re-engaged once you close the door.


● Disengage child safety lock function — turn clockwise until you hear a click.


If the active child safety lock device does not lock the oven door, it is possible that you accidentally, eg during cleaning, reset the hook to locking position.
To restore the correct operation of the child safety lock device, disengage the lock by turning the knob clockwise until you feel resistance. You will hear a click.
The child safety lock device will operate normally when you lock the door.
Care of enamel hob and plates
Protect the hob against discolouring by wiping it after each use. Avoid abrasive detergents. Use ordinary washing-up liquid or soap. If you want to polish it, use window cleaner.
Technical data
Dimensions
Width 698 mm
Height 900 mm
Depth 600 mm
Equipment
2 baking trays
1 roasting pan
1 grill rack
1 anti-tip device
Power
Hob 6500 W
Oven 3100 W
Grill 2000 W
Total 9600 W
If the appliance does not work:
Attention! The supplied power cord is intended for 3-phase 400V connection. If you wish to connect the appliance to 2-phase 400V, the power cord must be replaced. This should be performed by an electrician. Check that the fuses are not blown. For 400 V appliances check that the plug is inserted.
To contact Cylinda Service, see box.
For connection to the mains, see the data plate on the reverse of the appliance. (To find the model no. pull out the appliance and read the rating plate on the side of the appliance).
Warning! Do not perform any repairs by yourself. Electrical equipment must always be repaired by an authorised electrician.
Mounting the anti-tip device

A=104 mm; B=147 mm


If the tiles etc. only cover the top part of the rear wall, the anti-tip device must be distanced by the equivalent thickness.
Adjust the height of the appliance

IO-CFS-0336 / 8067900
(rev. 01.2017)
- UGNSFALSAR
- IMPORTANT
- TABLE OF CONTENTS
- NOTE
- DISPOSING OF USED PRODUCTS
- GUIDELINES CONCERNING THE SAFETY OF USE
- INSTALLATION
- FIT THE ANTI-TIP DEVICE (PAGE 36)
- THE APPLIANCE MUST BE LEVEL
- BEFORE USING THE APPLIANCE
- USE ENERGY WISELY
- FACTS ABOUT CERAMIC HOBS
- RESIDUAL HEAT INDICATORS
- MAINTENANCE
- POTS AND FRYING PANS
- WARNINGS
- THE OVEN AND ITS FUNCTIONS
- INTERIOR LIGHTING
- FAN AND RING HEATER ON
- FAN AND BOTTOM HEATING SWITCHED ON
- FAN AND INTENSIVE GRILL ON
- GRILL ON
- INTENSIVE GRILL (GRILL PLUS TOP HEAT)
- TOP HEATING ON
- BOTTOM HEATING ON
- TOP AND BOTTOM HEATING SWITCHED ON
- TEMPERATURE KNOB
- LOCK
- LIGHT INDICATORS
- BAKING
- RIGHT BAKING TIME
- COOKING
- GRILLING
- DO NOT PUT ALUMINIUM FOIL ON THE BOTTOM OR WALLS OF THE OVEN
- STORAGE DRAWER FOR ACCESSORIES
- ROASTING MEAT
- BUNS
- MUFFINS
- SWISS ROLL
- CLEANING THE OVEN DOOR
- REGULAR MAINTENANCE
- REPLACING THE LAMP IN THE OVEN
- OVEN FITTINGS
- STEAM CLEANING STEAM CLEAN
- REMOVE THE OVEN DOOR
- REMOVE THE INNER PANEL
- CHILD SAFETY LOCK
- CARE OF ENAMEL HOB AND PLATES
- TECHNICAL DATA
- DIMENSIONS
- EQUIPMENT
- POWER
- IF THE APPLIANCE DOES NOT WORK
- MOUNTING THE ANTI-TIP DEVICE
- ADJUST THE HEIGHT OF THE APPLIANCE
Brand : Cylinda
Model : S 5272 KVB
Category : Cooker