
imageFORMULA DR-5060F - Scanner CANON - Free user manual and instructions
Find the device manual for free imageFORMULA DR-5060F CANON in PDF.
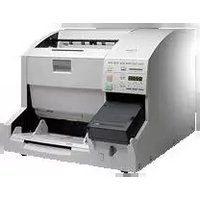


| Product Type | Document Scanner |
| Brand | Canon |
| Model | imageFORMULA DR-5060F |
| Scanner Type | Flatbed with Automatic Document Feeder (ADF) |
| Image Sensor | CCD |
| Optical Resolution | 600 dpi |
| Scanning Speed | Up to 50 ppm (single-sided), 100 ipm (duplex) |
| Document Feeder Capacity | 50 sheets (80 g/m² paper) |
| Maximum Document Size | A4 or Letter (216 x 356 mm) |
| Color Depth | 24-bit color |
| Connectivity | USB 2.0 and SCSI |
| Power Supply | AC 100-240 V, 50/60 Hz |
| Power Consumption | Approximately 60 W during operation |
| Dimensions (W x D x H) | 460 x 400 x 220 mm |
| Weight | Approximately 9.0 kg |
| Main Functions | Automatic double-sided color scanning, batch scan, image enhancement |
| Maintenance | Regular cleaning of rollers and glass platen; use Canon recommended cleaning supplies |
| Safety | Ensure proper grounding, avoid use near water; follow instructions in the manual |
| Spare Parts and Repairability | Consumables and spare parts available through Canon authorized service centers |
Frequently Asked Questions - imageFORMULA DR-5060F CANON
User questions about imageFORMULA DR-5060F CANON
0 question about this device. Answer the ones you know or ask your own.
Ask a new question about this device
Download the instructions for your Scanner in PDF format for free! Find your manual imageFORMULA DR-5060F - CANON and take your electronic device back in hand. On this page are published all the documents necessary for the use of your device. imageFORMULA DR-5060F by CANON.
USER MANUAL imageFORMULA DR-5060F CANON
Scanning Utility 5060
INSTRUCTIONS

NOTICE
① Copyright© 2001 by CANON ELECTRONICS INC. All rights reserved. No part of this publication may be reproduced, transmitted, transcribed, stored in a retrieval system, or translated into any language or computer language in any form or by any means, electronic, mechanical, magnetic, optical, chemical, manual, or otherwise, without the prior permission of CANON ELECTRONICS INC.
② The contents of this manual are subject to change without notice.
③ Every effort has been made to ensure the accuracy of information presented in this manual. However, Canon Electronics Inc. and the subsidiaries on the back cover assume no responsibility for any errors or their consequences.
④ We do not assume any responsibility for damage resulting from operations regardless of item ③.
Trademarks and Registered Trademarks
- Microsoft Windows and Microsoft Windows NT are registered trademark of Microsoft Corporation in the U.S. and in other countries.
- ISIS ® is a registered trademark of Pixel Translation, a division of ActionPoint Inc.
- Product names mentioned herein are for identification purposes only and may be trademarks and/or registered trademarks of their respective companies.
INTRODUCTION
Thank you for purchasing the Canon Document Scanner DR-5060F. This manual describes how to use Scanning Utility 5060 for scanning in images to the computer on Document Scanner DR-5060F. Be sure to read this manual and the separate DR-5060F Instructions before use to ensure that the functions of this Scanning Utility are effectively utilized.
Scanner drivers such as an ISIS or TWAIN driver are not required as this Scanning Utility packaged with the DR-5060F uses an exclusive scanner driver.
CONVENTIONS
This manual uses the following symbols and indications.
Before you start reading this manual, read the following and familiarize yourself with their meanings.

WARNING
Read carefully to avoid death or serious injury.

CAUTION
Read carefully to avoid serious injury or damage to the equipment or loss of valuable data.

NOTE
Read carefully to avoid damage to the equipment.

MEMO
Memos indicate where you will find useful information in this manual.
Contents
INTRODUCTION....1
CONVENTIONS 2
Chapter 1 Installation and Basic Operation of Scanning Utility 5060 .... 5
System Requirements 6
Installing Scanning Utility 5060 ....7
Before You Begin 7
Installing Scanning Utility 5060 7
Uninstalling Scanning Utility 5060....10
Basic Scanning Utility 5060 Operations 11
Starting Up Scanning Utility 5060 11
Explanation of the Scanning Utility 5060 Screen 12
Exiting Scanning Utility 5060 18
Chapter 2 Scanning a Document ...... 19
Before You Start Scanning 20
Setting Basic Scan Conditions 22
Scanner Settings 23
Scanning Originals and Saving Scanned Images.... 25
Scan Page 25
Scan Batch to File 27
Film Address File Name.... 31
Saving Scanned Images 35
Restrictions in the Number of Characters in File Names 35
About Save Formats 35
Saving Scanned Images to File (Scan Page) 36
Saving Multiple Page Originals 37
Opening Saved Files 39
Scanning and Printing Documents 40
Printing Opened Images 40
Scan Batch to Printer 42
Other Scan Operations 45
Verify Scan 45
Using Patch Codes/Function Sheets 47
Chapter 3 Setting Detailed Scan Conditions .... 51
Setting Scan Conditions....52
Setting up the Scanner 52
Detailed Settings 54
Image Controls 55
Option Devices 58
Feeder Option 63
Separation 65
Function Key Settings 66
Setting the Gamma Curve 68
Imprinter/Addon Settings 70
Barcode Settings 75
Patch Code Settings 78
Chapter 4 Troubleshooting....81
When An Error Message or Warning is Displayed 82
When The Scanned Image is Not Normal.... 85
Index 86
Chapter 1
Installation and Basic Operation of Scanning Utility 5060
This chapter describes how to install Scanning Utility 5060, and basic operation of Scanning Utility 5060.
System Requirements...... 6
Installing Scanning Utility 5060 .... 7
Before You Begin 7
Installing Scanning Utility 5060 ...... 7
Uninstalling Scanning Utility 5060 ..... 10
Basic Scanning Utility 5060 Operations.. 11
Starting Up Scanning Utility 5060...... 11
Explanation of the Scanning Utility
5060 Screen 12
Exiting Scanning Utility 5060 .... 18
You must have the following hardware and OS for Scanning Utility 5060 to work.
- An IBM PC/AT or compatible computer with a Pentium 133 MHz CPU or faster and at least 64 MB of memory
- OS: Microsoft Windows 95/98/Me or Microsoft Windows NT 4.0 Workstation, Microsoft Windows 2000 Professional
-
At least 100 MB of hard disk space (at least 5 MB at installation)
-
An SVGA compatible display
- A Microsoft Windows compatible keyboard, mouse and printer, CD-ROM drive (4· speed or faster recommended)
- A SCSI card whose operation has been confirmed
Operation of the following SCSI cards has been confirmed: Adaptec AHA-2930 series and AHA-2940 series
• SCSI-2 compatible SCSI cable

MEMO
- Scanning Utility 5060 uses a dedicated scanner driver. Scanner drivers such as the ISIS driver and TWAIN driver are not required.
- When you install Scanning Utility 5060, another folder “\ceiscan” is created under the Windows folder in addition to the installation destination folder, and the file “cei*.dll” is copied to \Windows\system.
Scanning Utility 5060 will not function properly if these files are modified. - Scanning Utility 5060 uses "wnaspi32.dll" for controlling the scanner. The scanner will not operate if "wnaspi32.dll" is not correctly installed.

NOTE
When Scanning Utility 5060 is used, set the scanner to the Backup mode or the Scanner Only mode. If Scanning Utility 5060 is used in the Filmer only mode, an error message is displayed when scanning is started.
This section describes how to install Scanning Utility 5060 and the installation procedure.
Before You Begin
Check the following items before you begin to install Scanning Utility 5060.
- Make sure that the OS of the computer on which you are going to install Scanning Utility 5060 is either Microsoft Windows® 95/98/Me or Microsoft Windows NT® 4.0 Workstation, Microsoft Windows® 2000 Professional.
- Connection with your computer For details on how to connect the scanner, refer to the separate DR-5060F Instructions.
Installing Scanning Utility 5060
The following describes the procedure for installing Scanning Utility 5060 on the computer.
1 Turn the scanner ON.

2 Turn the computer ON, and boot up Windows.
3 Insert the setup disc into the CD-ROM drive.
4 Click [Start] and select Run....

5 At Open, type "D:\su5060\setup.exe" and click OK.
In these instructions, the CD-ROM drive is specified as D.
The Choose Setup Language dialog box appears.

6 Select English (United States) and click OK.
The Welcome dialog box appears.

7 Click [Next].
The Choose Destination Location dialog box appears.

8 Check the displayed installation directory, and then click [Next].
→ Installation begins.
9 This continues the installation. After a while, the Setup Complete dialog box appears.

10 Click [Finish] to complete the installation.
Uninstalling Scanning Utility 5060
To uninstall Scanning Utility 5060, open "Add/Remove Programs" in the control panel, select [Scanning Utility 5060] and click [Add].

Basic Scanning Utility 5060 Operations
This section describes how to start up and exit Scanning Utility 5060, and the Scanning Utility 5060 screens.
Starting Up Scanning Utility 5060
Before you start operating the scanner, turn ON the scanner and the computer, and then start up Scanning Utility 5060.
1 Turn the scanner ON.

2 Turn the computer ON.

Windows boots up.
3 Click [Start] and choose [Program] - [Scanning Utility 5060].
![CANON imageFORMULA DR-5060F - Click [Start] and choose [Program] - [Scanning Utility 5060]. - 1](/content/2026/08/1572354/images/ce8d9e7e0544bea4ba5ff3348e63c447e1d19ad2abd7798dec0eea3790ea0f0a.jpg)
Scanning Utility 5060 starts up.

Explanation of the Scanning Utility 5060 Screen
This section describes the functions of the menu bar and Toolbar, and the mouse pointer on the Scanning Utility 5060 screen.

◆ Menu bar
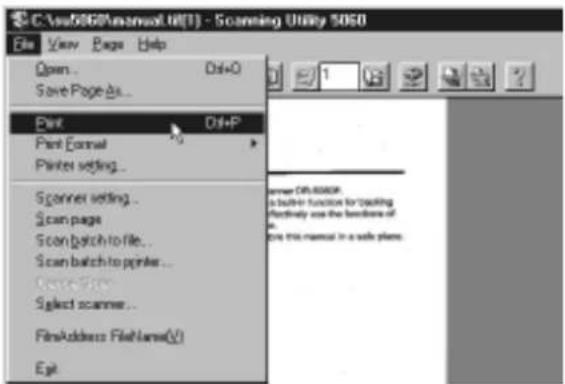
File menu

Open...
Opens images saved on Scanning Utility 5060. You can open files saved in one of the TIFF (*.tif), BMP (*.bmp), JPEG (*.jpg) or JBIG (*.jbg) file formats on Scanning Utility 5060. (See "Opening Saved Files" P. 39)
Save Page As...
Saves currently displayed pages under a different name. Pages that are not displayed when a file comprising two or more pages are not saved to file. (See "Saving Scanned Images to File (Scan Page)" P. 36)
Prints the image (See "Scanning and Printing Documents" P. 40)
Print Format
Sets the size of the image to be printed.
Actual size : Prints at the same size as the paper regardless of the size of paper to be printed or the resolution at which the image was scanned.
Fit to paper : Prints the image matched to the paper size when the document is larger than the paper, and prints at the actual size when the document is smaller than the paper.
Actual pixel : Prints each single dot in the scanned image using one output dot on the printer. For this reason, the print size becomes smaller when a scanned image is output on a small dot high-resolution printer.
Printer setting...
Sets the printer.
Scanner setting...
Sets the scanner. (See "Setting Basic Scan Conditions" P. 22)
Scan page
Scans only a single page. (See "Scan Page" P. 25)
Scan batch to file...
Scans and saves the document to a specified file. (See "Scan Batch to File" P.27)
Scan batch to printer...
Scans and prints the document on the printer currently set at Normally used printer. (See “Scan Batch to Printer” P. 42)
Cancel Scan
Cancels the current scan job.
Select scanner...
Selects the scanner to be used.
Film address file name
Scans the document, and saves the film address to a specified folder as a file name or folder name. (See "Film Address File Name" P. 31)
Exit
Exits Scanning Utility 5060.
View menu
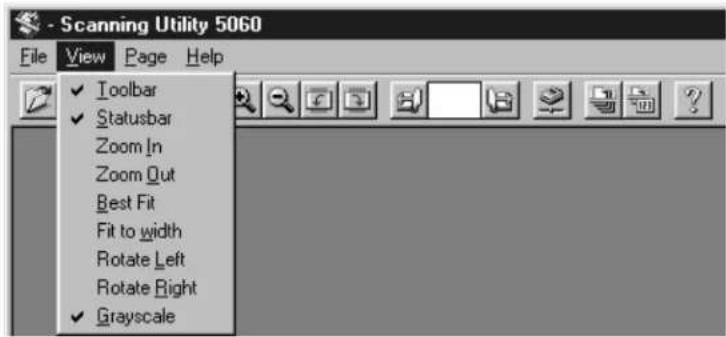
Toolbar
You can switch display of the toolbar ON and OFF.
Statusbar
You can switch display of the statusbar ON and OFF.
Zoom In
Each click of this button enlarges the image on screen.
Zoom Out
Each click of this button reduces the image on screen.
Best Fit
Displays the entire image in the window.
Fit to width
Displays the image so that its width matches the width of the window.
Rotate Left
Rotates images left (counterclockwise) by 90°.
Rotate Right
Rotates images right (clockwise) by 90°.
View Gray
Switches between black-and-white display and gray scale display. Reduced images are easier to view when View Gray is set.
Page menu
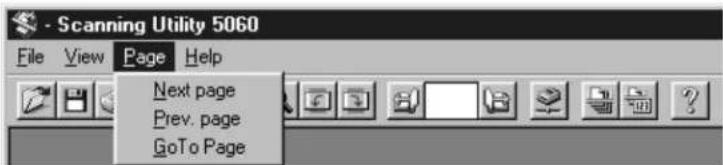
Next page
Displays the image on the next page.
Prev. page
Displays the image on the previous page.
GoTo Page
Opens the Goto Page dialog box. Entering any page number and clicking OK jumps to the page you specified.

Help menu

About
Displays the version information of Scanning Utility 5060.
◆ Toolbar

(Open): Open images saved on Scanning Utility 5060.

(Save Page As): Saves currently displayed pages under a different name. Pages that are not displayed when a file comprising two or more pages are not saved to file.

(Print): Prints the displayed image.

(Fit to width): Displays the image so that its width matches the width of the window.

(Best Fit): Displays the entire image in the window.

(Zoom In): Each click of this button enlarges the image on screen.

(Zoom Out): Each click of this button reduces the image on screen.

(Rotate Left): Rotates the image left (counterclockwise) by 90°.

(Rotate Right): Rotates the image right (clockwise) by 90° .


(Scroll page):
This button on the toolbar is enabled when a document comprising two or more pages is displayed. Pressing moves to the next page, while pressing moves to the previous page. Entering any page number at the specified page box and pressing Enter on the keyboard jumps to the page you specified.

(Scanner setting...): Sets the scanner.

(Scan batch to file...): Scans and saves the image to a specified file.

(Film address file name):
Scans the image, and saves the film address to a specified folder as a file name or folder name.

(About): Displays the version information of Scanning Utility 5060.
: Displays the folder and file name of the currently opened image.
◆ Mouse pointer
The mouse pointer is normally displayed as an arrow pointer ( ). However, the shape of the pointer changes shape to an open hand ( ) when an image is displayed, and the mouse pointer is moved to inside the window.

◆ Scrolling images
The scroll bar appears when an image is enlarged, and the enlarged image is larger than the window. To scroll the image, move the scroll bars. If you press the left mouse button in this state, the mouse pointer changes shape to a clenched hand ⏻. You can scroll the image by dragging the image in any direction and releasing the left mouse button.

◆ Statusbar

The statusbar displays explanations for menus and buttons, and warnings when the scanner is about to run out of film.
When the mouse pointer is over a menu or button, a menu or button explanation appears on the left of the statusbar.
When the scanner detects that it is about to run out of film during scanning, the scanner sounds a warning buzzer, and displays the "About to run out of film" warning on the right side of the status bar. (See "Warning" P. 84)
Exiting Scanning Utility 5060
1 Select [Quit application] from the File menu on the menu bar.

![CANON imageFORMULA DR-5060F - Select [Quit application] from the File menu on the menu bar. - 2](/content/2026/08/1572354/images/1fb77cf212f17b7a02b65c9190cddd4cf57869835cf90234a64d952bd89cfdbd.jpg)
Scanning Utility 5060 is quit.
NOTE
The mouse pointer changes shape to an hourglass when scanning is started, scanning is interrupted or when the scanner performs some operation after start of scanning is instructed.
If the mouse pointer changes shape to an hourglass while scanning is not being performed, the previous scanning job has not ended. Either press the Clear/Stop key on the operation panel, or select [Stop Scanning] from the File menu on the menu bar to cancel display of the hourglass and then exit Scanning Utility 5060.

Chapter 2
Scanning a Document
This chapter describes operation procedures on Scanning Utility 5060.
Before You Start Scanning.... 20
Setting Basic Scan Conditions ...... 22
Scanner Settings.... 23
Scanning Originals and Saving
Scanned Images 25
Scan Page 25
Scan Batch to File 27
Film Address File Name 31
Saving Scanned Images 35
Restrictions in the Number of Characters in File Names .... 35
About Save Formats 35
Saving Scanned Images to File (Scan Page).... 36
Saving Multiple Page Originals...... 37
Opening Saved Files 39
Scanning and Printing Documents...... 40
Printing Opened Images.... 40
Scan Batch to Printer.... 42
Other Scan Operations 45
Verify Scan.... 45
Using Patch Codes/Function Sheets... 47
Before you start scanning, check the operation mode and feeding option on the scanner's operation panel.

◆ About Scanner Operation Modes
The scanner operation mode can be verified by the state of the Backup key on the scanner's operation panel. In the Backup mode, the Backup key is lit, in the Scanner Only mode, it is out, and in the Filmer Only mode, it is blinking. (See DR-5060F Instructions "About Operation Modes" P. 40)
As Scanning Utility 5060 does not operate with the scanner in the Filmer Only mode, be sure to set the scanner to either the Backup mode or the Scanner Only mode.
◆ About Feeding Options
The feeding option selection and operation procedure differ according to the Feeding Option key setting. As the Feeding Option key setting is also reflected in Scanning Utility 5050, check the Feeding Option key before you start scanning. (See "Feeder Option" P. 63)
- When the Feeding Option key is out indicating [Remote] mode, scanning is started when scanning is instructed in Scanning Utility 5060. Check the original before you instruct start of scanning.
- When the Feeding Option lamp indicates the [Manual] mode, the document tray rises, and the scanner stands by for loading of the document and instruction of start of scanning. Instruct start of scanning in Scanning Utility 5060, and manually load the original one sheet at a time.
- When the Feeding Option lamp indicates the [Auto] mode, the Start key turns green and the scanner stands by for the original to be loaded when start of scanning is instructed in Scanning Utility 5060. Scanning is automatically started when the original is loaded on the document tray. Scanning is not started when the original has already been loaded and start of scanning is instructed in Scanning Utility 5060. To start scanning in this case, either press the Start key, or remove the original and then put it back on the document tray.
- When the Feeding Option lamp indicates the [Semi-Auto] mode, the Start key turns green and the scanner stands by for the Start key to be pressed when start of scanning is instructed in Scanning Utility 5060. Load the original on the document tray, and then press the Start key.
◆ About Backing Up to Microfilm
When the scanner is set to the Backup mode, all scanned document sheets are backed up to microfilm.
- If a system error or paper jam occurs during scanning and stops paper feed, clear the paper jam, for example, and make sure that the image of the last original page output from the scanner has been properly recorded to the computer. As you cannot confirm the image that has been photographed to film, discontinue the scan job, and repeat the procedure from scanning of the original that jammed to continue scanning.
- There are two types of camera units for photographing scanning images to microfilm: one for photographing in the Simplex mode, and the other for photographing in the Duplex mode. (See “Scan Batch to File” P. 27) When the camera unit for photographing in the Simplex mode is used, only the front side of originals is photographed. When the camera unit for photographing in the Duplex mode is used, both sides of the originals are photographed to film even if Simplex scanning is instructed in Scanning Utility 5060.
- Even if you have specified a size of paper smaller than the original at Page Size, and you have set up scanning so that part of the original is scanned, the whole area of the original is photographed to film.
- When function sheets or patch code sheets are used, you can set up scanning in the Scanning Utility 5060 settings so that sheets are not saved as images. However, be sure to perform this in the Backup mode. (See “Using Patch Codes/Function Sheets” P. 47)
◆ About Separators
When scanned images are separated into separate files for each document stack, patch code sheets are detected or press the New File button on the operation panel to send the separator signal to the computer from the scanner.
- When “Auto New File” is set in Scanning Utility 5060, the New File key on the scanner’s operation panel lights each time that scanning is discontinued, and the separator signal is sent to the computer. (See “Separation” P. 65)
- n Scanning Utility 5060, the folder or file name to save images to is changed and the file is separated by the separator signal. (See “Saving Multiple Page Originals” P. 37)
- When “2LevelBlip” is enabled in Scanning Utility 5060, the microfilm is marked with a “file mark” by the separator signal and images are separated independently of “page marks.” (See “Separation” P. 65)

Setting Basic Scan Conditions
Before you start scanning, set the basic scan condition items.
1 Start up Scanning Utility 5060.
2 Either select [Scanner setting...] from the File menu, or click on the toolbar.

The Scanner Settings dialog box is displayed.
3 Check the setup items and set them as required. (See "Scanner Settings" P. 23)

4 Click OK to close the dialog box.
Scanner Settings
Set the basic scan condition items.

Mode:
Select the scanning mode.
[Black and White]
This setting scans the image completely in black and white.
[Black and White ED]
This setting scans the image completely in black and white. Halftone gray areas are simulated and reproduced using error diffusion.
[Grayscale - 4 (16, 256) Level]
Reads scanned images as grayscale data. Use this item when grayscale data is required, for example, when scanned images must be image-processed on the computer.
Resolution:
Set the resolution (dots per inch: dpi) when originals are scanned. You can select from five resolutions: 200, 200 (high-speed), 240, 300 and 300 (high-speed).
MEMO
In high-speed scanner modes such as 200 (high-speed) and 300 (high-speed), the resolution in the sub-scanning (vertical) direction during scanning is halved to speed up scanning.
In the 200 (high-speed) mode, images scanned in at 200 · 100 dpi (horizontal · vertical) are output at 200 · 200 dpi, and in the 300 (high-speed) mode, images scanned in at 300 · 150 dpi (horizontal · vertical) are output at 300 · 300 dpi. In either of these modes, scan speed is increased, but image quality is slightly impaired.
Page Size:
Select the size of the original to be scanned from among the following:
Ledger -11 · 17 in Letter -8.5 · 11 in
Letter-R - 11 · 8.5 in Legal - 8.5 · 14 in
A3 (297 · 420mm) A4 (210 · 297mm)
A4-R (297 · 210mm) A5 (148 · 210mm)
A5-R (210 · 148mm) A6 (105 · 148mm)
A6-R (148 · 105mm) B4(ISO) (250 · 353mm)
B4(JIS) (257 · 364mm) B5(ISO) (176 · 250mm)
B5(ISO)-R (250 · 176mm) B5(JIS) (182 · 257mm)
B5(JIS)-R (257 · 182mm) Scanner's Maximum
Detect Page Size

MEMO
- If you scan an original larger than the specified size, its periphery will not be scanned. Also, if you scan an original smaller than the specified size, its periphery will appear black.
- When “automatic size detection” is selected, the width of the original is set by the width of the document guides. (default) The width of the original in automatic size detection can be matched to the width of the original to be actually scanned by the scanner’s user mode setting. (See DR-5060F Instructions “Setting in the User Mode” P.56)
Brightness:
The brightness of the scanned image is set automatically or manually. When “automatic” is set, the brightness setting is automatic. When “manual” is set, set the brightness within the range 1 to 255. A larger value increases the brightness, while a smaller value decreases the brightness.

MEMO
- The automatic brightness setting is enabled when Mode is set to [Black and White]. If the automatic brightness is set when mode is set to other than [Black and White], the brightness setting is at the central value.
- The brightness setting is reflected on the scanner's operation panel when the Scanner Settings dialog box is closed. Also, when the setting is changed on the operation panel, it is reflected in the settings in the Scanner Settings dialog box.
Contrast:
Automatically or manually sets the contrast. When you manually set the contrast, you can set within the range 1 to 13. A larger value increases the contrast, while a smaller value decreases the contrast.
[Detail...] button
Opens the Detail Settings dialog box to make the detailed settings. (See "Detailed Settings" P. 54)
[OK] button
Enables the settings and closes the dialog box.
[Cancel] button
Cancels any settings you have set and closes the dialog box.
Scanning Originals and Saving Scanned Images
There are three ways of scanning originals and saving the scanned image as an image file: (See "Scan Page" P. 25), (See "Scan Batch to File P. 27) and (See "Film Address File Name" P. 31). The operation procedure for each method is different.

MEMO
How to load originals and operation procedures vary according to the feeding option setting. Before you start scanning, check the feeding option setting. (See "Before You Start Scanning" P. 20)
Scan Page
With "scan page," you can scan only one page and check the image before you save or print the scanned image. This allows you to save or print scanned images as necessary. For this scanning method, set the feeding option to "Remote." (See "Feeding Option" P. 64)
1 Load one page on the document tray.
2 Select [Scan Page] from the File menu.


The document is scanned.
3 Check the scanned image.

Check the scanned image using the Display menu or toolbar buttons. (See "Explanation of the Scanning Utility 5060 Screen" P. 12)
4 To save scanned image, select [Save Page As] in the File menu, and save the scanned image. (See "Saving Scanned Images" P. 35)

5 To print scanned images, select [Print] in the File menu, and print the scanned image. (See "Printing Opened Images" P. 40)
Scan Batch to File
This setting specifies the file name to save images to before you start scanning images, and saves scanned images under the specified file name.
1 Select [Scan batch to file] from the File menu, or click on the toolbar.

The Save As dialog box appears.
2 Decide on the name of the file to save the image under, file type (save format) and where to save the file, and click [Save]. (See "Saving Scanned Images" P. 35)

The Start scanning dialog box is displayed.
3 Set [Feeder] (Duplex or Simplex).


MEMO
If the setting of the side to be scanned differs from the camera unit currently in use in the Backup mode, the following confirmation message is displayed when you click [Start Scanning].
- When the 1/57 camera unit is used and [Simplex] is selected

The images on both sides are backed up to film even if scanning is performed with [Simplex] selected and the 1/57 camera unit in use.
- When the 1/24 camera unit is used and [Duplex] is selected

The images on the front side of the original are backed up to film when scanning is performed with [Duplex] selected and the 1/24 camera unit in use.
- When the 1/24 camera unit is used and [Backside scanning] is selected (See "Backside scanning" P. 56)

The 1/24 camera unit is exclusively for photography of the front side. The images on the front side of the original are backed up to film even when scanning is performed with [Backside scanning] selected.
4 Set [Separator].

- None
The image to be saved to file is not given a file separator even if the New File key is pressed.
- Scan, Continue Scanning
Images are saved to separate files from the next image by pressing the New File key.

MEMO
- The [File Separator] setup item changes when the optional patch code/ function sheet detector is attached. (See "Using Patch Codes/Function Sheets" P. 47)
- The New File button lights each time that scanning is discontinued when the [Auto New File] setting in the Separation panel in the Detailed Settings dialog box is enabled. At this time, files are automatically separated if [Scan, Continue Scanning] is set.
5 Set [2LevelBlip]. (See "Separation" P. 65)
![CANON imageFORMULA DR-5060F - Set [2LevelBlip]. (See "Separation" P. 65) - 1](/content/2026/08/1572354/images/1627ed0b9f0f0ea38f3c699cf0aecf4dbe7995bbce9bfe15aa1e2ea34c3dd82d.jpg)
MEMO
The [2LevelBlip] setting is interlocked with the [2LevelBlip] check box in the Separation panel in the Detailed Settings dialog box.
6 Load the original. (when Feeding Option is set to [Remote])
7 Click [Start Scanning].

→ Scanning is started when Feeding Option is set to [Remote].
![CANON imageFORMULA DR-5060F - Click [Start Scanning]. - 2](/content/2026/08/1572354/images/b78a52546afe276451c8380becad9a572c9239e6a76bf11ed90c0e047e382b5f.jpg)
MEMO
- When Feeding Option is set to [Semi Auto], the Start key turns green and stands by to be pressed. Load the document and press the Start key.
- When Feeding Option is set to [Auto], the Start key turns green and stands by for the document to be loaded. Load the document.
- When Feeding Option is set to [Manual], the document tray rises. Load one sheet.
8 Scanning is paused when the document tray runs out of pages to scan.
The Continue Scanning dialog box is displayed when Feeding Option is set to [Remote].

9 To scan another original, return to step 5 and continue scanning.
10 To end scan batch to file, display the Continue Scanning dialog box, and click [Stop Scanning].
MEMO
When Feeding Option is set to other than [Remote], the Continue Scanning dialog box is displayed by pressing the Clear/Stop key on the scanner.
11 Check the scanned image.
→ Check the scanned image using the Display menu or toolbar buttons. (See "Explanation of the Scanning Utility 5060 Screen" P. 12)
12 To print the scanned image, select [Print] from the File menu, and print the scanned image. (See “Printing Opened Images” P. 40)

Film Address File Name
"Film address file name" is enabled when the scanner mode is set to the Backup mode. "Film address file name" automatically creates a file name from the film address, and saves scanned images to a specified folder.
1 Either select [Film Address File Name] from the File menu, or click in the toolbar.

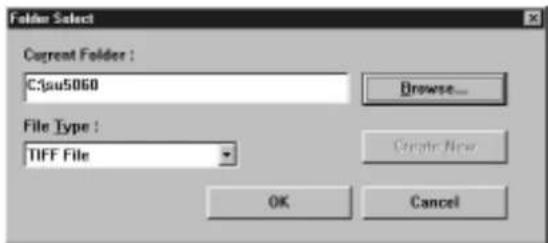
The Select Folder dialog box is displayed.
2 Determine the folder to save the file to and file type, and click [OK]. (See "Saving Scanned Images" P. 35)

The Start Scanning dialog box appears.
MEMO
- When saving to existing folders Either enter a new folder name to "Current folder" using an absolute path name, or press the [View] button and select an existing folder. In this case, limit the absolute path name to 256 characters.
- About creation of new folders
When you create a new folder, enter the new folder name to "Current folder" using an absolute path name, and click the [New] button. In this case, limit the absolute path name to 256 characters.

3 Set "Feeder".

MEMO
If the "Feeder" setting differs from the camera unit currently in use in the Backup mode, the following confirmation message is displayed when you click [Start Scanning]. (See "Scan Batch to File" P. 27)
4 Set [2LevelBlip]. (See "Separation" P. 65)
MEMO
The [2LevelBlip] setting is interlocked with the [2LevelBlip] check box in the Separation panel in the Detailed Settings dialog box.
5 Load the document on the document tray. (when Feeding Option is set to [Remote])
6 Click [Start Scanning].

→ Scanning is started when Feeding Option is set to [Remote].
![CANON imageFORMULA DR-5060F - Click [Start Scanning]. - 2](/content/2026/08/1572354/images/3075778b6b0a27ee8903a475d2b7d981962488a22b7b1dd9ba43b6723fe7a7c0.jpg)
MEMO
- When Feeding Option is set to [Semi Auto], the Start key turns green and stands by to be pressed. Load the document and press the Start key.
- When Feeding Option is set to [Auto], the Start key turns green and stands by for the document to be loaded. Load the document.
- When Feeding Option is set to [Manual], the document tray rises. Load one sheet.
7 Scanning is paused when the document tray runs out of pages to scan.

The Continue Scanning dialog box is displayed when Feeding Option is set to [Remote].


NOTE
If the folder you specified as the save destination contains a folder of the same name, the "Overwrite folder" confirmation message is displayed. If this happens, select "Change destination" and save to a different folder. If you select [Overwrite All], the content of the original file is deleted. If you select [No], the image file is not saved.

8 To scan another original, return to step 4 and continue scanning.
9 To end scanning, display the Continue Scanning dialog box, and click [Stop Scanning].

MEMO
- When Feeding Option is set to other than [Remote], the Continue Scanning dialog box is displayed by pressing the Clear/Stop key on the scanner.
10 Check the scanned image.

Check the scanned image using the Display menu or toolbar buttons. (See "Explanation of the Scanning Utility 5060 Screen" P. 12)
11 To print scanned images, select [Print] in the File menu, and print the scanned image. (See “Printing Opened Images” P. 40)

Saving Scanned Images
Scanned images are saved either while the original is being scanned or after it has been scanned. In either case, how the scanned image is saved differs according to the scan conditions and the type of the file to save the scanned image to.
Restrictions in the Number of Characters in File Names
- The name of the file to save scanned images to must be limited to 59 single-byte characters excluding extensions. An error message is displayed if the file name exceeds 59 characters.
- Limit the absolute path name for the folder to save the file to 256 characters.
About Save Formats
- Scanned images can be saved to files in one of the TIFF (*.tif), BMP (*.bmp), JPEG (*.jpg) or JBIG (*.jbg) file formats. Note, however, that the types of files that can be selected differ according to "Mode" in the scanner settings. (See "Mode" P. 23)
| Scanning Mode | Compatible File Format | |||
| BMP JB | IG JPEG | TIFF(MMR) | ||
| Black and White | ○ | ○ | ○ | |
| Black and White-ED | ○ | ○ | ○ | |
| Gray scale | ○ | ○ | ○ | |

MEMO
If you have selected JBIG (*.jbg) as the file format, the resolution (dpi) information when the image was scanned is not saved to the image file. All images scanned with JBIG (*.jbg) selected as the file format or images saved in JBIG (*.jbg) file format after they have been scanned are saved as "300 dpi" images regardless of the resolution setting (200 dpi or 300 dpi) that was active when they were scanned. For this reason, the images cannot be printed properly even if you select "Actual size" and "Fit to paper" at [Print Format]. So, we recommend setting the scan resolution when JBIG (*.jbg) is selected as the file format to "300 dpi".

Saving Scanned Images to File (Scan Page)
When scanned images are saved by [Save Page As...] in the File menu, only the one image currently displayed on screen can be saved. Normally, use this command to save images scanned by [Scan Page].
1 Either select [Save Page As...] from the File menu, or click on the toolbar.

The Save As dialog box is displayed
2 Decide on the name of the file to save the image under, file type (file format) and where to save the file, and click Save.

The scanned image is saved to the file that you specified.
Saving Multiple Page Originals
Image files comprising multiple pages to be saved by [Scan Batch to File] are saved as follows according to "File type" selected before scanning.
- When image are saved in TIFF format (multi-page TIFF)
Images of multiple scanned pages are saved under the specified file name. If “Separator” (See “Separator” P. 28) is set when scanning is started or files are separated by the automatic new file function (See “Separation” P.65), the specified file name is automatically appended a 4-digit continuous number (0001, 0002, ...) before the images are saved.

- When image are saved in BMP, JBIG or JPEG format
The specified file name is automatically appended a 4-digit continuous number (0001, 0002, ...), and the images of multiple scanned pages are saved in separate files.
If “Separator” (See “Separator” P. 28) is set when scanning is started or files are separated by the automatic new file function (See “Separation” P. 65), folders having a 4-digit continuous number (0001, 0002, ...) are automatically created, and images are saved to these folders.
![sv5060 File Edit View Help 0001 0002 0003 scan0001.bmp scan0002.bmp scan0003.bmp scan0004.bmp 7 object[x] 4.17MB](/content/2026/08/1572354/images/29e02a6d5a620ef607f29fb4cec3ae749aade36f86f29f144dc10e976a777ff9.jpg)
Image files comprising multiple pages to be saved by [Film Address File Name] are saved as follows according to “File type” selected before scanning.
- When images are saved in TIFF format (multi-page TIFF)
A file (0000126F.tif when the file address is "00126") having the same name as the file address on film is automatically created in the specified folder, and the images of multiple scanned pages are saved to this file.
When files are separated by "Separator", the file address is incremented by one, a file of the same name as the file address is automatically created, and images are saved in these files.
![0000129F.W 0000127F.W 0000129F.W 0000129F.W 4 object[x] 62.4KB](/content/2026/08/1572354/images/bb6f14860c874b46271779824ea7eead1cef350ce06648a134b48368f6d2ad2b.jpg)
- When images are saved in BMP, JBIG or JPEG format
An 8-digit folder (0000129F when the file address is "00129") having the same number as the file address on film is automatically created in the specified folder, the images of multiple scanned pages are automatically appended with an 8-digit file name (0000001P, 0000002P, ...) having the same number as the page address, and images are each saved as different files.
When scanning is performed in the Duplex mode, the page address of the back and front sides is the same. For this reason, the file name for the backside is appended with "2", and the file name for the backside becomes a 9-digit name (0000001P2).
When files are separated by "Separator", the file address is incremented by one, a folder of the same name as the file address is automatically created, and images are saved in these folders.
![sv5869 File Edit View Help [0000130] [0000131] [0000132] [0000133] 4 object[x] 0 bytes](/content/2026/08/1572354/images/63d7b50096f8f919eb7d30a58c9c246dbe74d28eccee521af573c5765e94b10b.jpg)
![000013N File Edit View Help 000000P.bnp 0000002P.bnp 000000P2.bnp 0000002P2.bnp 000001P.bnp 000001P2.bnp 6.object[x] 6.26MB](/content/2026/08/1572354/images/c6b99e6ffb4508c6202b4a099673d2a2b0eecf17d6d213d7237094a28d2e6b10.jpg)
Open image files saved on Scanning Utility 5060.

MEMO
- You can open image files saved in one of the TIFF (*.tif), BMP (*.bmp), JPEG (*.jpg) or JBIG (*.jbg) file formats on Scanning Utility 5060.
- If you save the file by [Save Page As...] in the File menu or 📄 when TIFF files (multi-page TIFF files) to which multiple pages are saved are opened, only the currently displayed page is saved, and images of other pages are deleted.
1 Select [Open] from the File menu, or click on the toolbar.

The Open dialog box is displayed.
2 Select a file and click OK.

The selected image file is displayed.

MEMO
Multiple files can be opened together simultaneously. To do this, click the first and last files with the Shift key on the keyboard held down. This selects all files in between the two files you specified. You can also open only specific files by selecting and clicking the desired files with the Ctrl key on the keyboard held down.
Scanning and Printing Documents
There are two ways of printing scanned images: by "scan batch to printer" that directly sends the images to the printer for printing without saving them, or by printing images that are opened on screen. The operation procedure for each method is different.
Printing Opened Images
The following describes the procedure for printing images opened on screen.
1 Check [Printer setting...] in the File menu.

2 Select [Print Format] in the File menu.

- Actual size
Prints at the same size as the paper regardless of the size of paper to be printed or the resolution at which the image was scanned.
- Fit to paper
Prints the image matched to the paper size when the document is larger than the paper, and prints at the actual size when the document is smaller than the paper.
- Actual pixel
Prints each single dot in the scanned image using one output dot on the printer. For this reason, the print size becomes smaller when a scanned image is output on a small dot high-resolution printer.

MEMO
When you select JBIG (*.jbg) at [Scan Batch to File] or [Film Address File Name] and print the scanned image, the image may not be printed properly even if you select "Actual size" and "Fit to paper". (See "About Save Formats" P. 35)
3 Either select [Print] from the File menu, or click 📄 on the toolbar.

![CANON imageFORMULA DR-5060F - Either select [Print] from the File menu, or click 📄 on the toolbar. - 2](/content/2026/08/1572354/images/7d198aa82cfb05ae652fc290fe660139bbe2d81d74df9114f11141973e2877f0.jpg)
The Print dialog box is displayed.
4 Check the print settings, and click the [OK] button.

![CANON imageFORMULA DR-5060F - Check the print settings, and click the [OK] button. - 2](/content/2026/08/1572354/images/d0b17f63708d6db54ddbde7680149b1bd25027fea1f6758b20e259a9f0562d06.jpg)
MEMO
The printer properties setting screen varies according to the printer in use. For details, refer to the Instruction Manual for the printer driver you are using or the Help file.
Scan Batch to Printer
With “scan batch to printer,” scanned images are printed directly on the printer without saving them. In this mode, scanned images cannot be saved. To save scanned images, use [Scan Batch to File].
1 Check [Printer setting...] in the File menu.

2 Select [Print Format] in the File menu.
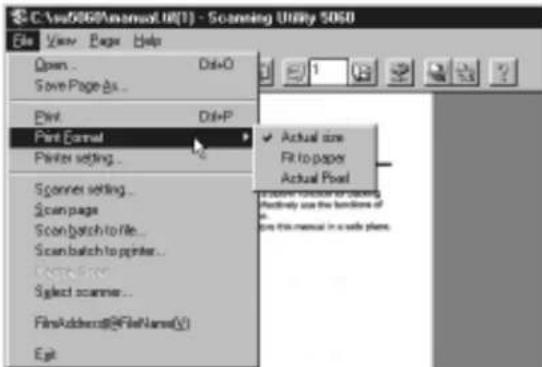
- Actual size
Prints at the same size as the paper regardless of the size of paper to be printed or the resolution at which the image was scanned.
- Fit to paper
Prints the image matched to the paper size when the document is larger than the paper, and prints at the actual size when the document is smaller than the paper.
- Actual pixel
Prints each single dot in the scanned image using one output dot on the printer. For this reason, the print size becomes smaller when a scanned image is output on a small dot high-resolution printer.
3 Select [Scan batch to printer] from the File menu.
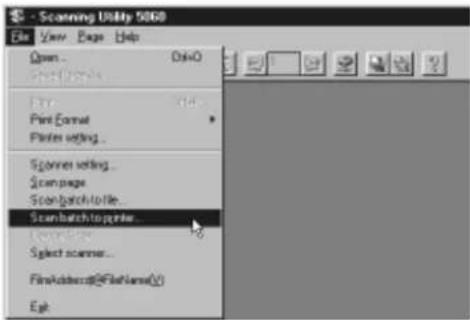
![CANON imageFORMULA DR-5060F - Select [Scan batch to printer] from the File menu. - 2](/content/2026/08/1572354/images/08ab9f47adb4d3e190db02161186297b2713778e371b3a9353dd2b630c16cd44.jpg)
The Start Scanning dialog box appears.
4 Set [Feeder] (Duplex or Simplex).

![CANON imageFORMULA DR-5060F - Set [Feeder] (Duplex or Simplex). - 2](/content/2026/08/1572354/images/b19f056cf741c4973965b695368fc1774b4a66d3fd9f534499971149e185bb78.jpg)
MEMO
If the [Feeder] setting is different from the camera unit in use in the Backup mode, a confirmation message is displayed when [Start Scanning] is clicked. (See "Scan Batch to File" P. 27)
5 Set [2LevelBlip]. (See "Separation" P. 65)
6 Load the document on the document tray. (when Feeding Option is set to [Remote])
7 Click [Start Scanning].


Scanning is started when Feeding Option is set to [Remote].

MEMO
- When Feeding Option is set to [Semi Auto], the Start key turns green and stands by to be pressed. Load the document and press the Start key.
- When Feeding Option is set to [Auto], the Start key turns green and stands by for the document to be loaded. Load the document.
- When Feeding Option is set to [Manual], the document tray rises. Load one sheet.
8 Scanning is paused when the document tray runs out of pages to scan.
The Continue Scanning dialog box is displayed when Feeding Option is set to [Remote].

9 To print another original, return to step 5 and continue scanning.
10 To end scan batch to printer, display the Continue Scanning dialog box, and click [Stop Scanning].
![CANON imageFORMULA DR-5060F - To end scan batch to printer, display the Continue Scanning dialog box, and click [Stop Scanning]. - 1](/content/2026/08/1572354/images/b4591ca33c1dde76ce32c94695031584aaea91494098fb63aa591b2db540a1c7.jpg)
MEMO
When Feeding Option is set to other than [Remote], the Continue Scanning dialog box is displayed by pressing the Clear/Stop key on the scanner.
11 Check the printed image.
Another way of scanning originals is “verify scan.” With “verify scan,” you set the number of originals before you start scanning, and the DR-5060 verifies the number you set against the number of scanned pages. If the number of scanned pages differs from the preset number, an error is displayed.
Verify Scan
Verify scans are performed in the scanner's Count Only mode. The verify scan function verifies the number of actually scanned pages in the original against a pre-counted (entered) number of pages. The verify error occurs if the number of scanned pages differs from the pre-counted number. (See "Verify Errors" P. 46)
1 Press the Count Only key on the operation panel.

The Count Only key lights, and the scanner enters the Count Only mode. Feeding Option [Semi-Auto] lights.
2 Place the original on the document tray, and press the Start key.

The original is fed, and the number of counted pages is displayed on the counter.
MEMO
- You can set the count start value before you press the Start key by pressing the ◀ or ▶key.
- If you already know the number of pages in the original, you can set the counter by pressing the ◀ or ▶key without pressing the Start key.
3 When the number of original pages has finished being counted, press the Count Only key to cancel the Count Only mode.
4 Open the Feeder Options panel, and mark the [Verify Enable] check box. (See "Feeder Option" P. 63)
5 Set the feeder option to any mode other than [Manual], and perform [Scan Batch to File].
![CANON imageFORMULA DR-5060F - Set the feeder option to any mode other than [Manual], and perform [Scan Batch to File]. - 1](/content/2026/08/1572354/images/f9027dffeed4b1f4981266fa77b4fb5c5b9e143cd7738c86ad7d2ecb324c1172.jpg)
The verify error occurs if the number of actually scanned pages differs from the number set in the Count Only mode. If the numbers match, scanning is discontinued.
![CANON imageFORMULA DR-5060F - Set the feeder option to any mode other than [Manual], and perform [Scan Batch to File]. - 2](/content/2026/08/1572354/images/0e9261466b9ad52758918c1a44b5fc5efeec30d1bdad2f6ae607c65372835bb3.jpg)
MEMO
- Verify scan is disabled when the feeding option is set to [Manual].
- Verify scan remains enabled even if scanning is discontinued. When you continue scanning a different original, the number of pages in this original is also verified. Before you scan a different original, first cancel scanning of the original whose scanning has been discontinued.
◆ Verify Errors
The verify error occurs if the number of scanned pages differs from the pre-counted number.
- When the number of original pages to be actually scanned is more than the number displayed on the counter
The original pages are scanned and scanning stops at the number displayed on the counter.
The counter displays the "U01" error, and the error message (verify count error) is displayed on the computer's screen.
If this happens, repeat the verify scan from counting of original pages.


MEMO
The “U01” error occurs and the error message is displayed even if a verify scan is performed without the number of original pages displayed.
- When the number of actually scanned original pages is less than the number displayed on the counter
The counter displays the “U02” error after scanning ends, and the error message (verify count error) is displayed on the computer's screen. If this happens, a probable cause is that a double feed occurred during scanning. Make sure that all of the original pages have been scanned.


MEMO
To reset the error display, press the Stop key.
Using Patch Codes/Function Sheets
The following functions are supported when the optional patch code/function sheet detector is attached on the scanner. For details on the optional patch code/function sheet detector, refer to the Instructions packaged with the optional patch code/function sheet detector.
◆ Automatic File Separation by Patch Code Sheets
Insert the patch code sheet in between original pages. Files can be automatically separated when this patch code sheet is detected. There are two types of patch code sheets: FILE A and FILE B, each with different separation functions. Use the patch code sheet to suit your specific requirements.
- FILE A

This sheet separates original pages into separate files from the next page.
- FILE B

This sheet separates original pages into separate files from this page. This sheet is recorded as an image even if recording as an image has been set to disabled.

MEMO
- Copy the patch code sheet onto paper of the same size as the original before use.
- When using the patch code sheet, insert the copy of the patch code sheet in front of the sheet at which the file is to be separated.
(Example of how to use patch code sheet)

Insert the copy of the patch code sheet in front of the sheet at which the file is to be separated.
- When the scanner is used in the Backup mode, the content of the patch code sheet is photographed to film.
1 Set up the scanner.
2 Set the Start Scanning dialog box.

[Separator] setting
Set file separator of the image when a patch code sheet is detected.
- None
Does not separate files even if patch code sheets are detected.
- Scan, Continue Scanning
Separates files and continues scanning when the patch code sheet is detected.
At this time, the content of the patch code sheet is recorded as an image.
- Skip, Continue Scanning
Separates files and continues scanning when the patch code sheet is detected.
At this time, the content of the patch code sheet is not recorded as an image.
- Scan, Stop Scanning
Stops scanning when the patch code sheet is detected.
At this time, the content of the patch code sheet is recorded as an image, and the file is separated from the image of the patch code sheet.
- Skip, Stop Scanning
Stops scanning when the patch code sheet is detected.
At this time, the content of the patch code sheet is not recorded as an image.
[2LevelBlip] setting
Set the film separator when the patch code sheet is detected.
• [2LevelBlip] marked
Marks film with a file mark when the New File key is pressed.
• [2LevelBlip] not marked
Does not mark film with a file mark when the New File key is pressed.
3 Click [Start Scanning] to start scanning.
MEMO
When scanning is set to stop when a patch code is detected, scanning is stopped when a patch code is detected, and the Scanning Canceled dialog box is displayed.
◆ Changing Scan Mode by Function Sheets
The scan mode can be automatically changed when a function sheet inserted between original pages is detected. There are four types of function sheets: for Text mode, for Photo mode, for Duplex mode, and for Simplex mode. Insert the function sheet to match the scan mode you are using to scan originals.

For Text mode
When this sheet is detected, the scan mode is changed to the Text mode (black-and-white) from the next original page. Note, however, when the grayscale is selected as the scan mode, the pattern in this function sheet is ignored, and is scanned as an image together with other original pages.

For Photo mode
When this sheet is detected, the scan mode is changed to the Photo mode (error diffusion) from the next original page. Note, however, when the grayscale is selected as the scan mode, the pattern in this function sheet is ignored, and is scanned as an image together with other original pages.

For Duplex mode
This sheet changes the scan mode to the Duplex mode from the next original page.

For Simplex mode
This sheet changes the scan mode to the Simplex mode from the next original page.

MEMO
- Copy the function sheet onto paper of the same size as the original before use.
- When using the function sheet, insert the copy of the function sheet in front of the sheet at which the scan mode is to be changed.
(Example of how to use function sheet)

Insert the copy of the function sheet in front of the sheet at which the scan mode is to be changed.
- When the scanner is used in the Backup mode, the content of the function sheet is photographed to film.
1 Open the Option Devices panel in the Detailed Settings dialog box, and make the function sheet settings.

- None
Disables detection of function sheets.
- Scan, Continue Scanning.
Records the content of the function sheet as an image when it is detected, and continues scanning.
- Skip, Continue Scanning
Does not record the content of the function sheet as an image when it is detected, and continues scanning.
- Scan, Stop Scanning
Records the content of the function sheet as an image when it is detected, and discontinues scanning.
- Skip, Stop Scanning
Does not record the content of the function sheet as an image when it is detected, and discontinues scanning.
2 Perform a scan.
MEMO
When scanning is set to stop when a function sheet is detected, scanning is stopped when a function sheet is detected, and the Scanning Canceled dialog box is displayed.
Chapter 3
Setting Detailed Scan
Conditions
This chapter describes how to set detailed scan conditions on the Scanning Utility 5060.
Setting Scan Conditions.... 52
Setting up the Scanner 52
Detailed Settings 54
Image Controls 55
Option Devices 58
Feeder Option.... 63
Separation.... 65
Function Key Settings 66
Setting the Gamma Curve 68
Imprinter/Addon Settings 70
Barcode Settings.... 75
Patch Code Settings 78
This section describes detailed scan condition settings.
Setting up the Scanner
Before you start scanning, set up the scanner.
1 Start up [Scanning Utility 5060].
2 Either select [Scanner setting...] from the File menu, or click on the toolbar.


The Scanner Settings dialog box appears.
3 Check the following setup items, and change the settings as required. (See "Scanner Settings" P. 23)

4 Press the [Detailed Settings] button to open the Detailed Settings dialog box. (See "Detailed Settings" P. 54)

![CANON imageFORMULA DR-5060F - Press the [Detailed Settings] button to open the Detailed Settings dialog box. (See "Detailed Settings" P. 54) - 2](/content/2026/08/1572354/images/02c4135899fdb4ab9ce70ef78aa0a433cf2824fae579a08adefa2379ba204e92.jpg)
MEMO
The Detailed Settings dialog box has five panels: Image Controls, Option Devices, Feeder Option, Separator, and Function Key Settings.
5 Press the [OK] button to close the dialog box.
Detailed Settings
Open the Detailed Settings dialog box, and make the detailed scan condition settings.
The Detailed Settings dialog box has five panels: Image Controls, Option Devices, Feeder Option, Separator, and Function Key Settings.
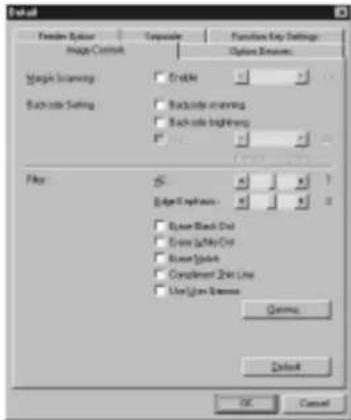

Image Controls (See P. 55) Option Devices (See P. 58)


Feeder Option (See P. 63) Separation (See P. 65)

Function Key Settings (See P.66)
Image Controls
The Image Controls panel is for setting margins around images to be scanned, settings for the backside of documents, and filters.

Margin Scanning
Adjust the scan area at the top, bottom, left and right of the page size set at Page Size (See P. 24).
Adjust the scan area by marking the [Enabled] check box and adjusting within the range -10 (scan with 10 mm (0.39 in.) less margin) and +10 (scan with 10 mm (0.39 in.) more margin).

MEMO
- To scan without clipping the edges of the scanned image, adjust this setting in the + direction to expand the scan area. To scan so that there is no black margin around the scanned image, adjust in the – direction to restrict the scan area.

- The maximum width of the scan area is 297 mm (11.5 in.). Areas outside of this maximum scan area of 297 mm (11.5 in.) after margins are adjusted are not scanned.
Set this item to scan the backside of documents.
[Backside scanning]
When this check box is marked, the backside of the document (the side of the document that is facing down when the document is loaded on the document tray) is scanned when scanning in the Simplex mode is set.
![CANON imageFORMULA DR-5060F - [Backside scanning] - 1](/content/2026/08/1572354/images/fab50e33eff6c08eb2270fd59985eb20e756a0027317faaa450304663d9ee1bb.jpg)
MEMO
- To scan a stack of one-sided document sheets from the last page, for example, mark this check box, load the document face down, and scan the document.
- When the 1/24 camera unit (for photographing the top side of documents) is mounted and [Backside scanning] is set, a confirmation message is displayed when scanning is started. (See P. 28)
- When the Backside scanning checkbox is marked, the Feeder setting when the Start Scanning dialog box is opened becomes “Simplex.”
- When scanning is performed with the Backside scanning checkbox marked and Feeder setting set to "Duplex," the Backside scanning checkbox becomes gray when the Detailed Settings dialog box is opened.
- A gray Backside scanning checkbox can be restored to normal by clicking the checkbox.
[Backside brightness]
Normally, the brightness of the backside of documents is set the same as that of the front side. However, the brightness setting when scanning the backside of documents can be set independently by marking this check box.
To change the brightness setting when scanning the backside of documents, mark this check box, and set the brightness either automatically or manually.
![CANON imageFORMULA DR-5060F - [Backside brightness] - 1](/content/2026/08/1572354/images/7d92f1a035438a28743dc13713c6be6a363acf90f1469f352895fb4ab4dc7000.jpg)
MEMO
Change the brightness setting of the backside when the density of the front and back sides of the document is different.
Filter settings
Set the type of filtering to be applied on scanned images.
[AE]
Set the level (1 to 13) of the automatic exposure function when Mode is set to [Black and White]. The automatic exposure function sets the brightness and contrast of the image according to the difference in light and dark in the selected area.
Reducing the level darkens the image, while increasing the level lightens the image. Default is 7.
[Edge Emphasis]
Set this to emphasize the edges of text or to soften graininess in photographic images, for example. Set the level within the range 1 to 5. Default is 3.
[Erase Black dot]
Marking this check box automatically erases isolated black dots (single dots) on white backgrounds.
[Erase White dot]
Marking this check box automatically erases isolated white dots (single dots) on black backgrounds.
[Erase Notch]
Marking this check box automatically erases parts (notches) protruding outside contours.
[Compliment Thin Line]
Marking this check box automatically joins faint or broken lines that occur when scanning documents containing thin lines or low density.
![CANON imageFORMULA DR-5060F - [Compliment Thin Line] - 1](/content/2026/08/1572354/images/60cd36012c1ea2fa36010bdc6f5b1cd71865ab63d320c3953bff4873afcc4363.jpg)
MEMO
[AE] is enabled when [Mode] is set to [Black and White].
[Edge Emphasis] is enabled when All is selected at Mode.
[Erase Black Dots], [Erase White Dots], [Erase Notch] and [Compliment Thin Line] are enabled when [Mode] is set to [Black and White] or [Black and White-ED].
[Use User Gamma]
Check this item to actually use the gamma curve data set by the Gamma button.
[Gamma] button
Opens the Gamma Settings dialog box, and downloads the gamma curve data for changing the tonal reproduction settings to the scanner. (See "Setting the Gamma Curve" P. 68)
Loaded gamma curve data is enabled when the Use User Gamma check box is marked.
[Default] button
Returns the settings in the Image Controls panel to their defaults.
[OK] button
Enables the settings and closes the Detailed Settings dialog box.
[Cancel] button
Cancels any settings you have set, and closes the Detailed Settings dialog box.
Option Devices
The Option Devices panel is for making settings when optional units are attached and for setting the scan log and dropout functions.

Function sheets
This function is enabled when the optional patch code/function sheet detector is attached. Set the desired action when a function sheet is detected. For details on how to use function sheets, see "Changing Scan Mode by Function Sheets" P. 49.
- None
Disables detection of function sheets.
- Scan, Continue Scanning.
Scans the function sheet as an image when it is detected, and continues scanning.
- Skip, Continue Scanning
Does not scan the function sheet as an image when it is detected, and continues scanning.
- Scan, Stop Scanning
Scans the function sheet as an image when it is detected, and discontinues scanning.
- Skip, Stop Scanning
Does not scan the function sheet as an image when it is detected, and discontinues scanning.
Imprinter/Endorser
Enables the optional imprinter and endorser.
[Imprinter]
When this check box is marked, the imprinter is enabled, and the text set in the Imprinter/Addon Settings dialog box is printed on the front side of scanned document sheets.
[Addon]
When this check box is marked, the text set in the Imprinter/Addon Settings dialog box is added on to scanned images.
In the Simplex mode, the text is added on to scanned images, and in the Duplex mode, the text is added on to scanned images on the front side.
[Imprinter/Addon] button
Opens the Imprinter/Addon Settings dialog box. In this dialog box, set the text to be printed/added on. (See "Imprinter/Addon Settings" P. 70)
[Endorser]
When this check box is marked, the endorser is enabled, and the backside of scanned document sheets is stamped.
![CANON imageFORMULA DR-5060F - [Endorser] - 1](/content/2026/08/1572354/images/3c9b776f34bb7a41c11e70400ca6756d617a08c259e47ca9724fc75e50b6f48b.jpg)
MEMO
- The [lmprinter] check box is enabled when the optional imprinter unit is attached.
- The [Endorser] check box is enabled when the optional endorser is attached.
Decoder
This function is enabled when the optional barcode decoder is attached, and is for scanning barcodes in originals.
[Barcode]
When this check box is marked, the barcode scanning function is enabled, and barcodes in originals are scanned at the barcode scanning conditions set in the Barcode Settings dialog box.
[Barcode] button
Open the Barcode Settings dialog box. In this dialog box, set the barcode scanning conditions. (See "Barcode Settings" P. 75)
![CANON imageFORMULA DR-5060F - [Barcode] button - 1](/content/2026/08/1572354/images/e2295021f78d56ec1fbb15d9dd63e3c4259339bcd821b9cdce3db7ece6cbfb03.jpg)
MEMO
Only either of the optional patch code/function sheet detector or barcode decoder can be attached. So, the function sheet and decoder functions cannot be used at the same time.
Film Address Log File
Log information (date and time, file name, film address, page address, etc.) of scanned images is saved as a CSV format text file.
[Record Log]
Saves log information of scanned images to the file selected at the [Log...] button.
![CANON imageFORMULA DR-5060F - [Record Log] - 1](/content/2026/08/1572354/images/8a206e51d7935ef735dbb764100ac068f963e9d88672de474728df664fa7b4fc.jpg)
MEMO
The following message is displayed when you cancel selection of this check box.

[Log...] button
Open the Select Log File dialog box. In this dialog box, select the file to save the log file to.

About Log Files
Log files are saved in CSV format (text files delimited by commas). Log files can be opened with data items in individual cells when they are opened in spreadsheet applications that support CSV format.
02/12/2001, 17:10:25, ,[117.0], #1, , . . .
02/12/2001, 17:12:09, C:\SU5060\canon0001.bmp,[118.0], #1, "CANON, 001", "ABC,DEF",
02/12/2001, 17:12:09, C:\SU5060\canon0002.bmp,[118.0], #1, , , , ,
02/12/2001, 17:12:09, C:\SU5060\canon0003.bmp,[118.1], #1, ""CANON, 002", ""ABC,DEF",
02/12/2001, 17:12:09, C:\SU5060\canon0004.bmp,[118.1], #1, . . .
02/13/2001, 10:30:45, C:\SU5060\canon0001.tif, None, #1, , , , ,
| 2/12/2001 17:1 | 0:25 [117.0] #1 | ||||
| 2/12/2001 17:1 | 2:09 C:\SU5060\canon0001.bmp [118.0] #1 "CANON, 001" "ABC,DEF" | ||||
| 2/12/2001 17:1 | 2:09 C:\SU5060\canon0002.bmp [118.0] #1 | ||||
| 2/12/2001 17:1 | 2:09 C:\SU5060\canon0003.bmp [118.1] #1 "CANON, 002" "ABC,DEF" | ||||
| 2/12/2001 17:1 | 2:09 C:\SU5060\canon0004.bmp [118.1] #1 | ||||
| 2/13/2001 10:30 | 0:45 C:\SU5060\canon0001.tif None #1 |
① ② ③ ④ ⑤ ⑥ ⑦
The following information is saved to log files.
① Scanned date (MM/DD/YYYY format)
The date when the image was scanned is saved in the format MM/DD/YYYY. If you want to change this format, contact a Canon service department.
② Time (HH:MM:SS format)
③ Directory/file name
When originals are scanned by [Scan Page] (See "Scan Page" P. 25), this item is left blank. However, when scanned images are saved by [Save Page As] (See "Saving Scanned Images to File (Scan Page)" P. 36), the directory/file name is saved to the log file.
④ Film address
The file address and page address are saved. When originals are scanned in the Scanner Only mode, the film address becomes None.
⑤ Camera ID
The ID number (#1 to #15) currently set to the camera unit in use is saved.
⑥ Print/addon text
The text that was printed/added on and the barcode information is enclosed by “””. When this item is opened in a spreadsheet application that supports CSV format, it is displayed in a single cell with the text enclosed by “. (Information is not delimited in individual cells even if the text contains a comma.) Note, however, that when the text is an arrow, the special characters that you entered to the text (See “Arrow” P. 71) are saved to the log file.
⑦ Barcode information
Information for up to four barcodes is saved. When barcodes are scanned in the Duplex mode, the barcode information is saved to the log of the side on which the barcode was searched.
Dropout
Set the dropout function. This function is for disabling scanning of the color red in originals.
To use this function, select "Red Drop" from the pulldown menu.
[Inhibit Section]
Set the section in which dropout is inhibited when it is enabled.
Specify the start position and the end position, with each of these positions as a distance in mm from the top edge of the paper.
![CANON imageFORMULA DR-5060F - [Inhibit Section] - 1](/content/2026/08/1572354/images/f6c8357a3eb488b1aaf80cffef45e001314f320b54aeb8f9de655db604c9f8ca.jpg)
MEMO
Only the color red can be dropped out on DR-5060F.
[Default] button
Returns the settings in the Option Devices panel to their defaults.
[OK] button
Enables the settings and closes the dialog box.
[Cancel] button
Cancels any settings you have set and closes the dialog box.
Feeder Option
The Feeder Option panel is for setting the paper thickness adjustment method, double feed detection and feed method.
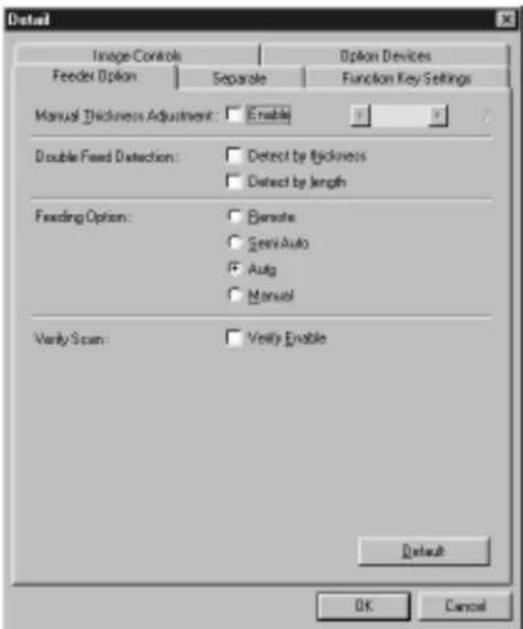
Manual Thickness Adjustment
Use this function to manually adjust the paper thickness when scanning coated documents and documents whose paper thickness cannot be adjusted automatically, or when double feed occurs frequently in the automatic paper thickness adjustment mode.
When setting the manual thickness adjustment, mark the [ON] check box, and specify the thickness within the range 1 (thinnest) to 13 (thickest).

MEMO
- Manual thickness adjustment can also be set to the scanner's function keys. For details, refer to the DR-5060F Instructions "Manual Thickness Adjustment" (P. 53).
- When the thickness is adjusted manually on both the function keys and this application, preference is given to the last set thickness.
Double Feed Detection
This setting is for selecting how double feeds are detected during continuous scanning. Double feeds are simultaneous feeding of two or more pages or partial overlapped feeding of pages.
[Detect by thickness]
Detects double feed by the thickness of the paper. When a document 1.5 times thicker than the first sheet of the document is fed, the scanner judges this to be a double feed and displays an error.
[Detect by length]
Detects double feed by the length of the paper. When a document 5 cm (2.0 in.) longer or shorter than the first sheet of the document is fed, the scanner judges this to be a double feed and displays an error.
![CANON imageFORMULA DR-5060F - [Detect by length] - 1](/content/2026/08/1572354/images/f36c774437faf2cd8f14ac3214c64322e20d641d48d183c822cdeac768f46e9b.jpg)
MEMO
- Double feed detection is performed taking the thickness and length of the first sheet of the document as the standard sheet. When the first sheet of the document is fed, the scanner memorizes the thickness and length of the document.
- Double feed cannot be detected on originals 130 mm (5.0 in.) wide or less.
Feeding Option
Selects the feed method.
[Remote]
The document starts to be fed (scanned) when you load the document and instruct scanning in the application.
[Semi Auto]
The document is fed (scanned) when scanning is instructed in the application and when you load the document and press the Start key.
[Auto]
The document is fed (scanned) automatically when scanning is instructed in the application and you load the document.
[Manual]
The document is fed manually one page at a time after scanning is instructed in the application. Use this when scanning particularly thick or thin pages.
![CANON imageFORMULA DR-5060F - [Manual] - 1](/content/2026/08/1572354/images/db4eeff098a0fdf5a8a0801b34ad461d472b7fb0cce6525873baf8cf64fa3786.jpg)
MEMO
The setting you make here is reflected in the scanner's operation panel when you press the [OK] button in the Scanner Settings dialog box and the dialog box is closed. It is also reflected in the Feeder Option panel when the setting is changed on the operation panel.
Verify Scan
Verify the number of pages counted before the document is scanned against the actual number of scanned pages. If the numbers differ, an error is displayed. For details on the verify scan procedure, see "Verify Scan" p.45. To perform a verify scan, mark the Verify Scan check box.
[Default] button
Returns the settings in the Feeder Option panel to their defaults.
[OK] button
Enables the settings and closes the dialog box.
[Cancel] button
Cancels any settings you have set, and closes the dialog box.
Separation
The Separation panel is for making settings for separating the scanned image to file or on film.

Separation
Set the file and film separators.
[Auto New File]
When this check box is marked, the New File key on the operation panel lights once scanning is discontinued. The file separator signal is then generated to separate the file, and the film is marked with a file mark. (See "About Separators" P. 21)
[2LevelBlip]
When this check box is marked, the film is marked with a file mark when a file is separated. (See "About Separators" P. 21)
[Patch Code]
Open the Patch Code Settings dialog box. This button is enabled when the optional patch code/function sheet detector is attached. (See "Patch Code Settings" P. 78)
[Default] button
Returns the settings in the Separation panel to their defaults.
[OK] button
Enables the settings and closes the dialog box.
[Cancel] button
Cancels any settings you have set, and closes the dialog box.
Function Key Settings
The Function Key Settings panel is for assigning functions to function keys.

Select Key
The following describes the procedure for assigning functions to the function keys on the scanner.
1 From the pulldown menu, select the key (F1 to F6) to register a function to.
When you select a function key from the pulldown menu, [Function Assignments] shows the function currently registered to the selected key.
2 Select the function to be assigned to the selected function key.
3 Press the [Set] button.
The function is assigned to the function key.
MEMO
- If you select the function to be assigned, and select a different function key without pressing the [Set] button, the assignment to the previous key is invalid.
- Functions assigned to function keys by pressing the [Set] button are not canceled by pressing the [Cancel] button.
- When [Assign scanner settings] is selected for a function key, press the [OK] button in the Scanner Settings dialog box to apply the settings, then open the Function Key Settings panel again and assign the scanner settings to the function key.
Assign Single Function
Select the function to be assigned after you have selected the function key. For details of these functions, refer to the separate DR-5060F Instruction “Function Key Settings.” (P. 52)
[Manual Thickness Adjustment]
Assigns the manual paper thickness function (See P. 63) to the function key.
[Imprinter]
Enables the imprinter.
[Fixed Thickness Mode]
Fixes the thickness of the paper to be scanned to the setting made by manual thickness adjustment.
[Double Feed Detection]
Automatically detects double feed. "Double feed" is detected when two or more sheets of the document are fed together or when part of one sheet overlaps another sheet.
[Display Odometer]
Displays the odometer of the currently attached camera unit.
[Display File Address]
Displays the file address of the currently attached camera unit.
[Display Page Address]
Displays the page address of the currently attached camera unit.
[Film Density]
Register the photographic density of the film within the range -3 to +3.
![CANON imageFORMULA DR-5060F - [Film Density] - 1](/content/2026/08/1572354/images/deb5f13cb5f5c3d94c41153a8113e2f8ac30134c8ee844e25ba60c03edb04d2e.jpg)
MEMO
If you change the film density setting and register the setting again to the same function key with the function key assigned the film density in a lit state, the function key goes out.
[Restore Settings]
Assigns the current scanner settings to a function keys. The function key assigned the scanner settings lights, and goes out when the settings are changed.
If you light the function key assigned the scanner settings before you open the Scanner Settings dialog box, the assigned scanner settings are restored. Note, however, that the [Mode] and [Resolution] settings are not restored, and must be set separately.
[None]
Does not assign functions to function keys.
[OK] button
Enables the settings and closes the dialog box.
[Cancel] button
Cancels any settings you have set, and closes the dialog box.
Setting the Gamma Curve
Set the gamma curve.

MEMO
The “gamma curve setting” uses gamma curve data prepared by the user to adjust the output values (output to the computer) with respect to the input values for 256 levels of brightness in the scanned image.
The gamma curve set here will not be enabled unless you mark [Use User Gamma] check box in the Image Controls dialog box (See P. 57).
1 Prepare gamma curve data matched to the gamma curve. (See "Preparing Gamma Curve Data" P. 69)
2 Open the Gamma Settings dialog box.
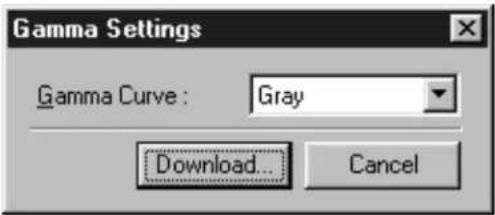

MEMO
Only [Gray] can be selected from the gamma settings pulldown menu. Other settings cannot be selected. Be sure to use gamma curve data that you have prepared for changing the gamma curve.
3 Press the [Download] button, and select the prepared gamma curve data.


MEMO
Gamma curve data is appended with the *.gmm extension.
4 Clicking [Open] downloads the gamma curve data to the scanner. After the data is downloaded, the display returns to the Gamma Settings dialog box.

MEMO
Information on the gamma curve data is held internally by the scanner, and is not cleared even if the scanner power is turned OFF. The gamma curve data information is not changed until other gamma curve data is downloaded.
◆ Preparing Gamma Curve Data
Gamma curve data is stored in a text file (*.gmm) comprising 258 lines. This file describes the output values for each of the 256 levels of input values.
Be sure to enter a comment in the 1st line of this file, and "256" in the 2nd line of this file.
The 3rd line onwards are the output values for the input values. Set "0" for the 3rd line, "1" for the 4th line and a continually incrementing number for each line until "255" is set for the 258th line.
Small values entered for the gamma curve data result in the image being reproduced dark, and large values result in the image being reproduced light.
Example
Normally, rightward-inclining gamma curves are prepared. However, a leftward-inclining gamma curve can be prepared by inverting all output values. As a result, the output image also will be inverted.
Gamma curve data
1st line : gamma curve
2nd line : 256
3rd line : 0
4th line : 1
5th line : 2
253rd line : 250
254th line : 251
255th line : 252
256th line : 253
257th line : 254
258th line : 255
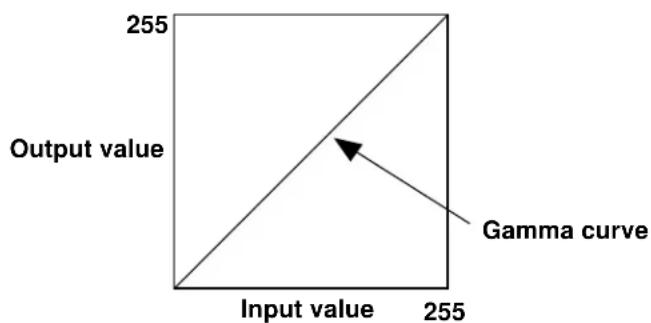
Gamma curve data (inverted)
1st line : Inverted linear gamma curve
2nd line:256
3rd line : 255
4th line : 254
5th line : 253
253rd line : 5
254th line : 4
255th line : 3
256th line : 2
257th line : 1
258th line : 0

Imprinter/Addon Settings
When the imprinter/addon function is used, any characters and counters can be printed/added on the scanned document and image.
The character strings to be printed or added by the imprinter/addon function and their printing conditions are set in the Imprinter/Addon Settings dialog box.

Text
Enter all single-byte characters for text to be printed/added on. The following characters and symbols can be entered:
- Numbers (0 to 9)
• Alphabet characters (upper-case, lower-case) - Space (blank)
- Symbols
The following symbols are added on as they are:
! “ # % \ amp; ^ ()* + -. /:; lt; = gt;? @ ^ _ | ^ ,
Enter the symbol to add on after “\”.
- Special characters
Counters, date, time and arrows can be specified as special characters. For details on how to enter special characters, refer to the description on the following page.

MEMO
- The maximum number of characters that you can enter is 32. Limit the text to be actually printed/added on to 32 characters including spaces. If the text you have entered contains special characters such as counters or the date, a parameter error will occur as the text to be actually printed or added will exceed 32 characters even if the entered text is within 32 characters.
- The default setting is “\”, but “¥” can be set also. To print/add on “¥” contact a service representative.
- When the film address log setting (See P. 60) is enabled, the text to be actually printed/added on is automatically saved to the log file. Note, however, that when the text is an arrow, the special characters that you entered to the text are saved to the log file.
Counter 1, 2
To print/add on a counter, specify a number enclosed by brackets [ ]. The number enclosed by brackets [ ] becomes the counter start number, and the number of entered digits becomes the number of digits (xxx) in the counter. To set two counters, enter two counters delimited by a “.” (period) in the format “Counter 2. Counter 1”. (See the entry example below.) The counter increment and increment timing are set at “Counter 1/Counter 2 Setting” described later. (When only Counter 1 is set, set the timing in “Counter 1 Setting”.)
[Input] [Print/Addon Result] CANON[10000001.000001] CANON 10000001 000001
Time
To print/add on the time that the document was scanned, enter “¥TIME”. The time in the 24-hour clock is printed (added on) as eight digits as follows.
(Example: 16:28:30)
[Input] [Print/Addon Result] ¥TIME 16:28:30
Date
To print/add on the date that the document was scanned, enter one of “¥MDY”, “¥DMY”, “¥YMD” as a combination of Y (year), M (month) or D (day). The date in the Western calendar is printed/added on as up to ten digits as follows. The year, month and date are delimited by a slash “/”.
(Example: (April 20, 2001)
[Input] [Print/Addon Result] ¥YMD 2001/04/20
Arrow
To print/add on an arrow, enter as follows: [Input] [Print/Addon Result] ¥u ↑ ¥d ↓ ¥l ← ¥r →
Counter 1, Counter 2
Set the counter increment and increment timing for when a counter is set to text.
Increment Trigger
Select the trigger for incrementing the counter value from one of the following:
[Separator]
The count is incremented at each file separator.
[Page]
The count is incremented at each new page.
[Never]
The count is not incremented.
Increment
Set the counter increment within the range 0 to 255.
Reset Trigger
Select the trigger for resetting the counter value from one of the following:
[Separator]
The counter is reset at each file separator.
[Page]
The counter is reset at each new page.
[Never]
The counter is not reset.
Start Value
Set the counter start value after a reset within the range 0 to 255.
Print Settings
Horizontal Offset (mm)
Specify the horizontal position where text is to be printed/added on within the range 0 to 300. Specify how many mm from the left edge of the document entrance characters are to be printed/added on in the feed direction.
Vertical Offset (mm)
Specify the vertical position where text is to be printed/added on within the range 0 to 500. Specify how many mm from the leading edge of the original characters are to be printed or added.
Pages
Selects on which page to print or add on.
[Page]
Prints or adds on every page.
[Separator]
Prints or adds on the next page indicated by the file separator.
Addon Type
Selects how the letters are to be added on the data.
[Black on White]
Prints (adds on) black letters on a white background.
![CANON imageFORMULA DR-5060F - [Black on White] - 1](/content/2026/08/1572354/images/b813ece7be91703f34f35ab748d649a299ac974741c20e3dd5b565dd8b74912a.jpg)
[White on Black]
Prints (adds on) white letters on a black background.
![CANON imageFORMULA DR-5060F - [White on Black] - 1](/content/2026/08/1572354/images/6094a531639d69d9ab8c3cf1b957dce083d86f89116ecaebb0dd96533bde8ae7.jpg)
[Black on Image]
Prints (adds on) black letters on the image.
![CANON imageFORMULA DR-5060F - [Black on Image] - 1](/content/2026/08/1572354/images/7d0eeff1f41d754b9dc34eb026817359e9e6052f6e5cee8d00e9b00f5b9b3eaa.jpg)
Orientation
Selects rotation of fonts to be printed/added on.

[None]
Fonts are not rotated.
![CANON imageFORMULA DR-5060F - [None] - 1](/content/2026/08/1572354/images/5518dd00eb0393937ece7a4950a96dd35e8fb6ef68a59839f8e91e0a97e4bc07.jpg)
[90 Degrees]
90 degree rotation clockwise
![CANON imageFORMULA DR-5060F - [90 Degrees] - 1](/content/2026/08/1572354/images/f52eef139e249654586851f18d3c14ac84eda3f5424bdd0cc1f293abac2e5b63.jpg)
[180 Degrees]
180 degree rotation
![CANON imageFORMULA DR-5060F - [180 Degrees] - 1](/content/2026/08/1572354/images/2b1f7c76310d6a2f3258ab2be8cd49127820ab9e72535242364d803b2ae52d0b.jpg)
[270 Degrees]
270 degree rotation clockwise
Small Font
Prints (adds on) characters using a small (8 · 7 dots) font. (The usual size is 12 · 12 dots.)
When the addon function is used for images, the size of the characters as the image changes according to the resolution at which the document is scanned.

Right to Left
Use this in combination with Orientation.
Example) By [Right to Left] and Orientation [180 Degrees], text is rotated 180 degrees and then printed/added on.
(Regular printing)
CANON DR-5060F
(Right to Left)
F0605-RD NONAC
(Right to Left +180 Degrees)
CANON DR-5060F
[OK] button
Enables the settings and closes the [Imprinter/Addon Settings] dialog box.
[Cancel] button
Cancels any settings you have set and closes the [Imprinter/Addon Settings] dialog box.
Barcode Settings
Make the settings for scanning barcodes. These settings are enabled only when the optional barcode decoder is installed.
These items are set in the Barcode Settings dialog box.

◆ Barcode Type
The following six kinds of barcodes can be recognized and scanned on this scanner:
- UPC codes (UPC-A, UPC-E)
- AN codes
- Codabar codes
- ITF codes (including Industrial 2of5)
- Code39 codes
- Code 128 codes
Select the type of barcode to scan, and mark the check box for the type of barcode you selected.

MEMO
- When the barcode type is unknown, mark all barcode check boxes before scanning the original so that all barcode types are automatically detected and the checksum is not scanned.

NOTE
Barcode information is saved to the log file specified in the film address log setting. (See "Film Address Log File" P. 60)
When [Record Log] is disabled in the film address log setting, the information of detected barcodes is not saved to log file. So, be sure to enabled [Record to Log] before you start scanning barcodes.
◆ Barcode Detailed Settings
Set barcode details. Setup items differ according to the type of barcode.
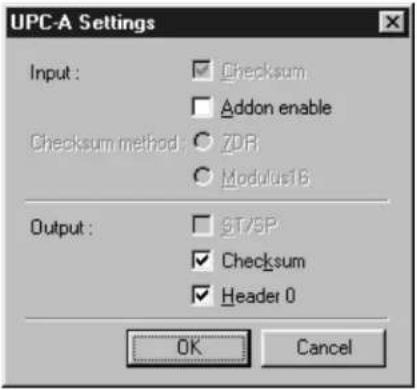
Input
[Checksum] (This item cannot be changed for UPC-A, UPC-E and JAN codes.)
Mark this check box to scan checksum codes.
[Addon enable] (UPC-A, JAN codes)
Mark this check box to scan addon codes.

MEMO
- Barcodes with addon codes cannot be detected at the same time as barcodes without addon codes. When scanning originals containing both barcodes with addon codes and bar bodes without addon codes, be sure to set the area to detect in the barcode area setting before you start scanning.
- The [Addon enable] setting for UPC-A codes is also reflected in the settings for UPC-E codes.
Checksum method (Codabar codes only)
[7DR]
Mark this check box when the checksum calculation on a Codabar barcode indicates scanning of a 7DR code.
[Modulus 16]
Mark this check box when the checksum calculation on a Codabar barcode indicates scanning of a Modulus 16 code.
[ST/SP] (Codabar, Code39 codes)
Click here to enable output of start/stop codes.
[Checksum] (This item cannot be changed for JAN codes.)
This item is enabled when [Checksum] at Input is enabled. Mark this check box to output the checksum code.
[Header] (UPC-A, UPC-E code)
Click here to enable output of the header on UPC codes.
◆ Barcodes per Page
Set the number of barcodes to be read per page (1 to 4).
![CANON imageFORMULA DR-5060F - [Modulus 16] - 1](/content/2026/08/1572354/images/ff0d6fe78c61846fbd043131899971e24fb507c08523f9ee0ec5a8fe45ed9152.jpg)
MEMO
When two or more barcodes are aligned horizontally, a recognition error may occur. Select only one type of barcode in the barcode area setting.
◆ Search Side
Select the side (Back, Front) of the original to scan barcodes.

MEMO
A parameter error will occur when you start scanning if you try to scan the front side in the Simplex mode with [Back] set at Search Side. Likewise, a parameter error will occur if you try to scan the back side in the Simplex mode with [Front] set at Search Side.
Area
Specify the barcode scanning area.
If you mark the [Maximum Area] check box, barcodes are scanned on the entire area of the page you specified. You can specify the barcode scanning area by canceling selection of the [Maximum Area] check box.

MEMO
- When scanning originals containing two or more barcodes and you want to detect only a specific type of barcode, set the area to detect in the barcode area setting.
- If you specify a size smaller than the document that is set at Page Size (See P. 23), barcodes outside the area of the specified page size will also be detected when the [Maximum Area] check box is marked at the Area setting.
Patch Code Settings
Make the settings for scanning patch codes (See P. 47) and function sheet patterns (See P. 49). These settings are enabled when the optional patch code/ function sheet detector is attached.

◆ Area
Specify the area in which patch codes and function sheet patterns are to be scanned.
[Maximum Area]
If you mark this check box, patch codes and function sheet patterns in the area shown below will be scanned in the original feed direction. If this check box is not marked, you can enter start and end points to specify a specific scan area within this area.

[X Offset Start]
Enter the scanning start point on the X-axis (horizontal direction) referenced to the left edge of the document entrance in the feed direction in millimeters (mm).
[X Offset End]
Enter the scanning end point on the X-axis in millimeters (mm).
[Y Offset Start]
Enter the scanning start point on the Y-axis (vertical direction) referenced to the leading edge of the original in the feed direction in millimeters (mm).
[Y Offset End]
Enter the scanning end point on the Y-axis in millimeters (mm).
![CANON imageFORMULA DR-5060F - [Y Offset End] - 1](/content/2026/08/1572354/images/861910eabcf9242694b391e10679073ce60787f4b125f9379737981a385fbea4.jpg)
MEMO
- Be sure to enter both [X Offset End] and [Y Offset End] when specifying the scan area. Otherwise a parameter error will occur.
- The orientation and position of function sheet patterns is determined as follows. Pay attention to this when specifying the scan area to prevent scan errors from occurring.
Paper center line

◆ Orientation
Specify the orientation of the patch code in the original.

[Horizontal]
Scans patch codes in the horizontal direction.
![CANON imageFORMULA DR-5060F - [Horizontal] - 1](/content/2026/08/1572354/images/2eb65695c2b6676474de902453e1feb1228dfb087e4c25f97664b0f3a59a4e8c.jpg)
[Vertical (90)]
Scan patch codes that are rotated 90 degrees to the right.
![CANON imageFORMULA DR-5060F - [Vertical (90)] - 1](/content/2026/08/1572354/images/50d77dace511e25e94e92927c7449df7e08a5bc391b524e40908fdd517da6342.jpg)
[Vertical (270)]
Scan patch codes that are rotated 90 degrees to the left.
![CANON imageFORMULA DR-5060F - [Vertical (270)] - 1](/content/2026/08/1572354/images/f95b6080a06896e63ccc65605cac2cf745a8c6b8f26b6965b025d9b1be59eb3b.jpg)
MEMO
When the orientation of patch codes is set inverted, FILE A patch code performs the same action as that of FILE B. Note, however, that if FILE B patch codes are inverted, FILE B is not detected as a patch code.
Chapter 4
Troubleshooting
This chapter describes the causes of trouble that may occur and how to remedy the trouble.
When An Error Message or Warning is Displayed.... 82
When The Scanned Image is Not Normal ... 85
When An Error Message or Warning is Displayed
Error messages may be displayed or warnings may be displayed on the statusbar if the document cannot be scanned properly or the scanner is about to run out of film. Check the error message or content of the warning, and remedy the error as follows.
◆ Error Messages
Message JAM occurred. Remove the paper.
Remedy A paper jam occurred on the scanner unit. Remove jammed paper. For more details, see the separate DR-5060F Instructions.
Message Cover is opened. Close the cover.
Remedy The upper unit or feed unit on the scanner unit is open. Close the upper unit or feed unit.
Message Scanner is not found. Check the cable.
Remedy 1 The computer cannot recognize the scanner. Make sure that the computer and scanner are correctly connected by a cable.
Remedy 2 This message may be displayed with the computer recognizing the scanner. In this case, a probable cause is that the SCSI card not compatible with the computer is installed. This error message is sometimes no longer output by turning asynchronous transfer in the scanner's user mode OFF. If this does not rectify the problem, contact the computer or SCSI card manufacturer.
Message Parameter is not valid. Change the parameters.
Remedy An invalid value was set in the scan conditions in the Scanner Settings dialog box. Change the setting to a valid value.
Message Scanner reset detected. Try again.
Remedy Follow the on-screen message to turn the power ON and OFF again.
Message No page was found. Set the paper and try again.
Remedy The document is not loaded on the scanner. Load the document, and try scanning again.
Message Scanner is busy. Please check if the scanning mode is Count Only Mode or Filmer Mode.
Remedy The scanner may currently be in the Count Only mode or Filmer Mode. Cancel the Count Only mode or Filmer Mode, and try scanning again. (See "Before You Start Scanning" P. 20)
Message Scanner is busy. Wait for a while and try again.
Remedy The scanner is currently processing other data, and cannot scan new documents. Try again later.
Message Verify count error occurred. Try again.
Remedy The number of document pages set in the verify scan (p.xx) does not match the actual number of scanned pages. When “U01” is displayed on the counter display, count the number of document pages again. When “U02” is displayed, make sure that all document pages have been scanned.
Message Parameter is not valid. Change the parameters again.
Remedy The scan condition setup is inappropriate. Change the setup, and try scanning again.
Message File access error occurred. Check write protect or disk full.
Remedy 1 The image file that you tried to save is write-protected. This file cannot be overwritten. Save the file under another name.
Remedy 2 There is not enough free space at the save destination. Either make more space at the save destination, or change the save destination.
Message File cannot be accessed. In use by other process.
Remedy The image file that you tried to open is in use by another application, and cannot be opened. Close the file in the other application.
Message File already exists, do you wish to over-write?
Remedy The file name that you are trying to save the scanned image under already exists. To overwrite the existing file, click [Yes]. To cancel overwriting, click [No] and save under a different name.
Message File name is too long. File name must be to 59 excluding extension.
Remedy The file name you are attempting to save to is too long. Limit file names to 59 characters excluding the file extension.
Message Photography was discontinued. (Error code "F-Err" or "F08" is displayed.)
Remedy when error code "F-Err" is displayed The release notch on the camera unit is not locked. Open the cover of the camera unit in a dark room, and check the film. Remedy when error code "F08" is displayed Repeat scanning from the beginning.
MessageRan out of film. (Error code "F-End" is displayed.)
Remedy The scanner has run out of film. Remove the camera unit, and replace with new film. When the scanner runs out of film midway during scanning, images are photographed up to the end of the film. When the film is replaced, the images photographed towards the end of the film are exposed and can no longer be used. After you have replaced the film, repeat scanning from the beginning.
◆ Warning (statusbar)
Warning Ran out of film.
Remedy The filmer has run out of film. Replace with new film.

MEMO
When the scanner detects that the scanner is about to run out of film, a warning is displayed on the status bar, the leftmost LED on the film remaining indicator blinks, and the buzzer sounds.
When The Scanned Image is Not Normal
If there is a problem in the scanned image (image is not sharp or stripes appear in the image), one of the following may be a probable cause. Check as follows and take the appropriate remedy.
- The scanning glasses and rollers on the scanner are dirty.
If the scanning glasses and rollers on the scanner are dirty, that dirt will appear on the scanned image.

Clean the scanning glasses and rollers. For details, see Chapter 5 "Daily Cleaning" in the separate DR-5060F Instructions.
- The scan conditions are inappropriate.
When the scan condition setup is inappropriate, the scanned image will not be sharp or will appear darkish.

Check the brightness, contrast and other settings.
If the scanned image is foggy or the document is not scanned at all, a probable cause is that brightness is set too high.
If the scanned image appears darkish, a probable cause is that the brightness is set too low.
- Scanning Utility 5060 does not run correctly.
If the document cannot be scanned correctly even if the scan conditions are adjusted, a probable cause is that Scanning Utility 5060 is not running correctly.

Re-install Scanning Utility 5060. (See "Installing Scanning Utility 5060" P.7)
- Other Causes
If the above remedies do not rectify the problem, contact a Canon service department.
Canon
CANON ELECTRONICS INC.
1248, SHIMOKAGEMORI, CHICHIBU-SHI, SAITAMA 369-1892, JAPAN
CANON U.S.A. INC.
ONE CANON PLAZA, LAKE SUCCESS, N.Y.11042, U.S.A.
CANON CANADA INC.
6390 DIXIE ROAD, MISSISSAUGA, ONTARIO L5T 1P7, CANADA
CANONEUROPAN.V.
BOVENKERKERWEG 59-61, 1185XB AMSTELVEEN, THE NETHERLANDS
CANON LATIN AMERICA, INC.
6505, BLUE LAGOON DRIVE, SUITE 325 MIAMI, FLORIDA 33126 U.S.A.
CANON AUSTRALIA PTY.LTD.
1 THOMAS HOLT DRIVE, NORTH RYDE, SYDNEY. N.S.W. 2113. AUSTRALIA
CANON SINGAPORE PTE. LTD.
79 ANSON ROAD #09-01/06, SINGAPORE 079906
- SCANNING UTILITY
- INSTRUCTIONS
- NOTICE
- TRADEMARKS AND REGISTERED TRADEMARKS
- INTRODUCTION
- CONVENTIONS
- WARNING
- CAUTION
- NOTE
- MEMO
- CONTENTS
- CHAPTER 1 INSTALLATION AND BASIC OPERATION OF SCANNING UTILITY
- CHAPTER 2 SCANNING A DOCUMENT
- CHAPTER 3 SETTING DETAILED SCAN CONDITIONS
- SETTING SCAN CONDITIONS
- DETAILED SETTINGS
- CHAPTER 4 TROUBLESHOOTING
- WHEN AN ERROR MESSAGE OR WARNING IS DISPLAYED
- WHEN THE SCANNED IMAGE IS NOT NORMAL
- INDEX
- CHAPTER
- INSTALLATION AND BASIC OPERATION OF SCANNING UTILITY
- BEFORE YOU BEGIN
- INSTALLING SCANNING UTILITY
- CLICK [START] AND SELECT RUN
- AT OPEN, TYPE "D:\SU5060\SETUP.EXE" AND CLICK OK
- SELECT ENGLISH (UNITED STATES) AND CLICK OK
- CLICK [NEXT]
- UNINSTALLING SCANNING UTILITY
- BASIC SCANNING UTILITY 5060 OPERATIONS
- STARTING UP SCANNING UTILITY
- TURN THE SCANNER ON
- TURN THE COMPUTER ON
- CLICK [START] AND CHOOSE [PROGRAM] - [SCANNING UTILITY 5060]
- EXPLANATION OF THE SCANNING UTILITY 5060 SCREEN
- ◆ MENU BAR
- FILE MENU
- OPEN
- SAVE PAGE AS
- PRINT FORMAT
- PRINTER SETTING
- SCANNER SETTING
- SCAN PAGE
- SCAN BATCH TO FILE
- SCAN BATCH TO PRINTER
- CANCEL SCAN
- SELECT SCANNER
- FILM ADDRESS FILE NAME
- EXIT
- VIEW MENU
- TOOLBAR
- STATUSBAR
- ZOOM IN
- ZOOM OUT
- BEST FIT
- FIT TO WIDTH
- ROTATE LEFT
- ROTATE RIGHT
- VIEW GRAY
- PAGE MENU
- NEXT PAGE
- PREV. PAGE
- GOTO PAGE
- HELP MENU
- ABOUT
- ◆ TOOLBAR
- ◆ MOUSE POINTER
- ◆ SCROLLING IMAGES
- ◆ STATUSBAR
- EXITING SCANNING UTILITY
- SELECT [QUIT APPLICATION] FROM THE FILE MENU ON THE MENU BAR
- SCANNING A DOCUMENT
- ◆ ABOUT SCANNER OPERATION MODES
- ◆ ABOUT FEEDING OPTIONS
- ◆ ABOUT BACKING UP TO MICROFILM
- ◆ ABOUT SEPARATORS
- SETTING BASIC SCAN CONDITIONS
- SCANNER SETTINGS
- MODE
- [BLACK AND WHITE]
- [BLACK AND WHITE ED]
- [GRAYSCALE - 4 (16, 256) LEVEL]
- RESOLUTION
- PAGE SIZE
- BRIGHTNESS
- CONTRAST
- [DETAIL...] BUTTON
- [OK] BUTTON
- [CANCEL] BUTTON
- SCANNING ORIGINALS AND SAVING SCANNED IMAGES
- SET [SEPARATOR]
- NONE
- SCAN, CONTINUE SCANNING
- SET [2LEVELBLIP]. (SEE "SEPARATION" P. 65)
- LOAD THE ORIGINAL. (WHEN FEEDING OPTION IS SET TO [REMOTE])
- CLICK [START SCANNING]
- SCANNING IS PAUSED WHEN THE DOCUMENT TRAY RUNS OUT OF PAGES TO SCAN
- TO SCAN ANOTHER ORIGINAL, RETURN TO STEP 5 AND CONTINUE SCANNING
- TO END SCAN BATCH TO FILE, DISPLAY THE CONTINUE SCANNING DIALOG BOX, AND CLICK [STOP SCANNING]
- CHECK THE SCANNED IMAGE
- TO PRINT THE SCANNED IMAGE, SELECT [PRINT] FROM THE FILE MENU, AND PRINT THE SCANNED IMAGE. (SEE “PRINTING OPENED IMAGES” P. 40)
- EITHER SELECT [FILM ADDRESS FILE NAME] FROM THE FILE MENU, OR CLICK IN THE TOOLBAR
- DETERMINE THE FOLDER TO SAVE THE FILE TO AND FILE TYPE, AND CLICK [OK]. (SEE "SAVING SCANNED IMAGES" P. 35)
- SET "FEEDER
- LOAD THE DOCUMENT ON THE DOCUMENT TRAY. (WHEN FEEDING OPTION IS SET TO [REMOTE])
- TO PRINT SCANNED IMAGES, SELECT [PRINT] IN THE FILE MENU, AND PRINT THE SCANNED IMAGE. (SEE “PRINTING OPENED IMAGES” P. 40)
- SAVING SCANNED IMAGES
- RESTRICTIONS IN THE NUMBER OF CHARACTERS IN FILE NAMES
- ABOUT SAVE FORMATS
- SAVING SCANNED IMAGES TO FILE (SCAN PAGE)
- EITHER SELECT [SAVE PAGE AS...] FROM THE FILE MENU, OR CLICK ON THE TOOLBAR
- DECIDE ON THE NAME OF THE FILE TO SAVE THE IMAGE UNDER, FILE TYPE (FILE FORMAT) AND WHERE TO SAVE THE FILE, AND CLICK SAVE
- SAVING MULTIPLE PAGE ORIGINALS
- WHEN IMAGE ARE SAVED IN TIFF FORMAT (MULTI-PAGE TIFF)
- WHEN IMAGE ARE SAVED IN BMP, JBIG OR JPEG FORMAT
- WHEN IMAGES ARE SAVED IN TIFF FORMAT (MULTI-PAGE TIFF)
- WHEN IMAGES ARE SAVED IN BMP, JBIG OR JPEG FORMAT
- SELECT [OPEN] FROM THE FILE MENU, OR CLICK ON THE TOOLBAR
- SELECT A FILE AND CLICK OK
- SCANNING AND PRINTING DOCUMENTS
- PRINTING OPENED IMAGES
- CHECK [PRINTER SETTING...] IN THE FILE MENU
- SELECT [PRINT FORMAT] IN THE FILE MENU
- ACTUAL SIZE
- FIT TO PAPER
- ACTUAL PIXEL
- EITHER SELECT [PRINT] FROM THE FILE MENU, OR CLICK 📄 ON THE TOOLBAR
- CHECK THE PRINT SETTINGS, AND CLICK THE [OK] BUTTON
- SELECT [SCAN BATCH TO PRINTER] FROM THE FILE MENU
- SET [FEEDER] (DUPLEX OR SIMPLEX)
- TO PRINT ANOTHER ORIGINAL, RETURN TO STEP 5 AND CONTINUE SCANNING
- TO END SCAN BATCH TO PRINTER, DISPLAY THE CONTINUE SCANNING DIALOG BOX, AND CLICK [STOP SCANNING]
- CHECK THE PRINTED IMAGE
- VERIFY SCAN
- PRESS THE COUNT ONLY KEY ON THE OPERATION PANEL
- PLACE THE ORIGINAL ON THE DOCUMENT TRAY, AND PRESS THE START KEY
- WHEN THE NUMBER OF ORIGINAL PAGES HAS FINISHED BEING COUNTED, PRESS THE COUNT ONLY KEY TO CANCEL THE COUNT ONLY MODE
- OPEN THE FEEDER OPTIONS PANEL, AND MARK THE [VERIFY ENABLE] CHECK BOX. (SEE "FEEDER OPTION" P. 63)
- SET THE FEEDER OPTION TO ANY MODE OTHER THAN [MANUAL], AND PERFORM [SCAN BATCH TO FILE]
- ◆ VERIFY ERRORS
- WHEN THE NUMBER OF ORIGINAL PAGES TO BE ACTUALLY SCANNED IS MORE THAN THE NUMBER DISPLAYED ON THE COUNTER
- WHEN THE NUMBER OF ACTUALLY SCANNED ORIGINAL PAGES IS LESS THAN THE NUMBER DISPLAYED ON THE COUNTER
- USING PATCH CODES/FUNCTION SHEETS
- ◆ AUTOMATIC FILE SEPARATION BY PATCH CODE SHEETS
- FILE A
- FILE B
- [SEPARATOR] SETTING
- [2LEVELBLIP] SETTING
- CLICK [START SCANNING] TO START SCANNING
- ◆ CHANGING SCAN MODE BY FUNCTION SHEETS
- OPEN THE OPTION DEVICES PANEL IN THE DETAILED SETTINGS DIALOG BOX, AND MAKE THE FUNCTION SHEET SETTINGS
- PERFORM A SCAN
- SETTING DETAILED SCAN
- CONDITIONS
- SETTING UP THE SCANNER
- PRESS THE [DETAILED SETTINGS] BUTTON TO OPEN THE DETAILED SETTINGS DIALOG BOX. (SEE "DETAILED SETTINGS" P. 54)
- PRESS THE [OK] BUTTON TO CLOSE THE DIALOG BOX
- IMAGE CONTROLS
- MARGIN SCANNING
- [BACKSIDE SCANNING]
- [BACKSIDE BRIGHTNESS]
- FILTER SETTINGS
- [AE]
- [EDGE EMPHASIS]
- [ERASE BLACK DOT]
- [ERASE WHITE DOT]
- [ERASE NOTCH]
- [COMPLIMENT THIN LINE]
- [USE USER GAMMA]
- [GAMMA] BUTTON
- [DEFAULT] BUTTON
- OPTION DEVICES
- FUNCTION SHEETS
- IMPRINTER/ENDORSER
- [IMPRINTER]
- [ADDON]
- [IMPRINTER/ADDON] BUTTON
- [ENDORSER]
- DECODER
- [BARCODE]
- [BARCODE] BUTTON
- FILM ADDRESS LOG FILE
- [RECORD LOG]
- [LOG...] BUTTON
- ABOUT LOG FILES
- DROPOUT
- [INHIBIT SECTION]
- FEEDER OPTION
- MANUAL THICKNESS ADJUSTMENT
- DOUBLE FEED DETECTION
- [DETECT BY THICKNESS]
- [DETECT BY LENGTH]
- FEEDING OPTION
- [REMOTE]
- [SEMI AUTO]
- [AUTO]
- [MANUAL]
- SEPARATION
- [AUTO NEW FILE]
- [2LEVELBLIP]
- [PATCH CODE]
- FUNCTION KEY SETTINGS
- SELECT KEY
- FROM THE PULLDOWN MENU, SELECT THE KEY (F1 TO F6) TO REGISTER A FUNCTION TO
- SELECT THE FUNCTION TO BE ASSIGNED TO THE SELECTED FUNCTION KEY
- PRESS THE [SET] BUTTON
- ASSIGN SINGLE FUNCTION
- [MANUAL THICKNESS ADJUSTMENT]
- [FIXED THICKNESS MODE]
- [DOUBLE FEED DETECTION]
- [DISPLAY ODOMETER]
- [DISPLAY FILE ADDRESS]
- [DISPLAY PAGE ADDRESS]
- [FILM DENSITY]
- [RESTORE SETTINGS]
- [NONE]
- SETTING THE GAMMA CURVE
- ◆ PREPARING GAMMA CURVE DATA
- EXAMPLE
- GAMMA CURVE DATA
- GAMMA CURVE DATA (INVERTED)
- IMPRINTER/ADDON SETTINGS
- TEXT
- COUNTER
- TIME
- DATE
- ARROW
- COUNTER 1, COUNTER
- INCREMENT TRIGGER
- [SEPARATOR]
- [PAGE]
- [NEVER]
- INCREMENT
- RESET TRIGGER
- START VALUE
- PRINT SETTINGS
- HORIZONTAL OFFSET (MM)
- VERTICAL OFFSET (MM)
- PAGES
- ADDON TYPE
- [BLACK ON WHITE]
- [WHITE ON BLACK]
- [BLACK ON IMAGE]
- ORIENTATION
- [90 DEGREES]
- [180 DEGREES]
- [270 DEGREES]
- SMALL FONT
- RIGHT TO LEFT
- BARCODE SETTINGS
- ◆ BARCODE TYPE
- ◆ BARCODE DETAILED SETTINGS
- INPUT
- CHECKSUM METHOD (CODABAR CODES ONLY)
- [7DR]
- [MODULUS 16]
- PATCH CODE SETTINGS
- ◆ AREA
- [MAXIMUM AREA]
- [X OFFSET START]
- [X OFFSET END]
- [Y OFFSET START]
- [Y OFFSET END]
- ◆ ORIENTATION
- [HORIZONTAL]
- [VERTICAL (90)]
- [VERTICAL (270)]
- TROUBLESHOOTING
- ◆ ERROR MESSAGES
- MESSAGE JAM OCCURRED. REMOVE THE PAPER
- MESSAGE COVER IS OPENED. CLOSE THE COVER
- MESSAGE SCANNER IS NOT FOUND. CHECK THE CABLE
- MESSAGE PARAMETER IS NOT VALID. CHANGE THE PARAMETERS
- MESSAGE SCANNER RESET DETECTED. TRY AGAIN
- MESSAGE NO PAGE WAS FOUND. SET THE PAPER AND TRY AGAIN
- MESSAGE SCANNER IS BUSY. PLEASE CHECK IF THE SCANNING MODE IS COUNT ONLY MODE OR FILMER MODE
- MESSAGE SCANNER IS BUSY. WAIT FOR A WHILE AND TRY AGAIN
- MESSAGE VERIFY COUNT ERROR OCCURRED. TRY AGAIN
- MESSAGE PARAMETER IS NOT VALID. CHANGE THE PARAMETERS AGAIN
- MESSAGE FILE ACCESS ERROR OCCURRED. CHECK WRITE PROTECT OR DISK FULL
- MESSAGE FILE CANNOT BE ACCESSED. IN USE BY OTHER PROCESS
- MESSAGE FILE ALREADY EXISTS, DO YOU WISH TO OVER-WRITE
- MESSAGE FILE NAME IS TOO LONG. FILE NAME MUST BE TO 59 EXCLUDING EXTENSION
- MESSAGE PHOTOGRAPHY WAS DISCONTINUED. (ERROR CODE "F-ERR" OR "F08" IS DISPLAYED.)
- MESSAGERAN OUT OF FILM. (ERROR CODE "F-END" IS DISPLAYED.)
- ◆ WARNING (STATUSBAR)
- WARNING RAN OUT OF FILM
- CANON
Brand : CANON
Model : imageFORMULA DR-5060F
Category : Scanner