
Clié PEG-NX60 - Digital Personal Assistant SONY - Free user manual and instructions
Find the device manual for free Clié PEG-NX60 SONY in PDF.



| Product Type | Personal Digital Assistant (PDA) |
| Brand | Sony |
| Model | Clié PEG-NX60 |
| Operating System | Palm OS 5.0 |
| Processor | 200 MHz ARM-based processor |
| Display | 3.2-inch TFT color display with 320x480 pixel resolution |
| Memory | 16 MB RAM, 32 MB ROM |
| Expansion Slot | Memory Stick card slot for additional storage |
| Connectivity | USB cradle, Infrared (IrDA) port |
| Battery | Internal rechargeable lithium-ion polymer battery |
| Dimensions (W x H x D) | Approximately 120 x 72 x 18 mm |
| Weight | Approximately 170 g (including battery) |
| Keyboard | Built-in QWERTY keyboard for easy text input |
| Audio | Built-in speaker, microphone, and stereo headphone jack |
| Pre-installed Software | PIM suite, media player, document viewer, and productivity applications |
| Power Adapter | AC adapter included for charging and cradle power |
| Maintenance and Cleaning | Wipe the exterior with a soft, dry cloth; avoid water and abrasive cleaners |
| Safety | Keep away from moisture, extreme heat, and magnetic fields |
| Spare Parts and Repairability | Replacement parts and service available through Sony authorized service centers |
| General Information | Includes user manual, warranty information, and software installation CD |
Frequently Asked Questions - Clié PEG-NX60 SONY
User questions about Clié PEG-NX60 SONY
0 question about this device. Answer the ones you know or ask your own.
Ask a new question about this device
Download the instructions for your Digital Personal Assistant in PDF format for free! Find your manual Clié PEG-NX60 - SONY and take your electronic device back in hand. On this page are published all the documents necessary for the use of your device. Clié PEG-NX60 by SONY.
USER MANUAL Clié PEG-NX60 SONY
Sony CLIÉ™ Handheld basic operations
Entering data in your Sony CLIÉ™ Handheld
Exchanging and updating data using a HotSync® operation
Customizing your Sony CLIÉ Handheld (Preferences)
Exchanging and updating data using a HotSync® operation (Other HotSync® operations)
Using "Memory Stick®" media
Beaming
Using the Calculator and finding records
Backing up your Sony CLIÉ™ Handheld data
Protecting your data with a password
Enhancing features with add-on applications
Using data with another Sony CLIÉ™ Handheld
Introduction
This “Handbook” explains the basic operations and useful features of your CLIÉ TM handheld.
When using CLIÉ handheld for the first time
The basic features and operations are explained in detail (pages 9-65).
Sony CLIÉ™ Handheld basic operations
Explains the basic operations of your CLIE handheld and how to use the applications.
Entering data in your Sony CLIÉ™ Handheld
Explains how to enter data in your CLIÉ handheld.
Exchanging and updating data using a HotSync ® operation
Explains how to use your CLIÈ handheld with your computer.
CLIÉ handheld advanced operations
The convenient features and how to make full use of your CLIÉ handheld are explained in detail (pages 66-172).
Customizing your Sony CLIÉ Handheld (Preferences)
Explains how to customize your CLIE handheld in a way to suit you.
Exchanging and updating data using a HotSync ® operation (Other HotSync ® operations).
Explains the methods of HotSync ® operations.
Using "Memory Stick®" media
Explains how to use data stored on “Memory Stick” media.
Beaming
Explains how to exchange data with another CLIÉ handheld by beaming.
Using the Calculator and finding records
Explains the calculator and how to find records.
Backing up your Sony CLIÉ™ Handheld data
Explains how to back up the data of your CLIÉ handheld.
Protecting your data with a password
Explains how to assign a password to restrict the use of your CLIE handheld or to protect your data.
Enhancing features with add-on applications
Explains how to install additional applications in your CLIÉ handheld.
Using data with another Sony CLIÉ™ Handheld
Explains how to transfer data from your CLIÈ handheld to another CLIÈ handheld.
Refer to the following with this manual together.
Read This First (Operating Instructions)
Please read this manual at the beginning.
The manual explains about what you need to prepare prior to operating your CLIÉ handheld, basic operations, or supplied applications in your CLIÉ handheld.
CLIÉ Application Manual (HTML format: Start up on a computer)
The manual explains about how to use the supplied applications in detail. For details on using the manual, refer to “Using CLIÉ Application Manual” in “Read This First (Operating Instructions).”
Troubleshooting Q&A
The manual helps in solving problems that you may face while using your CLIÉ handheld.
Note
Some of the illustrations in this manual (Handbook) may not be consistent with your Sony CLIÉ handheld.
For details on your CLIÉ handheld, refer to “Read This First (Operating Instructions).”
Table of Contents
Sony CLIÉ™ Handheld basic operations
Basic operations.... 10
Using the stylus 10
Using the Jog Dial™ navigator 12
Starting an application 14
Starting an application in the Application Launcher screen ("CLIE Launcher") 14
Quitting an application 15
Using "CLIE Launcher" 16
Locating the components 16
CLIE Launcher group 17
Using Favorite Applications (shortcuts). 21
Application manager icon 23
Displaying information about applications 24
Menu List 25
Using the Palm OS ® standard screen 27
Switching to the Palm OS standard screen. 27
Starting an application 29
Changing the display style of the Palm OS standard screen ..... 33
Displaying application by category. 35
Changing fonts 37
Common menus 38
Continued on next page
● ● ● ● ● ● ● ● ● ● ● ● ● ● ●
Entering data in your Sony CLIÉ™ Handheld
Entering data in your Sony CLIÉ™ Handheld 41
Practicing entering data using the on-screen keyboard. . . . . . . 42
Entering data 42
Using Graffiti ® writing to enter data 45
What is Graffiti writing? 45
Entering characters with Graffiti 53
Using Navigation stroke and shortcuts. 55
Exchanging and updating data using a HotSync® operation
What is a HotSync ® operation? 58
Performing a HotSync ® operation 60
Performing a HotSync ® operation with the cradle (Local HotSync ® ) 60
Using the Palm™ Desktop for CLIÉ software 62
Starting the Palm™ Desktop for CLIÉ software 62
Locating the Palm™ Desktop for CLIÉ software components ..... 63
Basic operations of the Palm™ Desktop for CLIÉ software ..... 64
Continued on next page
Customizing your Sony CLIÉ Handheld (Preferences)
What you can do with
Preferences 67
Adding/Changing the preference for the modem 69
Changing the Network
preferences 71
Selecting a service template . . . 71
Entering a user name ..... 72
Entering a password ..... 72
Selecting a connection ..... 73
Adding telephone settings .... 74
Adding detailed information to a
service template 75
Creating additional service
templates 77
Creating log in scripts. . . . . . . 78
Using the Network preferences
menus 81
Assigning applications to application
buttons 82
Customizing the full-screen pen stroke
activities. 83
Assigning applications to HotSync
buttons 84
Creating Graffiti® ShortCuts.....85
Setting the display format of the time,
date, and numbers ..... 86
Selecting a regional default....86
Customizing your own settings for
each unit 87
Setting the Date & Time
preferences 88
Setting the date 88
Setting the time 89
Setting the time zone and daylight
saving time. 90
Setting the automatic power-off
time 91
Setting sounds. 92
Turning the Alarm LED on or off . . . 93
Turning the Beam Receive feature on or
off....94
Adjusting the Digitizer.....95
Exchanging and updating data using a HotSync® operation (Other HotSync® operations)
Customizing HotSync ® application
settings (Conduit) .....97
Synchronizing with external data
(File Link). 99
Customizing how to start HotSync®
Manager and the HotSync ® setup
options....100
Performing an IR HotSync®
operation ....101
Performing a HotSync ® operation via a
modem....104
Performing a HotSync ® operation via a
network 110
Performing a HotSync ® operation via
Continued on next page
● ● ● ● ● ● ● ● ● ● ● ● ● ● ● ● ●
Using "Memory Stick®" media
Using "Memory Stick®" media...119
What is "Memory Stick" media? 119
Inserting and removing a "Memory Stick" media..... 120
Protecting the data in "Memory Stick" media..... 122
Starting an application in "Memory Stick" media..... 123
Viewing information of a "Memory Stick" media (Card Info) ..... 124
Assigning a name to a "Memory Stick" media.....125
Formatting "Memory Stick" media....126
Exchanging data via "Memory Stick" media. 128
Starting CLIE Files ..... 128
Copying your CLIÉ handheld data to a "Memory Stick" media .... 130
Copying data in "Memory Stick" media to your CLIÉ handheld .... 133
Deleting data in "Memory Stick" media....135
CLIE Files menus ..... 136
Exchanging data without using the CLIE Files application. . . . . . . 137
Notes on starting applications from a "Memory Stick" media .... 138
Beaming
Beaming between your Sony CLIÉ
Handheld and another Palm OS ®
PDA. 140
What you can do with beaming .....140
Beaming information .....141
Tips on beaming information .....142
Using the Calculator and finding records
Using the Calculator (Calc) .....144
Calculating with the Calculator .....144
The functions of the Calculator buttons....145
Using the Calculator menus . . .146
Finding records .....147
Using the Find option .....147
Backing up your Sony CLIÉ™ Handheld data
Backing up your Sony CLIÉ™ Handheld data .....150
Backing up data to your computer through a HotSync®
operation....150
Backing up data to a "Memory Stick" media using the Memory
Stick Backup application .....151
Continued on next page
● ● ● ● ● ● ● ● ● ● ● ● ● ● ● ● ●
Protecting your data with a password
Entering personal information . . . 155
Locking your CLIÉ handheld with a
password (Data protection)..... 157
Turn off your CLIÉ handheld after
locking 157
Setting your CLIÉ handheld to be
locked automatically ..... 159
Protecting data. 160
Assigning a password ..... 160
Changing or deleting a
password 161
Hiding or masking private
data 162
Enhancing features with add-on applications
Enhancing features with add-on
applications 164
Installing 165
Installing from your
computer 165
Installing applications in a
"Memory Stick" media.....167
Installing from the Internet . . . 167
Deleting the installed add-on
applications 168
Using data with another Sony CLIÉ™ Handheld
Using data with another Sony CLIÉ™
Handheld 170
Transferring data using the Palm™
Desktop for CLIÉ software . . . .170
INDEX....173
Sony CLIÉ™ Handheld basic operations
This chapter explains the basic operations of your CLIÉ handheld such as using the stylus, using the Jog Dial™ navigator, locating the components, and how to start the applications.
Menus that are common to the applications, and how to select the font of characters displayed on the screen are also explained.
Basic operations ..... 10
Starting an application.... 14
Using "CLIE Launcher" 16
Using the Palm OS ® standard screen .....27
Changing fonts 37
Common menus 38
Operating using the stylus and Jog Dial TM navigator.
Using the stylus
What is a stylus?
A stylus is a pen for operating your CLIÉ handheld by directly touching the screen.

Tip
Where is the stylus located?
The stylus is stored in your CLIÉ handheld.
The exact location of the storage varies depending on the model.
For details, refer to “Sony CLIÉ™ Handheld components” of “Read This First (Operating Instructions).”
Note
To prevent losing the stylus, always put it back in its holder on your CLIÉ handheld after use.
Continued on next page
You can operate your CLIÉ handheld using the stylus in the following ways.
Tapping
Lightly pressing the desired item on the screen with the stylus is called “Tapping.” When entering data with the on-screen keyboard or starting an application, “tap” the desired button or icon with the stylus.

Dragging
Touching the desired item on the screen with the stylus and moving it along the screen surface is called “Dragging.” Just as you “drag” the mouse on your computer, use the stylus to “drag” the scroll bar to scroll the screen or “drag” characters to highlight them.

Using the Jog Dial™ navigator
What is the Jog Dial™ navigator?
Your CLIÉ handheld is equipped with a Jog Dial™ navigator (Jog Dial™ navigator is a dial located at the left side of your CLIÉ handheld), which enables you to perform major operations one-handed without the stylus.

Rotating the Jog Dial™ navigator
Rotate the Jog Dial TM navigator to select various items or applications to start.

Continued on next page
Pressing the Jog Dial™ navigator
Press the Jog Dial TM navigator to determine the item selected or to run the selected application.

Note
The operations you can perform by using the Jog Dial TM navigator vary depending on the application.
For details on the operations of each application, refer to the “CLIÉ Application Manual” on your computer.
Tip
To rotate while holding down the Jog Dial™ navigator
Some applications support operations executed by pressing and rotating the Jog Dial TM navigator.
Starting an application
Software that operates on your CLIÉ handheld to execute a task, such as Date Book, To Do List, or e-mail software, is called “application.” You need to start an application when operating your CLIÉ handheld.
Note
For details on starting applications in “Memory Stick” media, refer to page 123.
There may be some system limitations to start applications in “Memory Stick” media in the Application Launcher screen.
Tip
What is the CLIE Launcher screen?
The screen displayed by turning on power and tapping the Home icon is called the Application Launcher screen.

The CLIÉ specific screen “CLIE Launcher” is displayed by the default setting.
Starting an application in the Application Launcher screen ("CLIE Launcher")
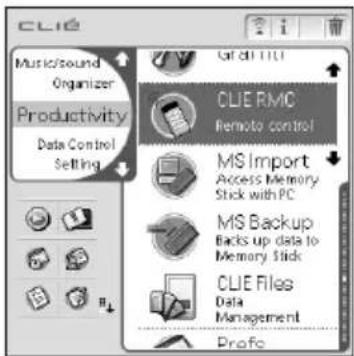
1 Tap the Home Icon to display the CLIE Launcher screen.
Continued on next page
2 Rotate the Jog Dial™ navigator to select an application icon and press the Jog Dial™ navigator to start the application.
Tip
You can also tap an application icon in the CLIE Launcher screen to start the application.
Quitting an application
Only one application can be opened and active at a time on your CLIÉ handheld.
The operation to save data is not required when you quit an application.
All work done while working in an application is automatically saved when the application is closed. When you restart the application, the last-saved data will be displayed automatically.
Note
For some applications, you need to operate Finish or Save.
For details, refer to “CLIÉ Application Manual” on your computer.
Tip
You can return to the CLIE Launcher screen by keeping pressing the BACK button.
Locating the components
Tip
Tap the Home 📂con to display the CLIE Launcher screen if it is not displayed.

1 CLIE Launcher group list (Page 17)
Displays the list of the CLIE Launcher groups.
2 Favorite Applications (shortcuts) (Page 21)
You can create shortcuts to applications used frequently.
3 Application manager icon (Page 23)
You can manage your applications. Functions may be added when you install some applications.
4 Application icon list
Displays application names and icons.
CLIE Launcher group
You can sort applications by grouping them.
Note
Applications in a “Memory Stick” media cannot be grouped.
Editing groups
1 Tap the Home icon.
2 Tap the Menu Icon.
3 Select Edit CLIE Launcher Group from the CLIE Launcher menu.
The CLIE Launcher Group setting screen is displayed.

Note
CLIE Launcher groups differ from Palm OS ® standard screen categories.
Continued on next page
4 Select a group to edit and tap Edit.
The CLIE Launcher Group screen is displayed.

Name: You can rename group names.
Ordering applications listed: Select the application and tap Up or Down to order applications in the CLIE Launcher screen.
Adding applications: Tap Add to display the list and select an application to add.
Removing applications: Select an application to remove and tap Remove. Applications removed will be listed in the Unfiled group.
Note
The Unfiled group cannot be renamed.
5 Tap Done.
The CLIE Launcher Group setting screen is displayed.
Continued on next page
6 Tap Done.
The CLIE Launcher screen is displayed.
Tip
You can add an application to a group by dragging an icon and dropping it in the group on the CLIE Launcher screen when the Use Drag&Drop check box on the CLIE Launcher Preferences screen (Page 26) is on.
Ordering listed groups
1 Select a group on the CLIE Launcher Group setting screen.
2 Tap Up or Down.
The order of listed groups in the CLIE Launcher screen is changed.
Creating a new group
1 Tap New on the CLIE Launcher Group setting screen.
2 Enter a new group name and then tap OK.

Note
Groups including no application are not listed in the main screen.
Deleting a group
1 Select a group name you want to delete and tap Delete on the CLIE Launcher Group setting screen.
If the group to be deleted includes an application, the Delete CLIE Launcher Group dialog box will be displayed. In the dialog box, tap Yes to delete the group. The applications included in the deleted group will be listed in the Unfiled group.
Note
You cannot delete the Unfiled group.
Selecting a group
1 Tap the Home icon.
2 Press the BACK button.
You can now perform operations on the CLIE Launcher Group List screen with the Jog Dial™ navigator.
3 Rotate the Jog Dial™ navigator to select a group.
The application icon at the top of the list in the group will be highlighted.
If you press the Jog Dial TM navigator, the application icon list is displayed.
Tips
- The applications saved in the “Memory Stick” media will be listed in the ☐ Card group.
- You can select the next group by tapping the Home icon. You can also tap the / icon or group names on the screen to select a group.
Using Favorite Applications (shortcuts)
You can create a Favorite Application (shortcut) for frequently used applications.
Note
You cannot create a Favorite Application (shortcut) for an application in a “Memory Stick” media.
Creating a Favorite Application (shortcut)
1 Tap the Home icon.
2 Tap the Menu Icon.
3 Select Edit Favorite Applications from the CLIE Launcher menu.
The Favorite Application screen is displayed.

Tip
On the CLIE Launcher screen, you can also tap the empty Favorite Application (shortcut) area to display the Favorite Application screen.
Continued on next page
4 Tap a Favorite Application (shortcut) number that you want to assign to an application.
The list of applications will be displayed. Tap the application name to create a Favorite Application (shortcut).

5 Tap Done.
Note
When the application added on the Favorite Application (shortcut) is deleted, the Favorite Application (shortcut) will be deleted from the list at the same time.
Tip
You can also create a Favorite Application (shortcut) for an application by dragging an icon and dropping it in the empty shortcut area when the Use Drag&Drop check box on the CLIE Launcher
Preferences screen (Page 26) is on.
To delete a Favorite Application (shortcut)
In step 4, tap a Favorite Application (shortcut) number that you want to delete and select (None) at the top of the list.
Tip
You can also delete a Favorite Application (shortcut) for an application by dragging an icon and dropping it in in the upper right of the screen (Page 168) when the Use Drag&Drop check box on the CLIE Launcher Preferences screen (Page 26) is on.
Application manager icon
You can manage your applications with the application manager icons.
The followings are featured as standard functions.

Transferring applications
Displays the Beam screen (Page 140)

Displaying the application information (Page 24)

Deleting applications (Page 168)
Tips
- Functions may be added when you install some applications.
- You can also manage an application by dragging an icon and dropping it in the each application manager icon when the Use Drag&Drop check box on the CLIE Launcher Preferences screen (Page 26) is on.
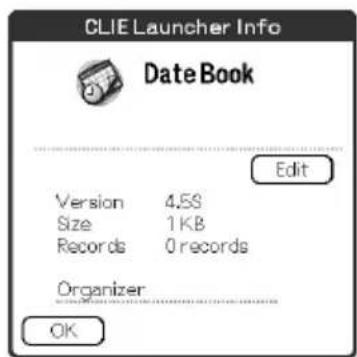
Displaying information about applications
1 Tap the Home icon.
2 Tap i.
The list of applications is displayed.
3 Tap an application name whose information you want to display.
The CLIE Launcher Info screen is displayed.
Tap OK to close the screen.
Tip
You can also display information about an application by dragging an icon and dropping it in at the upper right of the CLIE Launcher screen when the Use Drag&Drop check box on the CLIE Launcher Preferences screen (Page 26) is on.
Editing Description
Tap Edit to display the Edit Description screen and enter the new description.
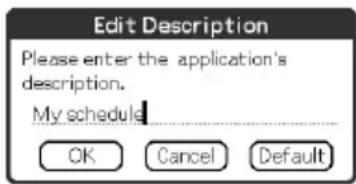
OK button: Change to the description entered.
Cancel button: Cancel the description entered.
Default button: Restore the default description.
Menu List
The following list describes the functions of each menu in the CLIE Launcher screen.
Menus in the CLIE Launcher screen
| Delete... Delete an application. (Page 168) | |
| Beam... Send an application to another Palm OS PDA device via the IR port. (Page 140) | |
| Edit CLIE Launcher Group | Edit a group of applications. (Page 17) |
| Edit Favorite Applications | Creating a shortcut to an application. (Page 21) |
| Info... Display the version, memory size, and the number of records of an application. | |
| Copy... Copy an application. | |
Options menu in the CLIE Launcher screen
Preferences... Set CLIE Launcher.
Show Expansion Cards
Check the box to display the applications in the "Memory Stick" media.
(Default: On)
Display Animation
Check the box to smooth the on-screen motion such as scrolling operation.
(Default: On)
Use Drag&Drop
Check the box to enable Drag & Drop operation.
(Default: Off)
Use Beam Icon To Beam Only
(available only when there is a communication facility other than beaming)
Check the box to display the Beam screen automatically when you tap the Beam icon.
(Default: Off)
Display
Icon: Displays a simple description for any application.
Icon (Small): Displays a simple description for an application that is highlighted.
(Default: Icon)
| Go To Standard View | Switch to the Palm OS standard screen. (Page 27) |
| About Applications | Displays information about the version of the CLIE Launcher application. |
Switching to the Palm OS standard screen
Your CLIÉ handheld is initially set to display the CLIÉ Launcher screen when you tap Home neon. To switch to the Palm OS standard screen, follow the procedure below.
1 Tap the Home icon.
2 Tap the Menu icon.
3 Tap Go To Standard View from the Options menu.
The screen will be switched to the Palm OS standard screen.
Tap to display menus.

Tip
You can display categories in sequence by tapping the Home icon.
Note
Palm OS standard screen categories differ from CLIE Launcher groups.
Switching to the CLIE Launcher screen
1 Tap the Home icon.
2 Tap the Menu icon.
3 Tap Go To CLIE Launcher View from the Options menu.
The screen will be switched to the CLIE Launcher screen.
Starting an application
Note
For details on starting applications in "Memory Stick" media, refer to page 123.
There may be some system limitations to start applications in “Memory Stick” media in the Application Launcher screen.
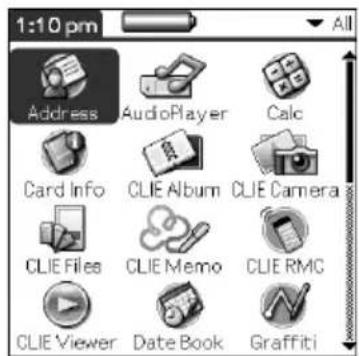
Starting an application by selecting with the Jog Dial™ navigator
1 Tap the Home icon to display the Palm OS standard screen.
2 Rotate the Jog Dial™ navigator to select the application you want to start and press the Jog Dial™ navigator.
Changing the preferences of the start-up screen for the Jog Dial™ navigator operation
Set the preferences so that rotating the Jog Dial TM navigator displays a list of applications on the left side of the screen.
1 Tap the Menu ☐ on on the Palm OS standard screen.
The menu is displayed.

2 Tap Preferences from the Options menu.
The Preferences screen is displayed.

Continued on next page
3 Tap the arrow ▼ next to Jog Select and select Popup.

4 Tap OK.
When the Jog Dial TM navigator is rotated, the list of applications are automatically displayed on the left of the screen.

Continued on next page
Starting an application by tapping an application icon
1 Tap the Home icon to open the Palm OS standard screen.
2 Tap the icon of the application you want to start.

Changing the display style of the Palm OS standard screen
On the Palm OS standard screen, you can display applications in the list format or in the small-icon format. You can also set to display your favorite category or last-used application when the Palm OS standard screen is displayed.
Application icons are displayed by the default setting.
1 Tap the Home icon.
2 Tap the Menu Icon.
3 Tap Preferences from the Options menu.
4 Tap the arrow ▼ next to the right of View By and select List, List (Small) or Icon (Small).
5 Tap OK.

List view
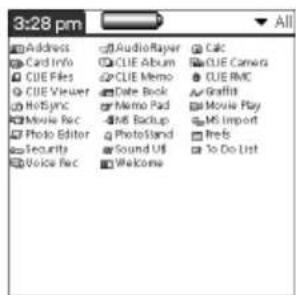
List (Small) view Icon (Small) view

Setting to display the last-opened category or the last-used application when the Palm OS standard screen is displayed
1 Tap the Home icon.
2 Tap the Menu icon.
3 Tap Preferences from the Options menu.
4 Tap the Remember Last Category check box or Remember Last Used App check box to select.
The check boxes are marked by the default setting.
5 Tap OK.
Note
Applications are not recognized as the last-used applications and categories in the following cases.
- Pressing an application button to start an application.
- Switching the screen from the Palm OS standard view to the CLIE Launcher view.
Displaying application by category
You can set to display applications on the category basis.
Categorizing applications
1 Tap the Home icon.
2 Tap the Menu icon.
3 Tap Category from the Application menu.
4 Tap the arrow ▼ next to each application and select the category.
Note
To create a new category, tap the arrow ▼ at the upper right of the Application Launcher screen and then tap Edit Categories to open the Edit Categories dialog box.
And tap New, enter a category name, and tap OK. Tap OK again when the new category is added.
5 Tap Done.
Displaying category-wise
1 Tap the Home icon.
2 Perform either of the following operations.
- Repeatedly tap the Home icon or repeatedly press the Jog Dial™ navigator to display the categories in sequence.
- Tap the arrow ▼ in the upper right of the screen and select the category you want to display.
Tip
If you select All, all applications are displayed on the Palm OS standard screen.
It is convenient to select All when you start an application with the Jog Dial™ navigator.
Note
CLIE Launcher groups differ from Palm OS ® standard screen categories.
Changing fonts
You can change the font style in applications such as Date Book or Address Book according to your preferences. A font style can be assigned to each application.
1 Start an application whose font style you want to change.
2 Tap the Menu Icon.
The menu is displayed.
3 Tap Font from the Options menu.
The Select Font dialog box is displayed.

4 Tap the font style you want to set.
5 Tap OK.
The text in the application is displayed in the selected font style.
Note
Font style is not available for all the application.
The following list describes the function of each menu that is common for the CLIÉ handheld applications such as Date Book, Address, To Do List, and Memo Pad.
To display the menu, tap the Menu icon while starting the application.
For menus that are specific to an application, refer to descriptions of menus for each application.
Note
Some menus may not be displayed depending on the display style.
Edit Menu
Undo Reverses the action of the last edit command.
For example, if you used Cut to remove text,
Undo restores the text you removed.
Cut Removes the selected text and stores it
temporarily in the memory of your CLIÉ
handheld. You can paste the text you cut into
another area of the current application or into
other applications.
Copy Copies the selected text and stores it
temporarily in the memory of your CLIÉ
handheld. You can paste the text that you
copied into another area of the current
application or into other applications.
Paste Inserts the text that you cut or copied at the
selected point. If you did not previously cut or
copy text, paste does not work.
Select All Selects all of the text in the current record or
screen. This function enables you to cut or
copy all of the text and paste it at the selected
point.
Continued on next page
● ● ● ● ● ● ● ● ● ● ● ● ● ● ●
Keyboard Opens the on-screen keyboard.
Graffiti Help Opens the list of the Graffiti ® character strokes. You can view a stroke for a character as needed.
Entering data in your Sony CLIÉ™ Handheld
This chapter explains how to enter data in your CLIÉ handheld.
Entering data in your Sony CLIÉ™ Handheld . . . 41
Practicing entering data using the on-screen keyboard 42
Using Graffiti® writing to enter data. . . . . . . . 45
Entering data in your Sony CLIÉ™ Handheld
On-screen keyboard (Input panel) (42 page)
Enter the data by tapping the keyboard displayed on the screen.

Graffiti (45 page)
Enter data using the freehand input characters called Graffiti. Once you get used to entering data using Graffiti, it is much faster than entering data with the on-screen keyboard.

Practicing entering data using the on-screen keyboard
You can enter data using the stylus of your CLIÉ handheld.
Entering data
To enter data, software (an application) that is compatible with your CLIÉ handheld is required. Follow the steps below to practice entering data using the Date Book application.
1 Tap the Date Book icon on the Application Launcher screen.
Date Book starts up. Today's schedule is displayed.

2 Tap the time line in the Date Book screen.

Continued on next page
3 Tap "a" to open the alphabetic keyboard, or tap "1" to open the numeric keyboard.
The selected keyboard is displayed.

4 Select the desired keyboard and tap the characters to enter text and numbers.
You can use the on-screen keyboard in the same way as in the keyboard of your computer. To enter a capital letter, tap cap and then tap the character button. To delete a character, tap ←.
Continued on next page
5 After you finish, tap Done to close the on-screen keyboard and place the text in the record.

Using Graffiti® writing to enter data
This section describes the procedures for creating letters, numbers, punctuations, and symbols, and teaches you some Graffiti ® tips and tricks.
What is Graffiti writing?
Most people find they can enter text quickly and accurately with only minutes of practice. Graffiti writing includes any character you can type on a standard keyboard. The Graffiti strokes closely resemble the upper case letters of the regular alphabet, which makes Graffiti writing easy to learn.


(Graffiti writing examples
A, B, C, D, E)
Entering characters with a single stroke
Most characters require only a single stroke. When you lift the stylus from the Graffiti writing area, your CLIÉ handheld recognizes and displays the text character immediately.
To allow you to write an entire character with a single stroke, some Graffiti strokes are portions of the regular alphabet equivalents.
The dot on each shape shows where to begin the stroke
Certain characters have similar shapes, but different beginning and end points. Always begin the stroke from the dot.

Note
You need not create the dot; it is only there to show you where to begin the stroke.
The area for writing letters and numbers are different
The Graffiti writing area is divided into two parts: one for writing the letters of the alphabet and one for writing numbers. The small marks at the top and bottom of the Graffiti writing area separate the two areas.

Graffiti character list
Alphabets
| A | ∧ | J | J |
| B | BB | K | α |
| C | C | L | L |
| D | DP | M | mm |
| E | N | N | |
| F | O | OO | |
| G | GG | P | PP |
| H | h | Q | O |
| I | I | R | RR |
Continued on next page
| S | S |
| T | 7 |
| U | U |
| V | V V |
| W | ω |
| X | ×∞ |
| Y | yγ |
| Z | Z |
Numbers
Shift to caps to make capital letters with the same stroke shapes as the basic alphabet characters.
• To draw the first letter of a word as a capital letter Use the Caps Shift stroke
Caps Shift
To return to the lower case, use the BackSpace stroke —
Note
When you create a new sentence or a new record (by tapping New or a blank line), the first letter is automatically capitalized.
• To enter only capital letters (Caps Lock)
Use the Caps Lock stroke ↓↓

Caps Lock
To return to the lower case, use the Caps Shift stroke

Writing punctuation marks
Make a single tap on the Graffiti writing area to activate Punctuation Shift. The next stroke you make anywhere in the Graffiti area (the letters or numbers side) creates a punctuation mark.

Continued on next page
| (.) Period (—) Dash | |
| (.) Comma ( () Left Paren | |
| (') Apostrophe ( ) Right Paren | |
| (?) Question (/) Slash | |
| (!) Exclamation ($) Dollar | |
| (@) At (\) Back slash | |
| (#) Number ({} Left brace | |
| (%) Percent ({}) Right brace | |
| (^) Circumflex | |
| (&) Ampersand | |
| (*) Asterisk (~) Swung dash | |
| (<) Left angle bracket | |
| (>) Right angle bracket | |
| (_) Under bar (:) Colon | |
| (1) Ditto Tab |
To undo punctuation shift
Enter (Back Space).
Writing symbols and extended characters
Make a Symbol Shift stroke on the Graffiti writing area to activate Symbol Shift. The next stroke you make creates a symbol or extended character.
![4:00 5:00 6:00 [New] [Details] [Go To]](/content/2026/08/1568140/images/ff6a7f6d4a3b4e383fa9565d4e5719c4fd21b29cd475ee3d964253df49ecfbd6.jpg)
Symbol Shift
| (•) Bullet x | • |
| ( TM ) Trademark ÷ | m |
| (®) Registered = | R |
| (©) Copyrighted (¢) Cent | |
| (') Left single quotation | √ |
| (') Right single quotation | 7 |
| (") Left double quotation | N |
| (") Right double quotation | N |
| (§) Section i | S |
| (°) Degree β | O |
| + | α |
| - | — |
| / | |
| # | |
| Z | |
| C | |
| (¥) Yen | # |
| (£) Pound | L |
| (€) Euro | € |
| i | L |
| ! | |
| B | |
| μ | M |
| f | S |
| ø | O |
To undo symbol shift mode
Enter — (Back Space).
Writing accented characters and non-English characters
To create accented characters, draw the stroke normally used to create the letter, followed by an accent stroke. Graffiti writing then adds the accent to the letter.
To enter "é," for example, draw and then.
| àèìòùáéíóúý | |
| âêîôûãõñ | N |
| äïöüÿå | O |
To write non-English characters
You can write the following characters without any special punctuation or shifting:
| C | α |
Note
You must write these non-English characters on the left side of the Graffiti writing area.
Displaying the Graffiti on-screen help
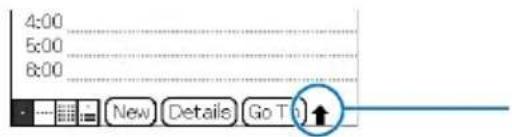
Drag the stylus from the bottom of the writing area to the top of the screen. Graffiti Help opens a series of screens that show the complete Graffiti character set.

Entering characters with Graffiti
1 Tap the Date Book icon on the Application Launcher screen.
Date Book starts. Today's schedule is displayed.
2 Tap the time line in the Date Book screen.
3 Use the tables on the previous pages to find the stroke shape for the letter you want to create. There are two different stroke shapes available for some letters. For those letters, choose the one that is easier for you. You use the same shape to create both the upper case and lower case version of a letter.
4 Position the stylus in the left-hand side of the Graffiti writing area. Start your stroke at the dot and draw the stoke shape as it appears in the tables.

Continued on next page
5 Lift the stylus from the screen at the end of the stroke shape.
When you lift the stylus from the screen, your CLIÉ handheld recognizes your stroke immediately and prints the letter at the insertion point on the screen.
As soon as you lift the stylus from the screen, you can begin the stroke for the next character you want to write.
Note
You must begin the character strokes in the Graffiti writing area. If you do not make Graffiti strokes in the Graffiti writing area, your CLIÉ handheld does not recognize them as text characters.
Notes on writing Graffiti characters
- Recognition accuracy improves when you write large characters. You should draw strokes that nearly fill the Graffiti writing area.
- Write at natural speed. Writing too slowly can generate recognition errors.
- Do not write on a slant. Vertical strokes should be parallel to the sides of the Graffiti writing area.
Using Navigation stroke and shortcuts
You can navigate within the fields of your application and also quickly enter symbols that are frequently used, by entering the navigation strokes and shortcuts with Graffiti.
Using navigation strokes
| Move cursor right | |
| Move cursor left | |
| You can copy or delete data(The features you can select vary depending on settings.) | |
| Go to the previous field (Address Book only) | |
| Go to the next field (Address Book only) | |
| Open Address Record (Address Book only) |
Using Shortcuts
There are four types of Graffiti Shortcuts.
To use a Shortcut, draw the Shortcut stroke ♡ followed by the Shortcut characters.
When you draw the Shortcut stroke, the Shortcut symbol appears at the insertion point to show that you are in Shortcut mode.
The following are the Graffiti Shortcuts that are registered in your CLIÉ handheld:
Date stamp ds Breakfast br
Time stamp ts Lunch lu
For example, when you enter the dts using the Graffiti Shortcut, you can enter the current date and time.
λ → b → 7 → S
Tip
You can also create your own Shortcuts (page 85).
Exchanging and updating data using a HotSync® operation
This chapter explains how to perform a HotSync® operation with your computer.
What is a HotSync® operation? ..... 58
Performing a HotSync® operation ..... 60
Using the Palm™ Desktop for CLIÉ software . . . 62
What is a HotSync® operation?
A HotSync ® operation is a one-step operation that enables you to synchronize data between your CLIÉ handheld and your computer. With just one press on the HotSync button, you can synchronize your CLIÉ handheld application data with the Palm ™ Desktop for CLIÉ software data on your computer, back up the data of your CLIÉ handheld on your computer, or install add-on applications.

① Synchronizing the data between your CLIÉ handheld and your computer
Synchronizes the data of the Date Book, Address Book, To Do List, and Memo Pad between your CLIÉ handheld and your computer. You can manage the data of multiple CLIÉ handhelds separately using the Palm™ Desktop for CLIÉ software.
② Saving back up data on your computer
Automatically creates the back up data of your CLIÉ handheld on your computer. Should you delete data by accident, or data be deleted by battery shut-off, or you need to perform a hard reset, a HotSync® operation allows you to restore the data using the back up data in your computer.
For details on backing up data, refer to page 150.
Continued on next page
Tip
You can create the back up data of your CLIÉ handheld in “Memory Stick” media. For details, refer to “Backing up data to a “Memory Stick” media using the Memory Stick Backup application” (151 page).
③ Using the data created in Microsoft® Windows® applications in your CLIÉ handheld
Import or Export the data between a Windows application on your computer and your CLIÉ handheld.
The compatible file formats that you can import/export with the Palm™ Desktop for CLIÉ software
- Comma/Tab delimited (*.csv, *.txt, *.tab, *.tsv)
- Text file (*.txt)
• vCal (Date Book) file (*.vcs)
• vCard (Address) file (*.vcf) - Date Book archive of the Palm™ Desktop for CLIÉ software (*.dba)
- Address Book archive of the Palm™ Desktop for CLIÉ software (*.aba)
- To Do List archive of the Palm™ Desktop for CLIÉ software (*.tda)
- Memo Pad archive of the Palm™ Desktop for CLIÉ software (*.mpa)
* The words in parentheses are file extensions. Archive is a unit that gathers associated files.
For details on importing/exporting data, refer to the Help menu of Palm™ Desktop for CLIÉ software.
Performing a HotSync® operation
To perform a HotSync ® operation, the Palm TM Desktop for CLIÉ software must be installed in your computer and the cradle should be connected to the computer.
For details on how to prepare for a HotSync® operation, follow the procedure of “Setting up your CLIÉ™ handheld” of “Read This First (Operating Instructions).”
Performing a HotSync ® operation with the cradle (Local HotSync ® )
Performing a HotSync ® operation with the cradle is called Local HotSync ® .
1 Place your CLIÉ handheld on the cradle.
2 Press the HotSync button on the front panel of the cradle.
The HotSync ® operation starts.

When the HotSync ® operation is complete, a message showing the HotSync ® completion is displayed on your CLIÉ handheld.
Continued on next page
Note
Do not remove your CLIÉ handheld from the cradle until the HotSync ® operation is complete as the Palm TM Desktop for CLIÉ software may not be quit normally.
If the HotSync ® operation does not start
Make sure that the HotSync icon is displayed in the Windows task tray.
If the HotSync icon is not displayed in the task tray, click
Start, Programs (All Programs in Windows® XP), Sony
Handheld, and HotSync Manager. Check that the
HotSync icon is displayed in the task tray and press the
HotSync button on the cradle to start the HotSync ®
operation.
The message is displayed on your computer screen when the HotSync ® operation starts.
* From this point, when Windows XP Home Edition and Windows XP Professional are common, they will both be referred to as Windows XP.
Tip
When you cannot perform a HotSync® operation
Refer to "Troubleshooting Q&A."
Using the Palm™ Desktop for CLIÉ software
The Palm™ Desktop for CLIÉ software enables you to view the data, which is transferred from your CLIÉ handheld by the HotSync® operation, on your computer.
Additionally, the Palm™ Desktop for CLIÉ software has the same functions as the Date Book, Address Book, To Do List, and Memo Pad applications so that you can enter or modify schedules or address data on your computer and export data to your CLIÉ handheld.
Starting the Palm™ Desktop for CLIÉ software
1 Double-click the Palm™ Desktop for CLIÉ software icon on the Windows desktop.
Or click Start, select Programs (All Programs in Windows XP), Sony Handheld, and Palm™ Desktop for CLIÉ software.
The Palm TM Desktop for CLIÉ software starts.
Tip
To quit the Palm™ Desktop for CLIÉ software
Click the close button at the upper right corner of the screen or select Exit from the File menu.
Locating the Palm™ Desktop for CLIÉ software components
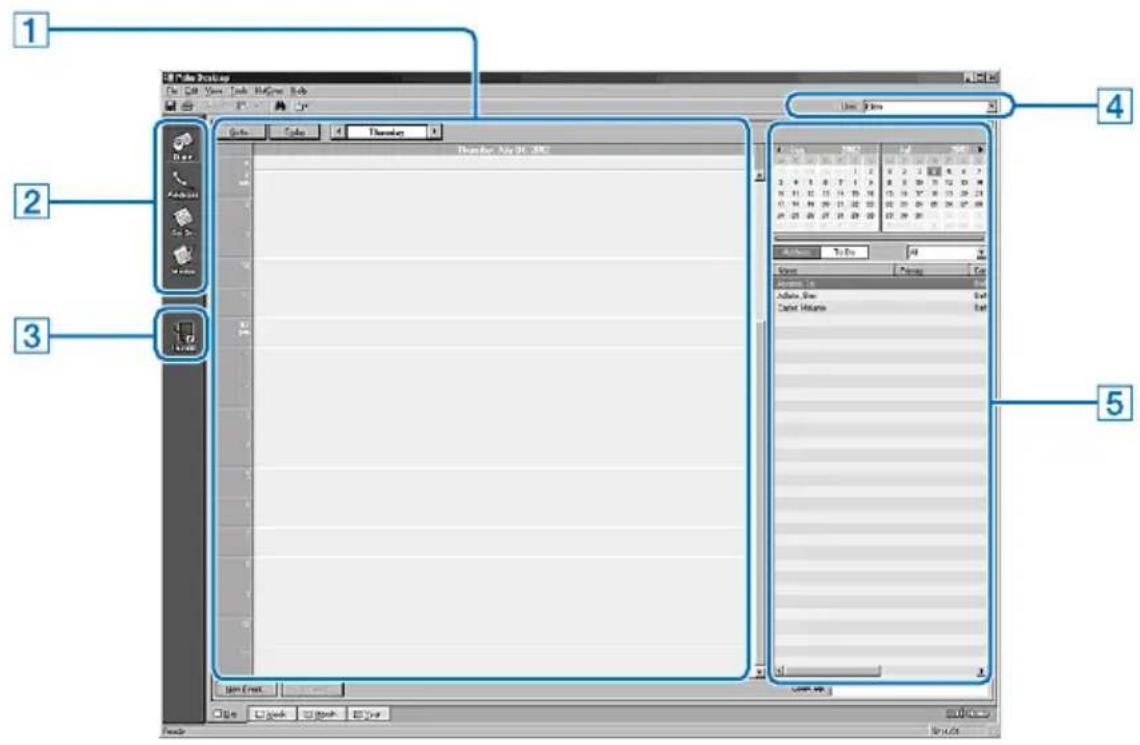
1 List pane
Displays the records in the current Desktop application.
2 Application Launch bar
Click an icon to open the associated application.
3 Install Tool icon
Click this icon to display the Install Tool dialog box. You can install applications from your CLIÉ handheld with a HotSync® operation. For details, refer to “Installing” on page 165.
4 User selector
Displays the user name of the current information.
Continued on next page
5 Record pane
Displays full details of the record that is selected in the List pane. The information displayed here is the same as that displayed on your CLIÉ handheld's Details screen.
Basic operations of the Palm™ Desktop for CLIÉ software
Click the icon of the application you want to use. The screen switches to the selected application screen.
Basic operations for each application are the same as those of the corresponding CLIÉ application. For details on operations, refer to the Palm™ Desktop online help. To display the online help, select Palm™ Desktop Help from the Help menu.
Tip
Changing the user name of your CLIÉ handheld
① In the Palm™ Desktop for CLIÉ window, click Users from the Tools menu.
The Users dialog box is displayed.
② Click the user name you want to change and click Rename.
③ Enter a new user name and click OK.
Your CLIÉ handheld user name is changed at the next HotSync® operation.
Continued on next page
When using the Microsoft® Windows® XP operating system
When you start Palm™ Desktop for CLIÉ software on your computer and select Custom, File Link, View Log, or Setup from the HotSync menu, the configuration window may open behind the Palm™ Desktop for CLIÉ software window.
In this case, bring the configuration window to front by performing one of the followings.
- Press the Alt and Tab keys at the same time.
- Click the HotSync icon at the lower right on the Windows task tray.
Customizing your Sony CLIÉ Handheld (Preferences)
This chapter explains how to customize your CLIÉ handheld by changing the Preferences settings.
What you can do with Preferences ..... 67
Adding/Changing the preference for the modem 69
Changing the Network preferences....71
Assigning applications to application buttons.... 82
Customizing the full-screen pen stroke activities 83
Assigning applications to HotSync buttons .... 84
Creating Graffiti® ShortCuts 85
Setting the display format of the time, date, and numbers. 86
Setting the Date & Time preferences ..... 88
Setting the automatic power-off time ..... 91
Setting sounds 92
Turning the Alarm LED on or off. 93
Turning the Beam Receive feature on or off. . . . 94
Adjusting the Digitizer 95
The Preferences screen enables you to customize the configuration options on your CLIÉ handheld.
Setting options may be added by installing new application or software for peripheral devices.
| Settings Details | |
| ShortCuts Defines a list of Graffiti® abbreviations.For details, refer to page 85. | |
| Digitizer Calibrates the screen on your CLIÉ handheld.For details, refer to page 95. | |
| Network Sets the Internet connection configuration.For details, refer to page 71. | |
| Buttons Customizes applications assigned to application buttonsand a HotSync button, or the full-screen pen stroke activities.For details, refer to page 82~84. | |
| General Sets the general configurations such as system sound,LED feature* or auto shut-off interval.(*May not work in some models.)For details, refer to page 91~94. | |
| Owner Sets the owner information such as name or phone number.For details, refer to page 155. | |
| Formats Sets the formats for time or date.For details, refer to page 86. | |
| Connection Sets the configuration for the mobile communication adapter or modem.For details, refer to page 69. | |
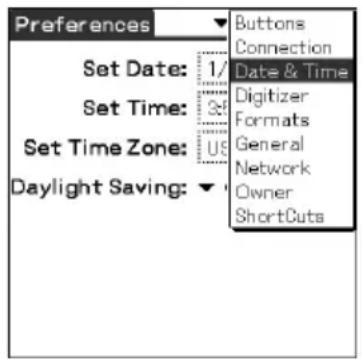
| Date & Time Sets the current date, time, time zone, daylight saving configuration.For details, refer to page 88. |
Tip
For the setting options not mentioned in the list, refer to “Read This First (Operating Instructions).”
Displaying the Preference screen for each menu
1 Rotate the Jog Dial™ navigator to select the Prefs icon on the Application Launcher screen and press the Jog Dial™ navigator.
The Preferences screen is displayed.
Tip
You can also tap the Prefs icon to display the Preferences screen.
2 Tap the arrow ▼ in the upper right of the screen and select the Preferences menu you want to configure.
Adding/Changing the preference for the modem
You can customize the preference for a modem to be connected to your CLIÉ handheld. The applications using the modem comply with this preference.
1 Tap the arrow ▼ in the upper right of the Preferences screen and select Connection.
2 Tap New.
To change the existing preference, tap the preference you want to change and Edit.
3 Enter the connection name in Name.
Enter the name that is recognizable.
4 Tap the arrow ▼ next to Connect to and select how you connect your CLIÉ handheld to your computer.
5 Tap the arrow ▼ next to Via and select what you use to connect your CLIÉ handheld to your computer.
When you select a modem for Connect to
① Tap the arrow▼ next to Dialing and select the type of line you want to use.
Usually, select TouchTone™.
Do not select Rotary, except when you are sure that the telephone service being used is not TouchTone™.
② Tap the arrow ▼ next to Volume and select the volume of the modem speaker at the time of connection.
③ Tap Details.
④ Tap the arrow▼ next to Speed and select the maximum speed for the transmission between the modem and CLIÉ handheld.
⑤ Tap the arrow▼ next to Flow Ctl and select the flow control of the modem connection.
Usually, select Automatic.
⑥ Enter the modem initialization command in the Init String.
By default, it is set to either AT&FX4 or ATZ. If the modem initialization command is not specified on the modem, it is not required to change.
⑦ Tap OK.
Continued on next page
6 Tap OK.
The configuration for the modem is changed and the Preferences screen is displayed.
Note
For the settings specific to each peripheral device, refer to the manual of each peripheral device.
Selecting a service template
You can customize the Service setting to select the service template for your Internet Service Provider or a dial-in server.
1 Tap the arrow ▼ in the upper right of the Preferences screen and select Network.
The Network Preferences screen is displayed.
2 Tap the arrow ▼ next to Service and select the service template (Internet Service Provider name) you want to use.
Tip
- To add the new service template, select New from the Service menu.
When the Internet Service Provider name you want to use is not displayed in the list, tap the area showing the service template, or select New from the Service menu, and enter the new Internet Service Provider name.
You can create multiple service templates for your Internet Service Provider.
You need to name them so that those service templates are uniquely identified, such as “So-net1” and “So-net2.” It is useful when you creatively use your Internet Service Provider by access point or setting.
- When you want to copy an existing service template without change, select Duplicate from the Service menu.
Entering a user name
The User Name setting identifies the name you use when you log into your Internet Service Provider or dial-in server.
1 On the Network Preferences screen, tap User Name field.
2 Enter your user name.
Notes
- Although this field can contain multiple lines of text, only two lines appear on-screen.
- Most dial-in servers do not accept spaces in the user name.
Entering a password
The Password box identifies the password you use to log into your server or ISP. Your entry in this field determines whether your CLIÉ handheld prompts you to enter a password each time you log into your network:
- If you do not enter a password, your CLIÉ handheld displays the word -Prompt- in this field and asks you to enter a password during the log in procedure.
- If you enter a password, your CLIÉ handheld displays the word -Assigned- in this field and does not prompt you to enter a password during the log in procedure.
Note
If you are concerned about security, select the Prompt option and do not enter a password.
1 On the Network Preferences screen, tap the Password field.
2 Enter the password you use to log into your server.
3 Tap OK.
The Password field updates to display the word -Assigned-.
Selecting a connection
Use the Connection setting to select the method you want to use to connect to your Internet Service Provider or a dial-in server.
1 On the Network Preferences screen, tap the arrow ▼ next to Connection and select Standard Modem.
Adding telephone settings
When you select the Phone field, your CLIÉ handheld opens a dialog box in which you define the telephone number you use to connect with your ISP or dial-in server. In addition, you can also define a prefix, disable Call Waiting, and give special instructions for using a calling card.
Note
The Phone Setup dialog box works correctly for AT&T and Sprint long-distance services. However, because MCI works differently, MCI customers need to put the calling card number in the Phone # field and the phone number in the Use calling card field.
1 On the Network Preferences screen, tap the Phone field. The Phone Setup screen is displayed.
2 Enter the phone number for your ISP or dial-in server in the Phone # field.
3 Change the following settings if necessary:
① Enter the telephone number used to access the modem.
If necessary, enter a dial prefix (such as "9") to access an outside line, and tap the Dial prefix check box. You can enter a comma in the field to introduce a "pause" in the dialing sequence. Each comma equals a two second pause.
② If the phone line you are using for your CLIÉ handheld has Call Waiting, select the Disable call waiting check box to avoid an interruption during a modem HotSync ® operation.
Note
Each telephone company assigns a code to disable Call Waiting. Contact your local telephone company for the code that is appropriate for you.
Continued on next page
③ If you want to use a calling card to place the call, select the Use calling card check box and enter the calling card number.
Tip
There is usually a delay before you enter your calling card number.
Consequently, add at least three commas before your calling card number to compensate for the delay.
4 Tap OK.
Adding detailed information to a service template
If you are using one of the predefined service templates, you probably only need to enter your user name and telephone number. If you are creating a new service template, you may need to provide additional information to your ISP or dial-in server. Use the Details dialog box to add additional information to a selected service template.
To select a connection type
1 On the Network Preferences screen, tap the service field.
2 Tap Details.
The Details screen is displayed.
3 Tap the arrow ▼ next to Connection type and select one of the following connection types.
- PPP: Point-to-Point Protocol
• SLIP: Serial Line Internet Protocol - CSLIP: Compressed Serial Line Internet Protocol
Tip
If you are not sure, try PPP; if that doesn't work, ask your Internet Service Provider or your System Administrator for the correct connection type.
Continued on next page
4 Tap the arrow ▼ next to Idle timeout and select one of the following options.
- 1 Minute: Waits one minute before dropping the connection when you open another application that does not use the network.
• 2 Minutes: Waits two minutes.
• 3 Minutes: Waits three minutes. - Never: Keeps your PPP or SLIP connection until you turn off your CLIÉ handheld (or until it times out).
Note that this option will be more costly than others.
5 Tap the Query DNS check box to deselect it.
6 Enter the IP address for the Primary and Secondary DNS (Domain Naming System).
Ask your Internet Service Provider or System Administrator for the correct Primary or Secondary DNS IP numbers.
7 If you need to enter the CLIÉ handheld's IP Address, tap the IP Address check box to uncheck the selection and display a permanent IP address field below the check box.
Normally, you do not have to enter this IP address. If you are not sure, select Automatic and go to step 9.
8 Enter the CLIÉ handheld's IP Address.
9 Tap OK.
Creating additional service templates
You can create additional service templates from scratch or by duplicating existing templates and editing the information. After you create a new or duplicate template, you can add and edit settings.
To duplicate an existing service template
1 On the Network Preferences screen, tap the arrow ▼ next to Service and select the predefined service template you want to duplicate.
2 Tap the Menu icon.
3 Tap Duplicate from the Service menu.
A copy of the service template (The name of an original service template + Copy) is added to the drop-down list for the Service field.
To delete a service template
You can delete an existing service template.
1 On the Network Preferences screen, tap the arrow ▼ next to Service and select the predefined service template you want to delete.
2 Tap the Menu icon.
3 Tap Delete from the Service menu. The Delete Service dialog box is displayed.
4 Tap OK.
The selected service template is deleted.
When you want to cancel deleting, tap Cancel.
Creating log in scripts
A log in script is a series of commands that automates logging in to a network server, such as your corporate network or your Internet Service Provider (ISP).
You can also use non-ASCII characters or literal characters for Log in Scripts.
For details, refer to “Non-ASCII Characters for Log in Scripts” on page 80.
Note
Depending on the type of mobile communication adapter and communication adapter (sold separately), there may be cases when there is no need to create a log in script.
For details on accessories that are not supplied, please refer to "Read This First (Operating Instructions)."
1 On the Network Preferences screen, tap the service field.
2 Tap Details.
The Details screen is displayed.
3 Tap Script.
The Log in Script screen is displayed.
4 Tap the arrow ▼ next to End and select one of the following commands.
If the command requires additional information, a field appears to the right of it for you to enter the information.
Wait For Tells your CLIÉ handheld to wait for specific characters from the TCP/IP server before executing the next command.
Wait For Prompt Detects a challenge-response prompt coming from the server and displays the dynamically generated challenge value. Then enter the challenge value into your token card, which in turn generates a response value for you to enter on your CLIÉ handheld. This command takes two arguments, separated by a vertical bar (l) on the input line.
Send Transmits specific characters to the TCP/IP server to which you are connecting.
Continued on next page
| Send CR Transmits a carriage return or LF character to the TCP/IP server to which you are connecting. |
| Send User ID Transmits the User ID information entered in the User ID field of the Network Preferences screen. |
| Send Password Transmits the password entered in the Password field of the Network Preferences screen. If you did not enter a password, this command prompts you to enter one. The Password command is usually followed by a Send CR command. |
| Delay Tells your CLIÉ handheld to wait a specific number of seconds before executing the next command in the log in script. |
| Get IP Reads an IP address and uses it as the IP address for your CLIÉ handheld. This command is used with SLIP connections. |
| Prompt Opens a dialog box and prompts you to enter text of some kind (for example, a password or a security code). |
| End Identifies the last line in the log in script. |
5 Repeat step 4 until the log in script is complete.
6 Tap OK.
The Details screen is displayed.
7 Tap OK.
The Network Preferences screen is displayed.
Non-ASCII Characters for Log in Scripts
The following information enables you to create custom log in scripts that require non-ASCII characters. It is provided for advanced users who understand the use and requirements of such characters in a custom log in script.
Use of ^char
You may use the caret (^) to transmit ASCII command characters. If you send ^char, and the ASCII value of character is between @ and _, then the character is automatically translated to a single-byte value between 0 and 31.
For example, M is converted to a carriage return.
If character is a value between A and Z, then the character sequence is translated to a single-byte value between 1 and 26. If character is any other value, then the character sequence is not subject to any special processing. For example, the string “Joe^M” transmits Joe, followed by a carriage return.
Carriage return and line feed
You may include carriage return and line feed commands as part of the log in script, when they are entered in the following format.
- < cr>: Sends or receives a carriage return
- < If>: Sends or receives a line feed
For example, the string “waitfor Joe
Literal characters
The backslash () character defines that the next character is transmitted as a literal character, and is not subject to any special processing ordinarily associated with that character.
Examples:
- \^ : Includes a caret as part of the string
- \< : Includes a < as part of the string
- \ : Includes a backslash as part of the string
Using the Network preferences menus
This section describes the menu commands specific to network preferences. For the menu commands that are common for the CLIÉ handheld applications, refer to “Common menus” on page 38.
Service menus
| New Creates a new service template. |
| Delete... Deletes the current service template. |
| Duplicate Duplicates the current service template. |
Options menus
| View Log | Displays the Network Log that lists the history of your Internet connection.Tap Done to close the Network Log screen. |
Assigning applications to application buttons
You can assign your favorite applications to the application buttons on the front panel of your CLIÉ handheld.
For example, you can assign the To Do List button to start Calculator.
The position of the application buttons varies depending on the model.
For details, refer to “Locating the parts of your Sony CLIÉ Handheld” in “Read This First (Operating Instructions).”
1 Tap the arrow ▼ at the upper right of the Preference screen and select Buttons.
The Buttons Preferences screen is displayed.

2 Tap the arrow ▼ next to a button and select the application you want to assign.
The application button is changed to what you assigned.
To start the original applications
When you assigned another application to the button, start the original application on the Application Launcher screen.
To reset to the default settings
Tap the Default in step 2.
All application buttons are reset to their factory settings.
Customizing the full-screen pen stroke activities
You can customize the assignment of the full-screen pen stroke.

Drag the stylus from the bottom of the writing area to the top on the screen.
By default, the full-screen pen stroke activates the Graffiti ® Help.
1 Tap the arrow ▼ in the upper right of the Preference screen and select Buttons.
2 Tap Pen. The Pen screen is displayed.
3 Tap the arrow ▼ next to Graffiti Help and select the setting for the full-screen pen stroke.
Backlight Turns on the backlight of your CLIÉ handheld without using the POWER button.
Brightness Opens the Adjust Brightness screen.
Keyboard Opens the on-screen keyboard for entering text.
Graffiti Help Opens a series of screens that show the complete Graffiti character set.
Turn Off & Lock Turns off and locks your CLIÉ handheld. To start your CLIÉ handheld operation when it is locked, you need to enter the password. (To use the Lock function, you need to preset a password)
For details, please refer to "Protecting your data with a password" (154 page).
Beam Data Beams the current record to another Palm OS PDA.
4 Tap OK.
Assigning applications to HotSync buttons
You can assign your favorite applications to the HotSync buttons on the cradle and modem (if a HotSync button is provided).
1 Tap the arrow ▼ in the upper right of the Preference screen and select Buttons.
2 Tap HotSync.
3 Tap the arrow ▼ next to a button and select the application you want to assign.
4 Tap OK.
The Buttons Preferences screen is displayed.
You can start the selected application by pressing the HotSync button.
You can create abbreviations (ShortCuts) for entering text with Graffiti ® strokes.
For details on how to use Graffiti ® ShortCuts, refer to “Using Shortcuts” on page 55.
1 Tap the arrow ▼ in the upper right of the Preference screen and select ShortCuts.
2 Tap New.
The ShortCut Entry screen is displayed.
3 Enter the ShortCut name and an abbreviation (character string).
4 Tap OK.
The new ShortCut is created and the list of ShortCuts is displayed.
To Edit a ShortCut
1 Tap the ShortCut you want to edit and tap Edit.
2 Edit the ShortCut name or the abbreviation (character string) and tap OK.
To Delete a ShortCut
1 Tap the ShortCut you want to delete and tap Delete. The confirmation message is displayed.
2 Tap Yes.
The selected ShortCut is deleted.
Setting the display format of the time, date, and numbers
Selecting a regional default
When you select the region where you use your CLIÉ handheld, the display format of the time, date, week start day, and numbers are adjusted to the regional default. For example, in the United Kingdom, time is expressed using a 24-hour clock; in the United States, time is expressed using a 12-hour clock with an AM or PM suffix.
The regional default setting is applied to the display formats of all your CLIÉ applications. However, you can customize your own settings for each unit such as time or date.
1 Tap the arrow ▼ in the upper right of the Preference screen and select Formats.
2 Tap the arrow ▼ next to Preset to and select a region name.
Customizing your own settings for each unit
You can customize your own settings for the display formats of the time, date, week start day, and numbers. The settings are applied to the display formats of all your CLIÉ applications.
1 Tap the arrow ▼ in the upper right of the Preference screen and select Formats.
2 Tap the arrow ▼ next to Time and select the desired format.
3 Tap the arrow ▼ next to Date and select the desired format.
4 Tap the arrow ▼ next to Week starts and select Sunday or Monday.
This setting is applied to the Day, Week, Month, and Agenda views in Date Book and all other applications displaying calendars.
5 Tap the arrow ▼ next to Numbers and select the desired format.
Setting the Date & Time preferences
You can set the date, time, time zone, and the on/off of daylight savings for your CLIÉ handheld. After you set the local date and time of your home base, you can change the displayed time (for example, during business trips) by simply switching the time zones.
Setting the date
1 Tap the arrow ▼ in the upper right of the Preference screen and select Date & Time.
The Date & Time Preferences screen is displayed.
2 Tap Set Date.
The Set Date screen is displayed.
3 Tap the each arrow ◀ or ▶ beside the year at the top of the screen to set the year.
4 Tap the current month.
5 Tap the current date.
Setting the time
1 Tap the arrow ▼ in the upper right of the Preference screen and select Date & Time.
The Date & Time Preferences screen is displayed.
2 Tap Set Time.
The Set Time screen is displayed.
3 Tap the arrow ▼ or ▲ to set the hour.
4 Tap the minute box and tap the arrow ▼ or ▲ to set the minute.
5 Tap AM or PM.
6 Tap OK.
Setting the time zone and daylight saving time
Setting the time zone
1 Tap the arrow ▼ in the upper right of the Preference screen and select Date & Time.
The Date & Time Preferences screen is displayed.
2 Tap the Set Time Zone field.
The Set Time Zone screen is displayed.
3 Select the time zone of your region.
4 Tap OK.
Setting the daylight saving time
1 Tap the arrow ▼ at the upper right of the Preference screen and select Date & Time.
The Date & Time Preferences screen is displayed.
2 Tap the arrow ▼ next to Daylight saving.
3 Tap On or Off.
Setting the automatic power-off time
Your CLIÉ handheld has an automatic power-off feature that turns off the power after a period of inactivity to conserve your CLIÉ battery.
You can adjust the time setting for the automatic power-off feature.
By default setting, your CLIÉ handheld will be turned off after two minutes of inactivity and will be on while it is connected to the cradle.
1 Tap the arrow ▼ in the upper right of the Preference screen and select General.
The General Preferences screen is displayed.
2 Tap the arrow ▼ next to Auto-off After and select the desired time.
You can select 30 seconds, 1 minute, 2 minutes, or 3 minutes.
3 If you want to leave your CLIÉ handheld turned on while it is connected to the cradle, tap the check box next to Stay on in Cradle to check it.
You can adjust the volume level of the system sounds, alarm sounds, and game sounds or turn the sounds off.
1 Tap the arrow ▼ in the upper right of the Preference screen and select General.
The General Preferences screen is displayed.
2 Tap the arrow ▼ next to System Sound and select the desired volume level or Off.
When the System Sound is turned off, the chime tones associated with the HotSync ® operation is also turned off.
3 Tap the arrow ▼ next to Alarm Sound and select the desired volume level or Off.
4 Tap the arrow ▼ next to Game Sound and select the desired volume level or Off.
The Game Sound setting is only applied to the games programmed to respond to this setting.
Turning the Alarm LED on or off
You can set the CLIÉ handheld to flash its LED at the setting time. If you turn the Alarm Sound off and turn on the Alarm LED, you can utilize the alarm feature without disturbing other people around you.
1 Tap the arrow ▼ in the upper right of the Preference screen and select General.
The General Preferences screen is displayed.
2 Tap the arrow ▼ next to Alarm LED and select On or Off.
Turning the Beam Receive feature on or off
You can turn on or off the Beam Receive feature.
When you turn off the Beam Receive feature, you cannot receive data via beaming but your CLIÉ battery is conserved. By default setting, the Beam Receive feature is set to On.
1 Tap the arrow ▼ in the upper right of the Preference screen and select General.
2 Tap the arrow ▼ next to Beam Receive and select On or Off.
- On: Enables the Beam Receive feature.
- Off: Disables the Beam Receive feature.
Adjusting the Digitizer
You need to adjust the digitizer when performing a hard reset, the tapping operation or scrolling does not work properly, or when you cannot adjust the brightness of the back light or screen contrast.
1 Tap the arrow in the upper right of the Preference screen and select Digitizer.
The Digitizer calibration screen is displayed.

This Digitizer calibration screen is exactly the same as the screen displayed the first time you turn on your CLIÉ handheld. Follow the on-screen instructions to adjust the digitizer.
Tip
Use the stylus perpendicular to the screen to tap targets.
Exchanging and updating data using a HotSync® operation (Other HotSync® operations)
This chapter explains how to select HotSync ® operation options and how to perform a HotSync ® operation via cradle, infrared communications port, or network. Other advanced HotSync ® operations include how to use file link functions and how to import data from Windows applications.
Customizing HotSync® application settings (Conduit) 97
Synchronizing with external data (File Link) ... 99
Customizing how to start HotSync® Manager and the HotSync® setup options ..... 100
Performing an IR HotSync® operation ..... 101
Performing a HotSync® operation via a modem 104
Performing a HotSync® operation via a network 110
Performing a HotSync® operation via LAN (LANSync) 115
Customizing HotSync® application settings (Conduit)
The programs handling data of an application during a HotSync® operation are called “conduit.”
For each application, you can define a set of options that determine how data are handled during synchronization. By default settings, a HotSync® operation synchronizes all data between your CLIÉ handheld and the Palm™ Desktop for CLIÉ software.
In addition to the conduits for Date Book, Address Book, To Do List, and Memo Pad, the Palm™ Desktop for CLIÉ software offers System and Install conduits. The System conduit backs up the system information stored on your CLIÉ handheld. The Install conduit installs add-on applications to your CLIÉ handheld. You can select them as needed.
1 Click the HotSync icon in the Windows task tray and select Custom from the HotSync® Manager menu.
You can also select Custom from the HotSync menu of the Palm™ Desktop for CLIÉ software.
The Custom dialog box is displayed.

2 Select the user name you are using on your CLIÉ handheld from the list at the top.
3 Select an application in the Conduit list.
Continued on next page
4 Click Change.
The Change HotSync Action dialog box is displayed.

5 Click to select one of the following:
- Synchronize the files
- Desktop overwrites handheld
• Handheld overwrites Desktop - Do nothing
6 Click OK.
7 Repeat steps 2 through 6 to customize conduit settings for other applications (or other users).
8 Click Done.
The conduit setting is changed.
Notes
- The conduit setting is applied to only the next HotSync operation. Thereafter, the HotSync Actions revert to their default settings. To set a new setting as the default, in step 5, click the Set as default box to check it.
• To restore the default settings, click Default in the Custom dialog box.
Synchronizing with external data (File Link)
You can synchronize Address Book or Memo Pad data in your CLIÉ handheld with external files such as address book data in your computer (File Link).
HotSync ® Manager stores the file data in your computer in a separate category on your Palm TM Desktop for CLIÉ software and your CLIÉ handheld. You can set the File Link feature to start synchronization only when the external file has been updated.
The compatible file formats that you can import with File Link
- Comma delimited (*.csv)
- Memo Pad archive of the Palm™ Desktop for CLIÉ software (*.mpa)
- Address Book archive of the Palm™ Desktop for CLIÉ software (*.aba)
- Text file (*.txt)
For details on how to set up File Link, refer to the online help of the Palm™ Desktop for CLIÉ software.
Customizing how to start HotSync® Manager and the HotSync® setup options
1 Click the HotSync icon in the Windows task tray and select Setup from the shortcut menu.
The Setup dialog box is displayed.
2 Click the General tab and select the setting as needed. If you are not sure which option to use, select Always available.
- Always available: Starts the HotSync® Manager when Windows starts. This allows you to perform a HotSync® operation even when the Palm™ Desktop for CLIÉ software is not running.
- Available only when the Palm™ Desktop is running: Starts the HotSync® Manager when you start the Palm™ Desktop for CLIÉ software.
- Manual: Starts the HotSync ® Manager only when you select HotSync ® Manager from the Windows Start menu.
3 Click the Local tab and adjust the setting for the connection between the computer and cradle as needed.
- Serial port: Specifies the computer port that is used for a HotSync operation. Make sure that the serial port for HotSync is not shared with the port for modem.
- Speed: Determines the speed at which data is transferred. Try the As Fast As Possible rate first, and adjust downward if you have any problems.
4 Click the Modem tab and select the setting for the modem as needed.
For details, refer to “Performing a HotSync ® operation via modem” on page 104.
5 Click the Network tab and select the setting for the network as needed.
6 Click OK to finish.
You can use the IR (infrared) port of your CLIÉ handheld to perform an IR HotSync ® operation with a computer equipped with an IrDA (Infrared Data Association) IR port. An IR HotSync ® operation enables you to perform a HotSync ® operation without using the cradle.
Prior to performing an IR HotSync ® operation
Check the following items.
- Your computer is equipped with an infrared port supporting the IrDA standard.
- The infrared port of your computer is enabled for Windows operating system use.
- Check the port number allocated to the infrared port.
- The infrared port number is available in the Infrared Monitor in the Control Panel.
For details on the Infrared Monitor, refer to the manual of your computer or the Windows online help.
Preparing your computer
To perform an IR HotSync ® operation, you need to allocate a virtual port to an IR HotSync ® operation.
For Windows 2000 Professional/Windows XP
1 Click the HotSync 📊 icon in the Windows task tray (bottom-right corner of the taskbar) and check IR. IR HotSync® operation is enabled.
For Windows 98 Second Edition/Me
1 Click the HotSync 📊 icon in the Windows task tray (bottom-right corner of the taskbar) and check Local Serial.
Continued on next page
2 Click the HotSync icon in the Windows task tray once again and select Setup from the shortcut menu.
The Setup dialog box is displayed.

3 Click the Local tab.
4 Adjust the following settings as needed.
- Serial port: Specifies a virtual port for an infrared port. If you are not sure of the connection port, refer to the Infrared Monitor in the Windows Control Panel.
- Speed: Determines the speed at which data is transferred. Try the As Fast As Possible rate first, and adjust downward if you have any problems.
5 Tap OK.
IR HotSync ® operation is enabled.
Note
When performing a local HotSync ® operation with the cradle, you need to restore the local HotSync settings. For details, refer to “To restore the local HotSync settings” on page 103.
Continued on next page
Performing an IR HotSync® operation
You can perform an IR HotSync ® operation when you have prepared your computer setting, CLIÉ handheld setting, and Conduit Setup.
1 Rotate the Jog Dial™ navigator to select the HotSync icon and press the Jog Dial™ navigator.
The HotSync dialog box is displayed.

Tip
You can also tap the HotSync icon on the Application Launcher screen to display the HotSync dialog box.
2 Tap Local.
3 Tap the arrow ▼ and select IR to a PC/Handheld.
4 Point the IR port of your CLIÉ handheld directly at the IR port of the computer.
For best results, your computer and your CLIÉ handheld should be 4 to 8 inches (approximately 10 to 20 centimeters) apart, and the path between your CLIÉ handheld and the computer must be clear of obstacles.
5 Tap the HotSync

The HotSync ® operation starts.
The message will be displayed to note that the HotSync ® operation is complete.
To restore the local HotSync settings
When performing a local HotSync ® operation with the cradle, you need to restore the local HotSync settings.
1 Connect the cradle to your computer.
2 Click the HotSync icon in the Windows task tray and check Local USB from the shortcut menu.
Performing a HotSync® operation via a modem
You can perform a HotSync ® operation via a modem when you are away from your computer.
![graph TD A["Client Handheld"] --> B["PC"] C["Computer"] --> D["Mobile Device"] E["Satellite"] --> F["Home"] G["Power Supply"] --> H["Power Supply"] I["Power Supply"] --> J["Power Supply"] K["Power Supply"] --> L["Power Supply"] M["A HotSync® operation with the PC at home"] --> N["Home"]](/content/2026/08/1568140/images/c699b748f3219ce2db5fdc5859b4700e6748eb2f89baeddce99577ac17d50e33.jpg)
Notes
- For the first HotSync operation, you need to perform a local HotSync operation using the cradle (page 60).
- It may take some time to complete a HotSync operation via modem. To shorten the time required to synchronize data with a modem, define the files and/or applications you synchronize with a modem HotSync operation in advance. For details, refer to “Selecting the conduits for a modem HotSync operation” on page 108.
Prior to performing a HotSync ® operation via a modem
Check the following items.
- A modem or terminal adapter (TA) is connected to your computer.
- Your CLIÉ handheld is properly connected to a Mobile Communication adapter sold separately.
- The Palm™ Desktop for CLIÉ software is properly configured for use with the modem.
For details, refer to “Customizing how to start HotSync® Manager and the HotSync® setup options” on page 100.
Preparing your computer
To perform a HotSync ® operation via a modem, you need to follow the steps below to set your computer to receive a call from your CLIÉ handheld.
1 Check the following items.
- The modem is connected to your computer and both the modem and computer are turned on.
- No communication applications, such as fax or telephone software, are running on the COM port.
• The computer is disconnected from the Internet.
2 Click the HotSync icon in the Windows task tray (bottom-right corner of the taskbar) and select Modem from the shortcut menu.
3 Click the HotSync icon in the Windows task tray again and select Setup from the shortcut menu. The Setup dialog box is displayed.
4 Click the Modem tab.

Continued on next page
5 Adjust the following settings as needed.
- Serial port: Specifies the port for the modem. If you are not sure of the port settings, check the Modem Properties (Phone and Modem Options for Windows 2000 Professional/XP) in the Windows Control Panel.
- Speed: Determines the speed at which data is transferred. Try the As Fast As Possible rate first, and adjust downward if you have any problems.
- Modem: Specifies the modem type or manufacturer. If you are not sure of your modem type or if you cannot find your modem type in the list, select Hayes Basic.
- Setup string: Identifies the setup string for your modem automatically if you specify the modem type or manufacturer. If it does not work properly, refer to the manual of your modem.
6 Click OK.
Preparing your CLIÉ handheld
Follow the steps below to set up your CLIÉ handheld for a modem HotSync ® operation.
1 Rotate the Jog Dial™ navigator to select the HotSync icon and press the Jog Dial™ navigator.
The HotSync dialog box is displayed.
Tip
You can also tap the HotSync icon on the Application Launcher screen to display the HotSync dialog box.
2 Tap Modem.

Continued on next page
3 Tap the Enter phone # field beneath the modem name.
The Phone Setup dialog box is displayed.

4 Adjust the following settings if necessary:
① Enter the telephone number used to access the modem connected to your computer.
② Enter a dial prefix (such as “9”) to access an outside line, and tap the Dial prefix check box as needed. You can also enter a comma in the field to introduce a pause in the dialing sequence. Each comma equals a two second pause.
③ If the phone line you are using for your CLIÉ handheld has Call Waiting, select the Disable call waiting check box to avoid an interruption during the modem HotSync ® operation.
④ If you want to use a calling card to place the call, select the Use calling card check box and enter the calling card number.
5 Tap OK.
The HotSync screen is displayed again.
Selecting the conduits for a modem HotSync® operation
You can specify files and/or applications to be synchronized to shorten the time required to synchronize data with a modem.
For details, refer to “Customizing HotSyn® application settings (Conduit)” on page 97.
Note
If the configurations of your CLIÉ handheld and Change HotSync Action in your computer are not identical, the operation complies with the CLIÉ handheld's configurations.
1 Rotate the Jog Dial™ navigator to select the HotSync icon and press the Jog Dial™ navigator.
The HotSync screen is displayed.
Tip
You can also tap the HotSync ® icon to display the HotSync screen.
2 Tap the Menu icon.
3 Tap Conduit Setup from the Options menu.
The Conduit Setup screen is displayed.

Continued on next page
4 Tap the check boxes to uncheck the selection of the files and applications that you do not want to synchronize during a modem HotSync® operation.
By the default setting, all files are selected to be synchronized.
The data of applications that do not have a database (such as games) cannot be synchronized.
5 Tap OK.
Performing a HotSync® operation via a modem
You can perform a modem HotSync ® operation when you have prepared your computer setting, CLIÉ handheld setting, and Conduit Setup.
1 Rotate the Jog Dial™ navigator to select the HotSync icon and press the Jog Dial™ navigator.
The HotSync screen is displayed.
Tip
You can also tap the HotSync ® icon to display the HotSync screen.
2 Tap the HotSync

A HotSync ® operation starts.
A message will be displayed to note that the HotSync ® operation is complete.
Performing a HotSync ® operation via a network
To operate HotSync ® operations via a network, a person must be as competent as a network administrator.
You can perform a HotSync ® operation via a network between your CLIÉ handheld and the computer in the LAN of your office depending on the network environment of your office. For details, contact the administrator of the remote access server.
Prior to performing a HotSync® operation via a network
Check the following items.
- Both your company's network system and its remote access server support TCP/IP.
- You have a remote access account.
- Your CLIÉ handheld is properly connected to a Mobile Communication adapter sold separately.
Preparing your computer
1 Click the HotSync icon in the Windows task tray (bottom-right corner of the taskbar) and select Network from the shortcut menu.
2 Click the HotSync icon in the Windows task tray again and select Setup from the shortcut menu.
The Setup screen is displayed.
3 Click the Network tab.
4 Click the check box next to the user name for HotSync.
Click TCP/IP Settings and assign a subnet mask as needed. For details on a subnet mask address, refer to the manual of your operating system or contact the system administrator.
5 Click OK.
Continued on next page
6 Place your CLIÉ handheld on the cradle and press the HotSync button.
The computer information (Primary PC name and Primary PC address (IP address)) is transferred to your CLIÉ handheld.
When you perform a HotSync ® operation via a network, your CLIÉ handheld identifies the computer based on the information transferred.
Preparing your CLIÉ handheld
Follow the steps below to set up your CLIÉ handheld for a HotSync® operation via a network.
1 Rotate the Jog Dial™ navigator to select the HotSync icon and press the Jog Dial™ navigator on the Application Launcher screen.
The HotSync screen is displayed.
Tip
You can also tap the HotSync icon to display the HotSync screen.
2 Tap Modem.
3 Tap the Menu icon.
4 Tap Modem Sync Prefs from the Options menu. The Modem Sync Preferences screen is displayed.

5 Tap Network.
6 Tap OK.
The HotSync screen is displayed.
Continued on next page
7 Tap Select Service beneath the icon. The Network Preferences screen is displayed.

8 Tap the arrow ▼ next to Service and select Unix or Windows RAS from the drop-down list.
For details, refer to “Changing the Network preferences” on page 71 and contact the administrator of the remote access server.
9 Tap Done.
10 Tap the Enter phone # field. The Phone Setup dialog box is displayed.
11 Adjust the following settings as needed.
12Tap OK. The HotSync screen is displayed.
13Follow "Performing a HotSync ® operation via modem" on page 104 to select data to be synchronized.
Performing a HotSync ® operation via a network
You can perform a HotSync ® operation via a network when you have prepared your computer setting, CLIÉ handheld setting, and Conduit Setup.
1 Rotate the Jog Dial™ navigator to select the HotSync icon and press the Jog Dial™ navigator on the Application Launcher screen.
The HotSync screen is displayed.
Tip
You can also tap the HotSync icon to display the HotSync screen.
2 Tap the HotSync

A HotSync ® operation starts.
The message will be displayed to note that the HotSync ® operation is complete.
Performing a HotSync® operation via LAN (LANSync)
To operate LANSync, a person must be as competent as a network manager. Consult a network manager prior to setting LANSync.
You can perform a HotSync ® operation via LAN between your computer and another computer connected to your CLIÉ handheld.
![graph TD A["Smartphone"] --> B["Server 1"] B --> C["Server 2"] C --> D["Server 3"] D --> E["Your computer"] F["LANSync via LAN"] --> B F --> D style A fill:#f9f,stroke:#333 style E fill:#f9f,stroke:#333](/content/2026/08/1568140/images/00c2020017cd958eb29f39e1107855a11ee11b033816ffa91cb8b5b8da85d65c.jpg)
Prior to performing a LANSync operation
Check the following items.
- The Palm™ Desktop for CLIÉ software is installed in both computers connected by the LAN.
- Your CLIÉ handheld is placed on the cradle correctly and the cradle is connected to the computer properly.
Preparing your computer
1 Click the HotSync icon in the Windows task tray (bottom-right corner of the taskbar) and select Network from the shortcut menu.
2 Click the HotSync icon in the Windows task tray again and select Setup from the shortcut menu.
The Setup screen is displayed.
3 Click the Network tab.
4 Click the check box next to the user name for HotSync.
5 Click OK.
Continued on next page
6 Place your CLIÉ handheld on the cradle and press the
HotSync

button.
The computer information (Primary PC name and Primary PC address (IP address)) is transferred to your CLIÉ handheld.
When you perform a HotSync ® operation via LAN, your CLIÉ handheld identifies the computer based on the information transferred.
Preparing your CLIÉ handheld
Follow the steps below to set up your CLIÉ handheld for a HotSync® operation via the LAN.
1 Rotate the Jog Dial™ navigator to select the HotSync icon and press the Jog Dial™ navigator on the Application Launcher screen.
The HotSync screen is displayed.
Tip
You can also tap the HotSync icon to display the HotSync screen.
2 Tap Local.
3 Tap the Menu icon.
4 Tap LANSync Prefs in the Options menu.
The LANSync Preferences screen is displayed.

5 Tap LANSync.
Continued on next page
6 Tap OK.
The HotSync screen is displayed.
Performing a LANSync operation
You can perform a LANSync operation when you have prepared your computer setting, CLIÉ handheld setting, and Conduit Setup. Turn on the computers and start the HotSync® Manager application.
Note
To perform a LANSync operation, both computers connected to the cradle and performing a HotSync ® are required to be set for LANSync. On each computer, click the HotSync icon in the Windows task tray (bottom-right corner of the taskbar) and make sure that Network in the shortcut menu is checked. If not, click Network to check it.
1 Rotate the Jog Dial™ navigator to select the HotSync icon and press the Jog Dial™ navigator on the Application Launcher screen.
The HotSync screen is displayed.
Tip
You can also tap the HotSync icon to display the HotSync screen.
2 Tap the HotSync

A HotSync ® operation starts.
The message will be displayed to note that the HotSync ® operation is complete.
Using "Memory Stick®" media
This chapter explains how to communicate with another Palm OS® PDA device via “Memory Stick” media, how to handle “Memory Stick” media, and how to use the CLIE Files application for managing the data in “Memory Stick” media.
Using "Memory Stick®" media .....119
Exchanging data via "Memory Stick" media .. 128
What is "Memory Stick" media?
“Memory Stick” media is a new, compact, and portable Integrated Circuit recording medium with a data capacity that exceeds a floppy disk. “Memory Stick” media is specially designed for exchanging and sharing data among “Memory Stick” media compatible products, such as a digital video camera. Because it is removable, “Memory Stick” media can also be used for external data storage.
“Memory Stick” media enables you to exchange data between your CLIÉ handheld and computer. To exchange data via “Memory Stick” media, your CLIÉ handheld uses the supplied CLIÉ Files application.
Types of "Memory Stick" media
There are two types of “Memory Stick” media:
- “MagicGate Memory Stick” media, which is equipped with “MagicGate” copyright protection technology.
- “Memory Stick” media, which is not equipped with “MagicGate” copyright protection technology.
You can use both types of “Memory Stick” media with your CLIÉ handheld. However, to play ATRAC3 format files, make sure to use “MagicGate Memory Stick” media.
What is MagicGate?
MagicGate is the copyright protection technology that is utilized for “MagicGate Memory Stick” media or MagicGate compatible devices such as a CLIÉ handheld. MagicGate certifies the device and “MagicGate Memory Stick” media as copyright-protection-compatible devices and encodes data to be played back on devices. The copyrighted data cannot be played back on a device not certificated.
Note on using "MagicGate Memory Stick" media
Do not handle copyright-protected files or directories stored in “MagicGate Memory Stick” media with the CLIE Files application or Windows® Explorer, the file may be disabled. To handle copyright-protected files, use a “MagicGate” compliant application such as the SonicStage software.
Inserting and removing a “Memory Stick” media
Insert a "Memory Stick" media into the "Memory Stick" slot.

While the power of your CLIÉ handheld is on, the applications in the “Memory Stick” media will be displayed on the Application Launcher screen automatically if you insert the “Memory Stick” media into the slot. (The feature does not work when certain application is running.)
Notes
- Insert a “Memory Stick” media in the right direction. If “Memory Stick” media is forced in the wrong direction, it may be damaged.
- Do not insert a “Memory Stick” media into the place other than the “Memory Stick” slot.
To remove "Memory Stick" media
Make sure that your CLIÉ handheld is not writing to or reading data from “Memory Stick” media. Push the “Memory Stick” media gently into the slot to release it. When the “Memory Stick” media has popped out, pick it out from the slot.

Push "Memory Stick" media in Pull "Memory Stick" media out
Notes on using "Memory Stick" media
When you use “Memory Stick” media, follow the precautions below.
- Avoid touching the terminals of “Memory Stick” media or touching it with a metal object.
- Do not drop, bend, or expose “Memory Stick” media to external shock.
- Do not disassemble or modify “Memory Stick” media.
- Avoid getting liquids on “Memory Stick” media.
- Avoid using or storing “Memory Stick” media in a location subject to: - extremely high temperature such as inside of a hot car, the outdoors exposed to direct sunlight, or near a heater - direct sunlight – high humidity - corrosive substances – excessive dust - magnetic fields
- When storing and carrying “Memory Stick” media, keep it in its original case to ensure protection of important data.
- Make a backup of important data.
- Avoid removing “Memory Stick” media from the insertion slot while data is being written or read.
- To avoid damaging or erasing data, do not
- pull out “Memory Stick” media or unplug the AC power adapter while formatting, or reading or writing data.
-
use “Memory Stick” media in a location subject to static electricity or electrical interference.
-
If the battery of your CLIÉ handheld is running short, an error message is displayed and you cannot exchange data with “Memory Stick” media. If this occurs, connect the AC power adapter or fully charge your CLIÉ handheld.
- Use the CLIÉ Files application to format “Memory Stick” media you use in your CLIÉ handheld. If you format it using another application, further operation with your CLIÉ handheld is not guaranteed.
- If you insert “Memory Stick” media that has been formatted by another application, a message prompting you to format it is displayed. To use “Memory Stick” media in your CLIÉ handheld, follow the instructions to format it. Note, however, that all stored data will be erased.
Protecting the data in "Memory Stick" media
To prevent accidental erasure of important data, you can use the write protect tab of “Memory Stick” media. Slide the tab to the left to enable or right to disable writing to “Memory Stick” media.
Write enable position
Slide the tab to the left to select the write enable position. You can read and write data in the “Memory Stick” media.
Write protect position (LOCK)
Slide the tab to the right to select the write protect position. You can only read the data in the “Memory Stick” media. Select the write protect position when you insert “Memory Stick” media containing any important data that you do not want to accidentally delete or overwrite.
Back side
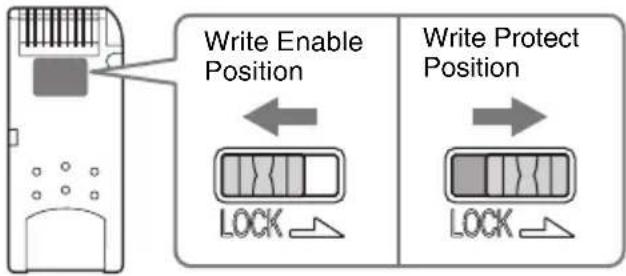
Tip
Shape or exact location of the tab may differ from the illustration depending on a type of “Memory Stick” media.
Starting an application in "Memory Stick" media
You can start the applications in “Memory Stick” media in the same way as the applications of your CLIÉ handheld. While the power of your CLIÉ handheld is on, the applications in the “Memory Stick” media will be displayed on the Application Launcher screen automatically if you insert the “Memory Stick” media into the slot. (The feature does not work when certain application is running.)
To switch from the Application Launcher screen to the screen where the applications in "Memory Stick" media are displayed, perform the following steps.
Tip
You cannot start applications other than that saved on the /PALM/Launcher folder by performing the following steps.
1 Display the Application Launcher screen, while the "Memory Stick" media is inserted in the CLIÉ handheld.
2 Press the BACK button to select the group.

3 Rotate the Jog Dial™ navigator to select 📁 Card.
The applications in "Memory Stick" media are displayed.
You can start an application in the same way that you start an application of your CLIÉ handheld.
If you have assigned a name to the "Memory Stick" media, then the
Card is displayed in that name.
Tip
You can also tap the Card icon to select it.
Note
Depending on the applications, some of the features may not work. In such a case, use the CLIIE Files application to copy the data in the CLIÉ handheld and use the copied data.
Viewing information of a "Memory Stick" media (Card Info)
You can view the information (such as the remaining memory space) of the "Memory Stick" media with the Card Info application.
1 Insert the "Memory Stick" media into your CLIÉ handheld.
2 Rotate the Jog Dial™ navigator to select the Card Info icon and press the Jog Dial™ navigator.
The Card Info screen is displayed.

Tip
You can also tap the Card Info icon to display the Card Info screen.
Assigning a name to a “Memory Stick” media
You can assign a name to each "Memory Stick" media with the Card Info application.
1 Insert the "Memory Stick" media into your CLIÉ handheld.
2 Rotate the Jog Dial™ navigator to select the Card Info icon and press the Jog Dial™ navigator.
The Card Info screen is displayed.
3 Tap the Menu icon. The menu is displayed.
4 Tap Rename Card in the Card menu. The Rename Card dialog box is displayed.

5 Enter a new name for the inserted "Memory Stick" media and tap Rename.
Formatting "Memory Stick" media
A “Memory Stick” media commercially produced is already formatted for use. In the case that you need to format your “Memory Stick” media, use the CLIE Files or Card Info application. The following explains how to format a “Memory Stick” media with the CLIE Files application.
1 Insert the "Memory Stick" media into your CLIÉ handheld.
2 Rotate the Jog Dial™ navigator to select CLIE Files and press the Jog Dial™ navigator.
The CLIE Files application starts.
You can also tap the CLIE Files icon to start the application.
3 Tap the Menu icon.
The Menu screen is displayed.
4 Tap Format from the Tool menu.
The confirmation message is displayed.
5 Enter a new name for the formatted "Memory Stick" media and tap OK.
The Confirmation message is displayed.
6 Tap OK.
To cancel formatting
Tap Cancel in step 5.
What is formatting?
Formatting defines the recording format for your “Memory Stick” media so that you can access data with your CLIÉ handheld.
Notes
- If a “Memory Stick” media is reformatted, all the data stored in the “Memory Stick” media will be erased. Make sure to check the data prior to formatting so that you do not delete important data.
- To use the “Memory Stick” media on your CLIÉ handheld, format it in your CLIÉ handheld. The “Memory Stick” media formatted by the computer may not be read or written properly on your CLIÉ handheld.
- If you remove the “Memory Stick” media during formatting, the “Memory Stick” media will not be recognized by devices. In this case, insert the “Memory Stick” media again to restart formatting.
Starting CLIE Files
You can copy, move, or delete data in a “Memory Stick” media and your CLIÉ handheld with the CLIÉ Files application.
For details on the CLIE Files application, refer to “CLIE Files” in “CLIÉ Application Manual” on your computer.
1 Rotate the Jog Dial™ navigator to select CLIE Files and press the Jog Dial™ navigator.
The CLIE Files application starts and the list of data in the “Memory Stick” media is displayed.
You can also tap the CLIE Files icon to start the application.
When displaying the data in a "Memory Stick" media
The following icons are displayed only when you view the data in “Memory Stick” media. For the other icons, refer to “When displaying the data in your CLIÉ handheld” (page 129).
Iap here to sort in ascending or descending order

Tap here to switch the view between your CLIÉ handheld and "Memory Stick" media
Tap here to switch to the Directory list screen
Tap here to switch the view of the following
- size: File size
- creator: Creator ID of the file
- type: File type
- version: Version of the file
- none: no items displayed
Tap here to switch the view of the following
- Name: name displayed on the computer
- DBname: name assigned on your CLIÉ handheld
Tap here to switch the view between your CLIÉ handheld and "Memory Stick" media
Tap here to display the contents of the folder*
Tap here to display the upper directory*
* and icons are specific to the screen when displaying the data in a “Memory Stick” media. Except for these icons, all icons in the screen are common to the one when displaying the data in your CLIÉ handheld. You can also rotate the Jog Dial™ navigator to select a folder.
Continued on next page
Tip
You can select a folder in the Directory list screen and tap OK to display the contents of the folder. Additionally, you can tap New to create a new folder or tap Rename to change the name of existing folder.
Notes
- When the directory tree is made up with nine levels or more, directory levels are not displayed.
- When the battery power of your CLIÉ handheld is insufficient, data in “Memory Stick” media may not be displayed. In such a case, you need to charge your CLIÉ handheld or connect the AC adapter to your CLIÉ handheld.
When displaying the data in your CLIÉ handheld
Switch the database display by group
- All databases
- Creator group
- Application

Notes on moving or deleting data using the CLIE Files application
In some cases when you move or delete a specific file using the CLIE Files application, some CLIÉ applications may not be operated properly or some data may be formatted. Sony is not liable for any trouble with applications or data that arises out of your moving or deletion of a file.
Do not move or delete the following files:
- Saved Preference: Saves the final operation status or settings for various applications.
- Unsaved Preference: Saves the settings for various applications or user information of your CLIÉ handheld. If this file is deleted, you may not be able to synchronize correct information.
Continued on next page
- CLIE Launcher XXX: Saves the database for CLIE Launcher. If this file is deleted, you may not be able to operate CLIE Launcher.
- NetworkDB: Saves network settings. If this file is deleted, network connection is disabled.
- AddressDB: Saves the database for Address Book*.
- DatebookDB: Saves the database for Date Book*.
- MemoDB: Saves the database for Memo Pad*.
- ToDoDB: Saves the database for To Do List*.
* These database files can be copied to “Memory Stick” media as a back up file. If you copy them back to your CLIÉ handheld, the identical files in your CLIÉ handheld will be overwritten with the information at the time of the back up. Note that any added or edited information in your CLIÉ handheld after the back up will not be restored.
Copying your CLIÉ handheld data to a "Memory Stick" media
You can save your CLIÉ handheld data to “Memory Stick” media with the CLIE Files application.
Notes
- Since data copying consumes a lot of power, you cannot use “Memory Stick” media when your CLIÉ handheld is short of battery power. In such a case, connect the AC adapter to your CLIÉ handheld.
- If your CLIÉ handheld receives IR communication while copying data, the copying will be interfered. Do not allow your CLIÉ handheld to receive IR communication while copying data.
1 Insert "Memory Stick" media into your CLIÉ handheld.
2 Tap the Home icon.
Continued on next page
3 Rotate the Jog Dial™ navigator to select CLIE Files and press the Jog Dial™ navigator.
The CLIE Files application starts and the list of data in the “Memory Stick” media is displayed.

Tip
You can also tap the CLIE Files icon to start the application.
4 Press the Jog Dial™ navigator to select Internal at the upper right corner of the screen.
5 Tap the data you want to copy and change to.
You can select multiple data by marking the check boxes.
Note
The data marked with the f can not be copied.
6 Tap Copy.
The Directory list screen is displayed.
7 Tap the "Memory Stick" directory.
When you want to create a new directory in the “Memory Stick” media, tap New and enter the directory name. Tap the directory created.
When you want to rename an existing directory, tap Rename and enter the new name.
8 Tap OK.
The data is copied to the directory selected in step 7.
Continued on next page
To copy all the data at once
Tap Select in step 5 and select Select all.
To cancel the selection
- To cancel all the selections: tap Select and select Clear all.
- To clear only specific items: tap the selected item once again.
When you want to select data other than the one specified
After following step 5, tap Select and select Invert. The selections of ☑ and □ are reversed.
Moving your CLIÉ handheld data to "Memory Stick" media
When the memory space of your CLIÉ handheld is not sufficient, you can move the data from your CLIÉ handheld to a “Memory Stick” media.
1 In step 6, tap Move.
The data in your CLIÉ handheld is transferred to the “Memory Stick” media and saved.
Note
If the low battery error message is displayed while you are copying or moving data from your CLIÉ handheld to a “Memory Stick” media, invalid files created by incomplete copying or moving may be left in the “Memory Stick” media.
Charge your CLIÉ handheld and try copying or moving again. If the overwrite confirm message is displayed, tap Yes or Yes to all.
Copying data in “Memory Stick” media to your CLIÉ handheld
You can copy the data saved in a “Memory Stick” media to your CLIÉ handheld. Prior to copying data, make sure that the memory space of your CLIÉ handheld is sufficient.
Tip
You can also copy data to another folder in the “Memory Stick” media.
1 Insert "Memory Stick" media into your CLIÉ handheld.
2 Tap the Home icon.
3 Rotate the Jog Dial™ navigator to select CLIE Files and press the Jog Dial™ navigator.
The CLIE Files application starts and the list of data in the “Memory Stick” media is displayed.

Tip
You can also tap the CLIE Files icon to start the application.
4 Tap the data you want to copy and change to.
You can select multiple data by marking the check boxes.
5 Tap Copy.
The Directory list screen is displayed.
6 Select Internal.
Continued on next page
7 Tap OK.
The data selected in step 4 is copied to Internal.
To copy all the data at once
Tap Select in step 4 and select Select all.
To cancel the selection
- To cancel all the selections: tap Select and select Clear all.
- To clear only specific items: tap the selected item once again.
To change the folder to be copied
Tap ☐ to select the folder you want to copy. The displays of the folders are changed. You can specify a folder to be copied.
Moving data in “Memory Stick” media to your CLIÉ handheld
You can move the data from a “Memory Stick” media to your CLIÉ handheld.
1 In step 5, tap Move.
The data in the “Memory Stick” media is transferred to your CLIÉ handheld and saved.
Note
Some data copied from “Memory Stick” media to your CLIÉ handheld may not be synchronized during a HotSync ® operation.
Deleting data in "Memory Stick" media
You can delete the data from a “Memory Stick” media with the CLIE Files application.
1 Insert "Memory Stick" media in your CLIÉ handheld.
2 Tap the Home icon.
3 Rotate the Jog Dial™ navigator to select CLIE Files and press the Jog Dial™ navigator.
The CLIE Files application starts and the list of data in the “Memory Stick” media is displayed.

Tip
You can also tap the CLIE Files icon to start the application.
4 Tap the data you want to delete and change to.
5 Tap Del.
The Delete File dialog box is displayed.
6 Tap OK.
The data selected in step 4 is deleted from “Memory Stick” media.
To delete all the data at once
Tap Select in step 4 and select Select all.
To cancel the selection
- To cancel all the selections: tap Select and select Clear all.
- To clear only specific items: tap the selected item once again.
To change the folder to be deleted
Tap ☐ to select the folder you want to delete. The displays of the folders are changed. You can specify a folder to be deleted.
CLIE Files menus
The following describes the menus that are specific to CLIE Files.
For the menus common to the CLIÉ applications, refer to Common menus on page 38.
Tool menu
| Format Formats (Initializes) a “Memory Stick” media inserted in your CLIÉ handheld. Note that all data stored in a “Memory Stick” media will be erased when formatting the “Memory Stick” media. |
| Media Info Displays information, such as the amount of memory or volume label, of your CLIÉ handheld or “Memory Stick” media. |
| New Dir Creates a folder under the current folder in the “Memory Stick” media. (Only when “Memory Stick” media is selected) |
| Rename Changes the name of current directory or folder. (Only when “Memory Stick” media is selected)This is for “a name displayed on the computer.” |
| About CLIIE Files Displays the version information of “CLIIE Files.” |
Exchanging data without using the CLIE Files application
You can exchange the data between a "Memory Stick" media and your CLIÉ handheld from the menu of the Application Launcher screen.
However, problems may occur depending on the applications. Note the following items.
- You can copy only applications. Related files cannot be copied.
- Data stored in the “Memory Stick” media (such as image files) cannot be displayed.
1 Insert the "Memory Stick" media into the "Memory Stick" slot of your CLIÉ handheld.
2 Tap the Menu icon on the Application Launcher screen. The menu is displayed.
3 Tap Copy from the CLIE Launcher menu. The Copy dialog box is displayed.
4 Tap the arrow ▼ next to Copy To, and select Handheld or Card. From is automatically selected when you select Copy To.
5 Tap the application you want to copy.
6 Tap Copy. The selected application is copied to CLIÉ handheld or “Memory Stick” media.
Notes on starting applications from a "Memory Stick" media
You can start an application (files with extensions such as .prc,.pdb) from a “Memory Stick” media. However, note the following items prior to starting them.
- You can start only applications. Related files such as image files or movie files may not be opened (played back).
- When the data that cannot be opened in the application are installed in the “Memory Stick” media, move the data to your CLIÉ handheld or delete them with using the CLIÉ Files application.
Tip
When the data is installed in the “Memory Stick” media with the HotSync ® operation, the data files are stored in the /PALM/Launcher folder.
Beaming
This chapter explains how to communicate with another Palm OS ® PDA device via the infrared communications port.
Beaming between your Sony CLIÉ Handheld and another Palm OS® PDA 140
Beaming between your Sony CLIÉ Handheld and another Palm OS® PDA
What you can do with beaming
Your CLIÉ handheld is equipped with an IR (infrared) port that enables you to exchange data with another Palm OS® PDA device that has an IR port. The IR port is located at the top of your CLIÉ handheld, behind the small dark shield.

You can beam the following information between your CLIÉ handheld and another Palm OS ® PDA device that has an IR port:
- The data of Address Book, Date Book, To Do List, or Memo Pad.
- All data in the category currently displayed in Address Book, To Do List, or Memo Pad.
- Address Book data that you designate as your business card.
- Add-on applications installed in the memory.
Note
Some applications are protected from copying and cannot be beamed. The applications marked with the icon cannot be copied.
Beaming information
You can beam the data in your CLIÉ handheld to another Palm OS PDA device that has an IR port.
1 Select the data, category, or business card you want to beam.
2 Tap the Menu icon.
3 Tap one of the following:
• The Beam command for an individual record
• In Address Book only: Beam Business Card
- Beam Category
4 When the Beam dialog box is displayed, point the IR port of your CLIÉ handheld directly to the IR port of another Palm OS PDA device.

Tip
For best performance of the data exchange, keep 4 to 8 inches (approximately 10 to 20 centimeters) from your CLIÉ handheld to another Palm OS PDA device. Do not place any obstacle between the devices. The optimum distance for beaming may vary depending on devices.
5 Wait for a while until the Beam dialog box to display that the transfer is complete.
Receiving beamed information
1 Turn on your CLIÉ handheld and point the IR port of your CLIÉ handheld directly to the IR port of another Palm OS PDA device.
The Beam dialog box is displayed and beaming of data starts.
2 Select the category where you want to save the received data.
You can also create a new category to save the data to, or save it in the Unfiled category.
3 Tap Yes.
The data is saved.
Note
When Beam Receive in the Preferences screen is set to Off, you cannot receive data using the beaming feature. Prior to beaming data, set Beam Receive to On.
Tips on beaming information
- Data or applications received by beaming are saved in the Unfiled category.
- You can press the Address Book button for about two seconds to beam your business card.
- You can use Graffiti writing to beam the current entry ( then , or β and then tap )
Using the Calculator and finding records
This chapter explains how to efficiently search for records and how to use the calculator.
Using the Calculator (Calc) 144
Finding records 147
Calculating with the Calculator
You can perform basic calculations with the calculator. Moreover, you can save the numbers in the calculator memory and recalls it from the memory.
1 Rotate the Jog Dial™ navigator to select the Calculator icon and press the Jog Dial™ navigator on the Application Launcher screen.
The Calculator application starts.

Tip
You can also tap the Calc icon to start the application.
2 Perform calculations.
To use the Calculator, tap the numbers or symbols on the screen with the stylus or fingertip.
The functions of the Calculator buttons
The calculator has several buttons to help you perform calculations.
| CE Clears the last number you entered. Use this button if you make a mistake while entering numbers. This button enables you to re-enter the number without starting over the calculation. | |
| C Clears the entire calculation and enables you to start a new calculation. | |
| +/- Toggles the current number between positive and negative. If you want to enter a negative number, enter the number and then tap the +/- button. | |
| M+ Adds the current number to the total value in the memory. Each number you enter with the M+ button is added to the total value stored in the memory. The number to be added can be either a calculated value or the number you entered by pressing the number buttons. Pressing this button has no effect on the current calculation (or series of calculations); it merely places the value into the memory until it is recalled. | |
| MR Recalls the total value stored in the memory and inserts it in the current calculation. | |
| MC Clears any value that is stored in the Calculator memory. | |
| √ | Calculates the square root of the entered number. Tap the button after entering the number. |
Using the Calculator menus
Edit menus
Copy, Paste Copies values from Calculator and pastes it into another application. You can also paste numeric values you copied from another application such as Memo Pad into Calculator.
Options menus
Recent Calculations You can review the last series of calculations. It is convenient when you want to view the calculations later.
About Calculator Shows the version information for the Calculator application.
Using the Find option
You can find records, such as Date Book, Address Book, To Do List, or Memo Pad data, in your CLIÉ handheld by entering the whole word or first few letters. The search results are displayed by application basis. This feature is convenient when you do not remember which application you used to create a record you search for.
Note
The Find option is not compatible with certain application data.
1 Tap the Find icon.
The Find dialog box is displayed.

2 Enter the text you want to find.
You can enter letters, symbols, or numbers.
3 Tap OK.
The Find option starts to search and displays the list of search results. The attached comments added to each data are also searchable.
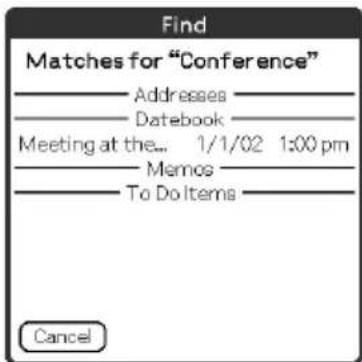
Continued on next page
4 Tap the data you want to view in the list of search results. The application associated with the data automatically starts to open the data.
To stop searching
Tap Stop and Exit.
To resume the search, tap Find More.
Note
The Find option is not case sensitive; searching for “sony” also finds “Sony.”
Tip
Select text in an application prior to tapping the Find icon to automatically place the text in the Find dialog box.
Backing up your Sony CLIÉ™ Handheld data
This chapter explains how to take the back up of your CLIÉ handheld data.
Backing up your Sony CLIÉ™ Handheld data .. 150
Backing up data to your computer through a HotSync® operation 150
Backing up data to a "Memory Stick" media using the Memory Stick Backup application. 151
Backing up your Sony CLIÉ™ Handheld data
You can create backup of your CLIÉ handheld data by one of the following methods:
- Back up data to your computer through a HotSync operation
- Back up data to a “Memory Stick” media using the Memory Stick Backup application
Backing up data to your computer through a HotSync® operation
By the default settings, you can back up the following data to your computer through a HotSync ® operation:
- Memo Pad data files
- Address Book data files
- To Do List data files
- Date Book data files
- Preferences data files
- Application files that have been installed using a HotSync operation
- User information files to perform a HotSync operation
When the HotSync ® operation is performed, the backup data is compared with the data in your computer, and the newer one becomes effective. If you perform a hard reset, all data stored in your CLIÉ handheld are erased and the initial status will be restored. In such a case, you can restore the backup data from your computer that was created through the previous HotSync ® operation.
Notes
- The following applications or data cannot be backed up through a HotSync operation.
- Applications or data transferred from a “Memory Stick” media or beamed - Certain applications or driver files added later, or certain data in an application For details on applications that cannot be backed up, refer to manuals for each application.
When you want to make a complete backup, use the Memory Stick Backup application.
- If you customize settings in the Change HotSync Action dialog box, you may not be able to create a back up file. You cannot back up an application or restore its data if an option other than “Synchronize the files” is selected. For details, refer to “Customizing HotSync® application settings (Conduit)” on page 97.
Backing up data to a “Memory Stick” media using the Memory Stick Backup application
With the Memory Stick Backup application, you can back up the following applications and data to a “Memory Stick” media.
- Memo Pad data files
- Address Book data files
• To Do List data files - Date Book data files
- Preferences data files
- Add-on application files
1 Insert a "Memory Stick" media into your CLIÉ handheld.
2 Tap the Home icon.
3 Rotate the Jog Dial™ navigator to select the MS Backup icon and press the Jog Dial™ navigator.
The Memory Stick Backup application starts.
4 Tap Backup icon.
The Backup All Files dialog box is displayed.
5 Tap OK.
The Backup Progress screen is displayed.
General information of the back up (date, size, and number of database) is displayed in the list.
Notes
- When you create backup data of your CLIÉ handheld in a “Memory Stick” media, the size of the backup data may become larger than the size of original data.
- Do not back up when free memory space in your CLIÉ handheld is insufficient. This may cause an improper restore.
Continued on next page
Tips
- The back up will be finished within a few minutes.
- In step 4, you can also select an existing file from the backup list then tap Backup to overwrite it.
- The data size displayed in the list shows the size of the applications and data stored in CLIÉ handheld.
- “Number of database” shows the number of applications and data that have been backed up.
- If a backup file in a “Memory Stick” media has been updated using the CLIE Files application, the file may not be backed up or restored properly.
To delete a backup file from the "Memory Stick" media
Select the backup data you want to delete in the Backup list, and tap Delete.
Restoring backup data and applications to your CLIÉ handheld
Notes
- When you restore backup data and applications to your CLIÉ handheld, the data currently saved in your CLIÉ handheld will be overwritten with the backup data. Any data created or edited after you saved the backup will be deleted.
- You can only restore data to the CLIÉ handheld from which you took that backup.
1 Perform a hard reset on your CLIÉ handheld.
For details on a hard reset, refer to “Basic operations of your Sony CLIÉ™ Handheld: Resetting your Sony CLIÉ Handheld” in “Read This First (Operating Instructions).”
2 Insert the "Memory Stick" media containing the backup files into your CLIÉ handheld.
3 Tap the Home icon.
4 Rotate the Jog Dial™ navigator to select the MS Backup icon and press the Jog Dial™ navigator.
The Memory Stick Backup application starts up and the back-up list appears.
5 Tap the backup data you want to restore from the list.
Continued on next page
6 Tap the Restore icon.
The Restore All Files dialog box is displayed.
7 Tap OK.
The Confirm Restore dialog box is displayed.
8 Tap OK.
The Restore Process dialog box is displayed.
If there are initial data automatically created by each application when you performed a hard reset or if there are data created or updated after a hard reset, the Overwrite Confirm dialog box is displayed. Tap Yes to overwrite, tap Yes to All to overwrite all data, or tap No to leave the data.
When the backup data is restored, the CLIÉ handheld shuts down and restarts automatically.
Tip
To select backup data by file, use the Copy feature in the CLIE Files application. For details on how to use CLIE Files application, refer to page 128.
Protecting your data with a password
This chapter explains how to manage your personal details using the various applications of your CLIÉ handheld and how to protect your data with a password.
Entering personal information ..... 155
When you have already assigned a password to protect your data 156
Locking your CLIÉ handheld with a password (Data protection) .....157
Turn off your CLIÉ handheld after locking . . . 157 Setting your CLIÉ handheld to be locked automatically ..... 159
Protecting data 160
Assigning a password .... 160 Changing or deleting a password .... 161 Hiding or masking private data .... 162
Entering personal information
You can enter personal information such as name, company name and telephone number in your CLIÉ handheld. If you assign a password, the personal information will be displayed when the CLIÉ handheld is turned on next time.
1 Rotate the Jog Dial™ navigator to select the Preferences icon and press the Jog Dial™ navigator on the Application Launcher screen.
The Preferences screen is displayed.
Tip
You can also tap the Preferences icon to display the Preferences screen.
2 Tap the arrow in the upper right on the Preference screen and select Owner.
The Owner preferences screen is displayed.

3 Enter your personal information.
When character strings that are entered do not fit within the screen, the scroll bar is displayed at the right of the screen.
When you have already assigned a password to protect your data
As the information is already protected, the personal information cannot be entered or edited. Follow the steps below to unlock the protection to enter/edit personal information.
1 Rotate the Jog Dial™ navigator to select the Prefs icon and press the Jog Dial™ navigator on the Application Launcher screen.
The Preferences screen is displayed.
Tip
You can also tap the Prefs icon to display the Preferences screen.
2 Tap the arrow in the upper right on the Preference screen and select Owner.
The Owner preferences screen is displayed.
3 Tap Unlock.
The Unlock Message screen is displayed.

4 Enter the assigned password and tap OK.
Locking your CLIÉ handheld with a password (Data protection)
You can lock your CLIÉ handheld by assigning a password. Your CLIÉ handheld requires a user to enter the password when it is turned on.
Note
To start your CLIÉ handheld when it is locked, it is necessary to enter the correct password. If you forget the password, you need to perform a hard reset. However, performing a hard reset deletes all your data in your CLIÉ handheld. (By performing a HotSync® operation, you can restore the backup data in your computer.)
For details on how to reset your CLIÉ handheld, refer to “Basic operations of your Sony CLIÉ™ Handheld: Resetting your Sony CLIÉ Handheld” of “Read This First (Operating Instructions).”
Turn off your CLIÉ handheld after locking
This feature locks and turns off your CLIÉ handheld. To start your CLIÉ handheld, it is necessary to enter the correct password.
1 Perform a HotSync ® operation between your computer and CLIÉ handheld to create a backup data of your CLIÉ handheld in your computer.
For details on the HotSync ® feature, refer to “Backing up data to your computer through a HotSync ® operation” on page 150.
2 Follow "Assigning a password" on page 160 to assign a password.
Continued on next page
3 Rotate the Jog Dial™ navigator to select Security and press the Jog Dial™ navigator, on the Application Launcher screen.
The Security screen is displayed.

Tip
You can also tap the Security icon to display the Security screen.
4 Tap Lock & Turn OFF.
The System Lockout screen is displayed.

5 Tap Off & Lock.
Your CLIÉ handheld turns off and locks.
To start your CLIÉ handheld, it is necessary to enter the correct password.
Setting your CLIÉ handheld to be locked automatically
You can set a time for your CLIÉ handheld to be locked automatically.
1 Follow steps one through three of "Turn off your CLIÉ handheld after locking" on page 157.
The Security screen is displayed.
2 Tap Never.
The Password screen is displayed.
3 Enter the password and tap OK.
The Lock Handheld screen is displayed.

4 Tap your choice from the list on the Lock Handheld screen.
- Never: Your CLIÉ handheld is not locked automatically.
- On power off: Your CLIÉ handheld is locked when it is turned off.
- At a preset time: Set a time for your CLIÉ handheld to be locked automatically.
- After a preset delay: Set a time for your CLIÉ handheld to be locked automatically if it is inactive for a preset time.
5 Tap OK.
You can protect your data from unauthorized users by assigning a password. Additionally, you can create your private data that cannot be displayed in the normal condition irrespective of whether the password is entered or not.
Assigning a password
You can assign a password to protect your private data or to lock your CLIÉ handheld.
1 Rotate the Jog Dial™ navigator to select Security and press the Jog Dial™ navigator on the Application Launcher screen. The Security screen is displayed.
Tip
You can also tap the Security icon to display the Security screen.
2 Tap -Unassigned-.
The Password dialog box is displayed.

3 Enter a password.
4 Tap OK.
The Password Confirm dialog box is displayed.
5 Enter the password once again to verify it and tap OK.
Your password is assigned and -Assigned- is displayed in step 2.
Continued on next page
Tip
In step 3, you can enter a hint to remember your password. The hint will be displayed to remind you the correct password when you enter the incorrect password.
Changing or deleting a password
You can change or delete the assigned password.
1 Rotate the Jog Dial™ navigator to select Security and press the Jog Dial™ navigator on the Application Launcher screen. The Security screen is displayed.
Tip
You can also tap the Security icon to display the Security screen.
2 Tap -Assigned-.
The Password dialog box is displayed.
3 Enter the current password and tap OK.
The Password dialog box is displayed.
4 Enter a new password and tap OK.
To delete the password, tap Unassign.
If you forget your password
If you forget your password, you can delete it forcibly. However, note that deleting the password forcibly also deletes all your private data. (If you perform a HotSync ® operation to synchronize with your computer, you can restore your private data that has been backed up.)
1 In step 2, tap Lost Password.
The Delete Password dialog box is displayed.
2 Tap Yes.
Your password and private data are deleted.
Hiding or masking private data
You can set to hide or mask your private data in applications such as Address Book or Memo Pad. To view the private data, you need to enter the password. Even if the data is invisible, it is saved.
1 Rotate the Jog Dial™ navigator to select Security on the Application Launcher screen.
The Security screen is displayed.
Tip
You can also tap the Security icon to display the Security screen.
2 Tap the arrow ▼ next to Current Privacy to select Mask Records or Hide Records.
The Mask Records screen or Hide Records screen is displayed.
3 Tap OK.
The private data becomes invisible.


When you select Hide Records When you select Mask Records
Enhancing features with add-on applications
This chapter explains how to enhance features of your CLIÉ handheld by installing applications from your computer, Internet and “Memory Stick” media.
Enhancing features with add-on applications.... 164
Installing 165
Installing from your computer.....165
Installing applications in a
"Memory Stick" media. 167
Installing from the Internet ..... 167
Deleting the installed add-on applications . . . 168
Enhancing features with add-on applications
To install the applications from the supplied CD-ROM, refer to “Using applications” of “Read This First (Operating Instructions).”
You can enhance the features of your CLIÉ handheld by installing applications such as games or other software that run on Palm OS (Add-on applications). For the latest information on the applications that can be used in your CLIÉ handheld, please refer to the CLIÉ web site.
Note
As all the add-on applications installed in your CLIÉ handheld are temporarily saved in the memory, all the add-on applications will be deleted when a hard reset is performed. In such a case, you need to reinstall them in your CLIÉ handheld.
Installing from your computer
You can install the applications of your computer into your CLIÉ handheld or "Memory Stick" media inserted in your CLIÉ handheld.
For details on how to install the applications that are supplied with your CLIÉ handheld, refer to “Using applications” of “Read This First (Operating Instructions).”
1 Double click the Palm™ Desktop for CLIÉ icon on your Windows desktop.
You can also click Start, Programs (All Programs for Windows XP), Sony Handheld, and Palm™ Desktop for CLIÉ in Windows.
The Palm™ Desktop for CLIÉ software starts.
2 Click Install.
The Install Tool screen is displayed.

3 Select the user from the User selector.
4 Click Add.
The Open dialog box is displayed.
The supplied applications are saved in the folder: Program Files/Sony Handheld/Add-on.
Continued on next page
5 Select applications you want to install from the folder and click Open.
A list of the selected applications is displayed on the Install Tool screen. Click Remove to delete applications that you do not want to install. The applications will be deleted from the list, but not from your computer.

6 Click Done.
The confirmation screen is displayed.
7 Click OK.
8 Perform a local HotSync operation.
Installs the applications selected in step 5 into your CLIÉ handheld or the "Memory Stick" media.
For details on local HotSync ® , refer to “Performing a Hotsync ® operation” on page 60.
Displaying the Install Tool screen directly from the Start menu in Windows
To display the Install Tool screen, click Start, Programs (All Programs for Windows XP), Sony Handheld, and Installation Tool. You can also double-click files that can be installed such as .prc or .pdb format files.
Installing applications in a “Memory Stick” media
The applications can be installed in “Memory Stick” media by the following methods.
- Install an application directly into “Memory Stick” media from your computer using the Memory Stick Import/Memory Stick Export application.
- After step 5 of “Installing from your computer,” click Changing the installation destination. Select the application and click either >> or << to specify “Memory Stick” media for the location to save the application.
Notes on installing applications in "Memory Stick" media:
In some applications, related files such as image files or movie files cannot be opened (played back).
In the procedure mentioned above, select “Memory Stick” media and install the data or application into the “Memory Stick” media by a HotSync® operation. They are installed in /PALM/Launcher folder. Some applications from Sony only support data in the designated folder. The data installed in /PALM/
Launcher folder in a “Memory Stick” media by a HotSync ® operation cannot be displayed in those applications.
In such a case, delete those data or applications from the “Memory Stick” media with the CLIE Files application.
Installing from the Internet
You can download applications from the CLIÉ Website (http://www.sony.com/clie/) and install them in your CLIÉ handheld.
1 Download the applications you want to install in your computer, from the Internet.
2 Follow the instructions such as a Readme file to install the downloaded application in your CLIÉ handheld. If there are no specific instructions, double click the downloaded PRC format (.prc) file and perform step 6 through 8 of “Installing from your computer” on page 165.
Deleting the installed add-on applications
Tip
You can only delete the applications that you installed yourself. Default applications such as Address Book, Memo Pad cannot be deleted.
1 Tap the Home icon.
2 Tap the Delete icon.
The Delete dialog box is displayed.
Tip
You can also delete an application by dragging an icon and dropping it over the Delete icon on the CLIE Launcher screen when the Use Drag&Drop check box on the CLIE Launcher Preferences screen (page 26) is on.
3 Tap the arrow ▼ next to delete source to select Handheld or Card.
4 Tap the application you want to delete and tap Delete. The confirmation message appears.

5 Tap Yes.
The application selected in step 4 will be deleted. To cancel deleting, tap No.
6 Tap Done.
The Application Launcher screen is displayed.
Using data with another Sony CLIÉ™ Handheld
This chapter explains how to transfer data from your CLIÉ handheld to other CLIÉ handhelds.
Using data with another Sony CLIÉ™ Handheld 170 Transferring data using the Palm™ Desktop for CLIÉ software 170
Using data with another Sony CLIÉ™ Handheld
Notes
- You cannot transfer data from another CLIÉ handheld with the Memory Stick Backup application.
- Some third-party applications may operate only on your old CLIÉ handheld. For details, contact the application manufacturer.
Transferring data using the Palm™ Desktop for CLIÉ software
For the data of the basic Palm OS ® applications such as Address Book, Memo Pad, To Do List, and Date Book, you can use the Palm ™ Desktop for CLIÉ software to transfer data from your old CLIÉ handheld to new CLIÉ handheld by exporting and importing data.
Before you start transferring data, you need to perform a HotSync ® operation between your previous CLIÉ handheld and the Palm ™ Desktop for CLIÉ software for your new CLIÉ handheld using a new user name you have never used. After performing a HotSync ® operation following “Exchanging and updating data using a HotSync ® operation” on page 58, follow the steps below.
1 Double click the Palm™ Desktop for CLIÉ icon on your Windows desktop.
You can also click Start, Programs (All Programs for Windows XP), Sony Handheld, and Palm™ Desktop for CLIÉ in Windows.
The Palm TM Desktop for CLIÉ software starts.
2 Click the user name of your previous CLIÉ handheld from the User name list at the upper right of the screen.
3 Click the icon of the application you want to copy.
4 Click Export, from the File menu.
5 Enter the file name and click Export.
The data of your old CLIÉ handheld is exported.
Change the location to save the application if necessary.
6 Repeat step 3 through 5 to export data of other applications.
Continued on next page
7 Click the user name of your new CLIÉ handheld from the User name list at the upper right of the screen.
Tip
If you have never performed a HotSync ® operation with your new CLIÉ handheld, select Users from the Tools menu. Click New in the Users screen and enter a new user name.
Then select the user name you just entered.
8 Click Import, from the File menu.
9 Select the files you have exported in step 3 through 6 and click Open.
10Perform a HotSync ® operation.
The data exported from your old CLIÉ handheld is copied onto your new CLIÉ handheld.
Do not perform a HotSync® operation with the same user name in other CLIÉ handhelds
If a HotSync ® operation between your new CLIÉ handheld and the Palm ™ Desktop for CLIÉ software for your old CLIÉ handheld is performed with the user name that has been being used, the setting information that are specific to the old CLIÉ handheld will be transferred with the data and some problems may arise. If you try performing a HotSync ® operation in the same way with your old CLIÉ handheld, problem may also arise. Do not transfer data by this method.
The screen to select the user name is displayed when performing a HotSync® operation in your CLIÉ handheld
Please enter a name that is different from the user name of the CLIÉ handheld that is being used. If the same user name is used, the Palm™ Desktop for CLIÉ software will not recognize your CLIÉ handheld properly and the data of the respective models will be mixed or deleted.
Moreover, if you copy UnsavedPreference from another CLIÉ handheld to your CLIÉ handheld, you will not be able to manage your CLIÉ handheld with another name since the user name is also copied.
Note on performing a HotSync ® operation in another CLIÉ handheld
When using another CLIÉ handheld, install (Over write) Palm™ Desktop for CLIÉ software that is supplied with the newly purchased CLIÉ handheld without deleting the Palm™ Desktop for CLIÉ software that is being used, from your computer.
The new Palm ™ Desktop for CLIÉ software will be installed after uninstalling old software except for the necessary features for another CLIÉ handheld.
A
Application
Add-on applications .....164
Deleting the add-on applications ...168
Enhancing the features .....164
Installing from the Internet .....167
Installing from your computer .....165
Quitting....15
Starting 14
Application buttons .....82
Application Launcher screen
CLIE Launcher ....14
Palm OS standard screen .....27
Application manager icon
Beam 23
Delete 23
Info 23
Archive 59, 99
Automatic power-off time .....91
B
BACK button....15
Backing up data
Backing up data to a "Memory Stick" media using the Memory Stick Backup application....151
Backing up data to your computer through a HotSync ® operation .....150
Basic operations....10
Beam Receive feature
Beaming .....141
IR HotSync .....101
Receiving .....142
What you can do .....140
Brightness 83
Buttons 82, 83, 84
C
Calculator
Calculating 144
functions of the Calculator buttons ..... 145 Using the Calculator menus ..... 146
Calling card 75
Card Info 124
CLIE Files
Copying data in "Memory Stick" media to your CLIÉ handheld 133
Copying your CLIÉ handheld data to a "Memory Stick" media ..... 130
Deleting data in "Memory Stick" media 135 Starting 128
CLIE Launcher
Application manager icon ..... 23
CLIE Launcher group 17
Creating a group 19
Deleting a group 20
Displaying information about applications 24
Locating the components ..... 16
Menu List 25
Ordering listed groups 19
Selecting a group 20
Using Favorite Applications (shortcuts) 21
Common menus 38
Conduit 97
Connection 69
Customizing the full-screen pen stroke activities 83
D
Data protection .....157
Date 86
Date Book 42
Digitizer 95
Dragging .....11
E
Entering data 40
Graffiti ® writing....45
on-screen keyboard .....42
F
File Link 99
Finding 147
Fonts 37
Format 86
G
General 92, 93, 94
Graffiti® writing
Graffiti character list .....46
Graffiti writing area ....53
Using Navigation stroke and
shortcuts 55
What is Graffiti writing? .....45
H
Hide Records....162
HotSync
Assigning applications to HotSync buttons .84
Customizing HotSync ® application settings (Conduit) .....97
Customizing how to start HotSync ®
Manager and the HotSync®
setup options 100
Performing a HotSync® operation . . . 60
Performing a HotSync ® operation via a modem 104
Performing a HotSync ® operation via a network 110
Performing a HotSync ® operation via LAN. 115
Performing a HotSync ® operation with the cradle (Local HotSync ® ) ..... 60
Performing an IR HotSync®
operation 101
Synchronizing with external data
(File Link) 99
What is a HotSync® operation? ..... 58
HotSync button 58
HotSync ® operation via a
modem 104
HotSync ® operation via a
network 110
I
IR port 25,101,140
J
Jog Dial™ navigator 12
L
LANSync 115
Locking 157
Log in scripts 78
M
Mask Records 162
Memory Stick Backup 151
"Memory Stick" LED .....120
"Memory Stick" media
Assigning a name .....125
Exchanging data 128
Formatting....126
Inserting and removing .....120
Protecting the data in "Memory Stick"
media 122
Starting an application .....123
Viewing information .....124
What is "Memory Stick" media? . . .119
"Memory Stick" slot .....120
Modem 69
N
Network 71
Network Log 81
Numbers
Selecting a regional default .....86
0
Owner 155
P
Palm™ Desktop for CLIÉ software
Basic operations 64
Locating the components .....63
Starting 62
Using data of another Sony CLIÉ
Handheld 170
Password
Changing or deleting .....161
If you forget your password .....161
Preferences
Buttons .....82, 83, 84
Connection 69
Date & Time .....88
Digitizer 95
Formats 86
General 91, 92, 93, 94
Network 71
Owner 155
ShortCuts 85
Private data 160
Protecting 160
S
Service template 71, 77
Setting the Date & Time
preferences 88
ShortCuts 16,55,85
Sounds 92
Stylus 10
T
Tapping 11
Time 86
Transferring data 170
U
User name 97,110
Using Favorite Applications (shortcuts)
Creating 21
Deleting 22
Using the Palm OS standard screen
Changing the display style of the Palm OS
standard screen 33
Starting 29
Switching to the CLIE Launcher
screen 28
V
View Log 81
For the latest information on support and accessories,
check our official Sony CLIÉ Web site
http://www.sony.com/clie/




- INTRODUCTION
- WHEN USING CLIÉ HANDHELD FOR THE FIRST TIME
- SONY CLIÉ™ HANDHELD BASIC OPERATIONS
- ENTERING DATA IN YOUR SONY CLIÉ™ HANDHELD
- EXCHANGING AND UPDATING DATA USING A HOTSYNC ® OPERATION
- CLIÉ HANDHELD ADVANCED OPERATIONS
- CUSTOMIZING YOUR SONY CLIÉ HANDHELD (PREFERENCES)
- EXCHANGING AND UPDATING DATA USING A HOTSYNC ® OPERATION (OTHER HOTSYNC ® OPERATIONS)
- USING "MEMORY STICK®" MEDIA
- BEAMING
- USING THE CALCULATOR AND FINDING RECORDS
- BACKING UP YOUR SONY CLIÉ™ HANDHELD DATA
- PROTECTING YOUR DATA WITH A PASSWORD
- ENHANCING FEATURES WITH ADD-ON APPLICATIONS
- USING DATA WITH ANOTHER SONY CLIÉ™ HANDHELD
- READ THIS FIRST (OPERATING INSTRUCTIONS)
- CLIÉ APPLICATION MANUAL (HTML FORMAT: START UP ON A COMPUTER)
- TROUBLESHOOTING Q&A
- NOTE
- TABLE OF CONTENTS
- BASIC OPERATIONS
- STARTING AN APPLICATION
- USING "CLIE LAUNCHER
- USING THE PALM OS ® STANDARD SCREEN
- CHANGING FONTS
- COMMON MENUS
- EXCHANGING AND UPDATING DATA USING A HOTSYNC® OPERATION
- EXCHANGING AND UPDATING DATA USING A HOTSYNC® OPERATION (OTHER HOTSYNC® OPERATIONS)
- USING THE STYLUS
- WHAT IS A STYLUS
- TIP
- WHERE IS THE STYLUS LOCATED
- TAPPING
- DRAGGING
- USING THE JOG DIAL™ NAVIGATOR
- WHAT IS THE JOG DIAL™ NAVIGATOR
- ROTATING THE JOG DIAL™ NAVIGATOR
- PRESSING THE JOG DIAL™ NAVIGATOR
- TO ROTATE WHILE HOLDING DOWN THE JOG DIAL™ NAVIGATOR
- STARTING AN APPLICATION IN THE APPLICATION LAUNCHER SCREEN ("CLIE LAUNCHER")
- QUITTING AN APPLICATION
- LOCATING THE COMPONENTS
- CLIE LAUNCHER GROUP
- EDITING GROUPS
- SELECT A GROUP TO EDIT AND TAP EDIT
- TAP DONE
- ORDERING LISTED GROUPS
- CREATING A NEW GROUP
- DELETING A GROUP
- SELECTING A GROUP
- TIPS
- USING FAVORITE APPLICATIONS (SHORTCUTS)
- CREATING A FAVORITE APPLICATION (SHORTCUT)
- TAP A FAVORITE APPLICATION (SHORTCUT) NUMBER THAT YOU WANT TO ASSIGN TO AN APPLICATION
- TO DELETE A FAVORITE APPLICATION (SHORTCUT)
- APPLICATION MANAGER ICON
- DISPLAYING INFORMATION ABOUT APPLICATIONS
- EDITING DESCRIPTION
- MENU LIST
- OPTIONS MENU IN THE CLIE LAUNCHER SCREEN
- SHOW EXPANSION CARDS
- DISPLAY ANIMATION
- USE DRAG&DROP
- USE BEAM ICON TO BEAM ONLY
- DISPLAY
- SWITCHING TO THE PALM OS STANDARD SCREEN
- SWITCHING TO THE CLIE LAUNCHER SCREEN
- STARTING AN APPLICATION BY SELECTING WITH THE JOG DIAL™ NAVIGATOR
- CHANGING THE PREFERENCES OF THE START-UP SCREEN FOR THE JOG DIAL™ NAVIGATOR OPERATION
- TAP THE ARROW ▼ NEXT TO JOG SELECT AND SELECT POPUP
- TAP OK
- STARTING AN APPLICATION BY TAPPING AN APPLICATION ICON
- CHANGING THE DISPLAY STYLE OF THE PALM OS STANDARD SCREEN
- SETTING TO DISPLAY THE LAST-OPENED CATEGORY OR THE LAST-USED APPLICATION WHEN THE PALM OS STANDARD SCREEN IS DISPLAYED
- DISPLAYING APPLICATION BY CATEGORY
- CATEGORIZING APPLICATIONS
- DISPLAYING CATEGORY-WISE
- TAP THE HOME ICON
- PERFORM EITHER OF THE FOLLOWING OPERATIONS
- EDIT MENU
- ON-SCREEN KEYBOARD (INPUT PANEL) (42 PAGE)
- GRAFFITI (45 PAGE)
- PRACTICING ENTERING DATA USING THE ON-SCREEN KEYBOARD
- ENTERING DATA
- USING GRAFFITI® WRITING TO ENTER DATA
- WHAT IS GRAFFITI WRITING
- ENTERING CHARACTERS WITH A SINGLE STROKE
- THE DOT ON EACH SHAPE SHOWS WHERE TO BEGIN THE STROKE
- THE AREA FOR WRITING LETTERS AND NUMBERS ARE DIFFERENT
- GRAFFITI CHARACTER LIST
- WRITING PUNCTUATION MARKS
- WRITING SYMBOLS AND EXTENDED CHARACTERS
- TO UNDO SYMBOL SHIFT MODE
- WRITING ACCENTED CHARACTERS AND NON-ENGLISH CHARACTERS
- TO WRITE NON-ENGLISH CHARACTERS
- DISPLAYING THE GRAFFITI ON-SCREEN HELP
- ENTERING CHARACTERS WITH GRAFFITI
- LIFT THE STYLUS FROM THE SCREEN AT THE END OF THE STROKE SHAPE
- NOTES ON WRITING GRAFFITI CHARACTERS
- USING NAVIGATION STROKE AND SHORTCUTS
- USING SHORTCUTS
- WHAT IS A HOTSYNC® OPERATION
- ③ USING THE DATA CREATED IN MICROSOFT® WINDOWS® APPLICATIONS IN YOUR CLIÉ HANDHELD
- THE COMPATIBLE FILE FORMATS THAT YOU CAN IMPORT/EXPORT WITH THE PALM™ DESKTOP FOR CLIÉ SOFTWARE
- PERFORMING A HOTSYNC® OPERATION
- PERFORMING A HOTSYNC ® OPERATION WITH THE CRADLE (LOCAL HOTSYNC ® )
- IF THE HOTSYNC ® OPERATION DOES NOT START
- START, PROGRAMS (ALL PROGRAMS IN WINDOWS® XP), SONY
- HANDHELD, AND HOTSYNC MANAGER. CHECK THAT THE
- WHEN YOU CANNOT PERFORM A HOTSYNC® OPERATION
- USING THE PALM™ DESKTOP FOR CLIÉ SOFTWARE
- STARTING THE PALM™ DESKTOP FOR CLIÉ SOFTWARE
- DOUBLE-CLICK THE PALM™ DESKTOP FOR CLIÉ SOFTWARE ICON ON THE WINDOWS DESKTOP
- TO QUIT THE PALM™ DESKTOP FOR CLIÉ SOFTWARE
- LOCATING THE PALM™ DESKTOP FOR CLIÉ SOFTWARE COMPONENTS
- RECORD PANE
- BASIC OPERATIONS OF THE PALM™ DESKTOP FOR CLIÉ SOFTWARE
- WHEN USING THE MICROSOFT® WINDOWS® XP OPERATING SYSTEM
- DISPLAYING THE PREFERENCE SCREEN FOR EACH MENU
- ADDING/CHANGING THE PREFERENCE FOR THE MODEM
- SELECTING A SERVICE TEMPLATE
- ENTERING A USER NAME
- NOTES
- ENTERING A PASSWORD
- SELECTING A CONNECTION
- ADDING TELEPHONE SETTINGS
- ADDING DETAILED INFORMATION TO A SERVICE TEMPLATE
- TO SELECT A CONNECTION TYPE
- CREATING ADDITIONAL SERVICE TEMPLATES
- TO DUPLICATE AN EXISTING SERVICE TEMPLATE
- TO DELETE A SERVICE TEMPLATE
- CREATING LOG IN SCRIPTS
- NON-ASCII CHARACTERS FOR LOG IN SCRIPTS
- USE OF ^CHAR
- CARRIAGE RETURN AND LINE FEED
- LITERAL CHARACTERS
- USING THE NETWORK PREFERENCES MENUS
- ASSIGNING APPLICATIONS TO APPLICATION BUTTONS
- TAP THE ARROW ▼ AT THE UPPER RIGHT OF THE PREFERENCE SCREEN AND SELECT BUTTONS
- TAP THE ARROW ▼ NEXT TO A BUTTON AND SELECT THE APPLICATION YOU WANT TO ASSIGN
- TO START THE ORIGINAL APPLICATIONS
- TO RESET TO THE DEFAULT SETTINGS
- CUSTOMIZING THE FULL-SCREEN PEN STROKE ACTIVITIES
- ASSIGNING APPLICATIONS TO HOTSYNC BUTTONS
- TO EDIT A SHORTCUT
- TO DELETE A SHORTCUT
- SETTING THE DISPLAY FORMAT OF THE TIME, DATE, AND NUMBERS
- SELECTING A REGIONAL DEFAULT
- CUSTOMIZING YOUR OWN SETTINGS FOR EACH UNIT
- SETTING THE DATE & TIME PREFERENCES
- SETTING THE DATE
- SETTING THE TIME
- SETTING THE TIME ZONE AND DAYLIGHT SAVING TIME
- SETTING THE TIME ZONE
- SETTING THE DAYLIGHT SAVING TIME
- SETTING THE AUTOMATIC POWER-OFF TIME
- TURNING THE ALARM LED ON OR OFF
- TURNING THE BEAM RECEIVE FEATURE ON OR OFF
- ADJUSTING THE DIGITIZER
- TAP THE ARROW IN THE UPPER RIGHT OF THE PREFERENCE SCREEN AND SELECT DIGITIZER
- CUSTOMIZING HOTSYNC® APPLICATION SETTINGS (CONDUIT)
- CLICK CHANGE
- CLICK TO SELECT ONE OF THE FOLLOWING
- CLICK OK
- REPEAT STEPS 2 THROUGH 6 TO CUSTOMIZE CONDUIT SETTINGS FOR OTHER APPLICATIONS (OR OTHER USERS)
- CLICK DONE
- SYNCHRONIZING WITH EXTERNAL DATA (FILE LINK)
- THE COMPATIBLE FILE FORMATS THAT YOU CAN IMPORT WITH FILE LINK
- CUSTOMIZING HOW TO START HOTSYNC® MANAGER AND THE HOTSYNC® SETUP OPTIONS
- PRIOR TO PERFORMING AN IR HOTSYNC ® OPERATION
- PREPARING YOUR COMPUTER
- FOR WINDOWS 2000 PROFESSIONAL/WINDOWS XP
- FOR WINDOWS 98 SECOND EDITION/ME
- CLICK THE HOTSYNC ICON IN THE WINDOWS TASK TRAY ONCE AGAIN AND SELECT SETUP FROM THE SHORTCUT MENU
- CLICK THE LOCAL TAB
- ADJUST THE FOLLOWING SETTINGS AS NEEDED
- PERFORMING AN IR HOTSYNC® OPERATION
- TO RESTORE THE LOCAL HOTSYNC SETTINGS
- PERFORMING A HOTSYNC® OPERATION VIA A MODEM
- PRIOR TO PERFORMING A HOTSYNC ® OPERATION VIA A MODEM
- CHECK THE FOLLOWING ITEMS
- PREPARING YOUR CLIÉ HANDHELD
- ROTATE THE JOG DIAL™ NAVIGATOR TO SELECT THE HOTSYNC ICON AND PRESS THE JOG DIAL™ NAVIGATOR
- TAP MODEM
- TAP THE ENTER PHONE # FIELD BENEATH THE MODEM NAME
- ADJUST THE FOLLOWING SETTINGS IF NECESSARY
- SELECTING THE CONDUITS FOR A MODEM HOTSYNC® OPERATION
- PERFORMING A HOTSYNC ® OPERATION VIA A NETWORK
- PRIOR TO PERFORMING A HOTSYNC® OPERATION VIA A NETWORK
- PERFORMING A HOTSYNC® OPERATION VIA LAN (LANSYNC)
- PRIOR TO PERFORMING A LANSYNC OPERATION
- PERFORMING A LANSYNC OPERATION
- WHAT IS "MEMORY STICK" MEDIA
- TYPES OF "MEMORY STICK" MEDIA
- WHAT IS MAGICGATE
- NOTE ON USING "MAGICGATE MEMORY STICK" MEDIA
- INSERTING AND REMOVING A “MEMORY STICK” MEDIA
- TO REMOVE "MEMORY STICK" MEDIA
- NOTES ON USING "MEMORY STICK" MEDIA
- PROTECTING THE DATA IN "MEMORY STICK" MEDIA
- WRITE ENABLE POSITION
- WRITE PROTECT POSITION (LOCK)
- STARTING AN APPLICATION IN "MEMORY STICK" MEDIA
- VIEWING INFORMATION OF A "MEMORY STICK" MEDIA (CARD INFO)
- ASSIGNING A NAME TO A “MEMORY STICK” MEDIA
- FORMATTING "MEMORY STICK" MEDIA
- STARTING CLIE FILES
- ROTATE THE JOG DIAL™ NAVIGATOR TO SELECT CLIE FILES AND PRESS THE JOG DIAL™ NAVIGATOR
- WHEN DISPLAYING THE DATA IN A "MEMORY STICK" MEDIA
- WHEN DISPLAYING THE DATA IN YOUR CLIÉ HANDHELD
- NOTES ON MOVING OR DELETING DATA USING THE CLIE FILES APPLICATION
- COPYING YOUR CLIÉ HANDHELD DATA TO A "MEMORY STICK" MEDIA
- PRESS THE JOG DIAL™ NAVIGATOR TO SELECT INTERNAL AT THE UPPER RIGHT CORNER OF THE SCREEN
- TAP THE DATA YOU WANT TO COPY AND CHANGE TO
- TAP COPY
- TAP THE "MEMORY STICK" DIRECTORY
- TO COPY ALL THE DATA AT ONCE
- TO CANCEL THE SELECTION
- WHEN YOU WANT TO SELECT DATA OTHER THAN THE ONE SPECIFIED
- MOVING YOUR CLIÉ HANDHELD DATA TO "MEMORY STICK" MEDIA
- IN STEP 6, TAP MOVE
- COPYING DATA IN “MEMORY STICK” MEDIA TO YOUR CLIÉ HANDHELD
- TO CHANGE THE FOLDER TO BE COPIED
- MOVING DATA IN “MEMORY STICK” MEDIA TO YOUR CLIÉ HANDHELD
- IN STEP 5, TAP MOVE
- DELETING DATA IN "MEMORY STICK" MEDIA
- TO DELETE ALL THE DATA AT ONCE
- TO CHANGE THE FOLDER TO BE DELETED
- CLIE FILES MENUS
- EXCHANGING DATA WITHOUT USING THE CLIE FILES APPLICATION
- NOTES ON STARTING APPLICATIONS FROM A "MEMORY STICK" MEDIA
- BEAMING BETWEEN YOUR SONY CLIÉ HANDHELD AND ANOTHER PALM OS® PDA
- WHAT YOU CAN DO WITH BEAMING
- BEAMING INFORMATION
- RECEIVING BEAMED INFORMATION
- TIPS ON BEAMING INFORMATION
- CALCULATING WITH THE CALCULATOR
- THE FUNCTIONS OF THE CALCULATOR BUTTONS
- USING THE CALCULATOR MENUS
- EDIT MENUS
- OPTIONS MENUS
- USING THE FIND OPTION
- TAP THE FIND ICON
- ENTER THE TEXT YOU WANT TO FIND
- TO STOP SEARCHING
- BACKING UP DATA TO YOUR COMPUTER THROUGH A HOTSYNC® OPERATION
- BACKING UP DATA TO A “MEMORY STICK” MEDIA USING THE MEMORY STICK BACKUP APPLICATION
- TO DELETE A BACKUP FILE FROM THE "MEMORY STICK" MEDIA
- RESTORING BACKUP DATA AND APPLICATIONS TO YOUR CLIÉ HANDHELD
- ENTERING PERSONAL INFORMATION
- LOCKING YOUR CLIÉ HANDHELD WITH A PASSWORD (DATA PROTECTION)
- PROTECTING DATA
- WHEN YOU HAVE ALREADY ASSIGNED A PASSWORD TO PROTECT YOUR DATA
- TURN OFF YOUR CLIÉ HANDHELD AFTER LOCKING
- SETTING YOUR CLIÉ HANDHELD TO BE LOCKED AUTOMATICALLY
- ASSIGNING A PASSWORD
- CHANGING OR DELETING A PASSWORD
- IF YOU FORGET YOUR PASSWORD
- HIDING OR MASKING PRIVATE DATA
- INSTALLING FROM YOUR COMPUTER
- SELECT APPLICATIONS YOU WANT TO INSTALL FROM THE FOLDER AND CLICK OPEN
- PERFORM A LOCAL HOTSYNC OPERATION
- DISPLAYING THE INSTALL TOOL SCREEN DIRECTLY FROM THE START MENU IN WINDOWS
- INSTALLING APPLICATIONS IN A “MEMORY STICK” MEDIA
- NOTES ON INSTALLING APPLICATIONS IN "MEMORY STICK" MEDIA
- INSTALLING FROM THE INTERNET
- DELETING THE INSTALLED ADD-ON APPLICATIONS
- TRANSFERRING DATA USING THE PALM™ DESKTOP FOR CLIÉ SOFTWARE
- DO NOT PERFORM A HOTSYNC® OPERATION WITH THE SAME USER NAME IN OTHER CLIÉ HANDHELDS
- THE SCREEN TO SELECT THE USER NAME IS DISPLAYED WHEN PERFORMING A HOTSYNC® OPERATION IN YOUR CLIÉ HANDHELD
- NOTE ON PERFORMING A HOTSYNC ® OPERATION IN ANOTHER CLIÉ HANDHELD
- A
- APPLICATION
- APPLICATION LAUNCHER SCREEN
- B
- BACKING UP DATA
- BEAM RECEIVE FEATURE
- C
- CALCULATOR
- CLIE FILES
- CLIE LAUNCHER
- D
- E
- F
- G
- H
- I
- J
- L
- M
- N
- P
- S
- T
- U
- V
Brand : SONY
Model : Clié PEG-NX60
Category : Digital Personal Assistant