MB20053418 - Grill Masterbuilt - Free user manual and instructions
Find the device manual for free MB20053418 Masterbuilt in PDF.


| Product Type | Charcoal Grill |
| Brand | Masterbuilt |
| Model Number | MB20053418 |
| Color | Black |
| Cooking Area | 240 square inches |
| Number of Cooking Grates | 2 |
| Cooking Grate Material | Porcelain-coated steel |
| Dimensions (W x H x D) | 25.6 x 40.2 x 22.8 inches |
| Weight | 32.4 lbs |
| Primary Fuel | Lump charcoal or briquettes |
| Temperature Gauge | Built-in lid gauge |
| Adjustable Air Dampers | 2 (top and bottom) |
| Ash Management | Removable ash pan |
| Cart Features | 2 lockable caster wheels |
| Assembly Required | Yes |
| Exterior Material | Steel with heat-resistant paint |
| Warranty | 1-year limited |
| Manual Information | Free PDF download available |
Frequently Asked Questions - MB20053418 Masterbuilt
User questions about MB20053418 Masterbuilt
0 question about this device. Answer the ones you know or ask your own.
Ask a new question about this device
Download the instructions for your Grill in PDF format for free! Find your manual MB20053418 - Masterbuilt and take your electronic device back in hand. On this page are published all the documents necessary for the use of your device. MB20053418 by Masterbuilt.
USER MANUAL MB20053418 Masterbuilt
Burning wood chips gives off carbon monoxide, which has no odor and can cause death.
DO NOT burn wood chips inside homes, vehicles, tents, garages or any enclosed areas.
USE ONLY OUTDOORS where it is well ventilated.

DANGER

IF YOU SMELL GAS:
- Shut off gas to the appliance.
- Extinguish any open flame.
- Open/remove door.
- If odor continues, keep away from the appliance and immediately call your fire department.
! WARNING !
This manual contains important information necessary for the proper assembly and safe use of the appliance.
Read and follow all warnings and instructions before assembling and using the appliance.
Follow all warnings and instructions when using the appliance.
Keep this manual for future reference.

Failure to follow these instructions could result in fire, explosion or burn hazard which could cause property damage, personal injury, or death.

! DANGER !
- Never operate this appliance unattended.
- Never operate this appliance within 10 feet (3.0m) of any structure, combustible material or other gas cylinder.
- Never operate this appliance within 25 feet (7.5m) of any flammable liquid.
- If fire should occur, keep away from appliance and immediately call your fire department. Do not attempt to extinguish an oil/grease fire with water.
STRUCTURAL PROXIMITY AND SAFETY USAGE RECOMMENDATIONS
Before using smoker check wind direction and place cylinder DOWNWIND 12" in upright position. This is necessary so that cylinder supply system is arranged for vapor withdrawal and prevent cylinder from striking unit if tipped.

HOSE IS A TRIP HAZARD THAT COULD CAUSE SUPPLY CYLINDER TO TIP

READ ALL INSTRUCTIONS
• Always use unit in accordance with all applicable local, state and federal fire codes.
- Before each use check all nuts, screws and bolts to make sure they are tight and secure.
- Never operate unit under overhead construction such as roof coverings, carports, awnings, or overhangs.
- Unit is for HOUSEHOLD OUTDOOR USE ONLY.
- Never use inside enclosed areas such as patios, garages, buildings or tents.
- Never use inside or on recreational vehicles or boats.
- Maintain a minimum distance of 10ft (3m) from overhead construction, walls, rails or other structures.
- Keep a minimum 10ft (3m) clearance of all combustible materials such as wood, dry plants, grass, brush, paper, or canvas.
- Never use unit for anything other than its intended use. This unit is NOT for commercial use.
- Accessory attachments not supplied by Masterbuilt Manufacturing, LLC are NOT recommended and may cause injury.
- Use of alcohol, prescription or non-prescription drugs may impair user's ability to properly assemble or safely operate unit.
- Keep a fire extinguisher accessible at all times while operating unit.
- When cooking with oil or grease, have a type BC or ABC fire extinguisher readily available.
- In the event of an oil or grease fire do not attempt to extinguish with water. Immediately call the fire department. A Type BC or ABC fire extinguisher may, in some circumstances contain the fire.
- Use unit on a level, non-combustible, stable surface such as dirt, concrete, brick or rock. An asphalt surface (blacktop) may not be acceptable for this purpose.
- Unit MUST be on the ground. Do not place unit on tables or counters. Do NOT move unit across uneven surfaces.
- Do not use unit on wooden or flammable surfaces.
- Keep unit clear and free from combustible materials such as gasoline and other flammable vapors and liquids.
- Do not leave unit unattended.
- Keep children and pets away from unit at all times. Do NOT allow children to use unit. Close supervision is necessary should children or pets be in area where unit is being used.
- Do NOT allow anyone to conduct activities around unit during or following its use until it has cooled.
- Never use glass, plastic or ceramic cookware in unit. Never place empty cookware in unit while in use.
- Never move unit when in use. Allow unit to cool completely (below 115°F (45°C) ) before moving or storing.
- Store only when fire is completely out and all surfaces are cold.
- Never use unit as a heater (READ CARBON MONOXIDE HAZARD).
- The unit is HOT while in use and will remain HOT for a period of time afterwards and during cooling process. Use CAUTION. Wear protective gloves/mitts.
- Be careful when removing food from unit. All surfaces are HOT and may cause burns. Use protective gloves/mitts or long, sturdy cooking tools for protection from hot surfaces or splatter from cooking liquids.
- DO NOT bump or impact the unit to prevent personal harm, damage to unit or spillage/splashing of hot cooking liquid.
- Do not touch HOT surfaces.
- Unit is hot during use. To avoid burns, keep face and body away from door, lid and vents. Steam and hot air are expelled during use.
• Air dampers are HOT while the unit is in use and during cooling; wear protective gloves when adjusting.
- Unit has an open flame. Keep hands, hair, and face away from burner flame. Do NOT lean over burner when lighting. Loose hair and clothing may catch fire.
- DO NOT obstruct flow of combustion and ventilation.
- Do not cover cooking racks with metal foil. This will trap heat and may cause damage to the unit.
- The installation of this appliance shall comply with the requirement of AS/NZS 5601 and the local authority - gas.
- Before each use inspect gas hose for signs of damage.
- Keep fuel supply hose away from any heated surface.
- Keep fuel supply hose away from unit while in operation.
- Regulator and hose assembly supplied with unit MUST be used. For replacement parts, if needed, contact Customer Service at 1300 174 876.
- Use 20LB (9kgs) gas cylinder that has protective collar (cylinder not included with unit).
- Keep ventilation openings of cylinder enclosure free and clear of debris.
WARNINGS & IMPORTANT SAFEGUARDS CONTINUED ON PAGE 4
WARNINGS & IMPORTANT SAFEGUARDS CONTINUED FROM PAGE 3
- LP gas cylinder being used must be constructed and marked in accordance with specifications for LP gas cylinders of the US Department of Transportation (DOT) or the Standard for Cylinders, Spheres and Tubes for the Transportation for Dangerous Goods, CAN/CSA-B339.
- Never use gas cylinder if there is evidence of dents, gouges, bulges, fire damage, erosion, leakage, excessive rust, or other forms of visible external damage. This may be hazardous and cylinder should be taken to a liquid propane supplier to be checked.
- Never attach/disconnect gas cylinder, move or alter gas fittings when unit is in operation.
• Always disconnect gas cylinder from unit when not in use.
• Propane only, 9.22MJ/h, inlet pressure 2.75kpa, injector orifice 0.84mm.
• This product will NOT operate with natural gas. - When use is complete, always, first turn the burner control valve OFF, then turn the gas cylinder valve OFF, and finally disconnect the cylinder.
- Gas MUST be turned off at the supply cylinder when not in use.
- Cylinder MUST be stored outdoors, out of children's reach and must NOT be stored in a building, garage, or any other enclosed area.
- Do NOT store spare LP gas cylinder under or near unit. Gas cylinder safety relief valve may overheat allowing gas to release causing fire which may cause death or serious injury.
- Never fill cylinder over 80% full or cylinder may release gas causing fire which may cause death or serious injury.
- Place a dust cap on cylinder valve outlet whenever cylinder is not in use. Only install dust cap provided with cylinder. Other caps or plugs may cause leaks.
- If you smell, hear or see gas escaping, immediately get away from gas cylinder and call the fire department. Fire may cause death or serious injury.
• Reference ignition steps before use. - Never use lighter fluid with propane.
- Wood chips must be used in order to produce smoke and create the smoke flavor.
- Flame disk bowl/ wood chip tray/bowl is HOT when unit is in use. Use caution when adding wood.
- Check grease tray often during cooking. Empty grease tray before it gets full. Grease tray may need to be emptied periodically during cooking.
- Do not open upper smoker door(s) unless necessary. Opening smoker door(s) causes heat to escape, which may cause extended cooking time and may cause wood to flare up. Closing the door(s) will re-stabilize the temperature and stop flare up.
- This is a smoker. There will be a lot of smoke produced when using wood chips. Smoke will escape through seams and turn the inside of smoker black. This is normal. To minimize smoke loss around door(s), door latch(s) can be adjusted to further tighten door seal against body.
- To adjust door latch, loosen hex nut on door latch. Turn hook clockwise to tighten as shown. Secure hex nut firmly against door latch.
- When outside temperature is cooler than 65° F ( 18° C) and/or altitude is above 3,500 feet (1067m), additional cooking time may be required. To ensure that meat is completely cooked use a meat thermometer to test internal temperature.
- Do not use wood pellets.
- Food needs to be in the center of smoking racks. This allows food drippings to go into the water bowl.
- Do not leave old wood or ashes in the flame disk bowl/woodchip tray/bowl. Once ashes are cold, empty bowl/tray. Bowl/tray should be cleaned out prior to, and after each use to prevent ash and residue buildup.
- Dispose of cold ashes by placing them in aluminum foil, soaking with water and discarding in a non-combustible container.
- Do not store unit with HOT ashes inside unit.
• DO NOT SPRAY AEROSOLS IN THE VICINITY OF THIS APPLIANCE WHILE IT IS IN OPERATION.
• DO NOT USE OR STORE FLAMMABLE MATERIALS IN OR NEAR THIS APPLIANCE.
• DO NOT PLACE ARTICLES ON OR AGAINST THIS APPLIANCE.
• DO NOT MODIFY THIS APPLIANCE. - SERVICING SHALL BE CARRIED OUT ONLY BY AUTHORIZED PERSONNEL, AND THAT THE APPLIANCE SHALL NOT BE MODIFIED.
SAVE THESE INSTRUCTIONS
SMOKER OPERATION - READ & FOLLOW ALL INSTRUCTIONS CAREFULLY
GETTING STARTED
• Pre-season unit prior to first use. See PRE-SEASON INSTRUCTIONS.
• Before starting the unit, see ADDING WOOD CHIPS OR CHUNKS.
CAUTION - All surfaces are HOT and may cause burns. Use protective gloves or long, sturdy cooking tools when loading/unloading food or racks, and when adding wood chips or water.
PRE-SEASON INSTRUCTIONS
Curing your smoker will rid the unit of chemicals and oils left over by the manufacturing process allowing them to burn off.
PRE-SEASON SMOKER PRIOR TO FIRST USE.
- Perform soapy water test, see SOAPY WATER TEST WARNINGS AND PROCEDURES.
- Using a napkin or cloth, rub a light coat of cooking oil on smoking racks and inside smoker door. Make sure water pan is in place with NO WATER.
- Fill wood chip tray with up to 1 cup (0.24l) of wood chips or chunks and light smoker. Close door.
- Start smoker and let the smoker burn for about 1 hour. Make sure temperature gets up to 350°F (177°C).
- Allow unit to cool COMPLETELY.
- Reapply light coat of cooking oil on smoking racks and inside of smoker door.
- Restart smoker and burn for 20 minutes.
- Cure your smoker periodically to prevent excessive rust.
ADDING WOOD CHIPS OR CHUNKS
- You may use dry or pre-soaked wood chips or chunks in your smoker. Dry chips or chunks will burn faster and produce more intense smoke. Chips or chunks pre-soaked in water (for approximately 30 minutes) will burn slower and produce a less intense smoke.
- DO NOT ADD MORE THAN 1 CUP (0.24l) OF WOOD CHIPS OR CHUNKS AT A TIME. Never use wood pellets.
- Place additional wood chips or chunks in smoker as needed to achieve desired smoke flavor.
- Wood chips or chunks must be used in order to produce smoke and create the smoke flavor.
OPERATING INSTRUCTIONS
- To start smoker see IGNITION INSTRUCTIONS.
- With protective gloves on, place water bowl in position. Pour 1 inch of water, juice, or vinegar into water bowl. This will add flavor and moisture to food and prevent it from drying out.
3 DO NOT cover racks with aluminum foil as this will not allow heat to circulate properly. - Pre-heat smoker for 30 to 45 minutes at max temperature before loading food.
- Place food in the smoker, position on the center of the smoking rack.
6 DO NOT overload smoker with food. Extra large amounts of food may trap heat, extend cooking time and cause uneven cooking. Leave space between food on racks and smoker sides to ensure proper heat circulation. If utilizing cooking pans, be sure pans do not cover more than 75% of the rack space and place pans on center of rack to ensure even cooking. - For best results, rotate racks between the top and bottom positions during cooking.
- Adjust smoker settings, control knob and air dampers, to desired cooking temperature.
- Close all air dampers on unit to retain moisture and heat. If cooking foods such as fish or jerky, open air dampers to release moisture.
-
If wood chips or chunks do not smoke on low setting, increase temperature to 275° . After 8 to 10 minutes or when wood chips or chunks begin to smolder, reduce temperature to desired low setting.
-
Use caution when cooking on windy days to ensure the flame does not blow out. If you suspect or experience a flame blow out, first open the door to check the flame and follow the IGNITION INSTRUCTIONS to re-ignite the burner if needed. Adjust the burner control valve setting for a higher flame to prevent further blow outs. Never ignite smoker with the door closed.
- Extreme cold temperatures may extend cooking times.
- Once cooking is complete turn unit OFF, see IGNITION INSTRUCTIONS for turning off unit, remove the gas cylinder and then follow CLEANING and STORING INSTRUCTIONS. CLEAN AFTER EVERY USE. This will extend the life of your smoker and prevent mold and mildew.
CLEANING and STORING INSTRUCTIONS
- ALWAYS MAKE SURE UNIT IS COOL TO THE TOUCH BEFORE CLEANING AND STORING.
- Be sure to clean smoker after each use. Make sure the gas cylinder has been turned off and removed.
- For rack supports, racks, water bowl, and drip pan use a mild dish detergent. Rinse and dry thoroughly.
- For woodchip tray clean frequently to remove ash build up, residue and dust.
- Dispose of cold ashes by placing them in aluminum foil, soaking with water and discarding in a non-combustible container.
- For the interior, exterior and door seal of the unit simply wipe down with a damp cloth after each use to keep unit in proper working condition. Do not use a cleaning agent. Make sure to dry thoroughly.
• After cleaning, store smoker in a covered and DRY AREA. - Store only when fire is completely out and all surfaces are cold.
- When not in frequent use and using a cover, remember to check your smoker periodically to avoid possible rust and corrosion due to moisture buildup.
CHECK OUT MASTERBUILT.COM FOR MORE TIPS AND RECIPE VIDEOS.
! WARNING !
PERFORM "SOAPY WATER TEST" BEFORE EACH USE. SEE "SOAPY WATER TEST" SECTION IN MANUAL.EXTINGUISH ALL OPEN FLAMES BEFORE CONNECTING REGULATOR TO GAS CYLINDER. TURN GAS OFF AFTER EACH USE.
SOAPY WATER TEST WARNINGS & PROCEDURES
WARNINGS
- Soapy water test MUST be performed each time gas cylinder is connected to burner/hose or each time it is used.
- Soapy water test MUST be performed outdoors in well ventilated area.
- When performing soapy water test keep unit away from open flames, sparks or lit cigarettes.
- Never use an open flame to test for gas leaks.
PREPARATION:
- Remove any cookware and accessories from unit.
- Make sure gas cylinder valve and burner control knob are turned to the OFF position.
- Prepare soapy water solution: (1) part dish washing liquid (or more if desired), (3) parts water.
- Apply soapy water solution to gas cylinder valve, regulator and hose length up to burner control valve.
Apply solution to gas cylinder valve

Apply solution to hose regulator and the full length of the hose
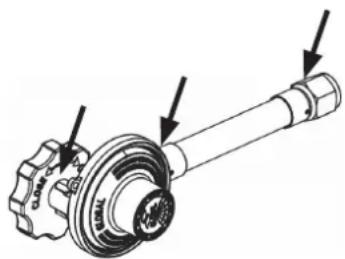
Apply solution underneath control panel where burner and hose are connected

(Smoker shown on back for clarity only)
Failed test will present bubbles as shown below.

TESTING GAS CYLINDER VALVE:
- Turn gas cylinder valve ON and watch for bubbles. DO NOT LEAVE GAS ON MORE THAN 12 SECONDS. If bubbles appear, stop, turn gas cylinder valve OFF and retighten fitting. Repeat test.
TESTING REGULATOR AND HOSE:
- AFTER gas cylinder valve has passed soapy water test, turn gas cylinder valve ON and check for bubbles at regulator location, along full length of hose and at burner control knob. DO NOT LEAVE GAS ON MORE THAN 12 SECONDS. If bubbles appear, stop, turn gas cylinder valve OFF and retighten the connection that is leaking gas. If hose is source of leak, STOP, do not use unit. Hose must be replaced.
- WHEN TEST IS COMPLETE, AND THERE ARE NO LEAKS, WAIT MINIMUM OF 5 MINUTES FOR GAS FUMES TO DIMINISH BEFORE LIGHTING SMOKER.
DURING ANY PORTION OF SOAPY WATER TEST IF BUBBLES CONTINUE TO APPEAR, STOP, DO NOT USE UNIT. CONTACT LOCAL PROPANE DEALER OR CUSTOMER SERVICE AT 1300 174 876.
Note: Use 20LB (9kgs) gas cylinder that has a protective collar with this unit. Cylinder NOT included with this unit.
IGNITION INSTRUCTIONS
REGULATOR, BURNER AND GAS VALVE CONNECTION & OPERATION
- Inspect hose before each use. If there are signs of abrasion, wear, cuts, or leaks, the hose must be replaced. DO NOT USE.
- Inspect burner before each use. Check burner and burner venturi tube for insects and insect nests. A clogged tube can lead to a fire beneath unit.
- Check to ensure the orifice is centered inside the venturi tube. Failure to properly assemble the valve orifice to the venture tube can result in gas leak or potential fire at connection. See assembly steps for proper assembly method.
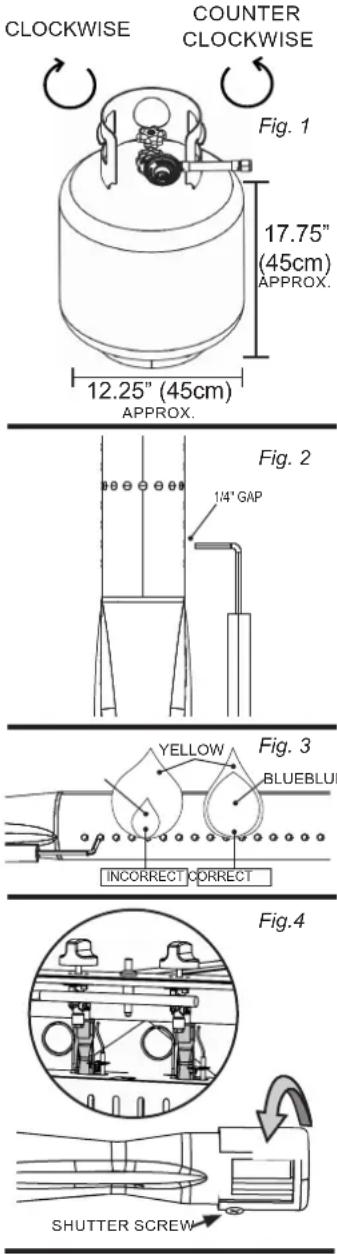
- Check to ensure the igniter pin is properly spaced and aligned to the burner. Igniter pin should be approximately 1/4" from the burner and aligned to the top of a burner port (Fig. 2). Confirm spacing is correct by pressing the igniter button and ensuring spark occurs between igniter pin and burner.
- Connect hose regulator to LP Gas Cylinder (Fig. 1)
- Make sure gas cylinder valve is closed. Turn valve clockwise until it stops.
- Make sure burner control valve on smoker is in the OFF position.
- Remove protective cap from gas cylinder and coupling nut if applicable.
- Center and insert regulator nipple into valve outlet on gas cylinder as shown in figure on the left.
Turn regulator coupling nut counter clockwise until it stops. DO NOT OVER TIGHTEN.
- Perform soapy water test.
- Before starting lighting procedure make sure the smoker door(s) are open.
- When lighting burner remove all parts inside or on unit to prevent explosion from gas build up.

- To use, turn gas cylinder valve ON, push control knob in, hold and and turn counter-clockwise to desired temperature setting. Push ignitor button to light, after ignition continue holding control knob in for 5 seconds to activate the flame sensor.
- If ignition does not take place within five seconds, turn control knob to OFF position and wait five minutes and repeat lighting procedures. If ignition still does not occur, see match light instructions.
• Always ensure that smoker door(s) are open before igniting. Gas can accumulate in smoker. - If flame goes out during cooking, turn control knob OFF, turn gas cylinder valve OFF, wait 5 minutes, then open door(s) and wait 5 additional minutes before repeating ignition instructions above.
- Control knob sets the smoker to a desired temperature. Push control knob in and turn clockwise to shut flame off.
- Visually check burner flame (Fig. 3). A CORRECT FLAME should be blue with a small amount of yellow at the tip. An INCORRECT FLAME is excessively yellow and irregular. If an incorrect flame occurs, turn control knob to OFF position, turn OFF gas cylinder valve. Allow unit to cool then loosen shutter screw and adjust air shutter (Fig. 4). If an incorrect flame still occurs allow unit to cool and then clean burner. Let burner completely dry before re-lighting.
- After use turn control knob OFF, then turn gas cylinder valve OFF and disconnect tank.
MATCH LIGHT INSTRUCTIONS
-
Read all instructions and warnings before lighting.
-
Check gas control valve and gas cylinder valve to be certain it is in OFF position before connecting to gas cylinder.
-
Perform soapy water test before each use.
-
Open door(s) during lighting and/or remove all accessories and cooking vessels from in/or on unit.
-
Turn gas cylinder valve on, then turn gas control valve on.
-
Place a long, lit fireplace match stick close enough to burner to ignite.
-
If ignition does not take place within five seconds, turn gas control valve to OFF position and wait five minutes and repeat match light instructions.
-
After each use, first turn gas control valve off, then gas cylinder valve off. Always allow unit to cool completely before touching, moving or storing.

WARNING
In the event of a gas leak that cannot be stopped, or if a fire occurs due to a gas leak, contact the fire department.
Emergency Cause Possible Solution
| Gas leaking from cracked, cut or burned hose | Damaged hose Turn off gas at LP cylinder. | |
| Replace hose. | ||
| Contact Customer Service at 1300 174 876. | ||
| Gas leaking from LP cylinder | Failure due to rust or mishandled equipment | Replace LP cylinder. |
| Gas leaking from gas cylinder valve | Failure of valve due to rust, mechanical failure or mishandled equipment | Turn off gas cylinder valve and return cylinder to gas provider/supplier. |
| Gas leaking between LP cylinder and regulator connection | Improper installation, connection not tight enough, damaged threads or bad rubber seal | Turn off gas cylinder valve, then re-attach regulator to cylinder. |
| Turn off gas cylinder valve and return cylinder to gas provider/supplier. | ||
| Visually inspect rubber seal for damage. | ||
| Fire under control panel Fire in tube of | burner due to burner blockage | Turn off both burner control knobs and gas cylinder valve. Once the fire is out and burner has cooled, remove and inspect burner for spiders, nests, rust or other debris. |
| Grease fire or excessive/ continuous flame | Grease build up on or around burner area | Turn off both burner control knobs and gas cylinder valve. Allow flames to extinguish and time for unit to cool down. Clean grease/food particles from/around burner or burner area and surrounding surfaces. |
TROUBLESHOOTING GUIDE
| Symptom Cause Possible Solution | ||
| Low flame output* Out of fuel Refill or replace with full LP cylinder. | ||
| Flames blow out* Low on LP gas | Refill LP cylinder. | |
| Flare-up | Excessive grease buildup | Clean burners and inside unit. |
| Excessive fat on meat | Trim fat off of meat. | |
| Cooking temperature too high | Adjust or lower temperature accordingly. | |
| Persistent grease fire | Grease trapped by food buildup around burner system | Turn burner control knobs and gas cylinder valve off.Allow fire to extinguish and the unit to cool down. Once cool, remove and clean parts. |
| Flashback (fire in burner tube) | Burner and/or burner tube has blockage | Turn burner control knobs and gas cylinder valve off.Clean burner and/or burner tube. |
| Slower than expected cooking times* | Valve not properly aligned to burner | Check to see if valve is centered in burner tube. |
* Also see Troubleshooting solutions: "Causes" Low or No Flow/Vapor Lock/Excess flow below.
| TROUBLESHOOTING SOLUTIONS: “CAUSES” LOW OR NO FLOW/VAPOR LOCK/EXCESS FLO | ||
| Symptom Cause Possible Solution | ||
| Burner doesn’t light after pressing ignitor button | Low/no gas flow 1. Turn burner control knobs to “OFF” position. | |
| Vapor lock at coupling nut to LP cylinder | 2. Turn gas cylinder valve knob to OFF.3. Disconnect regulator from cylinder to relieve vapor lock.4. Reconnect regulator to cylinder by hand turning until tight.5. Slightly open the gas cylinder valve slowly and then open further by turning 1 full turn.6. You are now ready to light the smoker.7. Turn the burner control knobs to high and light with ignitor. | |
| Low flame output Excess flow valve tripped | ||
| Flames blow out Excess flow valve tripped | ||
| Slower than expected cooking times Vapor lock | ||

DO NOT RETURN TO RETAILER. For assembly assistance, missing or damaged parts
please contact Customer Service at 1300 174 876.
Please have model number and serial number available when calling.
These numbers are located on the silver label on the back of unit.
- BEFORE ASSEMBLY READ ALL INSTRUCTIONS CAREFULLY.
• ASSEMBLE UNIT ON A CLEAN, FLAT SURFACE.
• TOOLS NEEDED: Adjustable wrench, Phillips head screwdriver - APPROXIMATE ASSEMBLY TIME: 25 minutes
** It is possible that some assembly steps have been completed in the factory. **
PARTS LIST
Actual product may differ from picture shown.

HARDWARE LIST

(A)
M6x12
Qty-45

(B)
10x3/8
Qty-6

(C)
M6×30
Qty-4

(D)
M6
Qty-3

(E)
M4
Qty-4

(F)
M6
Qty-16

(G)
M4x10
Qty-4

(H)
M5×10
Qty-4

(1)
Wing Nut
(packed with temperature gauge)
Qty-1

(J)
Wing Screw
(pre-assembled to tank retainer)
Qty-1
PARTS LIST
| NO QTY DESCRIPTION | |
| 1 10 Smoking Rack Support | |
| 2 1 Large Smoker Door w/window | |
| 3 1 Body Handle (rear) | |
| 4 4 Smoking Rack | |
| 5 1 Large Door Handle | |
| 6 1 Small Door Handle | |
| 7 1 Small Smoker Door | |
| 8 1 Smoker Body | |
| 9 1 Water Bowl Holder | |
| 10 1 Water Bowl | |
| 11 2 Air Damper (round) | |
| 12 1 Temperature Gauge | |
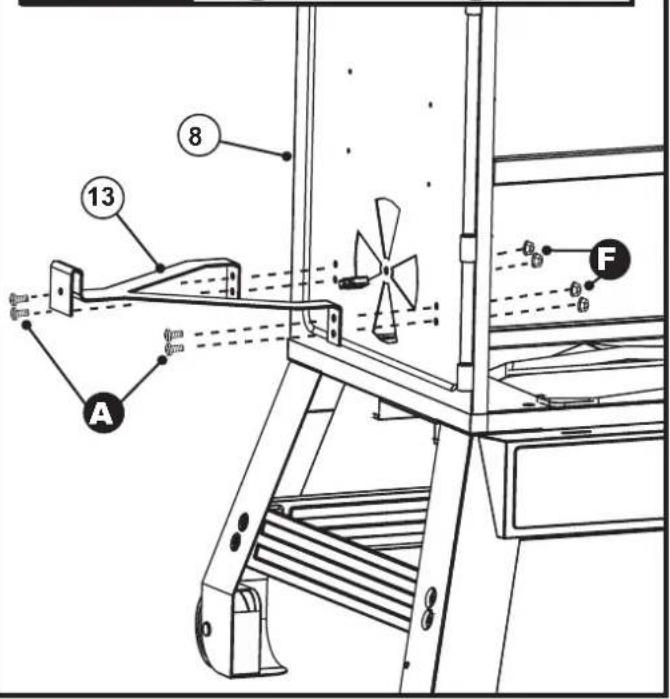
| 13 1 Propane Tank Retention Bracket | |
| 14 1 Wood Chip Tray w/Lid | |
| 15 2 Grease Tray | |
| 16 2 Grease Tray Support | |
| 17 1 Control Panel | |
| 18 1 Burner Box Kit | |
| 19 1 Ignitor | |
| 20 1 Heat Diffuser | |
| 21 1 Wood Chip Rack | |
| 22 1 Left Front Leg Kit | |
| 23 1 Right Front Leg Kit | |
| 24 1 Rear Leg Brace | |
| 25 2 Side Leg Brace | |
| 26 1 Left Rear Leg | |
| 27 1 Right Rear Leg | |
| 28 2 Control Knob | |
| 29 1 Wood Chip Handle | |
| 30 3 Door Latch | |
| 31 1 Match Stick w/Chain | |
| 32 1 Regulator/Hose | |
| 33 2 Wood Chip Tray Brackets | |
| 34 1 Heat Shield | |
| 35 1 Air Damper (square) | |
| 36 1 Valve Assembly | |
| 37 2 Flame Sensor |
ASSEMBLY
1

2

A x12

3

A

F x12
4

A x4x12


ASSEMBLY


ASSEMBLY
Align venturis over valve orifices and attach ignition wires to piezo ignitor on control panel. Attach flame sensor connectors to valves.


12

A x4

13

A x4 x4 F

14

15

16

Chip tray placement per burner(s) used.

17


19

x1


GASMATE BARBEQUES AND ACCESSORIES PRODUCT RANGE
SITRO GROUP AUSTRALIA (S.G.A.) warrants the purchaser of this product against defects in workmanship and materials for the following periods from the date of purchase:
For domestic use, this table applies:-
| Stainless steel components 5 years (surface oxidization excluded) | |
| Enamel components 5 years (chips excluded) | |
| Powder coated components 1 year | |
| Burners 3 years (surface rust excluded) | |
| Cast iron cooking plates & burners 3 years (surface rust excluded) | |
| Valves 3 years | |
| Ignition 1 year | |
| All other items 1 year | |
For commercial use :- 3 months.
This warranty is not transferable to a subsequent purchaser if the product is sold by the original purchaser during the warranty period.
If a warranty fault appears within the warranty period, S.G.A. reserves the right to replace or repair the product.
In the event that S.G.A. chooses to replace the product, this original warranty will expire at the original date.
If the product includes various accessories or components, only the defective accessory or component will be replaced or repaired.
S.G.A. reserves the right to replace defective parts of the product with parts and components of similar quality, grade and composition where an identical part or component is not available.
Products presented for repair may be replaced by refurbished products of the same type rather than being repaired. Refurbished parts may be used to repair the products.
To make a warranty claim, first contact S.G.A's Customer Service Line on the contact number below.
The purchase receipt for this product is to be retained and must be presented if making claim under the terms of this S.G.A. warranty.
Warranty repairs are free of charge, provided the product is delivered to our Service Department at 33-35 Lionel Road, Mt Waverley, Victoria, 3149 or to one of our Authorised Service Agents.
If a warranty fault is found the freight cost will be credited to the owner.
If no fault is found the product will be returned and any costs associated with the service will be charged to the owner.
Products sent freight forward will not be accepted. In most cases the defective accessory or component only will need to be returned. The product or part of the product being returned must be adequately protected in a box.
S.G.A. will not be responsible for any in-transit loss or damage.
This warranty does not apply to any defect, deterioration, loss, injury or damage occasioned by or as a result of misuse or abuse, negligent handling or storage, normal wear and tear or if the product has not been installed and used in accordance with S.G.A.'s instructions, recommendations and specifications or if the product has been subjected to abnormal conditions. The warranty does not apply to blockages caused by insects or living organisms.
The warranty is void if there is evidence of the product being tampered with by unauthorised persons.
The warranty does not extend to installation or disconnection costs.
Our goods come with guarantees that cannot be excluded under the Australian Consumer Law. You are entitled to a replacement or refund for a major failure and for compensation for any other reasonably foreseeable loss or damage. You are also entitled to have the goods repaired or replaced if the goods fail to be of acceptable quality and the failure does not amount to a major failure. The benefits of this warranty are in addition to any rights and remedies imposed by Australian State and Federal legislation that cannot be excluded.
Gas Products Approved For Outdoor Use Only
For warranty claims, service, spare parts or products information in Australia, please call SITRO GROUP AUSTRALIA Pty Ltd on the Customer Service Line 1300 174 876
Register your Warranty online at www.gasmate.com.au
A receipt or proof of purchase is required and must be kept for your records.
Note: If you do not have internet access call our customer service team on 1300 174 876
CONTACT DETAILS
Sitro Group Australia Pty Ltd
33-35 Lionel Road, Mt. Waverley
Victoria 3149, Australia.
Tel (+613) 9543 9533
Fax (+613) 9543 9839
sales@sitro.com.au
MASTERBUILT®
Rest assured, we're here to help.
Do not return to place of purchase. For any queries or assistance call
Customer Service
(Australia Only)
1300 174 876
Hours of operation: Monday to Friday 8am - 5pm EST
Keep your purchase receipt. This will be required to make any claims under the 12 month warranty.



- DANGER
- IF YOU SMELL GAS
- WARNING
- STRUCTURAL PROXIMITY AND SAFETY USAGE RECOMMENDATIONS
- READ ALL INSTRUCTIONS
- WARNINGS & IMPORTANT SAFEGUARDS CONTINUED FROM PAGE
- SAVE THESE INSTRUCTIONS
- SMOKER OPERATION - READ & FOLLOW ALL INSTRUCTIONS CAREFULLY
- GETTING STARTED
- PRE-SEASON INSTRUCTIONS
- PRE-SEASON SMOKER PRIOR TO FIRST USE
- ADDING WOOD CHIPS OR CHUNKS
- OPERATING INSTRUCTIONS
- CLEANING AND STORING INSTRUCTIONS
- CHECK OUT MASTERBUILT.COM FOR MORE TIPS AND RECIPE VIDEOS
- PERFORM "SOAPY WATER TEST" BEFORE EACH USE. SEE "SOAPY WATER TEST" SECTION IN MANUAL.EXTINGUISH ALL OPEN FLAMES BEFORE CONNECTING REGULATOR TO GAS CYLINDER. TURN GAS OFF AFTER EACH USE
- SOAPY WATER TEST WARNINGS & PROCEDURES
- WARNINGS
- PREPARATION
- TESTING GAS CYLINDER VALVE
- TESTING REGULATOR AND HOSE
- DURING ANY PORTION OF SOAPY WATER TEST IF BUBBLES CONTINUE TO APPEAR, STOP, DO NOT USE UNIT. CONTACT LOCAL PROPANE DEALER OR CUSTOMER SERVICE AT
- IGNITION INSTRUCTIONS
- REGULATOR, BURNER AND GAS VALVE CONNECTION & OPERATION
- MATCH LIGHT INSTRUCTIONS
- PARTS LIST
- HARDWARE LIST
- X
- ASSEMBLY
- GASMATE BARBEQUES AND ACCESSORIES PRODUCT RANGE
- GAS PRODUCTS APPROVED FOR OUTDOOR USE ONLY
- MASTERBUILT®
- DO NOT RETURN TO PLACE OF PURCHASE. FOR ANY QUERIES OR ASSISTANCE CALL
Brand : Masterbuilt
Model : MB20053418
Category : Grill