Tv 0 0032s - Television CECOTEC - Free user manual and instructions
Find the device manual for free Tv 0 0032s CECOTEC in PDF.


| Product type | LED Television |
| Brand | Cecotec |
| Model | Tv 0 Series 0032s |
| Screen size | 32 inches (81 cm) |
| Resolution | HD (1366 x 768 pixels) |
| Aspect ratio | 16:9 |
| Viewing angle | 178° horizontal and vertical |
| Connectivity | 2x HDMI, 1x USB, antenna input, audio output |
| Tuner | Built-in HD DTT (DVB-T2) |
| Speakers | 2 x 8 W stereo |
| Power supply | 220-240 V ~ 50/60 Hz |
| Power consumption | 50 W (max), <0.5 W standby |
| Dimensions (with stand) | 73.5 x 46.5 x 18 cm |
| Dimensions (without stand) | 73.5 x 43.5 x 8 cm |
| Weight | 5.2 kg |
| Wall mount | VESA 200 x 200 mm |
| Main functions | Picture modes, timer, parental control, EPG |
| Care and cleaning | Dry soft cloth, do not use solvents |
| Safety | Do not expose to moisture, do not block ventilation |
| Spare parts and repairability | Remote control included, external power adapter |
| Box contents | Television, stand, remote control, batteries, manual |
Frequently Asked Questions - Tv 0 0032s CECOTEC
User questions about Tv 0 0032s CECOTEC
0 question about this device. Answer the ones you know or ask your own.
Ask a new question about this device
Download the instructions for your Television in PDF format for free! Find your manual Tv 0 0032s - CECOTEC and take your electronic device back in hand. On this page are published all the documents necessary for the use of your device. Tv 0 0032s by CECOTEC.
USER MANUAL Tv 0 0032s CECOTEC
Safety instructions 8
-
Before use 70
-
Installation 70
-
Remote control buttons and interface 72
-
Modes and Menus 74
-
Remote control 85
-
Troubleshooting 87
-
Technical specifications 89
-
Disposal of old electrical and electronic appliances 89
-
Technical support and warranty 90
-
Copyright 90
-
Simplified Declaration of Conformity 90
SOMMAIRE
Read these instructions thoroughly before using the appliance. Keep this instruction manual for future reference or new users.
- DANGER: RISK OF ELECTRIC SHOCK. DO NOT OPEN. To reduce the risk of electric shock, do not remove the lid and refer servicing to qualified personnel.
- In the event of any type of incident, breakdown, revision, or maintenance, contact the Official Cecotec Technical Support Service.
- ⚠️ Pay particular attention to the information marked with this symbol: important instructions for use/operation.
- Warning: pay particular attention to the information marked with this symbol: danger of electric shock.
- Do not use this appliance near water.
- Clean it only with a dry cloth.
- Do not block any ventilation openings. Install the appliance with the specifications of the manufacturer.
- Do not install it near sources of heat like radiators, heaters or any other appliances that may produce heat.
- Do not tamper with the protection of the earthed plug on the appliance. A polarized plug has two blades with one wider than the other. An earthed plug has two prongs and a third
earthed prong. If the plug does not fit your outlet, consult an electrician to have the outlet replaced.
- Protect the power cable to prevent it from being damaged.
- Use only accessories specified by the manufacturer.
- Use only with stand, table, etc. specified by the manufacturer, or sold with the appliance. If you use a table with wheels, be careful when moving it to avoid injury.
- Unplug this appliance during lightning storms or when you do not plan to use it for long periods of time.
- Caution: to reduce the risk of fire or electric shock, do not expose the appliance to rain or moisture.
- Make sure that the mains socket is accessible and close to the appliance.
- This appliance is not intended for built-in installation unless adequate ventilation is provided, or the manufacturer's instructions are followed.
- Do not expose the appliance to dripping or splashing and do not place objects filled with liquids (such as vases) on the appliance.
- Do not place any object that may create a hazard on top of the appliance (for example, objects filled with liquid, lighted candles, etc.)
- Wall or ceiling mounting - The appliance should be mounted on the wall or ceiling only according to the manufacturer's recommendations.
- Never place the TV, remote control or batteries near naked flames or other sources of heat, including direct sunlight. To prevent fire, always keep candles or other sources of fire away from the TV, remote control, and batteries.
- The USB terminal accepts 0.5 A under normal operating conditions.
- Save maintenance instructions for use by authorized
personnel. To reduce the risk of electric shock, do not perform any maintenance operations other than those included in the instruction manual, unless you are qualified to do so.
- Do not expose the battery to excessive heat sources such as sunshine, fire or the like.
- This equipment is a class II or double insulated electrical appliance. It has been designed in such a way that it does not require a safety earthed connection.
- The maximum ambient temperature for use is 45 degrees. The maximum altitude of use is 2000 meters.
- ATTENTION: TO REDUCE THE RISK OF ELECTRIC SHOCK DO NOT REMOVE LID (OR BACK PAD). IT DOES NOT CONTAIN PARTS THAT CAN BE CHANGED BY THE USER. CONTACT QUALIFIED TECHNICAL PERSONNEL.
- In extreme weather (storms, lightning) and long periods of inactivity (going on vacation) disconnect the television from the mains. The mains plug is used to disconnect the television from the electricity and must therefore always be accessible. If the TV is not disconnected from the mains, the device will still consume power for all situations, even if the TV is in standby mode or switched off.
- WARNING: this appliance is not intended for use by people (including children) with the ability/experience in operating such a device without supervision unless they have been given supervision or instruction concerning use of the appliance by a person responsible for their safety.
- Please use this appliance at an altitude of less than 5000 meters above sea level, in dry places and in regions with temperate or tropical climates. The TV is designed for domestic and similar indoor use.
- To facilitate ventilation, leave at least 5 cm of free space around the TV. Ventilation should not be impeded by covering
or blocking the ventilation openings with items such as newspapers, tablecloths, curtains, etc.
- The power cable must be easily accessible. Do not place the TV or any furniture etc. on the power cable or step on it. A damaged cable may cause a fire or give you an electric shock. Grasp the power cable by the plug; do not unplug the TV by pulling on the power cable. Never touch the cable with wet hands, as this may cause a short circuit or give you an electric shock. Never tie a knot in the cable or splice it with other cables. You must replace it when it is damaged, being only a professional who can do it. If the cable or any other part of the device is damaged, contact the Official Cecotec Technical Support Service.
- Do not expose the TV to dripping and splashing liquids, and do not place objects filled with liquids, such as flower vases, cups, etc., on the TV (e.g., on shelves above the TV). Do not expose the TV to direct sunlight or open flames, such as light candles on top of or near the TV. Do not place any heat sources such as electric heaters, radiators, etc. near the TV. Do not place the TV on the floor or on inclined surfaces.
- To avoid a suffocation hazard, keep plastic bags out of the reach of babies, children, and pets.
- Carefully attach the stand to the TV. If the stand is provided with screws, tighten the screws firmly to prevent the TV from tilting. Do not over-tighten the screws and mount the bracket rubbers properly.
- Do not dispose of batteries in fire or with hazardous or flammable materials.
- WARNING: never expose batteries to excessive heat source such as sunlight, fire or the like. VERY IMPORTANT: You MUST NOT let anyone, especially children, insert any objects into holes, slots, or any opening on the TV.
- Excessive volume on headphones could cause hearing loss problems.
INSTRUCTIONS DE SÉCURITÉ
- This appliance is packaged in a way as to protect it during transport. Take the appliance out of its box and remove all packaging materials. You can keep the original box and other packaging elements in a safe place. This will help you prevent damage to the appliance when transporting it in the future. In case the original packaging is disposed of, make sure all packaging materials are recycled accordingly.
- Make sure all parts and components are included and in good conditions. If there is any piece missing or in bad conditions, contact the official Cecotec Technical Support Service immediately.
Box content:
- TV
- Remote control
- AA batteries (x2)
- Instruction manual
Note:
The graphics in this manual are schematic representations and may not exactly match the appliance.
2. INSTALLATION
Assembling the bracket
To fix the TV to the wall:
Fig. 1
- First, please put the TV on the table, and put a soft cloth on the table to avoid scratches on the display.
- Use the screwdriver to remove the screws that are attached to the bottom bracket (as shown in figure 1); then remove the bottom bracket (remove screws and bottom bracket carefully).
- Choose a bracket that can be fixed to the wall according to the measurements of the TV as shown in figures 2 and 3.
- Drill four holes in the wall and put four screws.
- Use the screwdriver to fix the screw on the back of the TV. Next, hang the TV on the wall.
Legend Fig.1:
- Wall
- Bracket
- Wall
- Wall screw
Note:
- Wall mounting bracket (VESA) is not included.
- When mounting the TV, be sure to keep it at a safe distance from other appliances.
- If necessary, contact a competent technician to avoid danger.
- The figure is for reference only.
- Follow the instructions in the manual to securely secure the TV to the stand.
- Follow the VESA standard for proper mounting of the TV to the bracket.
Installation and connection of the TV
TV Configuration. Fig. 3
- Place the TV on a stable place that can support its weight.
- To avoid danger, keep the TV away from water or heat sources (such as a light, candle, or heating appliance), and ensure adequate ventilation at the back of the TV.
Connect the antenna and power
- Connect the antenna cable to the antenna socket on the back of the TV.
- To plug in the TV's power cable:
Turn on the TV
- Press the power button on the TV: the indicator light will light up green. If the TV is in standby mode (red indicator light), press the power button on the remote to turn on the TV.
Fig. 3 key:
- TV signal output
Note: the figure is for reference only.
Bracket installation
- Take the TV, accessories and base out of the box (some models do not include a base). Fig. 4
- To avoid damaging the TV, place it on a cloth or soft material supported on the table and screw the neck of the base to the TV.
- Properly secure the base to the TV to complete the installation.
Tip:
To ease the base installation and avoid damage, we advise you to use a PH2 type screwdriver.
Fig. 5
First installation
Connect an RF cable to the "RF-In" input of the TV and to the input of your TV antenna.
Select language
Press◀ /▶ to select the system language.
Select the country
Press ▼ / ▲ to highlight the "Country" option.
Press ◀ / ▶ to select the country you want.
Fig. 6.
Fig. 7
Automatic tuning
To automatically tune your TV, press "Menu" and left arrow button to skip ATV tuning; do the same to skip DTV tuning.
Fig. 8
WARNING:
Do not place the TV in an unstable place to prevent it from falling and causing injury or damage. Many injuries can be avoided by taking basic precautions such as:
- Use cabinets or supports recommended by the manufacturer of the television.
- Only use furniture that can safely support the weight of the TV.
- Make sure that the television does not protrude from the edge of the supporting furniture.
-
Do not place the television on tall furniture (for example, cabinets or bookcases) without securing both the furniture and the television to a suitable support.
-
Do not place tablecloths or other materials between the television and the supporting furniture.
-
Educate children about the dangers of climbing on furniture to reach the TV or remote.
Consider the above if you want to move the TV to another place.
3. REMOTE CONTROL BUTTONS AND INTERFACE
Remote control buttons
Show/Hide Icon: When the icon is not displayed, please press the corresponding button: the button icon will appear as shown in the figure above, and it will automatically turn off after 5 seconds of inactivity.
Icon selection: Short press the corresponding button and move right to select the icon.
Icon function selection: long press the button to get the selected icon function.
Icon Description:
Switch-off icon It corresponds to the "POWER" button on the remote control.
Menu icon: It corresponds to the "MENU" button on the remote control.
Source icon: It corresponds to the "SOURCE" button on the remote control.
CH+ icon (go to next channel): It corresponds to the "CH+" button on the remote control.
CH- icon (go back to the previous channel): It corresponds to the "CH-" button on the remote control.
+ Volume icon+ (increase volume) Corresponds to the "VOL+" button on the remote control.
Volume icon- (decrease volume): It corresponds to the "VOL-" button on the remote control.
Interface
| AV InputExternal AV signal input and right/left sound channel | |
| CI SLOTCommon Interface (CI) card slot requires Conditional Access Module (CAM) for Pay TV. | |
| HDMI InputDigital signal input from the HDMI video connector | |
| ANT 75Input for the connection of the antenna/cable (75/VHF/UHF). | |
| USB inputInsert a USB device here to play your media files or record programmes using the PVR function. | |
| COAXIALTo connect the SPDIF receiver. |

Please keep away, protect, and do not touch the HDMI and USB terminals of the TV to extend the life of the TV and ensure proper operation.
External device connection scheme
Check figure 2.
Fig. 2 key:
-
DVD
-
Set-Top Box
ENGLISH
- AV Input Connector
- HDMI Input Connector
- USB Connector
- TV Connector
4. MODES AND MENUS
Main Menu
CHANNEL Menu
Press the MENU button to display the main menu.
Press ◀ / ▶ to select CHANNEL in the main menu. Fig. 9
- Press ▼ / ▲ to select the option you want to set in the CHANNEL menu.
- Press Enter to confirm the setting.
- Once the setting is done, press the Enter button to save and return to the previous menu.
Automatic tuning
Press ▼ / ▲ to select "Auto Tuning" and then press Enter/▶.
Fig. 10
Manual ATV Tuning
Actual channel
Channel number setting.
Colour System
Colour system selection.
(Available systems: AUTO, PAL, SECAM)
Sound system
Sound system selection.
Precise setting
Precise setting of the channel frequency.
Search
Channel search
Fig. 11
Manual DTV Tuning
- Press ▼ / ▲ to select "DTV Manual Tuning" and then press Enter to access the corresponding submenu.
- Press ◀ / ▶ to select the channel; then, press Enter to search the programme.
Fig. 12
Channel edition
Press ▼ / ▲ to select "Program Edit", then press Enter to access the corresponding submenu.
Fig. 13
The tricolour buttons are the direct access buttons for channel programming.
Press first ▼ / ▲ to highlight the channel you want to select, then:
- Press the red button to delete the channel from the list.
- Press the yellow button to scroll the channel from the list.
- Press the blue button to skip the selected channel.
- Press "Fav" button to add or remove a channel from your favourite list (TV will skip channel automatically when you press CH+/- to change channel).
Programming list
- Press ▼ / ▲ to select "Schedule List", then press Enter to access the corresponding submenu. The programming list is available for DTV and satellite. Fig. 14
- Press the yellow button to access the interface below. Fig. 15
- In case of programming problems, a warning message will appear. Fig. 16
Signal information
Press ▼ / ▲ to select Signal Information: press the button Enter to see the detailed information about the signal (only available with DTV signal). Fig. 17
CI information (Common Interface)
Press ▼ / ▲ to select CI Information; then, press the Enter button to see the CI card details (if inserted).
NOTE: CI card not included.
List of satellite channels Fig. 18
Automatic tuning
Press ▼ / ▲ to select "Auto Tuning" and then press Enter/ ▶. Fig. 19
Satellite dish setup
Press ▼ / ▲ to select "Dish Setup"; then, press Enter/ ▶ to confirm. Fig. 20
Picture Menu
- Press the MENU button to display the main menu.
- Press ◀ / ▶ to select PICTURE in the main menu. Fig. 21
Note:
- MODE 120 Hz NOT COMPATIBLE
-
MODE 60 Hz NOT COMPATIBLE
-
Press ▼ / ▲ to select the option you want to set in the PICTURE menu.
- Press OK to confirm the setting.
- Once the setting is done, press the MENU button to save and return to the previous menu.
Picture Mode
- Press ▼ / ▲ to select "Picture Mode", then press OK to access the corresponding submenu.
- You can change the contrast, brightness, colour, sharpness, and tint value when the image is in Personal (custom) mode.
Tips: You can press the PMODE button to directly change the picture settings.
Fig. 22
Contrast/brightness/colour/sharpness/shade
Press ▼ / ▲ to select the value you want; then press Enter/▶ to set the value.
- Contrast: Highlights the images light but the shadow does not change.
- Brightness: Set the fibre optic output; affects the darks of the image.
- Colour: Sets the colour saturation
- Shade: It is used to compensate for colour shift in NTSC broadcast.
- Sharpness: Sets the level of detail of the image.
Colour temperature
- Modifies the perception of the colour range of the television.
- Press ▼ / ▲ to select "Colour Temperature"; to continue, press OK to access the corresponding submenu.
- Press ▼ / ▲ to select the option you want; colour temperature: Cool (cold), Medium (neutral), Warm (warm).
Fig. 23
- Cool: Increases the blue hue and reduces white.
- Medium (neutral): Increases pinks and blues and reduces white.
- Warm: Increases red and reduces white.
Noise reduction
Filters and reduces sound and improves image quality. Press ▼ / ▲ to select "Noise Reduction"; then press OK to access the corresponding submenu. Fig. 24
- Off (Switched-off): Select this option to disable sound detection
- Low: Detects and reduces low sound.
- Middle (moderate): Detects and reduces moderate sound.
- High: Detects and reduces high sound.
- Default: Default.
HDMI Mode
- Press ▼ / ▲ to select "HDMI Mode", then press OK to access the corresponding submenu. Fig. 25
- Press ▼ / ▲ to select between the available picture modes: Auto/Video/PC.
Sound Menu
- Press the MENU button to display the main menu. Fig. 26
-
Press ◀ / ▶ to select SOUND in the main menu.
-
Press ▼ / ▲ to select the option you want to set in the ◀ SOUND ▶ menu.
- Press Enter to confirm the setting.
- Once the setting is done, press the Enter button to save and return to the previous menu.
Fig. 27
Sound Menu
Press ▼ / ▲ to select "Sound Mode", then press Enter to access the corresponding submenu. Press ▼ / ▲ to select to select from the available options
You can change the treble and bass value when the sound is in custom mode.
Tips: Press the SMODE button on the remote to directly change the sound mode.
Standard: Produces balanced sound in all environments. Music: Preserves the original sound. Ideal for musical programmes. Movie: Enhances treble and bass for a better sound experience. Sports: Improves vocal clarity for sports. Personal (custom): Select this option to customize the image settings.
Note: Treble and Bass are only available in custom mode, and you can adjust them as you like.
Balance
Press ▼ / ▲ to select the value you want; then press ◀ / ▶ to set the value.
Auto Volume Level (automatic volume)
Press ▼ / ▲ to select this option; then press ◀ / ▶ to turn it on or off.
SPDIF Mode
Press ▼ / ▲ to select "SPDIF Mode"; then press ◀ / ▶ to select between Off/PCM/Auto.
AD Switch
Press ▼ / ▲ to select this option; then press ◀ / ▶ to turn it on or off. The television also has an audio description function for blind people.
NOTE:
Balance: Sets the output audio for a more balanced listening experience.
Auto Volume Level (automatic volume): Automatically reduces the difference between the volume of the channel and that of the program.
Time Menu
- Press the MENU button to display the main menu.
- Press ◀ / ▶ to select TIME in the main menu.
Fig. 28
-
Press ▼ / ▲ button to select the option you want to set in the TIME menu.
-
Press Enter to confirm the setting.
-
Once the setting is done, press the Enter button to save and return to the previous menu.
Time zone
- Press ▼ / ▲ to select "Time zone", then press Enter to access the corresponding submenu. Fig. 29
- Press ▼ / ▲/◀ / ▶ to select the time zone.
Switch-off timer
- Press ▼ / ▲ to select "Sleep Timer", then press Enter to access the corresponding submenu. Fig. 30
- Press ▼ / ▲ to select from the available options:
- Off, 15 min, 30 min, 45 min, 60 min, 90 min, 120 min, 240 min).
Auto Standby mode
- Press ▼ / ▲ to select "Auto Standby", then press Enter to access the corresponding submenu. Fig. 31
- Press ▼ / ▲ to select from the available options.
Tips: Do not perform any operations with the controller during the selected time; otherwise, the time will be reset.
OSD timer
- Press ▼ / ▲ to select "OSD Timer", then press Enter to access the corresponding submenu. Fig. 32
- Press ▼ / ▲ to select from the available options.
Lock Menu
Press the MENU button to display the main menu. Press ◀ / ▶ to select LOCK in the main menu.
Fig. 33
- Press ▼ / ▲ to select the option you want to set in the LOCK SYSTEM menu.
- Press Enter ◀ / ▶ to confirm the setting.
- Once the setting is done, press the MENU button to return to the previous menu.
System Lock
Press ▼ / ▲ to select "System Lock" then, press Enter to access the next 3 options.
Fig. 34
The default password is 0000. If you forget the password, try "8899".
Set password
Press ▼ / ▲ to select "Set Password"; then press enter to access the corresponding submenu and set the password.
Fig. 35
Channel Lock
- Press ▼ / ▲ to select "Channel Lock", then press Enter to access the corresponding submenu.
- Press the green button to lock or unlock the channel you want.
Fig. 36
Parental control
Pulse ▼ / ▲ to select "Parental control"; then press Enter to access the corresponding submenu and select the age of your children. Fig. 37
Key lock
Press ▼ / ▲ to select the "Key Lock"; then press ◀ / ▶ to turn it on or off. By activating this option, the remote buttons will be locked.
Hotel Mode
Fig. 38
- Press ▼ / ▲ on the remote control to select "Hotel Mode" in the Lock menu.
- Press the Enter button on the remote control to access the corresponding submenu.
- Once the setting is done, press the MENU button to save and return to the previous menu.
Hotel Mode
Press ▼ / ▲ to select the "Hotel Mode"; then press ◀ / ▶ to turn it on or off.
Source lock
- Press ▼ / ▲ to select "Source Lock", then press Enter to access the corresponding submenu.
- The hotel administrator can set the source block as DTV/HDMI, AV, etc. User cannot select source lock.
Default source
- Press ▼ / ▲ to select "Default Source", then press Enter to access the corresponding submenu.
- The hotel administrator can set the default source. The TV will turn on with the default source.
Default programming
- Press ▼ / ▲ to select "Default prog", then press ◀ / ▶ to make the settings you want (available with "TV" as the default source).
- The hotel administrator can set the default schedule. Only DTV/TV default source can be set
Default volume
- Press ▼ / ▲ to select "Default Volume"; then press ◀ / ▶ to make the settings that you want.
- The hotel administrator can set the default volume. The TV will turn on at the default volume.
Maximum volume
- Press ▼ / ▲ to select "Max Volume"; then press ▼ / ▶ to make the settings that you want.
- The hotel administrator can set the maximum volume. The user can adjust the volume below the set maximum level.
Channel
Press ▼ / ▲ to select the CHANNEL option; then press ◀ / ▶ to turn it on or off.
Image
Press ▼ / ▲ to select the PICTURE option; then press ◀ / ▶ to turn it on or off.
Sound
Press ▼ / ▲ to select the SOUND option; then press◀ / ▶ to turn it on or off.
Time
Press ▼ / ▲ to select the TIME option; then press ▼ / ▶ to turn it on or off.
Lock
Press ▼ / ▲ to select the LOCK option, then press ▼ / ▶ to turn it on or off.
Configuration
Press ▼ / ▲ to select the SETUP option; then press◀ / ▶ to turn it on or off.
Delete setting
Press ▼ / ▲ to select "Clear Lock", then press Enter to undo the previous setting.
Import database
The hotel administrator can import channel information by inserting a USB device into the port.
Export database
The hotel administrator can insert the import USB disk to other TVs. You can then use this feature to clone all the channels to the new TVs.
Reset
This function restores the hotel mode defaults
You can select the hotel mode after entering the 8888 system password in the main menu lock (the prerequisite is that the software sets the hotel function to open by default).
Fig. 39
Settings menu
- Press the MENU button to display the main menu.
-
Press ◀ / ▶ to select SETUP in the main menu. Fig. 40
-
Press the ▼ / ▲ button to select the option you want to set in the SETUP menu.
- Press Enter to confirm the setting.
- Once the setting is done, press the Enter button to save and return to the previous menu.
OSD Language
- Select a language for the OSD menu. The default language is English
- Press ▼ / ▲ / ◀ / ▶ to select "Menu Language".
Fig. 41
Teletext language
- Press▼ / ▲ to select "TT Language", then press Enter to access the corresponding submenu.
- Press ▼ / ▲ to select a teletext language.
Fig. 42
Audio languages
- Press ▼ / ▲ to select "Audio Languages", then press Enter to access the corresponding submenu.
- Press ◀ / ▶ to access the available audio languages.
- Press ▼ / ▲ / ◀ / ▶ to select the audio language that you want.
Fig. 43
Subtitle language
- Press ▼ / ▲ to select "Subtitle Language", then press Enter to access the corresponding submenu.
- Press ◀ / ▶ to access the available subtitle languages.
- Press ▼ / ▲ / ◀ / ▶ to select the subtitle language that you want.
Fig. 44
Audio accessibility
Press ▼ / ▲ to select the "Hearing Impaired" option; then press Enter to turn it on or off.
PVR file system
- Press ▼ / ▲ to select "PVR File System", then press Enter to access the corresponding submenu.
- Press ▼ / ▲ to select "Check PVR File System", then press Enter to access the corresponding submenu. This function checks the USB speed.
Fig. 45
Aspect ratio
- Press ▼ / ▲ to select "Aspect ratio", then press Enter to access the corresponding submenu.
- Press ▼ / ▲ to select among the available aspect ratios: Auto, 4:3,16:9, Zoom1 and Zoom2.
Fig. 46
Blue screen
Press ▼ / ▲ to select the "Blue Screen" option; then press Enter to turn it on or off.
First installation
Press ▼ / ▲ to select "First time installation"; then press Enter to access.
Reset
Press ▼ / ▲ to select "Reset", then press Enter to access the corresponding submenu.
Software update (USB)
Press ▼ / ▲ to select "Software Update (USB)" plug your USB device into the USB slot, and then press the Enter button to update the software to the latest version.
HDMI CEC (compatible with HDMI CEC/ARC function)
Press ▼ / ▲ to select "HDMI CEC", then press Enter to access the corresponding submenu. Fig. 47
- HDMI CEC: Press ◀ / ▶ to turn on or off the HDMI CEC option.
- HDMI ARC: Press ◀ / ▶ to turn on or off the HDMI ARC option.
- Auto Standby: Press ◀ / ▶ to turn on or off the Auto Standby option.
- Device List: Press Enter open the main menu of the device.
Display menu
- Press the MENU button to display the main menu.
- Press ◀ / to select SCREEN in the main menu. Fig. 48
- Press ◀ / ▶ button to select the option you want to set in the SCREEN menu.
- Press Enter to confirm the setting.
- Once the setting is done, press the Enter button to save and return to the previous menu.
Automatic setting
Press Enter to automatically adjust the following options: H-Offset/V-Offset/Size/Phase.
H-Offset
- Horizontal offset of the image.
- Press ▼ / ▲ to select "H-Offset", then press Enter to access the corresponding submenu.
V-Offset
- Vertical offset of the image.
- Press ▼ / ▲ to select "V-Offset", then press Enter to access the corresponding submenu.
Size
- Set the display size.
- Press ▼ / ▲ to select "Size", then press Enter to access the corresponding submenu.
Phase
- Set the horizontal lines of interference.
- Press ▼ / ▲ to select "Phase", then press Enter to access the corresponding submenu.
Reset position
Press ▼ / ▲ to select Position reset then press Enter to reset the screen position.
Note:
- You cannot reduce the sound for the PICTURE option.
- You cannot select "AD Switch" for the SOUND option.
- Audio Description and Hearing Impaired Accessibility features are the same.
- Channel lock and parental control options are not available in the LOCK menu.
- Audio/Subtitle Language, Hearing Impaired Accessibility, and PVR File System options are not available in the SETUP menu.
- The PC option is not compatible with the CHANNEL menu.
Media content
Note: Before entering the Media menu, please connect the USB device and press the "Source" button to set the Media input source.
Fig. 49
- Press ▼ / ▲ to select Media in the "Source" menu; then, press Enter.
- Press ◀ / ▶ button to select the option you want to set in the Media menu, press Enter.
Photo Menu
- Press ◀ / ▶ to select PHOTO in the main menu; then press Enter.
- Press Exit to return to the previous menu; press it again to exit completely.
Fig. 50
Press ◀ / ▶ to select the file that you want to see in the file selection menu; then press Enter to display the photo/image.
By highlighting the selected option, the file information will appear on the right and the image will be previewed in the centre. Fig. 51
Music Menu
- Press ◀ / ▶ to select MUSIC in the main menu; then press Enter.
- Press Exit to return to the previous menu; press it again to exit completely.
Fig. 52
Fig. 53
- Press ◀ / ▶ to select the song/disc you want to play; then press the Enter button.
- Press ◀ / ▶ to select the option to return to the previous menu.
Fig. 54
Movie Menu
- Press ◀ / to select MOVIE in the main menu; then press Enter.
- Press Exit to return to the previous menu; press it again to exit completely.
Fig. 55
- Press ◀ / ▶ to select the movie you want to play; then press the Enter button.
- Press the Enter button to play the selected movie.
- Select the media menu you want to access, and press Enter. Press Exit to return to the previous menu; press it again to exit completely.
Fig. 56
Text Menu
- Press ◀ / ▶ to select TEXT in the main menu; then press Enter.
- Press Exit to return to the previous menu; press it again to exit completely.
- Fig. 57
- Press ◀ / ▶ to select the element you want to play; then press the Enter button.
- Press ◀ / ▶ to select the option to return to the previous menu.
Fig. 58
5. REMOTE CONTROL
Fig. 59
- POWER: Turn on the TV or put it in standby mode.
- MUTE: Press to mute the sound. Press again or press VOL+ to turn the sound back on.
- 0 - 9: Press 0-9 to directly select a channel while watching TV. The channel will change after 2 seconds. Applicable to teletext mode, etc.
- DTV/ATV: Press to switch between analogue and digital TV.
- ↻ : Press to return to the previously viewed program.
- S. MODE: Press this button to select between the different sound settings.
- SLEEP: Select the amount of time before the TV turns off automatically.
-
MTS: Press to browse NICAM modes.
-
P. MODE: Press this button to select between the different image settings.
- MENU: Allows you to navigate between the system menus.
- SOURCE: Open the main menu and tap to navigate between sources.
- ▼▲◀ ▶ ENTER allows you to navigate the on-screen menus and adjust system settings to your preferences.
- EXIT: Press this button to exit the menu or submenu and cancel the corresponding function (if applicable).
- DISPLAY: Press this button to display the source and channel information.
- VOL+/VOL-: Press to increase/decrease the volume.
- TV/RADIO: When watching a channel, it allows you to switch between TV and Radio modes.
- GUIDE:
- Open the EPG (Electronic Program Guide).
- Fast backward in PVR or Media Player mode.
- TIME SHIFT:
- Time control DTV channels.
- Time control in PVR or Media Player mode.
- CANCEL:
- When a page is selected in Teletext mode, it may take time for it to be available; pressing CANCEL key will return to TV mode. When you find the desired page, the page number will appear at the top of the screen; press CANCEL to return to teletext mode and navigate on the page.
- Previous chapter in PVR or Media Player mode.
- INDEX:
- Press this button to request the Index page in Teletext mode.
- Exit playback function in PVR or Media Player mode.
- SIZE: Press this button to change the display size in Teletext mode.
- REVEAL: Click this button to show or hide the hidden/shown words.
- THREE-COLOUR BUTTONS: Control in Teletext mode, selection of items in the menu and MHEGS in the DVB menu.
- CH+/CH-: Press these buttons to navigate through the channels.
- FAV/LIST: Press these buttons to open the favourites list. Then select a favourite channel.
- ASPECT:
- Click this button to select the scale of the image.
- Fast forward in PVR or Media Player mode.
- FREEZE: Press this button to freeze the image.
- SUB. PG:
- Press this button to access the subpage.
- Next chapter in PVR or Media Player mode.
- SUBTITLE: Press this button to display and set the language of the current DTV channel.
- HOLD: Press this button to turn the display of the current page on or off.
-
TEXT: Press this button to activate or deactivate teletext.
-
RECLIST: Press this button to display the list of recordings.
-
REC: Press this button to record in PVR mode.
Fig. 60
Battery Installation:
- Slide down and pull out the battery compartment lid on the back of the controller to remove it. Insert two AAA batteries into the battery compartment observing the polarity (+/-) as indicated. Do not insert new and old batteries or different types of batteries.
- Slide the lid until you hear it click into place.
Using the remote control:
- Unless otherwise stated, the remote control can control all functions of the TV.
- Always point the remote directly at the sensor located on the front of the TV
CAUTION: Do not ingest batteries, there is a danger of chemical burns. This product contains batteries. Swallowing batteries can cause severe internal burns in just 2 hours and can cause death. Keep new and used batteries out of the reach of children. If the battery compartment does not close securely, stop using the product and keep it out of the reach of children. If you think batteries may have been swallowed or placed inside any part of the body, seek immediate medical attention.
6. TROUBLESHOOTING
| No power supply | Check whether the AC cable of the TV is connected or not. If there is still no power, unplug the plug and plug it back in after 60 seconds. Reconnect power. |
| The TV is not receiving the signal correctly | If there are tall buildings or mountains near where the TV is located, the screen may experience ghosting or double images. If this is the case, you can fix the picture manually by adjusting the direction of the outdoor antenna. |
| If you use an indoor antenna, it may be more difficult to pick up the signal. Set the direction of the antenna to ensure good reception. If signal reception does not improve, you may need to switch to an external antenna. | |
| There is no image | Check if the antenna on the back of the TV is well connected. |
| Check other channels to see if the issue persists. | |
| There is no audio | Try turning up the volume. |
| Check if the TV sound is muted or not. | |
| There is audio, but there is no picture, or the picture is washed out | Try adjusting the contrast and brightness. |
| Static noise affects video and audio quality | Check if the antenna on the back of the TV is well connected. |
| Broken lines appear on the screen | Electrical devices such as hair dryers, vacuum cleaners, etc. may interfere with the TV. Turn off these types of devices. |
| The remote control doesn't work | Remove the plastic that wraps the remote. Try moving the remote closer to the TV and press any button. Make sure the batteries are installed correctly or try using new batteries. |
| The TV will go into standby mode if there is no response after a few minutes. | |
| There is no image (PC mode) | Check if the cable is connected to the HDMI port correctly or if it is bent. |
| Flashing vertical line (PC Mode) | Enter the main menu and adjust the vertical placement of the screen to remove the vertical line. |
| Horizontal line (PC mode) | Adjust the horizontal placement of the screen to remove the horizontal line. |
| Screen too bright or dark (PC mode) | Adjust the brightness or contrast in the main menu. |
| No response from PC | Check if the screen resolution of the PC is set to a resolution that is compatible with that of the TV. |
| Lines appear when connecting a device to the RCA port | Be sure to use a good quality cable. |
| The problem persists | Unplug the power cable wait 30 seconds, and plug it back into the power outlet. If the problem persists, do not try to repair the TV yourself. Contact the official Technical Support Service of Cecotec. |
Do not leave the TV displaying a static image, be it a paused video, a menu screen, etc. for an extended period of time to prevent screen burn-in.
- TECHNICAL SPECIFICATIONS
| Product | 0 Series 0024 | 0 Series 0032 | 0 Series 0040 |
| Product reference | 02610 | 02612 | 00993 |
| QR |  |  |  |
| Power | 36 W | 56 W | 90 W |
| Voltage | 100 – 240 V | ||
| Frequency | 50 / 60 Hz | ||
| Shelf life | 60.000 hours (approx.) | ||
The terms HDMI and HDMI High-Definition Multimedia Interface, and the HDMI logo are trademarks or registered trademarks of HDMI Licensing LLC in the United States and/or other countries.
Technical specifications may change without prior notice to improve product quality.
Made in China | Designed in Spain
8. DISPOSAL OF OLD ELECTRICAL AND ELECTRONIC APPLIANCES

This symbol indicates that, according to the applicable regulations, the product and/or batteries must be disposed of separately from household waste. When this product reaches the end of its shelf life, you should dispose of the cells/batteries/accumulators and take them to a collection point designated by the local authorities.
Consumers must contact their local authorities or retailer for information concerning the correct disposal of old appliances and/or their batteries.
Compliance with the above guidelines will help protecting the environment.
9. TECHNICAL SUPPORT AND WARRANTY
Cecotec shall be liable to the end user or consumer for any lack of conformity that exists at the time of delivery of the product under the terms, conditions, and deadlines established by the applicable regulations.
It is recommended that repairs are carried out by qualified personnel.
If at any moment you detect any problem with your product or have any doubt, do not hesitate to contact the official Cecotec Technical Support Service at +34 96 321 07 28.
10. COPYRIGHT
The intellectual property rights over the texts in this manual belong to CECOTEC INNOVACIONES, S.L. All rights reserved. The contents of this publication may not, in whole or in part, be reproduced, stored in a retrieval system, transmitted, or distributed by any means (electronic, mechanical, photocopying, recording or similar) without the prior authorization of CECOTEC INNOVACIONES, S.L.
11. SIMPLIFIED DECLARATION OF CONFORMITY
CE
Cecotec Innovaciones hereby declares that the televisions, model 02610_0 Series 0024, 02612_0 Series 0032 and 00993_0 Series 0040 are in compliance with the Radio Equipment Directive 2014/53/EU.
The full text of the EU Declaration of Conformity can be found on the following website:
https://cecotec.es/es/information/declaration-of-conformity
1. AVANT UTILISATION
- Mur
- Support
- Mur
- Vis murale
Note :
https://cecotec.es/es/information/declaration-of-conformity
1. VOR DEM GEBRAUCH
https://cecotec.es/es/information/declaration-of-conformity
1. VÓÓR U HET APPARAAT GEBRUIKT
https://cecotec.es/es/information/declaration-of-conformity
1. PRZED UŻYCIEM
https://cecotec.es/es/information/declaration-of-conformity
1. PŘED POUŽÍVÁNÍM

Fig./Img./Abb./Afb./Rys./Obr. 3
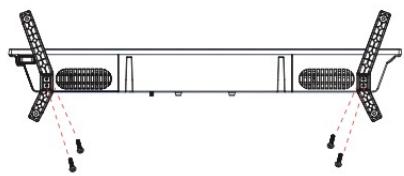
Fig./Img./Abb./Afb./Rys./Obr. 4
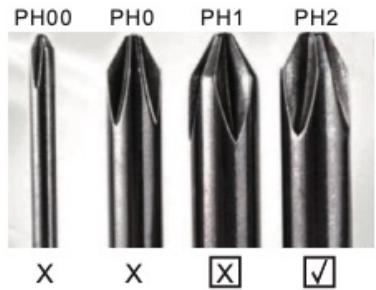
Fig./Img./Abb./Afb./Rys./Obr. 5
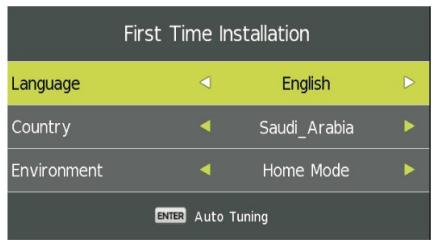
Fig./Img./Abb./Afb./Rys./Obr. 6

Fig./Img./Abb./Afb./Rys./Obr. 7


Fig./Img./Abb./Afb./Rys./Obr. 8

Fig./Img./Abb./Afb./Rys./Obr. 9

Fig./Img./Abb./Afb./Rys./Obr. 10

Fig./Img./Abb./Afb./Rys./Obr. 11
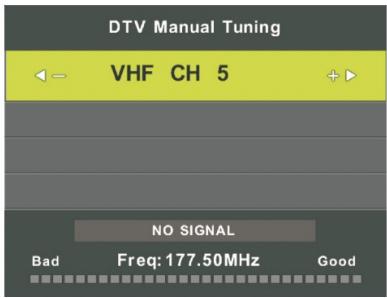
Fig./Img./Abb./Afb./Rys./Obr. 12
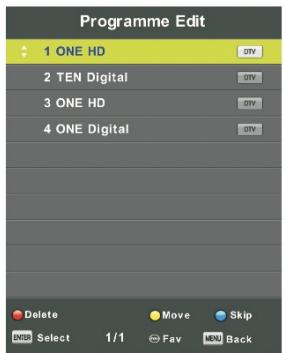
Fig./Img./Abb./Afb./Rys./Obr. 13

Fig./Img./Abb./Afb./Rys./Obr. 14
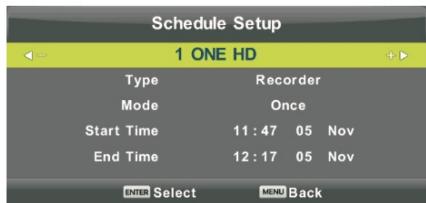
Fig./Img./Abb./Afb./Rys./Obr. 15

Fig./Img./Abb./Afb./Rys./Obr. 16
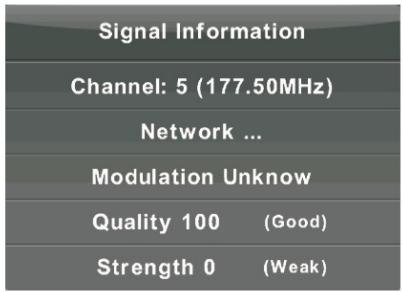
Fig./Img./Abb./Afb./Rys./Obr. 17

Fig./Img./Abb./Afb./Rys./Obr. 18

Fig./Img./Abb./Afb./Rys./Obr. 19
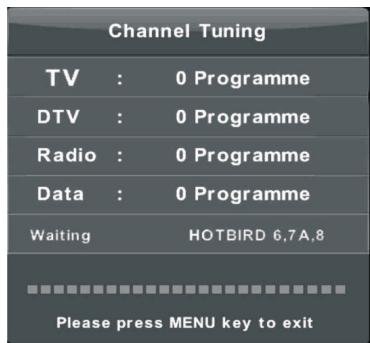

Fig./Img./Abb./Afb./Rys./Obr. 20
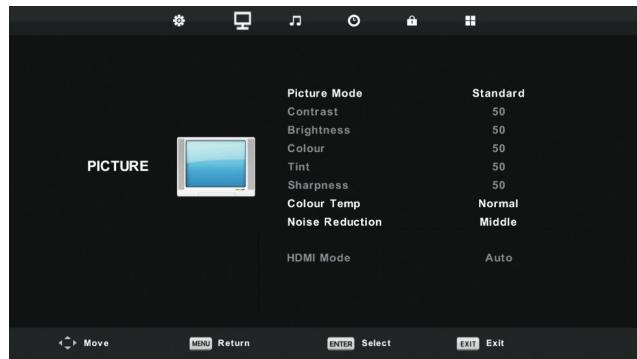
Fig./Img./Abb./Afb./Rys./Obr. 21

Fig./Img./Abb./Afb./Rys./Obr. 22
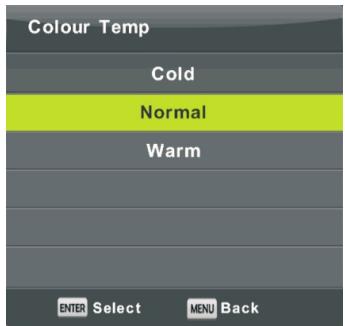
Fig./Img./Abb./Afb./Rys./Obr. 23

Fig./Img./Abb./Afb./Rys./Obr. 24

Fig./Img./Abb./Afb./Rys./Obr. 25
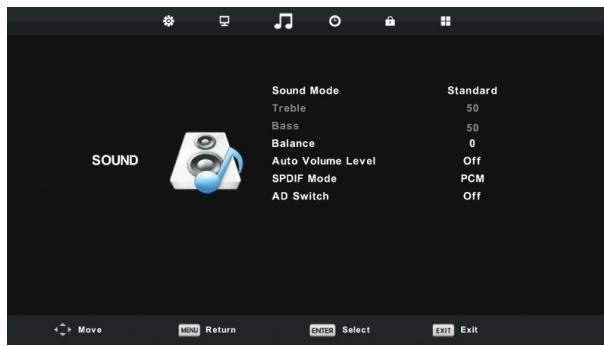
Fig./Img./Abb./Afb./Rys./Obr. 26
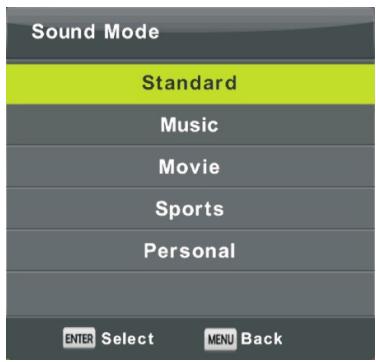
Fig./Img./Abb./Afb./Rys./Obr. 27

Fig./Img./Abb./Afb./Rys./Obr. 28
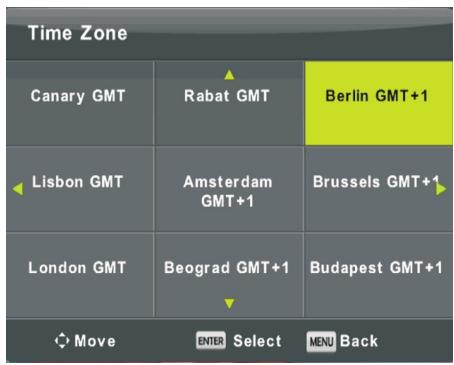
Fig./Img./Abb./Afb./Rys./Obr. 29

Fig./Img./Abb./Afb./Rys./Obr. 30

Fig./Img./Abb./Afb./Rys./Obr. 31

Fig./Img./Abb./Afb./Rys./Obr. 32

Fig./Img./Abb./Afb./Rys./Obr. 33

Fig./Img./Abb./Afb./Rys./Obr. 34

Fig./Img./Abb./Afb./Rys./Obr. 35

Fig./Img./Abb./Afb./Rys./Obr. 36
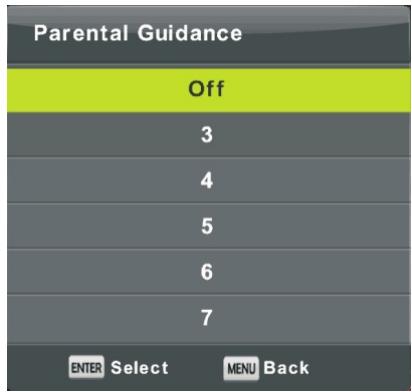
Fig./Img./Abb./Afb./Rys./Obr. 37

Fig./Img./Abb./Afb./Rys./Obr. 38

Fig./Img./Abb./Afb./Rys./Obr. 39

Fig./Img./Abb./Afb./Rys./Obr. 40

Fig./Img./Abb./Afb./Rys./Obr. 41

Fig./Img./Abb./Afb./Rys./Obr. 42
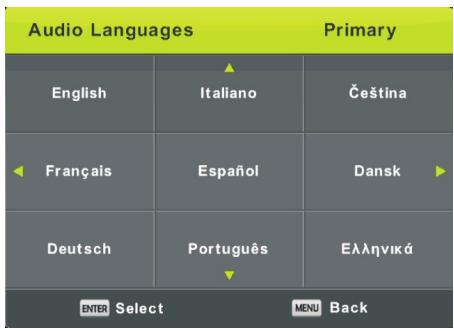
Fig./Img./Abb./Afb./Rys./Obr. 43

Fig./Img./Abb./Afb./Rys./Obr. 44
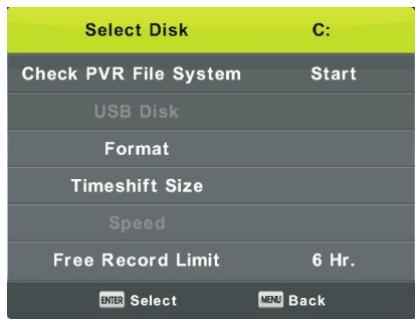
Fig./Img./Abb./Afb./Rys./Obr. 45

Fig./Img./Abb./Afb./Rys./Obr. 46

Fig./Img./Abb./Afb./Rys./Obr. 47

Fig./Img./Abb./Afb./Rys./Obr. 48

Fig./Img./Abb./Afb./Rys./Obr. 49

Fig./Img./Abb./Afb./Rys./Obr. 50

Fig./Img./Abb./Afb./Rys./Obr. 51
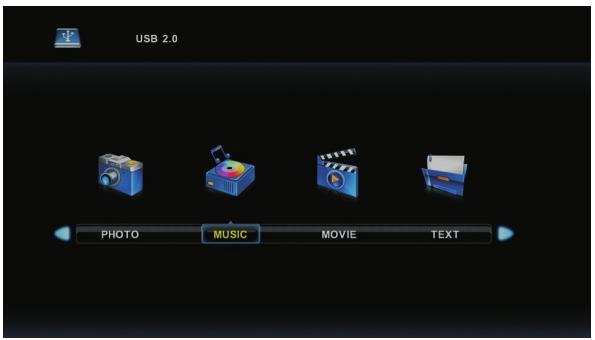
Fig./Img./Abb./Afb./Rys./Obr. 52
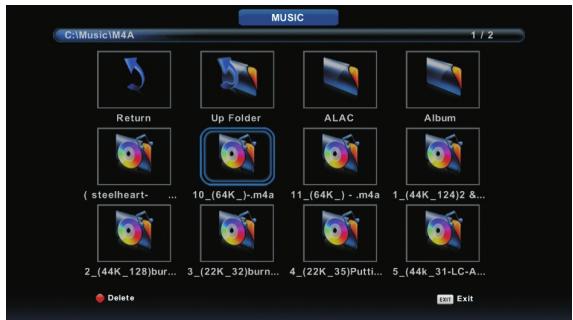
Fig./Img./Abb./Afb./Rys./Obr. 53
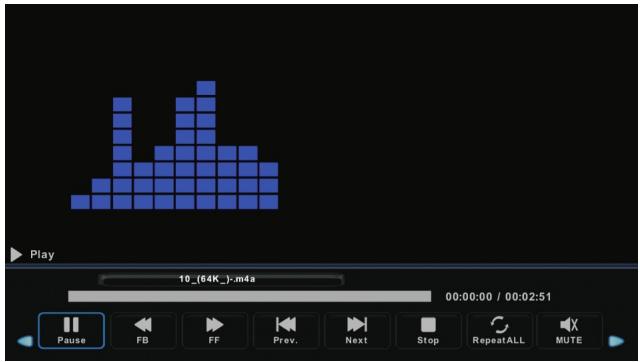
Fig./Img./Abb./Afb./ Rys./Obr. 54

Fig./Img./Abb./Afb./Rys./Obr. 55
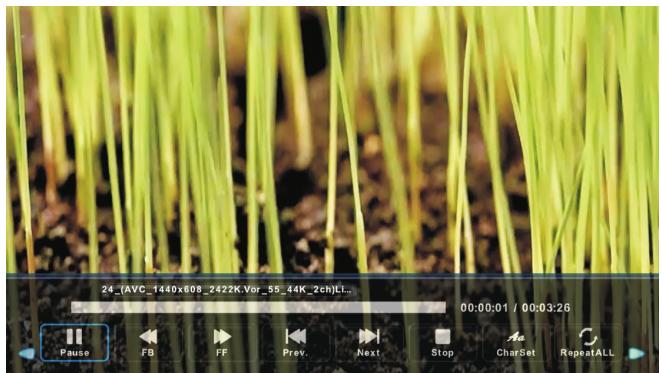
Fig./Img./Abb./Afb./Rys./Obr. 56

Fig./Img./Abb./Afb./Rys./Obr. 57

Fig./Img./Abb./Afb./Rys./Obr. 58
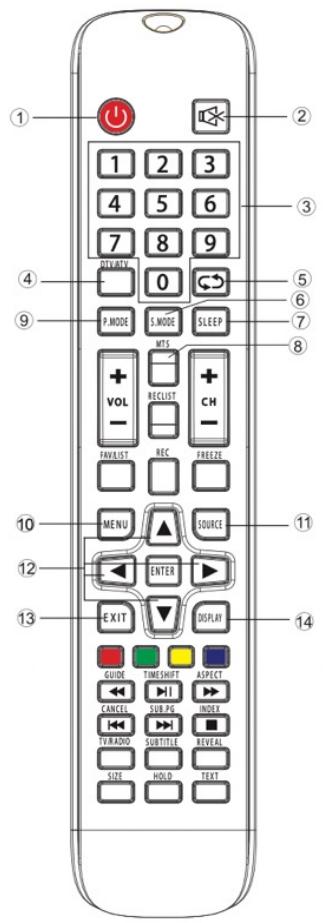
Fig./Img./Abb./Afb./Rys./Obr. 59
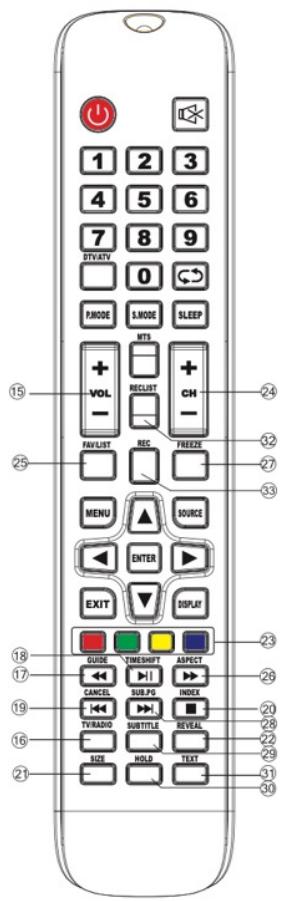
Fig./Img./Abb./Afb./Rys./Obr. 60
Dolby
AUDIO
Manufactured under license from Dolby Laboratories.
Dolby, Dolby Audio, and the double-D symbol are
trademarks of Dolby Laboratories Licensing Corporation.
HDMI®
HIGH-DEFINITION MULTIMEDIA INTERFACE
The terms HDMI and HDMI High-Definition Multimedia Interface, and the HDMI logo are trademarks or registered trademarks of HDMI Licensing LLC in the United States and other countries.
www.cecotec.es
- SOMMAIRE
- INSTRUCTIONS DE SÉCURITÉ
- Box content:
- INSTALLATION
- Assembling the bracket
- Installation and connection of the TV
- TV Configuration. Fig. 3
- Connect the antenna and power
- Turn on the TV
- Bracket installation
- First installation
- Select language
- Select the country
- Automatic tuning
- WARNING:
- REMOTE CONTROL BUTTONS AND INTERFACE
- Remote control buttons
- Icon Description:
- ENGLISH
- MODES AND MENUS
- Main Menu
- CHANNEL Menu
- Manual ATV Tuning
- Colour System
- Sound system
- Precise setting
- Search
- Manual DTV Tuning
- Channel edition
- Programming list
- Signal information
- CI information (Common Interface)
- List of satellite channels Fig. 18
- Satellite dish setup
- Picture Menu
- Note:
- Picture Mode
- Contrast/brightness/colour/sharpness/shade
- Colour temperature
- Noise reduction
- HDMI Mode
- Sound Menu
- Balance
- Auto Volume Level (automatic volume)
- SPDIF Mode
- AD Switch
- Time Menu
- Time zone
- Switch-off timer
- Auto Standby mode
- OSD timer
- Lock Menu
- System Lock
- Set password
- Channel Lock
- Parental control
- Key lock
- Hotel Mode
- Source lock
- Default source
- Default programming
- Default volume
- Maximum volume
- Channel
- Image
- Sound
- Time
- Lock
- Configuration
- Delete setting
- Import database
- Export database
- Reset
- Settings menu
- OSD Language
- Teletext language
- Audio languages
- Subtitle language
- Audio accessibility
- PVR file system
- Aspect ratio
- Blue screen
- Software update (USB)
- HDMI CEC (compatible with HDMI CEC/ARC function)
- Display menu
- Automatic setting
- H-Offset
- V-Offset
- Size
- Phase
- Reset position
- Media content
- Photo Menu
- Music Menu
- Movie Menu
- Text Menu
- REMOTE CONTROL
- Battery Installation:
- Using the remote control:
- TROUBLESHOOTING
- DISPOSAL OF OLD ELECTRICAL AND ELECTRONIC APPLIANCES
- TECHNICAL SUPPORT AND WARRANTY
- COPYRIGHT
- SIMPLIFIED DECLARATION OF CONFORMITY
- AVANT UTILISATION
- VOR DEM GEBRAUCH
- VÓÓR U HET APPARAAT GEBRUIKT
- PRZED UŻYCIEM
- PŘED POUŽÍVÁNÍM
Brand : CECOTEC
Model : Tv 0 0032s
Category : Television