
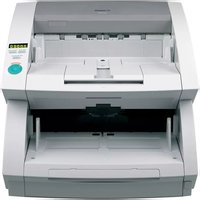
imageFORMULA DR-758 - Scanner CANON - Free user manual and instructions
Find the device manual for free imageFORMULA DR-758 CANON in PDF.


| Product Type | Document Scanner |
| Scan Speed (Color) | Up to 80 ppm (simplex) / 160 ipm (duplex) |
| Optical Resolution | 600 x 600 dpi |
| Document Feeder | Automatic Document Feeder (ADF) with 300-sheet capacity |
| Duplex Scanning | Yes, one-pass duplex |
| Interface | USB 3.0 |
| Dimensions (W x D x H) | 11.7 x 10.2 x 7.5 inches |
| Weight | 8.6 lb |
| Power Source | AC 100-240V, 50/60 Hz |
| Power Consumption | 50 W (max), 2 W (standby) |
| Supported Media Sizes | Up to 11.7 x 17 inches (A3) |
| Scan Modes | Color, grayscale, black-and-white |
| Maintenance | Clean rollers with lint-free cloth; replace roller kit after 200,000 scans |
| Safety Feature | Auto shut-off after 1 hour of inactivity |
| Spare Parts | Roller kit, pickup roller, separation roller |
| Repairability | User-replaceable rollers; serviceable by authorized technicians |
| General Information | Supports ISIS and TWAIN drivers; includes CapturePerfect software |
Frequently Asked Questions - imageFORMULA DR-758 CANON
User questions about imageFORMULA DR-758 CANON
0 question about this device. Answer the ones you know or ask your own.
Ask a new question about this device
Download the instructions for your Scanner in PDF format for free! Find your manual imageFORMULA DR-758 - CANON and take your electronic device back in hand. On this page are published all the documents necessary for the use of your device. imageFORMULA DR-758 by CANON.
USER MANUAL imageFORMULA DR-758 CANON
International ENERGY STAR® Office Equipment Program

As an ENERGY STAR partner, Canon Electronics Inc. has determined that this product meets the ENERGY STAR guidelines for energy efficiency.
The International ENERGY STAR Office Equipment Program is an international program that promotes energy saving through the use of computers and other office equipment. The program backs the development and dissemination of products with functions that effectively reduce energy consumption. It is an open system in which business proprietors can participate voluntarily. The targeted products are office equipment such as computers, monitors, printers, fax machines, copiers and scanners. Their standards and logos are uniform among the participating nations.
FCC REGULATIONS (For 120V models)
This equipment has been tested and found to comply with the limits for a Class A digital device, pursuant to Part 15 of the FCC Rules. These limits are designed to provide reasonable protection against harmful interference when the equipment is operated in a commercial environment. This equipment generates, uses, and can radiate radio frequency energy and, if not installed and used in accordance with the instruction manual, may cause harmful interference to radio communications. Operation of this equipment in a residential area is likely to cause harmful interference in which case the user will be required to correct the interference at his own expense.
Do not make any changes or modifications to the equipment unless otherwise specified in the manual. If such changes or modifications should be made, you could be required to stop operation of the equipment.
RADIO INTERFERENCE REGULATIONS (For 120V models)
This digital apparatus does not exceed the Class A limits for radio noise emissions from digital apparatus as set out in the Interference-causing equipment standard entitled “Digital Apparatus”, ICES-003 of the Industry Canada.
RÈGLEMENT SUR LE BROUILLAGE RADIOÉLECTRIQUE (For 120V models)
① Copyright 2003 by CANON ELECTRONICS INC. All rights reserved. No part of this publication may be reproduced, transmitted, transcribed, stored in a retrieval system, or translated into any language or computer language in any form or by any means, electronic, mechanical, magnetic, optical, chemical, manual, or otherwise, without the prior permission of CANON ELECTRONICS INC.
②The contents of this manual are subject to change without notice.
③ Every effort has been made to ensure the accuracy of information presented in this manual. However, Canon Electronics Inc. and the subsidiaries on the back cover assume no responsibility for any errors or their consequences.
④ We do not assume any responsibility for damage resulting from operations regardless of item ③.
Trademarks and Registered Trademarks
- Microsoft Windows and Microsoft Windows NT are registered trademarks of Microsoft Corporation in the United States and in other countries.
●ISIS is a trademark of Pixel Translation A Division of Captiva Software Corporation in the United States.
● Product names mentioned herein are for identification purposes only and may be trademarks and/or registered trademarks of their respective companies.
READ CAREFULLY BEFORE OPENING THE SEALED DISK PACKAGE
CANON SOFTWARE LICENSE AGREEMENT
IMPORTANT-READ THIS AGREEMENT BEFORE OPENING THE SEALED DISK PACKAGE! BY OPENING THE SEALED DISK PACKAGE, YOU ARE DEEMED TO AGREE TO BE BOUND BY THIS AGREEMENT.
This legal document is a license agreement between you and Canon Electronics Inc. ("Canon"). BY OPENING THE SEALED DISK PACKAGE, YOU ARE DEEMED TO AGREE TO BE BOUND BY THE TERMS OF THIS AGREEMENT. IF YOU DO NOT AGREE TO THE TERMS OF THIS AGREEMENT, DO NOT OPEN THE SEALED DISK PACKAGE AND PROMPTLY RETURN THE CANON SCANNER, THE DISK PACKAGE CONTAINING SCANNER DRIVER SOFTWARE PROGRAMS AND/OR SCANNER UTILITY SOFTWARE PROGRAM PROPRIETARY TO CANON OR ITS LICENSOR (THE "SOFTWARE") AND THE ACCOMPANYING DOCUMENTATION AND OTHER ITEMS TO THE PLACE WHERE YOU OBTAINED THEM FOR A REFUND BEFORE THEY ARE USED OR OPENED OR UNPACKED.
In consideration of the right to use the SOFTWARE, you agree to abide by the terms and conditions of this Agreement.
- GRANT OF LICENSE: Canon grants you the personal, non-exclusive right to use the SOFTWARE only on a single computer. You may physically transfer the SOFTWARE from one computer to another provided that the SOFTWARE is used on only one computer at any time.
You shall not assign, sublicense, sell, rent, lease, loan, convey or transfer to any third party, or send or bring the SOFTWARE out of the country where you originally obtain it to other countries without required authorization of applicable governments, or copy, duplicate, translate or convert to another programming language the SOFTWARE or accompanying documentation, except as expressly provided herein.
Except as expressly permitted under the applicable law, you shall not alter, modify, disassemble, decompile or otherwise reverse engineer the SOFTWARE or accompanying documentation and you also shall not have any third party to do so.
-
BACK-UP COPY: You may make one copy of the SOFTWARE solely for a back-up purpose or copy the SOFTWARE onto the permanent storage device (e.g. a hard disk) of your computer and retain the original for a back-up purpose. Except as expressly permitted under the applicable law, any other copying of the SOFTWARE is a violation of this Agreement. You must reproduce and include the copyright notice on the back-up copy.
-
SUPPORT AND UPDATE: Canon, Canon's affiliate, their distributor or dealer is not responsible for maintaining or helping you to use the SOFTWARE. No updates, fixes or support will be made available for the SOFTWARE.
-
LIMITED WARRANTY AND DISCLAIMER OF INDEMNITY: Canon, Canon's affiliate, their distributor or dealer will not guarantee uninterrupted service, or absence or correction of errors. Therefore, the SOFTWARE is licensed on an "AS IS" basis without warranty of any kind. The diskette on which the SOFTWARE is recorded is warranted against defective material or workmanship under normal use for a period of ninety (90) days from the date you purchased the same as evidenced by a receipt or otherwise. The limited warranty does not apply if the failure of the diskette resulted from accident, abuse or misapplication of the SOFTWARE and shall not extend to anyone other than the original user of the SOFTWARE.
CANON, CANON'S AFFILIATE, THEIR DISTRIBUTOR OR DEALER DISCLAIMS ALL IMPLIED WARRANTIES, INCLUDING ANY WARRANTY OF MERCHANTABILITY OR FITNESS FOR A PARTICULAR PURPOSE, WITH RESPECT TO THE SOFTWARE OR ACCOMPANYING DOCUMENTATION.
NEITHER CANON, CANON'S AFFILIATE, THEIR DISTRIBUTOR NOR DEALER IS LIABLE FOR ANY LOSS OR DAMAGE INCLUDING CONSEQUENTIAL OR INCIDENTAL LOSS OR DAMAGE SUCH AS LOSS OF PROFITS, EXPENSE OR INCONVENIENCE, WHATSOEVER CAUSED BY OR ARISING OUT OF THE SOFTWARE, ACCOMPANYING DOCUMENTATION OR THE USE THEREOF.
CANON, CANON'S AFFILIATE, THEIR DISTRIBUTOR OR DEALER SHALL HAVE NO OBLIGATION TO INDEMNIFY YOU AGAINST ANY CLAIM OR SUIT BROUGHT BY A THIRD PARTY ALLEGING THAT THE SOFTWARE, ACCOMPANYING DOCUMENTATION OR THE USE THEREOF INFRINGES ANY INTELLECTUAL PROPERTY OF SUCH THIRD PARTY.
THE ABOVE IS CANON'S ENTIRE LIABILITY AND YOUR EXCLUSIVE REMEDY IN CONNECTION WITH THE SOFTWARE AND ACCOMPANYING DOCUMENTATION.
-
TERM: This Agreement is effective upon opening the sealed disk package and remains in effect until terminated. You may terminate this Agreement by destroying the SOFTWARE and any copy thereof. This Agreement will also terminate if you fail to comply with any of the terms of this Agreement. In addition to Canon enforcing its respective legal rights, you must then promptly destroy the SOFTWARE and any copy thereof.
-
U.S. GOVERNMENT RESTRICTED RIGHTS NOTICE: The SOFTWARE is provided with RESTRICTED RIGHTS. Use, duplication or disclosure is subject to restrictions as set forth in either subparagraph (c) (1) (ii) of the Rights in Technical Data and Computer Software clause at DFARs 252.227-7013 or subparagraph (c) (1) and (2) of the Commercial Computer Software Restricted Rights Clause at FAR 52.227-19, as applicable.
-
SEVERABILITY: In the event that provision of this Agreement is declared or found to be illegal by any court or tribunal of competent jurisdiction, such provision shall be null and void with respect to the jurisdiction of that court or tribunal and all the remaining provisions of this Agreement shall remain in full force and effect.
-
ACKNOWLEDGEMENT: BY OPENING THE SEALED DISK PACKAGE, YOU ACKNOWLEDGE THAT YOU HAVE READ THIS AGREEMENT, UNDERSTOOD IT, AND AGREE TO BE BOUND BY ITS TERMS AND CONDITIONS. YOU ALSO AGREE THAT THIS AGREEMENT IS THE COMPLETE AND EXCLUSIVE STATEMENT OF AGREEMENT BETWEEN YOU AND CANON CONCERNING THE SUBJECT MATTER HEREOF AND SUPERSEDES ALL PROPOSALS OR PRIOR AGREEMENTS, VERBAL OR WRITTEN, AND ANY OTHER COMMUNICATIONS BETWEEN YOU AND CANON RELATING TO THE SUBJECT MATTER HEREOF. NO AMENDMENT TO THIS AGREEMENT SHALL BE EFFECTIVE UNLESS SIGNED BY A DULY AUTHORIZED REPRESENTATIVE OF CANON.
Should you have any questions concerning this Agreement, or if you desire to contact Canon for any reason, please write to Canon's local affiliate.
INTRODUCTION
Thank you for purchasing the Canon Document Scanner DR-7580/9080C. Please read this manual thoroughly before operating the machine in order to familiarize yourself with its capabilities, and to make the most of its many functions. After reading this manual, store it in a safe place for future reference.
Conventions
This manual uses the following symbols and indications. Before you start reading this manual, read the following and familiarize yourself with their meanings.

Warnings are provided for your safety and contain extremely important information. Failure to observe the instructions provided in a warning could result in death or serious injury to yourself or your coworkers.

Caution notices are also provided for your safety and contain important information. Failure to observe the instructions provided in a caution notice could result in serious injury to yourself or your coworkers or damage to the equipment.

These important notes contain important information on procedures that must be followed or actions that must be avoided. Failure to observe a request could result in damage to the equipment or a malfunction.

Notes provide additional tips or advice that can save you time and effort in using the scanner.
CONTENTS
INTRODUCTION ....1
Conventions 1
Safety Precautions ....5
Daily Maintenance 5
Installation Location 7
Power Supply 8
Carrying 8
Chapter 1 DR-7580/9080C
1.1 Features of the DR-7580/9080C ....10
1.2 Packaging: What Is in the Box? 12
1.3 Part Names ...... 13
◆ Front View 13
◆ Rear View 14
◆ Connectors (Bottom View) 14
◆ Operation Panel 15
1.4 Optional Products ....16
Chapter 2 Preparation Before Use
2.1 Checking Your Operating Environment ....18
2.2 Connecting to a Computer.... 19
SCSI Connections 19
◆ SCSI Cards 19
◆ Connecting the SCSI Cable 20
Setting the SCSI ID and Terminator 20
USB Connections 22
◆ USB 2.0 Interface Cards 22
◆ Connecting a USB Interface Cable 23
Connecting the Power Cord.... 23
2.3 Preparing for Paper Feed and Eject 24
Preparing the Document Tray Extension 24
Preparing the Document Eject Tray Extension 25
◆ Long Documents 25
◆ Short Documents 26
2.4 Turning ON/OFF the Power ....27
Turning ON the Power 27
Recognizing the Scanner 28
Turning OFF the Power 30
Chapter 3 Software
3.1 About the Software 32
3.2 Installing the Software 33
Installing the ISIS/TWAIN Driver 33
Installing CapturePerfect 34
3.3 How to Use the Software.... 36
How to Use the ISIS/TWAIN Driver 36
How to Use CapturePerfect 37
◆ Starting CapturePerfect 37
◆ Closing CapturePerfect 38
3.4 Uninstalling the Software....39
Chapter 4 Document Feeding and Scanning
4.1 Documents 42
Types of Documents 42
How to Place Documents 43
4.2 Document Feeding and Scanning ....44
Scan Procedure 44
◆ Standard Feeding 45
◆ Panel-Feeding 46
◆ Automatic Feeding 48
◆ Manual Feeding (Bypass Mode) 50
Count Only Mode 52
Using Patch Code Sheets 53
◆ Patch Code Sheets 53
◆ Types of Patch Code Patterns.... 54
◆ How to Use Patch Code Sheets.... 55
Chapter 5 Other Functions
5.1 Document Detection Function.... 58
Double Feed Detection Function 58
Skew Detection Function 58
Staple Detection 59
5.2 Setting in the User Mode.... 60
How to Set the User Mode.... 62
Chapter 6 Troubleshooting
6.1 When the Scanner Is Not Recognized 64
SCSI Connections 64
USB Connections 66
6.2 Clearing Paper Jams 67
Paper Jam in the Paper Feed Unit 67
Paper Jam in the Paper Exit Section 70
6.3 Paper Feed Trouble ....72
6.4 When the Scanned Image Is Not Normal .....74
6.5 When an Error Code Is Displayed .....75
Chapter 7 Daily Cleaning
7.1 Daily Cleaning 80
Cleaning the Main Unit 80
Cleaning the Document Detection Sensor 81
Cleaning the Scanning Glasses and Rollers 81
Cleaning the Shading Plates 85
Cleaning the Guide Plate (When Using the Imprinter) 87
Cleaning the Ink Jet Nozzles (When Using the Imprinter) 87
Power Outlet 87
7.2 Replacing the Rollers ....88
When to Replace Rollers 88
Resetting the Counter 89
Installing and Removing the Rollers 91
◆ Installing and Removing Pickup Rollers 92
◆ Installing and Removing Feed Rollers 94
◆ Installing and Removing Retard Rollers 97
Specifications ....100
Specifications for the Scanner 100
Options.... 101
Consumables 102
Exterior Dimensions.... 102
Index 103
Safety Precautions
Daily Maintenance
When you are working around the scanner, follow these precautions to avoid the hazards of fire and electrical shock:

■Never install and operate the scanner near flammable substances such as alcohol, paint thinner, benzene, or any other type of volatile solution.
■Never damage or modify the power cord, and never place heavy objects on the power cord.
■Always make sure that your hands are dry when you are handling the power cord or plug. Never grasp the plug when your hands are wet.
■Never plug the scanner into a multiplug power strip.
■ Never bundle, wrap, or tie the power cord around itself or another object. Connect the plug securely to the power source.
■Use only the power cord and plug provided with the scanner.
■Never attempt to disassemble or modify the scanner.
■Never use flammable aerosol products near the scanner.
■Before you clean the scanner, turn OFF the power and disconnect the power cord from the power outlet.
■ To clean the scanner exterior, use a firmly wrung cloth moistened slightly with water or mild detergent. Never use any type of volatile solution such as alcohol, benzene or paint thinner.
If you hear a strange sound, detect smoke or abnormal heat, sense vibration, or smell odd odors around the scanner, turn OFF the power immediately and disconnect the power cord from the power outlet. Call for service immediately.
■Handle the scanner with care. Avoid shocks and vibrations to the scanner caused by reckless handling. If you suspect the scanner has been accidentally damaged, turn OFF the power immediately and disconnect the power cord from the power outlet. Call for service immediately.
■Before you move the scanner, always turn OFF the power and disconnect the power cord from the power outlet.
■The scanner weighs 55.1 lb (25 kg). Two people must carry the scanner. You may drop the scanner, or pinch your fingers if you attempt to carry it by yourself.

■ To avoid damage to the scanner, never place the scanner on an unstable or vibrating surface. The scanner may tip or fall over, and cause an injury.
■ To avoid overheating and causing a fire, never block the air vents on the rear of the scanner.
- Keep all liquids, beverages, or any type of liquid, and clips, staples, necklaces, or other metal objects away from the scanner. If you accidentally spill liquid or drop a metal object into the scanner, turn OFF the power immediately and disconnect the power cord from the power outlet. Call for service immediately.
■Never install the scanner in humid or dusty locations. Doing so might cause a fire or electrical shock.
■Never place heavy objects on top of the scanner. Such objects may tip or fall over, and cause an injury.
■When you remove the power cord, grip it by the plug head. Never attempt to disconnect the cord from the outlet by pulling on the cord. Doing so might expose or break the core leads, damage the power cord, and cause a fire or electrical shock.
- Keep the area around the power outlet clear of all obstacles so you can disconnect the power cord easily at all times.
■ Never spill water or type of volatile solution (alcohol, benzene, paint thinner) into the scanner. Doing so might cause a fire or electrical shock.
■When the scanner is not being used for a long time, disconnect the power cord from the power outlet.
■ Avoid wearing loose fitting clothing, dangling jewelry, long ties, or even long hair that could become entangled with moving parts, especially the rollers that feed the scanner. If such objects become entangled, immediately disconnect the power plug from the power outlet to stop the scanner.
■Be very careful when you are loading a document or removing a paper jam. You may be injured unexpectedly. For example, the paper edges may cut your fingers.
■Do not open the imprinter cover or upper scanner while the scanner is operating. Doing so might result in a malfunction or injury.
■Do not directly touch the pins and contacts on the scanner connector with your hands. Doing so might result in a malfunction.
Installation Location

For operation, maintenance and ventilation, make sure that there is enough space around the scanner, as shown in the illustration above.
Avoid placing the scanner in the following places. Doing so may cause a malfunction and adversely affect the scanner or your computer.
- P laces exposed to direct sunlight
If installation in such places is unavoidable, provide a curtain or similar object to shade the scanner. - P laces subject to dust and fumes
Dust and cigarette fumes adversely affect the components inside the scanner. - Near running water, a heat source, water vapor, or in an area such as a
laboratory exposed to ammonia gas, paint thinner, or other volatile chemicals. - P laces subject to vibration and strong shock
- P laces subject to rapid changes in temperature or humidity
Condensation occurring inside the scanner may impair scan image quality. Place the scanner in a room that is well within the following range:
Room temperature 50°F to 90.5°F (10°C to 32.5°C)
Relative humidity 20% to 80% RH
Use the recommended operating environment for the ink cartridge when using the imprinter.
- Near electronic equipment or heavy equipment that generates a strong magnetic field, such as a speaker, TV, and radio.
Power Supply
- Be sure to connect to an AC 220-240V (50/60 Hz) or AC 120V (60 Hz) power supply, according to your region's requirement.
- Ensure that the scanner is connected to an independent power outlet. Do not plug the scanner into an outlet shared with another device. If you use an extension cable, pay attention to the total amperage of the cable.
- If you are unsure of anything relating to the power supply, contact your service representative.
- Never place an object on top of the power cord or step on the power cord.
- Never bundle the power cord or wrap the cord around an object, such as a table leg.
- Do not tug the power cord. When you remove the power cord, grip it by the plug head.
- Keep the area around the power outlet free of obstacles.
Carrying
Take care when moving the scanner. Two people should hold the scanner firmly on opposite sides when lifting it.


■The scanner weighs 55.1 lb (25 kg). Two people must carry the scanner. You may drop the scanner, or pinch your fingers if you attempt to carry it by yourself.
■When moving the scanner, be sure to turn OFF the power and remove any cables. If the cables are not removed before moving the scanner, you may damage the plugs or connectors by forcibly pulling them out.
Chapter 1
DR-7580/9080C
This chapter describes the features of the scanner, what's in the box, and the names and functions of parts on the scanner.
1.1 Features of the DR-7580/9080C ..... 10
1.2 Packaging: What Is in the Box? ..... 12
1.3 Part Names ......13
Front View 13
Rear View 14
Connectors (Bottom View) 14
Operation Panel 15
1.4 Optional Products ......16
1.1
Features of the DR-7580/9080C
The DR-7580/9080C is a compact scanner that can handle large volumes of documents. Here is a summary of the outstanding features of the DR-7580/9080C.
●Supports black-and-white (binary), and grayscale output (DR-7580)
Supports black-and-white (binary), and grayscale.
●Supports black-and-white (binary), grayscale and 24-bit color output (DR-9080C)
Supports black-and-white (binary), grayscale and 24-bit color output.
●High speed scanning
Small documents, such as checks and business cards, all the way up to 11" x 17"/A3 size documents can be scanned. LTR/A4 size (portrait) documents can be scanned at high speed of up to 90 sheet per minute (DR-9080C).
●Large capacity, reliable paper feeding
- Up to 500 sheets of A4/LTR-size documents can be placed at once.
- A wide range of size and thickness of documents can be scanned. Paper feeding is highly reliable. Document skew is automatically aligned as it passes through the scanner. The scanner accurately handles documents of various sizes and thicknesses.
●Double feed detection (See p.58.)
The scanner detects double fed documents.
●Staple detection (See p.59.)
The scanner detects stapled documents.
●Skew correction (See p.58.)
This function automatically detects if the document is fed in at an angle, and straightens out skewed documents.
●High durability
The scanner has high durability of six million scans.
●Compact size
12.3" (H) x 18.1" (W) x 20.7" (D)/312 mm (H) x 460 mm (W) x 525 mm (D)
- Drop out color
This function enables drop out scanning of (that is, "drops out") a specific color in the document.
●Various options
The wide range of options includes the imprinter for printing characters on the document being scanned, the bar code module that reads bar codes on documents that are being scanned, and the endorser for printing numbers on the documents after scanning.
1.2
Packaging: What Is in the Box?
Make sure that you have everything. Check every item you have removed from the box. If any items are missing, contact your sales representative.

DR-7580/9080C

Power Cord

Setup Disc

Instructions (this manual)

Warranty Card (U.S.A. and Canada only)
- The setup disc is in the Instructions.
- Item included in this package may change without notice.
1.3 Part Names
1
This section describes the names and functions of each part. Before you connect the DR-7580/9080C, take a few minutes to familiarize yourself with the main parts.
◆ Front View


Do not open the imprinter cover when the optional imprinter is not installed.
◆ Rear View


To avoid overheating and causing a fire, never block the air vents on the rear of the scanner.
◆ Connectors (Bottom View)

◆ Operation Panel
1

(1) Counter display
Displays an error code or the number of pages scanned.
To clear the number on the counter display, press the [Count Only] key, then press the [Stop] key down for at least two seconds.
(2) Count Only key
Sets the scanner to the Count Only mode for just counting the number of pages fed. (See p.52.)
When you press this key, it will light. If you place the document and press the Start key in this state, the document will be fed and the scanner will count the number of pages. (The document will not be scanned.)
(3) New File key
Enabled when the application supports the “Batch Separator” function. This key lights when it is pressed, or when the batch separator has been set in the application. When this function is in use, scanned images will be saved to a separate file or folder from that of the preceding images.
(4) Bypass Mode key
Press this key to set the scanner to the Bypass (manual) mode. Use this function to scan documents that might double feed or that are bound at the edge and to be fed without page separation.
(5) Stop key
Press this key to stop scanning.
Also use this key to cancel the currently set mode, or to clear the number of pages scanned or cancel an error on the counter display.
(6) Start key
LED will light when the Count Only mode is selected or the application has activated the scanner. Press the [Start] key when the LED is lit to start scanning.
1.4
Optional Products
The following options can be purchased and used on the DR-7580/9080C, if they are necessary. Contact your sales representative.
◆ Imprinter Unit
The imprinter unit is installed inside the scanner, and prints a text message on the front of the document being scanned. You can set the text message that is imprinted in the application.

Ink cartridges used are Hewlett-Packard ink cartridges, and the model numbers are: C6602B (blue), C6602G (green), and C6602R (red).
◆ Endorser ED-600
The Endorser ED-600 unit is installed on top of the scanner, and prints a eight digit number on the back of the document being scanned.

When using the endorser, the scanning speed lowers to match the printing speed of the endorser.
◆ Hard Counter
The hard counter is a seven digit counter that is installed inside the upper scanner. It keeps a tally of the pages that are fed through the scanner.
◆ Bar Code Module
The bar code module is add-on software that allows the ISIS/TWAIN driver to recognize bar codes. The application you are using must support bar code recognition in order to use the bar code module. See the “ISIS/TWAIN Driver HELP” for more information.
Chapter 2
Preparation Before Use
This chapter describes the procedure from scanner connection through to turning ON the power.
2.1 Checking Your Operating Environment 18
2.2 Connecting to a Computer ....19 SCSI Connections ....19 USB Connections ....22 Connecting the Power Cord ....23
2.3 Preparing for Paper Feed and Eject 24 Preparing the Document Tray Extension 24 Preparing the Document Eject Tray Extension 25
2.4 Turning ON/OFF the Power ....27 Turning ON the Power .... 27 Recognizing the Scanner .... 28 Turning OFF the Power.... 30
2.1
Checking Your Operating
Environment
Your computer system must meet the following conditions to use the DR-7580/9080C.
- IBM PC/AT or compatible machines that meet the following specifications:
• Intel Celeron 733 MHz or faster
• 256 MB main memory or more (recommended)
- 100 MB or more of free space on the hard disk
- SCSI card that is compatible with this scanner or Hi-Speed USB 2.0 interface card (See “Connecting to a Computer,” on p.19.)
●Monitor that can display at a resolution of 1024 x 768 (XGA) or greater is recommended.
●One of the following operating systems:
For SCSI
- Microsoft Windows 98SE
- Microsoft Windows Me
- Microsoft Windows NT 4.0 Workstation SP6
- Microsoft Windows 2000 Professional SP3 or later
- Microsoft Windows XP SP1 or later
For USB
• Microsoft Windows 98SE
- Microsoft Windows Me
- Microsoft Windows 2000 Professional SP3 or later
- Microsoft Windows XP SP1 or later
●Either an ISIS (compatible) or a TWAIN (compatible) application that operates on one of the operating systems noted above.

Important
●Use the latest USB 2.0 driver when using USB connections. Contact your sales representative.
- If the CPU, memory, SCSI card, or USB interface card does not meet the recommended specifications, the scanning speed may slow down or the time required to transfer data may increase.
2.2
Connecting to a Computer
There are two ways to connect the scanner to your computer, SCSI or USB. Use the method that is compatible with your computer system.

■Do not turn OFF the scanner or remove any interface cables when an application is running.
■Do not connect both SCSI and USB interface cables at the same time.
■ Turn OFF the computer and the scanner before changing the cable format.
SCSI Connections
Connect the scanner to the computer.

To connect the scanner with a SCSI cable, you will need the following items that are not included in the package:
●SCSI card
Check that the SCSI card is installed on your computer.
Use one of the recommended SCSI cards.
●SCSI cable
The scanner's SCSI connector is a half-pitch 50-pin (pin type) connector. Check the shape of the connector on your computer's SCSI card or on the SCSI device connected to your computer, and prepare a SCSI cable that is compatible with the connector that can be connected to the scanner.
♦ SCSI Cards
Be sure to use one of the recommended SCSI cards when connecting the scanner with a SCSI cable. The recommended SCSI cards are listed below.
Recommended SCSI cards
Manufacturer: Adaptec
Product names: AHA-2930U, AHA-2940AU, AHA-2930LP, ASC-19160, ASC-29160, APA-1480

- Be sure to follow the installation procedure in your computer's operation manual when installing the SCSI card to your computer.
- Scan speed is slightly reduced with AHA-2930LP because synchronous transfer is not available in Windows 2000/XP.
◆ Connecting the SCSI Cable

■Before you connect the SCSI cable, make sure that the scanner and the computer are turned OFF.
■Do not connect both SCSI and USB interface cables at the same time.
Connect your computer to the scanner using the SCSI cable.
Two SCSI connectors are located on the rear of the scanner. Insert the SCSI cable from the computer into one of the connectors on the bottom of the scanner. To connect another SCSI device to the computer, insert the other SCSI cable into the vacant SCSI connector on the rear of the scanner, and connect the other end of the SCSI cable into the SCSI device in a daisy chain.

SCSI Cable
USB Connector
(cannot be connected) SCSI Connectors Power Cord Connector

◆ Setting the SCSI ID and Terminator
Set the SCSI ID and the terminator on the DIP switches located between the SCSI connectors and the power cord connector.
Move the DIP switch towards you to turn it OFF and move it towards the scanner to turn it ON.

Set the SCSI ID referring to the table above.
Set unique SCSI IDs to any other built-in SCSI devices or SCSI devices connected to the computer.

●The SCSI ID default is set to 2.
- Assign SCSI ID numbers ranging from 0 to 7 for each SCSI device. Do not select 7 as this is normally assigned to the SCSI controller. If a SCSI hard disk is mounted, do not use 0 and 1. Normally 0 and 1 are assigned for hard disks.
Set the terminator on the last SCSI device on a daisy chain to ON.
Set the terminator switch to ON.
In such a connection, be sure to set the terminator on all other SCSI devices to OFF.
![graph LR A["Computer"] --> B["Terminator OFF"] B --> C["Printer"] C --> D["Terminator ON"]](/content/2026/07/1525625/images/6ff847f0a4730a9dd09954e0c5875b559e532f684e9ac05b569dc5261e25f8ab.jpg)
Set the terminator switch on the scanner to OFF.
In such a connection, set the terminator on the SCSI device connected as the end device to ON.
![graph LR A["Computer"] --> B["Printer"] B --> C["Server"] D["Terminator OFF"] --> B E["Terminator ON, or attach terminator."] --> C](/content/2026/07/1525625/images/8dc44beb2aff5e11a0736305cadfce0ef8affa5dfd37302cad56cdc3c1152897.jpg)

Be sure to set the DIP switch or use a terminator plug if this scanner is installed as the last piece of equipment in a daisy chain. Note that if you use a terminator plug and the DIP switch is set to ON, the scanner may malfunction.
USB Connections
Connect the scanner to the computer.

Important
To connect the scanner with a USB interface cable, you will need the following items that are not included in the package.
●USB interface card
Use an extended USB interface card that is compatible with Hi-Speed USB 2.0 and operationally tested by Canon.
◆ USB 2.0 Interface Cards
Be sure to use one of the recommended USB 2.0 interface cards when connecting the scanner with a USB interface cable. The recommended USB 2.0 interface cards are listed below.
Recommended USB 2.0 interface cards
Manufacturer: Adaptec
Product: USB 2 Connect 2000LP (AUA-2000)
USB 2 Connect 3100 (AUA-3100LP)
USB 2 Connect 5100 (AUA-5100)
USB 2 Connect for Notebooks (AUA-1420)

Important
- Be sure to follow the installation procedure in your computer's operation manual when installing the USB 2.0 interface card to your computer.
●Use the most recent USB 2.0 driver provided by Microsoft.
●Windows NT operating systems do not support USB. Use a SCSI cable to connect the scanner to computers with Windows NT operating systems.
●Use a USB hub that supports USB 2.0 if you need to use a USB hub.
●This scanner has passed the Hi-Speed USB 2.0 verification test. However, it may not function properly even when Hi-Speed USB 2.0 is built-in a computer as standard. - Scan speed may slow down when Hi-Speed USB 2.0 is not supported.
◆ Connecting a USB Interface Cable

Do not connect both a SCSI cable and USB interface cable at the same time.

USB Interface Cable

Connecting the Power Cord
Connect the power cord.
Be sure to use only the power cord provided with the scanner.


When connecting the power cord, follow these precautions. Failure to do so might cause a fire or electrical shock.
■Never grasp the plug when your hands are wet.
■Never plug the scanner into a multiplug power strip.
■Never bundle or tie the power cord around itself or another object. Connect the plug securely to the power source.
■Use only the power cord and plug provided with the scanner.
■Before you connect the power cord, be sure to turn OFF the power.
■Be sure to connect to an AC 220-240V (50/60 Hz) or AC 120V (60 Hz) power supply, according to your region's requirement.
■Do not plug the scanner into an outlet shared with another device. If you use an extension cable, pay attention to the total amperage of the cable.
2.3
Preparing for Paper Feed and Eject
Pull out the document tray extension and the document eject tray extension to match the size of the document being scanned.
Preparing the Document Tray Extension
Pull out the document tray extension to accommodate the size of the document to be scanned.
1 Pull out the document tray extension from the document tray.
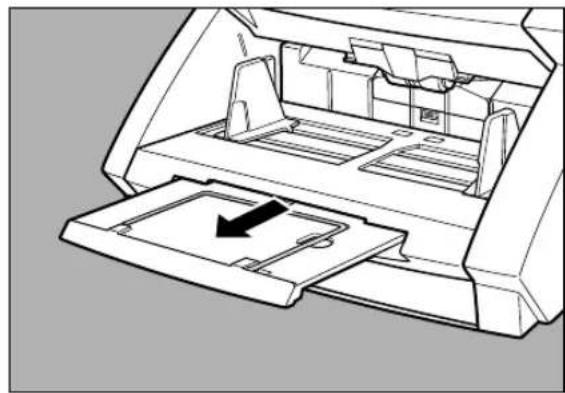
2 Gently open the extension wire.


Note
Use the extension wire if the document extends beyond the edge of the document tray.
Preparing the Document Eject Tray Extension
Use the document eject tray extension and stopper to prevent scanned documents from falling off the eject tray.
◆ Long Documents
If the document you are scanning is long, open the document eject tray extension and adjust the position of the stopper as needed.
1 Open the document eject tray extension.

2 Lift up the stopper.

3 Adjust the position of the stopper to match the length of the document.

Note
You can use the stopper without opening the document eject tray extension. (See p.26.)
◆ Short Documents
If the document you are scanning is short, use the stopper without opening the document eject tray extension.
1 Lift up the stopper.

2 Adjust the position of the stopper to match the length of the document.


Adjust the position of the document eject guides if the document being ejected drifts to the left or right.
2.4
Turning ON/OFF the Power
Follow the procedures below to turn ON or OFF the scanner power.
Turning ON the Power

Important
Be sure to turn ON the power of all connected SCSI devices before you turn ON the computer.
1 To turn ON the scanner, press the power switch.


"00000" is displayed on the counter display of the operation panel.

WARNING
If you hear a strange sound, detect smoke or abnormal heat, sense vibration, or smell odd odors around the scanner, turn OFF the power immediately and disconnect the power cord from the power outlet. Contact your service representative immediately. Failure to do so might cause a fire.
2 Turn ON the computer.

Note
When you connect the scanner to the computer, you need to make Windows recognize the scanner when you first start up Windows. (See "Recognizing the Scanner", on p.28.)
Recognizing the Scanner
If you are using Windows 98/Me or Windows 2000/XP, then the first time that you turn ON your computer after connecting this scanner to your computer, Windows Plug and Play function automatically displays a screen prompting you to install the scanner driver. Follow the instructions on the screen to proceed with the installation. (The name of the installation dialog varies depending on the Windows operating system.)
- If you are using Windows 98SE, the “Add New Hardware Wizard” dialog box appears.
- Click the [Next] button.
- Select [Search for the best driver for your device. (Recommended).], and then click the [Next] button.
- Insert the setup disc into the computer's CD-ROM drive.
- Select [Specify a location], enter "D:\INF" (assuming that "D" is assigned to your CD-ROM drive), and then click the [Next] button.
- Click the [Next] button.
- Click the [Finish] button.
- If you are using Windows Me, the “Add New Hardware Wizard” dialog box appears.
- Select [Specify the location of the driver (Advanced)] and then click the [Next] button.
- Insert the setup disc into the computer's CD-ROM drive.
- Select [Search for the best driver for your device. (Recommended).], and then select [Specify a location]. Enter "D:\INF" (assuming that "D" is assigned to your CD-ROM drive), and then click the [Next] button.
- Click the [Next] button.
- Click the [Finish] button.
- If you are using Windows 2000 Professional, the “Found New Hardware Wizard” dialog box appears.
- Click the [Next] button to proceed to the "Install Hardware Device Drivers" screen.
- Select [Search for a suitable driver for my device (recommended)], and then click the [Next] button to proceed to the "Locate Driver Files" screen.
- Select [Specify a location], and then click the [Next] button.
- Insert the setup disc into the computer's CD-ROM drive.
- Enter "D:\INF" (assuming that "D" is assigned to your CD-ROM drive), and then click the [OK] button.
- In the "Driver Files Search Results" screen, click the [Next] button.
- If the message "Digital Signature Not Found" appears, click [Yes] to continue installation.
- On the "Completing the Found New Hardware Wizard" screen, click the [Finish] button.
- If you are using Windows XP, the “Found New Hardware Wizard” dialog box appears.
- Insert the setup disc into the computer's CD-ROM drive.
- In the "Welcome to the Found New Hardware Wizard" screen, select [Install from a list or specific location (Advanced)], and then click the [Next] button.
- Select [Search for the best driver in these locations], and then clear the [Search removable media (floppy, CD-ROM...)] check box. Select [Include this location in the search], enter "D:\INF" (assuming that "D" is assigned to your CD-ROM drive), and then click the [Next] button.
- Click the [Continue Anyway] button in the "Hardware Installation" dialog box. Although a message appears indicating that the driver "has not passed Windows logo testing", simply continue operation.
- Click the [Finish] button in the "Completing the Found New Hardware Wizard" screen.

Note
●The DR-7580 will be registered as “CANON DR-7580 SCSI” or “CANON DR-7580 USB” in the “Imaging Device” directory.
●The DR-9080C will be registered as “CANON DR-9080C SCSI” or “CANON DR-9080C USB” in the “Imaging Device” directory.
●The displayed device name of the DR-7580 or DR-9080C differs depending on the connection, via SCSI or via USB. Turn OFF the power to the scanner and the computer before changing the connections, and then turn ON the power and let the computer recognize the scanner again.

Important
If you cancel the scanner recognition operation before it finishes, the driver installer screen will be displayed again when you restart your computer. Complete the driver installation.
Turning OFF the Power
1 Turn OFF the computer.
2 To turn OFF the scanner, press the power switch.


■ Wait at least 10 seconds before turning ON the scanner again.
■ For your safety, disconnect the power plug from the power outlet if you are not using the scanner for a long time.
Chapter 3
Software
This chapter describes how to install and use the ISIS/TWAIN driver and CapturePerfect so that you can use this scanner.
3.1 About the Software ....32
3.2 Installing the Software ....33
Installing the ISIS/TWAIN Driver.... 33
Installing CapturePerfect.... 34
3.3 How to Use the Software....36
How to Use the ISIS/TWAIN Driver ..... 36
How to Use CapturePerfect 37
3.4 Uninstalling the Software .... 39
3.1 About the Software
The following software applications are provided on the setup disc that is packaged with the scanner. Be sure to open and read the Readme.txt file on the setup disc before installing the software.
●ISIS/TWAIN driver
●CapturePerfect
This is a ISIS compatible application for scanning images. Install it if necessary.

●The ISIS/TWAIN driver provided with the scanner does not necessarily operate all ISIS compatible applications or all TWAIN compatible applications. Contact your sales representative for further information.
●Some functions mentioned in this manual may not be operated in some applications.
3.2 Installing the Software
This section describes how to install the ISIS/TWAIN driver and CapturePerfect so that you can use the scanner.
Installing the ISIS/TWAIN Driver
Connect the scanner to the computer.

Important
- If another ISIS compatible driver is already installed on the computer, be sure to make a backup of the following file. The content of this file may be overwritten when the ISIS/TWAIN driver is installed.
C:\Windows\PixTran*.*
C:\Windows\System\pix*.dll
●The names of the “\Windows” and “\Windows\System” folders are different, depending on which Windows operating system you are using. The names of the above folders are representative and should be replaced by the name of the folder used in your operating system.
1 Turn ON your computer and start Windows.

Important
Be sure to log on as an administrator if your system is Windows NT 4.0 Workstation, Windows 2000 Professional, or Windows XP.
2 Insert the setup disc into the CD-ROM drive.
This manual assumes that "D" is assigned to your CD-ROM drive.
3 Click the [Start] button, and then select [Run].
The screen depends on which Windows operating system you are using.

4 Enter "D:\Driver\setup.exe" in the [Open] field, and then click [OK].

The installation starts.
5 Follow the instructions on the screen to complete the installation.
Installing CapturePerfect
Connect the scanner to the computer.
1 Turn ON your computer and start Windows.

Important
Be sure to log on as an administrator if your system is Windows NT 4.0 Workstation, Windows 2000 Professional, or Windows XP.
2 Insert the setup disc into the CD-ROM drive.
This manual assumes that "D" is assigned to your CD-ROM drive.
3 Click the [Start] button, and then select [Run].
The screen depends on which Windows operating system you are using.

4 Enter "D:\CapturePerfect\setup.exe" in the [Open] field, and then click [OK].

The installation starts.
5 Follow the instructions on the screen to complete the installation.
3
3.3
How to Use the Software
This section describes how to use CapturePerfect so that you can use the scanner.
Read the “ISIS/TWAIN Driver HELP” for information on using the ISIS/TWAIN driver.
How to Use the ISIS/TWAIN Driver
The explanation on how to use the ISIS/TWAIN driver is in the ISIS/TWAIN driver help file. To view the help file, click the [Start] button, then click [Programs] - [Canon DR-6080 & 7580 & 9080C] - [Canon DR-6080 & 7580 & 9080C Help].

How to Use CapturePerfect
This section describes the procedure to start and end CapturePerfect. See [Help] in CapturePerfect for information on how to use CapturePerfect.
Starting CapturePerfect
1 Click the [Start] button, and then click [Programs] - [CapturePerfect]. Click [All Programs] - [CapturePerfect] if your OS is Windows XP.

3
2 Start CapturePerfect.


Note
The basic operation of CapturePerfect is noted in the CapturePerfect help file. Refer by selecting [Help] from the [Help] menu on the menu bar in CapturePerfect to view the explanation.
◆ Closing CapturePerfect
1 Select [Exit] from the [File] menu.

3.4
Uninstalling the Software
This section describes how to uninstall the ISIS/TWAIN driver and CapturePerfect.

- Be sure to log on as an administrator if your system is Windows NT 4.0 Workstation, Windows 2000 Professional, or Windows XP.
●The dialogs and button names in Windows XP are different from those used in the explanations in this manual. Refer to the Windows XP "Help and Support Center" to uninstall the software.
1 Click the [Start] button, and then click [Settings]-[Control Panel].

2 Double click on the [Add/Remove Programs] icon.

The [Add/Remove Programs Properties] dialog box appears.
3 Select "Canon DR-6080/7580/9080C Driver" or "CapturePerfect" from the list in the dialog box, and then click the [Add/Remove] button.

4 The [Confirm File Deletion] dialog box appears.

If you selected "Canon DR-6080/7580/9080C Driver," the above dialog box appears.

If you selected "CapturePerfect," the above dialog box appears.
5 Click the [Yes] button, and the uninstaller starts. Follow the instructions on the screen to finish uninstalling the software.
Chapter 4
Document Feeding and Scanning
This chapter describes precautions regarding documents that can be handled on this scanner and scanning operations.
4.1 Documents ......42
Types of Documents. 42
How to Place Documents 43
4.2 Document Feeding and Scanning.....44
Scan Procedure 44
Count Only Mode 52
Using Patch Code Sheets.... 53
4.1
Documents
This section describes about the types of documents and how to set them.

Treat the documents carefully. The paper edges may cut your fingers.
Types of Documents
The DR-7580/9080C can feed a wide variety of document sizes. The ranges of width and length for a document are:
Width : 2.2" to 12" (55 to 305 mm)
Length : 2.8" to 17.0" (70 to 432 mm) (Documents up to 39.4" (1,000 mm) can be scanned in the extra long mode.)
Thickness: 0.002" to 0.006"/0.06 to 0.15 mm (Auto feeding) 0.002" to 0.01"/0.05 to 0.3 mm (Manual feeding)
Weight : 13 to 32 lb bond (52 to 128 g/m 2 )(Auto feeding) 11 to 64 lb bond (42 to 255 g/m 2 )(Manual feeding)
Follow these guidelines when you prepare a document for scanning:
- Duplex scanning, color scanning, and high density (600 dpi) scanning cannot be done with large documents, such as 11" x 17" size paper and A3 size paper. Change the scanning mode to scan these sizes.
- Set the scan mode to "black and white" to scan long documents.
- Before scanning documents that contain pasted artwork, make sure that the ink or paste on the pages is thoroughly dry. If the documents are scanned with the ink or paste still wet, the scanner may cause problems.
- If you scan a document written in pencil, the letters may not scan properly or the pencil may rub off onto the rollers and stain subsequent documents. Before you scan this kind of document, make a copy and then scan the copy. After scanning a document written in pencil or some other soft writing material, be sure to clean the scanning rollers. (See p.81.)
- If you scan thin paper in the Duplex mode, the ink printed on the back side may be scanned. If this happens, adjust the scanning density.
- If you scan documents with a rough surface, friction between the documents may cause a feeding error. If this happens, select [Manual feed] and scan the document one by one.
- When you scan a batch of NCR documents, make sure that they are not stuck together.
- To avoid paper jams, damage to documents, and a scanner malfunction, do not feed the following types of paper. If you want to scan these types of paper, first make a copy and then scan the copy.

Wrinkled or creased paper

Carbon-backed paper

Curled paper

Coated paper or fax recording paper

Torn paper

Extremely thin paper

Paper with clips or staples

Paper with binding holes

Note
- Note that mixing documents of different thickness and size may cause a malfunction during feeding.
● Heavily curled wrinkled, or creased documents may cause them to double feed. - Documents containing text or pictures within 0.2" (5 mm) of its edges or documents with a color background may cause erroneous skew detection or automatic size detection.
How to Place Documents
Note the following points when placing documents on the scanner.
● Place the documents face up in the document tray.
- Do not exceed the load limitation mark when placing documents in the document tray. It may cause paper jams.

Small Size Limitation Mark: When placing documents that are smaller than LTR/A4 size.
Large Size Limitation Mark: When placing documents that are larger than LTR/A4 size.
- It is possible to place approximately 500 documents of regular LTR/A4 size (80g/m 2 or 20 lb bond), or approximately 200 documents of larger than LTR size.
- If the document tray does not rise and makes a “clacking” noise, then the amount of paper placed on the document tray may weigh too much even if the documents do not exceed the limitation mark. Reduce the amount of pages and scan the documents again.
- In the Long Document mode, if you place a long document askew in the document tray, it will rub against both sides of the feeding path and may damage the document. Be sure to align the document straight when placing it in the document tray. (See p.61.)
4.2
Document Feeding and Scanning
This section describes how to place the document in the document tray, the procedure until scanning begins, the count only mode for counting the number of sheets, and the patch code sheet for automatically separating batches of documents.

CAUTION
■ Avoid wearing loose fitting clothing, dangling jewelry, long ties, or even long hair that could become entangled with moving parts, especially the rollers that feed the paper. If such objects become entangled, immediately disconnect the power plug from the power outlet to stop the scanner.
- Check the stack and remove all clips, staples, pins, or any other type of metal or plastic fastener. They may damage the document, cause a paper jam, or scanner malfunction.
Scan Procedure
The procedure for scanning a document varies depending on how the document is fed.
There are four ways to feed documents as shown below. Select [Feeding Option] on the ISIS/TWAIN driver's settings screen.
● Standard Feeding (See p.45.)
This feeding mode is selected from the application to start or stop scanning. Instruct the scanner to start scanning from the computer after the document is placed in the scanner.
● Panel-Feeding (See p.46.)
This feeding mode is useful when you want to continuously scan batches of documents that are different sizes. Place the document and adjust the document guides, then press the Start key on the scanner.
When scanning is finished, place the next document on the scanner and press the Start key to continue scanning.
● Automatic Feeding (See p.48.)
This feeding mode is useful when scanning documents that are all the same size. Scanning starts automatically when the scanner detects a document in the document tray.
Scanning stops when the document in the document tray is gone. Place the next document in the document tray to continue scanning.
● Manual Feeding (See p.50.)
Select this feeding mode if the document is prone to double feeding or if the document does not feed continuously very well. Place one page of the document in the document tray at a time and scan it.
◆ Standard Feeding
To use the standard feeding mode, instruct the scanner to start from the application.
1 Select [Standard Feeding] in [Feeding Option] on the ISIS/TWAIN driver's settings screen.
2 Align a batch of documents to be scanned until the edges are even.
3 Place the document face up in the document tray, aligning the document's top edge against the back of the document tray.

4 Adjust the document guides to the width of the document.

5 Instruct scanning to start from the application.
6 The document tray rises, and scanning begins. When scanning ends, the document tray is lowered.

If paper feed stops during scanning due to a system error or paper jam, make sure that the last page of the document was recorded properly before continuing to scan.
◆ Panel-Feeding
To use the panel-feeding mode, instruct the scanner to start from the application and it will go into standby mode. Start scanning by pressing the Start/Stop key on the scanner.
1 Select [Panel-Feeding] in [Feeding Option] on the ISIS/TWAIN driver's settings screen.
2 Align a batch of documents to be scanned until the edges are even.
3 Place the document face up in the document tray, aligning the document's top edge against the back of the document tray.

4 Adjust the document guides to the width of the document.

5 Instruct scanning to start from the application.
→ The Start key changes color from red to green.
6 Press the [Start] key.

7 The document tray rises, and scanning begins. When scanning ends, the document tray is lowered.

Note
If paper feed stops during scanning due to a system error or paper jam, make sure that the last page of the document was recorded properly before continuing to scan.
8 If there are more documents to scan, place the document and press the [Start] key. To end scanning, press the [Stop] key.
◆ Automatic Feeding
To use the automatic feeding mode, after you instruct the scanner to start scanning from the application, the scanner will start scanning as soon as it detects a document in the document tray.
1 Select [Automatic Feeding] in [Feeding Option] on the ISIS/TWAIN driver's settings screen.
2 Place the first page of the document face up in the document tray, aligning the document's top edge against the back of the document tray. Adjust the document guides to the width of the document.
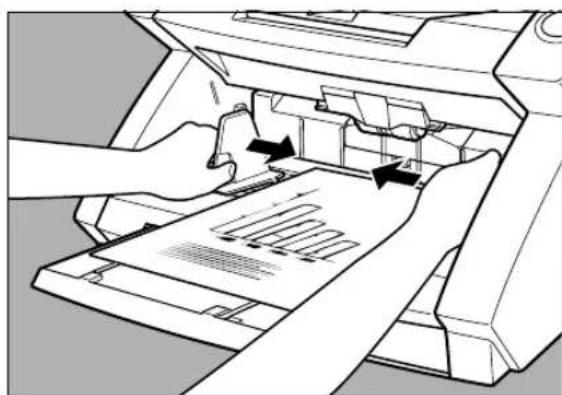
3 Instruct scanning to start from the application.

Note
Automatic scanning does not start when the document is placed before you instruct scanning to start from the application. Either press the [Start] key, or remove and place the document again.
4 Align a batch of documents to be scanned until the edges are even.
5 Place the remainder of the document face up in the document tray, aligning the document's top edge against the back of the document tray.

6 The document tray rises, and scanning begins. When scanning ends, the document tray is lowered.

If the scanning mode is set to "Automatic Feeding," then scanning will start automatically when the sensor on the document tray shown below detects the document.
■ After instructing the scanner to start, if something is placed over the sensor, it will mistakenly recognize it as a document and start scanning. Do not place anything other than documents over the sensor.

■ Dust on the sensor will cause false recognition. Clean the sensor periodically. (See “Cleaning the Document Detection Sensor,” on p.81.)
7 If there are more documents to scan, place the document, and scanning begins automatically. To end scanning, press the [Stop] key.
◆ Manual Feeding (Bypass Mode)
Use the Manual Feeding mode if the paper is thin, does not slide well, or the documents are stuck together.
1 Place the first page of the document face up in the document tray, aligning the document's top edge against the back of the document tray. Adjust the document guides to the width of the document.

2 Select [Manual Feeding] in [Feeding Option] on the ISIS/TWAIN driver's settings screen. Alternatively, press the [Bypass Mode] key on the operation panel.


The document tray rises.


Be careful not to pinch your fingers in the document tray.
3 Instruct scanning to start from in the application.
4 Place the next page of the document face up in the document tray, aligning the document's top edge against the back of the document tray.

The document is scanned.

5 Continue to place the document one page at a time.
6 To end scanning, press the [Stop] key.

The document tray will stay up as long as the Bypass Mode key is lit. After scanning is complete, press the [Bypass Mode key] on the operation panel to lower the document tray.
Count Only Mode
In the count only mode, the documents are fed through the scanner and the number of the documents is only counted, they are not scanned.
1 Press the [Count Only] key on the operation panel of the scanner.
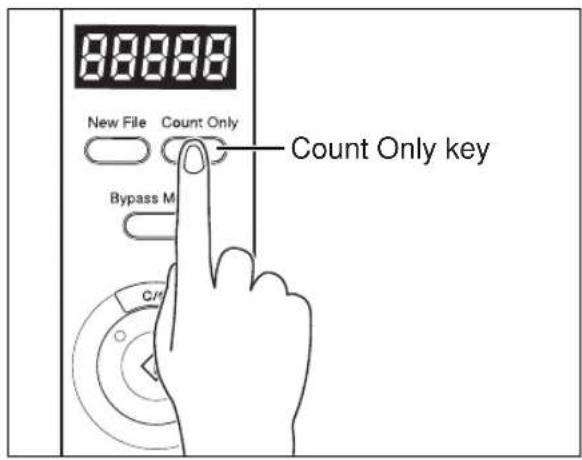
→ The Count Only key lights to indicate the Count Only mode.
2 Place the document in the document tray, aligning the document's top edge against the back of the document tray. Press the [Start] key.
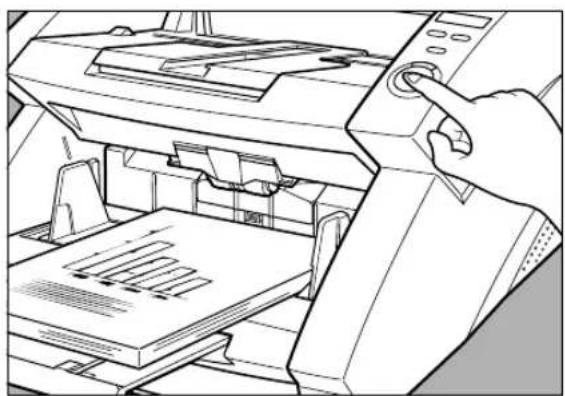
The document is fed and the number of documents appears on the counter display.
3 When counting ends, press the [Count Only] key to cancel the count only mode.
To clear the number on the counter display, press the [Count Only] key, then press the [Stop] key down for at least two seconds. (See p.15.)
![CANON imageFORMULA DR-758 - When counting ends, press the [Count Only] key to cancel the count only mode. - 1](/content/2026/07/1525625/images/a4c217d2c7da2ce7d247b36595aeecc291167b1c462e35c0d5c35d8dbb182259.jpg)
You can use the count only mode to count the number of documents and do "Verify scan" (checking the number of documents scanned against the number of documents counted). For details on verify scan, refer to "ISIS/TWAIN Driver HELP."
Using Patch Code Sheets
Patch code sheets are sheets of paper on which a special pattern is printed so that files can be separated without stopping the scanning operation. The scanner can recognize the pattern on these sheets, which allows files to be separated.

- Refer to "ISIS/TWAIN Driver HELP" when using patch code sheets.
- Patch code sheets are enabled only when the application being used for scanning supports file separation.
4
◆ Patch Code Sheets
Patch code sheets are PDF (portable document format) data of which there are four types, [PATCH II (A4)], [PATCH II (LTR)], [PATCH T (A4)], and [PATCH T (LTR)]. Click on the [Start] button in Windows, and then click [Programs] – [Canon DR-6080 & 7580 & 9080C] – [PATCH X(XX)], and use the document that is printed.


You need CapturePerfect or an application that can open PDF (portable document format) files.
◆ Types of Patch Code Patterns
There are two patch code patterns as shown below. The result varies depending on the pattern.
● PATCH T (FILE A)

When this sheet is recognized, the document following the sheet is saved to a separate file.
● PATCH II (FILE B)

When this sheet is recognized, the file is separated after this sheet and this sheet is saved as an image, even if the patch code recognition setting is set not to save this sheet as an image.
◆ How to Use Patch Code Sheets
1 Print the patch code sheet on the printer. Print the patch code sheet data on the following size paper:
● Print [PATCH II (A4)] and [PATCH T (A4)] on A4 size paper.
● Print [PATCH II (LTR)] and [PATCH T (LTR)] on letter size paper.

Note
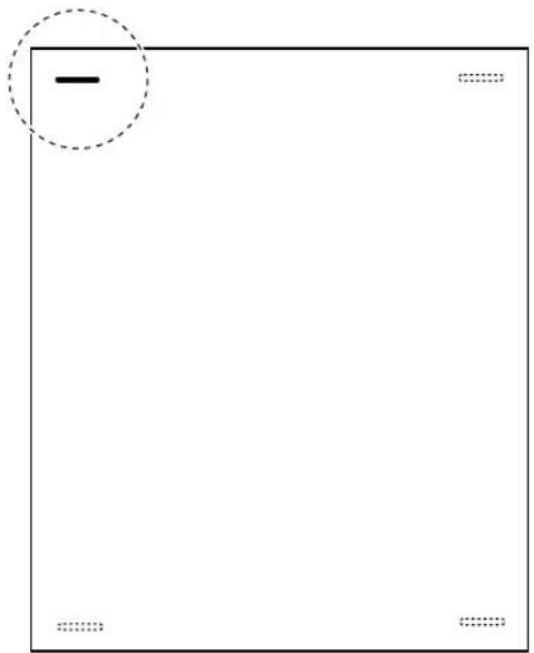
- Patch code patterns are detected within the enabled range shown below. When you make a copy of the patch code sheet, adjust the position of the image so that it appears in the range in which detection is enabled.

Units: inches (units in parenthesis are millimeters)
- When copying the patch code sheets, use the same size paper and the same density as the original patch code sheet. If the copied sheet is not dense enough, or if it is too dense, the scanner may not be able to recognize it correctly.
- Be careful not to let the patch code sheet get dirty, particularly for the range in which patch code detection is enabled. Do not bend or wrinkle the patch code sheet. This could prevent the scanner from recognizing the sheet.
- When the patch code sheet is being scanned, if it is not dense enough, or if it is too dense, the scanner may not be able to recognize it correctly.
2 Place the patch code sheet on top of the documents that are to be saved to a separate file, and then scan the documents.

3 Set the scanning conditions and then start scanning.
Chapter 5
Other Functions
This chapter describes the scanner's other functions.
5.1 Document Detection Function .....58
Double Feed Detection Function 58
Skew Detection Function 58
Staple Detection 59
5.2 Setting in the User Mode ....60
How to Set the User Mode 62
5.1
Document Detection Function
The scanner is equipped with a document detection function which stops a document from feeding if it detects that the document is not being fed correctly.
Double Feed Detection Function
The scanner automatically detects two pages that have been fed at the same time (double feed) and displays an error code that means “Double feed detection” when scanning documents continuously.
The following shows the double feed detection methods. Select the detection method on the ISIS/TWAIN driver's settings screen.
●Detect by Length
The scanner uses the length of the first page of the document as the standard, and any pages that exceed this length by 2" (50 mm) or more are considered to be a double feed.
●Detect by Ultrasonic
The scanner detects the gap between the two pages that have been fed together and considers it to be a double feed.

Note
●The ultrasonic double feed detection works when a document overlaps by more than 2" (50 mm).
●You can combine the detection methods noted above.
●The error code, which is displayed when a double feed is detected, varies depending on the combination of detection methods. For more information, see “When an Error Code Is Displayed,” on page 75.
●Double feed detection in the count only mode is set in user mode settings. For more information, see "Setting in the User Mode," on page 60.
Skew Detection Function
If a long document is skewed, it may rip when it rubs against the feeding path or the sides of the feeding path. The scanner is equipped with a “skew detection function” that can detect skewed documents when they touch the edges of the feeding path. When a skewed document is detected, an error code is displayed and the scanner stops scanning.
Staple Detection
The scanner has sensors on both sides of the feeding slot to detect feed errors when the documents with staple is lifted up.
You can enable or disable staple detection on the ISIS/TWAIN driver's setting screen.


●The staple detector detects documents stapled in one of their four corners because the document is lifted up. It cannot accurately detect stapled documents in two corners or A5 (148 x 210 mm) or smaller because the document does not lift up high enough to be detected.
- You can set the detection accuracy for staple detection in the user mode settings. For information on the user mode, see "Setting in the User Mode," on page 60.
5.2
Setting in the User Mode
You can select the mode of operation (user mode) for the scanner from those listed below.
●Operation panel buzzer setting
U01-0 Do not sound buzzer during key operation. U01-1 Sound buzzer during key operation (default).
●Count Only mode setting
U02-0 Do not use the endorser in the Count Only mode (default). U02-1 Use the endorser in the Count Only mode.
●Endorser Stamp mode setting
U03-0 Use the endorser in the check mode (default). U03-1 Use the endorser in the A4 mode.
●Double feed detection control settings in the Count Only mode
U04-0 Do not detect double feed in the Count Only mode (default). U04-1 Detect double feed in the Count Only mode.
●Staple detection settings in the Count Only mode
U05-0 Do not detect staples in the Count Only mode (default). U05-1 Detect staples in the Count Only mode.
●Staple detection accuracy settings
U06-0 Low level accuracy staple detection. U06-1 Medium level accuracy staple detection (default). U06-2 High level accuracy staple detection.
●Imprinter control settings in the Count Only mode
U07-0 Do not use the imprinter in the Count Only mode (default). U07-1 Use the imprinter in the Count Only mode.
●Skew detection control settings in the Count Only mode
U08-0 Do not use skew detection in the Count Only mode. U08-1 Use skew detection in the Count Only mode (default).
●Energy-saving mode setting
U09-0 Do not go into energy-saving mode. U09-1 Go into energy-saving mode after 10 minutes of no operation (default).
●Length of scanned document settings
U10-0 Normal mode Length of document is 17" (432 mm) or less (default).
U10-1 Long Document mode Length of document is 39.4" (1,000 mm) or less.

Note the following points when using the Extra Long mode.
- Processing speed may slow down when scanning with automatic size detection while Extra Long mode is set.
- When using the Extra Long mode, if you place a long document askew in the document tray, it will rub against both sides of the feeding path and may damage the document. Be sure to align the document straight when placing it in the document tray.
- When using the Extra Long mode, documents may be damaged if the paper jam detection us late. Be sure to watch out for paper jams.
●Be sure to use the Manual Feeding mode when scanning in Extra Long mode.
●Settings SCSI Transfer Speed
Set the maximum value for synchronous transfer speed for the SCSI interface.
U11-0: 5 Mbyte/sec
U11-1: 10 Mbyte/sec (First SCSI)
U11-2: 20 Mbyte/sec (Ultra SCSI) (default)
If the scanner does not operate correctly when the output speed is set to [20 Mbyte/sec], reduce the transfer speed to [10 Mbyte/sec] or [5 Mbyte/sec].

If you change the setting for the SCSI transfer speed, turn OFF the scanner, and then turn it ON.
How to Set the User Mode
Use the following procedure to set user modes.
1 Press both the [New File] key and the [Count Only] key at the same time.

The New File key and the Count Only key flash, and the counter display shows the user mode.
2 Press the [New File] key, and then select a user mode (U01 to U11).

3 Press the [Count Only] key to select the mode (last digits only).
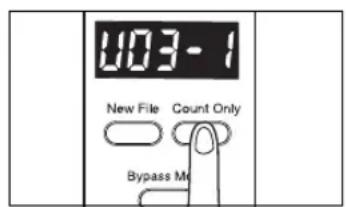
4 Press the [Stop] key when the settings are complete.
The mode you selected is set, and the counter returns to the page count display.
Chapter 6
Troubleshooting
This chapter describes the trouble that may occur on the DR-7580/9080C and how to correct it.
6.1 When the Scanner Is Not
Recognized 64
SCSI Connections 64
USB Connections 66
6.2 Clearing Paper jams ....67
Paper Jam in the Paper Feed Unit ...... 67
Paper Jam in the Paper Exit Section ..... 70
6.3 Paper Feed Trouble 72
6.4 When the Scanned Image Is Not
Normal 74
6.5 When an Error Code Is Displayed .....75
6.1
When the Scanner Is Not Recognized
The following describes possible causes of your computer not recognizing the scanner. Remedy the problem by following the procedure for the respective cause.
SCSI Connections
Cause The scanner is not correctly connected.
Remedy Connect the SCSI cables to the scanner in the correct way.
Cause The SCSI card is not correctly recognized.
Remedy Correctly connect the SCSI card referring to the SCSI card manual.
Also, check the following according to the OS that your computer is running on.
Click [Start]-[Settings]-[Control Panel]-[System], and then open the [Device Manager] and check if "SCSI Controller" has an "x" or "!" on it. If you can see one of these, then refer to the SCSI card's operator's manual to reset the SCSI card.
Click [Start]-[Settings]-[Control Panel], and then open the [SCSI adapter] and check if the “SCSI card” is being recognized correctly. If it is not correctly recognized, then refer to the SCSI card’s operator’s manual to reset the SCSI card.
Click [Start]-[Settings]-[Control Panel]-[System]-[Hardware], and then open the [Device Manager] and check if "SCSI controller" has an "x" or "!" on it. If you can see one of these, then refer to the SCSI card's operator's manual to reset the SCSI card.
Click [Start]-[Control Panel]-[Performance and Maintenance]-[System]-[Hardware], and then open the [Device Manager] and check if "SCSI controller" has an "x" or "!" on it. If you can see one of these, then refer to the SCSI card's operator's manual to reset the SCSI card.
Cause Same SCSI ID is used for other SCSI devices.
Remedy Check the SCSI ID of all connected SCSI devices, and make sure that the same SCSI ID is not set to two or more devices. Reset the SCSI IDs if the same SCSI ID is set.
Cause The terminator is not correctly connected.
Remedy Connect the terminator to the last SCSI device on the end of the daisy chain. Enable the terminator function if the SCSI device has a built-in terminator function.
Cause The scanner was turned ON after the computer.
Remedy Turn OFF the computer and scanner. Then, turn ON the scanner and turn ON the computer.
Cause The scanner is OFF.
Remedy Turn OFF the computer. Then, turn ON the scanner and turn ON the computer.
Cause The scanner's power cord is disconnected from the scanner or the AC power outlet.
Remedy Turn OFF the computer, and correctly connect the scanner's power cord. Then, turn ON the scanner and turn ON the computer.
Cause The scanner does not support this SCSI card.
Remedy Replace with a SCSI card compatible with the driver application. (See p.19.)
USB Connections
Cause Scanner is not correctly connected.
Remedy Connect the scanner correctly with a cable that supports USB 2.0.
Cause The USB 2.0 interface card is not correctly installed to the computer.
Remedy Refer to the USB 2.0 interface card operation manual and install it correctly. Also, check if the USB 2.0 interface card is being recognized by Windows in the operating system you are using.
Cause The scanner is OFF.
Remedy Check the connections with the computer, and then turn ON the scanner.
Cause The USB 2.0 interface card dose not support the scanner.
Remedy Use one of the recommended USB 2.0 interface cards. (See p.22.)
6.2 Clearing Paper Jams
Paper may have jammed if scanning stops midway or "PXX" appears on the counter display. Follow the procedure below to remove jammed paper from inside the DR-7580/9080C.

■Be careful when you clear a paper jam. You may be injured unexpectedly. For example, the paper edges may cut your fingers, or the document may be damaged.
■Remove all jammed sheets of paper. Paper scraps left inside the scanner may be drawn into the scanner again, causing another paper jam or malfunction.
■When opening or closing the upper scanner, take care not to get your fingers caught.
Paper Jam in the Paper Feed Unit
1 Remove the documents from the document tray and the eject tray.
2 Close the document eject tray extension if it is open.

3 Open the upper scanner.
Press the open/close button, and lift up the upper scanner gently until it stops and locks in the open position.


4 Remove the jammed paper from inside the scanner.

5 Carefully close the upper scanner.
Do not force the upper scanner down. Doing so might damage the scanner.

6 Press the upper scanner down firmly on both sides to close it.
If you press the upper scanner down only on one side, the opposite side will not be fully closed. Make sure that you hear it click into place.

Paper Jam in the Paper Exit Section
1 Remove the jammed paper from the document tray or the document eject tray.
2 Close the document eject tray extension if it is open.

3 Lift up the upper scanner slightly.

4 Remove any jammed paper from the exit section.

5 Press the upper scanner down firmly on both sides to close it.
If you press the upper scanner down only on one side, the opposite side will not be fully closed. Make sure that you hear it click into place.

6.3
Paper Feed Trouble
If the document is not fed properly or the detection functions do not work smoothly, remedy the problem by following the procedures described below.
Condition Paper jam has occurred.
Cause and remedy • Check the document to see if the size and thickness of the document are within the ranges supported by the scanner, and to see if the quality of the document paper is appropriate.
For cautions on handling documents, see “Documents,” on p.42.
- Document slipping may be causing a paper feed error to occur.
Scan paper one sheet at a time in the Bypass (manual) mode. (See p.50.)
- Dirty or worn rollers inside the scanner cause paper jams.
Clean rollers if dirty. (See p.81.) Worn rollers must be replaced. Contact your service representative.
Condition The document tray does not rise and makes a "clacking" sound instead.
Cause and remedy The weight of the placed document sometimes increases due to the environment (e.g., very humid locations) in which the document is stored. If this happens, the weight of the paper will exceed the maximum allowed stacked weight even if the number of stacked sheets is below the maximum. This sometimes prevents the document tray from rising. Reduce the number of document sheets placed in the document tray, and scan the document again.
Condition Double feed error occurs even though the documents are not being double-fed (erroneous detection of double feed).
Cause and remedy If the size of the paper on which the patch code sheet is copied differs from that of the document to be scanned when the patch code sheet is used, the scanner erroneously judges this to be a double feed, and this error occurs. If this happens, turn OFF double feed detection, and scan the document again. Or, copy the patch code sheet on paper of same size as the document, and use that copy.
Condition When the document becomes dirty (with the optional imprinter installed).
Cause and remedy This is because ink is sticking to the holes on the guide plate inside of the imprinter. Clean these holes with a cotton wool swab.
6.4
When the Scanned Image Is Not Normal
If there is a problem on the scanned image (image is not sharp or stripes appear on the image), one of the following may be a probable cause. Check the following and take the appropriate action.
●The scanning glasses or rollers in the scanner are dirty.
If the scanning glasses or rollers in the scanner are dirty, that dirt will appear on the scanned image.
→Clean the scanning glasses and rollers. For details, see “Daily Cleaning,” on p.80.
●The scan conditions are inappropriate.
When the scan condition setup is inappropriate, the scanned image will not be sharp or will appear darkish.
→Check the brightness and other scanner settings.
If the scanned image is foggy or the document is not scanned at all, a probable cause is that brightness is set too high.
If the scanned image appears darkish, a probable cause is that the brightness is set too low.
Also, check the settings on the driver and the application.
●The driver or application does not run correctly.
If the document cannot be scanned correctly even if the scan conditions are adjusted, a probable cause is that the driver or the application is not functioning correctly.
→Reinstall the driver or application.
For details on how to install the driver, see Chapter 3, "Software."
For details on how to install the application, see the instruction manual for the application in use.
●Other Causes
Even if the computer is correctly recognizing the scanner and the driver and the application is installed correctly, scanning may not be performed correctly.
A probable cause is that the interface card is not compatible. Use the recommended interface card.
If the above remedies do not rectify the problem, contact your service representative.
6.5
When an Error Code Is Displayed
When the scanner unit malfunctions or when trouble such as a paper feed or eject error occurs, an error code appears on the counter display of the operation panel. The following describes error codes that appear on the counter display and how to remedy the error.
Error code A01
Cause The document does not feed correctly.
Remedy Press the [Stop] key to reset the counter. Place the document back on the document tray and scan the document again.
Error code C01
Cause The upper scanner is open.
Remedy Close the upper scanner.
Error code C02
Cause The imprinter cover is open (with the optional imprinter installed).
Remedy Close the imprinter cover.
Error code C03
Cause The upper scanner and imprinter cover are open (with the optional imprinter installed).
Remedy Close the upper scanner and imprinter cover.
Error code C04
Cause The endorser ED600 cover is open (with the optional endorser ED600 installed).
Remedy Close the endorser ED600 cover.
Error code C05
Cause The upper scanner and endorser ED600 cover are open (with the optional endorser ED600 installed).
Remedy Close the upper scanner and endorser ED600 cover.
Error code C06
Cause The imprinter cover and endorser ED600 cover are open (with the optional imprinter and endorser ED600 installed).
Remedy Close the imprinter cover and endorser ED600 cover.
Error code C07
Cause The upper scanner, imprinter cover, and endorser ED600 cover are open (with the optional imprinter and endorser ED600 installed).
Remedy Close all covers.
Error code d02
Cause Double feed detected by the document length.
Remedy Check the document against the scanned image, and scan the document again.
Error code d04
Cause Double feed detected by the ultrasonic.
Remedy Check the document against the scanned image, and scan the document again.
Error code d06
Cause Double feed detected by the document length and the ultrasonic.
Remedy Check the document against the scanned image, and scan the document again.
Error codes Exx (Service call error)
Cause Scanner internal error
Remedy The scanner must be repaired by a service engineer. Turn OFF the power, contact your service representative, and notify them of the error code.
Error code H01
Cause The optional imprinter's ink cartridge is not correctly installed.
Remedy Install the imprinter cartridge properly.
Error code J01
Cause Staple detected, document transfer stopped.
Remedy Open the upper scanner and remove the document. Check to see if the document was scanned correctly, and scan the document again.
Error code J02
Cause Staple detected, document feed stopped.
Remedy Open the upper scanner and remove the document. Check to see if the document was scanned correctly, and scan the document again.
Error code J18
Cause Detected a skewed document, document feed stopped.
Remedy Open the upper scanner and remove the document. Check to see if the document was scanned correctly, and scan the document again.
Error code P00
Cause Document detected in the scanner when the power was turned ON or the upper scanner was open.
Remedy Remove the document that was left in the scanner. (See p.67.)
Error code P02
Cause Detected a document that is longer than the document that is set.
Remedy Open the upper scanner and remove the document. Check to see if the document was scanned correctly, and scan the document again.
Error code P03
Cause Detected a document that is shorter than the document that is set.
Remedy Open the upper scanner and remove the document. Check to see if the document was scanned correctly, and scan the document again.
Error code P30
Cause Endorser ED600 paper jam
Remedy Clear the paper jammed from inside the optical endorser ED600, according to the instructions in the Endorser ED600 Instructions.
Error code U01
Cause Number of document sheets to be scanned exceeds set number of sheets in the verify scan.
Remedy Two or more sheets may have been fed when the number of sheets is counted. Press the [Stop] key to reset the counter to "0." Check the number of sheets to see if all document sheets have been counted, and scan the document again.
Error code U02
Cause Number of scanned document sheets is less than the set number of sheets in the verify scan.
Remedy Two or more sheets may have been fed when the document is scanned. Press the [Stop] key to reset the counter to "0." Check the number of scanned images with the number of document sheets to see if all document sheets have been correctly scanned, and scan the document again.
Chapter 7
Daily Cleaning
This chapter describes daily cleaning of the scanner.
7.1 Daily Cleaning 80
Cleaning the Main Unit 80
Cleaning the Document Detection
Sensor 81
Cleaning the Scanning Glasses and
Rollers 81
Cleaning the Shading Plates 85
Cleaning the Guide Plate
(When Using the Imprinter) 87
Cleaning the Ink Jet Nozzles
(When Using the Imprinter) 87
Power Outlet 87
7.2 Replacing the Rollers .....88
When to Replace the Rollers 88
Resetting the Counter 89
Installing and Removing the Rollers ..... 91
7.1
Daily Cleaning
To ensure high-quality image scanning, regularly clean your DR-7580/9080C as described below.

■ Before you clean the scanner, turn OFF the scanner and computer and disconnect the power cord from the power outlet. Otherwise, it might cause an electrical shock.
■ Never clean the scanner with any kind of organic solvent, such as alcohol, benzene, or paint thinner. It might cause a fire and electrical shock, or cause the exterior of the scanner to disfigure of discolor.
■ Never spray mild detergent or water directly on the scanning glasses. The spray could penetrate below the glass and contaminate the internal light source and lenses.
Cleaning the Main Unit
Wipe the scanner with a firmly wrung cloth moistened slightly with water or mild detergent. Then wipe off with a clean, dry cloth.

Cleaning the Document Detection Sensor
Dust and debris that collects on the sensor will cause false recognition. Clean the sensor periodically so that dust and debris do not collect on it.

Cleaning the Scanning Glasses and Rollers
A probable cause of stripes appearing on scanned images or dirt appearing on scanned documents is dirt on the scanning glasses or rollers. Clean the scanning glasses and rollers regularly.
1 Press the power switch to turn OFF the scanner, and unplug the power cord from the power outlet.
2 Close the document eject tray extension if it is open.
3 Open the upper scanner.
Press the open/close button, and lift up the upper scanner gently until it stop and locks in the open position.

4 Use a clean, soft cloth to wipe the scanning glasses.
Be sure to clean both scanning glasses, the one below and one above.

Never spray mild detergent or water directly on the scanning glasses. The spray could penetrate below the glass and contaminate the internal light source and lenses.

5 Wipe the rollers with a firmly wrung cloth moistened with water. Rollers are located at the positions indicated in the figure below.

6 Remove the pickup roller, retard roller, and feed roller. (See "Installing and Removing the Rollers," on p.91.)
7 Use cloth from which all the water has been wrung out to wipe off the rollers.

8 Replace the rollers that you removed. (See “Installing and Removing the Rollers,” on p.91.)
9 Carefully close the upper scanner.

10 Press the upper scanner down firmly on both sides to close it.
If you press the upper scanner down only on one side, the opposite side will not be fully closed. Make sure that you hear it click into place.


If paper jams or double-feed (feeding of two or more document pages) occurs frequently in spite of your having cleaned the rollers, a probable cause is roller friction. If this happens, replace the rollers. Contact your service representative.
Cleaning the Shading Plates
If scanned images appear scratchy even after you have cleaned the rollers, the shading plates inside the scanner may be dirty. If this happens, clean the shading plates.

■ The power to the scanner is ON when you are cleaning the shading plates so be very careful.
■ Be careful not to bend the shading plates while you clean them. If they are bent, scanning cannot be done properly.
■ Do not clean the back side of the shading plates. Doing so may cause the shading plates to bend.
1 Open the upper scanner.
Press the open/close button, and lift up the upper scanner gently until it stops and locks in the open position.

2 Press the [Start] key.
The shading plates come out from above the platen rollers.

Shading Plates
3 Wipe the surface of the shading plate with a firmly wrung cloth moistened with water.
4 Press the [Stop] key.
The shading plates retract.
5 Carefully close the upper scanner.

6 Press the upper scanner down firmly on both sides to close it.
If you press the upper scanner down only on one side, the opposite side will not be fully closed. Make sure that you hear it click into place.


If there is no change in the appearance of the image after you have cleaned the shading plates, contact your service representative.
Cleaning the Guide Plate (When Using the Imprinter)
Ink that collects on the guide plate inside the optional imprinter may stain the documents when they are scanned. Clean off the ink with water and a mild detergent on a soft cloth that has been firmly wrung, and then thoroughly dry it with a dry cloth.

Cleaning the Ink Jet Nozzles (When Using the Imprinter)
Ink that collects around the ink jet nozzle may stain your documents or cause the text to appear scratchy. Remove the ink jets and clean them periodically with cotton swabs.


Do not touch the contact while you are cleaning the ink jet nozzles. Doing so may cause incorrect printing.
Power Outlet
If you leave the power plug connected to the power outlet for a long period of time, dust may accumulate at the power outlet, and cause a fire or electrical shock. Clean it periodically.

Replacing the Rollers
The feed rollers (pickup rollers, feed rollers, and retard rollers) are consumables. The feed rollers need to be changed periodically to maintain scanning quality.
When to Replace the Rollers
If the total number of scanned documents exceeds 250,000, a message for roller replacement appears when you restart the computer. In this case, buy the exchange roller kit and replace the feed rollers (pickup rollers, feed rollers, and retard rollers).

Be sure to reset the counter after changing the counter.

- Windows NT do not support a function to display a message for roller replacement. To confirm the total scan, check "Total Scanning Count" in the "About" dialog box of the ISIS/TWAIN driver and replace the feed rollers if the count shows around 250,000 scans.

- Contact your sales representative for information about exchange roller kit (pickup rollers, feed rollers, and retard rollers).
Resetting the Counter
Do the following procedure to reset the counter after replacing the feed rollers.
1 Click the [Start] button, and then click [Settings]-[Control Panel].

2 Double click on the [Scanners and Cameras] icon

![CANON imageFORMULA DR-758 - Double click on the [Scanners and Cameras] icon - 2](/content/2026/07/1525625/images/593e013de7b084a2072cff62cdc70c77ce950b9d30dc9b6ca36ea0790a9198f6.jpg)
● Windows NT do not display the "Scanners and Cameras" icon.
● The displayed dialog box differs depending on which Windows operating system you are using.
3 Select the scanner that you are using, and click on the [Properties] button.

4 Click the [Counter] tab.

5 Click the [Reset] button and confirm whether the counter is reset to 0.

Installing and Removing the Rollers
Follow the procedure shown below to remove and install the rollers when you need to clean or replace the pickup, feed, or retard rollers.

■ Turn OFF the power to the scanner and unplug the power cord from the power outlet when you remove or install the rollers. Leaving the power turned ON may result in an electrical shock.
■ When removing or replacing the rollers be careful to not use too much force. Forcing the rollers into position may damage them.

◆ Installing and Removing Pickup Rollers
1 Open the upper scanner.
2 Open the roller cover.

3 Open the roller holder and remove the pickup rollers.
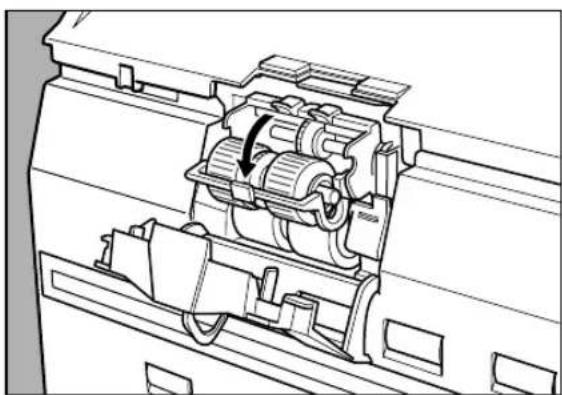
4 Position the square axle of the pickup roller on the left and insert the new pickup rollers.

5 Firmly close the roller holder until you hear it click.

6 Firmly close the roller cover until you hear it click.

7 Carefully close the upper scanner.

If the roller holder and roller cover are not firmly closed it will cause a feed error. Always be sure to check that the roller holder and roller cover are closed.
◆ Installing and Removing Feed Rollers
1 Open the upper scanner.
2 Open the roller cover.

3 Pull the lever that locks the feed rollers in place towards you.

4 Slide the feed rollers to the right, and then pull them towards you.

5 Remove the feed rollers.

6 Place the new feed rollers on the pin.

7 Set the feed rollers in place (①), and align the notch in the roller's axle with the shaft on the scanner (②).

8 Lock the lever.

9 Firmly close the roller cover until you hear it click.
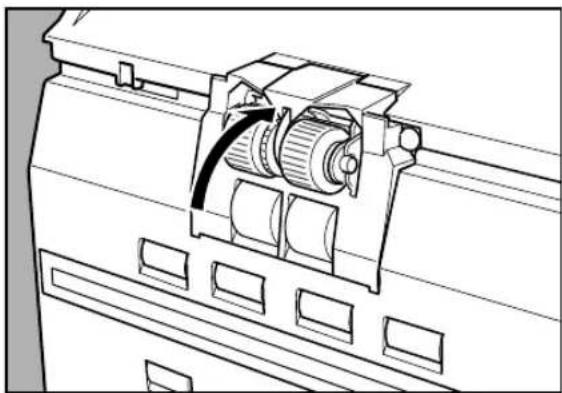
10 Carefully close the upper scanner.

If the roller cover is not firmly closed it will cause a feed error. Always be sure to check that the roller cover is closed.
◆ Installing and Removing Retard Rollers
1 Open the upper scanner.
2 Remove the roller cover.

3 Lift the roller clamp lever (①) and slide it to the left (②).

4 Move the retard rollers to the left and remove them.
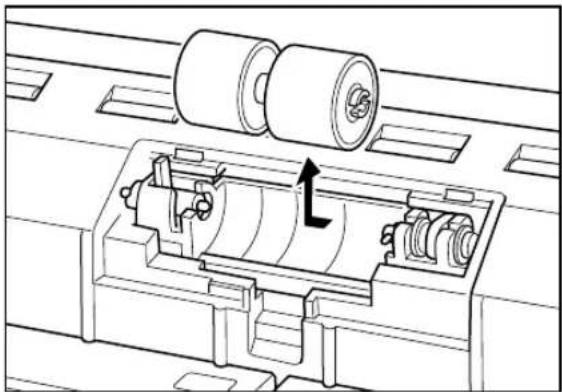
5 Set the new retard rollers in place, and align the notch in the roller's axle with the shaft on the scanner.

6 Slide the roller clamp lever to the right, and push it into the hole in the retard rollers.

7 Pull the lever towards you to clamp the retard rollers in place.

8 Put back the roller cover.

9 Carefully close the upper scanner.

■ Be sure that the hook is completely latched and the roller cover is not loose. If the roller cover is loose, the document tray will catch on it causing the scanner to not operate correctly.
■ Never clean the scanner with any kind of organic solvent, such as alcohol, benzene, or paint thinner. Doing so might cause a fire and electrical shock, or cause the exterior of the scanner to disfigure or discolor.
Specifications
Specifications for the Scanner
Type Desktop sheet fed type
Document size Width: 2.2" to 12"/55 to 305 mm
Length: 2.8" to 17.0"/70 to 432 mm
2.8" to 39.4" /70 to 1,000 mm (Long Document mode)
Thickness: 0.002" to 0.006"/0.06 to 0.15 mm (Auto feeding)
0.002" to 0.01"/0.05 to 0.3 mm (Manual feeding)
Weight: 13 to 32 lb bond (52 to 128 g/m 2 )(Auto feeding)
11 to 64 lb bond (42 to 255 g/m 2 )(Manual feeding)
Document feeding Semiautomatic/automatic/manual (Bypass mode)
Scanning method Contact image sensor (CMOS)
Light source Three color (RGB) single-line LED
Scanning side Simplex/duplex
Scanning mode
DR-7580 Black and white, advanced text enhanced, error diffusion, 256-level grayscale
DR-9080C Black and white, advanced text enhanced, error diffusion, 256-level grayscale, 24-bit color, 24 bit smoothing color
Scanning resolution 600 x 600dpi/400 x 400dpi/300 x 300dpi/
(primary scan lines x 240 x 240dpi/200 x 200dpi/150 x 150dpi/
secondary scan lines) 100 x 100dpi
Scanning speed (max.)
| DR-9080C DR-7580 | ||||
| Black and White | Simplex | 200 x 200 dpi | 90 ppm | 75 ppm |
| 300 x 300 dpi 90 ppm | 75 ppm | |||
| Duplex | 200 x 200 dpi | 180 ipm | 150 ipm | |
| 300 x 300 dpi | 180 ipm | 150 ipm | ||
| 256-level grayscale | Simplex | 200 x 200 dpi | 90 ppm | 75 ppm |
| 300 x 300 dpi 90 ppm | 75 ppm | |||
| Duplex | 200 x 200 dpi | 180 ipm | 150 ipm | |
| 300 x 300 dpi | 180 ipm | 150 ipm | ||
| 24-bit color | Simplex | 200 x 200 dpi | 54 ppm | |
| 300 x 300 dpi 38 ppm | ||||
| Duplex | 200 x 200 dpi 92 ipm | |||
| 300 x 300 dpi 64 ipm | ||||
Automatic feed LTR (A4) or smaller: Max. 500 sheets (80g/m² or 20 lb bond)
capacity Larger than LTR (A4): Max. 200 sheets (80g/m² or 20 lb bond)
Interface SCSI-III/USB 2.0
Other functions
Automatic paper size detection, Paper thickness and double feed detection, Staple detection, Skew detection, Dropout color, Count only mode
Dimensions 12.2" (H) x 18.1" (W) x 20.7" (D)/
Weight Approximately 55.1 lb (25 kg)
Power requirement AC 220-240V (50/60 Hz), 0.6A (max)
AC 120V (60 Hz), 1A (max)
Power consumption
220-240 V model Operating: 0.5 A maximum
Standby: Under 0.23 A
120 V model Operating: 1 A maximum
Standby: Under 0.23 A
Noise Less than 70 dB
Operating environment Temperature: 50°F to 90.5°F (10°C to 32.5°C)
Humidity: 20% to 80% RH
● You can use the functions noted above if the software supports them.
- They may not work depending on your computer's capabilities and the software you are using.
- If the scanning conditions are set to duplex scanning, color scanning, or high density (600 dpi) scanning, then large documents such as 11" x 17" size paper and A3 size paper cannot be scanned. Change the scan conditions to scan these sizes.
Specifications are subject to change without notice.
Options
Imprinter
Prints a variety of text messages on the front of the scanned document.
Endorser
Endorses a variety of text messages and a six digit number on the back of the scanned document.
Hard Counter
Counts the number of pages fed through the scanner.
Bar Code Module
Add on software that allows bar codes to be recognized by the ISIS/TWAIN driver.
- When using the endorser, the scanning speed lowers to match the printing speed of the endorser.
- Ink cartridge for the imprinter is not included. Please purchase the Hewlett-Packard ink cartridge.
- Contact your sales representative for information about optional products.
Consumables
Exchange Roller Kit This kit is for replacing the feed rollers. If a roller replacement message appears, contact your service representative to buy an Exchange Roller Kit. (See “Replacing the Rollers,” on p.88.)
Exterior Dimensions
Units: inches (units in parenthesis are millimeters)
◆ Top view

◆ Side view

Index
- A -
About documents 42
- How to place documents ...... 43
- Type of documents 42
About the power supply 8
Air vent 14
Automatic feeding 48
- B -
Bypass mode 15, 50
- C -
CapturePerfect 32
- How to use CapturePerfect ...... 37
- Install 34
Carrying 8
Cleaning
- Document detection sensor ..... 81
- Main unit 80
- Power outlet 87
- Rollers 81
- Scanning glasses.... 81
Connecting to a computer 19
Connectors 14
Consumables 102
Count only key 15, 52
Count only mode 52
Counter 89
Counter display 15
- D -
Daily cleaning 80
Daily maintenance 5
DIP switch 14
Document detection function ..... 58
Document detection sensor .... 49
Document eject tray extension . 13, 25
Document eject tray guide .... 13
Document guide 13
Document tray 13
Document tray extension ..... 13, 24
Double feed detection function ..... 58
- E -
Error code 75
Extension wire 13,24
Exterior dimensions ...... 102
- F -
Features of DR-7580/9080C 10
Feed rollers 88
- Installing and removing the rollers 91
- Replacing the feed rollers 88
File separation 53
- G -
Guide plate 87
- | -
Imprinter cover 13
Ink absorber 87
Installation location 7
ISIS/TWAIN driver 32
- How to use the ISIS/TWAIN driver 36
- Install 33
- M -
Manual feeding 50
- N -
New file key 15
-0-
Operating environment 18
Operation panel 13, 15
Options 16,99
- P -
Panel-feeding 46
Paper feed methods.... 44
- Automatic feeding 44
- Manual feeding 44
- Panel- feeding...... 44
- Standard feeding 44
Paper feed trouble 72
Paper jams 67
Part names 13
Patch code patterns 54
Patch code sheets 53
- How to use patch code sheets ... 53
PATCH II 54
PATCH T 54
Power cord 23
Power cord connector 14
Power switch 13,27
- R -
Recognizing the scanner 28
Retard roller 97
- S -
SCSI connections
- Connecting to a computer ..... 19
- Operating environment ...... 18
SCSI connector 14
Setup disc 12
Skew detection function 58
Software 32
- How to use the software ...... 36
- Install 33
- Uninstall 39
Specifications 100
Standard feeding.... 45
Staple detection 59
Start key 15
Stop key 15
Stopper.... 13, 25
-T-
Troubleshooting 63
Turning OFF the power 30
Turning ON the power 27
- U -
Unpacking the scanner 12
Upper scanner 13
USB connections
- Connecting to a computer ...... 22
- Operating environment ...... 18
USB connector 14
User mode 60
- How to set the user mode ...... 62
Canon
CANON ELECTRONICS INC.
1248, SHIMOKAGEMORI, CHICHIBU-SHI, SAITAMA 369-1892, JAPAN
CANON U.S.A. INC.
ONE CANON PLAZA, LAKE SUCCESS, N.Y. 11042, U.S.A.
CANON CANADA INC.
6390 DIXIE ROAD, MISSISSAUGA, ONTARIO L5T 1P7, CANADA
CANON EUROPA N.V.
BOVENKERKERWEG 59-61, P.O.BOX 2262 AMSTELVEEN, THE NETHERLANDS
CANON LATIN AMERICA, INC.
703 WATERFORD WAY SUITE 400 MIAMI, FLORIDA 33126 U.S.A.
CANON AUSTRALIA PTY. LTD.
1 THOMAS HOLT DRIVE, NORTH RYDE, SYDNEY. N.S.W, 2113. AUSTRALIA
CANON SINGAPORE PTE. LTD.
1 HARBOUR FRONT AVENUE #04-01 KEPPEL BAY TOWER SINGAPORE 098632
19TH FLOOR, THE METROPOLIS TOWER, 10 METROPOLIS DRIVE, HUNGHOM, KOWLOON, HONG KONG.

- INTERNATIONAL ENERGY STAR® OFFICE EQUIPMENT PROGRAM
- FCC REGULATIONS (FOR 120V MODELS)
- RADIO INTERFERENCE REGULATIONS (FOR 120V MODELS)
- RÈGLEMENT SUR LE BROUILLAGE RADIOÉLECTRIQUE (FOR 120V MODELS)
- TRADEMARKS AND REGISTERED TRADEMARKS
- READ CAREFULLY BEFORE OPENING THE SEALED DISK PACKAGE
- CANON SOFTWARE LICENSE AGREEMENT
- IMPORTANT-READ THIS AGREEMENT BEFORE OPENING THE SEALED DISK PACKAGE! BY OPENING THE SEALED DISK PACKAGE, YOU ARE DEEMED TO AGREE TO BE BOUND BY THIS AGREEMENT
- INTRODUCTION
- CONVENTIONS
- CONTENTS
- SAFETY PRECAUTIONS
- CHAPTER 1 DR-7580/9080C
- FEATURES OF THE DR-7580/9080C
- PACKAGING: WHAT IS IN THE BOX
- PART NAMES
- OPTIONAL PRODUCTS
- CHAPTER 2 PREPARATION BEFORE USE
- CHECKING YOUR OPERATING ENVIRONMENT
- CONNECTING TO A COMPUTER
- PREPARING FOR PAPER FEED AND EJECT
- TURNING ON/OFF THE POWER
- CHAPTER 3 SOFTWARE
- ABOUT THE SOFTWARE
- INSTALLING THE SOFTWARE
- HOW TO USE THE SOFTWARE
- UNINSTALLING THE SOFTWARE
- CHAPTER 4 DOCUMENT FEEDING AND SCANNING
- DOCUMENTS
- DOCUMENT FEEDING AND SCANNING
- CHAPTER 5 OTHER FUNCTIONS
- DOCUMENT DETECTION FUNCTION
- SETTING IN THE USER MODE
- CHAPTER 6 TROUBLESHOOTING
- WHEN THE SCANNER IS NOT RECOGNIZED
- CLEARING PAPER JAMS
- PAPER FEED TROUBLE
- WHEN THE SCANNED IMAGE IS NOT NORMAL
- WHEN AN ERROR CODE IS DISPLAYED
- CHAPTER 7 DAILY CLEANING
- DAILY CLEANING
- REPLACING THE ROLLERS
- SPECIFICATIONS
- INDEX
- DAILY MAINTENANCE
- INSTALLATION LOCATION
- POWER SUPPLY
- CARRYING
- CHAPTER
- DR-7580/9080C
- ●VARIOUS OPTIONS
- ◆ FRONT VIEW
- ◆ OPERATION PANEL
- COUNTER DISPLAY
- COUNT ONLY KEY
- NEW FILE KEY
- BYPASS MODE KEY
- STOP KEY
- START KEY
- ◆ IMPRINTER UNIT
- ◆ ENDORSER ED
- ◆ HARD COUNTER
- ◆ BAR CODE MODULE
- PREPARATION BEFORE USE
- CHECKING YOUR OPERATING
- ENVIRONMENT
- FOR SCSI
- FOR USB
- SCSI CONNECTIONS
- ♦ SCSI CARDS
- RECOMMENDED SCSI CARDS
- ◆ CONNECTING THE SCSI CABLE
- ◆ SETTING THE SCSI ID AND TERMINATOR
- USB CONNECTIONS
- ◆ USB 2.0 INTERFACE CARDS
- RECOMMENDED USB 2.0 INTERFACE CARDS
- ◆ CONNECTING A USB INTERFACE CABLE
- CONNECTING THE POWER CORD
- PREPARING THE DOCUMENT TRAY EXTENSION
- PREPARING THE DOCUMENT EJECT TRAY EXTENSION
- ◆ LONG DOCUMENTS
- OPEN THE DOCUMENT EJECT TRAY EXTENSION
- LIFT UP THE STOPPER
- ADJUST THE POSITION OF THE STOPPER TO MATCH THE LENGTH OF THE DOCUMENT
- ◆ SHORT DOCUMENTS
- TURNING ON THE POWER
- TO TURN ON THE SCANNER, PRESS THE POWER SWITCH
- TURN ON THE COMPUTER
- RECOGNIZING THE SCANNER
- IF YOU ARE USING WINDOWS 98SE, THE “ADD NEW HARDWARE WIZARD” DIALOG BOX APPEARS
- IF YOU ARE USING WINDOWS ME, THE “ADD NEW HARDWARE WIZARD” DIALOG BOX APPEARS
- IF YOU ARE USING WINDOWS 2000 PROFESSIONAL, THE “FOUND NEW HARDWARE WIZARD” DIALOG BOX APPEARS
- IF YOU ARE USING WINDOWS XP, THE “FOUND NEW HARDWARE WIZARD” DIALOG BOX APPEARS
- TURNING OFF THE POWER
- SOFTWARE
- ●ISIS/TWAIN DRIVER
- ●CAPTUREPERFECT
- INSTALLING THE ISIS/TWAIN DRIVER
- TURN ON YOUR COMPUTER AND START WINDOWS
- INSERT THE SETUP DISC INTO THE CD-ROM DRIVE
- CLICK THE [START] BUTTON, AND THEN SELECT [RUN]
- INSTALLING CAPTUREPERFECT
- HOW TO USE THE ISIS/TWAIN DRIVER
- HOW TO USE CAPTUREPERFECT
- STARTING CAPTUREPERFECT
- START CAPTUREPERFECT
- ◆ CLOSING CAPTUREPERFECT
- SELECT [EXIT] FROM THE [FILE] MENU
- CLICK THE [START] BUTTON, AND THEN CLICK [SETTINGS]-[CONTROL PANEL]
- DOUBLE CLICK ON THE [ADD/REMOVE PROGRAMS] ICON
- TYPES OF DOCUMENTS
- HOW TO PLACE DOCUMENTS
- SCAN PROCEDURE
- ● STANDARD FEEDING (SEE P.45.)
- ● PANEL-FEEDING (SEE P.46.)
- ● AUTOMATIC FEEDING (SEE P.48.)
- ● MANUAL FEEDING (SEE P.50.)
- ◆ STANDARD FEEDING
- ◆ PANEL-FEEDING
- ◆ AUTOMATIC FEEDING
- ◆ MANUAL FEEDING (BYPASS MODE)
- COUNT ONLY MODE
- PRESS THE [COUNT ONLY] KEY ON THE OPERATION PANEL OF THE SCANNER
- PLACE THE DOCUMENT IN THE DOCUMENT TRAY, ALIGNING THE DOCUMENT'S TOP EDGE AGAINST THE BACK OF THE DOCUMENT TRAY. PRESS THE [START] KEY
- WHEN COUNTING ENDS, PRESS THE [COUNT ONLY] KEY TO CANCEL THE COUNT ONLY MODE
- USING PATCH CODE SHEETS
- ◆ PATCH CODE SHEETS
- ◆ TYPES OF PATCH CODE PATTERNS
- ◆ HOW TO USE PATCH CODE SHEETS
- PRINT THE PATCH CODE SHEET ON THE PRINTER. PRINT THE PATCH CODE SHEET DATA ON THE FOLLOWING SIZE PAPER
- PLACE THE PATCH CODE SHEET ON TOP OF THE DOCUMENTS THAT ARE TO BE SAVED TO A SEPARATE FILE, AND THEN SCAN THE DOCUMENTS
- SET THE SCANNING CONDITIONS AND THEN START SCANNING
- OTHER FUNCTIONS
- DOUBLE FEED DETECTION FUNCTION
- ●DETECT BY LENGTH
- ●DETECT BY ULTRASONIC
- SKEW DETECTION FUNCTION
- STAPLE DETECTION
- ●OPERATION PANEL BUZZER SETTING
- ●COUNT ONLY MODE SETTING
- ●ENDORSER STAMP MODE SETTING
- ●DOUBLE FEED DETECTION CONTROL SETTINGS IN THE COUNT ONLY MODE
- ●STAPLE DETECTION SETTINGS IN THE COUNT ONLY MODE
- ●STAPLE DETECTION ACCURACY SETTINGS
- ●IMPRINTER CONTROL SETTINGS IN THE COUNT ONLY MODE
- ●SKEW DETECTION CONTROL SETTINGS IN THE COUNT ONLY MODE
- ●ENERGY-SAVING MODE SETTING
- ●LENGTH OF SCANNED DOCUMENT SETTINGS
- NOTE THE FOLLOWING POINTS WHEN USING THE EXTRA LONG MODE
- ●SETTINGS SCSI TRANSFER SPEED
- HOW TO SET THE USER MODE
- TROUBLESHOOTING
- WHEN THE SCANNER IS NOT
- WHEN THE SCANNED IMAGE IS NOT
- CAUSE THE SCANNER IS NOT CORRECTLY CONNECTED
- CAUSE THE SCSI CARD IS NOT CORRECTLY RECOGNIZED
- CAUSE SAME SCSI ID IS USED FOR OTHER SCSI DEVICES
- CAUSE THE TERMINATOR IS NOT CORRECTLY CONNECTED
- CAUSE THE SCANNER WAS TURNED ON AFTER THE COMPUTER
- CAUSE THE SCANNER IS OFF
- CAUSE THE SCANNER'S POWER CORD IS DISCONNECTED FROM THE SCANNER OR THE AC POWER OUTLET
- CAUSE THE SCANNER DOES NOT SUPPORT THIS SCSI CARD
- CAUSE SCANNER IS NOT CORRECTLY CONNECTED
- CAUSE THE USB 2.0 INTERFACE CARD IS NOT CORRECTLY INSTALLED TO THE COMPUTER
- CAUSE THE USB 2.0 INTERFACE CARD DOSE NOT SUPPORT THE SCANNER
- PAPER JAM IN THE PAPER FEED UNIT
- OPEN THE UPPER SCANNER
- REMOVE THE JAMMED PAPER FROM INSIDE THE SCANNER
- CAREFULLY CLOSE THE UPPER SCANNER
- PRESS THE UPPER SCANNER DOWN FIRMLY ON BOTH SIDES TO CLOSE IT
- PAPER JAM IN THE PAPER EXIT SECTION
- REMOVE ANY JAMMED PAPER FROM THE EXIT SECTION
- CONDITION PAPER JAM HAS OCCURRED
- CONDITION THE DOCUMENT TRAY DOES NOT RISE AND MAKES A "CLACKING" SOUND INSTEAD
- CONDITION DOUBLE FEED ERROR OCCURS EVEN THOUGH THE DOCUMENTS ARE NOT BEING DOUBLE-FED (ERRONEOUS DETECTION OF DOUBLE FEED)
- CONDITION WHEN THE DOCUMENT BECOMES DIRTY (WITH THE OPTIONAL IMPRINTER INSTALLED)
- ●THE SCANNING GLASSES OR ROLLERS IN THE SCANNER ARE DIRTY
- ●THE SCAN CONDITIONS ARE INAPPROPRIATE
- ●THE DRIVER OR APPLICATION DOES NOT RUN CORRECTLY
- ●OTHER CAUSES
- CAUSE STAPLE DETECTED, DOCUMENT FEED STOPPED
- CAUSE DETECTED A SKEWED DOCUMENT, DOCUMENT FEED STOPPED
- CAUSE DOCUMENT DETECTED IN THE SCANNER WHEN THE POWER WAS TURNED ON OR THE UPPER SCANNER WAS OPEN
- CAUSE DETECTED A DOCUMENT THAT IS LONGER THAN THE DOCUMENT THAT IS SET
- CAUSE DETECTED A DOCUMENT THAT IS SHORTER THAN THE DOCUMENT THAT IS SET
- CAUSE ENDORSER ED600 PAPER JAM
- CAUSE NUMBER OF DOCUMENT SHEETS TO BE SCANNED EXCEEDS SET NUMBER OF SHEETS IN THE VERIFY SCAN
- CAUSE NUMBER OF SCANNED DOCUMENT SHEETS IS LESS THAN THE SET NUMBER OF SHEETS IN THE VERIFY SCAN
- CLEANING THE MAIN UNIT
- CLEANING THE DOCUMENT DETECTION SENSOR
- CLEANING THE SCANNING GLASSES AND ROLLERS
- USE A CLEAN, SOFT CLOTH TO WIPE THE SCANNING GLASSES
- CLEANING THE SHADING PLATES
- PRESS THE [START] KEY
- WIPE THE SURFACE OF THE SHADING PLATE WITH A FIRMLY WRUNG CLOTH MOISTENED WITH WATER
- PRESS THE [STOP] KEY
- CLEANING THE GUIDE PLATE (WHEN USING THE IMPRINTER)
- CLEANING THE INK JET NOZZLES (WHEN USING THE IMPRINTER)
- POWER OUTLET
- WHEN TO REPLACE THE ROLLERS
- RESETTING THE COUNTER
- DOUBLE CLICK ON THE [SCANNERS AND CAMERAS] ICON
- INSTALLING AND REMOVING THE ROLLERS
- REMOVE THE FEED ROLLERS
- PLACE THE NEW FEED ROLLERS ON THE PIN
- SET THE FEED ROLLERS IN PLACE (①), AND ALIGN THE NOTCH IN THE ROLLER'S AXLE WITH THE SHAFT ON THE SCANNER (②)
- LOCK THE LEVER
- FIRMLY CLOSE THE ROLLER COVER UNTIL YOU HEAR IT CLICK
- PULL THE LEVER TOWARDS YOU TO CLAMP THE RETARD ROLLERS IN PLACE
- PUT BACK THE ROLLER COVER
- SPECIFICATIONS FOR THE SCANNER
- POWER CONSUMPTION
- OPTIONS
- IMPRINTER
- ENDORSER
- HARD COUNTER
- BAR CODE MODULE
- CONSUMABLES
- EXTERIOR DIMENSIONS
- ◆ TOP VIEW
- ◆ SIDE VIEW
- A
- B
- C
- D
- E
- F
- G
- M
- N
- P
- R
- S
- T
- U
- CANON
Brand : CANON
Model : imageFORMULA DR-758
Category : Scanner