
FDR-AX30 - Camcorder SONY - Free user manual and instructions
Find the device manual for free FDR-AX30 SONY in PDF.


| Product Type | 4K Camcorder |
| Model | FDR-AX30 |
| Brand | Sony |
| Dimensions (approx) | 73 × 80.5 × 173 mm (2 7/8 × 3 1/4 × 6 7/8 in) |
| Weight (approx) | 625 g (1 lb 6.1 oz) with battery and memory card |
| Power Supply | Rechargeable battery pack NP-FV70 |
| Recording Media | SD/SDHC/SDXC memory card (Class 4 or higher) or Memory Stick |
| Image Sensor | 1/2.3-type Exmor R CMOS |
| Processor | BIONZ X |
| Lens | Zeiss Vario-Sonnar T*, 20x optical zoom, f=2.6-65mm |
| Maximum Aperture | f/1.8 - f/3.4 |
| Image Stabilization | Balanced Optical SteadyShot |
| Maximum Video Resolution | 3840 × 2160 (4K) |
| Frame Rates | 4K: 25p; Full HD: 50p/25p |
| Viewfinder | 0.24-type OLED with 1.44 million dots |
| LCD Screen | 3.0-type Touch Panel LCD (921,600 dots) |
| Wi-Fi | Built-in Wi-Fi (IEEE 802.11b/g/n) |
| NFC | Yes |
| Maintenance | Clean with soft dry cloth; avoid moisture; store in cool dry place |
| Safety | Do not disassemble; avoid exposure to rain or moisture; keep away from children |
| Spare Parts | Battery NP-FV70, AC adapter, remote control RM-VPR1 available separately |
| Included Accessories | Rechargeable battery NP-FV70, AC adapter, HDMI cable, USB cable, remote commander, shoe adapter |
Frequently Asked Questions - FDR-AX30 SONY
User questions about FDR-AX30 SONY
0 question about this device. Answer the ones you know or ask your own.
Ask a new question about this device
Download the instructions for your Camcorder in PDF format for free! Find your manual FDR-AX30 - SONY and take your electronic device back in hand. On this page are published all the documents necessary for the use of your device. FDR-AX30 by SONY.
USER MANUAL FDR-AX30 SONY
Digital 4K Video Camera Recorder
Operating Guide

"Help Guide" (Web manual)
Refer to "Help Guide" for in-depth instructions on the many functions of the camera.
http://rd1.sony.net/help/cam/1510/h_zz/
Getting started
Recording/Playback
Saving images
Customizing your camcorder
Others

HANDYCSM.
Read this first
Before operating the unit, please read this manual thoroughly, and retain it for future reference.
Owner's Record
The model and serial numbers are located on the bottom. Record the serial number in the space provided below. Refer to these numbers whenever you call your Sony dealer regarding this product.
Model No. FDR-
Serial No. ____
Model No. AC-
Serial No. ____
WARNING
To reduce the risk of fire or electric shock,
1) do not expose the unit to rain or moisture.
2) do not place objects filled with liquids, such as vases, on the apparatus.
Do not expose the batteries to excessive heat such as sunshine, fire or the like.
IMPORTANT SAFETY INSTRUCTIONS
SAVE THESE INSTRUCTIONS. DANGER - TO REDUCE THE RISK OF FIRE OR ELECTRIC SHOCK, CAREFULLY FOLLOW THESE INSTRUCTIONS.
- Read these instructions.
- Keep these instructions.
- Heed all warnings.
- Follow all instructions.
- Do not use this apparatus near water.
- Clean only with dry cloth.
- Do not block any ventilation openings. Install in accordance with the manufacturer's instructions.
- Do not install near any heat sources such as radiators, heat registers, stoves, or other apparatus (including amplifiers) that produce heat.
- Do not defeat the safety purpose of the polarized or grounding-type plug. A polarized plug has two blades with one wider than the other. A grounding type plug has two blades and a third grounding prong. The wide blade or the third prong are provided for your safety. If the provided plug does not fit into your outlet, consult an electrician
for replacement of the obsolete outlet.
- Protect the power cord from being walked on or pinched particularly at plugs, convenience receptacles, and the point where they exit from the apparatus.
- Only use attachments/accessories specified by the manufacturer.
- Use only with the cart, stand, tripod, bracket, or table specified by the manufacturer, or sold with the apparatus. When a cart is used, use caution when moving the cart/ apparatus combination to avoid injury from tip-over.

- Unplug this apparatus during lightning storms or when unused for long periods of time.
- Refer all servicing to qualified service personnel. Servicing is required when the apparatus has been damaged in any way, such as power-supply cord or plug is damaged, liquid has been spilled or objects have fallen into the apparatus, the apparatus has been exposed to rain or moisture, does not operate normally, or has been dropped.
- If the shape of the plug does not fit the power outlet, use an attachment plug adaptor of the proper configuration for the power outlet.
Representative plug of power supply cord of countries/regions around the world.


A Type (American Type)
B Type (British Type)

BF Type (British Type)

B3 Type (British Type)

C Type (CEE Type)

SE Type (CEE Type)

O Type (Ocean Type)
The representative supply voltage and plug type are described in this chart. Depend on an area, Different type of plug and supply voltage are used.
Attention: Power cord meeting demands from each country shall be used.
- For only the United States
Use a supplied power cord.
Europe
| Countries/regions Voltage Frequency (Hz) Plug type | |||
| Austria | 230 | 50 | C |
| Belgium | 230 | 50 | C |
| Czech | 220 | 50 | C |
| Denmark | 230 | 50 | C |
| Finland | 230 | 50 | C |
| France | 230 | 50 | C |
| Germany | 230 | 50 | C |
| Greece | 220 | 50 | C |
| Hungary | 220 | 50 | C |
| Iceland | 230 | 50 | C |
| Ireland | 230 | 50 | C/BF |
| Italy | 220 | 50 | C |
| Luxemburg | 230 | 50 | C |
| Netherlands | 230 | 50 | C |
| Norway | 230 | 50 | C |
| Poland | 220 | 50 | C |
| Portugal | 230 | 50 | C |
| Romania | 220 | 50 | C |
| Russia | 220 | 50 | C |
| Slovak | 220 | 50 | C |
| Spain | 127/230 | 50 | C |
| Sweden | 230 | 50 | C |
| Switzerland | 230 | 50 | C |
| UK | 240 | 50 | BF |
Asia
| Countries/regions Voltage Frequency (Hz) Plug type | |||
| China | 220 | 50 | A |
| Hong Kong | 200/220 | 50 | BF |
| India | 230/240 | 50 | C |
| Indonesia | 127/230 | 50 | C |
| Japan | 100 | 50/60 | A |
| Korea (rep) | 220 | 60 | C |
| Malaysia | 240 | 50 | BF |
| Philippines | 220/230 | 60 | A/C |
| Singapore | 230 | 50 | BF |
| Taiwan | 110 | 60 | A |
| Thailand | 220 | 50 | C/BF |
| Vietnam | 220 | 50 | A/C |
Oceania
| Countries/regions Voltage Frequency (Hz) Plug type | |||
| Australia | 240 | 50 | O |
| New Zealand | 230/240 | 50 | O |
North America
| Countries/regions Voltage Frequency (Hz) Plug type | |||
| Canada | 120 | 60 | A |
| USA | 120 | 60 | A |
Central America
| Countries/regions Voltage Frequency (Hz) Plug type | |||
| Bahamas | 120/240 | 60 | A |
| Costa Rica | 110 | 60 | A |
| Cuba | 110/220 | 60 | A/C |
| Dominican (rep) | 110 | 60 | A |
| El Salvador | 110 | 60 | A |
| Guatemala | 120 | 60 | A |
| Honduras | 110 | 60 | A |
| Jamaica | 110 | 50 | A |
| Mexico | 120/127 | 60 | A |
| Nicaragua | 120/240 | 60 | A |
| Panama | 110/220 | 60 | A |
South America
| Countries/regions Voltage Frequency (Hz) Plug type | |||
| Argentina | 220 | 50 | C/BF/O |
| Brazil | 127/220 | 60 | A/C |
| Chile | 220 | 50 | C |
| Colombia | 120 | 60 | A |
| Peru | 220 | 60 | A/C |
| Venezuela | 120 | 60 | A |
Middle East
| Countries/regions Voltage Frequency (Hz) Plug type | |||
| Iran | 220 | 50 | C/BF |
| Iraq | 220 | 50 | C/BF |
| Israel | 230 | 50 | C |
| Saudi Arabia | 127/220 | 50 | A/C/BF |
| Turkey | 220 | 50 | C |
| UAE | 240 | 50 | C/BF |
Africa
| Countries/regions Voltage Frequency (Hz) Plug type | |||
| Algeria | 127/220 | 50 | C |
| Congo (dem) | 220 | 50 | C |
| Egypt | 220 | 50 | C |
| Ethiopia | 220 | 50 | C |
| Kenya | 240 | 50 | C/BF |
| Nigeria | 230 | 50 | C/BF |
| South Africa | 220/230 | 50 | C/BF |
| Tanzania | 230 | 50 | C/BF |
| Tunisia | 220 | 50 | C |

CAUTION
Battery pack
If the battery pack is mishandled, the battery pack can burst, cause a fire or even chemical burns. Observe the following cautions.
- Do not disassemble.
- Do not crush and do not expose the battery pack to any shock or force such as hammering, dropping or stepping on it.
- Do not short circuit and do not allow metal objects to come into contact with the battery terminals.
- Do not expose to high temperature above 60°C (140°F) such as in direct sunlight or in a car parked in the sun.
- Do not incinerate or dispose of in fire.
- Do not handle damaged or leaking lithium ion batteries.
- Be sure to charge the battery pack using a genuine Sony battery charger or a device that can charge the battery pack.
- Keep the battery pack out of the reach of small children.
- Keep the battery pack dry.
- Replace only with the same or equivalent type recommended by Sony.
- Dispose of used battery packs promptly as described in the instructions.
I AC Adaptor
Do not use the AC Adaptor placed in a narrow space, such as between a wall and furniture.
Use the nearby wall outlet (wall socket) when using the AC Adaptor. Disconnect the AC Adaptor from the wall outlet (wall socket) immediately if any malfunction occurs while using the apparatus.
I Note on the power cord (mains lead)
The power cord (mains lead) is designed specifically for use with this camcorder only, and should not be used with other electrical equipment.
Even if your camcorder is turned off, AC power source (mains) is still supplied to it while connected to the wall outlet (wall socket) via the AC Adaptor.
Excessive sound pressure from earphones and headphones can cause hearing loss.
For Customers in the U.S.A. and Canada
I RECYCLING LITHIUM-ION BATTERIES
Lithium-Ion batteries are recyclable.
You can help preserve our environment by returning your used rechargeable batteries to the collection and recycling location nearest you.

For more information regarding recycling of rechargeable batteries, call toll free
1-800-822-8837, or visit http://www.call2recycle.org/
Caution: Do not handle damaged or leaking Lithium-Ion batteries.
Battery pack
This device complies with Part 15 of the FCC Rules. Operation is subject to the following two conditions:
(1) This device may not cause harmful interference, and (2) this device must accept any interference received, including interference that may cause undesired operation.
This equipment complies with FCC/IC radiation exposure limits set forth for an uncontrolled environment and meets the FCC radio frequency (RF) Exposure Guidelines and RSS-102 of the IC radio frequency (RF) Exposure rules. This equipment has very low levels of RF energy that are deemed to comply without testing of specific absorption ratio (SAR).
For Customers in the U.S.A.
If you have any questions about this product, you may call:
Sony Customer Information Center 1-800-222-SONY (7669).
The number below is for the FCC related matters only.
Regulatory Information
Declaration of Conformity
Trade Name: SONY
Model No.: FDR-AX33
Responsible Party: Sony
Electronics Inc.
Address: 16530 Via Esprillo,
San Diego, CA 92127
U.S.A.
Telephone No.: 858-942-2230
This device complies with Part 15 of the FCC Rules. Operation is subject to the following two conditions: (1) This device may not cause harmful interference, and (2) this device must accept any interference received, including interference that may cause undesired operation.
This equipment must not be co-located or operated in conjunction with any other antenna or transmitter.
CAUTION
You are cautioned that any changes or modifications not expressly approved in this manual could void your authority to operate this equipment.
Note:
This equipment has been tested and found to comply with the limits for a Class B digital device, pursuant to Part 15 of the FCC Rules.
These limits are designed to provide reasonable protection against harmful interference in a residential installation. This equipment generates, uses, and can radiate radio frequency energy and, if not installed and used in accordance with the instructions, may cause harmful interference to radio communications. However, there is no guarantee that interference will
not occur in a particular installation. If this equipment does cause harmful interference to radio or television reception, which can be determined by turning the equipment off and on, the user is encouraged to try to correct the interference by one or more of the following measures:
- Reorient or relocate the receiving antenna.
- Increase the separation between the equipment and receiver.
- Connect the equipment into an outlet on a circuit different from that to which the receiver is connected.
- Consult the dealer or an experienced radio/TV technician for help.
The supplied interface cable must be used with the equipment in order to comply with the limits for a digital device pursuant to Subpart B of Part 15 of FCC Rules.
For Customers in Canada
This device complies with Industry Canada licence-exempt RSS standard(s).
Operation is subject to the following two conditions: (1) this device may not cause interference, and (2) this device must accept any interference, including interference that may cause undesired operation of the device.
For Customers in Europe
Notice for the customers in the countries applying EU Directives
Manufacturer: Sony Corporation, 1-7-1 Konan Minato-ku Tokyo, 108-0075 Japan
For EU product compliance: Sony Deutschland GmbH, Hedelfinger Strasse 61, 70327 Stuttgart, Germany
CE
Hereby, Sony Corporation, declares that this equipment is in compliance with the essential requirements and other relevant provisions of Directive 1999/5/EC. For details, please access the following URL:
http://www.compliance.sony.de/
Notice
If static electricity or electromagnetism causes data transfer to discontinue midway (fail), restart the application or disconnect and connect the communication cable (USB, etc.) again.
This product has been tested and found compliant with the limits set out in the EMC regulation for using connection cables shorter than 3 meters (9.8 feet).
The electromagnetic fields at the specific frequencies may influence the picture and sound of this unit.
Disposal of waste batteries and electrical and electronic equipment (applicable in the European Union and other European countries with separate collection systems)

This symbol on the product, the battery or on the packaging indicates that the product and the battery shall not be
treated as household waste. On certain batteries this symbol might be used in combination with a chemical symbol. The chemical symbols for mercury (Hg) or lead (Pb) are added if the battery contains more than 0.0005% mercury or 0.004% lead. By ensuring these products and batteries are disposed of correctly, you will help prevent potentially negative consequences for the environment and human health which could otherwise be caused by inappropriate waste handling. The recycling of the materials will help to conserve natural resources.
In case of products that for safety, performance or data integrity reasons require a permanent connection with an incorporated battery, this battery should be replaced by qualified service staff only. To ensure that the battery and the electrical and electronic equipment will be treated properly, hand over these products at end-of-life to the applicable collection point for the recycling of electrical and electronic equipment.
For all other batteries, please view the section on how to remove the battery from the product safely. Hand the battery over to the applicable collection point for the recycling of waste batteries. For more detailed information about recycling of this product or battery, please contact your local Civic Office, your household waste disposal service or the shop where you purchased the product or battery.
For Customers in Singapore
Complies with IDA Standards DB00353
For Customers in U.A.E.
TRA
REGISTERED No:
ER0098751/12
DEALER No:
DA0073692/11
This manual describes 1080 60i-compatible devices and 1080 50i-compatible devices.
To check whether your camera is a 1080 60i-compatible device or 1080 50i-compatible device, check for the following marks on the bottom of the camera.
1080 60i-compatible device: 60i
1080 50i-compatible device: 50i
Learning more about the camcorder (Help Guide)
Help Guide is an on-line manual. Refer to it for in-depth instructions on the many functions of the camcorder.
Access the Sony support page.
http://rd1.sony.net/help/cam/1510/h_zz/

You will find further information such as the following functions in Help Guide.
• Highlight Movie Maker
- Live Streaming
- Multi Camera Control
- Trimming Playback
Table of Contents
Read this first 2
Learning more about the camcorder (Help Guide) .....11
Selecting the recording format for movies 12
Getting started ..... 14
Supplied items 14
Charging the battery pack ..... 15
Turning the power on .....18
Inserting a memory card ..... 19
Recording/Playback ... 21
Recording 21
Using the manual adjustment features 24
Playback 25
Viewing images on a TV ...... 28
Viewing images using the built-in projector (FDR-AXP33/AXP35) 32
Saving images ...... 33
Using PlayMemories Home™ 33
Connecting an external media device 34
Using the Wi-Fi function ..... 36
Customizing your camcorder 41
Using the menus ....41
Others 44
Precautions 44
Specifications 46
Parts and controls 50
Index 53
Selecting the recording format for movies
The camcorder is compatible with the XAVC S format.
What is XAVC S?
XAVC S is a recording format that allows high-resolution images, such as 4K, to be highly compressed with MPEG-4 AVC/H.264 and recorded in the MP4 file format. High image quality will be obtained while keeping the data size within a certain level.
Recording formats available and their features
| XAVC S 4K XAVC S HD AVCHD | |||
| Pixels |  3840 × 2160 1920 × 1080 1920 × 1080 3840 × 2160 1920 × 1080 1920 × 1080 |   | |
| Bit-rate 60 Mbps/100 Mbps | 50 Mbps Max. 28 Mbps | ||
| Features Records images in 4K. Recording in this format is recommended even if you do not have a 4K TV so you will be able to enjoy the benefits of 4K in the future. | Information volume is greater compared to AVCHD, enabling recording of clearer images. | Compatibility with recording devices other than computers is good. | |
- Bit-rate indicates the quantity of data recorded in a certain period.
Recording format and the available shooting mode
| Recording format | XAVC S 4K XAVC S | HD AVCHD | |
| Shooting mode | Movie Movie | High Speed REC | Movie Smth Slw REC Golf Shot |
- You can change the recording format by selecting MENU → [Image Quality/Size] → [File Format].
Storage method
| Recording format Storage method | Image quality stored at | Page | |
| XAVC S 4K Computer using XAVC S HD XAVC S HD 33 | PlayMemories HomeTM software• External media device | XAVC S 4K 33 | |
| AVCHD Computer using PlayMemories Home software | AVCHD 33 | ||
| External media device | AVCHD 34 | ||
• See the following website for the latest storage environment. http://www.sony.net/
- You can store images by connecting to a recorder with an analog AV cable (sold separately). Movies are copied with standard definition image quality.
- You can directly copy images to an external media device with the VMC-UAM2 USB Adaptor Cable (sold separately).
To transfer images to a smartphone
You can transfer MP4 images to a smartphone connected to the camcorder via Wi-Fi (page 36). MP4 format is good for uploading to the Internet. When [Dual Video REC] is set to [On], the camcorder records movies in XAVC S 4K format, XAVC S HD format, or AVCHD format while recording movies in MP4 format at the same time.
Supplied items
The numbers in ( ) indicate the supplied quantity.
All models
- Camcorder (1)
- AC Adaptor (1)

• Power cord (mains lead) (1)

• USB connection support cable (1)

The USB connection support cable is designed for use with this camcorder only. Use this cable when the Built-in USB Cable of the camcorder is too short for connection.

- HDMI cable (1)

- "Operating Guide" (This manual) (1)
- Rechargeable battery pack NP-FV70 (1)

Charging the battery pack
1 Turn off your camcorder by closing the LCD monitor, retract the viewfinder*, and attach the battery pack.

* Models with the viewfinder (FDR-AX33/AXP33/AXP35) only
2 Connect the AC Adaptor and the power cord (mains lead) to your camcorder and the wall outlet (wall socket).

* Align the ▲ mark on the DC plug with that on the DC IN jack.
• The POWER/CHG (charge) lamp turns orange.
- The POWER/CHG (charge) lamp turns off when the battery pack is fully charged. Disconnect the AC Adaptor from the DC IN jack of the camcorder.
Charging the battery using your computer
Turn off your camcorder and connect the camcorder to a running computer using the Built-in USB Cable (page 52).
- Change the setting of your computer so that it would not enter the sleep (hibernation) state before charging your camcorder.
Estimated time of charging the supplied battery pack (minutes)
| Battery pack AC Adaptor (supplied) Computer | |
| NP-FV70 205 555 |
- The charging times are measured when charging an empty battery pack to its full capacity at a room temperature of 25°C (77 °F).
- The charging times are measured without using the USB connection support cable.
Estimated time of recording and playback using the supplied battery pack (minutes)
| Battery pack | Recording time | Playback time | |
| Continuous Typical | |||
| NP-FV70 135 65 235 | |||
- The recording and playback times are measured when using the camcorder at 25°C (77°F).
- The recording times are measured when recording movies with the default settings ([File Format]: [XAVCS 4K], [REC Mode]: [60Mbps 50 Dual Video REC]: [Off]).
- Typical recording time shows the time when you repeat recording start/stop, switching the [Shooting Mode], and zooming.
- The recording time shows the time when recording with the LCD monitor open.
To use your camcorder connected to the wall outlet (wall socket)
Connect the camcorder to the wall outlet (wall socket) in the same way as "Charging the battery pack."
To remove the battery pack
Turn off your camcorder. Slide the BATT (battery) release lever (①) and remove the battery pack (②).

To charge the battery pack abroad
You can charge the battery pack in any countries/regions using the AC Adaptor supplied with your camcorder within the AC 100 V - 240 V, 50 Hz/60 Hz range.
- Do not use an electronic voltage transformer.
Turning the power on
1 Open the LCD monitor of your camcorder and turn the power on.

- You can also turn on the camcorder by pulling out the viewfinder (models with the viewfinder (FDR-AX33/AXP33/AXP35) only).
2 Following the instructions on the LCD monitor, select the language, the geographical area, Daylight Savings or Summer Time, date format, and the date and time.

- To go to the next page, touch [Next].
- To turn off the power, close the LCD monitor. If the viewfinder is pulled out, retract it (models with the viewfinder (FDR-AX33/AXP33/AXP35) only).
- To set the date and time again, select MENU → [Setup] → [Clock Settings] → [Date & Time Setting]. (In case you haven't used your camcorder for several months)
- To turn off the operating sound, select MENU → [Setup] → [General Settings] → [Beep] → [Off].
Inserting a memory card
1 Open the cover, and insert the memory card until it clicks.
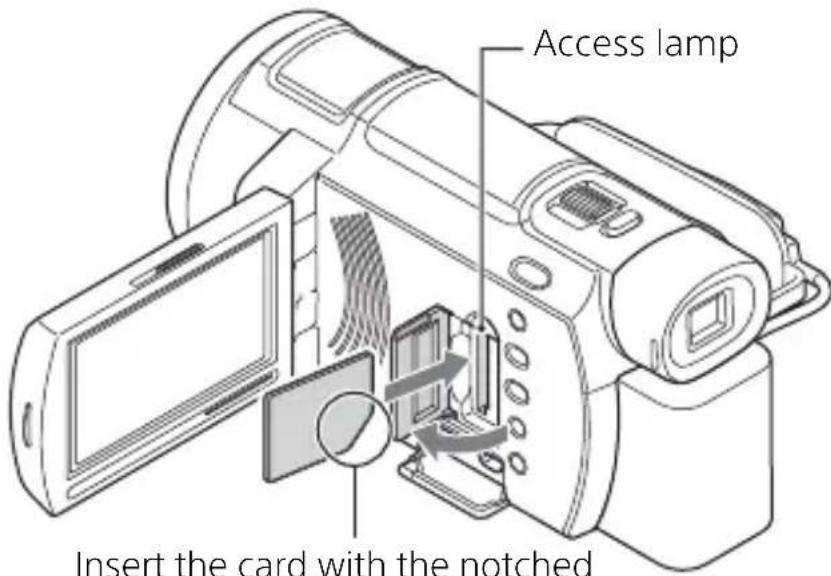
Insert the card with the notched corner in the direction as illustrated.
- The [Preparing image database file. Please wait.] screen appears if you insert a new memory card. Wait until the screen disappears.
- To select a memory card as the recording medium, select MENU → [Setup] → [Media Settings] → [Media Select] → [Memory Card] (FDR-AX30/AXP35).
- To eject the memory card, open the cover and lightly push the memory card in once.
Types of memory card you can use with your camcorder
Recording images in the XAVC S format
| SD Speed Class | Capacity (operation verified) | |
| SDXC memory card* Class 10 or faster Up to 128 GB |
* Use an SDXC UHS-I U3 memory card or faster when the recording mode is set to 100Mbps or higher.
Recording images in a format other than XAVC S
| SD Speed Class | Capacity (operation verified) | |
| SD memory card/SDHC memory card/SDXC memory card | Class 4 or faster Up to | 128 GB |
| Memory Stick PRO DuoTM(Mark2) media/Memory Stick PRO-HG DuoTMmedia | - | U |
| Memory Stick XC-HG DuoTMmedia | Up to 64 GB |
p
To format the recording media
- To ensure stable operation of the memory card, it is recommended to format the memory card with your camcorder before the first use.
- To format the memory card, select MENU → [Setup] → [Media Settings] → [Format] → desired recording medium → OK.
- Formatting the memory card will erase all the data stored on it and the data will be irrecoverable. Save your important data on your PC, etc.
Notes
- Movies recorded on Memory Stick XC-HG Duo media or SDXC memory cards cannot be imported to or played back on computers or AV devices not supporting the exFAT* file system by connecting the camcorder to these devices with the USB cable. Confirm in advance that the connecting equipment is supporting the exFAT system. If you connect equipment not supporting the exFAT system and the format screen appears, do not perform the format. All the data recorded will be lost.
* The exFAT is a file system that is used for Memory Stick XC-HG Duo media and SDXC memory cards.
Recording
Recording movies
1 Open the LCD monitor, and press START/STOP to start recording.

• To stop recording, press START/STOP again.
- Items on the LCD monitor disappear if you do not operate the camcorder for a few seconds. To display items again, touch anywhere except the buttons on the LCD monitor.
Notes
- While recording movies in the XAVC S 4K 100Mbps or XAVC S 4K 60Mbps format, video signals (HDMI output signal/AV cable output signal) are not output to external media.
To record MP4 movies simultaneously (Dual Video REC)
When [Dual Video REC] is set to [On], the camcorder records movies in MP4 format while recording movies in XAVC S 4K format, XAVC S HD format, or AVCHD format at the same time.
Select MENU → [Image Quality/Size] → [Dual Video REC] → desired setting.
- MP4 format is easy for playing back your movies on a smartphone, for uploading to a network, or for uploading to the Web.
Recording photos during movie recording (Dual Capture)
You can record photos during movie recording by pressing PHOTO.
Notes
- You may not be able to shoot photos depending on the setting in [RE C Mode] and [ Frame Rate].
- You cannot specify the storage destination (internal memory/memory card) of photos and movies separately (FDR-AX30/AXP35).
To suppresses the voice of the person recording the movie (My Voice Canceling)
Press My Voice Canceling) (page 51). The voice of the person recording the movie will be suppressed.
Approximate recording time available
| Movie format Internal memory* | 1 | Memory card (64 GB) |
| XAVC S 4K 2 h. 5 min.* | 2 | 2 h. 5 min. |
*1 FDR-AX30/AXP35 only *2 If you want to record up to the maximum recording time, you need to delete the demonstration movie on this product (FDR-AX30/AXP35).
- When recording with using the default setting: [File Format]: [XAVK\$ 4K], [REC Mode]: [60Mbps ], [Dual Video REC]: [Off]
- When using a Sony memory card.
- The actual recording time or number of recordable photos is displayed on the LCD monitor during recording.
1 Open the LCD monitor and select [MODE] → (Photo).

- You can also switch between Movie) and (Photo) by pressing the Shooting Mode) button (FDR-AX33/AXP33/AXP35).
2 Press PHOTO lightly to adjust the focus, then press it fully.

- When the focus is adjusted properly, AE/AF lock indicator appears on the LCD monitor.
Using the manual adjustment features
Assigning a menu item to the MANUAL ring
1 Press and hold MANUAL button (page 51) for a few seconds.
- The menu items you can control with the MANUAL ring will appear on the [Manual Ring Setting] screen.
![STBY MANUAL Ring Setting Zoom Focus Exposure IRIS Shutter Speed AE Shift White Balance Shift RESET [MANUAL]: EXEC](/content/2026/07/1523654/images/11694de7208f5c1c121a0614b980c60198d2405fb88b1dc0fb8e82cf0877945f.jpg)
2 Rotate the MANUAL ring (page 51) to select the item to be assigned, and then press MANUAL button.
Making the manual adjustment using the MANUAL ring
① Press the MANUAL button to switch to manual adjustment mode.
② Rotate the MANUAL ring to make the adjustment.
- To return to automatic adjustment mode, press MANUAL button again.
- When Zoom function is assigned, make the adjustment by only rotating the MANUAL ring.
1 Open the LCD monitor and press the (View Images) button on the camcorder to enter the playback mode.

• The Event View screen appears after some seconds.
2 Select ↕ to move the desired event to the center, and then select the part circled (①) in the figure.

*1 The icon varies depending on the [File Format] setting.
*2 Highlight Movie Maker will be displayed when Movie format is set to AVCHD.
- Photos and movies are stored in the same recording medium (internal memory/memory card). (FDR-AX30/AXP35)
- To select the XAVC S movies or AVCHD movies you want to play, edit, or copy to other devices, select MENU → [Image Quality/Size] → [File Format].
- You can play movies of the selected frame rate only in the case of XAVC S 4K movies. Select the frame rate according to the movies you want to play.
3 Select the image.

To switch between movies and photos (Visual index)
Select the desired type of images.

| Playback operations
 | Volume / Previous/Next |
 | Delete / Fast-reverse/Fast-forward |
 | Context / Play/Pause |
 | Stop Play/Stop slide show |
 | Motion Shot Video Motion Interval ADJ |
To delete the images
① Select MENU → [Image Quality/Size] → [File Format] → format of images to be deleted.
- The available format varies depending on the [File Format] setting.
② Select [Edit/Copy] → [Delete] → [Multiple Images] → image type to be deleted.
③ Touch and display the√ mark on the images to be deleted, then select OK.
Switching to MP4
① Select "Switch Movie Format button."
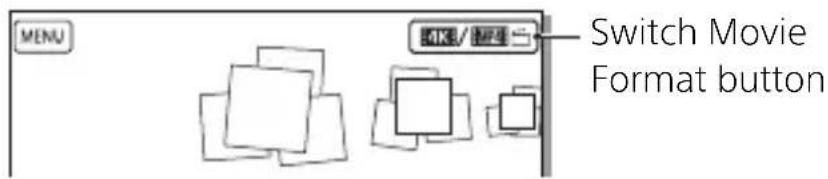
• The Movie Format Select screen appears.
② Select the format of the movie.

To copy the images from the internal memory to a memory card (FDR-AX30/AXP35)
① Select MENU → [Edit/Copy] → [Copy] → [Int. Memory → Memory card] → [Multiple Images].
② Select the image type to be copied.
③ Touch and display the √ mark on the images to be copied, then select OK.
④ Select OK
Viewing images on a TV
Playing back images
playable images may be restricted depending on the combination of the movie format at the time of recording, the type of playback images selected on the Event View screen, and the HDMI output settings.
1 Connect the HDMI OUT jack of the camcorder to the HDMI IN jack of a TV using the HDMI cable supplied.
![graph LR A["HDMI OUT"] --> B["Signal flow"] B --> C["HDMI"] C --> D["Computer"]](/content/2026/07/1523654/images/b3a20b42eb982abed153a4a674dfff3dbcc35cb9fe9957524a619dbf12a4e8fc.jpg)
How to set the playback images
| Movie format | TV | [HDMI Resolution] | Visual index (page 26) | Playback image quality |
| XAVC S 4K | 4K TV [Auto], [2160p/1080p] | MOVIEPHOTOMOVIE/PHOTO | 4K image quality | |
| [1080p], [1080i], [720p] | MOVIEMOVIE/PHOTO | |||
| PHOTO 4K image quality* | ||||
| High definition TV | [Auto], [1080p], [1080i], [720p] | MOVIEPHOTOMOVIE/PHOTO | High definition image quality (HD) | |
| XAVC S HD AVCHD | 4K TV or High definition TV | [Auto], [2160p/1080p], [1080p], [1080i], [720p] | MOVIE MOVIE/PHOTO | High definition image quality (HD) |
| PHOTO 4K | image quality (when connected to a 4K TV)* | |||
* The resolution will be the HDMI Resolution set on your camcorder.
- Images will be played when [HDMI Resolution] is set to [Auto] (default setting).
- If images are not played properly with [Auto], change the [HDMI Resolution] setting. Select MENU → [Setup] → [↔ Connection] → [HDMI Resolution] → desired setting.
- If your TV does not have an HDMI jack, connect the Multi/Micro USB Terminal of the camcorder to the video/audio input jacks of the TV using an AV cable (sold separately).
Connecting the camcorder to a network-compatible TV
Connect the camcorder to an access point with a security setting (page 39). Press View Images) on the camcorder, and then select MENU → [Wireless] → [Function] → [View on TV] → image type to be played back.
- You can view AVCHD movies, MP4 movies, and photos only.
Playing back trimmed movies (Trimming Playback) recorded in XAVC S 4K format
You can play back the movies recorded in XAVC S 4K file format while magnifying and trimming the part you want to watch, and also while zooming the scene up to the full high definition image quality.
1 Change the HDMI output setting to output 4K movies.
Select MENU → [Setup] → [↔ Connection] → [HDMI
Resolution] → desired setting.
2 Connect the HDMI OUT jack of the camcorder to the HDMI IN jack of a TV using the HDMI cable supplied.
![graph LR A["Signal flow"] --> B["HDMI OUT"] B --> C["I/O"] C --> D["HDMI IN"] D --> E["Computer"]](/content/2026/07/1523654/images/bae2e9231bd7d6284c4f92cae891c2b7b0d7fc239f7ed078e390655869c582c9.jpg)
| TV [HDMI Resolution] | |
| 4K TV [Auto]*, [2160p/1080p]*, [1080p], [1080i], [720p] | |
| High definition TV [Auto], [1080p], [1080i], [720p] |
* The screen turns blank for a few seconds when you turn on or off the trimmed movie playback function.
3 Touch (trimming on) on the LCD monitor during playback, and then select the part to be trimmed by touching there.
- The playback image is trimmed in high definition image quality (HD).
Notes
- Playback of trimmed movies is not available on the LCD monitor of the camcorder.
Viewing images using the built-in projector (FDR-AXP33/AXP35)
1 Press the PROJECTOR button (page 51).
2 Select [Image Shot on This Device].
3 Follow the operating guide on the LCD monitor, and then select [Project].
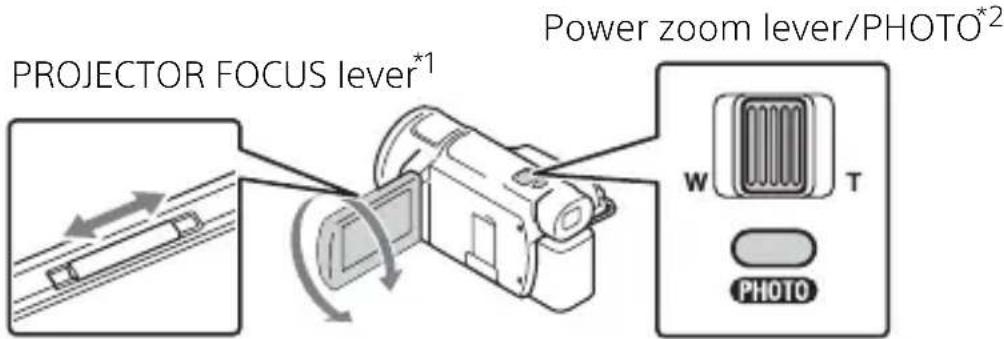
*1 Adjust the focus of the projected image.
*2 Use the power zoom lever to move the selection frame that appears on the projected image, then press the PHOTO button.
Using the built-in projector with a computer/smartphone
① Connect the PROJECTOR IN jack (page 51) of this product and the HDMI output terminal of the device you wish to connect by using an HDMI cable (supplied).
- Use a commercially available plug adapter if the HDMI cable (supplied) does not fit with the terminal of the device you wish to connect to. For details, refer to the instruction manuals of the device you wish to connect to.
② Select [Image from External Device] in the Step 2 above.
Using PlayMemories Home™
What you can do with PlayMemories Home
PlayMemories Home allows you to import movies and photos to your computer to use them in a variety of ways.

Import images from the camcorder.
For Windows, the following functions are also available.

Viewing images on Calendar

Creating movie discs

Uploading images to network services
Playing back imported images

Sharing images on PlayMemories Online™


To download PlayMemories Home
PlayMemories Home can be downloaded from the following URL. www.sony.net/pm/
To check the computer system
You can check the computer requirements for the software at the following URL.
www.sony.net/pcenv/

Connecting an external media device
How to store movies and photos to an external media device is explained here. Also refer to the instruction manual supplied with the external media device.
Store movies to a computer using PlayMemories Home software (page 33).
How to store movies
| Device Cable | Image quality/Recording format | Media | |
| Recorder without a USB jack | AV cable (sold separately) | Standard definition image quality | DVD |
| External media device | VMC-UAM2 USB Adaptor Cable (sold separately) | 4K/High definition image quality (HD)• XAVCS• AVCHD | External media |
| Computer Built-in | USB Cable 4K/High | definition image quality (HD)• XAVCS• AVCHD | Computer and connected external media |
How to connect a device
Recorder without a USB jack
Connect a recorder to the Multi/Micro USB Terminal of your camcorder using an AV cable (sold separately).
![graph LR A["Speaker"] --> B["MULTI"] B --> C["Audio Module"] C --> D["Video"] C --> E["Audio"]](/content/2026/07/1523654/images/49fddf504cab5d32c7d994ed92d1c59e5a42ff34673b315d1aa94f4ff250b82e.jpg)

Signal flow
• Movies are copied with standard definition image quality.
External media device
Connect an external media device to the Multi/Micro USB Terminal of your camcorder using VMC-UAM2 USB Adaptor Cable (sold separately).
![graph LR A["Device"] --> B["MULTI"] B --> C["Switch"] C --> D["Monitor"]](/content/2026/07/1523654/images/3da5e2ded179eac94cce27880533433388c8b7f9cabc1d849e32ef40992d04b2.jpg)

Signal flow
• Movies are copied with 4K/high definition image quality (HD).
Using the Wi-Fi function
Installing PlayMemories Mobile™ on your smartphone
For the latest information and more detailed information on the functions of PlayMemories Mobile, visit the following URL.

PlayMemories
Mobile

http://www.sony.net/pmm/
Android OS
Install PlayMemories Mobile from Google Play.

ANDROID APP ON
Google play
- Android 4.0 or higher is required to use One-Touch functions (NFC).
iOS
Install PlayMemories Mobile from App Store.

Available on the iPhone
App Store
- One-touch functions (NFC) are not available with iOS.
Notes
- You may not be able to download PlayMemories Mobile from Google play or App Store depending on the country or the region. In that case, search for "PlayMemories Mobile".
- If PlayMemories Mobile is already installed in your smartphone, update the software to the latest version.
- The Wi-Fi function described here is not guaranteed to work on all smartphones and tablets.
- The Wi-Fi function of the camcorder cannot be used connected to a public wireless LAN.
- To use the One-touch functions (NFC) of the camcorder, a smartphone or tablet supporting the NFC function is required.
- The operation methods and display screens for the application are subject to change without notice by future upgrades.
Transferring MP4 movies and photos to your smartphone
One-touch connection with an Android supporting NFC
1 On the smartphone, select [Settings], then, select [More...] to check that [NFC] is enabled.

2 On the camcorder, play back an image to be sent to the smartphone.
- You can transfer MP4 movies and photos only.
- To select MP4 movies when you play back movies, see "Switching to MP4" (page 27).
3 Touch the camcorder to the smartphone.

Notes
- Cancel the sleep mode or unlock the screen on the smartphone beforehand.
- Make sure that 📄 displayed on the LCD monitor of the camcorder and the smartphone.
- Continue touching the camcorder to the smartphone without moving until PlayMemories Mobile starts (1 to 2 seconds).
- If the camcorder cannot be connected with the smartphone by NFC, see "Connection without using NFC" (page 37).
| Connection without using NFC
1 Press the View Images) button, then select MENU → [Wireless] → [Function] → [Send to Smartphone] → [Select on This Device] → image type.
2 Select the image you want to transfer, and add √ and then select -OK OK.
- The SSID and a password are displayed, and the camcorder is ready to be connected with the smartphone.
3 Connect the camcorder to the smartphone, and transfer images.
Android
①Start up PlayMemories Mobile and select the SSID of the camcorder.
②Input the password displayed on the camcorder (first time only).
![graph LR A["① Device Input"] --> B["User Login"] B --> C["② User Login"]](/content/2026/07/1523654/images/7e57c4980e825d63eee0e5b38247beee6845d40e739e2bc5809e2ba86be70f80.jpg)
iPhone/iPad
① Select [Settings] → [Wi-Fi] → the SSID displayed on the camcorder.
②Input the password displayed on the camcorder (first time only).
③Confirm that the SSID displayed on the camcorder is selected.
④Return to Home, and start up PlayMemories Mobile.
![graph TD A["① Device Input"] --> B["② User Interface"] B --> C["③ User Login"]](/content/2026/07/1523654/images/61c8375df27fc3f659f4ac648d8289ebbd8dc354571ab6ab81d437c1a51c11d1.jpg)
Using your smartphone as a wireless remote commander
You can record with the camcorder using your smartphone as a wireless remote commander.
1 On your camcorder, select MENU → [Wireless] → [Function] → [Ctrl with Smartphone].
2 On your smartphone, perform in the same way as in step 3 in "Connection without using NFC" (page 37). When you use NFC, display the recording screen on your camcorder, and touch on the camcorder to on the smartphone.
3 Operate the camcorder on your smartphone.
Notes
- Depending on local electrical interference or the smartphone's capabilities, the live view images may not be displayed smoothly.
Saving movies and photos to your computer via Wi-Fi
Connect your computer to a wireless access point or wireless broadband router in advance.
1 Install the dedicated software in your computer (first time only).
Windows: PlayMemories Home www.sony.net/pm/
Mac: Wireless Auto Import http://www.sony.co.jp/imsoft/Mac/
- If the software is already installed in your computer, update the software to the latest version.
2 Connect your camcorder to an access point as follows (first time only).
If you cannot register, refer to the instruction of the access point, or contact the person who set up the access point.
If the wireless access point has a WPS button
①On your camcorder, select
MENU → [Wireless] →
[Setting] → [WPS Push].
②Press the WPS button on the access point you want to register.

If you know the SSID and the password of your wireless access point
①On your camcorder, select MENU → [Wireless] →
[Setting] → [Access point settings].
②Select the access point you want to register, enter the password, then select [Next].

3 If your computer is not started, turn on the computer.
4 Start sending images from the camcorder to the computer.
①Press the (View Images) button on your camcorder.
② Select MENU → [Wireless]
→ [Function] → [Send to Computer].
- Images are automatically transferred to and saved on the computer.
- Only newly recorded images are transferred. Importing movies and multiple photos may take time.
Using the menus
1 Select MENU .

2 Select a category.
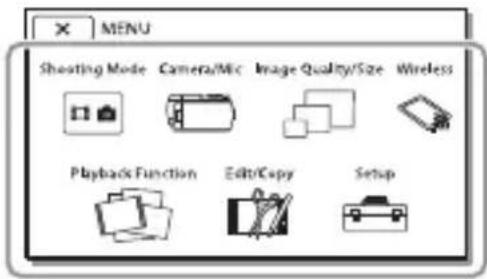
3 Select a desired menu item.

Scroll the menu items up or down.
- Select to finish setting the menu or to return to the previous menu screen.
Menu lists
Shooting Mode
Movie
Photo
Smth Slw REC
Golf Shot
High Speed REC
Camera/Mic
Manual Settings
White Balance
Spot Meter/Fcs
Spot Meter
Spot Focus
Exposure
Focus
IRIS
Shutter Speed
AGC Limit
AE Shift
White Balance Shift
Low Lux
Camera Settings
Scene Selection
Picture Effect
Cinematone
Fader
Self-Timer
SteadyShot
SteadyShot
Digital Zoom
Auto Back Light
Manual Ring Setting
NIGHTSHOT Light

Face
Face Detection
Smile Shutter
Smile Sensitivity

Flash *1
Flash
Flash Level
Red Eye Reduction

Microphone
My Voice Canceling
Blt-in Zoom Mic
Auto Wind NR
Audio Mode
Audio Rec Level

Shooting Assist
My Button
Focus Magnifier
Grid Line
Display Setting
Zebra
Peaking
Audio Level Display

Image Quality/Size

REC Mode

Frame Rate
Dual Video REC

File Format

Image Size

Wireless

Function
Ctrl with Smartphone
Multi Camera Control
Live Streaming
Send to Smartphone
Send to Computer
View on TV

Setting
Airplane Mode
Multi Camera Ctrl Set
Vid REC during strm. *2
WPS Push
Access point settings
Edit Device Name
Disp MAC Address
SSID/PW Reset
Network Info Reset

Playback Function
Event View

Edit/Copy
Delete
Protect
Copy
Direct Copy *3

Setup

Media Settings
Media Select *4
Media Info
Format
Repair Img. DB F.
File Number

Playback Settings
Data Code
Volume
Motion Interval ADJ
Download Music *5
Empty Music *5

Connection
TV Type
HDMI Resolution
CTRL FOR HDMI
USB Connect
USB Connect Setting
USB LUN Setting

General Settings
Beep
Monitor Brightness
Auto Keystone ADJ 4
REC Lamp
Power ON w/monitor *
Language Setting
24p Mode 8
Cancel 24p Mode 8
Calibration
Battery Info
Power Save
Initialize
Demo Mode
Version

Clock Settings
Date & Time Setting
Area Setting
*1 You can set this item when you use a flash (sold separately).
*2 Live Streaming feature is dependent upon the Third Party Internet Provider's service and terms in your region. The feature may not be available due to your region's broadband and internet service restriction.
*3 You can set this item when you use an external media device (sold separately).
*4 FDR-AX30/AXP35
*5 The feature may not be available depending on the countries/regions.
*6 FDR-AXP33/AXP35
*7 FDR-AX30
*8 1080 50i-compatible models
Precautions
AC Adaptor
Do not short-circuit the battery terminal with any metallic objects. This may cause a malfunction.
Playing back images with other devices
You may not be able to play back images that were recorded on your camcorder with other devices normally. Also, you may not be able to play back images recorded on other devices with your camcorder.
Recording and playback
- Avoid rough handling, disassembling, modifying, physical shock, or impact such as hammering, dropping or stepping on the product. Be particularly careful with the lens.
- To ensure stable operation of the memory card, it is recommended to format the memory card with your camcorder before the first use. Formatting the memory card will erase all the data stored on it and the data will be irrecoverable. Save your important data on your PC, etc.
- Confirm the direction of the memory card. If you forcibly insert the memory card in the wrong direction, the memory card, memory card slot, or image data may be damaged.
-
Before starting to record, test the recording function to make sure the image and sound are recorded without any problems.
-
Television programs, films, video tapes, and other materials may be copyrighted. Unauthorized recording of such materials may be a violation of the copyright laws.
- Compensation for the content of recordings cannot be provided, even if recording or playback is not possible due to a malfunction of the camcorder, recording media, etc.
- The camcorder is not dustproofed, dripproofed or waterproofed.
- Do not let your camcorder get wet, for example, from rain or sea water. If your camcorder gets wet, it may malfunction. Sometimes this malfunction cannot be repaired.
- Do not aim the camcorder at the sun or strong light. Doing so may cause your camcorder to malfunction.
- Do not use the camcorder near strong radio waves or radiation. The camcorder may not be able to record or play back images properly.
- Do not use the camcorder on a sandy beach or anywhere dusty. Doing so may cause your camcorder to malfunction.
- If moisture condensation occurs, stop using the camcorder until moisture evaporates.
- Do not subject the camcorder to mechanical shock or vibration. If you do so, the camcorder may operate incorrectly or may not record images. In addition, the recording medium or recorded data may be damaged.
LCD monitor
The LCD monitor is manufactured using extremely high-precision technology, so over 99.99% of the pixels are operational for effective use. However, there may be some tiny black points and/or bright points (white, red, blue, or green in color) that appear constantly on the LCD monitor. These points are normal results of the manufacturing process and do not affect the recording in any way.
Camcorder temperature
If you use the camcorder continuously for a long time, the camcorder gets very warm. This is not a malfunction.
Overheat protection
Depending on the camcorder and battery temperature, you may be unable to record movies or the power may turn off automatically to protect the camcorder. A message will be displayed on the LCD monitor before the power turns off or you can no longer record movies. In this case, leave the power off and wait until the camcorder and battery temperature goes down. If you turn on the power without letting the camcorder and battery cool enough, the power may turn off again or you may be unable to record movies.
Deactivating wireless LAN (Wi-Fi, NFC, etc.) temporarily
When you board an airplane, you can deactivate the Wi-Fi function temporarily. Select MENU
[Wireless] → [Setting] → [Airplane Mode] → [On].
Wireless LAN
We assume no responsibility whatsoever for any damage caused by unauthorized access to, or unauthorized use of, destinations loaded on the camcorder, resulting from loss or theft.
About the security on using Wireless LAN products
- Please ensure that you always use a secured wireless network with your devices to avoid hacking, unapproved third party access and other vulnerabilities.
- It is important to set security when using the wireless network function.
- Sony makes no guarantees and is not responsible for any damage resulting from having inadequate security or using the wireless network function.
Troubleshooting
If you run into any problems using your camcorder:
- Check your camcorder referring to Help Guide (page 11).
- Disconnect the power source, attach the power source again after about 1 minute, and turn the camcorder on.
- Initialize your camcorder (page 43). All settings, including the clock setting, are reset.
- Contact your Sony dealer or local authorized Sony service facility.
Specifications
System
Signal format:
UHDTV
HDTV
NTSC color, EIA standards
(1080 60i-compatible models)
PAL color, CCIR standards
(1080 50i-compatible models)
Movie recording format:
XAVC S (XAVC S format)
Video: MPEG-4 AVC/H.264
Audio: MPEG-4 Linear PCM 2ch
(48 kHz/16 bit)
AVCHD (AVCHD format Ver.2.0
compatible)
Video: MPEG-4 AVC/H.264
Audio: Dolby Digital 2ch/5.1ch
Dolby Digital 5.1 Creator *1
MP4
Video: MPEG-4 AVC/H.264
Audio: MPEG-4 AAC-LC 2ch
*1 Manufactured under license from Dolby Laboratories.
Photo file format:
DCF Ver.2.0 Compatible
Exif Ver.2.3 Compatible
MPF Baseline Compatible
Viewfinder:
0.6 cm (0.24 type) Color
1 555 200 dots equivalent
Recording media (Movie/Photo):
Common:
Internal memory (FDR-AX30/
AXP35): 64 GB 2
AVCHD, Photo
Memory Stick PRO-HG Duo
media, Memory Stick XC-HG
Duo media, SD card (Class 4 or faster)
XAVC S HD, XAVC S 4K
(60Mbps)
SDXC Memory Card (Class 10 or faster)
XAVC S 4K (100Mbps)
SDXC Memory Card (UHS-I U3 or faster)
*2 The capacity that a user can use (Approx.): 62.4 GB
1 GB equals 1 billion bytes, a portion of which is used for system management and/or application files. Only preinstalled demonstration movie may be deleted.
Image device:
1/2.3-type (7.76 mm)
back-illuminated Exmor R TM
CMOS sensor
Recording pixels (photo, 16:9):
Max. 20.6 mega pixels
(6 048 × 3 400) *3
Gross: Approx. 18.9 mega
pixels
Effective (movie, 16:9) *4 :
Approx. 8.29 mega pixels
Effective (photo, 16:9):
Approx. 10.3 mega pixels
Effective (photo, 4:3):
Approx. 7.74 mega pixels
Lens:
Image Zoom, while recording
movies) *5 HD: 20×(Clear Image
Zoom, while recording
movies)*5, 120× (Digital)
Filter diameter:
52 mm (2 1/8 in.)
F1.8 - F3.4
Focal length:
f= 3.8 mm - 38.0 mm (5/32 in. -
11/2 in.)
When converted to a 35 mm still camera
For movies *4 :
29.8 mm - 298.0 mm
(1 3/16 in. - 11 3/4 in.) (16:9)
For photos:
26.8 mm - 268.0 mm
(1 1/16 in. - 10 5/8 in.) (16:9)
Color temperature: [Auto], [One]
Push], [Indoor], [Outdoor]
Minimum illumination:
4K: 9 lx (lux), HD: 6 lx (lux) (in default setting, shutter speed 1/60 second)
4K: 5 lx (lux), HD: 3 lx (lux) ([Low Lux] is set to [On], shutter speed 1/30 second)
NightShot: 0 lx (lux) (shutter speed 1/60 second)
*3 The unique image processing system of Sony's BIONZ-X allows still image resolution equivalent to the sizes described.
*4 [SteadyShot] is set to [Standard] or [Off].
*5 [SteadyShot] is set to [Active].
Input/Output connectors
HDMI OUT jack: HDMI micro connector
PROJECTOR IN jack (FDR-AXP33/AXP35): HDMI micro connector
MIC input jack: Stereo minijack ( φ 3.5 mm)
Headphone jack: Stereo minijack ( φ 3.5 mm)
USB jack: Type A (Built-in USB)
Multi/Micro USB Terminal*
* Supports Micro USB compatible devices.
USB connection is only for output (For customers in Europe).
LCD monitor
Picture: 7.5 cm (3.0 type, aspect ratio 16:9)
Total number of pixels: 921 600 (640 × 1 440)
Projector (FDR-AXP33/AXP35)
Projection type: DLP
Light source: LED (R/G/B)
Focus: Manual
Throw Distance: 0.5 m (1.6 feet) or over
Resolution (output): 854 × 480
Continuous projection time (when using the supplied battery pack): Approx. 2 h. 25 min.
Wireless LAN
Supported standard: IEEE 802.11 b/g/n
Frequency: 2.4 GHz
Supported security protocols: WEP/WPA-PSK/WPA2-PSK
Configuration method: WPS (Wi-Fi Protected Setup)/manual
Access method: Infrastructure Mode
NFC: NFC Forum Type 3 Tag compliant
General
Power requirements:
DC 6.8 V (battery pack), DC 8.4 V (AC Adaptor)
USB Charging: DC 5 V 1 500 mA
Average power consumption: During camera recording using the viewfinder (FDR-AX33/AXP33/AXP35): 4K: 5.6 W, HD: 3.9 W*
During camera recording using LCD monitor at normal brightness: 4K: 5.6 W, HD: 3.9 W*
* in AVCHDFH mode
Operating temperature: 0 °C to 40 °C (32 °F to 104 °F)
Storage temperature: -20°C to +60°C ( -4°F to +140°F )
Dimensions (approx.):
FDR-AX30:
71 mm × 78.5 mm × 133.5 mm
(2 7/8 in. × 3 1/8 in. × 5 3/8 in.)
(w/h/d) including the projecting parts
71 mm × 78.5 mm × 155 mm
(2 7/8 in. × 3 1/8 in. × 6 1/8 in.)
(w/h/d) including the
projecting parts, and the supplied rechargeable battery pack
FDR-AX33:
71 mm × 78.5 mm × 149.5 mm
(2 7/8 in. × 3 1/8 in. × 6 in.)
(w/h/d) including the projecting parts
71 mm × 78.5 mm × 155 mm
(2 7/8 in. × 3 1/8 in. × 6 1/8 in.)
(w/h/d) including the projecting parts, and the
supplied rechargeable battery pack
FDR-AXP33/AXP35:
75 mm × 78.5 mm × 149.5 mm
(3 in. × 3 1/8 in. × 6 in.) (w/h/d)
including the projecting parts
75 mm × 78.5 mm × 155 mm
(3 in. × 3 1/8 in. × 6 1/8 in.)
(w/h/d) including the projecting parts, and the
supplied rechargeable battery pack
Mass (approx.):
FDR-AX30:
585 g (1 lb 4 oz) main unit only
685 g (1 lb 8 oz) including the supplied rechargeable battery pack NP-FV70
FDR-AX33:
600 g (1 lb 5 oz) main unit only
700 g (1 lb 8 oz) including the supplied rechargeable battery pack NP-FV70
FDR-AXP33/AXP35:
625 g (1 lb 6 oz) main unit only
725 g (1 lb 9 oz) including the supplied rechargeable battery pack NP-FV70
AC Adaptor AC-L200D
Power requirements: AC 100 V - 240 V, 50 Hz / 60 Hz
Power consumption: 18 W
Output voltage: DC 8.4 V*
* See the label on the AC Adaptor for other specifications.
Rechargeable battery pack NP-FV70
Maximum output voltage: DC 8.4 V
Output voltage: DC 6.8 V
Maximum charge voltage: DC 8.4 V
Maximum charge current: 3.0 A
Capacity
Typical: 14.0 Wh (2 060 mAh)
Minimum: 13.3 Wh (1 960 mAh)
Type: Li-ion
Trademarks
- AVCHD, AVCHD Progressiv
AVCHD logotype and AVCHD
Progressive logotype are
trademarks of Panasonic
Corporation and Sony
Corporation.
• XAVC S and XAVC S registered trademarks of Sony Corporation.
• Memory Stick and are trademarks or registered trademarks of Sony Corporation. - Blu-ray Disc™ and Blu-ray™ are trademarks of the Blu-ray Disc Association.
- Dolby and the double-D symbol are trademarks of Dolby Laboratories.
- The terms HDMI and HDMI High-Definition Multimedia Interface, and the HDMI Logo are trademarks or registered trademarks of HDMI Licensing LLC in the United States and other countries.
- Windows is either registered trademark or trademark of Microsoft Corporation in the United States and/or other countries.
• Mac is a registered trademark of Apple Inc. in the United States and other countries. - Intel, Pentium and Intel Core are trademarks of Intel Corporation in the U.S. and/or other countries.
- SDXC logo is a trademark of SD-3C, LLC.
- Android and Google Play are trademarks of Google Inc.
-
iOS is a registered trademark or trademark of Cisco Systems, Inc.
-
Wi-Fi, the Wi-Fi logo, Wi-Fi PROTECTED SET-UP are registered trademarks of the Wi-Fi Alliance.
- The N Mark is a trademark or registered trademark of NFC Forum, Inc. in the United States and in other countries.
- Facebook and the "f" logo are trademarks or registered trademarks of Facebook, Inc.
- YouTube and the YouTube logo are trademarks or registered trademarks of Google Inc.
- iPhone and iPad are trademarks of Apple Inc., registered in the U.S. and other countries.
All other product names mentioned herein may be the trademarks or registered trademarks of their respective companies. Furthermore, ™ and ® are not mentioned in each case in this manual.
Parts and controls
Figures in ( ) are reference pages.

1 PHOTO button (21, 23)
2 Power zoom lever (23)
3 N mark (37)
NFC: Near Field
Communication
4 Loop for a shoulder belt
5 Grip belt
6 Multi interface shoe

For details on compatible accessories of the Multi interface shoe, visit the Sony web site in your area, or consult your Sony dealer or local authorized Sony service facility.
Operations with other manufacture's accessories are not guaranteed.
If you use a shoe adaptor (sold separately), you can also use accessories compatible with an Active Interface Shoe.
To prevent failure, do not use a commercially available flash with high-voltage synchro terminals or with reverse polarity.
7 (microphone) jack (PLUG IN POWER)
8 (headphones) jack
9 Camera recording lamp
10 NIGHTSHOT light
11 Multi/Micro USB Terminal Supports Micro USB compatible devices. This terminal does not support VMC-AVM1 Adaptor Cable (sold separately). You cannot use accessories via an A/V remote connector.

1 PROJECTOR FOCUS lever (32) (FDR-AXP33/AXP35)
2 LCD monitor/Touch panel
3 Speaker
4 Projector lens (FDR-AXP33/AXP35)
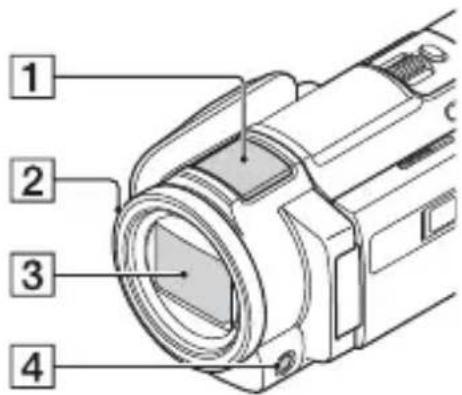
1 Built-in microphone
2 MANUAL ring
Manual functions can be assigned to the button and the dial.
3 Lens (ZEISS lens)
4 MANUAL button

1 Memory card access lamp (19)
2 Memory card slot (19)
3 HDMI OUT jack
4 PROJECTOR IN jack (32) (FDR-AXP33/AXP35)

1 (Shooting Mode) button (23) (FDR-AX33/AXP33/AXP35)
2 (My Voice Canceling)
button
Suppresses the voice of the
person recording the movie.
3 PROJECTOR button (32) (FDR-AXP33/AXP35)
4 (View Images) button (25)
5 NIGHTSHOT button
6 ⏻ (ON/STANDBY) button

1 Viewfinder (FDR-AX33/AXP33/AXP35)
The camcorder is turned on when the viewfinder is pulled out.
2 Viewfinder lens adjustment dial (FDR-AX33/AXP33/AXP35)
If the indications in the viewfinder appear blurred, turn the viewfinder lens adjustment dial.
3 START/STOP button (21)
4 POWER/CHG (charge) lamp (15)
5 Built-in USB Cable (16)
6 DC IN jack
7 Tripod receptacle
8 BATT (battery) release lever
9 Battery pack (15)
To fasten the grip belt

Index
A
AC Adaptor 15
Android 36
App Store 36
Assigning a menu item 24
AVCHD 12, 13
B
Battery pack 15
Beep 18
Built-in USB Cable 16
C
Charging the battery pack 15
Charging the battery using your computer 16
Charging time 16
Computer 33
Computer system 33
D
Date and time 18
Delete 27
Dual Video REC 21
E
Edit 25
F
Format 20
Full charge 16
G
Google play 36
Grip belt 52
H
HDMI cable 28
Help Guide 11
|
Install 36
iOS 36
L
LCD monitor 15
M
Manual recording 24
Memory card 19
Memory Stick PRO Duo (Mark2)
media 20
Memory Stick PRO-HG Duo
media 20
Memory Stick XC-HG Duo media 20
Menu lists 41
Menus 41
Movies 21
MP4 37
My Voice Canceling 22
N
Network 29
NFC 37
0
One-Touch functions (NFC) 36
P
Photos 23
Playback 25
PlayMemories Home 33
PlayMemories Online 33
Power on 18
Precautions 44
Projector 32
R
Recording 21
Recording media 20
Recording time 22
Recording/playback time 16
S
SD memory card 20
Smartphone 36
GB
53
Software 33
Specifications 46
Supplied items 14
T
Touch panel 23
Trimming Playback 30
Tripod 52
Troubleshooting 45
TV 28
W
Wireless access point 39
X
XAVC S 4K 12, 13
XAVC S HD 12, 13
Z
Zoom 21
Additional information on this product and answers to frequently asked questions can be found at our Customer Support Website.
http://www.sony.net/
- DIGITAL 4K VIDEO CAMERA RECORDER
- HELP GUIDE" (WEB MANUAL)
- READ THIS FIRST
- OWNER'S RECORD
- WARNING
- IMPORTANT SAFETY INSTRUCTIONS
- SAVE THESE INSTRUCTIONS. DANGER - TO REDUCE THE RISK OF FIRE OR ELECTRIC SHOCK, CAREFULLY FOLLOW THESE INSTRUCTIONS
- REPRESENTATIVE PLUG OF POWER SUPPLY CORD OF COUNTRIES/REGIONS AROUND THE WORLD
- CAUTION
- BATTERY PACK
- I AC ADAPTOR
- I NOTE ON THE POWER CORD (MAINS LEAD)
- FOR CUSTOMERS IN THE U.S.A. AND CANADA
- I RECYCLING LITHIUM-ION BATTERIES
- FOR CUSTOMERS IN THE U.S.A
- REGULATORY INFORMATION
- DECLARATION OF CONFORMITY
- NOTE
- FOR CUSTOMERS IN CANADA
- FOR CUSTOMERS IN EUROPE
- NOTICE FOR THE CUSTOMERS IN THE COUNTRIES APPLYING EU DIRECTIVES
- CE
- NOTICE
- FOR CUSTOMERS IN SINGAPORE
- FOR CUSTOMERS IN U.A.E
- TRA
- REGISTERED NO
- DEALER NO
- LEARNING MORE ABOUT THE CAMCORDER (HELP GUIDE)
- ACCESS THE SONY SUPPORT PAGE
- TABLE OF CONTENTS
- GETTING STARTED
- RECORDING/PLAYBACK
- SAVING IMAGES
- CUSTOMIZING YOUR CAMCORDER
- OTHERS
- SELECTING THE RECORDING FORMAT FOR MOVIES
- WHAT IS XAVC S
- RECORDING FORMAT AND THE AVAILABLE SHOOTING MODE
- STORAGE METHOD
- TO TRANSFER IMAGES TO A SMARTPHONE
- SUPPLIED ITEMS
- ALL MODELS
- CHARGING THE BATTERY PACK
- CHARGING THE BATTERY USING YOUR COMPUTER
- ESTIMATED TIME OF CHARGING THE SUPPLIED BATTERY PACK (MINUTES)
- ESTIMATED TIME OF RECORDING AND PLAYBACK USING THE SUPPLIED BATTERY PACK (MINUTES)
- TO USE YOUR CAMCORDER CONNECTED TO THE WALL OUTLET (WALL SOCKET)
- TO REMOVE THE BATTERY PACK
- TO CHARGE THE BATTERY PACK ABROAD
- TURNING THE POWER ON
- INSERTING A MEMORY CARD
- TYPES OF MEMORY CARD YOU CAN USE WITH YOUR CAMCORDER
- RECORDING IMAGES IN A FORMAT OTHER THAN XAVC S
- TO FORMAT THE RECORDING MEDIA
- NOTES
- RECORDING
- RECORDING MOVIES
- TO RECORD MP4 MOVIES SIMULTANEOUSLY (DUAL VIDEO REC)
- RECORDING PHOTOS DURING MOVIE RECORDING (DUAL CAPTURE)
- TO SUPPRESSES THE VOICE OF THE PERSON RECORDING THE MOVIE (MY VOICE CANCELING)
- APPROXIMATE RECORDING TIME AVAILABLE
- USING THE MANUAL ADJUSTMENT FEATURES
- ASSIGNING A MENU ITEM TO THE MANUAL RING
- SELECT THE IMAGE
- TO SWITCH BETWEEN MOVIES AND PHOTOS (VISUAL INDEX)
- PLAYBACK OPERATIONS
- TO DELETE THE IMAGES
- SWITCHING TO MP
- TO COPY THE IMAGES FROM THE INTERNAL MEMORY TO A MEMORY CARD (FDR-AX30/AXP35)
- VIEWING IMAGES ON A TV
- PLAYING BACK IMAGES
- CONNECTING THE CAMCORDER TO A NETWORK-COMPATIBLE TV
- PLAYING BACK TRIMMED MOVIES (TRIMMING PLAYBACK) RECORDED IN XAVC S 4K FORMAT
- VIEWING IMAGES USING THE BUILT-IN PROJECTOR (FDR-AXP33/AXP35)
- USING THE BUILT-IN PROJECTOR WITH A COMPUTER/SMARTPHONE
- USING PLAYMEMORIES HOME™
- WHAT YOU CAN DO WITH PLAYMEMORIES HOME
- TO DOWNLOAD PLAYMEMORIES HOME
- TO CHECK THE COMPUTER SYSTEM
- CONNECTING AN EXTERNAL MEDIA DEVICE
- HOW TO CONNECT A DEVICE
- RECORDER WITHOUT A USB JACK
- EXTERNAL MEDIA DEVICE
- USING THE WI-FI FUNCTION
- INSTALLING PLAYMEMORIES MOBILE™ ON YOUR SMARTPHONE
- ANDROID OS
- IOS
- TRANSFERRING MP4 MOVIES AND PHOTOS TO YOUR SMARTPHONE
- ONE-TOUCH CONNECTION WITH AN ANDROID SUPPORTING NFC
- CONNECTION WITHOUT USING NFC
- ANDROID
- IPHONE/IPAD
- USING YOUR SMARTPHONE AS A WIRELESS REMOTE COMMANDER
- SAVING MOVIES AND PHOTOS TO YOUR COMPUTER VIA WI-FI
- IF THE WIRELESS ACCESS POINT HAS A WPS BUTTON
- IF YOU KNOW THE SSID AND THE PASSWORD OF YOUR WIRELESS ACCESS POINT
- START SENDING IMAGES FROM THE CAMCORDER TO THE COMPUTER
- USING THE MENUS
- SELECT MENU
- SELECT A CATEGORY
- SELECT A DESIRED MENU ITEM
- MENU LISTS
- SHOOTING MODE
- CAMERA/MIC
- MANUAL SETTINGS
- CAMERA SETTINGS
- FACE
- SHOOTING ASSIST
- IMAGE QUALITY/SIZE
- WIRELESS
- FUNCTION
- SETTING
- PLAYBACK FUNCTION
- EDIT/COPY
- SETUP
- MEDIA SETTINGS
- PLAYBACK SETTINGS
- CONNECTION
- GENERAL SETTINGS
- CLOCK SETTINGS
- PRECAUTIONS
- AC ADAPTOR
- PLAYING BACK IMAGES WITH OTHER DEVICES
- RECORDING AND PLAYBACK
- LCD MONITOR
- CAMCORDER TEMPERATURE
- OVERHEAT PROTECTION
- DEACTIVATING WIRELESS LAN (WI-FI, NFC, ETC.) TEMPORARILY
- WIRELESS LAN
- ABOUT THE SECURITY ON USING WIRELESS LAN PRODUCTS
- TROUBLESHOOTING
- SPECIFICATIONS
- SYSTEM
- INPUT/OUTPUT CONNECTORS
- PROJECTOR (FDR-AXP33/AXP35)
- GENERAL
- AC ADAPTOR AC-L200D
- RECHARGEABLE BATTERY PACK NP-FV
- TRADEMARKS
- PARTS AND CONTROLS
- INDEX
- A
- B
- C
- D
- E
- F
- G
- H
- L
- M
- N
- P
- R
- S
- T
- W
- X
- Z
Brand : SONY
Model : FDR-AX30
Category : Camcorder