
Q3HD - Audio/Video Recorder ZOOM - Free user manual and instructions
Find the device manual for free Q3HD ZOOM in PDF.

| Product Type | Portable Audio/Video Recorder |
| Brand | ZOOM |
| Model | Q3HD |
| Power Supply | 2 AA batteries (alkaline or rechargeable NiMH) or AC adapter AD-14 (optional) |
| Storage | SD/SDHC card (Class 4 or higher recommended), 64 MB internal memory |
| Video | Resolutions up to 1080p (Full HD), light modes (Auto, Concert, Night), digital zoom |
| Audio | PCM and AAC formats, adjustable sampling rate, mic gain (L/H/Auto), low-cut filter |
| Connectivity | USB, HDMI (Type C Mini), Line In (3.5 mm), Line Out/headphones (3.5 mm), tripod (1/4-20UNC) |
| Main Functions | Video/audio recording, playback, editing (divide, trim), erase, PC transfer, online sharing via HandyShare |
| Display | Yes (type not specified) |
| Speaker | Yes, with option to disable beeps |
| Firmware Update | Via SD card |
| Included Accessories | SD card, test batteries, HandyShare software, user guide |
| Safety | Do not disassemble, avoid moisture, extreme temperatures, shocks |
| Maintenance | Clean with a dry cloth, do not use solvents |
| TV Compatibility | AV and HDMI outputs, TV standard adjustment via menu |
Frequently Asked Questions - Q3HD ZOOM
User questions about Q3HD ZOOM
0 question about this device. Answer the ones you know or ask your own.
Ask a new question about this device
Download the instructions for your Audio/Video Recorder in PDF format for free! Find your manual Q3HD - ZOOM and take your electronic device back in hand. On this page are published all the documents necessary for the use of your device. Q3HD by ZOOM.
USER MANUAL Q3HD ZOOM
Q3HD Handy Video Recorder
Handy
Video
Recorder
Q3HD
User Guide
Safety and Operation
Precautions must be read
before using the unit.
Items included with this product
Q3HD unit
2 AA batteries (for testing the unit)
Note: Use alkaline or rechargeable NiMH batteries.
- SD card

- User Guide (this document)

HandyShare software for video editing and sharing
To install HandyShare on your computer, connect the Q3HD to the computer and double-click the HandyShare installer on the included SD card. If your computer does not already have QuickTime installed, follow the instructions that appear on your screen after starting the HandyShare installer.
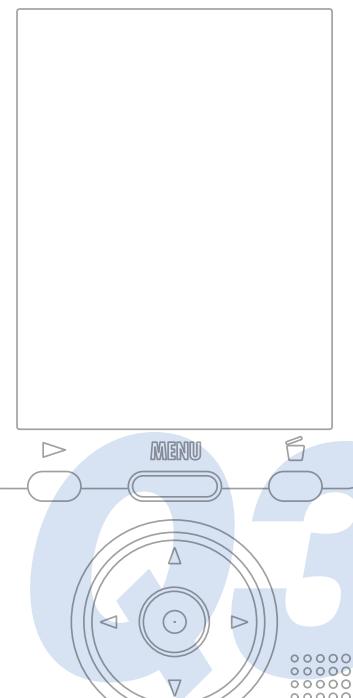
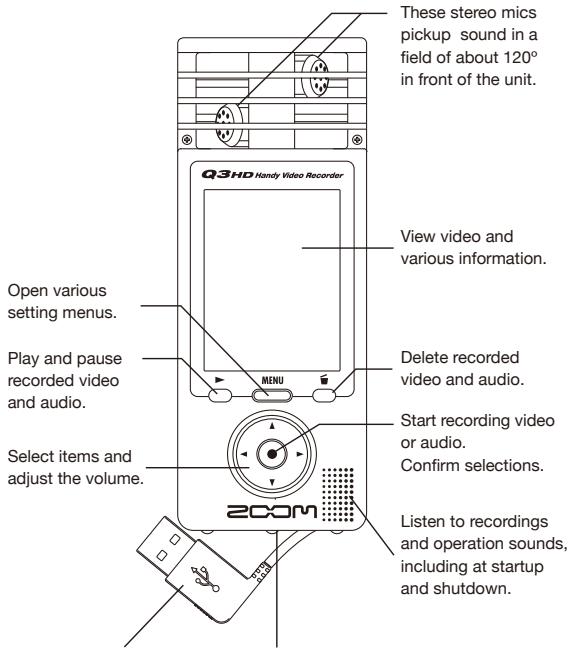
Part functions
Parts of the unit
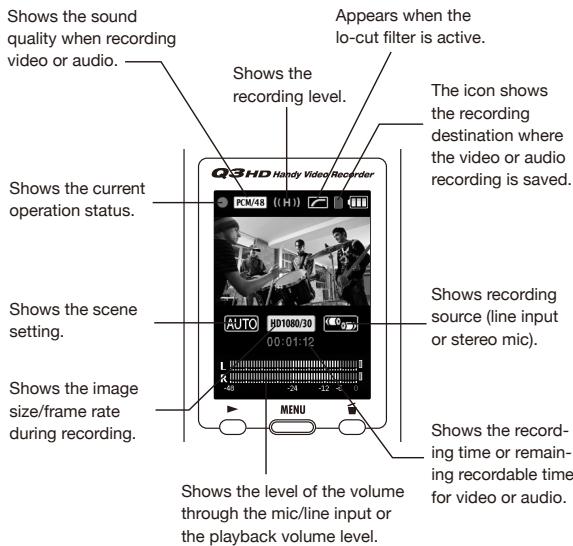
Video/audiorecordingdestination

The SD card icon shows that video/audio is being recorded to the SD card.

The built-in memory icon shows that video/audio is being recorded to the built-in memory.
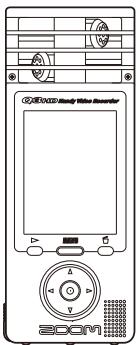
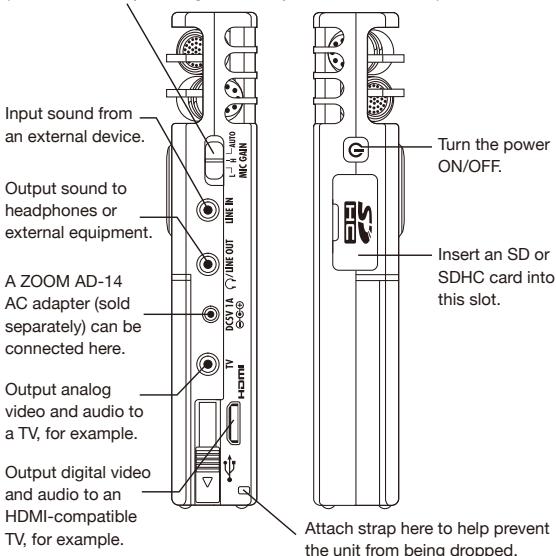
Part functions (continued)
Parts of the unit
Connect to a computer to check and use data on the SD card.
Attach a tripod (1/4-20UNC size) to use the unit in a fixed position.
Set the mic gain to one of three levels.
(L = low sensitivity, H = high sensitivity, AUTO = automatic)
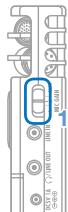
Inserting batteries
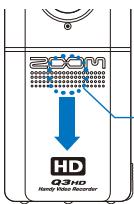
Open the case while pressing here and then insert the batteries.
Note: Use alkaline batteries or rechargeable NIMH batteries.
Setting the date and time

This is used for video and audio recording information, so set it accurately before recording.
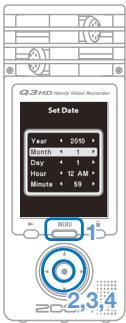
- Press to open the Main Menu.
2.Use 日 to select SETTING and press
3.Use 4 to select Set Date and press
4.Use 1234 to set the current date and time, and press - After formatting completes, the SETTING menu reopens.
Setting the battery type

By setting the battery type, the amount of remaining battery life can be accurately shown.

- Press E N U to open the Main Menu.
2.Use 47910 to select SETTING and press.
3.Use (4) to select Battery and press
4.Use (工) to select the battery type and press - Press again after the setting is made.
Note: Use alkaline batteries or rechargeable NiMH batteries.
Formatting an SD card

Format an SD card to make it compatible with the Q3HD.
Warning: formatting a card will permanently erase all data on it.
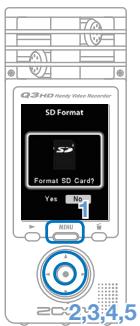
- Press E N U to open the Main Menu.
2.Use 11111 to select SETTING and press.
3.Use 出 to select SD Format and press - Use to select "Yes" to format or "No" to cancel, and press .
-
When the reconfirmation screen appears, use the same procedure to select again and press .
-
Select "Yes" to start formatting.
-
Select "No" to not format the card and return to the SETTING menu.
-
After formatting completes, the SETTING menu reopens.
NOTE
- If the SD card write-protection switch is set to ON, the card cannot be formatted.
- Formatting also initializes the built-in memory at the same time.
Turning operation sounds on or off

The output of beeping sounds from the Q3HD speaker at startup and during operation can be turned on or off.
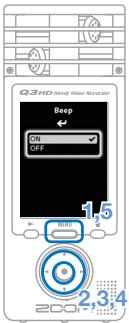
- Press to open the Main Menu.
2.Use 47910 to select SETTING and press.
3.Use 日 to select Beep and press
4.Use to select ON or OFF,and press - Press MEH again after the setting is made.
Reducing noise

Turn the low-cut filter function on to reduce wind sounds and other noise.
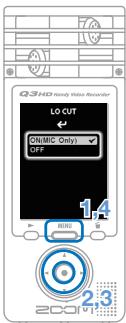
- Press E N U to open the Main Menu.
2.Use 4745 to select LO CUT and press
3.Use 4 to select ON (MIC Only) or OFF, and press - Press MENU again after the setting is made.
NOTE
Use the windscreen included in the APQ-3HD accessory package to further reduce noise.
Adjusting the recording level

By changing the recording sensitivity, you can record both quiet sounds and loud band performances at the optimal level.
- Set the MIC GAIN switch according to the recording conditions.
Low sensitivity
Band performances and concerts
H High sensitivity
Field recordings
AUTO Automatic sensitivity adjustment
Use in various situations to maintain an even recording level without breaks in sound
NOTE
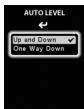
AUTO LEVEL
Up and Down
One Way Down

When set to AUTO, use the AUTO LEVEL menu to set how the mic sensitivity works.
Sensitivity increases and decreases according to the input level
Sensitivity decreases in response to the highest input level
Turning sound monitoring on or off

Turn this on to hear the sound being recorded through devices connected to the line/headphones output, TV and HDMI jacks.
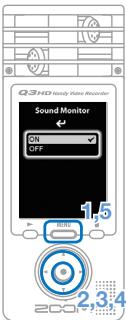
- Press to open the Main Menu.
2.Use 日 to select SETTING and press
3.Use A to select Sound Monitor and press
4.Use 已 to select ON or OFF,and press - Press again after the setting is made.
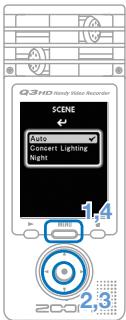
Setting video-recording lighting

You can set the camera sensitivity to suit the videorecording conditions. This allows the unit to record video optimally even in dark places or on stages with bright lights.
-
Press to open the Main Menu.
2.Use 品 to select SCENE and press
3.Use (4) to select the mode and press -
"AUTO" adjusts to lighting conditions automatically.
- "CONCERT LIGHTING" is best for concerts and other situations with bright lights.
-
"NIGHT" is best for night and dark situations.
-
Press again after the setting is made.
Setting the image quality

You can set the resolution and frame rate used during recording. The amount of recording time available decreases as the image quality is increased.
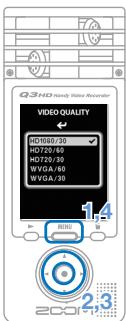
- Press E N U to open the Main Menu.
2.Use to selectVIDEO and press
3.Use (4) to select the video quality and press - Press again after the setting is made.
Setting the sound quality
You can set the sound quality to use when recording video or audio. The amount of recording time available decreases as the sound quality is increased.
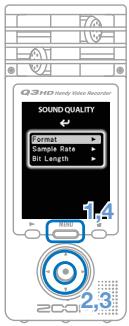
- Press to open the Main Menu.
- Use 4100 to select SOUND and press to open the SOUND QUALITY menu.
- Change each item as desired.
Format
Select PCM or AAC format.
Sample Rate
If set to PCM, the sample rate can be changed.
Bit Length/Rate
If set to PCM, the bit length can be changed.
If set to AAC, the bit rate can be changed.
- Press again after the setting is made.
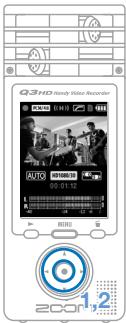
Recording audio and video

From the main operation screen, you can start recording audio or video by pushing a single button.
-
After preparing to record audio or video, press to start recording.
-
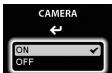
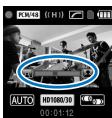
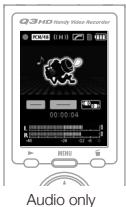
Use the CAMERA menu to set whether to record video with audio or audio only.
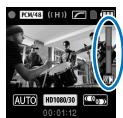
- Press and to zoom in and out.
Zoom in and out
- Press and to adjust the volume level when using the line/headphones jack.
Adjust the volume
- Press when finished to put the unit back into audio/video recording standby.
NOTE
- If the transfer speed to the card is not fast enough during video/audio recording, "Low Speed Card!" appears on the screen and recording stops. We recommend using cards that are Class 4 or faster. Information about SD cards that can be used with this unit can be found at www.zoom.co.jp.
- Even if no SD/SDHC card is in the unit, video can be recorded to the built-in memory (64 MB). However, this video can only be viewed on the unit; it cannot be copied or transferred.
Playing recordings

Turn the unit sideways to play back recorded audio and video.
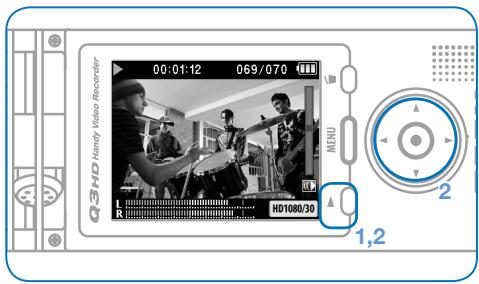
- Press when on the main operation screen.
- Use and to select a different file to play
Functions of other buttons
Adjust volume
- Press and hold during playback to search backward/forward.
Press to pause during playback and restart when paused.
NOTE
Only files that have been recorded with the Q3HD can be played back.
Erasing recordings
You can erase recorded video and audio files to increase the amount of open space on the media card.
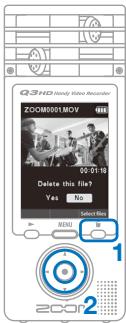
- Press 口 while the file that you want to erase is playing.
- If you press this when on the main operation screen, the last recorded or played file will be selected to be erased.
- When the confirmation screen opens, select "Yes" to erase the recording or "No" to cancel, and then press .
Erasing multiple recordings at the same time
- Press when on the main operation screen or while playing to open the "Delete this file?" confirmation screen.
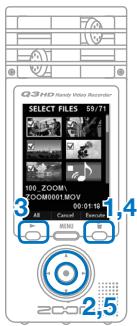
Press again to open the video selection screen
2.Use 4789 to select a recording that you want to erase and press
3. Repeat Step 2 as many times as necessary to select other files that you want to erase.
-
Press to select all files.
-
Press when you are done selecting files.
- When the confirmation screen opens, select "Yes" to erase the recordings or "No" to cancel, and then press .
Editing recordings
Recorded video and audio files can be divided and trimmed.
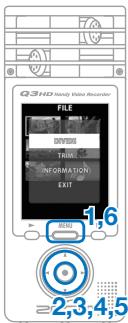
- Press E N U to open the Main Menu.
2.Use 47910 to select FILE and press. - Thumbs nails of the recorded files are shown. Use 1234 to select a file that you want to edit and press 5 .
- The editing menu opens. Use to select the item you want and press . See the following page for the editing options.
- After editing, a reconfirmation screen opens. Select "Yes" to execute the change or "No" to cancel, and then press .
- When you are done editing, press MENU
DIVIDE

Change the point where the file will be divided
Play/pause
Confirm the point where the file will be divided
TRIM (partial deletion)
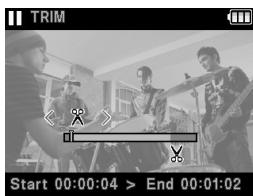
Move trim points to set how much of the file to delete at its beginning and end
Switch between the beginning and end trim points
Play/pause
Confirm the trim points
INFORMATION (about the file)
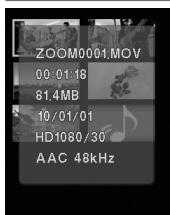
Return to the thumbnail list
Connecting external devices
This unit can be connected to various external devices as needed.
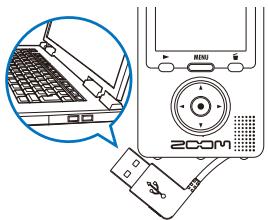
Connect to a computer (via USB) to edit and save files and upload them to video sharing sites
With this unit's power off, connect its built-in USB connector to a computer running Windows or Macintosh. When connected, you can use the bundled HandyShare software for the following functions.
- Upload to video sharing sites
- Add reverb and other effects to audio
- Playback audio or video
- Delete or backup files
- Extract parts of selected audio or video
NOTE
HandyShare is on the included SD card. See page 1.
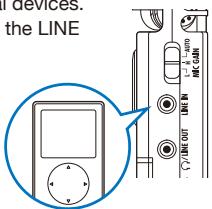
Input sound from another device (LINE IN connection)
This unit can record sounds from external devices. When an external device is connected to the LINE IN jack, the stereo mic is disabled.
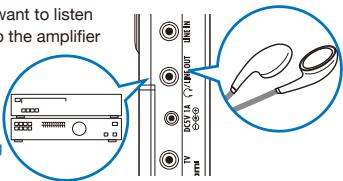
Listen with headphones or audio equipment (LINE OUT connection)
Use this connector when you want to listen with headphones or connect to the amplifier
of an external audio device.
Turn monitoring on to listen to sound input during recording through headphones.
See "Turning sound monitoring on or off" on page 8.
View on a TV (AV connection)
Use an AV cable to output recorded video and audio to a TV or similar device.
- Before connecting to a TV, use the SETTING menu to set the TV Out item according to the region where you are using the device.
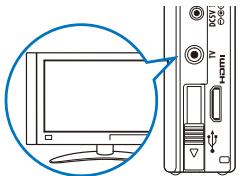
View on a TV (HDMI connection)
Use an HDMI cable to connect the unit to an HDMI-compatible TV to view recordings with high definition image quality.
NOTE
Since different TVs support different audio formats, correct playback might not be possible in some cases.


Caution
The Q3HD HDMI connector is a Type C Mini connector.
When using an HDMI cable (purchased separately), be sure to use a High Speed HDMI (category 2) cable with a Type C Mini connector on one end and a connector that matches your TV's HDMI input on the other.
Viewing information

You can check the firmware version and remaining recordable memory.
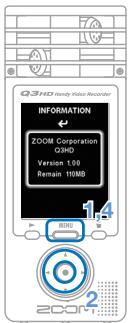
- Press MENU to open the Main Menu.
2.Use to select INFO and press - Check the information.
- When you are done checking, press MENU
Resetting the unit

The unit can be reset to the settings, including SCENE and video and audio quality, it had when it was shipped from the factory.
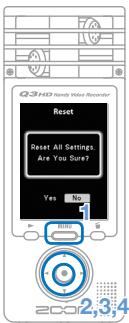
- Press E N U to open the Main Menu.
2.Use 日 to select SETTING and press.
3.Use 出 to select Reset and press - When the confirmation screen opens, select "Yes" to execute the change or "No" to cancel, and then press .
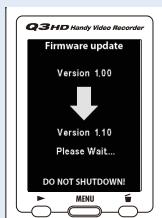
Upgrading the firmware version
Upgrade the firmware version when necessary.
NOTE
You can check the firmware version using the INFORMATION menu item.

-
The latest version of the firmware can be downloaded from wwwzoomo.co.jp.
-
Copy the file for upgrading the firmware to the SD card.
- Insert the SD card into the unit's card slot.
- While pressing and holding , press to open the VERSION UP screen.
- If the version upgrade shown is the one desired, select "Yes" and press .
- When the screen shows that the version upgrade is complete, press 0 to turn the power OFF.

Caution
Upgrading the firmware version is not possible if the remaining battery power is low.
Safety and Operation Precautions

This indicates that if a user ignores this warning and handles the device incorrectly, serious injury or death could result.

This indicates that if a user ignores this caution and handles the device incorrectly, bodily injury or damage to equipment could occur.
Observe the following precautions to use this unit safely.
Power and batteries

- Use only the ZOOM AD-14 (DC 5V/1A/center plus) AC adapter (sold separately).
- Unplug the AC adapter when the unit will not be used for a long time.
- When using batteries, insert two commercially-available AA-size alkaline batteries or NiMH recyclable batteries with the correct orientation.
- Remove batteries from the unit if they will not be used for a long time.
Operation environment
Avoid using the unit in the following types of places.
Doing so could cause malfunction.

- Places that become extremely hot or cold
Near heating devices or other sources of heat - Places that are extremely humid or where the unit could become wet
- Sandy or dusty places
- Places with frequent vibrations
Handling

Do not disassemble or modify this device. Doing so could cause injury or malfunction. ZOOM Corporation will not take responsibility for malfunctions resulting from disassembly or modification.

Do not apply excessive force to buttons and other parts. Use of excessive force, dropping, bumping and other shocks could break the unit.
You might need this User Guide in the future.
Always keep it in a place where you can access it easily.
FCC regulation warning (for the U.S.A.)
This equipment has been tested and found to comply with the limits for a Class B digital device, pursuant to part 15 of the FCC Rules. These limits are designed to provide reasonable protection against harmful interference in a residential installation. This equipment generates, uses and can radiate radio frequency energy and, if not installed and used in accordance with the instructions, may cause harmful interference to radio communications. However, there is no guarantee that interference will not occur in a particular installation. If this equipment does cause harmful interference to radio or television reception, which can be determined by turning the equipment off and on, the user is encouraged to try to correct the interference by one or more of the following measures:
- Reorient or relocate the receiving antenna.
- Increase the separation between the equipment and receiver.
- Connect the equipment to an outlet on a circuit different from that to which the receiver is connected.
- Consult the dealer or an experienced radio/TV technician for help.
For EU Countries

Declaration of Conformity: This product complies with the requirements of EMC Directive 2004/108/EC and Low Voltage Directive 2006/95/EC
Disposal of Old Electrical & Electronic Equipment (Applicable in European countries with separate collection systems)
This symbol on the product or on its packaging indicates that this product shall not be treated as household waste. Instead it shall be handed over to the applicable collection point for the recycling of electrical and electronic equipment. By ensuring this product is disposed of correctly, you will help prevent potential negative consequences for the environment and human health, which could otherwise be caused by inappropriate waste handling of this product. The recycling of materials will help to conserve natural resources. For more detailed information about recycling of this product, please contact your local city office, your household waste disposal service or the shop where you purchased the product.
THIS PRODUCT IS LICENSED UNDER THE AVC PATENT PORTFOLIO LICENSE FOR THE PERSONAL AND NONCOMMERCIAL USE OF A CONSUMER TO
(i) ENCODE VIDEO IN COMPLIANCE WITH THE AVC STANDARD ("AVCVIDEO") AND/OR
(ii) DECODE AVC VIDEO THAT WAS ENCODED BY A CONSUMER ENGAGED IN A PERSONAL AND NONCOMMERCIAL ACTIVITY AND/OR WAS OBTAINED FROM A VIDEO PROVIDER LICENSED TO PROVIDE AVC VIDEO.
NO LICENSE IS GRanted OR SHALL BE IMplied FOR ANY OTHER USE. ADDITIONAL INFORMATION MAY BE OBTAINED FROM MPEG LA, LLC. SEE http://WWW.MPEGLA.COM

QuickTime
HOMI
NOEETNNTNNNTNDNNTNNTNE

YouTube
Windows is a trademark of Microsoft Corporation (USA), Macintosh, QuickTime and the QuickTime logo are registered trademarks or trademarks of Apple Computer Inc. in the USA and other countries. The SD and SDHC logos are trademarks. YouTube is a registered trademark of Google, Inc. HDMI (High-Definition Multimedia Interface) and HDMI are trademarks of HDMI Licensing, LLC. Other product names, registered trademarks and company names in this document are the property of their respective companies. The contents of this document and the specifications of the product could be changed without notice.
200
wwwzoomo.co.jp
ZOOM CORPORATION
4-4-3 Kanda-Surugadai, Chiyoda-ku, Tokyo
101-0062 Japan
- Handy
- Video
- Recorder
- Q3HD
- Items included with this product
- Q3HD unit
- AA batteries (for testing the unit)
- - SD card
- - User Guide (this document)
- HandyShare software for video editing and sharing
- Part functions
- Parts of the unit
- Video/audiorecordingdestination
- Part functions (continued)
- Inserting batteries
- Setting the date and time
- Setting the battery type
- Formatting an SD card
- NOTE
- Turning operation sounds on or off
- Reducing noise
- Adjusting the recording level
- AUTO LEVEL
- Turning sound monitoring on or off
- Setting video-recording lighting
- Setting the image quality
- Setting the sound quality
- Recording audio and video
- Playing recordings
- Functions of other buttons
- Erasing recordings
- Erasing multiple recordings at the same time
- Editing recordings
- DIVIDE
- TRIM (partial deletion)
- INFORMATION (about the file)
- Connecting external devices
- Listen with headphones or audio equipment (LINE OUT connection)
- View on a TV (AV connection)
- View on a TV (HDMI connection)
- Caution
- Viewing information
- Resetting the unit
- Upgrading the firmware version
- Safety and Operation Precautions
- Power and batteries
- Operation environment
- Handling
- FCC regulation warning (for the U.S.A.)
- For EU Countries
- Disposal of Old Electrical & Electronic Equipment (Applicable in European countries with separate collection systems)
- THIS PRODUCT IS LICENSED UNDER THE AVC PATENT PORTFOLIO LICENSE FOR THE PERSONAL AND NONCOMMERCIAL USE OF A CONSUMER TO
Brand : ZOOM
Model : Q3HD
Category : Audio/Video Recorder